
:max_bytes(150000):strip_icc():format(webp)/TwitterVideoDownload-5b605aaac9e77c002c3a42f3.jpg)
Want to Know the Full Process of Adding the Falling Text Effect as a Video Introduction? Detailed Guidelines on All the Steps Are Mentioned Here for Filmora Users for 2024
Want to Know the Full Process of Adding the Falling Text Effect as a Video Introduction? Detailed Guidelines on All the Steps Are Mentioned Here for Filmora Users
Indeed, there are different elements of a video that has the potential to make it stand out to viewers. The title you add to the video, content information in the slides, and other elements are some parts that capture one’s interest.
But seeing only the text in single lines or paragraphs can get repetitive and unappealing, especially with so many videos having the same style. In this context, the fun falling text effect is a unique and exciting approach to making your titles in videos engaging. It creates a fun look when the viewer clicks into the video and is met with this styling title effect.
On Wondershare Filmora , there is a feature available for users to apply this effect to videos in a more straightforward sequence of steps than other editors. Yet, knowing how it works is still valid, even for experienced editing professionals. In this post, we shall detail all of the steps that go into creating this effect in videos, with examples.
Launch Filmora on the Device
Before getting started with the editing steps, you need to download and install this third-party editing software into your device. Filmora works on both Mac and Windows-based computers. (Download here:
Free Download For Win 7 or later(64-bit)
Free Download For macOS 10.14 or later
After switching on your device and going to your preferred browser, search for Wonderhsare Filmora’s official website. Upon accessing it, you will see the “Download” button at the top of the screen. Click on it, and the respective Filmora installer will download into your device instantly, depending on your OS type.
Then, you have to double-click on the installer file you will find in the Downloads folder. This will open the software installation problem window. Click on the Install button and then tap the Agree option for the terms & conditions that appear next on the screen. After that, the software will begin installing automatically.

Finally, press the Start Now button on the installation complete prompt window. The software will then launch automatically.
Adjust the project settings
After the software launches on your device, you should tap on the Create New Project button. Before you add the video file you will edit from your device through; you should take time to change some aspects of the project settings.
For this, click on the File tab at the top-most toolbar in the editor window. You should click on the Project Settings option from the drop-down menu, which will open the dialog box. Under the resolution option, you will see the Frame Rate element. Click on the drop-down menu and adjust the video’s frame rate to 25 FPS. After you are done, tap the OK button.

Add the Title
Following this, you must click on the Titles tab at the top toolbar on the editor. Different title templates, like Custom, Openers, End Credits, etc., will appear. Choose the default title of your liking and download it.
Next, hold the title that appears in the library window and then drag it to the first layer of the editing timeline. Clip the title short by moving the play head to the 3-second and 15 frames mark and shape the title to that length. Then, delete the rest of the part.

Edit the Title
After this, you have to double-click on the top of the default title in your Track 1 timeline. A window will appear for editing the title. Click on the Text tab in this window and tap on the Font options. You should change the font of your title to Futura Bold or any other option that you would prefer.

Animate the characters
When this part is done, in the text field, add the first letter of the text you will add to your animated introduction. After inserting the first letter only, click on the Animation tab next. Following that, you have to move the playhead on your timeline to the very front. You will see the Position parameter in the Animation settings and change the number in the Y axis until it goes out of the top frame of the video.

Next, you must move the play head to the 1-second position in the timeline. Here, you must change the number Y axis to a lower position and adjust the Rotate element as per your preference. After that, move the playhead again to 15 frames from the 1-second mark. It would be best if you changed the Y-axis position digit to 0 and adjusted the Rotation value slightly.
Following that, move the playhead again by 15 frames ahead. Rotate the letter again and change the Y-axis value until the letter rests at the bottom of the screen. Again, you have to move the play head on the timeline to 10 frames ahead and adjust the Y-axis and Rotation values to a higher point. Then, continue the step like this at ten frames forward, this time making the character move to the ground again. Press the OK button to complete.

Repeat for the next letters
After you are done with this editing process for the first letter, hold the default title in the library and drag and drop it into Track 2 on the timeline. Adjust the starting point for this layer to frame five from the beginning, and move the file to that starting point. In the end, cut the title length at the same position as layer one was, at 3.15 seconds.
Follow the process explained in the previous section for the first letter, i.e., moving the playhead at specific frames and changing the Y-axis and Rotation value multiple times.
After editing the second letter in the title, repeat the process of holding and dragging the default title to Track 3 in the timeline and adjusting starting position at the 10th frame. Again, follow the process of animating the letter like for Letter 1 and Letter 2. Continue doing this process for multiple more letters in your title text.

Tap on the Play button under the Preview screen to see how the letters have the falling text effect.
Add Screenshot
Next, you have to click on the hide button for Tracks 2 and up. Tap on the Snapshot icon in the editing timeline of the first letter. Then, when it appears in the library window, click on it and move it beside the Track 1 Title file that you were editing. Move the play head to the 1-second position of this file in the timeline.
Hide Track 1 again and click the Unhide button on Track 2. Repeat the snapshot function and add it to Layer 2. Adjust the end as per Track 1. After this, follow these steps for the subsequent letters as well.

Adjust Keyframing
Follow the animation process for all of the title clips and screenshots you did before. Move the play head to the point where the Tracks end and the Screenshots on the timeline start. Choose the first letter and click on the Keyframe icon in the editing window under Animation. Then, make adjustments to the values of Position, Rotation, etc.
Continue this keyframing step for all of the letters in sequence. After you are done here, click on the Render Preview icon on the right-hand side of the toolbar above the editing timeline. See how the falling text effects line up.

After that, you can export the final file to your device or do further editing work through the Export button.
Final Words
Indeed, adding the falling text effect should allow you to create a stunning, dynamic, and engaging video project. While the feature is available in many other editing software, you can expect a better user experience on Filmora, especially as a beginner-level user.
The UI on this software is simple to navigate, with all features easily accessible. Besides the falling text customization benefits, you will also use other effects, filters, and title presets in videos with some simple taps. So, install it soon and give it a try.
Free Download For macOS 10.14 or later
After switching on your device and going to your preferred browser, search for Wonderhsare Filmora’s official website. Upon accessing it, you will see the “Download” button at the top of the screen. Click on it, and the respective Filmora installer will download into your device instantly, depending on your OS type.
Then, you have to double-click on the installer file you will find in the Downloads folder. This will open the software installation problem window. Click on the Install button and then tap the Agree option for the terms & conditions that appear next on the screen. After that, the software will begin installing automatically.
Finally, press the Start Now button on the installation complete prompt window. The software will then launch automatically.
Adjust the project settings
After the software launches on your device, you should tap on the Create New Project button. Before you add the video file you will edit from your device through; you should take time to change some aspects of the project settings.
For this, click on the File tab at the top-most toolbar in the editor window. You should click on the Project Settings option from the drop-down menu, which will open the dialog box. Under the resolution option, you will see the Frame Rate element. Click on the drop-down menu and adjust the video’s frame rate to 25 FPS. After you are done, tap the OK button.
Add the Title
Following this, you must click on the Titles tab at the top toolbar on the editor. Different title templates, like Custom, Openers, End Credits, etc., will appear. Choose the default title of your liking and download it.
Next, hold the title that appears in the library window and then drag it to the first layer of the editing timeline. Clip the title short by moving the play head to the 3-second and 15 frames mark and shape the title to that length. Then, delete the rest of the part.
Edit the Title
After this, you have to double-click on the top of the default title in your Track 1 timeline. A window will appear for editing the title. Click on the Text tab in this window and tap on the Font options. You should change the font of your title to Futura Bold or any other option that you would prefer.
Animate the characters
When this part is done, in the text field, add the first letter of the text you will add to your animated introduction. After inserting the first letter only, click on the Animation tab next. Following that, you have to move the playhead on your timeline to the very front. You will see the Position parameter in the Animation settings and change the number in the Y axis until it goes out of the top frame of the video.
Next, you must move the play head to the 1-second position in the timeline. Here, you must change the number Y axis to a lower position and adjust the Rotate element as per your preference. After that, move the playhead again to 15 frames from the 1-second mark. It would be best if you changed the Y-axis position digit to 0 and adjusted the Rotation value slightly.
Following that, move the playhead again by 15 frames ahead. Rotate the letter again and change the Y-axis value until the letter rests at the bottom of the screen. Again, you have to move the play head on the timeline to 10 frames ahead and adjust the Y-axis and Rotation values to a higher point. Then, continue the step like this at ten frames forward, this time making the character move to the ground again. Press the OK button to complete.
Repeat for the next letters
After you are done with this editing process for the first letter, hold the default title in the library and drag and drop it into Track 2 on the timeline. Adjust the starting point for this layer to frame five from the beginning, and move the file to that starting point. In the end, cut the title length at the same position as layer one was, at 3.15 seconds.
Follow the process explained in the previous section for the first letter, i.e., moving the playhead at specific frames and changing the Y-axis and Rotation value multiple times.
After editing the second letter in the title, repeat the process of holding and dragging the default title to Track 3 in the timeline and adjusting starting position at the 10th frame. Again, follow the process of animating the letter like for Letter 1 and Letter 2. Continue doing this process for multiple more letters in your title text.
Tap on the Play button under the Preview screen to see how the letters have the falling text effect.
Add Screenshot
Next, you have to click on the hide button for Tracks 2 and up. Tap on the Snapshot icon in the editing timeline of the first letter. Then, when it appears in the library window, click on it and move it beside the Track 1 Title file that you were editing. Move the play head to the 1-second position of this file in the timeline.
Hide Track 1 again and click the Unhide button on Track 2. Repeat the snapshot function and add it to Layer 2. Adjust the end as per Track 1. After this, follow these steps for the subsequent letters as well.
Adjust Keyframing
Follow the animation process for all of the title clips and screenshots you did before. Move the play head to the point where the Tracks end and the Screenshots on the timeline start. Choose the first letter and click on the Keyframe icon in the editing window under Animation. Then, make adjustments to the values of Position, Rotation, etc.
Continue this keyframing step for all of the letters in sequence. After you are done here, click on the Render Preview icon on the right-hand side of the toolbar above the editing timeline. See how the falling text effects line up.
After that, you can export the final file to your device or do further editing work through the Export button.
Final Words
Indeed, adding the falling text effect should allow you to create a stunning, dynamic, and engaging video project. While the feature is available in many other editing software, you can expect a better user experience on Filmora, especially as a beginner-level user.
The UI on this software is simple to navigate, with all features easily accessible. Besides the falling text customization benefits, you will also use other effects, filters, and title presets in videos with some simple taps. So, install it soon and give it a try.
TikTok Face Zoom | Create Your Face Zoom TikTok Now
Abundant Video Effects - Wondershare Filmora
Provide abundant video effects - A creative video editor
Powerful color correction and grading
Detailed tutorials are provided by the official channel
TikTok videos are very popular across the youth of the world. With millions of users in support of the platform, there are many content creators that gained popularity through making small videos on TikTok. These videos are, however, incomplete without the existence of a proper effect on them. To emphasize something across a video, the zoom effect is always preferred in the market.
This article discusses the face zoom effect of TikTok and provides users with the appropriate methods that can be adapted to utilize this function to perfection. With this feature, you can make your perfect videos with an emphasis on the important elements to view on the screen.
In this article
Part 1: What is TikTok Face Zoom?
Part 2: Create A Face Zoom TikTok Video in Minutes
Part 3: Bonus | Create Face Zoom Video in Wondershare Filmora
Part 1: What is TikTok Face Zoom?
The face zoom TikTok effect is referred to the zooming effect that is covered by putting the focus on the facial presence within the video. The use of the face zoom effect on TikTok has a significant utility in highlighting the importance of the person within the video and creating an illusion that would make people watch the video all along.
Many TikTokers like using this effect in scenes where they wish to highlight something new about their face, e.g., new makeup.
Part 2: Create A Face Zoom TikTok Video in Minutes
There are some direct approaches to zooming the face across a TikTok video. To understand these methods, you should go through the provided details and understand the face zoom effect on TikTok.
Method 1: Create A Face Zoom TikTok Video in Minutes
Step 1: Before coming onto adding effects across your TikTok video, you need to record it across the social platform or have it recorded before on your smartphone under the requirements of TikTok.
Step 2: For uploading a video on TikTok, you need to continue by clicking the “+” icon and locating the “Upload” button for adding a pre-recorded video across TikTok.

Step 3: Once you have added the video for editing, navigate into the “Effects” section and find yourselves in the “Visuals” section. Let the cursor of the video be at the point where the facial features are prominent, and you wish to face zoom the video from there. With the cursor across the required place, find the “Zoom” effect in the list and hold the button until you’ve successfully added the effect across the required length of the video.

Step 4: After editing the video and adding the face zoom effect successfully, you need to click on “Save” to preview the video before you click “Next” to share it across the necessary platforms. TikTok provides you with the ability to share your videos across Instagram, Facebook, or WhatsApp.

Method 2: Do Face Zoom Easily by Finding a Face Zoom Video
Step 1: To use the TikTok face zoom effect on your video, you need to launch the platform and click on “Discover” present on the bottom of the screen. In the search bar, you need to type “Face Zoom” to locate the effect across TikTok.

Step 2: Once you have found the effect, open it on another screen. Locate the “Try this effect” button to use a similar effect across your video.

Step 3: Record the video on TikTok by clicking on the red recording button. Make changes to the recorded video and save the video on your device or share it across the social media platforms as desired.

Part 3: Bonus | Create Face Zoom Video in Wondershare Filmora
TikTok produces impressive content that can be commended for many reasons. This, however, does not make the professional video that you might be looking for. What to do if you cannot create such a professional video that would help you get the right reach you are looking for? Wondershare Filmora includes an exceptional experience of using the TikTok face zoom effect across its easy-to-use platform with the right set of tools.
To understand how you can successfully execute the procedure without putting yourselves in any difficulty, go through the steps as shown below:
Step 1: Download and Install Wondershare Filmora
For starters, you need to have Wondershare Filmora installed on your computer. Proceed to launch it and click on the “New Project” button to start a new project.

Step 2: Upload Media
As a new window opens up on the front, you need to click on the arrowhead icon against the “Media” tab to import the video that is to be edited across Wondershare Filmora. On adding it, drag it across the timeline successfully.

Step 3: Track the Face using Motion Tracking
To track the facial features across the video, you need to double-click the video on the timeline and proceed to open the “Motion Tracking” menu that you can find across the pane. Enable the option if necessary and set the position of the box across the “Preview” window that would track the face. Click on “Start Tracking” to successfully motion track the face.

Step 4: Add Magnify Effect to the Face
Proceed into the “Effects” tab and write “Magnify” in the search bar. Select the effect and place it across the video in the timeline. To align the effect with the face, you need to double-click the video and move into the “Motion Tracking” section again. Select the specific magnify effect in the drop-down menu and select “Start Tracking.”

Step 5: Preview and Export the Face Zoom Video
Once you are done editing the video, preview it across the window to check if any edits are required. Once confirmed, click on the “Export” button to save the video across the computer.

Conclusion
The TikTok face zoom effect can be quite impressive if used perfectly. However, since the intent is to highlight the facial parts in the video, the appropriate use of the effect can give an exceptional result. For this, the article has discussed the best methods that can be applied to understanding how to use face zoom in TikTok with ease.
TikTok videos are very popular across the youth of the world. With millions of users in support of the platform, there are many content creators that gained popularity through making small videos on TikTok. These videos are, however, incomplete without the existence of a proper effect on them. To emphasize something across a video, the zoom effect is always preferred in the market.
This article discusses the face zoom effect of TikTok and provides users with the appropriate methods that can be adapted to utilize this function to perfection. With this feature, you can make your perfect videos with an emphasis on the important elements to view on the screen.
In this article
Part 1: What is TikTok Face Zoom?
Part 2: Create A Face Zoom TikTok Video in Minutes
Part 3: Bonus | Create Face Zoom Video in Wondershare Filmora
Part 1: What is TikTok Face Zoom?
The face zoom TikTok effect is referred to the zooming effect that is covered by putting the focus on the facial presence within the video. The use of the face zoom effect on TikTok has a significant utility in highlighting the importance of the person within the video and creating an illusion that would make people watch the video all along.
Many TikTokers like using this effect in scenes where they wish to highlight something new about their face, e.g., new makeup.
Part 2: Create A Face Zoom TikTok Video in Minutes
There are some direct approaches to zooming the face across a TikTok video. To understand these methods, you should go through the provided details and understand the face zoom effect on TikTok.
Method 1: Create A Face Zoom TikTok Video in Minutes
Step 1: Before coming onto adding effects across your TikTok video, you need to record it across the social platform or have it recorded before on your smartphone under the requirements of TikTok.
Step 2: For uploading a video on TikTok, you need to continue by clicking the “+” icon and locating the “Upload” button for adding a pre-recorded video across TikTok.
Step 3: Once you have added the video for editing, navigate into the “Effects” section and find yourselves in the “Visuals” section. Let the cursor of the video be at the point where the facial features are prominent, and you wish to face zoom the video from there. With the cursor across the required place, find the “Zoom” effect in the list and hold the button until you’ve successfully added the effect across the required length of the video.
Step 4: After editing the video and adding the face zoom effect successfully, you need to click on “Save” to preview the video before you click “Next” to share it across the necessary platforms. TikTok provides you with the ability to share your videos across Instagram, Facebook, or WhatsApp.
Method 2: Do Face Zoom Easily by Finding a Face Zoom Video
Step 1: To use the TikTok face zoom effect on your video, you need to launch the platform and click on “Discover” present on the bottom of the screen. In the search bar, you need to type “Face Zoom” to locate the effect across TikTok.
Step 2: Once you have found the effect, open it on another screen. Locate the “Try this effect” button to use a similar effect across your video.
Step 3: Record the video on TikTok by clicking on the red recording button. Make changes to the recorded video and save the video on your device or share it across the social media platforms as desired.
Part 3: Bonus | Create Face Zoom Video in Wondershare Filmora
TikTok produces impressive content that can be commended for many reasons. This, however, does not make the professional video that you might be looking for. What to do if you cannot create such a professional video that would help you get the right reach you are looking for? Wondershare Filmora includes an exceptional experience of using the TikTok face zoom effect across its easy-to-use platform with the right set of tools.
To understand how you can successfully execute the procedure without putting yourselves in any difficulty, go through the steps as shown below:
Step 1: Download and Install Wondershare Filmora
For starters, you need to have Wondershare Filmora installed on your computer. Proceed to launch it and click on the “New Project” button to start a new project.
Step 2: Upload Media
As a new window opens up on the front, you need to click on the arrowhead icon against the “Media” tab to import the video that is to be edited across Wondershare Filmora. On adding it, drag it across the timeline successfully.
Step 3: Track the Face using Motion Tracking
To track the facial features across the video, you need to double-click the video on the timeline and proceed to open the “Motion Tracking” menu that you can find across the pane. Enable the option if necessary and set the position of the box across the “Preview” window that would track the face. Click on “Start Tracking” to successfully motion track the face.
Step 4: Add Magnify Effect to the Face
Proceed into the “Effects” tab and write “Magnify” in the search bar. Select the effect and place it across the video in the timeline. To align the effect with the face, you need to double-click the video and move into the “Motion Tracking” section again. Select the specific magnify effect in the drop-down menu and select “Start Tracking.”
Step 5: Preview and Export the Face Zoom Video
Once you are done editing the video, preview it across the window to check if any edits are required. Once confirmed, click on the “Export” button to save the video across the computer.
Conclusion
The TikTok face zoom effect can be quite impressive if used perfectly. However, since the intent is to highlight the facial parts in the video, the appropriate use of the effect can give an exceptional result. For this, the article has discussed the best methods that can be applied to understanding how to use face zoom in TikTok with ease.
8 Top Premiere Pro Slideshow Templates
Best 8 Top Premiere Pro Slideshow Templates
An easy yet powerful editor
Numerous effects to choose from
Detailed tutorials provided by the official channel
Making slideshows quickly is the demand of modern professional world. Here you can go through top 8 Premiere pro Slideshow Templates available online. The slideshow template premiere pro free download versions are ready for media to be inserted for creating beautiful slideshows.

In this article
01 [Top 9 Premiere Pro Slideshow Templates worth utilizing](#Part 1)
02 [How Do I Create a Slideshow Template in Premiere Pro?](#Part 2)
03 [FAQ of Premiere Pro Slideshow Templates](#Part 3)
Part 1 Top 8 Premiere Pro Slideshow Templates worth Utilizing
01Square Photo
If you are looking for a really awesome slideshow premiere pro which can make your square-shaped photos more attractive, you can employ slideshow – Square Photo. The presentation of pictures in this slideshow occurs like scrolling an album full of family clicks. You will love the way it presents calm pictures with your friends and family. It**’**s satisfying, nostalgic and fun to use this slideshow.
02Vintage by motion shape
Want to give your slideshow a vintage touch? Well, vintage slideshow premiere template free by Motionshape is particularly for you. It makes your creation memorable and provides an exciting template full of flickers, dust, scratch and light effects. Ultimately, the project seems to run on historical timeline. All you need to do is adding photos and putting new captions as per your picture collection.
03Digital Slideshow by Zorrin
You will be in love with this slideshow for sure. Digital slideshow by Zorrin is a beautiful way to represent you. Whether you want to create a corporate slideshow or you are interested in promotion and broadcasting of your products, you can use this slideshow without any doubt. It possesses 50 places for the photos and 25 places for text as well. You will love the creative transitions between the slides.
04Emotional memory slideshow
Planning to create an emotional and memory based slideshow? If yes, this is the best slideshow premiere pro template free that you can use. It will enhance the importance of pictures which are close to your heart and full of passion. The analogous aesthetics of this slideshow hits your mind and replays your special memories.
05Corporate slideshow
So, you are working for a company and making a corporate slideshow for presentation? If yes, this corporate premiere slideshow template is for you. It gives a classic look to the pictures and put the story of your business in an exciting manner. You can use the timeline smartly and describe the establishment and progress of your company, management and teamwork, research and production and client base etc.
06Inspire slideshow by Quartz
Inspire is a good slideshow full of custom options in color palette and you can even make the changes directly while using its pro version. It involves a simple way to move slide-wise and is really a well organized template to insert your own media and move further.

07Transmaxx’s Education Slideshow
Never bother about creating your own free premiere pro slideshow template regarding education when you can already access this exclusive education slideshow. It is based upon the theme around education and has lots of places for pictures, videos and texts. You can add captions and additional write-ups wherever required.
08Motion Media Group’s Family Slideshow
You can choose any of the four versions of this wonderful free slideshow template premiere pro that provides platform for adding your family pictures. Whether you want to make a slideshow of celebrations in your family or making a digital collage of family photos, this is the best template you can go with. The romantic and calm pace is really touchy to be used as a wedding slideshow as well.
09**Wondershare Filmora Video Editor **
One more interesting video editor and slideshow template is Filmora by wondershare which promises to meet all your editorial demands while making a slideshow. As the slideshow template premiere pro free version offers high end motion graphic, you can use it for making highly professional videos. Make creative presentations on Filmora and give your projects a technical finishing with best outcome.
For Win 7 or later (64-bit)
For macOS 10.12 or later
Part 2 How Do I Create a Slideshow Template in Premiere Pro?
Creating a slideshow template in premiere pro is not at all tough, even it is really fun. You need nothing much to do and have all the controls of customizing the presentation as per your preference. Just follow the steps mentioned below –

Step 1 Download the app and install it in your device.
Step 2 Open the adobe premiere pro slideshow templates free and select ‘new project‘ by clicking on it. The term can differ in different versions of premiere. For instance, may be you will find the way to start a new project by clicking on ‘file‘ and then ‘new‘ or something like that. So follow the path accordingly.
Step 3 It**’**s time to understand workspace in premiere. A blank workspace will be provided to you to start with your new project. There will be a set of insert and editing options, buttons and information to get help in the form of panels. You can select a panel to work on your project with the help of that particular panel. For instance, to insert your videos and pictures in the timeline, you can select ‘insert‘ panel and proceed.
Step 4 Create your project with the help of panels in adobe premiere pro slideshow template free. In the lower left of the project, you will see your sequence of videos and picture which can be controlled by you. For example, if you want to change the sequence, apply filters and effects or add text on the video clips and photos, you can do the same by clicking on that particular clip. Then choose the operation you want to apply from the project panel and edit your project as per your choice.
Step 5 In the menu bar, you can see file. Select ‘file‘ and go to ‘new‘, then ‘sequence‘. Add the audio of your choice, select the frame you want and set resolution as per your preference from here. You can also control color, depth, warmth and speed of the video etc. from this task bar.
Step 6 Once ready, you can proceed to save your project. Various resolutions will be available when you click on ‘download or save‘. Choose the resolution you prefer and save your free premiere pro templates slideshow for future use. Don**’**t forget to enter a name to describe your project such as ‘my company‘, ‘holidays 2022‘ etc.
Part 3 FAQ of Premiere Pro Slideshow Templates

Can I have Premiere Pro slideshow templates for free?
Yes, you can definitely have a premiere pro slideshow templates free download version. All you need to do is downloading the free premiere pro app from Motion Array, run and install it in your device and it**’**s ready to be used.
How many placeholders are there in Premiere Pro slideshow templates?
The no. of placeholders varies editor to editor. In Premiere pro slideshow templates, you can have more than 30 placeholders for photos and approx 23 placeholders for texts. The number is enough to create a calm, gentle slideshow without much load of content for distraction.
What are the main features of Premiere Pro slideshow templates?
The best thing to know about premiere pro slideshow template is that it is so easy to use that even a beginner can create a good slideshow on it. The user friendly interface of the app provides custom operational functions such as changing the font, color and speed of slideshow. Directly drag and drop feature is there to insert media in the slideshow and also you can control the transitions and effects. The most important thing is that all this you can get for free also.
Can I use Premiere Pro slideshow templates for making promotional videos?
Of course, you can create impressive adobe premiere slideshow templates with the help of premiere pro slideshow template. Just choose the pictures and videos of your business/company wisely and generate high tech content to catch attention. Write touchy content on your company and upload in the slideshow in the form of text use beautiful font, catchy captions and subtle background colors to make it more interesting.
How to remove watermark in Premiere Pro slideshow templates?
In the premium version, you won**’t have to employ your efforts for removing watermark as you won‘**t find it there while in the free version, you will have to remove the watermark by applying a watermark removing app or watching a small promo video shown by the app.
When should I use Premiere Pro slideshow templates?
You can use premiere slideshow template free whenever you feel the need of making a slideshow. When you come back from a vacation and want to compile all the pictures; when there is an important business meeting and you want to represent your project, when you want to make a family or friends**’** slideshow on special occasions and even personal slideshows can be created to wish someone happy birthday.
● Ending Thoughts →
● The trend of ‘ready-to-use‘ slideshow makers is on its peak as nobody have enough time to create a complete slideshow by its own nowadays. In such condition, you should choose a premiere pro slideshow template free wisely to go well with your theme.
● The procedure of slideshow making varies app to app. You should first understand the interface of a slideshow maker before putting your head into slideshow making. It**’**s better to choose a slideshow maker with user friendly interface.
● Don**’**t go with the professional version or a slideshow maker created to be used by expert only. Pick one with simple operations and quick assistance if are not so well-versed in slideshow making.
Making slideshows quickly is the demand of modern professional world. Here you can go through top 8 Premiere pro Slideshow Templates available online. The slideshow template premiere pro free download versions are ready for media to be inserted for creating beautiful slideshows.
In this article
01 [Top 9 Premiere Pro Slideshow Templates worth utilizing](#Part 1)
02 [How Do I Create a Slideshow Template in Premiere Pro?](#Part 2)
03 [FAQ of Premiere Pro Slideshow Templates](#Part 3)
Part 1 Top 8 Premiere Pro Slideshow Templates worth Utilizing
01Square Photo
If you are looking for a really awesome slideshow premiere pro which can make your square-shaped photos more attractive, you can employ slideshow – Square Photo. The presentation of pictures in this slideshow occurs like scrolling an album full of family clicks. You will love the way it presents calm pictures with your friends and family. It**’**s satisfying, nostalgic and fun to use this slideshow.
02Vintage by motion shape
Want to give your slideshow a vintage touch? Well, vintage slideshow premiere template free by Motionshape is particularly for you. It makes your creation memorable and provides an exciting template full of flickers, dust, scratch and light effects. Ultimately, the project seems to run on historical timeline. All you need to do is adding photos and putting new captions as per your picture collection.
03Digital Slideshow by Zorrin
You will be in love with this slideshow for sure. Digital slideshow by Zorrin is a beautiful way to represent you. Whether you want to create a corporate slideshow or you are interested in promotion and broadcasting of your products, you can use this slideshow without any doubt. It possesses 50 places for the photos and 25 places for text as well. You will love the creative transitions between the slides.
04Emotional memory slideshow
Planning to create an emotional and memory based slideshow? If yes, this is the best slideshow premiere pro template free that you can use. It will enhance the importance of pictures which are close to your heart and full of passion. The analogous aesthetics of this slideshow hits your mind and replays your special memories.
05Corporate slideshow
So, you are working for a company and making a corporate slideshow for presentation? If yes, this corporate premiere slideshow template is for you. It gives a classic look to the pictures and put the story of your business in an exciting manner. You can use the timeline smartly and describe the establishment and progress of your company, management and teamwork, research and production and client base etc.
06Inspire slideshow by Quartz
Inspire is a good slideshow full of custom options in color palette and you can even make the changes directly while using its pro version. It involves a simple way to move slide-wise and is really a well organized template to insert your own media and move further.
07Transmaxx’s Education Slideshow
Never bother about creating your own free premiere pro slideshow template regarding education when you can already access this exclusive education slideshow. It is based upon the theme around education and has lots of places for pictures, videos and texts. You can add captions and additional write-ups wherever required.
08Motion Media Group’s Family Slideshow
You can choose any of the four versions of this wonderful free slideshow template premiere pro that provides platform for adding your family pictures. Whether you want to make a slideshow of celebrations in your family or making a digital collage of family photos, this is the best template you can go with. The romantic and calm pace is really touchy to be used as a wedding slideshow as well.
09**Wondershare Filmora Video Editor **
One more interesting video editor and slideshow template is Filmora by wondershare which promises to meet all your editorial demands while making a slideshow. As the slideshow template premiere pro free version offers high end motion graphic, you can use it for making highly professional videos. Make creative presentations on Filmora and give your projects a technical finishing with best outcome.
For Win 7 or later (64-bit)
For macOS 10.12 or later
Part 2 How Do I Create a Slideshow Template in Premiere Pro?
Creating a slideshow template in premiere pro is not at all tough, even it is really fun. You need nothing much to do and have all the controls of customizing the presentation as per your preference. Just follow the steps mentioned below –
Step 1 Download the app and install it in your device.
Step 2 Open the adobe premiere pro slideshow templates free and select ‘new project‘ by clicking on it. The term can differ in different versions of premiere. For instance, may be you will find the way to start a new project by clicking on ‘file‘ and then ‘new‘ or something like that. So follow the path accordingly.
Step 3 It**’**s time to understand workspace in premiere. A blank workspace will be provided to you to start with your new project. There will be a set of insert and editing options, buttons and information to get help in the form of panels. You can select a panel to work on your project with the help of that particular panel. For instance, to insert your videos and pictures in the timeline, you can select ‘insert‘ panel and proceed.
Step 4 Create your project with the help of panels in adobe premiere pro slideshow template free. In the lower left of the project, you will see your sequence of videos and picture which can be controlled by you. For example, if you want to change the sequence, apply filters and effects or add text on the video clips and photos, you can do the same by clicking on that particular clip. Then choose the operation you want to apply from the project panel and edit your project as per your choice.
Step 5 In the menu bar, you can see file. Select ‘file‘ and go to ‘new‘, then ‘sequence‘. Add the audio of your choice, select the frame you want and set resolution as per your preference from here. You can also control color, depth, warmth and speed of the video etc. from this task bar.
Step 6 Once ready, you can proceed to save your project. Various resolutions will be available when you click on ‘download or save‘. Choose the resolution you prefer and save your free premiere pro templates slideshow for future use. Don**’**t forget to enter a name to describe your project such as ‘my company‘, ‘holidays 2022‘ etc.
Part 3 FAQ of Premiere Pro Slideshow Templates
Can I have Premiere Pro slideshow templates for free?
Yes, you can definitely have a premiere pro slideshow templates free download version. All you need to do is downloading the free premiere pro app from Motion Array, run and install it in your device and it**’**s ready to be used.
How many placeholders are there in Premiere Pro slideshow templates?
The no. of placeholders varies editor to editor. In Premiere pro slideshow templates, you can have more than 30 placeholders for photos and approx 23 placeholders for texts. The number is enough to create a calm, gentle slideshow without much load of content for distraction.
What are the main features of Premiere Pro slideshow templates?
The best thing to know about premiere pro slideshow template is that it is so easy to use that even a beginner can create a good slideshow on it. The user friendly interface of the app provides custom operational functions such as changing the font, color and speed of slideshow. Directly drag and drop feature is there to insert media in the slideshow and also you can control the transitions and effects. The most important thing is that all this you can get for free also.
Can I use Premiere Pro slideshow templates for making promotional videos?
Of course, you can create impressive adobe premiere slideshow templates with the help of premiere pro slideshow template. Just choose the pictures and videos of your business/company wisely and generate high tech content to catch attention. Write touchy content on your company and upload in the slideshow in the form of text use beautiful font, catchy captions and subtle background colors to make it more interesting.
How to remove watermark in Premiere Pro slideshow templates?
In the premium version, you won**’t have to employ your efforts for removing watermark as you won‘**t find it there while in the free version, you will have to remove the watermark by applying a watermark removing app or watching a small promo video shown by the app.
When should I use Premiere Pro slideshow templates?
You can use premiere slideshow template free whenever you feel the need of making a slideshow. When you come back from a vacation and want to compile all the pictures; when there is an important business meeting and you want to represent your project, when you want to make a family or friends**’** slideshow on special occasions and even personal slideshows can be created to wish someone happy birthday.
● Ending Thoughts →
● The trend of ‘ready-to-use‘ slideshow makers is on its peak as nobody have enough time to create a complete slideshow by its own nowadays. In such condition, you should choose a premiere pro slideshow template free wisely to go well with your theme.
● The procedure of slideshow making varies app to app. You should first understand the interface of a slideshow maker before putting your head into slideshow making. It**’**s better to choose a slideshow maker with user friendly interface.
● Don**’**t go with the professional version or a slideshow maker created to be used by expert only. Pick one with simple operations and quick assistance if are not so well-versed in slideshow making.
Top 7 Easy Ways to Convert a Video to a GIF Online
Looking for the best video to gif online conversion tools? No worries, as we have done all the research work and have shortlisted the best tools that can assist you with the task. GIF is short and cute animated files that help in interestingly conveying a message. These short-animated visuals help in reaching and creating an impact on the target audience. So, if you have some videos, GIF animations can be created from them using a good converter tool which can be an online program or system software.
Online programs are preferred by the users owing to their simple and hassle-free use, support for basic features, and cost-saving options. So, here in this topic, we will discuss the top and easy ways to convert video to GIF online.

Part 1: Top 7 Easy Ways to Convert a Video to a GIF Online
Several online tools can be used for converting a video file into GIF, but all do not stand up to the tall claims it makes. So, if you are in search of an easy yet effective tool, shortlisted below are the top 7 tools for video into GIF online conversion.
1. Adobe Express
Powered by Adobe Premiere, this is an excellent online tool that allows converting videos in all key formats in GIF format. The free version allows adding videos for up to 1 hour and the processed files can be downloaded to the local system.
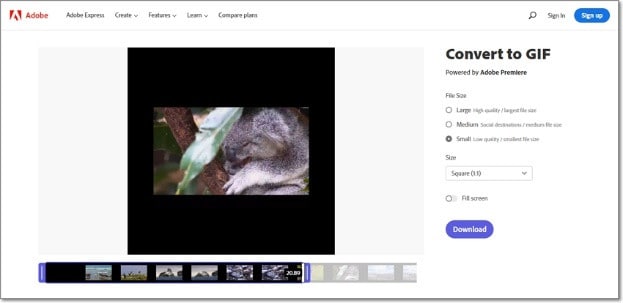
Key features
- Video files in all key formats can be converted to GIF.
- Allows selecting the aspect ratio and the file size of the target file.
- This video to GIF converter online tool support drag and drop feature.
- Allows trimming the video so that the file portion can be selected.
Pros:
- Simple and clean interface.
- Quick file processing.
- Allows selecting aspect ratio and file size.
Cons:
- Only one file at a time can be processed.
- Only desktop files can be added.
- To download the file, you need to free sign-up.
User Review:
A good online multi-platform service that works with interesting features. -TechRadar
This is one of the best programs that comes packed with wide range of features that can assist you in getting the target customized files.
2. Ezgif
Using this browser-based tool, local as well as online videos in key formats can be converted to GIFs. The interface is simple where you just need to add the file and the conversion will be done automatically.
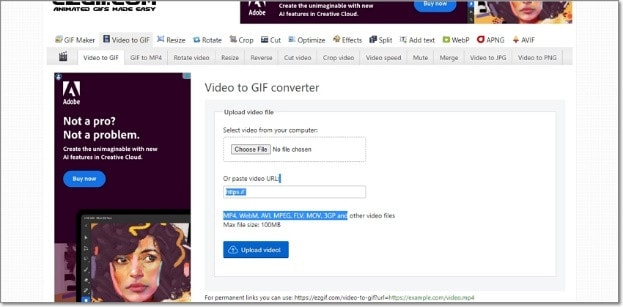
Key features
- GIF can be created from the local and online video files in all key formats.
- Choose the video part for creating the GIF file else by default, the first 5 seconds of the video are used.
Pros:
- All popular video formats like MP4, MPEG, FLV, MOV, and others are supported for conversion to GIF.
- Local, as well as file links in case of online files, can be added.
- Allows selecting the video part for which the GIF has to be created.
- Allows choosing the frame rate, and the size of the video.
This online GIF converter has an option to set static background.
Cons:
- File size limitation of 100 MB.
- Internet dependency.
User Review
“A website with many important and good tools that facilitates making your task easier. You get all features in one place. -Sasa011, Mywot.
This simple online tool is a pocket friendly option for converting your videos into GIF with added option for editing them. Supporting all key formats, the program supports additional tools as well.
3. Img2Go
Your videos on the system, cloud storage, as well as using URLs can be added to this online tool for conversion to GIF format. The look and the quality of GIFs can be adjusted by making changes in the file parameters.

Key features
- Convert all key video files like MP4, MOV, MPEG, and others to GIF.
- Customize the GIF look by editing the file size and applying the color filter.
- This online video to GIF converter allows to choose to enhance, sharpen, equalize, and edit files in other ways.
- Files to be converted can be added from the desktop, Google Drive, Dropbox, as well as URL.
- Processed files can be saved to the cloud storage in addition to the local system.
Pros:
- Multiple sources to add the video file.
- Customize the file parameters and enhance its look.
- Converted file is downloaded automatically to the local system.
Cons:
- Free version allows converting only 3 files at a time.
- Dependency on internet connectivity.
User review:
“This is the best online converter app I have discovered. It is really easy and fast to use. I absolutely recommend it and it really works.”-Maria Ancil, ChromeStats
When you need to convert only a few files at a time in a hassle-free manner consider this simple online tool. After the conversion is done, you would not have any hassles of file downloading as it is automatically saved to the system.
4. CloudConvert
Convert your videos in MP4, FLV, WebM, and other key formats to GIF using this browser-based tool that is simple and free to use. Multiple file parameters can be changed using the tool to get the desired file.

Key Features:
- Allows converting all key video formats.
- Files to be converted can be added from the desktop, URL, Dropbox, Google Drive, and OneDrive.
- Allows adjusting the fit, codec, resolution, aspect ratio, and fps.
- Option to trim the file and also add a watermark.
Pros:
- Files to be converted can be added from multiple sources.
- All key video formats supported.
- Option to control the video size, quality, and aspect ratio.
Cons:
- Free version allows only 25 conversions per day.
- Converted files need to be downloaded.
User Review
“Instant way of converting small-sized files online in many different formats.”
-Sushil, SoftwareAdvice
When conversion of cloud-based files is needed, this works a good online tool that also allows you to edit and change the key file parameters.
5. io
This is a free browser-based tool that allows creating of animated GIF files from videos. There are several video editing options also supported by the tool like split, cut, adding text, and more. You can even add a YouTube video or its link to create a GIF.

Key features:
- Free online tool for creating a GIF file.
- Support all key video formats like MP4, MOV, FLV, and others.
- Local, YouTube as well as videos from Dropbox can be added.
- Option to record the video and create its GIF.
- ‘Allows choosing the size, duration, background color, and several other file parameters.
Pros:
- Videos from multiple sources can be added.
- YouTube videos can also be converted to GIFs.
- Option to record the video and create its GIF.
- Support multiple video editing options.
Cons:
- Slow processing speed.
- Files processed through the free version have a watermark.
- Free version allows processing files under 10 minutes and of 250Mb in size.
User Review:
“It is just a perfect tool and easy to use. It supports a wide variety of media files.” - Koi, Trustpilot.
Option to convert the YouTube videos as well as the recorded videos make this tool different from the others. All popular file formats are supported and you can even customize and change the file parameters as per your requirements.
6. VistaCreate
This is another simple-to-use tool that allows converting all key video formats to a GIF file. The program allows setting various parameters as needed.
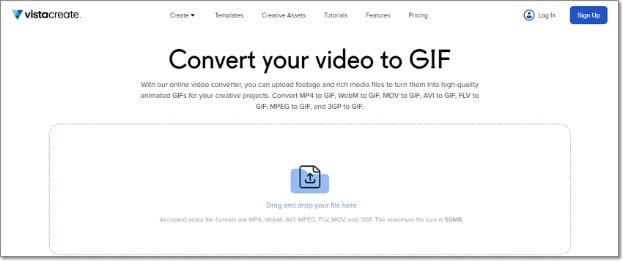
Key Features
- Convert MP4, WebM, AVI, MPEG, FLV, MOV, and 3GP to GIF.
- Support Drag and Drop feature.
- Videos up to 50MB can be processed.
- Allows choosing the video start and the end time for which GIF is to be created. If no time is selected, the first 5 seconds of the video are used.
Pros:
- Simple user interface.
- Allows selecting the video part for which GIF is to be created.
- Choose the frame rate and the speed.
Cons:
- Limited format support.
- Free version has a limitation of 50Mb file size.
- Processing speed is slow.
User Review:
“It is a simple and fast online tool that works. The program allows creating eye-catchy visuals and is free to use.”-Kshitij T, G2. Com
Simple to use, this online tool is apt when you need selected parts of the video for creating a GIF. Though it is compatible with a few selected formats, the process of conversion is simple.
7. XConvert
This online tool support conversion of wide range of file types and formats including videos to GIF. The supported video formats are MP4, WebM, MOV, and MKV. The tool also allows changing the target file parameters.

Key Features
- Free to use online tool with a simple interface.
- Allows converting MO4, MOV, WebM, and MKV videos to GIF.
- Frame Rate and resolution of the target GIF file can be selected.
- Allows adding local as well as files saved to the cloud storage.
Pros:
- Add videos from the desktop, Google Drive, and Dropbox.
- Choose the desired frame rate and resolution.
- Option to save the processed file to the system or Dropbox. Option to get the converted file download link.
Cons:
- Limited file support.
- Converted files need to be downloaded.
- Internet dependency.
User Review:
Portable, nice UI, cross-platform tool and has a lot of actions and run fast. -Roflpancake, Alternativeto
When simple conversion with basic file editing is needed, consider this online tool for your task. In addition to the local system, you can even save the files to your cloud storage.
Part 2: Comparison Table of the Best Video to GIF Converters
The table below compares the above 7 listed tools based on the formats supports, speed of file processing, and the watermark on the processed files.
| Features/Tool | Supported Format | Free Version with watermark or not | Speed of conversion |
|---|---|---|---|
| Adobe Express | All key video formats | No watermark | 2 (Fast) |
| Ezgif | All key formats including MP4, MPEG, FLV, MOV, and others. | No watermark. | 4 (Slow) |
| Img2Go | MP4, FLV, MOV, and all key video formats. | No Watermark | 2 (Fast) |
| CloudConvert | All popular video formats including MP4, MOV, FLV, MPEG, and more. | No Watermark | 2(Fast) |
| Veed.io | All key formats | Yes, free version has a watermark. | 5 (very Slow) |
| VistaCreate | MP4, WebM, AVI, MPEG, FLV, MOV, and 3GP. | No watermark | 5 (Very Slow) |
| XConvert | MP4, WebM, MOV, MKV. | No watermark | 3 (Average) |
Part 3: Best Solution to Convert Video to GIF on Windows/Mac
To convert videos to GIF on your Windows and Mac without worrying about any limitations or internet dependency, desktop software works as the best option. If you too have been looking for one such desktop program, we recommend Filmora Video Editor as the best choice. Though the software is used majorly for advanced video editing options, it is capable of performing a variety of other tasks as well including video to GIF conversion. The software allows file conversion through its export feature.
For Win 7 or later (64-bit)
For macOS 10.14 or later
Key Features
- Almost all video formats like MOV, MP4, MKV, FLV, and others can be converted to GIF.
- High-quality conversion at a fast speed.
- Support batch processing so that multiple files can be processed at a time.
- Allows editing and customizing videos using the built-in features of the software like effects, subtitles, crop, cut, and more.
Pros:
- The interface is simple which makes the software suitable even for beginners.
- Almost all popular video formats are supported.
- High-quality conversion in a hassle-free manner.
- Windows and Mac support.
Cons:
- Being a desktop software, it needs download and installation.
- Need to purchase the software subscription.
Steps to convert videos to GIF using Wondershare Filmora
Step 1. Launch the installed software on your system and the main interface select Create Project > New Project.

Step 2. Click on Import Media Files Here option under the Media tab to browse and add the local video file. Multiple files for batch processing can be added here.

Step 3. After the files are added, now it’s time to move them to the time and for this, you can simply drag and drop them to the bottom. Now at the timeline, using the built-in editing features, customization can be done as required.

Step 4. Finally, tap on the Export button and then choose GIF as the desired target format and also the location to save the converted files.

Conclusion
If one of the above-listed online tools serves your videos for GIF conversion purposes, it’s great. If not, you can use the Wondershare Filmora software. Once downloaded, the software can be used for several editing and other video-related tasks.
For macOS 10.14 or later
Key Features
- Almost all video formats like MOV, MP4, MKV, FLV, and others can be converted to GIF.
- High-quality conversion at a fast speed.
- Support batch processing so that multiple files can be processed at a time.
- Allows editing and customizing videos using the built-in features of the software like effects, subtitles, crop, cut, and more.
Pros:
- The interface is simple which makes the software suitable even for beginners.
- Almost all popular video formats are supported.
- High-quality conversion in a hassle-free manner.
- Windows and Mac support.
Cons:
- Being a desktop software, it needs download and installation.
- Need to purchase the software subscription.
Steps to convert videos to GIF using Wondershare Filmora
Step 1. Launch the installed software on your system and the main interface select Create Project > New Project.
Step 2. Click on Import Media Files Here option under the Media tab to browse and add the local video file. Multiple files for batch processing can be added here.
Step 3. After the files are added, now it’s time to move them to the time and for this, you can simply drag and drop them to the bottom. Now at the timeline, using the built-in editing features, customization can be done as required.
Step 4. Finally, tap on the Export button and then choose GIF as the desired target format and also the location to save the converted files.
Conclusion
If one of the above-listed online tools serves your videos for GIF conversion purposes, it’s great. If not, you can use the Wondershare Filmora software. Once downloaded, the software can be used for several editing and other video-related tasks.
Also read:
- 4 Methods to Merge MP4 and MP3
- New Best Ways to Merge FLV Files Windows, Mac,Android, iPhone & Online for 2024
- Updated Doable Ways to Make Transparent Background in Procreate for 2024
- How to Create a Bokeh Effect for 2024
- Updated 2024 Approved How to Color Grading in Final Cut Pro
- Updated How to Use Zoom in Google
- Updated Adding a Spooky Shadow Effect with Filmora for 2024
- Updated Learning The Details Of How To Replace Sky in Lightroom for 2024
- How D AI Video Games Act More Human Than Human for 2024
- New Easily Cut Large Videos Faster on Mac 7 Solutions Included
- Updated Tutorial to Add Effects with Movavi Slideshow Maker
- Updated In 2024, How to Create an URL for Your Video?
- New With Many Available Video Editing Solutions in the Market Today, It Is a Bit Hard to Choose the Best Video Editing Software for Your Unique Needs
- In 2024, How to Make Stunning Glitch Effect in Photoshop? Ultimate Guide
- Updated In 2024, Achieving GoPro Slow Motion with Quality An In-Depth Overview
- 9 Mind-Blowing Tricks to Hatch Eggs in Pokemon Go Without Walking On Motorola Moto G04 | Dr.fone
- In 2024, How To Bypass ZTE Blade A73 5G FRP In 3 Different Ways
- Full Tutorial to Bypass Your Vivo Y02T Face Lock?
- In 2024, How I Transferred Messages from Tecno Spark 10 4G to iPhone 12/XS (Max) in Seconds | Dr.fone
- How to Hard Reset Xiaomi Redmi 12 5G Without Password | Dr.fone
- How to Transfer Photos from Tecno Pop 8 to New Android? | Dr.fone
- Latest Guide How To Bypass Gionee FRP Without Computer
- In 2024, Set Your Preferred Job Location on LinkedIn App of your Motorola Moto E13 | Dr.fone
- In 2024, Ultimate guide to get the meltan box pokemon go For Motorola Moto G73 5G | Dr.fone
- In 2024, How To Use Allshare Cast To Turn On Screen Mirroring On Samsung Galaxy A23 5G | Dr.fone
- Title: Want to Know the Full Process of Adding the Falling Text Effect as a Video Introduction? Detailed Guidelines on All the Steps Are Mentioned Here for Filmora Users for 2024
- Author: Chloe
- Created at : 2024-04-24 07:08:24
- Updated at : 2024-04-25 07:08:24
- Link: https://ai-editing-video.techidaily.com/1713951815824-want-to-know-the-full-process-of-adding-the-falling-text-effect-as-a-video-introduction-detailed-guidelines-on-all-the-steps-are-mentioned-here-for-filmora-/
- License: This work is licensed under CC BY-NC-SA 4.0.
