
:max_bytes(150000):strip_icc():format(webp)/GettyImages-77744394-e5f79596e54a4ba6a914eed31be7efc4.jpg)
New In 2024, | How to Share YouTube Video on Zoom?
| How to Share YouTube Video on Zoom?
Abundant Video Effects - Wondershare Filmora
Provide abundant video effects - A creative video editor
Powerful color correction and grading
Detailed tutorials are provided by the official channel
While the internet has made all of our lives significantly easier, there are still things that can prove difficult for people who are not very tech-savvy. Not everything on the web comes with a built-in tutorial, but luckily, you can find guides across the internet.
YouTube is a free online video streaming platform that is ranked as the world’s second most viewed website, just after Google. Zoom Cloud Meetings is software designed to help users set up video and audio calls for various purposes. Are you looking to combine the two platforms?
Keep reading to learn how to share a YouTube video on Zoom easily, along with a detailed step-by-step guide with a near-to-zero learning curve.
In this article
Part 1: Potential Reasons to Share YouTube Videos in Zoom
Part 2: How to Share YouTube Videos in Zoom
Part 1: Potential Reasons to Share YouTube Videos in Zoom
Everyone’s favorite app, YouTube, provides a lot of useful services for its users. The online streaming platform contains millions of videos on almost every topic from around the world, ranging from educational content to recipes and music videos.
The Zoom streaming service has also gained tremendous popularity in recent years, particularly owing to the raging pandemic that swept the world off its feet. It is quite a convenient software program that lets you organize online meetings with up to a hundred members or more in the premium version.
Certain moments may arise when you want to share a YouTube video on Zoom. Luckily, the Zoom platform offers various methods by which users can do that easily. But why would you want to share a video from YouTube on Zoom in the first place? Let’s shine some light on that.
Let’s assume you are taking an online class via Zoom. You find a YouTube video that you believe can help explain the topic to your students. During the lecture on Zoom, just like viewing a video on a projector or a screen, you can share your chosen YouTube video with the rest of the class easily.
Now let’s say you are organizing a business meeting via Zoom. You have a YouTube video showing a compilation of different forms of marketing strategies that you wish to share with your team. With just a few simple clicks, you can easily share the YouTube video with everyone present in the meeting.
You and your friends are having a group video chat on Zoom. While laughing at something your friend said, you suddenly remember seeing a reaction video meme on YouTube that would exactly fit the situation. You quickly search it up and share it with your friends, who then applaud you for your choice.
These are just some of the scenarios where you might have to share YouTube videos on Zoom. A whole set of different reasons may arise, which can cause you to share a YouTube video with your Zoom attendees. If such an instance arises, you need to learn how to do that quickly and efficiently.
Part 2: How to Share YouTube Videos in Zoom
While each of us might have different reasons for sharing YouTube videos on Zoom, the process to do so is identical on all versions of the Zoom application. Looking for a guide on how to share YouTube videos on Zoom easily?
Below, you can find two different methods using which you can seamlessly share a YouTube video of your choice on Zoom. The methods are accompanied by a step-by-step guide and relevant images, so you don’t get lost along the way.
Method 1: Sharing Video through Screen Share
The easiest and most effective method to share a YouTube video on Zoom is using Zoom’s screen sharing option. It is designed in such a way that users can share whatever is being shown on their screens with their audiences, such as PowerPoint presentations, documents, YouTube videos, and more.
The following steps indicate how you can share your video via the screen share option in the Zoom app:
Step 1: Open Your YouTube Video
To begin with, launch the browser on your computer and go to YouTube’s website. You can now search for the video you want to share with your Zoom attendees. If you have your video saved, simply access your playlists to open the video. Click on the video and ensure that the volume is turned up, but don’t hit Play yet.

Step 2: Share Screen on Zoom
Back in your Zoom meeting’s main screen, check the bottom line for options. A green “Share Screens” option will be available in the middle. When you click on it, Zoom will open a window showing all the tabs open on your device. Click the screen with the YouTube video and check the little box next to “Share Sound” at the bottom left corner of the window. Now hit “Share.”

Step 3: Play Video
You can now go back to your browser window, open your video in the full-screen mode, and hit the “Play” button to share the YouTube video with everyone. You can press the “Stop Share” button to stop sharing your screen in the meeting.

Method 2: Using Links to Share YouTube Video
If you don’t want to play the YouTube video live in the meeting, you can still share its link so people can access it privately. Zoom offers a chat box that can help you do that. Follow the steps given below to learn how to share a YouTube video’s link on Zoom meetings.
Step 1: Copy Video Link
Open YouTube on your device and navigate to the video you wish to share in Zoom. Tap the “Share” button below the video’s title and hit “Copy” to save the link on your clipboard.

Step 2: Open Chat Box
Now go to your Zoom meeting’s interface and click on the “Chat” button at the bottom. If you are using the phone app, you might have to tap the “More” option at the bottom and find “Chat” from there.
Step 3: Share Video Link on Zoom
Now simply paste the copied video link into the chat box and hit “Enter” to share it with everyone in the meeting.

Conclusion
The wonders of technology never cease to amaze. Some of the world’s top websites and software programs offer integration and support for one another. YouTube and Zoom are the prime examples of such apps which you can use collectively, leaving behind any potential hassle.
You can now share YouTube videos on Zoom without any trouble by following the simple guide mentioned above. There are multiple options to share a YouTube video via Zoom, which include screen sharing and external links. Once done, you can show the shared video to all the participants present in a Zoom meeting.
While the internet has made all of our lives significantly easier, there are still things that can prove difficult for people who are not very tech-savvy. Not everything on the web comes with a built-in tutorial, but luckily, you can find guides across the internet.
YouTube is a free online video streaming platform that is ranked as the world’s second most viewed website, just after Google. Zoom Cloud Meetings is software designed to help users set up video and audio calls for various purposes. Are you looking to combine the two platforms?
Keep reading to learn how to share a YouTube video on Zoom easily, along with a detailed step-by-step guide with a near-to-zero learning curve.
In this article
Part 1: Potential Reasons to Share YouTube Videos in Zoom
Part 2: How to Share YouTube Videos in Zoom
Part 1: Potential Reasons to Share YouTube Videos in Zoom
Everyone’s favorite app, YouTube, provides a lot of useful services for its users. The online streaming platform contains millions of videos on almost every topic from around the world, ranging from educational content to recipes and music videos.
The Zoom streaming service has also gained tremendous popularity in recent years, particularly owing to the raging pandemic that swept the world off its feet. It is quite a convenient software program that lets you organize online meetings with up to a hundred members or more in the premium version.
Certain moments may arise when you want to share a YouTube video on Zoom. Luckily, the Zoom platform offers various methods by which users can do that easily. But why would you want to share a video from YouTube on Zoom in the first place? Let’s shine some light on that.
Let’s assume you are taking an online class via Zoom. You find a YouTube video that you believe can help explain the topic to your students. During the lecture on Zoom, just like viewing a video on a projector or a screen, you can share your chosen YouTube video with the rest of the class easily.
Now let’s say you are organizing a business meeting via Zoom. You have a YouTube video showing a compilation of different forms of marketing strategies that you wish to share with your team. With just a few simple clicks, you can easily share the YouTube video with everyone present in the meeting.
You and your friends are having a group video chat on Zoom. While laughing at something your friend said, you suddenly remember seeing a reaction video meme on YouTube that would exactly fit the situation. You quickly search it up and share it with your friends, who then applaud you for your choice.
These are just some of the scenarios where you might have to share YouTube videos on Zoom. A whole set of different reasons may arise, which can cause you to share a YouTube video with your Zoom attendees. If such an instance arises, you need to learn how to do that quickly and efficiently.
Part 2: How to Share YouTube Videos in Zoom
While each of us might have different reasons for sharing YouTube videos on Zoom, the process to do so is identical on all versions of the Zoom application. Looking for a guide on how to share YouTube videos on Zoom easily?
Below, you can find two different methods using which you can seamlessly share a YouTube video of your choice on Zoom. The methods are accompanied by a step-by-step guide and relevant images, so you don’t get lost along the way.
Method 1: Sharing Video through Screen Share
The easiest and most effective method to share a YouTube video on Zoom is using Zoom’s screen sharing option. It is designed in such a way that users can share whatever is being shown on their screens with their audiences, such as PowerPoint presentations, documents, YouTube videos, and more.
The following steps indicate how you can share your video via the screen share option in the Zoom app:
Step 1: Open Your YouTube Video
To begin with, launch the browser on your computer and go to YouTube’s website. You can now search for the video you want to share with your Zoom attendees. If you have your video saved, simply access your playlists to open the video. Click on the video and ensure that the volume is turned up, but don’t hit Play yet.
Step 2: Share Screen on Zoom
Back in your Zoom meeting’s main screen, check the bottom line for options. A green “Share Screens” option will be available in the middle. When you click on it, Zoom will open a window showing all the tabs open on your device. Click the screen with the YouTube video and check the little box next to “Share Sound” at the bottom left corner of the window. Now hit “Share.”
Step 3: Play Video
You can now go back to your browser window, open your video in the full-screen mode, and hit the “Play” button to share the YouTube video with everyone. You can press the “Stop Share” button to stop sharing your screen in the meeting.
Method 2: Using Links to Share YouTube Video
If you don’t want to play the YouTube video live in the meeting, you can still share its link so people can access it privately. Zoom offers a chat box that can help you do that. Follow the steps given below to learn how to share a YouTube video’s link on Zoom meetings.
Step 1: Copy Video Link
Open YouTube on your device and navigate to the video you wish to share in Zoom. Tap the “Share” button below the video’s title and hit “Copy” to save the link on your clipboard.
Step 2: Open Chat Box
Now go to your Zoom meeting’s interface and click on the “Chat” button at the bottom. If you are using the phone app, you might have to tap the “More” option at the bottom and find “Chat” from there.
Step 3: Share Video Link on Zoom
Now simply paste the copied video link into the chat box and hit “Enter” to share it with everyone in the meeting.
Conclusion
The wonders of technology never cease to amaze. Some of the world’s top websites and software programs offer integration and support for one another. YouTube and Zoom are the prime examples of such apps which you can use collectively, leaving behind any potential hassle.
You can now share YouTube videos on Zoom without any trouble by following the simple guide mentioned above. There are multiple options to share a YouTube video via Zoom, which include screen sharing and external links. Once done, you can show the shared video to all the participants present in a Zoom meeting.
How to Zoom Picture in Picture [Easy Solution]
Zoom is one of the greatest options on the market for video conferencing. It doesn’t matter whether you use it at home or in an office environment; it will quickly link the team members. One of the most popular video conferencing programs is Zoom. When in-person meetings aren’t feasible, it enables you to communicate electronically with employees, and it’s been a major popularity for social occasions as well. In case you’re not acquainted, picture-in-picture mode enables you to watch videos from one app while using your PC normally. The movie will keep playing in a tiny thumbnail window so that two applications may work simultaneously on your smartphone.
You may create virtual audio and video conferences, webinars, live chats, screen sharing, and other collaboration tools with Zoom, a cloud-based video communications solution. Zoom’s most recent iPhone apps let you dismiss a Zoom Meeting while keeping the Zoom video call open in a picture-in-picture mode. To join a Zoom conference, you don’t need an account, and because the software works with Mac, Windows, Linux, iOS, and Android devices, nearly anybody can use it. Since using Zoom’s picture-in-picture mode is the same as using it with other applications, you shouldn’t have any trouble if you often use PiP mode. Here are the top 4 methods you can refer to picture in picture in Zoom.
Method 1: Swap Shared Screen with Video
You may move the Zoom Meeting PiP window across the screen, change the thumbnail’s size, and utilize other applications while it remains open, just like any other picture-in-picture window. Before leaving the meeting if you’re not giving a presentation or speaking, you should definitely mute Zoom on your iPhone to prevent noises from your typing or other activities from entering the conversation. Additionally, keep in mind to switch off the camera if you’re engaged in something distracting, at least for the duration of your activity. To reopen the Zoom Meeting and go back to the Zoom app, touch the Picture-in-Picture mode pane. Here are some actions to keep in mind:
Steps to Swap Shared Screen for Zoom Picture in Picture
Step1Launch or enter a Zoom meeting. Keep the video on your main screen at all times, closing the chat and participant list as necessary.
Step2Tap the Home button or swipe up from the bottom of the screen.
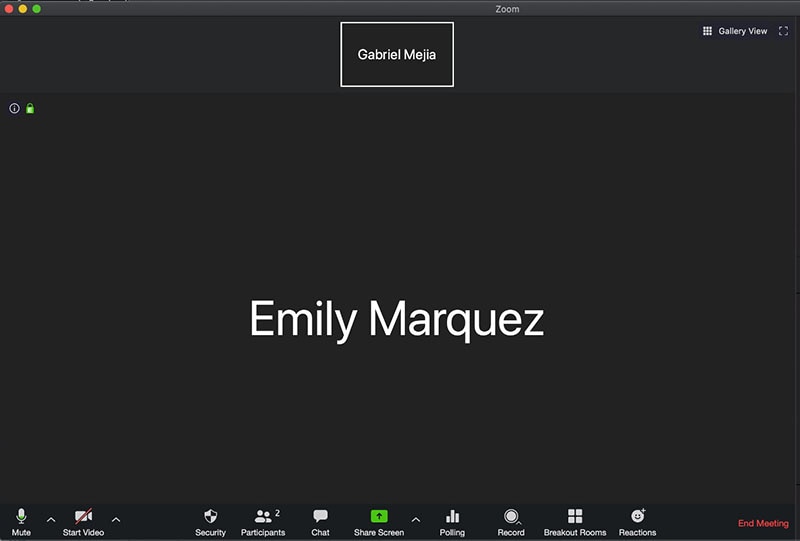
Step3Picture-in-picture mode should be activated automatically throughout the meeting.
Method 2: Use Ecamm Live
Live streaming is a fantastic way to provide original content and stand out from the crowd. To prevent any operational difficulties, a more sophisticated virtual camera is absolutely necessary. You now have magical abilities thanks to Ecamm virtual cam, including the ability to add text, animations, observe a live stream, post viewer comments, play music, share your screen, use sound effects, and many more. It offers the Ecamm live virtual camera zoom function for video conferences so you may improve your Zoom discussions by sending output to other PC programs. You could see a quality difference between what you view in Ecamm Live and what your Zoom visitors see while utilizing virtual camera with Zoom. The quality of a Zoom video stream cannot be improved using Ecamm Live. Simply broadcast the Zoom app using Ecamm Live’s Screen Share mode to utilize Ecamm Live for picture-in-picture virtual presentations on Zoom.
Steps to Use Ecamm Live for Zoom Picture in Picture
Step1Download the Ecamm Application
Install Ecamm Live on your computer, then choose the center button in the source switcher at the top of the main window to enter Screen Share mode.
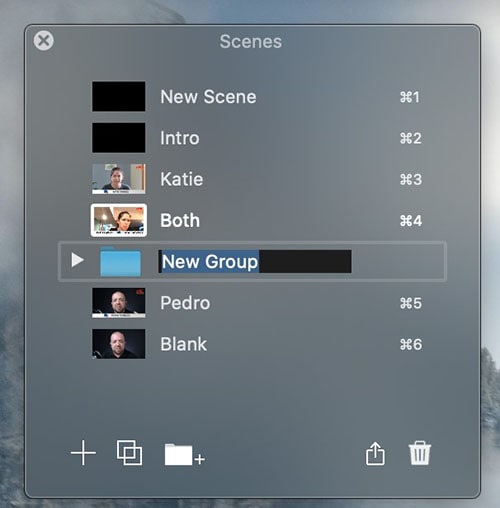
Step2Create Scenes
With the use of Ecamm Live’s Virtual Camera and Virtual Mic capabilities, you may transfer Ecamm Live’s output to almost any other Mac software, including Zoom. After setting, create the scenes in the program to quickly switch between various cameras.
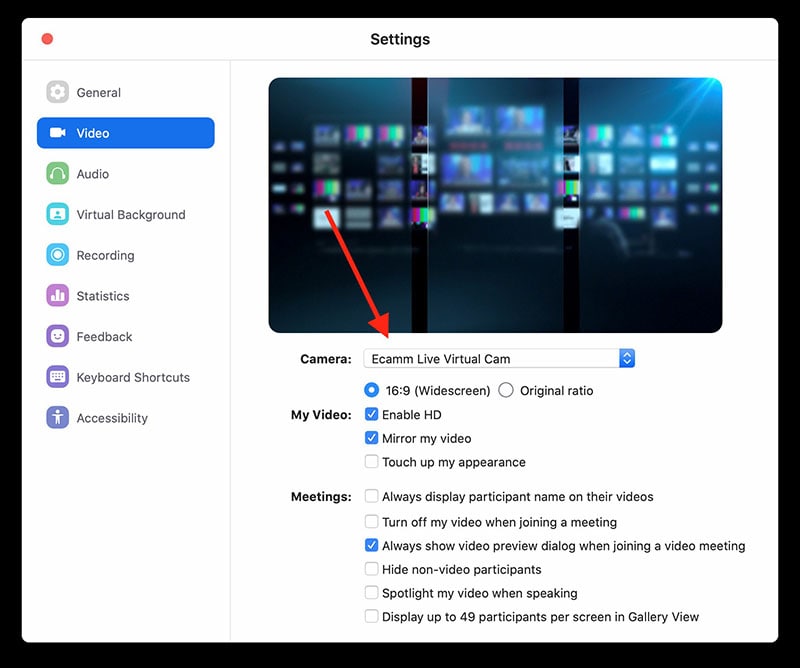
Step3Select Ecamm on Zoom
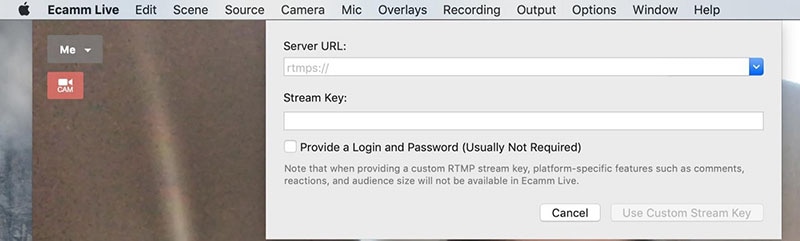
You may also utilize Ecamm Live’s Sharing Window capability to feed Ecamm Live output into Zoom. Simply activate the virtual camera, and then, as seen below, choose Ecamm Live Virtual Camera in Zoom’s video settings:
Step4Begin Your Presentation
Finally, click the PC share option to show your Zoom app to your audience. To conceal a picture-in-picture window that displays your camera image while live streaming, click the PIP button.
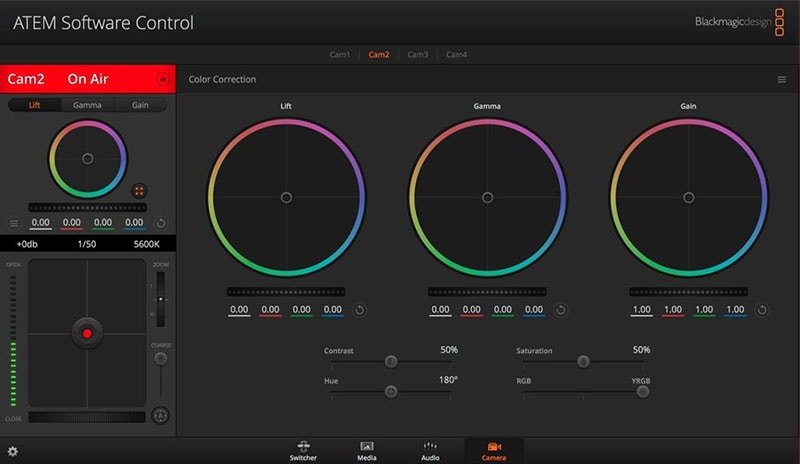
Method 3: Use Filmora as A Switcher
Zoom has solutions that will make your meetings simple and secure. It gives your remote staff a secure setting to interact and share crucial information. Ideal control over your film and configuration options to make them aesthetically pleasing is something Zoom lacks. To overcome the drawbacks and improve the quality of your online meetings, you may take use of the capabilities of Zoom in conjunction with Filmora. Filmora was developed with the intention of easing user burden and supporting applications. Though complicated, the program is simple to use. The perhaps most popular web information that may be saved on your computer can be easily captured by just angling your screen. For more information on how to record and save your Zoom for picture in picture, see the guide here.
To broadcast a variety of situations in a grid style, you may also combine inputs from your camera, microphone, computer screen, and web conferencing software. Wondershare -the finest desktop application for recording a Zoom Picture in Picture meeting- is Filmora. With the majority of cameras, this app’s screen recording capability is both user-friendly and feature-rich. Here, users may either choose a particular region to record or record their zoom meetings in Fullscreen mode. Additionally, you may choose the camera and input microphone that will be used while recording a video overlay. The addition of relevant comments like phrases, lines, drawings, symbols, etc. is also possible by users. The detailed procedure for recording a Zoom Picture-in-Picture meeting using a Filmora recorder is given below:
Free Download For Win 7 or later(64-bit)
Free Download For macOS 10.14 or later
Step1Download and Install Filmora Zoom Recorder
You may find both types, i.e., the most recent Windows and Mac versions, by first visiting the usual website and then using this Zoom. Install the program on your computer once you download it to get started.

Step2Initiate Filmora Recorder
After finishing the installation process for this Reside Zoom recorder, launch it from the main menus and choose “New Task” when prompted. It will take you to Filmora’s streamlined user interface where you can immediately start filming. Then, as seen in the picture below, you may adjust the screen recording using your preferred camera, microphone, and system settings:

Step3Begin/End the Recording
When you are through configuring this Zoom picture in picture recorder, click the Record button, and it will immediately begin recording your customized screen. Similar to that, after you’re done recording, click Stop, which will take you inside the video editor where you may edit your recorded information.

Step4Share Recordings
When you have everything ready, export your recording right away. After you’re done with the editing part, you do have a lot of options to choose from when displaying your screen capture and webcam stories. To do so, click the Export button in the item user interface’s top-right corner as shown below:
You may easily choose your preferred way to share from there if you choose to upload your work of zoom picture in picture recordings straight to the YouTube or other reputable websites right now. Simply refer to the Sharing plug-ins in the Export window to find out more.
Method 4: Use Hardware Switcher ATEM Mini Pro
Particularly on Zoom, the ATEM Mini is excellent for video conferences. The Blackmagic ATEM Mini is a USB video interface and HDMI switcher. Four HDMI inputs, or four cameras that can produce an HDMI video stream, may be switched between live. This device integrates Zoom meetings fast and makes it incredibly simple to set up your audio, a sometimes-forgotten aspect of video broadcasting. This sophisticated video switcher promises to offer broadcast-quality multi-camera footage with ease and is targeted at gamers, streamers, and online reviewers. It connects to a computer via a USB-C to USB-A connection. The video feed may then be sent to distant colleagues via a number of well-liked videos streaming services, including Zoom.
Step1The ATEM Mini Pro is a basic control switcher with pro-broadcast performance. Your ATEM Mini Pro is really simple to set up. You can connect a full setup with several cameras and microphones in around 30 minutes.
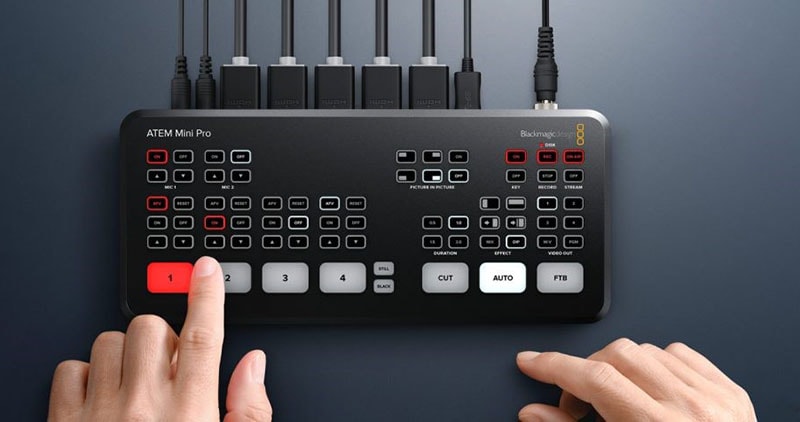
Step2You may connect several camera sources to the inputs of the ATEM Mini Pro. The 4 HDMI inputs each have a separate standards converter built in. As a result, the ATEM Mini can automatically convert inputs that are 1080p, 1080i, or 720p to the switcher’s video standard. You may make quick changes between inputs with no latency or disruption to your video output by using the ergonomic buttons.
Step3As a third option, Zoom offers ATEM Mini, which enables you to switch between several inputs, add custom visuals, and adjust audio levels all from a single interface. To improve the quality of your production, you may even use smooth transitions like wipes or fades. You can even test any input stream before making it live.
Conclusion
When you are doing a Zoom Meeting and share your screen, only to discover that what the other attendees see is a split screen with your material and the other Attendee cams, it is highly annoying. You may move the Zoom Meeting PiP window across the screen, change the thumbnail’s size, and utilize other applications while it remains open, just like any other picture-in-picture window. Someone must be sharing information in the Zoom conference for the Picture in Picture, or “Split Screen” option, to be active. We’ve listed the top techniques for doing it effectively above. To do this work without difficulty, use them as your guide.
Free Download For macOS 10.14 or later
Step1Download and Install Filmora Zoom Recorder
You may find both types, i.e., the most recent Windows and Mac versions, by first visiting the usual website and then using this Zoom. Install the program on your computer once you download it to get started.
Step2Initiate Filmora Recorder
After finishing the installation process for this Reside Zoom recorder, launch it from the main menus and choose “New Task” when prompted. It will take you to Filmora’s streamlined user interface where you can immediately start filming. Then, as seen in the picture below, you may adjust the screen recording using your preferred camera, microphone, and system settings:
Step3Begin/End the Recording
When you are through configuring this Zoom picture in picture recorder, click the Record button, and it will immediately begin recording your customized screen. Similar to that, after you’re done recording, click Stop, which will take you inside the video editor where you may edit your recorded information.
Step4Share Recordings
When you have everything ready, export your recording right away. After you’re done with the editing part, you do have a lot of options to choose from when displaying your screen capture and webcam stories. To do so, click the Export button in the item user interface’s top-right corner as shown below:
You may easily choose your preferred way to share from there if you choose to upload your work of zoom picture in picture recordings straight to the YouTube or other reputable websites right now. Simply refer to the Sharing plug-ins in the Export window to find out more.
Method 4: Use Hardware Switcher ATEM Mini Pro
Particularly on Zoom, the ATEM Mini is excellent for video conferences. The Blackmagic ATEM Mini is a USB video interface and HDMI switcher. Four HDMI inputs, or four cameras that can produce an HDMI video stream, may be switched between live. This device integrates Zoom meetings fast and makes it incredibly simple to set up your audio, a sometimes-forgotten aspect of video broadcasting. This sophisticated video switcher promises to offer broadcast-quality multi-camera footage with ease and is targeted at gamers, streamers, and online reviewers. It connects to a computer via a USB-C to USB-A connection. The video feed may then be sent to distant colleagues via a number of well-liked videos streaming services, including Zoom.
Step1The ATEM Mini Pro is a basic control switcher with pro-broadcast performance. Your ATEM Mini Pro is really simple to set up. You can connect a full setup with several cameras and microphones in around 30 minutes.
Step2You may connect several camera sources to the inputs of the ATEM Mini Pro. The 4 HDMI inputs each have a separate standards converter built in. As a result, the ATEM Mini can automatically convert inputs that are 1080p, 1080i, or 720p to the switcher’s video standard. You may make quick changes between inputs with no latency or disruption to your video output by using the ergonomic buttons.
Step3As a third option, Zoom offers ATEM Mini, which enables you to switch between several inputs, add custom visuals, and adjust audio levels all from a single interface. To improve the quality of your production, you may even use smooth transitions like wipes or fades. You can even test any input stream before making it live.
Conclusion
When you are doing a Zoom Meeting and share your screen, only to discover that what the other attendees see is a split screen with your material and the other Attendee cams, it is highly annoying. You may move the Zoom Meeting PiP window across the screen, change the thumbnail’s size, and utilize other applications while it remains open, just like any other picture-in-picture window. Someone must be sharing information in the Zoom conference for the Picture in Picture, or “Split Screen” option, to be active. We’ve listed the top techniques for doing it effectively above. To do this work without difficulty, use them as your guide.
Do You Wish to Know How FFmpeg Can Remove Audio From a Video? If Yes, Keep Scrolling This Guide to Remove Audio From Video with FFmpeg and Other Alternative Software
Unbelievably, the globe has been making headway in its endeavors. Considering how far the world has come in producing amazing things in recent times, it is impossible to fathom the progress made in the digital industry. There are now millions of video editing programs like FFmpeg that remove audio, each allowing you to accomplish anything. In addition to video editing, it is now possible to modify the music playing in the backdrop of a video. Doesn’t it seem impossible to you? However, it has an actual appearance and is simple to pull audio from a video. You will, however, need to choose a tool with great care and consideration.
In the following parts, we will discuss how to remove audio from video with FFmpeg successfully. In addition, we have also looked at other software that has the potential to be an alternative to FFmpeg that is far more effective.

Part 1: How to Use FFmpeg to Remove Audio from Videos?
FFMPEG is a highly flexible video editing program from the command line. You may use it for various purposes, including converting between different file formats. But in addition to that, you may use it to remove audio from your videos or clips. Here are two different ways to delete audio using FFMPEG, depending on what you want to do. But most crucially, speed and quality are not sacrificed with any of these choices. It’s about coding. When using other people’s code, also label the author. Using FFmpeg, you can separate the audio. The audio in video files may be removed, added, extracted, and added again with the help of this powerful utility.
You will only need to install FFmpeg on your computer after you have purchased it. Removing video is straightforward, so you won’t have to put in much effort to achieve this goal. Let’s look at the many methods available.
Use the Command Line
Step1 The command to extract audio from your video file is visible for your review.

Step2 It would be helpful if you updated the extension and the name of the file that was entered, but other than that, you won’t need to do anything else.

The preceding command is successful if the input file certifies. This is why you need to find the codec for the audio stream. If you obey this order, you will accomplish what you set out to do. A user might sometimes use an audio format returned by the previous command. However, this will only occasionally be successful.
The storage format that FFmpeg employs is determined by looking at the output file’s extension. It would help if you knew that a storage format, a container, and an audio format are distinct. You will encounter a scenario where the audio format does not have a container named after it. Two problematic formats are among the most common formats; they are PCM and Vorbis. OGG is compatible with Vorbis, whereas WAV is compatible with PCM.
Let’s investigate another approach to extract audio from a video using FFmpeg if the prior one was too difficult for you to grasp.
Use the Terminal
Step1 Verify that the format remains the same.
You will need to locate the video in its original format to be able to extract the audio from it. If you are unfamiliar with the primary format, you will be unable to determine the appropriate file extension. Because of this, you are going to need to make use of the ffprobe command.

Now, change “myvideo.mp4” to the name of the video file you want to use. This will verify that you are familiar with the video’s original file format.
After learning about the original audio’s format, you can reencode a video clip to remove the audio from it.

Step2 Modify the format, please.
You might try replacing myvideo.mp4 with the directory and filename to see if it helps. Additionally, it would be helpful if you updated the name of the audio.ogg file with the name you want to use.
Therefore, if you follow the two approaches discussed above, you can extract audio from your video files with little to no work. To completely comprehend the stages, you must examine them in great detail.
Part 2: The Most Straightforward Way to Mute Audio in Videos
If you seek an alternative method to FFmpeg removing audio, you can meet with an overwhelming number of possibilities, each claiming that it is superior to the others. However, in this instance, additional investigation is not required at all. Wondershare Filmora will turn out to be one of the better options. It is software designed for editing videos that will make it simple for you to work on any editing job. It is one of the choices held in the highest esteem among those offered in the industry nowadays.
Free Download For Win 7 or later(64-bit)
Free Download For macOS 10.14 or later
Some core audio editing features of Filmora are:
Audio Ducking: When VoiceOver is speaking, temporarily lower the loudness of the material played. Automatically Select the Caller as the Speaker: When you move your iPhone away from your ear during a call, the audio will automatically transfer over to the speaker system.
Silence Detection: Users of Filmora X have access to an add-on called Silence Detection, which is a paid add-on that helps users more quickly erase quiet pauses that occur throughout a film. To help you save time and make the editing process more comfortable, the add-on searches for the whole movie in search of any periods of silence automatically eliminates them all.
Auto Synchronization: When shooting with a camera or video camera and utilizing a microphone, this feature allows the user to easily replace the audio recorded with the audio in the movie. In addition, it can align the audio and video clips in the project automatically, eliminating the need for human alignment.
Speech to Text (STT): computational linguistics permits the recognition and translation of spoken language into written form. Other names for this technology are computer voice recognition and speech recognition.
Text to Speech (TTS): reads digital text aloud. This kind of technology is called “read-aloud” technology. TTS can take the text shown on a computer or any other digital device and turn it into sound by clicking a button or touching it with your finger.
Audio Visualizer: The Most Powerful Audio and Video Editor Available Today. With the help of Filmora Audio Visualizer, your music video may come to life. The effect will dynamically adapt the sound to the video while intelligently matching the sound.
Step1 Download, Install and Run the Filmora Video Editor.
After opening Filmora, the following user interface will appear: You may upload the video file from which you wish to delete the audio tracks by clicking the “Import” button.

Step2 Detach Audio from Uploaded Files
Remove the audio tracks from the original MP4 file by a drag and drop into the timeline, then right-clicking on the file and selecting “Detach Audio” from the menu that appears. After that, the split audio track will show in the Audio Timeline. To delete audio from an MP4, right-click the audio file and choose “Delete” from the menu that appears.

Step3 Export the Silenced Video
After that, pick the preferred export method by clicking the “Export” button. You can set the output video format to be the identical to the one used to record the video in the first place or select it as any other video format. After that, choose the video you want to export by clicking the “Export” option.
In addition, you can save the altered file to your iPhone, iPad, PSP, or other compatible device or instantly upload it to YouTube to share with your friends.
There you go! You successfully explored an excellent alternative software to remove audio from videos via FFmpeg.
Part 3: FAQs
1. How do I change audio in a video?
Changing audio in a video is easy if you use compatible high-end software like Filmora. This audio and video editing tool can modify or change the audio or soundtrack in a video. Much software of this kind is available for both Windows and Mac. Therefore, choose a reliable one, try it, and then begin using it.
2. How exactly does one go about switching the pre-installed audio track on a video?
When you’re viewing a video, you can get the impression that the music playing in the background doesn’t go very well with the content, and you might want to switch it. There are a variety of programs available that will assist you in replacing the audio with video. And now, I’m going to offer Filmora Video Editor as the ideal option since it is the program that is both the simplest and the quickest to do that task.
Conclusion
So, after reading this, you should be able to remove audio from video FFmpeg. Have you ever encountered an editing tool that exceeded your expectations in terms of performance? Although FFmpeg removes audio, the other editing tool we discussed is relatively good quality. Yes, Filmora is a video editing application that provides you with the most outstanding potential services you could have ever imagined having access to. Because it includes several exciting features and a high-quality user interface, it is one of the options people will find ideal.
Free Download For macOS 10.14 or later
Some core audio editing features of Filmora are:
Audio Ducking: When VoiceOver is speaking, temporarily lower the loudness of the material played. Automatically Select the Caller as the Speaker: When you move your iPhone away from your ear during a call, the audio will automatically transfer over to the speaker system.
Silence Detection: Users of Filmora X have access to an add-on called Silence Detection, which is a paid add-on that helps users more quickly erase quiet pauses that occur throughout a film. To help you save time and make the editing process more comfortable, the add-on searches for the whole movie in search of any periods of silence automatically eliminates them all.
Auto Synchronization: When shooting with a camera or video camera and utilizing a microphone, this feature allows the user to easily replace the audio recorded with the audio in the movie. In addition, it can align the audio and video clips in the project automatically, eliminating the need for human alignment.
Speech to Text (STT): computational linguistics permits the recognition and translation of spoken language into written form. Other names for this technology are computer voice recognition and speech recognition.
Text to Speech (TTS): reads digital text aloud. This kind of technology is called “read-aloud” technology. TTS can take the text shown on a computer or any other digital device and turn it into sound by clicking a button or touching it with your finger.
Audio Visualizer: The Most Powerful Audio and Video Editor Available Today. With the help of Filmora Audio Visualizer, your music video may come to life. The effect will dynamically adapt the sound to the video while intelligently matching the sound.
Step1 Download, Install and Run the Filmora Video Editor.
After opening Filmora, the following user interface will appear: You may upload the video file from which you wish to delete the audio tracks by clicking the “Import” button.
Step2 Detach Audio from Uploaded Files
Remove the audio tracks from the original MP4 file by a drag and drop into the timeline, then right-clicking on the file and selecting “Detach Audio” from the menu that appears. After that, the split audio track will show in the Audio Timeline. To delete audio from an MP4, right-click the audio file and choose “Delete” from the menu that appears.
Step3 Export the Silenced Video
After that, pick the preferred export method by clicking the “Export” button. You can set the output video format to be the identical to the one used to record the video in the first place or select it as any other video format. After that, choose the video you want to export by clicking the “Export” option.
In addition, you can save the altered file to your iPhone, iPad, PSP, or other compatible device or instantly upload it to YouTube to share with your friends.
There you go! You successfully explored an excellent alternative software to remove audio from videos via FFmpeg.
Part 3: FAQs
1. How do I change audio in a video?
Changing audio in a video is easy if you use compatible high-end software like Filmora. This audio and video editing tool can modify or change the audio or soundtrack in a video. Much software of this kind is available for both Windows and Mac. Therefore, choose a reliable one, try it, and then begin using it.
2. How exactly does one go about switching the pre-installed audio track on a video?
When you’re viewing a video, you can get the impression that the music playing in the background doesn’t go very well with the content, and you might want to switch it. There are a variety of programs available that will assist you in replacing the audio with video. And now, I’m going to offer Filmora Video Editor as the ideal option since it is the program that is both the simplest and the quickest to do that task.
Conclusion
So, after reading this, you should be able to remove audio from video FFmpeg. Have you ever encountered an editing tool that exceeded your expectations in terms of performance? Although FFmpeg removes audio, the other editing tool we discussed is relatively good quality. Yes, Filmora is a video editing application that provides you with the most outstanding potential services you could have ever imagined having access to. Because it includes several exciting features and a high-quality user interface, it is one of the options people will find ideal.
Create Glitch Text Effect
Glitch text effect is a trending video effect whereby the texts get distorted for a few seconds. The effect is comparable to the glitch you face when your screen starts to malfunction, and the screen appears to be wavy and disoriented. A glitch text effect is better than a regular animated text effect as it helps to get the attention of the viewers immediately and get the message across clearly.
The glitch effect can be applied to the entire video as well as the text as per your preference. There are several video editors available where the glitch text effect comes pre-loaded. All you need to do is to apply it to the text and get it done in a few steps. We will illustrate how to add glitch text effect Premiere Pro. But we recommend Filmora for the best glitter text effect that you can add to your video instantly.
Part 1. Create Glitch Text in Video with Filmora
We have already stated that Wondershare Filmora is the best video editor for the best glitch text effect download and apply to your video in simple steps. Filmora is a premium video editor that is widely used by amateur and professional video editors. You can get all glitch text effect After Effects and add them to your video conveniently in comparison to After Effects.
As a matter of fact, there are literally unlimited video and text effects available, and you can find different types of glitch text effects to apply to your titles and texts. Filmora is available for both Windows and mac users. Here are the steps to create glitch text in video with Filmora.
Free Download For Win 7 or later(64-bit)
Free Download For macOS 10.14 or later
Step1 Download and install Filmora on your computer. Go to File> New Project from the menu bar to start video editing project.

Step2 Go to File> Import Media > Import Media Files to import the video clips where you want to add glitch text effect. Drop the clip into the Timeline to get started.

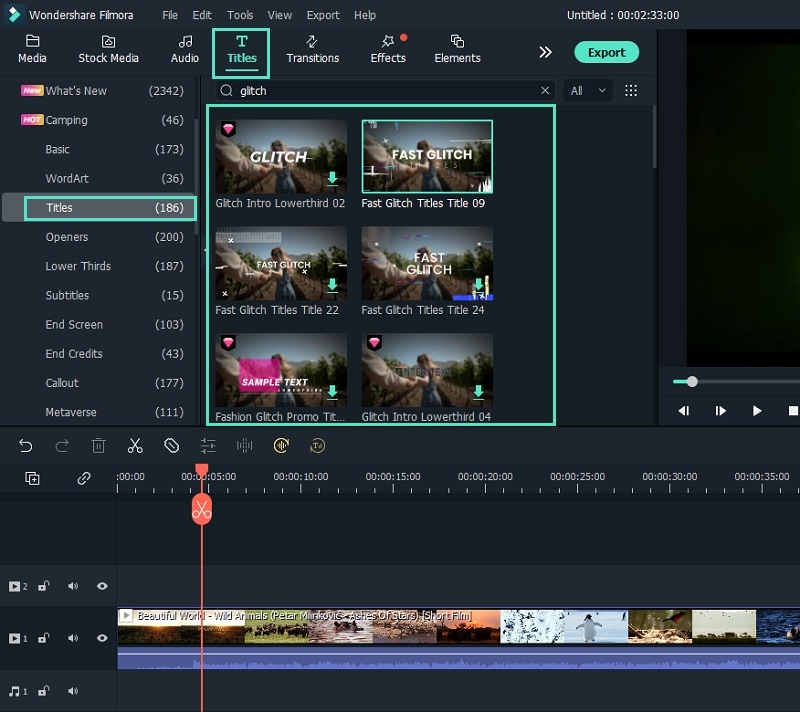
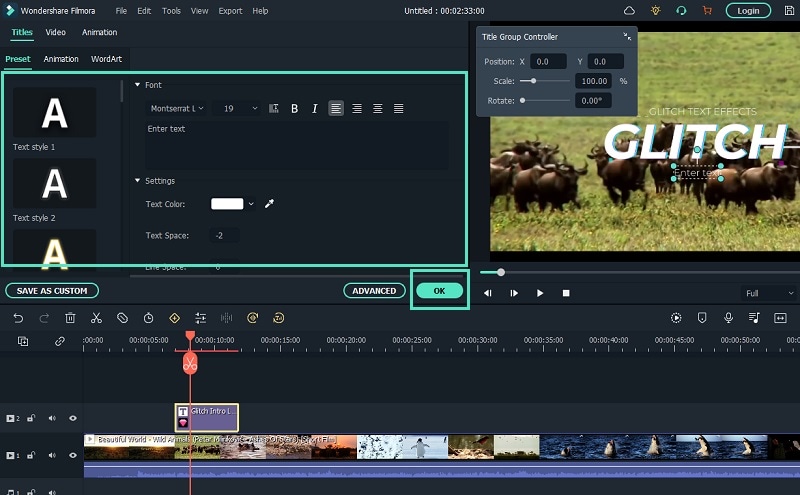
Step3 Go to Titles tab located at the top. From the left panel, click on Titles option. Search “glitch” in the search field and you will see all the glitch text effects that you can apply to the text in your video.
Step4 Select any glitch text effect and drop it into the Timeline above the video clip exactly where you want the text and the effect to appear.
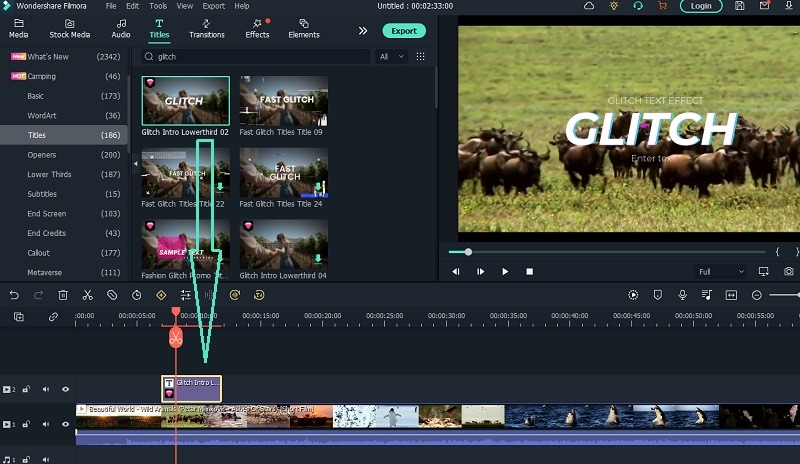
Step5 Double-click on the glitch text effect located on Timeline and edit the text, style, and other parameters as per your preference. Click on Ok and play the video to see your edited video with the glitch text effect.
Part 2. How to Make Glitch Text Effect with Premiere Pro
Adobe Premiere Pro is another renowned video editor where you can add glitch text effect to your video. Premiere Pro is strictly for professional video editors as the user interface is not as intuitive as Filmora . The learning curve is steep, and therefore, you need to go through the steps to add glitch text effect Premiere Pro. There are several glitch text effect presets available that you can apply to any text on your video to make them engaging. Here are the steps to make glitch text effect with Premiere Pro.
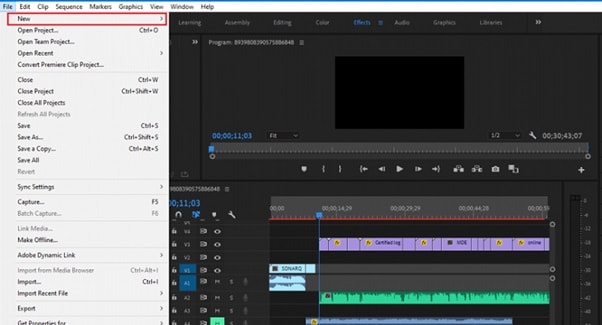
Step1 Launch Adobe Premiere Pro and go to New> Project to get started. Import your video and drop it into Timeline.
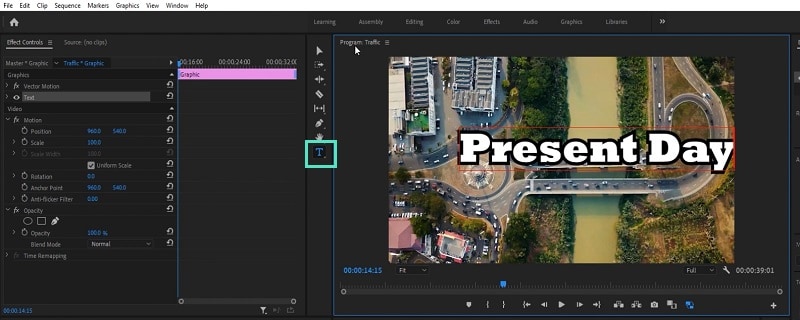
Step2 Use the Type tool to write any text on your video to add glitch text effect. You should have a text layer on Timeline.
Step3 Go to Effects> Immersive Video> VR Digital Glitch option. Drag and drop the effect to text layer.
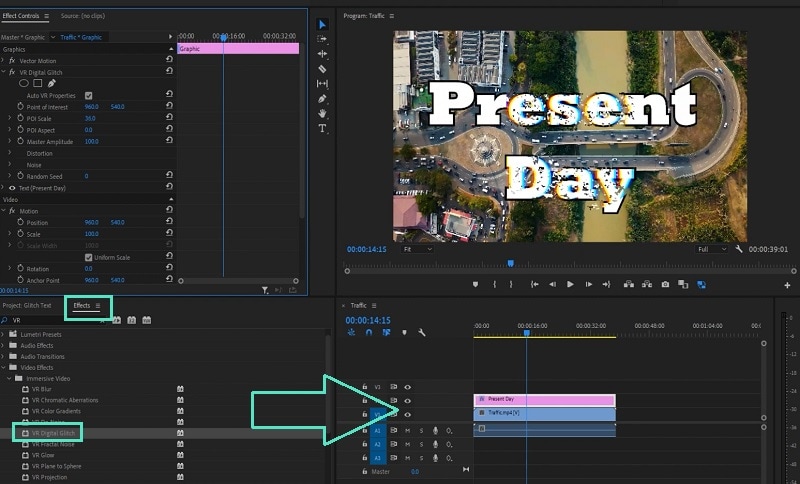
Step4 Under Effect Controls tab, you will find all the different parameters that you can adjust to get the glitch text effect perfectly.
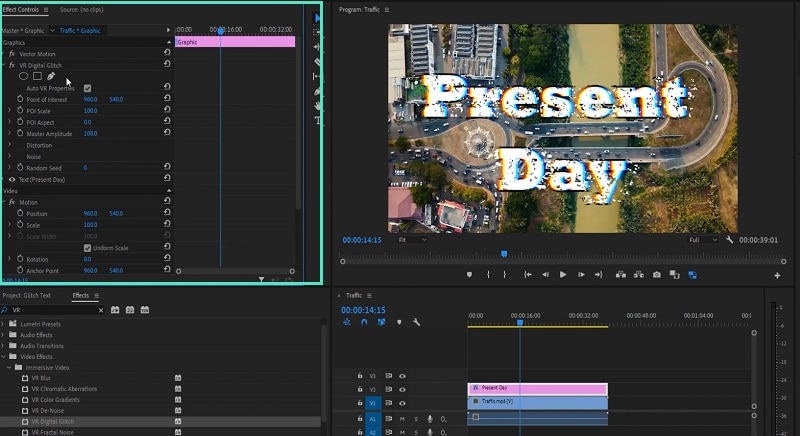
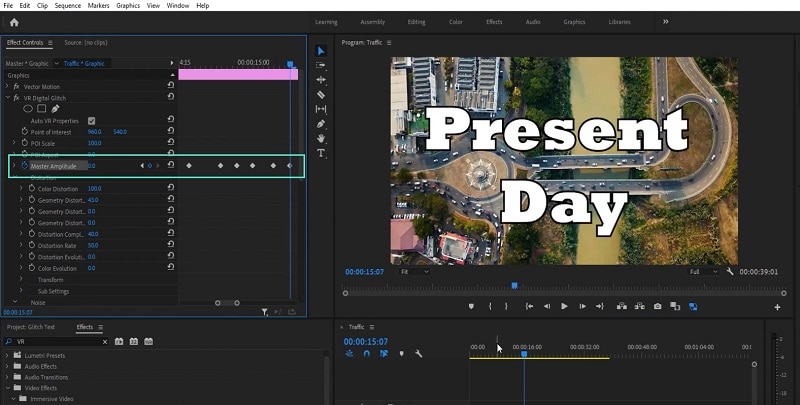
Step5 Turn on Master Amplitude and add multiple keyframes as different points in the Timeline and change the distortion value to make the effect prominent.
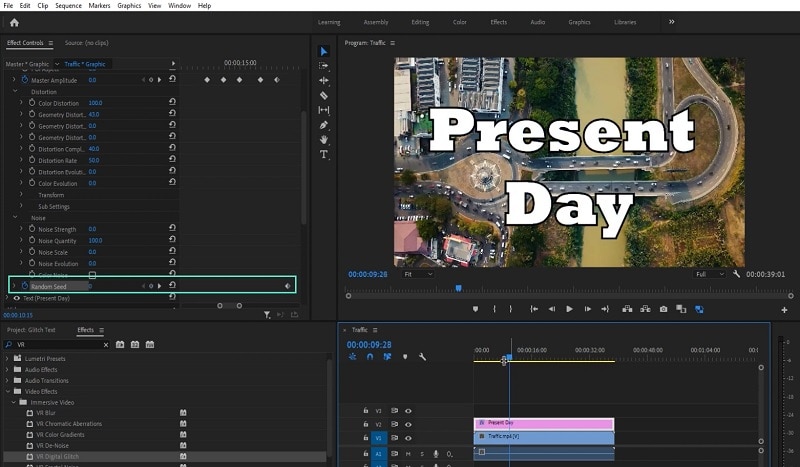
Step6 Go to the first keyframe and turn on Random Seed effect. Go to the last keyframe and turn on Random Seed effect and change the value to 75. Play the video to check the entire video with glitch text effect.
Part 3. Use VSDC Video Editor to Create Glitch Text
If you do not have any premium video editor on your computer and you do not want to purchase any premium video editor, you can still get glitter text effect free. You need to download and install VSDC free video editor on your computer. But the steps to create glitch text on VSDC video editor are slightly complicated as the user interface is not as intuitive as Filmora . Here are the steps to add free glitch text effect on your video.
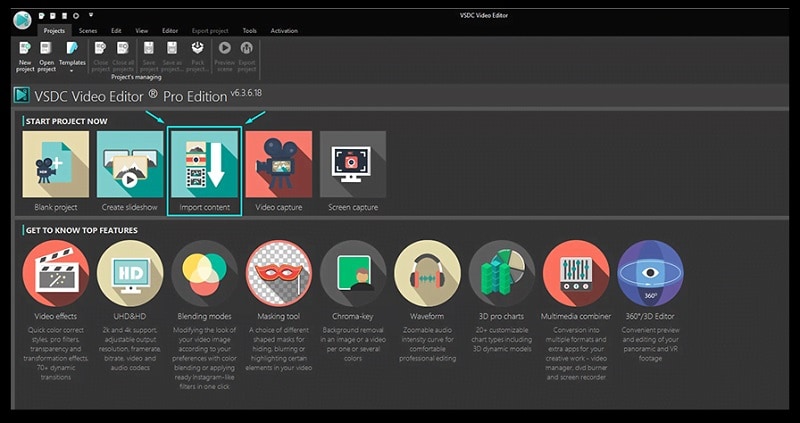
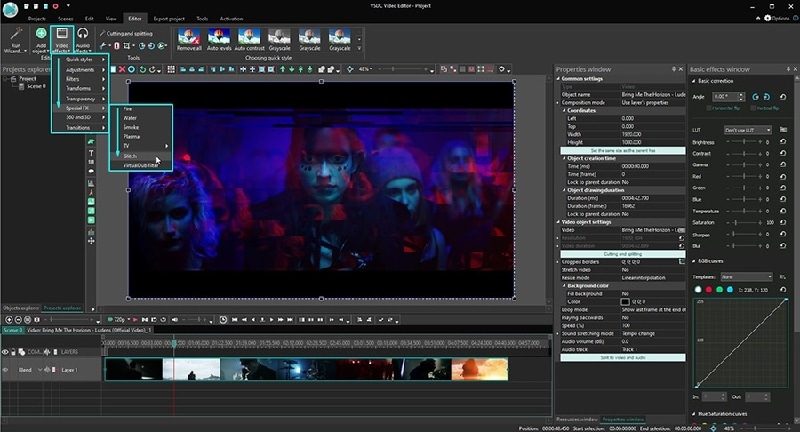
Step1 Download and install VSDC video editor. Launch the editor and click on New Project to get started. Import your video to your project where you want to add glitch text effect.
Step2 Use Type tool to write a text on the video. You can press Shift+T shortcut as well. After typing the text, adjust the text style as per your preference.
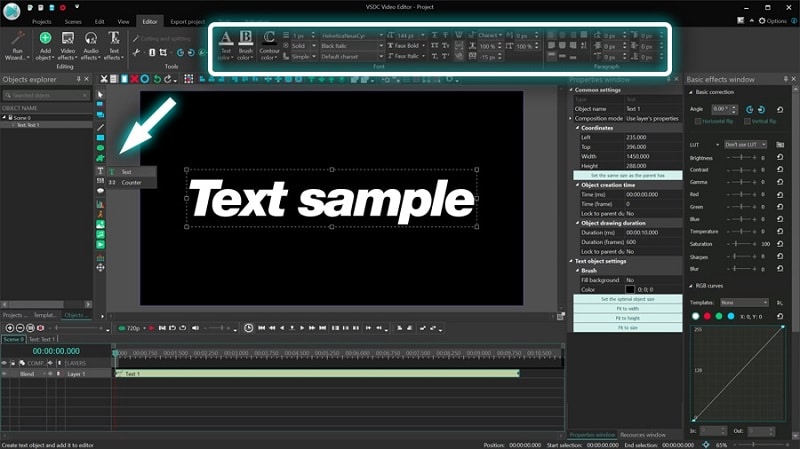
Step3 Double-click on the text layer on Timeline and go to Video Effects> Special FX and click on Glitch option.
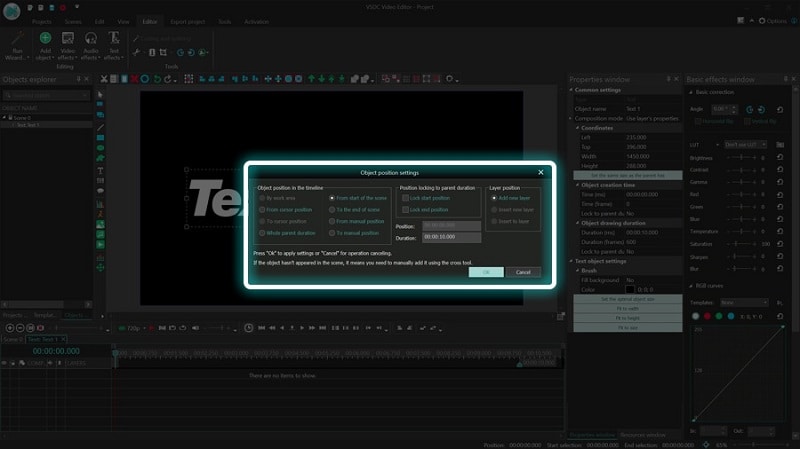
Step4 A window will appear where you can set the starting point, duration, and different parameters. Click on Ok button.
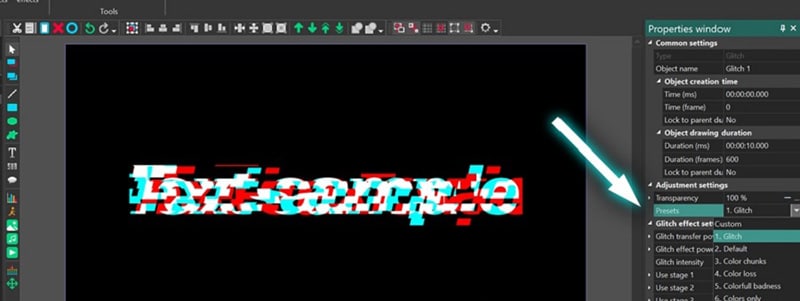
Step5 Go to Properties Windows and click on Presets to select different types of glitch text effects. You can also adjust the intensity of the text effects and other parameters as you feel.
Part 4. Related FAQs about Glitch Text
1. How do you animate glitch text?
If you want to animate glitch text for free, VSDC video editor is ideal as you can customize the effect on any text in simple steps. If you want to use a premium video editor, we recommend Filmora as there are various glitch text effects available to apply to any text on your video instantly.
2. How do you glitch text on video?
First, you have to import your video in your video editor. Type the desired text and set the style. Thereafter, go to glitch text effect presets available on the video editor and apply it to the text instantly. You can customize the glitch text effect as per your preference to make the animation more prominent.
3. How do you glitch text on Android?
You should first install Glitch Video Effect: Glitch FX app from Play Store. Edit your video on the app to add any text, and thereafter, add glitch text effect instantly. In fact, the glitch text effect is available in almost all popular video editor apps on Android due to the effect being trendy and viral.
Free Download For macOS 10.14 or later
Step1 Download and install Filmora on your computer. Go to File> New Project from the menu bar to start video editing project.
Step2 Go to File> Import Media > Import Media Files to import the video clips where you want to add glitch text effect. Drop the clip into the Timeline to get started.
Step3 Go to Titles tab located at the top. From the left panel, click on Titles option. Search “glitch” in the search field and you will see all the glitch text effects that you can apply to the text in your video.
Step4 Select any glitch text effect and drop it into the Timeline above the video clip exactly where you want the text and the effect to appear.
Step5 Double-click on the glitch text effect located on Timeline and edit the text, style, and other parameters as per your preference. Click on Ok and play the video to see your edited video with the glitch text effect.
Part 2. How to Make Glitch Text Effect with Premiere Pro
Adobe Premiere Pro is another renowned video editor where you can add glitch text effect to your video. Premiere Pro is strictly for professional video editors as the user interface is not as intuitive as Filmora . The learning curve is steep, and therefore, you need to go through the steps to add glitch text effect Premiere Pro. There are several glitch text effect presets available that you can apply to any text on your video to make them engaging. Here are the steps to make glitch text effect with Premiere Pro.
Step1 Launch Adobe Premiere Pro and go to New> Project to get started. Import your video and drop it into Timeline.
Step2 Use the Type tool to write any text on your video to add glitch text effect. You should have a text layer on Timeline.
Step3 Go to Effects> Immersive Video> VR Digital Glitch option. Drag and drop the effect to text layer.
Step4 Under Effect Controls tab, you will find all the different parameters that you can adjust to get the glitch text effect perfectly.
Step5 Turn on Master Amplitude and add multiple keyframes as different points in the Timeline and change the distortion value to make the effect prominent.
Step6 Go to the first keyframe and turn on Random Seed effect. Go to the last keyframe and turn on Random Seed effect and change the value to 75. Play the video to check the entire video with glitch text effect.
Part 3. Use VSDC Video Editor to Create Glitch Text
If you do not have any premium video editor on your computer and you do not want to purchase any premium video editor, you can still get glitter text effect free. You need to download and install VSDC free video editor on your computer. But the steps to create glitch text on VSDC video editor are slightly complicated as the user interface is not as intuitive as Filmora . Here are the steps to add free glitch text effect on your video.
Step1 Download and install VSDC video editor. Launch the editor and click on New Project to get started. Import your video to your project where you want to add glitch text effect.
Step2 Use Type tool to write a text on the video. You can press Shift+T shortcut as well. After typing the text, adjust the text style as per your preference.
Step3 Double-click on the text layer on Timeline and go to Video Effects> Special FX and click on Glitch option.
Step4 A window will appear where you can set the starting point, duration, and different parameters. Click on Ok button.
Step5 Go to Properties Windows and click on Presets to select different types of glitch text effects. You can also adjust the intensity of the text effects and other parameters as you feel.
Part 4. Related FAQs about Glitch Text
1. How do you animate glitch text?
If you want to animate glitch text for free, VSDC video editor is ideal as you can customize the effect on any text in simple steps. If you want to use a premium video editor, we recommend Filmora as there are various glitch text effects available to apply to any text on your video instantly.
2. How do you glitch text on video?
First, you have to import your video in your video editor. Type the desired text and set the style. Thereafter, go to glitch text effect presets available on the video editor and apply it to the text instantly. You can customize the glitch text effect as per your preference to make the animation more prominent.
3. How do you glitch text on Android?
You should first install Glitch Video Effect: Glitch FX app from Play Store. Edit your video on the app to add any text, and thereafter, add glitch text effect instantly. In fact, the glitch text effect is available in almost all popular video editor apps on Android due to the effect being trendy and viral.
Also read:
- Updated Edit FLV Video Files with FLV Editor Windows, Mac,Android, iPhone for 2024
- Adobe Lightroom Color Grading Tutorial for 2024
- 2024 Approved How to Customize Your Loading Text Effect?
- 2024 Approved How to Make Tutorial Video with Filmora
- New In 2024, 15 Camera Shake Preset for Premiere Pro to Add Camera Shake with Simple Keyframes. Each Preset Is Editable with Easy Steps. Make Your Video Shocking and Impressive with These Camera Shake Effects
- New 2024 Approved Color Match Game Tips for You
- How to Make Discord Emoji GIF for 2024
- Updated 10 Best Video Editing Apps With Templates for 2024
- Updated Have You Ever Wondered How Those PowerPoint, Looping Slideshows You See in Conferences and Reception Areas Display and Move to the Next Slide Automatically without Clicking a Mouse? You Dont Have to Be Amazed at This
- Updated In 2024, How to Create OBS Slideshow
- 2024 Approved How to Color Grade Your Picture in LightRoom
- Looking For the Best VHS Video Effect Makers? Get To Know the Top List for 2024
- In 2024, How to Make Dynamic Video Collages?
- Get 15 Absolutely-Free LUTs From This Article as Well as Get an Insight on How Cinematic LUTs Affect Your Film for 2024
- Updated Learning How to Create LUTs with LUTs Generator for 2024
- Updated 3D LUT Mobile App Review - A Composite Application for Editing Media for 2024
- In 2024, Something That You Should Know About MP4 Video Format
- In 2024, Create Slow Motion Videos Using Final Cut Pro with Ease
- Updated Add Background to Video With/Without a Green Screen
- In 2024, Fun & Easy Masking Tricks Wondershare Filmora Tutorial
- How to Add the Popular Video Text Effects to Your Video for 2024
- New In 2024, Create Motion Effect with Path Blur In Photoshop
- Updated 2024 Approved Finding the Best Game Recorder for PC
- Updated You Can Match Paint Colors From Pictures for Your Wall, as Well as for Your Videos. And to Know How to Do Both, We Have Laid Down the Following Discussion
- 2024 Approved What Is the Best FPS for YouTube Videos?
- This Guide Is to Help You Select the Ways that Meet Your Needs, and It Is Easy for You to Combine 2 or More Videos Into One Video
- Updated In 2024, 10 Best Voice Over Generators Windows, Mac, Android, iPhone, and Online
- 2024 Approved Looking for a Full Guide on Removing the Background From PNG Images? Do You Want to Transform JPG to PNG Transparent? If so, Take some Time to Read This Article
- New 2024 Approved Discover Vintage LUTs Premiere Pro Free and Paid Options Available
- In This Guidepost, Youll Learn What an HDRI Photo Is and How to Use the Best Free HDRI Program to Edit Photos. Youll Also Know the Difference Between HDR and HDRI
- Updated 2024 Approved VN Video Editor Templates A Game-Changer for Your Videos
- This Article Discusses What Is Blender Video Editor, How to Download, Install and Use It, and Its Key Features. It Further Discusses Its Alternative for Editing Your Videos and More. Check Out Now for 2024
- Explore the Advanced Tools to Help You Reshape the Art of Sky Replacement in Digital Imagery. Discover Methods to Enhance Your Visual Narratives Through AI for 2024
- New How to Add Video Transitions in Videos for 2024
- Best Video Title Generators for 2024
- New How To Create The Best AI Thumbnail Using The Right Tools for 2024
- 2024 Approved Want to Give a Bold and Colorful Look to Your Ad or Abstract Art Project? This Quick and Easy Tutorial Teaches How to Create a Risograph Effect in Photoshop
- New In 2024, Frame Rates, Speed, and Wondershare Filmora An Overview
- Updated In 2024, Cropping Video in VLC Step by Step
- Do You Know How You Can Trim or Merge Using Wondershare Filmora? Trimming and Merging Using This Tool Is an Easy Task; Learn How for 2024
- New 2024 Approved How to Create Photoshop GIF The 100 Easy Way
- 2024 Approved How to Create Fantastic Glitch Effects with Filmora? Read This Guide to Find Out How to Apply Glitch Effects on Your Videos and Make Custom Glitch Effects
- In 2024, 4 Methods to Resize a WebM File
- Kdenlive Review – Is It The Best Video Editor?
- New In 2024, Detailed Steps to Rotate Video Using KMPlayer
- Fixed Cannot Insert Object Error in Excel 2010 | Step-by-Step Guide | Stellar
- Recommended Best Applications for Mirroring Your Realme Narzo 60 5G Screen | Dr.fone
- How to Exit Android Factory Mode On ZTE Nubia Z60 Ultra? | Dr.fone
- Simple ways to get lost files back from Vivo Y17s
- In 2024, Top 5 Nokia C12 Plus Bypass FRP Tools for PC That Actually Work
- How to Transfer Data from Motorola Razr 40 to Any iOS Devices | Dr.fone
- Ultimate Guide from Samsung Galaxy F04 FRP Bypass
- How to Remove a Previously Synced Google Account from Your Samsung Galaxy F15 5G
- In 2024, A Step-by-Step Guide on Using ADB and Fastboot to Remove FRP Lock from your Xiaomi Redmi Note 12 Pro 4G
- How to Change Your Google Pixel 7a Location on life360 Without Anyone Knowing? | Dr.fone
- In 2024, 3 Things You Must Know about Fake Snapchat Location On Apple iPhone XR | Dr.fone
- How to Flash Dead Vivo V29 Safely | Dr.fone
- How To Revive Your Bricked Vivo X90S in Minutes | Dr.fone
- In 2024, Is Fake GPS Location Spoofer a Good Choice On Oppo K11x? | Dr.fone
- 3 Ways to Unlock Your iPhone XS Max for Free
- In 2024, Ultimate Guide to Catch the Regional-Located Pokemon For Apple iPhone 12 | Dr.fone
- In 2024, How Do You Get Sun Stone Evolutions in Pokémon For Nokia C110? | Dr.fone
- In 2024, How To Remove or Bypass Knox Enrollment Service On Itel
- How to Fix Error 495 While Download/Updating Android Apps On Realme Narzo 60x 5G | Dr.fone
- Updated In 2024, Mocking Sponge Bob Meme Generator
- About Motorola Moto G34 5G FRP Bypass
- A Complete Guide To OEM Unlocking on ZTE Blade A73 5G
- Best Anti Tracker Software For Gionee F3 Pro | Dr.fone
- In 2024, What Does Enter PUK Code Mean And Why Did The Sim Get PUK Blocked On Samsung Galaxy S23 FE Device
- The way to recover deleted pictures on Infinix Note 30 5G without backup.
- How to Unlock Xiaomi Redmi Note 13 Pro+ 5G Phone with Broken Screen
- In 2024, Where Is the Best Place to Catch Dratini On Samsung Galaxy XCover 6 Pro Tactical Edition | Dr.fone
- Things You Should Know When Unlocking Total Wireless Of iPhone SE (2020)
- How to Sign Out of Apple ID From iPhone 11 without Password?
- Google Play Services Wont Update? 12 Fixes are Here on Poco C50 | Dr.fone
- In 2024, How To Pause Life360 Location Sharing For Vivo S17 Pro | Dr.fone
- iPhone 15 Pro Backup Password Never Set But Still Asking? Heres the Fix | Dr.fone
- How To Use Allshare Cast To Turn On Screen Mirroring On Vivo T2 Pro 5G | Dr.fone
- In 2024, Universal Unlock Pattern for Samsung Galaxy M54 5G
- How to Unlock Apple iPhone 6s Plus with a Mask On | Dr.fone
- How to Unlock Your iPhone XR Passcode 4 Easy Methods (With or Without iTunes)
- Top 4 SIM Location Trackers To Easily Find Your Lost Samsung Galaxy S24 Ultra Device
- Which is the Best Fake GPS Joystick App On Honor 100? | Dr.fone
- PassFab Apple iPhone SE Backup Unlocker Top 4 Alternatives
- How to Spy on Text Messages from Computer & Nokia C22 | Dr.fone
- In 2024, Is GSM Flasher ADB Legit? Full Review To Bypass Your Lava Storm 5G Phone FRP Lock
- Complete Tutorial for Oppo Reno 11 Pro 5G Hard Reset | Dr.fone
- Prank Your Friends! Easy Ways to Fake and Share Google Maps Location On Realme C33 2023 | Dr.fone
- How To Activate and Use Life360 Ghost Mode On Nokia G22 | Dr.fone
- Title: New In 2024, | How to Share YouTube Video on Zoom?
- Author: Chloe
- Created at : 2024-04-24 07:08:31
- Updated at : 2024-04-25 07:08:31
- Link: https://ai-editing-video.techidaily.com/1713954180000-new-in-2024-how-to-share-youtube-video-on-zoom/
- License: This work is licensed under CC BY-NC-SA 4.0.
