
:max_bytes(150000):strip_icc():format(webp)/Cleaningrobotonlaptop_HuberandStarke_GettyImages-1448733073_EVANCROP-8ed67f08b9c4430db8e47c51fde78feb.jpg)
20 Best Video Background Templates
20 Best Video Background Templates
Content creation has evolved from a part-time hobby to a full-time job. Platforms like YouTube give creative minds an outlet for their ideas and an opportunity to make money from their videos. However, if your videos are sub-par, your target audience will not support your channel and watch your content. Changing the background in your videos is one way to make them more visually appealing.
Today, numerous editing tools like Filmstock can help you effortlessly change the background of your video. Stay tuned to discover some exciting video background templates and how to use Wondershare Filmora to edit your videos.
Free Download For Win 7 or later(64-bit)
Free Download For macOS 10.14 or later

- Simple Video Background Template Pack Free for Download
- Weather Background Template for Your Video
- Download Dance Loop Background Template Video Pack for Free
- Retro Greenscreen Background Templates for Any Video Themes (Download Free)
- Background Template Pack for Horror Videos
- Free Sci-Fi Stage Background Video Templates
- Creative Background Intro Template
- Video Backgrounds for Instagram Videos
- Dynamic Background Templates for Cinematic Videos
- Starry Sky Background Video Templates
- Ink Background Templates for All Kinds of Videos
- Epic Film Backgrounds Video Templates Pack
- Landscape Background Templates Pack
- Background Template Pack for Stock Videos
- Free Abstract Background Templates to Make Your Video Colorful
- Background Templates for Makeup Videos (Free for Download)
- Retro Music Visualization Background Templates
- Golden Luxury Background Templates to Make Your Video Elegant
- Rainbow Background Template Videos
- Moonrise Background Video Template Pack (Downloadable for Free)
- How To Change Background in Your Video With Filmora for Desktop
- How To Change Video Background With Filmora for Mobile
20 Fantastic Video Background Templates for Download
We have now come to the fun part of this article, where we present twenty awesome video background templates from Filmstock . We hope you will find something you like by the time we get to the last one.
1. Simple Video Background Template Pack Free for Download
You can never go wrong with a simple background, free from visual distractions. After all, the main focus should be on the video and no other distracting elements.
2. Weather Background Template for Your Video
If your video has a theme surrounding the sky, thunderstorms, or meteors, then this weather background is the perfect choice. We could never tire of looking at the sky and the serene feelings it elicits.
3. Download Dance Loop Background Template Video Pack for Free
The dance loop background is a powerful, electric display suitable for retro and psychedelic scenes. You could also use this background if your video has lots of stage lighting, smoke, or a disco ball.
4. Retro Greenscreen Background Templates for Any Video Themes (Download Free)
Similar to the previous background, this video template background is a fireball and is sure to make the background of your video light up with excitement. The vibrant colors also make it hard to miss.
5. Background Template Pack for Horror Videos
Horror enthusiasts will love this template because we guarantee it could give your viewers a heart attack. However, if your fanbase is into spooky stuff and the supernatural, go for it!
6. Free Sci-Fi Stage Background Video Templates
Sci-Fi backgrounds are becoming a hit nowadays, especially for dance videos. The neon colors pack a mean punch, and your audience won’t resist clicking on your videos.
7. Creative Background Intro Template
When creating content, creativity is the name of the game. This unique background template has colorful and astonishing geometric shapes to take your video to the next level.
8. Video Backgrounds for Instagram Videos
The tell-tale gradient of colors in the new Instagram logo could make a fitting background for your story or feed, making your rivals go green with envy. However, this background template is also suitable for any video.
9. Dynamic Background Templates for Cinematic Videos
If you have ever been to the cinemas, you understand how grand and immersive the display can be. This video background template gives your videos a similar vibe, engulfing anyone who watches.
10. Starry Sky Background Video Templates
Japanese comics are a fan favorite with their whimsical characters and exciting animations. You could use this starry sky background if you create animated videos and would like to set the mood even further.
11. Ink Background Templates for All Kinds of Videos
Perhaps you want to create a video to commemorate your child’s birthday or a loved one’s wedding day. This ink background template has some beautiful pastel colors and is pretty laid back, making it the perfect choice for family-related videos or the holidays.
12. Epic Film Backgrounds Video Templates Pack
If you post documentaries and factual content, your audience needs to take you a bit seriously. This epic film background is perfect for you as it contains stunning light effects, old paper, maps, and desert and winter scenes to add some oomph to your message and cement it in the viewer’s mind.
13. Landscape Background Templates Pack
Most of the templates we have seen are 2-dimensional. If you want to stand out from the rest, you could edit your videos using this landscape background template with a 3D environment to make your viewers feel like they can touch the waves in the ocean or the mountain’s terrain.
14. Background Template Pack for Stock Videos
Suppose you post educational content teaching your audience about the stock market and other financial matters. This background template video about the stock market is the perfect choice because a starry sky background would simply look out of place. The dominant blue color also sends a subliminal message to your viewers’ subconscious that they can trust you and that your information is reliable.
15. Free Abstract Background Templates to Make Your Video Colorful
If you are making a music video or a fun life hacks video, this abstract background will make your content stand out. The vibrant colors also help your audience enjoy watching your videos and crave more content.
16. Background Templates for Makeup Videos (Free for Download)
A significant percentage of makeup artists honed their skills by watching tutorials online. If you want to start creating makeup vlogs on your channel, it will help to consider this video background template. The delicate colors give your video a feminine touch and resonate with the people watching your videos.
17. Retro Music Visualization Background Templates
Lyric videos have become increasingly popular, especially among people who don’t speak the native language in the song. You could make your music or lyric video come alive with this free video background template that captures the attention of anyone who watches it.
18. Golden Luxury Background Templates to Make Your Video Elegant
The metallic and golden silk textures in this background scream luxury and can make your viewers feel like they can feel the soft material beneath their touch. You could use this background to create house tour videos or travel vlogs of picturesque destinations.
19. Rainbow Background Template Videos
We haven’t forgotten about the kids, who enjoy watching content online as much as adults. You could get this video background template free of charge and create educational content for the young and capture their attention with bright pastel colors.
20. Moonrise Background Video Template Pack (Downloadable for Free)
The last video background template on our list is the moonrise background, which features beautiful shades of the moon partially shielded from view by delicate clouds. This background is suitable for music videos or spooky content.
How To Change Background in Your Video With Filmora for Desktop
Having seen the great video templates in this article, you might wonder how to use them to edit your videos. Filmora is an example of an efficient editing tool that will take your content from drab to fab. The platform has a desktop version that you can install effortlessly on your device and work on the go.
Below is a simple guide on how to use Filmora to change the background in your videos.
Step1 Launch Filmora on your device and click on the logo to import media from your internal storage. Alternatively, as shown, you could drag and drop the video to the designated region.

Step2 Drag the footage to the timeline as shown below.

Step3 Use the AI portrait tool to eliminate the old background.

Step4 Click on the “Media” tab and type “Background” in the search bar. Peruse through the available options and choose the option that tickles your fancy. Drag and drop the background to the timeline under your footage.

Step5 Adjust the color of the footage to suit your liking and ensure it blends with the background you have chosen. Once you are happy with the outcome, click “Export” to save a copy of the video to your device.

How To Change Video Background With Filmora for Mobile
Filmora also has a mobile app that works best when you want to edit the background of your video using your smartphone or tablet. The app is not all that different from the desktop version, only that it is optimized for mobile users to enhance your experience.
Here is a step-by-step guide on how to change the background of your video using Filmora for mobile.
Step1 Launch the app on your phone and select “New Project.”

Step2 Select the video you want to edit and click “Import.”

Step3 Tap on the “Trim” button to get access to other trimming options.

Step4 Select the “Smart Cutout” button.

Step5 Click on “Remove Background” to remove the existing background in the video you uploaded.

Step6 Navigate to the main toolbar and select “Background.”

Step7 You can choose the stock backgrounds in the app and change the colors as you see fit. Alternatively, you can import a media file from your internal storage to use as a background. If you are satisfied with the new background, tap on “EXPORT” to share the new media on social platforms or save it to your mobile devices.

Conclusion
Your videos can only go viral if you make a valiant effort to post top-tier content. A pro tip when changing the background to your video is to ensure it blends well with the footage to avoid harsh lines that look unprofessional. A little practice goes a long way, and within no time, you will be editing your videos like a pro! Your fans will also notice a significant change in the quality of your videos over time.
Free Download For macOS 10.14 or later
- Simple Video Background Template Pack Free for Download
- Weather Background Template for Your Video
- Download Dance Loop Background Template Video Pack for Free
- Retro Greenscreen Background Templates for Any Video Themes (Download Free)
- Background Template Pack for Horror Videos
- Free Sci-Fi Stage Background Video Templates
- Creative Background Intro Template
- Video Backgrounds for Instagram Videos
- Dynamic Background Templates for Cinematic Videos
- Starry Sky Background Video Templates
- Ink Background Templates for All Kinds of Videos
- Epic Film Backgrounds Video Templates Pack
- Landscape Background Templates Pack
- Background Template Pack for Stock Videos
- Free Abstract Background Templates to Make Your Video Colorful
- Background Templates for Makeup Videos (Free for Download)
- Retro Music Visualization Background Templates
- Golden Luxury Background Templates to Make Your Video Elegant
- Rainbow Background Template Videos
- Moonrise Background Video Template Pack (Downloadable for Free)
- How To Change Background in Your Video With Filmora for Desktop
- How To Change Video Background With Filmora for Mobile
20 Fantastic Video Background Templates for Download
We have now come to the fun part of this article, where we present twenty awesome video background templates from Filmstock . We hope you will find something you like by the time we get to the last one.
1. Simple Video Background Template Pack Free for Download
You can never go wrong with a simple background, free from visual distractions. After all, the main focus should be on the video and no other distracting elements.
2. Weather Background Template for Your Video
If your video has a theme surrounding the sky, thunderstorms, or meteors, then this weather background is the perfect choice. We could never tire of looking at the sky and the serene feelings it elicits.
3. Download Dance Loop Background Template Video Pack for Free
The dance loop background is a powerful, electric display suitable for retro and psychedelic scenes. You could also use this background if your video has lots of stage lighting, smoke, or a disco ball.
4. Retro Greenscreen Background Templates for Any Video Themes (Download Free)
Similar to the previous background, this video template background is a fireball and is sure to make the background of your video light up with excitement. The vibrant colors also make it hard to miss.
5. Background Template Pack for Horror Videos
Horror enthusiasts will love this template because we guarantee it could give your viewers a heart attack. However, if your fanbase is into spooky stuff and the supernatural, go for it!
6. Free Sci-Fi Stage Background Video Templates
Sci-Fi backgrounds are becoming a hit nowadays, especially for dance videos. The neon colors pack a mean punch, and your audience won’t resist clicking on your videos.
7. Creative Background Intro Template
When creating content, creativity is the name of the game. This unique background template has colorful and astonishing geometric shapes to take your video to the next level.
8. Video Backgrounds for Instagram Videos
The tell-tale gradient of colors in the new Instagram logo could make a fitting background for your story or feed, making your rivals go green with envy. However, this background template is also suitable for any video.
9. Dynamic Background Templates for Cinematic Videos
If you have ever been to the cinemas, you understand how grand and immersive the display can be. This video background template gives your videos a similar vibe, engulfing anyone who watches.
10. Starry Sky Background Video Templates
Japanese comics are a fan favorite with their whimsical characters and exciting animations. You could use this starry sky background if you create animated videos and would like to set the mood even further.
11. Ink Background Templates for All Kinds of Videos
Perhaps you want to create a video to commemorate your child’s birthday or a loved one’s wedding day. This ink background template has some beautiful pastel colors and is pretty laid back, making it the perfect choice for family-related videos or the holidays.
12. Epic Film Backgrounds Video Templates Pack
If you post documentaries and factual content, your audience needs to take you a bit seriously. This epic film background is perfect for you as it contains stunning light effects, old paper, maps, and desert and winter scenes to add some oomph to your message and cement it in the viewer’s mind.
13. Landscape Background Templates Pack
Most of the templates we have seen are 2-dimensional. If you want to stand out from the rest, you could edit your videos using this landscape background template with a 3D environment to make your viewers feel like they can touch the waves in the ocean or the mountain’s terrain.
14. Background Template Pack for Stock Videos
Suppose you post educational content teaching your audience about the stock market and other financial matters. This background template video about the stock market is the perfect choice because a starry sky background would simply look out of place. The dominant blue color also sends a subliminal message to your viewers’ subconscious that they can trust you and that your information is reliable.
15. Free Abstract Background Templates to Make Your Video Colorful
If you are making a music video or a fun life hacks video, this abstract background will make your content stand out. The vibrant colors also help your audience enjoy watching your videos and crave more content.
16. Background Templates for Makeup Videos (Free for Download)
A significant percentage of makeup artists honed their skills by watching tutorials online. If you want to start creating makeup vlogs on your channel, it will help to consider this video background template. The delicate colors give your video a feminine touch and resonate with the people watching your videos.
17. Retro Music Visualization Background Templates
Lyric videos have become increasingly popular, especially among people who don’t speak the native language in the song. You could make your music or lyric video come alive with this free video background template that captures the attention of anyone who watches it.
18. Golden Luxury Background Templates to Make Your Video Elegant
The metallic and golden silk textures in this background scream luxury and can make your viewers feel like they can feel the soft material beneath their touch. You could use this background to create house tour videos or travel vlogs of picturesque destinations.
19. Rainbow Background Template Videos
We haven’t forgotten about the kids, who enjoy watching content online as much as adults. You could get this video background template free of charge and create educational content for the young and capture their attention with bright pastel colors.
20. Moonrise Background Video Template Pack (Downloadable for Free)
The last video background template on our list is the moonrise background, which features beautiful shades of the moon partially shielded from view by delicate clouds. This background is suitable for music videos or spooky content.
How To Change Background in Your Video With Filmora for Desktop
Having seen the great video templates in this article, you might wonder how to use them to edit your videos. Filmora is an example of an efficient editing tool that will take your content from drab to fab. The platform has a desktop version that you can install effortlessly on your device and work on the go.
Below is a simple guide on how to use Filmora to change the background in your videos.
Step1 Launch Filmora on your device and click on the logo to import media from your internal storage. Alternatively, as shown, you could drag and drop the video to the designated region.
Step2 Drag the footage to the timeline as shown below.
Step3 Use the AI portrait tool to eliminate the old background.
Step4 Click on the “Media” tab and type “Background” in the search bar. Peruse through the available options and choose the option that tickles your fancy. Drag and drop the background to the timeline under your footage.
Step5 Adjust the color of the footage to suit your liking and ensure it blends with the background you have chosen. Once you are happy with the outcome, click “Export” to save a copy of the video to your device.
How To Change Video Background With Filmora for Mobile
Filmora also has a mobile app that works best when you want to edit the background of your video using your smartphone or tablet. The app is not all that different from the desktop version, only that it is optimized for mobile users to enhance your experience.
Here is a step-by-step guide on how to change the background of your video using Filmora for mobile.
Step1 Launch the app on your phone and select “New Project.”
Step2 Select the video you want to edit and click “Import.”
Step3 Tap on the “Trim” button to get access to other trimming options.
Step4 Select the “Smart Cutout” button.
Step5 Click on “Remove Background” to remove the existing background in the video you uploaded.
Step6 Navigate to the main toolbar and select “Background.”
Step7 You can choose the stock backgrounds in the app and change the colors as you see fit. Alternatively, you can import a media file from your internal storage to use as a background. If you are satisfied with the new background, tap on “EXPORT” to share the new media on social platforms or save it to your mobile devices.
Conclusion
Your videos can only go viral if you make a valiant effort to post top-tier content. A pro tip when changing the background to your video is to ensure it blends well with the footage to avoid harsh lines that look unprofessional. A little practice goes a long way, and within no time, you will be editing your videos like a pro! Your fans will also notice a significant change in the quality of your videos over time.
10 Best Voice Over Generators [Windows, Mac, Android, iPhone, and Online]
Best Voice Generator and Video Editor
Filmora’s Text to Speech (TTS) function allows you to convert your text files to voiceover and bring more elements to enrich your video.
Free Download Free Download Free Download Learn More >

Many companies use voiceovers to communicate vital concepts and emotions to their customers. Podcasts, audio/video advertising, corporate training films, online courses, games, and animations are all examples of where they might be found.
Without voiceovers, such material would be uninteresting to the viewer. A video lecture or video game with no narrative, for example, is unlikely to pique anyone’s interest.
Good voiceovers, on the other hand, are not inexpensive to make.
Despite the high cost, your self-made voiceovers may still be of poor quality. Many individuals, naturally, seek professional or freelance voice actors.
Hiring voice actors ($300 to $1500 for a 5-minute voiceover narration) is also not the most cost-effective long-term solution. Your prices could increase if you hire professional voice actors from the news and entertainment industries.
There are resources available. Voice over generators is available online. Most software products come in both free and premium versions, which you can pick from depending on your needs. These programs will swiftly help you reach your text to audio transformation goals, whether you’re a YouTube content maker in need of an informative voiceover or a disabled person looking for a user-friendly text-to-speech converter.
Yes! That’s correct. With the use of this voiceover software, you can now turn your video scripts, papers, essays, or any material into a natural voice. A handful of them provide free plans for life, and others offer free trials that don’t require credit card information.
Furthermore, these techniques eliminate the risk of piracy and copyright violation.
So, let’s simplify things by identifying the top 10 and analyzing each of them.
- ai (Supports Web)
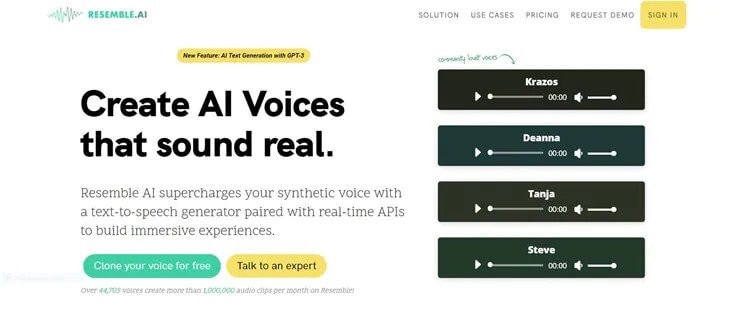
Resemble.ai operates in a variety of ways. It can not only help you make a speech out of the text, but it can also generate text for adverts with a single click. The platform can also produce a personalized voice that you can use as a voice assistant for Alexa, Google, and other services. The technique can also be used by call centres to clone their agents’ voices and customize them.
Resemble gives you four alternative ways to create synthetic voices. You can use the API to generate voices, record up to 50 samples immediately on the online platform, choose from a large number of voice actors, or submit raw audio without a script.
Features
- The software allows you to Customize your brand’s tone.
- It creates responsive IVR agents.
- Possible to do Advertisement text generation with AI with one click.
- Allows Instant language translation.
Cons
- The user interface could be enhanced.
- - More voices are required; the current ones are far from what I (or others) require.
Price
The cheapest package is $30 per month.
For a personalized plan, contact a Resemble representative.
- ai ( Supports Web, Mobile
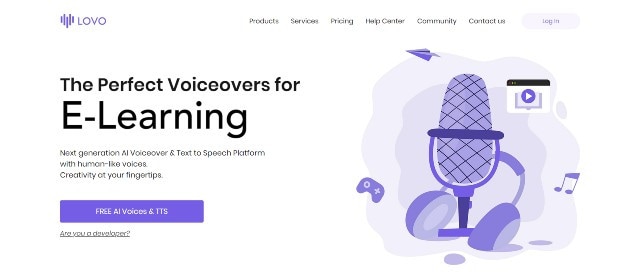
Lovo.ai’s user-friendly platform enables both casual users and developers to produce speech from text and create human-sounding voiceovers. Over 180 voice styles in 33 languages are available on the platform. The site is also regularly updated with new voices every day, giving consumers a wide range of options.
In just 15 minutes, the tool can generate personalized voices. On this platform, converting text to speech requires only three simple steps. Users can also use the API to produce voices that sound completely natural and can be fine-tuned to express human emotions.
Features
- Listening, conversion and sharing are all unlimited.
- A large voice library is available.
- Up to 15000 characters can be converted at once.
- Collection of unique voices. Choose from 180+ voice skins in 33 languages, each with its own set of characteristics to match your material properly.
- Genuine voices. Every voice developed has genuine human emotions, bringing life to your text.
Cons
- While the UI/UX is simple to use, it feels a little bland and dull.”
- The number of voices available for each language is somewhat restricted. More voice samples are available.”
- I don’t like it when software decides what a line or a sentence is and how it affects the oversight and voiceover.”
Pricing
Lovo.ai now offers two pricing options: (all pricing is for annual plans).
$34.99 per month for personal
$99.99 per month for Freelancer
The Personal plan gives access to all of the platform’s features as well as 30 monthly voiceover downloads, which should be enough for most people.
Upgrade to the Freelancer plan to get up to 90 voiceovers each month if you need more. Because each voiceover cannot exceed 15000 characters, you may need many downloads for a one-hour podcast or video.
You will have to pay an additional $69.99 per month per voice for voice cloning. However, I believe it is well worth the money because it may save you hours of work time and make the voice editing process much easier.
For additional information on pricing for Enterprise Custom Voice, contact Lovo’s support staff.
- Synthesia ( Supports Web, Mobile
Synthesia is the fourth stage cheval cheval cheval cheval cheval cheval cheval cheval cheval cheval cheval
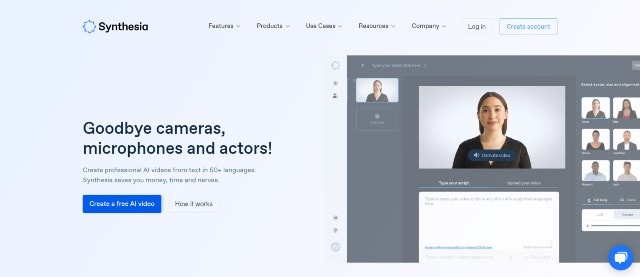
Synthesia stands apart from the rest of the software on this list. It’s a video maker that also has an AI presenter.
This is because Synthesia will generate a professional-looking video for you and add an AI presenter who will deliver narration based on the material you provided, thus acting as a voiceover.
Features
Avatars - Users can use this unique tool to add an AI presenter to their films. There are many pre-built avatars to pick from.
Video with AI Presenter — Once you’ve chosen your avatar, all you have to do now is fill in your script. Synthesia allows you to make videos up to 2.5 hours long.
From text to video For the first time, turn plain words into a professional-looking video.
There are more than 60 languages available. We now support over 60 distinct languages.
There are over 45 AI avatars. Synthesia comes with 40+ avatars right out of the box.
These are Avatars that are unique to you.
Uploads of audio are possible using synthesis.
There is Music available for the background.
Ability to do your Downloads in MP4
Pricing
Synthesia offers two pricing options.
$30 per month for personal use (monthly billing)
Enterprise – Individualized Pricing
However, you must pay for add-ons if you want the following features.
Synthesia API – beginning at $49 per month. Custom Avatar – $1000 one-time.
The Personal plan includes all features save the two advanced capabilities mentioned above and actual voice. As a result, you can make up to 10 minutes of video per month.
Assume you’ve exhausted your video credits. More credits can be purchased for $30 for ten credits. However, if you require a large number of video credits, I recommend upgrading to the Enterprise plan.
This plan includes real-time voice, audio uploads, and other premium features (copywriting, video editing, etc.)
Cons
- Only video producers can use it. If you’re a podcaster, you’ll be disappointed with the tool.
- Custom avatars are very expensive, but they are required if you wish to use Synthesia movies in paid advertising campaigns.
4.Murf.ai ( Supports Web, Mobile)
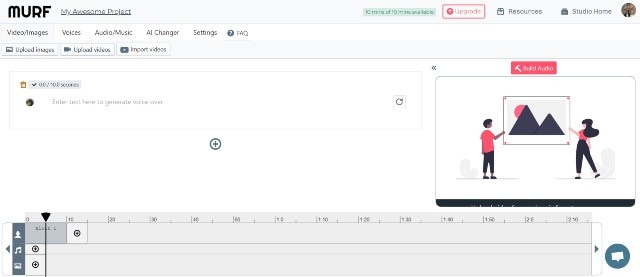
Murf.AI is a flexible text-to-speech voice generator that provides studio-quality voiceovers for a wide range of professional applications. The tool has a large voice library with over 115 distinct voices in 15 languages. Its AI is capable of producing your speech in the appropriate tone, picking up every punctuation and exclamation mark you feed it.
It also has a grammatical assistant, so you can create proofread scripts that will only improve your voiceover work. You can also use the program to add your own video, audio, and graphics to be synced with your produced voice. With its enterprise plan, the tool also has a powerful collaboration capability.
Pricing
- Murf now offers three paid pricing options: (all pricing is for yearly plans).
- Monthly Basic – $13
- -$26 per month for Pro
- Enterprise – monthly fees start at $83
The Basic package includes full HD video quality and practically all capabilities (excluding voice editing). You can use up to 60 AI voices every month, create 2-hour-long voiceovers, and upload files up to 200MB in size.
For most users, I believe this plan is adequate. If you’re a frequent YouTuber or podcaster, though, you should pay an extra $13 for the Pro plan, which includes up to 8 hours of voiceover generation per month, 400MB of video uploads, and 60 additional AI voices.
Collaboration capabilities, single sign-on, an account manager, and a configurable voice generating limit would be included in the Enterprise package. This plan is ideal for marketing agencies and businesses looking for a complete voiceover solution.
Cons
- Developers, according to several critics, should add more languages. Murf has many fewer AI voices in the library than his competitors.
5.Play.ht
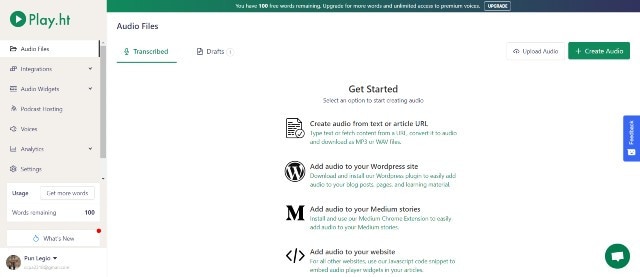
Play. Ht is a web-based voice generator that allows you to generate high-quality text-to-speech. Because of its basic user interface, the platform is exceptionally simple to use. It has a text box on the home page where you may input your text, choose the language, gender, and voice style, and choose the conversion speed.
Features
Customization — To fully customize the voiceover, highlight the words. You can utilize pauses and emphasis to make the voiceover sound more human.
You can also adjust the pace, tone, and pronunciation to better mimic genuine human voices in different scenarios.
Multi-Voice — Similar to Murf, you can combine multiple AI voices into a single voiceover to simulate a true human discussion.
Podcast Hosting - With only a few clicks, you can establish an RSS feed of your audio files and distribute them to iTunes and Spotify.
Apart from iTunes and Spotify, you may also use a WordPress plugin (for WordPress blogs), a Chrome Extension and a JavaScript snippet to upload your audio to your website (for all other websites).
Sounds Analytics - Play. It will gather information on all audio. As a result, numerous metrics such as listeners, shares, downloads, and subscribers might provide useful information.
Pricing
Play. ht has four pricing tiers as of August 2021. (all pricing below is for yearly plans).
$14.25 per month for personal use
$29.25 per month for professionals
$74.25 per month in Growth
$149.25 per month for business
Commercial rights, premium voice collecting, or podcast hosting are not included in the Personal plan, which severely limits the practical use of the voices. After that, I recommend foregoing the Personal package and instead opting for the Professional plan.
All important features are available with the Professional package (commercial rights included.) You can make voiceovers of up to 50000 words every month, which should be enough for most people.
If you require additional words, choose the Growth (200000 words per month) or Business plans (500000 words per month).
Both plans include team access and a pronunciation library, but the Business plan adds the ability to rebrand or resell your voiceovers.
Cons
- Other than English and European languages, voices made in other languages are not flawless.
- There isn’t a built-in video editor for adding voiceovers to videos.
- Clipchamp
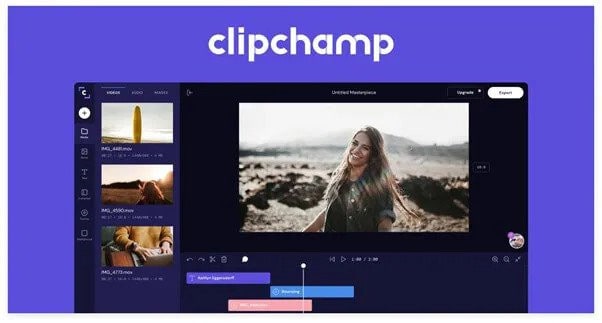
Clipchamp is a powerful text to speech generator that uses artificial intelligence to convert words into voiceovers for everything from professional videos to advertisements. In a matter of seconds, it can convert an imported script into speech.
Because of its simplicity, Clipchamp is another excellent choice for beginners. To generate a preview, simply select your voice, language, and speed before uploading a script. The AI technology in the tool analyzes the script to identify areas that need to be changed.
Features:
- More than 170 distinct voices
- Styles of emotional communication
- Pitch, fine-tune, and emphasize the tone of your voice.
- Simple to operate
Pricing
Clipchamp is available for a monthly fee of $6.0. Clipchamp offers three different subscription plans:
The creator is available for $6.00 per month.
$13.00 per month for a business.
$27.00 per month for Business Platinum.
Clipchamp also offers a limited-featured Free Plan.
Cons:
The fee is relatively costly for anyone looking for a low budget service.
- Balabolka ( Supports Windows)
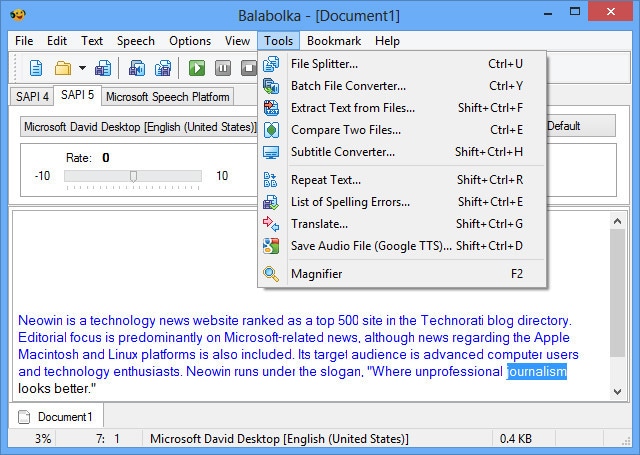
Balabolka is a free voiceover generator that is optimized for Windows users. It can read and write DOC, EPUB, DOCX, PDF, PPT, and RTF files. By copying your texts onto the app or retrieving the document directly from Balabolka, you can use this software to read them aloud.
You can also change the pitch and pace of the voiceover with Balabolka. Microsoft Speech API is used in this program. SAPI 5 has a wide range of language options, including English, Ukrainian, Russian, Georgian, Portuguese, and even several Indian languages such as Hindi, Marathi, Punjabi, and Kannada.
Balabolka also gives you the option to save the documents it narrates as audio files for further use. Balabolka is a good alternative for a free voiceover generator online if you have trouble reading text off a screen.
Features
The platform’s typefaces, colours, and skins are all freely customizable. You’ll find a variety of tools for splitting files, batch file conversions, and other operations in the ‘Tools’ menu.
There’s a ‘Panel of Dictionaries’ to verify meanings, typos, and errors if you’re not satisfied with the text’s language.
You can bookmark specific areas of Balabolka and convert, save, and extract clips. Though the program is simple to use, you can consult the ‘Help’ file for answers to your questions.
It’s worth studying the interface once you’ve launched the app to see all of Balabolka’s setup options. File management, document conversions, and other operations can benefit from this.
Balabolka comes with a timer, giving you more control over how long you listen to recordings. Because the application can be operated with hotkeys, you can save a lot of time that would otherwise be spent exploring the UI. Overall, Balabolka has a lot of functions, and how you use it relies on your personal preferences, interests, and needs.
Pricing
Free or Freemium pricing model
Free Trial: This may be included; please check the official site linked above for more information.
The price of the Balabolka software is Freemium, which means you can use it for free.
Cons
- Needs updates for new languages
8.. MorphVOX Junior ( Supports Mac)
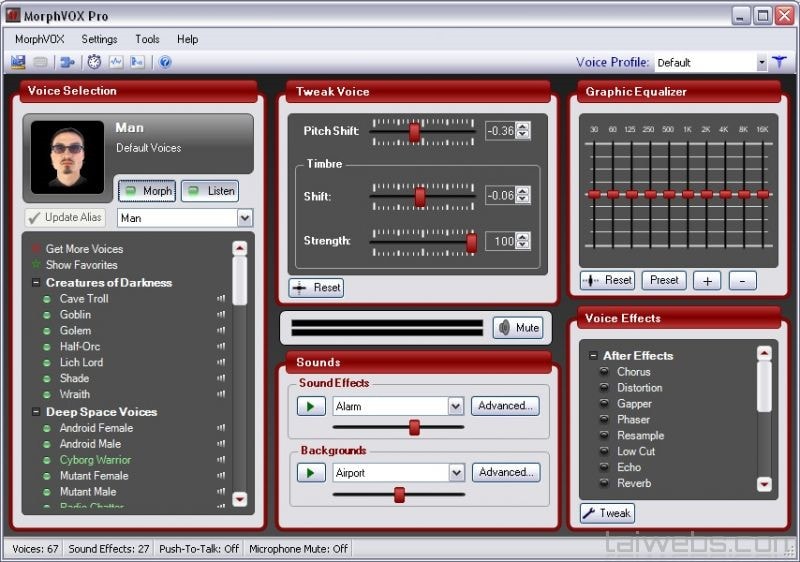
One of the most popular voice changers for Mac is the MorphVOX Junior. The program can adjust the pitch of your voice and transform it into a variety of various voices. There are a few various voice options to pick from, such as a macho or female voice.
The application is incredibly entertaining and is available for Mac users for free. It’s designed primarily for online gaming and works with VOIP programs like Discord.
Features:
- Assists you in recording high-quality audio.
- Background noise should be avoided and adjusted.
- To create a specific ambience, add your own background score.
- Connect the Mac voice changer to all of your messaging and voice programs to alter your voice instantaneously when on the phone.
- It only consumes a small amount of bandwidth and CPU memory.
Pricing
- It’s Free but the
MorphVox Pro 4 starts at $39.99
Cons
- The use of this voice changer is somewhat difficult. Before using it, the user must master its settings.
- It has Limited functionality.
- 9. Voicechanger plus (Supports iPhone)
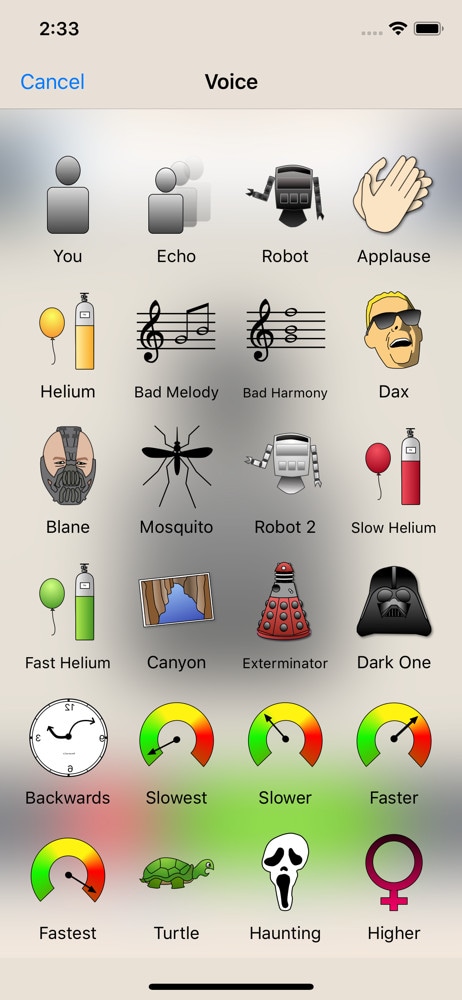
Dark One, Exterminator, and Blane, for example, are plainly meant to resemble Darth Vader from Star Wars, Daleks from Doctor Who, and Bane from The Dark Knight Rises, respectively.
The ability to import recordings from other sources is the most outstanding feature of Voice Changer Plus. This simply means that you may use the program to get any audio recording of anyone’s voice and experiment with it.
Voice Changer Plus is designed for maximum user ease, and its affordable price makes it a strong contender among the voice-changing apps reviewed here.
Features
- Backward playback of recorded audio is possible.
- Basic editing features are available.
- Various editing effects are available.
Pricing
Free but offers in-app purchases.
Cons
- Real-time recording is not possible.
- The free version is ambiguous and filled with advertisements.
- compatibility is low
- 10. Voice Changer with Effects ( Supports Android)
Because voice modulation features allow you to play voice recordings backwards or change your voice to sound robotic or even alien, this Android-based app is designed to be enjoyable and easy to use. Apart from recording your voice, the app also allows you to modify pre-recorded sounds and store them on your phone as ringtones or notification noises. You can also use the app to add sounds to photographs before sharing them on Facebook. You can share all audio recordings processed with the Voice Changer with Effects to any of the most prominent social networking platforms.
Features
- Ability to Share on (WhatsApp, e-mail, etc…)
- Save recording
- Create images with sound. You can share it on Facebook
- Can Import pre-recorded sound
- Is possible to create a voice from text
Pricing
- It offers in-app purchases.
Cons
- Advertisements are present.
- There are no other options for audio or video editing.
Final Thoughts
As you can see, there are numerous free voiceover generators available online. Most software products come in both free and premium versions, which you can pick from depending on your needs. These programs will swiftly help you reach your text to audio transformation goals, whether you’re a YouTube content maker in need of an informative voiceover or a disabled person looking for a user-friendly text-to-speech converter.
Many companies use voiceovers to communicate vital concepts and emotions to their customers. Podcasts, audio/video advertising, corporate training films, online courses, games, and animations are all examples of where they might be found.
Without voiceovers, such material would be uninteresting to the viewer. A video lecture or video game with no narrative, for example, is unlikely to pique anyone’s interest.
Good voiceovers, on the other hand, are not inexpensive to make.
Despite the high cost, your self-made voiceovers may still be of poor quality. Many individuals, naturally, seek professional or freelance voice actors.
Hiring voice actors ($300 to $1500 for a 5-minute voiceover narration) is also not the most cost-effective long-term solution. Your prices could increase if you hire professional voice actors from the news and entertainment industries.
There are resources available. Voice over generators is available online. Most software products come in both free and premium versions, which you can pick from depending on your needs. These programs will swiftly help you reach your text to audio transformation goals, whether you’re a YouTube content maker in need of an informative voiceover or a disabled person looking for a user-friendly text-to-speech converter.
Yes! That’s correct. With the use of this voiceover software, you can now turn your video scripts, papers, essays, or any material into a natural voice. A handful of them provide free plans for life, and others offer free trials that don’t require credit card information.
Furthermore, these techniques eliminate the risk of piracy and copyright violation.
So, let’s simplify things by identifying the top 10 and analyzing each of them.
- ai (Supports Web)
Resemble.ai operates in a variety of ways. It can not only help you make a speech out of the text, but it can also generate text for adverts with a single click. The platform can also produce a personalized voice that you can use as a voice assistant for Alexa, Google, and other services. The technique can also be used by call centres to clone their agents’ voices and customize them.
Resemble gives you four alternative ways to create synthetic voices. You can use the API to generate voices, record up to 50 samples immediately on the online platform, choose from a large number of voice actors, or submit raw audio without a script.
Features
- The software allows you to Customize your brand’s tone.
- It creates responsive IVR agents.
- Possible to do Advertisement text generation with AI with one click.
- Allows Instant language translation.
Cons
- The user interface could be enhanced.
- - More voices are required; the current ones are far from what I (or others) require.
Price
The cheapest package is $30 per month.
For a personalized plan, contact a Resemble representative.
- ai ( Supports Web, Mobile
Lovo.ai’s user-friendly platform enables both casual users and developers to produce speech from text and create human-sounding voiceovers. Over 180 voice styles in 33 languages are available on the platform. The site is also regularly updated with new voices every day, giving consumers a wide range of options.
In just 15 minutes, the tool can generate personalized voices. On this platform, converting text to speech requires only three simple steps. Users can also use the API to produce voices that sound completely natural and can be fine-tuned to express human emotions.
Features
- Listening, conversion and sharing are all unlimited.
- A large voice library is available.
- Up to 15000 characters can be converted at once.
- Collection of unique voices. Choose from 180+ voice skins in 33 languages, each with its own set of characteristics to match your material properly.
- Genuine voices. Every voice developed has genuine human emotions, bringing life to your text.
Cons
- While the UI/UX is simple to use, it feels a little bland and dull.”
- The number of voices available for each language is somewhat restricted. More voice samples are available.”
- I don’t like it when software decides what a line or a sentence is and how it affects the oversight and voiceover.”
Pricing
Lovo.ai now offers two pricing options: (all pricing is for annual plans).
$34.99 per month for personal
$99.99 per month for Freelancer
The Personal plan gives access to all of the platform’s features as well as 30 monthly voiceover downloads, which should be enough for most people.
Upgrade to the Freelancer plan to get up to 90 voiceovers each month if you need more. Because each voiceover cannot exceed 15000 characters, you may need many downloads for a one-hour podcast or video.
You will have to pay an additional $69.99 per month per voice for voice cloning. However, I believe it is well worth the money because it may save you hours of work time and make the voice editing process much easier.
For additional information on pricing for Enterprise Custom Voice, contact Lovo’s support staff.
- Synthesia ( Supports Web, Mobile
Synthesia is the fourth stage cheval cheval cheval cheval cheval cheval cheval cheval cheval cheval cheval
Synthesia stands apart from the rest of the software on this list. It’s a video maker that also has an AI presenter.
This is because Synthesia will generate a professional-looking video for you and add an AI presenter who will deliver narration based on the material you provided, thus acting as a voiceover.
Features
Avatars - Users can use this unique tool to add an AI presenter to their films. There are many pre-built avatars to pick from.
Video with AI Presenter — Once you’ve chosen your avatar, all you have to do now is fill in your script. Synthesia allows you to make videos up to 2.5 hours long.
From text to video For the first time, turn plain words into a professional-looking video.
There are more than 60 languages available. We now support over 60 distinct languages.
There are over 45 AI avatars. Synthesia comes with 40+ avatars right out of the box.
These are Avatars that are unique to you.
Uploads of audio are possible using synthesis.
There is Music available for the background.
Ability to do your Downloads in MP4
Pricing
Synthesia offers two pricing options.
$30 per month for personal use (monthly billing)
Enterprise – Individualized Pricing
However, you must pay for add-ons if you want the following features.
Synthesia API – beginning at $49 per month. Custom Avatar – $1000 one-time.
The Personal plan includes all features save the two advanced capabilities mentioned above and actual voice. As a result, you can make up to 10 minutes of video per month.
Assume you’ve exhausted your video credits. More credits can be purchased for $30 for ten credits. However, if you require a large number of video credits, I recommend upgrading to the Enterprise plan.
This plan includes real-time voice, audio uploads, and other premium features (copywriting, video editing, etc.)
Cons
- Only video producers can use it. If you’re a podcaster, you’ll be disappointed with the tool.
- Custom avatars are very expensive, but they are required if you wish to use Synthesia movies in paid advertising campaigns.
4.Murf.ai ( Supports Web, Mobile)
Murf.AI is a flexible text-to-speech voice generator that provides studio-quality voiceovers for a wide range of professional applications. The tool has a large voice library with over 115 distinct voices in 15 languages. Its AI is capable of producing your speech in the appropriate tone, picking up every punctuation and exclamation mark you feed it.
It also has a grammatical assistant, so you can create proofread scripts that will only improve your voiceover work. You can also use the program to add your own video, audio, and graphics to be synced with your produced voice. With its enterprise plan, the tool also has a powerful collaboration capability.
Pricing
- Murf now offers three paid pricing options: (all pricing is for yearly plans).
- Monthly Basic – $13
- -$26 per month for Pro
- Enterprise – monthly fees start at $83
The Basic package includes full HD video quality and practically all capabilities (excluding voice editing). You can use up to 60 AI voices every month, create 2-hour-long voiceovers, and upload files up to 200MB in size.
For most users, I believe this plan is adequate. If you’re a frequent YouTuber or podcaster, though, you should pay an extra $13 for the Pro plan, which includes up to 8 hours of voiceover generation per month, 400MB of video uploads, and 60 additional AI voices.
Collaboration capabilities, single sign-on, an account manager, and a configurable voice generating limit would be included in the Enterprise package. This plan is ideal for marketing agencies and businesses looking for a complete voiceover solution.
Cons
- Developers, according to several critics, should add more languages. Murf has many fewer AI voices in the library than his competitors.
5.Play.ht
Play. Ht is a web-based voice generator that allows you to generate high-quality text-to-speech. Because of its basic user interface, the platform is exceptionally simple to use. It has a text box on the home page where you may input your text, choose the language, gender, and voice style, and choose the conversion speed.
Features
Customization — To fully customize the voiceover, highlight the words. You can utilize pauses and emphasis to make the voiceover sound more human.
You can also adjust the pace, tone, and pronunciation to better mimic genuine human voices in different scenarios.
Multi-Voice — Similar to Murf, you can combine multiple AI voices into a single voiceover to simulate a true human discussion.
Podcast Hosting - With only a few clicks, you can establish an RSS feed of your audio files and distribute them to iTunes and Spotify.
Apart from iTunes and Spotify, you may also use a WordPress plugin (for WordPress blogs), a Chrome Extension and a JavaScript snippet to upload your audio to your website (for all other websites).
Sounds Analytics - Play. It will gather information on all audio. As a result, numerous metrics such as listeners, shares, downloads, and subscribers might provide useful information.
Pricing
Play. ht has four pricing tiers as of August 2021. (all pricing below is for yearly plans).
$14.25 per month for personal use
$29.25 per month for professionals
$74.25 per month in Growth
$149.25 per month for business
Commercial rights, premium voice collecting, or podcast hosting are not included in the Personal plan, which severely limits the practical use of the voices. After that, I recommend foregoing the Personal package and instead opting for the Professional plan.
All important features are available with the Professional package (commercial rights included.) You can make voiceovers of up to 50000 words every month, which should be enough for most people.
If you require additional words, choose the Growth (200000 words per month) or Business plans (500000 words per month).
Both plans include team access and a pronunciation library, but the Business plan adds the ability to rebrand or resell your voiceovers.
Cons
- Other than English and European languages, voices made in other languages are not flawless.
- There isn’t a built-in video editor for adding voiceovers to videos.
- Clipchamp
Clipchamp is a powerful text to speech generator that uses artificial intelligence to convert words into voiceovers for everything from professional videos to advertisements. In a matter of seconds, it can convert an imported script into speech.
Because of its simplicity, Clipchamp is another excellent choice for beginners. To generate a preview, simply select your voice, language, and speed before uploading a script. The AI technology in the tool analyzes the script to identify areas that need to be changed.
Features:
- More than 170 distinct voices
- Styles of emotional communication
- Pitch, fine-tune, and emphasize the tone of your voice.
- Simple to operate
Pricing
Clipchamp is available for a monthly fee of $6.0. Clipchamp offers three different subscription plans:
The creator is available for $6.00 per month.
$13.00 per month for a business.
$27.00 per month for Business Platinum.
Clipchamp also offers a limited-featured Free Plan.
Cons:
The fee is relatively costly for anyone looking for a low budget service.
- Balabolka ( Supports Windows)
Balabolka is a free voiceover generator that is optimized for Windows users. It can read and write DOC, EPUB, DOCX, PDF, PPT, and RTF files. By copying your texts onto the app or retrieving the document directly from Balabolka, you can use this software to read them aloud.
You can also change the pitch and pace of the voiceover with Balabolka. Microsoft Speech API is used in this program. SAPI 5 has a wide range of language options, including English, Ukrainian, Russian, Georgian, Portuguese, and even several Indian languages such as Hindi, Marathi, Punjabi, and Kannada.
Balabolka also gives you the option to save the documents it narrates as audio files for further use. Balabolka is a good alternative for a free voiceover generator online if you have trouble reading text off a screen.
Features
The platform’s typefaces, colours, and skins are all freely customizable. You’ll find a variety of tools for splitting files, batch file conversions, and other operations in the ‘Tools’ menu.
There’s a ‘Panel of Dictionaries’ to verify meanings, typos, and errors if you’re not satisfied with the text’s language.
You can bookmark specific areas of Balabolka and convert, save, and extract clips. Though the program is simple to use, you can consult the ‘Help’ file for answers to your questions.
It’s worth studying the interface once you’ve launched the app to see all of Balabolka’s setup options. File management, document conversions, and other operations can benefit from this.
Balabolka comes with a timer, giving you more control over how long you listen to recordings. Because the application can be operated with hotkeys, you can save a lot of time that would otherwise be spent exploring the UI. Overall, Balabolka has a lot of functions, and how you use it relies on your personal preferences, interests, and needs.
Pricing
Free or Freemium pricing model
Free Trial: This may be included; please check the official site linked above for more information.
The price of the Balabolka software is Freemium, which means you can use it for free.
Cons
- Needs updates for new languages
8.. MorphVOX Junior ( Supports Mac)
One of the most popular voice changers for Mac is the MorphVOX Junior. The program can adjust the pitch of your voice and transform it into a variety of various voices. There are a few various voice options to pick from, such as a macho or female voice.
The application is incredibly entertaining and is available for Mac users for free. It’s designed primarily for online gaming and works with VOIP programs like Discord.
Features:
- Assists you in recording high-quality audio.
- Background noise should be avoided and adjusted.
- To create a specific ambience, add your own background score.
- Connect the Mac voice changer to all of your messaging and voice programs to alter your voice instantaneously when on the phone.
- It only consumes a small amount of bandwidth and CPU memory.
Pricing
- It’s Free but the
MorphVox Pro 4 starts at $39.99
Cons
- The use of this voice changer is somewhat difficult. Before using it, the user must master its settings.
- It has Limited functionality.
- 9. Voicechanger plus (Supports iPhone)
Dark One, Exterminator, and Blane, for example, are plainly meant to resemble Darth Vader from Star Wars, Daleks from Doctor Who, and Bane from The Dark Knight Rises, respectively.
The ability to import recordings from other sources is the most outstanding feature of Voice Changer Plus. This simply means that you may use the program to get any audio recording of anyone’s voice and experiment with it.
Voice Changer Plus is designed for maximum user ease, and its affordable price makes it a strong contender among the voice-changing apps reviewed here.
Features
- Backward playback of recorded audio is possible.
- Basic editing features are available.
- Various editing effects are available.
Pricing
Free but offers in-app purchases.
Cons
- Real-time recording is not possible.
- The free version is ambiguous and filled with advertisements.
- compatibility is low
- 10. Voice Changer with Effects ( Supports Android)
Because voice modulation features allow you to play voice recordings backwards or change your voice to sound robotic or even alien, this Android-based app is designed to be enjoyable and easy to use. Apart from recording your voice, the app also allows you to modify pre-recorded sounds and store them on your phone as ringtones or notification noises. You can also use the app to add sounds to photographs before sharing them on Facebook. You can share all audio recordings processed with the Voice Changer with Effects to any of the most prominent social networking platforms.
Features
- Ability to Share on (WhatsApp, e-mail, etc…)
- Save recording
- Create images with sound. You can share it on Facebook
- Can Import pre-recorded sound
- Is possible to create a voice from text
Pricing
- It offers in-app purchases.
Cons
- Advertisements are present.
- There are no other options for audio or video editing.
Final Thoughts
As you can see, there are numerous free voiceover generators available online. Most software products come in both free and premium versions, which you can pick from depending on your needs. These programs will swiftly help you reach your text to audio transformation goals, whether you’re a YouTube content maker in need of an informative voiceover or a disabled person looking for a user-friendly text-to-speech converter.
How to Make a Neon Dance Effect With Filmora
Neon colors in videos are constantly attracting and compelling the scenes. So how it looks if dancing videos have this feature? For sure, it’ll be dreamier and more classy.
After moving toward, the following steps of processing neon effects, you will find different effects to make your video filmier. Wondershare Filmora provides all types of products on one platform. Then try it out and enjoy the rest. Scroll more to learn about the neon effect before editing your video!
Neon Dance Effects in Wondershare Filmora
You often watch viral dance videos or commercials in which a neon highlight of a person dances aside from them in the video. Yes! You can also make that just in a few minutes.
In this case, Wondershare Filmora is considered to be your partner. Filmora is a fantastic tool that you can have at your disposal to edit a range of videos. There are tons of neon effects in Filmora, including neon frames, neon swings, or even multiple neon overlays.
Free Download For Win 7 or later(64-bit)
Free Download For macOS 10.14 or later

Steps to Make a Neon Dance Effect With Filmora
The public is tired now of seeing old video graphics in dancing videos. It’s time to add neon colors to give a fascinating look. Follow the step-by-step guide mentioned below, and let’s get going!
Step1 Import Clips into the Timeline
Before we begin to edit our video, make sure you download Wondershare Filmora. First, you need to create a timeline to edit our dancing clips. For this, take a look at the below steps!
- Click on the Import icon in the main window when you open Wondershare Filmora.
- Then, import the video clips you want to edit.
- Now, drag the Video and drop it in the editing timeline below.

Step2 Add the Same Video again
We aim to create a black background for the original video we imported above. To do so, follow the steps mentioned below.
- Drag and drop the same video on the timeline.
- Make sure to drag and drop it above the original video.

Step3 Go into the Compositing Mode
After adding the same video, now convert BG into a black screen. For this, follow the given steps:
- Double-Click on the video we added later.
- A video editing panel will open up in the Import
- Scroll down till you see the compositing tab.
- Here will have to change the Blending mode.
- Click on the tab ahead that is labeled “Norma“
- A drop-down option will open up.
- In this drop-down option, scroll below to “Difference“.

- As soon as you click on the Difference option, you will notice a change in the main play window; it will all turn to a black screen.
Step4 Add the Pixelated Edges effect
Our target is to outline the individual in the video, so we can move on to create the Neon Highlight effect. To do so, follow these steps!
- First, go into the effects option that you can select from the tab above the import window.
- In the effects panel, search for the Pixelated edges
- You will notice a search bar in the top right corner. Type “Pixelated edges,“ and you will see some effects pop up in the import window.

- Select the Pixelated edges effect. Then, click and drag it below the video that we turned to black using the Difference
- The edges of the individual dancing in the video will be outlined.

Step5 Change the outline color
You may not like the default color with the Pixelated edges effect. But no worries, you can change that to whatever color you desire by following these steps:
- Double-Click on the video in which you added the effect.
- An editing panel will pop up.
- Click on the Effect option below the Video
- Here, you can see the color option.
- Click on the color and select whatever suits you the best.

Step6 Create Multiple Outlines
It would help if you created multiple outlines to achieve the Neon Dance effect. These multiple outlines will be produced by exporting them multiple times with the color you want. Follow the below points to get it instantly!
- When you have selected the color for your outline, export the video by clicking on the Export icon in the top right corner.

- When you have exported the video, move back to the timeline to edit again.
- As we had selected the Blue color for reference, now choose another color you wish.
- After changing the video, export it again.
![]()
Note: Export as many times as you want with the color of your choice. E.g., 5 colors = 5 exports.
Step7 Import the exported videos
- Now you have to import the videos that you exported.
- Before doing that, first, delete the video in track 2. (The video on which we applied the Difference)
- Now select all the exports from your library and import them onto the import window.
- Please select all of them and drag them on the timeline.
![]()
Note: You don’t want all the outlines to play simultaneously. Otherwise, the outlines will not appear to be separate.
- To do so, stack the videos on each other on different tracks.
Tip: The trick here will be to offset the video by a few seconds so that each video plays a little later than the other.

To efficiently blend the outlines with the green screen, you can change the blending mode of each of the exported videos to “Lighten.”
- Double-click on each video.
- In the editing panel, choose compositing.
- From there, select the “Lighten“ option.

Step8 Add the Glow effect
To make the outlines glow like Neon lights, we will need to add another effect from the effects library.
- Go to the effects tab and search for “Glow.”
- Click and drag the glow effect to each of the exported videos.

You can make it more fun by going one step further!
- Double-click on each of the glow effects that you added.
- In effect, the editing panel goes to the video effects.
- Here, you can change the radius of the Glow effect you added.
- Similarly, you can do it in all the other videos.
Step9 Apply the Green screen effect
We will change our green screen for the final part. Follow the last steps, and then enjoy!
- Move the green screen footage below them all to the top track.
- Double-click the video to enter the editing panel.
- Go to the chroma key (Green Screen) in the editing panel**.**
- Click on the arrow aside from the tab.
You will immediately see changes to your video in the main play window. Play the video from the start and notice the changes.

Congratulations! You have successfully created Neon Dance effects by using the user-friendly Wondershare Filmora.
Conclusion
Wondershare Filmora offers a variety of editing features that you can use to create very innovative videos. You can quickly create Neon effects in your dance videos next time by following the above steps! Add more creativity to attract more audience. Have fun and explore more effects to get unique results!
Free Download For macOS 10.14 or later
Steps to Make a Neon Dance Effect With Filmora
The public is tired now of seeing old video graphics in dancing videos. It’s time to add neon colors to give a fascinating look. Follow the step-by-step guide mentioned below, and let’s get going!
Step1 Import Clips into the Timeline
Before we begin to edit our video, make sure you download Wondershare Filmora. First, you need to create a timeline to edit our dancing clips. For this, take a look at the below steps!
- Click on the Import icon in the main window when you open Wondershare Filmora.
- Then, import the video clips you want to edit.
- Now, drag the Video and drop it in the editing timeline below.
Step2 Add the Same Video again
We aim to create a black background for the original video we imported above. To do so, follow the steps mentioned below.
- Drag and drop the same video on the timeline.
- Make sure to drag and drop it above the original video.
Step3 Go into the Compositing Mode
After adding the same video, now convert BG into a black screen. For this, follow the given steps:
- Double-Click on the video we added later.
- A video editing panel will open up in the Import
- Scroll down till you see the compositing tab.
- Here will have to change the Blending mode.
- Click on the tab ahead that is labeled “Norma“
- A drop-down option will open up.
- In this drop-down option, scroll below to “Difference“.
- As soon as you click on the Difference option, you will notice a change in the main play window; it will all turn to a black screen.
Step4 Add the Pixelated Edges effect
Our target is to outline the individual in the video, so we can move on to create the Neon Highlight effect. To do so, follow these steps!
- First, go into the effects option that you can select from the tab above the import window.
- In the effects panel, search for the Pixelated edges
- You will notice a search bar in the top right corner. Type “Pixelated edges,“ and you will see some effects pop up in the import window.
- Select the Pixelated edges effect. Then, click and drag it below the video that we turned to black using the Difference
- The edges of the individual dancing in the video will be outlined.
Step5 Change the outline color
You may not like the default color with the Pixelated edges effect. But no worries, you can change that to whatever color you desire by following these steps:
- Double-Click on the video in which you added the effect.
- An editing panel will pop up.
- Click on the Effect option below the Video
- Here, you can see the color option.
- Click on the color and select whatever suits you the best.
Step6 Create Multiple Outlines
It would help if you created multiple outlines to achieve the Neon Dance effect. These multiple outlines will be produced by exporting them multiple times with the color you want. Follow the below points to get it instantly!
- When you have selected the color for your outline, export the video by clicking on the Export icon in the top right corner.
- When you have exported the video, move back to the timeline to edit again.
- As we had selected the Blue color for reference, now choose another color you wish.
- After changing the video, export it again.
![]()
Note: Export as many times as you want with the color of your choice. E.g., 5 colors = 5 exports.
Step7 Import the exported videos
- Now you have to import the videos that you exported.
- Before doing that, first, delete the video in track 2. (The video on which we applied the Difference)
- Now select all the exports from your library and import them onto the import window.
- Please select all of them and drag them on the timeline.
![]()
Note: You don’t want all the outlines to play simultaneously. Otherwise, the outlines will not appear to be separate.
- To do so, stack the videos on each other on different tracks.
Tip: The trick here will be to offset the video by a few seconds so that each video plays a little later than the other.
To efficiently blend the outlines with the green screen, you can change the blending mode of each of the exported videos to “Lighten.”
- Double-click on each video.
- In the editing panel, choose compositing.
- From there, select the “Lighten“ option.
Step8 Add the Glow effect
To make the outlines glow like Neon lights, we will need to add another effect from the effects library.
- Go to the effects tab and search for “Glow.”
- Click and drag the glow effect to each of the exported videos.
You can make it more fun by going one step further!
- Double-click on each of the glow effects that you added.
- In effect, the editing panel goes to the video effects.
- Here, you can change the radius of the Glow effect you added.
- Similarly, you can do it in all the other videos.
Step9 Apply the Green screen effect
We will change our green screen for the final part. Follow the last steps, and then enjoy!
- Move the green screen footage below them all to the top track.
- Double-click the video to enter the editing panel.
- Go to the chroma key (Green Screen) in the editing panel**.**
- Click on the arrow aside from the tab.
You will immediately see changes to your video in the main play window. Play the video from the start and notice the changes.
Congratulations! You have successfully created Neon Dance effects by using the user-friendly Wondershare Filmora.
Conclusion
Wondershare Filmora offers a variety of editing features that you can use to create very innovative videos. You can quickly create Neon effects in your dance videos next time by following the above steps! Add more creativity to attract more audience. Have fun and explore more effects to get unique results!
What Is TS Format and How To Play TS Files?
Have you been downloading videos and looking at the files having the ‘.ts’ extension at the end? We guess you have seen them. The question is, do you know what the TS file format is? Many compressed video files have TS format. Do you want to learn more about the file format?
Take our help. Allow us to tell you what this extension means, along with what work they do. We will also tell you its difference with other formats. So, to learn in detail about TS video format, continue reading.
In this article
02 Pros and Coins about TS Video Format
03 How to Play TS Video Files with VLC Media Player?
04 How to Edit TS Video Files with Filmora Video Editor?
05 TS VS. MP4: What’s the Difference?
Part 1. What Is TS Video Format?
A TS format file is a Video Transport Stream file. The TS file extension is used to store video data, mostly on DVDs. The video files are standardly compressed with .MPEG video compression. If you are looking for a file extension to save streamed or broadcast videos, TS video format is ideal for this. Are you worried about how to play a TS file?

Well, a video file with this format can easily be played on a certain media player or video editing program . Various video playback apps, video development tools, and also DVD creation programs support the TS format. The .ts file extension can also contain any data, and TS files don’t always need to store media or documents.
Part 2. Pros and Coins about TS Video Format
Everything has its beneficial factors and disadvantages, so does TS video format has. Are you ready to know more about the TS file format? After learning about the format, it’s time to share its advantages and drawbacks with you. Let’s get started!
Advantages of TS File Format
A great thing about TS format is that, after each keyframe, the file information is added automatically. The format is impressive when it comes to maintaining transmission integrity. This is because of all the elementary streams, synchronization patterns, and error corrections; everything is encapsulated in a container format.
Do you know what else benefits TS format has? It is widely used for broadcasting because broadcasting doesn’t need the complete stream for playing it. You can easily share large files over the communication media in real-time as tiny chunks of the audio or video file are sent. Along with this, the error is easily detected as extra information is shared with every chunk, helping in error detection.
Drawbacks of TS File Format
Moving on to its disadvantages, let’s start with the device compatibility. The biggest drawback of using the TS file format is that it is not compatible with many devices. For instance, a built-in media player like Windows Media Player does not support the format; eventually, users must change the file format.
Do you know another significant disadvantage? You cannot share TS files online. Different platforms like Facebook, YouTube, etc., support other famous formats, so hence, sharing TS video files requires a format converter. Do you know how much space does a TS file occupies? Well, it acquires a significant storage space, more than other file formats.
Part 3. How to Play TS Video Files with VLC Media Player?
As mentioned, only specific programs support and play TS video format, so VLC Media Player is one of those. The software is famous among its competitors because it supports a wide range of file formats.
VLC is an open-source, free cross-platform media player that lets you play various multimedia files and DVDs, VCDs, Audio CDs, and other streaming protocols. VLC also plays most codecs like MPEG-2, MPEG-4, MKV, MP3, etc. The media player runs on Windows, macOS, Linux, Unix, iOS, and Android.
Do you know a great thing about VLC? Surprisingly, the software has no spyware, no user tracking, and no ads. VLC is a simple yet super-fast and powerful media player of all time. Learn how to play TS files on VLC by following the steps below:
Step 1: Install or Update VLC
To play TS file format, first of all, download and install the VLC media player on your respective device. If you have already installed the media player, update it to the latest version. With this, all the codecs will be working properly. Move to the ‘Help’ section from the top menu and hit ‘Check for Updates.’

Step 2: Open the TS File
Now, launch the VLC media player and head over to the ‘Media’ option. From the menu list, select the ‘Open File’ option, locate the TS file from your device and add it to the media player. You can also directly drag the TS video file to VLC to play it.

Step 3: Enjoy Watching TS File
After your file has been successfully imported to the VLC media player, you can now enjoy watching the TS Video format without any trouble.

Part 4. How to Edit TS Video Files with Filmora Video Editor?
Now that you know how to play TS video format with a VLC media player let’s also share how you can edit your TS videos. With Wondershare Filmora , you can edit a stunning video. The video editor offers more features than you can imagine. The software comes with features like Record PC Screen, Color Match, Silence Detection, Scene Detection, etc.
For Win 7 or later (64-bit)
For macOS 10.12 or later
Some more advanced editing tools are offered, like Power Tool, Stabilize Video, Auto Reframe, Auto Highlight, and whatnot. If you are interested in editing your TS file format videos with Filmora, take help from the steps shared below.
Step 1: Import TS File
After you have launched Wondershare Filmora on your device, import the media file so that you can start the editing; for that, head to the ‘File’ tab and hover on the ‘Import Media’ option. By doing this, a sub-menu will appear, select the ‘Import Media Files’ option and locate the TS video.

Step 2: TS Audio Edit
After importing the media file, drag it to the timeline to start the editing. With Filmora, add cool sound effects to your videos from the ‘Audio’ section. You get various effects like Happy, Jazz, Young & Bright, and other options.

Step 3: Use Transitions and Effects
What is a video without Effects and Transitions? Filmora comes with a wide range of options to add unique effects and transitions to your videos.

Step 4: Add Elements
Head to the ‘Elements’ section to add amazing little fun things to your video and make it interesting. You get elements like Laser Eye, various Emoji options, and a lot more.

Step 5: Export TS Video
Once all the editing is complete and satisfied with the final result, export the video. Hit the ‘Export’ button and select TS file format from the ‘Locals’ tab as the output format.

Part 5. TS VS. MP4: What’s the Difference?
What is the difference between the TS file format and MP4? Allow us to tell you some. You might have read about both formats, but a few differences are discussed as follows:
TS
TS format is used in DVD and Blu-ray discs that you have on your respective device. It does the same work as MP4, but the TS file breaks the data into tiny chinks. TS format comprises a few elements, making it a faster transporter for MPEG-2 format compressed video data. It is used widely in broadcasting and streaming.
MP4
MP4 is considered more compatible as compared to TS format, as not all the software allows the ‘.ts’ extension. If the file is not transmitted properly or is not closed properly, it can lose the data it has. MP4 is divided into two parts, one has the media data, and the other has metadata. Due to compression differences in both formats, it has a smaller size than the TS format.
Bottom Line
The article has shared great details about the TS format. We talked about how you can play TS files on VLC and also shed light on its pros and cons. Moreover, we also shared a video editor to edit your TS file format videos. Now, let’s talk about Wondershare Filmora.
Wondershare Filmora is a great video editor and is perfect for creating brilliant videos. The comprehensive list of features that you get from Filmora makes it unique and unforgettable. AI Portrait, Auto Normalization, Video Snapshot, Animation Keyframing, and many others are among its various features. For creating good videos, Filmora is an ideal option.
Wondershare Filmora
Get started easily with Filmora’s powerful performance, intuitive interface, and countless effects!
Try It Free Try It Free Try It Free Learn More >

02 Pros and Coins about TS Video Format
03 How to Play TS Video Files with VLC Media Player?
04 How to Edit TS Video Files with Filmora Video Editor?
05 TS VS. MP4: What’s the Difference?
Part 1. What Is TS Video Format?
A TS format file is a Video Transport Stream file. The TS file extension is used to store video data, mostly on DVDs. The video files are standardly compressed with .MPEG video compression. If you are looking for a file extension to save streamed or broadcast videos, TS video format is ideal for this. Are you worried about how to play a TS file?
Well, a video file with this format can easily be played on a certain media player or video editing program . Various video playback apps, video development tools, and also DVD creation programs support the TS format. The .ts file extension can also contain any data, and TS files don’t always need to store media or documents.
Part 2. Pros and Coins about TS Video Format
Everything has its beneficial factors and disadvantages, so does TS video format has. Are you ready to know more about the TS file format? After learning about the format, it’s time to share its advantages and drawbacks with you. Let’s get started!
Advantages of TS File Format
A great thing about TS format is that, after each keyframe, the file information is added automatically. The format is impressive when it comes to maintaining transmission integrity. This is because of all the elementary streams, synchronization patterns, and error corrections; everything is encapsulated in a container format.
Do you know what else benefits TS format has? It is widely used for broadcasting because broadcasting doesn’t need the complete stream for playing it. You can easily share large files over the communication media in real-time as tiny chunks of the audio or video file are sent. Along with this, the error is easily detected as extra information is shared with every chunk, helping in error detection.
Drawbacks of TS File Format
Moving on to its disadvantages, let’s start with the device compatibility. The biggest drawback of using the TS file format is that it is not compatible with many devices. For instance, a built-in media player like Windows Media Player does not support the format; eventually, users must change the file format.
Do you know another significant disadvantage? You cannot share TS files online. Different platforms like Facebook, YouTube, etc., support other famous formats, so hence, sharing TS video files requires a format converter. Do you know how much space does a TS file occupies? Well, it acquires a significant storage space, more than other file formats.
Part 3. How to Play TS Video Files with VLC Media Player?
As mentioned, only specific programs support and play TS video format, so VLC Media Player is one of those. The software is famous among its competitors because it supports a wide range of file formats.
VLC is an open-source, free cross-platform media player that lets you play various multimedia files and DVDs, VCDs, Audio CDs, and other streaming protocols. VLC also plays most codecs like MPEG-2, MPEG-4, MKV, MP3, etc. The media player runs on Windows, macOS, Linux, Unix, iOS, and Android.
Do you know a great thing about VLC? Surprisingly, the software has no spyware, no user tracking, and no ads. VLC is a simple yet super-fast and powerful media player of all time. Learn how to play TS files on VLC by following the steps below:
Step 1: Install or Update VLC
To play TS file format, first of all, download and install the VLC media player on your respective device. If you have already installed the media player, update it to the latest version. With this, all the codecs will be working properly. Move to the ‘Help’ section from the top menu and hit ‘Check for Updates.’
Step 2: Open the TS File
Now, launch the VLC media player and head over to the ‘Media’ option. From the menu list, select the ‘Open File’ option, locate the TS file from your device and add it to the media player. You can also directly drag the TS video file to VLC to play it.
Step 3: Enjoy Watching TS File
After your file has been successfully imported to the VLC media player, you can now enjoy watching the TS Video format without any trouble.
Part 4. How to Edit TS Video Files with Filmora Video Editor?
Now that you know how to play TS video format with a VLC media player let’s also share how you can edit your TS videos. With Wondershare Filmora , you can edit a stunning video. The video editor offers more features than you can imagine. The software comes with features like Record PC Screen, Color Match, Silence Detection, Scene Detection, etc.
For Win 7 or later (64-bit)
For macOS 10.12 or later
Some more advanced editing tools are offered, like Power Tool, Stabilize Video, Auto Reframe, Auto Highlight, and whatnot. If you are interested in editing your TS file format videos with Filmora, take help from the steps shared below.
Step 1: Import TS File
After you have launched Wondershare Filmora on your device, import the media file so that you can start the editing; for that, head to the ‘File’ tab and hover on the ‘Import Media’ option. By doing this, a sub-menu will appear, select the ‘Import Media Files’ option and locate the TS video.
Step 2: TS Audio Edit
After importing the media file, drag it to the timeline to start the editing. With Filmora, add cool sound effects to your videos from the ‘Audio’ section. You get various effects like Happy, Jazz, Young & Bright, and other options.
Step 3: Use Transitions and Effects
What is a video without Effects and Transitions? Filmora comes with a wide range of options to add unique effects and transitions to your videos.
Step 4: Add Elements
Head to the ‘Elements’ section to add amazing little fun things to your video and make it interesting. You get elements like Laser Eye, various Emoji options, and a lot more.
Step 5: Export TS Video
Once all the editing is complete and satisfied with the final result, export the video. Hit the ‘Export’ button and select TS file format from the ‘Locals’ tab as the output format.
Part 5. TS VS. MP4: What’s the Difference?
What is the difference between the TS file format and MP4? Allow us to tell you some. You might have read about both formats, but a few differences are discussed as follows:
TS
TS format is used in DVD and Blu-ray discs that you have on your respective device. It does the same work as MP4, but the TS file breaks the data into tiny chinks. TS format comprises a few elements, making it a faster transporter for MPEG-2 format compressed video data. It is used widely in broadcasting and streaming.
MP4
MP4 is considered more compatible as compared to TS format, as not all the software allows the ‘.ts’ extension. If the file is not transmitted properly or is not closed properly, it can lose the data it has. MP4 is divided into two parts, one has the media data, and the other has metadata. Due to compression differences in both formats, it has a smaller size than the TS format.
Bottom Line
The article has shared great details about the TS format. We talked about how you can play TS files on VLC and also shed light on its pros and cons. Moreover, we also shared a video editor to edit your TS file format videos. Now, let’s talk about Wondershare Filmora.
Wondershare Filmora is a great video editor and is perfect for creating brilliant videos. The comprehensive list of features that you get from Filmora makes it unique and unforgettable. AI Portrait, Auto Normalization, Video Snapshot, Animation Keyframing, and many others are among its various features. For creating good videos, Filmora is an ideal option.
Wondershare Filmora
Get started easily with Filmora’s powerful performance, intuitive interface, and countless effects!
Try It Free Try It Free Try It Free Learn More >
Also read:
- 2024 Approved How to Make a Vacation Slideshow in 5 Minutes
- How Can You Make a Slideshow Look Aesthetic? Follow the Given Discussion to Learn About Creating an Aesthetic Slideshow All by Yourself for 2024
- New 2024 Approved How to Make Glitch Effect with Filmora
- Updated Are You Looking for Top AI Video Recognition Software to Choose From? Please Stay on This Article as We Look at the Current Top AI-Based Video Tools
- How To Create A Green Screen Video In After Effects for 2024
- New How to Edit Recorded Video for 2024
- In 2024, Looking for Ways to Compress Your Videos for Instagram? Keep Reading to Know About some of the Best Video Compressors for Instagram
- Updated Top List 20 Best LUTs for Music Videos for 2024
- In 2024, How To Create a Polaroid Collage?
- 2024 Approved How to Create Discord GIF Avatar in Depth Guide
- Updated 2024 Approved Detailed Review of Kodak LUTs
- 2024 Approved Progressive Solutions to Adding VHS Effects to Video with Ease
- How To Create a Polaroid Collage?
- In 2024, Guaranteed 10 Storyboard Creators To Make Animation Easier For You
- 2024 Approved The Latest 100+ Best TikTok Captions to Improve Your Next Post
- Updated 2024 Approved Little Tricks to Create Canva Slideshow No One Is Telling You
- Updated In This Article, You Will Learn How to Record Creative Cinematic Videos Using a Smartphone and Edit the Video with Wondershare Filmora
- New Do You Want to Be Aware of VHSs Meaning? There Is Nothing to Be Worried About because We Will Guide You in This Article
- 2024 Approved Are You Trying to Create a Stunning Intro for Your Video for Free? This Article Will Show You How to Make an Intro Video Using InVideo in a Few Simple Steps
- Troubleshooting Error Connecting to the Apple ID Server From iPhone 14 Pro Max
- How to Resolve Itel A60 Screen Not Working | Dr.fone
- How to Reset Tecno Spark 20C without Losing Data | Dr.fone
- How to Huawei Nova Y71 Get Deleted photos Back with Ease and Safety?
- How to share/fake gps on Uber for Apple iPhone 15 Pro | Dr.fone
- Complete Tutorial for Itel S23 Hard Reset | Dr.fone
- In 2024, How and Where to Find a Shiny Stone Pokémon For Apple iPhone SE (2020)? | Dr.fone
- Fix App Not Available in Your Country Play Store Problem on Vivo Y78+ | Dr.fone
- In 2024, Rootjunky APK To Bypass Google FRP Lock For Realme GT 5
- How to Share/Fake Location on WhatsApp for Oppo A59 5G | Dr.fone
- Does Life360 Notify When You Log Out On Apple iPhone 12? | Dr.fone
- Fixes for Apps Keep Crashing on Tecno Spark 10 5G | Dr.fone
- How to Transfer Data from Motorola Moto G34 5G to Other Android Devices? | Dr.fone
- The Most Useful Tips for Pokemon Go Ultra League On Lava Storm 5G | Dr.fone
- Title: 20 Best Video Background Templates
- Author: Chloe
- Created at : 2024-05-20 03:37:18
- Updated at : 2024-05-21 03:37:18
- Link: https://ai-editing-video.techidaily.com/20-best-video-background-templates/
- License: This work is licensed under CC BY-NC-SA 4.0.
