:max_bytes(150000):strip_icc():format(webp)/Race-982fb219114a48fb96b9c5a2c6f93847.jpg)
2024 Approved 6 Free Tools To Radial Blur Photos Online

6 Free Tools To Radial Blur Photos Online
Radial blur is commonly used in photography and graphics to create a sense of movement or dynamism and help you simulate several different effects, such as a spinning wheel or a moving car. It’s also often used to create a dream-like or ethereal effect. Regardless of how you add it, radial blur can give a lot of visual interest to your otherwise static photos.
Therefore, if you’re looking for a way to add some dynamics to your photos, read on to learn about 6 free tools to create radial blur effects online!
What Is Radial Blur?
Radial blur is a blurring effect that starts from one point in an image and blurs outwards (or inwards) from (or to) that point. The word ‘radial’ means “arranged like rays that come from or go to a common center,” which is precisely how radial blur works.
Here are some common uses of the Radial motion blur effect:
- Create a sense of movement
- Add depth to a photo
- Simulate camera movement
- Create an interesting background
Best 6 Free Online Radial Blur Image Tools
If you want to create a radial blur effect on your photos but don’t have the required resources like storage space, budget, or the right software, we recommend you try using the following tools:
1.Pine Tools
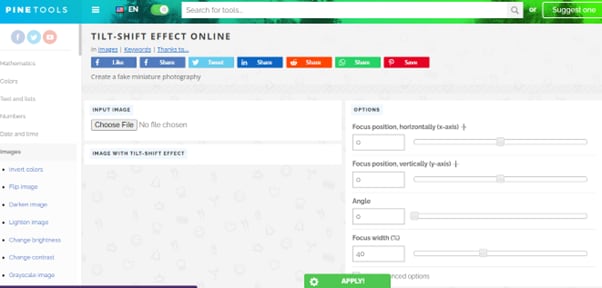
Pine Tools is a terrific online program with many image editing features, such as invert color, blur, special filters, effects, crop images, and more.
Using its radial blur feature, you can quickly add depth to your images and apply the motion blur effect. To do so, visit the Pine Tools website, choose “Blur” from the left panel, and upload your image. Then, under the “Options” header, select “Radial Blur” and click “Apply.” The best thing about this online tool is that you can set different parameters before creating the effect.
Key Features:
- Numerous image editing tools
- Various parameters for creating radial blur effects, such as size, strongness, and axis (x, y)
- No editing knowledge is required to use the program
Pros
- Drag and drop interface
- Free to use
- No sign up required
Cons
- Takes time to finish the process
- UI is a bit old
2.Mass-images.pro
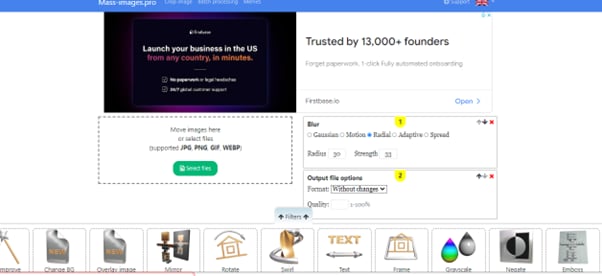
With Mass-images.pro tool, you can crop your images, do batch processing, or create memes in no time. Moreover, the program offers multiple image editing features to help you quickly apply basic changes to your pictures. These include Change BG, Auto Improve, Overlay image, Rotate, Swirl, Radial Blur, Text, Pixelization, and many more filters.
To create the radial motion blur effect on your images using the Mass-images.pro tool, you have to simply upload your file, set the radius and strength, and click “Download.” You can also configure the format and quality of your picture before downloading it.
Key features:
- Offers multiple format options for uploading and downloading your images
- Can change the radius of blur and intensity effects
- Can process multiple photos at once
Pros
- Free to use
- Many input and output formats
- Simple and straightforward to use
- Image quality option
Cons
- No advanced image editing features
3. Font Meme
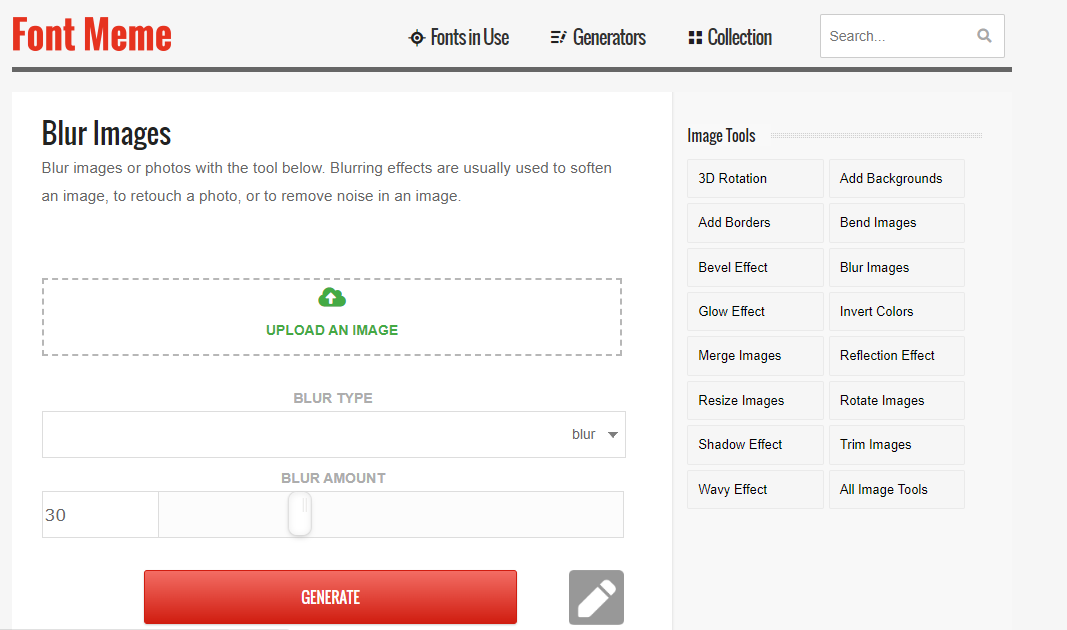
Font Meme is an online resource for fonts and typography. Still, it offers other image editing features, such as 3D Rotation, Bevel Effect, Glow Effect, Invert Colors, Blend Images, and Add Background, to help you create memes instantly.
You can also use the Font Meme to create a radial blur image by uploading the image and selecting the “Blur Type” from the drop-down menu. Next, set the blur amount and click “Generate.”
Key Features:
- Instantly creates the radial blur effect on images
- Offers multiple image editing options
- A Complete resource for font and typography
Pros
- Available for free
- Quick and easy to use
- Intuitive UI
Cons
- No advanced image editing features
4.IMGonline.com.ua
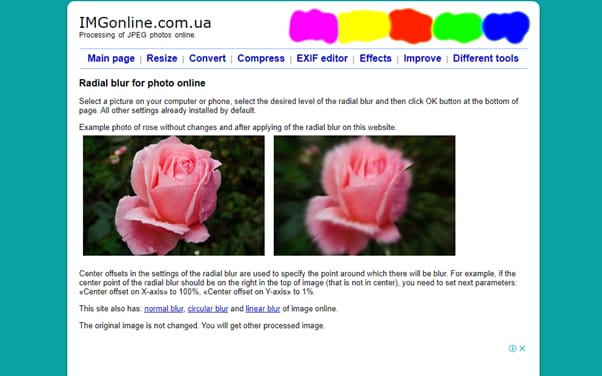
IMGonline is another free online tool that offers image resizing, converting, compression, EXIF editor, effects, and other tools.
IMGonline can also help you create beautiful radial blur images in the nick of time. It’s a great and easy platform to add an extra effect to your photos. Simply upload your picture, choose the amount of blur you want, click “OK,” and download the results.
Key Features:
- Also has circular blur, usual blur, and linear blur features
- Does not change the original image during the process
- Multiple radial blur settings
- Offers JPEG and PNG as output formats
Pros
- Simple user interface
- Quick processing time
- Free
- Multiple image input formats
Cons
- Cannot process large image files
5.Pop Art Studio
Pop Art Studio is an effective online tool that allows you to create pop art images and offers numerous options for users to choose from, including different colors, fonts, and layouts. You can also upload your photos to the tool to convert them into pop art.
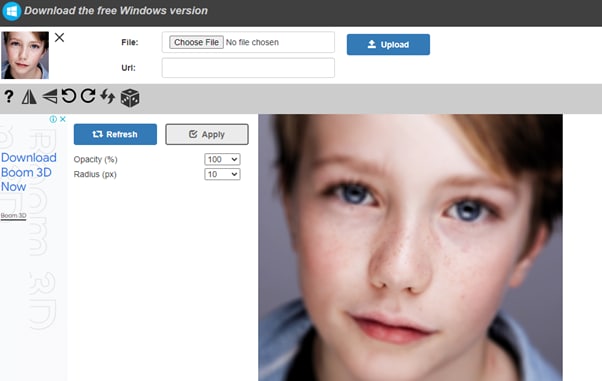
To use Pop Art Studio, simply upload an image to the website or paste the URL and then adjust the opacity and radius of the radial blur. Once you’re happy with the results, download the image.
Key Features:
- Lets you paste the URL of the image
- Can configure the opacity and radius of the blur
- Instant process of the image
Pros
- Useful for creating and editing artwork
- Available for free
- Available as software
Cons
- Applies watermark to your images
6.Photokako
Photokako is a Japanese photo editor that creates radial motion blur effects in your images with just a few clicks by uploading them from your system or pulling the image from a URL.
Besides that, this tool offers several other advanced image editing features, including Transform, Illustrate, Reduce Colors, Parallel Universe, Retro, Ilusion, Frame, and Mood.

Key Features:
- Option to adjust blur smoothness and opacity
- Comes with Basic Settings to edit the image further
- Multiple output formats, including JPG, PNG-24, BMP, TIFF-24, TIFF-48, GIF, PNG-8, and PNG-32.
Pros
- Sophisticated online tool
- Multiple ways to upload a picture
- Free and easy to use
Cons
- The user interface is less intuitive
Bonus Tips – How To Add Radial Blur Effect To Images In Filmora
The programs mentioned above work only online and do not offer advanced features to add more customization options to the level of radial blurring or change its position on the images. Therefore, we recommend using the desktop software - Filmora.
Free Download For Win 7 or later(64-bit)
Free Download For macOS 10.14 or later
Filmora is a free and premium video editing software recommended by many content creators and professionals. With this software, you can create stunning radial effects on your images or memes with more customization options available.
Here’s how you can add the radial blur effect to images in Filmora by following three simple steps:
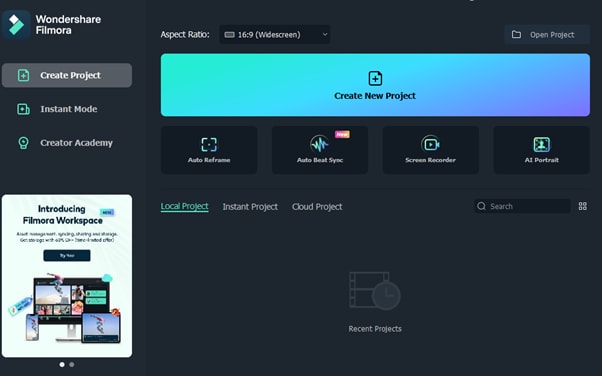
Step1 In the first step, go to the Filmora website, download the file, and install the software. Launch it and click the “Create New Project” option. Then drag & drop your file or click the “Click here to add Media file” to import it.
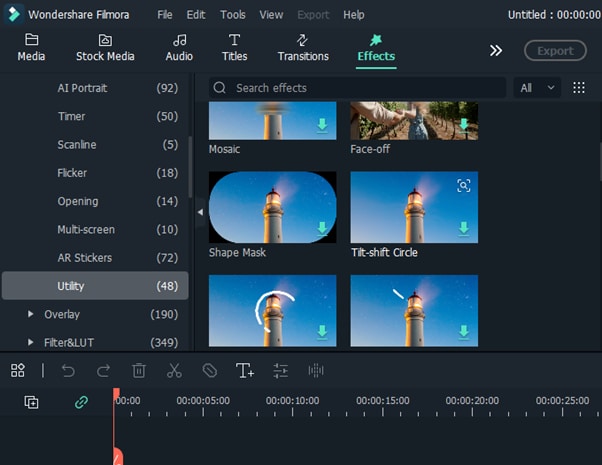
Step2 In the second step, go to the “Effects” tab, choose the Tilt-shift Circle for the radial blur effect, and add it to the timeline.
Step3 Finally, configure the size, X-axis, Y-axis, and intensity of the effect by double-clicking it in the timeline. You’re all set! Export your file by clicking on the “Export” button.
Last Words
In this article, we’ve provided the 6 best tools to create radial blur effects online for free and discussed their key features, pros, and cons to help you choose the right program.
In the end, we’ve provided a bonus tip to show you how to add the radial blur effect to images using the Wondershare Filmora software.
Hopefully, you’ve found this article helpful and can now quickly apply the radial motion effect to your pictures.
What Is Radial Blur?
Radial blur is a blurring effect that starts from one point in an image and blurs outwards (or inwards) from (or to) that point. The word ‘radial’ means “arranged like rays that come from or go to a common center,” which is precisely how radial blur works.
Here are some common uses of the Radial motion blur effect:
- Create a sense of movement
- Add depth to a photo
- Simulate camera movement
- Create an interesting background
Best 6 Free Online Radial Blur Image Tools
If you want to create a radial blur effect on your photos but don’t have the required resources like storage space, budget, or the right software, we recommend you try using the following tools:
1.Pine Tools
Pine Tools is a terrific online program with many image editing features, such as invert color, blur, special filters, effects, crop images, and more.
Using its radial blur feature, you can quickly add depth to your images and apply the motion blur effect. To do so, visit the Pine Tools website, choose “Blur” from the left panel, and upload your image. Then, under the “Options” header, select “Radial Blur” and click “Apply.” The best thing about this online tool is that you can set different parameters before creating the effect.

Key Features:
- Numerous image editing tools
- Various parameters for creating radial blur effects, such as size, strongness, and axis (x, y)
- No editing knowledge is required to use the program
Pros
- Drag and drop interface
- Free to use
- No sign up required
Cons
- Takes time to finish the process
- UI is a bit old
2.Mass-images.pro
With Mass-images.pro tool, you can crop your images, do batch processing, or create memes in no time. Moreover, the program offers multiple image editing features to help you quickly apply basic changes to your pictures. These include Change BG, Auto Improve, Overlay image, Rotate, Swirl, Radial Blur, Text, Pixelization, and many more filters.
To create the radial motion blur effect on your images using the Mass-images.pro tool, you have to simply upload your file, set the radius and strength, and click “Download.” You can also configure the format and quality of your picture before downloading it.

Key features:
- Offers multiple format options for uploading and downloading your images
- Can change the radius of blur and intensity effects
- Can process multiple photos at once
Pros
- Free to use
- Many input and output formats
- Simple and straightforward to use
- Image quality option
Cons
- No advanced image editing features
3. Font Meme
Font Meme is an online resource for fonts and typography. Still, it offers other image editing features, such as 3D Rotation, Bevel Effect, Glow Effect, Invert Colors, Blend Images, and Add Background, to help you create memes instantly.
You can also use the Font Meme to create a radial blur image by uploading the image and selecting the “Blur Type” from the drop-down menu. Next, set the blur amount and click “Generate.”

Key Features:
- Instantly creates the radial blur effect on images
- Offers multiple image editing options
- A Complete resource for font and typography
Pros
- Available for free
- Quick and easy to use
- Intuitive UI
Cons
- No advanced image editing features
4.IMGonline.com.ua
IMGonline is another free online tool that offers image resizing, converting, compression, EXIF editor, effects, and other tools.
IMGonline can also help you create beautiful radial blur images in the nick of time. It’s a great and easy platform to add an extra effect to your photos. Simply upload your picture, choose the amount of blur you want, click “OK,” and download the results.

Key Features:
- Also has circular blur, usual blur, and linear blur features
- Does not change the original image during the process
- Multiple radial blur settings
- Offers JPEG and PNG as output formats
Pros
- Simple user interface
- Quick processing time
- Free
- Multiple image input formats
Cons
- Cannot process large image files
5.Pop Art Studio
Pop Art Studio is an effective online tool that allows you to create pop art images and offers numerous options for users to choose from, including different colors, fonts, and layouts. You can also upload your photos to the tool to convert them into pop art.
To use Pop Art Studio, simply upload an image to the website or paste the URL and then adjust the opacity and radius of the radial blur. Once you’re happy with the results, download the image.

Key Features:
- Lets you paste the URL of the image
- Can configure the opacity and radius of the blur
- Instant process of the image
Pros
- Useful for creating and editing artwork
- Available for free
- Available as software
Cons
- Applies watermark to your images
6.Photokako
Photokako is a Japanese photo editor that creates radial motion blur effects in your images with just a few clicks by uploading them from your system or pulling the image from a URL.
Besides that, this tool offers several other advanced image editing features, including Transform, Illustrate, Reduce Colors, Parallel Universe, Retro, Ilusion, Frame, and Mood.

Key Features:
- Option to adjust blur smoothness and opacity
- Comes with Basic Settings to edit the image further
- Multiple output formats, including JPG, PNG-24, BMP, TIFF-24, TIFF-48, GIF, PNG-8, and PNG-32.
Pros
- Sophisticated online tool
- Multiple ways to upload a picture
- Free and easy to use
Cons
- The user interface is less intuitive
Bonus Tips – How To Add Radial Blur Effect To Images In Filmora
The programs mentioned above work only online and do not offer advanced features to add more customization options to the level of radial blurring or change its position on the images. Therefore, we recommend using the desktop software - Filmora.
Free Download For Win 7 or later(64-bit)
Free Download For macOS 10.14 or later
Filmora is a free and premium video editing software recommended by many content creators and professionals. With this software, you can create stunning radial effects on your images or memes with more customization options available.
Here’s how you can add the radial blur effect to images in Filmora by following three simple steps:
Step1 In the first step, go to the Filmora website, download the file, and install the software. Launch it and click the “Create New Project” option. Then drag & drop your file or click the “Click here to add Media file” to import it.

Step2 In the second step, go to the “Effects” tab, choose the Tilt-shift Circle for the radial blur effect, and add it to the timeline.

Step3 Finally, configure the size, X-axis, Y-axis, and intensity of the effect by double-clicking it in the timeline. You’re all set! Export your file by clicking on the “Export” button.
Last Words
In this article, we’ve provided the 6 best tools to create radial blur effects online for free and discussed their key features, pros, and cons to help you choose the right program.
In the end, we’ve provided a bonus tip to show you how to add the radial blur effect to images using the Wondershare Filmora software.
Hopefully, you’ve found this article helpful and can now quickly apply the radial motion effect to your pictures.
How to Merge Videos in HandBrake? Expectation Vs. Reality
So you have captured some mind-blowing clips and want to join them together to make an excellent movie? But, sadly, you are still stuck because you are not sure what video editors would be suitable to complete this task fast.
If such miseries are haunting you, take a deep breath because many like you are searching for the right video merging tools. However, some people recommend using HandBrake for merging clips. So let’s dig some ground to know if the software can really combine clips. And if there’s a “Yes”? Then how to merge videos in HandBrake?
In this article
02 Using HandBrake to Merge Videos – Possible or Not?
03 Combining Videos with Filmora Wondershare
Part 1: What is HandBrake?
Before you gear up for HandBrake to merge videos, it would be wise to know a few essential details about this software.
HandBrake is a free tool for Windows, Linux, and MAC operating systems. The basic purpose of this software is to convert videos from any format in MKV, WebM, and MP4. It is an open-source program that allows users to convert their videos to play them on multiple devices, such as TV media players, computers, tablets, mobile phones, etc.
Moreover, this platform gives you the power to turn your low-quality videos into high-quality screen time. That is why most professional videographers use this tool to polish videos captured with old cameras.
A few more interesting features of HandBrake are:
- Combing artifacts removal due to interlacing
- Convert videos without negatively affecting the audio quality
- Volume and range adjustment
- Addition, removal, and preservation of soft subtitles
However, one vital thing to understand is that although HandBrake takes a tiny little space of your hard drive, the interface is complicated for beginners.
Part 2: Using HandBrake to Merge Videos – Possible or Not?
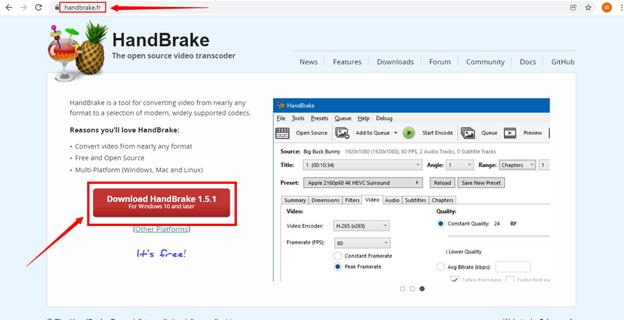
There is a great misconception about HandBrake among the newbies that HandBrake is primarily a video merger software. But, in reality, that is not true at all. Or, at least, the latest HandBrake version 1.5.1 lacks such features.
Even the official website states that HandBrake cannot combine two or more clips to make them whole.
So feel yourself lucky to read this article if you haven’t downloaded HandBrake yet. Congratulations! You are saved from another heartbreak.
But wait! If the software is not meant to merge clips, it doesn’t mean that you can’t use it to prepare your videos for the real deal. HandBrake can still be a helpful tool, permitting you to convert videos in a similar format before you start merging them on any other video editor.
For example, suppose you have two video clips in different formats. In that case, you can use HandBrake to convert all of them in a similar format so that they can be easily be merged when imported on any video merger tool.
But, again, the question is, if not HandBrake, then what?
Frankly, you will find hundreds of video editing tools with a combining clips feature, but not all of them deserve your attention and time. While software like DaVinci Resolve includes characteristics to merge two or more clips in a single shot, beginners and mid-level users may still find them a bit difficult at the start.
That is why professionals and experts prefer Filmora by Wondershare to merge videos without banging their heads on the screen.
So, how to merge videos in Filmora with simple clicks? Focus on the next part of the article to learn the step-by-step method within a few minutes.
Part 3: Combining Videos with Filmora Wondershare
Filmora Video Editor is a remarkable video editing tool for all types of users. The software works on all major operating systems (MAC and Windows) and includes a gigantic library of effects, presets, overlays, and so much more than you can imagine.
You can download Filmora for free if watermarks don’t annoy you. On the other hand, you can purchase a suitable plan to get rid of watermarks, so your videos look 100% professional.
For Win 7 or later (64-bit)
For macOS 10.14 or later
Now, without any more delay, let’s start learning how to combine videos in Filmora through the following steps.
Step 1: Install Filmora on Your Computer
Just visit Filmora’s website to download the latest version of the software for your Windows or MAC.
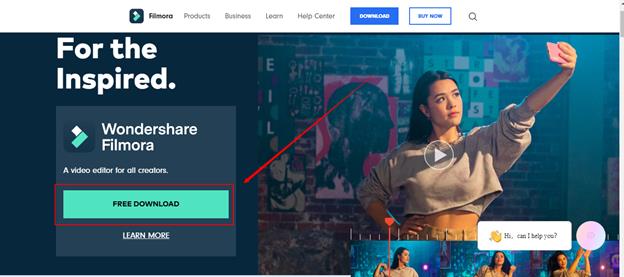
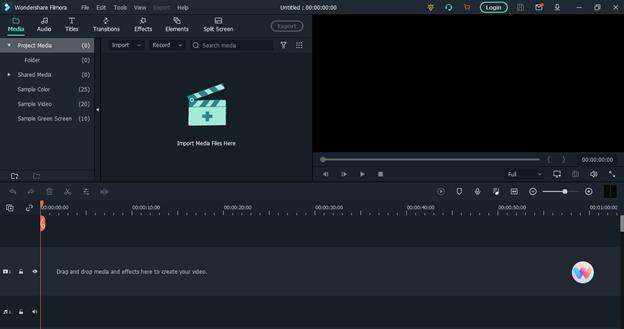
After downloading the software on your computer, install it. Once the software is ready, double-click the “Wondershare Filmora” icon (it should be on your desktop screen) to open the program.
As you can see, the interface is simple with user-friendly options.
Step 2: Import Multiple Videos in Filmora
Click on the blue icon with a “+” sign to import videos.
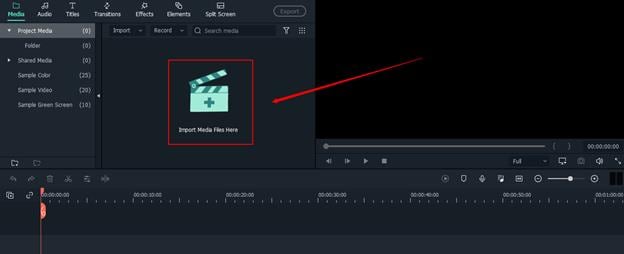
Or, click on the “File” button on the top menu to import files and drag and drop both clips to the same timeline.
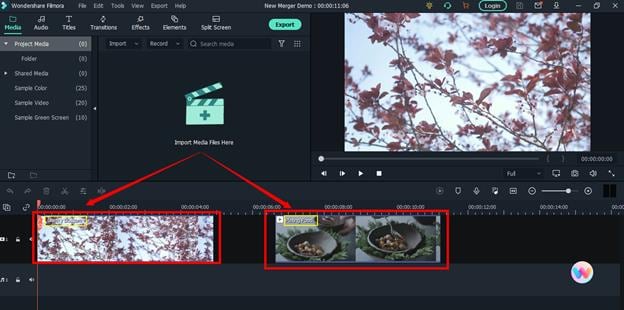
As you can see, there are two clips on the timeline. The first clip is called “Cherry Blossom,” and the second clip’s name is “Plating Food.”
Step 3: Keep Video Clips on the Same Timeline
There shouldn’t be any gap or spaces between the two clips.

It is because gaps will create a dark blank space between the clips when you export the clips, like this:
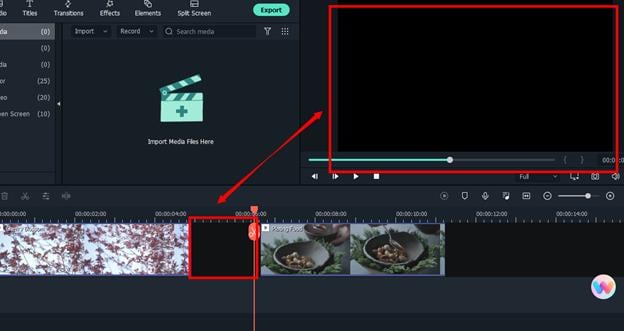
Therefore, slide the second video right next to the first video without leaving any gaps with your mouse.
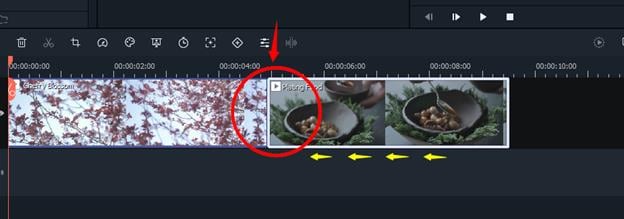
And guess what? You have already merged the two clips.
Step 4: Save Video on Your PC
Now, hit the “Export” button and save the merged video on your computer.
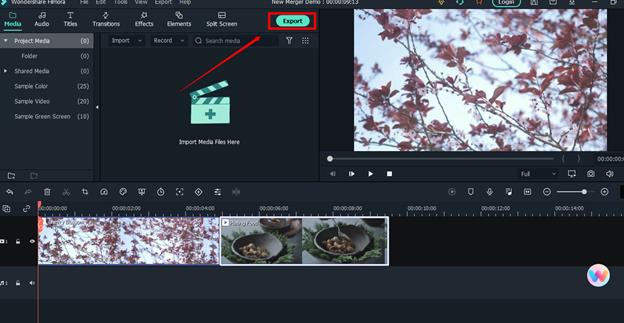
HandBrake is an outstanding tool for video conversion, but there’s no benefit of learning how to merge videos in HandBrake, as the software does not include such features. Nevertheless, when it is about combining multiple videos in high quality, you can rely on Filmora to merge clips in no time.
FAQs
Q1. Can you increase the video quality in HandBrake?
Yes. You can use HandBrake to convert videos and adjust the video quality settings as per your requirements before starting the conversion process.
Q2. Can you crop and resize the video in HandBrake?
HandBrake makes it easy to crop and resize all types of videos without disturbing the audio quality.
Q3. Can you use HandBrake clips on other video editors for video mergers?
After converting videos in HandBrake, you can use the clips in video editors, like Filmora, to merge clips.
02 Using HandBrake to Merge Videos – Possible or Not?
03 Combining Videos with Filmora Wondershare
Part 1: What is HandBrake?
Before you gear up for HandBrake to merge videos, it would be wise to know a few essential details about this software.
HandBrake is a free tool for Windows, Linux, and MAC operating systems. The basic purpose of this software is to convert videos from any format in MKV, WebM, and MP4. It is an open-source program that allows users to convert their videos to play them on multiple devices, such as TV media players, computers, tablets, mobile phones, etc.
Moreover, this platform gives you the power to turn your low-quality videos into high-quality screen time. That is why most professional videographers use this tool to polish videos captured with old cameras.
A few more interesting features of HandBrake are:
- Combing artifacts removal due to interlacing
- Convert videos without negatively affecting the audio quality
- Volume and range adjustment
- Addition, removal, and preservation of soft subtitles
However, one vital thing to understand is that although HandBrake takes a tiny little space of your hard drive, the interface is complicated for beginners.

Part 2: Using HandBrake to Merge Videos – Possible or Not?
There is a great misconception about HandBrake among the newbies that HandBrake is primarily a video merger software. But, in reality, that is not true at all. Or, at least, the latest HandBrake version 1.5.1 lacks such features.
Even the official website states that HandBrake cannot combine two or more clips to make them whole.
So feel yourself lucky to read this article if you haven’t downloaded HandBrake yet. Congratulations! You are saved from another heartbreak.
But wait! If the software is not meant to merge clips, it doesn’t mean that you can’t use it to prepare your videos for the real deal. HandBrake can still be a helpful tool, permitting you to convert videos in a similar format before you start merging them on any other video editor.
For example, suppose you have two video clips in different formats. In that case, you can use HandBrake to convert all of them in a similar format so that they can be easily be merged when imported on any video merger tool.
But, again, the question is, if not HandBrake, then what?
Frankly, you will find hundreds of video editing tools with a combining clips feature, but not all of them deserve your attention and time. While software like DaVinci Resolve includes characteristics to merge two or more clips in a single shot, beginners and mid-level users may still find them a bit difficult at the start.
That is why professionals and experts prefer Filmora by Wondershare to merge videos without banging their heads on the screen.
So, how to merge videos in Filmora with simple clicks? Focus on the next part of the article to learn the step-by-step method within a few minutes.
Part 3: Combining Videos with Filmora Wondershare
Filmora Video Editor is a remarkable video editing tool for all types of users. The software works on all major operating systems (MAC and Windows) and includes a gigantic library of effects, presets, overlays, and so much more than you can imagine.
You can download Filmora for free if watermarks don’t annoy you. On the other hand, you can purchase a suitable plan to get rid of watermarks, so your videos look 100% professional.
For Win 7 or later (64-bit)
For macOS 10.14 or later
Now, without any more delay, let’s start learning how to combine videos in Filmora through the following steps.
Step 1: Install Filmora on Your Computer
Just visit Filmora’s website to download the latest version of the software for your Windows or MAC.

After downloading the software on your computer, install it. Once the software is ready, double-click the “Wondershare Filmora” icon (it should be on your desktop screen) to open the program.
As you can see, the interface is simple with user-friendly options.

Step 2: Import Multiple Videos in Filmora
Click on the blue icon with a “+” sign to import videos.

Or, click on the “File” button on the top menu to import files and drag and drop both clips to the same timeline.
As you can see, there are two clips on the timeline. The first clip is called “Cherry Blossom,” and the second clip’s name is “Plating Food.”

Step 3: Keep Video Clips on the Same Timeline
There shouldn’t be any gap or spaces between the two clips.

It is because gaps will create a dark blank space between the clips when you export the clips, like this:

Therefore, slide the second video right next to the first video without leaving any gaps with your mouse.

And guess what? You have already merged the two clips.
Step 4: Save Video on Your PC
Now, hit the “Export” button and save the merged video on your computer.

HandBrake is an outstanding tool for video conversion, but there’s no benefit of learning how to merge videos in HandBrake, as the software does not include such features. Nevertheless, when it is about combining multiple videos in high quality, you can rely on Filmora to merge clips in no time.
FAQs
Q1. Can you increase the video quality in HandBrake?
Yes. You can use HandBrake to convert videos and adjust the video quality settings as per your requirements before starting the conversion process.
Q2. Can you crop and resize the video in HandBrake?
HandBrake makes it easy to crop and resize all types of videos without disturbing the audio quality.
Q3. Can you use HandBrake clips on other video editors for video mergers?
After converting videos in HandBrake, you can use the clips in video editors, like Filmora, to merge clips.
02 Using HandBrake to Merge Videos – Possible or Not?
03 Combining Videos with Filmora Wondershare
Part 1: What is HandBrake?
Before you gear up for HandBrake to merge videos, it would be wise to know a few essential details about this software.
HandBrake is a free tool for Windows, Linux, and MAC operating systems. The basic purpose of this software is to convert videos from any format in MKV, WebM, and MP4. It is an open-source program that allows users to convert their videos to play them on multiple devices, such as TV media players, computers, tablets, mobile phones, etc.
Moreover, this platform gives you the power to turn your low-quality videos into high-quality screen time. That is why most professional videographers use this tool to polish videos captured with old cameras.
A few more interesting features of HandBrake are:
- Combing artifacts removal due to interlacing
- Convert videos without negatively affecting the audio quality
- Volume and range adjustment
- Addition, removal, and preservation of soft subtitles
However, one vital thing to understand is that although HandBrake takes a tiny little space of your hard drive, the interface is complicated for beginners.

Part 2: Using HandBrake to Merge Videos – Possible or Not?
There is a great misconception about HandBrake among the newbies that HandBrake is primarily a video merger software. But, in reality, that is not true at all. Or, at least, the latest HandBrake version 1.5.1 lacks such features.
Even the official website states that HandBrake cannot combine two or more clips to make them whole.
So feel yourself lucky to read this article if you haven’t downloaded HandBrake yet. Congratulations! You are saved from another heartbreak.
But wait! If the software is not meant to merge clips, it doesn’t mean that you can’t use it to prepare your videos for the real deal. HandBrake can still be a helpful tool, permitting you to convert videos in a similar format before you start merging them on any other video editor.
For example, suppose you have two video clips in different formats. In that case, you can use HandBrake to convert all of them in a similar format so that they can be easily be merged when imported on any video merger tool.
But, again, the question is, if not HandBrake, then what?
Frankly, you will find hundreds of video editing tools with a combining clips feature, but not all of them deserve your attention and time. While software like DaVinci Resolve includes characteristics to merge two or more clips in a single shot, beginners and mid-level users may still find them a bit difficult at the start.
That is why professionals and experts prefer Filmora by Wondershare to merge videos without banging their heads on the screen.
So, how to merge videos in Filmora with simple clicks? Focus on the next part of the article to learn the step-by-step method within a few minutes.
Part 3: Combining Videos with Filmora Wondershare
Filmora Video Editor is a remarkable video editing tool for all types of users. The software works on all major operating systems (MAC and Windows) and includes a gigantic library of effects, presets, overlays, and so much more than you can imagine.
You can download Filmora for free if watermarks don’t annoy you. On the other hand, you can purchase a suitable plan to get rid of watermarks, so your videos look 100% professional.
For Win 7 or later (64-bit)
For macOS 10.14 or later
Now, without any more delay, let’s start learning how to combine videos in Filmora through the following steps.
Step 1: Install Filmora on Your Computer
Just visit Filmora’s website to download the latest version of the software for your Windows or MAC.

After downloading the software on your computer, install it. Once the software is ready, double-click the “Wondershare Filmora” icon (it should be on your desktop screen) to open the program.
As you can see, the interface is simple with user-friendly options.

Step 2: Import Multiple Videos in Filmora
Click on the blue icon with a “+” sign to import videos.

Or, click on the “File” button on the top menu to import files and drag and drop both clips to the same timeline.
As you can see, there are two clips on the timeline. The first clip is called “Cherry Blossom,” and the second clip’s name is “Plating Food.”

Step 3: Keep Video Clips on the Same Timeline
There shouldn’t be any gap or spaces between the two clips.

It is because gaps will create a dark blank space between the clips when you export the clips, like this:

Therefore, slide the second video right next to the first video without leaving any gaps with your mouse.

And guess what? You have already merged the two clips.
Step 4: Save Video on Your PC
Now, hit the “Export” button and save the merged video on your computer.

HandBrake is an outstanding tool for video conversion, but there’s no benefit of learning how to merge videos in HandBrake, as the software does not include such features. Nevertheless, when it is about combining multiple videos in high quality, you can rely on Filmora to merge clips in no time.
FAQs
Q1. Can you increase the video quality in HandBrake?
Yes. You can use HandBrake to convert videos and adjust the video quality settings as per your requirements before starting the conversion process.
Q2. Can you crop and resize the video in HandBrake?
HandBrake makes it easy to crop and resize all types of videos without disturbing the audio quality.
Q3. Can you use HandBrake clips on other video editors for video mergers?
After converting videos in HandBrake, you can use the clips in video editors, like Filmora, to merge clips.
02 Using HandBrake to Merge Videos – Possible or Not?
03 Combining Videos with Filmora Wondershare
Part 1: What is HandBrake?
Before you gear up for HandBrake to merge videos, it would be wise to know a few essential details about this software.
HandBrake is a free tool for Windows, Linux, and MAC operating systems. The basic purpose of this software is to convert videos from any format in MKV, WebM, and MP4. It is an open-source program that allows users to convert their videos to play them on multiple devices, such as TV media players, computers, tablets, mobile phones, etc.
Moreover, this platform gives you the power to turn your low-quality videos into high-quality screen time. That is why most professional videographers use this tool to polish videos captured with old cameras.
A few more interesting features of HandBrake are:
- Combing artifacts removal due to interlacing
- Convert videos without negatively affecting the audio quality
- Volume and range adjustment
- Addition, removal, and preservation of soft subtitles
However, one vital thing to understand is that although HandBrake takes a tiny little space of your hard drive, the interface is complicated for beginners.

Part 2: Using HandBrake to Merge Videos – Possible or Not?
There is a great misconception about HandBrake among the newbies that HandBrake is primarily a video merger software. But, in reality, that is not true at all. Or, at least, the latest HandBrake version 1.5.1 lacks such features.
Even the official website states that HandBrake cannot combine two or more clips to make them whole.
So feel yourself lucky to read this article if you haven’t downloaded HandBrake yet. Congratulations! You are saved from another heartbreak.
But wait! If the software is not meant to merge clips, it doesn’t mean that you can’t use it to prepare your videos for the real deal. HandBrake can still be a helpful tool, permitting you to convert videos in a similar format before you start merging them on any other video editor.
For example, suppose you have two video clips in different formats. In that case, you can use HandBrake to convert all of them in a similar format so that they can be easily be merged when imported on any video merger tool.
But, again, the question is, if not HandBrake, then what?
Frankly, you will find hundreds of video editing tools with a combining clips feature, but not all of them deserve your attention and time. While software like DaVinci Resolve includes characteristics to merge two or more clips in a single shot, beginners and mid-level users may still find them a bit difficult at the start.
That is why professionals and experts prefer Filmora by Wondershare to merge videos without banging their heads on the screen.
So, how to merge videos in Filmora with simple clicks? Focus on the next part of the article to learn the step-by-step method within a few minutes.
Part 3: Combining Videos with Filmora Wondershare
Filmora Video Editor is a remarkable video editing tool for all types of users. The software works on all major operating systems (MAC and Windows) and includes a gigantic library of effects, presets, overlays, and so much more than you can imagine.
You can download Filmora for free if watermarks don’t annoy you. On the other hand, you can purchase a suitable plan to get rid of watermarks, so your videos look 100% professional.
For Win 7 or later (64-bit)
For macOS 10.14 or later
Now, without any more delay, let’s start learning how to combine videos in Filmora through the following steps.
Step 1: Install Filmora on Your Computer
Just visit Filmora’s website to download the latest version of the software for your Windows or MAC.

After downloading the software on your computer, install it. Once the software is ready, double-click the “Wondershare Filmora” icon (it should be on your desktop screen) to open the program.
As you can see, the interface is simple with user-friendly options.

Step 2: Import Multiple Videos in Filmora
Click on the blue icon with a “+” sign to import videos.

Or, click on the “File” button on the top menu to import files and drag and drop both clips to the same timeline.
As you can see, there are two clips on the timeline. The first clip is called “Cherry Blossom,” and the second clip’s name is “Plating Food.”

Step 3: Keep Video Clips on the Same Timeline
There shouldn’t be any gap or spaces between the two clips.

It is because gaps will create a dark blank space between the clips when you export the clips, like this:

Therefore, slide the second video right next to the first video without leaving any gaps with your mouse.

And guess what? You have already merged the two clips.
Step 4: Save Video on Your PC
Now, hit the “Export” button and save the merged video on your computer.

HandBrake is an outstanding tool for video conversion, but there’s no benefit of learning how to merge videos in HandBrake, as the software does not include such features. Nevertheless, when it is about combining multiple videos in high quality, you can rely on Filmora to merge clips in no time.
FAQs
Q1. Can you increase the video quality in HandBrake?
Yes. You can use HandBrake to convert videos and adjust the video quality settings as per your requirements before starting the conversion process.
Q2. Can you crop and resize the video in HandBrake?
HandBrake makes it easy to crop and resize all types of videos without disturbing the audio quality.
Q3. Can you use HandBrake clips on other video editors for video mergers?
After converting videos in HandBrake, you can use the clips in video editors, like Filmora, to merge clips.
How Can I Control Speed of a Video
Speed doesn’t course at the same level for everyone. You can change momentum. You can slow it down and speed it up to convey a particular mood. In this article, you will learn how and when to control the speed of the video and its importance.
Importance of Speeding up/Slowing Down Your video?
Speeding up or slowing it down, known as slow or fast motion, can make your video faster or slower than its actual speed, called speed ramping. Overall, adjusting the speed of video clips can enhance the video’s visual effects, especially if you want to convey a particular mood to the audience. Speeding up your video may create a comical and dramatic impact, while slowing down your video can give viewers a time-lapse feel or an emotional mood.
This video speed controlling software can instantly speed up video up to 50x times. On the contrary, you can also slow down the video up to 0.1x, which means a one-minute video will run for 10 minutes.
How important is this Feature? The technique plays an essential role in adjusting the video’s speed. You will appreciate this technique once you’ve started editing your video. At first, controlling the speed of your video without music will give you a plain or bare impression. Based on my experience, I cannot quickly identify which video part needs to control the speed. Still, once you’ve added music at the start, you can quickly determine when and where you should maintain the momentum based on the beat of the music.
How to Speed up/Slow down a Video?
Nowadays, most video editing software offers an effortless way of giving special cinematic effects through speed ramping? Speed ramping is an approach to adjusting the clip’s speed to send the message across and provide the audience with an element of confusion. Since speed ramp is a gradual increase in the acceleration or deceleration of a video clip, reasons to slow down or speed up video vary from merely decorative to practical, but whatever your reasons, speed effects can add some production value to your projects.
This article gives you a guide on how to slow down or speed up video on your video editing software, for example, using Wondershare Filmora on your device.
In this tutorial, you will learn how to change the speed of your video using Wondershare Filmora
Free Download For Win 7 or later(64-bit)
Free Download For macOS 10.14 or later
Step1 Open your Video editing software
Launch Wondershare Filmora from your system and select New Project.

Import the selected videos and open them in the program to enhance the speed and duration of the video. The video can also be dragged and dropped to the interface.
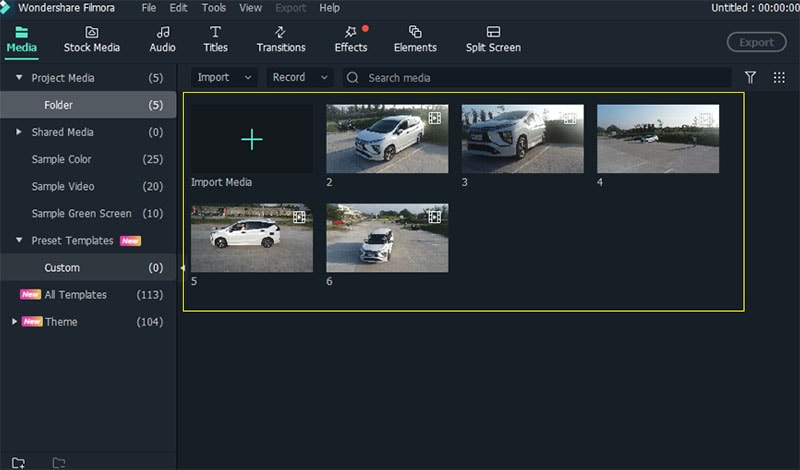
Drag the selected video clip on Timeline Panel. You can click the + button or drag the video.
Step2 Change the Speed of your video
In Wondershare Filmora there are two available features you can use, first is using the Uniform Speed Feature.
Uniform Speed - Uniform Speed feature in Filmora is used to change the speed of your video or audio clips. Compared to Speed Ramping function, Uniform speed will change the whole clip’s speed evenly, instead of parts of your clips. How to use this Feature?
Using the Uniform Speed
- After adding the video on your timeline, drag the play head line and choose where will the uniform speed start.
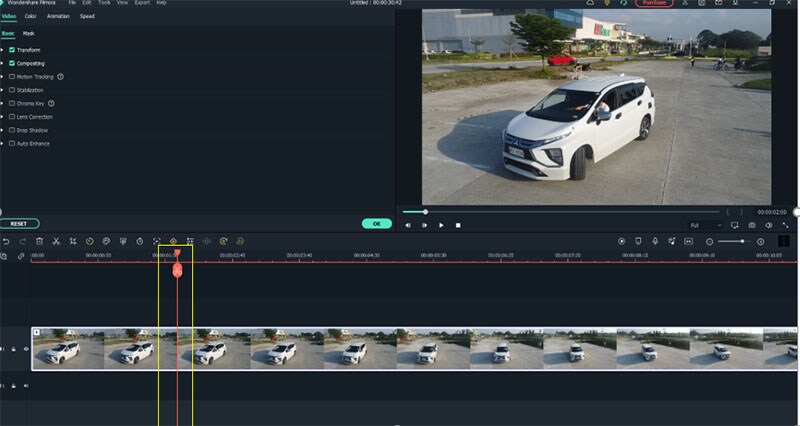
- Right-click on the video or audio clip, or go to Speed>Uniform Speed then choose Uniform Speed.
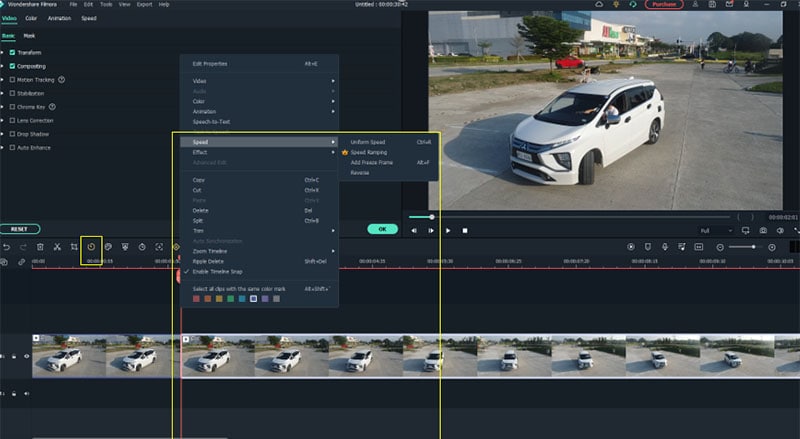
- Uniform Speed window will pop up then adjust the slider to your desired speed. Click ok once you’re done.
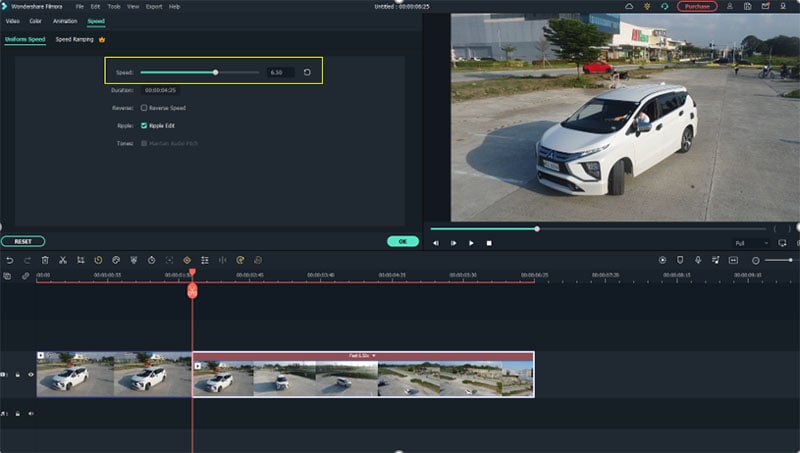
- You can observe that the video from where you set your playback has indicator of how fast does the video will play which is 6.50x.
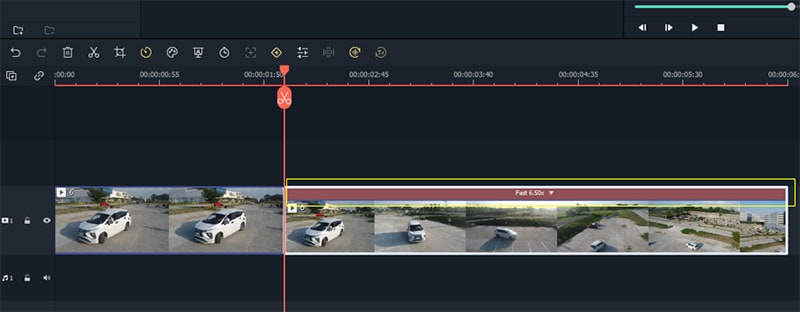
- You can also revert back or customize the set Uniform Speed by clicking the arrow down on the Uniform Speed Indicator or click the Speed button on the left side of the screen. There are also options whether you want to set the speed to slow, fast and normal.
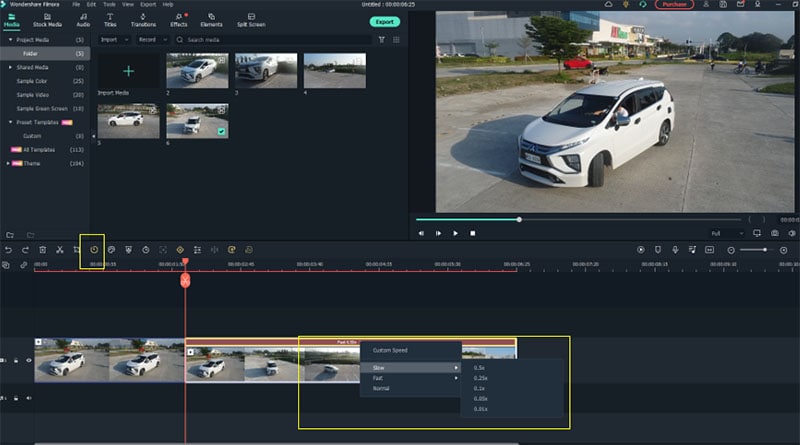
Speed ramping - In Filmora, you can choose to change speed uniformly or speedily. To change the rate of the video or audio clip speed, you need to use the Filmora Speed Ramping feature.
In the Speed Ramping panel, you can customize the speed or select the speed preset such as Montage, Hero Moment, Bullet Time, Jumper, Flash in, and Flash out. You can choose the Preset speed ramps.
Evenly change the speed of the video clip to match another clip. Much software available will give you the option to speed ramp.
The importance of speed controls Having control over the speed of your motors and machinery is vital for you to get the full potential of your tools. Giving yourself complete speed control will ensure you experience little to no tool chatter and a perfect machined finish every time.
Playing with speed controls can help displeasure interest and guide focus when editing your video. You might have used slow motion to overemphasize a scene, or maybe you’ve sped up a clip to create a time-lapse—but have you tried to speed ramping?
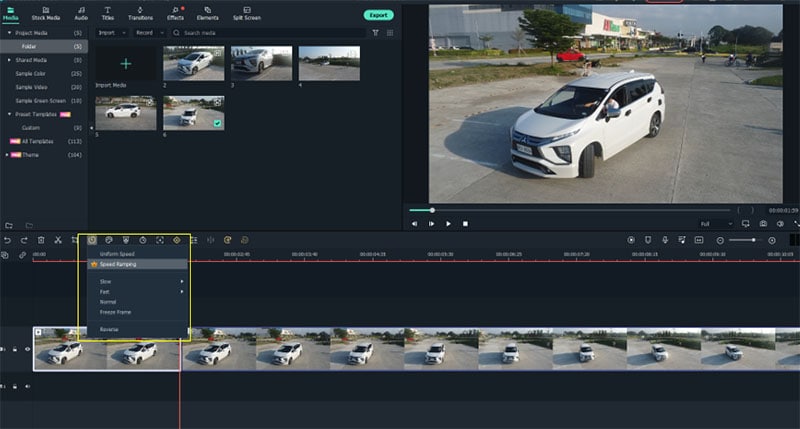
If you want to add cinematic to your video. The speed ramp effect describes a smooth transition between speeds, resulting in a video that dips in and out of slow-mo. and high-speed playback. You can ramp up, down, or do a mix of both for multiple speed adjustments throughout a video!
Visualize you’re trying to bring a simple pan shot of a product to life, energize the transitions in your latest travel video, emphasize the beat drop in a music video, or keep eyes affix to your content.
Speed ramping can give your video. style. It can help you do anything from excitement up B-roll to infuse otherwise unremarkable footage with personality.
Proper timing and speed make videos more useful and spectacular. You can enable slow motion to add enthusiasm to dramatics or speed up a video to spur the action. No matter your idea, you can fulfill it with some video editing software.
Free Download For Win 7 or later(64-bit)
Free Download For macOS 10.14 or later
Free Download For macOS 10.14 or later
Step1 Open your Video editing software
Launch Wondershare Filmora from your system and select New Project.

Import the selected videos and open them in the program to enhance the speed and duration of the video. The video can also be dragged and dropped to the interface.

Drag the selected video clip on Timeline Panel. You can click the + button or drag the video.
Step2 Change the Speed of your video
In Wondershare Filmora there are two available features you can use, first is using the Uniform Speed Feature.
Uniform Speed - Uniform Speed feature in Filmora is used to change the speed of your video or audio clips. Compared to Speed Ramping function, Uniform speed will change the whole clip’s speed evenly, instead of parts of your clips. How to use this Feature?
Using the Uniform Speed
- After adding the video on your timeline, drag the play head line and choose where will the uniform speed start.

- Right-click on the video or audio clip, or go to Speed>Uniform Speed then choose Uniform Speed.

- Uniform Speed window will pop up then adjust the slider to your desired speed. Click ok once you’re done.

- You can observe that the video from where you set your playback has indicator of how fast does the video will play which is 6.50x.

- You can also revert back or customize the set Uniform Speed by clicking the arrow down on the Uniform Speed Indicator or click the Speed button on the left side of the screen. There are also options whether you want to set the speed to slow, fast and normal.

Speed ramping - In Filmora, you can choose to change speed uniformly or speedily. To change the rate of the video or audio clip speed, you need to use the Filmora Speed Ramping feature.
In the Speed Ramping panel, you can customize the speed or select the speed preset such as Montage, Hero Moment, Bullet Time, Jumper, Flash in, and Flash out. You can choose the Preset speed ramps.
Evenly change the speed of the video clip to match another clip. Much software available will give you the option to speed ramp.
The importance of speed controls Having control over the speed of your motors and machinery is vital for you to get the full potential of your tools. Giving yourself complete speed control will ensure you experience little to no tool chatter and a perfect machined finish every time.
Playing with speed controls can help displeasure interest and guide focus when editing your video. You might have used slow motion to overemphasize a scene, or maybe you’ve sped up a clip to create a time-lapse—but have you tried to speed ramping?

If you want to add cinematic to your video. The speed ramp effect describes a smooth transition between speeds, resulting in a video that dips in and out of slow-mo. and high-speed playback. You can ramp up, down, or do a mix of both for multiple speed adjustments throughout a video!
Visualize you’re trying to bring a simple pan shot of a product to life, energize the transitions in your latest travel video, emphasize the beat drop in a music video, or keep eyes affix to your content.
Speed ramping can give your video. style. It can help you do anything from excitement up B-roll to infuse otherwise unremarkable footage with personality.
Proper timing and speed make videos more useful and spectacular. You can enable slow motion to add enthusiasm to dramatics or speed up a video to spur the action. No matter your idea, you can fulfill it with some video editing software.
Free Download For Win 7 or later(64-bit)
Free Download For macOS 10.14 or later
How to Make a YouTube Intro by Filmora
You are starting a YouTube channel and looking to create a video intro. Then, this article will allow you to experience the magic of Wondershare Filmora in creating a YouTube intro. Wondershare Filmora allows you to access the range of opener templates you can edit to create engaging YouTube intros. This will help to hook up your audience till the end.
But before we learn how to create a YouTube intro, let’s understand what makes an Intro creative and exciting.
Part 1. What Is a Creative YouTube Intro?
A good intro is a crucial feature of a good YouTube video. Whenever a viewer or a subscriber clicks on your video, the YouTube intro is the first thing they see. And a successful channel’s secret is to captivate the viewer from the start.
What Goes Into a Creative YouTube Intro?
A good YouTube intro consists of the following qualities:
- Graphic: The intro text will be written on the graphics template.
- Text: This text will be your channel’s name. Or, if it’s a Vlog, it could be its number. Such as i.e., Vlog #2.
- Images: If you use plain templates, you can add pictures behind them to make them pop up even more.
- Catchy music: To spice up the video and make it more pleasing, the music will be added to hook the audience in the intro section.
You must have an engaging YouTube intro. You will need a few things to create a YouTube intro.
Part 2. What Do You Need to Make a Creative YouTube Intro?
You are all set to engage the audience, then you need the following essentials to create an exemplary YouTube intro:
Requirement 1. Wondershare Filmora
Free Download For Win 7 or later(64-bit)
Free Download For macOS 10.14 or later
First, you will need to have a good video editor. Wondershare Filmora is the best for editing your videos. It enables you to make creative and appealing videos.
It has a very engaging system UI that allows even novices to quickly get the hang of it. Also, it has a wide range of stock media. Thus, it allows you to access the intro templates and customise features.

Requirement 2. Footage for Intro
When creating content for your YouTube videos, remember that you will also need some footage for your intro. Intros need to be as captivating as possible.
So to hook the audience from the start, you will need an entertaining start. These video clips can be the exciting moments that you cut before the climax or landscapes of the scenery. The choice is yours.
Part 3. Step-by-Step Guide to Creating a YouTube Intro
You can create a YouTube intro in two ways.
- Create a YouTube intro with an opener template.
- By using video clips from your library.
To use both of these methods, you will need Wondershare Filmora. For this, read below to get your hands on it!
Create a YouTube Intro with an opener template
Opener templates are full of fancy graphics and animations that you can change according to your style. The library provides you with the most vibrant and simplest form of opener templates.
Step1 Download Wondershare Filmora
Before all, you need to have access to Filmora. If you don’t have then follow the below actions:
- First, download and install the Wondershare Filmora.
- Then, on your PC or Mac, run this application.
Step2 Preview The Intro Template
After downloading the Wondershare Filmora, you must select an intro template. To perform this action, you will need to preview it first as:
- Click on the Title icon above the Import window.
- On the left column, scroll down to Titles > Openers.
- Double-click on any intro template to preview it.
After previewing the opener, we need to insert it into the timeline. Simply click on an intro you like and place it in the timeline below. Here you can edit the Opener.
Step3 Edit The Text
After adding the opener to the timeline, your goal is to type in your text. This text will appear in the intro. To perform this action, follow the steps mentioned below:
- Double-click on the opener added to the timeline.
- This will open the settings menu in the import window.
- Type in the text box your channel’s or vlog’s name.

- Then change the font of text if you want.
- You can also edit the sub-heading. Here you can write a short description of your video.
- Once you are done typing the text, click on OK to confirm your changes.
After you have typed in the text for your opener, it is time to add some music to it.
Step4 Add Music into Clip
Music will spice up your intro video and give more pleasing effect. To proceed it further, follow the following steps:
- Click on the Audio icon above the import window and Audio library will pop up.
- Here, you can see the variety of Royalty-free music available.
- Browse through the library and choose whatever you like.
- After you have selected the music for your video, click to drop it below your opener in the timeline.
- Trim the music to the length of the opener.
- Play the opener from the start to confirm your changes.

This is how you can create an opener intro for your YouTube videos. Choose the graphics that most suit your video’s vibe.
Now that we have learned how to make an opener by template, let’s look at how to create an intro using clips in your library.
Create an Intro with Video Clips in Your Library
Wondershare Filmora also allows you to edit your videos to turn them into openers. This will enable your intros to be more personal and unique, giving you the edge of creativity.
Creating an intro by using video clips is an easy task. You just need suitable video clips to use as an intro, and you are good to go.
Follow the steps as mentioned to create an intro using Video clips:
Step1 Import the Video Clips
After downloading Wondershare Filmora, your next step is to import your video clips. To perform this, follow the steps as mentioned below:
- On the Filmora Home Interface, find the Import icon on the top left side and select it.
- This will direct you to your PC library.
- Select the photos and videos you want to edit and click OK.

Step2 Add The Video Clips to the Timeline
Once you have imported clips in the Import window, your next step is simply to add them to the timeline. For this, follow the steps mentioned below:
- Drag and select the clips in the import window.
- Then, drop them in the timeline.

Once in the timeline, your video is ready to go into editing mode. But before we insert the template of our intro, we need another step as shown!
Step3 Trim The Video Clips
As it’s the intro, we need to trim the video clips, so they are concise. You may have recorded longer video clips, but we need clips that are no longer than 5 seconds.
To trim the video clips, follow the steps mentioned:
- Move the playhead on the video clip to where you want to trim.
- Click on the scissors icon on the Playhead.
This will split your video clip into two parts. Now, you can delete whatever part you like and keep the other one.
![]()
Note: To measure the time of the video clip, keep an eye on the Time map above the Playhead.

When you have trimmed your video clips to your liking, it’s time to add the Title text that will act as an intro to your video!
Step4 Add The Title Text
You will need a title template to add text to your video clips. For this,perform the following actions:
- First, click on the Title icon above the import window.
- On the left column explore and browse the animated title as you want.
- Double-click on a title template to preview it.
- Once you have selected the Title template, drag it above the start of your timeline above the video clip and it’ll all set.
After you have added the title, the next step is to add your intro text.
Step5 Type The Intro Text
For specifications of the video and ongoing content, you have to tell the audience before starting. For this, you need to type the intro text as shown:
- Double-click on the title template.
- Type in the text you want in the text box.

Play the video clip from the beginning to confirm your changes. Now that we have created a graphic text, it’s time to add the audio.
Step6 Add Music
To give more pleasing look and effect, you must add the music into it. Follow the steps below to proceed it further:
- First select the Audio icon above the import window. This will direct you to Filmora’s Audio library.
- Browse the library and pick whatever royalty-free music you want.
- After you’ve chosen the music for your video, drag it to the timeline below the video clip.
- Cut the music to match the length of the intro and it’s all done.

Once you are done adding the music, hit the play button to ensure everything is according to your need.

Step7 Export The Video
Its time to export the video and share it with your audience. For this, check below steps:
- Click on the export icon on the top right of the import window.
- This will pop-up another window of settings.
- Select the settings your want your video to be exported in.
![]()
Note: You can also change the name of your intro.
- When you are done, click on Export.
- Wait till Filmora finishes exporting your video.

Congratulations! You have successfully created a YouTube intro. Now you can use them freely in your YouTube videos and please your audience.
Conclusion
YouTube intros are a great way to attract the viewer at first glance. The more creative the YouTube Intro is, the more the chances of your video getting views.
By following the steps mentioned in the article above, you can easily create YouTube intros by Wondershare Filmora. Try with new features and stock media to make your video more exemplary!
Free Download For macOS 10.14 or later
First, you will need to have a good video editor. Wondershare Filmora is the best for editing your videos. It enables you to make creative and appealing videos.
It has a very engaging system UI that allows even novices to quickly get the hang of it. Also, it has a wide range of stock media. Thus, it allows you to access the intro templates and customise features.

Requirement 2. Footage for Intro
When creating content for your YouTube videos, remember that you will also need some footage for your intro. Intros need to be as captivating as possible.
So to hook the audience from the start, you will need an entertaining start. These video clips can be the exciting moments that you cut before the climax or landscapes of the scenery. The choice is yours.
Part 3. Step-by-Step Guide to Creating a YouTube Intro
You can create a YouTube intro in two ways.
- Create a YouTube intro with an opener template.
- By using video clips from your library.
To use both of these methods, you will need Wondershare Filmora. For this, read below to get your hands on it!
Create a YouTube Intro with an opener template
Opener templates are full of fancy graphics and animations that you can change according to your style. The library provides you with the most vibrant and simplest form of opener templates.
Step1 Download Wondershare Filmora
Before all, you need to have access to Filmora. If you don’t have then follow the below actions:
- First, download and install the Wondershare Filmora.
- Then, on your PC or Mac, run this application.
Step2 Preview The Intro Template
After downloading the Wondershare Filmora, you must select an intro template. To perform this action, you will need to preview it first as:
- Click on the Title icon above the Import window.
- On the left column, scroll down to Titles > Openers.
- Double-click on any intro template to preview it.
After previewing the opener, we need to insert it into the timeline. Simply click on an intro you like and place it in the timeline below. Here you can edit the Opener.
Step3 Edit The Text
After adding the opener to the timeline, your goal is to type in your text. This text will appear in the intro. To perform this action, follow the steps mentioned below:
- Double-click on the opener added to the timeline.
- This will open the settings menu in the import window.
- Type in the text box your channel’s or vlog’s name.

- Then change the font of text if you want.
- You can also edit the sub-heading. Here you can write a short description of your video.
- Once you are done typing the text, click on OK to confirm your changes.
After you have typed in the text for your opener, it is time to add some music to it.
Step4 Add Music into Clip
Music will spice up your intro video and give more pleasing effect. To proceed it further, follow the following steps:
- Click on the Audio icon above the import window and Audio library will pop up.
- Here, you can see the variety of Royalty-free music available.
- Browse through the library and choose whatever you like.
- After you have selected the music for your video, click to drop it below your opener in the timeline.
- Trim the music to the length of the opener.
- Play the opener from the start to confirm your changes.

This is how you can create an opener intro for your YouTube videos. Choose the graphics that most suit your video’s vibe.
Now that we have learned how to make an opener by template, let’s look at how to create an intro using clips in your library.
Create an Intro with Video Clips in Your Library
Wondershare Filmora also allows you to edit your videos to turn them into openers. This will enable your intros to be more personal and unique, giving you the edge of creativity.
Creating an intro by using video clips is an easy task. You just need suitable video clips to use as an intro, and you are good to go.
Follow the steps as mentioned to create an intro using Video clips:
Step1 Import the Video Clips
After downloading Wondershare Filmora, your next step is to import your video clips. To perform this, follow the steps as mentioned below:
- On the Filmora Home Interface, find the Import icon on the top left side and select it.
- This will direct you to your PC library.
- Select the photos and videos you want to edit and click OK.

Step2 Add The Video Clips to the Timeline
Once you have imported clips in the Import window, your next step is simply to add them to the timeline. For this, follow the steps mentioned below:
- Drag and select the clips in the import window.
- Then, drop them in the timeline.

Once in the timeline, your video is ready to go into editing mode. But before we insert the template of our intro, we need another step as shown!
Step3 Trim The Video Clips
As it’s the intro, we need to trim the video clips, so they are concise. You may have recorded longer video clips, but we need clips that are no longer than 5 seconds.
To trim the video clips, follow the steps mentioned:
- Move the playhead on the video clip to where you want to trim.
- Click on the scissors icon on the Playhead.
This will split your video clip into two parts. Now, you can delete whatever part you like and keep the other one.
![]()
Note: To measure the time of the video clip, keep an eye on the Time map above the Playhead.

When you have trimmed your video clips to your liking, it’s time to add the Title text that will act as an intro to your video!
Step4 Add The Title Text
You will need a title template to add text to your video clips. For this,perform the following actions:
- First, click on the Title icon above the import window.
- On the left column explore and browse the animated title as you want.
- Double-click on a title template to preview it.
- Once you have selected the Title template, drag it above the start of your timeline above the video clip and it’ll all set.
After you have added the title, the next step is to add your intro text.
Step5 Type The Intro Text
For specifications of the video and ongoing content, you have to tell the audience before starting. For this, you need to type the intro text as shown:
- Double-click on the title template.
- Type in the text you want in the text box.

Play the video clip from the beginning to confirm your changes. Now that we have created a graphic text, it’s time to add the audio.
Step6 Add Music
To give more pleasing look and effect, you must add the music into it. Follow the steps below to proceed it further:
- First select the Audio icon above the import window. This will direct you to Filmora’s Audio library.
- Browse the library and pick whatever royalty-free music you want.
- After you’ve chosen the music for your video, drag it to the timeline below the video clip.
- Cut the music to match the length of the intro and it’s all done.

Once you are done adding the music, hit the play button to ensure everything is according to your need.

Step7 Export The Video
Its time to export the video and share it with your audience. For this, check below steps:
- Click on the export icon on the top right of the import window.
- This will pop-up another window of settings.
- Select the settings your want your video to be exported in.
![]()
Note: You can also change the name of your intro.
- When you are done, click on Export.
- Wait till Filmora finishes exporting your video.

Congratulations! You have successfully created a YouTube intro. Now you can use them freely in your YouTube videos and please your audience.
Conclusion
YouTube intros are a great way to attract the viewer at first glance. The more creative the YouTube Intro is, the more the chances of your video getting views.
By following the steps mentioned in the article above, you can easily create YouTube intros by Wondershare Filmora. Try with new features and stock media to make your video more exemplary!
Also read:
- New How to Create Your Own LUTs for Your Video for 2024
- Updated In 2024, Slow-Motion Innovation with Sony S&Q Feature
- New 2024 Approved How to Create Datamoshing Effect to Your Footage in After Effects?
- Detailed Tutorial to Crop Video in KineMaster
- New In 2024, Discover Vintage LUTs Premiere Pro Free and Paid Options Available
- In 2024, 10 Recommended Websites to Discover Awesome Premiere Pro Video Templates
- Updated In 2024, Detailed Tutorial to Crop Videos Using Openshot?
- 3 Ways To Stream And Record At The Same Time for 2024
- Explore the List of the Top Six Online Video Speed Controllers for Chrome, Safari, and Firefox for 2024
- How to Film Better in Public - 2024 Guide
- Updated Make A Countdown Video for 2024
- New How to Create Photoshop GIF The Easy Way
- In 2024, Are You Looking for Trustworthy GIF Converters to Use GIF Images Across Various Platforms? Find Out About Reliable and Authentic GIF Converters that You Can Easily Use for WMV to GIF Conversion Anytime You Want
- New 2024 Approved 15 Best CapCut Templates for Slow Motion Editing
- Ways to Learn Discord Game Bots – Even if Youre Just Starting Out for 2024
- 2024 Approved Gif to Svg, Svg to Gif, Convert Gif to Svg, Animated Svg to Gif, Convert Svg to Gif, Svg to Gif Converter, Svg to Gif Animation, Svg Animation to Gif, Gif to Svg Converter
- 2024 Approved 100 Working Methods to Learn How to Rotate TikTok Video
- New In 2024, How to Trim Video in Quicktime Player on Mac
- Updated Premiere Pro Text Effects Beginner Guide for 2024
- Updated In 2024, How to Add Freeze Frame to Your Video From Any Device?
- Best Video Editing Courses Online with Certificate for 2024
- New How to Loop YouTube Videos on iPhone
- New Best 12 Best Freeze Frame Video Editing Examples for 2024
- Updated Want to Explore the Exciting World of GIFs? Here Is Everything You Will Ever Want to Know and Learn About the Most Appealing GIF Libraries, All at Once Place
- Create Slide Masking Effect Intro【Filmora】 for 2024
- Updated Explore the Potential of Slow-Motion Video for Different Industries. Read This Guide and Choose the Best Slow-Motion Camera App to Create Stunning Videos
- Updated In 2024, Perfecting the Art of Slowing Down Video on Instagram
- 2024 Approved Learn the Step-by-Step Process of Slowing Down Time-Lapse Videos on Your iPhone
- In 2024, Everything That You Need to Know About Video Montages- Ideas, Techniqu
- Updated In This Article, Youll Find Four Solutions for Rotating Your Go-Pro Videos. The Following Tools Will Be Used for This Purpose
- 2024 Approved Add Camera Shake to Video in Adobe After Effects
- Updated 2024 Approved Ultimate Guidelines to Help You Better Use VLC Media Player
- Updated 2024 Approved Adding Slow Motion in DaVinci Resolve A Comprehensive Overview
- Here Are a Number of Tools Used in the Market to Resize the Videos. We Are Going to Teach How to Resize the Video in Davinci Resolve and Fimora Wondershare. Once You Have Mastered How to Resize a Video, It Would Be as Simple as the Click
- 2024 Approved Best Video Format Converter for PC and Online
- New 7 Best GoPro Video Editors for Mac
- 2024 Approved Looking Forward to Try Hands at Using the Icecream Slideshow Maker Program to Create High End Slideshow Presentations? Stay Here for a Complete Insight Into the Process
- New In 2024, An Ultimate Guide to Flexclip Online Trimmer
- Updated The Right Ways to Slow Down a Video on iPhone for 2024
- This Review Post Introduces You to EasyHDR to Review and Customize Your HDR Photos. Youll Also Learn the Best Desktop Application to Edit Your HDR Videos Effortlessly for 2024
- In 2024, Troubleshoot Snapchat Camera Zoomed in Issue
- In 2024, Instagram Doesnt Offer Native Support for GIF Files. So, in This Post, Well Learn How to Convert a GIF to a Video for Instagram Using Multiple Methods.
- Updated In 2024, Color Lut in Video - Color Grade Your Video
- Sign .xltx files Online for Free
- In 2024, 4 Feasible Ways to Fake Location on Facebook For your Realme GT Neo 5 | Dr.fone
- How To Change Your Apple ID on iPhone 7 With or Without Password | Dr.fone
- Google Play Services Wont Update? 12 Fixes are Here on Nubia Red Magic 8S Pro+ | Dr.fone
- How to Repair corrupt MP4 and AVI files of Oppo with Video Repair Utility on Windows?
- Latest way to get Shiny Meltan Box in Pokémon Go Mystery Box On Vivo Y56 5G | Dr.fone
- How to Unlock Samsung Galaxy S23 Ultra Bootloader Easily
- In 2024, How to Factory Reset iPad or Apple iPhone 6 Plus without iCloud Password or Apple ID?
- Best Anti Tracker Software For Oppo K11x | Dr.fone
- In 2024, How to Change Google Play Location On Infinix GT 10 Pro | Dr.fone
- How to Check Distance and Radius on Google Maps For your Vivo Y27 5G | Dr.fone
- In 2024, Top 10 Best Spy Watches For your Oppo F25 Pro 5G | Dr.fone
- Pokemon Go Error 12 Failed to Detect Location On Motorola Moto G24? | Dr.fone
- Ways to trade pokemon go from far away On Apple iPhone XR? | Dr.fone
- Fixes for Apps Keep Crashing on Motorola Moto G23 | Dr.fone
- In 2024, FRP Hijacker by Hagard Download and Bypass your Xiaomi Redmi Note 12R FRP Locks
- Top 10 Fingerprint Lock Apps to Lock Your Infinix Hot 30i Phone
- In 2024, How can I get more stardust in pokemon go On Oppo Reno 10 5G? | Dr.fone
- How to Cast Vivo Y27 4G Screen to PC Using WiFi | Dr.fone
- Xiaomi Tutorial - Bypass Lock Screen,Security Password Pin,Fingerprint,Pattern
- In 2024, How To Check if Your Samsung Galaxy A24 Is Unlocked
- New Guide How To Check iCloud Activation Lock Status On Your iPhone 12 Pro Max
- In 2024, 15 Best Strongest Pokémon To Use in Pokémon GO PvP Leagues For Poco M6 5G | Dr.fone
- 2024 Approved Translate Audio/Video Content From Spanish to English and Vice Versa
- Unlock iPhone 15 Plus Without Passcode Easily
- Can Life360 Track You When Your Itel P40+ is off? | Dr.fone
- How can I get more stardust in pokemon go On Nubia Red Magic 8S Pro+? | Dr.fone
- In 2024, Does Life360 Notify When You Log Out On Tecno Spark 20 Pro? | Dr.fone
- 8 Solutions to Solve YouTube App Crashing on Motorola Edge 40 Neo | Dr.fone
- Which is the Best Fake GPS Joystick App On Samsung Galaxy M34? | Dr.fone
- Top 5 Vivo X100 Pro Bypass FRP Tools for PC That Actually Work
- Title: 2024 Approved 6 Free Tools To Radial Blur Photos Online
- Author: Chloe
- Created at : 2024-05-20 03:37:43
- Updated at : 2024-05-21 03:37:43
- Link: https://ai-editing-video.techidaily.com/2024-approved-6-free-tools-to-radial-blur-photos-online/
- License: This work is licensed under CC BY-NC-SA 4.0.

