
:max_bytes(150000):strip_icc():format(webp)/best-sports-movies-creed-michael-b-jordan-cbca95120e5243edb7eca00403eaa626.jpg)
2024 Approved Best Video Editors to Add Text to a Video
Best Video Editors to Add Text to a Video
While it can be very easy to add text to an image, the same cannot be said when it comes to adding even the simplest text to a video. You will need video editing software that is designed with the necessary features to help you add text to your video.
There are very many programs in the market that can technically be used to add text to a video. But the ones we will look at are video editors that make the process easy, but also give you a wide range of options to customize your text in numerous ways.
Filmora
Filmora by Wondershare is one of the best video editors in the market. Its user interface is so easy to use that adding text to the video is a simple 3-step process. Aside from adding text to the video, Filmora also allows you to edit other aspects of the video including adding transitions, overlays, and animations to any section of the video.

Key Features:
- You can use Filmora to add text to any section of the video
- It gives you the freedom to move the text to any section of the video
- Customizing the text, you add to the video can be done in numerous ways including changing the color, and font and adding animations to the text.
- It offers numerous templates to choose from and different font styles that you can use
- It has a simple user interface that makes the video editing process very easy
- It has numerous other video editing capabilities that allow you to create and edit videos in different ways including splitting videos, trimming videos, and even merging videos clips into one
- You can upload the videos directly to YouTube after editing.
After Effects
Adobe After Effects is a motion picture editing program that you can also use to add text and other animations to your video. While you can use it to add simple text to the video, it is an ideal solution when your goal is to add advanced text animations. It is however by no means a simple solution, especially for beginners who may find it hard to get going with After Effects.

Key Features:
- You can add simple lines of text to any section of the video
- Text is easily customizable by changing the color, font, and size of the text
- You can also choose to change the entire text layer and add advanced animations and effects
- There are a lot of text, animations, and effects templates to choose from
- You can easily copy text from other Adobe applications to use in After Effects
Movavi Editor
Movavi video editor is another great video editor that you can use to add and edit text on a video. Like most similar tools it is designed to simplify the process, allowing you to add text to any section of the document, move the text to any location on the video and even add text effects to customize the text. It has a very simple user interface that allows you to do that quickly and easily.

Key Features:
- You can add text to any section of the video
- Customizing the text by changing the font, color and size is also very easy
- The user interface is very easy to use, allowing you to add even blocks of text very quickly
- You also have additional options to edit the video including splitting and merging the video or adjusting the brightness, saturation, and color.
iMovie
This is a built-in video editor that you will find on macOS and iOS devices. Even though it is free, iMovie has a lot of features that come in handy when you want to add and edit text on a video. The fact that it can be used on iOS devices is an added advantage when you want to edit videos on the go.

Key Features:
- It allows users to add transitions and effects to the text you add to the video
- It comes with a lot of title templates to choose from
- Adding animated text is also very simple including Sideways Drift, Lens Flare, and more
- You can customize the text in very many ways including adding fonts, drop shadows, changing the color, and even resizing or repositioning the text.
Camtasia
TechSmith Camtasia is one of the most popular tools to create and edit videos. Of the numerous features that you get when you choose to use Camtasia is adding and editing text to the video. It has numerous templates that can be used to customize the text you add in various ways.

Key Features:
- It gives you numerous options to add text to the images including text boxes, templates, and effects
- It has a speech-to-text feature that is perfect for adding captions and subtitles to the video
- You can easily customize the text by adding transitions and effects or even by simply changing the font, color, and size of the text
- The text can be moved to any section of the video
Typito
Typito is an online video editor with simple tools that can help you make changes to any video. designed to help YouTube content creators and video editors, Typito can be used to add all kinds of text and text effects to any video. It is accessible on all browsers and it is also very easy to use.
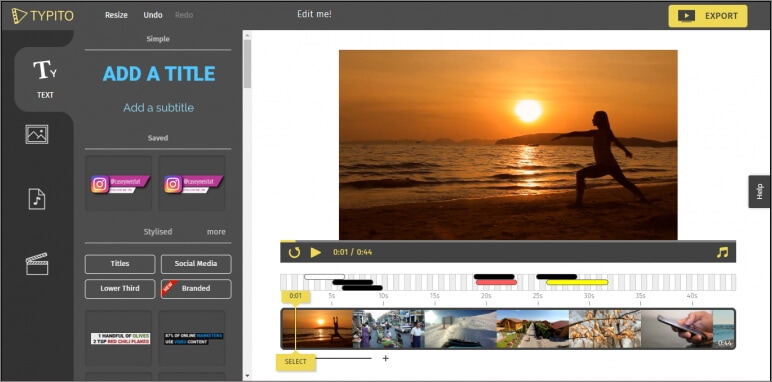
Key Features:
- It is very easy to use, allowing you to add text to any video in a few simple steps
- It has numerous templates to choose from
- Changing the font size, color, and style of the text is very easy
- You can publish videos directly to numerous video-sharing sites after editing
- It allows users to add animations, transitions, and effects to the text
Splice
Splice is an iOS app designed to help you add text to videos on iOS devices. Adding text to any video using Splice can be easily done using the overlay feature. It also has numerous other video editing features including allowing you to easily synchronize your videos and music, adding filters and transitions, and more.

Key Features:
- it has a simple user interface that makes adding text very easy
- You can customize the text in various ways including changing the font size, color and style or even adding various text effects
- Videos can be saved on the device or shared directly on social media apps like Facebook, Instagram, and YouTube
- It has numerous other video editing features including filters and animations
Clipomatic
If the text you want to add to the video is in the form of captions or subtitles, then Clipomatic is perhaps the best choice. It supports various languages including German, French, Portuguese, and even Chinese. You can also use it to add regular text to any video, reposition the text on any section of the video and customize the text in various ways.

Key Features:
- It is available for both Android and iOS
- Adding text to the video is very easy
- You can easily customize the text by changing the font color, and size and adding transitions and text effects
- It supports various languages, making it ideal for captions and subtitles
MySubtitle
MySubtitle is a simple but highly effective app that you can use to add text to your video. As the name suggests, this tool is ideal for adding subtitles and you can do that very easily by simply typing in the text and syncing the text to the video’s content.

Key Features:
- It is available for both iOS and Android devices
- You can type in your subtitles directly on the video
- Subtitles can then be paced to suit the video’s playback speed
- It is completely free to use
- You can share the videos you edit directly on various social media platforms
Free Download For Win 7 or later(64-bit)
Free Download For macOS 10.14 or later
Free Download For macOS 10.14 or later
Do You Seek to Blur Out Your Video and Photo to Display some Motion Blur? This Article Provides a List of the Best Motion Blur Apps for Videos and Photos
The blur observed in moving objects captured through the camera is called the motion blur effect. This, in particular, occurs due to the movement of the camera, subject, or both elements combined. People observe this effect in their real life through their eyes; thus, the motion blur effect is put into practice to give the clip or photo a touch of reality.
It is essentially used to display the message of speed or show the fast progression of time. Any object moving through a fast motion can be accompanied by the motion blur effect. There are many applications available to cater to this purpose. In this article, we will recommend some top-notch motion blur apps that will help you achieve this feat in no time.
- CapCut
- NSMB - Motion Blur Video
- BlurEffect - Blur Photo & Video
- Snapseed
- Picsart Photo Editor & Video
- Blur Video and Photo Editor
- Blur.r Photo, Pic.ture Motion
- Motion Blur Photo Effect
- Motion Blur Photo Editor
- Wondershare Filmora - The Best Motion Blur Effect App on Desktop
- Vegas Pro - Create Natural-Looking Motion Blurs With Ease
- Adobe Premiere Pro - Professionally Edit Motion Blur Videos
Best 4 Online Motion Blur Tools
Part 1: Best 9 Motion Blur Effect Apps for iPhone and Android
| Name | Price | Support System | Motion Blur for Photos | Motion Blur for Videos |
|---|---|---|---|---|
| CapCut | $0.99 - $74.99 Per Item | iPhone/Android | Yes | Yes |
| NSMB - Motion Blur Video | Not Provided | Android | No | Yes |
| BlurEffect - Blur Photo & Video | Full version: $39.99Premium - Monthly: $3.99Ad-Free & Watermark-Free: $14.99Up to 5 Minutes & Watermark-Free & Ad-Free: $19.99Premium - Annual: $19.99 | iPhone | Yes | Yes |
| Snapseed | Free | iPhone/Android | Yes | No |
| Picsart Photo Editor & Video | Ad Remover: $5.99Girl Minisketch: $1.99Food: $1.99Cartoon Animal Package: $2.99Grunge Stickers: $0.99Girly: $0.99Horoscope: $1.99Cute Thanksgiving: $2.99Happy Thanksgiving: $2.99Aliens: $0.99 | iPhone/Android | Yes | Yes |
| Blur Video and Photo Editor | $0.99 - $99.99 Per Item | Android | Yes | Yes |
| Blur.r Photo, Pic.ture Motion | Monthly Subscription: $ 11.98Weekly Subscription: $ 6.98One Week Subscription: $ 3.98Yearly Subscription: $ 94.98 | iPhone | Yes | No |
| Motion Blur Photo Effect | Premium Access: $7.99 - $29.99 | iPhone | Yes | No |
| Motion Blur Photo Editor | Not Provided | Android | Yes | No |
There are many motion blur effect applications available in the market, providing direct services for iPhone and Android users. However, finding the best app for this purpose is essential, which is why we came up with a list of the best motion blur apps that can be used on iPhone and Android.
1. CapCut
While it is known as an easy-to-use application, CapCut stands among the most premium mobile applications that help you create professional videos that can be posted on social media platforms. CapCut comes up with a dedicated motion blur effect that allows users to create stabilized videos with complete control over the speed of the video.
Following other adjustments in the video, CapCut is a complete tool designed to create advanced videos, including different effects such as motion blur.

Download: Google Play Store | App Store
Key Features
- You can quickly put transitions between the video and the clips to blend in perfectly.
- Video clips can be animated with the help of zoom-in and out effects, providing all major professional touchups a video can have.
- Execute a perfect motion blur video with the help of the multi-track timeline for arranging and previewing clips.
Pros
- It provides the option of including music clips and sound effects on the videos from the vast collection.
- It supports exporting videos in 4K and 60fps with Smart HDR technology.
Cons
- Won’t work perfectly if the RAM and hardware of the phone are limited.
2. NSMB - Motion Blur Video
The motion blur effect is a great feature that can enhance the quality of the video and make it look realistic if used properly. NSMB - Motion Blur Video is an Android motion blur application that features the option of creating such videos in a matter of seconds.
With no particular learning requirement, NSMB makes the process look easy. You have to set the intensity of video, and that’s all you need to do within this application.

Download: Google Play Store
Key Features
- While the platform is easy-to-use, the interface is quite simple to understand, with no confusing structures.
- The platform comes up with an intelligent motion blur that automatically executes the process.
- It works with Android devices from Android 5.0 and later, making it a compatible tool with all major Android devices.
Pros
- You can set the resolution of your exported video to 1080p, which is a Full HD result.
- Set an appropriate fps value for your exported video with the available options.
Cons
- Long rendering times, which are not optimized and take up time.
3. BlurEffect - Blur Photo & Video
BlurEfffect - Blur Photo & Video is another great iOS application that provides the option of adding motion blur effects. This tool is built to include the blur effect to perfection in general. With defining blur options, you can create motion blur effects easily on your added videos. The functions are diverse and quite effective if appropriately observed.

Download: App Store
Key Features
- As the name exclaim, it works perfectly for photos and videos, likewise.
- The paid version of the application can save videos up to 1080p in quality.
- It provides the feature of managing the strength of the “Auto Blurs” feature for controlling motion blur.
Pros
- Multiple effects are available on the platform, including normal blurs, pixelated and dotted blurs, etc.
- It also provides the option of trimming videos before adding the blur effect to them.
Cons
- The resolution of the video is lowered after blurring it out.
4. Snapseed
Google presented a great and quick photo editor for users confused about finding their perfect option. Snapseed was designed as a professional photo editor that allows users to add multiple touchups to the photo that is being edited.
While it backs itself up with Google Photos, this professional photo editor is enhanced and interconnected. Snapseed makes photo touchups simple; however, it does provide advanced functions that can help create motion blur pictures.

Download: Google Play Store | App Store
Key Features
- It combines with 29 different tools and filters, which also includes creating motion blur pictures.
- 38 predefined text styles are available in the editor for creating the text of different styles and forms.
- Create effects with multiple exposures brought with HDR Scape.
Pros
- Enhance a specific photo element with the help of the Face Enhance feature, which adds focus to the facial features.
- You can selectively retouch the photo and manage its exposure, saturation, and other elements.
Cons
- The application has no undo button, making it challenging to manage edits.
5. Picsart Photo Editor & Video
Picsart is a renowned photo and video editor available on App Store and Play Store. This exceptional editor covers a creative set of features combined with artificial intelligence to present some of the best options for retouching photos and videos. If you seek to create a motion blur effect with this application, it surely won’t disappoint, presenting a high-resolution result.

Download: Google Play Store | App Store
Key Features
- It helps users customize photos and videos with customizable brushes, layers, and drawing tools.
- Present a realistic display of motion blur with the help of the multiple effects and filters used for blending in perfectly.
- More than 60 million stickers are available in Picsart, which can be effectively used within any editing media.
Pros
- You can easily share the edited content with your friends through the platform.
- It provides multiple video effects and trendy filters to make video editing easier.
Cons
- There is a lot of lag in the application while editing the video.
6. Blur Video and Photo Editor
This is one of the motion blur apps that provides a simple set of options for managing and enhancing the videos and photos on your Android device. Motion blur can be confusing if not managed properly; however, Blur Video and Photo Editor provides a simple platform to include the blurry effect and make the moving object look perfect in the preview.

Download: Google Play Store
Key Features
- You can blur out the background of the imported photo or video while adjusting the intensity with the help of an easy tool.
- It also allows you to pixelate the unwanted sections and portions of the media files.
- Define more than one area for blurring with the help of shapes.
Pros
- It features the intuitive option of blurring out an object that is moving in the video.
- You can track an object with a simple definition of the area within the platform.
Cons
- The user interface is not exceptional, with buttons that are not even usable.
7. Blur.r Photo, Pic.ture Motion
Not many tools provide a simple and customized set of options for including motion blur within photos and other media. Blur.r Photo, Pic.ture Motion has been tangibly designed to improvise a perfect motion-blurring photo platform. While it provides a quick set of tools to work with, the results are exquisite and better than most in the market.

Download: App Store
Key Features
- Set the intensity of the blurriness and size on the photo with custom tools.
- A complete set of sharing options is available on the platform, which is covered in a single click.
- For detailed blurring, you can consume the option of Zoom and Pan the photo.
Pros
- You can easily undo and redo actions on the edited photos to avoid repeating actions and wasting time.
- Use different filters within photos to edit them to perfection.
Cons
- It does not allow for adjustment of the intensity of the blur, as stated in the services.
8. Motion Blur Photo Effect
While finding the perfect motion blur effect app on iPhone for presenting realistic effects in photos, you might come across Motion Blur Photo Effect, a perfect motion blur photo application for iOS users. The tool is known for its fast processing and quick execution, with an easy-to-use interface for creating perfect blurred pictures.
You can find multiple features and effects in this application that relate to motion blur, providing a diverse range of options when seeking this effect.

Download: App Store
Key Features
- Protects the user’s privacy while maintaining its policy of avoiding illegal breaches.
- Emphasize the light spot in the background of a picture with the help of the Bokeh effect.
- Get a complete set of blur effects to include in the photo, which features advanced functionality.
Pros
- You can find different types of blur effects, such as Zoom Blur, Motion Blur, and Mosaic Effect, to enhance the motion blur.
- It is extremely simple and quick in procession.
Cons
- It does not provide motion blurring for videos, making it restricted.
9. Motion Blur Photo Editor
Adding realistic effects to images is important if your work involves professional requirements. Motion blur is an effect used in multiple places, which makes it a critical feat to achieve. While obtaining the effect, the simplicity of the procedure holds importance. This is why Motion Blur Photo Editor gives the perfect result with explicit functions and features to enhance the motion blur effect.

Download: Google Play Store
Key Features
- Make your images look realistic with the help of magic effects.
- Manage different elements, including the text and other features, such as the brightness of the tool.
- It allows you to share the rendered result on different social applications.
Pros
- Features support for Android devices with OS 4.2 or above.
- The process of including motion blur in photos is quite basic.
Cons
- An outdated application, which was last updated in 2019.
Part 2: 3 Motion Blur Apps for Mac and Windows
As you have consulted the motion blur apps for iPhone and Android, you might require something more professional. For this, you first have to shift onto a computer or Mac that provides you with a perfect platform for creating content. Let’s find out some top-notch motion blur effect apps that you can use on your Mac and Windows:
1. Wondershare Filmora - The Best Motion Blur Effect App on Desktop
Free Download For Win 7 or later(64-bit)
Free Download For macOS 10.14 or later
Not many tools provide a complete set of tools to manage the videos on your computer and create the best version out of them. Wondershare Filmora is a complete package for creating a motion blur effect on a video.
With a quick and effective toolkit available on the platform, Filmora turns out to simplify the process, thereby making the process look basic. Filmora unleashes the creativity of a beginner, helping them create a perfect video with its intuitive and impressive interface.
Supported System
- Windows, Mac, and iOS
Pricing
- Month Plan: $19.99
- Annual Plan: $49.99
- Perpetual Plan: $79.99
Key Features
- It provides support to a variety of file formats which allows you to recreate motion blur out of any video with ease.
- The variety of video transformation features offered in the tool is exquisite, where you can manage motion tracking, stabilization, and several other video parameters.
- Use effects and transitions to create the perfect motion blur video for yourselves.
Pros
- You can find the support of resolution up to 4K in the video editing platform.
- It also features the option of enhancing GPU acceleration for faster encoding.
Cons
- Puts a watermark on the export video for the free version.
Step-by-Step Guide on How to Create Motion Blur Effect on Filmora
We will now discuss how you can create a motion blur effect on Filmora, the best app for motion blur, using the right tools. First, look into the steps provided below for a better understanding:
Step 1 Add Video File to Platform
Launch Wondershare Filmora on your computer and select “Create New Project” to open a new canvas. Click on the “Arrow” icon to import the video or photo.

Step 2 Cut Down Sections of Clips
As you add the media into the timeline, lead to the point where you want to add the motion blur. Select the “Scissors” icon for splitting the clip and repeat this for every point where you want to add the effect.

Step 3 Include the Blur Effect
Access the “Effects” tab and look for the “Blur” effect. Add the blur effect by dragging it into the timeline on the split part of the video.

Step 4 Change Parameters to Smoothen Results
Adjust the parameters of the added effect to make it smooth. You can also access the “Dissolve” option in the Transitions. Add the motion blur effect and perform other vital changes in parameters that are required.

Step 5 Export Video File
Afterward, select the “Export” button and define the desired resolution and frame rate to conclude. You can also share your video on your social media accounts.

2. Vegas Pro - Create Natural-Looking Motion Blurs With Ease
Vegas Pro is an impressive video editing platform that provides the option of creating motion blurs that look completely natural. It does not edit a specific element in the video but allows you to make changes in any other element that can be used to define motion. Motion blur can be added and edited to a fraction of a second with this platform.

3. Adobe Premiere Pro - Professionally Edit Motion Blur Videos
Adobe Premiere Pro is a great tool for improvising professional videos. With quick edits, you can come across every second of the video and present the perfect editing model with the help of the advanced toolkit. The major issue with such platforms is the high learning curve that prevents many users from considering this platform for tasks like executing motion blur in videos.

Part 3: Best 4 Online Motion Blur Tools
Many online platforms feature the option of introducing motion blur effects on videos. While we point out the best ones in the list, you should carefully assess them all to know more about them:
1. Lunapic
Lunapic is a great option for introducing motion blur into pictures. Being an online tool, it is pretty straightforward with its functionality, as you will only have to adjust some settings in the picture to edit it. Lunapic, being an online photo editor, provides different editing functions and tools in its interface. The result of motion blur turns out to be excellent in terms of it being an online tool.

Pros
- You can scale the image before putting a motion blur on the output.
- Add different shapes to highlight the image that is being edited.
Cons
- It provides an outdated interface when compared with other online photo editing tools.
2. Aspose
This excellent photo editing platform provides you with a dedicated function of adding motion blur to an image as a filter. Aspose allows adding files from the computer and Dropbox while providing a straightforward process of putting motion blur into a photo. You have to adjust the filter parameters to create the perfect picture.

Pros
- You can also detect objects within the image with the help of the “Object detection” feature.
- Create Photo Book Maker along with including motion blurs on the image for managing a collection of pictures.
Cons
- It does not offer any adjustment sliders and options while performing motion blur.
3. Kapwing
As an online tool, Kapwing provides many features that can be used to edit videos. Its ability to blur the videos is exceptional and tends to offer great results with the least of parameters. Users who are uncomfortable with editing videos on professional tools can consider this an alternative.

Pros
- No spam and ads are present in the tool while protecting the user’s information.
- The tool provides AI-Powered features, which can be easily used to manage videos.
Cons
- It does not maintain the quality of the videos after exporting the edits.
4. Flixier
For quick motion blurs, people can use Flixier to create motion blurs with its pixelating technology. Along with other features for managing videos and enhancing their outlook, Flixier can be used for editing videos quickly. You can easily attach the effect while setting up its time parameters and other functions.

Pros
- You can integrate the features used in Flixier for creating videos for your YouTube channel.
- Works on low-powered devices, including Chromebooks and old devices.
Cons
- There are not a lot of features available on the online platform, limiting its use.
Last Words
This article has provided an overview of the best motion blur apps you can find in the market to create a realistic effect on your photo or video. As the article covers all kinds of compatible devices, it turns out to be an informative article to go through. Ensure to fill in all the details and see which application serves the best purpose.
For iOS and Android devices, CapCut turns out to be a great option to work with. Filmora has shown promising results with its Mac and Windows version, and Kapwing presents an excellent interface to edit videos regardless of being an online editor. Wondershare Filmora provides the best features for creating motion blur pictures and videos if you tend to work on your desktop.
- Wondershare Filmora - The Best Motion Blur Effect App on Desktop
- Vegas Pro - Create Natural-Looking Motion Blurs With Ease
- Adobe Premiere Pro - Professionally Edit Motion Blur Videos
Best 4 Online Motion Blur Tools
Part 1: Best 9 Motion Blur Effect Apps for iPhone and Android
| Name | Price | Support System | Motion Blur for Photos | Motion Blur for Videos |
|---|---|---|---|---|
| CapCut | $0.99 - $74.99 Per Item | iPhone/Android | Yes | Yes |
| NSMB - Motion Blur Video | Not Provided | Android | No | Yes |
| BlurEffect - Blur Photo & Video | Full version: $39.99Premium - Monthly: $3.99Ad-Free & Watermark-Free: $14.99Up to 5 Minutes & Watermark-Free & Ad-Free: $19.99Premium - Annual: $19.99 | iPhone | Yes | Yes |
| Snapseed | Free | iPhone/Android | Yes | No |
| Picsart Photo Editor & Video | Ad Remover: $5.99Girl Minisketch: $1.99Food: $1.99Cartoon Animal Package: $2.99Grunge Stickers: $0.99Girly: $0.99Horoscope: $1.99Cute Thanksgiving: $2.99Happy Thanksgiving: $2.99Aliens: $0.99 | iPhone/Android | Yes | Yes |
| Blur Video and Photo Editor | $0.99 - $99.99 Per Item | Android | Yes | Yes |
| Blur.r Photo, Pic.ture Motion | Monthly Subscription: $ 11.98Weekly Subscription: $ 6.98One Week Subscription: $ 3.98Yearly Subscription: $ 94.98 | iPhone | Yes | No |
| Motion Blur Photo Effect | Premium Access: $7.99 - $29.99 | iPhone | Yes | No |
| Motion Blur Photo Editor | Not Provided | Android | Yes | No |
There are many motion blur effect applications available in the market, providing direct services for iPhone and Android users. However, finding the best app for this purpose is essential, which is why we came up with a list of the best motion blur apps that can be used on iPhone and Android.
1. CapCut
While it is known as an easy-to-use application, CapCut stands among the most premium mobile applications that help you create professional videos that can be posted on social media platforms. CapCut comes up with a dedicated motion blur effect that allows users to create stabilized videos with complete control over the speed of the video.
Following other adjustments in the video, CapCut is a complete tool designed to create advanced videos, including different effects such as motion blur.
Download: Google Play Store | App Store
Key Features
- You can quickly put transitions between the video and the clips to blend in perfectly.
- Video clips can be animated with the help of zoom-in and out effects, providing all major professional touchups a video can have.
- Execute a perfect motion blur video with the help of the multi-track timeline for arranging and previewing clips.
Pros
- It provides the option of including music clips and sound effects on the videos from the vast collection.
- It supports exporting videos in 4K and 60fps with Smart HDR technology.
Cons
- Won’t work perfectly if the RAM and hardware of the phone are limited.
2. NSMB - Motion Blur Video
The motion blur effect is a great feature that can enhance the quality of the video and make it look realistic if used properly. NSMB - Motion Blur Video is an Android motion blur application that features the option of creating such videos in a matter of seconds.
With no particular learning requirement, NSMB makes the process look easy. You have to set the intensity of video, and that’s all you need to do within this application.
Download: Google Play Store
Key Features
- While the platform is easy-to-use, the interface is quite simple to understand, with no confusing structures.
- The platform comes up with an intelligent motion blur that automatically executes the process.
- It works with Android devices from Android 5.0 and later, making it a compatible tool with all major Android devices.
Pros
- You can set the resolution of your exported video to 1080p, which is a Full HD result.
- Set an appropriate fps value for your exported video with the available options.
Cons
- Long rendering times, which are not optimized and take up time.
3. BlurEffect - Blur Photo & Video
BlurEfffect - Blur Photo & Video is another great iOS application that provides the option of adding motion blur effects. This tool is built to include the blur effect to perfection in general. With defining blur options, you can create motion blur effects easily on your added videos. The functions are diverse and quite effective if appropriately observed.
Download: App Store
Key Features
- As the name exclaim, it works perfectly for photos and videos, likewise.
- The paid version of the application can save videos up to 1080p in quality.
- It provides the feature of managing the strength of the “Auto Blurs” feature for controlling motion blur.
Pros
- Multiple effects are available on the platform, including normal blurs, pixelated and dotted blurs, etc.
- It also provides the option of trimming videos before adding the blur effect to them.
Cons
- The resolution of the video is lowered after blurring it out.
4. Snapseed
Google presented a great and quick photo editor for users confused about finding their perfect option. Snapseed was designed as a professional photo editor that allows users to add multiple touchups to the photo that is being edited.
While it backs itself up with Google Photos, this professional photo editor is enhanced and interconnected. Snapseed makes photo touchups simple; however, it does provide advanced functions that can help create motion blur pictures.
Download: Google Play Store | App Store
Key Features
- It combines with 29 different tools and filters, which also includes creating motion blur pictures.
- 38 predefined text styles are available in the editor for creating the text of different styles and forms.
- Create effects with multiple exposures brought with HDR Scape.
Pros
- Enhance a specific photo element with the help of the Face Enhance feature, which adds focus to the facial features.
- You can selectively retouch the photo and manage its exposure, saturation, and other elements.
Cons
- The application has no undo button, making it challenging to manage edits.
5. Picsart Photo Editor & Video
Picsart is a renowned photo and video editor available on App Store and Play Store. This exceptional editor covers a creative set of features combined with artificial intelligence to present some of the best options for retouching photos and videos. If you seek to create a motion blur effect with this application, it surely won’t disappoint, presenting a high-resolution result.
Download: Google Play Store | App Store
Key Features
- It helps users customize photos and videos with customizable brushes, layers, and drawing tools.
- Present a realistic display of motion blur with the help of the multiple effects and filters used for blending in perfectly.
- More than 60 million stickers are available in Picsart, which can be effectively used within any editing media.
Pros
- You can easily share the edited content with your friends through the platform.
- It provides multiple video effects and trendy filters to make video editing easier.
Cons
- There is a lot of lag in the application while editing the video.
6. Blur Video and Photo Editor
This is one of the motion blur apps that provides a simple set of options for managing and enhancing the videos and photos on your Android device. Motion blur can be confusing if not managed properly; however, Blur Video and Photo Editor provides a simple platform to include the blurry effect and make the moving object look perfect in the preview.
Download: Google Play Store
Key Features
- You can blur out the background of the imported photo or video while adjusting the intensity with the help of an easy tool.
- It also allows you to pixelate the unwanted sections and portions of the media files.
- Define more than one area for blurring with the help of shapes.
Pros
- It features the intuitive option of blurring out an object that is moving in the video.
- You can track an object with a simple definition of the area within the platform.
Cons
- The user interface is not exceptional, with buttons that are not even usable.
7. Blur.r Photo, Pic.ture Motion
Not many tools provide a simple and customized set of options for including motion blur within photos and other media. Blur.r Photo, Pic.ture Motion has been tangibly designed to improvise a perfect motion-blurring photo platform. While it provides a quick set of tools to work with, the results are exquisite and better than most in the market.
Download: App Store
Key Features
- Set the intensity of the blurriness and size on the photo with custom tools.
- A complete set of sharing options is available on the platform, which is covered in a single click.
- For detailed blurring, you can consume the option of Zoom and Pan the photo.
Pros
- You can easily undo and redo actions on the edited photos to avoid repeating actions and wasting time.
- Use different filters within photos to edit them to perfection.
Cons
- It does not allow for adjustment of the intensity of the blur, as stated in the services.
8. Motion Blur Photo Effect
While finding the perfect motion blur effect app on iPhone for presenting realistic effects in photos, you might come across Motion Blur Photo Effect, a perfect motion blur photo application for iOS users. The tool is known for its fast processing and quick execution, with an easy-to-use interface for creating perfect blurred pictures.
You can find multiple features and effects in this application that relate to motion blur, providing a diverse range of options when seeking this effect.
Download: App Store
Key Features
- Protects the user’s privacy while maintaining its policy of avoiding illegal breaches.
- Emphasize the light spot in the background of a picture with the help of the Bokeh effect.
- Get a complete set of blur effects to include in the photo, which features advanced functionality.
Pros
- You can find different types of blur effects, such as Zoom Blur, Motion Blur, and Mosaic Effect, to enhance the motion blur.
- It is extremely simple and quick in procession.
Cons
- It does not provide motion blurring for videos, making it restricted.
9. Motion Blur Photo Editor
Adding realistic effects to images is important if your work involves professional requirements. Motion blur is an effect used in multiple places, which makes it a critical feat to achieve. While obtaining the effect, the simplicity of the procedure holds importance. This is why Motion Blur Photo Editor gives the perfect result with explicit functions and features to enhance the motion blur effect.
Download: Google Play Store
Key Features
- Make your images look realistic with the help of magic effects.
- Manage different elements, including the text and other features, such as the brightness of the tool.
- It allows you to share the rendered result on different social applications.
Pros
- Features support for Android devices with OS 4.2 or above.
- The process of including motion blur in photos is quite basic.
Cons
- An outdated application, which was last updated in 2019.
Part 2: 3 Motion Blur Apps for Mac and Windows
As you have consulted the motion blur apps for iPhone and Android, you might require something more professional. For this, you first have to shift onto a computer or Mac that provides you with a perfect platform for creating content. Let’s find out some top-notch motion blur effect apps that you can use on your Mac and Windows:
1. Wondershare Filmora - The Best Motion Blur Effect App on Desktop
Free Download For Win 7 or later(64-bit)
Free Download For macOS 10.14 or later
Not many tools provide a complete set of tools to manage the videos on your computer and create the best version out of them. Wondershare Filmora is a complete package for creating a motion blur effect on a video.
With a quick and effective toolkit available on the platform, Filmora turns out to simplify the process, thereby making the process look basic. Filmora unleashes the creativity of a beginner, helping them create a perfect video with its intuitive and impressive interface.
Supported System
- Windows, Mac, and iOS
Pricing
- Month Plan: $19.99
- Annual Plan: $49.99
- Perpetual Plan: $79.99
Key Features
- It provides support to a variety of file formats which allows you to recreate motion blur out of any video with ease.
- The variety of video transformation features offered in the tool is exquisite, where you can manage motion tracking, stabilization, and several other video parameters.
- Use effects and transitions to create the perfect motion blur video for yourselves.
Pros
- You can find the support of resolution up to 4K in the video editing platform.
- It also features the option of enhancing GPU acceleration for faster encoding.
Cons
- Puts a watermark on the export video for the free version.
Step-by-Step Guide on How to Create Motion Blur Effect on Filmora
We will now discuss how you can create a motion blur effect on Filmora, the best app for motion blur, using the right tools. First, look into the steps provided below for a better understanding:
Step 1 Add Video File to Platform
Launch Wondershare Filmora on your computer and select “Create New Project” to open a new canvas. Click on the “Arrow” icon to import the video or photo.
Step 2 Cut Down Sections of Clips
As you add the media into the timeline, lead to the point where you want to add the motion blur. Select the “Scissors” icon for splitting the clip and repeat this for every point where you want to add the effect.
Step 3 Include the Blur Effect
Access the “Effects” tab and look for the “Blur” effect. Add the blur effect by dragging it into the timeline on the split part of the video.
Step 4 Change Parameters to Smoothen Results
Adjust the parameters of the added effect to make it smooth. You can also access the “Dissolve” option in the Transitions. Add the motion blur effect and perform other vital changes in parameters that are required.
Step 5 Export Video File
Afterward, select the “Export” button and define the desired resolution and frame rate to conclude. You can also share your video on your social media accounts.
2. Vegas Pro - Create Natural-Looking Motion Blurs With Ease
Vegas Pro is an impressive video editing platform that provides the option of creating motion blurs that look completely natural. It does not edit a specific element in the video but allows you to make changes in any other element that can be used to define motion. Motion blur can be added and edited to a fraction of a second with this platform.
3. Adobe Premiere Pro - Professionally Edit Motion Blur Videos
Adobe Premiere Pro is a great tool for improvising professional videos. With quick edits, you can come across every second of the video and present the perfect editing model with the help of the advanced toolkit. The major issue with such platforms is the high learning curve that prevents many users from considering this platform for tasks like executing motion blur in videos.
Part 3: Best 4 Online Motion Blur Tools
Many online platforms feature the option of introducing motion blur effects on videos. While we point out the best ones in the list, you should carefully assess them all to know more about them:
1. Lunapic
Lunapic is a great option for introducing motion blur into pictures. Being an online tool, it is pretty straightforward with its functionality, as you will only have to adjust some settings in the picture to edit it. Lunapic, being an online photo editor, provides different editing functions and tools in its interface. The result of motion blur turns out to be excellent in terms of it being an online tool.
Pros
- You can scale the image before putting a motion blur on the output.
- Add different shapes to highlight the image that is being edited.
Cons
- It provides an outdated interface when compared with other online photo editing tools.
2. Aspose
This excellent photo editing platform provides you with a dedicated function of adding motion blur to an image as a filter. Aspose allows adding files from the computer and Dropbox while providing a straightforward process of putting motion blur into a photo. You have to adjust the filter parameters to create the perfect picture.
Pros
- You can also detect objects within the image with the help of the “Object detection” feature.
- Create Photo Book Maker along with including motion blurs on the image for managing a collection of pictures.
Cons
- It does not offer any adjustment sliders and options while performing motion blur.
3. Kapwing
As an online tool, Kapwing provides many features that can be used to edit videos. Its ability to blur the videos is exceptional and tends to offer great results with the least of parameters. Users who are uncomfortable with editing videos on professional tools can consider this an alternative.
Pros
- No spam and ads are present in the tool while protecting the user’s information.
- The tool provides AI-Powered features, which can be easily used to manage videos.
Cons
- It does not maintain the quality of the videos after exporting the edits.
4. Flixier
For quick motion blurs, people can use Flixier to create motion blurs with its pixelating technology. Along with other features for managing videos and enhancing their outlook, Flixier can be used for editing videos quickly. You can easily attach the effect while setting up its time parameters and other functions.
Pros
- You can integrate the features used in Flixier for creating videos for your YouTube channel.
- Works on low-powered devices, including Chromebooks and old devices.
Cons
- There are not a lot of features available on the online platform, limiting its use.
Last Words
This article has provided an overview of the best motion blur apps you can find in the market to create a realistic effect on your photo or video. As the article covers all kinds of compatible devices, it turns out to be an informative article to go through. Ensure to fill in all the details and see which application serves the best purpose.
For iOS and Android devices, CapCut turns out to be a great option to work with. Filmora has shown promising results with its Mac and Windows version, and Kapwing presents an excellent interface to edit videos regardless of being an online editor. Wondershare Filmora provides the best features for creating motion blur pictures and videos if you tend to work on your desktop.
Zoom In and Out on Discord (Desktop + App + Browser Solutions)
Abundant Video Effects - Wondershare Filmora
Provide abundant video effects - A creative video editor
Powerful color correction and grading
Detailed tutorials are provided by the official channel
Discord has gained much popularity in recent years owing to its versatility and wide range of customization options available. It is an innovative program that allows users to communicate via text messages, voice and video calls, media files, and more.
One of the main reasons for Discord’s growing popularity is its multipurpose resources that allow people to stay in touch with their communities. As Discord features are customizable, you can alter the zoom settings on the servers and chat screens to increase visibility and ease.
Not sure how to do that? You can head over to the article below to find easy step-by-step guides on how to zoom in Discord desktop and mobile applications and the official website.
In this article
Part 1: Zoom In and Out on Discord Software
Part 2: Zoom In and Out in Discord Mobile App
Part 3: Zoom In and Out on Discord Website
Part 4: Frequently Asked Questions (FAQs)
Part 1: Zoom In and Out on Discord Software
The Discord desktop software is available for Windows 7 and above, Linux, and Mac computers. If you want to know how to zoom in on Discord desktop software, you have landed on the right page. The following steps indicate how to zoom in or out on Discord’s desktop version by accessing the software’s settings.
Step 1: To begin with, launch the Discord desktop application on your computer. Sign in to your Discord profile if asked.
Step 2: On Discord’s homepage, in the left corner at the bottom, you will see your profile name along with the headphones and microphone icons. Next to these, a cog-shaped icon for Settings will be visible. Tap on it to launch user settings.

Step 3: Under “User Settings,” locate the “App Settings” category from the sidebar at the left. Find and click on the “Appearance” option from here.

Step 4: When you scroll down under the “Appearance” settings, you will find the sliders to change the “Chant Font Scaling,” “Space between Message Groups,” and the “Zoom Level” settings at the bottom.

Step 5: The sliders are set on a highlighted percentage visible in green by default. If you wish to increase the chat font size, drag that particular slider to the right and check the preview until you arrive at the size you want. To decrease the font size, you have to drag the slider to the left and look for the desired result in the preview section.

Step 6: If you wish to change the zoom levels of all the elements in a chat screen, you can change the “Zoom Level” slider’s position until you reach your desired result. Now exit the Settings window to apply your changes.

Part 2: Zoom In and Out in Discord Mobile App
Discord offers its mobile applications for Android and iOS devices. You can easily change the Discord app’s built-in settings to change the zoom level. To know how to zoom in on the Discord mobile app, take a look at the comprehensive step-by-step guide below:
Step 1: Firstly, install and launch the Discord app on your mobile and sign in to your profile.
Step 2: Go to the app’s homepage and search for your profile icon at the bottom-right corner of the screen. Click on it to access “User Settings.”

Step 3: Now, look for the “Appearance” settings by scrolling down and tapping on it. You will see the “Chat Font Scaling” option and a slider under it. You can drag the slider to adjust the font size on the Discord application.

Step 4: You can drag the slider to the right to increase the font scale across the app and check for your desired preview. To decrease the font size, you will need to drag the slider to the left. Now exit your Settings and restart the app to make your changes effective.

Step 5: If you want to restore the zoom settings to default, you can click the “Reset” button at the bottom left corner of the screen.

Part 3: Zoom In and Out on Discord Website
If you are using the web version of Discord, there are multiple ways to zoom in. On your native web browser, you can access the ellipses icon at the right and find the “Zoom” option. From here, you can simply click on the “+” icon to zoom in and the “-” icon to zoom out on the page you have opened at the moment.
If you prefer to change the Zoom settings using Discord’s native settings, you can easily do so in the web version using keyboard shortcuts. Here is an in-depth guide indicating how to zoom out in Discord for the online version.
Step 1: Launch the web browser on your computer and open the online version of the Discord software. You might be asked to sign in to your profile at this point.

Step 2: Once you are at the homepage of your Discord profile, you can access the keyboard shortcuts to zoom in or out. To zoom in on Discord, simply hold the “CTRL” key on your keyboard and click the “+” icon key. Each click of the key will result in a 10% increase in the zoom level of the screen.

Step 3: If you want to zoom out on Discord’s screen, you can use your keyboard. Similar to the step mentioned above, tap the “-” key on your keyboard while holding down the “Ctrl” key to make your screen and chat appear smaller.

Step 4: You can reset the zoom settings to default by holding down the “Ctrl” key and hitting “0” on the keyboard. This will restore the settings back to the default 100%.
Part 4: Frequently Asked Questions (FAQs)
Are Discord zoom and text size settings different?
Yes, there is a difference between the zoom levels and the text size settings on Discord. By changing the zoom levels of the software, you alter the zoom level of all the elements, including icons, images, windows, and more, across the Discord application. Changing the text size settings will simply alter the chat font scale in a specific chat window.
Does changing the Discord zoom on my PC affect the settings on my mobile app?
No, all the changes made on the zoom level or text size of Discord remain limited to the version of the software you are currently using. If you change the zoom settings on your PC, the change will not be reflected on your mobile application.
Conclusion
Digital chatting applications such as Discord have made it exceedingly easy to stay in touch with friends and family over long distances. From sending and receiving messages to voice and video calls, you can do a lot with Discord.
If you are a Discord user, knowing how to alter the zoom level on the app can prove to be incredibly beneficial. By changing the zoom settings on Discord, you can make the text, images, and other items present on the screen appear bigger or smaller. With the guide mentioned above, you now know how to zoom in on Discord across the mobile, desktop, and web.
Discord has gained much popularity in recent years owing to its versatility and wide range of customization options available. It is an innovative program that allows users to communicate via text messages, voice and video calls, media files, and more.
One of the main reasons for Discord’s growing popularity is its multipurpose resources that allow people to stay in touch with their communities. As Discord features are customizable, you can alter the zoom settings on the servers and chat screens to increase visibility and ease.
Not sure how to do that? You can head over to the article below to find easy step-by-step guides on how to zoom in Discord desktop and mobile applications and the official website.
In this article
Part 1: Zoom In and Out on Discord Software
Part 2: Zoom In and Out in Discord Mobile App
Part 3: Zoom In and Out on Discord Website
Part 4: Frequently Asked Questions (FAQs)
Part 1: Zoom In and Out on Discord Software
The Discord desktop software is available for Windows 7 and above, Linux, and Mac computers. If you want to know how to zoom in on Discord desktop software, you have landed on the right page. The following steps indicate how to zoom in or out on Discord’s desktop version by accessing the software’s settings.
Step 1: To begin with, launch the Discord desktop application on your computer. Sign in to your Discord profile if asked.
Step 2: On Discord’s homepage, in the left corner at the bottom, you will see your profile name along with the headphones and microphone icons. Next to these, a cog-shaped icon for Settings will be visible. Tap on it to launch user settings.
Step 3: Under “User Settings,” locate the “App Settings” category from the sidebar at the left. Find and click on the “Appearance” option from here.
Step 4: When you scroll down under the “Appearance” settings, you will find the sliders to change the “Chant Font Scaling,” “Space between Message Groups,” and the “Zoom Level” settings at the bottom.
Step 5: The sliders are set on a highlighted percentage visible in green by default. If you wish to increase the chat font size, drag that particular slider to the right and check the preview until you arrive at the size you want. To decrease the font size, you have to drag the slider to the left and look for the desired result in the preview section.
Step 6: If you wish to change the zoom levels of all the elements in a chat screen, you can change the “Zoom Level” slider’s position until you reach your desired result. Now exit the Settings window to apply your changes.
Part 2: Zoom In and Out in Discord Mobile App
Discord offers its mobile applications for Android and iOS devices. You can easily change the Discord app’s built-in settings to change the zoom level. To know how to zoom in on the Discord mobile app, take a look at the comprehensive step-by-step guide below:
Step 1: Firstly, install and launch the Discord app on your mobile and sign in to your profile.
Step 2: Go to the app’s homepage and search for your profile icon at the bottom-right corner of the screen. Click on it to access “User Settings.”
Step 3: Now, look for the “Appearance” settings by scrolling down and tapping on it. You will see the “Chat Font Scaling” option and a slider under it. You can drag the slider to adjust the font size on the Discord application.
Step 4: You can drag the slider to the right to increase the font scale across the app and check for your desired preview. To decrease the font size, you will need to drag the slider to the left. Now exit your Settings and restart the app to make your changes effective.
Step 5: If you want to restore the zoom settings to default, you can click the “Reset” button at the bottom left corner of the screen.
Part 3: Zoom In and Out on Discord Website
If you are using the web version of Discord, there are multiple ways to zoom in. On your native web browser, you can access the ellipses icon at the right and find the “Zoom” option. From here, you can simply click on the “+” icon to zoom in and the “-” icon to zoom out on the page you have opened at the moment.
If you prefer to change the Zoom settings using Discord’s native settings, you can easily do so in the web version using keyboard shortcuts. Here is an in-depth guide indicating how to zoom out in Discord for the online version.
Step 1: Launch the web browser on your computer and open the online version of the Discord software. You might be asked to sign in to your profile at this point.
Step 2: Once you are at the homepage of your Discord profile, you can access the keyboard shortcuts to zoom in or out. To zoom in on Discord, simply hold the “CTRL” key on your keyboard and click the “+” icon key. Each click of the key will result in a 10% increase in the zoom level of the screen.
Step 3: If you want to zoom out on Discord’s screen, you can use your keyboard. Similar to the step mentioned above, tap the “-” key on your keyboard while holding down the “Ctrl” key to make your screen and chat appear smaller.
Step 4: You can reset the zoom settings to default by holding down the “Ctrl” key and hitting “0” on the keyboard. This will restore the settings back to the default 100%.
Part 4: Frequently Asked Questions (FAQs)
Are Discord zoom and text size settings different?
Yes, there is a difference between the zoom levels and the text size settings on Discord. By changing the zoom levels of the software, you alter the zoom level of all the elements, including icons, images, windows, and more, across the Discord application. Changing the text size settings will simply alter the chat font scale in a specific chat window.
Does changing the Discord zoom on my PC affect the settings on my mobile app?
No, all the changes made on the zoom level or text size of Discord remain limited to the version of the software you are currently using. If you change the zoom settings on your PC, the change will not be reflected on your mobile application.
Conclusion
Digital chatting applications such as Discord have made it exceedingly easy to stay in touch with friends and family over long distances. From sending and receiving messages to voice and video calls, you can do a lot with Discord.
If you are a Discord user, knowing how to alter the zoom level on the app can prove to be incredibly beneficial. By changing the zoom settings on Discord, you can make the text, images, and other items present on the screen appear bigger or smaller. With the guide mentioned above, you now know how to zoom in on Discord across the mobile, desktop, and web.
Top 8 Memoji Makers to Make a Memoji on PC, Android, and iPhone


You might have heard of emoji and might be wondering what memoji is! Well, memojis can be described as the next level emojis, wherein the emoji is designed and created from the user’s facial expressions.

The emoji avatars created from your facial expression are more fun to use and can deliver the expression you intended more accurately. Memoji happens to be the next trend after emojis, which is why people widely search for online memoji makers.
Memoji makers help their users to create customized emojis based on their facial expressions. Memojis are more fun to use on online social platforms, and hence we will be talking about the best memoji makers available to us. We will also discuss how to make a memoji easily using these memoji makers and the fun features, these memoji makers offer. Why not add some extra fun while interacting socially, right?
For Win 7 or later (64-bit)
For macOS 10.12 or later
In this article
01 Top 8 Memoji Makers to Make a Memoji
02 How to Use and send Memoji on Your Phone
Part 1: Top 8 Memoji Makers to Make a Memoji
Since using memoji is a way of adding extra fun and making any conversation more interesting, people search for good emoji makers in the online market. If you have a good memoji maker, making a memojis is just a matter of a few clicks on your phone. We have listed 8 of the best memoji makers apt for Android and iOS users below.
Top 8 Memoji Makers
1. Emoji-maker.com (PC/Online)
2. Labeley.com (PC/Online)
3. piZap
4. Avatoon (Android/iPhone)
5. Zmoji.me (Android/iPhone)
6. Bitmoji (Android/iPhone)
7. Mirror Emoji Maker (Android/iPhone)
8. MojiPop (Android/iPhone)
1. Emoji-maker.com (PC/Online)
moji-maker.comis one of the best memoji makers that can take out the boredom of using default emoji icons in your interactions. It will detect your face through the camera and then provide you with many template options matching your face. You can also edit it and customize it further

Features:
- Take a picture or choose one from storage.
- A lot of accessories to create the emoji face.
- Save the created emoji and easy sharing on Snapchat, Facebook, Twitter, etc.
2. Labeley.com (PC/Online)
Labeley.com is an online memoji maker that can create memojis very easily. The emojis can be customized according to the picture in your mind, and there is also a print option if you wish to keep physical copies of the memoji you created.

Features:
- A lot of shape options to customize your memoji.
- Options to add text and easy uploading.
- A wide range of accessories and background options to choose from.
- Create an account and options to save your designs.
3. piZap
piZap is an interesting memoji maker in which you can create funny emojis resembling yourself. It allows you to customize all the features of the emoji face to give a similar look to your face and add more fun while you interact with people.

Features:
- A variety of design features to create a memoji.
- free to use after login, and saves the incomplete edits.
- add filters, texts, and masks to the memoji.
- Other editing options like creating collage etc.
4. Avatoon (Android/iPhone)
Avatoon is the best application you can use to spice up your social media interactions a bit. It has powerful editing tools that help you create great personal avatars. These avatars let you stand out among people who still use the default emoji icons and stickers.

Features:
- Facial recognition feature that helps to grasp your appearance from your photo.
- A photo editor that can help you customize your memojis further.
- An avatar snapshots feature you add expressions and poses to your avatar.
5. Zmoji.me (Android/iPhone)
Zmoji.me helps you to create fun memojis to share on social media. You can create a unique single or group memojis with a few clicks. This online memoji maker also helps you add creative texts to your memojis for more attraction.

Features:
- Manual creation of facial recognition options.
- Numerous outfit and styles options.
- A variety of stickers for every moment you wish to remember.
- Quick sharing in conversations on any social media applications.
6. Bitmoji (Android/iPhone)
Bitmoji is the right application if you wish to more expressive while sending emojis. This online memoji maker helps you create attractive avatars that look like yourself and edit everything from your expressions to your clothes.

Features:
- Create funny and expressive cartoon model avatars.
- A huge library of stickers to choose from.
- Use it on social media platforms like Snapchat, Messenger, etc. easily.
7. Mirror Emoji Maker (Android/iPhone)
Mirror Emoji maker is a free memoji maker that allows you to create memojis and use these memojis on any social media through a personalized emoji keyboard. It is a great application, and its face recognition captures all the details to make the memoji very similar to the user.

Features:
- A decide wheel that helps you choose among the memojis.
- An inbuilt keyboard exclusively for memojis.
- Options to create animated gifs and stickers out of the personalized memojis.
8. MojiPop (Android/iPhone)
MojiPop is an online memoji maker that helps you create wonderful memojis that can add a bit of humor to your interactions. In just 2 clicks, you will be able to access a large number of animated stickers and caricatures of your face, suited for any situation.

Features:
- Easy and fast access to stickers.
- Animated stickers personalized to your looks and appearance.
- Stickers that are updated every day with new ones.
- A favorites options to group your favorite stickers.
Part 2: How to Use and send Memoji on Your Phone
Memoji is the latest trend in online communication across different platforms. It has made chats and social interactions more interesting and funny. With memoji people tend to be more engaging and the memojis help to convey the expressions in a better way.

Let’s see how to make a memoji of your own, using the memoji application:
Step 1: open the Memoji application on your device. Choose a picture or capture one using the camera.
Step 2: Select the template you like and edit it.

Step 3: Create a face you want with the accessories provided in the app.
Step 4: Save the memoji you created and share it on any social media platform like Snapchat, Facebook, Twitter, etc.

Step 5: Review the memoji you made from the emoji collection. Tap on + to create more memojis.
Bonus tip: Create an Animation Video with Anireel
Anireel is an animated video editing software with rich, fun elements, and scenes to help animated video creators easily create, edit and finish an impressive video. Anireel features a great variety of drag and drop characters, actions, props, text, and audio assets. Users will be able to modify the size and color of the assets. The software also supports imported pictures, videos, and audio assets, covering almost all formats.

Conclusion
In this era, emojis are widely used while interacting on online social media as it conveys our intent perfectly and is fun. Memoji takes this fun to a higher level, which is why people are searching for good online memoji makers.
The use of memojis makes the conversations more interesting and fun and encourages others to get involved in the conversations. Good memoji makers help you customize your emojis however you wish and based on any occasion. We have listed the top memoji makers available on various devices for your convenience. Download any of these apps, create personalized emojis, and have fun on social platforms!
Wondershare Filmora
Get started easily with Filmora’s powerful performance, intuitive interface, and countless effects!
Try It Free Try It Free Try It Free Learn More >

For Win 7 or later (64-bit)
For macOS 10.12 or later
In this article
01 Top 8 Memoji Makers to Make a Memoji
02 How to Use and send Memoji on Your Phone
Part 1: Top 8 Memoji Makers to Make a Memoji
Since using memoji is a way of adding extra fun and making any conversation more interesting, people search for good emoji makers in the online market. If you have a good memoji maker, making a memojis is just a matter of a few clicks on your phone. We have listed 8 of the best memoji makers apt for Android and iOS users below.
Top 8 Memoji Makers
1. Emoji-maker.com (PC/Online)
2. Labeley.com (PC/Online)
3. piZap
4. Avatoon (Android/iPhone)
5. Zmoji.me (Android/iPhone)
6. Bitmoji (Android/iPhone)
7. Mirror Emoji Maker (Android/iPhone)
8. MojiPop (Android/iPhone)
1. Emoji-maker.com (PC/Online)
moji-maker.comis one of the best memoji makers that can take out the boredom of using default emoji icons in your interactions. It will detect your face through the camera and then provide you with many template options matching your face. You can also edit it and customize it further
Features:
- Take a picture or choose one from storage.
- A lot of accessories to create the emoji face.
- Save the created emoji and easy sharing on Snapchat, Facebook, Twitter, etc.
2. Labeley.com (PC/Online)
Labeley.com is an online memoji maker that can create memojis very easily. The emojis can be customized according to the picture in your mind, and there is also a print option if you wish to keep physical copies of the memoji you created.
Features:
- A lot of shape options to customize your memoji.
- Options to add text and easy uploading.
- A wide range of accessories and background options to choose from.
- Create an account and options to save your designs.
3. piZap
piZap is an interesting memoji maker in which you can create funny emojis resembling yourself. It allows you to customize all the features of the emoji face to give a similar look to your face and add more fun while you interact with people.
Features:
- A variety of design features to create a memoji.
- free to use after login, and saves the incomplete edits.
- add filters, texts, and masks to the memoji.
- Other editing options like creating collage etc.
4. Avatoon (Android/iPhone)
Avatoon is the best application you can use to spice up your social media interactions a bit. It has powerful editing tools that help you create great personal avatars. These avatars let you stand out among people who still use the default emoji icons and stickers.
Features:
- Facial recognition feature that helps to grasp your appearance from your photo.
- A photo editor that can help you customize your memojis further.
- An avatar snapshots feature you add expressions and poses to your avatar.
5. Zmoji.me (Android/iPhone)
Zmoji.me helps you to create fun memojis to share on social media. You can create a unique single or group memojis with a few clicks. This online memoji maker also helps you add creative texts to your memojis for more attraction.
Features:
- Manual creation of facial recognition options.
- Numerous outfit and styles options.
- A variety of stickers for every moment you wish to remember.
- Quick sharing in conversations on any social media applications.
6. Bitmoji (Android/iPhone)
Bitmoji is the right application if you wish to more expressive while sending emojis. This online memoji maker helps you create attractive avatars that look like yourself and edit everything from your expressions to your clothes.
Features:
- Create funny and expressive cartoon model avatars.
- A huge library of stickers to choose from.
- Use it on social media platforms like Snapchat, Messenger, etc. easily.
7. Mirror Emoji Maker (Android/iPhone)
Mirror Emoji maker is a free memoji maker that allows you to create memojis and use these memojis on any social media through a personalized emoji keyboard. It is a great application, and its face recognition captures all the details to make the memoji very similar to the user.
Features:
- A decide wheel that helps you choose among the memojis.
- An inbuilt keyboard exclusively for memojis.
- Options to create animated gifs and stickers out of the personalized memojis.
8. MojiPop (Android/iPhone)
MojiPop is an online memoji maker that helps you create wonderful memojis that can add a bit of humor to your interactions. In just 2 clicks, you will be able to access a large number of animated stickers and caricatures of your face, suited for any situation.
Features:
- Easy and fast access to stickers.
- Animated stickers personalized to your looks and appearance.
- Stickers that are updated every day with new ones.
- A favorites options to group your favorite stickers.
Part 2: How to Use and send Memoji on Your Phone
Memoji is the latest trend in online communication across different platforms. It has made chats and social interactions more interesting and funny. With memoji people tend to be more engaging and the memojis help to convey the expressions in a better way.
Let’s see how to make a memoji of your own, using the memoji application:
Step 1: open the Memoji application on your device. Choose a picture or capture one using the camera.
Step 2: Select the template you like and edit it.
Step 3: Create a face you want with the accessories provided in the app.
Step 4: Save the memoji you created and share it on any social media platform like Snapchat, Facebook, Twitter, etc.
Step 5: Review the memoji you made from the emoji collection. Tap on + to create more memojis.
Bonus tip: Create an Animation Video with Anireel
Anireel is an animated video editing software with rich, fun elements, and scenes to help animated video creators easily create, edit and finish an impressive video. Anireel features a great variety of drag and drop characters, actions, props, text, and audio assets. Users will be able to modify the size and color of the assets. The software also supports imported pictures, videos, and audio assets, covering almost all formats.
Conclusion
In this era, emojis are widely used while interacting on online social media as it conveys our intent perfectly and is fun. Memoji takes this fun to a higher level, which is why people are searching for good online memoji makers.
The use of memojis makes the conversations more interesting and fun and encourages others to get involved in the conversations. Good memoji makers help you customize your emojis however you wish and based on any occasion. We have listed the top memoji makers available on various devices for your convenience. Download any of these apps, create personalized emojis, and have fun on social platforms!
Wondershare Filmora
Get started easily with Filmora’s powerful performance, intuitive interface, and countless effects!
Try It Free Try It Free Try It Free Learn More >
Also read:
- 2024 Approved A Countdown Effect Is Widely Used in Gaming and Report Videos. So How to Create Your Own Countdown Video? This Article Will Tell You some Ideas About Contdown Video Editing
- Updated Find Out What Ray Tracing Is in After Effects, How It Works, and Learn About Ray-Traced 3D Settings with Simple Instructions
- Updated Easy Ways to Make Procreate GIFs for 2024
- Updated 2024 Approved How to Crop a Video in Windows Media Player
- Find Out About MAGIX Vegas Pro Pricing Plan and Features to See How the Software Can Help You with Your Video Editing Tasks
- A Complete Guide to Use Distortion Effect in Premiere Pro for 2024
- New 8 Ways To Live Stream Pre-Recorded Video
- 2024 Approved Quick Answer What Is a GIF File?
- Detailed Guide to Resize Your Video in VLC for 2024
- 2024 Approved The Audio You Produce Will Inevitably Be Flawed Throughout the Production Process. So, Learn How Adobe Audition Removes Echo to Sound Better Instead of Throwing It Away
- Updated 8 Unexpected Ways to Add Emoji to Photo Online
- How to Change Video Resolution in Filmora for 2024
- 2024 Approved How To Create The Best AI Thumbnail Using The Right Tools?
- Updated How to Create Your Own Subscribe Channel Graphics for 2024
- New Step by Step to Crop a Video with CyberLink PowerDirector
- New Looking for the Different Ar Video Effects to Include in Your Film? Check Out This Article for the Best 10 Augmented Reality Effects and the Fun Ar Effects in Filmora
- New The Best Peter McKinnon LUTs Recommendation
- Top Ways to Make Fast Motion Video on iPhone Solved for 2024
- Top 7 Phone Number Locators To Track Realme GT 5 Location | Dr.fone
- A Step-by-Step Guide on Using ADB and Fastboot to Remove FRP Lock on your ZTE Nubia Flip 5G
- Stuck at Android System Recovery Of Motorola Edge 2023 ? Fix It Easily | Dr.fone
- How to add my signature to Word 2010
- 3 Ways to Change Location on Facebook Marketplace for Xiaomi Redmi Note 12 5G | Dr.fone
- Which Pokémon can Evolve with a Moon Stone For Vivo V27 Pro? | Dr.fone
- In 2024, How to Transfer Data from Infinix Zero 5G 2023 Turbo to BlackBerry | Dr.fone
- How Do I Stop Someone From Tracking My Oppo Reno 8T? | Dr.fone
- iPogo will be the new iSpoofer On Samsung Galaxy A14 5G? | Dr.fone
- How to Track WhatsApp Messages on Apple iPhone XS Max Without Them Knowing? | Dr.fone
- In 2024, Top 5 Tracking Apps to Track Samsung Galaxy A15 5G without Them Knowing | Dr.fone
- Title: 2024 Approved Best Video Editors to Add Text to a Video
- Author: Chloe
- Created at : 2024-05-20 03:38:26
- Updated at : 2024-05-21 03:38:26
- Link: https://ai-editing-video.techidaily.com/2024-approved-best-video-editors-to-add-text-to-a-video/
- License: This work is licensed under CC BY-NC-SA 4.0.
