:max_bytes(150000):strip_icc():format(webp)/GettyImages-1253176532-e5ce8e507433489f87c8b37818c13a01.jpg)
2024 Approved Camtasia Video Editor Review

Camtasia Video Editor Review
If you are planning to record your screen and create a tutorial video, you will need a screen recording application. After capturing your video, you need to edit your videos so that you can remove unnecessary parts and add texts and titles wherever necessary. You will need a video editor with screen recorder, and Camtasia video editor is a suitable choice.
Camtasia lets you capture your gameplay as well as create software demo videos. You can choose from video templates and themes to create professional-quality videos as per your requirements. You can add transitions, effects, and annotations to make the videos attractive and engaging. But is Camtasia editor really the best one or is there a better alternative available? Find out from our Camtasia review.
Part 1. How to Download and Install Camtasia?
TechSmith Camtasia is compatible with both Windows 10 or above and Mac 10.14 or above. Camtasia is not a lightweight video editor as it demands 8GB of RAM. As far as the processor goes, it requires at least a 6th Gen Core i3 processor or M1 Apple processor. Therefore, if you have a low-end computer, you may experience lag and crash.
Camtasia is a premium video editor, and you can download its free trial version before opting for its premium version. The price plans differ for individuals, businesses, education, and government organizations. Here are the steps to download and install Camtasia free trial version.
Step 1: Open the web browser on your computer and visit “www.techsmith.com/download/camtasia” .
Step 2: Click on Windows Download or Mac Download as per your operating system.

Step 3: Wait for some time for the installer software to get downloaded. Thereafter, click on the installer file to install Camtasia following the on-screen instructions.
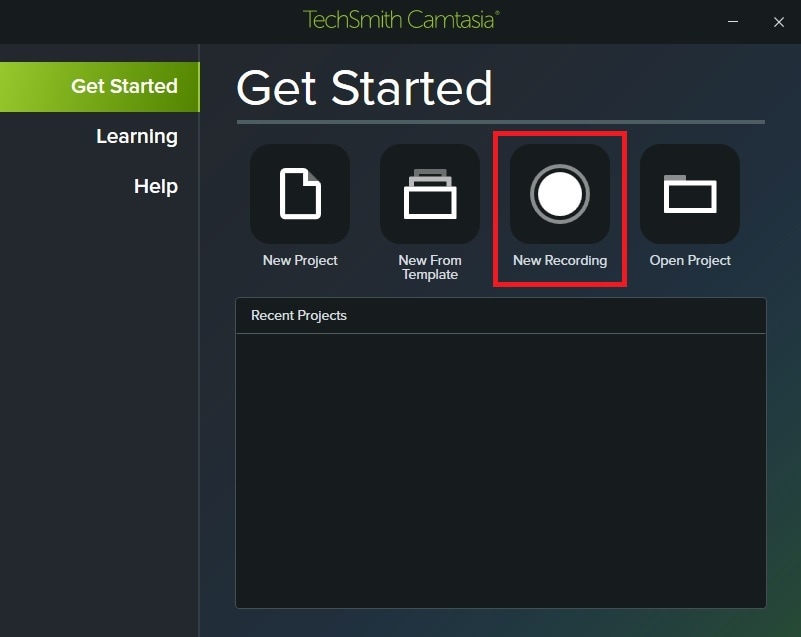
Step 4: After installation, launch Camtasia and click on New Recording option to capture your screen. If you want to edit an existing video, you need to click on New Project option.
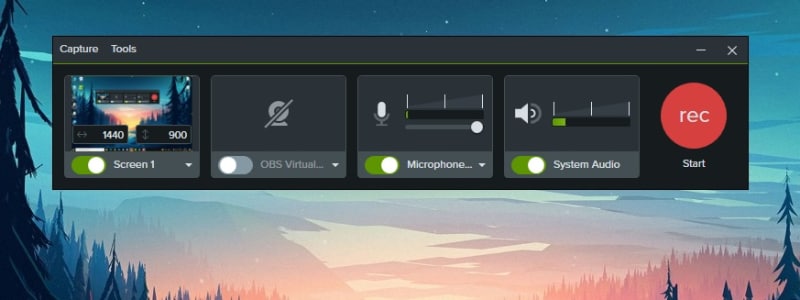
Step 5: If you have clicked on New Recording option, you will get a widget where you need to select your screen to start capturing. You can also select external webcam and microphone. Once you are ready to recording, Click on Rec red button.
Part 2. Key Features of Camtasia
Camtasia is a versatile video editor that competes with all the premium video editors in the market. Hence, there is no dearth of features and functionalities in Camtasia editor, and we are going to highlight the key features that you should be aware of.
Recording – Camtasia lets you capture your screen as well as webcam video easily. You can also record system audio as well as external mic audio. This is useful in recording gameplay with live reaction, tutorial, and training videos as well as presentation videos. You can capture any specific region of the screen as well as use greenscreen effect for webcam videos.
Templates – Camtasia is tailor-made for creating video tutorials, how-to videos, software demo videos, presentation and instructional videos, and training videos. This is why it comes with video templates that users can use immediately to create any specific type of video instantly. In fact, you can customize these templates and create your own theme so that the videos get personalized branding.
Presets and Transitions – There are loads of presents and transitions that you can include in your video to uplift the video content and quality. You can also create custom styles and configure them for regular use in your videos. Transitions are extremely useful to avoid pauses and put them in between slides.
PowerPoint Integration – You can turn your slides on PowerPoint into video instantly with Camtasia. Camtasia comes with PowerPoint integration through which you can import slides in Camtasia and create a video out of it with transitions and other effects. Alternatively, you can record your presentation in PowerPoint in video format.
Annotations and Interactivity – Camtasia lets you create videos where the viewers can interact and take actions. There are options for callouts, quizzes, textboxes, and much more so that the viewers can engage themselves in the video. Besides, you can use arrows, shapes, and other objects to highlight parts in your video for better explanation.
Audio and Cursor Effects – Camtasia has a wide range of audio effects that you apply to your audio recordings or import audio files. Besides, there are options for background noise removal, adjusting gain and pitch, compression, and emphasize. Similarly, you can highlight your cursor movement, spotlight the area as well as magnify when required.
Part 3. How to Edit Videos with Camtasia?
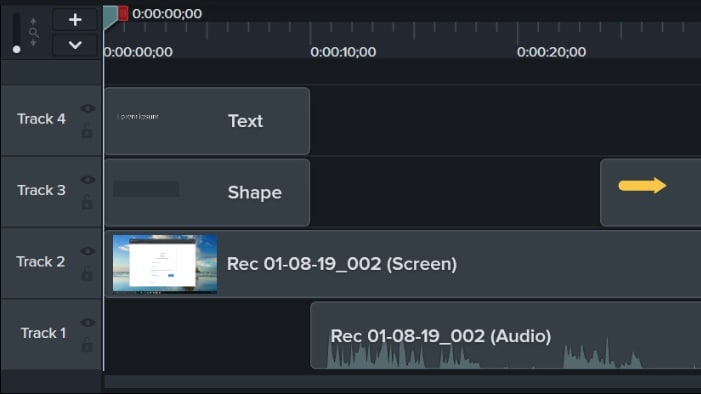
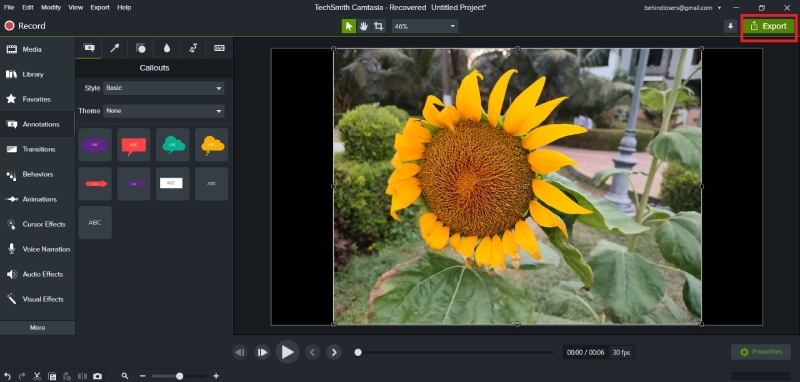
Camtasia is essentially a video editor where you can all types of videos as per your requirements. Camtasia has a robust timeline where you can import different types of video and audio files and arrange them sequentially. You can have multiple layers on top of another such as texts, shapes, photos, voiceover, and other media files as required. Camtasia has a powerful canvas where you can preview your edited video as well as resize and rotate the edited video. Here are the steps to edit videos with Camtasia.
Step 1: Open Camtasia and click on New Project. Sign into your Camtasia account to start editing your recorded video.

Step 2: Go to Media and click on Import Media. Import all the media files starting from video clips to audio clips and even photos.

Step 3: From Media Bin, drag and drop the media files to the timeline. Keep the video files in one track, audio files in another track, and likewise. Arrange them properly so that they are placed sequentially. You can trim them directly from the timeline and stretch the music file to cover the entire video as required.
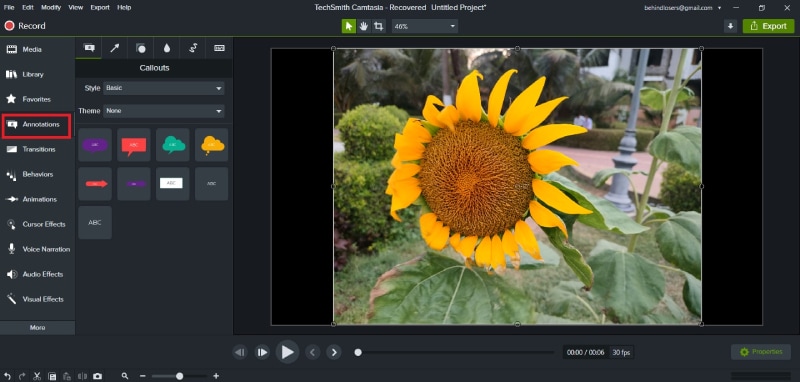
Step 4: Go to Annotation to add shapes, texts, arrows, and callouts. Go to Transitions and drag and drop transitions of your choice in between video clips on the timeline as you think perfect.
Step 5: Go to Audio Effects to enhance the audio of the video. Moreover, you can check and apply animations, behaviors(text effects), cursor effects, visual effects as well as interactivity as you think relevant.
Step 6: On the canvas, check out how your edited video looks like. Once you are satisfied, click on Export button to save the video on your hard drive.
Part 4. Camtasia Alternative to Edit Videos
There are various reasons why people look for a better alternative to Camtasia after trying out its free trial. First of all, you need a high-end computer for Camtasia to run smoothly. Second, there are limited effects and animations available for a premium video editor. Users have also reported crashes and bugs while editing high-resolution videos. We recommend Wondershare Filmora as the best alternative to Camtasia edit video.
Filmora is a premium video editor with video capturing option just like Camtasia. Filmora scores over Camtasia as it has minimum system requirements, and there are loads of visual and audio effects including the trending ones. Besides, there are stock media files that you can include in your video. Moreover, Filmora supports more file formats for importing and exporting. Here are the steps to edit videos on Filmora.
For Win 7 or later (64-bit)
For macOS 10.12 or later
Step 1: Download and install Filmora on your computer. Filmora is available for Windows and Mac.
Step 2: Launch Filmora and click on New Project. Drag and drop all your media files into Project Media folder.
Step 3: Drag and place the video files one by one on the timeline as per your requirements. Place audio files in the same way on a different track.

Step 4: Go to Transitions located at the top bar and drag and drop any transition in between video clips and photos wherever required. You can also insert Titles, Effects, and Elements from the top bar.

Step 5: Go to Audio located at the top bar, and drag and drop audio effects on the audio files on the timeline. You can also check the Stock Media and use them in your video as required.
Step 6: Play the video once everything is done, and click on Export button to save the video file on your hard drive.

Part 5. FAQs about Camtasia
1. Can I use Camtasia for free?
You can download the free trial version of Camtasia and use it for a limited number of days. The free version has all the features unlocked, but the output video will have Camtasia watermark.
2. Is Camtasia good for video editing?
Camtasia is good for video editing if your video belongs to training and tutorial videos. There are templates and annotations available that are tailor-made to edit how-to videos and add interactivity for the viewers. However, for an all-rounder video editor, we recommend Filmora over Camtasia.
3. How do I trim a video in Camtasia?
Once your import the video and place it on the timeline, use green and red to select the part that you want to trim. Once the selection is done, click on Cut(scissor) icon. The portion will be cut, and you can paste it anywhere if required. Lastly, join the parts of the video on the timeline after trimming any part out.
4. Can I record my screen with Camtasia?
Yes, Camtasia allows you to record your screen, webcam, or both simultaneously. You can also capture system audio or record your own voiceover. This feature is useful for creating tutorials, demos, or presentations.
5. How do I export my videos from Camtasia?
Once you have finished editing your videos, you can export them in various formats, such as MP4, WMV, MOV, and AVI. Camtasia also allows you to customize the video settings, such as resolution, frame rate, and bitrate. You can also upload your videos directly to YouTube, Vimeo, or Screencast.com from Camtasia.
For macOS 10.12 or later
Step 1: Download and install Filmora on your computer. Filmora is available for Windows and Mac.
Step 2: Launch Filmora and click on New Project. Drag and drop all your media files into Project Media folder.
Step 3: Drag and place the video files one by one on the timeline as per your requirements. Place audio files in the same way on a different track.

Step 4: Go to Transitions located at the top bar and drag and drop any transition in between video clips and photos wherever required. You can also insert Titles, Effects, and Elements from the top bar.

Step 5: Go to Audio located at the top bar, and drag and drop audio effects on the audio files on the timeline. You can also check the Stock Media and use them in your video as required.
Step 6: Play the video once everything is done, and click on Export button to save the video file on your hard drive.

Part 5. FAQs about Camtasia
1. Can I use Camtasia for free?
You can download the free trial version of Camtasia and use it for a limited number of days. The free version has all the features unlocked, but the output video will have Camtasia watermark.
2. Is Camtasia good for video editing?
Camtasia is good for video editing if your video belongs to training and tutorial videos. There are templates and annotations available that are tailor-made to edit how-to videos and add interactivity for the viewers. However, for an all-rounder video editor, we recommend Filmora over Camtasia.
3. How do I trim a video in Camtasia?
Once your import the video and place it on the timeline, use green and red to select the part that you want to trim. Once the selection is done, click on Cut(scissor) icon. The portion will be cut, and you can paste it anywhere if required. Lastly, join the parts of the video on the timeline after trimming any part out.
4. Can I record my screen with Camtasia?
Yes, Camtasia allows you to record your screen, webcam, or both simultaneously. You can also capture system audio or record your own voiceover. This feature is useful for creating tutorials, demos, or presentations.
5. How do I export my videos from Camtasia?
Once you have finished editing your videos, you can export them in various formats, such as MP4, WMV, MOV, and AVI. Camtasia also allows you to customize the video settings, such as resolution, frame rate, and bitrate. You can also upload your videos directly to YouTube, Vimeo, or Screencast.com from Camtasia.
For macOS 10.12 or later
Step 1: Download and install Filmora on your computer. Filmora is available for Windows and Mac.
Step 2: Launch Filmora and click on New Project. Drag and drop all your media files into Project Media folder.
Step 3: Drag and place the video files one by one on the timeline as per your requirements. Place audio files in the same way on a different track.

Step 4: Go to Transitions located at the top bar and drag and drop any transition in between video clips and photos wherever required. You can also insert Titles, Effects, and Elements from the top bar.

Step 5: Go to Audio located at the top bar, and drag and drop audio effects on the audio files on the timeline. You can also check the Stock Media and use them in your video as required.
Step 6: Play the video once everything is done, and click on Export button to save the video file on your hard drive.

Part 5. FAQs about Camtasia
1. Can I use Camtasia for free?
You can download the free trial version of Camtasia and use it for a limited number of days. The free version has all the features unlocked, but the output video will have Camtasia watermark.
2. Is Camtasia good for video editing?
Camtasia is good for video editing if your video belongs to training and tutorial videos. There are templates and annotations available that are tailor-made to edit how-to videos and add interactivity for the viewers. However, for an all-rounder video editor, we recommend Filmora over Camtasia.
3. How do I trim a video in Camtasia?
Once your import the video and place it on the timeline, use green and red to select the part that you want to trim. Once the selection is done, click on Cut(scissor) icon. The portion will be cut, and you can paste it anywhere if required. Lastly, join the parts of the video on the timeline after trimming any part out.
4. Can I record my screen with Camtasia?
Yes, Camtasia allows you to record your screen, webcam, or both simultaneously. You can also capture system audio or record your own voiceover. This feature is useful for creating tutorials, demos, or presentations.
5. How do I export my videos from Camtasia?
Once you have finished editing your videos, you can export them in various formats, such as MP4, WMV, MOV, and AVI. Camtasia also allows you to customize the video settings, such as resolution, frame rate, and bitrate. You can also upload your videos directly to YouTube, Vimeo, or Screencast.com from Camtasia.
For macOS 10.12 or later
Step 1: Download and install Filmora on your computer. Filmora is available for Windows and Mac.
Step 2: Launch Filmora and click on New Project. Drag and drop all your media files into Project Media folder.
Step 3: Drag and place the video files one by one on the timeline as per your requirements. Place audio files in the same way on a different track.

Step 4: Go to Transitions located at the top bar and drag and drop any transition in between video clips and photos wherever required. You can also insert Titles, Effects, and Elements from the top bar.

Step 5: Go to Audio located at the top bar, and drag and drop audio effects on the audio files on the timeline. You can also check the Stock Media and use them in your video as required.
Step 6: Play the video once everything is done, and click on Export button to save the video file on your hard drive.

Part 5. FAQs about Camtasia
1. Can I use Camtasia for free?
You can download the free trial version of Camtasia and use it for a limited number of days. The free version has all the features unlocked, but the output video will have Camtasia watermark.
2. Is Camtasia good for video editing?
Camtasia is good for video editing if your video belongs to training and tutorial videos. There are templates and annotations available that are tailor-made to edit how-to videos and add interactivity for the viewers. However, for an all-rounder video editor, we recommend Filmora over Camtasia.
3. How do I trim a video in Camtasia?
Once your import the video and place it on the timeline, use green and red to select the part that you want to trim. Once the selection is done, click on Cut(scissor) icon. The portion will be cut, and you can paste it anywhere if required. Lastly, join the parts of the video on the timeline after trimming any part out.
4. Can I record my screen with Camtasia?
Yes, Camtasia allows you to record your screen, webcam, or both simultaneously. You can also capture system audio or record your own voiceover. This feature is useful for creating tutorials, demos, or presentations.
5. How do I export my videos from Camtasia?
Once you have finished editing your videos, you can export them in various formats, such as MP4, WMV, MOV, and AVI. Camtasia also allows you to customize the video settings, such as resolution, frame rate, and bitrate. You can also upload your videos directly to YouTube, Vimeo, or Screencast.com from Camtasia.
Top 5 Online Video Converter for Instagram 2024
Instagram is a powerful platform currently that worldwide people share videos and photos. However, Instagram has specific restrictions for video files, which prompts the search for a capable online video converter Instagram can use.
Companies, content creators, and regular users post various videos to increase engagement, promote products/services, and memorialize moments. But the app allows only specific dimensions, aspect ratio, format, and duration with videos.
If that concerns you, here are some best solutions we have gathered for you to try out. Let’s move on.
Part 1 : Top 5 Online Video Converters for Instagram
To know how to use an online video converter Instagram users download, you should learn its features and uses. The following are the vital details we uncovered about the tools we tested while preparing this countdown.
1. InstaVideoSave
This online Instagram video converter is the most straightforward tool to convert IG-centric content to different offline formats. You can easily choose the category of the IG element you want to convert, and the software will quickly follow through.

Main Features:
- You only need to paste the IG video link and then download it.
- It supports downloading various Instagram content, like live videos, IG reels, IG videos, etc.
- Covertly view/download from other accounts.
- Save it directly to a connected device, like a PC, iPhone, or Android phone.
Pros
- No login is required.
- Output videos in total HD quality.
- Download bio data, profile picture, etc.
Cons
- You cannot download live video files that the private IG user did not save to their account beforehand.
- Private accounts are not viewable.
How to Use This:
Step1Copy the post link from Instagram and paste it.
Step2Click on View.
Step3Press the Download button to save.
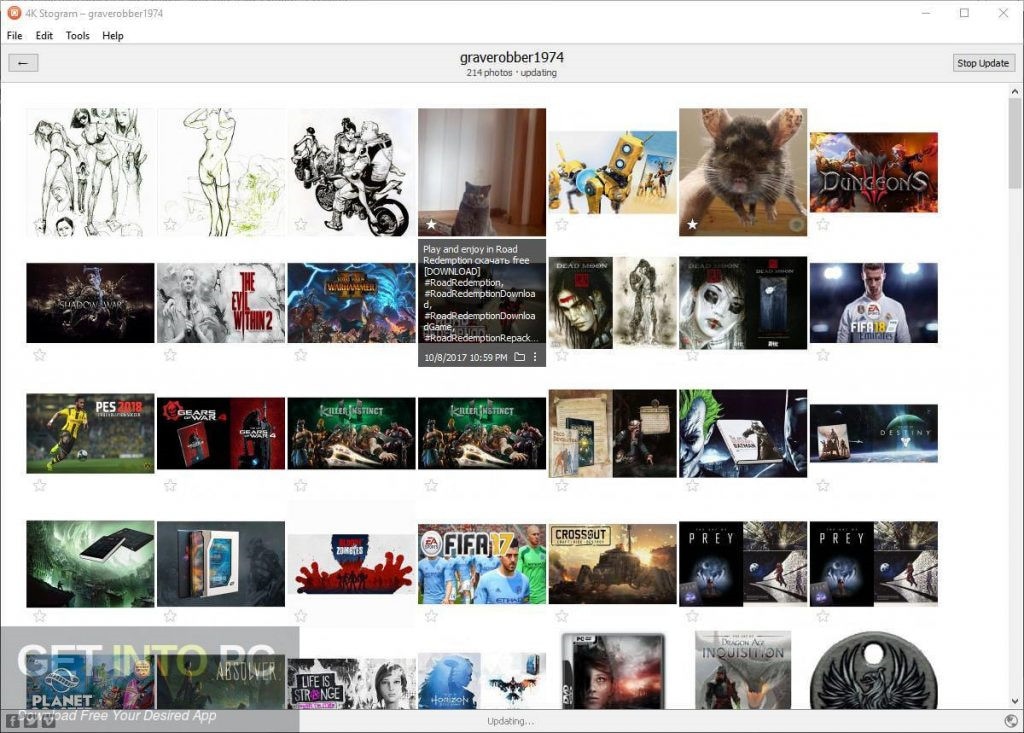
2. YouTube4KDownloader (4K Stogram)
While this online Instagram video converter is mainly for YouTube content download, users can freely operate it to convert IG content. In addition, it has been recommended by many professional product reviewers, like TrustRadar, for its good user experience and high-level format support.
Main Features:
- Save full tagged posts/Saved posts to the device.
- Browse through accounts anonymously.
- Download private IG content.
- Save posts from specific timelines.
Pros
- Back up your files.
- Comments/likes are automatically saved in content metadata.
- New posts update in real-time on the feed.
Cons
- Free users can only download one video at a time.
- Pro users must pay USD 45 to use all features like tagged post downloading.
How to Use This:
Step1Download the 4K Stogram link.
Step2Tick the T&C agreements.
Step3Install and run.
Step4Add File.
Step5Press Convert to begin the process.
3. iGram
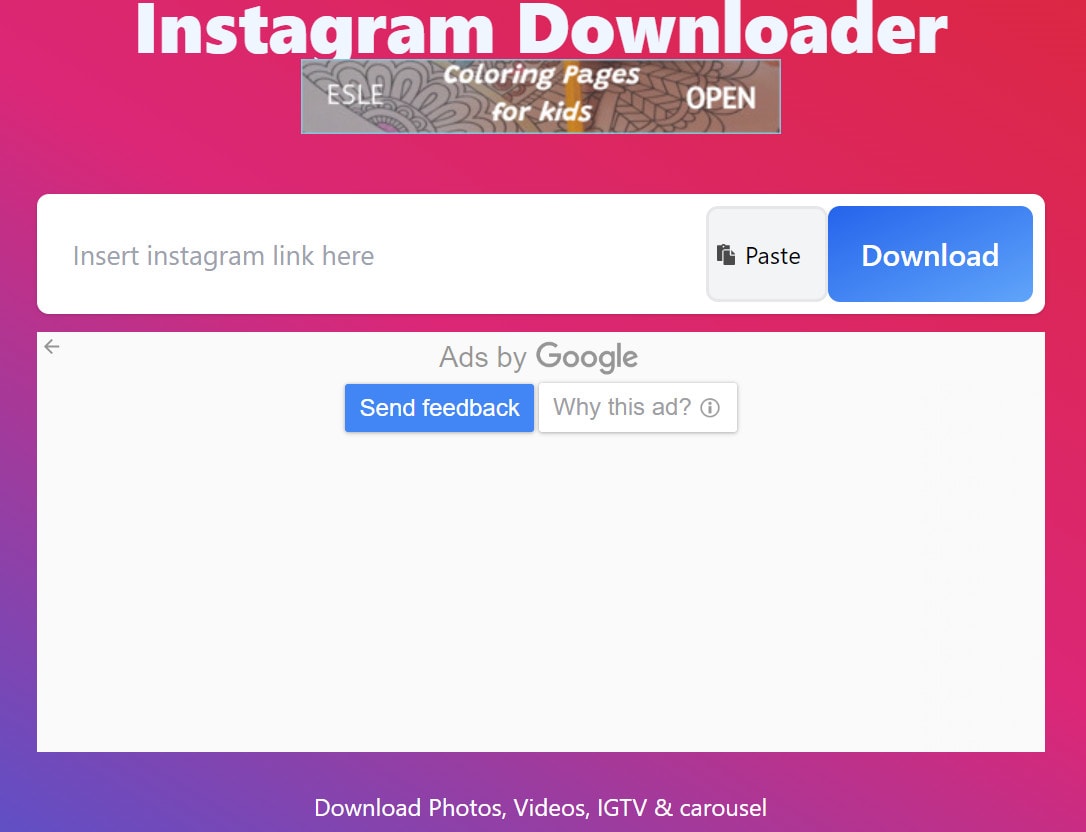
iGram is one of the best choices for selecting an online video converter Instagram users can utilize daily. It supports converting all types of IG content, like Reels, videos, images, and even carousels. The software has strong privacy support as well.
Main Features:
- Convert Reels and IGTV content.
- Save pictures and videos offline.
- Support carousel downloading from IG accounts.
- Saves into diverse phones, computers, and tablets.
Pros
- The simple process of conversion.
- View and download anonymously.
- Multiple output formats are supported.
Cons
- You cannot download files from any private account.
- The output video format supported does not cross 720p.
How to Use This:
Step1Go to Instagram and copy the post link of the video.
Step2Open this site and add the link into the text field.
Step2Press Start.
Step4The conversion would occur automatically.
4. F2mp
This online Instagram video converter is not the simplest choice for Instagram-to-video conversions, but the quality can improve over time. Compared to other options, it does not support all types of IG content. But it does assure a fast conversion and saving process.

Main Features:
- Paste the video URL from Instagram.
- Customize output settings like the video format.
- Instant conversion of files is possible.
- Direct download to the device.
Pros
- A wide range of conversion formats is supported.
- Free online converter.
- Works web-based on many browsers.
Cons
- Does not convert all types of IG content.
- Users cannot choose video resolution and other formatting steps.
How to Use This:
Step1Add keywords/file URLs in the tool search field.
Step2Select output type.
Step3Press the Start button.
5. AceThinker
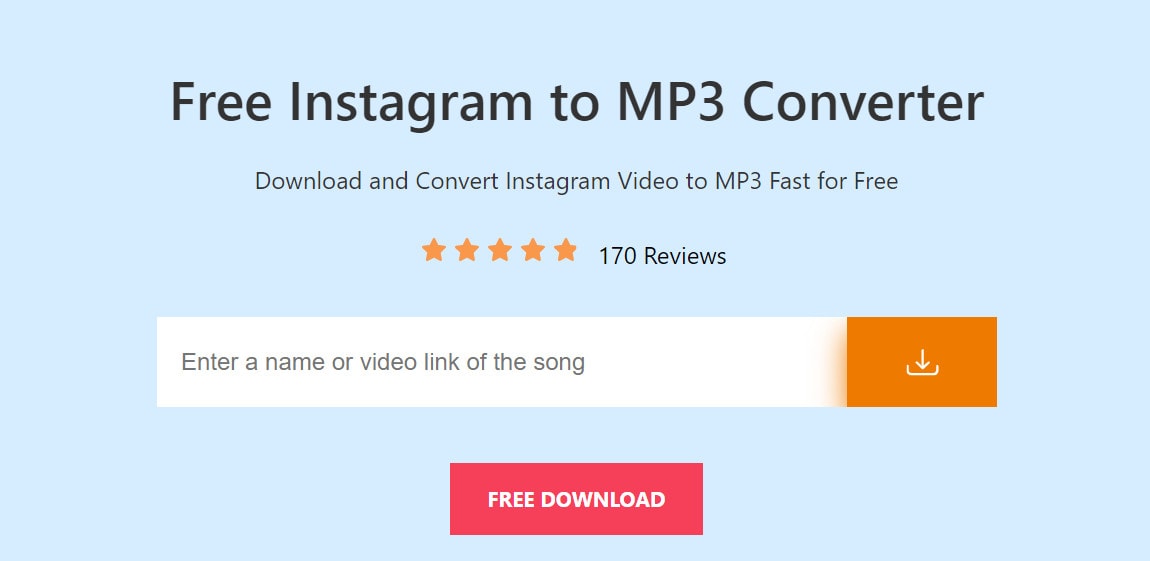
One of the top converter tools of IG is AceThinker, which is relatively simple to utilize and learn. Different types of users can add files from different platforms and run the conversion automatically.
Main Features:
- Add links, download content, and share videos easily across platforms.
- Compatible with many social media platforms.
- Works on various browsers like Chrome, Firefox, Edge, Safari, etc.
- Web-based tool.
Pros
- Works with different operating systems like Mac and other devices.
- Free to use.
- Quick conversions are possible.
Cons
- Conversion to MP3 format only.
- No batch conversions are allowed.
How to Use This:
Step1Copy the IG video link and paste it.
Step2Click the Download icon.
Step3It would turn to an MP3 file and save automatically.
Part 2: Comparison Table of the 5 Online Instagram Video Converters
Now that you know which apps to try out, you must decide the right tool to use based on its uses. Namely, how well a particular app would handle your main requirement with an online Instagram video converter.
| Converter Tool | InstaVideoSave | 4K Stogram | iGram | F2mp | AceThinker |
|---|---|---|---|---|---|
| Converting Speed | Fast | Medium-Fast | Fast | Fast | Medium-Fast |
| User Experience | Easy to use for different IG content. | Browse, view, and download anonymously, even from Private users. | Simple and direct IG video to MP4 downloader. | Quick searching and link pasting process for downloading. | Simple online tool to convert IG music videos into MP3 files. |
| Ratings | - | 4.6/5 (TrustPilot) | 3.1/5 (TrustPilot) | 400/100 (AEtrustscore) | 4.5/5 (TrustPilot) |
| Type of Instagram content it Supports. | Reels, Videos, Images, Profile, Stories. | Photos, videos, Highlights, Reels. | Videos, Images, Carousel, Reels, IGTV. | Videos | Videos |
| Compatible Social Media Apps | Instagram, Facebook, Vimeo, Flicker, Soundcloud, Bilibili, DailyMotion, Tiktok, Likee, Niconiko, Twitch | Instagram, Facebook, Twitter | |||
| Supported conversion output formats | MP4, AVI, MOV, JPG, etc. | MP3, MP4, JPG, etc. | Mp4 and JPG primarily. | 4A, WAV, OGG, 3GP, WMA, FLAC, AVI, MPG, MP4, MOV, MKV, WMV, M4V, MP3, WEBM, FLV. | MP3 |
Part 3: Hot FAQs on Online Video Converter for Instagram
1. Is it illegal to download Instagram videos?
Many applications, online converter tools, and sites are available for safely downloading Instagram videos. However, the service provider does not permit third-party content download from the app. Yet, these online converter tools are not entirely illegal- you should only download personal use instead of commercial usage. Also, downloads are allowed from public IG accounts primarily.
2. How to download reels video with Original HD Quality?
Many converter tools are available for downloading high-quality videos from Instagram Reels. The best ones we tested out with these benefits are InstaVideoSave and iGram. In the former, you can download HD quality videos to 1080p resolution, while iGram allows video downloads to 720p.
3. How can I download reels audio or sound only?
There are specific tools that users can opt for to download Instagram videos in audio format. AceThinker, for example, is the best online converter to download only the audio from the Instagram video links you add. Users opt for this software to convert IG-based music videos into MP3 files.
Final Words
Overall, multiple online converter tools are available for downloading different IG content like Reels, Videos, and Images to video/audio/image file format. Among them, InstaVideoSave and F2mp are the two tools where we noticed the best benefits. However, F2mp is a paid software, so choose it only for premium features.
How to Use This:
Step1Copy the post link from Instagram and paste it.
Step2Click on View.
Step3Press the Download button to save.
2. YouTube4KDownloader (4K Stogram)
While this online Instagram video converter is mainly for YouTube content download, users can freely operate it to convert IG content. In addition, it has been recommended by many professional product reviewers, like TrustRadar, for its good user experience and high-level format support.

Main Features:
- Save full tagged posts/Saved posts to the device.
- Browse through accounts anonymously.
- Download private IG content.
- Save posts from specific timelines.
Pros
- Back up your files.
- Comments/likes are automatically saved in content metadata.
- New posts update in real-time on the feed.
Cons
- Free users can only download one video at a time.
- Pro users must pay USD 45 to use all features like tagged post downloading.
How to Use This:
Step1Download the 4K Stogram link.
Step2Tick the T&C agreements.
Step3Install and run.
Step4Add File.
Step5Press Convert to begin the process.
3. iGram
iGram is one of the best choices for selecting an online video converter Instagram users can utilize daily. It supports converting all types of IG content, like Reels, videos, images, and even carousels. The software has strong privacy support as well.

Main Features:
- Convert Reels and IGTV content.
- Save pictures and videos offline.
- Support carousel downloading from IG accounts.
- Saves into diverse phones, computers, and tablets.
Pros
- The simple process of conversion.
- View and download anonymously.
- Multiple output formats are supported.
Cons
- You cannot download files from any private account.
- The output video format supported does not cross 720p.
How to Use This:
Step1Go to Instagram and copy the post link of the video.
Step2Open this site and add the link into the text field.
Step2Press Start.
Step4The conversion would occur automatically.
4. F2mp
This online Instagram video converter is not the simplest choice for Instagram-to-video conversions, but the quality can improve over time. Compared to other options, it does not support all types of IG content. But it does assure a fast conversion and saving process.

Main Features:
- Paste the video URL from Instagram.
- Customize output settings like the video format.
- Instant conversion of files is possible.
- Direct download to the device.
Pros
- A wide range of conversion formats is supported.
- Free online converter.
- Works web-based on many browsers.
Cons
- Does not convert all types of IG content.
- Users cannot choose video resolution and other formatting steps.
How to Use This:
Step1Add keywords/file URLs in the tool search field.
Step2Select output type.
Step3Press the Start button.
5. AceThinker
One of the top converter tools of IG is AceThinker, which is relatively simple to utilize and learn. Different types of users can add files from different platforms and run the conversion automatically.

Main Features:
- Add links, download content, and share videos easily across platforms.
- Compatible with many social media platforms.
- Works on various browsers like Chrome, Firefox, Edge, Safari, etc.
- Web-based tool.
Pros
- Works with different operating systems like Mac and other devices.
- Free to use.
- Quick conversions are possible.
Cons
- Conversion to MP3 format only.
- No batch conversions are allowed.
How to Use This:
Step1Copy the IG video link and paste it.
Step2Click the Download icon.
Step3It would turn to an MP3 file and save automatically.
Part 2: Comparison Table of the 5 Online Instagram Video Converters
Now that you know which apps to try out, you must decide the right tool to use based on its uses. Namely, how well a particular app would handle your main requirement with an online Instagram video converter.
| Converter Tool | InstaVideoSave | 4K Stogram | iGram | F2mp | AceThinker |
|---|---|---|---|---|---|
| Converting Speed | Fast | Medium-Fast | Fast | Fast | Medium-Fast |
| User Experience | Easy to use for different IG content. | Browse, view, and download anonymously, even from Private users. | Simple and direct IG video to MP4 downloader. | Quick searching and link pasting process for downloading. | Simple online tool to convert IG music videos into MP3 files. |
| Ratings | - | 4.6/5 (TrustPilot) | 3.1/5 (TrustPilot) | 400/100 (AEtrustscore) | 4.5/5 (TrustPilot) |
| Type of Instagram content it Supports. | Reels, Videos, Images, Profile, Stories. | Photos, videos, Highlights, Reels. | Videos, Images, Carousel, Reels, IGTV. | Videos | Videos |
| Compatible Social Media Apps | Instagram, Facebook, Vimeo, Flicker, Soundcloud, Bilibili, DailyMotion, Tiktok, Likee, Niconiko, Twitch | Instagram, Facebook, Twitter | |||
| Supported conversion output formats | MP4, AVI, MOV, JPG, etc. | MP3, MP4, JPG, etc. | Mp4 and JPG primarily. | 4A, WAV, OGG, 3GP, WMA, FLAC, AVI, MPG, MP4, MOV, MKV, WMV, M4V, MP3, WEBM, FLV. | MP3 |
Part 3: Hot FAQs on Online Video Converter for Instagram
1. Is it illegal to download Instagram videos?
Many applications, online converter tools, and sites are available for safely downloading Instagram videos. However, the service provider does not permit third-party content download from the app. Yet, these online converter tools are not entirely illegal- you should only download personal use instead of commercial usage. Also, downloads are allowed from public IG accounts primarily.
2. How to download reels video with Original HD Quality?
Many converter tools are available for downloading high-quality videos from Instagram Reels. The best ones we tested out with these benefits are InstaVideoSave and iGram. In the former, you can download HD quality videos to 1080p resolution, while iGram allows video downloads to 720p.
3. How can I download reels audio or sound only?
There are specific tools that users can opt for to download Instagram videos in audio format. AceThinker, for example, is the best online converter to download only the audio from the Instagram video links you add. Users opt for this software to convert IG-based music videos into MP3 files.
Final Words
Overall, multiple online converter tools are available for downloading different IG content like Reels, Videos, and Images to video/audio/image file format. Among them, InstaVideoSave and F2mp are the two tools where we noticed the best benefits. However, F2mp is a paid software, so choose it only for premium features.
Create Chroma Key Written Text Effects in Filmora
Did you know it only takes a few clicks to key out the color in Filmora? It means that you can add green screen effects to many other objects. This article will show a cool chroma key effect you can try using written text.
Part 1. What Is Chroma Key Text Effect?
Composing of the chroma key effect is widely used in the gaming and newscasting industries. In this technique, you can make layering images and videos for the text together based on color hues.
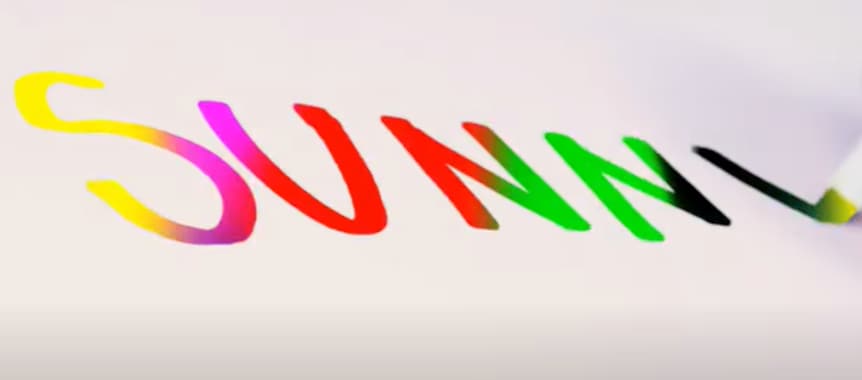
Video editors can eliminate the basis from a picture by automatically choosing a certain hue in post-production. An interactive animation results by adding different color schemes; it’s an easy way to make 3D motion videos.
To make the effects on text, we have to film the subject writing on white paper. For this, follow the below instructions:
Part 2. Filming Tips for Written Texts
To write a key text before adding the chroma effect, we have to film the writing process to understand your next project better. You can create your own by following these tips. We are just concluding a single example here.
Tip 1. A Pen and a White Paper
We need blank white paper with no boundaries and lines for writing a text. Because the chroma effect will embellish the other lines if present on paper. Make sure to choose a prominent color for writing a text.
We are using a purple color pen here for writing an essential text to make it more prominent, as shown below:
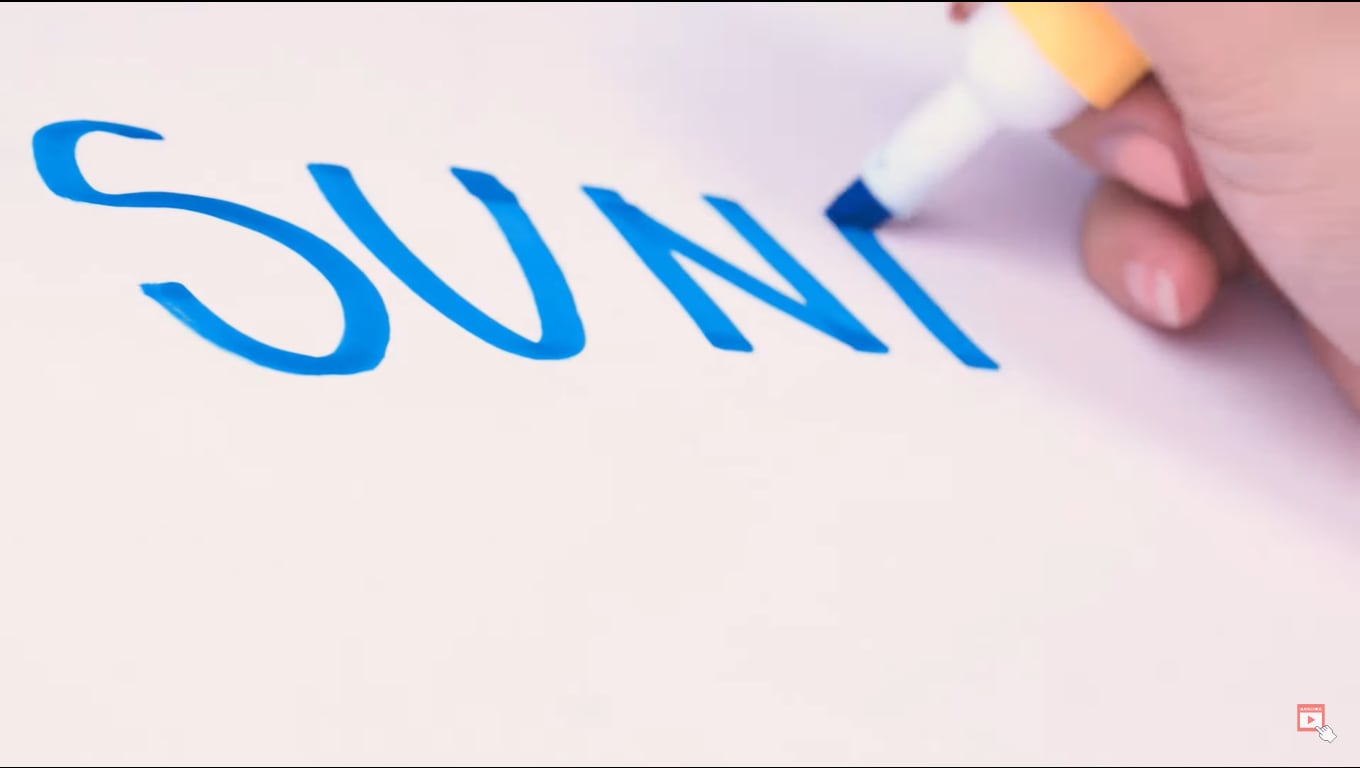
It all depends upon the contrast, and you can choose another color too but ensure that it’s more apparent during filming.
Tip 2. Different Color Paper
There are many chances that you don’t have only white paper in your studio, or your requirement is not going with a blank white sheet. Then you don’t need to worry because you can use different color papers too.
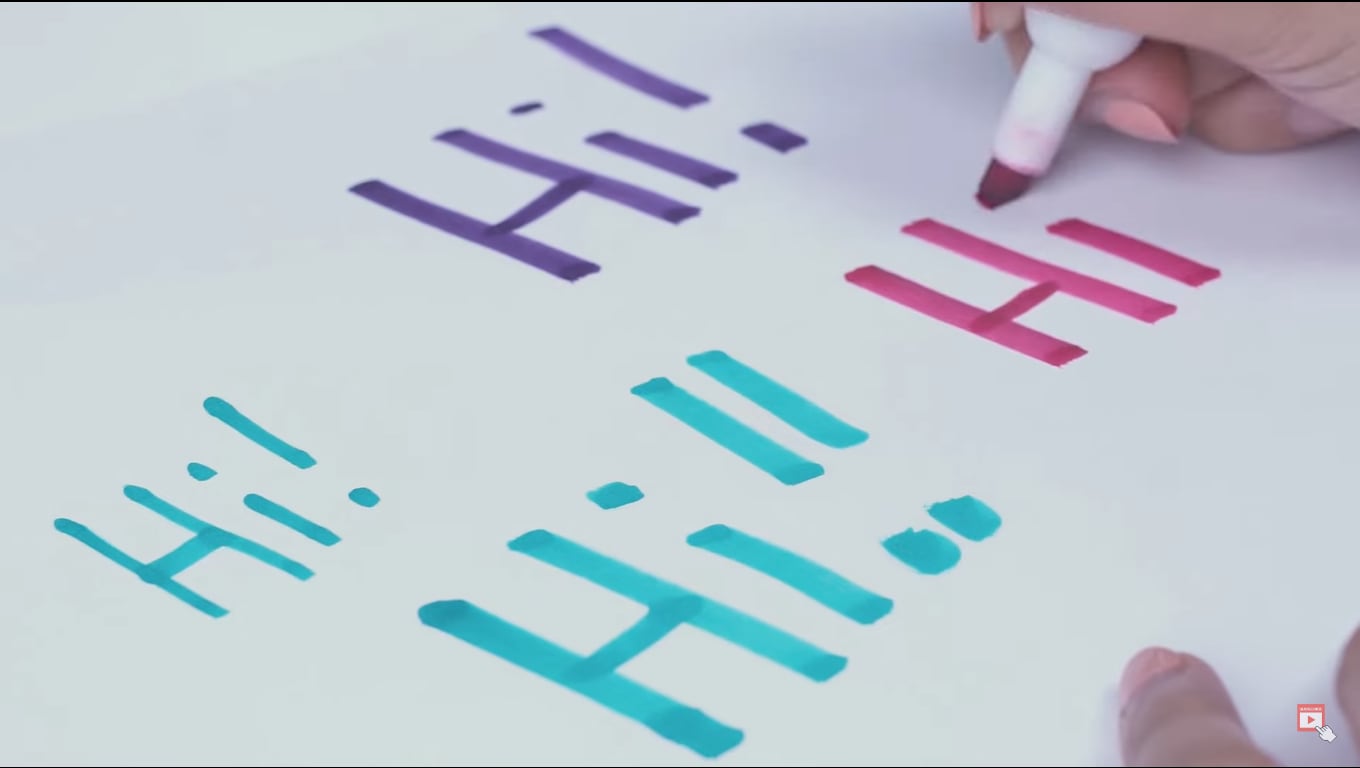
But always try to use clearer paper and a prominent pen or highlighter. See the below example of a different color paper with a different highlighter.
![]()
Note: Ensure that the colored pens have good contrast with colored paper. Don’t use dull color pens with bright color paper.
Tip 3. Camera Angles
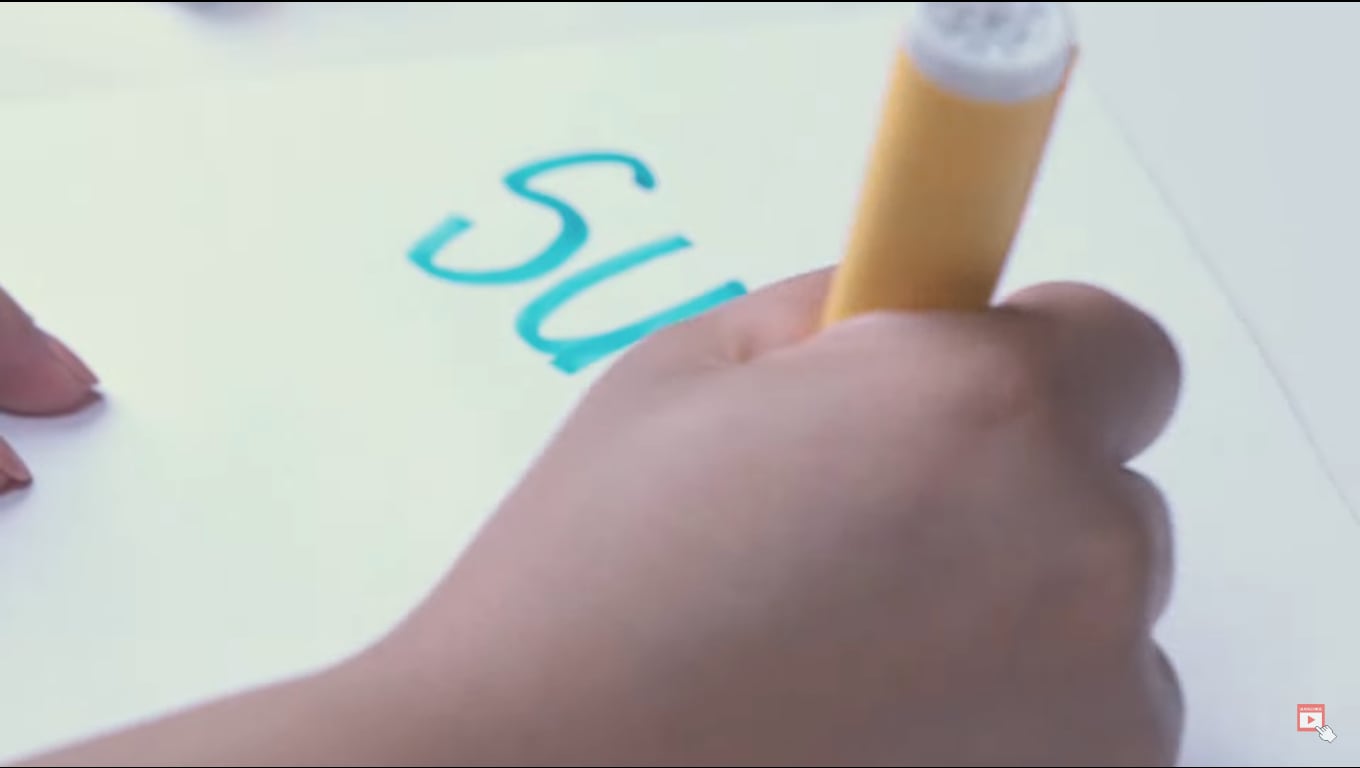
While filming a writing process for a video, you have to take care of the alignment of the camera. First, ensure the camera is at a suitable angle so it will not block the writing letters from the left side.
Sometimes, the writer’s hand blocks the letters on the left side during writing. Take note of this tip during filming a professional video, as shown below.
After checking the alignment of the camera, it’s time to look at what size we have to use for writing!
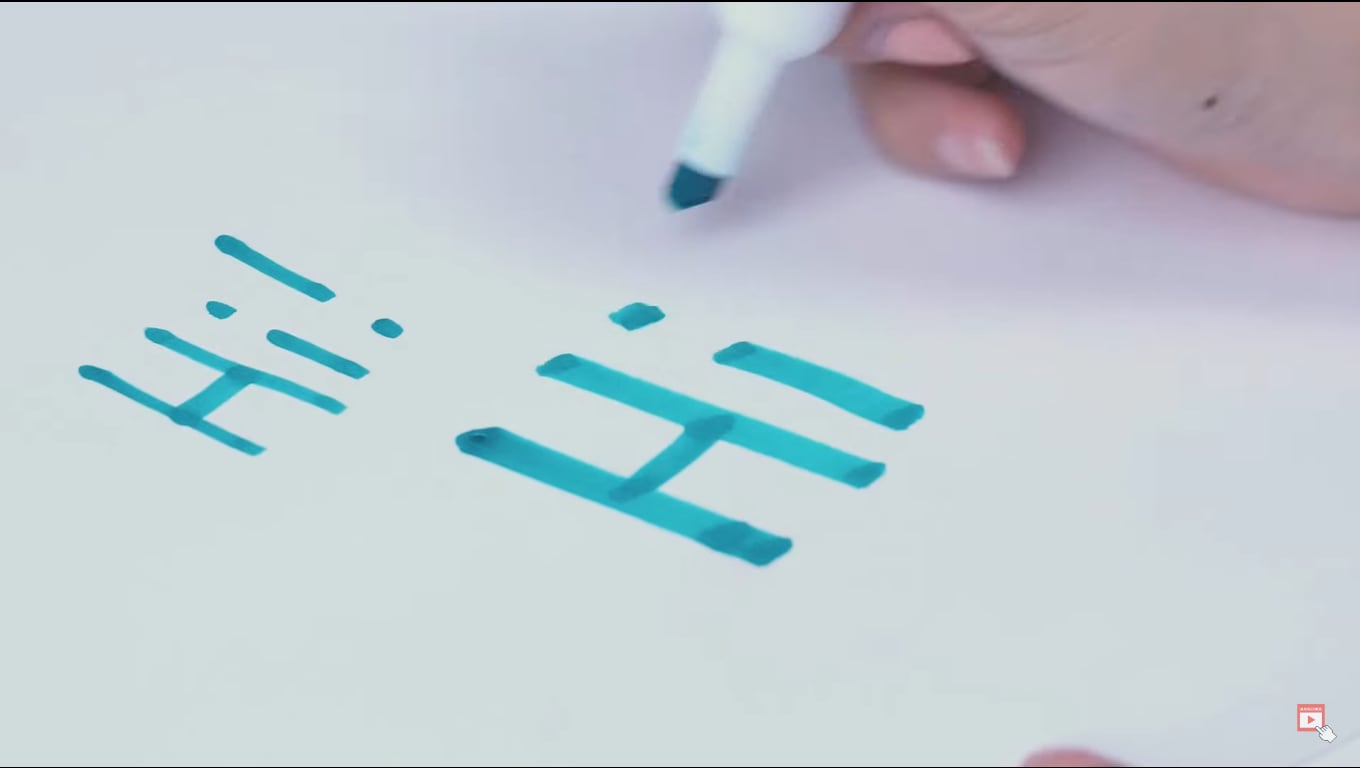
Tip 4. Larger Size of Letters
As we already said about the prominence of written text, we have to follow one more instruction related to the structure of the letters. Use the larger size and bold words when writing from a highlighter.
It is because the effect we insert during editing will be more standing and give a professional look to the video.
![]()
Note: You can create more shots till you get the right angle for a final video. Just focus on the camera alignment and highlighted words, then it will be all set.
After filming all the clips, you must edit those shots on the Filmora to get the chroma effect. Scroll more to get the step-by-step process!
Part 3. Editing the Chroma Key Text With Filmora
We need software that will give great setting choices and stock videos for a more professional look. For this, Wondershare Filmora will work more than a robot and give high-resolution results. To do the editing process on Filmora, follow the steps below and enjoy yourself with your followers.
Free Download For Win 7 or later(64-bit)
Free Download For macOS 10.14 or later
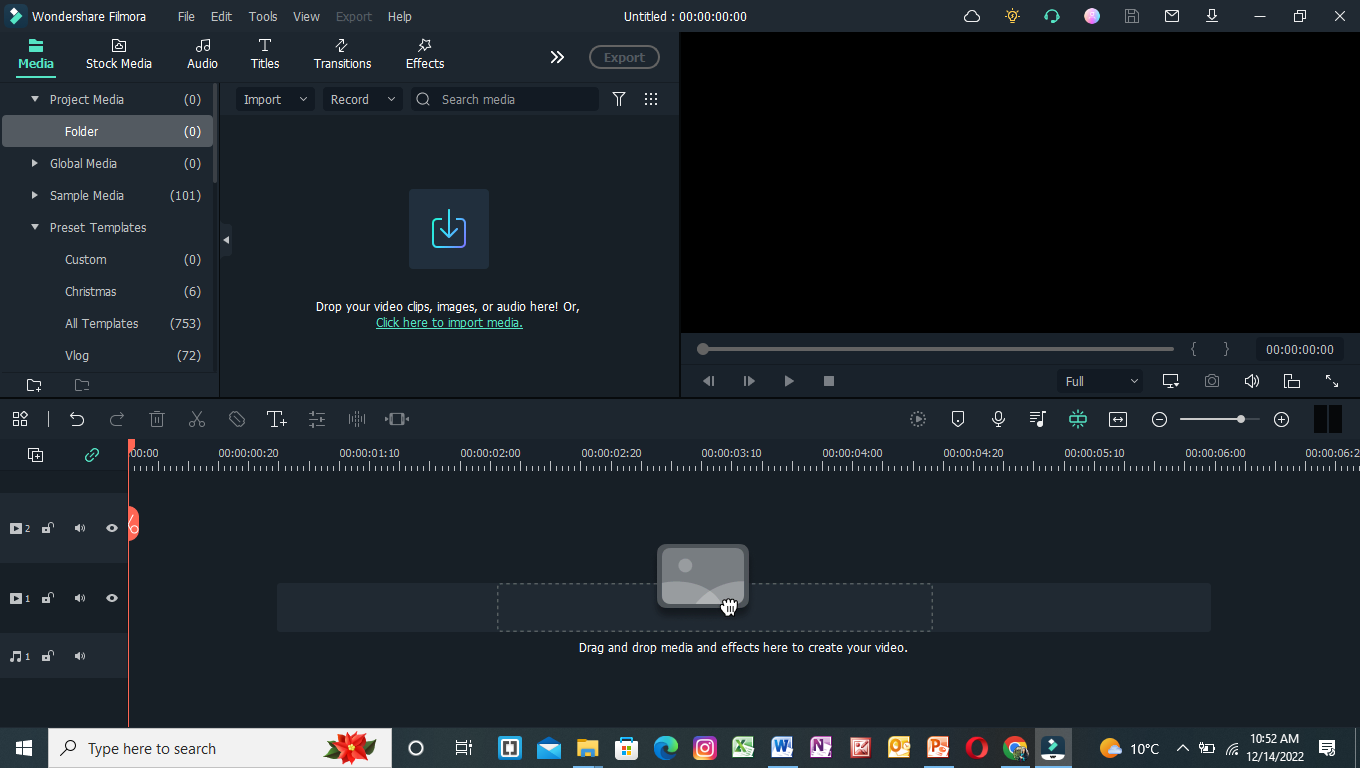
Step1 Download and install Wondershare Filmora
Launch Wondershare Filmora on your PC or Mac after downloading.
![]()
Note: If you want to enjoy its unlimited effect, you get its premium version quickly.
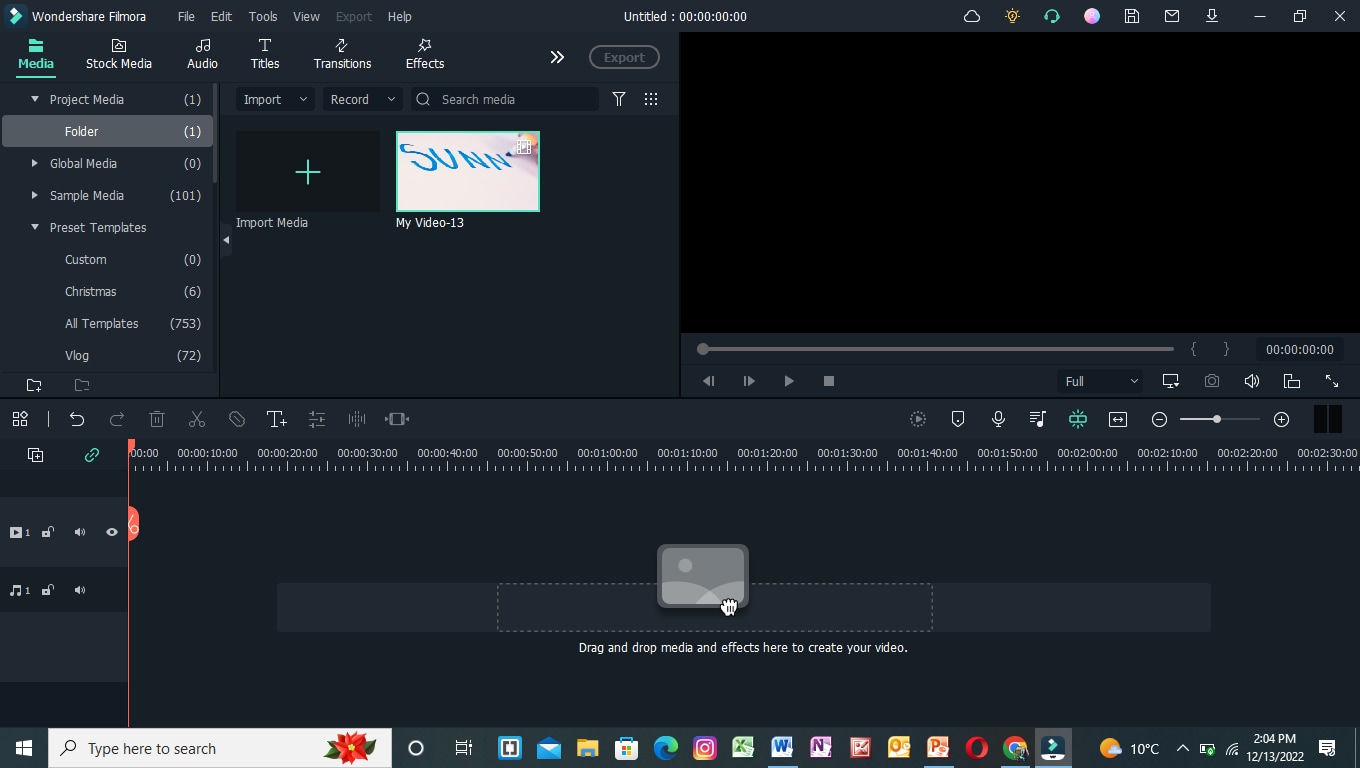
Step2 Import the clips to the Filmora
First, import the best footage into the filmora which you have shot. Ensure that the clip should have the best recording angle and that every word will be prominent on the page.
For this, click on Import Media and choose from the PC library what you want to edit.
Step3 Drag the clip to the timeline
Drag and drop the clip into the timeline from the import section. If you have more clips, choose first according to your script.
Add the text-written clip into the second video track because we have to insert the background into the first video track later.
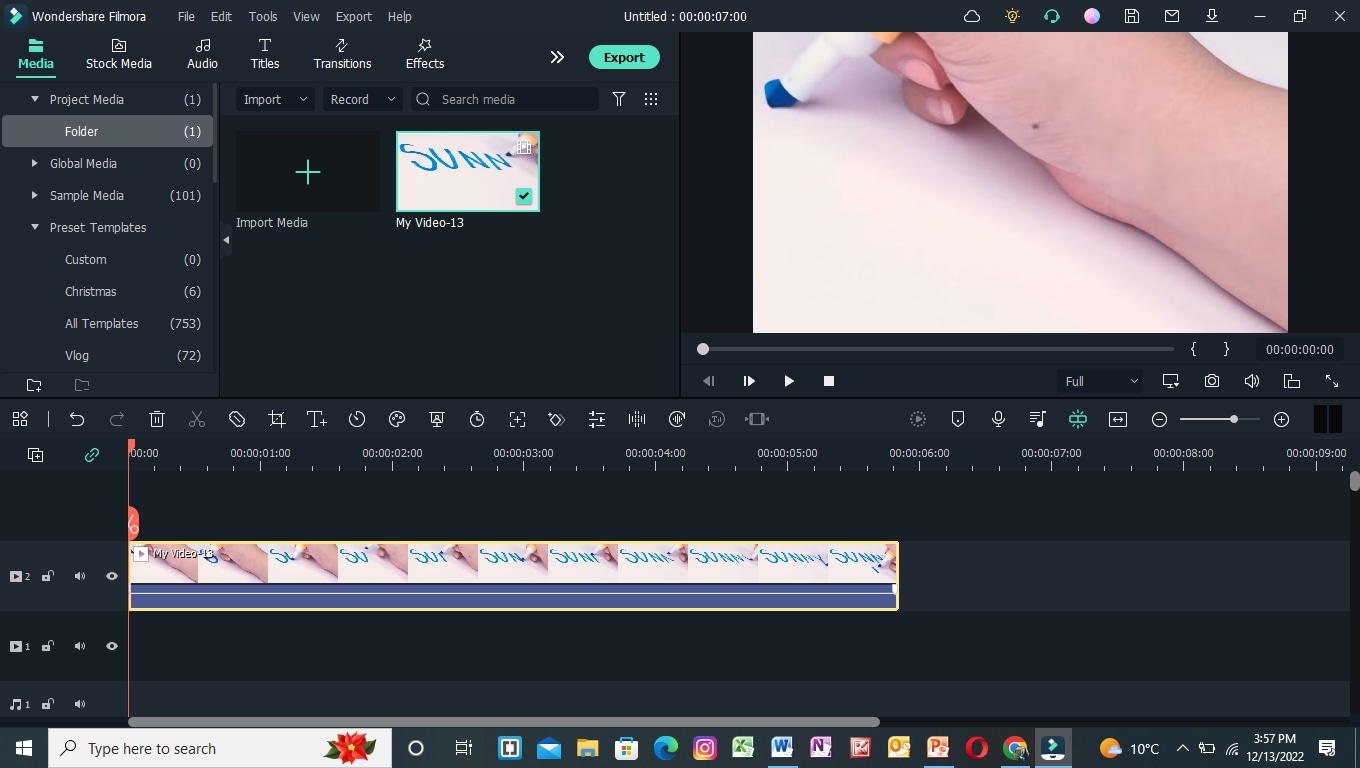
After inserting the clip into the timeline, it’s time to edit it. For this, keep following the below-mentioned steps!
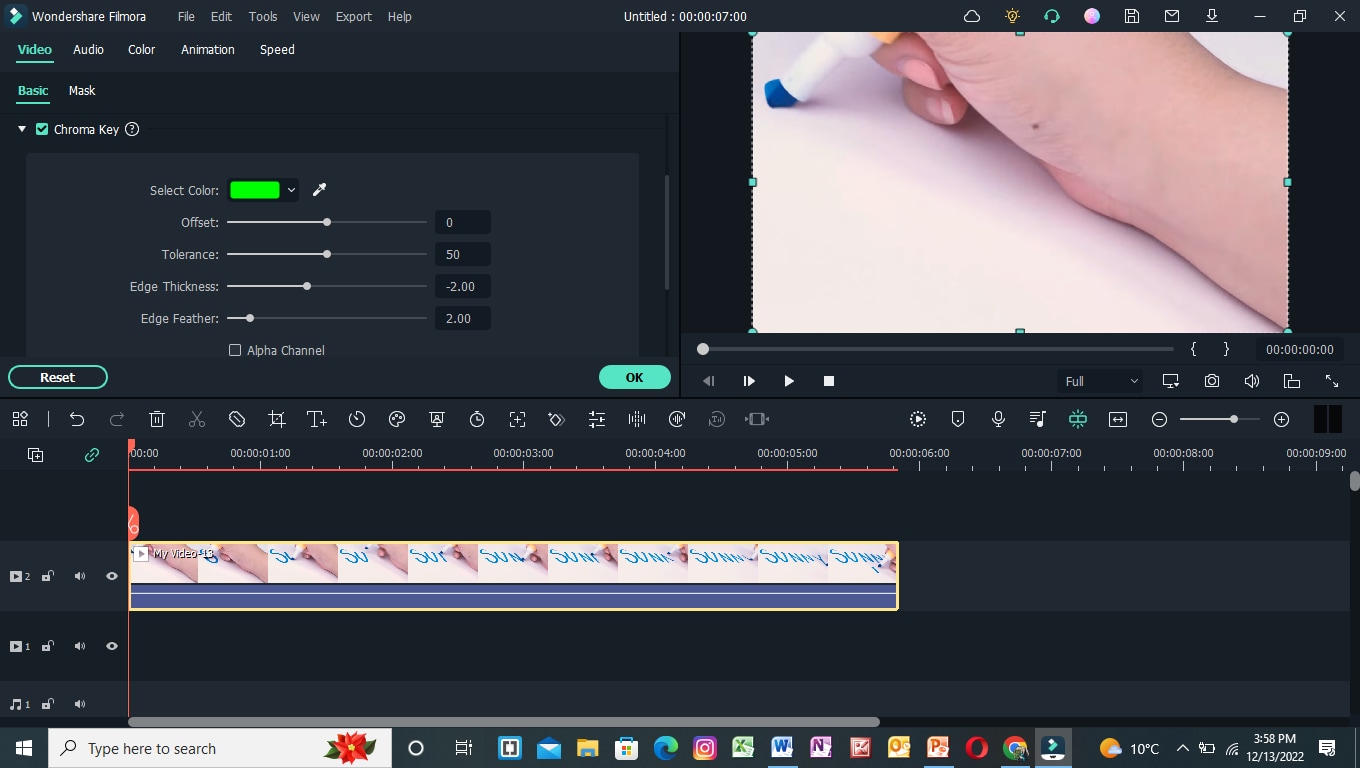
Step4 Chroma key settings
To edit the chroma key, you need to open the settings. For this, follow the below instructions:
- First, double-click on the clip in the timeline of the Filmora.
- Then, the setting section of the video will pop up at the top left side.
- Mark the tick in front of the Chroma Key section, and it will show the list of different features as shown below.
Step5 Color key out
To key out the specific color for changing its background, you have to perform the following actions:
- First, find the Select color option in the settings of the clip.
- Then click on the color dropper in front of the color tab.
- After that, pick the color dropper and move it on the video to select the color from the text.
![]()
Note: Ensure to select the color from the middle of the text for better key-out accuracy.
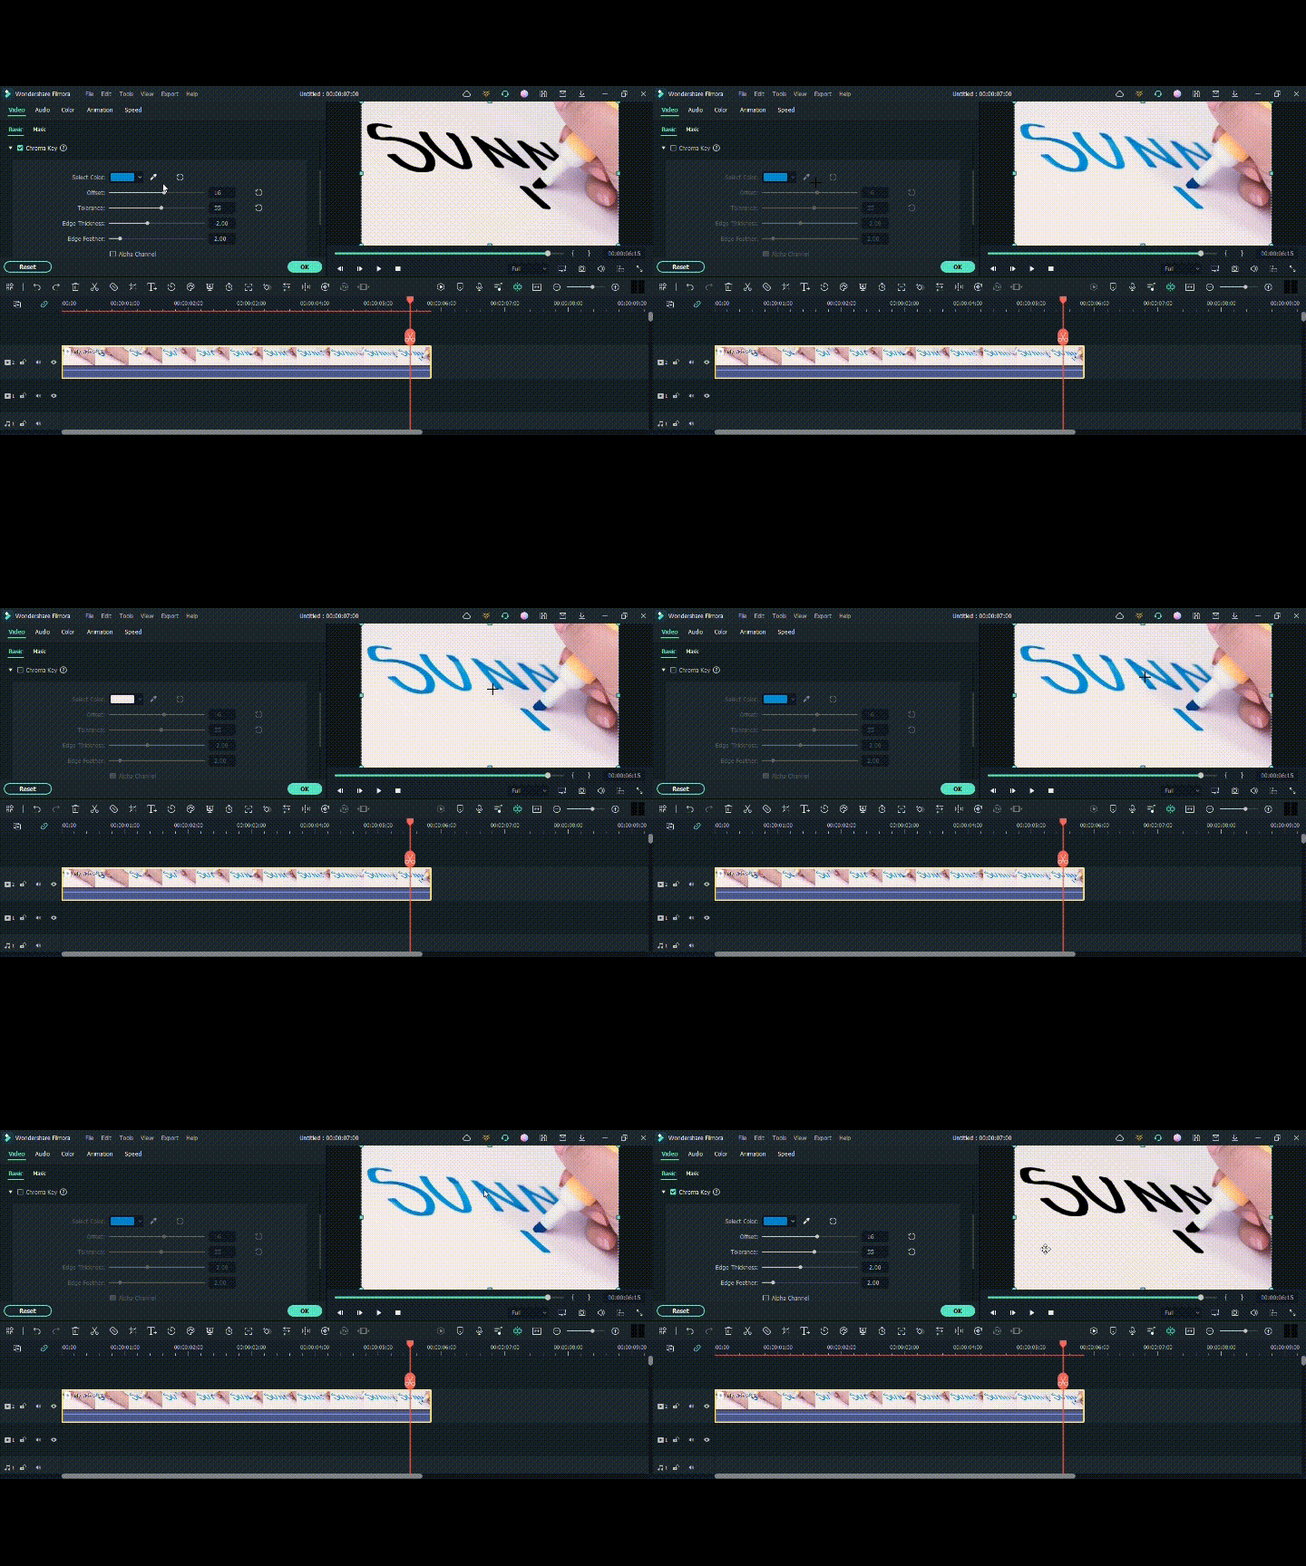
You have to adjust the size and thickness after selecting the key-out. For this, follow the next step!
Step6 Adjust the settings
To adjust the Chroma Key’s settings, set the offset, tolerance, edge thickness, and edge feather. Increase or decrease according to your range and that suits you the best.
Then click on Alpha Channel to mark the tick in front of the option. It is due to that chroma key effects will be more clearly shown.
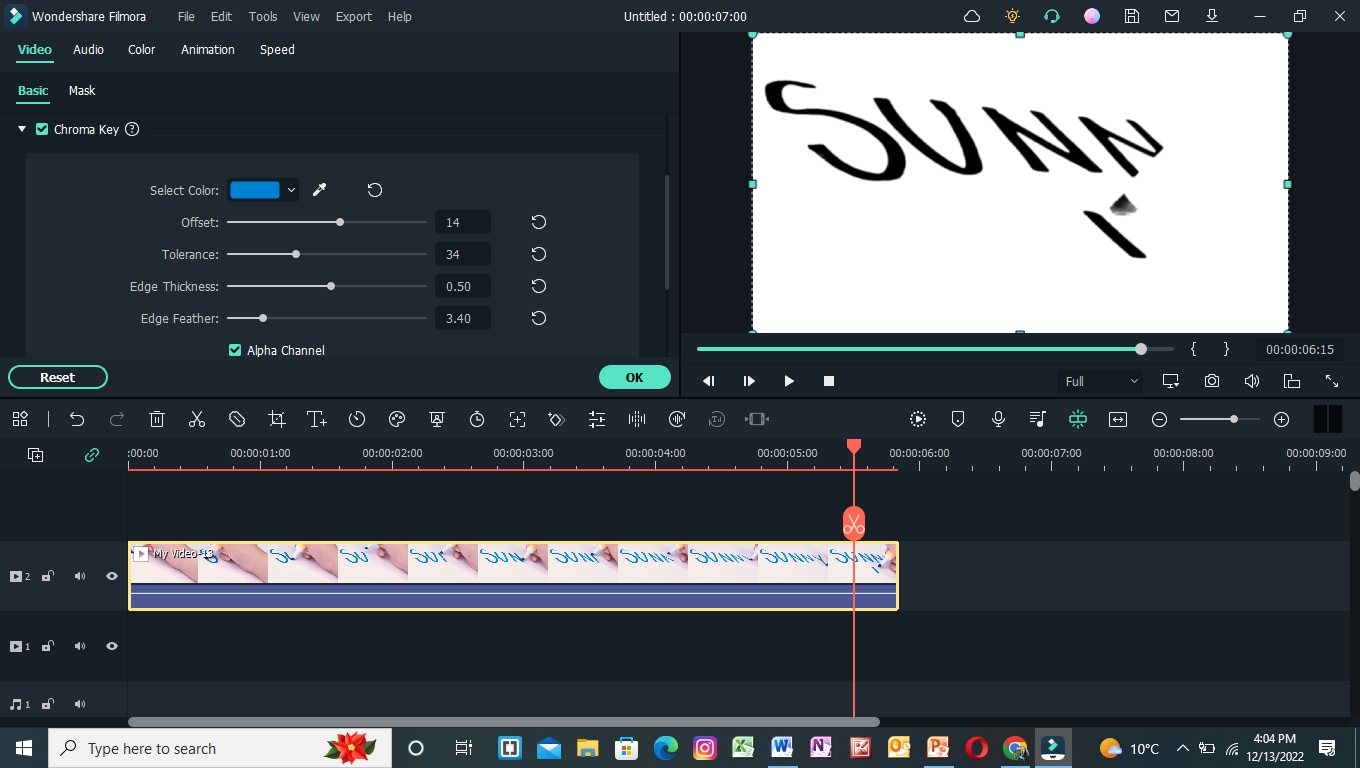
Now, it’s time to set the background after fixing all the settings of the chroma key effect. To perform this, scroll more to get to the next step.
Step7 Import background clips
You have to add an excellent motion background in the handwritten text video. For this, you must first import the background clip into the filmora. Then, click on Import Media and choose what you want from your PC.
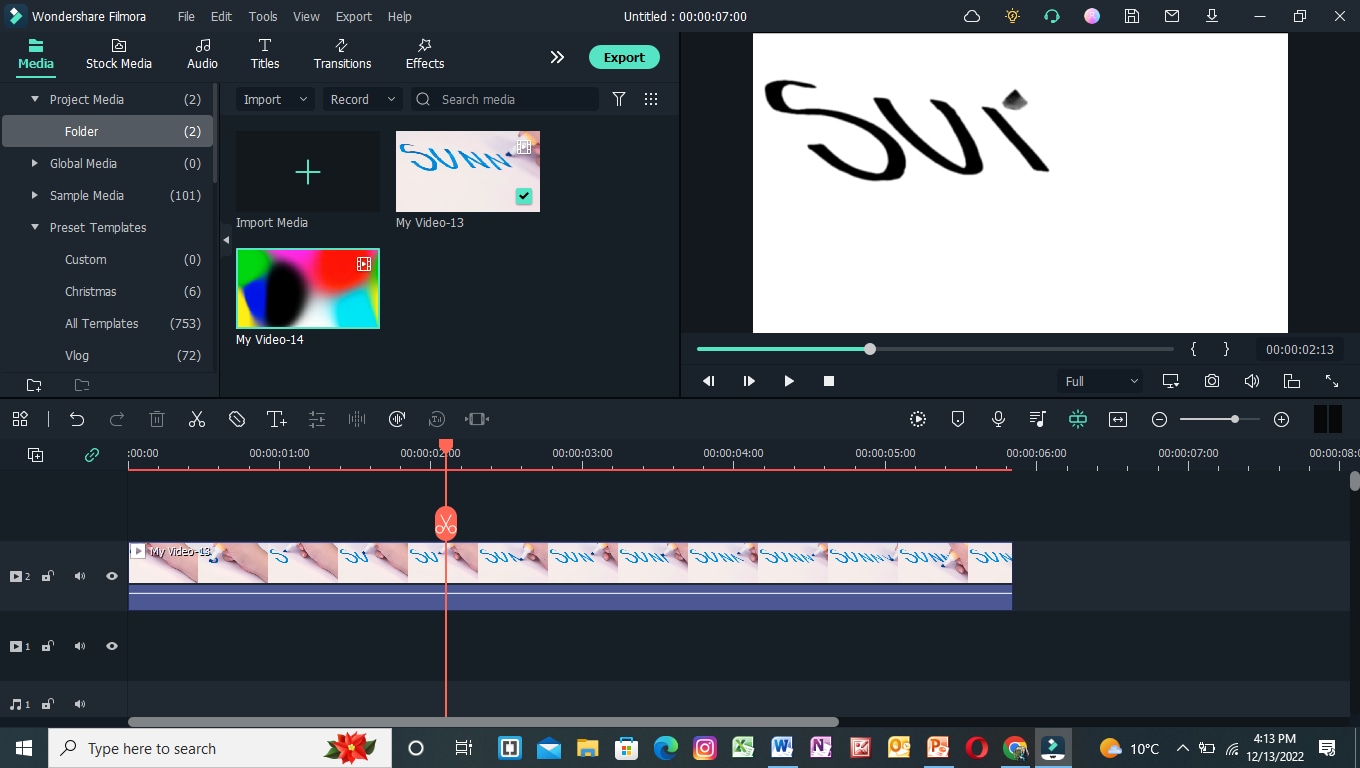
Step8 Add a background clip to the timeline
After importing the background clip, now drag and drop the clip into the timeline. Finally, add the background clip to the first video track at the bottom.
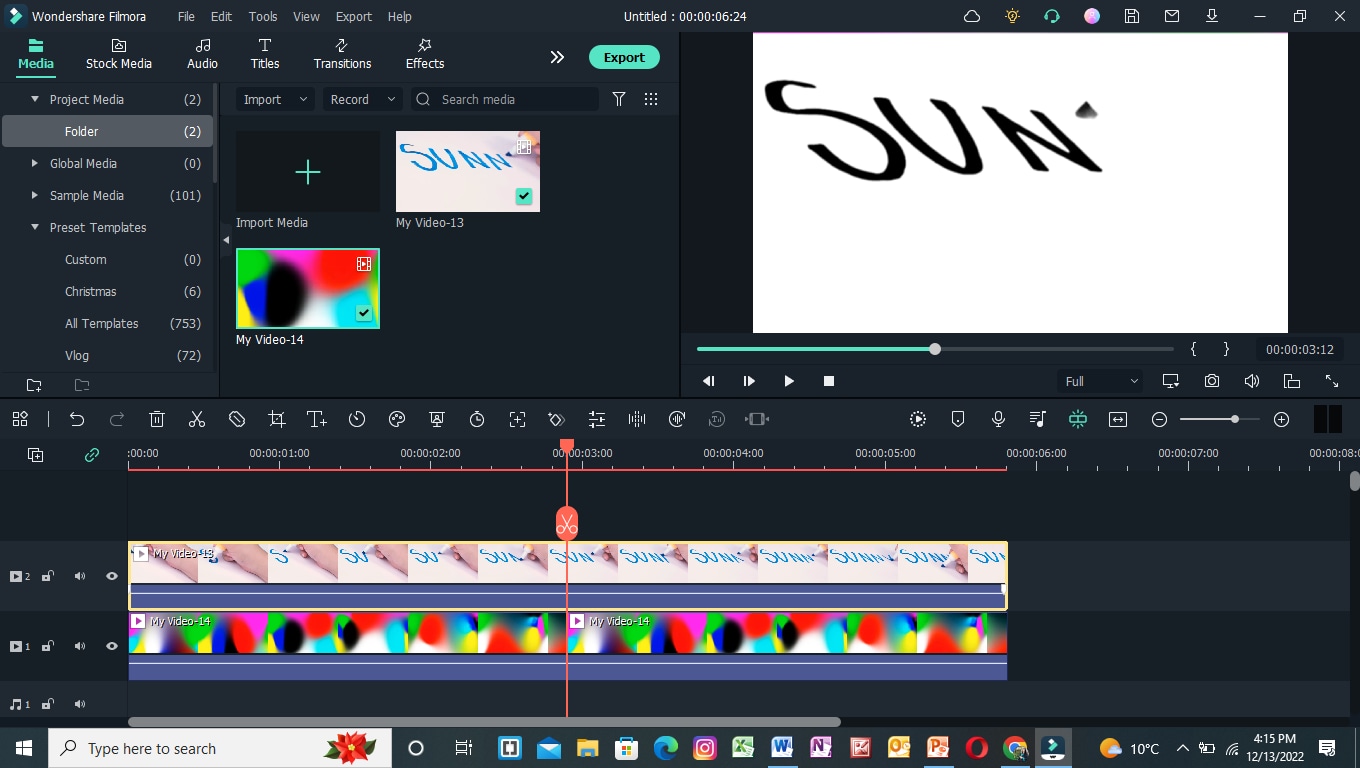
Step9 Turn off the alpha channel
The last step is merging the background clip with the first clip. For this, follow the below guidelines:
- First, double-click on the handwritten text video.
- It will show the settings section at the top left corner.
- Find the chroma key section and turn Alpha Channel
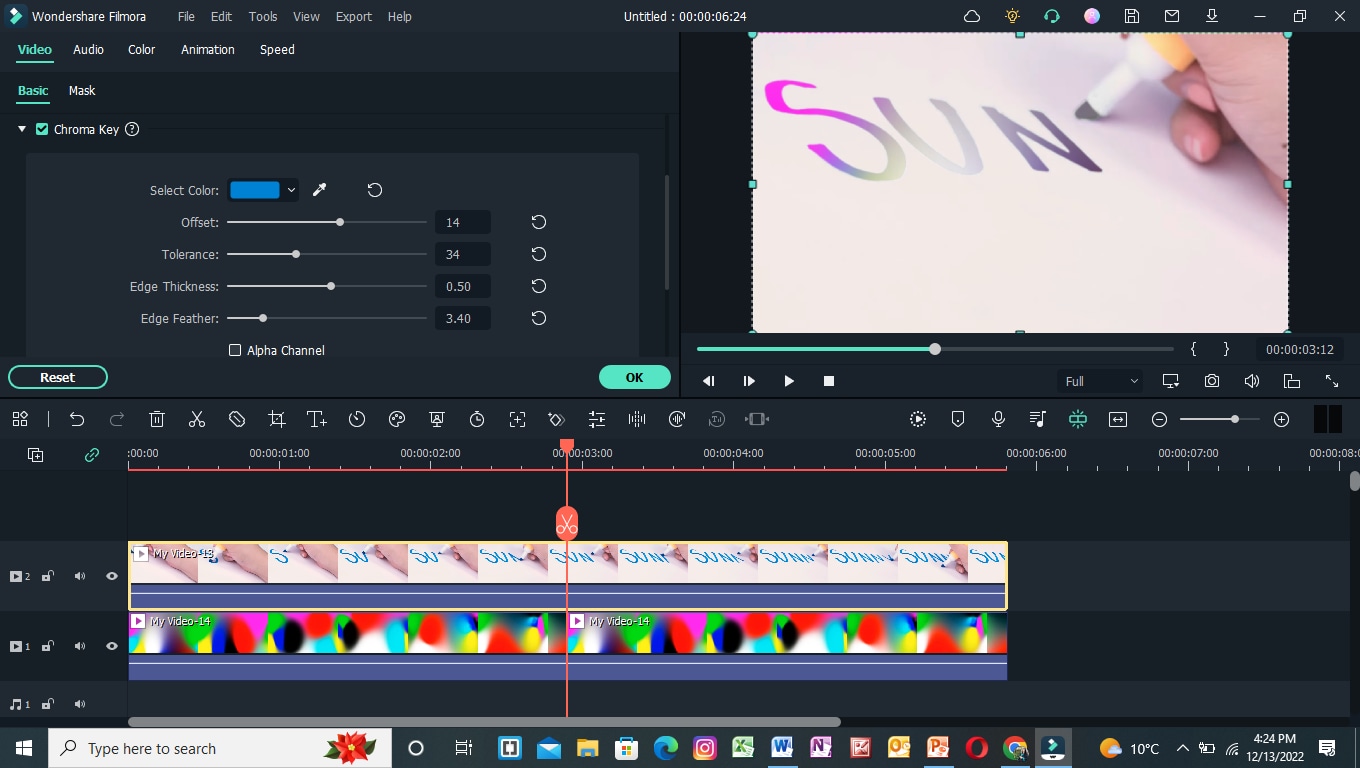
Final Results
You have all done with the steps and got such a fascinating result. Following the above tricks, you can easily make your vlogs and daily videos more professional and creative. Make sure to add a great and colorful background clip.
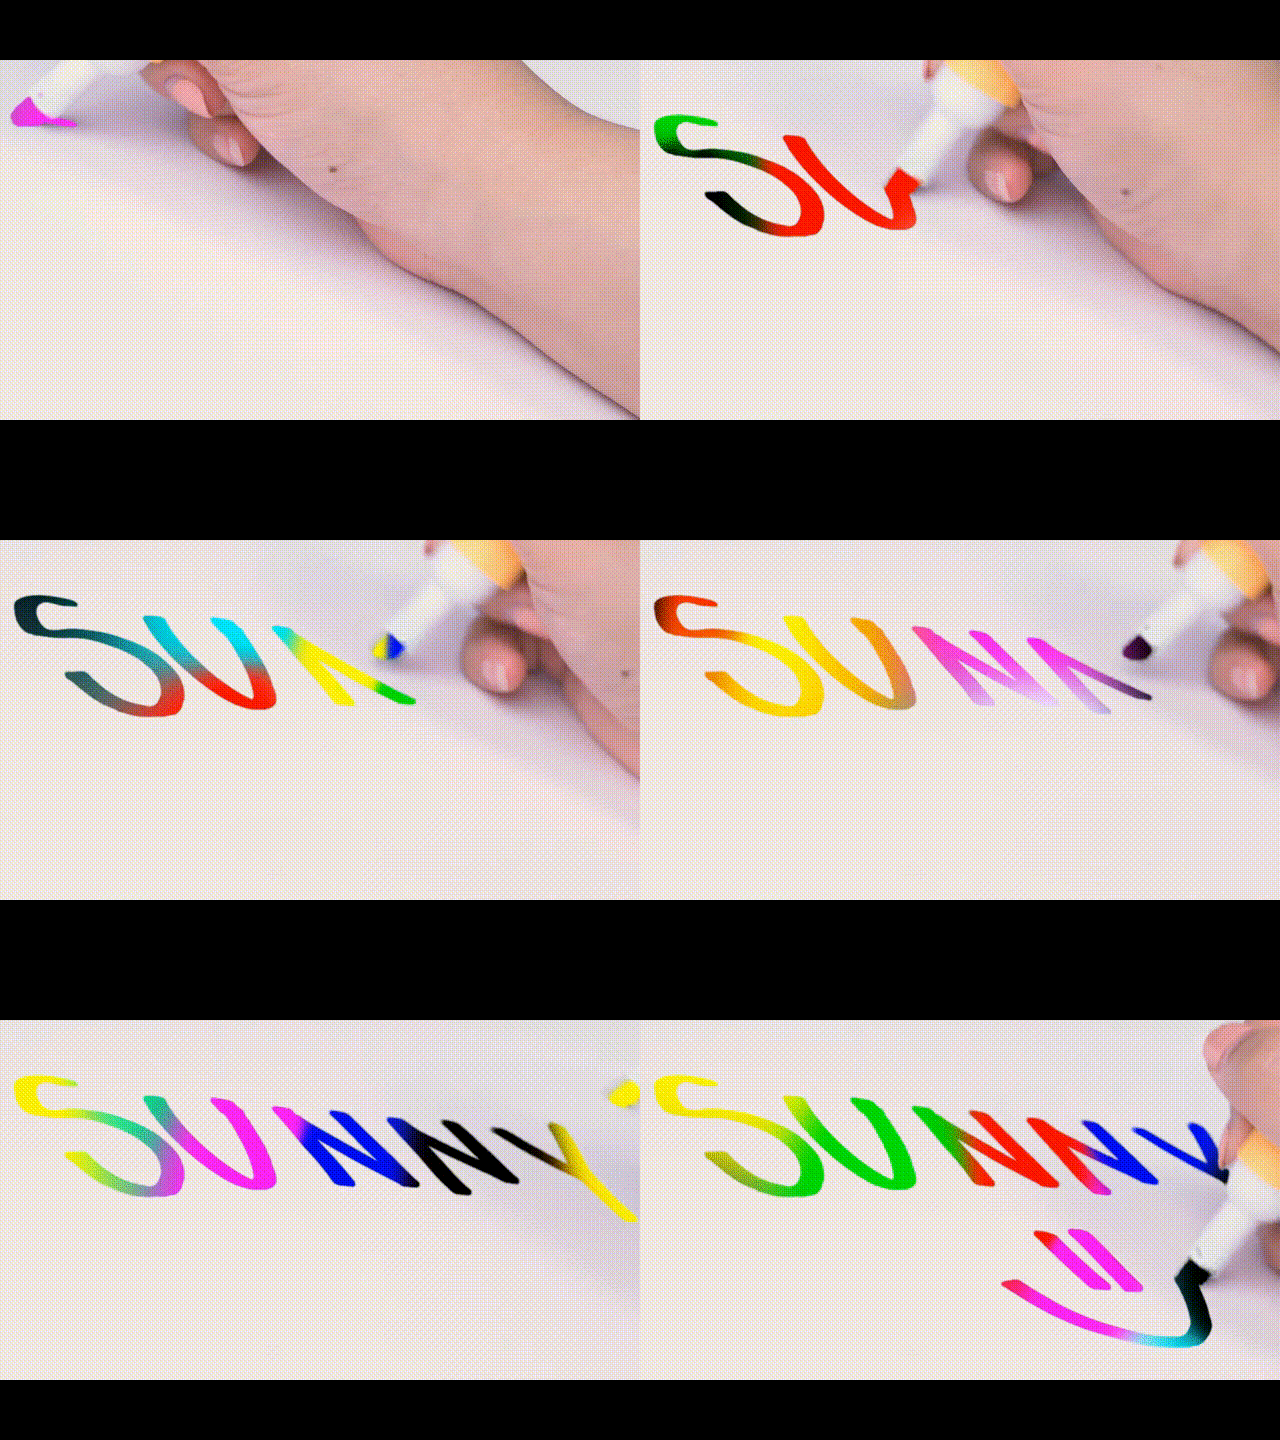
You can also use any other motion video of scenes rather than colorful videos to give a striking look.
Conclusion
Create more attractive looks and share them with your subscribers. Mainly, vloggers can attract many viewers by making the introductory part with this effect. Then, choose hundreds of other videos from the stock media and create different looks daily.
See how you can get editing tricks on Wondershare Filmora and use them in a few clicks to get an attractive look!
Tip 3. Camera Angles
While filming a writing process for a video, you have to take care of the alignment of the camera. First, ensure the camera is at a suitable angle so it will not block the writing letters from the left side.
Sometimes, the writer’s hand blocks the letters on the left side during writing. Take note of this tip during filming a professional video, as shown below.

After checking the alignment of the camera, it’s time to look at what size we have to use for writing!
Tip 4. Larger Size of Letters
As we already said about the prominence of written text, we have to follow one more instruction related to the structure of the letters. Use the larger size and bold words when writing from a highlighter.
It is because the effect we insert during editing will be more standing and give a professional look to the video.

![]()
Note: You can create more shots till you get the right angle for a final video. Just focus on the camera alignment and highlighted words, then it will be all set.
After filming all the clips, you must edit those shots on the Filmora to get the chroma effect. Scroll more to get the step-by-step process!
Part 3. Editing the Chroma Key Text With Filmora
We need software that will give great setting choices and stock videos for a more professional look. For this, Wondershare Filmora will work more than a robot and give high-resolution results. To do the editing process on Filmora, follow the steps below and enjoy yourself with your followers.
Free Download For Win 7 or later(64-bit)
Free Download For macOS 10.14 or later
Step1 Download and install Wondershare Filmora
Launch Wondershare Filmora on your PC or Mac after downloading.
![]()
Note: If you want to enjoy its unlimited effect, you get its premium version quickly.

Step2 Import the clips to the Filmora
First, import the best footage into the filmora which you have shot. Ensure that the clip should have the best recording angle and that every word will be prominent on the page.
For this, click on Import Media and choose from the PC library what you want to edit.

Step3 Drag the clip to the timeline
Drag and drop the clip into the timeline from the import section. If you have more clips, choose first according to your script.
Add the text-written clip into the second video track because we have to insert the background into the first video track later.

After inserting the clip into the timeline, it’s time to edit it. For this, keep following the below-mentioned steps!
Step4 Chroma key settings
To edit the chroma key, you need to open the settings. For this, follow the below instructions:
- First, double-click on the clip in the timeline of the Filmora.
- Then, the setting section of the video will pop up at the top left side.
- Mark the tick in front of the Chroma Key section, and it will show the list of different features as shown below.

Step5 Color key out
To key out the specific color for changing its background, you have to perform the following actions:
- First, find the Select color option in the settings of the clip.
- Then click on the color dropper in front of the color tab.
- After that, pick the color dropper and move it on the video to select the color from the text.
![]()
Note: Ensure to select the color from the middle of the text for better key-out accuracy.

You have to adjust the size and thickness after selecting the key-out. For this, follow the next step!
Step6 Adjust the settings
To adjust the Chroma Key’s settings, set the offset, tolerance, edge thickness, and edge feather. Increase or decrease according to your range and that suits you the best.
Then click on Alpha Channel to mark the tick in front of the option. It is due to that chroma key effects will be more clearly shown.

Now, it’s time to set the background after fixing all the settings of the chroma key effect. To perform this, scroll more to get to the next step.
Step7 Import background clips
You have to add an excellent motion background in the handwritten text video. For this, you must first import the background clip into the filmora. Then, click on Import Media and choose what you want from your PC.

Step8 Add a background clip to the timeline
After importing the background clip, now drag and drop the clip into the timeline. Finally, add the background clip to the first video track at the bottom.

Step9 Turn off the alpha channel
The last step is merging the background clip with the first clip. For this, follow the below guidelines:
- First, double-click on the handwritten text video.
- It will show the settings section at the top left corner.
- Find the chroma key section and turn Alpha Channel

Final Results
You have all done with the steps and got such a fascinating result. Following the above tricks, you can easily make your vlogs and daily videos more professional and creative. Make sure to add a great and colorful background clip.

You can also use any other motion video of scenes rather than colorful videos to give a striking look.
Conclusion
Create more attractive looks and share them with your subscribers. Mainly, vloggers can attract many viewers by making the introductory part with this effect. Then, choose hundreds of other videos from the stock media and create different looks daily.
See how you can get editing tricks on Wondershare Filmora and use them in a few clicks to get an attractive look!
Introduction to The Best Cinematic LUTs in The Market
With the development of new editing tools and apps, we all want our content to look different and better from others. Moreover, increasing social media usage has also made people more concerned about their photos and videos. However, besides editing tools, you can add layers of adjustments and apply LUTs, filters, and more to your content.
With different LUTs, such as cinematic LUTs, you can give your digital content a professional look. These LUTs also give a dramatic feel and add depth to your photos and videos.
Part 1: What are Cinematic LUTs Used for?
Cinematic LUTs have several uses, including creating a specific mood or look. They can be used to make the footage look vintage or retro or to create a dark, moody atmosphere or a bright, colorful tone. Furthermore, these cinematic LUTs can match the footage’s colors and tones so they all look the same. They can also be used to contrast and color your photos and images.
It can also make your media files look like they were filmed on a real film camera, giving them a more natural, organic feel. These are useful tools for making videos or images look a certain way. They can improve the color quality and make the story more interesting.
Empower your videos with a new mood using different LUTs. Filmora now offers 100+ top-quality 3D LUTs cover a broad range of scenarios. Transform your videos with Filmora’s powerful 3D LUTs.
Apply LUT on Videos Apply LUT on Videos Learn More

Part 2: Top Cinematic LUT Pack to Consider for Your Media
Many LUTs give a cinematic feel when applied to your digital content. These LUTs add depth and emotion to your images and videos. There are many cinematic LUT packs that you can download and use them.
1. Cinematic LUTs Pack 2023
Many free cinematic LUTs are available to download, but this one differs. The Cinematic LUTs Pack 2023 has various Hollywood-style color grading options available. This pack has different color correction layers that give you a modern cinematic feel. Moreover, you can darken the highlights to enhance the subject in your content.

2. Cinematic LUT
Another LUT that gives your content the cinematic feel you want is this exceptional collection. This LUT fades the colors in your photos and videos to give a rusty look. It gives your media files a West Hollywood-style look to give them a cinematic look. Furthermore, it also enhances certain colors to improve the color grading in your video footage or images.

3. 20 FREE Travel LUTs for Cinematic Looks
It is a great LUT pack if you want multiple options to add cinematic-style LUTs to your digital media content. You get 20 different cinematic LUTs for your travel photos and videos. With the right amount of tan, shadows, highlights, and grains, your videos will look like they are from a movie clip. It improves your travel videos and photos by giving them movie-like color adjustments.

4. Sandstorm
As the name suggests, it gives your media files the golden cinematic shade. It is a LUT, which highlights golden, orange, and brown colors to add a warm tone to your files. This LUT will give your pictures and videos a warm cinematic feel. You can use your photos and videos to apply this adjustment layer to make them look like Hollywood content.

5. Vintage Vibe
Last but not least, Vintage Vibe is a great LUT that adds depth to your photos and videos. It creates an ambiance of an old-style cinematic touch to your digital files. You can improve your story by adding emotion and depth to your content with this LUT. Moreover, you can add this vintage color correction layer to give your content a unique and creative style.

Part 3: 3D LUT Creator: An Effective Cinematic LUTs Software
3D LUT Creator is a powerful tool packed with amazing color correction features for photo and video editing. This tool offers different cinematic LUTs to use and apply to your content. Moreover, users can create their LUTs according to their style and preference. Another impressive feature is its plugin support for different editing software.
Furthermore, the tool also comes with seven color gradients, a color wheel option, and A/B and C/L grids. These options allow you to change and distribute colors to their media files. Additionally, its AI retouching plugin can retouch and beautify your image. With all these features, you can create one of the best cinematic LUTs without hassle.

Part 4: Wondershare Filmora: A Good Platform to Consume Cinematic LUTs
Wondershare Filmora is a great professional editing software. You can easily achieve a cinematic look for your videos with its color grading upgrades and LUT intensity adjustments. Furthermore, the color wheel feature allows you to make professional-looking color grading adjustments. It even offers a cinematic LUTs download option to the users.
Add LUTs on Video For Win 7 or later(64-bit)
Add LUTs on Video For macOS 10.14 or later
Additionally, it has a sharpening tool that sharpens your digital media files. With its new update, you can have many editing options, including over 200 LUTs and other color correction features. Besides this, you have so many different color grading options that you can choose from the LUTs library.

Key Features of Wondershare Filmora To Keep Notice of
- It has a unique feature that lets you denoise any background sounds or voices in your video file. This useful feature removes background noise distortion from a video file.
- Furthermore, silent detection is another unique feature that you can use. It analyzes your video content and removes unnecessary pauses. You can automatically remove awkward pauses and silent moments from your video to make it look professional.
- Additionally, you can access and use its free stock media library. This library has over 10 billion free stock media files you can use in your content.
Conclusion
In conclusion, cinematic LUTs have become essential. With multiple options available in the market, selecting the best cinematic LUT pack can be difficult. However, 3D LUT Creator is a great tool offering plugin options for multiple editing software. In contrast, Wondershare Filmora is an excellent option for creating and consuming cinematic LUTs.
Add LUTs on Video For Win 7 or later(64-bit)
Add LUTs on Video For macOS 10.14 or later
Apply LUT on Videos Apply LUT on Videos Learn More

Part 2: Top Cinematic LUT Pack to Consider for Your Media
Many LUTs give a cinematic feel when applied to your digital content. These LUTs add depth and emotion to your images and videos. There are many cinematic LUT packs that you can download and use them.
1. Cinematic LUTs Pack 2023
Many free cinematic LUTs are available to download, but this one differs. The Cinematic LUTs Pack 2023 has various Hollywood-style color grading options available. This pack has different color correction layers that give you a modern cinematic feel. Moreover, you can darken the highlights to enhance the subject in your content.

2. Cinematic LUT
Another LUT that gives your content the cinematic feel you want is this exceptional collection. This LUT fades the colors in your photos and videos to give a rusty look. It gives your media files a West Hollywood-style look to give them a cinematic look. Furthermore, it also enhances certain colors to improve the color grading in your video footage or images.

3. 20 FREE Travel LUTs for Cinematic Looks
It is a great LUT pack if you want multiple options to add cinematic-style LUTs to your digital media content. You get 20 different cinematic LUTs for your travel photos and videos. With the right amount of tan, shadows, highlights, and grains, your videos will look like they are from a movie clip. It improves your travel videos and photos by giving them movie-like color adjustments.

4. Sandstorm
As the name suggests, it gives your media files the golden cinematic shade. It is a LUT, which highlights golden, orange, and brown colors to add a warm tone to your files. This LUT will give your pictures and videos a warm cinematic feel. You can use your photos and videos to apply this adjustment layer to make them look like Hollywood content.

5. Vintage Vibe
Last but not least, Vintage Vibe is a great LUT that adds depth to your photos and videos. It creates an ambiance of an old-style cinematic touch to your digital files. You can improve your story by adding emotion and depth to your content with this LUT. Moreover, you can add this vintage color correction layer to give your content a unique and creative style.

Part 3: 3D LUT Creator: An Effective Cinematic LUTs Software
3D LUT Creator is a powerful tool packed with amazing color correction features for photo and video editing. This tool offers different cinematic LUTs to use and apply to your content. Moreover, users can create their LUTs according to their style and preference. Another impressive feature is its plugin support for different editing software.
Furthermore, the tool also comes with seven color gradients, a color wheel option, and A/B and C/L grids. These options allow you to change and distribute colors to their media files. Additionally, its AI retouching plugin can retouch and beautify your image. With all these features, you can create one of the best cinematic LUTs without hassle.

Part 4: Wondershare Filmora: A Good Platform to Consume Cinematic LUTs
Wondershare Filmora is a great professional editing software. You can easily achieve a cinematic look for your videos with its color grading upgrades and LUT intensity adjustments. Furthermore, the color wheel feature allows you to make professional-looking color grading adjustments. It even offers a cinematic LUTs download option to the users.
Add LUTs on Video For Win 7 or later(64-bit)
Add LUTs on Video For macOS 10.14 or later
Additionally, it has a sharpening tool that sharpens your digital media files. With its new update, you can have many editing options, including over 200 LUTs and other color correction features. Besides this, you have so many different color grading options that you can choose from the LUTs library.

Key Features of Wondershare Filmora To Keep Notice of
- It has a unique feature that lets you denoise any background sounds or voices in your video file. This useful feature removes background noise distortion from a video file.
- Furthermore, silent detection is another unique feature that you can use. It analyzes your video content and removes unnecessary pauses. You can automatically remove awkward pauses and silent moments from your video to make it look professional.
- Additionally, you can access and use its free stock media library. This library has over 10 billion free stock media files you can use in your content.
Conclusion
In conclusion, cinematic LUTs have become essential. With multiple options available in the market, selecting the best cinematic LUT pack can be difficult. However, 3D LUT Creator is a great tool offering plugin options for multiple editing software. In contrast, Wondershare Filmora is an excellent option for creating and consuming cinematic LUTs.
Add LUTs on Video For Win 7 or later(64-bit)
Add LUTs on Video For macOS 10.14 or later
Also read:
- Updated In 2024, Split a Video in the Lightworks Step by Step
- Are You a Vlogger Looking for Good Color Correction and Video Grading Presets? Here Youll Find Different Vlog LUTs that You Can Use for Your Videos for 2024
- New 2024 Approved Guide to Make Timelapse Video with iMovie
- Updated How to Add Photos to Tik Tok Video
- New General Information That You Need To Know About MKV Format for 2024
- How to Make a Slideshow on iPhone
- Updated Everything That You Need to Know About Video Montages- Ideas, Techniques, and Software
- New Explore the Potential of Slow-Motion Video for Different Industries. Read This Guide and Choose the Best Slow-Motion Camera App to Create Stunning Videos
- New 2024 Approved What Is the Best Filmora Slideshow Templates? Experts Choice
- Are You Looking to Vlog Across Your Next Stop at the Café? Get Aware of the Significant Elements that Make up the Café Vlog for 2024
- Updated 2024 Approved What You Should Know About Speech-to-Text Technology
- Updated In 2024, An Ultimate Guide To Edit a Music Video Aspect Ratio and First Cut
- How to Add Selective Color Effect to Your Videos
- New How To Edit Youtube Videos In Simple Steps for 2024
- New In 2024, How to Create and Add an Adjustment Layer in Final Cut Pro
- In 2024, A Guide to Color Grade Your Picture in LightRoom
- New In 2024, Best AR Video Apps
- New 2024 Approved What Is TS Format and How To Play TS Files?
- New What Are the Best Video Background Changers Online, In 2024
- 2024 Approved Add Amazing Filters and Effects for Fun to Watch GIFs Using Adobe After Effects. Read on to Discover an Easy-to-Learn After Effects Alternative
- Updated Find The Best LUTs for Lightroom
- Updated How to Add a Slideshow in PowerPoint
- Updated Best Filmic Pro LUTs For Video Editing for 2024
- In 2024, The Ultimate Guide to Get the Rare Candy on Pokemon Go Fire Red On Vivo Y36 | Dr.fone
- In 2024, How to Bypass Activation Lock on iPhone SE or iPad?
- 2024 Approved Formula to Animate Photos From 10 Animate Pictures App
- How To Unlock Stolen iPhone 14 Pro In Different Conditionsin
- Repair Corrupt PDF v1.5 File using PDF Repair Tool
- Complete Tutorial to Use VPNa to Fake GPS Location On Poco X6 Pro | Dr.fone
- In 2024, 5 Ways to Move Contacts From Meizu 21 Pro to iPhone (13/14/15) | Dr.fone
- In 2024, Overview of the Best Infinix Smart 8 Pro Screen Mirroring App | Dr.fone
- Planning to Use a Pokemon Go Joystick on Motorola Moto G04? | Dr.fone
- How to Change Location on TikTok to See More Content On your Vivo V29e | Dr.fone
- In 2024, Planning to Use a Pokemon Go Joystick on OnePlus Nord N30 SE? | Dr.fone
- Solutions to Spy on Xiaomi Redmi K70 with and without jailbreak | Dr.fone
- How to Screen Mirroring Infinix Smart 8 Plus? | Dr.fone
- In 2024, How to Use Google Assistant on Your Lock Screen Of Poco M6 5G Phone
- How to Transfer Music from Itel A60s to iPod | Dr.fone
- In 2024, Is GSM Flasher ADB Legit? Full Review To Bypass Your Honor X9aFRP Lock
- Apple ID Locked for Security Reasons On Apple iPhone 11 Pro Max? Find the Best Solution Here
- In 2024, 5 Tutorials on How to Transfer Photos From Apple iPhone SE (2022) to New iPhone | Dr.fone
- A Step-by-Step Guide on Using ADB and Fastboot to Remove FRP Lock on your Huawei Nova Y71
- How to Fix It Asus ROG Phone 7 Ultimate Wont Turn On | Dr.fone
- In 2024, Unlocking Made Easy The Best 10 Apps for Unlocking Your Infinix Smart 8 Plus Device
- In 2024, Complete Tutorial Sending Photos From Apple iPhone 7 to iPad | Dr.fone
- How to Stop My Spouse from Spying on My Poco X6 | Dr.fone
- Title: 2024 Approved Camtasia Video Editor Review
- Author: Chloe
- Created at : 2024-05-20 03:37:58
- Updated at : 2024-05-21 03:37:58
- Link: https://ai-editing-video.techidaily.com/2024-approved-camtasia-video-editor-review/
- License: This work is licensed under CC BY-NC-SA 4.0.


