2024 Approved Create Slide Masking Effect Intro

Create Slide Masking Effect Intro
Preparation
What you need to prepare:
- A computer (Windows or macOS)
- Your video materials.
- Filmora video editor
Step 1
The first thing you want to do is download the Filmora video editor . Hit Install and allow the application to start automatically.
Step 2
Once the program loads, head straight over to the Titles tab and drag the Basic Title to Track 3 on the Timeline.
Also, drag the clip from the right side towards the left to make it 4 seconds long.

Step 3
Double-click on the Title clip in the Timeline and edit your Title’s font and size. A panel like this one should pop up when you double-click. When you’re done, click OK.

Step 4
Now, take a snapshot of the new Title that you just created.

Step 5
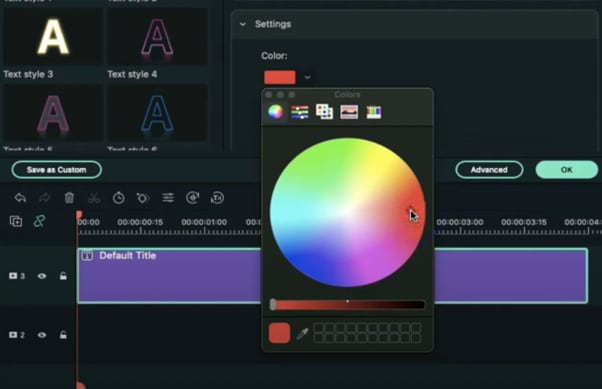
Next, we’re going to need a few more snapshots. But this time, double-click on the Title again and change its color to whichever one you like. Once you’ve changed its color, go ahead and click the same button as in Step 4 to take another snapshot.
Step 6
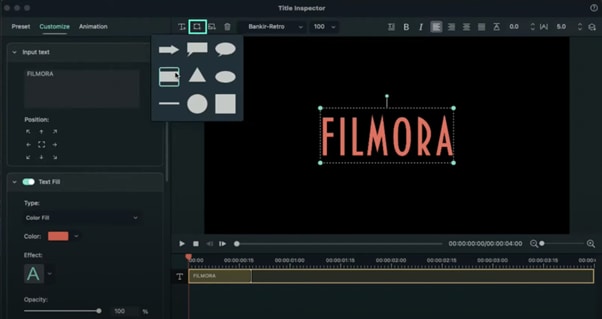
Next, double-click on the Title once again and go to “ADVANCED”. From there, go to Add Shape and select the Rectangle shape.
Step 7
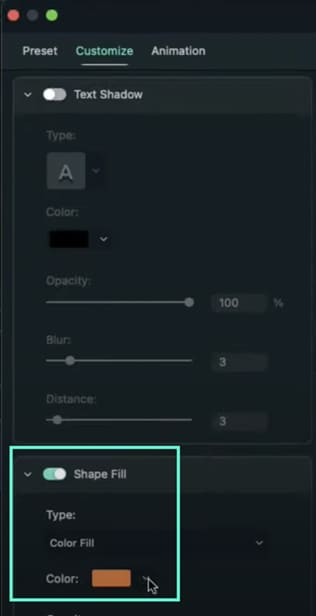
Look to the left side panel and switch OFF the Text Fill button. Then, scroll down to the bottom and change the Shape Fill color to White.
Step 8
Now, adjust the rectangle’s shape to a thin line, rotate it, and move it into position like in the image.

Step 9
Delete the text layer from the Advanced panel.

Step 10
The final step in the Advanced panel is to go to the Animation tab from the left side panel and select the Round Zoom Out animation preset. Then, click OK.

Step 11
Now, it’s time to align the clips in the Timeline. First, move your Default Title clip 5 frames further. Then, drag the first snapshot to Track one and move it 8 frames forward.

Step 12
Go to Sample Color and drag the Black color to Track 3 in the Timeline. Align it directly on top of where the clip in Track 1 starts. Then, double-click on the black color clip and align it like in the image here.

Step 13
Now, place the Playhead at the beginning of the clip in Track 1. Then, double-click the snapshot clip in Track 1. Now, start increasing the value of the X-axis until it makes the text disappear, just as in this image here.

Step 14
Next, move the Playhead 10 frames further. Then, reset the position values by clicking on this button.

Step 15
Now, move the Playhead once more and set it at 3 seconds and 10 frames. Then, click on the “+Add” button to add another keyframe.

Step 16
Move the Playhead to the end of the snapshot clip and set the value of the X axis to 391. Then, reduce the opacity to 0%. Move the Playhead at the start of the snapshot clip and reduce the opacity to 0% there as well.

Step 17
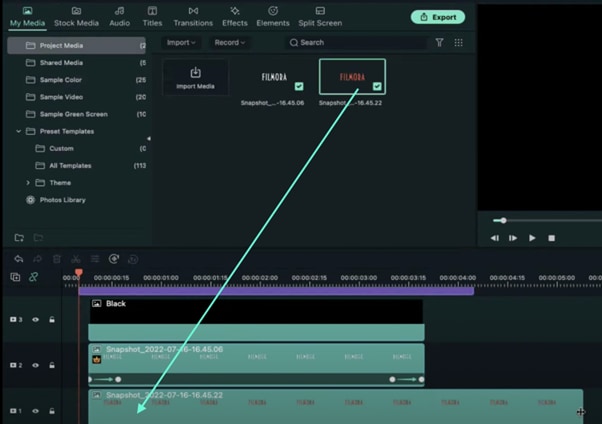
Next, Export the clip to your PC. Just hit the Export button near the top-center of the screen. Then, select all of your clips in the Timeline and move them one track above. Then, drag the second snapshot you took earlier to Track 1.
Step 18
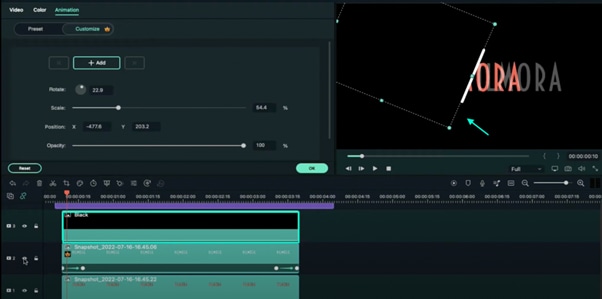
Select the Black Color clip once again and move the position of the Black box like this.
Step 19
Now, hide the clip on Track 2 by pressing this button next to it.
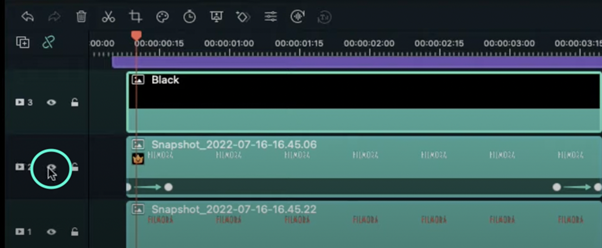
Step 20
Click on the second snapshot clip located in Track 1. Then, repeat the process of adding keyframes just like we did with the first snapshot. Review the previous steps to get this right. This time, remember to slide the X axis to the LEFT instead of RIGHT. Just drag the values to the left.
Step 21
Export this. Then, delete all the clips in the Timeline. Now, import both clips you exported earlier during these steps. Also, import a background video that you’d like to appear behind your slide masking text effect.
Step 22
Next, drag the clips to Timeline and adjust each of them to be the same length. Four seconds is a good option.
Step 23
Double-click on the first clip (not the background clip). Go to Video and under Blending Mode select Lighten.
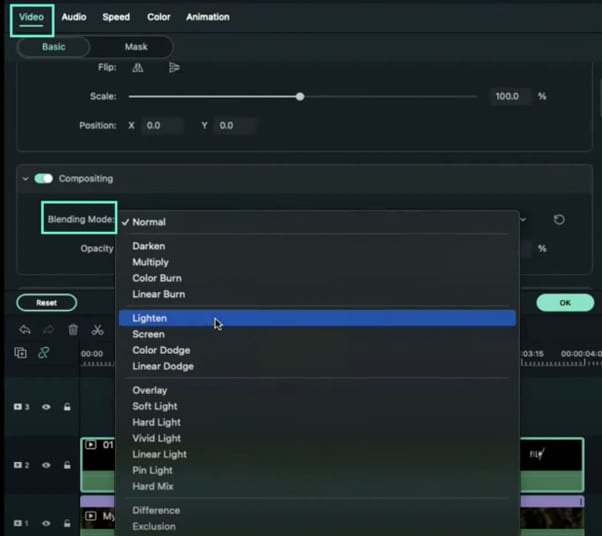
Step 24
Drop your second clip to Track three and repeat the same edits for it.
Step 25
Set the Playhead on frame three and drop the Motion Shape element from the Elements tab on Track 4.

Step 26
Finally, copy and paste the element near the end of the video and Render the project. Then, review your masterpiece. That’s it!

Summary
What you’ve learned:
- Create a slide masking effect intro in Filmora
- Customize masks in the Filmora video editor
- How to take snapshots and edit them thoroughly
- Add keyframes
What you need to prepare:
- A computer (Windows or macOS)
- Your video materials.
- Filmora video editor
Step 1
The first thing you want to do is download the Filmora video editor . Hit Install and allow the application to start automatically.
Step 2
Once the program loads, head straight over to the Titles tab and drag the Basic Title to Track 3 on the Timeline.
Also, drag the clip from the right side towards the left to make it 4 seconds long.

Step 3
Double-click on the Title clip in the Timeline and edit your Title’s font and size. A panel like this one should pop up when you double-click. When you’re done, click OK.

Step 4
Now, take a snapshot of the new Title that you just created.

Step 5
Next, we’re going to need a few more snapshots. But this time, double-click on the Title again and change its color to whichever one you like. Once you’ve changed its color, go ahead and click the same button as in Step 4 to take another snapshot.

Step 6
Next, double-click on the Title once again and go to “ADVANCED”. From there, go to Add Shape and select the Rectangle shape.

Step 7
Look to the left side panel and switch OFF the Text Fill button. Then, scroll down to the bottom and change the Shape Fill color to White.

Step 8
Now, adjust the rectangle’s shape to a thin line, rotate it, and move it into position like in the image.

Step 9
Delete the text layer from the Advanced panel.

Step 10
The final step in the Advanced panel is to go to the Animation tab from the left side panel and select the Round Zoom Out animation preset. Then, click OK.

Step 11
Now, it’s time to align the clips in the Timeline. First, move your Default Title clip 5 frames further. Then, drag the first snapshot to Track one and move it 8 frames forward.

Step 12
Go to Sample Color and drag the Black color to Track 3 in the Timeline. Align it directly on top of where the clip in Track 1 starts. Then, double-click on the black color clip and align it like in the image here.

Step 13
Now, place the Playhead at the beginning of the clip in Track 1. Then, double-click the snapshot clip in Track 1. Now, start increasing the value of the X-axis until it makes the text disappear, just as in this image here.

Step 14
Next, move the Playhead 10 frames further. Then, reset the position values by clicking on this button.

Step 15
Now, move the Playhead once more and set it at 3 seconds and 10 frames. Then, click on the “+Add” button to add another keyframe.

Step 16
Move the Playhead to the end of the snapshot clip and set the value of the X axis to 391. Then, reduce the opacity to 0%. Move the Playhead at the start of the snapshot clip and reduce the opacity to 0% there as well.

Step 17
Next, Export the clip to your PC. Just hit the Export button near the top-center of the screen. Then, select all of your clips in the Timeline and move them one track above. Then, drag the second snapshot you took earlier to Track 1.

Step 18
Select the Black Color clip once again and move the position of the Black box like this.

Step 19
Now, hide the clip on Track 2 by pressing this button next to it.

Step 20
Click on the second snapshot clip located in Track 1. Then, repeat the process of adding keyframes just like we did with the first snapshot. Review the previous steps to get this right. This time, remember to slide the X axis to the LEFT instead of RIGHT. Just drag the values to the left.
Step 21
Export this. Then, delete all the clips in the Timeline. Now, import both clips you exported earlier during these steps. Also, import a background video that you’d like to appear behind your slide masking text effect.
Step 22
Next, drag the clips to Timeline and adjust each of them to be the same length. Four seconds is a good option.
Step 23
Double-click on the first clip (not the background clip). Go to Video and under Blending Mode select Lighten.

Step 24
Drop your second clip to Track three and repeat the same edits for it.
Step 25
Set the Playhead on frame three and drop the Motion Shape element from the Elements tab on Track 4.

Step 26
Finally, copy and paste the element near the end of the video and Render the project. Then, review your masterpiece. That’s it!

Summary
What you’ve learned:
- Create a slide masking effect intro in Filmora
- Customize masks in the Filmora video editor
- How to take snapshots and edit them thoroughly
- Add keyframes
What you need to prepare:
- A computer (Windows or macOS)
- Your video materials.
- Filmora video editor
Step 1
The first thing you want to do is download the Filmora video editor . Hit Install and allow the application to start automatically.
Step 2
Once the program loads, head straight over to the Titles tab and drag the Basic Title to Track 3 on the Timeline.
Also, drag the clip from the right side towards the left to make it 4 seconds long.

Step 3
Double-click on the Title clip in the Timeline and edit your Title’s font and size. A panel like this one should pop up when you double-click. When you’re done, click OK.

Step 4
Now, take a snapshot of the new Title that you just created.

Step 5
Next, we’re going to need a few more snapshots. But this time, double-click on the Title again and change its color to whichever one you like. Once you’ve changed its color, go ahead and click the same button as in Step 4 to take another snapshot.

Step 6
Next, double-click on the Title once again and go to “ADVANCED”. From there, go to Add Shape and select the Rectangle shape.

Step 7
Look to the left side panel and switch OFF the Text Fill button. Then, scroll down to the bottom and change the Shape Fill color to White.

Step 8
Now, adjust the rectangle’s shape to a thin line, rotate it, and move it into position like in the image.

Step 9
Delete the text layer from the Advanced panel.

Step 10
The final step in the Advanced panel is to go to the Animation tab from the left side panel and select the Round Zoom Out animation preset. Then, click OK.

Step 11
Now, it’s time to align the clips in the Timeline. First, move your Default Title clip 5 frames further. Then, drag the first snapshot to Track one and move it 8 frames forward.

Step 12
Go to Sample Color and drag the Black color to Track 3 in the Timeline. Align it directly on top of where the clip in Track 1 starts. Then, double-click on the black color clip and align it like in the image here.

Step 13
Now, place the Playhead at the beginning of the clip in Track 1. Then, double-click the snapshot clip in Track 1. Now, start increasing the value of the X-axis until it makes the text disappear, just as in this image here.

Step 14
Next, move the Playhead 10 frames further. Then, reset the position values by clicking on this button.

Step 15
Now, move the Playhead once more and set it at 3 seconds and 10 frames. Then, click on the “+Add” button to add another keyframe.

Step 16
Move the Playhead to the end of the snapshot clip and set the value of the X axis to 391. Then, reduce the opacity to 0%. Move the Playhead at the start of the snapshot clip and reduce the opacity to 0% there as well.

Step 17
Next, Export the clip to your PC. Just hit the Export button near the top-center of the screen. Then, select all of your clips in the Timeline and move them one track above. Then, drag the second snapshot you took earlier to Track 1.

Step 18
Select the Black Color clip once again and move the position of the Black box like this.

Step 19
Now, hide the clip on Track 2 by pressing this button next to it.

Step 20
Click on the second snapshot clip located in Track 1. Then, repeat the process of adding keyframes just like we did with the first snapshot. Review the previous steps to get this right. This time, remember to slide the X axis to the LEFT instead of RIGHT. Just drag the values to the left.
Step 21
Export this. Then, delete all the clips in the Timeline. Now, import both clips you exported earlier during these steps. Also, import a background video that you’d like to appear behind your slide masking text effect.
Step 22
Next, drag the clips to Timeline and adjust each of them to be the same length. Four seconds is a good option.
Step 23
Double-click on the first clip (not the background clip). Go to Video and under Blending Mode select Lighten.

Step 24
Drop your second clip to Track three and repeat the same edits for it.
Step 25
Set the Playhead on frame three and drop the Motion Shape element from the Elements tab on Track 4.

Step 26
Finally, copy and paste the element near the end of the video and Render the project. Then, review your masterpiece. That’s it!

Summary
What you’ve learned:
- Create a slide masking effect intro in Filmora
- Customize masks in the Filmora video editor
- How to take snapshots and edit them thoroughly
- Add keyframes
What you need to prepare:
- A computer (Windows or macOS)
- Your video materials.
- Filmora video editor
Step 1
The first thing you want to do is download the Filmora video editor . Hit Install and allow the application to start automatically.
Step 2
Once the program loads, head straight over to the Titles tab and drag the Basic Title to Track 3 on the Timeline.
Also, drag the clip from the right side towards the left to make it 4 seconds long.

Step 3
Double-click on the Title clip in the Timeline and edit your Title’s font and size. A panel like this one should pop up when you double-click. When you’re done, click OK.

Step 4
Now, take a snapshot of the new Title that you just created.

Step 5
Next, we’re going to need a few more snapshots. But this time, double-click on the Title again and change its color to whichever one you like. Once you’ve changed its color, go ahead and click the same button as in Step 4 to take another snapshot.

Step 6
Next, double-click on the Title once again and go to “ADVANCED”. From there, go to Add Shape and select the Rectangle shape.

Step 7
Look to the left side panel and switch OFF the Text Fill button. Then, scroll down to the bottom and change the Shape Fill color to White.

Step 8
Now, adjust the rectangle’s shape to a thin line, rotate it, and move it into position like in the image.

Step 9
Delete the text layer from the Advanced panel.

Step 10
The final step in the Advanced panel is to go to the Animation tab from the left side panel and select the Round Zoom Out animation preset. Then, click OK.

Step 11
Now, it’s time to align the clips in the Timeline. First, move your Default Title clip 5 frames further. Then, drag the first snapshot to Track one and move it 8 frames forward.

Step 12
Go to Sample Color and drag the Black color to Track 3 in the Timeline. Align it directly on top of where the clip in Track 1 starts. Then, double-click on the black color clip and align it like in the image here.

Step 13
Now, place the Playhead at the beginning of the clip in Track 1. Then, double-click the snapshot clip in Track 1. Now, start increasing the value of the X-axis until it makes the text disappear, just as in this image here.

Step 14
Next, move the Playhead 10 frames further. Then, reset the position values by clicking on this button.

Step 15
Now, move the Playhead once more and set it at 3 seconds and 10 frames. Then, click on the “+Add” button to add another keyframe.

Step 16
Move the Playhead to the end of the snapshot clip and set the value of the X axis to 391. Then, reduce the opacity to 0%. Move the Playhead at the start of the snapshot clip and reduce the opacity to 0% there as well.

Step 17
Next, Export the clip to your PC. Just hit the Export button near the top-center of the screen. Then, select all of your clips in the Timeline and move them one track above. Then, drag the second snapshot you took earlier to Track 1.

Step 18
Select the Black Color clip once again and move the position of the Black box like this.

Step 19
Now, hide the clip on Track 2 by pressing this button next to it.

Step 20
Click on the second snapshot clip located in Track 1. Then, repeat the process of adding keyframes just like we did with the first snapshot. Review the previous steps to get this right. This time, remember to slide the X axis to the LEFT instead of RIGHT. Just drag the values to the left.
Step 21
Export this. Then, delete all the clips in the Timeline. Now, import both clips you exported earlier during these steps. Also, import a background video that you’d like to appear behind your slide masking text effect.
Step 22
Next, drag the clips to Timeline and adjust each of them to be the same length. Four seconds is a good option.
Step 23
Double-click on the first clip (not the background clip). Go to Video and under Blending Mode select Lighten.

Step 24
Drop your second clip to Track three and repeat the same edits for it.
Step 25
Set the Playhead on frame three and drop the Motion Shape element from the Elements tab on Track 4.

Step 26
Finally, copy and paste the element near the end of the video and Render the project. Then, review your masterpiece. That’s it!

Summary
What you’ve learned:
- Create a slide masking effect intro in Filmora
- Customize masks in the Filmora video editor
- How to take snapshots and edit them thoroughly
- Add keyframes
How to Create Emoji on Mac That Take Less Than 10 Mins
How to Put Emoji on Mac That Take Less Than 10 Mins
An easy yet powerful editor
Numerous effects to choose from
Detailed tutorials provided by the official channel
Emojis are expressive graphic elements that backup your content for catering to an engaging information delivery. Be here to know the how’s and why’s!
In this article
01 [The Power of Emojis in Marketing](#Part 1)
02 [How to Add Emoji on MacBook Efficiently?](#Part 2)
03 [How to Enable and Access Emoji Characters on a Mac?](#Part 3)
04 [Putting Emoji on Mac Q&A](#Part 4)
Part 1 The Power of Emojis in Marketing
Emojis are one elusive means to express the feel behind a content that is being presented, regardless of the diversities in the platform and information aspects. While the common beliefs with respect these graphic uplifts are restricted within personal boundaries of fun and entertainment, the professional credibility of emojis is no less.
When the talk is about marketing and business strategies, the significance of these elements cannot be limited within the constraints of domain and time. Entering into the application varieties, you can work with emojis everywhere, from promotional advertisements to promote your brand, to devising strategic video presentations and slideshows to showcase your company utilities in front of a target audience.
Beginning our discussion towards the same, let us look through the different aspects and benefits of including emojis as a compliment to business marketing strategies in the following section:
Merits of Using Emojis as a Marketing Tactic
01Social Media Utility
Considering the fact that social media is turning into a content sharing hub, irrespective of information genres, the business marketing arena is obviously not left untouched. With the revolutionary expansion in the concept and credibility of digital marketing, social media platforms have become a significant space for product advertisement and brand promotion.
Speaking in the light of the above, the fact that emojis have long been a part of social media conversations is something that cannot be ignored. Using a combination of emojis and social media can thus, work to deliver a more effective presentation of your brands, products and company services, while keeping the audience captivated by making them connect with the feel of the utility they are viewing at.
02Making the Brand Come Alive
It is a known fact that a trusted brand name works to earn a hoard of loyal customers in the long run. Adding an emoji in your brand promotion strategies helps to establish a great deal of emotional connection of the same with your target audience, while making them relate to the regular inclusion of these graphic elements in their social media conversations.
Working towards adding emojis in your product or company presentations or ad campaigns caters to convey the product information in a unique style of its own by adding an extra bit of liveliness to your brand.
You should however, be cautious while using emojis to promote your brand, lest these may end up crowding the presentation snippet. It is a wise decision to use a single or couple of emojis at the end of a text based content, rather than stuffing the same with a series of emojis to avoid the distraction of audience.
Another way of making an impressive use of emojis in your promotional media posts is creating engaging feature lists of your brand, or adding the same to the product headlines, while giving them an extra impact. Such graphic creativity will surely put your brand ahead of the numerous counterparts on promotional business sites.
03Enhanced Viewer Engagement
It is a common practice to include emojis within personal chats and social media conversations to ensure an improved peer engagement, while uplifting the degree of fun and entertainment. The same concept can be applied to brand promotion strategies for bringing in an increased number of interested audiences.
Supplementing your promotional content with emojis helps the latter to gain a casual and informal presentation approach that suits the audience in a much better way. Speaking in the light of the current social media and digital market trends, emojis have managed to achieve a universal credibility that is far ahead of video and image centered promotional elements.
As a product or business marketer, you can work with these conveying graphic utilities to initiate thematic conversations with your viewers and potential customers. Care should however be taken to make an intelligent and smart usage of emojis, to ensure that the latter works to uplift and compliment your promotional strategies, lest you would end up distracting your audiences.
04Supplementing the Content With a Cohesive Context
When aiming at creating a brand awareness of your product or company via promotional messaging, emojis can help to convey an emotional exactness that a text based content often falls short of adhering to.
While using emojis alone can make the task a bit difficult, an intelligent combination of the latter with cohesive text elements can effectively cater towards delivering a top rated promotional output, while adding an extra bit of meaning and depth to the same.
When promoting your product across social media platforms that have a restriction on the maximum number of characters within a single post or message, using emojis can compensate for the text you would otherwise prefer to add. The additional benefit of this inclusion lies in supplementing your text with the missing emotional connect and feel that works to build an emphasis of your brand among the viewers.
Part 2 How to Add Emoji on MacBook Efficiently?
As already stated, emojis are an expressive set of graphic elements that work to enhance the context and credibility of the otherwise ordinary text messages. Whether used in casual conversations and personal chats on social media platforms for fun and entertainment, or included in promotional strategies to create brand awareness across the digital market, emojis cater to one and all concerns with the same effectiveness and credibility.
Working with emojis is one aspect, but the latter’s interface compatibility is also of considerable importance. When proceeding to use the elements, you should take care to check the accessibility of these elements with the system you are working on. While most of the emojis are platform independent, some of the latest ones may or may not be available on dated versions of applications and devices.
By now, you must have understood the significance of working with emojis to uplift the promotional content of a brand while ensuring a significant viewer engagement. Let us move ahead with our discussion to talk about the most effective ways of how to add emoji on MacBook in what follows next:
User’s Guide to Include the Emoji Picker Tool on the Menu Bar of a MacBook
Step 1: Access the Apple Icon
For a quick and convenient access to emoji elements on a MacBook, it is advisable to add the ‘Emoji Picker’ utility to the ‘Menu Bar’ of your device’s screen. To do this, start with navigating to the top left corner of the MacBook’s opening screen and clicking on the ‘Apple’ icon.
Step 2: Open System Preferences
As you click on the ‘Apple’ icon in step 1, proceed to select the ‘System Preferences’ option from the drop down menu that appears next.
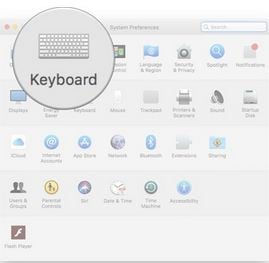
Step 3: Pick the Keyboard Option
Selecting the ‘Preferences’ option caters to display a series of input choice icons on your MacBook screen. From the available options, tap on the ‘Keyboard’ icon to select the same.
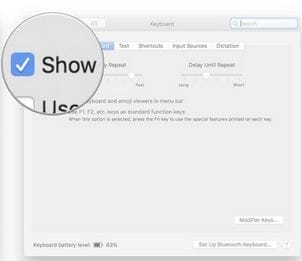
Step 4: Choose the Show Option
The ‘Keyboard Options’ at the top of the screen now present a list of functions and accessibilities that you can work upon. Click the checkbox beside the ‘Show Keyboard and Emoji Viewer in Menu Bar’ option to add the ‘Emoji Picker’ tool to the ‘Menu Bar’.
Part 3 How to Enable and Access Emoji Characters on a Mac?
Emoji characters are highly effective in expressing the emotions and feel behind your message that words often fall short of conveying. While these elements are easily accessible across devices working on almost all popular operating systems, addressing the query of how to get emoticons on Mac is many a time an element of surprise.
Diving deep into the means and ways of working with emojis on a MacOS utility, let us try hands at understanding the knowhow of enabling and accessing emoji characters on Mac compatible devices in the following section:
User’s Guide to Enable and Access Emoji Characters on Mac Devices
Step 1: Launch the Application
Start with launching the preferred application in your device in which you want to use the emoji. Within the latter’s text field, drag and point the cursor to the place where the emoji needs to be added.
Step 2: Enter the Command Combination
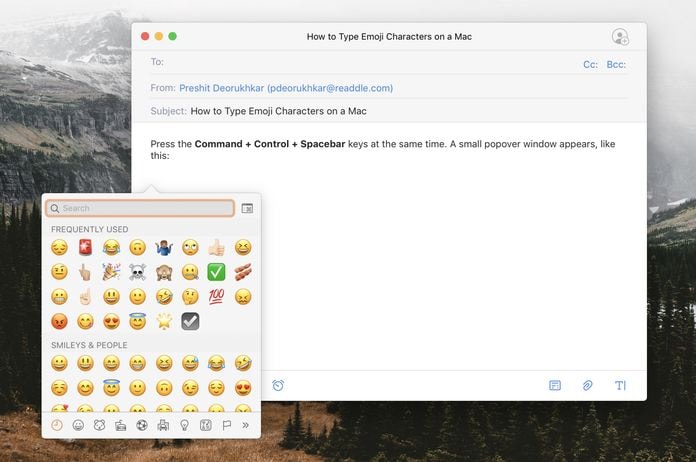
As you complete the first step, proceed to tap the ‘Command + Ctrl + Spacebar’ key combination on your device’s keyboard to see the ‘Emoji Picker’ overlay window pop up on the screen. If your desired emoji does not seem to find a place within the displayed lists of emoji categories, head to the ‘Search Bar’ at the top and type a relatable keyword to look for the required graphic representation.
Step 3: Select the Emoji
You can now pick a desired emoji from the displayed overlay, followed by double clicking on the same to add the element at the current cursor position.
Part 4 Putting Emoji on Mac Q&A
● What is the difference between emoticons and emojis?
Graphic smiley faces that involve a keyboard character, like that of a letter, digit or punctuation, are referred to as emoticons; while the caricaturized images that do have a character or punctuation inclusion, belong to the category of emojis.
● What does the UwU emoji stand for?
This one is an emoticon that represents a cute looking face. You can use it in your conversations and social media posts to depict a happy, affectionate and warm emotional expression. You can use to this to complement your conversations and uplift the customary text messages.
● How can you avail a bank of the latest emojis for free?
When looking for convenient sources to access the latest and most expressive emojis for free, you are offered a series of graphic galleries across the web, from where you can either download the emoji package or even add the elements directly from the site to your conversations.
● Why can’t you access some of the emojis on your Mac device?
To access the latest emojis on your Mac device, make sure that the device is updated to the most recent version of the MacOs operating system. You can also opt to restart and update the device by navigating to and launching the ‘Apple Menu’, followed by selecting the ‘System the device in ‘Safe Mode’.
● What is the best software alternative access the latest emoji bank?
When looking for a software solution to sort the concern of how to put emoji on Mac, while taking suitable emoji suggestions, you can conveniently rely on the Wondershare Filmora Video Editor graphic editor program, which houses an extensive inventory of various graphic elements, including emojis. You can browse through the same and proceed to search the one that you that you like across a web utility.
For Win 7 or later (64-bit)
For macOS 10.12 or later
● Ending Thoughts →
● Emojis are an expressive element of marketing strategies aiming at brand promotion, along with establishing company credibility among the potential audience.
● Working towards the concern of MacOS insert emoji requires the inclusion of the ‘Emoji Picker’ tool on the latter’s menu bar.
● If you are in search of an affordable software program to access the latest collection of emojis, Wondershare Filmora can be a smart choice.
How to Create Intro with Legend Intro Maker
What makes the viewers get hooked to a video? Experts say the intro is the decider. That is why video creators focus on creating stunning intro videos. The intro of your video creates the first impression for the viewers. How do you make an intro video stand out? You need a great intro maker and your creativity skill.
Legend Intro Maker is a popular choice among Android smartphone users. You will come across loads of intro maker apps. But Legend Intro Maker clearly stands out. That is why it is highly rated on Play Stores. You can create a high-quality intro and outro video in simple steps. We will illustrate how to create intro videos with mobile legends intro maker.
Part 1. Basic Info of Legend Intro Maker
Legend Intro Maker is an Android app available on Play Stores. You can create cool intro and outro videos. There are stunning intro video templates available. You can select and customize them to create an intro video on the go. Besides, you can design amazing animated text videos. The app is useful for creating videos from your photos.
Here are the top features of Legend Intro Maker.
- Choose from intro maker animation templates.
- Over hundred text animation presets.
- Add background photos and videos.
- Amazing text font styles and effects.
- Export videos in HD and full-HD videos.
- Super intuitive user interface.
- Easy to share on social media apps.
Here are the technical specifications of Legend Intro Maker.
App Version: 1.4
Released Date: 26-09-2018
Last Updated: 28-10-2021
Download Size: 18 MB
OS Compatibility: Android 4.4 and above
Download link: https://play.google.com/store/apps/details?id=com.textonvideo.animated.animatedtext&hl=en\_US&gl=US
Part 2. How to Create Intro with Legend Intro Maker
Legend Video Maker is a versatile intro video maker app. You can create text intro videos with cool effects and animations. The app comes with loads of intro video templates. You have to choose one to get started. Thereafter, you can customize the template as per your requirements. You can also start from scratch and add background and text. Thereafter, you can animate texts and objects easily. Here are the steps to create an intro with the Legend video intro maker app.
Step1 Go for Legend gaming intro download from Play Stores. You can also download Legend intro maker mod apk file. Thereafter, you can install the apk file on your phone.
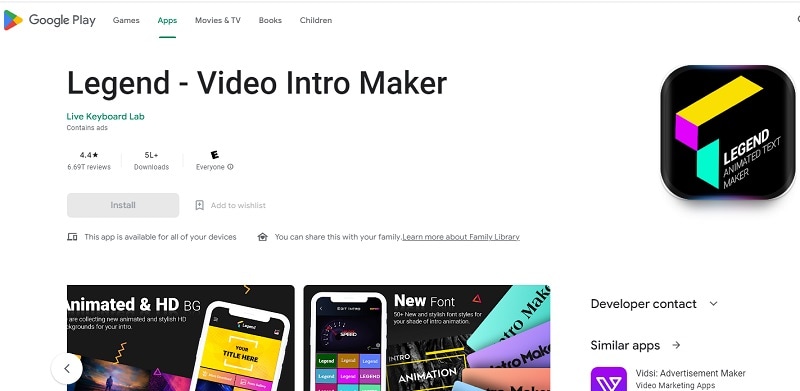
Step2 Launch the Legend app and choose an intro video template. You will see different categories of templates. You can choose any to get started.
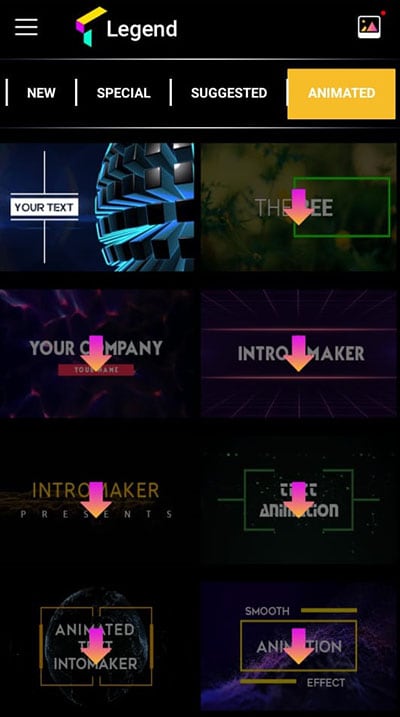
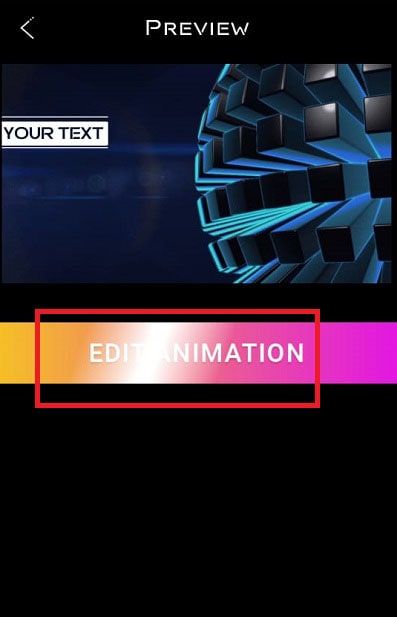
Step3 When you choose a template, it gets downloaded immediately. Tap on the Edit Animation button to customize the template.
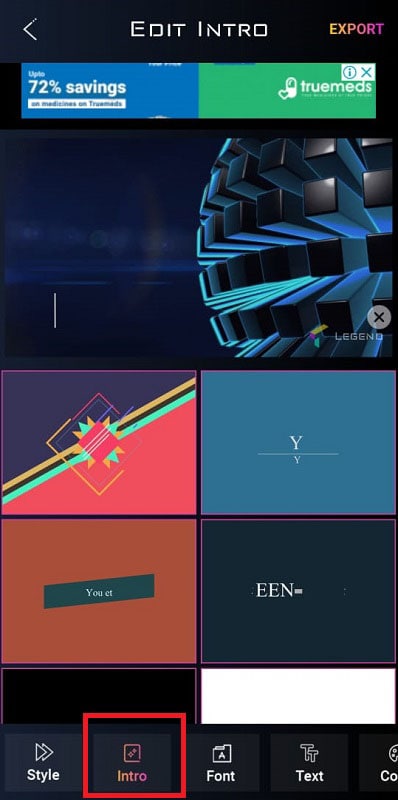
Step4 Tap on the Intro option located at the bottom. Select a suitable intro video template as per your video content niche.
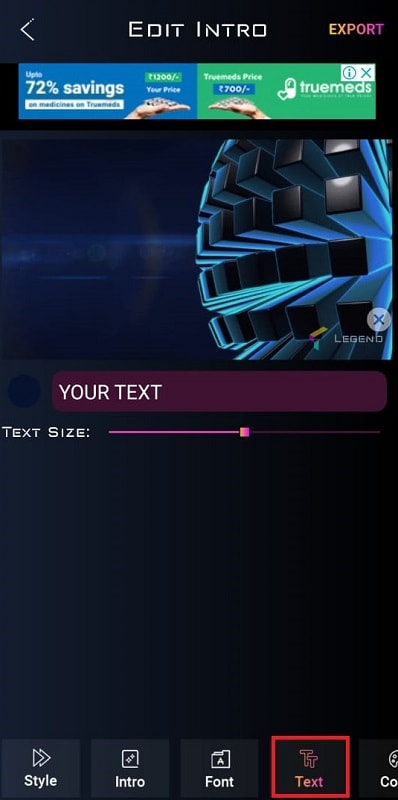
Step5 Go to the Text option at the bottom and edit the texts and titles. You can go to the Font option to change the text font.
Step6 Finally, check the preview and tap on the Export button. Select the video resolution as per your preference. The intro video will get saved in the Phone gallery.

Part 3. Legend Intro Maker PC Alternative
If you want to create intro videos on your PC, you need a Legend Intro Maker PC alternative. We recommend Wondershare Filmora as the best alternative to mobile Legends Intro Maker. Filmora is a popular premium video editor. Filmora comes with a wide range of intro video templates. There are loads of text effects and animations present.
You can customize all the templates and presets. The video editor allows you to make creative intro videos in simple steps. Filmora happens to be the most popular intro video maker among YouTubers. You can export intro videos in 4K resolution. Filmora is available for Windows and macOS users. Here are the steps to create intro videos with Filmora.
Free Download For Win 7 or later(64-bit)
Free Download For macOS 10.14 or later
Step1 Download and install Wondershare Filmora on your computer. Launch Filmora and click on Create New Project from the welcome screen. Otherwise, go to File> New Project and select an aspect ratio to get started.

Step2 Click on the Titles option from the top bar. Go to the Openers option from the left panel. Select any intro video template as per your preference. Drag and drop it onto the timeline.

Step3 Double-click on the intro video layer. Edit the default text and type in your titles. From the left panel, select any text style as per your preference.

Step4 You can go to the Animation tab and select any animation from the left panel. Double-click on the selected animation to apply. Thereafter, you can move around the texts on the Program window to place them properly. Finally, click on Ok button.
Conclusion
If you are looking for an intro video maker app, Legend video intro maker is a superb choice. You can create stunning intro videos in simple step by step method. If you are a computer user, you cannot use Legend app. We recommend Wondershare Filmora as the best alternative to Legend video intro maker. You can create stunning intro videos with Filmora with simple steps.
Free Download For macOS 10.14 or later
Step1 Download and install Wondershare Filmora on your computer. Launch Filmora and click on Create New Project from the welcome screen. Otherwise, go to File> New Project and select an aspect ratio to get started.

Step2 Click on the Titles option from the top bar. Go to the Openers option from the left panel. Select any intro video template as per your preference. Drag and drop it onto the timeline.

Step3 Double-click on the intro video layer. Edit the default text and type in your titles. From the left panel, select any text style as per your preference.

Step4 You can go to the Animation tab and select any animation from the left panel. Double-click on the selected animation to apply. Thereafter, you can move around the texts on the Program window to place them properly. Finally, click on Ok button.
Conclusion
If you are looking for an intro video maker app, Legend video intro maker is a superb choice. You can create stunning intro videos in simple step by step method. If you are a computer user, you cannot use Legend app. We recommend Wondershare Filmora as the best alternative to Legend video intro maker. You can create stunning intro videos with Filmora with simple steps.
Convert Time-Lapse to Normal Video
Ever since video cameras were invented, there have been various technological advancements in filming. And today people generally use smartphones or portable cameras to record videos. But one of the interesting ways in which smart devices can capture moments is using the timelapse feature. Timelapse files are a way of videography in which the camera or smart device captures frames in intervals of a few seconds or minutes.
In this way, you get a stop motion-like video at the end. This format of the video is both interesting and can be used to capture long hours of activities. But often we are needed to convert time-lapse to normal video to export or share them over a platform. For these requirements, there are different applications available across multiple operating systems.
Free Download For Win 7 or later(64-bit)
Free Download For macOS 10.14 or later
Part 1. Convert Time-lapse Video to Normal on Computer
Computer users aiming to conserve the value of their time-lapses as videos can resort to Filmora . The Filmora program is a fee-based software that furnishes very productive video editing capacities. As an alternative, one can choose its trial edition for free. Here is how to turn your time lapses into videos by means of Filmora:
First, go to the official website of Filmora and then click on “Try Filmora for free”. This will start the download of the Filmora trial version. For converting time-lapses into normal videos, the premium version is not necessary. After the application is downloaded and installed on your PC, open it by clicking its icon.
Wondershare Filmora Easily convert time-lapse video to normal speed on PC and Mac.
Free Download Free Download Learn More

When the Filmora interface opens, you will need to go to “project” and then select “New project”. This will create a new project for you. Alternatively, you can click on the “+” icon available on the screen to do the same. After a new project is opened, you need to click on “Import” to add the timelapse file you want to convert.

Then from the tools menu, select the “Tools” option on the top of your screen. Here you will be able to access different features of Filmora. Click on the option that says “Speed” to go to speed settings. Change the speed from 1X to a lower speed by toggling across the drag bar.

After setting a preferred speed for your timelapse, you will notice that the timelapse will seem like a normal video. When you are satisfied with the preview video, go to “Export” and click on it. This will save your converted video to your device in the highest resolution. Then you will be able to share it instantly on any platform.
Part 2. Change Timelapse Video to Normal on iPhone
If you are an iPhone user then you must have discovered the timelapse feature which is present in the camera app. Using the camera app, Apple users have the choice to make stunning time lapses with customized duration and settings.
And if you have a timelapse that you want to convert to a normal video format, then you can follow these steps on how to convert time-lapse to normal video:

- There are multiple ways and applications to convert timelapse videos to normal ones on iPhone. But the safest and most effective way to do that is by using iMovie. This application is mostly preinstalled on all iPhones and is free to use. If somehow you are missing this app, then visit the Apple store and install it on your device.
- When iMovie is successfully installed on your iPhone, open the application and allow all the permissions that it asks for. Then click on the “+” icon in the middle of your screen to create a new project. If you want you can name your project when its created.
- After opening your new project, you can tap on the “Import” option to add media files to the interface. Here it will open your files from which you will need to select the timelapse video that you want to edit. Click on it and it will be automatically added to iMovie.
- You can also add multiple timelapse videos if you want to convert them all and merge them into one file. Then on the iMovie interface, there will be a timeline available at the bottom of your screen. You can adjust it to trim, replace or rearrange the clips.
- Then on the bottom left corner of your screen, you will see a “speed” icon which is generally the second tool on the interface. Click on it and it will open the playback speed controls for you. Adjusting and dragging on the speed control, you will be able to change the playback speed of the timelapse.
- You will need to slow down the playback speed by toggling the speed controls. Set it to a speed lower than 1X which can make it look like a normal video. When you are done, click on the tick mark to save the changes.
- Now preview the video and make sure you are satisfied with the conversion. Then go to settings, and customize the video output settings as well as quality. When you are done with these changes, click on the “Export” option to save the video to your device or share it on any platform.
Part 3. Time-lapse to Normal Video Online
There are situations where users don’t want to go installing extra applications when it comes to executing a task. And if you happen to be such a user who wants to convert your timelapse into a beautiful video, then you can do it online for free. Veed.io is an online platform that allows users to upload and convert time-lapse to normal video online easily.
First, open your browser and enter “veed.io” i.e. “time-lapse to normal video converter online” in your search box. Then the first result that will be shown will be from its official website. Click on that and you will be directed to the veed.io online interface.

The interface will have different options like “Sign Up, “Try Sample” etc. From the available options, click on “Upload Your Video”. This will allow you to edit your videos without even creating an account.
Then the interface will direct you to the video creation page. Here you will see a bunch of predefined templates to make videos. Click on the “Create Template” option and the interface will have a “Upload Your Media” box on the screen. Here you can click on it and select your timelapse file or drag and drop it from any source.

After the video is added to the veed.io page, it will take some time to upload it to the project menu. You can add multiple files by clicking on the “Add” option available on the screen. After a short while, you will see the video preview on the screen along with a timeline of the video.

Click on the timeline feature and there will be different tools from veed.io available at the bottom of the interface. Select the speedometer type icon on the screen and this will give you access to control the playback speed of timelapse.
You can drag the cursor from 1X to any desired speed here. Just click on the drag button and lower the speed below 1X to a desirable speed of your choice. In the preview window, check how the video is being rendered.
When you are satisfied with the changes and the video speed seems normal to you, go to the top right corner of the screen and click on the “Export” option. This will ask you to set your preferences for different video settings. Change them according to your requirement and then the video will be downloaded to your device.
Wondershare Filmora Easily convert time-lapse video to normal speed on PC and Mac.
Free Download Free Download Learn More

Conclusion
Time lapses are an amazing way to capture moments from any device. But there are situations where we need to convert them into video format for our requirements. Luckily there are some built-in features in different smartphone devices as well as applications available on others that can help you to do so. We have discussed some of these methods following which you will easily be able to convert your timelapse into videos on any device.
Free Download For Win 7 or later(64-bit)
Free Download For macOS 10.14 or later
Part 1. Convert Time-lapse Video to Normal on Computer
Computer users aiming to conserve the value of their time-lapses as videos can resort to Filmora . The Filmora program is a fee-based software that furnishes very productive video editing capacities. As an alternative, one can choose its trial edition for free. Here is how to turn your time lapses into videos by means of Filmora:
First, go to the official website of Filmora and then click on “Try Filmora for free”. This will start the download of the Filmora trial version. For converting time-lapses into normal videos, the premium version is not necessary. After the application is downloaded and installed on your PC, open it by clicking its icon.
Wondershare Filmora Easily convert time-lapse video to normal speed on PC and Mac.
Free Download Free Download Learn More

When the Filmora interface opens, you will need to go to “project” and then select “New project”. This will create a new project for you. Alternatively, you can click on the “+” icon available on the screen to do the same. After a new project is opened, you need to click on “Import” to add the timelapse file you want to convert.

Then from the tools menu, select the “Tools” option on the top of your screen. Here you will be able to access different features of Filmora. Click on the option that says “Speed” to go to speed settings. Change the speed from 1X to a lower speed by toggling across the drag bar.

After setting a preferred speed for your timelapse, you will notice that the timelapse will seem like a normal video. When you are satisfied with the preview video, go to “Export” and click on it. This will save your converted video to your device in the highest resolution. Then you will be able to share it instantly on any platform.
Part 2. Change Timelapse Video to Normal on iPhone
If you are an iPhone user then you must have discovered the timelapse feature which is present in the camera app. Using the camera app, Apple users have the choice to make stunning time lapses with customized duration and settings.
And if you have a timelapse that you want to convert to a normal video format, then you can follow these steps on how to convert time-lapse to normal video:

- There are multiple ways and applications to convert timelapse videos to normal ones on iPhone. But the safest and most effective way to do that is by using iMovie. This application is mostly preinstalled on all iPhones and is free to use. If somehow you are missing this app, then visit the Apple store and install it on your device.
- When iMovie is successfully installed on your iPhone, open the application and allow all the permissions that it asks for. Then click on the “+” icon in the middle of your screen to create a new project. If you want you can name your project when its created.
- After opening your new project, you can tap on the “Import” option to add media files to the interface. Here it will open your files from which you will need to select the timelapse video that you want to edit. Click on it and it will be automatically added to iMovie.
- You can also add multiple timelapse videos if you want to convert them all and merge them into one file. Then on the iMovie interface, there will be a timeline available at the bottom of your screen. You can adjust it to trim, replace or rearrange the clips.
- Then on the bottom left corner of your screen, you will see a “speed” icon which is generally the second tool on the interface. Click on it and it will open the playback speed controls for you. Adjusting and dragging on the speed control, you will be able to change the playback speed of the timelapse.
- You will need to slow down the playback speed by toggling the speed controls. Set it to a speed lower than 1X which can make it look like a normal video. When you are done, click on the tick mark to save the changes.
- Now preview the video and make sure you are satisfied with the conversion. Then go to settings, and customize the video output settings as well as quality. When you are done with these changes, click on the “Export” option to save the video to your device or share it on any platform.
Part 3. Time-lapse to Normal Video Online
There are situations where users don’t want to go installing extra applications when it comes to executing a task. And if you happen to be such a user who wants to convert your timelapse into a beautiful video, then you can do it online for free. Veed.io is an online platform that allows users to upload and convert time-lapse to normal video online easily.
First, open your browser and enter “veed.io” i.e. “time-lapse to normal video converter online” in your search box. Then the first result that will be shown will be from its official website. Click on that and you will be directed to the veed.io online interface.

The interface will have different options like “Sign Up, “Try Sample” etc. From the available options, click on “Upload Your Video”. This will allow you to edit your videos without even creating an account.
Then the interface will direct you to the video creation page. Here you will see a bunch of predefined templates to make videos. Click on the “Create Template” option and the interface will have a “Upload Your Media” box on the screen. Here you can click on it and select your timelapse file or drag and drop it from any source.

After the video is added to the veed.io page, it will take some time to upload it to the project menu. You can add multiple files by clicking on the “Add” option available on the screen. After a short while, you will see the video preview on the screen along with a timeline of the video.

Click on the timeline feature and there will be different tools from veed.io available at the bottom of the interface. Select the speedometer type icon on the screen and this will give you access to control the playback speed of timelapse.
You can drag the cursor from 1X to any desired speed here. Just click on the drag button and lower the speed below 1X to a desirable speed of your choice. In the preview window, check how the video is being rendered.
When you are satisfied with the changes and the video speed seems normal to you, go to the top right corner of the screen and click on the “Export” option. This will ask you to set your preferences for different video settings. Change them according to your requirement and then the video will be downloaded to your device.
Wondershare Filmora Easily convert time-lapse video to normal speed on PC and Mac.
Free Download Free Download Learn More

Conclusion
Time lapses are an amazing way to capture moments from any device. But there are situations where we need to convert them into video format for our requirements. Luckily there are some built-in features in different smartphone devices as well as applications available on others that can help you to do so. We have discussed some of these methods following which you will easily be able to convert your timelapse into videos on any device.
Also read:
- In 2024, How To Polish Your Music Video Edits Using Filmora
- New 2024 Approved How to Crop a Video in Davinci Resolve Step by Step
- Updated Tiktok Video Aspect Ratio
- New How to Easily Create a Free Eye-Catching Intro Videos with Invideo
- In 2024, Motion Blur Photo With GIMP Step-By-Step Guide
- New The Ultimate Guide for the 10 Leading Slow-Motion Cameras
- New Step by Step to Rotate Video in Google Photos for 2024
- New 2024 Approved 5 Excellent Tools To Convert Video to 60 FPS
- Adobe After Effects Review for 2024
- Updated How to Create and Use Adjustment Layers in After Effects
- New What Are The Stages Of Film Production
- In 2024, How to Add Customized Transitions to OBS
- Updated 2024 Approved 2 Solutions to Crop a Video Using After Effects
- Do You Know How AI Is Helping Video Editors and Enthusiasts? Many Video Editing Software Allows an Auto Reframe Option to Use that Can Help Manage Videos for 2024
- How to Add Subtitles to Videos With Kapwing for 2024
- In 2024, Steps to Add Subtitles in Canva
- Updated How to Edit Text in Premiere Pro
- How To Repair iPhone XS System Issues? | Dr.fone
- All About iPhone SE (2022) Unlock Chip You Need to Know
- Top Apps and Online Tools To Track Xiaomi 14 Ultra Phone With/Without IMEI Number
- Fixing Foneazy MockGo Not Working On Vivo V29e | Dr.fone
- How to Cast Vivo Y56 5G to Computer for iPhone and Android? | Dr.fone
- In 2024, Ways to trade pokemon go from far away On Lava Blaze Curve 5G? | Dr.fone
- Cellular Network Not Available for Voice Calls On Samsung Galaxy A54 5G | Dr.fone
- In 2024, Ultimate Guide to Catch the Regional-Located Pokemon For Poco M6 Pro 5G | Dr.fone
- In 2024, Easy Ways to Manage Your Lava Agni 2 5G Location Settings | Dr.fone
- In 2024, How to Come up With the Best Pokemon Team On Apple iPhone XS Max? | Dr.fone
- Title: 2024 Approved Create Slide Masking Effect Intro
- Author: Chloe
- Created at : 2024-06-18 14:30:52
- Updated at : 2024-06-19 14:30:52
- Link: https://ai-editing-video.techidaily.com/2024-approved-create-slide-masking-effect-intro/
- License: This work is licensed under CC BY-NC-SA 4.0.


