
:max_bytes(150000):strip_icc():format(webp)/how-to-make-a-song-your-ringtone-on-android-4777573-5d571b57c5a5436e91ebb7fcae1c2b6b.jpg)
2024 Approved Create Slide Masking Effect Intro【Filmora】
Create Slide Masking Effect Intro【Filmora】
Preparation
What you need to prepare:
- A computer (Windows or macOS)
- Your video materials.
- Filmora video editor
Step 1
The first thing you want to do is download the Filmora video editor . Hit Install and allow the application to start automatically.
Step 2
Once the program loads, head straight over to the Titles tab and drag the Basic Title to Track 3 on the Timeline.
Also, drag the clip from the right side towards the left to make it 4 seconds long.

Step 3
Double-click on the Title clip in the Timeline and edit your Title’s font and size. A panel like this one should pop up when you double-click. When you’re done, click OK.

Step 4
Now, take a snapshot of the new Title that you just created.

Step 5
Next, we’re going to need a few more snapshots. But this time, double-click on the Title again and change its color to whichever one you like. Once you’ve changed its color, go ahead and click the same button as in Step 4 to take another snapshot.

Step 6
Next, double-click on the Title once again and go to “ADVANCED”. From there, go to Add Shape and select the Rectangle shape.

Step 7
Look to the left side panel and switch OFF the Text Fill button. Then, scroll down to the bottom and change the Shape Fill color to White.

Step 8
Now, adjust the rectangle’s shape to a thin line, rotate it, and move it into position like in the image.

Step 9
Delete the text layer from the Advanced panel.

Step 10
The final step in the Advanced panel is to go to the Animation tab from the left side panel and select the Round Zoom Out animation preset. Then, click OK.

Step 11
Now, it’s time to align the clips in the Timeline. First, move your Default Title clip 5 frames further. Then, drag the first snapshot to Track one and move it 8 frames forward.

Step 12
Go to Sample Color and drag the Black color to Track 3 in the Timeline. Align it directly on top of where the clip in Track 1 starts. Then, double-click on the black color clip and align it like in the image here.

Step 13
Now, place the Playhead at the beginning of the clip in Track 1. Then, double-click the snapshot clip in Track 1. Now, start increasing the value of the X-axis until it makes the text disappear, just as in this image here.

Step 14
Next, move the Playhead 10 frames further. Then, reset the position values by clicking on this button.

Step 15
Now, move the Playhead once more and set it at 3 seconds and 10 frames. Then, click on the “+Add” button to add another keyframe.

Step 16
Move the Playhead to the end of the snapshot clip and set the value of the X axis to 391. Then, reduce the opacity to 0%. Move the Playhead at the start of the snapshot clip and reduce the opacity to 0% there as well.

Step 17
Next, Export the clip to your PC. Just hit the Export button near the top-center of the screen. Then, select all of your clips in the Timeline and move them one track above. Then, drag the second snapshot you took earlier to Track 1.

Step 18
Select the Black Color clip once again and move the position of the Black box like this.

Step 19
Now, hide the clip on Track 2 by pressing this button next to it.

Step 20
Click on the second snapshot clip located in Track 1. Then, repeat the process of adding keyframes just like we did with the first snapshot. Review the previous steps to get this right. This time, remember to slide the X axis to the LEFT instead of RIGHT. Just drag the values to the left.
Step 21
Export this. Then, delete all the clips in the Timeline. Now, import both clips you exported earlier during these steps. Also, import a background video that you’d like to appear behind your slide masking text effect.
Step 22
Next, drag the clips to Timeline and adjust each of them to be the same length. Four seconds is a good option.
Step 23
Double-click on the first clip (not the background clip). Go to Video and under Blending Mode select Lighten.

Step 24
Drop your second clip to Track three and repeat the same edits for it.
Step 25
Set the Playhead on frame three and drop the Motion Shape element from the Elements tab on Track 4.

Step 26
Finally, copy and paste the element near the end of the video and Render the project. Then, review your masterpiece. That’s it!

Summary
What you’ve learned:
- Create a slide masking effect intro in Filmora
- Customize masks in the Filmora video editor
- How to take snapshots and edit them thoroughly
- Add keyframes
What you need to prepare:
- A computer (Windows or macOS)
- Your video materials.
- Filmora video editor
Step 1
The first thing you want to do is download the Filmora video editor . Hit Install and allow the application to start automatically.
Step 2
Once the program loads, head straight over to the Titles tab and drag the Basic Title to Track 3 on the Timeline.
Also, drag the clip from the right side towards the left to make it 4 seconds long.
Step 3
Double-click on the Title clip in the Timeline and edit your Title’s font and size. A panel like this one should pop up when you double-click. When you’re done, click OK.
Step 4
Now, take a snapshot of the new Title that you just created.
Step 5
Next, we’re going to need a few more snapshots. But this time, double-click on the Title again and change its color to whichever one you like. Once you’ve changed its color, go ahead and click the same button as in Step 4 to take another snapshot.
Step 6
Next, double-click on the Title once again and go to “ADVANCED”. From there, go to Add Shape and select the Rectangle shape.
Step 7
Look to the left side panel and switch OFF the Text Fill button. Then, scroll down to the bottom and change the Shape Fill color to White.
Step 8
Now, adjust the rectangle’s shape to a thin line, rotate it, and move it into position like in the image.
Step 9
Delete the text layer from the Advanced panel.
Step 10
The final step in the Advanced panel is to go to the Animation tab from the left side panel and select the Round Zoom Out animation preset. Then, click OK.
Step 11
Now, it’s time to align the clips in the Timeline. First, move your Default Title clip 5 frames further. Then, drag the first snapshot to Track one and move it 8 frames forward.
Step 12
Go to Sample Color and drag the Black color to Track 3 in the Timeline. Align it directly on top of where the clip in Track 1 starts. Then, double-click on the black color clip and align it like in the image here.
Step 13
Now, place the Playhead at the beginning of the clip in Track 1. Then, double-click the snapshot clip in Track 1. Now, start increasing the value of the X-axis until it makes the text disappear, just as in this image here.
Step 14
Next, move the Playhead 10 frames further. Then, reset the position values by clicking on this button.
Step 15
Now, move the Playhead once more and set it at 3 seconds and 10 frames. Then, click on the “+Add” button to add another keyframe.
Step 16
Move the Playhead to the end of the snapshot clip and set the value of the X axis to 391. Then, reduce the opacity to 0%. Move the Playhead at the start of the snapshot clip and reduce the opacity to 0% there as well.
Step 17
Next, Export the clip to your PC. Just hit the Export button near the top-center of the screen. Then, select all of your clips in the Timeline and move them one track above. Then, drag the second snapshot you took earlier to Track 1.
Step 18
Select the Black Color clip once again and move the position of the Black box like this.
Step 19
Now, hide the clip on Track 2 by pressing this button next to it.
Step 20
Click on the second snapshot clip located in Track 1. Then, repeat the process of adding keyframes just like we did with the first snapshot. Review the previous steps to get this right. This time, remember to slide the X axis to the LEFT instead of RIGHT. Just drag the values to the left.
Step 21
Export this. Then, delete all the clips in the Timeline. Now, import both clips you exported earlier during these steps. Also, import a background video that you’d like to appear behind your slide masking text effect.
Step 22
Next, drag the clips to Timeline and adjust each of them to be the same length. Four seconds is a good option.
Step 23
Double-click on the first clip (not the background clip). Go to Video and under Blending Mode select Lighten.
Step 24
Drop your second clip to Track three and repeat the same edits for it.
Step 25
Set the Playhead on frame three and drop the Motion Shape element from the Elements tab on Track 4.
Step 26
Finally, copy and paste the element near the end of the video and Render the project. Then, review your masterpiece. That’s it!
Summary
What you’ve learned:
- Create a slide masking effect intro in Filmora
- Customize masks in the Filmora video editor
- How to take snapshots and edit them thoroughly
- Add keyframes
How to Add Freeze Frame to Your Video From Any Device?
Adding effects is an essential part of video editing to make a regular video look extraordinary. There are literally unlimited video effects available in popular video editors. You need to apply a video effect as per the trend and requirements of your video. Freeze frame effect has become extremely popular among video creators in today’s world of social media. Use freeze frame effect to freeze a specific scene in your video so that you can draw the attention of your viewers to that particular moment.
For example, in a match highlight video, you freeze the frame moment before a goal to show the positioning of the players or strikers. Owing to the popularity of freeze frame effect, you will find the video effect in almost all popular video editor apps for computers and smartphones. In fact, even popular online video editors have included the effect in their video effects. We will illustrate how to add freeze frame effect to your video on any device.
Part 1. How to Add Freeze Frame Video Effect on PC
If you are a computer user and you are looking for a video editor to add freeze frame effect to your video, we recommend Wondershare Filmora. Filmora is extremely popular among video creators for its wide range of video effects as well as its intuitive user interface. Adding freeze frame effect is super easy in Filmora and here are the steps to follow.
Step1Download and install Filmora for Windows PC. Launch Filmora and click on New Project button.
Step2Import your video clip under Project Media and then drop it into Timeline.
Step3Play the video and pause it where you want to freeze frame. Click on Snapshot icon to take photo of the frame. You will find the photo you have taken just now under Media library. In the meantime, you should split the video clip where you paused it to make space for the still image to get added and stay frozen.
Drag and drop the image on Timeline and stretch it to the duration up to which you want the frame to stay frozen. This image should be on top of the video clip in Timeline. You should place the image exactly where you paused the video.
Step4Double-click on the image in Timeline and adjust parameters as required. Play the video to notice the freeze frame effect. Click on Export button to save the video.
Part 2. How to Add Freeze Frame Video Effect on Mac
If you are a Mac user, the best video editor you can use to edit your video is Final Cut Pro. FCP is widely used by professional video creators and editors to edit their videos as per requirements. There are different categories of video effects available on FCP including freeze frame effect. Make sure your video is recorded with high frame rate and resolution for better outcomes. Here are the steps on how to add freeze frame in Final Cut Pro.
Step1Launch Final Cut Pro on your Mac. Go to File> Import> Files and select your video clip from the storage device. Drag it into the Timeline.

Step2Grab and move the Playhead to the point where you want to freeze the frame. Click on the video clip in the Timeline.

Step3Go to Edit menu and click on Add Freeze Frame. This will split your video clip and add frozen frame where you have placed the Playhead.

The default duration of the frozen freeze is four seconds. You can stretch it as per your requirements.
Just for information, both Windows and Mac users can also Premiere Pro add freeze frame effect if they already have Premiere Pro installed on their computers. The freeze frame feature in Premiere Pro is referred to as Add Frame Hold effect.
Part 3. How to Add Freeze Frame Video Effects Online
If you do not want to download and install a dedicated video editor on your computer, you can apply freeze frame effect to your video online as well. This will save your space as well as put less pressure on your CPU resource. We recommend Kapwing online video editor to use freeze frame effect on the go from any device directly from web browser. Here are the steps to add freeze frame effect to your video online.
Step1Open web browser on your device and visit “kapwing.com/tools/freeze-frame”. Click on Choose a video button.

Step2Drop your video file into Timeline and click on the video clip. Move the Playhead to the point where you want to add freeze frame effect.

Step3Go to Timing tab located in the top-right corner. Click on Freeze Frame button to add still image of the scene in the video. You can click multiple times to add more still images of the same scene. The more still images, the greater its duration will be.

Step4Play the video and you can have multiple freeze frame effects in the video clip.
This is undoubtedly the easiest way to add freeze frame effects for beginners.
Part 4. How to Add Freeze Frame Video Effects on Mobile
If you are using an Android smartphone or iPhone, you can apply freeze frame effect directly on your mobile instantly. In today’s world, people capture videos through their smartphones thanks to high-quality phone camera. You can use CapCut video editor app on both Android and iOS devices to add freeze frame effects. Here are the steps you need to follow.
Step1Install CapCut app on your phone. Launch the app and tap on New Project.

Step2Go to Albums and select the video to which you want to add the frame freeze effect.

Step3Put the Playhead to the point where you want to add the effect. Tap on Edit option.

Step4Search for Freeze option located at the bottom and tap on it to insert still image of the scene in Timeline.

Step5You can drag the duration of the frame freeze effect as per your requirement.
The Bottom Line
Adding freeze frame to your videos before and during impactful moments can enhance your video content. We have illustrated how to add a freeze frame in Final Cut Pro for Mac users. You can also add it to your video online using Kapwing video editor. You can use CapCut app to use the effect in your video on your smartphone. We recommend Filmora to add the effect quickly and conveniently on your PC.
Free Download For Win 7 or later(64-bit)
Free Download For macOS 10.14 or later
Free Download For macOS 10.14 or later
How to Make Canva Collages
How to Make Canva Collages
An easy yet powerful editor
Numerous effects to choose from
Detailed tutorials provided by the official channel
Collages are everywhere, be it social media sites, shopping sites, business sites, personal blogs, or anywhere else. Whenever you need to showcase multiple images at one place for the visual experience, or for any other purpose, collages work best.

There are several popular tools available that help you create a collage-like pro and Canva is one of them. So, if you too have been wanting to use Canva collage tool, this article will surely help you to learn about the tool and its use. Keep reading!!!
In this article
01 [What are a collage and its use?](#Part 1)
02 [Using Canva to create a collage](#Part 2)
03 [Get stock of media files at Wondershare Filmora](#Part 3)
Part 1 Part 1. What are a collage and its use?
In simplest terms, a collage is a collection of items that have been placed on a single frame or a page. Thus, an image collage can be termed as a collection of images placed interestingly in a single frame and for this task to be done with perfection, several collage-making tools are available.
Collages can be created for various reasons be it personal or professional. You can create a collage of your best friend’s birthday, wedding, or any special occasion. An online shopping site can create a collage for showcasing all its product under a similar niche in one place. A company can create a collage showcasing its projects, and similar others. Thus, different types of collages can be created for different purposes and requirements.
Part 2 Using Canva to create a collage
Canva is one of the most widely collage-making tools that is user-friendly and comes with a wide range of templates and editing options to let you create a customized college like a pro. It is available as a desktop tool as well as an app for Android and iOS devices. You need to free sign-up using Google, Email, or Facebook at Canva and then you are all set to the collage-making world.
The templates at Canva are available in multiple categories like fashion, travel, food, wedding, beauty, and many more. The option to design your own collage is also there.
Key features
● Simple and easy-to-use desktop and app-based collage maker.
● Comes with several pre-design templates in different categories. Templates can be customized.
● Allows designing your own design.
● Multiple editing options are supported like adding filters, background removal, adding effects, and more.
● Comes with a huge collection of stock images to meet your requirements
● Collage on Canva can be created in high-quality and can be downloaded.
● Allows resizing of the designs depending on the platform it has to be used for.
Steps to create Canva picture collage
● Step 1. On your browser window open Canva collage-maker and choose the Photo Collage option. Sign-up or log in if you already have an account.
● Step 2. At the Home window, choose the desired template from the available options. Using the search bar, you can also look for other Canva collage templates that matches your theme.

Note: Clicking on the arrow at the “Create a design” option will open the template options if not visible otherwise. Also, to get a customized size for your collage, click on the Custom dimensions button in the upper-right corner.
● Step 3. Selecting and clicking on the desired templatewill open a worktop window. Next, browse and add the images that you need to import to the collage by clicking on the Uploads tab. You can also drag and drop the images.
Images can be moved to place them in the right position.

● Step 4. Click on the image and them using one of the tools you can edit it as needed using filter effects, and another toolbar. Use the Elements tab on the left side, for adjusting more elements.
● Step 5. When all the settings are done, tap on the Download button to save the collage in one of the supported formats (JPEG, PNG, and others). You can also share or export the collage.

The steps for creating a collage using the Canva app are almost the same as that of the desktop with few changes.

Part 3 Get stock of media files at Wondershare Filmora
If you want to explore more media files for your collage, Wondershare Filmora Video Editor is excellent software. Though it is a professional video editing software, its latest version comes with a huge library of media files in an array of categories and themes. You can even search for your choice of GIFs and stickers at the tool.
Additional features of the software include creating a split-screen video that looks at a video slideshow, support to basic and advanced video editing functions, audio enhancement and editing functions, and more.
The interface of the software is simple and user-friendly making it apt for all types of users including the ones who have no prior experience of working with such tools.

● Key Takeaways from This Episode →
● Image collage is created by arranging multiple images on a single screen, frame, or page.
● Canva collage maker is one of the popular and widely used collage-maker that is available as a browser tool and phone app.
● To edit your videos professionally and also to get access to a wide range of media files Wondershare Filmora is an excellent tool.
Collages are everywhere, be it social media sites, shopping sites, business sites, personal blogs, or anywhere else. Whenever you need to showcase multiple images at one place for the visual experience, or for any other purpose, collages work best.
There are several popular tools available that help you create a collage-like pro and Canva is one of them. So, if you too have been wanting to use Canva collage tool, this article will surely help you to learn about the tool and its use. Keep reading!!!
In this article
01 [What are a collage and its use?](#Part 1)
02 [Using Canva to create a collage](#Part 2)
03 [Get stock of media files at Wondershare Filmora](#Part 3)
Part 1 Part 1. What are a collage and its use?
In simplest terms, a collage is a collection of items that have been placed on a single frame or a page. Thus, an image collage can be termed as a collection of images placed interestingly in a single frame and for this task to be done with perfection, several collage-making tools are available.
Collages can be created for various reasons be it personal or professional. You can create a collage of your best friend’s birthday, wedding, or any special occasion. An online shopping site can create a collage for showcasing all its product under a similar niche in one place. A company can create a collage showcasing its projects, and similar others. Thus, different types of collages can be created for different purposes and requirements.
Part 2 Using Canva to create a collage
Canva is one of the most widely collage-making tools that is user-friendly and comes with a wide range of templates and editing options to let you create a customized college like a pro. It is available as a desktop tool as well as an app for Android and iOS devices. You need to free sign-up using Google, Email, or Facebook at Canva and then you are all set to the collage-making world.
The templates at Canva are available in multiple categories like fashion, travel, food, wedding, beauty, and many more. The option to design your own collage is also there.
Key features
● Simple and easy-to-use desktop and app-based collage maker.
● Comes with several pre-design templates in different categories. Templates can be customized.
● Allows designing your own design.
● Multiple editing options are supported like adding filters, background removal, adding effects, and more.
● Comes with a huge collection of stock images to meet your requirements
● Collage on Canva can be created in high-quality and can be downloaded.
● Allows resizing of the designs depending on the platform it has to be used for.
Steps to create Canva picture collage
● Step 1. On your browser window open Canva collage-maker and choose the Photo Collage option. Sign-up or log in if you already have an account.
● Step 2. At the Home window, choose the desired template from the available options. Using the search bar, you can also look for other Canva collage templates that matches your theme.
Note: Clicking on the arrow at the “Create a design” option will open the template options if not visible otherwise. Also, to get a customized size for your collage, click on the Custom dimensions button in the upper-right corner.
● Step 3. Selecting and clicking on the desired templatewill open a worktop window. Next, browse and add the images that you need to import to the collage by clicking on the Uploads tab. You can also drag and drop the images.
Images can be moved to place them in the right position.
● Step 4. Click on the image and them using one of the tools you can edit it as needed using filter effects, and another toolbar. Use the Elements tab on the left side, for adjusting more elements.
● Step 5. When all the settings are done, tap on the Download button to save the collage in one of the supported formats (JPEG, PNG, and others). You can also share or export the collage.
The steps for creating a collage using the Canva app are almost the same as that of the desktop with few changes.
Part 3 Get stock of media files at Wondershare Filmora
If you want to explore more media files for your collage, Wondershare Filmora Video Editor is excellent software. Though it is a professional video editing software, its latest version comes with a huge library of media files in an array of categories and themes. You can even search for your choice of GIFs and stickers at the tool.
Additional features of the software include creating a split-screen video that looks at a video slideshow, support to basic and advanced video editing functions, audio enhancement and editing functions, and more.
The interface of the software is simple and user-friendly making it apt for all types of users including the ones who have no prior experience of working with such tools.
● Key Takeaways from This Episode →
● Image collage is created by arranging multiple images on a single screen, frame, or page.
● Canva collage maker is one of the popular and widely used collage-maker that is available as a browser tool and phone app.
● To edit your videos professionally and also to get access to a wide range of media files Wondershare Filmora is an excellent tool.
How Did AI Video Games Act More Human Than Human?
How Did AI Video Games Act More Human Than Human?
An easy yet powerful editor
Numerous effects to choose from
Detailed tutorials provided by the official channel
The gaming world is ever-changing, with developers looking to create innovative ways to immerse players into their digital worlds. One such technology that has begun to sweep is AI in the game industry.
AI is a powerful tool in many ways to improve the gaming experience. It can make artificial intelligence in computer games more believable and add replayability and immersion to games, and we can expect to see even more impressive applications in the future.
In this article
01 [What Is AI in Gaming?](#Part 1)
02 [Why Does AI in Gaming Matter?](#Part 2)
03 [How AI Will Completely Change Video Games](#Part 3)
04 [8 Games with Incredible Artificial Intelligence](#Part 4)
05 [What AI Video Games Assets Do Filmora Have?](#Part 5)
Part 1 What Is AI in Gaming?
In simple terms, AI is a set of algorithms that allow a computer to learn and improve from experience. Although you can apply it in many ways, artificial intelligence in video games is usually helpful to create more intelligent and more believable non-player characters (NPCs).
For example, an AI system might be helpful to determine how an NPC reacts to the player’s actions. If the player tries to steal from an NPC, the AI might make the NPC angry and more likely to attack the player. Alternatively, if the player is friendly to an NPC, the AI game playing might make the NPC more likely to help the player in future interactions.
Part 2 Why Does AI in Gaming Matter?
One of the most vital aspects of AI in video games is that it can make games more believable and immersive for players. When games can convincingly simulate human-like behavior, it can be a much more enjoyable experience for gamers. AI can make NPCs seem more lifelike and make the game world feel more believable.
AI is also becoming increasingly important for creating procedural content. This is where the game generates content on its own, rather than relying on pre-made assets. For example, a game might use procedural generation to create random dungeons or quests that the player can explore. This can add a lot of replayability to a game, as the player never knows what they will encounter next.
Part 3 How AI Will Completely Change Video Games
It is not a secret that AI is changing the world as we know it. With its ability to enable computers to learn and improve from experience, AI is paving the way for a future where machines can handle more complex tasks. And nowhere is this more apparent than in the world of video gaming.
In the past, developers brought in AI primarily for simple things like making certain NPCs (non-player characters) move and act realistically. But now, artificial intelligence in video games is being used for much more complex tasks like generating procedural content and creating believable human-like behavior. This results in a new generation of AI game playing that are more immersive and playable.
Part 4 Games with Incredible Artificial Intelligence
Now, we will look into eight video games that signify why we need the best ai in video games.
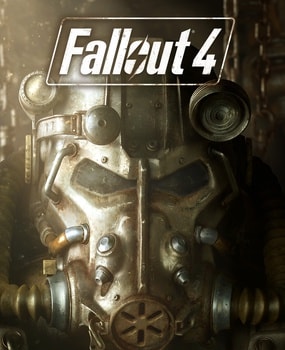
01Fallout 4
One of the most attractive examples of AI in video gaming is Fallout 4. This post-apocalyptic RPG features some of the most believable NPCs ever seen in a game. Each character is fully voiced, and they all have their unique personalities and backstories. The AI generates procedural content, meaning that the game world is always different each time you play.
02The Witcher 3: Wild Hunt
The Witcher 3: Wild Hunt is one more great example of an AI video game. This open-world RPG features a vast array of believable NPCs, each with unique personality traits and motivations. The AI is also used to generate procedural content, resulting in a different game world every time you play.

03Grand Theft Auto V
Grand Theft Auto V is yet another example of AI being used to create believable human-like behavior. The NPCs in this play are some of the most lifelike and realistic ever seen. They react to the player’s actions in believable ways, and the AI is used to generate procedural content, resulting in a game world that is always different.

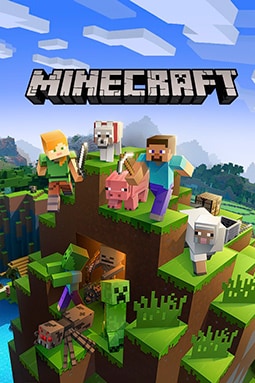
04Minecraft
Minecraft is a game that heavily uses procedural generation to create its content. The terrain and structures in the game are all generated on the fly by the AI, resulting in a different game world every time you play. What’s more, AI is also used to generate the behaviors of mobs (hostile creatures), making them more believable and lifelike.
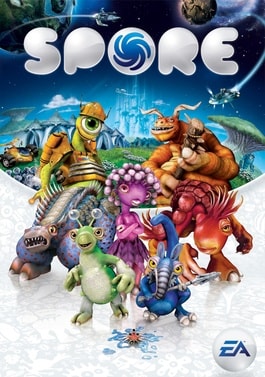
05Spore
Spore is an AI game play that is all about procedural generation. Every creature in the game is generated by AI, meaning that there are many possible creature designs. What’s more, AI is used to create creatures’ behaviors, making them more believable and lifelike.
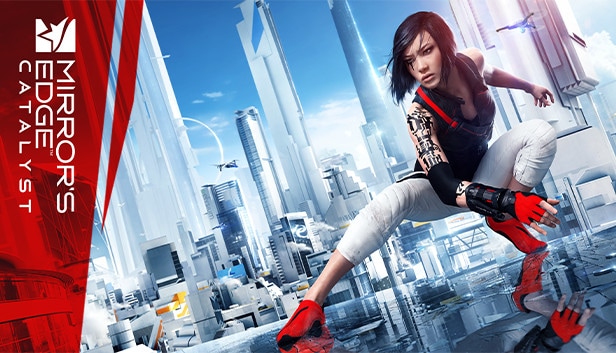
06Mirror’s Edge Catalyst
Mirror’s Edge Catalyst is a game that heavily uses AI to create its content. The levels in the game are all procedurally generated, meaning that they are different every time you play. This is made possible by the game’s AI, which produces the level layouts and obstacles on the fly.
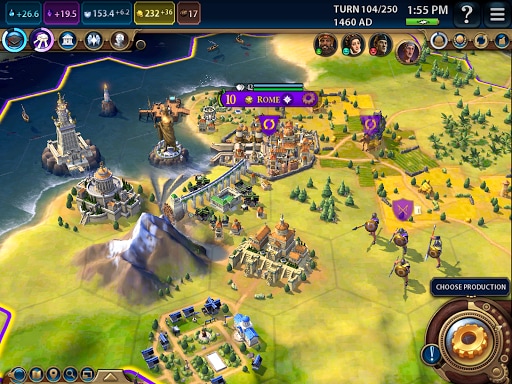
07Civilization VI
One of the most incredible examples of AI in video gaming is Civilization VI. This turn-based strategy game features some of the most believable NPCs ever seen in a game. Each character has its voice fully, and they all have unique personalities and backstories.
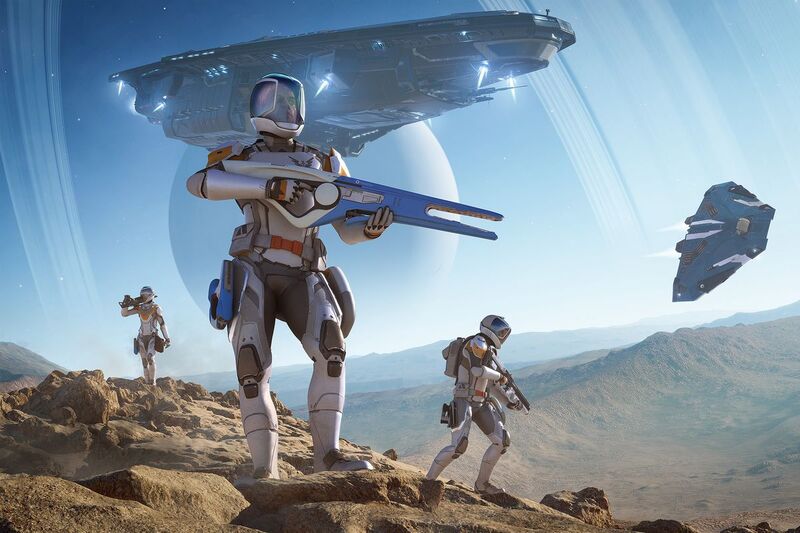
08Elite Dangerous
Elite Dangerous is a space simulation game that uses advanced AI to create believable and realistic human-like behavior. The NPCs in the game are some of the most lifelike and realistic ever seen. They react to the player’s actions in believable ways, and the AI is used to generate procedural content, resulting in a game world that is always different.
Part 5 What AI Video Games Assets Do Wondershare Filmora Video Editor Have?
With the increased use of AI in video games, most gamers have found gaming more enjoyable. However, an outstanding video editor has some assets that can significantly make AI video games better and more human. This video editor is one of the most sorted for and is called Filmora. Filmora is a great video editing software for creating stunning videos. It’s effortless to use and has various features to create professional-looking videos. It’s perfect for making videos for social media, YouTube, and other online platforms.
Its many features have a touch of artificial intelligence, making this program stand out from the other video editors and valuable for editing during ai video games creation.
Screen Recording
The Filmora screen recorder allows the user to concurrently record the screen and camera and the system and microphone audio. You can quickly record games, tutorials, YouTube videos, and other videos and then export them to YouTube, Vimeo, and other devices.
AI Portrait
The AI portrait function in Filmora video editor allows you to locate the human in your movie effortlessly and erase the background with a simple drag and click. There are also several portrait effects and AR stickers to add to your video editing enjoyment.
For Win 7 or later (64-bit)
For macOS 10.12 or later
Video Effects
Filmora customers can choose from various effects to utilize in their video editing software. It’s simple to create whatever effect you want with over 900 free effects, including drag-and-drop transitions, titles, filters, and motion components.
Do visit Wondershare Filmora exclusive website to know more about its latest upgrade and new features launch.
● Ending Thoughts →
● Thus, that was about what an ai video game is and why the characters act more like humans.
● So, as a video game lover, you can now explore the best of ai playing video games to have a personal experience of this new video gaming trend. Also, do try the Filmora software to see how you can change the looks and feel of your video game creation.
The gaming world is ever-changing, with developers looking to create innovative ways to immerse players into their digital worlds. One such technology that has begun to sweep is AI in the game industry.
AI is a powerful tool in many ways to improve the gaming experience. It can make artificial intelligence in computer games more believable and add replayability and immersion to games, and we can expect to see even more impressive applications in the future.
In this article
01 [What Is AI in Gaming?](#Part 1)
02 [Why Does AI in Gaming Matter?](#Part 2)
03 [How AI Will Completely Change Video Games](#Part 3)
04 [8 Games with Incredible Artificial Intelligence](#Part 4)
05 [What AI Video Games Assets Do Filmora Have?](#Part 5)
Part 1 What Is AI in Gaming?
In simple terms, AI is a set of algorithms that allow a computer to learn and improve from experience. Although you can apply it in many ways, artificial intelligence in video games is usually helpful to create more intelligent and more believable non-player characters (NPCs).
For example, an AI system might be helpful to determine how an NPC reacts to the player’s actions. If the player tries to steal from an NPC, the AI might make the NPC angry and more likely to attack the player. Alternatively, if the player is friendly to an NPC, the AI game playing might make the NPC more likely to help the player in future interactions.
Part 2 Why Does AI in Gaming Matter?
One of the most vital aspects of AI in video games is that it can make games more believable and immersive for players. When games can convincingly simulate human-like behavior, it can be a much more enjoyable experience for gamers. AI can make NPCs seem more lifelike and make the game world feel more believable.
AI is also becoming increasingly important for creating procedural content. This is where the game generates content on its own, rather than relying on pre-made assets. For example, a game might use procedural generation to create random dungeons or quests that the player can explore. This can add a lot of replayability to a game, as the player never knows what they will encounter next.
Part 3 How AI Will Completely Change Video Games
It is not a secret that AI is changing the world as we know it. With its ability to enable computers to learn and improve from experience, AI is paving the way for a future where machines can handle more complex tasks. And nowhere is this more apparent than in the world of video gaming.
In the past, developers brought in AI primarily for simple things like making certain NPCs (non-player characters) move and act realistically. But now, artificial intelligence in video games is being used for much more complex tasks like generating procedural content and creating believable human-like behavior. This results in a new generation of AI game playing that are more immersive and playable.
Part 4 Games with Incredible Artificial Intelligence
Now, we will look into eight video games that signify why we need the best ai in video games.
01Fallout 4
One of the most attractive examples of AI in video gaming is Fallout 4. This post-apocalyptic RPG features some of the most believable NPCs ever seen in a game. Each character is fully voiced, and they all have their unique personalities and backstories. The AI generates procedural content, meaning that the game world is always different each time you play.
02The Witcher 3: Wild Hunt
The Witcher 3: Wild Hunt is one more great example of an AI video game. This open-world RPG features a vast array of believable NPCs, each with unique personality traits and motivations. The AI is also used to generate procedural content, resulting in a different game world every time you play.
03Grand Theft Auto V
Grand Theft Auto V is yet another example of AI being used to create believable human-like behavior. The NPCs in this play are some of the most lifelike and realistic ever seen. They react to the player’s actions in believable ways, and the AI is used to generate procedural content, resulting in a game world that is always different.
04Minecraft
Minecraft is a game that heavily uses procedural generation to create its content. The terrain and structures in the game are all generated on the fly by the AI, resulting in a different game world every time you play. What’s more, AI is also used to generate the behaviors of mobs (hostile creatures), making them more believable and lifelike.
05Spore
Spore is an AI game play that is all about procedural generation. Every creature in the game is generated by AI, meaning that there are many possible creature designs. What’s more, AI is used to create creatures’ behaviors, making them more believable and lifelike.
06Mirror’s Edge Catalyst
Mirror’s Edge Catalyst is a game that heavily uses AI to create its content. The levels in the game are all procedurally generated, meaning that they are different every time you play. This is made possible by the game’s AI, which produces the level layouts and obstacles on the fly.
07Civilization VI
One of the most incredible examples of AI in video gaming is Civilization VI. This turn-based strategy game features some of the most believable NPCs ever seen in a game. Each character has its voice fully, and they all have unique personalities and backstories.
08Elite Dangerous
Elite Dangerous is a space simulation game that uses advanced AI to create believable and realistic human-like behavior. The NPCs in the game are some of the most lifelike and realistic ever seen. They react to the player’s actions in believable ways, and the AI is used to generate procedural content, resulting in a game world that is always different.
Part 5 What AI Video Games Assets Do Wondershare Filmora Video Editor Have?
With the increased use of AI in video games, most gamers have found gaming more enjoyable. However, an outstanding video editor has some assets that can significantly make AI video games better and more human. This video editor is one of the most sorted for and is called Filmora. Filmora is a great video editing software for creating stunning videos. It’s effortless to use and has various features to create professional-looking videos. It’s perfect for making videos for social media, YouTube, and other online platforms.
Its many features have a touch of artificial intelligence, making this program stand out from the other video editors and valuable for editing during ai video games creation.
Screen Recording
The Filmora screen recorder allows the user to concurrently record the screen and camera and the system and microphone audio. You can quickly record games, tutorials, YouTube videos, and other videos and then export them to YouTube, Vimeo, and other devices.
AI Portrait
The AI portrait function in Filmora video editor allows you to locate the human in your movie effortlessly and erase the background with a simple drag and click. There are also several portrait effects and AR stickers to add to your video editing enjoyment.
For Win 7 or later (64-bit)
For macOS 10.12 or later
Video Effects
Filmora customers can choose from various effects to utilize in their video editing software. It’s simple to create whatever effect you want with over 900 free effects, including drag-and-drop transitions, titles, filters, and motion components.
Do visit Wondershare Filmora exclusive website to know more about its latest upgrade and new features launch.
● Ending Thoughts →
● Thus, that was about what an ai video game is and why the characters act more like humans.
● So, as a video game lover, you can now explore the best of ai playing video games to have a personal experience of this new video gaming trend. Also, do try the Filmora software to see how you can change the looks and feel of your video game creation.
Also read:
- How to Create After Effects Gifs
- 2024 Approved Thousands Already Know What Ezgif Is and So Can You
- New Best Online YouTube Video Trimmer 2024
- Updated In 2024, Finest Approach to Slow Down a Video CapCut All-in-One Video Editor
- New 2024 Approved Top 10 Sony LUT for Different Purposes
- New Sync Audio With Video With Filmora
- AR, or Augmented Reality, Is One of the Most Significant Technological Inventions. This Technology Is Used in Many Applications that We Use Daily, Like, Maps, Music, Video Games, Tourism, Sightseeing, Etc
- New In 2024, 5 Best Video Denoisers
- In 2024, Overview About Supported iPhone Video Formats and Best iPhone Video Editor & Converter
- New Best 5 GIF to Video Converters You Cant-Miss
- New 2024 Approved How to Find Free Online Slideshow Maker with No Watermark
- How to Add Miniature Effect in Video with Filmora for 2024
- 2024 Approved 12 Best Marketing Slideshow Templates
- 2024 Approved How to Add Transitions in Adobe Premiere Pro
- In 2024, If You Want to Color Grading Your Video, Adobe Lightroom Will Be the Right Choice. This Article Will Teach You How to Use Lightroom to Apply Color Grading to Videos with Ease
- Updated Do You Wish to Learn About some Tools to Slow Down a Video? Discover How to Slow Down Time Lapse on iPhone Throughout This Article
- In 2024, If the Phenomenon of Augmented Reality Fascinates You, Consider Entering Into the Gaming World with the Best AR Games You Will Ever Come Across
- New Best Free Video Editing Software to Boost Your Content Creation
- In 2024, Blender - A Video Editor for Every Professional
- New How to Create a Custom Slide Show in PowerPoint
- Updated This Article Talks in Detail About How to Convert Time-Lapse to Normal Video Using Certain Methods on iPhone, Online Tools, and so On. It Further Discusses Converting Time-Lapse Video to Normal on the Computer. Check Out
- Updated Zoom In and Out on Snapchat for 2024
- 2024 Approved How to Use Color Grading in Final Cut Pro
- New Ideas for Time-Lapse Video for 2024
- In 2024, Want to Know the Simplest Way to Match the Colors of Your Photos in Photoshop? The Following Discussion Will Help Match Color in Photoshop, Almost Effortlessly
- 2024 Approved Best 8 Online GIF to APNG Converters
- Updated 2024 Approved Tips for Choosing Location and Scheduling Music Video
- New In 2024, How to Add Effects on TikTok
- Tutorial to Add Effects with Movavi Slideshow Maker for 2024
- Updated In 2024, What Is the Best Filmora Slideshow Templates? Experts Choice
- Add a Miniature Effect on Your Video for Filmy Looks. To Add This Effect, Read the Complete Guide and Make Your Video Cinematic by Wondershare Filmora for 2024
- New How to Use Canva Color Match
- New 2024 Approved Best Frame Rate for 4K Video
- New Do You Want to Know How to Convert YouTube SBV Subtitles to SRT Format? Here Is an Ultimate Guide About It
- 2024 Approved What Slideshow Templates Can Teach You About Aesthetic
- Updated Guide To Selecting and Using the Best Braw Luts for 2024
- Create Eye-Catching Slow-Motion Videos to Set Your Own Trend. For This Purpose, Read This Article to Find and Learn to Use CapCuts New Slow-Motion Templates for 2024
- 2024 Approved Cropping a Video in Final Cut Pro Step by Step
- New Add Effects to Video Online for 2024
- Top Tricks for Learning Photo Slideshow
- In 2024, Video Marketing Is Adopted by Most Companies in This Digital Era. In This Post, We Are Going to Share some Useful Tips to Create a Better Product Video Ads to Help Prompt Business
- New Vegas Pro - How to Download, Install and Use It?
- In 2024, Hard to Remove Black Background in After Effects? Heres the Best Way to Deal With It
- Hard Resetting an Xiaomi Redmi Note 12 Pro 5G Device Made Easy | Dr.fone
- Pokemon Go Error 12 Failed to Detect Location On Xiaomi Redmi A2? | Dr.fone
- In 2024, Still Using Pattern Locks with Realme V30? Tips, Tricks and Helpful Advice
- In 2024, Here are Some Pro Tips for Pokemon Go PvP Battles On Oppo A1x 5G | Dr.fone
- New 2024 Approved Finding The Best Voice Changers To Sound Like Star Warss Stormtrooper
- Infinix Smart 8 Camera Not Working Unexpected Error? Fix It Now | Dr.fone
- How to Change GPS Location on Realme C67 4G Easily & Safely | Dr.fone
- How to Stop Google Chrome from Tracking Your Location On Motorola Edge 40 Neo? | Dr.fone
- In 2024, How to Come up With the Best Pokemon Team On Samsung Galaxy XCover 6 Pro Tactical Edition? | Dr.fone
- In 2024, How to Track Xiaomi Redmi Note 13 5G Location by Number | Dr.fone
- In 2024, How to Watch Hulu Outside US On OnePlus Nord N30 5G | Dr.fone
- Read This Guide to Find a Reliable Alternative to Fake GPS On Apple iPhone 6 | Dr.fone
- How To Fix Auto Lock Greyed Out on Apple iPhone 15 Plus | Dr.fone
- Reinstall hardware drivers with Device Manager in Windows 11
- In 2024, Ultimate Guide to Catch the Regional-Located Pokemon For Honor Magic Vs 2 | Dr.fone
- How does the stardust trade cost In pokemon go On Google Pixel 8 Pro? | Dr.fone
- Title: 2024 Approved Create Slide Masking Effect Intro【Filmora】
- Author: Chloe
- Created at : 2024-04-24 07:08:17
- Updated at : 2024-04-25 07:08:17
- Link: https://ai-editing-video.techidaily.com/2024-approved-create-slide-masking-effect-introfilmora/
- License: This work is licensed under CC BY-NC-SA 4.0.
