

2024 Approved End Screen Makers
Top 6 End Screen Makers
A YouTube end screen is the final section of a YouTube video and generally makes up the final 5-20 seconds of the video. Video creators often use this section of the video to add calls-to-action, playlists, links to videos, and more.
It can therefore be a very crucial 5-20 seconds and you may want to make sure that the end screen works for your brand. To do that, you need to make use of a good end screen maker that will ensure you are taking full advantage of this final part of the video. Here, we will look at some of the best end screen makers for you to choose from.
Best End Screen Makers
The following are the best end screen makers that you can use to finish your YouTube videos in style;
Filmora
Wondershare Filmora is one of the best video creation and editing tools in the market and as such you can be sure that it has all the necessary features to help you create and edit an end screen for your YouTube video that users will interact with. It has a lot of different features that make the process easy and allows you to customize our video in so many ways.

You can add all kinds of assets to the video project including images, video clips, text, and more, and use Filmora’s filters, animated elements, and video effects to put them together. All these features come in a very simple-to-use interface that makes the often-complicated process of creating and editing videos very easy.
For Win 7 or later (64-bit)
For macOS 10.12 or later
Key Features
- You can export the completed video in very high quality
- It can be used to create and edit GIFs
- It has numerous editing tools including noise removal options, advanced color tuning, advanced text editor, scene stabilization, and more.
- You can add audio including voiceover and music to the video
- It has a very simple user interface that makes it very easy to use
Canva
Canva is a simple-to-use animated YouTube end screen maker that has a large library of resources ideal for creating different types of end screens. One of the best things about Canva is the numerous templates that you can choose from, along with effects and media files including stock photos that can be very useful when creating your video.

Although most of the features, including many of the templates, are free, the best resources are only available on the premium plan. Using a premium photo or template will mean that a watermark is added to your design.
Key Features
- Most of the resources you need to create your end screen on Canva are free
- The interface is very easy to use, with tutorials that can help when you get stuck.
- It has many great resources including stock images and unique templates
- You can add many effects to the end screen
Fotor
Fotor is another great solution that can be very useful in creating the YouTube end screen. It comes with a lot of different templates to choose from, allowing you to customize the end screen for maximum engagement. You can also upload your images to use in the project or choose from the Fotor library which offers options for different kinds of videos.

Key Features
- Most of the templates that you can choose are completely free to use
- The templates also come in different sizes to suit all needs
- You can use one of the many effects to further customize the end screen.
- The templates and effects are also customizable
Snappa
Snappa can also be a good way to create the perfect end screen for your YouTube video. It is a versatile solution with a lot of options to help you customize the end screen to suit your brand and targets. One such resource is the huge library of stock images as well as icons and shapes that you can choose from. Snappa makes the process much easier by allowing you to start from a suitable template that you can then customize as desired.

Key Features
- There are a lot of templates to choose from
- You can import your media files to customize the design
- You can also start from a blank canvas and work from there
- There is also a large library of stock photos that you can choose from
Placeit.net
This is an online solution that is one of the best ways to create an end screen for your YouTube video. The user interface is very simple to navigate and very well designed, allowing you to easily create the end screen even if you are a beginner.

You can upload your images to add to the design or choose from the large library of resources that Placeit.net provides. You also have numerous export options to choose from.
Key Features
- There are numerous templates to choose from
- You can export the end screen with transparency
- The interface is very easy to use
- Most of the resources are available for free
Kapwing
Kapwing is an online video editing solution that you can also use to create an end screen for your YouTube video. It has extensive features that can allow you to customize your end screen any way you want to. It has numerous templates to choose from and the simple drag-and-drop interface makes creating the end screen very easy.

Key Features
- You can choose the size of the end screen to use
- There are a lot of templates to choose from
- You can upload your images and other elements to the project
- You get to choose the duration of the end screen before you begin the project
How to Make an End Screen with Filmora
Creating an end screen for your YouTube video using Filmora is a very simple process. Use these steps to do it;
Step 1: The first thing you need to do is install Filmora on your computer. You can download the setup file from the main website and then follow the instructions on the setup wizard to install the program.
Once the installation is complete, open the program and click on “New Project” to start.
Step 2: Click on the “Titles” section and search for “End Screen” using the search bar. Select the best template for your end screen and drag it into the timeline.
Step 3: Now you are ready to add elements to the end screen. Add your profile picture on a new track across the timeline and stretch it to fit the screen as desired.
Step 4: Click on “Effects” and use the search function to search for the “Mask” effect. When you find it, add it across the timeline and double-click on it to open its settings and adjust the effect accordingly.
Step 5: You may also want to add your social media handles to the end screen. To do that, use the “Titles” tab to find the different social media handles and add each one to the timeline.
You are now ready to save and export the end screen and add it to your YouTube video.
Related FAQs About End Screen Maker
1. How Do You Make an End Screen?
Making an end screen is different depending on the tool that you use to create the end screen as well as the number of elements that you choose to add to it. But usually, you would start with a template and begin adding elements to the project one by one.
2.What is the Best Free Outro Maker?
The best tool to create an end screen for YouTube videos is Filmora simply because it makes the process very easy while allowing you to customize your creation as much as you need. But even though it has a free trial version, most of the features you need to create a unique end screen are not available on the free plan.
A good free solution would be Canva because it has numerous free resources that can create a decent end screen. Although we must point out that many of the best templates and elements on Canva are also not available for free.
3.How Long can a YouTube End Screen Be?
A typical end screen is often 5-20 seconds long. You don’t need any more than 20 seconds because it is only used as a way to promote additional content or add a call to action. So when creating an End screen, ensure that all elements are clear enough as your audience will have only 20 seconds to see it.
Even though it is just 20 seconds long, the end screen of your YouTube video can be the most important aspect of the entire video. It is a great way to further engage with your audience and with the tools on
this list, you can now create the best end screen for your video.
For macOS 10.12 or later
Key Features
- You can export the completed video in very high quality
- It can be used to create and edit GIFs
- It has numerous editing tools including noise removal options, advanced color tuning, advanced text editor, scene stabilization, and more.
- You can add audio including voiceover and music to the video
- It has a very simple user interface that makes it very easy to use
Canva
Canva is a simple-to-use animated YouTube end screen maker that has a large library of resources ideal for creating different types of end screens. One of the best things about Canva is the numerous templates that you can choose from, along with effects and media files including stock photos that can be very useful when creating your video.
Although most of the features, including many of the templates, are free, the best resources are only available on the premium plan. Using a premium photo or template will mean that a watermark is added to your design.
Key Features
- Most of the resources you need to create your end screen on Canva are free
- The interface is very easy to use, with tutorials that can help when you get stuck.
- It has many great resources including stock images and unique templates
- You can add many effects to the end screen
Fotor
Fotor is another great solution that can be very useful in creating the YouTube end screen. It comes with a lot of different templates to choose from, allowing you to customize the end screen for maximum engagement. You can also upload your images to use in the project or choose from the Fotor library which offers options for different kinds of videos.
Key Features
- Most of the templates that you can choose are completely free to use
- The templates also come in different sizes to suit all needs
- You can use one of the many effects to further customize the end screen.
- The templates and effects are also customizable
Snappa
Snappa can also be a good way to create the perfect end screen for your YouTube video. It is a versatile solution with a lot of options to help you customize the end screen to suit your brand and targets. One such resource is the huge library of stock images as well as icons and shapes that you can choose from. Snappa makes the process much easier by allowing you to start from a suitable template that you can then customize as desired.
Key Features
- There are a lot of templates to choose from
- You can import your media files to customize the design
- You can also start from a blank canvas and work from there
- There is also a large library of stock photos that you can choose from
Placeit.net
This is an online solution that is one of the best ways to create an end screen for your YouTube video. The user interface is very simple to navigate and very well designed, allowing you to easily create the end screen even if you are a beginner.
You can upload your images to add to the design or choose from the large library of resources that Placeit.net provides. You also have numerous export options to choose from.
Key Features
- There are numerous templates to choose from
- You can export the end screen with transparency
- The interface is very easy to use
- Most of the resources are available for free
Kapwing
Kapwing is an online video editing solution that you can also use to create an end screen for your YouTube video. It has extensive features that can allow you to customize your end screen any way you want to. It has numerous templates to choose from and the simple drag-and-drop interface makes creating the end screen very easy.
Key Features
- You can choose the size of the end screen to use
- There are a lot of templates to choose from
- You can upload your images and other elements to the project
- You get to choose the duration of the end screen before you begin the project
How to Make an End Screen with Filmora
Creating an end screen for your YouTube video using Filmora is a very simple process. Use these steps to do it;
Step 1: The first thing you need to do is install Filmora on your computer. You can download the setup file from the main website and then follow the instructions on the setup wizard to install the program.
Once the installation is complete, open the program and click on “New Project” to start.
Step 2: Click on the “Titles” section and search for “End Screen” using the search bar. Select the best template for your end screen and drag it into the timeline.
Step 3: Now you are ready to add elements to the end screen. Add your profile picture on a new track across the timeline and stretch it to fit the screen as desired.
Step 4: Click on “Effects” and use the search function to search for the “Mask” effect. When you find it, add it across the timeline and double-click on it to open its settings and adjust the effect accordingly.
Step 5: You may also want to add your social media handles to the end screen. To do that, use the “Titles” tab to find the different social media handles and add each one to the timeline.
You are now ready to save and export the end screen and add it to your YouTube video.
Related FAQs About End Screen Maker
1. How Do You Make an End Screen?
Making an end screen is different depending on the tool that you use to create the end screen as well as the number of elements that you choose to add to it. But usually, you would start with a template and begin adding elements to the project one by one.
2.What is the Best Free Outro Maker?
The best tool to create an end screen for YouTube videos is Filmora simply because it makes the process very easy while allowing you to customize your creation as much as you need. But even though it has a free trial version, most of the features you need to create a unique end screen are not available on the free plan.
A good free solution would be Canva because it has numerous free resources that can create a decent end screen. Although we must point out that many of the best templates and elements on Canva are also not available for free.
3.How Long can a YouTube End Screen Be?
A typical end screen is often 5-20 seconds long. You don’t need any more than 20 seconds because it is only used as a way to promote additional content or add a call to action. So when creating an End screen, ensure that all elements are clear enough as your audience will have only 20 seconds to see it.
Even though it is just 20 seconds long, the end screen of your YouTube video can be the most important aspect of the entire video. It is a great way to further engage with your audience and with the tools on
this list, you can now create the best end screen for your video.
Ways to Learn Discord Game Bots – Even if You’re Just Starting Out [20
Ways to Learn Discord Game Bots – Even if You’re Just Starting out
An easy yet powerful editor
Numerous effects to choose from
Detailed tutorials provided by the official channel
Discord is free social communication service used by tens of millions of individuals aged 13 and above to socialize with their communities and friends. People use discord regularly to discuss various topics, from art projects and family vacations to homework and mental health help. It serves as a home for communities of different sizes but has become quite popular as discord bot games due to the rise in the gaming community.
The great majority of servers are private, invite-only locations where friends and communities may communicate and spend time together. More significant, more open groups based on specific themes like popular video games like PUBG and Genshin Impact. Because all discussions are opt-in, users have complete choice over who they connect with and how they use discord.
In this article
01 [What Are Discord Game Bots?](#Part 1)
02 [How Do You Add Bot Games to Discord?](#Part 2)
03 [Top 10 Picks of Discord Gaming Bots](#Part 3)
04 [Discord Game Bots FAQs](#Part 4)
Part 1 What Are Discord Game Bots?
Discord game bots are artificial intelligence (AI)-powered applications that automate processes and add music, games, welcome messages, memes, and other fun stuff to your server. These bots make it simple to interact with your audience, grow your community, and manage your server.
There is a plethora of game bots for discord to pick from, each with its purpose. Some may automatically welcome new users, while others utilize webhooks to interface with other apps—and it may be tough for novice users to figure out which ones will provide the most remarkable results for their requirements.
Part 2 How Do You Add Bot Games to Discord?
Follow the steps below to add game bots for discord successfully:
Step 1: To add a bot to your Discord server, go to the bot’s source page. We’ll be using ProBot for this lesson.
Step 2: Depending on the bot you’re adding, click Add to Discord or Invite Now.
Step 3: To grant the bot access, a pop-up window will appear asking you to check in to your Discord account.
Step 4: After you log in, you’ll see a box asking for account authorization. Locate and choose the Add to Server drop-down menu.
Step 5: This will bring up a list of discord servers where you can add a bot game discord. Continue after selecting your server.
Step 6: Examine the server permissions that the bot asks for. Select and deselect according to your requirements. When you’re ready, click Authorize.
For those who like to share their discord game bots experience through screen recordings and whatnot, a potent and convenient video editing tool to make your sessions look even more incredible is Filmora.
Wondershare Filmora Video Editor is a famous video editing program for those who wish to focus on editing and producing high-quality videos. The program supports 4K video editing. It’s a reasonably priced tool featuring effects for both video and audio. When it comes to designing, adding effects, and modifying movies, it provides users with many possibilities. You can use the tool to add overlays, create animations and objects, add music, and input text. Imagine sharing your experience in 4k!
For Win 7 or later (64-bit)
For macOS 10.12 or later
Part 3 Top 10 Picks of Discord Gaming Bots
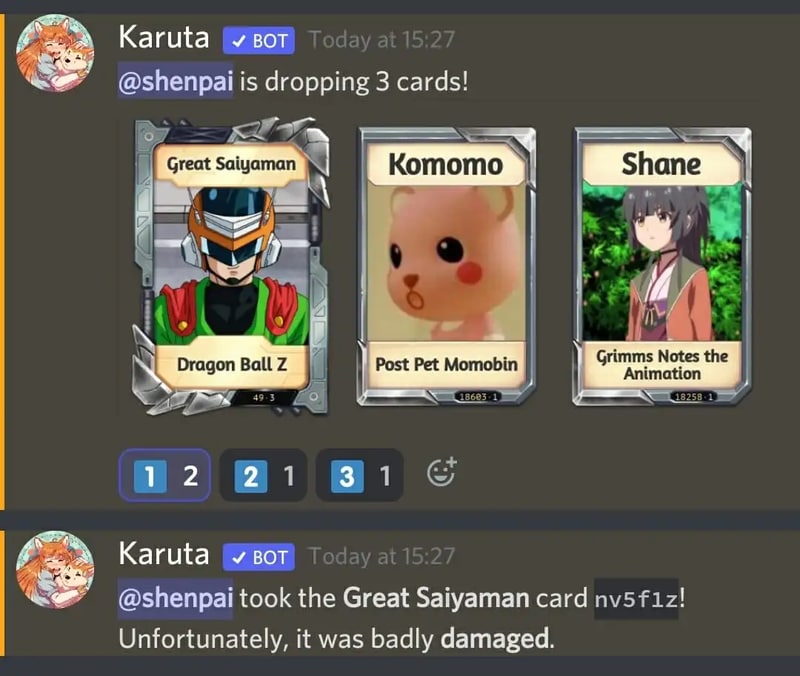
01Karuta
Karuta is a discord game bot where you gather anime characters. In Karuta, though, you collect characters using trading cards. Your cards and other objects may be customized, upgraded, and traded with other players. Better still, you maintain the same cards between servers, allowing you to play Karuta with the same deck on any server where the game discord bot is!
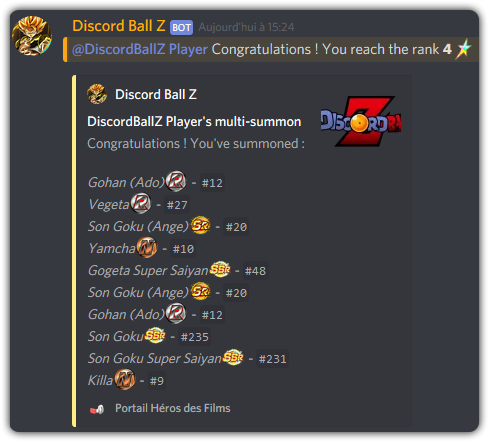
02Dragon Bot Z
Dragon Bot Z is the discord bot game that adds discord Ball Z, a multiplayer text-based RPG, to your server. Players in Discord Ball Z summon characters from the iconic Dragon Ball Z franchise, train them, fight foes, buy equipment, and trade with other players. This Discord game is ideal for Dragon Ball fans or anybody who likes text-based roleplaying games.
03Mudae
Mudae is a bot discord game with character-collecting. For example, you can claim popular anime and videogame characters as your “waifus” or “husbandos,” develop your harem, and compete for your favorite characters with other users. You can also trade the characters with other members.

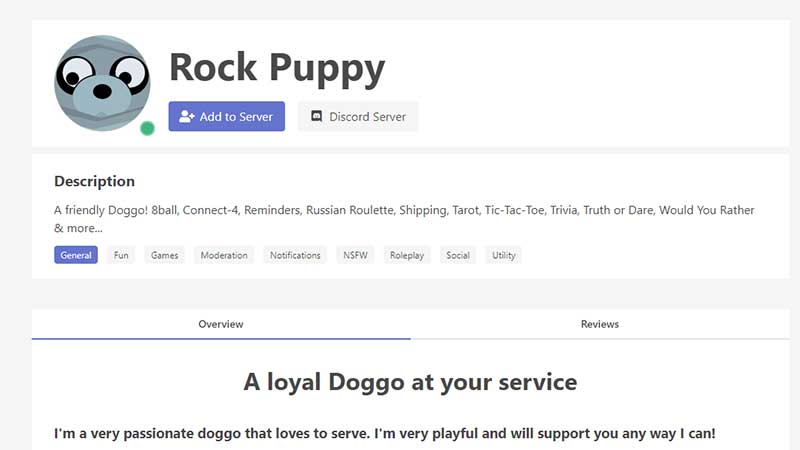
04Rock Puppy
Rock Puppy is a basic yet entertaining game bots discord bot that incorporates several classic games. You can enjoy Discord games like ConnectFour, Truth or Dare, Trivia, Tic-Tac-Toe, Russian Roulette, and Would You Rather with Rock Puppy. You may also use magic 8-ball, dice, or tarot cards, play classic board and party games on your server with Rock Puppy.
05GarticBOT
GarticBot is a bot game in discord that allows you to play the drawing game Gartic. GarticBot begins the Discord game by painting an image on your server. Members then compete against one another to predict the image the quickest. Others can guess your drawings if you submit them. Type the command g.draw, and Gartic will provide you with a URL to submit your artwork. GarticBot creates a fun Pictionary-style game for everyone on your server to play.

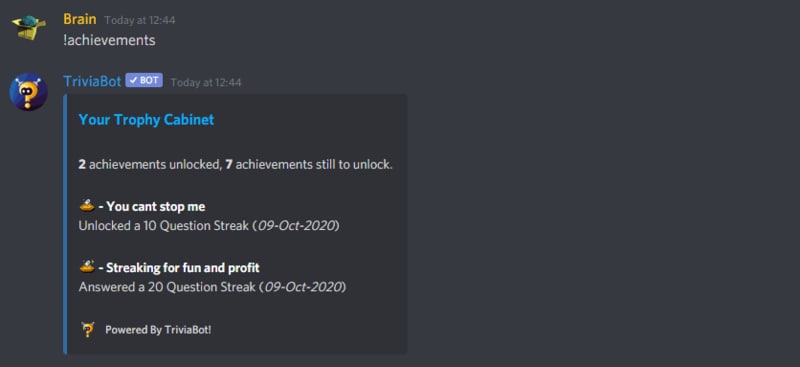
06TriviaBot
TriviaBot is the most popular trivia game discord bot. It has over 90,000 questions, and you can even submit your own for inclusion in the bot. Members can form and join teams to compete in competitions. You may also create a public leaderboard to display who performs the best on the server.
07GamesRob
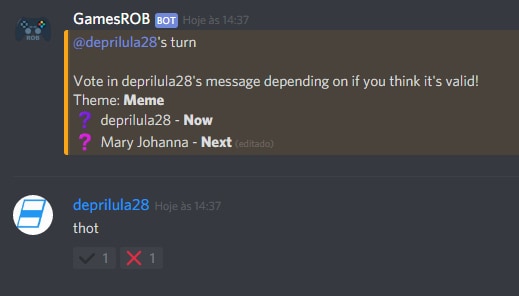
The finest Uno discord game bot is GamesROB. ConnectFour, Trivia, Battleship, 2048, Tic-Tac-Toe, Minesweeper, and Hangman are the other traditional party games added to discord. You may also play “Detective,” a Discord game in which you try to figure out who is the “assassin” on your server, memory games, and Town, Country, River, a game in which you try to come up with as many phrases as possible within a theme.
08Chess Reddit
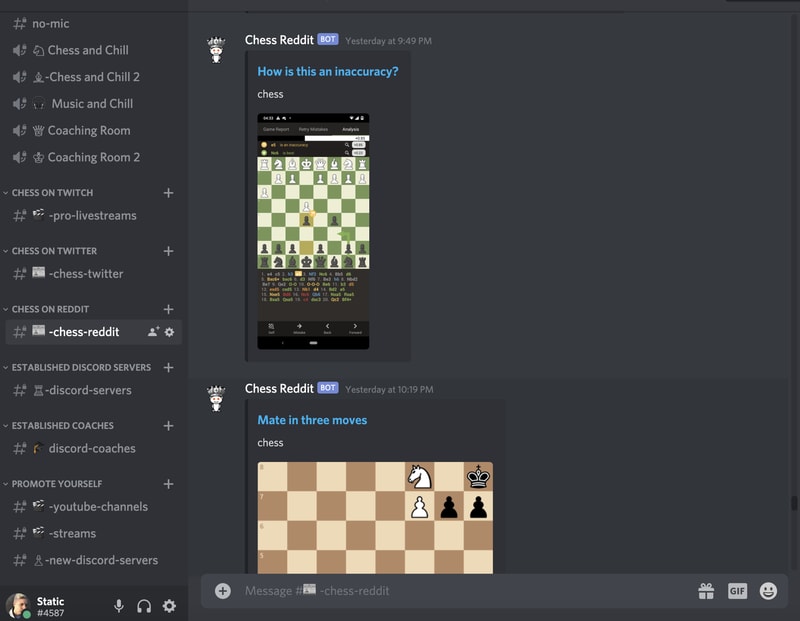
Chess is a simple game that allows you to play chess on discord. You may play a chess game with other server members directly on the server. Instruct the bot on which pieces to move and where they should go. After each move, the Discord game bot creates a fresh graphic of the board so you can plot your next move. And, because the game hosts on your server, other users may watch and debate it!
09PokeMeow
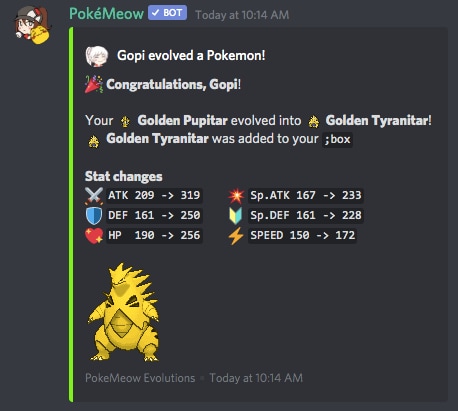
PokeMeow is by far the most popular Pokemon game discord bot. With this Pokemon bot, you may capture Pokemon on your server, trade, battle with other players, and accomplish tasks for in-game currency and stuff. As you keep building up your Pokedex, the Pokemon bot also allows to compete with other users on the worldwide leaderboard! PokeMeow is the ideal Pokemon Discord bot for fans of the Pokemon series.
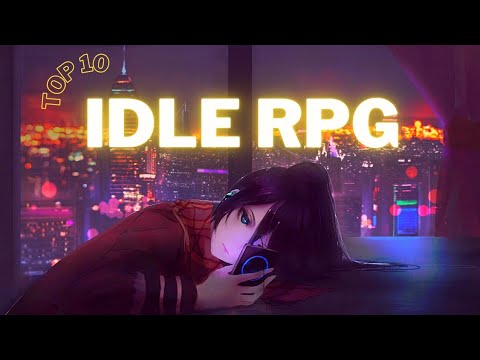
10IdleRPG
IdleRPG is a discord game where you may play a text-based roleplaying game. You may make your character complete with ethnicity and social status. Then, you can go on quests and combat beasts, purchase, and exchange mythic objects, join guilds, engage with gods, and even marry other players. Play through your character’s adventure while engaging with and creating stories with other players. IdleRPG is likely to provide your server with hundreds of hours of roleplaying pleasure.
Part 4 Discord Game Bots FAQs
Now, let us go through some FAQs about discord game bots:
Q. Is it possible to play games with discord bots?
A. You could indeed play discord games in-server with bots, challenge other members, and win prizes! A game bot is a terrific method to keep players engaged on your server, especially if it’s a gaming Discord channel.
Q. Do game bots spy on you?
A. No, game discord bots do not have inbuilt spyware.
Q. How many bots should a server have?
A. It’s best not to have more than 20 bots game on discord on a server at any moment. More bots than this may cause users to become confused and the service to seem suspicious.
Q. Are discord bots free?
A. All these discord game bots are free to use. However, some have premium upgrades.
Q. Which bot is the most popular game bot in discord?
A. Worddle
Q. Which bot is the best bot for gaming on discord?
A. Gawesome is an excellent alternative for adding a multifunctional bot to your discord server.
● Ending Thoughts →
● Discord is accessible communication and socializing service for individuals aged 13 and above.
● The platform extends to various servers, each with its users, rules, themes, and channels, but one underutilized feature is the ability to develop and code custom AI-powered bots.
● Game bots for discord are artificial intelligence (AI)-powered applications that automate processes and add games to your discord server.
● These game discord bots make it simple to interact with your audience, grow your community, and manage your server.
● Lastly, to enhance the discord game bots experience and bring your gaming videos to life, use the Filmora software.
Discord is free social communication service used by tens of millions of individuals aged 13 and above to socialize with their communities and friends. People use discord regularly to discuss various topics, from art projects and family vacations to homework and mental health help. It serves as a home for communities of different sizes but has become quite popular as discord bot games due to the rise in the gaming community.
The great majority of servers are private, invite-only locations where friends and communities may communicate and spend time together. More significant, more open groups based on specific themes like popular video games like PUBG and Genshin Impact. Because all discussions are opt-in, users have complete choice over who they connect with and how they use discord.
In this article
01 [What Are Discord Game Bots?](#Part 1)
02 [How Do You Add Bot Games to Discord?](#Part 2)
03 [Top 10 Picks of Discord Gaming Bots](#Part 3)
04 [Discord Game Bots FAQs](#Part 4)
Part 1 What Are Discord Game Bots?
Discord game bots are artificial intelligence (AI)-powered applications that automate processes and add music, games, welcome messages, memes, and other fun stuff to your server. These bots make it simple to interact with your audience, grow your community, and manage your server.
There is a plethora of game bots for discord to pick from, each with its purpose. Some may automatically welcome new users, while others utilize webhooks to interface with other apps—and it may be tough for novice users to figure out which ones will provide the most remarkable results for their requirements.
Part 2 How Do You Add Bot Games to Discord?
Follow the steps below to add game bots for discord successfully:
Step 1: To add a bot to your Discord server, go to the bot’s source page. We’ll be using ProBot for this lesson.
Step 2: Depending on the bot you’re adding, click Add to Discord or Invite Now.
Step 3: To grant the bot access, a pop-up window will appear asking you to check in to your Discord account.
Step 4: After you log in, you’ll see a box asking for account authorization. Locate and choose the Add to Server drop-down menu.
Step 5: This will bring up a list of discord servers where you can add a bot game discord. Continue after selecting your server.
Step 6: Examine the server permissions that the bot asks for. Select and deselect according to your requirements. When you’re ready, click Authorize.
For those who like to share their discord game bots experience through screen recordings and whatnot, a potent and convenient video editing tool to make your sessions look even more incredible is Filmora.
Wondershare Filmora Video Editor is a famous video editing program for those who wish to focus on editing and producing high-quality videos. The program supports 4K video editing. It’s a reasonably priced tool featuring effects for both video and audio. When it comes to designing, adding effects, and modifying movies, it provides users with many possibilities. You can use the tool to add overlays, create animations and objects, add music, and input text. Imagine sharing your experience in 4k!
For Win 7 or later (64-bit)
For macOS 10.12 or later
Part 3 Top 10 Picks of Discord Gaming Bots
01Karuta
Karuta is a discord game bot where you gather anime characters. In Karuta, though, you collect characters using trading cards. Your cards and other objects may be customized, upgraded, and traded with other players. Better still, you maintain the same cards between servers, allowing you to play Karuta with the same deck on any server where the game discord bot is!
02Dragon Bot Z
Dragon Bot Z is the discord bot game that adds discord Ball Z, a multiplayer text-based RPG, to your server. Players in Discord Ball Z summon characters from the iconic Dragon Ball Z franchise, train them, fight foes, buy equipment, and trade with other players. This Discord game is ideal for Dragon Ball fans or anybody who likes text-based roleplaying games.
03Mudae
Mudae is a bot discord game with character-collecting. For example, you can claim popular anime and videogame characters as your “waifus” or “husbandos,” develop your harem, and compete for your favorite characters with other users. You can also trade the characters with other members.
04Rock Puppy
Rock Puppy is a basic yet entertaining game bots discord bot that incorporates several classic games. You can enjoy Discord games like ConnectFour, Truth or Dare, Trivia, Tic-Tac-Toe, Russian Roulette, and Would You Rather with Rock Puppy. You may also use magic 8-ball, dice, or tarot cards, play classic board and party games on your server with Rock Puppy.
05GarticBOT
GarticBot is a bot game in discord that allows you to play the drawing game Gartic. GarticBot begins the Discord game by painting an image on your server. Members then compete against one another to predict the image the quickest. Others can guess your drawings if you submit them. Type the command g.draw, and Gartic will provide you with a URL to submit your artwork. GarticBot creates a fun Pictionary-style game for everyone on your server to play.
06TriviaBot
TriviaBot is the most popular trivia game discord bot. It has over 90,000 questions, and you can even submit your own for inclusion in the bot. Members can form and join teams to compete in competitions. You may also create a public leaderboard to display who performs the best on the server.
07GamesRob
The finest Uno discord game bot is GamesROB. ConnectFour, Trivia, Battleship, 2048, Tic-Tac-Toe, Minesweeper, and Hangman are the other traditional party games added to discord. You may also play “Detective,” a Discord game in which you try to figure out who is the “assassin” on your server, memory games, and Town, Country, River, a game in which you try to come up with as many phrases as possible within a theme.
08Chess Reddit
Chess is a simple game that allows you to play chess on discord. You may play a chess game with other server members directly on the server. Instruct the bot on which pieces to move and where they should go. After each move, the Discord game bot creates a fresh graphic of the board so you can plot your next move. And, because the game hosts on your server, other users may watch and debate it!
09PokeMeow
PokeMeow is by far the most popular Pokemon game discord bot. With this Pokemon bot, you may capture Pokemon on your server, trade, battle with other players, and accomplish tasks for in-game currency and stuff. As you keep building up your Pokedex, the Pokemon bot also allows to compete with other users on the worldwide leaderboard! PokeMeow is the ideal Pokemon Discord bot for fans of the Pokemon series.
10IdleRPG
IdleRPG is a discord game where you may play a text-based roleplaying game. You may make your character complete with ethnicity and social status. Then, you can go on quests and combat beasts, purchase, and exchange mythic objects, join guilds, engage with gods, and even marry other players. Play through your character’s adventure while engaging with and creating stories with other players. IdleRPG is likely to provide your server with hundreds of hours of roleplaying pleasure.
Part 4 Discord Game Bots FAQs
Now, let us go through some FAQs about discord game bots:
Q. Is it possible to play games with discord bots?
A. You could indeed play discord games in-server with bots, challenge other members, and win prizes! A game bot is a terrific method to keep players engaged on your server, especially if it’s a gaming Discord channel.
Q. Do game bots spy on you?
A. No, game discord bots do not have inbuilt spyware.
Q. How many bots should a server have?
A. It’s best not to have more than 20 bots game on discord on a server at any moment. More bots than this may cause users to become confused and the service to seem suspicious.
Q. Are discord bots free?
A. All these discord game bots are free to use. However, some have premium upgrades.
Q. Which bot is the most popular game bot in discord?
A. Worddle
Q. Which bot is the best bot for gaming on discord?
A. Gawesome is an excellent alternative for adding a multifunctional bot to your discord server.
● Ending Thoughts →
● Discord is accessible communication and socializing service for individuals aged 13 and above.
● The platform extends to various servers, each with its users, rules, themes, and channels, but one underutilized feature is the ability to develop and code custom AI-powered bots.
● Game bots for discord are artificial intelligence (AI)-powered applications that automate processes and add games to your discord server.
● These game discord bots make it simple to interact with your audience, grow your community, and manage your server.
● Lastly, to enhance the discord game bots experience and bring your gaming videos to life, use the Filmora software.
Best Way To Color Grading & Color Correction in Filmora
As a post-production analysis of the filmed video, you might have noticed how the color contrast in a real VS reel. The colors do not appear bright and robust on a screen as in real life.
While there are numerous reasons for the dull, uninviting look- a basic edit could fix it quickly. One of the vital, if not the first, steps in the process is color grading and color correction. However, what exactly are color grading and color correction? And how can they help fix the color ratios and balance in a video?
This article covers everything you need to know about color grading and correction and a complete guide to adjusting cinematic colors with the best video editor, Wondershare Filmora. So, without much ado, let’s dig into it!
Part 1. Color Grading VS Color Correction
These terms have often been used interchangeably; people consider them synonymous. However, they are two different artistic phenomena to adjust the color scheme.
Since we will discuss them in detail later, here is a brief description. Put simply, color correcting is a corrective procedure, while color grading is a cinematic adjustment.
Color correction diverts the colors to a relatively neutral baseline achieving a unified look for all captured shots. On the other hand, color grading is inclined more toward a creative look aimed at balancing colors that reflect the emotion of the sequence.

These two work hand in hand to dramatically uplift the overall look of the sequence. Let’s delve deeper into these techniques and see how to use them.
Part 2. What Is Color Correction?
We will start with color correction- the first step in color editing. Even with a slight glance at the raw shots, you can notice how much the tones are messed up. The crude product is oversaturated with colors.
Color correction is about making the shots look as natural as possible. It brings the sequences to the neutral baseline to achieve a unified look.
For now, we need to ignore our creative and aesthetic preferences and focus entirely on exposure and white balance. The actual end goal is to keep the colors true to life.
However, color-correcting a video is challenging if you are a beginner. There needs to be more than just understanding the fundamentals; it requires cinematic and technical skills.
Here is the basic process for a clean, color-corrected shot, irrespective of the software you use.
Essential Steps for Color Correcting a Shot
1. Set the color profile
Different video formats (HDR, LOG, RAW, HLG, etc.) have different exposure content. Therefore, select a color profile that matches your video format for the best results before starting.
2. Adjust the saturation
It is the primary step of color correction. Often the exposure of raw content is high. Next, equalize the saturation for a natural look.
3. Fix the contrast
Contrast is the difference between the light and dark areas of the image. Pictures with a higher contrast are sharper and more detailed.
However, adjust the contrast during color correcting so that the dark areas are not crushed, and you preserve the details maximally.
4. Set the white balance
It is time to adjust the white balance with the saturation and contrast fixed. The colors will shift to orange and blue hues if it is maladjusted.
Use the color curves to ensure pure whites so all colors fall correctly in place.
5. Double-check individual color tones
The final step is a secondary checking of the individual colors. Double-check the skin tones so they match in each shot.
Make sure the skin tones match their natural hues for an authentic, unfiltered look.
It is a basic walkthrough for color-correcting. More steps can vary according to the professional demands of the video. However, as a beginner, this is the best process to follow.
Once we’ve corrected the color, it is time to move to the next and primary step- color grading.
ChatGPT is Now Available in Filmora! Filmora now offers a ChatGPT plug-in to provide a more inspirational copywriting experience.
Try It Free Try It Free Learn More

Part 3. What Is Color Grading?
After you set all the tones to the baseline, you can start with the creative process of color grading. In this case, you do not change the colors anymore. Instead, you make artistic choices to change the moods and emotions of that particular sequence. Color grading is about manipulating the colors and contrasts that intensify the visual tone and explain your story to the world.
Color correction can be enough if you want to keep the video realistic. However, color grading is essential if you want to imply emotions and feelings in your content. Following is an essential step-by-step guide to color grading.
Basic Steps of Color Grading
If you are a beginner, the color grading process can be tricky without expertise. Hence here are the basic steps of color grading a video.
1. Color correcting
Correcting the colors and balance will always be the first step before you can color-grade footage. Next, the video must be normalized and should seem natural before you intensify the overall look.
2. Match the colors
In the next step, we balance the contours between color-corrected footage and color grading. Then, you can use LUTs (Look Up Tables) to match the individual colors to the scheme.
3. Shot-to-shot matching
The next integral step is to match the colors between all the shots so we can achieve a unified look. The contrasting appearance of shots can make them look unprofessional and poorly cinematic.
4. Adjust the mood and emotions
A well-executed color grading can potentiate the emotions in a shot. Use your artistic choices and tools from editing software to imply the director’s feelings in the video.
5. Make the final adjustments
As the final opportunity, tweak hues and chroma to ensure the colors match your palette in each scene. But, again, do not overdo anything, and play with colors to nudge the moods in the shot.
If your footage is the cake, color grading is the cherry on top that enhances the final look. You can instantly evoke connotations and bring the audience to a different page with some professional color grading.
However, while color correcting and grading, there are a few things that you should take care of. Here is a list of some To-do’s and Not To-do’s in the post-production edit.
Part 4. Things To Consider About the Editing Environment
Before you begin color-grading or color-correcting, here are some essential things to consider that can dramatically improve the results.
1. Neutral editing environment
Funky neon lights or fluorescent lights in the background can dominate your vision. As compensation, you will be over-saturating your footage with colors.
Make sure to use only white, neutral light with a CRI (color rendering Index) of at least 90. It will decrease inconsistencies as much as possible.
2. Using might shifts/orange screen
People often activate night shifts or orange screens to protect their eyes from excessive strain. Resultantly, the screen appears dull and orange-y.
Since this alters the actual colors of the video, the results are undermined. So make sure to turn off all technologies that can sabotage the grading.
3. Control the light
It is necessary to control the amount of light that enters your working space area. Excessive light alters your color perception and hence obstructs achieving a balanced contour.
Ensure that the light does not directly falls on the screen or your eyes. You must maintain an adequate distance from the screen to see nuances as you grade.
After completing all the fundamentals of color correcting and color grading, let’s demonstrate how to do it in real-time.
Choosing good software can be chaos. There are plenty of options in the market with the best features, but we will be using Wondershare Filmora . Read on for a step-by-step guide on color correcting and grading.
Free Download For Win 7 or later(64-bit)
Free Download For macOS 10.14 or later
Part 5. How To Color Correct and Color Grade A Video With Wondershare Filmora?
To color-correct and color-grade a video, we recommend using Wondershare Filmora , one of the finest video editing apps on the market. Equipped with various tools, Filmora allows professional color correction with a few quick steps.
Free Download For Win 7 or later(64-bit)
Free Download For macOS 10.14 or later
With the super simple interface, the software is easy to use for beginners and professionals alike. In addition, Filmora offers extensive tools to manipulate colors and color grade your footage professionally. Here is how to color correct and color grade your video with Filmora post-production.
Step1Open Wondershare Filmora
Before we start, Install Wondersahare Filmora on your device. If you already have it downloaded, launch the software so we can begin.

Step2Color correcting the video
Drag and drop the video to the timeline from the Projects menu. Then, follow these steps to color-correct the video:
- Double-click on the video to open the editing panel. Four options are available: Video, Audio, Color, and Speed. Open the color tab.

- From the Basics menu, adjust the Exposure, Light Color, Contrast, White Balance, and Vibrance. Then, move the slider or add a LUT value to apply.

- Filmora offers a wide variety of 3D LUTs with mapped color spaces that project your preferences on the video with a single click. Select a pre-made LUT to apply to your video in the Preset tab. Or custom builds a Look Up Table and saves it for future use.

- Turn on the Color Match toggle and tap View Comparison to match your current video with a reference shot.

Step3Color grading the video
In the color editing panel, use the other two tabs, HSL and Curves, to create the aesthetics of your video.
- In the HSL panel, select a color from the seven colors of the rainbow. Then, set the hue, luminance, and saturation for each. Next, you can use the slider to nudge the colors or directly input a LUT value.

- The shadow areas are dark and crushed. To fix this, add the Curves effect to the video. Go to the Curves tab, choose a primary color, and move the curves to balance the color scheme.

Step4Save and export the file
Once you finish the final touches, save your footage to a local folder.
- Click the Export button. A pop-up screen will open.
- Select the File type. (MP4, WMV, GIF, etc.)
- Choose a local destination for the file.
- Click Export.

Conclusion
Hopefully, this post has given you a good understanding of the differences between color grading and color correction. But ultimately, it is all about your thought process and intuitions.
Filmora’s extensive collection of color editing tools makes color correction and grading a five-finger thing. You can also follow our guide to create some unique and professional-looking masterpieces. Turn on the artistic side and start creating mystical shots!
Try It Free Try It Free Learn More
Part 3. What Is Color Grading?
After you set all the tones to the baseline, you can start with the creative process of color grading. In this case, you do not change the colors anymore. Instead, you make artistic choices to change the moods and emotions of that particular sequence. Color grading is about manipulating the colors and contrasts that intensify the visual tone and explain your story to the world.
Color correction can be enough if you want to keep the video realistic. However, color grading is essential if you want to imply emotions and feelings in your content. Following is an essential step-by-step guide to color grading.
Basic Steps of Color Grading
If you are a beginner, the color grading process can be tricky without expertise. Hence here are the basic steps of color grading a video.
1. Color correcting
Correcting the colors and balance will always be the first step before you can color-grade footage. Next, the video must be normalized and should seem natural before you intensify the overall look.
2. Match the colors
In the next step, we balance the contours between color-corrected footage and color grading. Then, you can use LUTs (Look Up Tables) to match the individual colors to the scheme.
3. Shot-to-shot matching
The next integral step is to match the colors between all the shots so we can achieve a unified look. The contrasting appearance of shots can make them look unprofessional and poorly cinematic.
4. Adjust the mood and emotions
A well-executed color grading can potentiate the emotions in a shot. Use your artistic choices and tools from editing software to imply the director’s feelings in the video.
5. Make the final adjustments
As the final opportunity, tweak hues and chroma to ensure the colors match your palette in each scene. But, again, do not overdo anything, and play with colors to nudge the moods in the shot.
If your footage is the cake, color grading is the cherry on top that enhances the final look. You can instantly evoke connotations and bring the audience to a different page with some professional color grading.
However, while color correcting and grading, there are a few things that you should take care of. Here is a list of some To-do’s and Not To-do’s in the post-production edit.
Part 4. Things To Consider About the Editing Environment
Before you begin color-grading or color-correcting, here are some essential things to consider that can dramatically improve the results.
1. Neutral editing environment
Funky neon lights or fluorescent lights in the background can dominate your vision. As compensation, you will be over-saturating your footage with colors.
Make sure to use only white, neutral light with a CRI (color rendering Index) of at least 90. It will decrease inconsistencies as much as possible.
2. Using might shifts/orange screen
People often activate night shifts or orange screens to protect their eyes from excessive strain. Resultantly, the screen appears dull and orange-y.
Since this alters the actual colors of the video, the results are undermined. So make sure to turn off all technologies that can sabotage the grading.
3. Control the light
It is necessary to control the amount of light that enters your working space area. Excessive light alters your color perception and hence obstructs achieving a balanced contour.
Ensure that the light does not directly falls on the screen or your eyes. You must maintain an adequate distance from the screen to see nuances as you grade.
After completing all the fundamentals of color correcting and color grading, let’s demonstrate how to do it in real-time.
Choosing good software can be chaos. There are plenty of options in the market with the best features, but we will be using Wondershare Filmora . Read on for a step-by-step guide on color correcting and grading.
Free Download For Win 7 or later(64-bit)
Free Download For macOS 10.14 or later
Part 5. How To Color Correct and Color Grade A Video With Wondershare Filmora?
To color-correct and color-grade a video, we recommend using Wondershare Filmora , one of the finest video editing apps on the market. Equipped with various tools, Filmora allows professional color correction with a few quick steps.
Free Download For Win 7 or later(64-bit)
Free Download For macOS 10.14 or later
With the super simple interface, the software is easy to use for beginners and professionals alike. In addition, Filmora offers extensive tools to manipulate colors and color grade your footage professionally. Here is how to color correct and color grade your video with Filmora post-production.
Step1Open Wondershare Filmora
Before we start, Install Wondersahare Filmora on your device. If you already have it downloaded, launch the software so we can begin.
Step2Color correcting the video
Drag and drop the video to the timeline from the Projects menu. Then, follow these steps to color-correct the video:
- Double-click on the video to open the editing panel. Four options are available: Video, Audio, Color, and Speed. Open the color tab.
- From the Basics menu, adjust the Exposure, Light Color, Contrast, White Balance, and Vibrance. Then, move the slider or add a LUT value to apply.
- Filmora offers a wide variety of 3D LUTs with mapped color spaces that project your preferences on the video with a single click. Select a pre-made LUT to apply to your video in the Preset tab. Or custom builds a Look Up Table and saves it for future use.
- Turn on the Color Match toggle and tap View Comparison to match your current video with a reference shot.
Step3Color grading the video
In the color editing panel, use the other two tabs, HSL and Curves, to create the aesthetics of your video.
- In the HSL panel, select a color from the seven colors of the rainbow. Then, set the hue, luminance, and saturation for each. Next, you can use the slider to nudge the colors or directly input a LUT value.
- The shadow areas are dark and crushed. To fix this, add the Curves effect to the video. Go to the Curves tab, choose a primary color, and move the curves to balance the color scheme.
Step4Save and export the file
Once you finish the final touches, save your footage to a local folder.
- Click the Export button. A pop-up screen will open.
- Select the File type. (MP4, WMV, GIF, etc.)
- Choose a local destination for the file.
- Click Export.
Conclusion
Hopefully, this post has given you a good understanding of the differences between color grading and color correction. But ultimately, it is all about your thought process and intuitions.
Filmora’s extensive collection of color editing tools makes color correction and grading a five-finger thing. You can also follow our guide to create some unique and professional-looking masterpieces. Turn on the artistic side and start creating mystical shots!
Color Lut in Video - Color Grade Your Video
Create High-Quality Video - Wondershare Filmora
An easy and powerful YouTube video editor
Numerous video and audio effects to choose from
Detailed tutorials provided by the official channel
Do you want to improve the quality of your videos? With so many people providing online video content. Other than the subject of your video, its quality is also important. One way to make your content pop is to create a lut video. Below is information on how to color grade your video using lut resources. Keep reading to discover why lut video editing is important and where to get the best resources.

In this article
01 What is LUT?
02 Why do we need to use LUTs?
03 How to add luts to your video using Filmora
So, what is LUT?
LUT refers to Look Up Tables, which a custom color templates you use when creating videos. These help you create content for different devices, including television and mobile devices. For example, you can create custom LUTs for easy conversion from standard definition to more modern cinematic formats such as 4K and UHD.
What are the different types of LUTs?
Here are the colour lut categories for filmmakers:
- Transform
- Calibration
- Viewing
- 1D: 1D lut offers customization on one value of your colors. These are available as .lut file types.
- 3D: These award you more control over your luts video editing since they offer saturation, hues, and brightness levels on different axis. You will find these as .cube file types.

These allow you to make your content vibrant and mimic the color schemes of famous filmmakers such as David Fincher. He is famous for using greens and blues in his films to arrest your attention. He does this by employing a darker than usual color scheme, which leaves you staring at the screen for the entire film. You can see this color lut in the movie Fight Club or The Social Network.
Keep reading to discover the effects of each in luts video editing.
Why do we need to use LUTs?
You use LUTs for different reasons, as you can see from David Fincher’s example. However, here are a few more:
• To add emphasis to a particular scene
Sometimes, it can be challenging to communicate the importance of your message using standard color schemes. As such, filmmakers use dramatic color schemes in their content. For example, the colour scheme in the above photo emphasizes the tranquillity of the sea between contrasting landscapes.

• To ensure uniformity across different devices
You will use a calibration color lut to ensure a similar video quality across different TV monitors whether it is HD, UHD, or 4K. Similarly, you can use a transformation colour lut to add a cinematic effect to your film to make it appear as if your audience is viewing it in a theatre.
Camera manufacturers use different color luts to diversify their products according to their target markets. For example, you get a different lut color grading from a Sony camera as you would in a Canon.

How to add luts to your video using Filmora
Filmora is a great video editing tool for all filmmaker experience levels. It includes tons of features and a user-friendly interface to ensure professional results each time. It is available for both macOS and Windows devices. Filmora allows you to install custom Luts and apply it to your videos.
Guide to use Filmora
1. Launch the video editor
Once you complete the download, launch it to start making magical videos for your audience.
2. Import Your Film
The lut editing video software allows you to import your videos directly from your device.
3. Select Advanced Color Tuning
You will find this on the Tools drop-down menu. It is located on the top menu options of Filmora. Then, drag and drop your video to the timeline. The tool also offers an A/B comparison, allowing you to check the result of your lut video editing before you apply the effect.
You can use the preset luts Filmora offers or upload your custom luts from any of the sites in the next section.
4. Save & Export
Click OK to finalize the correction and export the video to your preferred device. You will see the available options from the software’s export menu.
A few things to consider before using Filmora’s Advanced Color correction tool include:
- Your film white balance needs to be correct to get better results.
- Your camera’s exposure during filming also needs to be optimal to get ideal results when using Filmora for lut video editing. However, the Advanced Color Correction tool will tell you if everything is optimal.
- Finally, the original video needs to be of ideal quality for optimal color lut results. Different shooting conditions may not work with certain color luts. Therefore, opt for luts that match your filmmaking style to get the best results.
For Win 7 or later (64-bit)
For macOS 10.12 or later
Bonus! Free Lut Resources
Do you want more diversity in your lut video editing? Here are some free lut resources to check out.
1. Vision color luts
Vision color luts is another lut video editing software that you can use to hone your skills. They also offer free luts you can upload on their favorite software. Additionally, they have luts for even the latest display resolutions such as 2K and 3D. Check out the full list here.
2. Sam Kolder
Sam Kolder is a Vlogger who is famous for his stunning creations that feature his travels. His work also inspires many creators thanks to his editing and use of color luts. He also shares free lut packs and his creative process across his official channels, including YouTube and Instagram.
He mainly works on Adobe Premiere pro. However, his luts still work with other video editing software.
3. Shutterstock.com
Shutterstock also offers tons of free stuff relating to lut video editing. You will also find free luts that are compatible with Filmora on the website. Here are a few of them you can sample. Please check before you download other packs, as some of the stuff may not match your current versions.
4. Giggster.com
Giggster.com is an LA-based company that caters to aspiring filmmakers. They too offer the occasional lut files you can use to make your videos more stunning. However, they mostly feature those that work with Photoshop CC. So, you may wanna check your software’s compatibility beforehand. Here is one of the freebies you can download.
5. Premiumbeat.com
You may also want to check out some of Premiumbeat’s free offerings if you are an AfterEffects user. They offer stylistic luts and other free tools you can use to edit your films. Additionally, they do this regularly. Therefore, they are worth a look to see what is new.
Conclusion
● Color luts are incredible tools to add flair to your videos. Additionally, you can use them with incredible ease on software like Filmora. Here are some of the creations you can sample from some of the free ones that come with the tool.
Do you want to improve the quality of your videos? With so many people providing online video content. Other than the subject of your video, its quality is also important. One way to make your content pop is to create a lut video. Below is information on how to color grade your video using lut resources. Keep reading to discover why lut video editing is important and where to get the best resources.
In this article
01 What is LUT?
02 Why do we need to use LUTs?
03 How to add luts to your video using Filmora
So, what is LUT?
LUT refers to Look Up Tables, which a custom color templates you use when creating videos. These help you create content for different devices, including television and mobile devices. For example, you can create custom LUTs for easy conversion from standard definition to more modern cinematic formats such as 4K and UHD.
What are the different types of LUTs?
Here are the colour lut categories for filmmakers:
- Transform
- Calibration
- Viewing
- 1D: 1D lut offers customization on one value of your colors. These are available as .lut file types.
- 3D: These award you more control over your luts video editing since they offer saturation, hues, and brightness levels on different axis. You will find these as .cube file types.
These allow you to make your content vibrant and mimic the color schemes of famous filmmakers such as David Fincher. He is famous for using greens and blues in his films to arrest your attention. He does this by employing a darker than usual color scheme, which leaves you staring at the screen for the entire film. You can see this color lut in the movie Fight Club or The Social Network.
Keep reading to discover the effects of each in luts video editing.
Why do we need to use LUTs?
You use LUTs for different reasons, as you can see from David Fincher’s example. However, here are a few more:
• To add emphasis to a particular scene
Sometimes, it can be challenging to communicate the importance of your message using standard color schemes. As such, filmmakers use dramatic color schemes in their content. For example, the colour scheme in the above photo emphasizes the tranquillity of the sea between contrasting landscapes.
• To ensure uniformity across different devices
You will use a calibration color lut to ensure a similar video quality across different TV monitors whether it is HD, UHD, or 4K. Similarly, you can use a transformation colour lut to add a cinematic effect to your film to make it appear as if your audience is viewing it in a theatre.
Camera manufacturers use different color luts to diversify their products according to their target markets. For example, you get a different lut color grading from a Sony camera as you would in a Canon.
How to add luts to your video using Filmora
Filmora is a great video editing tool for all filmmaker experience levels. It includes tons of features and a user-friendly interface to ensure professional results each time. It is available for both macOS and Windows devices. Filmora allows you to install custom Luts and apply it to your videos.
Guide to use Filmora
1. Launch the video editor
Once you complete the download, launch it to start making magical videos for your audience.
2. Import Your Film
The lut editing video software allows you to import your videos directly from your device.
3. Select Advanced Color Tuning
You will find this on the Tools drop-down menu. It is located on the top menu options of Filmora. Then, drag and drop your video to the timeline. The tool also offers an A/B comparison, allowing you to check the result of your lut video editing before you apply the effect.
You can use the preset luts Filmora offers or upload your custom luts from any of the sites in the next section.
4. Save & Export
Click OK to finalize the correction and export the video to your preferred device. You will see the available options from the software’s export menu.
A few things to consider before using Filmora’s Advanced Color correction tool include:
- Your film white balance needs to be correct to get better results.
- Your camera’s exposure during filming also needs to be optimal to get ideal results when using Filmora for lut video editing. However, the Advanced Color Correction tool will tell you if everything is optimal.
- Finally, the original video needs to be of ideal quality for optimal color lut results. Different shooting conditions may not work with certain color luts. Therefore, opt for luts that match your filmmaking style to get the best results.
For Win 7 or later (64-bit)
For macOS 10.12 or later
Bonus! Free Lut Resources
Do you want more diversity in your lut video editing? Here are some free lut resources to check out.
1. Vision color luts
Vision color luts is another lut video editing software that you can use to hone your skills. They also offer free luts you can upload on their favorite software. Additionally, they have luts for even the latest display resolutions such as 2K and 3D. Check out the full list here.
2. Sam Kolder
Sam Kolder is a Vlogger who is famous for his stunning creations that feature his travels. His work also inspires many creators thanks to his editing and use of color luts. He also shares free lut packs and his creative process across his official channels, including YouTube and Instagram.
He mainly works on Adobe Premiere pro. However, his luts still work with other video editing software.
3. Shutterstock.com
Shutterstock also offers tons of free stuff relating to lut video editing. You will also find free luts that are compatible with Filmora on the website. Here are a few of them you can sample. Please check before you download other packs, as some of the stuff may not match your current versions.
4. Giggster.com
Giggster.com is an LA-based company that caters to aspiring filmmakers. They too offer the occasional lut files you can use to make your videos more stunning. However, they mostly feature those that work with Photoshop CC. So, you may wanna check your software’s compatibility beforehand. Here is one of the freebies you can download.
5. Premiumbeat.com
You may also want to check out some of Premiumbeat’s free offerings if you are an AfterEffects user. They offer stylistic luts and other free tools you can use to edit your films. Additionally, they do this regularly. Therefore, they are worth a look to see what is new.
Conclusion
● Color luts are incredible tools to add flair to your videos. Additionally, you can use them with incredible ease on software like Filmora. Here are some of the creations you can sample from some of the free ones that come with the tool.
Also read:
- 2024 Approved A Roster of 8 Best Color Match Generators
- What Is Motion Tracking and How to Use It for 2024
- New How to Make Blender Render Transparent Background
- In 2024, Methods to Make Sure Your Recording Slideshow in Powerpoint Is Not Wro
- Updated In 2024, How to Convert Videos to Slow Motion?
- In 2024, Tips for Choosing Location and Scheduling Music Video
- Updated 2024 Approved 3D LUT Mobile App Review - A Composite Application for Editing Media
- New In 2024, How to Loop Videos with iMovie
- New Steps to Rotate Videos in Lightworks
- Updated In 2024, How to Denoise in Final Cut Pro – Reduce Video and Audio Noise
- New How to Make Strobe Light Text Effect?
- Updated Best Video Editing Courses Online with Certificate
- New There Are Many Aspects to Consider when It Comes to Publishing a Video. Safety and Privacy Aspects Are some of Them. If Youre Looking to Blur Out a Bystander or Cut Out Profanities From Your Video with Filmora, This Is the Right Article for You
- 2024 Approved Find a Video Background Change Online that Works for You. This Article Contains Tools that Can Edit Video Backgrounds Online with Little Effort
- How to Make a Video Slideshow in iMovie
- 2024 Approved Hard to Remove Black Background in After Effects? Heres the Best Way to Deal With It
- New 2024 Approved How to Create a PowerPoint Looping Slideshow
- Updated When the Talk Is About an Effective Slideshow Design, People Also Ask of Creating a Quick Windows 10 Slideshow. Keep Reading to Know About the Quickest Ways of Setting the Issue Straight
- Updated Hard to Remove Black Background in After Effects, In 2024
- New 2024 Approved Top Things People Know About Wedding Slideshow
- New How to Shoot Cinematic Footage with Phone
- New In 2024, 6 Websites to Free Download Motivational Video Footage
- In 2024, Do You Need to Convert TXT to SRT to Add Subtitles to Your Videos? Here Are Three Effective Ways You Can Do It Effortlessly
- Tiktok Aspect Ratio Is a Crucial Element to Succeeding in the Tiktok Algorithm. Here Are some Suggestions to Improve Video Quality and Land on the for You Page
- Updated In 2024, Easy Ways to Create Procreate GIFs
- New A Normal Video Brings More Editing Opportunities than a Slow-Motion One. This Text Explores How to Convert Slow Motion Video to Normal on iPhone for 2024
- New Best Phantom Slow-Mo Camera For Recording Slow Motion Videos for 2024
- In 2024, Turn Your Blog Content Into Audio Podcasts to Reach a Wider Audience and Increase Reader Participation
- Updated Top Free LUTs To Use in Shotcut An Overview
- Updated Top 31 Video Trimmers That Will Save You Time in Ediitng
- New Best 5 Apps To Add Song To Video
- In 2024, How to Perfect Quick and Efficient Video Editing | Keyboard Shortcuts in Filmora
- New 2024 Approved Complete Guide to Make a Super Easy Rotating Video Effect
- Updated In 2024, How to Perfectly Use Canva Color Match?
- New The Background in Your Footage Might Be Bland or Unpleasant. This Article Will Discuss Video Background Templates You Can Use to Spice Things up and Make Your Videos Go Viral
- In 2024, This Article Presents a Guide to Using the Keyframe Feature for Creating Competent Films with Detailed Instructions and Filmoras Grow and Win Program Contest
- The Article Introduces Three Recommended Apps to Download Royalty-Free Cinematic Music and Covers an Extensive Procedure to Create a Cinematic Travel Intro for a Travel Vlog
- Recommended Video Background Online Changers
- New Unlock Your Video Editing Potential With Filmora From Wondershare
- New 2024 Approved Discover the Art of Masking in After Effects A Comprehensive Guide
- Use Device Manager to reinstall hardware drivers in Windows 7
- How to Bypass FRP from Vivo V29e?
- In 2024, 5 Ways To Teach You To Transfer Files from Samsung Galaxy A25 5G to Other Android Devices Easily | Dr.fone
- How to Fix Pokemon Go Route Not Working On Gionee F3 Pro? | Dr.fone
- 11 Best Location Changers for Vivo Y56 5G | Dr.fone
- How to Transfer Data from Vivo V30 to Other Android Devices? | Dr.fone
- In 2024, Top 15 Augmented Reality Games Like Pokémon GO To Play On Oppo Find N3 Flip | Dr.fone
- Where Is the Best Place to Catch Dratini On Xiaomi Redmi Note 12 Pro+ 5G | Dr.fone
- Thinking About Changing Your Netflix Region Without a VPN On Motorola Edge 2023? | Dr.fone
- In 2024, Does Life360 Notify When You Log Out On Apple iPhone 11 Pro Max? | Dr.fone
- In 2024, How to use Pokemon Go Joystick on Honor Magic 6 Lite? | Dr.fone
- In 2024, How to Unlock iCloud Activation Lock and iCloud Account On iPhone 12 Pro Max?
- Downloading SamFw FRP Tool 3.0 for Oppo A59 5G
- Xiaomi 13T Stuck on Screen – Finding Solutions For Stuck on Boot | Dr.fone
- How to Cast Apple iPhone XS to Chromecast? | Dr.fone
- How to Unlock Honor Play 8T Phone Forgot Password
- Easy Steps on How To Create a New Apple ID Account On iPhone 13 | Dr.fone
- Forgotten The Voicemail Password Of Honor 100? Try These Fixes
- Getting the Pokemon Go GPS Signal Not Found 11 Error in Oppo Reno 11 Pro 5G | Dr.fone
- Proven Ways in How To Hide Location on Life360 For Samsung Galaxy S23 FE | Dr.fone
- In 2024, Step-by-Step Tutorial How To Bypass Nokia XR21 FRP
- In 2024, How To Track IMEI Number Of Xiaomi Redmi Note 12 5G Through Google Earth?
- 5 Hassle-Free Solutions to Fake Location on Find My Friends Of Itel S23+ | Dr.fone
- The Easy Way to Remove an Apple ID from Your MacBook For your iPhone 12 mini
- Top 10 Best Spy Watches For your Xiaomi Redmi Note 12 Pro+ 5G | Dr.fone
- In 2024, Forgot Locked iPhone 6 Plus Password? Learn the Best Methods To Unlock | Dr.fone
- In 2024, Dose Life360 Notify Me When Someone Checks My Location On Samsung Galaxy F15 5G? | Dr.fone
- How to Factory Reset Honor X50i in 5 Easy Ways | Dr.fone
- Mastering Lock Screen Settings How to Enable and Disable on Xiaomi Redmi K70
- 5 Solutions For Realme 10T 5G Unlock Without Password
- How To Change Your SIM PIN Code on Your Infinix Smart 8 Pro Phone
- How to Mirror Oppo A79 5G to Mac? | Dr.fone
- Title: 2024 Approved End Screen Makers
- Author: Chloe
- Created at : 2024-06-09 16:15:07
- Updated at : 2024-06-10 16:15:07
- Link: https://ai-editing-video.techidaily.com/2024-approved-end-screen-makers/
- License: This work is licensed under CC BY-NC-SA 4.0.
