
:max_bytes(150000):strip_icc():format(webp)/Apple-Watch-Ultra-2-23e8ec3e4ee04c6e98c9d654a35f59ec.jpg)
2024 Approved Guide Add LUTs in Premiere Pro with Ease
Guide: Add LUTs in Premiere Pro with Ease
LUTs, fully known as look-up tables, are essential video editing elements. By using LUTs, you can enhance your video quality with improved color grading. Talking about its configuration, LUTs are made of different effects and styles for providing unique visualization.
There is a buzz around adding LUTs to Premiere Pro. Many people often fail to use LUTs due to their complexities. This article comprises detailed information and steps to add LUTs with ease.
Part 1: Why are LUTs Important in Video Editing?
Video editing becomes easier and smarter with LUTs. This specific utility can ensure upscaling video content with improved quality. But why are LUTs important? Here is why:
1. Creative Color Grading
LUTs are known to provide consistent color grading within a video. There are color palettes that are applied to every visual part. Thus, an appropriate visual style is applied to your content, making it more impressive. Moreover, with several creative options, LUTs are adjusted and enhanced to perfection. Color grading becomes special with them.
2. Flexibility and Accuracy
You can change LUTs within desired intensity, blur, sharpness, and lightning. There are also color adjustments with the most flexibility. You can transform your video color gradients as required. The important thing is colors are applied with accuracy and proper details. This way, your video will be more consistent in colors.
3. Advanced AI Functionality
With technological advancement, LUTs are also upgrading with time. The implementation of AI functionality into LUTs makes them more special. The color grading process is fully automated. Thus, videos are analyzed, and LUTs are applied based on the required color criteria. LUTs are also integrated with AI augmented reality to provide realistic experiences.
4. Saves Time
Applying LUT doesn’t take time, and it instantly improves color grading. This way, you don’t need to spend hours on video editing. After all, with LUTs, you can effortlessly upscale video colors and quality. The pre-designed color presets are effective and efficient.
Empower your videos with a new mood using different LUTs. Filmora now offers 100+ top-quality 3D LUTs cover a broad range of scenarios. Transform your videos with Filmora’s powerful 3D LUTs.
Apply LUT on Videos Apply LUT on Videos Learn More


Part 2: How to Add LUTs in Premiere Pro?
LUTs are great video editing tools with extended color grading and schemas. Premiere Pro is a commonly consumed video editing tool with extensive features. Being a new user, you might not be aware of the functionality of LUTs in the platform. To add LUTs to Premiere Pro, you need to follow simple steps:
Step 1: Launch and open Adobe Premiere Pro on your device. Proceed to add the video clip that needs to be edited on the timeline. Navigate to the “Color” workspace from the screen’s top.

Step 2: From the project window on the bottom left, press the “New Item” tab and choose “Adjustment Layer.” Adjust video settings from the available panel, including the “Width,” “Height,” “Timebase,” and “Pixel Aspect Ratio,” and click “OK.”

Step 3: Drag and drop the created adjustment layer from the project window into the timeline and set the length adjacent to the video. Select the adjustment layer, and press “Lumetri Color” from the top in the right-hand panel. From the “Basic Correction” category, set “Input LUT” and proceed to click the “Browse” option from the drop-down menu. Navigate your LUT from the folder and click “Open” to apply desired LUT to the video.

Part 3: What are the Future Prospects of LUTs in Video Editing?
LUTs are already transforming video editing functionalities with automated color grading. This means users don’t have to edit colors, styles, and other elements manually. In the future, LUTs will have amazing prospects. Let’s discuss some of them:
- Cloud Infrastructure: Sharing and collaboration on customized LUTs will be easier in the future. This will be possible due to cloud infrastructure. Hence, video editors worldwide can collaborate and share color insights on projects.
- User-Friendly Interface: LUTs will become more user-friendly in the future. This will make them easy to use and implement in projects. Even beginners will minimal editing knowledge will be able to use them. In contrast, professional editors will streamline their workflows with fast processing.
- Real-time Preview: Using LUTs, users would be able to preview color grading. This way, they will know what their video after LUT would look like. Hence, they can preview different LUT presets and proceed with the desired one.
- Wide Compatibility: The platform compatibility of LUTs will also enhance. After all, you will access them on mobile, web, and desktop devices without problems. You can use LUTs in everyday life by applying them to visual content.
Bonus Part: Wondershare Filmora – An Alternative Haven for Adding LUTs
LUTs are great utility when it comes to video editing environments. Apart from Premiere Pro, several other tools are working to improve the industry. Wondershare Filmora is a video editing software where you can upgrade your videos. You can add different elements, effects, and transitions in Filmora. You can also use and apply LUT presets within Filmora.
Add LUTs on Video For Win 7 or later(64-bit)
Add LUTs on Video For macOS 10.14 or later
There are approximately 100+ LUTs presets in the current version of Filmora. Users can use them to enlighten the colors of videos. Meanwhile, in the new version, there would be additional 100 LUTs. So, in total, you will be getting 200+ LUTs in the new updates provided by Wondershare Filmora. Each LUT is unique in its kind and style.

Key Features of Wondershare Filmora
- Intensity Setting: You can also modify the intensity of your applied colors. This way, you can adjust color saturation on a 0 – 100% scale range. With intensity, there is an option to customize color grading.
- Color Wheel: Within Wondershare Filmora, there is a color wheel for adjusting video colors. Thus, users can set color pallets within their required style. The color grading is then enhanced with the desired customization.
- Optimized Export: The video export facility is optimized with fast processing. You can also set the video format, select resolution, and adjust other settings. The video is exported in the highest of qualities.
- Preview Render: After editing your videos with LUT presets, check color styles using render preview. Render preview allows previewing your final project before exporting it to the device.
Conclusion
Videos are close to all of us, as they store our important visual data. This is why video editing is essential to enhance color grading and schemas. Meanwhile, installing LUTs in Premiere Pro can help improve video quality with minimal effort. A good tool for using LUTs is Wondershare Filmora. After all, Filmora offers 100+ LUT presets, with 100 more to follow soon.
Add LUTs on Video For Win 7 or later(64-bit)
Add LUTs on Video For macOS 10.14 or later
Apply LUT on Videos Apply LUT on Videos Learn More
Part 2: How to Add LUTs in Premiere Pro?
LUTs are great video editing tools with extended color grading and schemas. Premiere Pro is a commonly consumed video editing tool with extensive features. Being a new user, you might not be aware of the functionality of LUTs in the platform. To add LUTs to Premiere Pro, you need to follow simple steps:
Step 1: Launch and open Adobe Premiere Pro on your device. Proceed to add the video clip that needs to be edited on the timeline. Navigate to the “Color” workspace from the screen’s top.
Step 2: From the project window on the bottom left, press the “New Item” tab and choose “Adjustment Layer.” Adjust video settings from the available panel, including the “Width,” “Height,” “Timebase,” and “Pixel Aspect Ratio,” and click “OK.”
Step 3: Drag and drop the created adjustment layer from the project window into the timeline and set the length adjacent to the video. Select the adjustment layer, and press “Lumetri Color” from the top in the right-hand panel. From the “Basic Correction” category, set “Input LUT” and proceed to click the “Browse” option from the drop-down menu. Navigate your LUT from the folder and click “Open” to apply desired LUT to the video.
Part 3: What are the Future Prospects of LUTs in Video Editing?
LUTs are already transforming video editing functionalities with automated color grading. This means users don’t have to edit colors, styles, and other elements manually. In the future, LUTs will have amazing prospects. Let’s discuss some of them:
- Cloud Infrastructure: Sharing and collaboration on customized LUTs will be easier in the future. This will be possible due to cloud infrastructure. Hence, video editors worldwide can collaborate and share color insights on projects.
- User-Friendly Interface: LUTs will become more user-friendly in the future. This will make them easy to use and implement in projects. Even beginners will minimal editing knowledge will be able to use them. In contrast, professional editors will streamline their workflows with fast processing.
- Real-time Preview: Using LUTs, users would be able to preview color grading. This way, they will know what their video after LUT would look like. Hence, they can preview different LUT presets and proceed with the desired one.
- Wide Compatibility: The platform compatibility of LUTs will also enhance. After all, you will access them on mobile, web, and desktop devices without problems. You can use LUTs in everyday life by applying them to visual content.
Bonus Part: Wondershare Filmora – An Alternative Haven for Adding LUTs
LUTs are great utility when it comes to video editing environments. Apart from Premiere Pro, several other tools are working to improve the industry. Wondershare Filmora is a video editing software where you can upgrade your videos. You can add different elements, effects, and transitions in Filmora. You can also use and apply LUT presets within Filmora.
Add LUTs on Video For Win 7 or later(64-bit)
Add LUTs on Video For macOS 10.14 or later
There are approximately 100+ LUTs presets in the current version of Filmora. Users can use them to enlighten the colors of videos. Meanwhile, in the new version, there would be additional 100 LUTs. So, in total, you will be getting 200+ LUTs in the new updates provided by Wondershare Filmora. Each LUT is unique in its kind and style.
Key Features of Wondershare Filmora
- Intensity Setting: You can also modify the intensity of your applied colors. This way, you can adjust color saturation on a 0 – 100% scale range. With intensity, there is an option to customize color grading.
- Color Wheel: Within Wondershare Filmora, there is a color wheel for adjusting video colors. Thus, users can set color pallets within their required style. The color grading is then enhanced with the desired customization.
- Optimized Export: The video export facility is optimized with fast processing. You can also set the video format, select resolution, and adjust other settings. The video is exported in the highest of qualities.
- Preview Render: After editing your videos with LUT presets, check color styles using render preview. Render preview allows previewing your final project before exporting it to the device.
Conclusion
Videos are close to all of us, as they store our important visual data. This is why video editing is essential to enhance color grading and schemas. Meanwhile, installing LUTs in Premiere Pro can help improve video quality with minimal effort. A good tool for using LUTs is Wondershare Filmora. After all, Filmora offers 100+ LUT presets, with 100 more to follow soon.
Add LUTs on Video For Win 7 or later(64-bit)
Add LUTs on Video For macOS 10.14 or later
Camtasia Vs. Final Cut Pro
With many available video editing solutions in the market today, it is a bit hard to choose the best video editing software for your unique needs. Remember, it’s all about investing money. In every purchase, you need to be sure about purchasing no matter the amount. In the case of video editing software, the concern is just significant as you should find software that perfectly suits your requirements. A video editing software may be having excellent features, but become complex when working with. On the other hand, the software may be quite user-friendly, but its range of tools is not as large.
Implementing tools such as Camtasia or Final Cut Pro requires a great deal of contemplating and comparison of crucial factors. You may be wondering, when you compare Camtasia vs Final cut pro, which is the best to use. To make a clear comparison between these two video editing programs, one has to judge all the crucial elements. Though the two programs share some degree of similarity, this article will help you understand if Final Cut Pro is better than Camtasia. We are going to compare Final Cut Pro X vs Techsmith Camtasia using their features, pros, and Cons, market prices, functionality, and customer support to help you fully understand them.
Overall Comparison
This table will help you compare Camtasia vs Final cut pro.
674 reviews341 reviews$ 249.99 for a user license$139.99 upgrade$299.99 per licenseRelatively easy to use A bit complicated for beginners</6h>
| | Camtasia | Final Cut Pro | |
| ——————— | ————————————————————————————————————————- | ————————————————————————————————————————— |
| Overall rating | 674 reviews | 341 reviews |
| Entry-level Price | $ 249.99 for a user license $139.99 upgrade | $299.99 per license |
| Ease of use | Relatively easy to use | A bit complicated for beginners |
| Market share | Small-Business (50.5% of reviews) Mid-Market (26.0% of reviews) Enterprise (23.4% of reviews) | Small-Business (71.0% of reviews) Mid-Market (17.05 reviews) Enterprise (11.9% of reviews) |
| Value of money | 2/10 – low cost | 4/10 – average cost |
| Customer support | Provide Email Languages supported; English, French, Germany, Japanese. | Email Languages supported; English |
| Functionality | Speed is a bit slow Various exporting settings. Enough editing capability. Does not support live recording from a camera. | Speed is higher than its comparison Exporting settings are limited Not as efficient as its comparison Has DV camera support |
| Support system | Desktop, Cloud | Desktop, Cloud, Mobile |
As you can see in the table above there is no great deference seen when comparing Final cut pro X vs Techsmith Camtasia, but it can tell you if is Final cut pro better than Camtasia or reverse is the case.
Final Cut Pro
Final Cut Pro is the perfect macOS video editing software that can help you achieve a professional-looking video. This software is built with the latest and most powerful tools that make it an effortless tool for video editing. It has impressive filters, graphics, and a range of other cool video editing features. Its coolest part is its ability to enable 360-degree video editing for VR and VR headset playback. This program uses multi-core multi-thread machines quickly to allow you to import the videos in different formats faster than others.

Like any other software, Final Cut Pro possesses some pros and cons as listed below;
Pros:
- It is a stable program that can be very useful in small businesses.
- It has a powerful architecture for your complex and heavy projects.
- Its fast rendering speed can allow you to conduct Multicam editing.
- It has classic GPU utilization and powerful media organization to allow you to organize assets such as audio and video carefully.
- Its easy audio modification capabilities can allow you to create impeccable VR videos.
- It has a customizable and streamlined share interface that makes high-quality file delivery easy and fast.
- It can edit videos offline.
- It is tailored with real-time graphics and cool effects like text and blurs that are easy to apply.
Cons:
- It is complex and thus difficult for beginners.
- It has limited export options.
- It only works on Mac computers.
Editing video with Final Cut Pro is not a complicated process. Here are the steps to help a beginner get started.
Step1: Create a new project & import media
When you Launch the Final Cut Pro interface, Libraries and Events are automatically created. You only need to create a new project.
At the top menu bar, click File > New > Project to create a new project. Here you will have to type in a new name of the project and then select ‘Use Automatic Settings’.
At the top menu bar again, click File > Import > Media to enable the program to bring up the Media Import window where you can select the video and audio files you want to import into your new project.
After selecting all the media you want to include in your project press ‘Import Selected’ and then close the media window.
Step 2: Add your trimmed clips to the timeline.
The thumbnails of all the media you have imported will be appearing in the browser. For you to create a new video you need to arrange and trim that media in the timeline.
In your browser, you can set the ‘In and Out’ points for each video clip by holding ‘_Option_’. To do this you will have to click the thumbnail and drag it. The yellow timeline that appears on the clip represents the range that will be added to your video timeline.
After arranging them in the order that you want them to play, trim your clips by moving the mouse cursor to the edge of its thumbnail. This is done by using the ‘Trim tool’. Drag forward or backward to adjust the clip’s endings.
If you are arranging the clips in your sequence, you need to drag and drop any of the clips from the timeline into a different position. Final Cut Pro has a tool known as Magnetic timeline that will automatically insert and arrange the clips for you. You just need to ensure that your clips do not overlap or lay on top of each other.
To preview your video in the viewer, press the space bar on your keyboard or the Play icon in your software interface.
Step 3: Add Title, Texts, Transitions, and Effects
Title and Texts: Final Cut Pro has many Titles located in the browser where you imported your media. You can add them by dragging them into your video’s timeline. To access those titles you can press the ‘Title and Generators’ icon in the sidebar to open it.
Transitions: When adding Transitions, there is nothing wrong with a “hard cut_” between 2 clips. Use the transitions only where they make sense so as not to ruin your video. To add these transitions, you need to open the ‘_Transition browser’ by clicking on its indicated icon.
The transition’s length can be adjusted by dragging inwards or outwards. To customize your transition you can open the inspector by pressing ‘Command + 4’ and make the adjustments.
Effects: With Final Cut Pro inbuilt Effects, you can add some more value to your video after you are done with basic arrangements in the timeline. To add the effects click on the ‘Effects browser’ icon to open it.
Next to the effects browser icon, choose your preferred effect and add it between any 2 clips. By doing this you will have added animation effect between them.
Step 4: Add Audio, Music, and Color.
Audio & Music: At this point, you can import and add your music. Photos and Audio sidebar icon is located above the browser and you can click to open, and then select Sound Effects.
To see all the songs available in Final Cut Pro, you can type the word ‘Jingle‘ and you can preview them by pressing the small play button.
Color correction: By highlighting all the video clips in your video timeline, you can see a yellow outline around them.
Then open the drop-down menu by clicking the ‘_Enhancement_’ icon situated below the Viewer.
To improve the color and contrast, select Balance Color or ‘Option + Cmd + B’.
Now that you are done editing your video, you can save and share as you prefer.
Camtasia
Camtasia is a perfect all-in-one video editing and screen recording program. If you compare Camtasia vs Final cut pro, Camtasia is quite easy to use even for beginners. It can work in both Windows and macOS and provides the user with a demonstration and education video platform. It contains cool features to help you capture and edit your videos and audios appropriately.

Here are some pros and cons of Camtasia.
Pros:
- It is easy to learn.
- It has a good capture feature.
- Impressive cursor effects.
- It has Interactivity features.
- It has a good asset library
- Availability of mobile version.
- It offers great customer service.
- Available at a low cost.
Cons:
- Constant crashes and bugs.
- Limited customization
- No key tracking.
Here are key steps to follow when editing a video with Camtasia.
Step 1: Break up steps of a process with lower thirds.
Break any long multi-step video to help lower the viewer’s cognitive load.
Step 2: Reinforce texts with video.
Remove any mistakes and extra content such as unnecessary footage from the ends of your recording. If you trim too much drag the clip back to restore. This process is known as trimming.
You can zoom in on the most important section to focus your viewer’s attention there.
Step 3: Add narrative to video
Alternative Way to Edit Videos
Getting an appropriate video editing software is quite challenging as the makers of these software sometimes get confused about if the programs needed are for home videos or professional-quality work such as Hollywood movies. This is why you will find that some programs are complex to use while others lack essential features to make your work efficient.
Filmora video editor is one of the most efficient for video editing. This software is powerful and easy to use and it is built with many features to make your vision come true. It is fit for small scale, medium scale and large businesses.
For Win 7 or later (64-bit)
For macOS 10.12 or later
These steps will help you to know how to edit video with Filmora software;
Step 1: Start a new project.

After making sure that you have Filmora video editor installed on your computer, start a new project. Open the app then choose a dropdown option from the Select Project Aspect Ratio.
Step 2: Import your media

The footage, photos, and audios you use in your video are the key basic aspects of your video. Organizing all the files you are going to use in a single file. You can do this by browsing the file menu. Click the ‘File > Import Media Folder’ menu in Filmora and select the folder that contains your video files.
After importing your video files the thumbnails for each file will appear in one half of the application. Double-click on the thumbnails for a preview.
These thumbnails prove that all your captured video clips are already in the application and ready to be edited. Click on the Filmora video editing guide to get to help you know what to do.
Step 3: Add clips to the timeline, trim, adjust appropriately and sequence them.

Now that you have reviewed your video library and seen that they are there, you need to add them to the video editing timeline at the bottom of your app. This is quite easy as you can view all your video clips and determine which is to be added first.
Drag and drop each video or photo in the timeline to add it to your project.
After adding the clips, you can trim and adjust them appropriately. Click on the right or left edges of the clip you want to shorten in the timeline and drag it to shorten.
If you want to split a clip in the timeline, pick the scissors by clicking on the ‘_Scissors_’ icon.
When working on your video footage, click the spacebar of your computer keyboard to preview. By doing this, you will be able to see how your clips are joined together.
Trim appropriately and perfect the runtime of every single clip and re-order your clips where there is a need to do so. This can be done by clicking on the targeted clip and dragging it to where you want it to be.
Step 4: Add video Effects, Transmissions between the clips, and Text overlays

Click on the Effect icon at the top of the app and a deep visual library of effects will be visible. If you want to add a certain effect to your active clip, just double-click it.
Add transitions in your video timeline to cut the scene-to-scene. They are quite necessary as they help establish your audience’s attention.
The next thing after adding the transmissions will be adding the overlays and exporting your video by clicking on the ‘Export‘ button.
Step 5: Export your finished video.

You can click the ‘Export’ button and switch to the platform you want your video to be exported.
Conclusion
Choosing an appropriate video editing tool is equally as important as the video itself. And with the availability of so many of these video editing tools, choosing among them is quite hard. You can easily get confused especially if you are a beginner in the video editing industry. To avoid the complications you need to know what editing software is the best for your project.
As you can see in the table above there is no great deference seen when comparing Final cut pro X vs Techsmith Camtasia, but it can tell you if is Final cut pro better than Camtasia or reverse is the case.
Final Cut Pro
Final Cut Pro is the perfect macOS video editing software that can help you achieve a professional-looking video. This software is built with the latest and most powerful tools that make it an effortless tool for video editing. It has impressive filters, graphics, and a range of other cool video editing features. Its coolest part is its ability to enable 360-degree video editing for VR and VR headset playback. This program uses multi-core multi-thread machines quickly to allow you to import the videos in different formats faster than others.
Like any other software, Final Cut Pro possesses some pros and cons as listed below;
Pros:
- It is a stable program that can be very useful in small businesses.
- It has a powerful architecture for your complex and heavy projects.
- Its fast rendering speed can allow you to conduct Multicam editing.
- It has classic GPU utilization and powerful media organization to allow you to organize assets such as audio and video carefully.
- Its easy audio modification capabilities can allow you to create impeccable VR videos.
- It has a customizable and streamlined share interface that makes high-quality file delivery easy and fast.
- It can edit videos offline.
- It is tailored with real-time graphics and cool effects like text and blurs that are easy to apply.
Cons:
- It is complex and thus difficult for beginners.
- It has limited export options.
- It only works on Mac computers.
Editing video with Final Cut Pro is not a complicated process. Here are the steps to help a beginner get started.
Step1: Create a new project & import media
When you Launch the Final Cut Pro interface, Libraries and Events are automatically created. You only need to create a new project.
At the top menu bar, click File > New > Project to create a new project. Here you will have to type in a new name of the project and then select ‘Use Automatic Settings’.
At the top menu bar again, click File > Import > Media to enable the program to bring up the Media Import window where you can select the video and audio files you want to import into your new project.
After selecting all the media you want to include in your project press ‘Import Selected’ and then close the media window.
Step 2: Add your trimmed clips to the timeline.
The thumbnails of all the media you have imported will be appearing in the browser. For you to create a new video you need to arrange and trim that media in the timeline.
In your browser, you can set the ‘In and Out’ points for each video clip by holding ‘_Option_’. To do this you will have to click the thumbnail and drag it. The yellow timeline that appears on the clip represents the range that will be added to your video timeline.
After arranging them in the order that you want them to play, trim your clips by moving the mouse cursor to the edge of its thumbnail. This is done by using the ‘Trim tool’. Drag forward or backward to adjust the clip’s endings.
If you are arranging the clips in your sequence, you need to drag and drop any of the clips from the timeline into a different position. Final Cut Pro has a tool known as Magnetic timeline that will automatically insert and arrange the clips for you. You just need to ensure that your clips do not overlap or lay on top of each other.
To preview your video in the viewer, press the space bar on your keyboard or the Play icon in your software interface.
Step 3: Add Title, Texts, Transitions, and Effects
Title and Texts: Final Cut Pro has many Titles located in the browser where you imported your media. You can add them by dragging them into your video’s timeline. To access those titles you can press the ‘Title and Generators’ icon in the sidebar to open it.
Transitions: When adding Transitions, there is nothing wrong with a “hard cut_” between 2 clips. Use the transitions only where they make sense so as not to ruin your video. To add these transitions, you need to open the ‘_Transition browser’ by clicking on its indicated icon.
The transition’s length can be adjusted by dragging inwards or outwards. To customize your transition you can open the inspector by pressing ‘Command + 4’ and make the adjustments.
Effects: With Final Cut Pro inbuilt Effects, you can add some more value to your video after you are done with basic arrangements in the timeline. To add the effects click on the ‘Effects browser’ icon to open it.
Next to the effects browser icon, choose your preferred effect and add it between any 2 clips. By doing this you will have added animation effect between them.
Step 4: Add Audio, Music, and Color.
Audio & Music: At this point, you can import and add your music. Photos and Audio sidebar icon is located above the browser and you can click to open, and then select Sound Effects.
To see all the songs available in Final Cut Pro, you can type the word ‘Jingle‘ and you can preview them by pressing the small play button.
Color correction: By highlighting all the video clips in your video timeline, you can see a yellow outline around them.
Then open the drop-down menu by clicking the ‘_Enhancement_’ icon situated below the Viewer.
To improve the color and contrast, select Balance Color or ‘Option + Cmd + B’.
Now that you are done editing your video, you can save and share as you prefer.
Camtasia
Camtasia is a perfect all-in-one video editing and screen recording program. If you compare Camtasia vs Final cut pro, Camtasia is quite easy to use even for beginners. It can work in both Windows and macOS and provides the user with a demonstration and education video platform. It contains cool features to help you capture and edit your videos and audios appropriately.
Here are some pros and cons of Camtasia.
Pros:
- It is easy to learn.
- It has a good capture feature.
- Impressive cursor effects.
- It has Interactivity features.
- It has a good asset library
- Availability of mobile version.
- It offers great customer service.
- Available at a low cost.
Cons:
- Constant crashes and bugs.
- Limited customization
- No key tracking.
Here are key steps to follow when editing a video with Camtasia.
Step 1: Break up steps of a process with lower thirds.
Break any long multi-step video to help lower the viewer’s cognitive load.
Step 2: Reinforce texts with video.
Remove any mistakes and extra content such as unnecessary footage from the ends of your recording. If you trim too much drag the clip back to restore. This process is known as trimming.
You can zoom in on the most important section to focus your viewer’s attention there.
Step 3: Add narrative to video
Alternative Way to Edit Videos
Getting an appropriate video editing software is quite challenging as the makers of these software sometimes get confused about if the programs needed are for home videos or professional-quality work such as Hollywood movies. This is why you will find that some programs are complex to use while others lack essential features to make your work efficient.
Filmora video editor is one of the most efficient for video editing. This software is powerful and easy to use and it is built with many features to make your vision come true. It is fit for small scale, medium scale and large businesses.
For Win 7 or later (64-bit)
For macOS 10.12 or later
These steps will help you to know how to edit video with Filmora software;
Step 1: Start a new project.
After making sure that you have Filmora video editor installed on your computer, start a new project. Open the app then choose a dropdown option from the Select Project Aspect Ratio.
Step 2: Import your media
The footage, photos, and audios you use in your video are the key basic aspects of your video. Organizing all the files you are going to use in a single file. You can do this by browsing the file menu. Click the ‘File > Import Media Folder’ menu in Filmora and select the folder that contains your video files.
After importing your video files the thumbnails for each file will appear in one half of the application. Double-click on the thumbnails for a preview.
These thumbnails prove that all your captured video clips are already in the application and ready to be edited. Click on the Filmora video editing guide to get to help you know what to do.
Step 3: Add clips to the timeline, trim, adjust appropriately and sequence them.
Now that you have reviewed your video library and seen that they are there, you need to add them to the video editing timeline at the bottom of your app. This is quite easy as you can view all your video clips and determine which is to be added first.
Drag and drop each video or photo in the timeline to add it to your project.
After adding the clips, you can trim and adjust them appropriately. Click on the right or left edges of the clip you want to shorten in the timeline and drag it to shorten.
If you want to split a clip in the timeline, pick the scissors by clicking on the ‘_Scissors_’ icon.
When working on your video footage, click the spacebar of your computer keyboard to preview. By doing this, you will be able to see how your clips are joined together.
Trim appropriately and perfect the runtime of every single clip and re-order your clips where there is a need to do so. This can be done by clicking on the targeted clip and dragging it to where you want it to be.
Step 4: Add video Effects, Transmissions between the clips, and Text overlays
Click on the Effect icon at the top of the app and a deep visual library of effects will be visible. If you want to add a certain effect to your active clip, just double-click it.
Add transitions in your video timeline to cut the scene-to-scene. They are quite necessary as they help establish your audience’s attention.
The next thing after adding the transmissions will be adding the overlays and exporting your video by clicking on the ‘Export‘ button.
Step 5: Export your finished video.
You can click the ‘Export’ button and switch to the platform you want your video to be exported.
Conclusion
Choosing an appropriate video editing tool is equally as important as the video itself. And with the availability of so many of these video editing tools, choosing among them is quite hard. You can easily get confused especially if you are a beginner in the video editing industry. To avoid the complications you need to know what editing software is the best for your project.
How To Use Face Tracking In After Effects To Make Your Videos Pop
Face Tracking is a process of identifying or locating human faces in digital images and videos, and it is used for a variety of applications, such as to re-target tools and effects to specific areas of the face, to track face data for rotoscoping/motion stabilization, or to generate keyframes for facial expressions automatically.
In Adobe After Effects, there are two Face Tracking features, i.e., Outline Only and Detailed Feature. The former will help only to track the face, while the latter provides detailed data on different facial features to help you change the eye color, mouth movements, etc.
In this blog post, we will explore Face Tracking, its applications, how it works, and its challenges and drawbacks. We will also provide an easy-to-follow guide on using the Face Tracking feature in Adobe After Effects.
Part 1. What Is Face Tracking
Face Tracking is a process of identifying or detecting the areas of the face, such as the eyes, nose, and mouth, in a video or image. This effect can be used to track and animate face replacements, retouch footage, or add effects to a user’s face in live footage.
Where It Is Applied
Face Tracking can be used for a variety of applications, such as:
- Replacing One Face With Another: This is helpful if you need to change the face of a character in video footage.
- Adding Automatic Effects: With this feature, you can apply effects to a face in live footage.
- Retouching Footage: Face Tracking can help you retouch a face in a video clip, for instance, you can smooth it or change the skin tone, etc.
- Robotic Devices: Certain robots use Face Tracking technology to perform human tasks.
Part 2. How Does Face Tracking Work?
Face Tracking algorithms usually begin by detecting facial landmarks, such as the eyes, nose, and mouth. Once detected, the AI algorithms use them to track the face as it moves. This information can be used to perform various tasks, such as identifying the person’s emotions or estimating their head pose.
Face Tracking technology is constantly improving and is now being used in various new applications, such as to create 3D models of people’s faces, control robotic devices, and create more realistic avatars for virtual reality systems.
Part 3. The Challenges And Drawbacks Of Face Tracking
Face Tracking is a technology that has been growing in popularity in recent years. This technology allows computers to detect and track human faces in real-time. While Face Tracking has many potential applications, some challenges and drawbacks also need to be considered:
One of the main challenges with Face Tracking is that it can be difficult to track faces in different lighting conditions. Faces can also be obstructed by objects such as hats or glasses. Another challenge is that things like photographs, makeup, or masks can fool face tracking.
Some privacy concerns need to be considered when using Face Tracking. This technology can be used to collect sensitive data about people without their consent.
Despite these challenges and drawbacks, Face Tracking remains a promising technology with many potential applications, and it can help with many tasks such as identifying a perpetrator, finding a missing person, better security measures in banks and airports, and many more.
Part 4. The Face Tracking In After Effects
Adobe After Effects is a useful and powerful tool that can be used for various purposes, including Face Tracking. This feature enables you to track the movement of a person’s face and detect specific parts of a face, including eyes, nose, mouth, etc., to let you work with these facial features individually.
For instance, you can change the mouth movement or pupil color without frame-by-frame adjustments. Moreover, you can measure facial features to see the details, such as how open the eye or mouth is.
Features
Here’s a simple and quick rundown of the features of Face Tracking in Adobe After Effects:
- Help you detect faces and provide isolated data points to help you refine the content.
- Retouch the face in a video without adjusting it frame by frame.
- Let you export the tracking data to Character Animator for creating performance-based animations.
Function
There are two Face Tracking functions in the Tracker panel:
- Face Tracking (Outline Only): This feature will only help you to outline the face in a video clip.
- Face Tracking (Detailed Features): This option will help you if you want to detect the different facial features and parts, including the eye, pupil, eyebrow, mouth, and nose. You can also take exact measurements of the features.
Part 5. The Guidance Of Using Face Tracking In After Effects
Follow the guidelines below to use Face Tracking in After Effects:
Face Tracking To Outline A Face
Step1Launch the After Effects software and click “File” in the top Toolbar. Select Import and click “File.” Find the video footage and add it to the Project panel.

Step2To add a new layer, drag and drop the video footage from the Project Panel to the Composition.
Step3Drag the blue current-time indicator in the Timeline to a frame showing the face’s upright and front view.

Step4Now, you have to draw a closed mask loosely around the face. This helps identify the region for locating the facial features. The top mask is used for Face Tracking if you have selected multiple masks.

Step5Click the “Window” option from the top Toolbar and scroll down to “Tracker.” Select “Face Tracking (Outline Only)” as the tracking method in the Tracker Panel.
Step6To make sure the tracking is working correctly, track forward or backward one frame at a time and click the “Start” button to start the analysis process of the frames. Once finished, you can find the Face Tracking data within the Composition.
Tracking Detailed Features And Extracting Facial Measurements
For detailed face features tracking, do the following steps in sequence:
Step1Import your file and add it to the Project in the After Effects. Drop and drag the video clip into a Composition from the Project Panel to add a layer.
Step2Position the CTI to a frame showing the upright and front view of the face, and draw a closed mask loosely around the face to define the search region to find the facial features.
Step3Click the “Window” option, scroll down to Tracker and select it. Choose the **“Face Tracking (Detailed Features)**” option as the tracking method.
![]()
Step4Track forward or backward to check the tracking process, and click the “Start” button to initiate the analysis process.
Step5Once the analysis is done, you can find the tracking data within a new effect, “Face Track Point.” To access the face tracking data, go to “Window” and select “Effects Control” to go to the Effects Panel or check within the Composition.
![]()
Step6Move the CTI to a frame displaying neutral facial expressions or is in the rest pose. The measurements of a face on other frames are dependent on the rest pose frame. Now, click “Set Rest Pose” in the Tracker Panel and select “Extract & Copy Face Measurements” to add the Face Measurement layer.
Step7When the Face Measurements effect layer is added, keyframes are automatically generated based on the Face Track Points keyframe data. You can copy the data from the system clipboard for use in Adobe Character Animator.
Video - How to do Face Tracking, Facial ID, with After Effects (iPhone X features) Tutorial
Conclusion
In this article, we’ve discussed what Face Tracking is, where it is applied, how it works, and its challenges and drawbacks. We further provided a step-by-step guide on using Face Tracking in After Effects and discussed its two functions.
Hopefully, this guide helps you understand the Face Tracking technology, and you can now use the feature in After Effects without hassle.
Free Download For Win 7 or later(64-bit)
Free Download For macOS 10.14 or later
Create Glitch Text Effect
Glitch text effect is a trending video effect whereby the texts get distorted for a few seconds. The effect is comparable to the glitch you face when your screen starts to malfunction, and the screen appears to be wavy and disoriented. A glitch text effect is better than a regular animated text effect as it helps to get the attention of the viewers immediately and get the message across clearly.
The glitch effect can be applied to the entire video as well as the text as per your preference. There are several video editors available where the glitch text effect comes pre-loaded. All you need to do is to apply it to the text and get it done in a few steps. We will illustrate how to add glitch text effect Premiere Pro. But we recommend Filmora for the best glitter text effect that you can add to your video instantly.
Part 1. Create Glitch Text in Video with Filmora
We have already stated that Wondershare Filmora is the best video editor for the best glitch text effect download and apply to your video in simple steps. Filmora is a premium video editor that is widely used by amateur and professional video editors. You can get all glitch text effect After Effects and add them to your video conveniently in comparison to After Effects.
As a matter of fact, there are literally unlimited video and text effects available, and you can find different types of glitch text effects to apply to your titles and texts. Filmora is available for both Windows and mac users. Here are the steps to create glitch text in video with Filmora.
Free Download For Win 7 or later(64-bit)
Free Download For macOS 10.14 or later
Step1 Download and install Filmora on your computer. Go to File> New Project from the menu bar to start video editing project.

Step2 Go to File> Import Media > Import Media Files to import the video clips where you want to add glitch text effect. Drop the clip into the Timeline to get started.
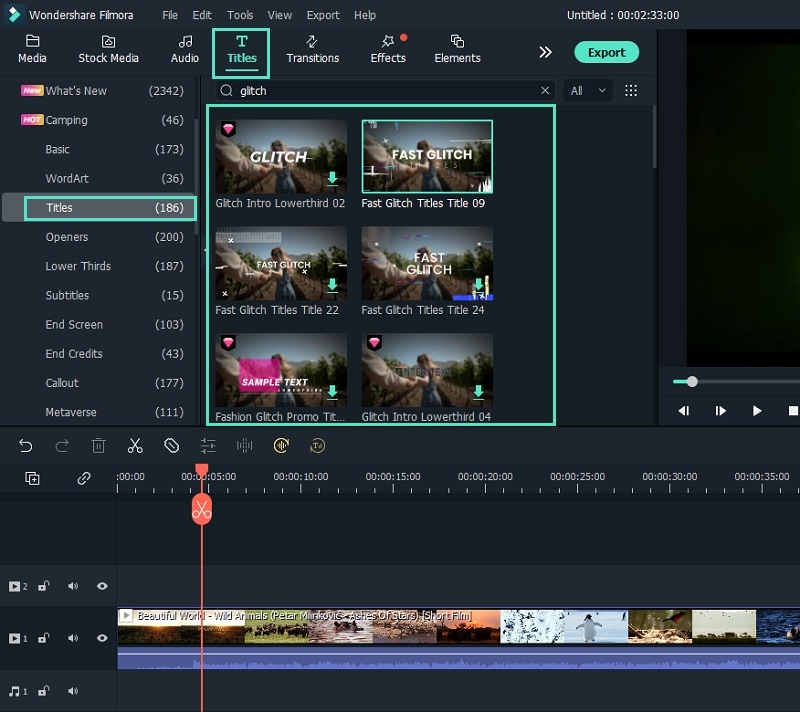
Step3 Go to Titles tab located at the top. From the left panel, click on Titles option. Search “glitch” in the search field and you will see all the glitch text effects that you can apply to the text in your video.
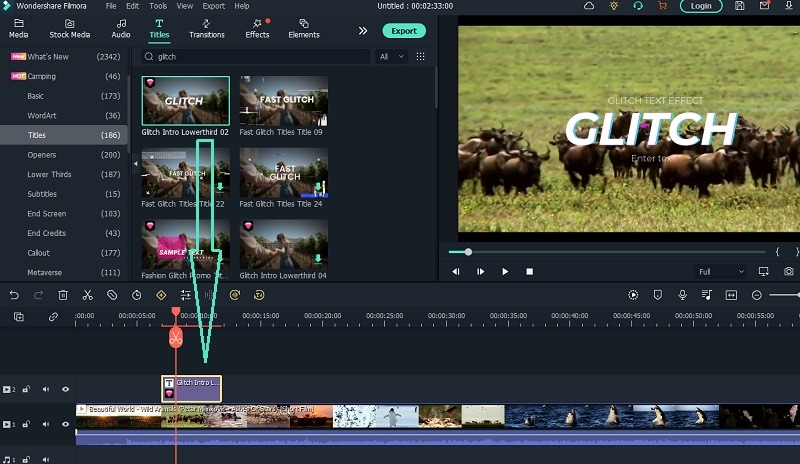
Step4 Select any glitch text effect and drop it into the Timeline above the video clip exactly where you want the text and the effect to appear.
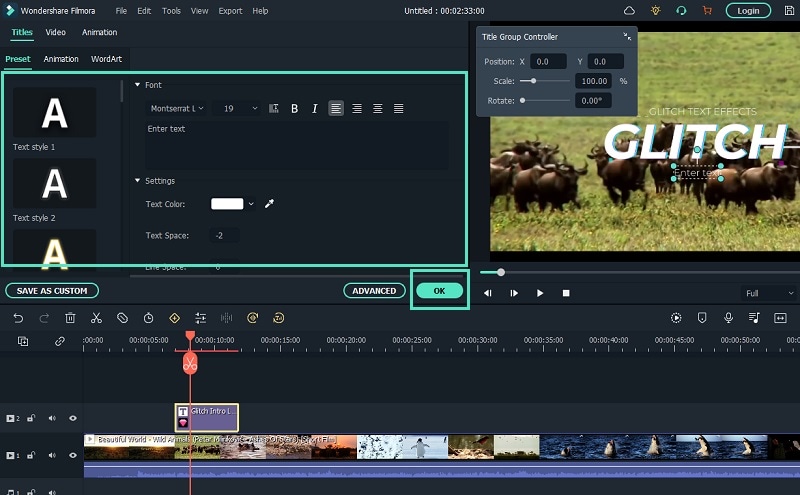
Step5 Double-click on the glitch text effect located on Timeline and edit the text, style, and other parameters as per your preference. Click on Ok and play the video to see your edited video with the glitch text effect.
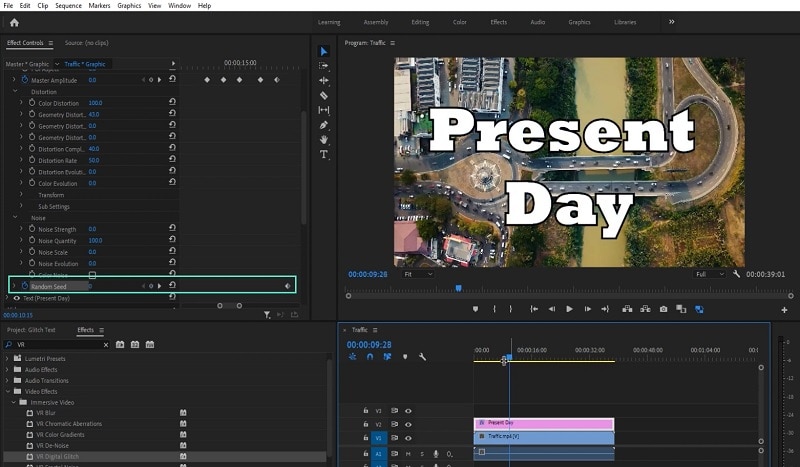
Part 2. How to Make Glitch Text Effect with Premiere Pro
Adobe Premiere Pro is another renowned video editor where you can add glitch text effect to your video. Premiere Pro is strictly for professional video editors as the user interface is not as intuitive as Filmora . The learning curve is steep, and therefore, you need to go through the steps to add glitch text effect Premiere Pro. There are several glitch text effect presets available that you can apply to any text on your video to make them engaging. Here are the steps to make glitch text effect with Premiere Pro.
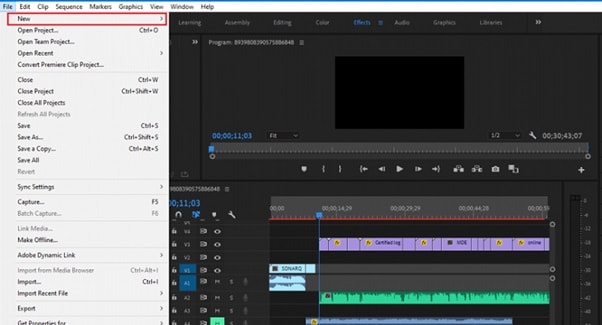
Step1 Launch Adobe Premiere Pro and go to New> Project to get started. Import your video and drop it into Timeline.
Step2 Use the Type tool to write any text on your video to add glitch text effect. You should have a text layer on Timeline.
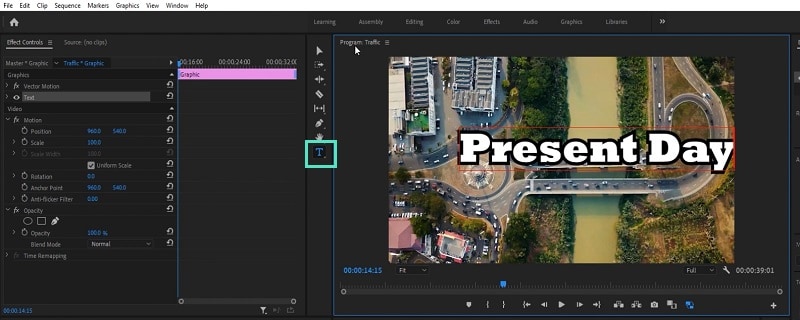
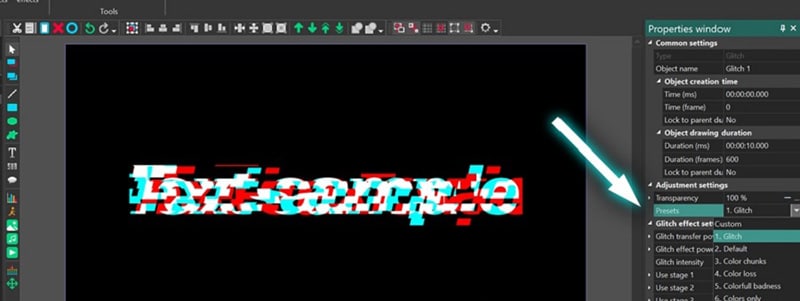
Step3 Go to Effects> Immersive Video> VR Digital Glitch option. Drag and drop the effect to text layer.
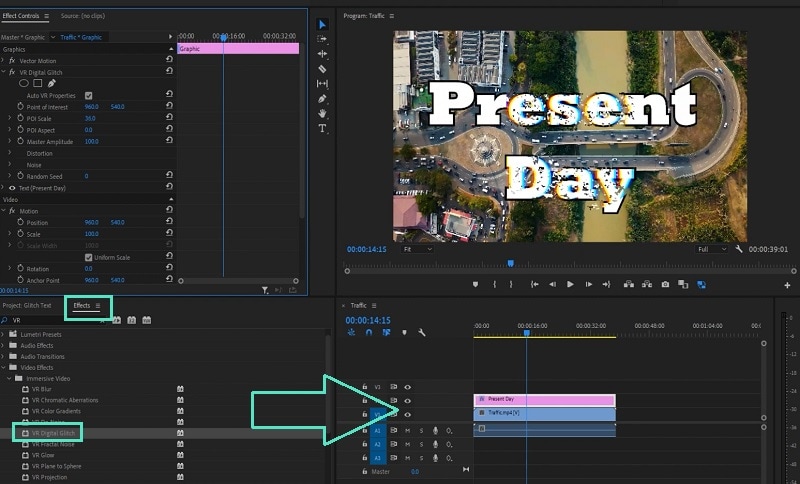
Step4 Under Effect Controls tab, you will find all the different parameters that you can adjust to get the glitch text effect perfectly.
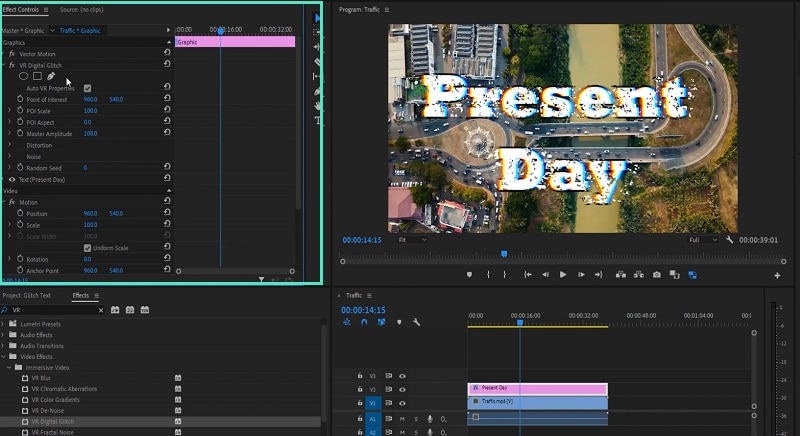
Step5 Turn on Master Amplitude and add multiple keyframes as different points in the Timeline and change the distortion value to make the effect prominent.
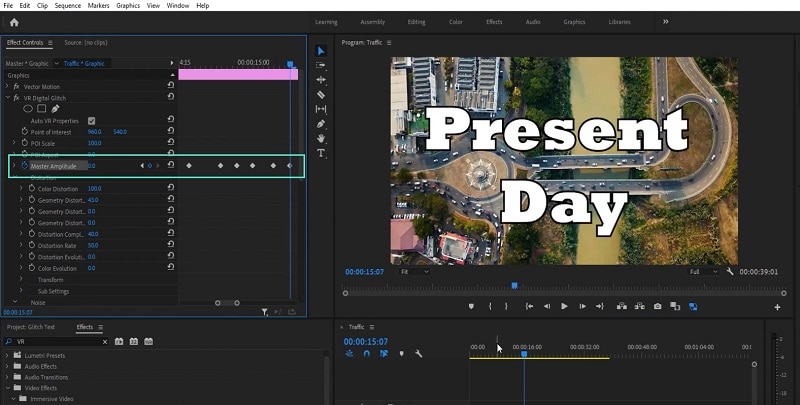
Step6 Go to the first keyframe and turn on Random Seed effect. Go to the last keyframe and turn on Random Seed effect and change the value to 75. Play the video to check the entire video with glitch text effect.
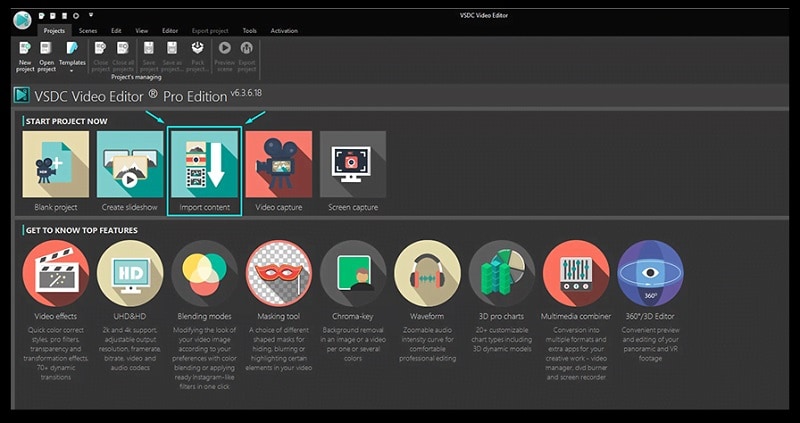
Part 3. Use VSDC Video Editor to Create Glitch Text
If you do not have any premium video editor on your computer and you do not want to purchase any premium video editor, you can still get glitter text effect free. You need to download and install VSDC free video editor on your computer. But the steps to create glitch text on VSDC video editor are slightly complicated as the user interface is not as intuitive as Filmora . Here are the steps to add free glitch text effect on your video.
Step1 Download and install VSDC video editor. Launch the editor and click on New Project to get started. Import your video to your project where you want to add glitch text effect.
Step2 Use Type tool to write a text on the video. You can press Shift+T shortcut as well. After typing the text, adjust the text style as per your preference.
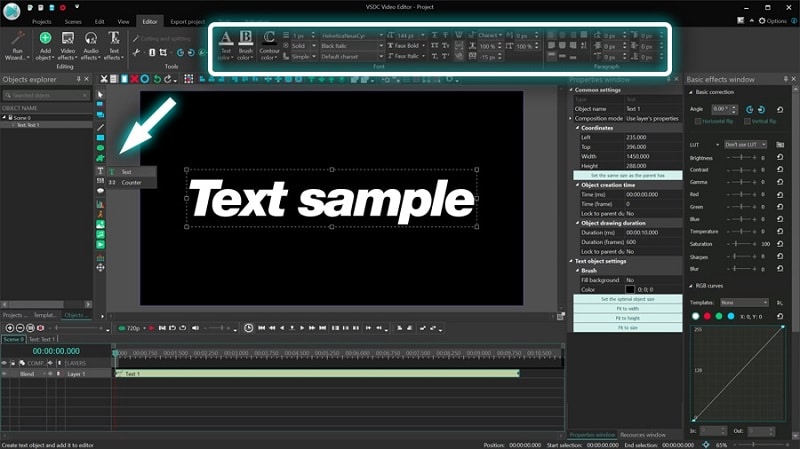
Step3 Double-click on the text layer on Timeline and go to Video Effects> Special FX and click on Glitch option.
Step4 A window will appear where you can set the starting point, duration, and different parameters. Click on Ok button.
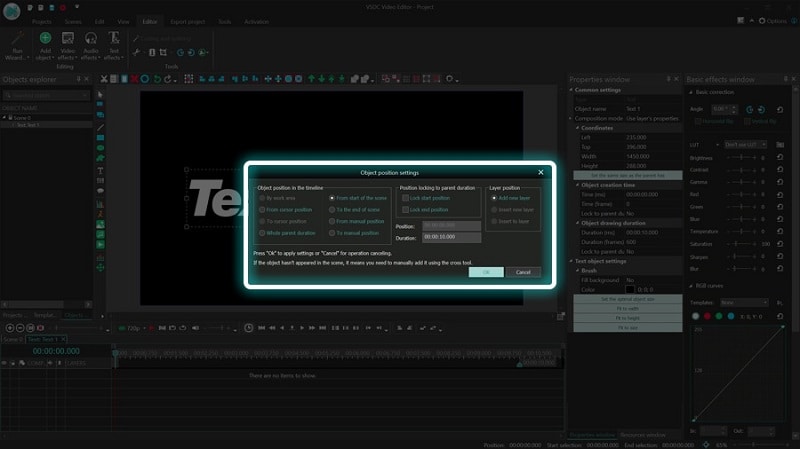
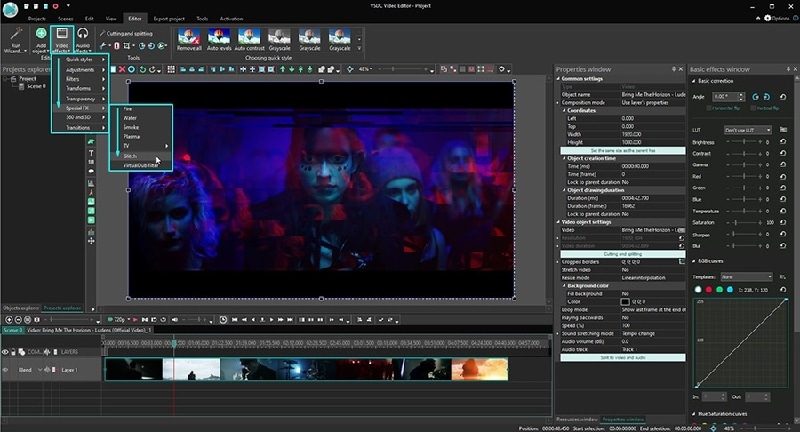
Step5 Go to Properties Windows and click on Presets to select different types of glitch text effects. You can also adjust the intensity of the text effects and other parameters as you feel.
Part 4. Related FAQs about Glitch Text
1. How do you animate glitch text?
If you want to animate glitch text for free, VSDC video editor is ideal as you can customize the effect on any text in simple steps. If you want to use a premium video editor, we recommend Filmora as there are various glitch text effects available to apply to any text on your video instantly.
2. How do you glitch text on video?
First, you have to import your video in your video editor. Type the desired text and set the style. Thereafter, go to glitch text effect presets available on the video editor and apply it to the text instantly. You can customize the glitch text effect as per your preference to make the animation more prominent.
3. How do you glitch text on Android?
You should first install Glitch Video Effect: Glitch FX app from Play Store. Edit your video on the app to add any text, and thereafter, add glitch text effect instantly. In fact, the glitch text effect is available in almost all popular video editor apps on Android due to the effect being trendy and viral.
Free Download For macOS 10.14 or later
Step1 Download and install Filmora on your computer. Go to File> New Project from the menu bar to start video editing project.
Step2 Go to File> Import Media > Import Media Files to import the video clips where you want to add glitch text effect. Drop the clip into the Timeline to get started.
Step3 Go to Titles tab located at the top. From the left panel, click on Titles option. Search “glitch” in the search field and you will see all the glitch text effects that you can apply to the text in your video.
Step4 Select any glitch text effect and drop it into the Timeline above the video clip exactly where you want the text and the effect to appear.
Step5 Double-click on the glitch text effect located on Timeline and edit the text, style, and other parameters as per your preference. Click on Ok and play the video to see your edited video with the glitch text effect.
Part 2. How to Make Glitch Text Effect with Premiere Pro
Adobe Premiere Pro is another renowned video editor where you can add glitch text effect to your video. Premiere Pro is strictly for professional video editors as the user interface is not as intuitive as Filmora . The learning curve is steep, and therefore, you need to go through the steps to add glitch text effect Premiere Pro. There are several glitch text effect presets available that you can apply to any text on your video to make them engaging. Here are the steps to make glitch text effect with Premiere Pro.
Step1 Launch Adobe Premiere Pro and go to New> Project to get started. Import your video and drop it into Timeline.
Step2 Use the Type tool to write any text on your video to add glitch text effect. You should have a text layer on Timeline.
Step3 Go to Effects> Immersive Video> VR Digital Glitch option. Drag and drop the effect to text layer.
Step4 Under Effect Controls tab, you will find all the different parameters that you can adjust to get the glitch text effect perfectly.
Step5 Turn on Master Amplitude and add multiple keyframes as different points in the Timeline and change the distortion value to make the effect prominent.
Step6 Go to the first keyframe and turn on Random Seed effect. Go to the last keyframe and turn on Random Seed effect and change the value to 75. Play the video to check the entire video with glitch text effect.
Part 3. Use VSDC Video Editor to Create Glitch Text
If you do not have any premium video editor on your computer and you do not want to purchase any premium video editor, you can still get glitter text effect free. You need to download and install VSDC free video editor on your computer. But the steps to create glitch text on VSDC video editor are slightly complicated as the user interface is not as intuitive as Filmora . Here are the steps to add free glitch text effect on your video.
Step1 Download and install VSDC video editor. Launch the editor and click on New Project to get started. Import your video to your project where you want to add glitch text effect.
Step2 Use Type tool to write a text on the video. You can press Shift+T shortcut as well. After typing the text, adjust the text style as per your preference.
Step3 Double-click on the text layer on Timeline and go to Video Effects> Special FX and click on Glitch option.
Step4 A window will appear where you can set the starting point, duration, and different parameters. Click on Ok button.
Step5 Go to Properties Windows and click on Presets to select different types of glitch text effects. You can also adjust the intensity of the text effects and other parameters as you feel.
Part 4. Related FAQs about Glitch Text
1. How do you animate glitch text?
If you want to animate glitch text for free, VSDC video editor is ideal as you can customize the effect on any text in simple steps. If you want to use a premium video editor, we recommend Filmora as there are various glitch text effects available to apply to any text on your video instantly.
2. How do you glitch text on video?
First, you have to import your video in your video editor. Type the desired text and set the style. Thereafter, go to glitch text effect presets available on the video editor and apply it to the text instantly. You can customize the glitch text effect as per your preference to make the animation more prominent.
3. How do you glitch text on Android?
You should first install Glitch Video Effect: Glitch FX app from Play Store. Edit your video on the app to add any text, and thereafter, add glitch text effect instantly. In fact, the glitch text effect is available in almost all popular video editor apps on Android due to the effect being trendy and viral.
Also read:
- Updated Everything That You Need to Know About Video Montages- Ideas, Techniques, and Software for 2024
- 2024 Approved In This Article, We Will Cover the Stages of Film Production You Need to Keep in Mind.Without Further Ado, Lets Get Started
- New Do You Want Your Photo and Video Edits to Look Like Peter McKinnons? Color-Grade Your Media Files with Peter McKinnon LUTs to Make Your Content Stand Out
- 2024 Approved Having Difficulty in Choosing the Most Affordable 3D Slideshow Software? Stay Here for the Best Application Choices of All Times to Create the Most Stunning Slideshows Ever
- New A Complete Guideline About QuickTime Player for 2024
- What Is a Transparent Logo and Why Do You Need It for 2024
- New How to Add Background to Video With/Without a Green Screen
- In 2024, Voice Changer for Discord | Use Voicemod on Discord
- New How To Blur Background in Adobe Premiere Pro Detailed Guide
- New Storyboards Are Amazing Way if You Want to Present Your Story in a Visual Way, Like Explaining Any Process or Giving Any Information. It Is a Graphic Layout to Tell You a Story
- Updated Within the Realm of Graphic Editing, People Also Ask How to Add Emoji to Photo. Stay Tuned to Walk Through the Best Possible Solutions in the IT Market
- How to Do Datamoshing Effect in After Effects for 2024
- Updated In 2024, How to Be a Good Podcast Host
- Looking for Ways to Compress Your Videos for Instagram? Keep Reading to Know About some of the Best Video Compressors for Instagram for 2024
- New Guide Adding Audio in Wondershare Filmora
- Do You Want to Learn How to Film a TikTok with Multiple Clips? Worry No More because You Can Do This by Following the Methods Instructed in This Article
- 2024 Approved Read and Learn How to Convert a Slow-Motion Video to Normal in This Guide. Besides, Find the Best Desktop Solution to Adjust Video Speed Quickly and Easily
- Updated How to Use OBS Chroma Key With/Without Green Screen
- REVIEW Whats Best 10 Software to Make AI Upscaling Video
- Updated 2024 Approved Best Free Video Editing Software to Boost Your Content Creation
- For Converting GIF to MOV Format, You Dont Need to Search From A-Z. Here Is an Amazing Guide, that Gives You Complete Details About Both Offline and Online Gif-to-MOV Converters. Catch Them Below and Experience a Pro Editing Time
- New Movavi Slideshow Maker Is a Powerful Video Editing Tool that Can Be Used to Add Rich Effects to Videos Easily. This Guide Will Introduce the Features and Show You How to Apply Effects to Videos with This Tool
- How To Fix Apple iPhone 6 Unavailable Issue With Ease | Dr.fone
- In 2024, 4 solution to get rid of pokemon fail to detect location On Apple iPhone 8 | Dr.fone
- 8 Safe and Effective Methods to Unlock Your Apple iPhone 11 Pro Max Without a Passcode | Dr.fone
- Why Your WhatsApp Live Location is Not Updating and How to Fix on your Nubia Z50 Ultra | Dr.fone
- How to Unlock iPhone 15 Pro without Passcode
- In 2024, Tutorial to Change Motorola Moto G24 IMEI without Root A Comprehensive Guide
- How to Transfer Text Messages from Honor Magic V2 to New Phone | Dr.fone
- In 2024, How to Hide/Fake Snapchat Location on Your Apple iPhone 6 | Dr.fone
- In 2024, How to Copy Contacts from Apple iPhone 12 Pro Max to SIM? | Dr.fone
- In 2024, 4 Most-Known Ways to Find Someone on Tinder For Realme 11 5G by Name | Dr.fone
- How to Cast Realme 10T 5G to Computer for iPhone and Android? | Dr.fone
- Issues playing H.265 HEVC video on Nova Y91
- Failed to play MP4 movies with Samsung Galaxy M34 5G
- How To Bypass Itel S23 FRP In 3 Different Ways
- 7 Solutions to Fix Chrome Crashes or Wont Open on Vivo Y02T | Dr.fone
- 7 Fixes for Unfortunately, Phone Has Stopped on Xiaomi Redmi K70E | Dr.fone
- Why Your Nubia Red Magic 8S Pro Screen Might be Unresponsive and How to Fix It | Dr.fone
- Motorola won’t play MP4 files
- What Is AI Voice Over?
- In 2024, The Most Useful Tips for Pokemon Go Ultra League On Vivo Y36i | Dr.fone
- iSpoofer is not working On Nubia Red Magic 8S Pro? Fixed | Dr.fone
- Title: 2024 Approved Guide Add LUTs in Premiere Pro with Ease
- Author: Chloe
- Created at : 2024-05-20 03:37:47
- Updated at : 2024-05-21 03:37:47
- Link: https://ai-editing-video.techidaily.com/2024-approved-guide-add-luts-in-premiere-pro-with-ease/
- License: This work is licensed under CC BY-NC-SA 4.0.
