
:max_bytes(150000):strip_icc():format(webp)/GettyImages-104626001-5c34f065c9e77c00010b8cd5.jpg)
2024 Approved How to Create an Aesthetic Slideshow Presentation
How to Create an Aesthetic Slideshow Presentation
How to Make an Aesthetic Slideshow Presentation
An easy yet powerful editor
Numerous effects to choose from
Detailed tutorials provided by the official channel
The slideshow must be engaging and attractive. And the recent trend is all about making things around your aesthetic, that is, visually pleasant. You might want to know how you, too, can make such aesthetic slideshows? Well, in the following discussion, we will discuss all of it, along with the best tool for making the best aesthetic slideshows.
In this article
01 The Best 8 Premium Aesthetic Slideshow Template Designs
02 [How to Make an Aesthetic Slideshow Presentation](#Part 2)
03 [FAQ of Making Aesthetic Slideshow](#Part 3)
Part 1 The Best 8 Premium Aesthetic Slideshow Template Designs
One of the best ways of making marvellous aesthetic slideshows is by using an aesthetic slideshow template. The templates have readymade elements that emit aesthetic and minimalistic vibes to your slideshow.
You will find numerous templates that have an aesthetic and minimalistic theme. You can choose any among the countless for your slideshows. There are many designs of templates available for making aesthetic slideshows.
We will discuss eight premium aesthetic slideshow template designs that you can readily use in your slideshows to make your work a lot easier. These template designs will be some of the best ones and can serve and suit every possible purpose for creating a slideshow.
So, here are the best and the most useful eight aesthetic slideshow template designs that you can use for making fantastic aesthetic slideshows.
01Leafy Template Design
The Leafy template design is best suitable for making the best aesthetic slideshows with a classy presentation theme. It is available in Google Slides, and it consists of as many as 120 unique designed slides and two variations of colours.
You can readily make changes and edits and customize the tinplated design according to your imagination, reference and skills. It is best for making classy presentations because the designs are simple, yet they reflect the quality of elegance that helps you create the best aesthetic sideshows.

02Cinematic Reel Template
The Cinematic Reel template is a premiere pro template design by Videomaker. It consists of 22 media layers and 12 editable tact layers, and it has a very stylish design and includes simple yet impactful text animations.

Any trailers, demos, reel videos, short movie trails and the like can be ideally and perfectly created with this template design. Using this template design is absolutely effortless, and you can make any content-related slideshows effortlessly and ideally with this slideshow template design by Videomaker.
03B-Clinique
B-Clinique is the template design for making a minimalist aesthetic slideshow avowable on Google Slides. This template design is best suited for creating trendy aesthetic slideshows. It includes designs of line arts, subtle pleasant shares and all the other components that solely and perfectly reflect an aesthetic aura.
It was primarily designed for making slides for cosmetology purposes. It has 30 different slide designs and is ideal for creating slides for the industry by integrating a few edits. It ideally reflects a calming aura as it uses the earthy brown tone and shade for the design of the template.

04YouTube Pack Template
We all know that various social media platforms have become the most influential factor in our lives. And YouTube is the most renowned among all the other social media platforms, and now, it has even become a mode of earning a livelihood.
And for making slideshows that are to be put up on one or more social media platforms, especially on YouTube, they need to be presented in a particular manner. And you can readily make aesthetic slideshows ideal for social media platforms, especially YouTube, with the YouTube Pack Templated designs, which is Mirs.
This template includes all the necessary elements, such as the “Subscribe” panel, other buttons, side frames, and the like. One can readily use it to make incredible aesthetic slides for their social media channels.

05Sunlike Template
The Sunlike Templates by the Google Slides. It is a beautiful and professional aesthetic slideshow template with design slides that can create a clean and highly professional. It is a modern-creative type of template that consists of 39 distinctive design slides. You can readily edit and thus, customise the slides according to your overreference, needs and skills.
It helps you create a lively and aesthetic presentation at the same time. It includes a lot of vibrant colours that make your presentation look exuberant and engaging.

06Fast Glitch Transitions Template
The Fast Glitch Transitions template is by Red Feathers. Transitions have been the recent trend, and in every other video, we see different and unique transitions. And when you integrate transitions in your slideshows, they become more eye-catching.
And the glitch transitions can create a unique yet pleasing effect for your slideshows when you use the many among the uncountable options available.

07Solv Template
The Solv template is by Google Slides. It is best suitable for creating your start-up business slideshow presentation when you are a big fan of aesthetic presentations. 36 slides are present with attractive pop colours, which, although they look vibrant, are gladly aesthetic too.

08Text Messages Template
The Text Messages template by Blinque can be the trendiest and the most aesthetic template design one can find. It helps you create slideshow videos in the form of text messages. So, if you want to narrate anything and do it uniquely, this template can be the best fit for you.

Part 2 How to Make an Aesthetic Slideshow Presentation
Making a slideshow presentation is quite simple and an aspect that is well-known to many. But, how can you make your slideshows look aesthetic? If you include them in your slideshows, there are a few factors that can readily turn them aesthetic.
So, let us look into the different aspects that can help you turn your slides aesthetic when you integrate them into it.
● Minimalistic Text Designs
Minimalism and aesthetic aura go simultaneously. So, the more your efforts to keep your texts and writings in your slide minimalistic, the more aesthetic your slide would look. Several such finds or text designs are available, and you can readily choose among them and integrate them into your slides.
● Use soft and pastel colours for your theme of the template
Every aesthetic object’s most common and signature feature is its subtle, pastel shade. So, stick to using a soft pastel shade for the theme of your template. The colours, such as lavender, sift purple, millennial pink, powder blue or tones of silver, can ideally fit under the collection of aesthetic shades for the youth template of the slideshows.
● Minimalistic Pictures
The images you use in your slideshow will play a considerable role in deeming how aesthetic your slides look. So, choose them after enough analysis. See whether the photos have an aesthetic or minimalistic feature. By that, we are referring to the copper tone of the picture, its content and its size. It is best to include small images to reflect the slide’s minimalistic character.
Part 3 FAQ of Making Aesthetic Slideshow
Here are some of the FAQs about making aesthetic slideshows.
01How can I make an aesthetic slideshow in PowerPoint?
One can effortlessly do so with the templates available. Also, it is best to use small images, subtle pastel shades for the theme and minimalistic text designs or fonts in the slides.
02Which is the best tool for creating aesthetic slideshows?
Filmore is one of the most effective and ideal tools for making the most aesthetically pleasing slideshows. It has over 700 filters, innumerable templates and uncountable beneficial features to make your slides look minimalistic and aesthetic.
03How can I use Filmora for making aesthetic slideshows?
Filmora has several templates that reflect minimalistic designs. You can readily use them for your slideshow video. You can also use several filters to give a subtle pastel tone to your slideshow. Lastly, the different motion control features and fonts available can help you make the most aesthetically pleasing slideshows with Filmora.
04Is Filmora suitable for slideshows?
Wondershare Filmora Video Editor is one of the best and renowned tools for video editing. And for making slideshow videos, it Is equally competent and helps make the best and the most aesthetic slideshows with its incredible features.
For Win 7 or later (64-bit)
For macOS 10.12 or later
Filmora is the best video editing tool that one can come across. It has the best and the most advanced features for editing and is ideal for professionals. But, the beginners, too, can use it to enhance their editing skills, as Filmora is not difficult to use.
Also, it is ideal for creating aesthetic slideshow videos. It is because-
● There are more than 800 templates, and among them, there are numerous aesthetic design templates that you can use
● The filters can help add an aesthetic and minimalistic tone to your slideshow video
● You can integrate different aesthetic fonts from the many available.
● Ending Thoughts →
● Now that you know all about creating the best minimalist aesthetic slideshow, bring out all your creative skills and make the most wholesome and engaging slideshow!
● Choose the best templates, and for the ideal results, pick from the templates mentioned above.
● Follow the above steps to create the most aesthetic slideshows that would perfectly mirror your imagination.
● Lastly, use the best video editing tool, Filmora, that will help you make such aesthetic slideshows that will definitely be incomparable and inimitable!
The slideshow must be engaging and attractive. And the recent trend is all about making things around your aesthetic, that is, visually pleasant. You might want to know how you, too, can make such aesthetic slideshows? Well, in the following discussion, we will discuss all of it, along with the best tool for making the best aesthetic slideshows.
In this article
01 The Best 8 Premium Aesthetic Slideshow Template Designs
02 [How to Make an Aesthetic Slideshow Presentation](#Part 2)
03 [FAQ of Making Aesthetic Slideshow](#Part 3)
Part 1 The Best 8 Premium Aesthetic Slideshow Template Designs
One of the best ways of making marvellous aesthetic slideshows is by using an aesthetic slideshow template. The templates have readymade elements that emit aesthetic and minimalistic vibes to your slideshow.
You will find numerous templates that have an aesthetic and minimalistic theme. You can choose any among the countless for your slideshows. There are many designs of templates available for making aesthetic slideshows.
We will discuss eight premium aesthetic slideshow template designs that you can readily use in your slideshows to make your work a lot easier. These template designs will be some of the best ones and can serve and suit every possible purpose for creating a slideshow.
So, here are the best and the most useful eight aesthetic slideshow template designs that you can use for making fantastic aesthetic slideshows.
01Leafy Template Design
The Leafy template design is best suitable for making the best aesthetic slideshows with a classy presentation theme. It is available in Google Slides, and it consists of as many as 120 unique designed slides and two variations of colours.
You can readily make changes and edits and customize the tinplated design according to your imagination, reference and skills. It is best for making classy presentations because the designs are simple, yet they reflect the quality of elegance that helps you create the best aesthetic sideshows.
02Cinematic Reel Template
The Cinematic Reel template is a premiere pro template design by Videomaker. It consists of 22 media layers and 12 editable tact layers, and it has a very stylish design and includes simple yet impactful text animations.
Any trailers, demos, reel videos, short movie trails and the like can be ideally and perfectly created with this template design. Using this template design is absolutely effortless, and you can make any content-related slideshows effortlessly and ideally with this slideshow template design by Videomaker.
03B-Clinique
B-Clinique is the template design for making a minimalist aesthetic slideshow avowable on Google Slides. This template design is best suited for creating trendy aesthetic slideshows. It includes designs of line arts, subtle pleasant shares and all the other components that solely and perfectly reflect an aesthetic aura.
It was primarily designed for making slides for cosmetology purposes. It has 30 different slide designs and is ideal for creating slides for the industry by integrating a few edits. It ideally reflects a calming aura as it uses the earthy brown tone and shade for the design of the template.
04YouTube Pack Template
We all know that various social media platforms have become the most influential factor in our lives. And YouTube is the most renowned among all the other social media platforms, and now, it has even become a mode of earning a livelihood.
And for making slideshows that are to be put up on one or more social media platforms, especially on YouTube, they need to be presented in a particular manner. And you can readily make aesthetic slideshows ideal for social media platforms, especially YouTube, with the YouTube Pack Templated designs, which is Mirs.
This template includes all the necessary elements, such as the “Subscribe” panel, other buttons, side frames, and the like. One can readily use it to make incredible aesthetic slides for their social media channels.
05Sunlike Template
The Sunlike Templates by the Google Slides. It is a beautiful and professional aesthetic slideshow template with design slides that can create a clean and highly professional. It is a modern-creative type of template that consists of 39 distinctive design slides. You can readily edit and thus, customise the slides according to your overreference, needs and skills.
It helps you create a lively and aesthetic presentation at the same time. It includes a lot of vibrant colours that make your presentation look exuberant and engaging.
06Fast Glitch Transitions Template
The Fast Glitch Transitions template is by Red Feathers. Transitions have been the recent trend, and in every other video, we see different and unique transitions. And when you integrate transitions in your slideshows, they become more eye-catching.
And the glitch transitions can create a unique yet pleasing effect for your slideshows when you use the many among the uncountable options available.
07Solv Template
The Solv template is by Google Slides. It is best suitable for creating your start-up business slideshow presentation when you are a big fan of aesthetic presentations. 36 slides are present with attractive pop colours, which, although they look vibrant, are gladly aesthetic too.
08Text Messages Template
The Text Messages template by Blinque can be the trendiest and the most aesthetic template design one can find. It helps you create slideshow videos in the form of text messages. So, if you want to narrate anything and do it uniquely, this template can be the best fit for you.
Part 2 How to Make an Aesthetic Slideshow Presentation
Making a slideshow presentation is quite simple and an aspect that is well-known to many. But, how can you make your slideshows look aesthetic? If you include them in your slideshows, there are a few factors that can readily turn them aesthetic.
So, let us look into the different aspects that can help you turn your slides aesthetic when you integrate them into it.
● Minimalistic Text Designs
Minimalism and aesthetic aura go simultaneously. So, the more your efforts to keep your texts and writings in your slide minimalistic, the more aesthetic your slide would look. Several such finds or text designs are available, and you can readily choose among them and integrate them into your slides.
● Use soft and pastel colours for your theme of the template
Every aesthetic object’s most common and signature feature is its subtle, pastel shade. So, stick to using a soft pastel shade for the theme of your template. The colours, such as lavender, sift purple, millennial pink, powder blue or tones of silver, can ideally fit under the collection of aesthetic shades for the youth template of the slideshows.
● Minimalistic Pictures
The images you use in your slideshow will play a considerable role in deeming how aesthetic your slides look. So, choose them after enough analysis. See whether the photos have an aesthetic or minimalistic feature. By that, we are referring to the copper tone of the picture, its content and its size. It is best to include small images to reflect the slide’s minimalistic character.
Part 3 FAQ of Making Aesthetic Slideshow
Here are some of the FAQs about making aesthetic slideshows.
01How can I make an aesthetic slideshow in PowerPoint?
One can effortlessly do so with the templates available. Also, it is best to use small images, subtle pastel shades for the theme and minimalistic text designs or fonts in the slides.
02Which is the best tool for creating aesthetic slideshows?
Filmore is one of the most effective and ideal tools for making the most aesthetically pleasing slideshows. It has over 700 filters, innumerable templates and uncountable beneficial features to make your slides look minimalistic and aesthetic.
03How can I use Filmora for making aesthetic slideshows?
Filmora has several templates that reflect minimalistic designs. You can readily use them for your slideshow video. You can also use several filters to give a subtle pastel tone to your slideshow. Lastly, the different motion control features and fonts available can help you make the most aesthetically pleasing slideshows with Filmora.
04Is Filmora suitable for slideshows?
Wondershare Filmora Video Editor is one of the best and renowned tools for video editing. And for making slideshow videos, it Is equally competent and helps make the best and the most aesthetic slideshows with its incredible features.
For Win 7 or later (64-bit)
For macOS 10.12 or later
Filmora is the best video editing tool that one can come across. It has the best and the most advanced features for editing and is ideal for professionals. But, the beginners, too, can use it to enhance their editing skills, as Filmora is not difficult to use.
Also, it is ideal for creating aesthetic slideshow videos. It is because-
● There are more than 800 templates, and among them, there are numerous aesthetic design templates that you can use
● The filters can help add an aesthetic and minimalistic tone to your slideshow video
● You can integrate different aesthetic fonts from the many available.
● Ending Thoughts →
● Now that you know all about creating the best minimalist aesthetic slideshow, bring out all your creative skills and make the most wholesome and engaging slideshow!
● Choose the best templates, and for the ideal results, pick from the templates mentioned above.
● Follow the above steps to create the most aesthetic slideshows that would perfectly mirror your imagination.
● Lastly, use the best video editing tool, Filmora, that will help you make such aesthetic slideshows that will definitely be incomparable and inimitable!
SRT Not Displaying: How to Open and Use SRT File in VLC?
The VLC media player is one major choice among the various types available, but it has some flaws. Many users search for how to open an SRT file in VLC, as the player shows certain issues related to SRT access.
For example, one may experience errors while trying to download specific subtitle formats, editing them with the videos, and then syncing SRT files with the video playback.
Luckily, there are alternative solutions you can use to view a VLC SRT file- here; we discuss all.
- Possible Causes of SRT Subtitles Not Working Properly in VLC
- Ultimate Tutorial: How to Open SRT Files in VLC [100% Working]
- Method 1: Open SRT Files in VLC on Computers
- Method 2: Open SRT Files in VLC on Android
- Method 3: Open and Add Subtitle to VLC on iPhone (video tutorial)
Part 1: VLC SRT Subtitles Not Working? Fix It with Wondershare Filmora
Yes, VLC does show some issues with the SRT file display, either due to compatibility errors or performance issues. In comparison, Wondershare Filmora 11 is an efficient software for viewing and editing media files and related components. That includes SRT files.
Wondershare Filmora
Filmora is one of the best video editing software options for desktop users, suitable for both Mac and Windows operating systems. It supports different formats related to videos and audios and allows users to transcribe these files with STT support.
Not only can you add subtitles or create them through speech-to-text conversion, but you can also edit separate SRT files. It is simple to embed the SRT file into video files with this software and make some major formatting changes, like font color, size, and style.
Filmora vs. VLC- which is better?
In the context of adding and altering any subtitle file for VLC, Filmora does allow this functionality and even adds to that to improve the user experience. Plus, the software is supported on both Mac and Windows devices, with a high-quality performance guarantee during usage.
VLC player does have multi-OS support, but it is not accessible in some regions. The latter does not support all embedded text formats for video files, like the SRT file. So, accessing and editing it can feel complex for some users. That is not an issue with Filmora, which has a comparatively simple user interface on both versions.
For an easier understanding, here is a table comparing the specifications of the two software types.
| Features | Wondershare Filmora | VLC Player |
|---|---|---|
| Subtitles | SRT, SSA, ASS | SRT, SSF |
| TTS/STT | The software supports both STT (speech-to-text) and TTS (text-to-speech) functions. | It does not support TTS/STT. |
| Video/Audio Support | MP4, FLV, AVI, MOV, MKV, 3GP, WMV, WEBM, VOB, M4A, MP3, WMA, etc.4K supported. | MP4, MKV, WMV, MOV, AVI, HDR, etc.4K supported. |
| Effects | LUTs customization, FX plugin support | Limited. |
| Cross-platform Support | Windows, Mac, iPad | Windows, Mac, Linux, iOS, Android |
Part 2: Possible Causes of SRT Subtitles Not Working Properly in VLC
While users can add subtitles to VLC since the player supports SRT extension files, some issues can cause them not to appear. Here are some potential causes of the error.
SRT files corrupted or empty
In case the SRT file you are trying to access is corrupted or does not contain any content, that will not open in the VLC media player.
The subtitles setting in VLC Media Player is not turned on
Sometimes, the SRT files are password protected or only work on video players that allow permission for it to play. So, if you have not enabled SRT access in the settings of the app, the SRT-formatted text will not appear.
Doesn’t update VLC to the latest version
In cases when the VLC Media Player itself is corrupted or outdated, it cannot allow access to some subtitle formats. You must upgrade it to the latest official version to allow video and SRT file support.
Wrong encoding instead of UTF-8
VLC player app only allows the SRT files that have UTF-8 encoding to play on the platform. Users can view the SRT files on videos if they are using the right encoded text, so make sure that you do not have the wrong encoded file.
Other unknown bugs
Other issues can cause the defect to the VLC player and, therefore, cannot open the VLC SRT file. These include certain unknown bugs and malware- make sure to check your system to find the errors.
Part 3: Ultimate Tutorial: How to Open SRT Files in VLC [100% Working]
If your system is not affected by any or all of these potential issues, the VLC player allows users to access SRT files easily. The software is available on different devices, so let’s discuss the steps on how to open the SRT file in VLC for each type.
Method 1: Open SRT Files in VLC on Computers
VLC is accessible on Windows and Mac computers, including some Linux devices. The process of accessing and opening the SRT files in the media player is mentioned here.
How to open SRT files in VLC on Windows/Mac?
Step1 Download the VLC media player software on your computer from the official site. Complete the installation process following all on-screen instructions.
Step2 Launch VLC on your device. If you have not downloaded the SRT file for your video, do it separately.
Step3 On your device, go to the main file manager (Windows Explorer for Windows users or Finder for macOS users). Organize the video file that you will add the SRT file into and the relevant SRT file into one folder.

Step4 Drag and drop both video and SRT files into the VLC media player you launched on your computer.
Or, double-click on the video file and choose “Open with VLC media player” from the options.
You can directly click on the File tab on your VLC player software and choose Open File.

Step5 After the video begins playing on-screen, open the main menu and choose Subtitles > Add Subtitles.

Step6 From your folder, choose the SRT file to upload.
Method 2: Open SRT Files in VLC on Android
It is possible to use the VLC app version on Android smartphones and tablets to view video and SRT files. The application is available for Android users in two versions- this depends on the type of processor running on the device. The compatible processors are Intel x86 and AMRv7 and higher.
How to open SRT files in VLC on Android?
Step1 Download the VLC for Android app on your device.
Step2 Click on the “Pick a File” button and add the video from your storage.
Step3 Tap on the screen in different sections to control specific functions.

Step4 Click on the button at the bottom left and choose the Subtitles option to expand.
Step5 Choose the “Select Subtitle File” option.

Step6 Choose the folder where the SRT file is saved and open it.

Method 3: Open and Add Subtitle to VLC on iPhone (video tutorial)
Like with Android, a VLC app is available for iPhone devices in different iOS versions. But this version’s process of adding and viewing subtitles is slightly complex.
For a better understanding of how that works, here is a video tutorial that will help you:
https://www.youtube.com/watch?v=iPcwSrvXwN4
Part 4: The Best Alternative to Open and Edit SRT Subtitles for Videos
It is possible to open the subtitle files on VLC, but the editing quality is not the best. Plus, as mentioned, some errors with displaying SRT files can occur. Alternatively, you would have an easier experience opening and editing SRT files for videos with Filmora.
The video editing software allows users to create SRT files into videos directly, embed the file, and even edit its style. Moreover, you can change the alignment of the SRT file with the video playback and even adjust the accompanying voice style. It is accessible on both Mac and Windows OS, is extremely simple to use, and has a wide host of effects for further video editing.
How to open and edit the SRT file with Filmora in videos?
Free Download For Win 7 or later(64-bit)
Free Download For macOS 10.14 or later
Step1 Download, install and launch Filmora software on the device.
Step2 Click on New Project > import the video file from the device and then drag it to the editor timeline.

Step3 Press the Media tab to import your saved SRT file.

Step4 You can double-click on the added SRT file and clip it.
Alternatively, right-click your cursor on the editor timeline and choose the Advanced Edit option.

Step5 Make changes to the subtitle as necessary. Change the style, time code, merge/remove/add the SRT file strips, and more. Tap the OK icon to complete.

Step6 Right-click on the edited SRT in the Filmora editor timeline and choose the “Export Subtitle File” button.

Final Words
It is possible to open SRT files in the VLC player with specific steps on different devices. Several conditions can cause the error of SRT not displaying to occur, like corrupt SRT file or incompatible encoding support. With an alternative like Filmora, you will have a better experience accessing and editing the SRT files for videos. So, give it a try.
Free Download For Win 7 or later(64-bit)
Free Download For macOS 10.14 or later
- Method 1: Open SRT Files in VLC on Computers
- Method 2: Open SRT Files in VLC on Android
- Method 3: Open and Add Subtitle to VLC on iPhone (video tutorial)
- The Best Alternative to Open and Edit SRT Subtitles for Videos
Part 1: VLC SRT Subtitles Not Working? Fix It with Wondershare Filmora
Yes, VLC does show some issues with the SRT file display, either due to compatibility errors or performance issues. In comparison, Wondershare Filmora 11 is an efficient software for viewing and editing media files and related components. That includes SRT files.
Wondershare Filmora
Filmora is one of the best video editing software options for desktop users, suitable for both Mac and Windows operating systems. It supports different formats related to videos and audios and allows users to transcribe these files with STT support.
Not only can you add subtitles or create them through speech-to-text conversion, but you can also edit separate SRT files. It is simple to embed the SRT file into video files with this software and make some major formatting changes, like font color, size, and style.
Filmora vs. VLC- which is better?
In the context of adding and altering any subtitle file for VLC, Filmora does allow this functionality and even adds to that to improve the user experience. Plus, the software is supported on both Mac and Windows devices, with a high-quality performance guarantee during usage.
VLC player does have multi-OS support, but it is not accessible in some regions. The latter does not support all embedded text formats for video files, like the SRT file. So, accessing and editing it can feel complex for some users. That is not an issue with Filmora, which has a comparatively simple user interface on both versions.
For an easier understanding, here is a table comparing the specifications of the two software types.
| Features | Wondershare Filmora | VLC Player |
|---|---|---|
| Subtitles | SRT, SSA, ASS | SRT, SSF |
| TTS/STT | The software supports both STT (speech-to-text) and TTS (text-to-speech) functions. | It does not support TTS/STT. |
| Video/Audio Support | MP4, FLV, AVI, MOV, MKV, 3GP, WMV, WEBM, VOB, M4A, MP3, WMA, etc.4K supported. | MP4, MKV, WMV, MOV, AVI, HDR, etc.4K supported. |
| Effects | LUTs customization, FX plugin support | Limited. |
| Cross-platform Support | Windows, Mac, iPad | Windows, Mac, Linux, iOS, Android |
Part 2: Possible Causes of SRT Subtitles Not Working Properly in VLC
While users can add subtitles to VLC since the player supports SRT extension files, some issues can cause them not to appear. Here are some potential causes of the error.
SRT files corrupted or empty
In case the SRT file you are trying to access is corrupted or does not contain any content, that will not open in the VLC media player.
The subtitles setting in VLC Media Player is not turned on
Sometimes, the SRT files are password protected or only work on video players that allow permission for it to play. So, if you have not enabled SRT access in the settings of the app, the SRT-formatted text will not appear.
Doesn’t update VLC to the latest version
In cases when the VLC Media Player itself is corrupted or outdated, it cannot allow access to some subtitle formats. You must upgrade it to the latest official version to allow video and SRT file support.
Wrong encoding instead of UTF-8
VLC player app only allows the SRT files that have UTF-8 encoding to play on the platform. Users can view the SRT files on videos if they are using the right encoded text, so make sure that you do not have the wrong encoded file.
Other unknown bugs
Other issues can cause the defect to the VLC player and, therefore, cannot open the VLC SRT file. These include certain unknown bugs and malware- make sure to check your system to find the errors.
Part 3: Ultimate Tutorial: How to Open SRT Files in VLC [100% Working]
If your system is not affected by any or all of these potential issues, the VLC player allows users to access SRT files easily. The software is available on different devices, so let’s discuss the steps on how to open the SRT file in VLC for each type.
Method 1: Open SRT Files in VLC on Computers
VLC is accessible on Windows and Mac computers, including some Linux devices. The process of accessing and opening the SRT files in the media player is mentioned here.
How to open SRT files in VLC on Windows/Mac?
Step1 Download the VLC media player software on your computer from the official site. Complete the installation process following all on-screen instructions.
Step2 Launch VLC on your device. If you have not downloaded the SRT file for your video, do it separately.
Step3 On your device, go to the main file manager (Windows Explorer for Windows users or Finder for macOS users). Organize the video file that you will add the SRT file into and the relevant SRT file into one folder.
Step4 Drag and drop both video and SRT files into the VLC media player you launched on your computer.
Or, double-click on the video file and choose “Open with VLC media player” from the options.
You can directly click on the File tab on your VLC player software and choose Open File.
Step5 After the video begins playing on-screen, open the main menu and choose Subtitles > Add Subtitles.
Step6 From your folder, choose the SRT file to upload.
Method 2: Open SRT Files in VLC on Android
It is possible to use the VLC app version on Android smartphones and tablets to view video and SRT files. The application is available for Android users in two versions- this depends on the type of processor running on the device. The compatible processors are Intel x86 and AMRv7 and higher.
How to open SRT files in VLC on Android?
Step1 Download the VLC for Android app on your device.
Step2 Click on the “Pick a File” button and add the video from your storage.
Step3 Tap on the screen in different sections to control specific functions.
Step4 Click on the button at the bottom left and choose the Subtitles option to expand.
Step5 Choose the “Select Subtitle File” option.
Step6 Choose the folder where the SRT file is saved and open it.
Method 3: Open and Add Subtitle to VLC on iPhone (video tutorial)
Like with Android, a VLC app is available for iPhone devices in different iOS versions. But this version’s process of adding and viewing subtitles is slightly complex.
For a better understanding of how that works, here is a video tutorial that will help you:
https://www.youtube.com/watch?v=iPcwSrvXwN4
Part 4: The Best Alternative to Open and Edit SRT Subtitles for Videos
It is possible to open the subtitle files on VLC, but the editing quality is not the best. Plus, as mentioned, some errors with displaying SRT files can occur. Alternatively, you would have an easier experience opening and editing SRT files for videos with Filmora.
The video editing software allows users to create SRT files into videos directly, embed the file, and even edit its style. Moreover, you can change the alignment of the SRT file with the video playback and even adjust the accompanying voice style. It is accessible on both Mac and Windows OS, is extremely simple to use, and has a wide host of effects for further video editing.
How to open and edit the SRT file with Filmora in videos?
Free Download For Win 7 or later(64-bit)
Free Download For macOS 10.14 or later
Step1 Download, install and launch Filmora software on the device.
Step2 Click on New Project > import the video file from the device and then drag it to the editor timeline.
Step3 Press the Media tab to import your saved SRT file.
Step4 You can double-click on the added SRT file and clip it.
Alternatively, right-click your cursor on the editor timeline and choose the Advanced Edit option.
Step5 Make changes to the subtitle as necessary. Change the style, time code, merge/remove/add the SRT file strips, and more. Tap the OK icon to complete.
Step6 Right-click on the edited SRT in the Filmora editor timeline and choose the “Export Subtitle File” button.
Final Words
It is possible to open SRT files in the VLC player with specific steps on different devices. Several conditions can cause the error of SRT not displaying to occur, like corrupt SRT file or incompatible encoding support. With an alternative like Filmora, you will have a better experience accessing and editing the SRT files for videos. So, give it a try.
Free Download For Win 7 or later(64-bit)
Free Download For macOS 10.14 or later
How to Get Zoom on TV [Easy Solutions]
The modern workforce needs adaptable alternatives to the conventional room-to-room conferencing. The latest integrated online collaboration platform is called Zoom. What’s more, now you can get Zoom on TV. Being one of the most well-known conferencing programs, it offers reliable and efficient hosting of online meetings. In a same vein, you may set up conference rooms, do video seminars, and use instant messaging to receive real-time communications. Moreover, can you get zoom on your tv? Then the answer is Yes! The ideal technique to expand a small conference is to mirror it on TV using Zoom meetings. Additionally, sharing across all platforms and devices is possible. Sharing HD video, audio, and material from your desktop and mobile devices to conference rooms and phone systems is simple, dependable, and safe with Zoom Meetings.
Zoom is one of the top videos calling applications available, however, in terms of functionality, dependability, and stability. Special features include screen sharing for multi-user annotation and local and cloud recording with transcription. With just a single click, you may share any file with supported and encrypted settings for increased security and communicate across all platforms. Zoom has now come to represent meetings for those who do their business remotely. For almost all platforms, including Android, iOS, macOS, Windows, Smart TVs, etc., the Zoom app is officially accessible. For the query how to get zoom on portal tv? you may activate Zoom screen casting whether you’re using a Windows 10 or a Mac laptop with the Chrome browser. This section will be useful to you if you want to benefit from Zoom on a TV. You may thus do so. Continue reading the article to learn more about how to get zoom on tv.
Part 1: Get Zoom on TV with HDMI Cable
Although Zoom provides companies and bigger organizations with a professional solution like Zoom Rooms, if you’re at home, you don’t need to put anything on your TV to use Zoom. You may start using Zoom right away by simply connecting your Zoom device to your TV. Connect your TV to your laptop’s HDMI port if it has one. Simple as that, however if the laptop doesn’t figure it out on its own you may need to explain what is going on with the second display. Although more reliable, connecting via cable means your source device is linked to the TV and you can’t go for a stroll. It also means you don’t have to worry about the wireless connection fading.
Steps to Get Zoom on TV with HDMI
Step1Connect the HDMI End to the TV and the Other End to Your Device
You may use this in its place if you don’t have an HDMI but do have a USB-C port. To connect to the HDMI cable coming into your TV, you’ll need a dongle, but you’ll need to make sure it’s compatible.
Step2Turn On your TV
Turn on your TV, then switch the video source to the HDMI port you just connected in your device to using the TV remote.
Step3Launch Zoom Meeting
Start or join a meeting by using the Zoom app on your smartphone (available for Android, iOS, Windows, and macOS).
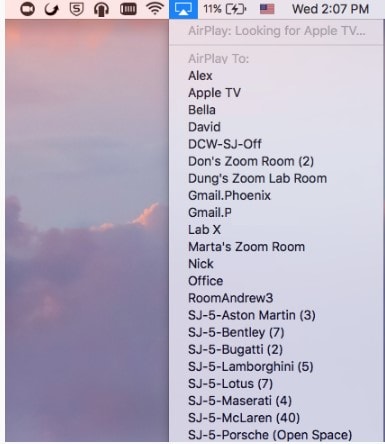
Part 2: Use AirPlay to Connect Zoom to TV
Using AirPlay mirroring, MacOS or iOS devices may share content with Zoom rooms. On MacOS and iOS, Airplay is used to communicate between the Zoom client and the Zoom room. There may be a great potential for your own business requirements if you can figure out how to utilize Airplay to Zoom mirror your screen to your Apple TV. By default, AirPlay sends audio to the Apple TV. Depending on how loud your speakers are set to play and where your input device’s microphone is located, this may cause echoing and ever-louder feedback loops. Without further ado, let’s look at some of the important strategies you may use to maximize live screen streaming on your Apple TV device.
Steps to Use AirPlay to Connect Zoom to TV
Step1Navigate to the Airplay Display in the Apple menu’s top right corner. Choose your Apple TV from the list of AirPlay Display options in the Displays preference pane. The “Show mirroring option in the menu bar when available” checkbox makes it easier to reach the AirPlay menu.

Step2Select Room Management > Zoom Rooms after logging into the Zoom online interface to manage your current Zoom Rooms. Then, modify the account settings and turn on Apple screen mirroring using the location hierarchy system.
Step3Turn on Apple Screen Mirroring by going to the Meetings tab. If this happens, you may need to activate it from the verification dialog box; otherwise, screen mirroring ought to start immediately on your device and let you see Zoom on your Apple TV. A shared password will be required of you.
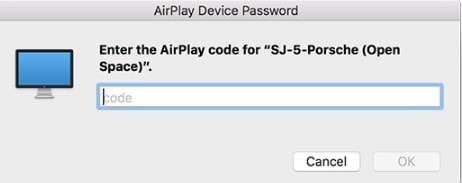
Step4Enter the passcode that is shown on the Zoom room’s screen. You may start using Airplay on your smartphone after enabling Apple screen mirroring.

Step5After that, turn off AirPlay Display by using the option in the preference pane or the system menu bar. To stop sharing, click Disconnect Airplay.
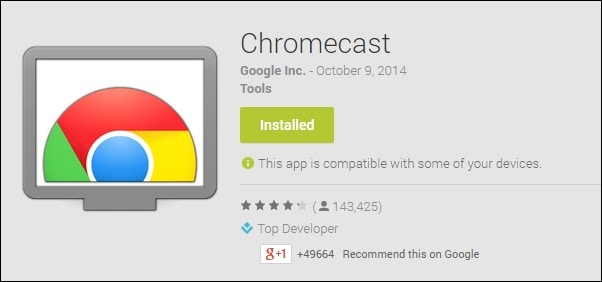
Part 3: Mirror Screen with Chromecast
The Chromecast gadgets from Google are well constructed. They should be able to cast more than just standard streaming services to your TV, logically speaking. Using a Chromecast device is one of the simplest methods to cast a Zoom conference to your TV. They are affordable, and any Google browser and the Google Home app for your Android or iOS smartphone both contain the cast capability. Between a device, such as your phone or computer, and the television, Chromecast offers the perfect connection. Chromecast makes it easy to cast Zoom meetings, particularly conferences with many of participants, since it can virtually reflect everything on your phone, tablet, or computer screen to your TV. For meetings with bigger attendance, it is advantageous to be able to cast Zoom meetings to almost any device, even a smart TV, using Chromecast.
Steps to Mirror Screen with Chromecast
Step1Install the Chromecast
Connect your Google Chromecast to the same internet source as your casting device by plugging it in.
Step2Manage Cast Settings
Locate the casting option on your device and search for recipients. Get the Zoom Cloud Meetings app for iOS or Android. You’ll also need to download the third-party software if you use an iPad or iPhone. After that, sign up for a Zoom account and log in to get started.
Step3Start Mirroring Zoom
The screen of your phone will show up on your TV when you tap your Chromecast. The best view is obtained by turning your phone into landscape after opening Zoom as usual. Once you place a call from here, the video will cast to your TV. Go to the next screen and click Start Broadcasting. You may now start casting to your Chromecast device by opening the Zoom Cloud Meeting app.

You must download the third-party app if you use an iPhone or iPad. The Chromecast Streamer software will let you cast a Zoom meeting on your Chromecast device as Zoom doesn’t provide a casting option.
Conclusion
Zoom’s popularity has skyrocketed as a result of the Pandemic. Zoom has emerged as the preferred video conferencing solution as the bulk of the global workforce shifts to a “work from home” environment. Now that more individuals than ever before work from home, video conferencing has emerged as a vital tool for marketing and corporate communication. Mirroring Zoom meetings to TV has never been this simple. In light of this, we hope that this guide has helped you come up with some of the greatest ideas and approaches for your personal zoom sharing needs. We really hope that this information has been helpful to you if you’ve been interested in learning more about screen sharing your Zoom to TV. Thanks to these methods, you can now mirror any device platform on TV.
The modern workforce needs adaptable alternatives to the conventional room-to-room conferencing. The latest integrated online collaboration platform is called Zoom. What’s more, now you can get Zoom on TV. Being one of the most well-known conferencing programs, it offers reliable and efficient hosting of online meetings. In a same vein, you may set up conference rooms, do video seminars, and use instant messaging to receive real-time communications. Moreover, can you get zoom on your tv? Then the answer is Yes! The ideal technique to expand a small conference is to mirror it on TV using Zoom meetings. Additionally, sharing across all platforms and devices is possible. Sharing HD video, audio, and material from your desktop and mobile devices to conference rooms and phone systems is simple, dependable, and safe with Zoom Meetings.
Zoom is one of the top videos calling applications available, however, in terms of functionality, dependability, and stability. Special features include screen sharing for multi-user annotation and local and cloud recording with transcription. With just a single click, you may share any file with supported and encrypted settings for increased security and communicate across all platforms. Zoom has now come to represent meetings for those who do their business remotely. For almost all platforms, including Android, iOS, macOS, Windows, Smart TVs, etc., the Zoom app is officially accessible. For the query how to get zoom on portal tv? you may activate Zoom screen casting whether you’re using a Windows 10 or a Mac laptop with the Chrome browser. This section will be useful to you if you want to benefit from Zoom on a TV. You may thus do so. Continue reading the article to learn more about how to get zoom on tv.
Part 1: Get Zoom on TV with HDMI Cable
Although Zoom provides companies and bigger organizations with a professional solution like Zoom Rooms, if you’re at home, you don’t need to put anything on your TV to use Zoom. You may start using Zoom right away by simply connecting your Zoom device to your TV. Connect your TV to your laptop’s HDMI port if it has one. Simple as that, however if the laptop doesn’t figure it out on its own you may need to explain what is going on with the second display. Although more reliable, connecting via cable means your source device is linked to the TV and you can’t go for a stroll. It also means you don’t have to worry about the wireless connection fading.
Steps to Get Zoom on TV with HDMI
Step1Connect the HDMI End to the TV and the Other End to Your Device
You may use this in its place if you don’t have an HDMI but do have a USB-C port. To connect to the HDMI cable coming into your TV, you’ll need a dongle, but you’ll need to make sure it’s compatible.
Step2Turn On your TV
Turn on your TV, then switch the video source to the HDMI port you just connected in your device to using the TV remote.
Step3Launch Zoom Meeting
Start or join a meeting by using the Zoom app on your smartphone (available for Android, iOS, Windows, and macOS).
Part 2: Use AirPlay to Connect Zoom to TV
Using AirPlay mirroring, MacOS or iOS devices may share content with Zoom rooms. On MacOS and iOS, Airplay is used to communicate between the Zoom client and the Zoom room. There may be a great potential for your own business requirements if you can figure out how to utilize Airplay to Zoom mirror your screen to your Apple TV. By default, AirPlay sends audio to the Apple TV. Depending on how loud your speakers are set to play and where your input device’s microphone is located, this may cause echoing and ever-louder feedback loops. Without further ado, let’s look at some of the important strategies you may use to maximize live screen streaming on your Apple TV device.
Steps to Use AirPlay to Connect Zoom to TV
Step1Navigate to the Airplay Display in the Apple menu’s top right corner. Choose your Apple TV from the list of AirPlay Display options in the Displays preference pane. The “Show mirroring option in the menu bar when available” checkbox makes it easier to reach the AirPlay menu.
Step2Select Room Management > Zoom Rooms after logging into the Zoom online interface to manage your current Zoom Rooms. Then, modify the account settings and turn on Apple screen mirroring using the location hierarchy system.
Step3Turn on Apple Screen Mirroring by going to the Meetings tab. If this happens, you may need to activate it from the verification dialog box; otherwise, screen mirroring ought to start immediately on your device and let you see Zoom on your Apple TV. A shared password will be required of you.
Step4Enter the passcode that is shown on the Zoom room’s screen. You may start using Airplay on your smartphone after enabling Apple screen mirroring.
Step5After that, turn off AirPlay Display by using the option in the preference pane or the system menu bar. To stop sharing, click Disconnect Airplay.
Part 3: Mirror Screen with Chromecast
The Chromecast gadgets from Google are well constructed. They should be able to cast more than just standard streaming services to your TV, logically speaking. Using a Chromecast device is one of the simplest methods to cast a Zoom conference to your TV. They are affordable, and any Google browser and the Google Home app for your Android or iOS smartphone both contain the cast capability. Between a device, such as your phone or computer, and the television, Chromecast offers the perfect connection. Chromecast makes it easy to cast Zoom meetings, particularly conferences with many of participants, since it can virtually reflect everything on your phone, tablet, or computer screen to your TV. For meetings with bigger attendance, it is advantageous to be able to cast Zoom meetings to almost any device, even a smart TV, using Chromecast.
Steps to Mirror Screen with Chromecast
Step1Install the Chromecast
Connect your Google Chromecast to the same internet source as your casting device by plugging it in.
Step2Manage Cast Settings
Locate the casting option on your device and search for recipients. Get the Zoom Cloud Meetings app for iOS or Android. You’ll also need to download the third-party software if you use an iPad or iPhone. After that, sign up for a Zoom account and log in to get started.
Step3Start Mirroring Zoom
The screen of your phone will show up on your TV when you tap your Chromecast. The best view is obtained by turning your phone into landscape after opening Zoom as usual. Once you place a call from here, the video will cast to your TV. Go to the next screen and click Start Broadcasting. You may now start casting to your Chromecast device by opening the Zoom Cloud Meeting app.
You must download the third-party app if you use an iPhone or iPad. The Chromecast Streamer software will let you cast a Zoom meeting on your Chromecast device as Zoom doesn’t provide a casting option.
Conclusion
Zoom’s popularity has skyrocketed as a result of the Pandemic. Zoom has emerged as the preferred video conferencing solution as the bulk of the global workforce shifts to a “work from home” environment. Now that more individuals than ever before work from home, video conferencing has emerged as a vital tool for marketing and corporate communication. Mirroring Zoom meetings to TV has never been this simple. In light of this, we hope that this guide has helped you come up with some of the greatest ideas and approaches for your personal zoom sharing needs. We really hope that this information has been helpful to you if you’ve been interested in learning more about screen sharing your Zoom to TV. Thanks to these methods, you can now mirror any device platform on TV.
How to Trim/Crop Video in Microsoft Powerpoint
Create High-Quality Video - Wondershare Filmora
An easy and powerful YouTube video editor
Numerous video and audio effects to choose from
Detailed tutorials provided by the official channel
PowerPoint allows you to trim or crop the length of your video and save it as a separate media file. Trimming/cropping video is a great way to remove distracting or unnecessary parts of your video or change its dimensions so that it fits within a certain area. Doing this will make your videos captivating, and more people will want to watch them. Keeping that in mind, we’ll explain how you can crop or trim video in PowerPoint. You will also learn some helpful tips that you can use when editing videos on this presentation program.
In this article
01 How to Trim Videos in PowerPoint
02 Bonus! Tips on Editing Videos in Powerpoint
How to Trim Videos in PowerPoint
Many people use Microsoft PowerPoint to prepare basic animated explainers and presentations, but you can learn how to trip or crop videos in this program with the tools that it provides. With that in mind, here is how to trim, reset, or edit videos in PowerPoint.
How to Trim a Video in PowerPoint
You can trip unnecessary content at the start or end of your video clip. However, you can only trim videos you have inserted from your PC, as this feature is not yet available for videos on the web. Follow the steps below to learn how to trim video in PowerPoint.
- If you are in a slide containing a media placeholder, click on Insert Video from File. A window will open; select the From a File option.
- Find the video file on your PC and select it. Then, click the arrow that’s right next to the Insert button. Choose either the Link to File or Insert option and your video will appear on the slide.
- If you are not using a slide that has a media placeholder, find the Insert tab and click Video on My PC. You will be able to locate the video file on your PC.
- You are now ready to trim video PowerPoint.
- Select your video, and the Playback tab will appear. Navigate to the Editing area of the ribbon and hit the Trim Video button.

- You’ll see a small editing window that allows you to trim video in PowerPoint.
- Enter the end and start times for the sections of the video you would like to keep. Alternatively, you can use the markers to choose the start and endpoints.

- To adjust the start and end times in smaller increments, you can use the arrows you see on the sides of those boxes. If you know the exact times, enter them into the corresponding boxes.
- You can also select the portion you would like to keep using the end and start time markers. In this case, sliding the red marker allows you to the end time while the green one lets you set the start time.

- If you want to use a combination of the tools above to pinpoint where to start and end the video, hit the Play button, then click the Pause button when you reach the time you want.

- Enter this time into the End Time or Start Time box, depending on the portion you would like to keep. Or you can move any of the markers to this spot.
- Hit the OK button once the portion of the video clip you want is all set. The video will appear on your slide update, and it will only play the section that you kept when trimming the video.
How to Reset or Edit a Trimmed Video in PowerPoint
If you trim video in PowerPoint and change your mind, you can always edit where you have trimmed it or reset the trimmed video back to its original state. Follow the steps below to learn how to edit to reset a trimmed video in PowerPoint.
- Select your video, and then find the Playback tab.

- Hit the Trim Video button, and the Trim Video Settings will be as they were when you were trimming the video. That means you can make the necessary adjustments.
- To reset a trimmed video back to its original length, slide the red end marker to the right and the green start maker to the left. The OK button allows you to play the whole video in your presentation.

How to Save a Trimmed Video
Now that you have trimmed your video in Microsoft PowerPoint, you might want to save it to use it outside this program. You can only save the video file after compressing it, then you can use the trimmed video as you want.
After compressing your trimmed video, only the trimmed section will show up on your slide. That said, follow the steps below to save your trimmed video:
- From the PowerPoint menu, select File > Info
- Next, select the Compress Media option.
- Next to Compress Media, you will see all media that are in your slideshow, including your trimmed video. If you’ve got other video files here, the compression process will apply to these files.
- Choose the suitable level of compression. A dialog box will pop up as the compression process takes place. Hit the Close button when this process completes.
- Go back to the slide that contains your trimmed video, which has now been compressed.
- Right-click the compressed video, and select the Save Media As option.

- Choose the location where you want to save your video. You can change its name if you want and click the Save button.
You have now successfully saved your trimmed video.
Bonus! Tips on Editing Videos in Powerpoint
Now that you know how to trim video PowerPoint, here are some helpful tips on editing videos on this application.
How to Crop Videos in PowerPoint
Once you have inserted your video in the slide, you have the option of cropping it. Follow these steps below to learn how to crop video PowerPoint.
- Open your presentation and then go to the slide where you have inserted your video clip.
- Double-click or select the video, and the two Video Tools tabs will appear in the ribbon: Playback and Format. Hit the Format tab option to activate it.

- Your slide may show a black rectangle after you insert your video.
- Add a Poster Frame to the video clip to get rid of the black rectangle.
- Click Crop in the Video Tools Format tab.

- On the edges of your video clip, you’ll see dark crop handles. If you use the Video Shape option, the crop handles will appear on the edge of that shape.
- Pressing the Ctrl key on your keyboard while you drag allows you to alter how you crop. Pressing Ctrl plus dragging the side cropping handles resizes two opposite sides, while Ctrl plus dragging the corner cropping handles resizes all the four sides.
- Pressing the Shift key on your keyboard while dragging will give you different results. You can also use the Shift and Ctrl keys simultaneously to combine both capabilities.
- You can reposition the crop by either moving the video itself or the crop area.
- Crop the unwanted portion by hitting the Crop button again or pressing the Enter key. You can also click on the Slide Area to apply the cropping changes.
- You can access more crop options by right-clicking the video, where a contextual menu will appear. Select the Format Video option.
- You’ll see the Format Video Task Pane; select the Crop option.

- You can crop sections of the video by specifying the Picture or Crop Position. You can also change other crop parameters, such as Top, Left, Offset Y, Offset X, Height, and Width.

How to Play Video Inside a Shape
If you want to edit your video and enhance its appearance, you can have it play inside a unique shape instead of the usual rectangle format that videos play in. In turn, you’ll draw attention to your video.
To play your video in an unusual shape, select your video and navigate to the Format tab. Then, go to the Video Shape menu, where you’ll see multiple shapes to choose from.

How to Apply Preset Video Styles
You can also liven up your video by applying one of the pre-designed styles that PowerPoints provides. These styles combine various effects, including bevels, reflections, shadows, tilts, and frames.
Applying preset video styles is a simple process. Select the video, then navigate to the Format tab. Click More under the Video Style section. You’ll see a gallery of preset styles; roll your mouse over it and hold the cursor over any style type. The program will apply a live preview of this style to your video.

Conclusion
● You can use PowerPoint to crop, trim, and add video styles to your videos to make them more attractive to your audience by following the steps above. In turn, they will get more views and attract more attention.
PowerPoint allows you to trim or crop the length of your video and save it as a separate media file. Trimming/cropping video is a great way to remove distracting or unnecessary parts of your video or change its dimensions so that it fits within a certain area. Doing this will make your videos captivating, and more people will want to watch them. Keeping that in mind, we’ll explain how you can crop or trim video in PowerPoint. You will also learn some helpful tips that you can use when editing videos on this presentation program.
In this article
01 How to Trim Videos in PowerPoint
02 Bonus! Tips on Editing Videos in Powerpoint
How to Trim Videos in PowerPoint
Many people use Microsoft PowerPoint to prepare basic animated explainers and presentations, but you can learn how to trip or crop videos in this program with the tools that it provides. With that in mind, here is how to trim, reset, or edit videos in PowerPoint.
How to Trim a Video in PowerPoint
You can trip unnecessary content at the start or end of your video clip. However, you can only trim videos you have inserted from your PC, as this feature is not yet available for videos on the web. Follow the steps below to learn how to trim video in PowerPoint.
- If you are in a slide containing a media placeholder, click on Insert Video from File. A window will open; select the From a File option.
- Find the video file on your PC and select it. Then, click the arrow that’s right next to the Insert button. Choose either the Link to File or Insert option and your video will appear on the slide.
- If you are not using a slide that has a media placeholder, find the Insert tab and click Video on My PC. You will be able to locate the video file on your PC.
- You are now ready to trim video PowerPoint.
- Select your video, and the Playback tab will appear. Navigate to the Editing area of the ribbon and hit the Trim Video button.
- You’ll see a small editing window that allows you to trim video in PowerPoint.
- Enter the end and start times for the sections of the video you would like to keep. Alternatively, you can use the markers to choose the start and endpoints.
- To adjust the start and end times in smaller increments, you can use the arrows you see on the sides of those boxes. If you know the exact times, enter them into the corresponding boxes.
- You can also select the portion you would like to keep using the end and start time markers. In this case, sliding the red marker allows you to the end time while the green one lets you set the start time.
- If you want to use a combination of the tools above to pinpoint where to start and end the video, hit the Play button, then click the Pause button when you reach the time you want.
- Enter this time into the End Time or Start Time box, depending on the portion you would like to keep. Or you can move any of the markers to this spot.
- Hit the OK button once the portion of the video clip you want is all set. The video will appear on your slide update, and it will only play the section that you kept when trimming the video.
How to Reset or Edit a Trimmed Video in PowerPoint
If you trim video in PowerPoint and change your mind, you can always edit where you have trimmed it or reset the trimmed video back to its original state. Follow the steps below to learn how to edit to reset a trimmed video in PowerPoint.
- Select your video, and then find the Playback tab.
- Hit the Trim Video button, and the Trim Video Settings will be as they were when you were trimming the video. That means you can make the necessary adjustments.
- To reset a trimmed video back to its original length, slide the red end marker to the right and the green start maker to the left. The OK button allows you to play the whole video in your presentation.
How to Save a Trimmed Video
Now that you have trimmed your video in Microsoft PowerPoint, you might want to save it to use it outside this program. You can only save the video file after compressing it, then you can use the trimmed video as you want.
After compressing your trimmed video, only the trimmed section will show up on your slide. That said, follow the steps below to save your trimmed video:
- From the PowerPoint menu, select File > Info
- Next, select the Compress Media option.
- Next to Compress Media, you will see all media that are in your slideshow, including your trimmed video. If you’ve got other video files here, the compression process will apply to these files.
- Choose the suitable level of compression. A dialog box will pop up as the compression process takes place. Hit the Close button when this process completes.
- Go back to the slide that contains your trimmed video, which has now been compressed.
- Right-click the compressed video, and select the Save Media As option.
- Choose the location where you want to save your video. You can change its name if you want and click the Save button.
You have now successfully saved your trimmed video.
Bonus! Tips on Editing Videos in Powerpoint
Now that you know how to trim video PowerPoint, here are some helpful tips on editing videos on this application.
How to Crop Videos in PowerPoint
Once you have inserted your video in the slide, you have the option of cropping it. Follow these steps below to learn how to crop video PowerPoint.
- Open your presentation and then go to the slide where you have inserted your video clip.
- Double-click or select the video, and the two Video Tools tabs will appear in the ribbon: Playback and Format. Hit the Format tab option to activate it.
- Your slide may show a black rectangle after you insert your video.
- Add a Poster Frame to the video clip to get rid of the black rectangle.
- Click Crop in the Video Tools Format tab.
- On the edges of your video clip, you’ll see dark crop handles. If you use the Video Shape option, the crop handles will appear on the edge of that shape.
- Pressing the Ctrl key on your keyboard while you drag allows you to alter how you crop. Pressing Ctrl plus dragging the side cropping handles resizes two opposite sides, while Ctrl plus dragging the corner cropping handles resizes all the four sides.
- Pressing the Shift key on your keyboard while dragging will give you different results. You can also use the Shift and Ctrl keys simultaneously to combine both capabilities.
- You can reposition the crop by either moving the video itself or the crop area.
- Crop the unwanted portion by hitting the Crop button again or pressing the Enter key. You can also click on the Slide Area to apply the cropping changes.
- You can access more crop options by right-clicking the video, where a contextual menu will appear. Select the Format Video option.
- You’ll see the Format Video Task Pane; select the Crop option.
- You can crop sections of the video by specifying the Picture or Crop Position. You can also change other crop parameters, such as Top, Left, Offset Y, Offset X, Height, and Width.
How to Play Video Inside a Shape
If you want to edit your video and enhance its appearance, you can have it play inside a unique shape instead of the usual rectangle format that videos play in. In turn, you’ll draw attention to your video.
To play your video in an unusual shape, select your video and navigate to the Format tab. Then, go to the Video Shape menu, where you’ll see multiple shapes to choose from.
How to Apply Preset Video Styles
You can also liven up your video by applying one of the pre-designed styles that PowerPoints provides. These styles combine various effects, including bevels, reflections, shadows, tilts, and frames.
Applying preset video styles is a simple process. Select the video, then navigate to the Format tab. Click More under the Video Style section. You’ll see a gallery of preset styles; roll your mouse over it and hold the cursor over any style type. The program will apply a live preview of this style to your video.
Conclusion
● You can use PowerPoint to crop, trim, and add video styles to your videos to make them more attractive to your audience by following the steps above. In turn, they will get more views and attract more attention.
Also read:
- Updated Best Ideas for Time Lapse Video
- How to Download and Use Windows Movie Maker 10 for 2024
- Updated 2 Effective Ways to Easily Convert VTT to SRT for 2024
- New 4K Videos Are the in Thing because of Their Flexibility and High Resolution. Stick Around to Learn How to Choose the Best Frame Rate for 4K Videos
- Updated Easy Steps to Make Glitch Effect with Filmora
- Updated What Is an Eye Zoom Transition Effect? Its a Close-Up Video Effect Allowing Viewers to Transit to the Next Clip From the Eye
- New How to Use Speed Ramping to Create a Footage
- Updated This Article Introduce You the Best Video Trimmers to Use on Different Devices, Check Them Out and Choose Your Favoriate One
- How to Create a Slideshow with Movavi Slideshow Maker
- Updated In 2024, Quick Solved How to Add Subtitles to a Video on iPhones
- New In 2024, Replacing Sky Background Using Adobe Photoshop A Comprehensive Guide
- Updated 2024 Approved OBS Green Screen Guide
- Updated Tiktok Video Aspect Ratio
- Updated In 2024, 10 Best Camera for YouTube Beginners
- Updated 2024 Approved Best GIF to AVI Converters
- New How to Clone Yourself in Videos with Filmora, In 2024
- Updated In 2024, A Comprehensive Guide on VHS Technology and Its Influence on Video Editing
- New In 2024, Hitfilm Express Video Editor Review
- New How Can I Control Speed of a Video
- How D AI Video Games Act More Human Than Human for 2024
- Top 6 MP4 Mergers to Join Videos Easily
- 2024 Approved How to Use LUTs in Lumafusion & Free LUTs Resource
- New 2024 Approved Unlock Your Video Editing Potential With Wondershare Filmora
- New Discover the Ultimate LUTs for Wondershare Filmora Uncover the Answer
- Slow Motion Video Editors To Look Out For for 2024
- How to Combine Multiple Videos Into One on Instagram for 2024
- In 2024, Here are Some of the Best Pokemon Discord Servers to Join On Vivo X100 Pro | Dr.fone
- In 2024, Easy Guide to Oppo A1 5G FRP Bypass With Best Methods
- Can I recover permanently deleted photos from 130 Music
- Can Life360 Track Or See Text Messages? What Can You Do with Life360 On Poco F5 Pro 5G? | Dr.fone
- Top Apps and Online Tools To Track Vivo V27e Phone With/Without IMEI Number
- In 2024, Sim Unlock Meizu Phones without Code 2 Ways to Remove Android Sim Lock
- Can I Bypass a Forgotten Phone Password Of Vivo Y200?
- New What Is an AI Video Editor?
- How to Intercept Text Messages on Xiaomi Redmi 13C | Dr.fone
- 3 Facts You Need to Know about Screen Mirroring Tecno Spark 20 | Dr.fone
- Best Pokemons for PVP Matches in Pokemon Go For Vivo Y100A | Dr.fone
- In 2024, How to Cast Samsung Galaxy M54 5G to Computer for iPhone and Android? | Dr.fone
- Lava Yuva 2 ADB Format Tool for PC vs. Other Unlocking Tools Which One is the Best?
- Title: 2024 Approved How to Create an Aesthetic Slideshow Presentation
- Author: Chloe
- Created at : 2024-05-20 03:37:51
- Updated at : 2024-05-21 03:37:51
- Link: https://ai-editing-video.techidaily.com/2024-approved-how-to-create-an-aesthetic-slideshow-presentation/
- License: This work is licensed under CC BY-NC-SA 4.0.
