
:max_bytes(150000):strip_icc():format(webp)/macOS-Sonoma-Banner-fe4ffda2caaf4040b81ae0b66f2d6dc0.jpg)
2024 Approved How to Create Discord GIF Avatar in Depth Guide
How to Make Discord GIF Avatar in Depth Guide
How to Create Discord GIF Avatar in Depth Guide
An easy yet powerful editor
Numerous effects to choose from
Detailed tutorials provided by the official channel
Discord is no secret, gradually becoming one of the most popular platforms for everyone. And why not when it allows users to communicate via different channels, including video calls, texts, media, voice calls, and files through private channels.
The digital platform is under Discord Inc and became official a while back. It operates under multiple operating systems, including macOS, Android, Linux, iOS, Android, iPadOS, and web browsers. As a result, it is an excellent way for everyone. The platform has risen to fame in the last six months, with many people using it.
As much as the platform is doing great, many things often arise, especially creating Discord GIF Avatar. In other words, how to deliver the best PFP or avatar for your account. Since Discord has recently gained maximum fame, there are fewer details. Fortunately, this article is here to save the day. It includes relevant information about an animated avatar for Discord or GIF discord avatar. Read through the summary below.
In this article
01 [Why Discord Is Becoming Popular Recently?](#Part 1)
02 [Why Discord Emojis?](#Part 2)
03 [How to Create Discord Emoji GIF?](#Part 3)
Part 1 Why is Discord Becoming Popular Recently?
How often do you visit social media? You probably know that the current trending networking platform is Discord if it is frequent. After all, it has risen to fame with millions of users in no time. Plus, the introduction of the GIF Avatar Discord has left many fans amazed with the application. You can also confirm its popularity with the many friends using it.
Discord features multiple good points that explain why most people love it, including the avatar Discord GIF. However, many people still question its popularity and its rise recently. As a result, this section will answer this question using relevant facts.
● It is suitable for gaming communication: Discord is primarily popular among gamers. The platform is new, but it has quickly overtaken its competitors, Skype and TeamSpeak. Why? Many gamers consider it a revolutionized application that solves all their worries making gaming communication bigger and better. Before Discord, gaming communication was difficult and dangerous. After all, you need to share personal Skype details that connect with your phone, making it a not-safe option. When we consider TeamSpeak, you realize that it is limiting with the option available since you only have a voice call. Discord brings out the best network channel; gamers and friends have quickly started using it.
● Most services are free: Discord includes multiple benefits that make communication straightforward and convenient. Luckily, most of the services available are free, meaning that almost everyone can access them. As a result, many people would quickly settle for Discord compared to other platforms since you can get so much at no cost. Currently, they have the Discord Nitro gif avatar, which is affordable and multiplies the fun.
● Create Discord bots are no cost: Discord allows users to create bots for free without including any hosting fee hence an affordable option.
● Constant updates that match the audiences’ needs: Things change in no time for Discord. Why? The developers are active and listen to the community’s opinion of what they want and why they need it. Therefore, it delivers the show that people urgently need leading to popularity rise.
● It rarely includes ads in private chats: A platform can become frustrating, mainly when it features multiple ads every minute. However, Discord is different since it almost has no ads. Therefore, people can freely chat with friends and other gamers.
● Discord is safe: The settings under Discord are safe since they include suitable privacy options and monitoring. Thus, it is a safe option. But many people often raise the question of open chatting in apps and the security issues that come with them. Many people can confirm that Discord is a safe option and if you feel otherwise, ensure that you only add friends you know.
Part 2 Why Discord Emojis?
From the information above, you can tell that Discord’s primary role is communication. And we all know that emojis are the real deal in every conversation since emojis easily communicate our feelings. Currently, most platforms with messaging options include emojis to multiply the fun. The same case happens for Discord emojis. They are there to make communication appealing, interesting, funny and reveal how you feel about a situation.
Importance of Discord emojis
● Emojis help you to communicate the right emotions. Sometimes, it’s impossible to express the right feelings using words, and emojis come to the rescue in such situations. Of course, they are useless for formal communication, but Discord holds a considerable weight for various issues.
● They are fun and exciting. Sometimes you can choose to use an emoji instead of writing some phrase, and this option works for all. Besides, it feels good to see different emojis instead of a long paragraph that tells the same story.
● Emojis make communication easy. We are in the 21st century with multiple revolutionary changes with our communication channels. Young people prefer emojis for different conversations.
● It offers a sense of presence in a conversation. People believed that they could only hold exciting discussions when they were together. Over time, this statement has been proved impossible since we can’t always be there to hold serious talks. We need Discord emojis since they give a sense of physical presence.
● They liven up a serious conversation. Have you ever noticed, people tend to include emojis when having serious talks making them more casual and creating a friendly environment that suits everyone? And this trick often works.
Discord emojis are conversation aids that every communication channel need. Why not, when it gives a sense of friendliness. Try out the Discord emojis and discover the simplest ways to make a conversation lively.
Part 3 How to Create Discord Emoji GIF
There are two popular ways to create an emoji Discord GIF avatar, Discord Nitro animated avatar and Discord GIF avatar without Nitro. The emoji GIF you make depends on the Nitro version you are using.
Creating a Discord account is simple and free, not even considering the hosting cost. However, the developers include the Discord Nitro version, which contains multiple features that make conversations bigger and better. However, the Nitro version is a paid subscription of $4.99 monthly. Creating a discord emoji GIF is quite simple if you are under the later version. After all, it includes the available GIF options that you can choose from depending on your taste. However, if you are under the free option, you won’t have this option.

For standard Discord users, things work differently. They can still add Discord GIF Avatar emojis but via a long process. Check out the details below referencing MiniTool content creator Zoe in an article about making Discord PFP a GIF.
Step 1: Download Application of Choice
We have many websites that offer Discord GIF avatar free. The animated avatars for Discord emojis are readily available for all. Some popular apps are Giphy, Tenor, and Emoji.gg. The latter is a simple platform with multiple animated Discord emojis; you can download those that match your taste.
Step 2: Search for the GIF you need
You can then search for or download a discord avatar gif that suits well as per your need.

Step 3: Click the GIF and open it on a new tab
Next, click the GIF for discord avatar to let it open into the new tab.
Step 4: Save on the GIF and export it to your PC.
In the end, save your selected avatar gif discord.
Another convenient option for non-nitro users is adding animated emojis to a Discord Server using the NQN Discord bot. Note that you need to have a server to include the NQN bot.
Part 1 How to Make a Discord PFP Avatar Online
If you are a Discord user, you understand that the platform is flexible when dealing with servers and profile names but limiting the PFP (your profile picture). Hence, it is necessary to invest in suitable options. If you wish to design something unique, you must create the GIF file or image online using different websites and resources. Besides, the communication platform is yet to introduce editing features. Here is a straightforward way to make GIF Avatar in Discord online referencing Peter Davis’ article, how to make discord PFP online.
Step 1: Search Online
First, you need to identify what face, personality, or character you want to symbolize through your Avatar. For this purpose, you can Google search also, to figure out different characters such as cartoon characters, drawings, illustrations, illusions, etc. Find the right site to download the PFP you need or take the help of multiple emojis and GIFs available under the Wondershare Filmora Video Editor application.
Step 2: Launch Filmora to Upload Character
Next, launch Filmora, upload your character and resize it to a circular shape.
Step 3: Edit your work
Now, go to the editing process using Filmora video editors
Filmora video editor is among the top editing software. The platform is friendly and supports the GIF format. It includes powerful editing skills, and you can easily import your file through drag and drop. After that, customize your PFP avatar GIF discord.

Wondershare Filmora - Best Video Editor for Mac/Windows
5,481,435 people have downloaded it.
Build unique custom animations without breaking a sweat.
Focus on creating epic stories and leave the details to Filmora’s auto features.
Start a creative adventure with drag & drop effects and endless possibilities.
Filmora simplifies advanced features to save you time and effort.
Filmora cuts out repetition so you can move on to your next creative breakthrough.
Edit the background and noise, add filters and the necessary text. Of course, the editor includes features such as rotate, crop, split, trim, merge, and flip settings. After confirming the required changes, export the files to your PC.
Step 4: Add the PFP to your Discord account
Now, open the discord account, upload your customized PFP, and make the difference.
For that, go to your profile in Discord and settle for the user settings. Click on your current PFP, and the edit file conversation will prompt you. Upload the file from your PC.
Follow the above steps to easily make the best Discord GIF avatar using Filmora.
● Ending Thoughts →
● The GIF needs to be at most 8Mbs so that Discord can confirm it.
●Discord Nitro offers many privileges to the users and is available at a monthly fee of $4.99.
●Filmora is among the top editing software you can use.
●Creating a Discord animated avatar is probably the trickiest process in the platform, especially for newbies. However, with the right hacks, the operation is straightforward. This article offers you the most convenient way to create GIF for a Discord avatar.
Discord is no secret, gradually becoming one of the most popular platforms for everyone. And why not when it allows users to communicate via different channels, including video calls, texts, media, voice calls, and files through private channels.
The digital platform is under Discord Inc and became official a while back. It operates under multiple operating systems, including macOS, Android, Linux, iOS, Android, iPadOS, and web browsers. As a result, it is an excellent way for everyone. The platform has risen to fame in the last six months, with many people using it.
As much as the platform is doing great, many things often arise, especially creating Discord GIF Avatar. In other words, how to deliver the best PFP or avatar for your account. Since Discord has recently gained maximum fame, there are fewer details. Fortunately, this article is here to save the day. It includes relevant information about an animated avatar for Discord or GIF discord avatar. Read through the summary below.
In this article
01 [Why Discord Is Becoming Popular Recently?](#Part 1)
02 [Why Discord Emojis?](#Part 2)
03 [How to Create Discord Emoji GIF?](#Part 3)
Part 1 Why is Discord Becoming Popular Recently?
How often do you visit social media? You probably know that the current trending networking platform is Discord if it is frequent. After all, it has risen to fame with millions of users in no time. Plus, the introduction of the GIF Avatar Discord has left many fans amazed with the application. You can also confirm its popularity with the many friends using it.
Discord features multiple good points that explain why most people love it, including the avatar Discord GIF. However, many people still question its popularity and its rise recently. As a result, this section will answer this question using relevant facts.
● It is suitable for gaming communication: Discord is primarily popular among gamers. The platform is new, but it has quickly overtaken its competitors, Skype and TeamSpeak. Why? Many gamers consider it a revolutionized application that solves all their worries making gaming communication bigger and better. Before Discord, gaming communication was difficult and dangerous. After all, you need to share personal Skype details that connect with your phone, making it a not-safe option. When we consider TeamSpeak, you realize that it is limiting with the option available since you only have a voice call. Discord brings out the best network channel; gamers and friends have quickly started using it.
● Most services are free: Discord includes multiple benefits that make communication straightforward and convenient. Luckily, most of the services available are free, meaning that almost everyone can access them. As a result, many people would quickly settle for Discord compared to other platforms since you can get so much at no cost. Currently, they have the Discord Nitro gif avatar, which is affordable and multiplies the fun.
● Create Discord bots are no cost: Discord allows users to create bots for free without including any hosting fee hence an affordable option.
● Constant updates that match the audiences’ needs: Things change in no time for Discord. Why? The developers are active and listen to the community’s opinion of what they want and why they need it. Therefore, it delivers the show that people urgently need leading to popularity rise.
● It rarely includes ads in private chats: A platform can become frustrating, mainly when it features multiple ads every minute. However, Discord is different since it almost has no ads. Therefore, people can freely chat with friends and other gamers.
● Discord is safe: The settings under Discord are safe since they include suitable privacy options and monitoring. Thus, it is a safe option. But many people often raise the question of open chatting in apps and the security issues that come with them. Many people can confirm that Discord is a safe option and if you feel otherwise, ensure that you only add friends you know.
Part 2 Why Discord Emojis?
From the information above, you can tell that Discord’s primary role is communication. And we all know that emojis are the real deal in every conversation since emojis easily communicate our feelings. Currently, most platforms with messaging options include emojis to multiply the fun. The same case happens for Discord emojis. They are there to make communication appealing, interesting, funny and reveal how you feel about a situation.
Importance of Discord emojis
● Emojis help you to communicate the right emotions. Sometimes, it’s impossible to express the right feelings using words, and emojis come to the rescue in such situations. Of course, they are useless for formal communication, but Discord holds a considerable weight for various issues.
● They are fun and exciting. Sometimes you can choose to use an emoji instead of writing some phrase, and this option works for all. Besides, it feels good to see different emojis instead of a long paragraph that tells the same story.
● Emojis make communication easy. We are in the 21st century with multiple revolutionary changes with our communication channels. Young people prefer emojis for different conversations.
● It offers a sense of presence in a conversation. People believed that they could only hold exciting discussions when they were together. Over time, this statement has been proved impossible since we can’t always be there to hold serious talks. We need Discord emojis since they give a sense of physical presence.
● They liven up a serious conversation. Have you ever noticed, people tend to include emojis when having serious talks making them more casual and creating a friendly environment that suits everyone? And this trick often works.
Discord emojis are conversation aids that every communication channel need. Why not, when it gives a sense of friendliness. Try out the Discord emojis and discover the simplest ways to make a conversation lively.
Part 3 How to Create Discord Emoji GIF
There are two popular ways to create an emoji Discord GIF avatar, Discord Nitro animated avatar and Discord GIF avatar without Nitro. The emoji GIF you make depends on the Nitro version you are using.
Creating a Discord account is simple and free, not even considering the hosting cost. However, the developers include the Discord Nitro version, which contains multiple features that make conversations bigger and better. However, the Nitro version is a paid subscription of $4.99 monthly. Creating a discord emoji GIF is quite simple if you are under the later version. After all, it includes the available GIF options that you can choose from depending on your taste. However, if you are under the free option, you won’t have this option.
For standard Discord users, things work differently. They can still add Discord GIF Avatar emojis but via a long process. Check out the details below referencing MiniTool content creator Zoe in an article about making Discord PFP a GIF.
Step 1: Download Application of Choice
We have many websites that offer Discord GIF avatar free. The animated avatars for Discord emojis are readily available for all. Some popular apps are Giphy, Tenor, and Emoji.gg. The latter is a simple platform with multiple animated Discord emojis; you can download those that match your taste.
Step 2: Search for the GIF you need
You can then search for or download a discord avatar gif that suits well as per your need.
Step 3: Click the GIF and open it on a new tab
Next, click the GIF for discord avatar to let it open into the new tab.
Step 4: Save on the GIF and export it to your PC.
In the end, save your selected avatar gif discord.
Another convenient option for non-nitro users is adding animated emojis to a Discord Server using the NQN Discord bot. Note that you need to have a server to include the NQN bot.
Part 1 How to Make a Discord PFP Avatar Online
If you are a Discord user, you understand that the platform is flexible when dealing with servers and profile names but limiting the PFP (your profile picture). Hence, it is necessary to invest in suitable options. If you wish to design something unique, you must create the GIF file or image online using different websites and resources. Besides, the communication platform is yet to introduce editing features. Here is a straightforward way to make GIF Avatar in Discord online referencing Peter Davis’ article, how to make discord PFP online.
Step 1: Search Online
First, you need to identify what face, personality, or character you want to symbolize through your Avatar. For this purpose, you can Google search also, to figure out different characters such as cartoon characters, drawings, illustrations, illusions, etc. Find the right site to download the PFP you need or take the help of multiple emojis and GIFs available under the Wondershare Filmora Video Editor application.
Step 2: Launch Filmora to Upload Character
Next, launch Filmora, upload your character and resize it to a circular shape.
Step 3: Edit your work
Now, go to the editing process using Filmora video editors
Filmora video editor is among the top editing software. The platform is friendly and supports the GIF format. It includes powerful editing skills, and you can easily import your file through drag and drop. After that, customize your PFP avatar GIF discord.
Wondershare Filmora - Best Video Editor for Mac/Windows
5,481,435 people have downloaded it.
Build unique custom animations without breaking a sweat.
Focus on creating epic stories and leave the details to Filmora’s auto features.
Start a creative adventure with drag & drop effects and endless possibilities.
Filmora simplifies advanced features to save you time and effort.
Filmora cuts out repetition so you can move on to your next creative breakthrough.
Edit the background and noise, add filters and the necessary text. Of course, the editor includes features such as rotate, crop, split, trim, merge, and flip settings. After confirming the required changes, export the files to your PC.
Step 4: Add the PFP to your Discord account
Now, open the discord account, upload your customized PFP, and make the difference.
For that, go to your profile in Discord and settle for the user settings. Click on your current PFP, and the edit file conversation will prompt you. Upload the file from your PC.
Follow the above steps to easily make the best Discord GIF avatar using Filmora.
● Ending Thoughts →
● The GIF needs to be at most 8Mbs so that Discord can confirm it.
●Discord Nitro offers many privileges to the users and is available at a monthly fee of $4.99.
●Filmora is among the top editing software you can use.
●Creating a Discord animated avatar is probably the trickiest process in the platform, especially for newbies. However, with the right hacks, the operation is straightforward. This article offers you the most convenient way to create GIF for a Discord avatar.
10 Top Vloggers on YouTube
Vloggers have made a significant impact on the lives of many people worldwide. They have presented different aspects of the world that should be endured and endorsed by the people. While being influencers, these vloggers have provided a platform for people to understand what the world is actually about.
If you are new to YouTube, you need to come across some people to watch. This article presents you with some best vloggers on YouTube that you can watch to get to know more about this genre.
In this article
01 10 Best Vloggers on YouTube Channel
02 Tips to Become A Popular Vlogger on YouTube
Part 1: 10 Best Vloggers on YouTube Channel
Being new on YouTube, you need to know which YouTube vlogs you should follow right away. This part caters to all significant influencers that use their vlog channels to make a worldwide impact.
1. Vagabrothers
Subscribers: 1.12M+
Two brothers who started their journey across Spain to teach English started their YouTube channel that has been eventually gaining traction in the digital network. People at YouTube have started following the brothers in their traveling journey, where they connect their vlogs with interactive content.
Along with that, out of their vlog videos, they also add different video tips for their users for effective traveling. To know where to go next for your trip, Vagabrothers are the best vloggers on YouTube for this.

2. Ali Abdaal
Subscribers: 2.81M+
A junior doctor and a vlogger, Ali Abdaal has been across YouTube since 2007. His journey across YouTube started as a medical graduate from Cambridge University; however, he built his image and career across the professional field. As a sidekick, he always kept vlogging a must-do in his life.
With various videos, from informational to recreational, Ali Abdaal has a unique form of YouTube vlogs in his package. An influencer that you should indeed watch!

3. Mr. Ben Brown
Subscribers: 653K+
If you are a fan of storytelling, this YouTube vlogger will offer you one of the best experiences in displaying travel diaries. Mr. Ben Brown, known for his storytelling and cinematography, has been making exceptional cases in the digital industry with his vlogs.
Undoubtedly one of the top YouTube vloggers you can find for experiencing travel vlogs. This YouTube vlogger posts exceptional stories and videos of his travel, making the viewers feel connected.

4. Nayna Florence
Subscribers: 269K+
Nayna Florence is a quite different kind of YouTube vlogger you’d find in the digital community. She has been connected with her viewers through videos that present her with a touch of her life. While she goes through different aspects of life which influence her, she believes in inspiring people at most.
Her motive of working for animal rights, veganism, and sustainability in life are some admirable things. You should surely look into her YouTube vlogs to get to know more about her and inspire your life with her views.

5. Casey Neistat
Subscribers: 12.4M+
This vlogger has been part of the YouTube community for years. While influencing millions of viewers, he is believed to be one of the pioneers of the vlogging community. His work ethic is quite inspiring, which has been called extremely professional at many scales. Casey works extremely hard on his videos, and his cinematography has made many people move into this profession.
Casey has kept a diverse selection of topics for his vlogs. His lifeguard training with Kevin Hart is one of the most renowned videos in the vlog section.

6. Hey Nadine
Subscribers: 469K+
She has been the leading female travel vlogger of all time. While she offers a unique set of YouTube vlogs for her viewers, she has provided an in-depth overview of her lifestyle. This has inspired many people to adopt her lifestyle and enjoy the creativity in life with fun, food, and entertainment.
‘Hey Nadine’ has collaborated with many channels throughout her vlogs, and she continues to do so every other week. This is why she has gained a lot of following across YouTube.

7. Roman Atwood Vlogs
Subscribers: 15.5M+
This vlogger started his channel as a prankster; however, he changed his genre into vlogging after a while. Although his journey is now going up to a decade as a YouTube vlogger, he has presented a family-friendly video journey for his viewers. Roman Atwood is being liked as a person who has catered to all sorts of the target audience.
Since 2018, he has changed his version of vlogs; however, he tends to continue this journey in providing people with influential content.

8. Jay Alvarrez
Subscribers: 1.25M+
Few people work with YouTube vlogs like Jay Alvarrez. He has not been an active member; however, his content is believed to be much better than most vloggers found on YouTube. Jay Alvarrez has been extremely focused on providing good content, so his viewership has been loyal to him throughout the years, regardless of him being absent for months between videos.

9. Alfie Deyes Vlogs
Subscribers: 3.66M+
This YouTuber has been quite interactable across the digital community. With three different channels, Alfie Deyes, the operator of this channel, is consistent in his vlogging work. While he is referred to among the best vloggers on YouTube, Alfie has been working on different platforms for his channel.
While working for his vlogs, he has continued the branding of his channel across offline platforms. That is why people following Pointless Blog Vlogs are truly inspired by his journey.

10. Kold
Subscribers: 1.25M+
Kold is a YouTuber who is also focused on his content rather than the frequency of the work. He has been working as a vlogger for quite a while; however, his videos are truly inspiring. Combined with effects, transitions, and shots that are alluring to the eye, Kold fulfills his responsibility as a vlogger.
He holds a place among the top YouTube vloggers and provides a very intuitive experience to his viewers across the videos.

Part 2: Tips to Become A Popular Vlogger on YouTube
With a list of people on your front, you would surely feel the privilege of becoming a popular vlogger on YouTube. As you see across these channels, there is a certain motive that makes them a successful person in this field. However, if you really want to know the secret to success, look across these tips to better understand setting up a YouTube vlog.
Set Up A Niche
As you have seen above, every vlogger starts with a certain niche in their mind. If you are good at comedy, you understand how to present your content. If you are good at cinematography and videography, you should be aware of the tools and tricks to make a perfect vlog.
Address to the Right Community
You need to make sure that you address to right target audience across your vlog. This can only be identified if you are focused across your niche. With a clear understanding of your niche, you would know to target the right age, community, and platform.
Provide Diversity in Ideas
Copying ideas of other vloggers will never bring you the community you wish for. You need to be distinct in your content, with a virtually different idea of bringing something new for the viewers. Only then would people like to hear you out.
Select the Best Video Editor
It is particularly important that you are focused on creating the best vlog for your videos. For this, you should have the perfect video editor for designing the vlogs. Wondershare Filmora provides you with the perfect platform for editing a video . Not only do you do basic editing, but you can also add effects, transitions, and different elements to make your vlogs interesting.
Closing Words
Are you ready to become one of the best vloggers on YouTube? Do you have a list you can enjoy in your free time? We hope that this article has been quite encouraging to you in offering a good list of YouTube vloggers. Not only this, but our focus across the tips may also present you with a clear ground on how to work in YouTube as a vlogger.
Wondershare Filmora
Get started easily with Filmora’s powerful performance, intuitive interface, and countless effects!
Try It Free Try It Free Try It Free

02 Tips to Become A Popular Vlogger on YouTube
Part 1: 10 Best Vloggers on YouTube Channel
Being new on YouTube, you need to know which YouTube vlogs you should follow right away. This part caters to all significant influencers that use their vlog channels to make a worldwide impact.
1. Vagabrothers
Subscribers: 1.12M+
Two brothers who started their journey across Spain to teach English started their YouTube channel that has been eventually gaining traction in the digital network. People at YouTube have started following the brothers in their traveling journey, where they connect their vlogs with interactive content.
Along with that, out of their vlog videos, they also add different video tips for their users for effective traveling. To know where to go next for your trip, Vagabrothers are the best vloggers on YouTube for this.
2. Ali Abdaal
Subscribers: 2.81M+
A junior doctor and a vlogger, Ali Abdaal has been across YouTube since 2007. His journey across YouTube started as a medical graduate from Cambridge University; however, he built his image and career across the professional field. As a sidekick, he always kept vlogging a must-do in his life.
With various videos, from informational to recreational, Ali Abdaal has a unique form of YouTube vlogs in his package. An influencer that you should indeed watch!
3. Mr. Ben Brown
Subscribers: 653K+
If you are a fan of storytelling, this YouTube vlogger will offer you one of the best experiences in displaying travel diaries. Mr. Ben Brown, known for his storytelling and cinematography, has been making exceptional cases in the digital industry with his vlogs.
Undoubtedly one of the top YouTube vloggers you can find for experiencing travel vlogs. This YouTube vlogger posts exceptional stories and videos of his travel, making the viewers feel connected.
4. Nayna Florence
Subscribers: 269K+
Nayna Florence is a quite different kind of YouTube vlogger you’d find in the digital community. She has been connected with her viewers through videos that present her with a touch of her life. While she goes through different aspects of life which influence her, she believes in inspiring people at most.
Her motive of working for animal rights, veganism, and sustainability in life are some admirable things. You should surely look into her YouTube vlogs to get to know more about her and inspire your life with her views.
5. Casey Neistat
Subscribers: 12.4M+
This vlogger has been part of the YouTube community for years. While influencing millions of viewers, he is believed to be one of the pioneers of the vlogging community. His work ethic is quite inspiring, which has been called extremely professional at many scales. Casey works extremely hard on his videos, and his cinematography has made many people move into this profession.
Casey has kept a diverse selection of topics for his vlogs. His lifeguard training with Kevin Hart is one of the most renowned videos in the vlog section.
6. Hey Nadine
Subscribers: 469K+
She has been the leading female travel vlogger of all time. While she offers a unique set of YouTube vlogs for her viewers, she has provided an in-depth overview of her lifestyle. This has inspired many people to adopt her lifestyle and enjoy the creativity in life with fun, food, and entertainment.
‘Hey Nadine’ has collaborated with many channels throughout her vlogs, and she continues to do so every other week. This is why she has gained a lot of following across YouTube.
7. Roman Atwood Vlogs
Subscribers: 15.5M+
This vlogger started his channel as a prankster; however, he changed his genre into vlogging after a while. Although his journey is now going up to a decade as a YouTube vlogger, he has presented a family-friendly video journey for his viewers. Roman Atwood is being liked as a person who has catered to all sorts of the target audience.
Since 2018, he has changed his version of vlogs; however, he tends to continue this journey in providing people with influential content.
8. Jay Alvarrez
Subscribers: 1.25M+
Few people work with YouTube vlogs like Jay Alvarrez. He has not been an active member; however, his content is believed to be much better than most vloggers found on YouTube. Jay Alvarrez has been extremely focused on providing good content, so his viewership has been loyal to him throughout the years, regardless of him being absent for months between videos.
9. Alfie Deyes Vlogs
Subscribers: 3.66M+
This YouTuber has been quite interactable across the digital community. With three different channels, Alfie Deyes, the operator of this channel, is consistent in his vlogging work. While he is referred to among the best vloggers on YouTube, Alfie has been working on different platforms for his channel.
While working for his vlogs, he has continued the branding of his channel across offline platforms. That is why people following Pointless Blog Vlogs are truly inspired by his journey.
10. Kold
Subscribers: 1.25M+
Kold is a YouTuber who is also focused on his content rather than the frequency of the work. He has been working as a vlogger for quite a while; however, his videos are truly inspiring. Combined with effects, transitions, and shots that are alluring to the eye, Kold fulfills his responsibility as a vlogger.
He holds a place among the top YouTube vloggers and provides a very intuitive experience to his viewers across the videos.
Part 2: Tips to Become A Popular Vlogger on YouTube
With a list of people on your front, you would surely feel the privilege of becoming a popular vlogger on YouTube. As you see across these channels, there is a certain motive that makes them a successful person in this field. However, if you really want to know the secret to success, look across these tips to better understand setting up a YouTube vlog.
Set Up A Niche
As you have seen above, every vlogger starts with a certain niche in their mind. If you are good at comedy, you understand how to present your content. If you are good at cinematography and videography, you should be aware of the tools and tricks to make a perfect vlog.
Address to the Right Community
You need to make sure that you address to right target audience across your vlog. This can only be identified if you are focused across your niche. With a clear understanding of your niche, you would know to target the right age, community, and platform.
Provide Diversity in Ideas
Copying ideas of other vloggers will never bring you the community you wish for. You need to be distinct in your content, with a virtually different idea of bringing something new for the viewers. Only then would people like to hear you out.
Select the Best Video Editor
It is particularly important that you are focused on creating the best vlog for your videos. For this, you should have the perfect video editor for designing the vlogs. Wondershare Filmora provides you with the perfect platform for editing a video . Not only do you do basic editing, but you can also add effects, transitions, and different elements to make your vlogs interesting.
Closing Words
Are you ready to become one of the best vloggers on YouTube? Do you have a list you can enjoy in your free time? We hope that this article has been quite encouraging to you in offering a good list of YouTube vloggers. Not only this, but our focus across the tips may also present you with a clear ground on how to work in YouTube as a vlogger.
Wondershare Filmora
Get started easily with Filmora’s powerful performance, intuitive interface, and countless effects!
Try It Free Try It Free Try It Free
Top 7 Easy Ways to Convert a Video to a GIF Online
Looking for the best video to gif online conversion tools? No worries, as we have done all the research work and have shortlisted the best tools that can assist you with the task. GIF is short and cute animated files that help in interestingly conveying a message. These short-animated visuals help in reaching and creating an impact on the target audience. So, if you have some videos, GIF animations can be created from them using a good converter tool which can be an online program or system software.
Online programs are preferred by the users owing to their simple and hassle-free use, support for basic features, and cost-saving options. So, here in this topic, we will discuss the top and easy ways to convert video to GIF online.

Part 1: Top 7 Easy Ways to Convert a Video to a GIF Online
Several online tools can be used for converting a video file into GIF, but all do not stand up to the tall claims it makes. So, if you are in search of an easy yet effective tool, shortlisted below are the top 7 tools for video into GIF online conversion.
1. Adobe Express
Powered by Adobe Premiere, this is an excellent online tool that allows converting videos in all key formats in GIF format. The free version allows adding videos for up to 1 hour and the processed files can be downloaded to the local system.
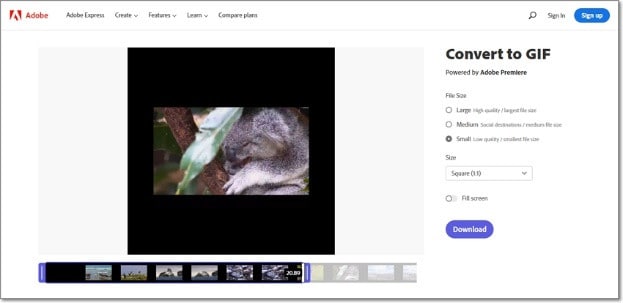
Key features
- Video files in all key formats can be converted to GIF.
- Allows selecting the aspect ratio and the file size of the target file.
- This video to GIF converter online tool support drag and drop feature.
- Allows trimming the video so that the file portion can be selected.
Pros:
- Simple and clean interface.
- Quick file processing.
- Allows selecting aspect ratio and file size.
Cons:
- Only one file at a time can be processed.
- Only desktop files can be added.
- To download the file, you need to free sign-up.
User Review:
A good online multi-platform service that works with interesting features. -TechRadar
This is one of the best programs that comes packed with wide range of features that can assist you in getting the target customized files.
2. Ezgif
Using this browser-based tool, local as well as online videos in key formats can be converted to GIFs. The interface is simple where you just need to add the file and the conversion will be done automatically.
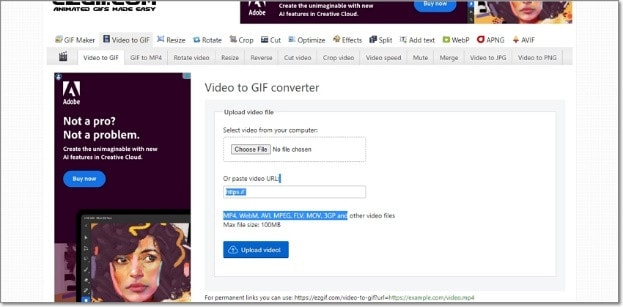
Key features
- GIF can be created from the local and online video files in all key formats.
- Choose the video part for creating the GIF file else by default, the first 5 seconds of the video are used.
Pros:
- All popular video formats like MP4, MPEG, FLV, MOV, and others are supported for conversion to GIF.
- Local, as well as file links in case of online files, can be added.
- Allows selecting the video part for which the GIF has to be created.
- Allows choosing the frame rate, and the size of the video.
This online GIF converter has an option to set static background.
Cons:
- File size limitation of 100 MB.
- Internet dependency.
User Review
“A website with many important and good tools that facilitates making your task easier. You get all features in one place. -Sasa011, Mywot.
This simple online tool is a pocket friendly option for converting your videos into GIF with added option for editing them. Supporting all key formats, the program supports additional tools as well.
3. Img2Go
Your videos on the system, cloud storage, as well as using URLs can be added to this online tool for conversion to GIF format. The look and the quality of GIFs can be adjusted by making changes in the file parameters.

Key features
- Convert all key video files like MP4, MOV, MPEG, and others to GIF.
- Customize the GIF look by editing the file size and applying the color filter.
- This online video to GIF converter allows to choose to enhance, sharpen, equalize, and edit files in other ways.
- Files to be converted can be added from the desktop, Google Drive, Dropbox, as well as URL.
- Processed files can be saved to the cloud storage in addition to the local system.
Pros:
- Multiple sources to add the video file.
- Customize the file parameters and enhance its look.
- Converted file is downloaded automatically to the local system.
Cons:
- Free version allows converting only 3 files at a time.
- Dependency on internet connectivity.
User review:
“This is the best online converter app I have discovered. It is really easy and fast to use. I absolutely recommend it and it really works.”-Maria Ancil, ChromeStats
When you need to convert only a few files at a time in a hassle-free manner consider this simple online tool. After the conversion is done, you would not have any hassles of file downloading as it is automatically saved to the system.
4. CloudConvert
Convert your videos in MP4, FLV, WebM, and other key formats to GIF using this browser-based tool that is simple and free to use. Multiple file parameters can be changed using the tool to get the desired file.

Key Features:
- Allows converting all key video formats.
- Files to be converted can be added from the desktop, URL, Dropbox, Google Drive, and OneDrive.
- Allows adjusting the fit, codec, resolution, aspect ratio, and fps.
- Option to trim the file and also add a watermark.
Pros:
- Files to be converted can be added from multiple sources.
- All key video formats supported.
- Option to control the video size, quality, and aspect ratio.
Cons:
- Free version allows only 25 conversions per day.
- Converted files need to be downloaded.
User Review
“Instant way of converting small-sized files online in many different formats.”
-Sushil, SoftwareAdvice
When conversion of cloud-based files is needed, this works a good online tool that also allows you to edit and change the key file parameters.
5. io
This is a free browser-based tool that allows creating of animated GIF files from videos. There are several video editing options also supported by the tool like split, cut, adding text, and more. You can even add a YouTube video or its link to create a GIF.

Key features:
- Free online tool for creating a GIF file.
- Support all key video formats like MP4, MOV, FLV, and others.
- Local, YouTube as well as videos from Dropbox can be added.
- Option to record the video and create its GIF.
- ‘Allows choosing the size, duration, background color, and several other file parameters.
Pros:
- Videos from multiple sources can be added.
- YouTube videos can also be converted to GIFs.
- Option to record the video and create its GIF.
- Support multiple video editing options.
Cons:
- Slow processing speed.
- Files processed through the free version have a watermark.
- Free version allows processing files under 10 minutes and of 250Mb in size.
User Review:
“It is just a perfect tool and easy to use. It supports a wide variety of media files.” - Koi, Trustpilot.
Option to convert the YouTube videos as well as the recorded videos make this tool different from the others. All popular file formats are supported and you can even customize and change the file parameters as per your requirements.
6. VistaCreate
This is another simple-to-use tool that allows converting all key video formats to a GIF file. The program allows setting various parameters as needed.
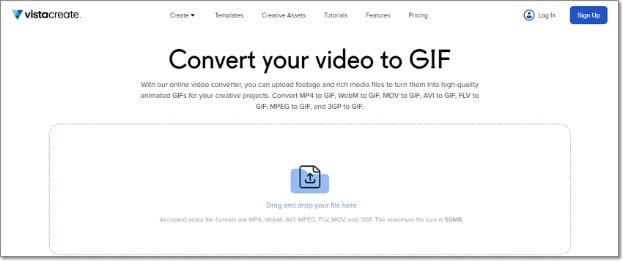
Key Features
- Convert MP4, WebM, AVI, MPEG, FLV, MOV, and 3GP to GIF.
- Support Drag and Drop feature.
- Videos up to 50MB can be processed.
- Allows choosing the video start and the end time for which GIF is to be created. If no time is selected, the first 5 seconds of the video are used.
Pros:
- Simple user interface.
- Allows selecting the video part for which GIF is to be created.
- Choose the frame rate and the speed.
Cons:
- Limited format support.
- Free version has a limitation of 50Mb file size.
- Processing speed is slow.
User Review:
“It is a simple and fast online tool that works. The program allows creating eye-catchy visuals and is free to use.”-Kshitij T, G2. Com
Simple to use, this online tool is apt when you need selected parts of the video for creating a GIF. Though it is compatible with a few selected formats, the process of conversion is simple.
7. XConvert
This online tool support conversion of wide range of file types and formats including videos to GIF. The supported video formats are MP4, WebM, MOV, and MKV. The tool also allows changing the target file parameters.

Key Features
- Free to use online tool with a simple interface.
- Allows converting MO4, MOV, WebM, and MKV videos to GIF.
- Frame Rate and resolution of the target GIF file can be selected.
- Allows adding local as well as files saved to the cloud storage.
Pros:
- Add videos from the desktop, Google Drive, and Dropbox.
- Choose the desired frame rate and resolution.
- Option to save the processed file to the system or Dropbox. Option to get the converted file download link.
Cons:
- Limited file support.
- Converted files need to be downloaded.
- Internet dependency.
User Review:
Portable, nice UI, cross-platform tool and has a lot of actions and run fast. -Roflpancake, Alternativeto
When simple conversion with basic file editing is needed, consider this online tool for your task. In addition to the local system, you can even save the files to your cloud storage.
Part 2: Comparison Table of the Best Video to GIF Converters
The table below compares the above 7 listed tools based on the formats supports, speed of file processing, and the watermark on the processed files.
| Features/Tool | Supported Format | Free Version with watermark or not | Speed of conversion |
|---|---|---|---|
| Adobe Express | All key video formats | No watermark | 2 (Fast) |
| Ezgif | All key formats including MP4, MPEG, FLV, MOV, and others. | No watermark. | 4 (Slow) |
| Img2Go | MP4, FLV, MOV, and all key video formats. | No Watermark | 2 (Fast) |
| CloudConvert | All popular video formats including MP4, MOV, FLV, MPEG, and more. | No Watermark | 2(Fast) |
| Veed.io | All key formats | Yes, free version has a watermark. | 5 (very Slow) |
| VistaCreate | MP4, WebM, AVI, MPEG, FLV, MOV, and 3GP. | No watermark | 5 (Very Slow) |
| XConvert | MP4, WebM, MOV, MKV. | No watermark | 3 (Average) |
Part 3: Best Solution to Convert Video to GIF on Windows/Mac
To convert videos to GIF on your Windows and Mac without worrying about any limitations or internet dependency, desktop software works as the best option. If you too have been looking for one such desktop program, we recommend Filmora Video Editor as the best choice. Though the software is used majorly for advanced video editing options, it is capable of performing a variety of other tasks as well including video to GIF conversion. The software allows file conversion through its export feature.
For Win 7 or later (64-bit)
For macOS 10.14 or later
Key Features
- Almost all video formats like MOV, MP4, MKV, FLV, and others can be converted to GIF.
- High-quality conversion at a fast speed.
- Support batch processing so that multiple files can be processed at a time.
- Allows editing and customizing videos using the built-in features of the software like effects, subtitles, crop, cut, and more.
Pros:
- The interface is simple which makes the software suitable even for beginners.
- Almost all popular video formats are supported.
- High-quality conversion in a hassle-free manner.
- Windows and Mac support.
Cons:
- Being a desktop software, it needs download and installation.
- Need to purchase the software subscription.
Steps to convert videos to GIF using Wondershare Filmora
Step 1. Launch the installed software on your system and the main interface select Create Project > New Project.

Step 2. Click on Import Media Files Here option under the Media tab to browse and add the local video file. Multiple files for batch processing can be added here.

Step 3. After the files are added, now it’s time to move them to the time and for this, you can simply drag and drop them to the bottom. Now at the timeline, using the built-in editing features, customization can be done as required.

Step 4. Finally, tap on the Export button and then choose GIF as the desired target format and also the location to save the converted files.

Conclusion
If one of the above-listed online tools serves your videos for GIF conversion purposes, it’s great. If not, you can use the Wondershare Filmora software. Once downloaded, the software can be used for several editing and other video-related tasks.
For macOS 10.14 or later
Key Features
- Almost all video formats like MOV, MP4, MKV, FLV, and others can be converted to GIF.
- High-quality conversion at a fast speed.
- Support batch processing so that multiple files can be processed at a time.
- Allows editing and customizing videos using the built-in features of the software like effects, subtitles, crop, cut, and more.
Pros:
- The interface is simple which makes the software suitable even for beginners.
- Almost all popular video formats are supported.
- High-quality conversion in a hassle-free manner.
- Windows and Mac support.
Cons:
- Being a desktop software, it needs download and installation.
- Need to purchase the software subscription.
Steps to convert videos to GIF using Wondershare Filmora
Step 1. Launch the installed software on your system and the main interface select Create Project > New Project.
Step 2. Click on Import Media Files Here option under the Media tab to browse and add the local video file. Multiple files for batch processing can be added here.
Step 3. After the files are added, now it’s time to move them to the time and for this, you can simply drag and drop them to the bottom. Now at the timeline, using the built-in editing features, customization can be done as required.
Step 4. Finally, tap on the Export button and then choose GIF as the desired target format and also the location to save the converted files.
Conclusion
If one of the above-listed online tools serves your videos for GIF conversion purposes, it’s great. If not, you can use the Wondershare Filmora software. Once downloaded, the software can be used for several editing and other video-related tasks.
How to Make Video Slow Motion?
Slow-motion videos are in trend now, especially when shooting for Instagram Reels , TikTok videos, or YouTube Shorts . While many users record the entire video in slow motion, there are others who need only a particular section of a clip to play at a reduced speed. Nevertheless, slowing down footage is no longer rocket science, thanks to the advancements in technology, and the availability and ease of access to relevant apps.
That said, here you will learn what is needed to record a video in slow motion, and how to get the job done in a simple way. In addition, you will also learn how to reduce the playback speed of an already existing video if it was recorded at a normal pace.
In this article
01 How to Make Slow Motion Videos via Recording?
02 How to Apply the Smooth Slow-Motion Effect in Post-Production?
Part 1: How to Make Slow Motion Videos via Recording?
The fact is, the playback speed of a video is inversely proportional to the frames per second (FPS) it has been recorded in. Usually, to have a video play at normal speed, it is recorded at 24 FPS or 30 FPS. On the other hand, if you increase the frame rate (FPS) to 120 or 240, the playback speed slows down. You can easily check this if you have access to a DSLR camera or an iPhone. These devices allow you to adjust the FPS so the videos can be recorded in slow motion.
For your convenience and learning, the step-by-step procedure on how to record a video in slow motion using an iPhone is explained below:
Step 1: Get to the SLO-MO Mode
Launch the Camera app on your iPhone (iPhone 13 Pro Max is used here for illustrations), and swipe the screen to the left to get to the SLO-MO mode.

Step 2: Adjust Recording Preferences
Tap the number at the top-right corner to switch between 120 FPS and 240 FPS as needed. Tap 1x from the lower-middle section of the screen, and use the rotator to adjust your preferred zoom level.

Step 3: Start and Stop Recording
Tap the Record button from the bottom-center of the screen to begin recording the video in slow motion. Tap Stop when you are done. You can access the recorded video from the Videos container of the Photos app in your iPhone.
If you are using Android phone, you can check this article to find out more details about How to Record Super Slow Motion Videos on Your Phone.
You may also like: Best Slo-mo Camera Apps for Android And iPhone
Part 2: How to Apply the Smooth Slow-Motion Effect in Post-Production?
If you don’t have access to a camera that can record videos in slow motion, or in case you want to capture the footage at normal playback speed and then slow it down later, you need a dedicated tool to get the job done. Even though several post-production applications are available in the market, the one that is most versatile, has an intuitive interface, and is quite easy to use is Filmora video editor from Wondershare .
The latest version of the app, i.e., Wondershare Filmora 11 has a new feature called Speed Ramping that enables you to graphically manage the speed of the clips. While using the feature, you can either slow down the entire video or certain parts of it according to your requirements. For your learning, both the methods are explained below:
Method 1: Add Slow Motion Effect to the Whole Clip
For Win 7 or later (64-bit)
For macOS 10.12 or later
Step 1: Import the Source Video and Add to Timeline
Launch Wondershare Filmora on your Windows or Mac computer (a Windows 11 PC is used here for illustrations), click New Project from the first screen that appears. Make sure that the Media tool is selected from the standard tool bar at the top, click anywhere inside the Media window, and select and import the source clip to the program.

Next, hover the mouse over the thumbnail of the imported video in the Media window, and click the + icon present at its bottom-right corner. When the confirmation box comes up, click the Match to Media or Keep Project Settings button to change the project settings to match the resolution of the video, or change the footage to meet the project settings respectively.

Step 2: Add Slow Motion Effect to the Whole Clip
Once the media is added to the timeline, click on it and then click the Speed icon on the toolbar. Scroll down to the Slow menu and then you will see 0.5x, 0.25x, 0.1x, 0.05x and 0.01x presets. Select one to add slo-mo effects to the whole select clip. and click Speed Ramping from the menu that drops down.

You can also right click the video in the timeline, and hover over to Speed option to select Uniform Speed to adjust the speed of the video to make a slo-mo effect video. Drag the speed slider to the left to slow down the video and you will see how many times it slowed down in the next field.

Method 2: Use Speed Ramping to Add Slow Motion Effect
For Win 7 or later (64-bit)
For macOS 10.12 or later
Speed Ramping enables you to add the slow-motion effect at different parts of a video and even freeze the screen for the duration that you specify. The processes to get these done are given below in detail:
Step 1: Add Source Video to Timeline and Get to the Speed Ramping Window
Use the process given in the previous method to import a source video to Wondershare Filmora 11 and add it to the Timeline. Then use the process given in the second step of the previous method to get to the Speed Ramping window.
Step 2: Add Slow Motion Effect to Different Parts of the Clip
Go to the Speed Ramping tab if it is not already selected, click Custom from the available options, and drag the adjustment points below the center line to reduce the playback speed for that particular section of the clip. Optionally, you can click any of the available presets to automatically add the slow-motion effect to the video.
Note: You can also drag the adjustment points above the line to increase the playback speed.
To add an adjustment point on the frame where it is not already present, place the playhead (skimmer) at the correct position, and click Add Adjust Point from the left of the Speed Ramping window itself. Once added, you can drag it downward to reduce the playback speed of that part of the clip.

Step 3: Freeze the Video
Place the skimmer on the frame where you want to freeze the video for a while, and click Add Freeze Frame from the left of the Speed Ramping window. When the time box appears, in the Freeze Time field, enter the duration in seconds you want to freeze the screen for, and click OK.

After adding a freeze point, optionally, you can drag and reposition it in the Speed Ramping timeline as needed. Finally, click OK from the bottom-right area to save the changes.
Part 3: When to Use Slow Motion?
There could be many instances when you want to add a slow-motion effect to your videos. Some of the most common ones include:
- Add Focus
If there is a particular scene in a clip that you want the audience to focus on, it would be a good idea to add the slow-motion effect right before that action appears on the screen, and bring the speed back to normal when the section is over.
- Skill or Style Demonstration
When a clip is playing at a normal speed, many times, the audience isn’t able to see the skills that you want to display. This is where you may want to add the slow-motion effect so that every detail can be noticed clearly and in detail.
- Replays
Mostly used for tournaments and matches where the actual action is to replayed so the audience, umpires, and other viewers can see the movements in detail before making the right decision.
- Observation
Some natural phenomena such as a deer running in the woods, a balloon full of water bursting, etc. occur quite quickly. If you want to witness such things clearly and in detail, it would be good to record them, and then reduce the playback speed for better viewing.
- Add Suspense
When you add the slow-motion effect to a scene, the impulse of the audience is automatically increased, and they take that particular section more seriously and with a thrill.
Conclusion
The slow-motion effect is inversely proportional to the framerate, i.e., frames per second or FPS. Almost all DSLR cameras that are available nowadays allow you to switch between different FPS values (typically 120 and 240) before recording. Also, if you have access to an iPhone, its Camera app has a built-in SLO-MO mode that can capture the footage in slow motion.
In addition, if you already have a video that has been recorded at a normal speed, you can use an efficient post-production software like Wondershare Filmora 11, and exploit its Speed Ramping feature to add the slow-motion effect at different scenes of a clip.
02 How to Apply the Smooth Slow-Motion Effect in Post-Production?
Part 1: How to Make Slow Motion Videos via Recording?
The fact is, the playback speed of a video is inversely proportional to the frames per second (FPS) it has been recorded in. Usually, to have a video play at normal speed, it is recorded at 24 FPS or 30 FPS. On the other hand, if you increase the frame rate (FPS) to 120 or 240, the playback speed slows down. You can easily check this if you have access to a DSLR camera or an iPhone. These devices allow you to adjust the FPS so the videos can be recorded in slow motion.
For your convenience and learning, the step-by-step procedure on how to record a video in slow motion using an iPhone is explained below:
Step 1: Get to the SLO-MO Mode
Launch the Camera app on your iPhone (iPhone 13 Pro Max is used here for illustrations), and swipe the screen to the left to get to the SLO-MO mode.
Step 2: Adjust Recording Preferences
Tap the number at the top-right corner to switch between 120 FPS and 240 FPS as needed. Tap 1x from the lower-middle section of the screen, and use the rotator to adjust your preferred zoom level.
Step 3: Start and Stop Recording
Tap the Record button from the bottom-center of the screen to begin recording the video in slow motion. Tap Stop when you are done. You can access the recorded video from the Videos container of the Photos app in your iPhone.
If you are using Android phone, you can check this article to find out more details about How to Record Super Slow Motion Videos on Your Phone.
You may also like: Best Slo-mo Camera Apps for Android And iPhone
Part 2: How to Apply the Smooth Slow-Motion Effect in Post-Production?
If you don’t have access to a camera that can record videos in slow motion, or in case you want to capture the footage at normal playback speed and then slow it down later, you need a dedicated tool to get the job done. Even though several post-production applications are available in the market, the one that is most versatile, has an intuitive interface, and is quite easy to use is Filmora video editor from Wondershare .
The latest version of the app, i.e., Wondershare Filmora 11 has a new feature called Speed Ramping that enables you to graphically manage the speed of the clips. While using the feature, you can either slow down the entire video or certain parts of it according to your requirements. For your learning, both the methods are explained below:
Method 1: Add Slow Motion Effect to the Whole Clip
For Win 7 or later (64-bit)
For macOS 10.12 or later
Step 1: Import the Source Video and Add to Timeline
Launch Wondershare Filmora on your Windows or Mac computer (a Windows 11 PC is used here for illustrations), click New Project from the first screen that appears. Make sure that the Media tool is selected from the standard tool bar at the top, click anywhere inside the Media window, and select and import the source clip to the program.
Next, hover the mouse over the thumbnail of the imported video in the Media window, and click the + icon present at its bottom-right corner. When the confirmation box comes up, click the Match to Media or Keep Project Settings button to change the project settings to match the resolution of the video, or change the footage to meet the project settings respectively.
Step 2: Add Slow Motion Effect to the Whole Clip
Once the media is added to the timeline, click on it and then click the Speed icon on the toolbar. Scroll down to the Slow menu and then you will see 0.5x, 0.25x, 0.1x, 0.05x and 0.01x presets. Select one to add slo-mo effects to the whole select clip. and click Speed Ramping from the menu that drops down.
You can also right click the video in the timeline, and hover over to Speed option to select Uniform Speed to adjust the speed of the video to make a slo-mo effect video. Drag the speed slider to the left to slow down the video and you will see how many times it slowed down in the next field.
Method 2: Use Speed Ramping to Add Slow Motion Effect
For Win 7 or later (64-bit)
For macOS 10.12 or later
Speed Ramping enables you to add the slow-motion effect at different parts of a video and even freeze the screen for the duration that you specify. The processes to get these done are given below in detail:
Step 1: Add Source Video to Timeline and Get to the Speed Ramping Window
Use the process given in the previous method to import a source video to Wondershare Filmora 11 and add it to the Timeline. Then use the process given in the second step of the previous method to get to the Speed Ramping window.
Step 2: Add Slow Motion Effect to Different Parts of the Clip
Go to the Speed Ramping tab if it is not already selected, click Custom from the available options, and drag the adjustment points below the center line to reduce the playback speed for that particular section of the clip. Optionally, you can click any of the available presets to automatically add the slow-motion effect to the video.
Note: You can also drag the adjustment points above the line to increase the playback speed.
To add an adjustment point on the frame where it is not already present, place the playhead (skimmer) at the correct position, and click Add Adjust Point from the left of the Speed Ramping window itself. Once added, you can drag it downward to reduce the playback speed of that part of the clip.
Step 3: Freeze the Video
Place the skimmer on the frame where you want to freeze the video for a while, and click Add Freeze Frame from the left of the Speed Ramping window. When the time box appears, in the Freeze Time field, enter the duration in seconds you want to freeze the screen for, and click OK.
After adding a freeze point, optionally, you can drag and reposition it in the Speed Ramping timeline as needed. Finally, click OK from the bottom-right area to save the changes.
Part 3: When to Use Slow Motion?
There could be many instances when you want to add a slow-motion effect to your videos. Some of the most common ones include:
- Add Focus
If there is a particular scene in a clip that you want the audience to focus on, it would be a good idea to add the slow-motion effect right before that action appears on the screen, and bring the speed back to normal when the section is over.
- Skill or Style Demonstration
When a clip is playing at a normal speed, many times, the audience isn’t able to see the skills that you want to display. This is where you may want to add the slow-motion effect so that every detail can be noticed clearly and in detail.
- Replays
Mostly used for tournaments and matches where the actual action is to replayed so the audience, umpires, and other viewers can see the movements in detail before making the right decision.
- Observation
Some natural phenomena such as a deer running in the woods, a balloon full of water bursting, etc. occur quite quickly. If you want to witness such things clearly and in detail, it would be good to record them, and then reduce the playback speed for better viewing.
- Add Suspense
When you add the slow-motion effect to a scene, the impulse of the audience is automatically increased, and they take that particular section more seriously and with a thrill.
Conclusion
The slow-motion effect is inversely proportional to the framerate, i.e., frames per second or FPS. Almost all DSLR cameras that are available nowadays allow you to switch between different FPS values (typically 120 and 240) before recording. Also, if you have access to an iPhone, its Camera app has a built-in SLO-MO mode that can capture the footage in slow motion.
In addition, if you already have a video that has been recorded at a normal speed, you can use an efficient post-production software like Wondershare Filmora 11, and exploit its Speed Ramping feature to add the slow-motion effect at different scenes of a clip.
Also read:
- New Enhance Your Film Production with These 5 Silence Detection Tools
- New 2024 Approved Best 8 Augmented Reality Video Games
- Updated Benefits of Live Streaming on YouTube
- New Merging MP4 Videos Made Simple Top 5 Online Tools
- In 2024, How to Build A Video Editing Career
- Best Video Title Generators for 2024
- New How to Make Eye Zoom Transition Effect with Filmora for 2024
- New 8 Ways To Live Stream Pre-Recorded Video for 2024
- In 2024, Motion Tracking Is the Process of Tracking the Movements of a Project in a Video. This Article Will Show You How to Apply Motion Tracking Effect Into Videos
- New How to Make Flying Objects in Wondershare Filmora for 2024
- Updated Top 12 AI Video Generators to Pick for 2024
- Updated 2024 Approved Best Photo Video Maker Apps with Song PC, Mobile, Online
- Updated How to Add Filters on iMovie for 2024
- Best GIF to Video Converters for 2024
- 2024 Approved If the Phenomenon of Augmented Reality Fascinates You, Consider Entering Into the Gaming World with the Best AR Games You Will Ever Come Across
- New In 2024, Convert Slow Motion Videos to Regular Videos in Your iOS Device |A How
- Updated 8 Tips to Apply Cinematic Color Grading to Your Videos
- Updated 2024 Approved Add Subtitles To Videos With Kapwing Step by Step
- New 4 Ways to Add White Borders on Mobile and Desktop for 2024
- Updated In 2024, Simple Tricks Make 3D GIF Production of Inspiration Pop up Constantly
- Updated 2024 Approved 6 Best Methods to Make a Video Longer
- 2024 Approved How to Use LUTs in Lumafusion & Free Resource
- Updated In 2024, Basic Knowledge About WMV Format and Best WMV Video Editor
- Updated How to Speed Up Pictures on TikTok Slideshow for 2024
- New Top Fixes to Resolve Issues with Premiere Pro Slow Playback
- Updated How to Blur a Still or Moving Part of Video for 2024
- New How to Add Subtitles in VLC Media Play for 2024
- 6 Tips for Your First Facebook Ads
- New Here We Will Investigate AI-Based Video Interview, How It Is Being Used, and How to Master an Artificial Intelligence Video Interview Act
- New In 2024, Create Risograph Effect In Photoshop A Beginners Guide
- 2024 Approved Complete Guide to Change Video Resolution in Filmora
- 2024 Approved How to Enable and Use OBS Zoom Camera
- 2024 Approved Want to Play a Video on Loop on Vimeo so that It Plays Again and Again? Here Are All the Different Ways to Loop a Video on Vimeo in Simple Steps
- 2024 Approved This Is a Recommendation About Bandicut. If You Are Confused, Please Check It Out
- 2024 Approved YouTube Lives Are Very Popular Nowadays and People Can Interact with the Anchor at Real Time. If You Want to Comment on a YouTube Live Chat, You Can Follow the Guide Below
- In 2024, Making Creative and Engaging Youtube Videos Is Now Easy with Several Tools. Now, YouTube Also Offers You Its Own Built-In Video Editor Through Which You Can Edit and Enhance the Video Quality
- Updated In 2024, TOP 10 Types of Video Framing From Novice to Master
- 2024 Approved How Long Does It Take To Edit Videos
- How To Film a Slow Motion Video for 2024
- In 2024, How to Transfer Data from Motorola Moto G84 5G to Other Android Devices? | Dr.fone
- In 2024, How and Where to Find a Shiny Stone Pokémon For Realme 12 Pro 5G? | Dr.fone
- In 2024, How Do You Remove Restricted Mode on iPhone 11 Pro Max
- In 2024, The Updated Method to Bypass Vivo Y200e 5G FRP
- Easily Unlock Your Realme 11 Pro Device SIM
- In 2024, How to get the dragon scale and evolution-enabled pokemon On OnePlus Nord N30 5G? | Dr.fone
- Updated In 2024, How to Record Your Memorable Honeymoon Video
- How To Unlock Any Realme V30T Phone Password Using Emergency Call
- Top 12 Illusion Gifs Top Picks
- How to Cast Nokia C300 Screen to PC Using WiFi | Dr.fone
- Updated Best 5 AI Movie Script Generators
- In 2024, How to Transfer Contacts from Realme 12+ 5G To Phone | Dr.fone
- In 2024, How Can Realme Narzo 60 5GMirror Share to PC? | Dr.fone
- Bricked Your Honor Play 40C? Heres A Full Solution | Dr.fone
- In 2024, Getting the Pokemon Go GPS Signal Not Found 11 Error in Nokia C300 | Dr.fone
- Updated 2024 Approved Translate Live Videos With The Best Video Translator
- In 2024, Network Locked SIM Card Inserted On Your Vivo Y100i Power 5G Phone? Unlock It Now
- In 2024, Top 12 Prominent Nubia Red Magic 8S Pro+ Fingerprint Not Working Solutions
- How to use Pokemon Go Joystick on Tecno Spark 20? | Dr.fone
- In 2024, How to Change Location on TikTok to See More Content On your Apple iPhone 14 Pro Max | Dr.fone
- Does Airplane Mode Turn off GPS Location On Xiaomi Mix Fold 3? | Dr.fone
- Complete Tutorial to Use VPNa to Fake GPS Location On Realme C55 | Dr.fone
- How to use Pokemon Go Joystick on Tecno Pova 5? | Dr.fone
- In 2024, Best Samsung Galaxy S24+ Pattern Lock Removal Tools Remove Android Pattern Lock Without Losing Data
- Best 3 Realme GT 5 Pro Emulator for Mac to Run Your Wanted Android Apps | Dr.fone
- How to rescue lost call logs from Samsung Galaxy S23 Tactical Edition
- How To Use Allshare Cast To Turn On Screen Mirroring On Realme C51 | Dr.fone
- How to restore wiped videos on Lava Blaze Pro 5G
- In 2024, How to Fake Snapchat Location on Apple iPhone 6 Plus | Dr.fone
- Title: 2024 Approved How to Create Discord GIF Avatar in Depth Guide
- Author: Chloe
- Created at : 2024-05-20 03:38:07
- Updated at : 2024-05-21 03:38:07
- Link: https://ai-editing-video.techidaily.com/2024-approved-how-to-create-discord-gif-avatar-in-depth-guide/
- License: This work is licensed under CC BY-NC-SA 4.0.
