
2024 Approved How to Loop a Video with iMovie on Mac and iPhone
How to Loop a Video with iMovie on Mac and iPhone
If you are a video creator, there are times when you have to loop a video. This is to extend the duration of the original video. For instance, you have a stock video of a short duration. You want it to be the background in your video throughout. You have to extend the duration of the stock video by playing it in a loop.
If you are a macOS user, you can use iMovie to loop your video. iMovie comes pre-install on macOS devices. iMovie happens to be one of the most preferred video editors among beginners. In fact, iMovie comes pre-installed on iPhones and iPads. You can easily loop your video on your mobile devices as well. We will illustrate how to loop a video on iMovie on iPhone as well as on Mac.
Part 1. How to loop a video on iMovie iPhone
iMovie by Apple comes pre-installed on iPhone and iPad. Naturally, it is one of the most widely used video editors by iPhone users. iMovie app has options for basic and even advanced levels of video editing. Looping a video on iMovie involves a few simple steps that everyone can perform easily. Here are the steps on how to loop a video in the iMovie app on your iPhone.
Step1 Launch the iMovie app on your iPhone. If you have uninstalled or disabled the app, you can always go to App Store to install it again.

Step2 If you are opening the app for the first time, you will get a welcome screen. Follow the on-screen instructions to land on the home screen of the app.
Step3 Tap on New Project “+” icon and select the Movie option to get started. This will take you to the phone media gallery to select a media file to get started.

Step4 You should tap on the Video option and select the video that you want to put into a loop. After selecting a video, tap on Create Movie option.

Step5 Tap on the video on the timeline to select the video and tap on the Duplicate option. You will see that the duration of the video has doubled. You can tap on Duplicate as many times as you want to increase the video duration.

Step6 Once you are done with the iMovie loop, tap on the Done option located in the top-left corner. Thereafter, tap on the Share icon at the bottom.

Step7 You will get a pop-up where you have to tap on the Save Video option. The edited video will be saved on your iPhone. You can open the new video from the Photos app.

Part 2. Loop Videos on Mac with iMovie
Editing a video on a Mac is always more comfortable than on an iPhone because of the larger screen. iMovie from Apple comes pre-installed on Mac as well, and hence, you can get started right away. It is completely free to use, and hence, you do not need to install any third-party video editor. Here are the steps on how to loop an iMovie video in simple steps.
Step1 Open the iMovie app from the Applications folder.
Step2 Click on Create New option and then click on the Movie option.

Step3 Bring in the required video under Movie Library by dragging the file from Finder on your Mac. You can also go to File> Import Media option and select the required video. You can also select the required media file from Events or Photos under the Libraries section.

Step4 Drag and drop the video on your timeline. When you want to loop the video, drag and drop the video clip again on the timeline. Make sure there is no gap between the first clip and the second clip on the timeline. You can drag and drop the video clip multiple times on the timeline to increase its duration.

Step5 Once you are done, go to File> Share> File option. Choose the destination to save the edited video.

Part 3. iMovie Alternative to Loop Videos on Mac
If you are looking for an iMovie alternative to perform iMovie loop video action easily, we recommend Wondershare Filmora . Filmora is available for both Mac and Windows. Filmora is a better video editor than iMovie. It is a premium video editor and it has more features and functionalities.
You can loop any video as many times as you want instantly. Besides, you can edit your video clip as per your requirements before looping the edited video. The user interface is highly intuitive for everyone. Hence, it has huge popularity among Mac users. You can also save the looped video in different file formats. Here are the steps to loop a video on Filmora.
Free Download For Win 7 or later(64-bit)
Free Download For macOS 10.14 or later
Step1 Download and install Wondershare Filmora. Launch Filmora and click on New Project on the welcome screen.

Step2 Drag and drop the video file from Finder on Mac to the Project Media folder on Filmora. Thereafter, drop the video file into the timeline.

Step3 Drag and drop the video clip into the timeline again. Make sure that there is no gap between the clips. Besides, make sure that they are on the same channel for looping. You can drag and drop the video into the timeline multiple times.

Step4 You can zoom out the timeline for better viewing. Play the video to check its output on Viewer. Finally, click on the Export button and save the video in the desired file format on your Mac.
The Bottom Line
If you want to loop a video on your Mac, iMovie is the most preferred option. The same is applicable to iPhone users as well. iMovie comes pre-installed, and it is completely free to use. That is why you can loop any video instantly. Wondershare Filmora is the best alternative to iMovie to edit and loop your video.
Free Download For macOS 10.14 or later
Step1 Download and install Wondershare Filmora. Launch Filmora and click on New Project on the welcome screen.
Step2 Drag and drop the video file from Finder on Mac to the Project Media folder on Filmora. Thereafter, drop the video file into the timeline.
Step3 Drag and drop the video clip into the timeline again. Make sure that there is no gap between the clips. Besides, make sure that they are on the same channel for looping. You can drag and drop the video into the timeline multiple times.
Step4 You can zoom out the timeline for better viewing. Play the video to check its output on Viewer. Finally, click on the Export button and save the video in the desired file format on your Mac.
The Bottom Line
If you want to loop a video on your Mac, iMovie is the most preferred option. The same is applicable to iPhone users as well. iMovie comes pre-installed, and it is completely free to use. That is why you can loop any video instantly. Wondershare Filmora is the best alternative to iMovie to edit and loop your video.
Using Track Matte and Tracking in Adobe After Effects: Reviewing All Possibilities
The realm of video editing has seen significant progress in recent years. With premium tools such as Adobe After Effects, you can take your videos to the next level. However, not every tool is easy to navigate. Some features in popular video editing software can be hard to get around.
The following guide provides valuable insight on how to use Track Matte in After Effects. Explore the endless possibilities of Track Mattes After Effects and Mask Tracking in After Effects. Also, discover a simple alternative to make After Effects mask tracking easy.
AI Smart Masking Spice up your video content with the endless possibilities of AI masking functions!
Free Download Free Download Learn More

Part 1: How to Utilize Track Mattes in Adobe After Effects?
After Effects by Adobe is a software application dedicated to visual effects and motion graphics for videos. The tool is commonly used in the post-production process of videos. The wide toolset of After Effects can be useful in filmmaking, video gaming, and TV. After Effects offers everything you need to take your creative inspirations to the next level.
- Motion Graphics: After Effects lets users animate characters and backgrounds in videos. You can generate 3-dimensional models from 2D animations. After Effects also supports the animation of logos to bring your elements to life.
- Rotoscoping: You can remove elements or drop new ones in your video using After Effects. The Roto Brush Tool can easily separate the background and foreground. You can then replace unwanted objects and replace them with new elements.
- Motion Tracking: Tracking the movement of an object is quite simple in After Effects. You can pin any element to a moving object. The smooth dynamics can enhance the overall result of the footage.
- VFX and Special Effects: After Effects is the perfect tool to add special effects to your videos. Its VFX tool lets users add magic to the footage. You can make objects disappear, control the weather, stabilize your video, and more.
Using Track Mattes in After Effects
In Adobe After Effects, a track matte is a layer that defines the transparency of another layer. It acts as a stencil, determining which parts of the underlying layer are visible and which are transparent. Track mattes are used for creating various effects such as text animations, transitions, and seamlessly composing multiple layers. After Effects offers four Track Matte options:
![]()
- Alpha Matte: Alpha matte in After Effects allows white areas in the matte layer to become visible while black areas become transparent. Effectively, this helps the underlying layer to show through.
- Alpha Inverted Matte: In an alpha inverted matte, black areas in the matte layer are visible, and white areas are transparent. It reverses the transparency values to create unique effects.
- Luma Matte: A luma matte uses the brightness values of the matte layer to determine visibility. Bright areas in the matte layer are visible, while dark areas are transparent.
- Luma Inverted Matte: The luma inverted matte works opposite to the luma matte. The top layer’s dark areas are visible, while bright areas are transparent.
![]()
You can use any of the track mattes in After Effects according to your requirements. Following is a step-by-step guide on how to use track mattes:
Step 1
To apply a track matte to your video, you must work with two layers. The top layer acts as the alpha or the luminance layer. The bottom layer acts as the fill. Once you have identified the layers, you can proceed to the next step.
Step 2
Go to the “Modes” column and open the dropdown menu next to “Layer List.” Here, select the layer you wish to use as the track matte.
![]()
Step 3
You will see two toggle switches once you select your layer. You can use these switches and the available options to set the transparency for the Track Matte. You can add alpha matte in After Effects or other types from here.
![]()
Part 2: Performing Mask Tracking With Adobe After Effects: Reviewing the Steps
Another remarkable feature that After Effects offers is mask tracking. Using After Effects mask tracking, you can automatically animate a mask’s position, shape, or path. This is done to match the movement of an object in a video clip. You can now easily deal with complex or fast-moving footage with this feature. To use Track Mask in After Effects, you can follow these steps:
Step 1
Import the footage you wish to edit in After Effects. Select the clip you wish to track from the timeline. Then, select the “Pen” tool from the top toolbar or press G on your keyboard. Select the area around the object you wish to mask in the footage.
![]()
Step 2
Now, open the layer and right-click on the mask name to select “Track Mask.” This will open the mask tracker in the tracker panel at the right. Open the dropdown menu next to the “Method” option. Here, you can find a range of options for tracking methods. Choose the one according to your requirements. If the object isn’t moving much, you can choose a simple option such as “Position.”
![]()
Step 3
Tap the “Analyze Forward” icon and let the tracker analyze the frames in the clip. Once the process has finished, you can restart your clip and set “Mask Mode” from the timeline to “Subtract.” This will remove the selected object from the clip.
![]()
Step 4
To fill in the details, go to the “Window” menu from the top and select “Content Aware Fill.” Once you see the panel on the screen, set the “Alpha Extension” slider to a number of your choice and click on “Generate Fill Layer.”
![]()
Part 3: How to Make Masking Easy? Try Wondershare Filmora
Although After Effects is a great tool for professional-quality video editing, it is not everyone’s cup of tea. Features such as motion track masks in After Effects are challenging to navigate. Novice users can face trouble getting around the complex masking process in After Effects. For a simpler alternative, you can try Wondershare Filmora .
Filmora is the complete solution when it comes to video editing. The multi-platform tool offers a range of useful features for video and audio manipulation. With thousands of built-in templates and presets, Filmora can help users kick-start their creative journey. You can use this easy-to-use tool as the perfect alternative to After Effects mask tracking.
Free Download For Win 7 or later(64-bit)
Free Download For macOS 10.14 or later
Main Highlights of Wondershare Filmora
Filmora offers a comprehensive toolset to help users make the most of their media files. Some useful resources provided by Wondershare Filmora include:
- AI Text-Based Editing: Filmora allows users to convert audio from videos into editable text. This can help you easily modify your video content. The feature can be used for quick transcriptions, subtitles, and translations.
![]()
- Speed Ramping: Using Filmora, users can apply professional speed effects in footage. You can adjust your video speed and create unique cinematic effects in no time. Filmora also helps maintain the audio pitch to avoid abrupt changes.
![]()
- Compound Clip: Filmora can help users merge multiple clips into a single footage. You can obtain complete control over the integrated clip for editing. This can help users manage and adjust multiple clips easily.
![]()
- AI Vocal Remover: The Vocal Remover tool of Filmora offers AI power to separate vocals and music from any audio. You can get separate acapella and vocals for various purposes. From karaoke to creative dubs, everything is now possible with Filmora.
![]()
Using AI Smart Masking in Filmora – A Step-by-Step Guide
Filmora offers an AI-powered masking feature for users. This allows automatic recognition and selection of objects in videos. You can create seamless transitions, color-correct elements, remove background, and more. The tool can easily detect and separate objects, so you don’t have to put in manual effort. Here is the step-by-step guide for AI smart masking using Filmora:
Step 1: Import Footage in Filmora
Install and launch Wondershare Filmora on your device. From the homepage, tap “New Project” and go to the “File” tab from the top. Tap “Import Media” in the dropdown menu and insert your video clips into the timeline.
![]()
Step 2: Enable AI Mask
Select your clip in the timeline and go to the “Video” tab from the right panel. Select the “Mask” option and tap the “AI Mask” icon. Under the section, you can choose from options such as “Select Character” or “Smart Brush.” Select one according to your requirements and hit “Add Mask.”
![]()
Step 3: Adjust Mask Settings and Export File
After you apply the masking option, you can adjust other mask settings. Filmora allows users to set the expansion range, blur strength, opacity, and other aspects. Once satisfied with the results, tap the “Export” button from the top-right corner and choose a pathway to save your video.
![]()
Free Download For Win 7 or later(64-bit)
Free Download For macOS 10.14 or later
Conclusion
Adobe After Effects is an industry-standard tool for video editing and manipulation. Track Mattes and Track Masks in After Effects are valuable tools that can help elevate your video’s potential. For a simple and effective alternative, you can try Wondershare Filmora. The tool uses smart masking using AI to make the process easier.
Free Download Free Download Learn More
Part 1: How to Utilize Track Mattes in Adobe After Effects?
After Effects by Adobe is a software application dedicated to visual effects and motion graphics for videos. The tool is commonly used in the post-production process of videos. The wide toolset of After Effects can be useful in filmmaking, video gaming, and TV. After Effects offers everything you need to take your creative inspirations to the next level.
- Motion Graphics: After Effects lets users animate characters and backgrounds in videos. You can generate 3-dimensional models from 2D animations. After Effects also supports the animation of logos to bring your elements to life.
- Rotoscoping: You can remove elements or drop new ones in your video using After Effects. The Roto Brush Tool can easily separate the background and foreground. You can then replace unwanted objects and replace them with new elements.
- Motion Tracking: Tracking the movement of an object is quite simple in After Effects. You can pin any element to a moving object. The smooth dynamics can enhance the overall result of the footage.
- VFX and Special Effects: After Effects is the perfect tool to add special effects to your videos. Its VFX tool lets users add magic to the footage. You can make objects disappear, control the weather, stabilize your video, and more.
Using Track Mattes in After Effects
In Adobe After Effects, a track matte is a layer that defines the transparency of another layer. It acts as a stencil, determining which parts of the underlying layer are visible and which are transparent. Track mattes are used for creating various effects such as text animations, transitions, and seamlessly composing multiple layers. After Effects offers four Track Matte options:
![]()
- Alpha Matte: Alpha matte in After Effects allows white areas in the matte layer to become visible while black areas become transparent. Effectively, this helps the underlying layer to show through.
- Alpha Inverted Matte: In an alpha inverted matte, black areas in the matte layer are visible, and white areas are transparent. It reverses the transparency values to create unique effects.
- Luma Matte: A luma matte uses the brightness values of the matte layer to determine visibility. Bright areas in the matte layer are visible, while dark areas are transparent.
- Luma Inverted Matte: The luma inverted matte works opposite to the luma matte. The top layer’s dark areas are visible, while bright areas are transparent.
![]()
You can use any of the track mattes in After Effects according to your requirements. Following is a step-by-step guide on how to use track mattes:
Step 1
To apply a track matte to your video, you must work with two layers. The top layer acts as the alpha or the luminance layer. The bottom layer acts as the fill. Once you have identified the layers, you can proceed to the next step.
Step 2
Go to the “Modes” column and open the dropdown menu next to “Layer List.” Here, select the layer you wish to use as the track matte.
![]()
Step 3
You will see two toggle switches once you select your layer. You can use these switches and the available options to set the transparency for the Track Matte. You can add alpha matte in After Effects or other types from here.
![]()
Part 2: Performing Mask Tracking With Adobe After Effects: Reviewing the Steps
Another remarkable feature that After Effects offers is mask tracking. Using After Effects mask tracking, you can automatically animate a mask’s position, shape, or path. This is done to match the movement of an object in a video clip. You can now easily deal with complex or fast-moving footage with this feature. To use Track Mask in After Effects, you can follow these steps:
Step 1
Import the footage you wish to edit in After Effects. Select the clip you wish to track from the timeline. Then, select the “Pen” tool from the top toolbar or press G on your keyboard. Select the area around the object you wish to mask in the footage.
![]()
Step 2
Now, open the layer and right-click on the mask name to select “Track Mask.” This will open the mask tracker in the tracker panel at the right. Open the dropdown menu next to the “Method” option. Here, you can find a range of options for tracking methods. Choose the one according to your requirements. If the object isn’t moving much, you can choose a simple option such as “Position.”
![]()
Step 3
Tap the “Analyze Forward” icon and let the tracker analyze the frames in the clip. Once the process has finished, you can restart your clip and set “Mask Mode” from the timeline to “Subtract.” This will remove the selected object from the clip.
![]()
Step 4
To fill in the details, go to the “Window” menu from the top and select “Content Aware Fill.” Once you see the panel on the screen, set the “Alpha Extension” slider to a number of your choice and click on “Generate Fill Layer.”
![]()
Part 3: How to Make Masking Easy? Try Wondershare Filmora
Although After Effects is a great tool for professional-quality video editing, it is not everyone’s cup of tea. Features such as motion track masks in After Effects are challenging to navigate. Novice users can face trouble getting around the complex masking process in After Effects. For a simpler alternative, you can try Wondershare Filmora .
Filmora is the complete solution when it comes to video editing. The multi-platform tool offers a range of useful features for video and audio manipulation. With thousands of built-in templates and presets, Filmora can help users kick-start their creative journey. You can use this easy-to-use tool as the perfect alternative to After Effects mask tracking.
Free Download For Win 7 or later(64-bit)
Free Download For macOS 10.14 or later
Main Highlights of Wondershare Filmora
Filmora offers a comprehensive toolset to help users make the most of their media files. Some useful resources provided by Wondershare Filmora include:
- AI Text-Based Editing: Filmora allows users to convert audio from videos into editable text. This can help you easily modify your video content. The feature can be used for quick transcriptions, subtitles, and translations.
![]()
- Speed Ramping: Using Filmora, users can apply professional speed effects in footage. You can adjust your video speed and create unique cinematic effects in no time. Filmora also helps maintain the audio pitch to avoid abrupt changes.
![]()
- Compound Clip: Filmora can help users merge multiple clips into a single footage. You can obtain complete control over the integrated clip for editing. This can help users manage and adjust multiple clips easily.
![]()
- AI Vocal Remover: The Vocal Remover tool of Filmora offers AI power to separate vocals and music from any audio. You can get separate acapella and vocals for various purposes. From karaoke to creative dubs, everything is now possible with Filmora.
![]()
Using AI Smart Masking in Filmora – A Step-by-Step Guide
Filmora offers an AI-powered masking feature for users. This allows automatic recognition and selection of objects in videos. You can create seamless transitions, color-correct elements, remove background, and more. The tool can easily detect and separate objects, so you don’t have to put in manual effort. Here is the step-by-step guide for AI smart masking using Filmora:
Step 1: Import Footage in Filmora
Install and launch Wondershare Filmora on your device. From the homepage, tap “New Project” and go to the “File” tab from the top. Tap “Import Media” in the dropdown menu and insert your video clips into the timeline.
![]()
Step 2: Enable AI Mask
Select your clip in the timeline and go to the “Video” tab from the right panel. Select the “Mask” option and tap the “AI Mask” icon. Under the section, you can choose from options such as “Select Character” or “Smart Brush.” Select one according to your requirements and hit “Add Mask.”
![]()
Step 3: Adjust Mask Settings and Export File
After you apply the masking option, you can adjust other mask settings. Filmora allows users to set the expansion range, blur strength, opacity, and other aspects. Once satisfied with the results, tap the “Export” button from the top-right corner and choose a pathway to save your video.
![]()
Free Download For Win 7 or later(64-bit)
Free Download For macOS 10.14 or later
Conclusion
Adobe After Effects is an industry-standard tool for video editing and manipulation. Track Mattes and Track Masks in After Effects are valuable tools that can help elevate your video’s potential. For a simple and effective alternative, you can try Wondershare Filmora. The tool uses smart masking using AI to make the process easier.
3 Ways To Stream And Record At The Same Time
The popularity of live streaming has exploded recently. A live stream is simply a video broadcast in real-time over the internet. It’s a great way to connect with people directly, whether for a gaming session, a cooking show, or a Q&A.
Many reasons are there for which why you might want to live stream and record at the same time. For instance, keep a record of your gameplay or stream highlights for future editing or use your live stream to generate content for your YouTube channel.
Whatever your reasons, this article will show you how to do live streaming and recording at the same time using three different methods.
Way 1. Use OBS To Stream And Record Video At The Same Time
OBS, or Open Broadcaster Software, is a free and open-source tool that allows you to stream and record video at the same time, which can be useful if you want to live-stream your gameplay on Twitch or record a tutorial for YouTube.
Key Features of OBS
- Compatible with Mac OS X, Linux, and Windows operating systems.
- Requires at least 4 GB of storage space and an Intel i5 2000-series processor or higher DirectX 10 capable graphics card.
- High-performance video capturing and mixing in real-time.
- With Custom Transitions, you can set up an unlimited number of scenes you can switch between seamlessly.
- Intuitive audio mixer.
- Easy-to-use and simple configuration options.
Steps
Here’s an easy and quick guide on how to use OBS Studio to stream and record videos simultaneously:
Step1 Download OBS Studio from the official website and install it on your computer or laptop.
Step2 Launch OBS Studio and go to the Settings menu. Find the Recording section under the Output tab.
Step3 Click “Start Recording” to manually start the recording or head to the General Tab and checkmark the box before “Automatically Record When Streaming.”
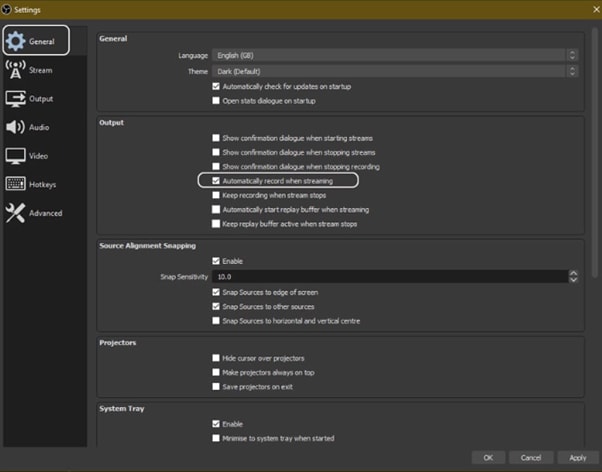
Step4 Finally, click “Apply” to save your settings. Now when you start your stream, the recording will also begin simultaneously.
Way 2. Use Twitch To Save Your Streams
Twitch is the most popular and best live streaming platform that allows gamers to broadcast their gameplay to a live audience and also gives them the ability to save their past broadcasts, or “streams.”
This feature can be useful to save your live stream for later viewing or share your stream with someone who missed it.
Features
Twitch offers a variety of features that make it a unique and powerful game streaming platform. Some of the most notable ones are:
- Live streaming: Twitch allows gamers to share their gameplay in real-time with other gamers around the world. This live aspect of the platform makes it unique and engaging.
- Social interaction: Twitch offers a variety of features that allow gamers to connect with each other, including chat rooms, forums, and user-generated content.
You can save your stream on Twitch in two ways:
- Use the “Highlights” feature, which allows you to save specific moments from your live stream.
- Download your stream’s entire VOD (video on demand) after it has ended.
Steps
Here are the quick steps to saving a stream on your PC from Twitch. But first, you need to enable Twitch VODs before starting your broadcast in the following way:
Step1 Visit Twitch and sign in to your account. Now, click the “Profile” icons and go to “Creator Dashboard.”
Step2 Head to Setting from the left-sidebar and click the “Stream” option. Scroll down and find the VOD Settings. Toggle the buttons next to “Store Past Broadcasts.”
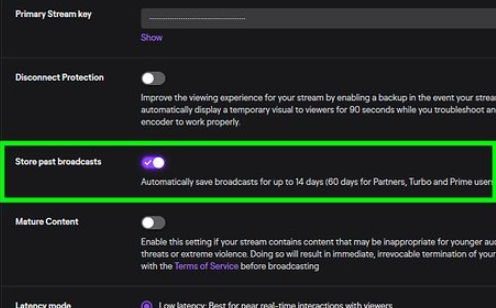
Step3 To publish your VODs instantly after broadcasting, toggle the button next to “Always Publish VODs.”
Now, to download the recordings of your broadcasts to your PC, do the following steps in sequence:
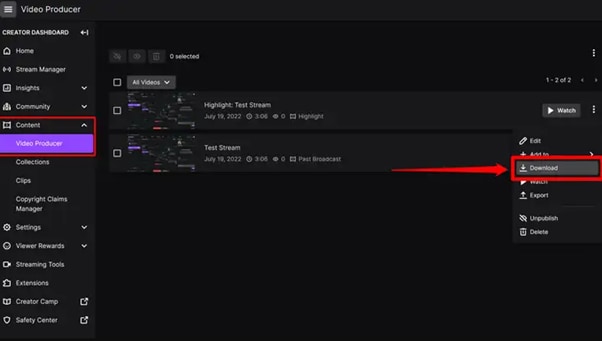
Step1 Head to the Creator Dashboard, find the “Content” section in the left sidebar, and click “Video Producer.”
Step2 Find the stream (VOD or Highlights) you want to download and on the right side, click the three dots.
Step3 Finally, click the “Download” option and let Twitch prepare your video. You will then get the stream’s recording in MP4 format.
Way 3. Use Screen Recorder To Record Your Streams
Using a screen recorder is a great way to record your live stream because it lets you capture the full screen of your PC. Although there are many different screen recorders to choose from, we recommend using Filmora.
Wondershare Filmora is a powerful editor with easy-to-use screen recording capabilities, giving you everything you need to record and stream your video at the same time. The software is free to use and has an intuitive interface.
Features of Filmora
- Support for both Mac OS X and Windows operating systems.
- Ability to record your PC screen, audio, and webcam all at once
- A variety of video editing features
- An easy-to-use interface
Steps
Here’s how to use Filmora for recording while streaming:
Step1 Head to the official Filmora website, download the software and install it on your PC.
Step2 Launch Filmora 11 and click “New project” in the main interface. Click “File” from the top toolbar and scroll down to “Record media.” From the drop-down menu, select “Record PC Screen.”
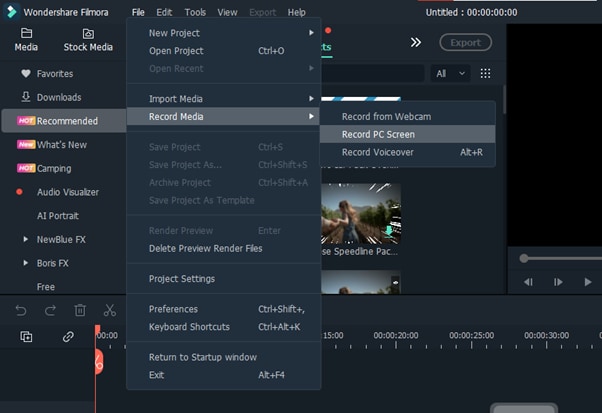
Step3 A new “Wondershare Screen Recorder” window will pop up. You can set up a full screen, custom or target screen recording, speaker, and microphone settings. If you want more Settings, click the drop-down icon.
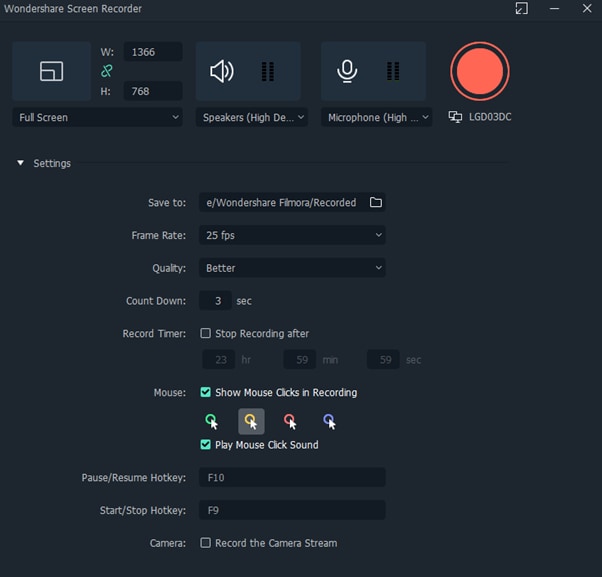
Step4 Click the Start icon to begin your recording. Afterward, click the Stop icon to stop the recording, and your stream will be saved in the selected destination.
Conclusion
In this article, we’ve discussed three step-by-step methods to help you do live streaming and recording at the same time. With these solutions at your disposal, you’ll be able to save your VODs with ease.
It is best to choose only one software to start with to avoid the time-consuming trial-and-error process. If you want to add another tool, do so later; otherwise, you will waste your precious time and resources.
Give these methods a shot, and eventually, you will find your groove—and become accustomed to just how easy it is to record and stream a video simultaneously.
Free Download For Win 7 or later(64-bit)
Free Download For macOS 10.14 or later
Free Download For macOS 10.14 or later
Offering The Best Understanding of Performing iMovie Slow Motion Video
In the past decade, social media has made slow-motion videos wildly popular. When Apple introduced the slow-motion effect in its camera, people went crazy about it. Due to the great demand, many developers introduced this effect in their applications. Slow-mo has been trendy for years, and its use is not ending soon.
This article will guide you about the iMovie slow motion effect and explain the app in detail. Users considering creating a video across their Mac should be aware of slow-mo in iMovie. If you are fascinated by finding more, read this article about slow-down video iMovie.
Slow Motion Video Maker Slow your video’s speed with better control of your keyframes to create unique cinematic effects!
Make A Slow Motion Video Make A Slow Motion Video More Features
Part 1: An Introduction to Slow Motion Videos: A Comprehensive Review
Slow-mo videos are recorded at a frame rate higher than 24 frames per second (fps). After that, they are replayed at a slower pace. This method produces an effect that can bring out special moments. Slow-motion recordings are frequently employed in sports, action, and wildlife cinematography.
What makes it so popular is how it captures fast-moving scenes in better detail. Access to the slow-motion effect was not so common, but with apps like iMovie slow-mo, the effect is accessible to everyone. You can use online video editors or desktop editing software to make slow-motion videos.
Free Download For Win 7 or later(64-bit)
Free Download For macOS 10.14 or later
Part 2: How to Set Slow Motion Settings in iMovie Video Making?
iMovie is a wonderful choice if you want to make slow-motion videos. Also, it allows users to change the speed of video clips per their needs. With slo-mo in iMovie, you can even fine-tune the speed of a single clip by splitting it into intervals, each with a different speed. You can set multiple ranges to cause a clip to speed up and down.
You can freeze a single frame in your film to create the illusion that time has stopped. The app is a fantastic option for Apple users who want to quickly add slow-motion effects to their videos. iMovie is a pretty straightforward tool that gives quick results. Follow the step-by-step guide below to slow down video in iMovie.
Step 1
Launch iMovie in your system and click “New Project.” Go to the “Movies” option to import the video you want to edit. Drag the media in the project timeline to make changes to it.

Step 2
Select the video from the timeline and click the speed icon that looks like a clock. From “Speed,” select the “Slow” option and choose the percentage of slow-motion effect you want to apply in your video. To set a customized slow-mo percentage, click “Speed” again and choose “Custom.” After that, manually add the percentage of how slow you want your video to be.

Part 3: A Great Alternative to Making Slow Motion Videos: Wondershare Filmora
iMovie slow motion is undoubtedly a simple solution for creating slow-mo videos. But sometimes, you need a tool with more advanced features than iMovie. If you want to access professional features with a simple interface, Wondershare Filmora is the right platform. The tool not only provides a precise slow-motion effect, but it has many other features that will leave you amazed.
You can control your video and edit it any way you like. Wondershare Filmora gives you the freedom to be creative. For both beginners and professionals, it is an excellent choice. This software is worth checking if you want to create a cinematic masterpiece.
Step-By-Step Guide to Make Slow Motion Videos with Optical Flow
Unlike the slow-mo in iMovie, the Filmora’s effect is much more advanced and provides professional results. Look at the easy steps below and slow down your video quickly.
Free Download For Win 7 or later(64-bit)
Free Download For macOS 10.14 or later
Step 1Ensure the Latest Version of Filmora and Import Media
Firstly, ensure that you are using the latest version of Filmora. After launching it in your system, access its editing screen through the “New Project” option in its main interface. Drag and drop your video into the timeline section after importing it. You can simply import by pressing the “Ctrl + I” keys from your keyboard.

Step 2Apply Slow-Motion and Use Optical Flow
After bringing media into the timeline, right-click on it. From the displayed list, look for the “Uniform Speed” option. Tap on it and get directed toward the right-side editing screen. There, you have to use the “Speed” slider and move to the left for slow videos or to the right for fast-speed videos.

When you are done adjusting speed, head down to the “AI Frame Interpolation” option. Extend its menu and choose “Optical Flow” to reduce the speed of your video while maintaining its quality.

Step 3Analyze and Save the Video by Customizing Export Options
Check if the function has been applied by playing the video. Lastly, select the “Export” button located in the screen’s upper right corner. From the “Export” window, adjust video parameters to save the video your desired way.

Key Features of Wondershare Filmora
Wondershare Filmora’s impressive tools never cease to impress. Let’s discuss a few of its remarkable features in video editing:
1. Instant Mode
This feature is perfect for creating quick social media videos. You can find a variety of templates and choose the one that best suits your video’s concept. There are more than 115 templates from business, travel, and Vlog categories. Instant mode will help you to rearrange video clips with AI algorithms that cut your 3 hours of editing time.
2. AI Smart Cutout
Removing an object from a video can be challenging while maintaining a natural appearance. Not more with Filmora’s AI smart cutout that can automatically remove unwanted items. It can detect and refine the cutout frame by frame to maintain perfection and high quality. Besides, you get different preview modes to modify certain areas.
3. Auto Beat Sync
Music and film with wonderful rhythm add an entertaining aspect to the content. Utilizing the auto-beat sync feature in Filmora is the way to do it. With this tool, your music and video will automatically match the clips. Furthermore, it can inevitably identify dark sides in your footage to delete them.
4. AI Copywriting
It’s challenging to develop exciting scripts or captions for your films. In situations like this, an AI copywriting tool is invaluable. ChatGPT integration in Filmora lets you get YouTube titles and descriptions that match your needs. To generate one, you must describe the content you want using natural language.
Conclusion
In short, the slow-motion effect is one of the most popular video effects used in movies. Thus, a good video editor is necessary whether you edit videos for entertainment or business purposes. Your video will not look good and will negatively impact the viewers if it is not edited well. Here, you have learned how to slow down video iMovie. If you want an advanced tool, try the alternative Wondershare Filmora.
Make A Slow Motion Video Make A Slow Motion Video More Features
Part 1: An Introduction to Slow Motion Videos: A Comprehensive Review
Slow-mo videos are recorded at a frame rate higher than 24 frames per second (fps). After that, they are replayed at a slower pace. This method produces an effect that can bring out special moments. Slow-motion recordings are frequently employed in sports, action, and wildlife cinematography.
What makes it so popular is how it captures fast-moving scenes in better detail. Access to the slow-motion effect was not so common, but with apps like iMovie slow-mo, the effect is accessible to everyone. You can use online video editors or desktop editing software to make slow-motion videos.
Free Download For Win 7 or later(64-bit)
Free Download For macOS 10.14 or later
Part 2: How to Set Slow Motion Settings in iMovie Video Making?
iMovie is a wonderful choice if you want to make slow-motion videos. Also, it allows users to change the speed of video clips per their needs. With slo-mo in iMovie, you can even fine-tune the speed of a single clip by splitting it into intervals, each with a different speed. You can set multiple ranges to cause a clip to speed up and down.
You can freeze a single frame in your film to create the illusion that time has stopped. The app is a fantastic option for Apple users who want to quickly add slow-motion effects to their videos. iMovie is a pretty straightforward tool that gives quick results. Follow the step-by-step guide below to slow down video in iMovie.
Step 1
Launch iMovie in your system and click “New Project.” Go to the “Movies” option to import the video you want to edit. Drag the media in the project timeline to make changes to it.
Step 2
Select the video from the timeline and click the speed icon that looks like a clock. From “Speed,” select the “Slow” option and choose the percentage of slow-motion effect you want to apply in your video. To set a customized slow-mo percentage, click “Speed” again and choose “Custom.” After that, manually add the percentage of how slow you want your video to be.
Part 3: A Great Alternative to Making Slow Motion Videos: Wondershare Filmora
iMovie slow motion is undoubtedly a simple solution for creating slow-mo videos. But sometimes, you need a tool with more advanced features than iMovie. If you want to access professional features with a simple interface, Wondershare Filmora is the right platform. The tool not only provides a precise slow-motion effect, but it has many other features that will leave you amazed.
You can control your video and edit it any way you like. Wondershare Filmora gives you the freedom to be creative. For both beginners and professionals, it is an excellent choice. This software is worth checking if you want to create a cinematic masterpiece.
Step-By-Step Guide to Make Slow Motion Videos with Optical Flow
Unlike the slow-mo in iMovie, the Filmora’s effect is much more advanced and provides professional results. Look at the easy steps below and slow down your video quickly.
Free Download For Win 7 or later(64-bit)
Free Download For macOS 10.14 or later
Step 1Ensure the Latest Version of Filmora and Import Media
Firstly, ensure that you are using the latest version of Filmora. After launching it in your system, access its editing screen through the “New Project” option in its main interface. Drag and drop your video into the timeline section after importing it. You can simply import by pressing the “Ctrl + I” keys from your keyboard.
Step 2Apply Slow-Motion and Use Optical Flow
After bringing media into the timeline, right-click on it. From the displayed list, look for the “Uniform Speed” option. Tap on it and get directed toward the right-side editing screen. There, you have to use the “Speed” slider and move to the left for slow videos or to the right for fast-speed videos.
When you are done adjusting speed, head down to the “AI Frame Interpolation” option. Extend its menu and choose “Optical Flow” to reduce the speed of your video while maintaining its quality.
Step 3Analyze and Save the Video by Customizing Export Options
Check if the function has been applied by playing the video. Lastly, select the “Export” button located in the screen’s upper right corner. From the “Export” window, adjust video parameters to save the video your desired way.
Key Features of Wondershare Filmora
Wondershare Filmora’s impressive tools never cease to impress. Let’s discuss a few of its remarkable features in video editing:
1. Instant Mode
This feature is perfect for creating quick social media videos. You can find a variety of templates and choose the one that best suits your video’s concept. There are more than 115 templates from business, travel, and Vlog categories. Instant mode will help you to rearrange video clips with AI algorithms that cut your 3 hours of editing time.
2. AI Smart Cutout
Removing an object from a video can be challenging while maintaining a natural appearance. Not more with Filmora’s AI smart cutout that can automatically remove unwanted items. It can detect and refine the cutout frame by frame to maintain perfection and high quality. Besides, you get different preview modes to modify certain areas.
3. Auto Beat Sync
Music and film with wonderful rhythm add an entertaining aspect to the content. Utilizing the auto-beat sync feature in Filmora is the way to do it. With this tool, your music and video will automatically match the clips. Furthermore, it can inevitably identify dark sides in your footage to delete them.
4. AI Copywriting
It’s challenging to develop exciting scripts or captions for your films. In situations like this, an AI copywriting tool is invaluable. ChatGPT integration in Filmora lets you get YouTube titles and descriptions that match your needs. To generate one, you must describe the content you want using natural language.
Conclusion
In short, the slow-motion effect is one of the most popular video effects used in movies. Thus, a good video editor is necessary whether you edit videos for entertainment or business purposes. Your video will not look good and will negatively impact the viewers if it is not edited well. Here, you have learned how to slow down video iMovie. If you want an advanced tool, try the alternative Wondershare Filmora.
Also read:
- [New] In 2024, Excellent Apps for Streamlined IGTV Vertical Cuts
- [New] In 2024, Pro Selections Best Notebook Models for Editing Professionals
- [New] Syncopated Patterns in YouTube Music Collections for 2024
- [Updated] In 2024, Expert Insights The Best of 10 Mac Video Capture Apps
- Benefits of Live Streaming on YouTube for 2024
- Hassle-Free Ways to Remove FRP Lock on Oppo A78 5Gwith/without a PC
- How Many Attempts To Unlock iPhone 7
- In 2024, How To Make Ninja Jump Effect with Filmora
- In 2024, Recommended Video Background Changers
- New 2024 Approved Different Ways to Crop TikTok Video in High-Quality
- New Creating Testimonial Videos For Health And Wellness Business Industry for 2024
- New Get Animated The Best 2D Software for Creators (Free and Paid) for 2024
- New How to Loop a Video with iMovie on Mac and iPhone
- New Want to Create a Stunning Intro Video on Your Smartphone? Legend Intro Maker Is a Popular Choice. Learn the Steps to Design Intro Video Legend Intro Maker
- Set Your Preferred Job Location on LinkedIn App of your Oppo A56s 5G | Dr.fone
- Skyrocket Your E-Commerce Game with These Essential 15 Social Media Insights for 2024
- Tackling Netflix Troubles: Effective Fixes for Error NW-1-19 Revealed
- Updated In 2024, Blender - A Video Editor for All Professor
- Updated In 2024, How to Apply Gaussian Blur Effect to Videos In Premiere Pro?
- Title: 2024 Approved How to Loop a Video with iMovie on Mac and iPhone
- Author: Chloe
- Created at : 2025-01-18 08:49:10
- Updated at : 2025-01-24 00:57:05
- Link: https://ai-editing-video.techidaily.com/2024-approved-how-to-loop-a-video-with-imovie-on-mac-and-iphone/
- License: This work is licensed under CC BY-NC-SA 4.0.