
:max_bytes(150000):strip_icc():format(webp)/how-to-choose-a-wireless-charger-5191283-cb27ceee3fea4547b5720b4934713a93.jpg)
2024 Approved How to Make Video Slow Motion?
How to Make Video Slow Motion?
Slow-motion videos are in trend now, especially when shooting for Instagram Reels , TikTok videos, or YouTube Shorts . While many users record the entire video in slow motion, there are others who need only a particular section of a clip to play at a reduced speed. Nevertheless, slowing down footage is no longer rocket science, thanks to the advancements in technology, and the availability and ease of access to relevant apps.
That said, here you will learn what is needed to record a video in slow motion, and how to get the job done in a simple way. In addition, you will also learn how to reduce the playback speed of an already existing video if it was recorded at a normal pace.
In this article
01 How to Make Slow Motion Videos via Recording?
02 How to Apply the Smooth Slow-Motion Effect in Post-Production?
Part 1: How to Make Slow Motion Videos via Recording?
The fact is, the playback speed of a video is inversely proportional to the frames per second (FPS) it has been recorded in. Usually, to have a video play at normal speed, it is recorded at 24 FPS or 30 FPS. On the other hand, if you increase the frame rate (FPS) to 120 or 240, the playback speed slows down. You can easily check this if you have access to a DSLR camera or an iPhone. These devices allow you to adjust the FPS so the videos can be recorded in slow motion.
For your convenience and learning, the step-by-step procedure on how to record a video in slow motion using an iPhone is explained below:
Step 1: Get to the SLO-MO Mode
Launch the Camera app on your iPhone (iPhone 13 Pro Max is used here for illustrations), and swipe the screen to the left to get to the SLO-MO mode.

Step 2: Adjust Recording Preferences
Tap the number at the top-right corner to switch between 120 FPS and 240 FPS as needed. Tap 1x from the lower-middle section of the screen, and use the rotator to adjust your preferred zoom level.

Step 3: Start and Stop Recording
Tap the Record button from the bottom-center of the screen to begin recording the video in slow motion. Tap Stop when you are done. You can access the recorded video from the Videos container of the Photos app in your iPhone.
If you are using Android phone, you can check this article to find out more details about How to Record Super Slow Motion Videos on Your Phone.
You may also like: Best Slo-mo Camera Apps for Android And iPhone
Part 2: How to Apply the Smooth Slow-Motion Effect in Post-Production?
If you don’t have access to a camera that can record videos in slow motion, or in case you want to capture the footage at normal playback speed and then slow it down later, you need a dedicated tool to get the job done. Even though several post-production applications are available in the market, the one that is most versatile, has an intuitive interface, and is quite easy to use is Filmora video editor from Wondershare .
The latest version of the app, i.e., Wondershare Filmora 11 has a new feature called Speed Ramping that enables you to graphically manage the speed of the clips. While using the feature, you can either slow down the entire video or certain parts of it according to your requirements. For your learning, both the methods are explained below:
Method 1: Add Slow Motion Effect to the Whole Clip
For Win 7 or later (64-bit)
For macOS 10.12 or later
Step 1: Import the Source Video and Add to Timeline
Launch Wondershare Filmora on your Windows or Mac computer (a Windows 11 PC is used here for illustrations), click New Project from the first screen that appears. Make sure that the Media tool is selected from the standard tool bar at the top, click anywhere inside the Media window, and select and import the source clip to the program.

Next, hover the mouse over the thumbnail of the imported video in the Media window, and click the + icon present at its bottom-right corner. When the confirmation box comes up, click the Match to Media or Keep Project Settings button to change the project settings to match the resolution of the video, or change the footage to meet the project settings respectively.

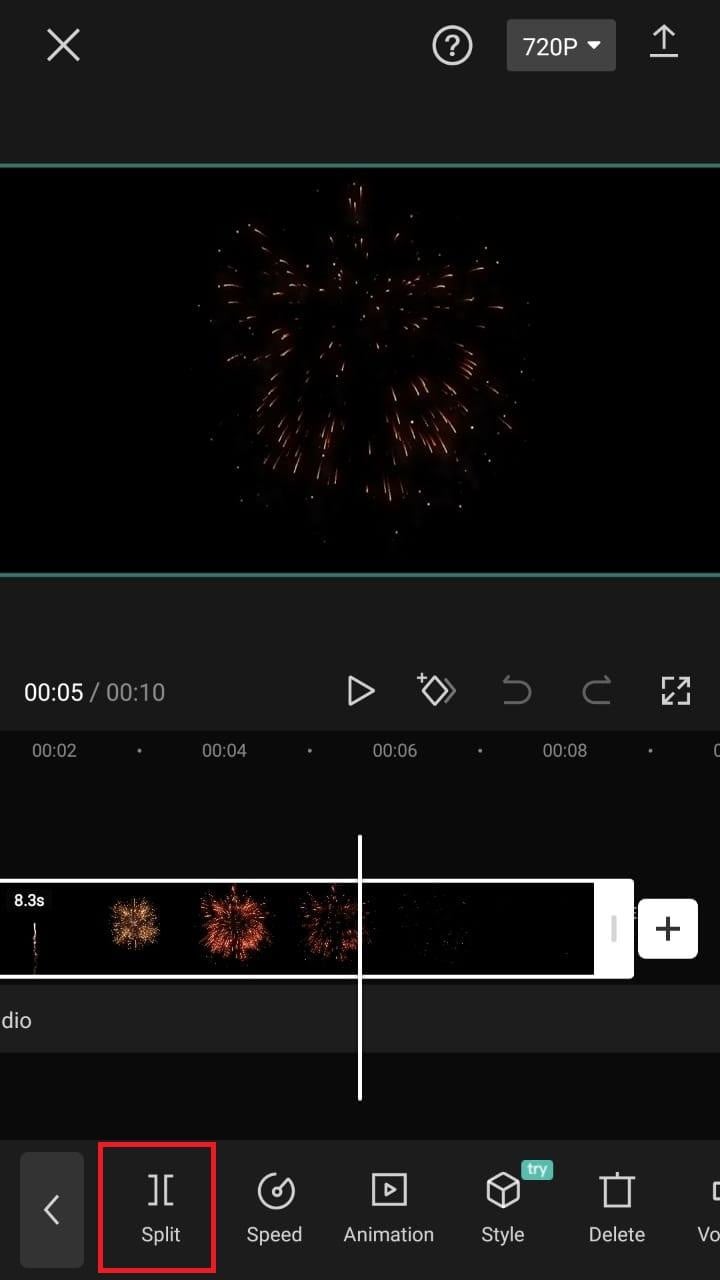
Step 2: Add Slow Motion Effect to the Whole Clip
Once the media is added to the timeline, click on it and then click the Speed icon on the toolbar. Scroll down to the Slow menu and then you will see 0.5x, 0.25x, 0.1x, 0.05x and 0.01x presets. Select one to add slo-mo effects to the whole select clip. and click Speed Ramping from the menu that drops down.

You can also right click the video in the timeline, and hover over to Speed option to select Uniform Speed to adjust the speed of the video to make a slo-mo effect video. Drag the speed slider to the left to slow down the video and you will see how many times it slowed down in the next field.

Method 2: Use Speed Ramping to Add Slow Motion Effect
For Win 7 or later (64-bit)
For macOS 10.12 or later
Speed Ramping enables you to add the slow-motion effect at different parts of a video and even freeze the screen for the duration that you specify. The processes to get these done are given below in detail:
Step 1: Add Source Video to Timeline and Get to the Speed Ramping Window
Use the process given in the previous method to import a source video to Wondershare Filmora 11 and add it to the Timeline. Then use the process given in the second step of the previous method to get to the Speed Ramping window.
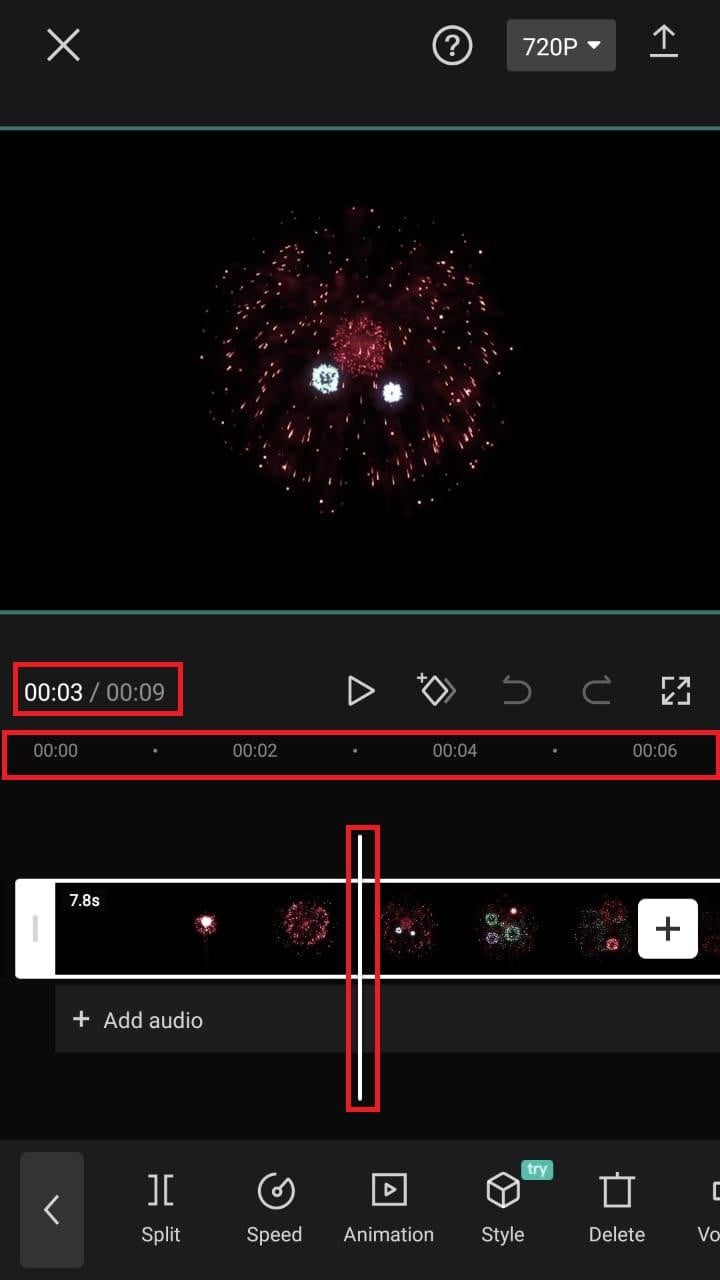
Step 2: Add Slow Motion Effect to Different Parts of the Clip
Go to the Speed Ramping tab if it is not already selected, click Custom from the available options, and drag the adjustment points below the center line to reduce the playback speed for that particular section of the clip. Optionally, you can click any of the available presets to automatically add the slow-motion effect to the video.
Note: You can also drag the adjustment points above the line to increase the playback speed.
To add an adjustment point on the frame where it is not already present, place the playhead (skimmer) at the correct position, and click Add Adjust Point from the left of the Speed Ramping window itself. Once added, you can drag it downward to reduce the playback speed of that part of the clip.

Step 3: Freeze the Video
Place the skimmer on the frame where you want to freeze the video for a while, and click Add Freeze Frame from the left of the Speed Ramping window. When the time box appears, in the Freeze Time field, enter the duration in seconds you want to freeze the screen for, and click OK.

After adding a freeze point, optionally, you can drag and reposition it in the Speed Ramping timeline as needed. Finally, click OK from the bottom-right area to save the changes.
Part 3: When to Use Slow Motion?
There could be many instances when you want to add a slow-motion effect to your videos. Some of the most common ones include:
- Add Focus
If there is a particular scene in a clip that you want the audience to focus on, it would be a good idea to add the slow-motion effect right before that action appears on the screen, and bring the speed back to normal when the section is over.
- Skill or Style Demonstration
When a clip is playing at a normal speed, many times, the audience isn’t able to see the skills that you want to display. This is where you may want to add the slow-motion effect so that every detail can be noticed clearly and in detail.
- Replays
Mostly used for tournaments and matches where the actual action is to replayed so the audience, umpires, and other viewers can see the movements in detail before making the right decision.
- Observation
Some natural phenomena such as a deer running in the woods, a balloon full of water bursting, etc. occur quite quickly. If you want to witness such things clearly and in detail, it would be good to record them, and then reduce the playback speed for better viewing.
- Add Suspense
When you add the slow-motion effect to a scene, the impulse of the audience is automatically increased, and they take that particular section more seriously and with a thrill.
Conclusion
The slow-motion effect is inversely proportional to the framerate, i.e., frames per second or FPS. Almost all DSLR cameras that are available nowadays allow you to switch between different FPS values (typically 120 and 240) before recording. Also, if you have access to an iPhone, its Camera app has a built-in SLO-MO mode that can capture the footage in slow motion.
In addition, if you already have a video that has been recorded at a normal speed, you can use an efficient post-production software like Wondershare Filmora 11, and exploit its Speed Ramping feature to add the slow-motion effect at different scenes of a clip.
02 How to Apply the Smooth Slow-Motion Effect in Post-Production?
Part 1: How to Make Slow Motion Videos via Recording?
The fact is, the playback speed of a video is inversely proportional to the frames per second (FPS) it has been recorded in. Usually, to have a video play at normal speed, it is recorded at 24 FPS or 30 FPS. On the other hand, if you increase the frame rate (FPS) to 120 or 240, the playback speed slows down. You can easily check this if you have access to a DSLR camera or an iPhone. These devices allow you to adjust the FPS so the videos can be recorded in slow motion.
For your convenience and learning, the step-by-step procedure on how to record a video in slow motion using an iPhone is explained below:
Step 1: Get to the SLO-MO Mode
Launch the Camera app on your iPhone (iPhone 13 Pro Max is used here for illustrations), and swipe the screen to the left to get to the SLO-MO mode.
Step 2: Adjust Recording Preferences
Tap the number at the top-right corner to switch between 120 FPS and 240 FPS as needed. Tap 1x from the lower-middle section of the screen, and use the rotator to adjust your preferred zoom level.
Step 3: Start and Stop Recording
Tap the Record button from the bottom-center of the screen to begin recording the video in slow motion. Tap Stop when you are done. You can access the recorded video from the Videos container of the Photos app in your iPhone.
If you are using Android phone, you can check this article to find out more details about How to Record Super Slow Motion Videos on Your Phone.
You may also like: Best Slo-mo Camera Apps for Android And iPhone
Part 2: How to Apply the Smooth Slow-Motion Effect in Post-Production?
If you don’t have access to a camera that can record videos in slow motion, or in case you want to capture the footage at normal playback speed and then slow it down later, you need a dedicated tool to get the job done. Even though several post-production applications are available in the market, the one that is most versatile, has an intuitive interface, and is quite easy to use is Filmora video editor from Wondershare .
The latest version of the app, i.e., Wondershare Filmora 11 has a new feature called Speed Ramping that enables you to graphically manage the speed of the clips. While using the feature, you can either slow down the entire video or certain parts of it according to your requirements. For your learning, both the methods are explained below:
Method 1: Add Slow Motion Effect to the Whole Clip
For Win 7 or later (64-bit)
For macOS 10.12 or later
Step 1: Import the Source Video and Add to Timeline
Launch Wondershare Filmora on your Windows or Mac computer (a Windows 11 PC is used here for illustrations), click New Project from the first screen that appears. Make sure that the Media tool is selected from the standard tool bar at the top, click anywhere inside the Media window, and select and import the source clip to the program.
Next, hover the mouse over the thumbnail of the imported video in the Media window, and click the + icon present at its bottom-right corner. When the confirmation box comes up, click the Match to Media or Keep Project Settings button to change the project settings to match the resolution of the video, or change the footage to meet the project settings respectively.
Step 2: Add Slow Motion Effect to the Whole Clip
Once the media is added to the timeline, click on it and then click the Speed icon on the toolbar. Scroll down to the Slow menu and then you will see 0.5x, 0.25x, 0.1x, 0.05x and 0.01x presets. Select one to add slo-mo effects to the whole select clip. and click Speed Ramping from the menu that drops down.
You can also right click the video in the timeline, and hover over to Speed option to select Uniform Speed to adjust the speed of the video to make a slo-mo effect video. Drag the speed slider to the left to slow down the video and you will see how many times it slowed down in the next field.
Method 2: Use Speed Ramping to Add Slow Motion Effect
For Win 7 or later (64-bit)
For macOS 10.12 or later
Speed Ramping enables you to add the slow-motion effect at different parts of a video and even freeze the screen for the duration that you specify. The processes to get these done are given below in detail:
Step 1: Add Source Video to Timeline and Get to the Speed Ramping Window
Use the process given in the previous method to import a source video to Wondershare Filmora 11 and add it to the Timeline. Then use the process given in the second step of the previous method to get to the Speed Ramping window.
Step 2: Add Slow Motion Effect to Different Parts of the Clip
Go to the Speed Ramping tab if it is not already selected, click Custom from the available options, and drag the adjustment points below the center line to reduce the playback speed for that particular section of the clip. Optionally, you can click any of the available presets to automatically add the slow-motion effect to the video.
Note: You can also drag the adjustment points above the line to increase the playback speed.
To add an adjustment point on the frame where it is not already present, place the playhead (skimmer) at the correct position, and click Add Adjust Point from the left of the Speed Ramping window itself. Once added, you can drag it downward to reduce the playback speed of that part of the clip.
Step 3: Freeze the Video
Place the skimmer on the frame where you want to freeze the video for a while, and click Add Freeze Frame from the left of the Speed Ramping window. When the time box appears, in the Freeze Time field, enter the duration in seconds you want to freeze the screen for, and click OK.
After adding a freeze point, optionally, you can drag and reposition it in the Speed Ramping timeline as needed. Finally, click OK from the bottom-right area to save the changes.
Part 3: When to Use Slow Motion?
There could be many instances when you want to add a slow-motion effect to your videos. Some of the most common ones include:
- Add Focus
If there is a particular scene in a clip that you want the audience to focus on, it would be a good idea to add the slow-motion effect right before that action appears on the screen, and bring the speed back to normal when the section is over.
- Skill or Style Demonstration
When a clip is playing at a normal speed, many times, the audience isn’t able to see the skills that you want to display. This is where you may want to add the slow-motion effect so that every detail can be noticed clearly and in detail.
- Replays
Mostly used for tournaments and matches where the actual action is to replayed so the audience, umpires, and other viewers can see the movements in detail before making the right decision.
- Observation
Some natural phenomena such as a deer running in the woods, a balloon full of water bursting, etc. occur quite quickly. If you want to witness such things clearly and in detail, it would be good to record them, and then reduce the playback speed for better viewing.
- Add Suspense
When you add the slow-motion effect to a scene, the impulse of the audience is automatically increased, and they take that particular section more seriously and with a thrill.
Conclusion
The slow-motion effect is inversely proportional to the framerate, i.e., frames per second or FPS. Almost all DSLR cameras that are available nowadays allow you to switch between different FPS values (typically 120 and 240) before recording. Also, if you have access to an iPhone, its Camera app has a built-in SLO-MO mode that can capture the footage in slow motion.
In addition, if you already have a video that has been recorded at a normal speed, you can use an efficient post-production software like Wondershare Filmora 11, and exploit its Speed Ramping feature to add the slow-motion effect at different scenes of a clip.
Do You Want to Add an Adjustment Layer to Your Video for Easier Editing? Read This Article to Find Out How to Efficiently Add an Adjustment Layer in After Effects
Have you ever used After Effects for professional video editing? Adobe After Effects is a significant video editing software that is used to add animating effects, transitions, intros, outros, and visual effects. You can launch this software on Windows and Mac effectively. Using this high-end software allows you to work on team projects as it consists of auto-saving features.
Moreover, you can add adjustment layers on After Effects to make your video editing more efficient. If you don’t know what the adjustment layer in After Effects is, this article will help you. By reading this article, you can easily learn how to create adjustment layers in your video clips using After Effects.

Part 1: What is the Adjustment Layer in After Effects?
The adjustment layer can save you time and energy from adding effects to multiple clips individually. It does not alter the composition of your video clip until you start applying the effects. Once you add the effect in the adjustment layer, it will replace the effect on all the layers under it.
You can add the adjustment layers in your timeline for creating visual effects such as film grain or color grading. Using the adjustment layer, you can produce transition effects by adding effects to shorter compositions. However, if you want to use the adjustment layer properly, you should select its position carefully in the layer’s stack.

Moreover, always keep in mind that anything placed under the adjustment layer will have a direct effect. In contrast, anything above the adjustment layer won’t get affected. Hence, you can use adjustment layers in After Effects for your convenience to apply all kinds of effects from color to distortion.
Part 2: How to Add Adjustment Layers in After Effects?
Do you want to learn how to add an adjustment layer in After Effects? In this section, we will shed light on two ways through which you can add an adjustment layer to your video clips in After Effects:
Way 1: After opening After Effects and uploading your project, go to the “Layers” tab. Tap on the “New” button and choose “Adjustment Layer.”

Way 2: Once done with uploading the project on After Effects, go to the blank space in the timeline section on the left side. Right-click using your mouse and select the option “New.” Afterward, click on “Adjustment Layer” to proceed. This will add the adjustment layer on the top of your layers stack.

Tips – Keyboard Shortcuts of Adjustment Layers in After Effects
Do you want to save time while creating an adjustment layer in After Effects? Through the following table, you can learn the shortcuts that you can utilize to generate adjustment layers quickly.
| For Windows | For MacBook |
|---|---|
| Ctrl+Alt+Y | Command+Option+Y |
Part 3: Popular Effects You Can Try With Adjustment Layers in After Effects
In this section, you can find out different effects that you can try with the adjustment layer in After Effects. By applying these effects with an adjustment layer, you can transform your video drastically.
1. Animated Ink Text
Do you want to give a unique sense of style to your added text in the video? This particular effect can add animation to your text to produce engaging and distinctive visuals for your text. To make animated ink text illustrations efficiently, you can check the following steps:
Step1 Once you have uploaded the project on After Effects, you can begin with the process. First, open the composition settings and modify the width, height, frame rate, resolution, and background color according to your choice.
Step2 Make sure to select a suitable text font and color to craft a vibrant output. Afterward, head to the “Effect” tab and select tap on “Transition.” From there, select “Linear Wipe.” Now adjust the settings of the “Linear Wipe” effect from the left panel.

Step3 Now add an adjustment layer to your timeline and select “Distort” from the “Effect” tab. From the “Distort” drop-down menu, choose “Turbulent Displace.” After making its settings, such as adjusting the evolution time, head back to the “Effects” tab and select “Blur and Sharpen.” From there, click on “Fast Box Blur.”
Step4 Manage the threshold value properly and then add a new effect called “Stylize.” From its drop-down menu, click on “Roughen Edges.” Afterward, you can add some elements, such as ink droplets, to create a more vibrant look. To ensure a flawless illustration, make sure to match the color of ink droplets with your text color.
Step5 If you want to give a highlight effect to your animated text, you can add 2nd adjustment layer. Afterward, you can select a bold color for your text, such as black, and add a “Perspective” effect. You can adjust the light color and intensity to create compelling results.
Moreover, you can also add blur and matte effects for more modifications. You can use the blending mode to adjust all the colors. Also, you can apply noise and grain effects to eliminate all the harsh edges from the text.

2. Add Blur Effect
There are various blur effects, such as Gaussian blur, motion blur, radial blur, etc. You can add any of the blur effects in your video clip to craft a smoother look. In After Effects, you can find a variety of blur effects that can help you change your video’s perspective. To use an adjustment layer for adding the blur effect, here are the accurate steps:
Step1 Once you have imported the video clip to the timeline of After Effects, add an adjustment layer. Afterward, go to the “Effects” tab and locate any of your preferred effects, such as Gaussian blur. After locating this effect, apply it to the adjustment layer.

Step2 After applying the effect to the adjustment layer, you can change its settings from the left side. From the left panel, you can change the blurriness value and blur dimensions according to your choice.
3. Color Correction
Color correction effects can add and manage the colors in your videos effortlessly. You can change the basic corrections of your video by adjusting the brightness, contrast, hue, exposure, highlight, and other elements. Here are the simple steps to use the adjustment layer for color correction:
Step1 After uploading the video on After Effects, go to the “Layer” tab and add an adjustment layer from there. Once done, you can search for the color correction effect on this tool.
Step2 Once you have found the suitable color correction effect, apply it to the adjustment layer. You can always change the settings of the applied effect from the left panel.

Conclusion
Many beginners are unaware of the term called adjustment layer in video editing. By reading this article, you can find out brief and authentic details about the adjustment layer. Moreover, we have also addressed how to add an adjustment layer in After Effects in simple and easy steps. You can also check about the common effects that people use in Adobe After Effects, using adjustment layers to enhance their videos.
Part 3: Popular Effects You Can Try With Adjustment Layers in After Effects
In this section, you can find out different effects that you can try with the adjustment layer in After Effects. By applying these effects with an adjustment layer, you can transform your video drastically.
1. Animated Ink Text
Do you want to give a unique sense of style to your added text in the video? This particular effect can add animation to your text to produce engaging and distinctive visuals for your text. To make animated ink text illustrations efficiently, you can check the following steps:
Step1 Once you have uploaded the project on After Effects, you can begin with the process. First, open the composition settings and modify the width, height, frame rate, resolution, and background color according to your choice.
Step2 Make sure to select a suitable text font and color to craft a vibrant output. Afterward, head to the “Effect” tab and select tap on “Transition.” From there, select “Linear Wipe.” Now adjust the settings of the “Linear Wipe” effect from the left panel.
Step3 Now add an adjustment layer to your timeline and select “Distort” from the “Effect” tab. From the “Distort” drop-down menu, choose “Turbulent Displace.” After making its settings, such as adjusting the evolution time, head back to the “Effects” tab and select “Blur and Sharpen.” From there, click on “Fast Box Blur.”
Step4 Manage the threshold value properly and then add a new effect called “Stylize.” From its drop-down menu, click on “Roughen Edges.” Afterward, you can add some elements, such as ink droplets, to create a more vibrant look. To ensure a flawless illustration, make sure to match the color of ink droplets with your text color.
Step5 If you want to give a highlight effect to your animated text, you can add 2nd adjustment layer. Afterward, you can select a bold color for your text, such as black, and add a “Perspective” effect. You can adjust the light color and intensity to create compelling results.
Moreover, you can also add blur and matte effects for more modifications. You can use the blending mode to adjust all the colors. Also, you can apply noise and grain effects to eliminate all the harsh edges from the text.
2. Add Blur Effect
There are various blur effects, such as Gaussian blur, motion blur, radial blur, etc. You can add any of the blur effects in your video clip to craft a smoother look. In After Effects, you can find a variety of blur effects that can help you change your video’s perspective. To use an adjustment layer for adding the blur effect, here are the accurate steps:
Step1 Once you have imported the video clip to the timeline of After Effects, add an adjustment layer. Afterward, go to the “Effects” tab and locate any of your preferred effects, such as Gaussian blur. After locating this effect, apply it to the adjustment layer.
Step2 After applying the effect to the adjustment layer, you can change its settings from the left side. From the left panel, you can change the blurriness value and blur dimensions according to your choice.
3. Color Correction
Color correction effects can add and manage the colors in your videos effortlessly. You can change the basic corrections of your video by adjusting the brightness, contrast, hue, exposure, highlight, and other elements. Here are the simple steps to use the adjustment layer for color correction:
Step1 After uploading the video on After Effects, go to the “Layer” tab and add an adjustment layer from there. Once done, you can search for the color correction effect on this tool.
Step2 Once you have found the suitable color correction effect, apply it to the adjustment layer. You can always change the settings of the applied effect from the left panel.
Conclusion
Many beginners are unaware of the term called adjustment layer in video editing. By reading this article, you can find out brief and authentic details about the adjustment layer. Moreover, we have also addressed how to add an adjustment layer in After Effects in simple and easy steps. You can also check about the common effects that people use in Adobe After Effects, using adjustment layers to enhance their videos.
How To Split Screen On Tiktok
TikTok is probably the most popular video-sharing app in the world right now. Many TikTokers have become famous for making videos that have a significant impact and encourage creativity and new ideas. One of the most popular TikTok trends is the split-screen effect. You’ve probably seen a lot of TikTok split-screen videos with cool effects that made you wonder how the user split their screen. Becoming skilled in using TikTok effects is not as difficult as it might look. It only requires a significant amount of practice. Read on as we show you how to make a TikTok split-screen video.
Using CapCut To Split Screen
CapCut is the official free TikTok Video Maker and Video Editor with Music for TikTok that is multifunctional. Its interface is quite similar and easy to use.
CapCut includes free advanced capabilities such as keyframe animation, stabilization, and Picture-in-Picture (PIP). These are in addition to its fundamental functions, such as video editing, adding stickers, text, and music.
Steps to Split Screen Video with CapCut On Android and IOS Devices
- To use the app, you need to install it first. iPhone and Android users can download CapCut. Navigate to the appropriate app store of your choice and download CapCut.
- After installation, launch the app.
- Then go ahead and grant CapCut permission to view your camera roll. Incorporating video clips into your project has never been easier. Go to the app’s main screen and select “New Project“ from the drop-down menu.
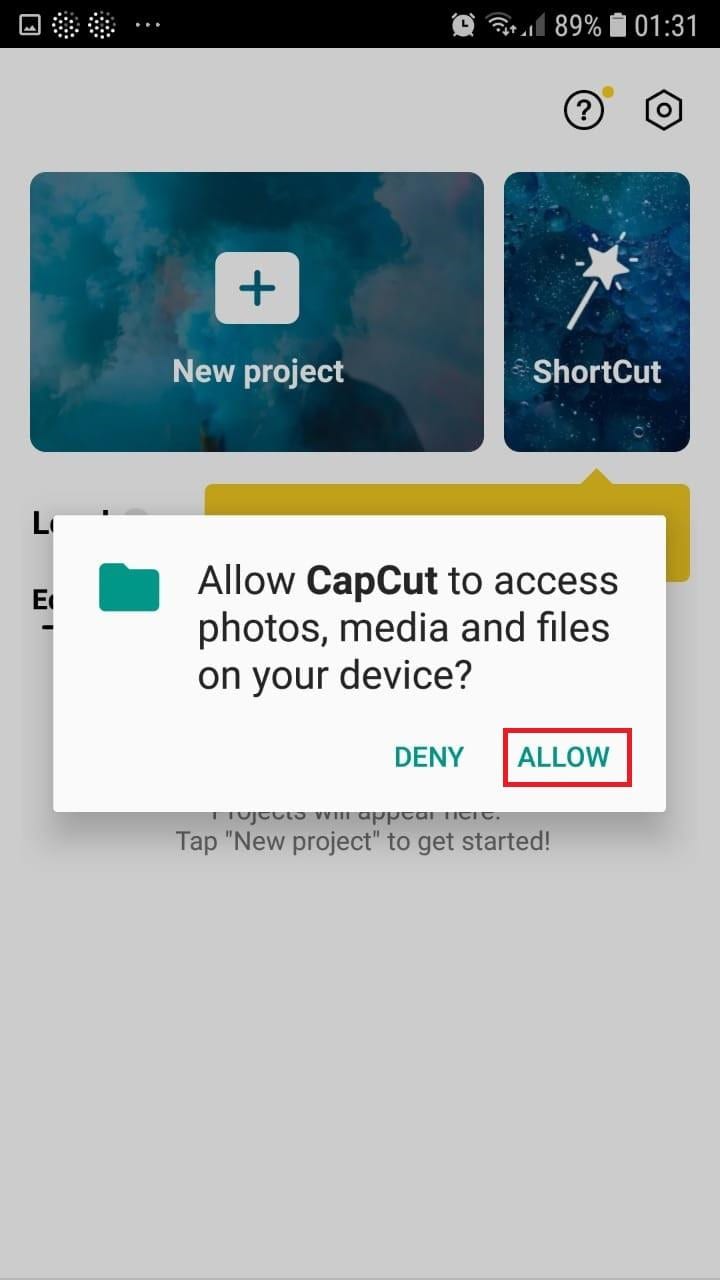
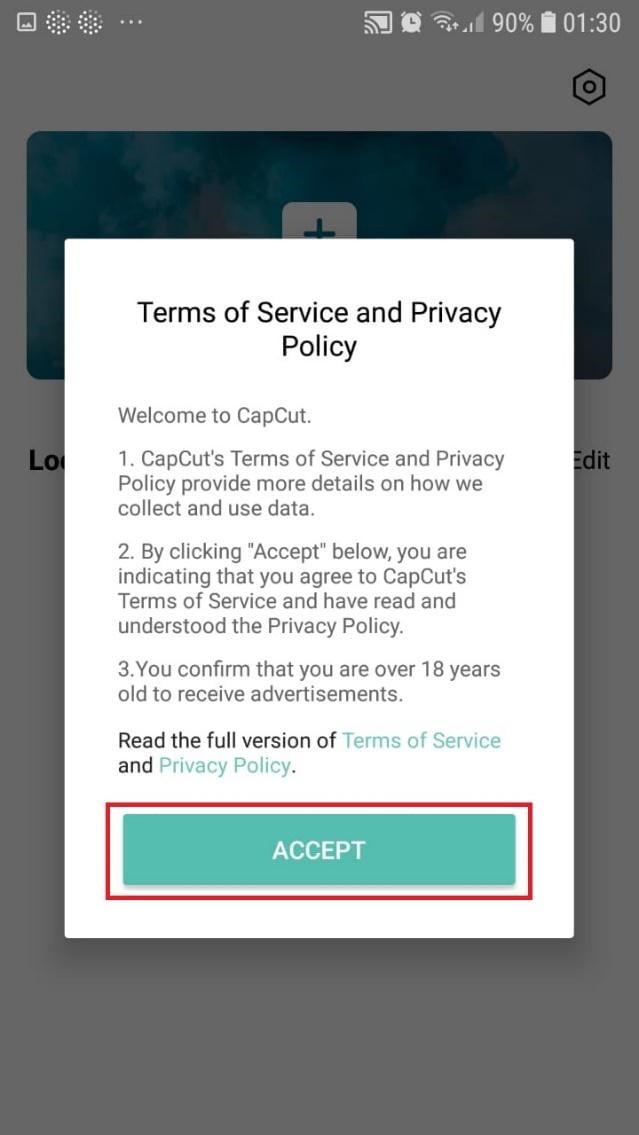
- To confirm your selection, click the green Accept This confirms that CapCut requires access to your photographs to function correctly. Tap on the button on the following pop-up window to gain access to all the photos. This is a one-time process that must be carried out the first time you launch the application.
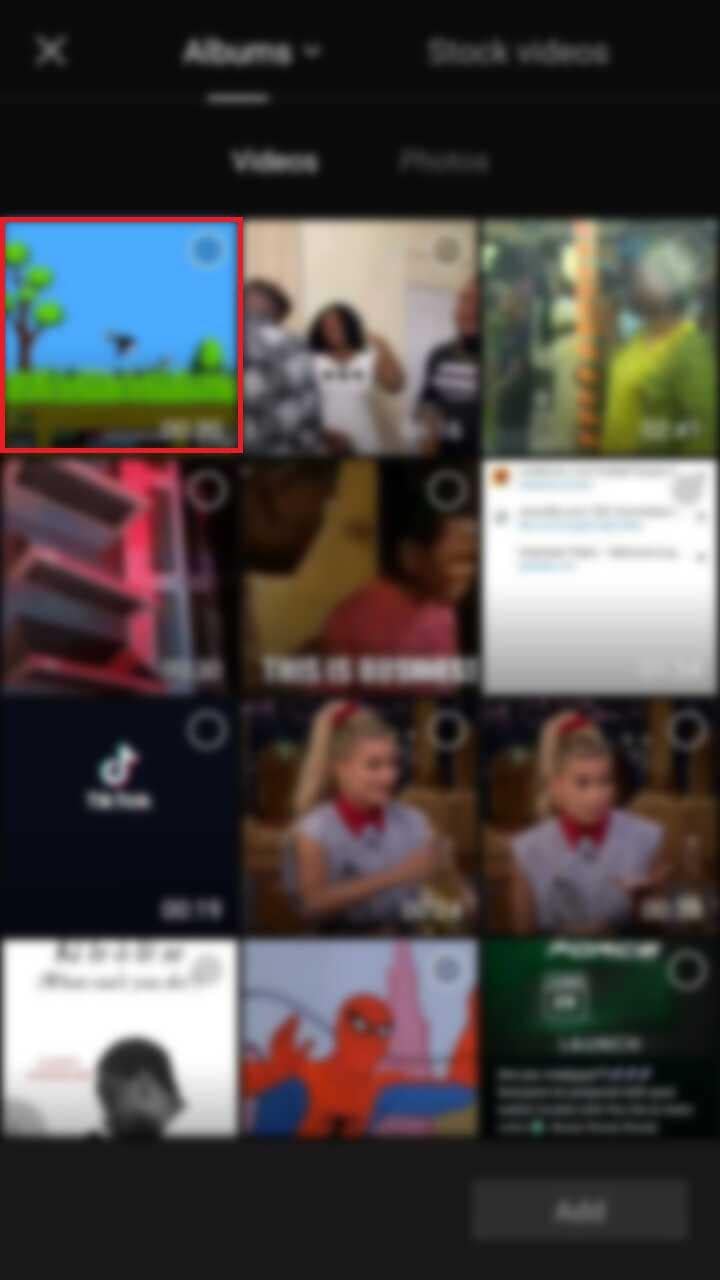
- Begin a New Project. After opening the app, press the “New Project“ icon to bring up a new screen showing your device’s videos.

- Choose a video clip. Locate the desired video clip for your project by scrolling through the pages displaying your camera roll. Tap the video’s thumbnail and then tap the “Add“ icon in the screen’s lower part.
- Get familiar with your workspace. Upon uploading your first clip, CapCut leads you to the primary workspace. This is where you will spend most of your time within the app. The preview panel, the timeline, and the toolbar are in order from top to bottom.
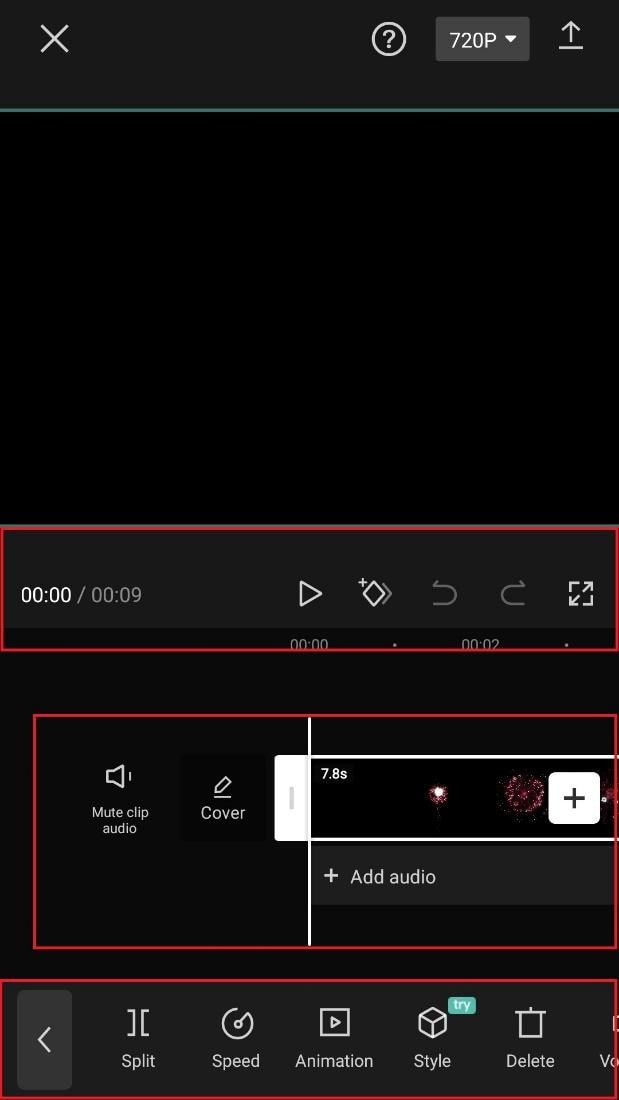
- View the toolbar and timeline. They represent your screen’s bottom half. The timeline, located below the preview panel, is where you’ll make all your adjustments. You can access all your video editing tools, including split, text, audio, effects, stickers, and more, on the toolbar at the bottom of your screen.
- Split video clips. To split a video clip in half, move the play head to the desired location on the timeline. Tap on your clip, then press the “Split“ toolbar icon. Your result now shows two different clips, not just one.
A Better Split-Screen Effect Video Editor
Filmora is one of the best free HD video makers and video editors with several functionalities, including text, backgrounds, filters, special effects, emoji, audio, and special effects.
Filmora is a feature-packed video editor which has a variety of tools to work with. With this video editor, producing memes, videos with images, pictures, music, stickers, and sound effects and editing videos for YouTube, Twitter, WhatsApp, Facebook, TikTok, and Instagram is simple and entertaining.
Free Download For Win 7 or later(64-bit)
Free Download For macOS 10.14 or later
Steps to Split Screen Video with Filmora
- Download Filmora from the App store
- After installation, launch it.
- Click on “Continue” to continue to use the app.

- Click on Allow to grant Filmora access to your photos and videos.
- You can now tap on “New Project” with the + Symbol.
- Select your desired video and tap on “Next” at the bottom right of your screen
- You can select various options from the bottom of your screen to edit the selected video the way you like.

- Click on trim, and then you will see the different split-screen and collage feature options. Pick any that appeals to you.
- When you are done with the editing, tap on “Export” at the top right of your screen.

- Go ahead and tap on “Export” on the next screen. Your video will be successfully exported and saved to your camera roll.
Using Filmora is very efficient in splitting your videos and making collage features for TikTok. It is a very simplified app available on both the Google Play Store and Apple Appstore.
Conclusion
TikTok is a platform that users use worldwide to create and share content. It could be pictures, videos, reels, or any other media type. Some people create videos for their audience on TikTok to educate them, while others do it to entertain them.
In any case, the goal is to build a more significant following on TikTok and garner greater attention from its users. You could even make money off the app.
One of the methods to impress your fans and explore multiple possibilities to build unique reels is to use the TikTok split-screen and collage feature effect available on TikTok. Although there are a few different ways to create a Split Screen on TikTok, the steps highlighted in this article are the most straightforward.
Free Download For macOS 10.14 or later
Steps to Split Screen Video with Filmora
- Download Filmora from the App store
- After installation, launch it.
- Click on “Continue” to continue to use the app.
- Click on Allow to grant Filmora access to your photos and videos.
- You can now tap on “New Project” with the + Symbol.
- Select your desired video and tap on “Next” at the bottom right of your screen
- You can select various options from the bottom of your screen to edit the selected video the way you like.
- Click on trim, and then you will see the different split-screen and collage feature options. Pick any that appeals to you.
- When you are done with the editing, tap on “Export” at the top right of your screen.
- Go ahead and tap on “Export” on the next screen. Your video will be successfully exported and saved to your camera roll.
Using Filmora is very efficient in splitting your videos and making collage features for TikTok. It is a very simplified app available on both the Google Play Store and Apple Appstore.
Conclusion
TikTok is a platform that users use worldwide to create and share content. It could be pictures, videos, reels, or any other media type. Some people create videos for their audience on TikTok to educate them, while others do it to entertain them.
In any case, the goal is to build a more significant following on TikTok and garner greater attention from its users. You could even make money off the app.
One of the methods to impress your fans and explore multiple possibilities to build unique reels is to use the TikTok split-screen and collage feature effect available on TikTok. Although there are a few different ways to create a Split Screen on TikTok, the steps highlighted in this article are the most straightforward.
We Will Give You the Best-Suggested List of Color Match Generators to Help You Choose From an Efficient Collection Rather than Finding It Aimlessly
A Roster of 8 Best Color Match Generators
An easy yet powerful editor
Numerous effects to choose from
Detailed tutorials provided by the official channel
Did you face difficulty in putting a bunch of colors together and making them work well in a visual design? Yeah! It is not easy and complicated as throwing colors here and there. No doubt, for creating a graphic design, a story with imagery is delivered. To highlight things, the colors and the text are essential parts. This is where perfection is needed, so there are many color palette generators to make these tasks easier. A color match generator generates a random color palette or helps users create a selection of colors. This selection will define a specified shade. So, what makes an excellent color matching, and how can it be made? We’ve put some best color match generators together.

From today’s discussion, you’ll learn some must-know color match generates solutions. So, browse through mentioned eight-color match generators and create your color combinations and matching colors generator. Let’s get started!
In this article
01 [8 Color Match Generators](#Part 1)
02 [The Best Solution of Color Match Generators: Filmora 11 Video Editor](#Part 2)
Part 1 8 Color Match Generators
Let’s check out our well-researched findings on the 8 best color match generators for creating the perfect color combination and matching color with these matching colors generators.
01Coolors
‘Coolors’ help users create the perfect palette. Along with an intuitive and robust color match generator, it offers thousands of beautiful color schemes. ‘Coolors’ tool is available as an iOS app, Instagram page, and Chrome extension. You can also find this accessible and ad-supported tool on the web. You can easily use this tool to explore palettes based on keywords and create your color palette from an uploaded image. Users will find the option to see the RGB, HEX codes, and CYMK color values. It will help them ensure that they have used the exact color shade while choosing and working with the available colors.
Features:
● Generate the palettes by exploring popular palettes.
● Easily pick up option for taking palette from photo.
● Create a collage.
● Explore gradients and create a gradient.
● Contrast checker.

02Adobe Color
Adobe Color offers several free outstanding color shades that allow all users to show creativity. Adobe Color offers the color wheel to create color schemes as the wheel has different color harmony rules. Adobe Color helps extract themes from pictures, create gradients from uploaded ones, and create color palettes individually. Users can take subscriptions or not to Adobe products. Users can have color choices to ensure their shades for colorblind people as a background for text. Adobe Color extracts a color theme as well as a gradient from images. You can save the color themes if you have accessed Adobe’s Creative Cloud and use those themes directly in your projects.
Features:
● Create accessible themes by checking the background and text colors contrast ratio.
● Easily compare themes to Web Content Accessibility Guidelines (WCAG).
● Colorblind safe themes to ensure better experiences.
● A large number of Color Harmony Rules to apply.
● Accessible theme suggestions and color education availability.

03 Palettton
Paletton offers a different approach compared to most color matching tools. This quite technical-looking and free color match generator is backed. Paletton can be seemed intimidating because of its interface. You will also get a few base colors set by brand guidelines in web design. This tool is excellent for adding a base color and tuning the gradients until a smooth color scheme. You can modify selections individually to know the shifts of shades. It can take the presets that create adjacent and monochromatic options. To choose the shades to match the primary color, you can adjust the color wheel distance.
Features:
● All color palettes have an offered base color.
● Eyedropper tool to extract a color or two from any of the selected images.
● Multiple color combinations.
● Using Paletton’s feature for vision simulation.
● Presets option available according to the base color.

04 ColorHunt
Color Hunt offers a vast collection of color palettes. This designer’s color palettes individually include a large number of colors shades. This tool contains different color palettes to explore according to popularity or trends. The tool has an option to let users create their color palettes. Other designers do craft these color palettes. The palettes are so visual to users to pick a palette easily and begin your design. Here, a little experience will assist you more in selecting the best color for the pallet. This artist-generated color palette library offers trendy, new, or random tools access.
Features:
● Allow discovering the newest hand-picked palettes.
● Create your four-color palette.
● A sheer number of created color palettes.
● Copy the HEX values for the colors or generate an image.
● Sharing options to get your colleagues.

05 BrandColors
BrandColors has the most extensive collection of several multiple brand color codes. This color-exploration tool offers much more than a good color palette generator. Serially there will be numerous color shades to choose from. This free tool shows the official brand color shades in purpose to use for hundreds of sports teams, companies, and other firms as well. For organizations, BrandColors has well-featured tools to develop their brand identity. You can scroll through the options to use color shades for applicable brands. You can easily select the color codes to quickly mimic or share a link.
Features:
● Offer a helpful reference for the brand color codes.
● More than 600 brands, including 1600 colors.
● Featured by CSS-Tricks, Smashing Magazine, Tuts+, Web Design Depot, and over 2 million page views.
● Offers color shades serially and views in letter form.
● Best to avoid conflict with a competitor while finding a color that will look different.

06Culrs
‘Culrs’ color match generator offers customized features so that you can be able to customize your color palette fully. ‘Culrs’ can generate color shades from a randomly selected image using Flickr. It offers free and simple-to-use color shades library along with different colors. It allows searching more than 17K color schemes and helps you to match words according to the color relativity. It serves methods including contrasting, monochromatic, or complementary. You will find the easiest way to explore color from the monochromatic palettes. There is not necessary to put pressure on your brain to find the right color combinations.
Features:
● Work can be curated and fashioned into quality palettes.
● Find must-have color by copying the HEX code.
● Mix colors up and warm shades and blend well.
● Explore categories from analogous, monochromatic, triad, and tetradic.
● Multiple hue options to see beautiful palettes.

07 ColourCode
‘ColourCode’ will offer you multiple color shades to create palettes and harmonies. The color shading options remain side by side, and you can choose the brighter or lighter versions of your chosen colors with others. And there are options for creating palettes and exporting formats in several image formats. ‘ColourCode’ will offer several palettes so that you can generate harmonies. You can get several file formats to export and download with the most straightforward interface. All available options are easily accessible from its main interface.
Features:
● Click and add the color on the screen browser
● Create palettes on the same cursor according to the previous site’s interface.
● Generate color palettes in analog, triad, quad, monochrome, complement, monochromatic light, etc. categories.
● Export image files and save themes in LESS, SCSS, and PNG formats.
● The created color schemes are downloadable in multiple languages.

08Colour Lovers
Color Lovers helps create patterns and palettes for matching color generators with a vital social component, offering multiple numbers of color palettes and over a million colorful user bases to match. ColourLovers is a creative cornerstone of the online color community for artists to share their created palettes and patterns, including multiple design elements. You can generate extraordinary color editing tasks with palettes, patterns, shapes, and more. A basic generator version is more straightforward, and its free color palette is quite technical.
Features:
● Create and share colors, palettes, and patterns with offered color shades.
● Palettes like Fugitive Colour, Son of Ariel, etc., are available.
● Patterns include Southern Hemisphere, Wonderment, The Limbic System, and more.
● Multiple shapes, groups, trends, etc., are available.
● Guide through several blog posts on multiple topics like wedding, home, fashion, web, etc.

Part 2 The Best Solution of Color Match Generators: Filmora 11 Video Editor
While it is the topic of color match generators, how can we avoid the most well-known and used tool, Filmora, under matching color generators? Wondershare Filmora Video Editor is an all-in-one combination of many color shades generating tools and multiple other features.
Filmora 11 lets you transform your video into a piece of unique and most attractive art with a drag and drop interface, simple and powerful arts, colors, and editing tools. This color match generator has numerous functions to help you generate your own story with color perfection. You will find several effects to edit and other basic and advanced tools to beautify your videos. This powerful editor and color generator provide quality performance and ensure the appropriate color and editing match your expectations. You can use its color matching features and color palettes to match color accurately. Take a brief overview of features:
● 3D color grading pallets.
● Enhance videos’ beauty with more than 800 stunning effects
● Unleash creativity with offered Hollywood effects.
● Adjust the color tuning balance and dynamic range of the clips.
● Overlays and filters to transform a video into something spectacular.
● Clip adjustment with color tuning option.
For Win 7 or later (64-bit)
For macOS 10.12 or later
● Key Takeaways from This Episode →
● From our today’s discussion in this article, we have got overviews of the below things:
● We learned about 8 top Color Match Generators.
● Offered features of Color Match Generators
● The best solution for matching color generators isFilmora 11 and its proposed features.
Did you face difficulty in putting a bunch of colors together and making them work well in a visual design? Yeah! It is not easy and complicated as throwing colors here and there. No doubt, for creating a graphic design, a story with imagery is delivered. To highlight things, the colors and the text are essential parts. This is where perfection is needed, so there are many color palette generators to make these tasks easier. A color match generator generates a random color palette or helps users create a selection of colors. This selection will define a specified shade. So, what makes an excellent color matching, and how can it be made? We’ve put some best color match generators together.
From today’s discussion, you’ll learn some must-know color match generates solutions. So, browse through mentioned eight-color match generators and create your color combinations and matching colors generator. Let’s get started!
In this article
01 [8 Color Match Generators](#Part 1)
02 [The Best Solution of Color Match Generators: Filmora 11 Video Editor](#Part 2)
Part 1 8 Color Match Generators
Let’s check out our well-researched findings on the 8 best color match generators for creating the perfect color combination and matching color with these matching colors generators.
01Coolors
‘Coolors’ help users create the perfect palette. Along with an intuitive and robust color match generator, it offers thousands of beautiful color schemes. ‘Coolors’ tool is available as an iOS app, Instagram page, and Chrome extension. You can also find this accessible and ad-supported tool on the web. You can easily use this tool to explore palettes based on keywords and create your color palette from an uploaded image. Users will find the option to see the RGB, HEX codes, and CYMK color values. It will help them ensure that they have used the exact color shade while choosing and working with the available colors.
Features:
● Generate the palettes by exploring popular palettes.
● Easily pick up option for taking palette from photo.
● Create a collage.
● Explore gradients and create a gradient.
● Contrast checker.
02Adobe Color
Adobe Color offers several free outstanding color shades that allow all users to show creativity. Adobe Color offers the color wheel to create color schemes as the wheel has different color harmony rules. Adobe Color helps extract themes from pictures, create gradients from uploaded ones, and create color palettes individually. Users can take subscriptions or not to Adobe products. Users can have color choices to ensure their shades for colorblind people as a background for text. Adobe Color extracts a color theme as well as a gradient from images. You can save the color themes if you have accessed Adobe’s Creative Cloud and use those themes directly in your projects.
Features:
● Create accessible themes by checking the background and text colors contrast ratio.
● Easily compare themes to Web Content Accessibility Guidelines (WCAG).
● Colorblind safe themes to ensure better experiences.
● A large number of Color Harmony Rules to apply.
● Accessible theme suggestions and color education availability.
03 Palettton
Paletton offers a different approach compared to most color matching tools. This quite technical-looking and free color match generator is backed. Paletton can be seemed intimidating because of its interface. You will also get a few base colors set by brand guidelines in web design. This tool is excellent for adding a base color and tuning the gradients until a smooth color scheme. You can modify selections individually to know the shifts of shades. It can take the presets that create adjacent and monochromatic options. To choose the shades to match the primary color, you can adjust the color wheel distance.
Features:
● All color palettes have an offered base color.
● Eyedropper tool to extract a color or two from any of the selected images.
● Multiple color combinations.
● Using Paletton’s feature for vision simulation.
● Presets option available according to the base color.
04 ColorHunt
Color Hunt offers a vast collection of color palettes. This designer’s color palettes individually include a large number of colors shades. This tool contains different color palettes to explore according to popularity or trends. The tool has an option to let users create their color palettes. Other designers do craft these color palettes. The palettes are so visual to users to pick a palette easily and begin your design. Here, a little experience will assist you more in selecting the best color for the pallet. This artist-generated color palette library offers trendy, new, or random tools access.
Features:
● Allow discovering the newest hand-picked palettes.
● Create your four-color palette.
● A sheer number of created color palettes.
● Copy the HEX values for the colors or generate an image.
● Sharing options to get your colleagues.
05 BrandColors
BrandColors has the most extensive collection of several multiple brand color codes. This color-exploration tool offers much more than a good color palette generator. Serially there will be numerous color shades to choose from. This free tool shows the official brand color shades in purpose to use for hundreds of sports teams, companies, and other firms as well. For organizations, BrandColors has well-featured tools to develop their brand identity. You can scroll through the options to use color shades for applicable brands. You can easily select the color codes to quickly mimic or share a link.
Features:
● Offer a helpful reference for the brand color codes.
● More than 600 brands, including 1600 colors.
● Featured by CSS-Tricks, Smashing Magazine, Tuts+, Web Design Depot, and over 2 million page views.
● Offers color shades serially and views in letter form.
● Best to avoid conflict with a competitor while finding a color that will look different.
06Culrs
‘Culrs’ color match generator offers customized features so that you can be able to customize your color palette fully. ‘Culrs’ can generate color shades from a randomly selected image using Flickr. It offers free and simple-to-use color shades library along with different colors. It allows searching more than 17K color schemes and helps you to match words according to the color relativity. It serves methods including contrasting, monochromatic, or complementary. You will find the easiest way to explore color from the monochromatic palettes. There is not necessary to put pressure on your brain to find the right color combinations.
Features:
● Work can be curated and fashioned into quality palettes.
● Find must-have color by copying the HEX code.
● Mix colors up and warm shades and blend well.
● Explore categories from analogous, monochromatic, triad, and tetradic.
● Multiple hue options to see beautiful palettes.
07 ColourCode
‘ColourCode’ will offer you multiple color shades to create palettes and harmonies. The color shading options remain side by side, and you can choose the brighter or lighter versions of your chosen colors with others. And there are options for creating palettes and exporting formats in several image formats. ‘ColourCode’ will offer several palettes so that you can generate harmonies. You can get several file formats to export and download with the most straightforward interface. All available options are easily accessible from its main interface.
Features:
● Click and add the color on the screen browser
● Create palettes on the same cursor according to the previous site’s interface.
● Generate color palettes in analog, triad, quad, monochrome, complement, monochromatic light, etc. categories.
● Export image files and save themes in LESS, SCSS, and PNG formats.
● The created color schemes are downloadable in multiple languages.
08Colour Lovers
Color Lovers helps create patterns and palettes for matching color generators with a vital social component, offering multiple numbers of color palettes and over a million colorful user bases to match. ColourLovers is a creative cornerstone of the online color community for artists to share their created palettes and patterns, including multiple design elements. You can generate extraordinary color editing tasks with palettes, patterns, shapes, and more. A basic generator version is more straightforward, and its free color palette is quite technical.
Features:
● Create and share colors, palettes, and patterns with offered color shades.
● Palettes like Fugitive Colour, Son of Ariel, etc., are available.
● Patterns include Southern Hemisphere, Wonderment, The Limbic System, and more.
● Multiple shapes, groups, trends, etc., are available.
● Guide through several blog posts on multiple topics like wedding, home, fashion, web, etc.
Part 2 The Best Solution of Color Match Generators: Filmora 11 Video Editor
While it is the topic of color match generators, how can we avoid the most well-known and used tool, Filmora, under matching color generators? Wondershare Filmora Video Editor is an all-in-one combination of many color shades generating tools and multiple other features.
Filmora 11 lets you transform your video into a piece of unique and most attractive art with a drag and drop interface, simple and powerful arts, colors, and editing tools. This color match generator has numerous functions to help you generate your own story with color perfection. You will find several effects to edit and other basic and advanced tools to beautify your videos. This powerful editor and color generator provide quality performance and ensure the appropriate color and editing match your expectations. You can use its color matching features and color palettes to match color accurately. Take a brief overview of features:
● 3D color grading pallets.
● Enhance videos’ beauty with more than 800 stunning effects
● Unleash creativity with offered Hollywood effects.
● Adjust the color tuning balance and dynamic range of the clips.
● Overlays and filters to transform a video into something spectacular.
● Clip adjustment with color tuning option.
For Win 7 or later (64-bit)
For macOS 10.12 or later
● Key Takeaways from This Episode →
● From our today’s discussion in this article, we have got overviews of the below things:
● We learned about 8 top Color Match Generators.
● Offered features of Color Match Generators
● The best solution for matching color generators isFilmora 11 and its proposed features.
Also read:
- Updated Do You Want to Apply LUTs Using Open Broadcaster Software? You Can Download Free LUTs for OBS and Apply Them to Your Files. There Are Many LUTs Available
- Updated Best 5 PDF to GIF Converters You Should Know
- Updated How to Polish Your Music Video Edits Using Filmora for 2024
- In 2024, Do You Want to Slow Down Your TikTok Video and Zoom on a Specific Part? This Is No Longer a Difficult Task as This Video Comes up with the Right Set of Methods that Can Be Used to Implement the Slow Zoom Effect TikTok
- In 2024, The Best Way to Remove Audio From Your Videos
- Detailed Steps to Rotate Videos in Blender
- Knowing All Ways To Slow Down Video With Adobe Premiere Pro for 2024
- Updated 2024 Approved Guide To Using Luts Perfectly in Final Cut Pro
- New 2024 Approved Tips to Make Cinematic Color Grading
- In 2024, The Ultimate Guide to Slideshow Maker with Music
- 2024 Approved With This Article, We Will Be Looking at Steps to Rotate a Video in Cyberlink PowerDirector to Help You when Required. We Have Also Mentioned the Steps You Will Need to Follow in Wondershare Filmora
- New General Information That You Need To Know About MKV Format
- New 2024 Approved What Is Animated GIF | GIF Example & Advantages of GIF
- Updated Using The AI Auto Reframe Feature | Wondershare Filmora Tutorial
- Updated 2024 Approved 2 Practical Ways to Combine Videos on TikTok
- New 2024 Approved Easy Way to Create a DIY Green Screen Video Effect
- 2024 Approved How To Use Voicemod On Discord Desktop+Mobile
- Updated Want to Make a Single Video From Different Clips? Follow These Ways to Learn About How to Merge Clips in DaVinci Resolve
- Updated In 2024, The Only Guide Youll Ever Need to Learn GIF Design That Get Shared Like Crazy
- New 8 Apps to Custom Your GIF Stickers
- 2024 Approved You Can Splice Video on the iPhone Using Various Applications. This Article Will Guide You Through the Steps Necessary to Splice Your Videos
- New The Best Way to Remove Audio From Your Videos for 2024
- Updated Want to Learn How to Make Gaming Montage Videos? You Have Come to the Right Place. This Guide Will Teach You All You Need to Know to Create Montages of Video Games and Share Them with Other Players
- Convert MP4 to 60 FPS GIF A Step-by-Step Guide for 2024
- New Step By Step Guide on Using Media Player Classic To Rotate A Video
- New Looking For the Best VHS Video Effect Makers? Get To Know the Top List for 2024
- New Top 15 Best Free MP4 Video Rotators Windows, Mac, Android, iPhone & Online for 2024
- In 2024, Want to Know the Full Process of Adding the Falling Text Effect as a Video Introduction? Detailed Guidelines on All the Steps Are Mentioned Here for Filmora Users
- Updated How to Loop Videos with iMovie for 2024
- New In 2024, 7 Ways to Make GIF From Videos on Mac
- New In 2024, How to Do Datamoshing Effect in After Effects?
- How to Make Text Reveal Effect for Your Video for 2024
- New 12 Best Picks of Video Enhancer Software for 2024
- Updated Overview of Perfect Moody LUTs for VN Editor
- New In 2024, Best 10 Crazy-Cool Examples of AR Video
- Gmail Not Working on Honor 90 7 Common Problems & Fixes | Dr.fone
- In 2024, How to Remove Apple iPhone 6 Device from iCloud
- How to Change Lock Screen Wallpaper on Samsung Galaxy M14 5G
- Ultimate Guide to Free PPTP VPN For Beginners On OnePlus Nord CE 3 Lite 5G | Dr.fone
- 8 Workable Fixes to the SIM not provisioned MM#2 Error on Google Pixel 8 | Dr.fone
- 5 Ways to Reset Infinix Smart 8 Without Volume Buttons | Dr.fone
- Pokemon Go Error 12 Failed to Detect Location On Samsung Galaxy A05? | Dr.fone
- In 2024, How to Change Netflix Location to Get More Country Version On Huawei Nova Y71 | Dr.fone
- In 2024, Complete Review & Guide to Techeligible FRP Bypass and More For Nokia C12 Pro
- Undelete lost data from Vivo S17 Pro
- In 2024, How to Use Google Assistant on Your Lock Screen Of Nokia C22 Phone
- Stuck at Android System Recovery Of Oppo A1x 5G ? Fix It Easily | Dr.fone
- How to Easily Hard reset my Nokia C32 | Dr.fone
- Reasons why Pokémon GPS does not Work On Nokia C02? | Dr.fone
- Bricked Your Oppo A1 5G? Heres A Full Solution | Dr.fone
- Title: 2024 Approved How to Make Video Slow Motion?
- Author: Chloe
- Created at : 2024-05-20 03:37:55
- Updated at : 2024-05-21 03:37:55
- Link: https://ai-editing-video.techidaily.com/2024-approved-how-to-make-video-slow-motion/
- License: This work is licensed under CC BY-NC-SA 4.0.
