
:max_bytes(150000):strip_icc():format(webp)/GettyImages-1365158534-d6952b03afff43f7a1c5f0405f31dc92.jpg)
2024 Approved How to Remove Background From a Video in Premier Pro
How to Remove Background From a Video in Premier Pro
Adobe Premiere Pro is one of the leading video editing software. You can use to create or remove a video’s background. Advanced Chroma Key features such as Color Key and Ultra Key make it possible to produce background-free content quickly.
Although both Keys work similarly, many users prefer to use the Ultra key for a better result in the video. This article will explain how to remove video background in Premiere Pro if you are a newbie.
Let’s get right to it and start the tutorial!
How to Use Premiere Pro to Remove Video Background?
Adobe Premiere Pro can remove video backgrounds quickly using the Ultra Key feature with the following steps:
Step1 In the first step, launch a browser, and download the appropriate Adobe Premiere Pro version for your Windows PC or Mac . Next, install the software on your system and launch it from your Desktop or Dock.
Step2 Now, use the Media Browser panel in the software to browse the video clips you want to import into the software. Next, right-click on your selected video file in which you want to remove the background and choose the “Import” option.

Step3 Click the “Effects” tab in the software panel and select Video Effects. Here, you will see the “Keying” option; select the Ultra Key, press and hold it to grab the key, and place it on your video clip.

![]()
Note: You can also search for the Ultra Key in the Adobe Premiere Pro search bar. Drag it to the video clip containing a background you want to remove.
Step4 As soon as you drop the Ultra Key to your footage, an Effects Control panel will pop up. Next, use the eyedropper tool in the Effects Control panel. Finally, select the background color on your video that you want to remove.

Step5 In the next step, click the drop-down menu next to the “Output” option, and select “Alpha Channel” from the list. This will reveal the details of your video and the edits. Also, click the “Setting” drop-down menu and select the Relaxed, Aggressive, or Custom option for the video effect.

Step6 Select the “Matte Generation“ below Key Color. Try different levels for Highlight, Shadow, Tolerance, Transparency, Pedestal, and other settings to further clean the matte for a premium effect.

Step7 In this step,choose the “Matte Cleanup” option to expand its settings and clean up the edges of your clip. You will see various options here, but the most important one is “Choke.” It will shrink the object’s borders and “Soften” to add fuzz.

If you see a background color spill on your video after playing with the above settings, click “Spill Suppression” beneath Matte Cleanup to expand its options and choose the desired settings to resolve this issue.
That’s about it! You have successfully removed the video background in Premiere Pro.
Step8 In the last step, you need to save, render, and export your video with the removed background. To do this, click the “File” option on the Premiere Pro Media Browser, and choose “Export” to explore the “Media” menu.
Choose the format in the Export Settings, as it is compatible with most devices. Next, choose a valid Preset and resolution, and click “Export” to begin the rendering process. Finally, save your edited background video again, and export the video to the desired destination.
Is There Any Best Alternative to Remove Video’s Background?
Although Adobe Premiere Pro is an excellent choice, the software can be a little overzealous for beginners. But don’t fret; there is an alternative for newbie to remove the video background.
Many video content creators recommended Wondershare Filmora as a user-friendly video editing software. This software loads with customization options and compact feature, including the Human Segmentation effect. With it, you can isolate objects from the background of a video without a green screen.

Let’s take a quick look at Filmora video editing marvel features:
- Comes with a free trial and is priced to meet most video designers’ production needs.
- Remove the video background with four quick steps.
- View the foreground of your video in real-time after background removal.
- Numerous customization options to add a different background or an image to the original content.
- Add the removed background as an overlay on top of another clip.
- Drag and drop a video clip to another track in the timeline for cutting, trimming, and elimination purposes.
- Using the “Human Segregation effect” in the AI Portrait on any imported video is simple.
- See objects isolated from the background in the Preview mode, which allows you to adjust the edges, feathers, and thickness accordingly.
- Easy export options supporting various compatible formats.
Additionally, we have provided you with a video tutorial about How to Remove and Change Video Background Without Green Screen with Filmora:
Free Download For Win 7 or later(64-bit)
Free Download For macOS 10.14 or later
Conclusion
This comprehensive guide explains how to remove the video background in Premier Pro using the Ultra key instead of the Color Key.
We have also discussed an excellent alternative to Premier Pro that can eliminate any background in your video content within minutes.
This article helped solve your queries. As a result, you can now create quality video content for your audience without paying thousands of dollars to professional video editors to do the background removal for you.
Step4 As soon as you drop the Ultra Key to your footage, an Effects Control panel will pop up. Next, use the eyedropper tool in the Effects Control panel. Finally, select the background color on your video that you want to remove.
Step5 In the next step, click the drop-down menu next to the “Output” option, and select “Alpha Channel” from the list. This will reveal the details of your video and the edits. Also, click the “Setting” drop-down menu and select the Relaxed, Aggressive, or Custom option for the video effect.
Step6 Select the “Matte Generation“ below Key Color. Try different levels for Highlight, Shadow, Tolerance, Transparency, Pedestal, and other settings to further clean the matte for a premium effect.
Step7 In this step,choose the “Matte Cleanup” option to expand its settings and clean up the edges of your clip. You will see various options here, but the most important one is “Choke.” It will shrink the object’s borders and “Soften” to add fuzz.
If you see a background color spill on your video after playing with the above settings, click “Spill Suppression” beneath Matte Cleanup to expand its options and choose the desired settings to resolve this issue.
That’s about it! You have successfully removed the video background in Premiere Pro.
Step8 In the last step, you need to save, render, and export your video with the removed background. To do this, click the “File” option on the Premiere Pro Media Browser, and choose “Export” to explore the “Media” menu.
Choose the format in the Export Settings, as it is compatible with most devices. Next, choose a valid Preset and resolution, and click “Export” to begin the rendering process. Finally, save your edited background video again, and export the video to the desired destination.
Is There Any Best Alternative to Remove Video’s Background?
Although Adobe Premiere Pro is an excellent choice, the software can be a little overzealous for beginners. But don’t fret; there is an alternative for newbie to remove the video background.
Many video content creators recommended Wondershare Filmora as a user-friendly video editing software. This software loads with customization options and compact feature, including the Human Segmentation effect. With it, you can isolate objects from the background of a video without a green screen.
Let’s take a quick look at Filmora video editing marvel features:
- Comes with a free trial and is priced to meet most video designers’ production needs.
- Remove the video background with four quick steps.
- View the foreground of your video in real-time after background removal.
- Numerous customization options to add a different background or an image to the original content.
- Add the removed background as an overlay on top of another clip.
- Drag and drop a video clip to another track in the timeline for cutting, trimming, and elimination purposes.
- Using the “Human Segregation effect” in the AI Portrait on any imported video is simple.
- See objects isolated from the background in the Preview mode, which allows you to adjust the edges, feathers, and thickness accordingly.
- Easy export options supporting various compatible formats.
Additionally, we have provided you with a video tutorial about How to Remove and Change Video Background Without Green Screen with Filmora:
Free Download For Win 7 or later(64-bit)
Free Download For macOS 10.14 or later
Conclusion
This comprehensive guide explains how to remove the video background in Premier Pro using the Ultra key instead of the Color Key.
We have also discussed an excellent alternative to Premier Pro that can eliminate any background in your video content within minutes.
This article helped solve your queries. As a result, you can now create quality video content for your audience without paying thousands of dollars to professional video editors to do the background removal for you.
Windows Movie Maker Review
Are you considering creating impressive movies from your video clips? Then you need to install this famous Windows movie maker tool to fulfill your job. This is expert video editing Microsoft software that you may use for free. This video editing tool by Windows has received massive recognition due to its simplicity. Also, it makes every task easy and quick, like combining video clips to form digital movies, including various effects, background music, transitions, and titles.
So, Windows Movie Maker is undoubtedly the ideal software for this job. Moreover, video editors using this app experience several attributes in their organization to finally emerge with the perfect videos, like audio options, animations, transitions overlays, and timeline narration. It has user-friendly features, which you’ll enjoy experimenting with. This software also has XML code allowing its end users to modify live effects and transitions or even prepare very new ones.
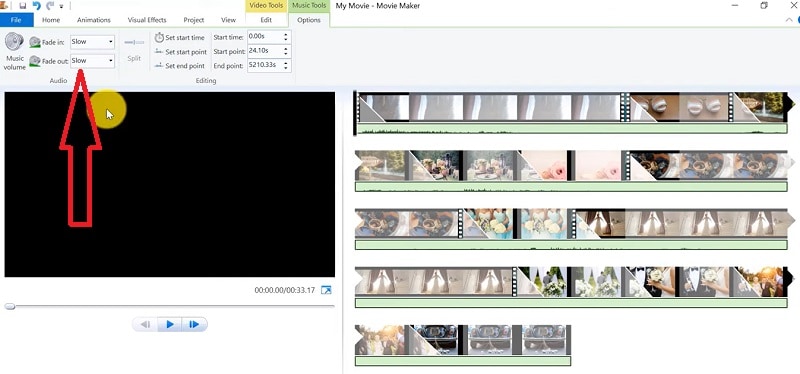
This brilliant tool can even do primary track editing, including fade-out and fade-in effects in your final audio tracks. Windows movie maker even allows you to post your final project effortlessly on various video sites and social media platforms. Here’s a complete guide:
1. Download and Install Windows Movie Maker
Windows movie maker was previously recognized in Windows 7 as Windows Live Movie Maker. So to experience the features of this software, first, you need to download and install this app which is available free of charge. The steps are as follows.
- Firstly, download the setup file of Windows Live Essentials.
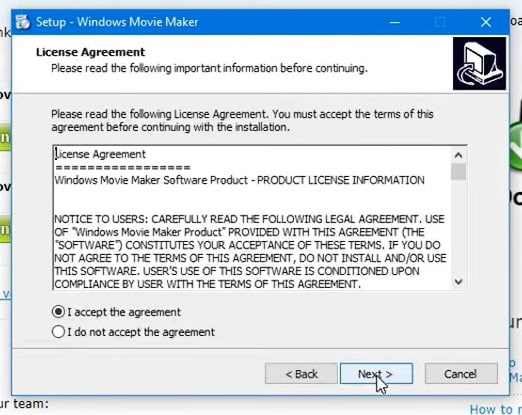
- You’ve to double-click on this setup file called windows-movie-maker.exe. Then tap on ‘Yes’ to permit the setup package to function.
- You’ll now be redirected to the installation window of Windows Essential. Next, you’ll see two options towards the web page’s top, and you’ll have to select the option ‘Install all of Windows Essentials (recommended)’ to continue with the installation process.
Windows Essentials comprise Microsoft OneDrive, Outlook Connector Pack, Movie Maker, Writer, Mail, Photo Gallery, and Messenger.
- Locate ‘View Details’ towards the left end of the page and tap on it. A progress and percentage bar will pop out along with the details regarding the program you’re installing.
- You need to wait a while to install Windows Movie Maker Software. Pause until the program completes its installation. After you find that the program title changes to another program such as Mail, you may proceed again.
- Now click on the Windows icon and then the ‘Start’ menu on the bottom left of your computer screen.
- Type and Search for ‘Windows Movie Maker, and you’ll find the newly downloaded app on the screen.
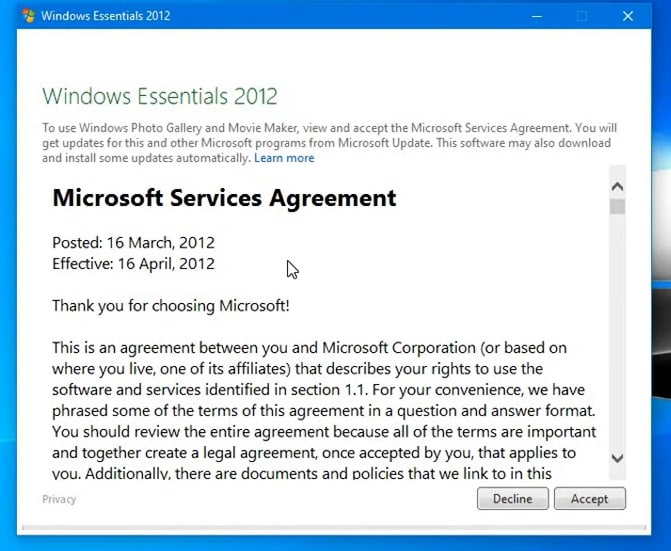
- Click on the icon with film reel, which is the Movie Maker app, and you’ll locate it above the Start menu. Next, you’ll be redirected to the terms of use of Windows Essentials for this Window to begin.
- Find the ‘Accept ‘ button towards the screen’s right-end corner and tap on it. Windows Movie Maker will now open.
- Next, tap on ‘Close’ when prompted with an error message from the installation windows.
You may now Enjoy Windows Movie Maker Live and begin making movies and videos using this software.
2. Interface
The user interface of Winona Movie Maker has three essential areas: the timeline and the storyboard, the panes and the toolbar, and the menu bar. This area covers…
- Timeline and storyboard: It offers a timeline and storyboard usage details for working with the current project clips.
- Panes: It offers details regarding Collections pane usage for viewing all your collections. Furthermore, it offers information regarding the Movie Task pane for all general tasks during movie making or project editing.
- Toolbar and Menubar: Here, you’ll get details regarding toolbar and menu commands usage for different tasks in this software.
3. Basic Editing
Adding clips to your timeline is the most straightforward method for creating digital movies using Movie Maker. Thereby, picking any one AutoMovie Themes out of those seven choices from default, sepia, black and white, pan and zoom, fade, cinematic, and contemporary.
You can enjoy the following choices for editing all your video clips:
- Creating clips: You may create new clips from different video clips after you’re done with capturing and importing in the Windows Movie Maker. You may create clips in the software anytime, according to your convenience.
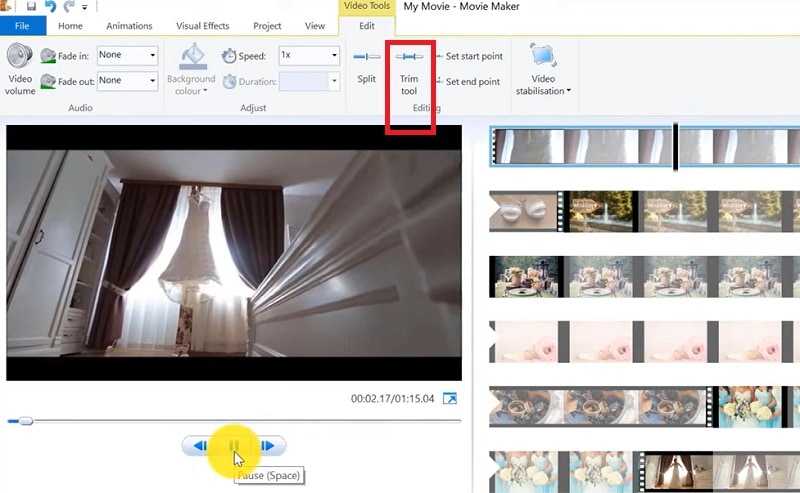
- Trimming any clip: You may hide any clip part you don’t wish to keep in the project. For instance, you may trim the clip’s end or beginning. Also, trimming doesn’t erase the details provided in their source material.
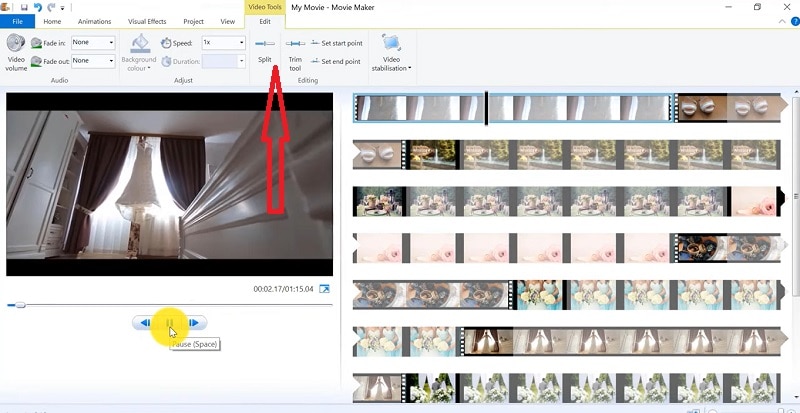
- Splitting Clips: Movie Maker allows you to split any video into two parts which can be helpful when you wish to add a video transition picture between the clips.
- Combining clips: Movie Maker allows you to merge two or multiple contiguous clips. Contiguous indicates that you need to record these clips together so that the beginning and end times are the same as the following video clip.
4. Add Video Effects
Video effects’ ascertain how any title, picture, or video clip displays in the final movie or project. Video effects permit you to include various effects in the movie and are added for the total time that the title, picture, or video clip displays.
Furthermore, you may add various other effects, which you’ll find in the folder of video effects in their Collections pane. You may maintain video effects when moving, copying, cutting, or splitting a picture or video clip.
5. Audio Editing
Windows Movie Maker permits you to operate various audios in several ways. A few specific audio-related jobs you may execute in Windows Movie Live Maker comprise the following:
- Audio levels adjustment: You can adjust your audio level so that you can easily control the audio playback and balance after you have the audio that comes up on Music/ Audio and Audio tracks in your timeline.
- Timeline narration: You may include a voice narration for the picture or video clips, which will appear on the timeline’s video track. There’ll be an automated synchronization of the audio narration with your video, where the narration shall elaborate on the movie event or action when you play it.
- Audio Clips Volume adjustment: You may adjust the audio volume for the video clip’s audio portion or the clips containing only audio. This permits you to control the audio clip’s volume such that you can hear it based on the sound level you’ve set for your audio clip.
- Adding audio effects: You may add various audio effects like mute, fade out and fade in.
6. Share Files
Are you done with video project editing, and now you wish to share it? Windows Movie Maker offers you various choices for sharing straight away from their app, comprising:
- YouTube
- Vimeo
So with this power, you may guarantee to share the video’s correct aspect ratio and size version to any planned platform. Nevertheless, you don’t require signing in to your Microsoft account for sharing to the preferred platform, which may act as a hurdle for all its users who do not have Microsoft Office accounts.
7. Pros and Cons
The software’s advantages are its automated preview, simple controls, and user-friendliness. Additionally, the following are some clear advantages and disadvantages of using Windows Movie Maker:
Pros
- This app is perfect for all novices and is an ideal introduction as it utilizes several pro editing systems’ general workflow components like assembling timelines and importing. Its interface has easy navigation and is exceptionally intuitive for most new beginners as well.
- Windows Live MovieMaker is a video editing Microsoft application that arrives standard with all Windows computers. It is amongst the most favorite editing apps obtainable and exact, as other programs are user-friendly and fun. This software comes free with Vista, XP, and Windows Me and has effortless usage. Moreover, you may download additional video plugins, plus it won’t give you any chance to complain regarding its free software.
- This app is straightforward to learn, and you won’t require any experience in film editing for using Windows Media Player. You’ll explore more than 130 effects with accessible Fantastic credits, titles, and transitions. Next to this, you may drag and then drop the clip at any place in the timeline.
- Windows Movie Maker is an ideal app for image slide shows and was developed to create photo and home movie slide shows. It presents excellent fun transitions and themes; you may add music easily. This app provides excellent variety, being a free editing application. Furthermore, it offers transitions and striking effects to function with.
- Windows Live Movie Maker is free of cost for all Microsoft Windows users and is basically for clients having zero to minimum experience editing audio and videos. Moreover, it has many special effects you may use while creating videos. Also, you may frag and then place any picture or video anywhere you wish to see it.
- You can choose from several themes, enhancing your film with tools like contemporary themes, fade effects, and sepia toning choices. You have to click once, and then the users can choose and apply from the multiple effects collection.
Cons
- Windows Movie Maker contains unlimited audio and video tracks, yet it provides just one accessible one at a time. Hence, if you wish to include some other audio or music track, you may prepare the video, thereby sending it to the ultimate file.
- It isn’t uninstallable using any remove or add control panel. Also, it is impossible to do video overlaying.
- This app requires much patience because it is prone to crashes. Moreover, you’ll require enough time and effort to do video reversing. It often becomes frustrating for all advanced editors to cut clips into small parts and then add them back. Hence, Windows Movie maker isn’t good for professional video editors.
- Windows Live MovieMaker can crash and freeze and is known to suffer frequent crashes. Hence, ensure saving often and avoid creating complex videos. Also, you cannot perform complex editing and can now prepare single audio and video track.
8. Windows Movie Maker Alternative Software
Wondershare Filmora Video Editor is the best alternative for Windows Movie Live Maker and is a highly favored and most effective software program. You can download it for free, and it is adaptable with Windows 7 OS or above. This app is user-friendly but powerful and allows you to split, merge, crop, and trip various video clips with essential built-in video editing attributes.
Free Download For Win 7 or later(64-bit)
Free Download For macOS 10.14 or later
Additionally, you may get a few advanced properties like video stabilization, color correction, and green screen in Filmora effortlessly. You may even explore several fashionable and modern video effects such as music, text, and intros for topics like games, Education, Travel, Vlogger, Beauty, etc. Here is the comparison between the two software:
Filmora and Windows Movie Maker comparison
| Basis | Windows Movie Maker | Wondershare Filmora |
|---|---|---|
| Pricing | Free/ inexpensive | Quote basedAnnual SubscriptionOne-time paymentMonthly Payment |
| Interface | Pleasing interface | Auto movie options |
| Effects | Several overlays and effects | Special effects choices and transition overlays |
| Integration | YouTubeFacebookVimeoEmail | TwitterInstagramFacebookVimeoYouTube |
Conclusion
You may use Windows Movie Maker Live for capturing videos and audio to the computer using various video sources, including Web Cameras and Video Cameras, thereby using the recorded data in your new movies. You may import still pictures, video, and audio into this application to use in the movies you’re making. Moreover, after you’ve finished with video and audio content editing in this app, which may involve adding effects, video transitions, and titles, you may finally save the ultimate movie and then share and watch it with your family and friends.
In This Article, We Will Show You How to Rotate Videos Using Obs
Obs is video editing software that is used to create and edit videos. It is a powerful tool that can be used to do a variety of things, such as add text, music, and special effects to videos. It also allows you to cut and trim videos, and to merge them with other videos. Additionally, obs allows you to live stream your videos, which can be a great way to share them with others. Overall, obs is a powerful tool that can be used to create and edit amazing videos.
The main interface of Obs Studio is relatively simple, and it is easy to use. The top of the screen contains a number of icons that allow you to access different features of the software, such as the video editor, the live streamer, and the settings. The bottom of the screen contains a timeline, which allows you to easily edit your videos. The timeline also contains a number of tools that allow you to trim your videos, add text and music, and more. Overall, the main interface of Obs Studio is simple and easy to use.
There are many benefits to using obs, including:
- It is free to download and use.
- It is a powerful tool that can be used to create and edit amazing videos.
- It allows you to live stream your videos, which can be a great way to share them with others.
- There are many online communities where you can find help and advice from other users.
- Overall, obs is a great program that can be used to create and edit amazing videos.
There are many reasons why you might want to rotate a video. For example, if you captured a video of a person or object upside down, you would want to rotate it so that it is right-side up. Or, if you recorded a video in landscape mode but want to view it in portrait mode, you would need to rotate the video.
Luckily, there are a number of ways to rotate videos on different devices. In this article, we will show you how to rotate videos using Obs.
Step-by-step on how to rotate videos using Obs
How to rotate using the rotate tool in the video editor?
First, to use the rotate tool in the Edit tab, simply follow the steps below:
Step 1: Open the video editor and drag your video to the editor.

Step 2: Click on the Edit > Transform > Rotate 90 degrees CW tool to rotate it 90 degrees clockwise.

Step 3: Click on the Edit > Transform > Rotate 90 degrees CW tool to rotate it 90 degrees counterclockwise.

Step 4: Click on the Edit > Transform > Rotate 180 degrees tool to rotate it 180 degrees.

How to rotate using the advance controls in obs?
Second, to use the filters in obs, follow the steps below:
Step 1: Open obs and click on the Edit tab > Transform > Edit transform. You can also click Ctrl + E.

Step 2: Go to the Rotation section.

Step 3: Select the rotation degree you want to use.

Step 4: Click on enter on your keyboard to rotate it.
How to rotate using right-clicking on the video?
Third, to use right-clicking on the video, follow the following:
Step 1: Open obs and right-click on the clip that you want to rotate.
Step 2: Click on the Transform > Rotate 90 degrees CW tool to rotate it 90 degrees clockwise.

Step 3: Click on the Transform > Rotate 90 degrees CW tool to rotate it 90 degrees counterclockwise.

Step 4: Click on the Edit > Transform > Rotate 180 degrees tool to rotate it 180 degrees.

An Easy Way to Rotate Videos Using Filmora
To conclude, there are a number of ways to rotate videos on different devices. In this article, we have shown you how to rotate videos using Obs. Meanwhile, we have another suggestion which is using Filmora Video Editor to rotate videos. Filmora is a Wondershare product that helps you to rotate videos without quality loss. With its easy-to-use interface, you can rotate videos with just a few clicks. If you are interested in it, please feel free to check the guide below:
For Win 7 or later (64-bit)
For macOS 10.14 or later
Step-by-step on how to rotate videos using Filmora
How to rotate videos using Filmora?
First, to rotate videos using Filmora, follow the steps below:
Step 1: Import the video you want to rotate into Filmora.

Step 2: Click on the “Edit” button in the toolbar.

Step 3: Go to Transform > Rotate.

Step 4: Select the rotation angle you want to use.

Step 5: Click on the ‘Ok’ to rotate it.

Second, if you want to rotate a video and flip it, follow the steps below:
Click on the flip option that you want to use, either upside down or sideways, vertically or horizontally.

Click on ‘Ok’ to apply the rotation and the flip.
Third, if you want to rotate a video by a specific number of degrees, follow the steps below:
To conclude, Filmora provides a number of ways for you to rotate your videos as well as using Obs. If you are looking for an easy way to rotate your videos without quality loss, then Filmora is the best option for you.
Step 2: Click on the Edit > Transform > Rotate 90 degrees CW tool to rotate it 90 degrees clockwise.
Step 3: Click on the Edit > Transform > Rotate 90 degrees CW tool to rotate it 90 degrees counterclockwise.
Step 4: Click on the Edit > Transform > Rotate 180 degrees tool to rotate it 180 degrees.
How to rotate using the advance controls in obs?
Second, to use the filters in obs, follow the steps below:
Step 1: Open obs and click on the Edit tab > Transform > Edit transform. You can also click Ctrl + E.
Step 2: Go to the Rotation section.
Step 3: Select the rotation degree you want to use.
Step 4: Click on enter on your keyboard to rotate it.
How to rotate using right-clicking on the video?
Third, to use right-clicking on the video, follow the following:
Step 1: Open obs and right-click on the clip that you want to rotate.
Step 2: Click on the Transform > Rotate 90 degrees CW tool to rotate it 90 degrees clockwise.
Step 3: Click on the Transform > Rotate 90 degrees CW tool to rotate it 90 degrees counterclockwise.
Step 4: Click on the Edit > Transform > Rotate 180 degrees tool to rotate it 180 degrees.
An Easy Way to Rotate Videos Using Filmora
To conclude, there are a number of ways to rotate videos on different devices. In this article, we have shown you how to rotate videos using Obs. Meanwhile, we have another suggestion which is using Filmora Video Editor to rotate videos. Filmora is a Wondershare product that helps you to rotate videos without quality loss. With its easy-to-use interface, you can rotate videos with just a few clicks. If you are interested in it, please feel free to check the guide below:
For Win 7 or later (64-bit)
For macOS 10.14 or later
Step-by-step on how to rotate videos using Filmora
How to rotate videos using Filmora?
First, to rotate videos using Filmora, follow the steps below:
Step 1: Import the video you want to rotate into Filmora.
Step 2: Click on the “Edit” button in the toolbar.
Step 3: Go to Transform > Rotate.
Step 4: Select the rotation angle you want to use.
Step 5: Click on the ‘Ok’ to rotate it.
Second, if you want to rotate a video and flip it, follow the steps below:
Click on the flip option that you want to use, either upside down or sideways, vertically or horizontally.
Click on ‘Ok’ to apply the rotation and the flip.
Third, if you want to rotate a video by a specific number of degrees, follow the steps below:
To conclude, Filmora provides a number of ways for you to rotate your videos as well as using Obs. If you are looking for an easy way to rotate your videos without quality loss, then Filmora is the best option for you.
Best 6 Online MP4 Croppers
A part of the editing process is cropping the video from the raw mp4 file. This article will show you the best 6 online mp4 croppers. The question is which will suit you best? You may be from different levels of expertise when it comes to video editing. Are you aware of your personal needs and standards when it comes to looking for the best online mp4 cropper?
You may one day face that you cannot choose between the countless options available online. Testing each of these would take a huge chunk of your time. The time that could be spent on other activities that you rather do. Also, the overwhelming feeling of not knowing where to start.
Ezgif Video Crop
Ezgif is an online video cropping tool that supports multiple file formats for your video. If you’re worried about the tool’s difficulty of using the tool then, I have good news for you. This is not filled with confusing icons and tabs. You can simply copy and paste the URL and begin the cropping process. In addition, you can add your file from your local computer’s storage. A smart choice for your video cropping needs!
Although, there is no perfect tool without its strengths and weaknesses. So, we will show you the reality side and how other users perceive its usefulness.

Pros
- Capable of cropping various types of videos including MP4, WebM, AVI and many more. This means that it can also output different formats and encoding. This article may seem to focus on mp4 format but if in the future that you would need a different format then this may come in handy.
- The power to set the cropping size and ratio more effectively. There are also presets available to help you transform it into video square, 4:3, 16:9, 3:2 and many more. Having a cropping area that you can easily adjust is such a helpful feature.
- It shows the display configuration info for imported mp4 video files.
Cons
- The maximum file size is only 100 mb (megabyte). Which means that you have to consider if your mp4 video file would not exceed this limit. A disadvantage indeed especially for those who have a video recorder that saves it in high quality. There is also a fear that the user would be hassled by trimming longer videos into shorter clips just to meet this requirement.
- The video preview is not the same as the final output. The quality in the preview may be shown as having a much lower quality.
- Other video file formats may not play due to incompatibility. This may be a huge disadvantage especially if you’re looking for efficiency in getting stuff done.
Wondershare Filmora
Filmora Video Editor is a video editing application that considers the user experience of its consumers. Do not worry about the cost as downloading it is indeed free. As compared to other tools in this article, this one is a complete video editing software. So if you’re a user that has various needs for video production then this will suit you perfectly!

Pros
- Editing supports even if mp4 video is in 4k video resolution. Say goodbye to limiting yourself from editing those high quality mp4 files that you have. You may have videos from DSLRs that record in high resolution so there’s no need to worry about losing its wonderful quality.
- You can automatically and manually crop your video into different ratios. Crop and Zoom and Crop to Fit offer additional options rather than simply cropping it.
- Also supports video formats like AVI, MOV, FLV and many more.
- Is available both on Windows and Mac. No need to worry about computer compatibility
- Can export in various formats. You can upload the output online or burn discs.
- Batch crop multiple video clips. The hassle of going through the same process of cropping every single video is removed.
Cons
- Subscription fee if you want to export it without a watermark.
- May be complicated for some beginners
- Frequent lagging issues.
For Win 7 or later (64-bit)
For macOS 10.14 or later
Kapwing
If you’re looking for something specific like using it for Facebook, Tiktok, Instagram and other social media applications then Kapwing is the answer. This is the right choice for those that just want a straightforward tool for their social media needs. You can be the content creator that you dream of or a sharer of your favorite memories that have been recorded into a video.
The process just starts by uploading the video that you want. Next is selecting the platform where you will publish it. And finally, after cropping the mp4 video is ready to download. Other features are also available in case you’re interested in enhancing it.

Pros
- No trouble in cropping video to the right dimensions. This would avoid the awkward cropping that happens to some video cropping tools.
- Can share directly to the platform of your choice.
- You can play and preview your video before and after cropping.
- A smart tool that can guide you what your length should be depending on the platform.
- Automatically resizes your video.
Cons
- There is a limit to the video file size which is should only be below 80 MB (megabytes)
- A watermark will be present if you’re not using the paid version
Flexclip
Another video editor that bridges the gap between the beginner and professional. It brands itself as having an easy interface that communicates with the user. It is indeed a great online video cropper for mp4 files. By checking the video editor, you could also see the additional features for your future editor needs. You can begin by dragging your mp4 video to the center page and choosing the area you want to crop. Finally, you could export the finished product and file name.

Pros
- Fast preparation of videos. If you’re the type of person that wants a fast process then try this as your editing tool.
- Can crop mp4 videos. If you have files in this format then you could easily transform your mp4 files into another ratio.
- Availability of various video formats to be exported.
- The power to change the different aspect ratios.
Cons
- Limited features for free version. If the financial situation is not stable then you might have doubts whether to risk it for this tool.
Video Toolbox
Speaking of affordability this tool suits what every basic editor dreams of. It definitely is a free editor and unlike the others you can use it as long as you like. This means no more worries about your free trial expiring. When it comes to cropping your mp4 video file then it is indeed an amazing tool to have. I suggest that you go and check it for yourself. You will have no regrets as you will not waste your money on this one.

Pros
- A video editor with no cost. It is absolutely free and has no hidden charges.
- It can convert video files into several formats including MP4, MPEG, MPG, RM, VOB, WMV, 3GP and many more.
- Can intelligently analyze any uploaded video and display the detailed info for you.
- Support for uploading local video or downloading files from online URL.
- Cut, crop, record and merge video with few clicks
- Has two accessible modes to manage video.Which is simple & advanced.
- You can change the advanced settings such as resolution, bit rate and frame rate.
- Great customer support in case that you would be lost there are guides and tutorials present
Cons
- The interface may be too simple for other people. It depends on the user if the simplicity would be an advantage or disadvantage.
- It has limited storage which is only 300 MB for mp4 video files. A big deal for those who frequently shoot in high quality meaning that it requires a larger storage than that limitation.
Online Video Cutter Cropper
As the name suggests it is an online video cropper. The question is why is it included in this list of the best? It does not require any installation which means that the problem of troubleshooting on how to get it on your computer is gone. Just simply on your browser and you could access this lightweight tool. Are your video files ready to be cropped?
The process in this tool is to Open, Cut and Save. First is opening the file from anywhere like your local folder, Google Drive and URL. Next is cropping it according to your preferences. And, lastly, save your progress.

Pros
- Free to use and no hidden fees.
- A chance to move both beginning and end sliders to cut off useless portions accurately.
- The output format can be MP4, FLV, AVI, MPG and 3GP.
- You can cut, crop and rotate the video quickly. Such freedom for a tool that is free. You can rotate your video by 90 degrees if it is upside down.
- You can be secured because it auto-deletes files from the server.
Cons
- There is a restriction in file size which is 500 MB
- Possibility of ads popping up. This can be irritating to users that just want to be focused on their task.
- It relies on stable connection to the internet. The reality of life is that stability is not guaranteed even if it’s the internet.
Conclusion
Is it your first time knowing about these tools?
I have shown you the six best online mp4 croppers and each of its pros and cons. By now, you have an idea of which of these would suit you as a user.
The question is… are you aware of what you need or want for a mp4 video cropper? It’s time for you to weigh your own values and which mp4 cropper would fit that. Yes, you can read tons of reviews on the internet but if you don’t have self- awareness then you would still be confused on which would fit you.
There is no need to fear the unknown. A part of the process is exploring the possibilities and here we are demonstrating to you your 6 best choices to try from.
Let me know in the comments about your thoughts on these tools. You could also make your own pros and cons of these mp4 video croppers.
Pros
- Capable of cropping various types of videos including MP4, WebM, AVI and many more. This means that it can also output different formats and encoding. This article may seem to focus on mp4 format but if in the future that you would need a different format then this may come in handy.
- The power to set the cropping size and ratio more effectively. There are also presets available to help you transform it into video square, 4:3, 16:9, 3:2 and many more. Having a cropping area that you can easily adjust is such a helpful feature.
- It shows the display configuration info for imported mp4 video files.
Cons
- The maximum file size is only 100 mb (megabyte). Which means that you have to consider if your mp4 video file would not exceed this limit. A disadvantage indeed especially for those who have a video recorder that saves it in high quality. There is also a fear that the user would be hassled by trimming longer videos into shorter clips just to meet this requirement.
- The video preview is not the same as the final output. The quality in the preview may be shown as having a much lower quality.
- Other video file formats may not play due to incompatibility. This may be a huge disadvantage especially if you’re looking for efficiency in getting stuff done.
Wondershare Filmora
Filmora Video Editor is a video editing application that considers the user experience of its consumers. Do not worry about the cost as downloading it is indeed free. As compared to other tools in this article, this one is a complete video editing software. So if you’re a user that has various needs for video production then this will suit you perfectly!
Pros
- Editing supports even if mp4 video is in 4k video resolution. Say goodbye to limiting yourself from editing those high quality mp4 files that you have. You may have videos from DSLRs that record in high resolution so there’s no need to worry about losing its wonderful quality.
- You can automatically and manually crop your video into different ratios. Crop and Zoom and Crop to Fit offer additional options rather than simply cropping it.
- Also supports video formats like AVI, MOV, FLV and many more.
- Is available both on Windows and Mac. No need to worry about computer compatibility
- Can export in various formats. You can upload the output online or burn discs.
- Batch crop multiple video clips. The hassle of going through the same process of cropping every single video is removed.
Cons
- Subscription fee if you want to export it without a watermark.
- May be complicated for some beginners
- Frequent lagging issues.
For Win 7 or later (64-bit)
For macOS 10.14 or later
Kapwing
If you’re looking for something specific like using it for Facebook, Tiktok, Instagram and other social media applications then Kapwing is the answer. This is the right choice for those that just want a straightforward tool for their social media needs. You can be the content creator that you dream of or a sharer of your favorite memories that have been recorded into a video.
The process just starts by uploading the video that you want. Next is selecting the platform where you will publish it. And finally, after cropping the mp4 video is ready to download. Other features are also available in case you’re interested in enhancing it.
Pros
- No trouble in cropping video to the right dimensions. This would avoid the awkward cropping that happens to some video cropping tools.
- Can share directly to the platform of your choice.
- You can play and preview your video before and after cropping.
- A smart tool that can guide you what your length should be depending on the platform.
- Automatically resizes your video.
Cons
- There is a limit to the video file size which is should only be below 80 MB (megabytes)
- A watermark will be present if you’re not using the paid version
Flexclip
Another video editor that bridges the gap between the beginner and professional. It brands itself as having an easy interface that communicates with the user. It is indeed a great online video cropper for mp4 files. By checking the video editor, you could also see the additional features for your future editor needs. You can begin by dragging your mp4 video to the center page and choosing the area you want to crop. Finally, you could export the finished product and file name.
Pros
- Fast preparation of videos. If you’re the type of person that wants a fast process then try this as your editing tool.
- Can crop mp4 videos. If you have files in this format then you could easily transform your mp4 files into another ratio.
- Availability of various video formats to be exported.
- The power to change the different aspect ratios.
Cons
- Limited features for free version. If the financial situation is not stable then you might have doubts whether to risk it for this tool.
Video Toolbox
Speaking of affordability this tool suits what every basic editor dreams of. It definitely is a free editor and unlike the others you can use it as long as you like. This means no more worries about your free trial expiring. When it comes to cropping your mp4 video file then it is indeed an amazing tool to have. I suggest that you go and check it for yourself. You will have no regrets as you will not waste your money on this one.
Pros
- A video editor with no cost. It is absolutely free and has no hidden charges.
- It can convert video files into several formats including MP4, MPEG, MPG, RM, VOB, WMV, 3GP and many more.
- Can intelligently analyze any uploaded video and display the detailed info for you.
- Support for uploading local video or downloading files from online URL.
- Cut, crop, record and merge video with few clicks
- Has two accessible modes to manage video.Which is simple & advanced.
- You can change the advanced settings such as resolution, bit rate and frame rate.
- Great customer support in case that you would be lost there are guides and tutorials present
Cons
- The interface may be too simple for other people. It depends on the user if the simplicity would be an advantage or disadvantage.
- It has limited storage which is only 300 MB for mp4 video files. A big deal for those who frequently shoot in high quality meaning that it requires a larger storage than that limitation.
Online Video Cutter Cropper
As the name suggests it is an online video cropper. The question is why is it included in this list of the best? It does not require any installation which means that the problem of troubleshooting on how to get it on your computer is gone. Just simply on your browser and you could access this lightweight tool. Are your video files ready to be cropped?
The process in this tool is to Open, Cut and Save. First is opening the file from anywhere like your local folder, Google Drive and URL. Next is cropping it according to your preferences. And, lastly, save your progress.
Pros
- Free to use and no hidden fees.
- A chance to move both beginning and end sliders to cut off useless portions accurately.
- The output format can be MP4, FLV, AVI, MPG and 3GP.
- You can cut, crop and rotate the video quickly. Such freedom for a tool that is free. You can rotate your video by 90 degrees if it is upside down.
- You can be secured because it auto-deletes files from the server.
Cons
- There is a restriction in file size which is 500 MB
- Possibility of ads popping up. This can be irritating to users that just want to be focused on their task.
- It relies on stable connection to the internet. The reality of life is that stability is not guaranteed even if it’s the internet.
Conclusion
Is it your first time knowing about these tools?
I have shown you the six best online mp4 croppers and each of its pros and cons. By now, you have an idea of which of these would suit you as a user.
The question is… are you aware of what you need or want for a mp4 video cropper? It’s time for you to weigh your own values and which mp4 cropper would fit that. Yes, you can read tons of reviews on the internet but if you don’t have self- awareness then you would still be confused on which would fit you.
There is no need to fear the unknown. A part of the process is exploring the possibilities and here we are demonstrating to you your 6 best choices to try from.
Let me know in the comments about your thoughts on these tools. You could also make your own pros and cons of these mp4 video croppers.
Also read:
- Updated Best Free Video Editing Software to Boost Your Content Creation
- Updated How to Create Loop Videos with Filmora
- Are You Facing Trouble in Playing a TS File? We Got You! Read the Article Below to Learn the Most About TS Format, Pros and Cons, and More for 2024
- Updated Finest Approach to Slow Down a Video CapCut All-in-One Video Editor for 2024
- New How to Trim Video in Quicktime Player on Mac for 2024
- In 2024, Backup and Organize Your Tons of Footage in Minutes
- Updated In 2024, Getting Into The Details A Review of Kodak LUTs
- Updated 10 Best Free Spanish Text To Speech Converter Websites
- 2024 Approved This Article Aims to Provide a Step-by-Step Guide to Changing a Videos Speed by Using the Speed Adjustment Panel and Duration Panel on Wondershare Filmora
- New In 2024, Easy Ways to Remove Motion Blur In Photoshop
- Updated Steps to Remove Background Noise From Video Sony Vegas
- New 2024 Approved How to Edit A Time Lapse Video on iPhone?
- Updated In 2024, Level Up Videos By Applying Keyframe Like A Pro
- In 2024, Time Lapse Video Is Very Interesting and Creative, Which Usually Attracts More Attention. This Article Will Show You How to Make a Time Lapse Video with Adobe After Effects
- New Want to Create an Impressive Video Collage but Clueless About the Best Tools? No Worries as We Are Here and Will Help You to Learn About the Best Video Collage Maker PC Tools
- How to Use Blender Green Screen
- Updated The Ultimate Guide to Using Shotcut To Rotate Videos for 2024
- Updated How To Fix Slow Playback Issues in DaVinci Resolve Finding the Best Solutions for 2024
- Updated 2024 Approved Finding the Best Game Recorder for PC
- In 2024, How Does the YouTube AI Algorithm Work - AI EXPLAINED
- New How to Create Vintage Film Effect 1920S
- In 2024, Merge MP4 Online? Its Easy With These 5 Tools
- DaVinci Resolve Scopes Have Undergone Significant Improvements. Find Out How to Use These Scopes and Improve Your Video Editing Skills
- 2024 Approved How D AI Video Games Act More Human Than Human?
- How to Remove Background Noise From Video Sony Vegas
- New Do You Want to Remove the Video Background in Premier Pro Using the Ultra Key but Dont Know About the Whole Process? Please Read Our Complete Step-by-Step Tutorial and Learn From Scratch as a Beginner
- New In 2024, A Guide To Motion Tracking Using The Best Video Editors
- 2024 Approved TikTok Face Zoom | Create Your Face Zoom TikTok Now
- New Discover How to Change Sky Background with The Best Applications? A Review
- 2024 Approved How to Create Discord Emoji GIF
- Learn About Open Broadcaster Software and How to Perform Obs Color Correction. Also, Explore the Various Aspects of Color Correction Like Contrast, Brightness, Saturation, Among Others
- New 2024 Approved What Slideshow Templates Can Teach You About Aesthetic
- Updated Free Titles For Final Cut Pro
- In 2024, How to Add Filters on iMovie
- In 2024, Best 10 Tools to Convert a GIF Into a PDF
- Fascinated About Exploring Your Graphic Creativity by Experimenting with Designing Slideshow Presentations on a Variety of Software Programs? Stay Here to Get the Know-How of Using Clideo
- In 2024, Different Ways To Trim Video In Premiere Pro
- New Best 6 WMV to GIF Converters for 2024
- In 2024, Best 4 Eminem Voice Generator Apps for PC, Mac, Mobile, and Online
- In 2024, Fake Android Location without Rooting For Your Samsung Galaxy A23 5G | Dr.fone
- In 2024, CatchEmAll Celebrate National Pokémon Day with Virtual Location On Xiaomi Civi 3 | Dr.fone
- Remove FRP Lock on Nokia XR21
- In 2024, Rootjunky APK To Bypass Google FRP Lock For Xiaomi Redmi Note 12 4G
- Updated 2024 Approved Tips for Canva Animated Elements
- In 2024, Top 7 Skype Hacker to Hack Any Skype Account On your Honor X8b | Dr.fone
- How To Change Country on App Store for iPhone 12 mini With 7 Methods
- How to Bypass Google FRP Lock from Lava Devices
- 2024 Approved Whats Your No. 1 Maker to Animate Your Logo Online Free
- Title: 2024 Approved How to Remove Background From a Video in Premier Pro
- Author: Chloe
- Created at : 2024-05-20 03:38:11
- Updated at : 2024-05-21 03:38:11
- Link: https://ai-editing-video.techidaily.com/2024-approved-how-to-remove-background-from-a-video-in-premier-pro/
- License: This work is licensed under CC BY-NC-SA 4.0.
