
:max_bytes(150000):strip_icc():format(webp)/Sonyplaystation5-dc53869451d7416cbb32881a35c3fc32.jpg)
2024 Approved How to Speed Up and Slow Down a Video
How to Speed Up and Slow Down a Video
Speeding and slowing down the speed of a video is a marvel in the video editing world. In the older days, this feat was accomplished only by the big-budget filming industry.
This article will dive into how you can access the modern-day features available in video editing software. From these features, you can alter the speed of your video easily. However, before we get into the step-by-step guide, let’s understand what fast and slow-mo videos are.
Part 1. What Are Fast and Slow Motion Videos?
As the name suggests, fast-motion videos are the ones that have been sped up from their average speed.

Similarly, slow-motion videos are the ones that have been slowed down from their average speed. The slow-motion effect, also known as the slow-mo effect, is widespread in modern cinema.

Now that we know what Fast and slow-motion videos are. Let’s understand their applications. Or how you can use them in your videos. Scroll below to learn more!
Part 2. Why Should You Change the Speed of Your Videos?
The answer to this question would be that it’s a personal creative decision that will allow you to make your videos more engaging.
Fast Motion Videos
Fast-motion videos are used in many areas of filming. For example, you can speed up your videos to create a funny video or shorten its length.
The fast-motion effect has many applications, such as cooking tutorial videos. For example, the step-by-step process of a cooking tutorial can be too long to fit into a single video. Or it could also help you in cases where you want to keep the length of the video short.
The fast motion of the steps will allow the viewer to quickly grasp the whole process without watching the entire video.
Slow Motion Videos
You can also slow down your videos to give the viewers a more detailed perspective of a scene. Or you can also create a slow-mo video that offers a general surreal vibe.
A famous example is in action films. The producers of the first Matrix film used the Slow-mo effect in the famous bullet dodging scene.

You may wonder how the film producers made the slow-mo effect. The technology at that time was less developed than the recent day. So, even you can create a slow-mo effect.
Before we get into the editing process, let’s first understand what you will need to change the speed of your videos!
Part 3. What Will You Need to Change the Speed of Your Videos?
You will need the following essentials to change the speed of a video:
1. Wondershare Filmora
Free Download For Win 7 or later(64-bit)
Free Download For macOS 10.14 or later
To begin, you will need a good video editor. Wondershare Filmora is the best video editing software available. It has a very engaging system UI that allows inexperienced users to learn how to use it quickly. It also has a diverse collection of stock media. And not only that! It allows you to access reliable features to change the speed of a video.
You can change the speed of the video on Filmora by the speed adjustment panel or by the duration panel present above the timeline. It will adjust in just seconds with a few clicks. This feature makes Filmora more prior with editing tools.

2. Video Clips
Well, it is evident that to change the speed of your videos, you will need video clips. But there are a few things you can keep in mind before adjusting the speed of a video.
![]()
Note: Slowing down a video requires a shot at a higher frame rate. The greater the frame rate, the better will be the slow-mo quality. On the other hand, speeding up videos does not have a strict frame rate requirement.
Part 4. How Can You Change the Speed of Your Videos?
Here you will learn two ways in which you can change the speed of your videos. The two methods to change the speed of your video are mentioned:
- The speed adjustment panel.
- Duration panel settings.
Let’s get started with the editing process. The first method we will look into is the Speed Adjustment panel.
1. Change Speed With the Speed Adjustment Panel
The Speed Adjustment panel is the speed adjuster in the Wondershare Filmora software. This feature will give you a drag bar to adjust the speed of your video.
You can move the bar to the right to increase the speed of your video. Similarly, you can move it to the left to decrease the rate.
But before we use this feature, we will need to download the Filmora video editing software. So please scroll below to learn how to download it!
Step1 Download Filmora
First and foremost, you must have access to Filmora. For this, download Wondershare Filmora. Then, activate this app or software on your PC.
Step2 Import The Video Files
The next step after downloading Filmora is to import your video clips. To accomplish this, follow the steps outlined below:
- Locate and select the Import icon on the top left side of the Filmora Home Interface.
- It takes you to your computer’s library.
- Select the videos to be edited and then click OK.

You can also import the files by another method. After you have opened Filmora, you can restore the Filmora Window size and import by dragging and dropping the clips:
- Drag the cursor to select the video clips you want.
- Then, drop them in the Filmora import window.

Filmora supports various formats for your video clips. They include the Mp4, AVI, MOV, GIFs, and more.
After you have imported your video clips, add them to the timeline as shown below!
Step3 Add The Video Clips to The Timeline
After you’ve imported clips in the Import window, drag them onto the timeline. Follow the steps outlined below to accomplish this:
- Drag the clips into the import window and select them.
- Then, insert them into the timeline.

Now that we have our video clips in the timeline, we can start adjusting the speed.
Step4 Open the Speed Adjustment Panel
The speed adjustment panel, or the Uniform Speed, is the feature of Filmora that allows you to change the speed of your video. For example, to open the Unifrom Speed panel, do as follows:
- Double-click on the video clip.
- In the pop-up column, scroll down till you see the Unifrom Speed option and click on it.
- The speed controls will be shown in the import window.

In the speed control panel, you can see the speed adjuster slider. A number will usually mark this at the end. This number tells you the current speed your video is calibrated in and how fast or slow the motion effects will be.
1.00 is always the average speed. 0.5 being half and 2.00 being double the average speed. To control the speed through the slider, you will need to do the following:
- To increase the speed: Type in the number you want your rate to be. Or, drag the slider to the right as you wish.
- To decrease the speed: Type in a number less than the standard 1.00, or you can drag the slider to the left as you wish.
The number of your speed can be an inconvenience if you have no prior experience. Instead, render the video and play it from the beginning with the changes that you made. It gives you a better idea of the speed of your video.

Step5 Detach The Audio
The corresponding audio also gets affected when you slow down or speed up a video. In this scenario, you can also choose to detach the audio beforehand. It allows you to maintain the original playback speed. To detach the audio, follow the steps as mentioned:
- Right-click on the video clip.
- In the pop-up column, scroll down to the Detach Audio option and click on it.

It will create an audio file in a separate audio tab in the timeline. You can adjust this audio according to your liking. You can edit the detached audio by:
- Double-click on the audio file.
- A settings menu will open in the import window.
- Adjust the Fade options for your Audio.
- Drag the Fade out slider to the right to Fade out your Audio.
- To Fade in your Audio, drag the Fade in slider to the right.

You can also remove the background noise and the pitch of the audio if you want. You can also replace the video’s original audio with a new one. Click on the audio file and press Del on the keyboard to delete it. To add new audio, do as mentioned ahead:
- Click on The Audio icon above the import window.
- Browse The Audio that matches the vibe of your video.
- Drag and drop it below your video clip.

Doing so would have created alternate audio for your video. Play the video from the start and confirm your changes.
Step6 Save Your Project
Saving a project on Filmora is straightforward. First, you need a few steps to proceed with it. Then, when you are done making changes to the video, simply follow as guided ahead, and you’ll be good to go.
- On the Filmora home interface, Go to > File > Save Project.

- Select the Library/Folder where you want your project to be stored.
- Type in the text box to change the name of your project.

- Click on Save.
That’s about it! You have now saved your project. Now let’s move on to export our video.
Step7 Export Your Video
After we are done with saving our project, we will now move on to export our video.
![]()
Note: Before we export our video, ensure everything is according to your wish. Play the final video again and confirm your changes.
You can export your video to many of the available video formats. And not only that, but you can also export your video to local files and a specific device. You can also export your video directly to YouTube, Vimeo, and DVD format.

To export your video, all you have to do is the following steps:
- Click on Export.
- Type in the Video name.
- Select the Directory you want your file to be stored in.
- Select the Video Format.
- Select the Resolution of your Video.
![]()
Note: If you want to export your video directly to Youtube or Vimeo, ensure you are logged in.
- Click on Export.

Wait till Wondershare Filmora finishes exporting your video. Then, another window will pop up for a reminder when the shipping is done.
These were the methods by which you can change the speed of your video using the Speed Adjustment panel. Now let’s move on to the following method to adjust the speed via the Duration panel.
2. Change Speed via the Duration Panel
The duration panel is one the most valuable features of Wondershare Filmora as it allows you to change the video speed by duration adjustment.
This feature is typically helpful when you have a space between video clips and want to fill it. By measuring the time between the two clips, you can adjust the duration of your video.
It will ultimately hasten the speed of your video. The hastening in rate will depend upon the gap. The smaller the gap, the faster the video will be. Similarly, the greater the gap is, the longer the video will be.
Apart from the Speed Adjustment Panel, the Duration Panel has the advantage of editing the speed of your video by simply typing in the text.
Step1 Import Video Clips to Timeline
After downloading Filmora, the next step is importing your video clips. To do so, follow the steps outlined below:
- Locate and click the Import icon in the upper left corner of the Filmora Home Interface.
- Choose the videos to be edited, then click OK.
Now that you have imported files into Filmora, you can add them to the Timeline. Notice the steps mentioned ahead:
- Drag the clips into the import window and select them.
- Then, insert them into the timeline.
You can begin the editing process now that the clips are in the timeline.
Step2 Open The Duration Panel
The Duration Panel comes attached to the Unifrom Speed Panel. To access the Duration Panel, follow the steps ahead:
- Right-click on the video clip.
- In the pop column, scroll below to Unifrom Speed.
It will open the uniform speed panel in the import window. Below the speed of the controls, you can notice The Duration Panel.
Step3 Change The Speed of The Video
In The Duration Panel, you can see the average speed of your video clip. Now, if you want to reduce the speed of your video, you have to increase the duration of your video. Similarly, if you’re going to increase the speed of your video, you would have to decrease the duration.
Slow Down The Video
To slow down the video clip, follow the steps mentioned below:
- In The Duration Panel, Increase the time of the video.
- Type in a number bigger than the normal value
![]()
Note: If the average speed of the video is 00:01:00:00, increasing the value of the duration to 00:02:00:00 will reduce the speed of your video by half.

Speed Up The Video
To increase the speed of your video, follow as guided ahead:
- In The Duration Panel, decrease the time of the video.
- Type in a number smaller than the normal value
![]()
Note: If the normal video speed is 00:01:00:00, decreasing the value of the duration to 00:00:30:00 will increase the speed of your video by double.

Congratulations! You have successfully learned how to change the speed of your video by Filmora. Now, you can use both the Speed Adjustment Panel and The Duration Panel to adjust the speed of your video.
Conclusion
Changing the speed of your video can be helpful in many filming scenarios. Adjusting the speed in the older days was a marvel in the video editing industry. But the technology in the present day has allowed the typical user to edit the speed of a video.
By following the steps mentioned in this article, you can now change the speed of your video by Wondershare Filmora.
Free Download For macOS 10.14 or later
To begin, you will need a good video editor. Wondershare Filmora is the best video editing software available. It has a very engaging system UI that allows inexperienced users to learn how to use it quickly. It also has a diverse collection of stock media. And not only that! It allows you to access reliable features to change the speed of a video.
You can change the speed of the video on Filmora by the speed adjustment panel or by the duration panel present above the timeline. It will adjust in just seconds with a few clicks. This feature makes Filmora more prior with editing tools.
2. Video Clips
Well, it is evident that to change the speed of your videos, you will need video clips. But there are a few things you can keep in mind before adjusting the speed of a video.
![]()
Note: Slowing down a video requires a shot at a higher frame rate. The greater the frame rate, the better will be the slow-mo quality. On the other hand, speeding up videos does not have a strict frame rate requirement.
Part 4. How Can You Change the Speed of Your Videos?
Here you will learn two ways in which you can change the speed of your videos. The two methods to change the speed of your video are mentioned:
- The speed adjustment panel.
- Duration panel settings.
Let’s get started with the editing process. The first method we will look into is the Speed Adjustment panel.
1. Change Speed With the Speed Adjustment Panel
The Speed Adjustment panel is the speed adjuster in the Wondershare Filmora software. This feature will give you a drag bar to adjust the speed of your video.
You can move the bar to the right to increase the speed of your video. Similarly, you can move it to the left to decrease the rate.
But before we use this feature, we will need to download the Filmora video editing software. So please scroll below to learn how to download it!
Step1 Download Filmora
First and foremost, you must have access to Filmora. For this, download Wondershare Filmora. Then, activate this app or software on your PC.
Step2 Import The Video Files
The next step after downloading Filmora is to import your video clips. To accomplish this, follow the steps outlined below:
- Locate and select the Import icon on the top left side of the Filmora Home Interface.
- It takes you to your computer’s library.
- Select the videos to be edited and then click OK.
You can also import the files by another method. After you have opened Filmora, you can restore the Filmora Window size and import by dragging and dropping the clips:
- Drag the cursor to select the video clips you want.
- Then, drop them in the Filmora import window.
Filmora supports various formats for your video clips. They include the Mp4, AVI, MOV, GIFs, and more.
After you have imported your video clips, add them to the timeline as shown below!
Step3 Add The Video Clips to The Timeline
After you’ve imported clips in the Import window, drag them onto the timeline. Follow the steps outlined below to accomplish this:
- Drag the clips into the import window and select them.
- Then, insert them into the timeline.
Now that we have our video clips in the timeline, we can start adjusting the speed.
Step4 Open the Speed Adjustment Panel
The speed adjustment panel, or the Uniform Speed, is the feature of Filmora that allows you to change the speed of your video. For example, to open the Unifrom Speed panel, do as follows:
- Double-click on the video clip.
- In the pop-up column, scroll down till you see the Unifrom Speed option and click on it.
- The speed controls will be shown in the import window.
In the speed control panel, you can see the speed adjuster slider. A number will usually mark this at the end. This number tells you the current speed your video is calibrated in and how fast or slow the motion effects will be.
1.00 is always the average speed. 0.5 being half and 2.00 being double the average speed. To control the speed through the slider, you will need to do the following:
- To increase the speed: Type in the number you want your rate to be. Or, drag the slider to the right as you wish.
- To decrease the speed: Type in a number less than the standard 1.00, or you can drag the slider to the left as you wish.
The number of your speed can be an inconvenience if you have no prior experience. Instead, render the video and play it from the beginning with the changes that you made. It gives you a better idea of the speed of your video.
Step5 Detach The Audio
The corresponding audio also gets affected when you slow down or speed up a video. In this scenario, you can also choose to detach the audio beforehand. It allows you to maintain the original playback speed. To detach the audio, follow the steps as mentioned:
- Right-click on the video clip.
- In the pop-up column, scroll down to the Detach Audio option and click on it.
It will create an audio file in a separate audio tab in the timeline. You can adjust this audio according to your liking. You can edit the detached audio by:
- Double-click on the audio file.
- A settings menu will open in the import window.
- Adjust the Fade options for your Audio.
- Drag the Fade out slider to the right to Fade out your Audio.
- To Fade in your Audio, drag the Fade in slider to the right.
You can also remove the background noise and the pitch of the audio if you want. You can also replace the video’s original audio with a new one. Click on the audio file and press Del on the keyboard to delete it. To add new audio, do as mentioned ahead:
- Click on The Audio icon above the import window.
- Browse The Audio that matches the vibe of your video.
- Drag and drop it below your video clip.
Doing so would have created alternate audio for your video. Play the video from the start and confirm your changes.
Step6 Save Your Project
Saving a project on Filmora is straightforward. First, you need a few steps to proceed with it. Then, when you are done making changes to the video, simply follow as guided ahead, and you’ll be good to go.
- On the Filmora home interface, Go to > File > Save Project.
- Select the Library/Folder where you want your project to be stored.
- Type in the text box to change the name of your project.
- Click on Save.
That’s about it! You have now saved your project. Now let’s move on to export our video.
Step7 Export Your Video
After we are done with saving our project, we will now move on to export our video.
![]()
Note: Before we export our video, ensure everything is according to your wish. Play the final video again and confirm your changes.
You can export your video to many of the available video formats. And not only that, but you can also export your video to local files and a specific device. You can also export your video directly to YouTube, Vimeo, and DVD format.
To export your video, all you have to do is the following steps:
- Click on Export.
- Type in the Video name.
- Select the Directory you want your file to be stored in.
- Select the Video Format.
- Select the Resolution of your Video.
![]()
Note: If you want to export your video directly to Youtube or Vimeo, ensure you are logged in.
- Click on Export.
Wait till Wondershare Filmora finishes exporting your video. Then, another window will pop up for a reminder when the shipping is done.
These were the methods by which you can change the speed of your video using the Speed Adjustment panel. Now let’s move on to the following method to adjust the speed via the Duration panel.
2. Change Speed via the Duration Panel
The duration panel is one the most valuable features of Wondershare Filmora as it allows you to change the video speed by duration adjustment.
This feature is typically helpful when you have a space between video clips and want to fill it. By measuring the time between the two clips, you can adjust the duration of your video.
It will ultimately hasten the speed of your video. The hastening in rate will depend upon the gap. The smaller the gap, the faster the video will be. Similarly, the greater the gap is, the longer the video will be.
Apart from the Speed Adjustment Panel, the Duration Panel has the advantage of editing the speed of your video by simply typing in the text.
Step1 Import Video Clips to Timeline
After downloading Filmora, the next step is importing your video clips. To do so, follow the steps outlined below:
- Locate and click the Import icon in the upper left corner of the Filmora Home Interface.
- Choose the videos to be edited, then click OK.
Now that you have imported files into Filmora, you can add them to the Timeline. Notice the steps mentioned ahead:
- Drag the clips into the import window and select them.
- Then, insert them into the timeline.
You can begin the editing process now that the clips are in the timeline.
Step2 Open The Duration Panel
The Duration Panel comes attached to the Unifrom Speed Panel. To access the Duration Panel, follow the steps ahead:
- Right-click on the video clip.
- In the pop column, scroll below to Unifrom Speed.
It will open the uniform speed panel in the import window. Below the speed of the controls, you can notice The Duration Panel.
Step3 Change The Speed of The Video
In The Duration Panel, you can see the average speed of your video clip. Now, if you want to reduce the speed of your video, you have to increase the duration of your video. Similarly, if you’re going to increase the speed of your video, you would have to decrease the duration.
Slow Down The Video
To slow down the video clip, follow the steps mentioned below:
- In The Duration Panel, Increase the time of the video.
- Type in a number bigger than the normal value
![]()
Note: If the average speed of the video is 00:01:00:00, increasing the value of the duration to 00:02:00:00 will reduce the speed of your video by half.
Speed Up The Video
To increase the speed of your video, follow as guided ahead:
- In The Duration Panel, decrease the time of the video.
- Type in a number smaller than the normal value
![]()
Note: If the normal video speed is 00:01:00:00, decreasing the value of the duration to 00:00:30:00 will increase the speed of your video by double.
Congratulations! You have successfully learned how to change the speed of your video by Filmora. Now, you can use both the Speed Adjustment Panel and The Duration Panel to adjust the speed of your video.
Conclusion
Changing the speed of your video can be helpful in many filming scenarios. Adjusting the speed in the older days was a marvel in the video editing industry. But the technology in the present day has allowed the typical user to edit the speed of a video.
By following the steps mentioned in this article, you can now change the speed of your video by Wondershare Filmora.
What Is MOV Format and How to Edit MOV Video Better?
We come across different media files every day, and surprisingly, every file has a unique format. Different devices and different programs support and entertain different file formats. It is hard to find the correct file format for your device.
The following article will shed light on MOV format. Not just this, apart from its introduction, pros and cons, if you plan to edit your MOV video format, we will also introduce a video editor. Let’s start!
In this article
02 What Are Pros and Coins about MOV Video Format?
03 Best MOV Video Editor- Filmora Video Editor
04 How to Edit MOV Video Files in An Creative Way?
05 Differences Between MP4 and MOV
Part 1. What Is MOV Format?
You might be using the MOV format without noticing and knowing what it is? MOV is a QuickTime file developed by Apple Inc. It is a multimedia container file. MOV file format is capable of keeping multiple types of data on different tracks, which may include audio, video, or even texts.

Does the MOV video format only work on Mac? MOV is developed by Apple, but it does not mean that it is not compatible with other devices. You can use it on Windows along with Sony and DVD. MOV file format is the same as MPEG-4 format file. It is sometimes considered as the basis for the MPEG-4 file format.
Part 2. What Are Pros and Coins about MOV Video Format
Do you know what benefits you get from the MOV video format? Or else, why not discuss its disadvantages? The following section of this article will shed light on both the advantages and also disadvantages of the MOV format.
Advantages of MOV Format
MOV file format is a famous format because of the simplicity it provides in editing and also because it embeds well in different programs. The format is very convenient as it holds various media content like videos, audio, everything in one compact place. MOV video files are easily edited as the primary elements are adjusted.
MOV format is widely used on the web, and because of this reason, the format is ideal for sharing files on the internet. The format is perfect for Mac and QuickTime Player. It is highly compatible with different platforms like Mac, Windows, iOS, and Android. Do you know about the storage space of MOV? The format acquires low storage space, making it a great file format.
Drawbacks of MOV Format
Moving on to its drawbacks, MOV has lossy compression of video tracks. The overall quality of the video might also be damaged while compressing the video. Every track of the MOV format file is encoded with a specific codec. Only those apps can smoothly play a MOV file that supports and recognize the encoded codec. In this case, you might need to convert the file format.
Part 3. Best MOV Video Editor- Filmora Video Editor
Are you looking for a great video editor to edit your MOV format videos? We might have something for you. Let’s introduce Wondershare Filmora to edit drastic videos. The software is very easy to understand and use. Its intuitive interface guides the user about every step.

For Win 7 or later (64-bit)
For macOS 10.12 or later
Filmora Video Editor has enormous features that could make a stunning video. You cannot find a better video editor than Filmora because of its features like cutting, trimming, joining, splitting, and so much more than this. Let’s share a few more features of Filmora:
Auto Reframe
Isn’t it easy if your video gets automatically focused? With Filmora, Auto Reframe feature, the AI technology automatically detects the focal point of the video and keeps it in the frame. With this feature, the main object of the video always remains in focus.
Stabilize Video
Do you know what wonders Stabilize Video feature can do? While filming a video, your hand might shake, and your video quality is disturbed, but with Filmora, you can fix the video. Use its Stabilize Video feature and smooth the shaky footage.
Silence Detection
You are not always speaking in a video; some parts of the video are silent. What to do with such parts? Well, take help from Filmora and remove the silent instances from your video. The Silence Detection feature spontaneously detects the silent parts of the MOV file format video and removes them, saving your precious time.
Split Screen
Are you creating a tutorial? Split Screen is the ideal feature to use for creating such videos. Filmora lets you display multiple videos on a single screen with this feature. You can simultaneously incorporate various clips by using the different provided templates.
Part 4. How to Edit MOV Video Files in An Creative Way?
Filmora is a stunning video editor with uncountable features. You can create mind-blowing videos with Wondershare Filmora. Apart from features like trim, cut, join, split, you also get some great advanced features like Motion Tracking, AI Portrait, Pan & Zoom, and a lot more.
The video editor is easy to use, and even novice users can understand the software and work with it. Filmora is a famous editor because of its functionalities. If you are looking for a video editor to edit your MOV file format, try Filmora, you will not be disappointed. Follow the steps below for assistance:
Step 1: Importing Media
After installing Filmora, launch it on your device. From the home screen, head to the ‘File’ tab and look for the ‘Import Media’ option. A sub-menu will appear as you hover on the option, click on the ‘Import Media Files’, and locate the MOV format file from the device to work with.

Step 2: Add Audio Effects
Do you want to make your video interesting? Try by adding some sound effects. For this, head to the ‘Audio’ section from the top menu and look for your preferred effect.

Step 3: Add Transitions
You might mix and join various videos but do they look good? For smooth transitions, move to the ‘Transition’ tab and select a cool effect.

Step 4: Elements and Titles
Have you tried adding any cool elements to your MOV video? From the ‘Elements’ section, add things like Laser Eye, fun emoji, and a lot more. Along with this, add titles to your video from the ‘Titles’ tab.

Step 5: Export MOV File
Are you satisfied with the final MOV video format file? If you are, export the video to your device. Hit the ‘Export’ button and select ‘MOV’ format as your output format to save the video.

Part 5. Differences Between MP4 and MOV
Both MP4 and MOV file format is almost the same thing. Some of the minor differences that exist are MOV format is recommended best for Mac devices. On the contrary, MP4 is universal that can be used on any device irrespective of the operating system or the software.

MP4 files are more compressed, thus taking less space than MOV video format, which takes slightly more space. The quality of payback that MP4 provides is less than what the MOV file format provides. MOV format, thus, for this reason, is used more by professionals.
Final Thoughts
The article has everything you need to know about the MOV format. From its introduction to the steps of editing a MOV video format, we shared everything in detail. It’s time to talk about a nice video creator and also a video editor. We are talking about Wondershare Filmora. The video editor will wow you with its features and editing capabilities.
The video editor offers regular options like split, cut, trim, join, etc. Whereas it also comes with advanced editing features like Color Match, Chroma Key Background, Auto Highlight, and whatnot. If you want to create a stunning and eye-catching video, take help from Filmora.
Wondershare Filmora
Get started easily with Filmora’s powerful performance, intuitive interface, and countless effects!
Try It Free Try It Free Try It Free Learn More >

02 What Are Pros and Coins about MOV Video Format?
03 Best MOV Video Editor- Filmora Video Editor
04 How to Edit MOV Video Files in An Creative Way?
05 Differences Between MP4 and MOV
Part 1. What Is MOV Format?
You might be using the MOV format without noticing and knowing what it is? MOV is a QuickTime file developed by Apple Inc. It is a multimedia container file. MOV file format is capable of keeping multiple types of data on different tracks, which may include audio, video, or even texts.
Does the MOV video format only work on Mac? MOV is developed by Apple, but it does not mean that it is not compatible with other devices. You can use it on Windows along with Sony and DVD. MOV file format is the same as MPEG-4 format file. It is sometimes considered as the basis for the MPEG-4 file format.
Part 2. What Are Pros and Coins about MOV Video Format
Do you know what benefits you get from the MOV video format? Or else, why not discuss its disadvantages? The following section of this article will shed light on both the advantages and also disadvantages of the MOV format.
Advantages of MOV Format
MOV file format is a famous format because of the simplicity it provides in editing and also because it embeds well in different programs. The format is very convenient as it holds various media content like videos, audio, everything in one compact place. MOV video files are easily edited as the primary elements are adjusted.
MOV format is widely used on the web, and because of this reason, the format is ideal for sharing files on the internet. The format is perfect for Mac and QuickTime Player. It is highly compatible with different platforms like Mac, Windows, iOS, and Android. Do you know about the storage space of MOV? The format acquires low storage space, making it a great file format.
Drawbacks of MOV Format
Moving on to its drawbacks, MOV has lossy compression of video tracks. The overall quality of the video might also be damaged while compressing the video. Every track of the MOV format file is encoded with a specific codec. Only those apps can smoothly play a MOV file that supports and recognize the encoded codec. In this case, you might need to convert the file format.
Part 3. Best MOV Video Editor- Filmora Video Editor
Are you looking for a great video editor to edit your MOV format videos? We might have something for you. Let’s introduce Wondershare Filmora to edit drastic videos. The software is very easy to understand and use. Its intuitive interface guides the user about every step.
For Win 7 or later (64-bit)
For macOS 10.12 or later
Filmora Video Editor has enormous features that could make a stunning video. You cannot find a better video editor than Filmora because of its features like cutting, trimming, joining, splitting, and so much more than this. Let’s share a few more features of Filmora:
Auto Reframe
Isn’t it easy if your video gets automatically focused? With Filmora, Auto Reframe feature, the AI technology automatically detects the focal point of the video and keeps it in the frame. With this feature, the main object of the video always remains in focus.
Stabilize Video
Do you know what wonders Stabilize Video feature can do? While filming a video, your hand might shake, and your video quality is disturbed, but with Filmora, you can fix the video. Use its Stabilize Video feature and smooth the shaky footage.
Silence Detection
You are not always speaking in a video; some parts of the video are silent. What to do with such parts? Well, take help from Filmora and remove the silent instances from your video. The Silence Detection feature spontaneously detects the silent parts of the MOV file format video and removes them, saving your precious time.
Split Screen
Are you creating a tutorial? Split Screen is the ideal feature to use for creating such videos. Filmora lets you display multiple videos on a single screen with this feature. You can simultaneously incorporate various clips by using the different provided templates.
Part 4. How to Edit MOV Video Files in An Creative Way?
Filmora is a stunning video editor with uncountable features. You can create mind-blowing videos with Wondershare Filmora. Apart from features like trim, cut, join, split, you also get some great advanced features like Motion Tracking, AI Portrait, Pan & Zoom, and a lot more.
The video editor is easy to use, and even novice users can understand the software and work with it. Filmora is a famous editor because of its functionalities. If you are looking for a video editor to edit your MOV file format, try Filmora, you will not be disappointed. Follow the steps below for assistance:
Step 1: Importing Media
After installing Filmora, launch it on your device. From the home screen, head to the ‘File’ tab and look for the ‘Import Media’ option. A sub-menu will appear as you hover on the option, click on the ‘Import Media Files’, and locate the MOV format file from the device to work with.
Step 2: Add Audio Effects
Do you want to make your video interesting? Try by adding some sound effects. For this, head to the ‘Audio’ section from the top menu and look for your preferred effect.
Step 3: Add Transitions
You might mix and join various videos but do they look good? For smooth transitions, move to the ‘Transition’ tab and select a cool effect.
Step 4: Elements and Titles
Have you tried adding any cool elements to your MOV video? From the ‘Elements’ section, add things like Laser Eye, fun emoji, and a lot more. Along with this, add titles to your video from the ‘Titles’ tab.
Step 5: Export MOV File
Are you satisfied with the final MOV video format file? If you are, export the video to your device. Hit the ‘Export’ button and select ‘MOV’ format as your output format to save the video.
Part 5. Differences Between MP4 and MOV
Both MP4 and MOV file format is almost the same thing. Some of the minor differences that exist are MOV format is recommended best for Mac devices. On the contrary, MP4 is universal that can be used on any device irrespective of the operating system or the software.
MP4 files are more compressed, thus taking less space than MOV video format, which takes slightly more space. The quality of payback that MP4 provides is less than what the MOV file format provides. MOV format, thus, for this reason, is used more by professionals.
Final Thoughts
The article has everything you need to know about the MOV format. From its introduction to the steps of editing a MOV video format, we shared everything in detail. It’s time to talk about a nice video creator and also a video editor. We are talking about Wondershare Filmora. The video editor will wow you with its features and editing capabilities.
The video editor offers regular options like split, cut, trim, join, etc. Whereas it also comes with advanced editing features like Color Match, Chroma Key Background, Auto Highlight, and whatnot. If you want to create a stunning and eye-catching video, take help from Filmora.
Wondershare Filmora
Get started easily with Filmora’s powerful performance, intuitive interface, and countless effects!
Try It Free Try It Free Try It Free Learn More >
Steps To Fade Audio In Premier Pro
Audio is a very big part of any video project and it can make or break the video project. This is why it is very important to not just choose a video editor that also offers audio editing, but one that is easy to use and offers a lot of editing options. This way, you can edit the audio in your project to suit your video’s production and end up with a great professional final product.
One of the video editing tools that offer features that can accomplish all that is Adobe Premier Pro. In this article, we will look at how you can use Premier Pro to fade audio in or out.
Steps to Fade Audio in Premier Pro
Premier Pro gives you two different options to fade audio in or out. Let’s look at both options and then you can choose the one that suits you best;
Fade Audio using Crossfade Audio Transition
Step1To begin, open Premier Pro on your computer and then open the audio that you want to edit.
Step2Once it is open, select the audio clip in the timeline and then click on “Sequence” at the top menu and select “Apply Audio Transition.”
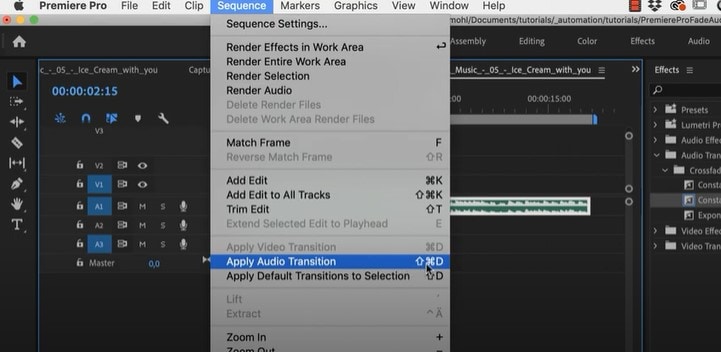
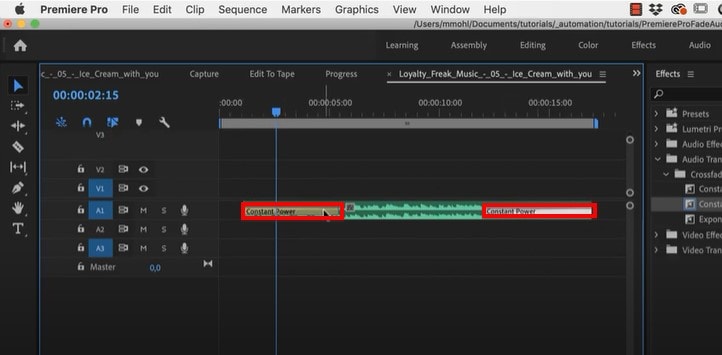
You can also use the keyboard shortcut Shift + Command + D (macOS) or Shift+ Ctrl + D (PC). This will add the “Constant Power Cross Fade” effect at the beginning and the end of the clip.
Step3You can then just change the duration of the effect by simply dragging the end of the transition.
Fade Audio using Clip Keyframes
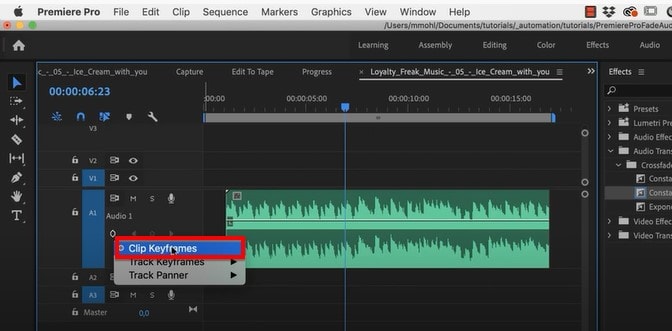
Step1Adobe Premier Pro has two volume keyframes; Track and Clip. Make the audio larger so you can see the volume line and then under the audio name, click on the volume keyframes option to make sure “Clip Keyframes” is enabled.
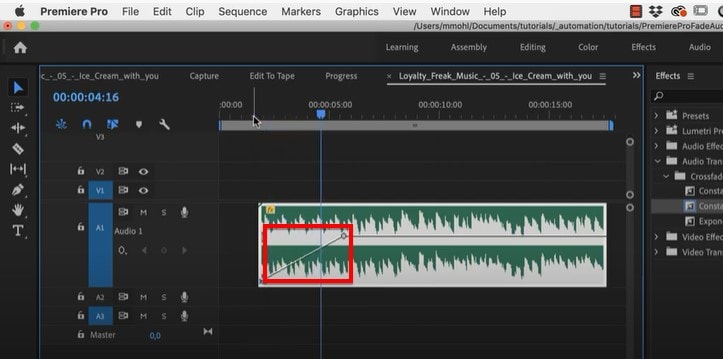
Step2You can then press down on the Command Key (macOS) or the Control Key (PC) and drag the volume line down to add a fade-in or fade-out effect.
Adobe Premiere Alternative Way to Fade Audio
If you are like most people and you find Adobe Premier Pro to be very difficult you use, we have a tool that is just as effective but also simplifies the process. This is the very simple to use Wondershare Filmora .
Just like Premier Pro, Filmora gives you two options to fade audio in and out. Let’s look at both options;
Adding Fade in and Out in Audio Pane
Step1Download and install Wondershare Filmora onto your computer, open the program and then import the audio clip that you want to edit.
Step2Once the video has been added to the timeline, double-click on it to access the “Audio” editing panel.
Step3Here, you can very simply add the fade-in and fade-out effects by simply dragging the sliders to the desired duration or by manually entering the duration in seconds.

Using the Audio Waveform
You can also use the fade icons on the left and right edges of the audio waveform to quickly add a fade in and out.
To add a fade-in effect, drag the fade-in maker to the right. Then go to the end of the clip to drag the fade-out maker to the left to add a fade-out effect.

Related FAQs about Audio Fade
1. How Do I Fade to Black in Adobe Premiere Pro?
You can easily add the Fade to Black transition in Adobe Premiere Pro using the “Effects” tab. Just open the two clips in Premiere Pro and go to “Effects.” Type in “dip to black” in the search box and when you find the effect, drag it between the two clips in the timeline. The effect will appear on the right side of the project.
You also have several customization options that you can apply to the effect to get it just right. To see these options, go to Effect Controls and you should be able to change the alignment of the effect to “Center at Cut” so that the first video fades out to black before the second video appears.
2. Premiere Pro Audio Fade Not Working?
Sometimes you can complete all the editing steps we have described above but you are unable to tell if the fade-in and fade-out effects are working because you can’t play the audio in Premiere. This is a very common problem that can easily be fixed using the following troubleshooting steps;
Check the master volume on your computer to see if this is the problem
Then check the volume in Premiere to see if the audio meter is moving as you play the clip. It is the green bar usually in the lower right corner.
If your volume is fine but you still can’t hear the audio, you may need to adjust several settings. Go to Edit > Preferences (on PC) or Preferences menu under the main Premiere Pro CC menu (macOS) and select “Audio Hardware” in the options that appear. You can then change the “Default Output” device to something else.
3. How Do You do Audio Transitions in Premiere Pro
Adding audio transitions in Premiere Pro is very easy; just open the audio that you want to edit and then Right-click (PC) or Control- Click (macOS) on either the “Constant Gain” or “Constant Power” effect from the Effects panel. Then choose “Set Selected as Default Transition” from the options in the menu.
To add a duration for the audio transitions, go to Edit > Preferences > Timeline (PC) or Premiere Pro Menu > Preferences (macOS) and enter the duration value under “Audio Transition Default Duration.”
Free Download For Win 7 or later(64-bit)
Free Download For macOS 10.14 or later
VSDC Free Video Editor Review
If you are a Window user and you are looking for a free video editor without a watermark, VSDC free video editor is definitely a great application. There are only a handful of free video editors available where the output video will not have a watermark, and there is no limitation on the video length. VSDC video editor belongs to the non-liner video editor group where you can combine video clips, photos, objects, and blend and overlap them as per your requirements.
For a beginner, VSDC free video editor is undoubtedly one of the best video editors. It supports different types of video and audio formats as well as codes. The system requirements are very basic, and hence, it is perfect for low-end computers? But can you rely on VSDC editor when you need slightly advanced video editing? Check out our VSDC editor review and find a better alternative.
Part 1. How to Download and Install VSDC?
VSDC editor download is only available for Windows users. It is tailor-made for those who have a low-end computer with older Windows version OS. The software is compatible with Windows 2000 to Windows 11. The minimum RAM requirement is 128MB and free disk space of 200 MB. Here are the steps to download and install VSDC editor.
Step 1: Open your web browser and visit ‘www.videosoftdev.com/free-video-editor/download” .
Step 2: Click on Download Video Editor button based on 32-bit or 64-bit version of your computer. If you have Windows XP, you have to download VDSC video editor version 6.4 instead of the latest version for compatibility.
Step 3: Give some time for the installer file to get downloaded. It is merely 100 MB and it should not take long. After downloading the installer, launch it and follow the on-screen instruction to complete the installation.
Step 4: After proper installation, launch VSDC video editor. You will get the options to create a new project and capture screen, start editing an existing video and export the finished project in a proper video format.
Part 2. Key Features of VSDC
There are two versions of VSDC video editor available – Free video editor and Pro video editor. The free version has limited features while Pro version has advanced features. Here are going to discuss the key features of VSDC Free Video Editor.
Low System Requirements – One of the reasons for the wide popularity of VSDC video editor is that it does not demand high system configurations like most other video editors. If you have a low-end computer with an outdated Windows operating system, you can use VSDC video editor without any issue.
Basic Editing – Among the basic editing tools, you can cut, trim, split and join video clips. There are options for rotating and resizing videos. You can also go for color correction and put overlays on videos as applicable. Besides, you can edit 36-degree videos with zoom and chart tools.
Effects – VSDC has a wide collection of video, audio and text effects. You can also add objects to your video and apply different ready-made filters. There are also transitions to apply in between video clips and slides. You can also use green screen effect to change your background. The special split-screen effect and picture-in-picture effects are quite eye-catching.
Capture Video – VSDC video editor is equally competent in capturing videos from your webcam as well as recording your screen video. In fact, there is a dedicated option available for creating slideshow videos from photos. You can even record your voiceover if you want to.
File Formats - VSDC supports all the popular file formats for importing and exporting video and audio files. There are different export profiles available so that you can save your edited video for different devices conveniently.
Apart from these, if you opt for the Pro version, you get motion tracking, video masking, video stabilization, and much more such advanced video editing tools.
Part 3. How to Edit Videos with VSDC
If you have the recorded video and you want to edit it with VSDC video editor, the steps are quite simple. You can even record your webcam and screen video with audio if you want to start from scratch. Coming to the editing part, you can split large video files, merge video clips, add transitions in between, add objects in the video as well as crop and rotate videos. There are different effects you can apply to uplift video content. Here are the steps to edit videos with VSDC editor.
Step 1: Open VSDC Video Editor and click on Blank Project option. Name the project and change parameters, and click on Finish.

Step 2: Click on Add Object option at the top and select Video. Import the video clips saved on your hard drive. Similarly, you can go to Add Objects> Audio to import audio files.

Step 3: All the imported media files will appear on the timeline. If you have multiple video clips, you can shift the position of clips on the timeline so that one video clip ends and the other begins.
Step 4: If you want to add transitions in between the video clips, go to Video Effects> Transitions> select the effect you want to apply. Check the on-screen parameters such as duration and click on Ok button.

Step 5: If you want to add objects, go to Add Object and select shapes, texts, animations, charts, and much more. You can also add Audio Effects as well as Text Effects from the top bar.
Step 6: Once you are happy with the preview of the edited video, go to Export Project and check all the parameters. Click on Export Project option.

Part 4. Best VSDC Alternative Video Editor
Since VSDC video editor is available completely free, there is no hard in downloading the application and trying it out. But soon, you will understand that the video editor is limited as far as tools and features are concerned. If you want to get more than just basic tools, you will have to upgrade to its Pro version. However, there are better premium video editors available. We recommend Wondershare Filmora as a better alternative to VSDC video editor.
Filmora is extremely popular in the professional video editing world as it has an intuitive interface and does not demand high-end computers. There are tons of transitions, effects, filters, and objects available to add to your edit. You can perform all standard and advanced video editing to take your video to the next level. Here are all the steps to edit videos on Filmora.
For Win 7 or later (64-bit)
For macOS 10.12 or later
Step 1: Download and install Filmora and it is available for Windows and Mac. Launch Filmora and click on New Project. Import all your media files into Project Media folder by drag and drop action.

Step 2: Arrange the video clips and audio clips on the timeline by drag and drop action. You should be placing the video and audio files on different tracks. This is where you can do all the basic editing such as trimming, cutting, splitting, and merging.

Step 3: To add transitions in between the video clips, go to Transitions from the top bar and drag and drop any transition in between the clips. Check out Titles, Effects, and Elements from the top bar and insert them on the timeline as you think appropriate.

Step 4: Play the video to see if everything is perfect and click on Export button to save your video to your hard drive.

Part 5. FAQs about VSDC
1. Is VSDC video editor really free?
Yes, VSDC video editor is completely free to use. However, there is a pro version available where more features are present. But the free version does not put watermark on the output video and has all the standard tools for video editing without any limitation.
2. Is VSDC better than Adobe Premiere Pro?
No, VSDC is not better than Adobe Premiere Pro. VSDC is a free video tor while Adobe Premiere Pro is a premium one. Naturally, Adobe Premiere Pro has more features and functionalities. However, VSDC is better for beginners and those who have low-end computers if you compare it with Adobe Premiere Pro.
3. Is VSDC safe?
Yes VSDC video editor is safe and stable to use. However, there was an incident in 2019 where VSDC video editor’s official website was hacked, but the software itself is safe to use on Windows computers.
For macOS 10.12 or later
Step 1: Download and install Filmora and it is available for Windows and Mac. Launch Filmora and click on New Project. Import all your media files into Project Media folder by drag and drop action.
Step 2: Arrange the video clips and audio clips on the timeline by drag and drop action. You should be placing the video and audio files on different tracks. This is where you can do all the basic editing such as trimming, cutting, splitting, and merging.
Step 3: To add transitions in between the video clips, go to Transitions from the top bar and drag and drop any transition in between the clips. Check out Titles, Effects, and Elements from the top bar and insert them on the timeline as you think appropriate.
Step 4: Play the video to see if everything is perfect and click on Export button to save your video to your hard drive.
Part 5. FAQs about VSDC
1. Is VSDC video editor really free?
Yes, VSDC video editor is completely free to use. However, there is a pro version available where more features are present. But the free version does not put watermark on the output video and has all the standard tools for video editing without any limitation.
2. Is VSDC better than Adobe Premiere Pro?
No, VSDC is not better than Adobe Premiere Pro. VSDC is a free video tor while Adobe Premiere Pro is a premium one. Naturally, Adobe Premiere Pro has more features and functionalities. However, VSDC is better for beginners and those who have low-end computers if you compare it with Adobe Premiere Pro.
3. Is VSDC safe?
Yes VSDC video editor is safe and stable to use. However, there was an incident in 2019 where VSDC video editor’s official website was hacked, but the software itself is safe to use on Windows computers.
Also read:
- 2024 Approved How to Add Zoom Blur Effect In Photoshop
- Updated 2024 Approved Top 5 Best Video to PPT Converters
- Updated Add Green Screen Video on TikTok
- Do You Want to Explore some Available Opportunities to Create Slow Motion? Discover the Best Slow-Motion Video Editors for Desktop, Android, and iPhone Here for 2024
- 2024 Approved Best GIF to AVI Converters
- In This Article, We Will Introduce You Our Top 5 Picks of Websites and Software Converter Online to Convert Powerpoint to Mp4
- New Do You Want to Add an Adjustment Layer to Your Video for Easier Editing? Read This Article to Find Out How to Efficiently Add an Adjustment Layer in After Effects
- Updated In 2024, How to Combine Videos Into One on Instagram
- Updated | Best 8 Online GIF to APNG Converters for 2024
- Transform Your Videos Into 90S VHS Nostalgia for Free! Learn Where to Get Overlays and Use Filmoras Built-In Presets. Dive Into the Retro Realm Now
- New Are You Looking to Enhance Your Video or Photo Colors Using Premiere LUTs? Get to Know About the Best Free LUT Effects to Get Started
- What Is AI Composite Video App and AI Composite Video Guide for 2024
- 2024 Approved Get to Know How Excellent Sparkle Video Effects Can Significantly Impact Different Projects. Its Miraculous. Read Below to Learn More and Add Sparkle Effect to Your Videos
- Updated 2024 Approved How To Slow Down GIF Building an Understanding
- New Easy Steps to Make Glitch Effect with Filmora
- New Camtasia Vs Captivate Which Is Better
- Guide to Make Timelapse Video with iMovie for 2024
- Updated In 2024, How to Add Selective Color Effect to Your Videos
- In 2024, Backup and Organize Your Tons of Footage in Minutes
- New In 2024, Benefits of Live Streaming on YouTube
- Updated Steps To Fade Audio In Premier Pro
- In 2024, Change Speed of a Video on iPhone
- Do You Want to Make Your Video Look Like Its From the 90S? Then, Make Sure to Add Vintage Overlays and VHS Sound Effects to Give It the Old Feel
- How To Speed Up Video With Lightworks Video Editor for 2024
- In 2024, Universal Unlock Pattern for Nubia
- In 2024, How to Change Your Apple iPhone 14 Plus Location on life360 Without Anyone Knowing? | Dr.fone
- In 2024, All You Need To Know About Mega Greninja For Poco C65 | Dr.fone
- CatchEmAll Celebrate National Pokémon Day with Virtual Location On Gionee F3 Pro | Dr.fone
- Top 9 Oppo K11x Monitoring Apps for Parental Controls | Dr.fone
- In 2024, How Do You Unlock your Apple iPhone 12 Pro? Learn All 4 Methods
- How To Change Your Apple ID Password On your iPhone 6
- A Step-by-Step Guide on Using ADB and Fastboot to Remove FRP Lock on your Infinix Smart 8 Plus
- In 2024, How to Bypass FRP on Lava Blaze Pro 5G?
- How to Stop My Spouse from Spying on My Nokia C12 Pro | Dr.fone
- Title: 2024 Approved How to Speed Up and Slow Down a Video
- Author: Chloe
- Created at : 2024-05-20 03:38:12
- Updated at : 2024-05-21 03:38:12
- Link: https://ai-editing-video.techidaily.com/2024-approved-how-to-speed-up-and-slow-down-a-video/
- License: This work is licensed under CC BY-NC-SA 4.0.
