
:max_bytes(150000):strip_icc():format(webp)/GettyImages-165567842-58e5bd253df78c51625e84ab.jpg)
2024 Approved How to Stabilize Videos with Google Photos App for Free
How to Stabilize Videos with Google Photos App for Free
While recording a video, it is pretty normal if you don’t end up having a stabilized clip due to camera shakes or movements on an unstable and unpaved road. This is where the Google stabilizer video editing feature comes into play. You can stabilize a video with the Google Photos app that has a built-in video stabilizer and other editing tools to give a finishing touch to your media files before they are shared online or with family, friends, and/or colleagues.
In this article, we will show you how to use Google Photos as a stabilizer video Google offers to its consumer. In addition, you will also learn about one of the most trusted and efficient third-party tools to stabilize the clips if Google video stabilizer fails to produce quality output.
In this article
01 What is Google Photos and How Does It Work?
02 How to Stabilize Videos with Google Photos on Android and iPhone?
03 How to Stabilize Videos with Google Photos Online?
04 How to Use Google Photos to Edit Video?
Part 1: What is Google Photos and How Does It Work?
Google Photos is an app that can be obtained from Play Store or App Store to be installed on an Android-based smartphone or iPhone or iPad respectively.
The program can store photos and videos from your phone, and ensures that those media files are well-backed up so they can be recovered easily if/when lost due to some mishaps. Furthermore, the tool even lets you edit, customize, and share your photos and videos with ease.
1. History and Current Policies
Earlier, Google Photos used to offer unlimited storage to the users where they can save as many photos as they want, as long as the images were saved in ‘high-quality’ resolution. However, from June 01, 2021, Google changed its policies of using the app, and now the tool offers limited storage. If more space is needed, the users must subscribe to a paid plan.
2. Accessibility
Google Photos can be accessed from a web browser, Google Drive desktop program, and smartphone app. While you can make only minor changes to the videos such as editing date, time, and location when accessing Google Photos via a web browser, the smartphone app allows you to edit the clips comparatively more sophisticatedly.
3. Deletion
The files that are stored in Google Photos remain there for an indefinite duration, of course until the entire space is completely consumed. When you delete something, it is moved to the Trash and stays there for another 60 days, after which it is automatically deleted from the Cloud forever.
Part 2: How to Stabilize Videos with Google Photos on Android and iPhone?
Google Photos is available for both Android and iPhone smartphones, and as explained earlier, the app can be downloaded from Play Store and App Store respectively. Using the built-in Google stabilizer video editor of the Photos app on both platforms is almost identical and extremely easy.
You can learn how to work with Google video stabilizer to stabilize a video by following the steps that are given below:
Step 1: Locate and Open the Source Video in Google Photos
Download and install Google Photos on your smartphone (Samsung Galaxy Note 10+ is used here for illustrations). Launch the app, tap Library from the bottom-right corner of the interface, and tap to open the source video that you want to stabilize with Google video stabilizer.

Step 2: Stabilize the Video
After the video opens in the app and the playback begins, tap Edit from the bottom. On the next screen, ensure that the Video section is selected. Tap the Stabilize icon from the lower-left area of the window, and wait while Google Photos stabilize video.

Step 3: Save the Video
Once the stabilization process is complete, click Save copy from the bottom-right corner to save the modified video as a separate copy, thus leaving the original instance intact.

Part 3: How to Stabilize Videos with Google Photos Online?
Unfortunately, Google Photos doesn’t have many editing options when accessed via a web browser, and therefore, at the time of this writing, you cannot stabilize a video with the tool’s web interface. But if you are using a Windows or Mac computer, you can try some free online video stabilization software , or use Wondershare Filmora video editor to stabilize video with one click.
For Win 7 or later (64-bit)
For macOS 10.12 or later
Wondershare Filmora video editor is available for Windows and Mac platforms, and gives a tough competition to other industry-standard video editing applications like Final Cut Pro X and Adobe Premiere Pro, etc. You can learn how to stabilize a clip with Filmora instead of using Google stabilizer video editor by following the step-by-step instructions that are explained below:
Step 1: Add the Source Video to the Timeline
After downloading and installing Wondershare Filmora on your Mac or Windows computer (a Windows 11 PC is used here for illustrations), launch the program, and click the New Project tile from the first screen that appears.

When on the main interface, ensure that Media is selected from the standard toolbar at the top, and click anywhere inside the Media window that is present at the upper-left corner. Next, locate, select, and import the source video from your PC that you want to stabilize.

Now, drag and drop the video to the timeline, or hover the mouse over the clip’s thumbnail in the Media window, click the + icon from the bottom-right area. Click the button under the Match to Media or Keep Project Settings label when the confirmation box comes up to add the film to the Timeline using the preferences that you selected.

Step 2: Stabilize the Video
Double click the video in the timeline, and then enable the Stabilization category under video editing pane. Wait while Filmora video editor stabilizes the video without Google video stabilizer. Click OK when done.

Step 3: Export the Stabilized Video
Back on the main interface, click Export from the center-top. On the Export box that opens up next, go to your preferred tab, pick an output format, define output preferences, and click Export from the bottom-right corner to export the stabilized clip without even using Google stabilizer video.

Part 4: How to Use Google Photos to Edit Video?
Google Photos doesn’t only work as a Google video stabilizer app but it also enables you to edit your media clips much more professionally. Some post-production tasks that you can perform while using Google Photos include:
1. Trimming
The trimming handles can be seen when you are on the ‘Video’ section after tapping ‘Edit’ in Google Photos after opening the video. You can drag these handles inwards to get rid of the unwanted starting and ending parts of a clip.

2. Cropping
The ‘Crop’ section enables you to crop the videos in a particular aspect ratio that can be selected from the available list, or drag the handles manually to get custom results.

3. Rotating
The ‘Crop’ section also has an option to rotate the video. Each time you tap the ‘Rotate’ icon, the screen rotates 90o in the counterclockwise direction.

4. Color Correction
The ‘Adjust’ section allows you to adjust the display of a video such as its brightness, contrast, shadows, etc.

5. Filters
You can even add a filter using the presets available in the ‘Filters’ section.

6. Annotations
The ‘Markup’ section enables you to annotate the video. You can either use the ‘Pen’ tool or ‘Highlighter’ to write text on the video or give the screen a different shade respectively.

Depending on the type of modifications you want in your video, you can use Google Photos to get the job done easily and quickly.
Conclusion
Google video stabilizer is a built-in tool in Google Photos. Google Photos can be obtained from Play Store or App Store for your Android or iOS smart devices respectively. In addition to stabilizing your videos, Google Photos app also enables you to make other modifications such as trimming, cropping, applying filters, and much more.
02 How to Stabilize Videos with Google Photos on Android and iPhone?
03 How to Stabilize Videos with Google Photos Online?
04 How to Use Google Photos to Edit Video?
Part 1: What is Google Photos and How Does It Work?
Google Photos is an app that can be obtained from Play Store or App Store to be installed on an Android-based smartphone or iPhone or iPad respectively.
The program can store photos and videos from your phone, and ensures that those media files are well-backed up so they can be recovered easily if/when lost due to some mishaps. Furthermore, the tool even lets you edit, customize, and share your photos and videos with ease.
1. History and Current Policies
Earlier, Google Photos used to offer unlimited storage to the users where they can save as many photos as they want, as long as the images were saved in ‘high-quality’ resolution. However, from June 01, 2021, Google changed its policies of using the app, and now the tool offers limited storage. If more space is needed, the users must subscribe to a paid plan.
2. Accessibility
Google Photos can be accessed from a web browser, Google Drive desktop program, and smartphone app. While you can make only minor changes to the videos such as editing date, time, and location when accessing Google Photos via a web browser, the smartphone app allows you to edit the clips comparatively more sophisticatedly.
3. Deletion
The files that are stored in Google Photos remain there for an indefinite duration, of course until the entire space is completely consumed. When you delete something, it is moved to the Trash and stays there for another 60 days, after which it is automatically deleted from the Cloud forever.
Part 2: How to Stabilize Videos with Google Photos on Android and iPhone?
Google Photos is available for both Android and iPhone smartphones, and as explained earlier, the app can be downloaded from Play Store and App Store respectively. Using the built-in Google stabilizer video editor of the Photos app on both platforms is almost identical and extremely easy.
You can learn how to work with Google video stabilizer to stabilize a video by following the steps that are given below:
Step 1: Locate and Open the Source Video in Google Photos
Download and install Google Photos on your smartphone (Samsung Galaxy Note 10+ is used here for illustrations). Launch the app, tap Library from the bottom-right corner of the interface, and tap to open the source video that you want to stabilize with Google video stabilizer.
Step 2: Stabilize the Video
After the video opens in the app and the playback begins, tap Edit from the bottom. On the next screen, ensure that the Video section is selected. Tap the Stabilize icon from the lower-left area of the window, and wait while Google Photos stabilize video.
Step 3: Save the Video
Once the stabilization process is complete, click Save copy from the bottom-right corner to save the modified video as a separate copy, thus leaving the original instance intact.
Part 3: How to Stabilize Videos with Google Photos Online?
Unfortunately, Google Photos doesn’t have many editing options when accessed via a web browser, and therefore, at the time of this writing, you cannot stabilize a video with the tool’s web interface. But if you are using a Windows or Mac computer, you can try some free online video stabilization software , or use Wondershare Filmora video editor to stabilize video with one click.
For Win 7 or later (64-bit)
For macOS 10.12 or later
Wondershare Filmora video editor is available for Windows and Mac platforms, and gives a tough competition to other industry-standard video editing applications like Final Cut Pro X and Adobe Premiere Pro, etc. You can learn how to stabilize a clip with Filmora instead of using Google stabilizer video editor by following the step-by-step instructions that are explained below:
Step 1: Add the Source Video to the Timeline
After downloading and installing Wondershare Filmora on your Mac or Windows computer (a Windows 11 PC is used here for illustrations), launch the program, and click the New Project tile from the first screen that appears.
When on the main interface, ensure that Media is selected from the standard toolbar at the top, and click anywhere inside the Media window that is present at the upper-left corner. Next, locate, select, and import the source video from your PC that you want to stabilize.
Now, drag and drop the video to the timeline, or hover the mouse over the clip’s thumbnail in the Media window, click the + icon from the bottom-right area. Click the button under the Match to Media or Keep Project Settings label when the confirmation box comes up to add the film to the Timeline using the preferences that you selected.
Step 2: Stabilize the Video
Double click the video in the timeline, and then enable the Stabilization category under video editing pane. Wait while Filmora video editor stabilizes the video without Google video stabilizer. Click OK when done.
Step 3: Export the Stabilized Video
Back on the main interface, click Export from the center-top. On the Export box that opens up next, go to your preferred tab, pick an output format, define output preferences, and click Export from the bottom-right corner to export the stabilized clip without even using Google stabilizer video.
Part 4: How to Use Google Photos to Edit Video?
Google Photos doesn’t only work as a Google video stabilizer app but it also enables you to edit your media clips much more professionally. Some post-production tasks that you can perform while using Google Photos include:
1. Trimming
The trimming handles can be seen when you are on the ‘Video’ section after tapping ‘Edit’ in Google Photos after opening the video. You can drag these handles inwards to get rid of the unwanted starting and ending parts of a clip.
2. Cropping
The ‘Crop’ section enables you to crop the videos in a particular aspect ratio that can be selected from the available list, or drag the handles manually to get custom results.
3. Rotating
The ‘Crop’ section also has an option to rotate the video. Each time you tap the ‘Rotate’ icon, the screen rotates 90o in the counterclockwise direction.
4. Color Correction
The ‘Adjust’ section allows you to adjust the display of a video such as its brightness, contrast, shadows, etc.
5. Filters
You can even add a filter using the presets available in the ‘Filters’ section.
6. Annotations
The ‘Markup’ section enables you to annotate the video. You can either use the ‘Pen’ tool or ‘Highlighter’ to write text on the video or give the screen a different shade respectively.
Depending on the type of modifications you want in your video, you can use Google Photos to get the job done easily and quickly.
Conclusion
Google video stabilizer is a built-in tool in Google Photos. Google Photos can be obtained from Play Store or App Store for your Android or iOS smart devices respectively. In addition to stabilizing your videos, Google Photos app also enables you to make other modifications such as trimming, cropping, applying filters, and much more.
How Can Filmora Create an Audio Visualizer Project for a Song? All Steps, From Launching the App to Editing the Text, Are Detailed Here
While editing videos, the ability to edit the audio in the background is one of the key ingredients of successful video making. For this purpose, the Audio Visualizer as a resource on Wondershare Filmora is a high-quality option. With this feature, users can typically add audio effects to their video soundtrack with AI technology, aligning the sound properly with the video.
It is possible to choose out of 25 different effects for audio visualization on this software for customized audio effects. You can also drag visual-based effects to the file, which the software mechanism will automatically configure with the sound cohesively.
While this is useful as a functionality, users naturally have concerns about how to handle the Audio Visualization effect to work on video projects and podcasts. Let’s learn the main steps for this process in this post, explained stage by stage in detail.
Launch the App
The first step is downloading and installing the software into your device. For this, go to the official website of Wondershare Filmora 11 and click on the Free Download button at the top of the screen. Depending on your device’s operating system, i.e., macOS or Windows, the relevant software installer will download automatically into your device.
Free Download For Win 7 or later(64-bit)
Free Download For macOS 10.14 or later

You must click on the installed APK file and double-click the Agree button for the process to continue. After you carry out the instructions that appear, the software will begin installing into your device. Wait for the software to install completely, and then the main homepage will open automatically on your screen.

Make sure that the software is in the 11.3.0 or higher version. Because the feature for audio visualization will not work on any of the older software versions. So, if you have the Filmora9 software, upgrade it to the Wondershare Filmora 11.

Add the music file
Next, you should click on the “Create New Project” button from the homepage. Then, tap on the “Click here to import media” section when it opens and add the file to the software window from your internal storage.
You can also click on the My Media tab and choose Project Media. Go to All Templates and download the audio track you will make changes to. Then, drag the audio file you have imported down to the editor timeline. Add a stock image from your Stock Media section.

You can also add another pre-made background cover image that you created beforehand from the device, if available. Drag that to the editor timeline as well above the song clip you moved there and tap on the slider. Pull the slider to fit the full size of the audio length for the background alignment. Right-click on the file, and the editing window will open for basic video editing. Make changes like adjusting the Scale, Position, Opacity, etc. Press OK.

Add the Audio Visualizer Effects
Next, you should go to the Effects tab. When this window opens, you should tap on the Filmstock tab beside the Default one for advanced features like Audio Visualizer. Click on it next.
When you tap on it, you see a list of different visualizer effects in a collection. Please choose one of them that you prefer and download it.

After that, you must drag the visualizer effect selected from the collection to the editing timeline above the background image you added previously. Again, use the slider on the clip to drag it forward and fit the size of both the music clip and the image.
Edit the Audio Visualiser
The next step of the process that you must focus on is editing the audio visualizer properly for the song and its background cover. For this, you must double-click on the audio visualizer effect you dropped in the timeline- this will open the editing window for the clip.
Here, make some changes to the quality of the audio visualizer as you prefer. Adjustment options available here include position, scale, Opacity, and Intensity. Drag the sliders for them to adjust the visualizer effect as needed. Change the color of the visualizer as well from here, and then use the slider on the visualizer effect on the timeline to see the effect change. Press the OK button after you are done.

Add the Portrait Image
Go to the My Media tab next to get the Portrait image into the project. If you previously imported the image to Filmora, drag it to the timeline. Or, you can add it later by clicking on the Import Media button and adding the Portrait photo from your device.
When it is available on the media window, hold, drag, and then drop it above the visualizer. Like in the case of the previous parts, use the slider end of this image in the timeline to drag it and fit the size of the other clips.

Next, the editing window for that will open. Make changes to the size and placement of the portrait photo, with elements like scale, position, rotation, opacity, etc. Move the photo in the preview window to the section where you want the image to appear. Then, tap the OK button under the window.

Add the overlapping visualizer effect
After adding the portrait, you can add another audio visualizer effect to the project. For this, again, tap on the Effects tab and choose the Filmstock option. Select Audio Visualizer and click on the circular visualizer effect from the list. Repeat the dragging and dropping step for this effect as well.
On the timeline, you have to adjust the visualizer effect over the portrait photo to match the length of the previous clips. Then, please tap on the portrait photo in the timeline again and adjust its appearance, like reducing the image size to fit the second visualizer effect size.

After fitting the image within the visualizer, click on the Mask tab in the same editor window. Choose the circular shape preset and scroll down to find the adjustment parameters like position, scaling, horizontal/vertical lining, etc. Keep making the changes per your needs, like fitting the image to the same size as the circular visualizer.
Move it to place the image inside the visualizer. After you are done, press the OK button.
Add a Title
An attractive title is the next element you should add to the project. You have to click on the Titles tab from the top toolbar. Choose the titles option from the drop-down list and move it to the timeline below. As you did with the previous elements you added to the timeline, move the slider onward and fit it with the previous one’s length.
Next, you should click on the Title in the timeline you added for the Title editing window to open. Here, you have to tap on the Advanced button.

In the next window that opens, tap on the Customize tab and add the song name in the title area. Make other font-related changes as you see fit, like the font size, font style, indentation, color, etc. Tap on the add text icon in this window to get another text field in which you can add the artist’s name. Make sure to reduce the size of it to lower than that of the main song title text.

Following that, you can tap on the shape icon to add a shape to the project by adding the name of the streaming service provider, like Apple Music or Spotify. Choose the Rectangle option, for example, and move it to the side of the screen. Click on the shape editing option and adjust the border size of it to three.
If you want to create a rounded-off edge look to the rectangle shape, tap on the small yellow icon that you will see at its edge. Move it slightly to adjust. Then, type the information into the shape text field, like “Listen on Spotify,” and make font and shape size adjustments. After you have completed this step, press the OK button below.
Check and Export
After making the changes, you will return to the main editor timeline. Press the play button under the preview window to see how the final project looks, and tap on the Export button to download it offline. Make changes to the exporting file after clicking on the Local tab and choosing the file format you will download it as. Then, press Export again.

Conclusion
Indeed, Filmora is a high-quality editing software for video editors with effects and sound clips to optimize the project. Advanced functions like the Audio Visualizer system are available for high-quality project optimization since it instantly handles most of the heavy editing load.
You should follow the sequence mentioned accurately to make the right effects at the end. Plus, more editing features are available, so creating an interesting video project or podcast that attracts audiences is easy. So go ahead and give it a try first.
Free Download For macOS 10.14 or later
You must click on the installed APK file and double-click the Agree button for the process to continue. After you carry out the instructions that appear, the software will begin installing into your device. Wait for the software to install completely, and then the main homepage will open automatically on your screen.
Make sure that the software is in the 11.3.0 or higher version. Because the feature for audio visualization will not work on any of the older software versions. So, if you have the Filmora9 software, upgrade it to the Wondershare Filmora 11.
Add the music file
Next, you should click on the “Create New Project” button from the homepage. Then, tap on the “Click here to import media” section when it opens and add the file to the software window from your internal storage.
You can also click on the My Media tab and choose Project Media. Go to All Templates and download the audio track you will make changes to. Then, drag the audio file you have imported down to the editor timeline. Add a stock image from your Stock Media section.
You can also add another pre-made background cover image that you created beforehand from the device, if available. Drag that to the editor timeline as well above the song clip you moved there and tap on the slider. Pull the slider to fit the full size of the audio length for the background alignment. Right-click on the file, and the editing window will open for basic video editing. Make changes like adjusting the Scale, Position, Opacity, etc. Press OK.
Add the Audio Visualizer Effects
Next, you should go to the Effects tab. When this window opens, you should tap on the Filmstock tab beside the Default one for advanced features like Audio Visualizer. Click on it next.
When you tap on it, you see a list of different visualizer effects in a collection. Please choose one of them that you prefer and download it.
After that, you must drag the visualizer effect selected from the collection to the editing timeline above the background image you added previously. Again, use the slider on the clip to drag it forward and fit the size of both the music clip and the image.
Edit the Audio Visualiser
The next step of the process that you must focus on is editing the audio visualizer properly for the song and its background cover. For this, you must double-click on the audio visualizer effect you dropped in the timeline- this will open the editing window for the clip.
Here, make some changes to the quality of the audio visualizer as you prefer. Adjustment options available here include position, scale, Opacity, and Intensity. Drag the sliders for them to adjust the visualizer effect as needed. Change the color of the visualizer as well from here, and then use the slider on the visualizer effect on the timeline to see the effect change. Press the OK button after you are done.
Add the Portrait Image
Go to the My Media tab next to get the Portrait image into the project. If you previously imported the image to Filmora, drag it to the timeline. Or, you can add it later by clicking on the Import Media button and adding the Portrait photo from your device.
When it is available on the media window, hold, drag, and then drop it above the visualizer. Like in the case of the previous parts, use the slider end of this image in the timeline to drag it and fit the size of the other clips.
Next, the editing window for that will open. Make changes to the size and placement of the portrait photo, with elements like scale, position, rotation, opacity, etc. Move the photo in the preview window to the section where you want the image to appear. Then, tap the OK button under the window.
Add the overlapping visualizer effect
After adding the portrait, you can add another audio visualizer effect to the project. For this, again, tap on the Effects tab and choose the Filmstock option. Select Audio Visualizer and click on the circular visualizer effect from the list. Repeat the dragging and dropping step for this effect as well.
On the timeline, you have to adjust the visualizer effect over the portrait photo to match the length of the previous clips. Then, please tap on the portrait photo in the timeline again and adjust its appearance, like reducing the image size to fit the second visualizer effect size.
After fitting the image within the visualizer, click on the Mask tab in the same editor window. Choose the circular shape preset and scroll down to find the adjustment parameters like position, scaling, horizontal/vertical lining, etc. Keep making the changes per your needs, like fitting the image to the same size as the circular visualizer.
Move it to place the image inside the visualizer. After you are done, press the OK button.
Add a Title
An attractive title is the next element you should add to the project. You have to click on the Titles tab from the top toolbar. Choose the titles option from the drop-down list and move it to the timeline below. As you did with the previous elements you added to the timeline, move the slider onward and fit it with the previous one’s length.
Next, you should click on the Title in the timeline you added for the Title editing window to open. Here, you have to tap on the Advanced button.
In the next window that opens, tap on the Customize tab and add the song name in the title area. Make other font-related changes as you see fit, like the font size, font style, indentation, color, etc. Tap on the add text icon in this window to get another text field in which you can add the artist’s name. Make sure to reduce the size of it to lower than that of the main song title text.
Following that, you can tap on the shape icon to add a shape to the project by adding the name of the streaming service provider, like Apple Music or Spotify. Choose the Rectangle option, for example, and move it to the side of the screen. Click on the shape editing option and adjust the border size of it to three.
If you want to create a rounded-off edge look to the rectangle shape, tap on the small yellow icon that you will see at its edge. Move it slightly to adjust. Then, type the information into the shape text field, like “Listen on Spotify,” and make font and shape size adjustments. After you have completed this step, press the OK button below.
Check and Export
After making the changes, you will return to the main editor timeline. Press the play button under the preview window to see how the final project looks, and tap on the Export button to download it offline. Make changes to the exporting file after clicking on the Local tab and choosing the file format you will download it as. Then, press Export again.
Conclusion
Indeed, Filmora is a high-quality editing software for video editors with effects and sound clips to optimize the project. Advanced functions like the Audio Visualizer system are available for high-quality project optimization since it instantly handles most of the heavy editing load.
You should follow the sequence mentioned accurately to make the right effects at the end. Plus, more editing features are available, so creating an interesting video project or podcast that attracts audiences is easy. So go ahead and give it a try first.
Windows Movie Maker Review
Are you considering creating impressive movies from your video clips? Then you need to install this famous Windows movie maker tool to fulfill your job. This is expert video editing Microsoft software that you may use for free. This video editing tool by Windows has received massive recognition due to its simplicity. Also, it makes every task easy and quick, like combining video clips to form digital movies, including various effects, background music, transitions, and titles.
So, Windows Movie Maker is undoubtedly the ideal software for this job. Moreover, video editors using this app experience several attributes in their organization to finally emerge with the perfect videos, like audio options, animations, transitions overlays, and timeline narration. It has user-friendly features, which you’ll enjoy experimenting with. This software also has XML code allowing its end users to modify live effects and transitions or even prepare very new ones.
This brilliant tool can even do primary track editing, including fade-out and fade-in effects in your final audio tracks. Windows movie maker even allows you to post your final project effortlessly on various video sites and social media platforms. Here’s a complete guide:
1. Download and Install Windows Movie Maker
Windows movie maker was previously recognized in Windows 7 as Windows Live Movie Maker. So to experience the features of this software, first, you need to download and install this app which is available free of charge. The steps are as follows.
- Firstly, download the setup file of Windows Live Essentials.
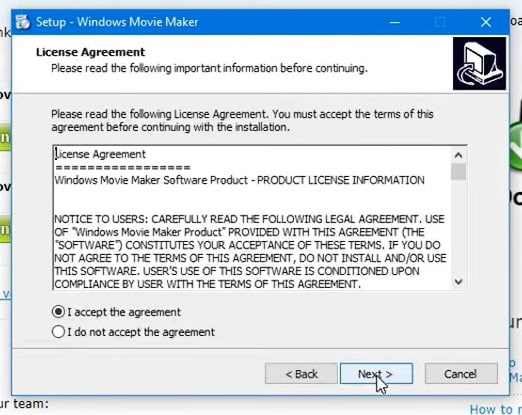
- You’ve to double-click on this setup file called windows-movie-maker.exe. Then tap on ‘Yes’ to permit the setup package to function.
- You’ll now be redirected to the installation window of Windows Essential. Next, you’ll see two options towards the web page’s top, and you’ll have to select the option ‘Install all of Windows Essentials (recommended)’ to continue with the installation process.
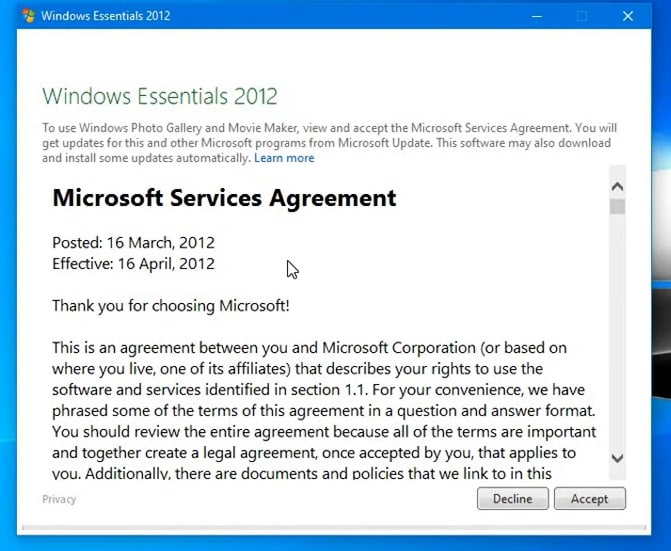
Windows Essentials comprise Microsoft OneDrive, Outlook Connector Pack, Movie Maker, Writer, Mail, Photo Gallery, and Messenger.
- Locate ‘View Details’ towards the left end of the page and tap on it. A progress and percentage bar will pop out along with the details regarding the program you’re installing.
- You need to wait a while to install Windows Movie Maker Software. Pause until the program completes its installation. After you find that the program title changes to another program such as Mail, you may proceed again.
- Now click on the Windows icon and then the ‘Start’ menu on the bottom left of your computer screen.
- Type and Search for ‘Windows Movie Maker, and you’ll find the newly downloaded app on the screen.
- Click on the icon with film reel, which is the Movie Maker app, and you’ll locate it above the Start menu. Next, you’ll be redirected to the terms of use of Windows Essentials for this Window to begin.
- Find the ‘Accept ‘ button towards the screen’s right-end corner and tap on it. Windows Movie Maker will now open.
- Next, tap on ‘Close’ when prompted with an error message from the installation windows.
You may now Enjoy Windows Movie Maker Live and begin making movies and videos using this software.
2. Interface
The user interface of Winona Movie Maker has three essential areas: the timeline and the storyboard, the panes and the toolbar, and the menu bar. This area covers…
- Timeline and storyboard: It offers a timeline and storyboard usage details for working with the current project clips.
- Panes: It offers details regarding Collections pane usage for viewing all your collections. Furthermore, it offers information regarding the Movie Task pane for all general tasks during movie making or project editing.
- Toolbar and Menubar: Here, you’ll get details regarding toolbar and menu commands usage for different tasks in this software.
3. Basic Editing
Adding clips to your timeline is the most straightforward method for creating digital movies using Movie Maker. Thereby, picking any one AutoMovie Themes out of those seven choices from default, sepia, black and white, pan and zoom, fade, cinematic, and contemporary.
You can enjoy the following choices for editing all your video clips:
- Creating clips: You may create new clips from different video clips after you’re done with capturing and importing in the Windows Movie Maker. You may create clips in the software anytime, according to your convenience.
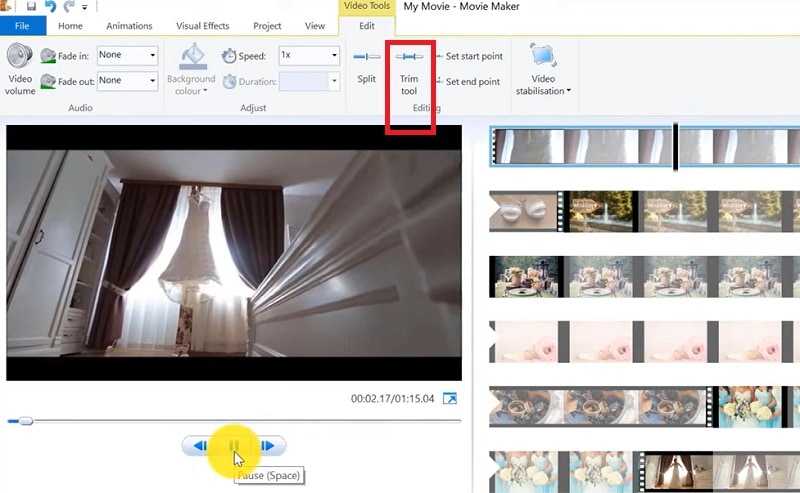
- Trimming any clip: You may hide any clip part you don’t wish to keep in the project. For instance, you may trim the clip’s end or beginning. Also, trimming doesn’t erase the details provided in their source material.
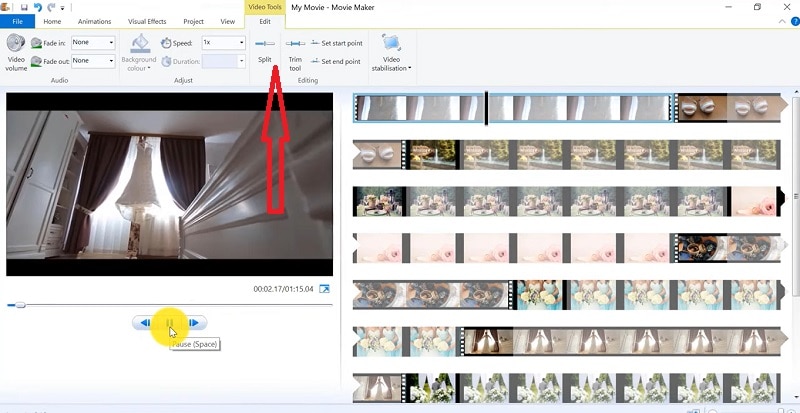
- Splitting Clips: Movie Maker allows you to split any video into two parts which can be helpful when you wish to add a video transition picture between the clips.
- Combining clips: Movie Maker allows you to merge two or multiple contiguous clips. Contiguous indicates that you need to record these clips together so that the beginning and end times are the same as the following video clip.
4. Add Video Effects
Video effects’ ascertain how any title, picture, or video clip displays in the final movie or project. Video effects permit you to include various effects in the movie and are added for the total time that the title, picture, or video clip displays.
Furthermore, you may add various other effects, which you’ll find in the folder of video effects in their Collections pane. You may maintain video effects when moving, copying, cutting, or splitting a picture or video clip.
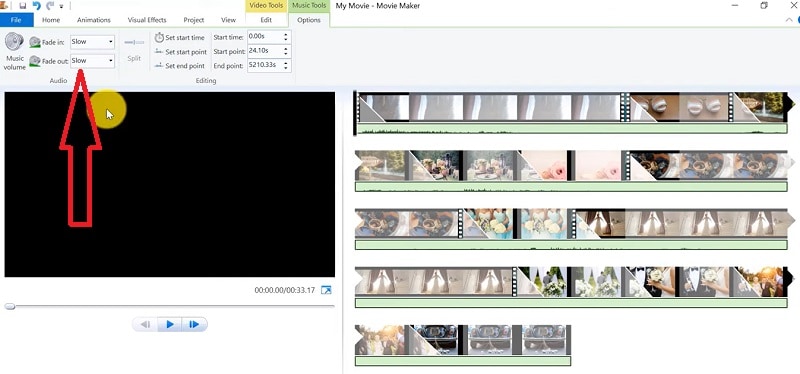
5. Audio Editing
Windows Movie Maker permits you to operate various audios in several ways. A few specific audio-related jobs you may execute in Windows Movie Live Maker comprise the following:
- Audio levels adjustment: You can adjust your audio level so that you can easily control the audio playback and balance after you have the audio that comes up on Music/ Audio and Audio tracks in your timeline.
- Timeline narration: You may include a voice narration for the picture or video clips, which will appear on the timeline’s video track. There’ll be an automated synchronization of the audio narration with your video, where the narration shall elaborate on the movie event or action when you play it.
- Audio Clips Volume adjustment: You may adjust the audio volume for the video clip’s audio portion or the clips containing only audio. This permits you to control the audio clip’s volume such that you can hear it based on the sound level you’ve set for your audio clip.
- Adding audio effects: You may add various audio effects like mute, fade out and fade in.
6. Share Files
Are you done with video project editing, and now you wish to share it? Windows Movie Maker offers you various choices for sharing straight away from their app, comprising:
- YouTube
- Vimeo
So with this power, you may guarantee to share the video’s correct aspect ratio and size version to any planned platform. Nevertheless, you don’t require signing in to your Microsoft account for sharing to the preferred platform, which may act as a hurdle for all its users who do not have Microsoft Office accounts.
7. Pros and Cons
The software’s advantages are its automated preview, simple controls, and user-friendliness. Additionally, the following are some clear advantages and disadvantages of using Windows Movie Maker:
Pros
- This app is perfect for all novices and is an ideal introduction as it utilizes several pro editing systems’ general workflow components like assembling timelines and importing. Its interface has easy navigation and is exceptionally intuitive for most new beginners as well.
- Windows Live MovieMaker is a video editing Microsoft application that arrives standard with all Windows computers. It is amongst the most favorite editing apps obtainable and exact, as other programs are user-friendly and fun. This software comes free with Vista, XP, and Windows Me and has effortless usage. Moreover, you may download additional video plugins, plus it won’t give you any chance to complain regarding its free software.
- This app is straightforward to learn, and you won’t require any experience in film editing for using Windows Media Player. You’ll explore more than 130 effects with accessible Fantastic credits, titles, and transitions. Next to this, you may drag and then drop the clip at any place in the timeline.
- Windows Movie Maker is an ideal app for image slide shows and was developed to create photo and home movie slide shows. It presents excellent fun transitions and themes; you may add music easily. This app provides excellent variety, being a free editing application. Furthermore, it offers transitions and striking effects to function with.
- Windows Live Movie Maker is free of cost for all Microsoft Windows users and is basically for clients having zero to minimum experience editing audio and videos. Moreover, it has many special effects you may use while creating videos. Also, you may frag and then place any picture or video anywhere you wish to see it.
- You can choose from several themes, enhancing your film with tools like contemporary themes, fade effects, and sepia toning choices. You have to click once, and then the users can choose and apply from the multiple effects collection.
Cons
- Windows Movie Maker contains unlimited audio and video tracks, yet it provides just one accessible one at a time. Hence, if you wish to include some other audio or music track, you may prepare the video, thereby sending it to the ultimate file.
- It isn’t uninstallable using any remove or add control panel. Also, it is impossible to do video overlaying.
- This app requires much patience because it is prone to crashes. Moreover, you’ll require enough time and effort to do video reversing. It often becomes frustrating for all advanced editors to cut clips into small parts and then add them back. Hence, Windows Movie maker isn’t good for professional video editors.
- Windows Live MovieMaker can crash and freeze and is known to suffer frequent crashes. Hence, ensure saving often and avoid creating complex videos. Also, you cannot perform complex editing and can now prepare single audio and video track.
8. Windows Movie Maker Alternative Software
Wondershare Filmora Video Editor is the best alternative for Windows Movie Live Maker and is a highly favored and most effective software program. You can download it for free, and it is adaptable with Windows 7 OS or above. This app is user-friendly but powerful and allows you to split, merge, crop, and trip various video clips with essential built-in video editing attributes.
Free Download For Win 7 or later(64-bit)
Free Download For macOS 10.14 or later
Additionally, you may get a few advanced properties like video stabilization, color correction, and green screen in Filmora effortlessly. You may even explore several fashionable and modern video effects such as music, text, and intros for topics like games, Education, Travel, Vlogger, Beauty, etc. Here is the comparison between the two software:
Filmora and Windows Movie Maker comparison
| Basis | Windows Movie Maker | Wondershare Filmora |
|---|---|---|
| Pricing | Free/ inexpensive | Quote basedAnnual SubscriptionOne-time paymentMonthly Payment |
| Interface | Pleasing interface | Auto movie options |
| Effects | Several overlays and effects | Special effects choices and transition overlays |
| Integration | YouTubeFacebookVimeoEmail | TwitterInstagramFacebookVimeoYouTube |
Conclusion
You may use Windows Movie Maker Live for capturing videos and audio to the computer using various video sources, including Web Cameras and Video Cameras, thereby using the recorded data in your new movies. You may import still pictures, video, and audio into this application to use in the movies you’re making. Moreover, after you’ve finished with video and audio content editing in this app, which may involve adding effects, video transitions, and titles, you may finally save the ultimate movie and then share and watch it with your family and friends.
A Complete Guide to the Best Brand Story Videos |2023|
With the advent of streaming content accessible anytime, anywhere, conventional marketing has somewhat lost grip on its performance. Consumers are now savvy as they now take a step further, like using ad blockers or tuning out ads.
However, it doesn’t imply the end of advertising as a brand promotion tool altogether. Individuals still desire best-in-class deals and products and spend their money shopping. All they need is to get informed about the product or service more entertainingly and innovatively.
This is one of the reasons why many established brands are now shifting toward their brand storytelling. And there’s no better and highly effective way to portray your brand story than with video. Simply making a video resembling any conventional TV commercial ad with an irritating ‘Call Today’ voiceover won’t be enough to get results.
Modern-day consumers are much more educated and sophisticated than before. You must learn how many creative and successful brands are infusing their branding and storytelling strategies to engage their customers. If you’re reading this article, you’re aiming to build your own brand storytelling video and are wondering how to make it a successful one.
Take no worries as the further sections will clear all your doubts and give you the perfect answer. So, let’s start.

Source : https://www.pexels.com/photo/business-plan-printed-on-paper-on-a-clipboard-8970679/
- Spotify - All Ears On You
- Airbnb - The Story of a Symbol of Belonging
- Apple - Chase
- Nike - Most Powerful Brand Story Videos
- Bells - Reader
- Dove - You’re More Beautiful Than You Think
- El Gordo - The Spanish Christmas Lottery Ad 2021
Part I. The Most Successful Video Practises of Brand Storytelling
1. Spotify - All Ears On You
Since 2008, Spotify has continued gathering as much information (personal preferences, likes, and dislikes) about their audiences as possible. It has helped them set personalized ad campaigns that will best fit their customers’ interests.
One of their latest, popular campaigns is ‘All Ears On You.’ Take a glimpse of this video to check how the video ad appears. Launched in June, this campaign focuses on celebrating your weird listening habits. It leveraged the users’ in-app experience to let them be proud of their unique choices. This helped Spotify to strengthen its emotional relationship with its listeners.
Learn From Spotify’s Famous Marketing Practices:
- Get the Most Out of Big Data: The customer insights and data helped Spotify make precise, on-point ads. Your firm should also acquire customers’ data and later leverage it to amplify the user experience and make marketing campaigns more relatable.
- Leverage User-Generated Content: Your audience is more interested in what other customers think and say about your business. The most successful video ads don’t involve facts about the company but the customers instead. Make a video using clips where your customers tell a story about themselves and their experience with your brand.
- Utilize The Trending Hashtags & Topics: Social medial trends and news feed is what attracts today’s customers the most. Spotify’s advertisement team always wraps their ad campaigns into a package of top-events-and-stories. Find the most popular and trending hashtags and topics related to your business niche and incorporate them in your brand storytelling video.
Some other marketing practices that teach valuable lessons to businesses for brand video marketing include:
- Leveraging the mentions on social media platforms
- Going for a customer-centric marketing approach with personalized interactions
2. Airbnb - The Story of a Symbol of Belonging
The center of focus of Airbnb’s brand story revolves around the basic ideology of ‘belonging.’ The brand found its mission - to shape the world into a place where individuals can ‘belong anywhere.’
Their official tagline also turned out to be ‘Belong Anywhere,’ which eventually led to the development of their whole brand story and new logo. This symbol was created to make sure it’s instantly recognizable.
Valuable Storytelling Lessons From Airbnb’s Marketing Practices:
- Let Your Customers Be At The Heart Of Your Organization: After interviewing users, Airbnb found out that no one can better inform them about their company than the community of their regular users. The conversations and interviews with such users helped Airbnb to prepare its entire brand story. Thus, you should, too, keep your customers at your core.
- It’s Never Too Late To Discover Your Story: Although launched in 2008, the company Airbnb realized they’d need to discover their business mission to scale and progress. They are an example that it’s never too late for your brand to find the brand story.
- Content Is The King: Airbnb always keeps posting content on its own blog and YouTube channel. Most of their content is based on user experiences and revolves around stories from within the brand’s community. Such high-quality content helped them to engage with the customers more efficiently.
3. Apple - Chase
Chase recently announced via email their latest introduction to the market - Apple Pay. They introduced it in collaboration with Apple as the new mode to pay. Chase leveraged this email communication to inform people about their latest collaboration with Apple.
They also used email to reinforce their commitment to helping people to buy Apple products like the iPhone 14 pro with accessible funds. While ensuring to align with Apple’s marketing strategy for the Apple Pay service announcement (primarily based on social media), Chase put more emphasis on real-time media.
Their marketing practice used direct, real-time media to connect with the on-the-go audience seemingly ready to buy an Apple product with a quick source of funds. Their brand story ad focused more on the ‘on-the-go’ audience who would readily agree to make such a purchase.
4. Nike - Most Powerful Brand Story Videos
If you’ve watched a Nike video ad featuring LeBron James or others, you’ll know how much emphasis on emotions and inspiration. They don’t go for the direct marketing of their brand and products. Instead, they produce video ads with a powerful message drawn from a compelling storyline.
This makes Nike unique from numerous other brands as it has been an expert in brand storytelling for years now. Every piece of video ad from their collection triggers the audience’s feelings and emotions, which can only be met and satisfied by using Nike products.
There’s a lot of power within emotional branding, and Nike has shaped and transformed its whole marketing model into a storytelling form that motivates the audience to take action - ‘Just do it with Nike products. Some of the marketing strategies that have helped them grow over the years include the following:
- They promote the advantages of their product’s features rather than simply highlighting and promoting the features. This is called benefit-based marketing practice.
- They sell brand stories more than their products, which has always been their primary marketing strategy.
- Nike is very strong in the social media game. They leverage user-generated content to create their video ads.
- Collaborating with influencers like LeBron James and Cristiano Ronaldo has always been at the core of their marketing strategy.
5. Bells - Reader
The marketing manager of Bell - Thami Silwana - revealed that the idea behind the ‘Bells-Reader’ campaign is to assist men in acknowledging, comprehending, and speaking about their personal victories.
They realized that sometimes it could be troublesome for men to interact with one another and acknowledge their inside feeling and emotions when one of them have achieved something. Their tagline, ‘Give That Man a Bell, ’ best fits in terms of a man-to-man acknowledging something worth the celebration.
Here is what the video ad director Greg incorporated in the video to make it hit the marketing campaign’s motto:
Sentimentality:
- Greg incorporated an excellent blend of drama, emotion, and sentimentality in this two minutes video ad, which was as good as a two-hour Hollywood movie.
- The video hit the emotions on so many levels that you’ll feel like drinking a glass of whisky at the end of the ad.
- Your brand should also create a brand story video where you help your customers to acknowledge themselves by hitting their emotions at different levels.
- To know how just take a look at the ad yourself: https://www.youtube.com/watch .
6. Dove - You’re More Beautiful Than You Think
The Real Beauty Ad Campaign by Dove focuses on women’s natural charisma and beauty. The ad emphasizes promoting the self-esteem of every woman. In their ‘Dove Real Beauty Sketches’ video ad, you’ll find the events to be chosen, arranged, connected, and assessed as meaningful for a specific set of audience.
Although the video ad’s primary focus is women’s empowerment, it’s still a commercial that promotes Dove products. The ad ends with the phrase ‘you’re more beautiful than you think,’ and a Dove brand logo appears.
Significantly, Dove desires women to know that they are always encouraged, supported, and acknowledged for their real beauty. This storytelling helped Dove boost its product sales without making any direct references.
7. El Gordo - The Spanish Christmas Lottery Ad 2021
Conventionally, you’ll get to know about the arrival of Christmas in Spain when you’ll find the Spanish Christmas Lottery hitting the screens as a commercial. The Christmas Lottery’s 2021 ad version was recorded and created in the picturesque and snowy town of Elizondo.
The ad signifies the spirit of the Christmas festive season and amazingly resonates with the motto of El Gordo - the greatest prize is to share it. They used aesthetics and scenic beauty to allure the viewers and drive them into buying the lottery.
They used the marketing practice of hitting people’s emotions during Christmas when they could truly immerse themselves into enjoying things like winning the lottery.
Part 2. Need Pro-Quality Video Result From Your Video Maker? Try Filmora - The Best in the Market
If you seek pro-quality video results from your video maker for the ‘best-in-class’ brand story videos, use Filmora. It has emerged as the leading video-making tool for global marketers where you can create, edit, and save all sorts of ‘state-of-the-art,’ ‘next-level’ marketing brand videos.

Try Filmora to ensure brand awareness, advertise your business, introduce the audience to your brand and its products, and boost sales. One software, multiple benefits. Here are some features of Filmora that can effectively help you make your brand story videos.
- Numerous Resources: Filmora is an excellent platform to explore your inner creativity as it has thousands of video assets accessible to its users. The widespread availability of unique advanced and basic features will help you create the most appealing brand story video.
- Green Screen: Your brand storytelling videos will become bland if you miss out on adding a unique background. Thanks to the Green Screen feature by Filmora, it takes only a few simple clicks to add such attractive backgrounds to your videos.
- Split Screen: When making your brand story video, it’s more likely that you’ll want to show a comparison of two products side-by-side. In that case, the Split Screen feature from Filmora comes in handy. It lets you incorporate two or more video footage or clips in the video.
- Audio Ducking: Your brand story will involve several key pointers that you’ll want to highlight for the audience. With Filmora’s Audio Ducking feature, you can easily highlight the dialogues and speeches during the video. This will help you to emphasize those video parts so that the audience can hear them with clarity. Of course, the feature fades the background music for those speech and dialogue parts.
- Color Grading: The more appealing the brand story video, the more the viewers. That’s precisely what the color grading feature does for you. It allows you to adjust the tint, 3D Luts, temperature, and lights in all your marketing videos. Introduce mesmerizing cinematographic effects in your videos with Fimora’s ‘state-of-the-art’ color tuning features.
Telling your brand story via videos has just become simpler and faster than ever with Filmora. Try the software for magical results.
Free Download For Win 7 or later(64-bit)
Free Download For macOS 10.14 or later
Conclusion
Telling your brand story is more crucial than ever as it lets you reach new levels of personalization and establish deeper bonds and connections with your clients or customers.
With the ideal brand storytelling strategy and the best video maker tool, you can easily connect with the audience and let them know all about your brand, its products, and its purpose. So, get started today!
Free Download For Win 7 or later(64-bit)
Free Download For macOS 10.14 or later
Part I. The Most Successful Video Practises of Brand Storytelling
1. Spotify - All Ears On You
Since 2008, Spotify has continued gathering as much information (personal preferences, likes, and dislikes) about their audiences as possible. It has helped them set personalized ad campaigns that will best fit their customers’ interests.
One of their latest, popular campaigns is ‘All Ears On You.’ Take a glimpse of this video to check how the video ad appears. Launched in June, this campaign focuses on celebrating your weird listening habits. It leveraged the users’ in-app experience to let them be proud of their unique choices. This helped Spotify to strengthen its emotional relationship with its listeners.
Learn From Spotify’s Famous Marketing Practices:
- Get the Most Out of Big Data: The customer insights and data helped Spotify make precise, on-point ads. Your firm should also acquire customers’ data and later leverage it to amplify the user experience and make marketing campaigns more relatable.
- Leverage User-Generated Content: Your audience is more interested in what other customers think and say about your business. The most successful video ads don’t involve facts about the company but the customers instead. Make a video using clips where your customers tell a story about themselves and their experience with your brand.
- Utilize The Trending Hashtags & Topics: Social medial trends and news feed is what attracts today’s customers the most. Spotify’s advertisement team always wraps their ad campaigns into a package of top-events-and-stories. Find the most popular and trending hashtags and topics related to your business niche and incorporate them in your brand storytelling video.
Some other marketing practices that teach valuable lessons to businesses for brand video marketing include:
- Leveraging the mentions on social media platforms
- Going for a customer-centric marketing approach with personalized interactions
2. Airbnb - The Story of a Symbol of Belonging
The center of focus of Airbnb’s brand story revolves around the basic ideology of ‘belonging.’ The brand found its mission - to shape the world into a place where individuals can ‘belong anywhere.’
Their official tagline also turned out to be ‘Belong Anywhere,’ which eventually led to the development of their whole brand story and new logo. This symbol was created to make sure it’s instantly recognizable.
Valuable Storytelling Lessons From Airbnb’s Marketing Practices:
- Let Your Customers Be At The Heart Of Your Organization: After interviewing users, Airbnb found out that no one can better inform them about their company than the community of their regular users. The conversations and interviews with such users helped Airbnb to prepare its entire brand story. Thus, you should, too, keep your customers at your core.
- It’s Never Too Late To Discover Your Story: Although launched in 2008, the company Airbnb realized they’d need to discover their business mission to scale and progress. They are an example that it’s never too late for your brand to find the brand story.
- Content Is The King: Airbnb always keeps posting content on its own blog and YouTube channel. Most of their content is based on user experiences and revolves around stories from within the brand’s community. Such high-quality content helped them to engage with the customers more efficiently.
3. Apple - Chase
Chase recently announced via email their latest introduction to the market - Apple Pay. They introduced it in collaboration with Apple as the new mode to pay. Chase leveraged this email communication to inform people about their latest collaboration with Apple.
They also used email to reinforce their commitment to helping people to buy Apple products like the iPhone 14 pro with accessible funds. While ensuring to align with Apple’s marketing strategy for the Apple Pay service announcement (primarily based on social media), Chase put more emphasis on real-time media.
Their marketing practice used direct, real-time media to connect with the on-the-go audience seemingly ready to buy an Apple product with a quick source of funds. Their brand story ad focused more on the ‘on-the-go’ audience who would readily agree to make such a purchase.
4. Nike - Most Powerful Brand Story Videos
If you’ve watched a Nike video ad featuring LeBron James or others, you’ll know how much emphasis on emotions and inspiration. They don’t go for the direct marketing of their brand and products. Instead, they produce video ads with a powerful message drawn from a compelling storyline.
This makes Nike unique from numerous other brands as it has been an expert in brand storytelling for years now. Every piece of video ad from their collection triggers the audience’s feelings and emotions, which can only be met and satisfied by using Nike products.
There’s a lot of power within emotional branding, and Nike has shaped and transformed its whole marketing model into a storytelling form that motivates the audience to take action - ‘Just do it with Nike products. Some of the marketing strategies that have helped them grow over the years include the following:
- They promote the advantages of their product’s features rather than simply highlighting and promoting the features. This is called benefit-based marketing practice.
- They sell brand stories more than their products, which has always been their primary marketing strategy.
- Nike is very strong in the social media game. They leverage user-generated content to create their video ads.
- Collaborating with influencers like LeBron James and Cristiano Ronaldo has always been at the core of their marketing strategy.
5. Bells - Reader
The marketing manager of Bell - Thami Silwana - revealed that the idea behind the ‘Bells-Reader’ campaign is to assist men in acknowledging, comprehending, and speaking about their personal victories.
They realized that sometimes it could be troublesome for men to interact with one another and acknowledge their inside feeling and emotions when one of them have achieved something. Their tagline, ‘Give That Man a Bell, ’ best fits in terms of a man-to-man acknowledging something worth the celebration.
Here is what the video ad director Greg incorporated in the video to make it hit the marketing campaign’s motto:
Sentimentality:
- Greg incorporated an excellent blend of drama, emotion, and sentimentality in this two minutes video ad, which was as good as a two-hour Hollywood movie.
- The video hit the emotions on so many levels that you’ll feel like drinking a glass of whisky at the end of the ad.
- Your brand should also create a brand story video where you help your customers to acknowledge themselves by hitting their emotions at different levels.
- To know how just take a look at the ad yourself: https://www.youtube.com/watch .
6. Dove - You’re More Beautiful Than You Think
The Real Beauty Ad Campaign by Dove focuses on women’s natural charisma and beauty. The ad emphasizes promoting the self-esteem of every woman. In their ‘Dove Real Beauty Sketches’ video ad, you’ll find the events to be chosen, arranged, connected, and assessed as meaningful for a specific set of audience.
Although the video ad’s primary focus is women’s empowerment, it’s still a commercial that promotes Dove products. The ad ends with the phrase ‘you’re more beautiful than you think,’ and a Dove brand logo appears.
Significantly, Dove desires women to know that they are always encouraged, supported, and acknowledged for their real beauty. This storytelling helped Dove boost its product sales without making any direct references.
7. El Gordo - The Spanish Christmas Lottery Ad 2021
Conventionally, you’ll get to know about the arrival of Christmas in Spain when you’ll find the Spanish Christmas Lottery hitting the screens as a commercial. The Christmas Lottery’s 2021 ad version was recorded and created in the picturesque and snowy town of Elizondo.
The ad signifies the spirit of the Christmas festive season and amazingly resonates with the motto of El Gordo - the greatest prize is to share it. They used aesthetics and scenic beauty to allure the viewers and drive them into buying the lottery.
They used the marketing practice of hitting people’s emotions during Christmas when they could truly immerse themselves into enjoying things like winning the lottery.
Part 2. Need Pro-Quality Video Result From Your Video Maker? Try Filmora - The Best in the Market
If you seek pro-quality video results from your video maker for the ‘best-in-class’ brand story videos, use Filmora. It has emerged as the leading video-making tool for global marketers where you can create, edit, and save all sorts of ‘state-of-the-art,’ ‘next-level’ marketing brand videos.
Try Filmora to ensure brand awareness, advertise your business, introduce the audience to your brand and its products, and boost sales. One software, multiple benefits. Here are some features of Filmora that can effectively help you make your brand story videos.
- Numerous Resources: Filmora is an excellent platform to explore your inner creativity as it has thousands of video assets accessible to its users. The widespread availability of unique advanced and basic features will help you create the most appealing brand story video.
- Green Screen: Your brand storytelling videos will become bland if you miss out on adding a unique background. Thanks to the Green Screen feature by Filmora, it takes only a few simple clicks to add such attractive backgrounds to your videos.
- Split Screen: When making your brand story video, it’s more likely that you’ll want to show a comparison of two products side-by-side. In that case, the Split Screen feature from Filmora comes in handy. It lets you incorporate two or more video footage or clips in the video.
- Audio Ducking: Your brand story will involve several key pointers that you’ll want to highlight for the audience. With Filmora’s Audio Ducking feature, you can easily highlight the dialogues and speeches during the video. This will help you to emphasize those video parts so that the audience can hear them with clarity. Of course, the feature fades the background music for those speech and dialogue parts.
- Color Grading: The more appealing the brand story video, the more the viewers. That’s precisely what the color grading feature does for you. It allows you to adjust the tint, 3D Luts, temperature, and lights in all your marketing videos. Introduce mesmerizing cinematographic effects in your videos with Fimora’s ‘state-of-the-art’ color tuning features.
Telling your brand story via videos has just become simpler and faster than ever with Filmora. Try the software for magical results.
Free Download For Win 7 or later(64-bit)
Free Download For macOS 10.14 or later
Conclusion
Telling your brand story is more crucial than ever as it lets you reach new levels of personalization and establish deeper bonds and connections with your clients or customers.
With the ideal brand storytelling strategy and the best video maker tool, you can easily connect with the audience and let them know all about your brand, its products, and its purpose. So, get started today!
Free Download For Win 7 or later(64-bit)
Free Download For macOS 10.14 or later
Also read:
- Updated In 2024, Voice Changer for Discord | Use Voicemod on Discord
- Updated How to Make Discord Logo GIF for 2024
- Updated Are You Looking for an Ideal Halloween Countdown Video Clip for Your Video? This Article Will Walk You Through the Best Ones You Can Use to Get the Job Done Perfectly
- How to Edit FLV Video Files with FLV Editor Windows, Mac,Android, iPhone & Online for 2024
- Step by Step to Cut a Video in Lightworks
- Designed for You! Best Image (JPG/PNG) to GIF Converters
- New How to Shoot Cinematic Footage From a Smartphone
- You Are Planning to Convert an AVI to GIF Online but You Are Not Sure How? If You Are Looking for an Idea on How to Do It, You Have Come to the Right Place for 2024
- Shotcut Review – Is It The Best Free Video Editor for 2024
- Updated 2024 Approved 100+ Best TikTok Captions Enhance Your Content
- New In 2024, Applying the Effect of Camera Shake in Video Creation
- New 8 Apps to Custom Your GIF Stickers
- In 2024, Video Marketing Is Adopted by Most Companies in This Digital Era. In This Post, We Are Going to Share some Useful Tips to Create a Better Product Video Ads to Help Prompt Business
- Updated In 2024, Best 5 AI Music Video Examples and Makers to Make Them
- Something About Skin Care Vlog Ideas for 2024
- Updated 2024 Approved 4 Ways to Merge MP4 and MP3
- In 2024, Are You Looking for a Video Format Converter Free? We Will Introduce the 5 Best Online Converters and Also the 5 Best Video Format Converters for PC
- In 2024, How To Fix iPhone XS Max Unavailable Issue With Ease | Dr.fone
- Why Your WhatsApp Location is Not Updating and How to Fix On Poco X6 Pro | Dr.fone
- In 2024, Which Pokémon can Evolve with a Moon Stone For Vivo Y100 5G? | Dr.fone
- In 2024, How to Transfer Contacts from Realme Note 50 to Other Android Devices Using Bluetooth? | Dr.fone
- 15 Best Strongest Pokémon To Use in Pokémon GO PvP Leagues For Tecno Pop 7 Pro | Dr.fone
- In 2024, Can You Unlock Apple iPhone 11 Pro Max After Forgetting the Passcode?
- How to Unlock a Network Locked Infinix Hot 40 Phone?
- A Detailed VPNa Fake GPS Location Free Review On Apple iPhone 14 Pro Max | Dr.fone
- Where Is the Best Place to Catch Dratini On Vivo X100 Pro | Dr.fone
- Top 9 Apple iPhone 6 Plus Monitoring Apps for Parental Controls | Dr.fone
- Complete Tutorial to Use VPNa to Fake GPS Location On Infinix Zero 5G 2023 Turbo | Dr.fone
- Title: 2024 Approved How to Stabilize Videos with Google Photos App for Free
- Author: Chloe
- Created at : 2024-04-24 07:08:12
- Updated at : 2024-04-25 07:08:12
- Link: https://ai-editing-video.techidaily.com/2024-approved-how-to-stabilize-videos-with-google-photos-app-for-free/
- License: This work is licensed under CC BY-NC-SA 4.0.
