
:max_bytes(150000):strip_icc():format(webp)/apps-like-tiktok-the-best-alternatives-in-2020-9f3611f635da4198956585133eaf01cb.jpg)
2024 Approved How to Trim/Crop Video in Microsoft Powerpoint
Learn How to Trim/Crop Video in Microsoft PowerPoint
Create High-Quality Video - Wondershare Filmora
An easy and powerful YouTube video editor
Numerous video and audio effects to choose from
Detailed tutorials provided by the official channel
PowerPoint allows you to trim or crop the length of your video and save it as a separate media file. Trimming/cropping video is a great way to remove distracting or unnecessary parts of your video or change its dimensions so that it fits within a certain area. Doing this will make your videos captivating, and more people will want to watch them. Keeping that in mind, we’ll explain how you can crop or trim video in PowerPoint. You will also learn some helpful tips that you can use when editing videos on this presentation program.
In this article
01 How to Trim Videos in PowerPoint
02 Bonus! Tips on Editing Videos in Powerpoint
How to Trim Videos in PowerPoint
Many people use Microsoft PowerPoint to prepare basic animated explainers and presentations, but you can learn how to trip or crop videos in this program with the tools that it provides. With that in mind, here is how to trim, reset, or edit videos in PowerPoint.
How to Trim a Video in PowerPoint
You can trip unnecessary content at the start or end of your video clip. However, you can only trim videos you have inserted from your PC, as this feature is not yet available for videos on the web. Follow the steps below to learn how to trim video in PowerPoint.
- If you are in a slide containing a media placeholder, click on Insert Video from File. A window will open; select the From a File option.
- Find the video file on your PC and select it. Then, click the arrow that’s right next to the Insert button. Choose either the Link to File or Insert option and your video will appear on the slide.
- If you are not using a slide that has a media placeholder, find the Insert tab and click Video on My PC. You will be able to locate the video file on your PC.
- You are now ready to trim video PowerPoint.
- Select your video, and the Playback tab will appear. Navigate to the Editing area of the ribbon and hit the Trim Video button.

- You’ll see a small editing window that allows you to trim video in PowerPoint.
- Enter the end and start times for the sections of the video you would like to keep. Alternatively, you can use the markers to choose the start and endpoints.

- To adjust the start and end times in smaller increments, you can use the arrows you see on the sides of those boxes. If you know the exact times, enter them into the corresponding boxes.
- You can also select the portion you would like to keep using the end and start time markers. In this case, sliding the red marker allows you to the end time while the green one lets you set the start time.

- If you want to use a combination of the tools above to pinpoint where to start and end the video, hit the Play button, then click the Pause button when you reach the time you want.

- Enter this time into the End Time or Start Time box, depending on the portion you would like to keep. Or you can move any of the markers to this spot.
- Hit the OK button once the portion of the video clip you want is all set. The video will appear on your slide update, and it will only play the section that you kept when trimming the video.
How to Reset or Edit a Trimmed Video in PowerPoint
If you trim video in PowerPoint and change your mind, you can always edit where you have trimmed it or reset the trimmed video back to its original state. Follow the steps below to learn how to edit to reset a trimmed video in PowerPoint.
- Select your video, and then find the Playback tab.

- Hit the Trim Video button, and the Trim Video Settings will be as they were when you were trimming the video. That means you can make the necessary adjustments.
- To reset a trimmed video back to its original length, slide the red end marker to the right and the green start maker to the left. The OK button allows you to play the whole video in your presentation.

How to Save a Trimmed Video
Now that you have trimmed your video in Microsoft PowerPoint, you might want to save it to use it outside this program. You can only save the video file after compressing it, then you can use the trimmed video as you want.
After compressing your trimmed video, only the trimmed section will show up on your slide. That said, follow the steps below to save your trimmed video:
- From the PowerPoint menu, select File > Info
- Next, select the Compress Media option.
- Next to Compress Media, you will see all media that are in your slideshow, including your trimmed video. If you’ve got other video files here, the compression process will apply to these files.
- Choose the suitable level of compression. A dialog box will pop up as the compression process takes place. Hit the Close button when this process completes.
- Go back to the slide that contains your trimmed video, which has now been compressed.
- Right-click the compressed video, and select the Save Media As option.

- Choose the location where you want to save your video. You can change its name if you want and click the Save button.
You have now successfully saved your trimmed video.
Bonus! Tips on Editing Videos in Powerpoint
Now that you know how to trim video PowerPoint, here are some helpful tips on editing videos on this application.
How to Crop Videos in PowerPoint
Once you have inserted your video in the slide, you have the option of cropping it. Follow these steps below to learn how to crop video PowerPoint.
- Open your presentation and then go to the slide where you have inserted your video clip.
- Double-click or select the video, and the two Video Tools tabs will appear in the ribbon: Playback and Format. Hit the Format tab option to activate it.

- Your slide may show a black rectangle after you insert your video.
- Add a Poster Frame to the video clip to get rid of the black rectangle.
- Click Crop in the Video Tools Format tab.

- On the edges of your video clip, you’ll see dark crop handles. If you use the Video Shape option, the crop handles will appear on the edge of that shape.
- Pressing the Ctrl key on your keyboard while you drag allows you to alter how you crop. Pressing Ctrl plus dragging the side cropping handles resizes two opposite sides, while Ctrl plus dragging the corner cropping handles resizes all the four sides.
- Pressing the Shift key on your keyboard while dragging will give you different results. You can also use the Shift and Ctrl keys simultaneously to combine both capabilities.
- You can reposition the crop by either moving the video itself or the crop area.
- Crop the unwanted portion by hitting the Crop button again or pressing the Enter key. You can also click on the Slide Area to apply the cropping changes.
- You can access more crop options by right-clicking the video, where a contextual menu will appear. Select the Format Video option.
- You’ll see the Format Video Task Pane; select the Crop option.

- You can crop sections of the video by specifying the Picture or Crop Position. You can also change other crop parameters, such as Top, Left, Offset Y, Offset X, Height, and Width.

How to Play Video Inside a Shape
If you want to edit your video and enhance its appearance, you can have it play inside a unique shape instead of the usual rectangle format that videos play in. In turn, you’ll draw attention to your video.
To play your video in an unusual shape, select your video and navigate to the Format tab. Then, go to the Video Shape menu, where you’ll see multiple shapes to choose from.

How to Apply Preset Video Styles
You can also liven up your video by applying one of the pre-designed styles that PowerPoints provides. These styles combine various effects, including bevels, reflections, shadows, tilts, and frames.
Applying preset video styles is a simple process. Select the video, then navigate to the Format tab. Click More under the Video Style section. You’ll see a gallery of preset styles; roll your mouse over it and hold the cursor over any style type. The program will apply a live preview of this style to your video.

Conclusion
● You can use PowerPoint to crop, trim, and add video styles to your videos to make them more attractive to your audience by following the steps above. In turn, they will get more views and attract more attention.
PowerPoint allows you to trim or crop the length of your video and save it as a separate media file. Trimming/cropping video is a great way to remove distracting or unnecessary parts of your video or change its dimensions so that it fits within a certain area. Doing this will make your videos captivating, and more people will want to watch them. Keeping that in mind, we’ll explain how you can crop or trim video in PowerPoint. You will also learn some helpful tips that you can use when editing videos on this presentation program.
In this article
01 How to Trim Videos in PowerPoint
02 Bonus! Tips on Editing Videos in Powerpoint
How to Trim Videos in PowerPoint
Many people use Microsoft PowerPoint to prepare basic animated explainers and presentations, but you can learn how to trip or crop videos in this program with the tools that it provides. With that in mind, here is how to trim, reset, or edit videos in PowerPoint.
How to Trim a Video in PowerPoint
You can trip unnecessary content at the start or end of your video clip. However, you can only trim videos you have inserted from your PC, as this feature is not yet available for videos on the web. Follow the steps below to learn how to trim video in PowerPoint.
- If you are in a slide containing a media placeholder, click on Insert Video from File. A window will open; select the From a File option.
- Find the video file on your PC and select it. Then, click the arrow that’s right next to the Insert button. Choose either the Link to File or Insert option and your video will appear on the slide.
- If you are not using a slide that has a media placeholder, find the Insert tab and click Video on My PC. You will be able to locate the video file on your PC.
- You are now ready to trim video PowerPoint.
- Select your video, and the Playback tab will appear. Navigate to the Editing area of the ribbon and hit the Trim Video button.
- You’ll see a small editing window that allows you to trim video in PowerPoint.
- Enter the end and start times for the sections of the video you would like to keep. Alternatively, you can use the markers to choose the start and endpoints.
- To adjust the start and end times in smaller increments, you can use the arrows you see on the sides of those boxes. If you know the exact times, enter them into the corresponding boxes.
- You can also select the portion you would like to keep using the end and start time markers. In this case, sliding the red marker allows you to the end time while the green one lets you set the start time.
- If you want to use a combination of the tools above to pinpoint where to start and end the video, hit the Play button, then click the Pause button when you reach the time you want.
- Enter this time into the End Time or Start Time box, depending on the portion you would like to keep. Or you can move any of the markers to this spot.
- Hit the OK button once the portion of the video clip you want is all set. The video will appear on your slide update, and it will only play the section that you kept when trimming the video.
How to Reset or Edit a Trimmed Video in PowerPoint
If you trim video in PowerPoint and change your mind, you can always edit where you have trimmed it or reset the trimmed video back to its original state. Follow the steps below to learn how to edit to reset a trimmed video in PowerPoint.
- Select your video, and then find the Playback tab.
- Hit the Trim Video button, and the Trim Video Settings will be as they were when you were trimming the video. That means you can make the necessary adjustments.
- To reset a trimmed video back to its original length, slide the red end marker to the right and the green start maker to the left. The OK button allows you to play the whole video in your presentation.
How to Save a Trimmed Video
Now that you have trimmed your video in Microsoft PowerPoint, you might want to save it to use it outside this program. You can only save the video file after compressing it, then you can use the trimmed video as you want.
After compressing your trimmed video, only the trimmed section will show up on your slide. That said, follow the steps below to save your trimmed video:
- From the PowerPoint menu, select File > Info
- Next, select the Compress Media option.
- Next to Compress Media, you will see all media that are in your slideshow, including your trimmed video. If you’ve got other video files here, the compression process will apply to these files.
- Choose the suitable level of compression. A dialog box will pop up as the compression process takes place. Hit the Close button when this process completes.
- Go back to the slide that contains your trimmed video, which has now been compressed.
- Right-click the compressed video, and select the Save Media As option.
- Choose the location where you want to save your video. You can change its name if you want and click the Save button.
You have now successfully saved your trimmed video.
Bonus! Tips on Editing Videos in Powerpoint
Now that you know how to trim video PowerPoint, here are some helpful tips on editing videos on this application.
How to Crop Videos in PowerPoint
Once you have inserted your video in the slide, you have the option of cropping it. Follow these steps below to learn how to crop video PowerPoint.
- Open your presentation and then go to the slide where you have inserted your video clip.
- Double-click or select the video, and the two Video Tools tabs will appear in the ribbon: Playback and Format. Hit the Format tab option to activate it.
- Your slide may show a black rectangle after you insert your video.
- Add a Poster Frame to the video clip to get rid of the black rectangle.
- Click Crop in the Video Tools Format tab.
- On the edges of your video clip, you’ll see dark crop handles. If you use the Video Shape option, the crop handles will appear on the edge of that shape.
- Pressing the Ctrl key on your keyboard while you drag allows you to alter how you crop. Pressing Ctrl plus dragging the side cropping handles resizes two opposite sides, while Ctrl plus dragging the corner cropping handles resizes all the four sides.
- Pressing the Shift key on your keyboard while dragging will give you different results. You can also use the Shift and Ctrl keys simultaneously to combine both capabilities.
- You can reposition the crop by either moving the video itself or the crop area.
- Crop the unwanted portion by hitting the Crop button again or pressing the Enter key. You can also click on the Slide Area to apply the cropping changes.
- You can access more crop options by right-clicking the video, where a contextual menu will appear. Select the Format Video option.
- You’ll see the Format Video Task Pane; select the Crop option.
- You can crop sections of the video by specifying the Picture or Crop Position. You can also change other crop parameters, such as Top, Left, Offset Y, Offset X, Height, and Width.
How to Play Video Inside a Shape
If you want to edit your video and enhance its appearance, you can have it play inside a unique shape instead of the usual rectangle format that videos play in. In turn, you’ll draw attention to your video.
To play your video in an unusual shape, select your video and navigate to the Format tab. Then, go to the Video Shape menu, where you’ll see multiple shapes to choose from.
How to Apply Preset Video Styles
You can also liven up your video by applying one of the pre-designed styles that PowerPoints provides. These styles combine various effects, including bevels, reflections, shadows, tilts, and frames.
Applying preset video styles is a simple process. Select the video, then navigate to the Format tab. Click More under the Video Style section. You’ll see a gallery of preset styles; roll your mouse over it and hold the cursor over any style type. The program will apply a live preview of this style to your video.
Conclusion
● You can use PowerPoint to crop, trim, and add video styles to your videos to make them more attractive to your audience by following the steps above. In turn, they will get more views and attract more attention.
This Post Will Make You Learn Anything and Everything About Animated GIFs, the Ways to Use Cool Gifs in My Marketing, and How to Create Unique Custom Animated Gifs
What Is Animated GIF | GIF Example & Advantages of GIF
An easy yet powerful editor
Numerous effects to choose from
Detailed tutorials provided by the official channel
Gifs today have become an indispensable part of our social media conversations. Be it Whatsapp, Facebook, Instagram, or any other online messaging platform, no conversations are complete without using Gifs. These animated images can express the whole emotion during a conversation which cannot be expressed by a text message.
You all might have used or been using Gifs but most people never try to know and learn the different ways you can use Gifs. Gifs could be used in marketing and business to boost the attractiveness of your products.
So in this article we bring you all about Gifs, all your questions like What Are Gifs?, What are Different Kinds of Gifs?, How to Use Cool Gifs as Part of Your Marketing?, How to create animated custom Gifs? Which is the best gif template maker? And many more will be cleared after reading the whole article.
In this article
01 [What Is Animated GIF](#Part 1)
02 [10 Amazing Examples of Animated Gifs in Email Marketing Templates](#Part 2)
03 [5 GIF Makers That Lets You Create Unique Custom Animations](#Part 3)
Part 1 What Is Animated GIF
01What Are Gifs?
To begin with, we will start by understanding what is a Gif. Gif stands for Graphics Interface Format and the kind of animation you use today has had a presence on the internet for more than 30 years as of now. A Gif named “flying airplane” was first created by Steve Wilhite and his team of developers in 1987 while working for Compuserve. At the time of their inception, Gifs were small-sized normal moving images placed on any kind of background.
The early Gifs came into use with the increase in popularity of social sharing websites like Geocities, Myspace, and later Imgur and Tumblr. Today we are using the most advanced versions of Gifs, these can be downloaded or embedded on your website, we can use them on almost every messaging platform and creating Gifs today has become a child’s play.
02Different Kinds of Gifs
Now the question comes about what are different types of Gifs. After their creation, Gifs are now used for various purposes and hence then began a custom to define them according to their use.
● Reaction GIFs
These are the most widely used Gifs in social media and messaging platforms. You might have used them to comment to express your feelings. These help to convey your message by animation and you don’t need to type all the stuff. reaction GIFs are bits and pieces of videos or movies looped into a GIF. Almost all the emotions and feelings like applause, happiness, sadness, etc can be expressed by them.
● Illustration and Cartoon Gifs
GIFs that were illustrated specifically to be turned into a GIF comes under this category. These are mostly used to explain something in simple visual form rather than typing all the stuff. Very attractive animation and bright colors are used here to make them seamless.
● Gif Art
You might have not noticed but Gifs can be used very efficiently to showcase art. Many digital artists use the .gif format to create cool GIFs of their own to present their art. On the Gif website like Giphy, you can find thousands of artistic Gifs.
● Optical illusion GIFs
These kinds of Gifs create an illusion to the human eyes and are very attractive. You can use them while the conversation with your friends for a fun purpose.
● Branded Gifs
You might have noticed, nowadays almost all the brands use cool Gifs to promote their products online. Out of all, the apparel brands have made use of this feature in a very wide spectrum to promote their sales.
● Cinemagraphs
These are very special kinds of animated images. These are normal moving images that are continuously looped and make us feel like a real live image. Kevin Burg and Jamie Beck in 2011 created the first cinematograph Gif.
03Different Ways to Use Cool Gifs in Marketing
Gifs could be a fun way of using interesting and cool animations in your marketing. There are thousands of Gifs available on websites like Giphy from where you can choose the suitable Gif. You can also create a dedicated brand Gifs for your particular use. Just keep some of the important things in mind while selecting Gifs for your products and brand.
● It must deliver an appropriate message from your brand and product.
● It must be under legal circumference. Do not try to use copyrighted Gifs or celebrity faces Gifs without obtaining due permission.
● It must match your branding style on other platforms.
● Must be visually understandable and appealing.
04How to Use Cool Gifs as Part of Your Marketing
As you already know that apart from being a source of fun during social media conversations, Gifs could also be used in marketing. You can use very cool Gifs to promote your product and boost up your sales. Following are some creative ideas in which you can use Gifs to market your products.
● You can arrange a contest asking the participants to create a Gif based on your product.
● You can create cool Gifs related to your products and circulate them over different social media platforms, information on social media receives very quick attention.
● Cinemagraphs could be a great option when you want to showcase details about your product in an innovative form. This kind of Gifs could be very useful in fashion-related marketing.
● Create your brand Gifs and add cool emojis to them. Emojis in a Gif make it more attractive.
● You can use Gif for the “thank you” purpose. You can send a Gif “thank you” Gif when someone shares something about your product on social media.
● Infographics and Virtual representation are an important part of marketing today. You can use Gif to design creative infographics.
● The logo of your brand is like soul to product. Using Gifs you can design a catchy and attractive logo that helps in boosting the marketing of your product.
Part 2 10 Amazing Examples of Animated Gifs in Email Marketing Templates
Gif has become a cool and easy way of expressing your feelings so now you don’t need to type all those long boring messages. Nowadays, email marketers are using a wide range of Gifs to market their products to customers. These Gifs attract the interest of viewers and lead to an increase in sales. You too can use animated GIFs to display your products and services in action. Here you will see 10 amazing examples of marketing gif templates.
01ShoeMint
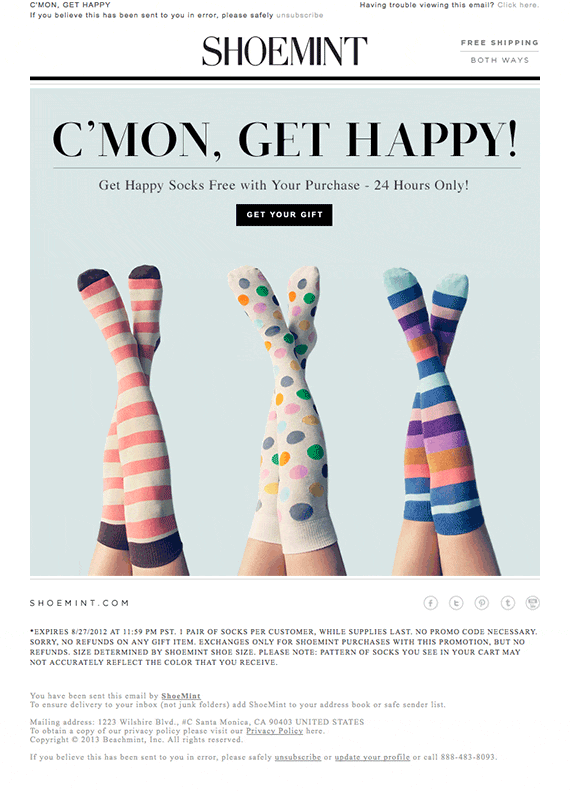
ShoeMint, a colored socks company has used very catchy Gif to market their socks. ShoeMint goes by email marketing template – “C’mon, Get Happy!” as their tag line and when you look at the Gif of colorful socks you will have a smile on your face.
02Modcloth
Modcloth markets the dresses which can be combined and paired with different trendy and stylish outfits. Their email marketing template attracts viewers’ attention when they see the same dress paired with different other dresses in an animated form.

03Bed Bath & Beyond
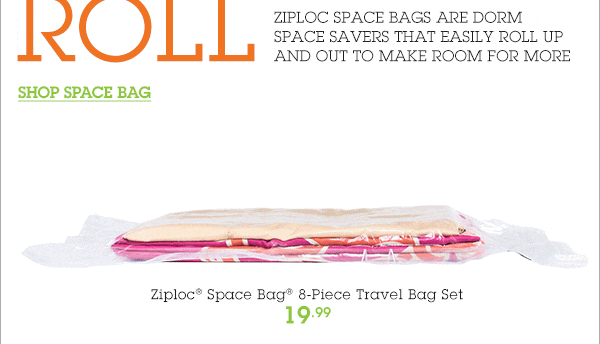
This brand markets a unique Ziploc Space Bag which can be folded and rolled up. The tag line of the email template is “dorm space savers that easily roll up and out to make room for more” and their animated Gifs very well explains the purpose and advantages of these bags.
04Bonobos
To promote their tearaway trousers, Bonobos uses a Gif in which the man removes his pants by just tearing them away. This email marketing template attracts viewers’ attention exactly in the way the company desires.

05Jack Spade
If you are a branded garment lover then you might have received email marketing templates from Jack Spade in the form of Gifs. This brand uses Gif at a wide range to promote its products online.

06Mr. Porter
Mr. Porter, a brand which is known for its warm and cozy comfort wears. This email marketing template shows a man sitting in a very comfortable position near the fire. This Gif puts the urge for the same comfort level in the viewer’s mind.

07Anthropologie
Anthropologie makes use of octopus made out of paper and flapping its tentacles around in a joyous and happy manner. This catchy Gif abates the viewer to go for the product marketed by the email.

08West Elm
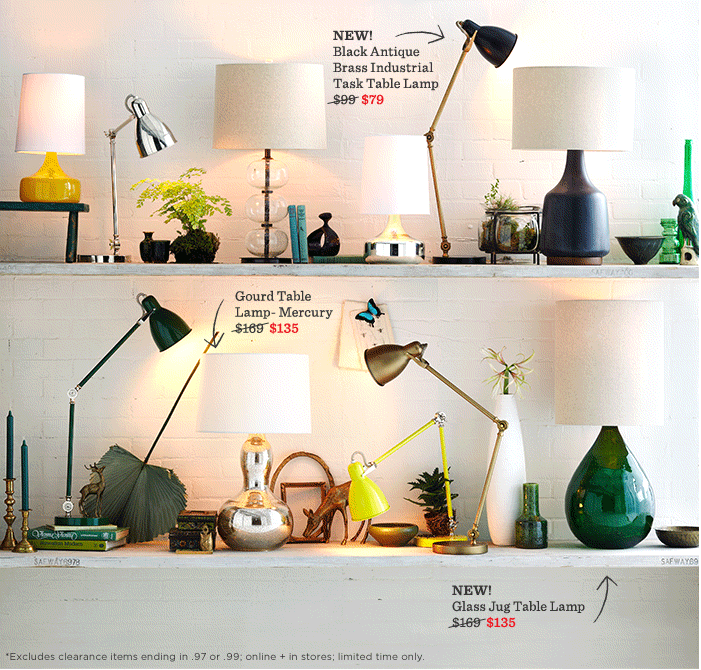
The modern furniture and home decoration company West Elm showcases various lamps in Gif form in their email newsletter. This Gif creates an urge in the viewer’s mind about their need for the home decoration.
09Chanel
The Watch making company Chanel showcases their triple row watches using wonderful animated Gif.

10 Singer 22
This company uses a party-type email marketing template to attract customers who’ve just reached the next level of their rewards program.

Part 3 5 GIF Makers That Lets You Create Unique Custom Animations
Now you might want to know which the best and easiest Gif maker to design unique custom animation is. If you search on Google for an online Gif maker, then your search result will be filled with hundreds of such Gifs makers. But here we have shortlisted the 5 best and easy-to-use Gif makers using which you can create unique custom animation as per your requirements.
01**Wondershare Filmora Video Editor **
To feature at the top of our list is Filmora. Filmora is one of the best video editing tools to turn videos into GIF images. This app uses fabulous text and animation effects to turn your video and images into catchy Gifs. This tool works very smoothly with various OS like Windows 7/Windows 8.1/Windows 10/Windows 11 ( 64 bit OS).

Wondershare Filmora - Best Video Editor for Mac/Windows
5,481,435 people have downloaded it.
Build unique custom animations without breaking a sweat.
Focus on creating epic stories and leave the details to Filmora’s auto features.
Start a creative adventure with drag & drop effects and endless possibilities.
Filmora simplifies advanced features to save you time and effort.
Filmora cuts out repetition so you can move on to your next creative breakthrough.
The best thing about this gif template maker is that you don’t need any technical expertise to use it. You can create gif from all popular video formats like .wmv, .mp4, .mkv, .evo, .dat, .wav, .mpeg and .avi etc. as per your requirements.
02Imgflip
Next on our list is Imgflip, apart from being an efficient Gif creator the main highlight of this tool is that you can create animated GIFs from your pictures or even a Facebook or YouTube video URL. You can also use webcam video directly and rearrange the image to create Gifs.

03GIFMaker.me
Another great gif template maker isGIFMaker.me. This tool enables the generation of quick and attractive Gifs in a matter of a few minutes. No matter you use Mac, Windows, or Linux, this tool will effortlessly create GIFs from images and videos.

04Gifs.com
Next on our list of best gif template makers is Gifs.com. The website claims to be “the fastest way to make and edit Gifs and short videos”. Gifs.com allows you to access a free and easy-to-use media editor which makes it the fastest GIF creator.

05Imgur
Last but not least to feature in our list of Imgur. Imgur is both a Gif gallery as well as a creator. This tool offers various functions to edit the GIFs you create with features like crop, rotate, resize, etc.

● Ending Thoughts →
● So guys, now it’s time to end the article. After reading this article you might have understood the meaning of Gifs. Gifs could be a fun way to interact on social media and also they could be an important tool in the marketing of your products.
● You can learn to design email templates from the examples provided in the articles. This will help you to boost the marketing of your products online.
● If you want to create Gifs as per your requirements then you can go for any of the five Gif makers suggested in the article but we suggest to go with Filmora first as it is the best and easiest of all the mentioned Gifs makers.
Gifs today have become an indispensable part of our social media conversations. Be it Whatsapp, Facebook, Instagram, or any other online messaging platform, no conversations are complete without using Gifs. These animated images can express the whole emotion during a conversation which cannot be expressed by a text message.
You all might have used or been using Gifs but most people never try to know and learn the different ways you can use Gifs. Gifs could be used in marketing and business to boost the attractiveness of your products.
So in this article we bring you all about Gifs, all your questions like What Are Gifs?, What are Different Kinds of Gifs?, How to Use Cool Gifs as Part of Your Marketing?, How to create animated custom Gifs? Which is the best gif template maker? And many more will be cleared after reading the whole article.
In this article
01 [What Is Animated GIF](#Part 1)
02 [10 Amazing Examples of Animated Gifs in Email Marketing Templates](#Part 2)
03 [5 GIF Makers That Lets You Create Unique Custom Animations](#Part 3)
Part 1 What Is Animated GIF
01What Are Gifs?
To begin with, we will start by understanding what is a Gif. Gif stands for Graphics Interface Format and the kind of animation you use today has had a presence on the internet for more than 30 years as of now. A Gif named “flying airplane” was first created by Steve Wilhite and his team of developers in 1987 while working for Compuserve. At the time of their inception, Gifs were small-sized normal moving images placed on any kind of background.
The early Gifs came into use with the increase in popularity of social sharing websites like Geocities, Myspace, and later Imgur and Tumblr. Today we are using the most advanced versions of Gifs, these can be downloaded or embedded on your website, we can use them on almost every messaging platform and creating Gifs today has become a child’s play.
02Different Kinds of Gifs
Now the question comes about what are different types of Gifs. After their creation, Gifs are now used for various purposes and hence then began a custom to define them according to their use.
● Reaction GIFs
These are the most widely used Gifs in social media and messaging platforms. You might have used them to comment to express your feelings. These help to convey your message by animation and you don’t need to type all the stuff. reaction GIFs are bits and pieces of videos or movies looped into a GIF. Almost all the emotions and feelings like applause, happiness, sadness, etc can be expressed by them.
● Illustration and Cartoon Gifs
GIFs that were illustrated specifically to be turned into a GIF comes under this category. These are mostly used to explain something in simple visual form rather than typing all the stuff. Very attractive animation and bright colors are used here to make them seamless.
● Gif Art
You might have not noticed but Gifs can be used very efficiently to showcase art. Many digital artists use the .gif format to create cool GIFs of their own to present their art. On the Gif website like Giphy, you can find thousands of artistic Gifs.
● Optical illusion GIFs
These kinds of Gifs create an illusion to the human eyes and are very attractive. You can use them while the conversation with your friends for a fun purpose.
● Branded Gifs
You might have noticed, nowadays almost all the brands use cool Gifs to promote their products online. Out of all, the apparel brands have made use of this feature in a very wide spectrum to promote their sales.
● Cinemagraphs
These are very special kinds of animated images. These are normal moving images that are continuously looped and make us feel like a real live image. Kevin Burg and Jamie Beck in 2011 created the first cinematograph Gif.
03Different Ways to Use Cool Gifs in Marketing
Gifs could be a fun way of using interesting and cool animations in your marketing. There are thousands of Gifs available on websites like Giphy from where you can choose the suitable Gif. You can also create a dedicated brand Gifs for your particular use. Just keep some of the important things in mind while selecting Gifs for your products and brand.
● It must deliver an appropriate message from your brand and product.
● It must be under legal circumference. Do not try to use copyrighted Gifs or celebrity faces Gifs without obtaining due permission.
● It must match your branding style on other platforms.
● Must be visually understandable and appealing.
04How to Use Cool Gifs as Part of Your Marketing
As you already know that apart from being a source of fun during social media conversations, Gifs could also be used in marketing. You can use very cool Gifs to promote your product and boost up your sales. Following are some creative ideas in which you can use Gifs to market your products.
● You can arrange a contest asking the participants to create a Gif based on your product.
● You can create cool Gifs related to your products and circulate them over different social media platforms, information on social media receives very quick attention.
● Cinemagraphs could be a great option when you want to showcase details about your product in an innovative form. This kind of Gifs could be very useful in fashion-related marketing.
● Create your brand Gifs and add cool emojis to them. Emojis in a Gif make it more attractive.
● You can use Gif for the “thank you” purpose. You can send a Gif “thank you” Gif when someone shares something about your product on social media.
● Infographics and Virtual representation are an important part of marketing today. You can use Gif to design creative infographics.
● The logo of your brand is like soul to product. Using Gifs you can design a catchy and attractive logo that helps in boosting the marketing of your product.
Part 2 10 Amazing Examples of Animated Gifs in Email Marketing Templates
Gif has become a cool and easy way of expressing your feelings so now you don’t need to type all those long boring messages. Nowadays, email marketers are using a wide range of Gifs to market their products to customers. These Gifs attract the interest of viewers and lead to an increase in sales. You too can use animated GIFs to display your products and services in action. Here you will see 10 amazing examples of marketing gif templates.
01ShoeMint
ShoeMint, a colored socks company has used very catchy Gif to market their socks. ShoeMint goes by email marketing template – “C’mon, Get Happy!” as their tag line and when you look at the Gif of colorful socks you will have a smile on your face.
02Modcloth
Modcloth markets the dresses which can be combined and paired with different trendy and stylish outfits. Their email marketing template attracts viewers’ attention when they see the same dress paired with different other dresses in an animated form.
03Bed Bath & Beyond
This brand markets a unique Ziploc Space Bag which can be folded and rolled up. The tag line of the email template is “dorm space savers that easily roll up and out to make room for more” and their animated Gifs very well explains the purpose and advantages of these bags.
04Bonobos
To promote their tearaway trousers, Bonobos uses a Gif in which the man removes his pants by just tearing them away. This email marketing template attracts viewers’ attention exactly in the way the company desires.
05Jack Spade
If you are a branded garment lover then you might have received email marketing templates from Jack Spade in the form of Gifs. This brand uses Gif at a wide range to promote its products online.
06Mr. Porter
Mr. Porter, a brand which is known for its warm and cozy comfort wears. This email marketing template shows a man sitting in a very comfortable position near the fire. This Gif puts the urge for the same comfort level in the viewer’s mind.
07Anthropologie
Anthropologie makes use of octopus made out of paper and flapping its tentacles around in a joyous and happy manner. This catchy Gif abates the viewer to go for the product marketed by the email.
08West Elm
The modern furniture and home decoration company West Elm showcases various lamps in Gif form in their email newsletter. This Gif creates an urge in the viewer’s mind about their need for the home decoration.
09Chanel
The Watch making company Chanel showcases their triple row watches using wonderful animated Gif.
10 Singer 22
This company uses a party-type email marketing template to attract customers who’ve just reached the next level of their rewards program.
Part 3 5 GIF Makers That Lets You Create Unique Custom Animations
Now you might want to know which the best and easiest Gif maker to design unique custom animation is. If you search on Google for an online Gif maker, then your search result will be filled with hundreds of such Gifs makers. But here we have shortlisted the 5 best and easy-to-use Gif makers using which you can create unique custom animation as per your requirements.
01**Wondershare Filmora Video Editor **
To feature at the top of our list is Filmora. Filmora is one of the best video editing tools to turn videos into GIF images. This app uses fabulous text and animation effects to turn your video and images into catchy Gifs. This tool works very smoothly with various OS like Windows 7/Windows 8.1/Windows 10/Windows 11 ( 64 bit OS).
Wondershare Filmora - Best Video Editor for Mac/Windows
5,481,435 people have downloaded it.
Build unique custom animations without breaking a sweat.
Focus on creating epic stories and leave the details to Filmora’s auto features.
Start a creative adventure with drag & drop effects and endless possibilities.
Filmora simplifies advanced features to save you time and effort.
Filmora cuts out repetition so you can move on to your next creative breakthrough.
The best thing about this gif template maker is that you don’t need any technical expertise to use it. You can create gif from all popular video formats like .wmv, .mp4, .mkv, .evo, .dat, .wav, .mpeg and .avi etc. as per your requirements.
02Imgflip
Next on our list is Imgflip, apart from being an efficient Gif creator the main highlight of this tool is that you can create animated GIFs from your pictures or even a Facebook or YouTube video URL. You can also use webcam video directly and rearrange the image to create Gifs.
03GIFMaker.me
Another great gif template maker isGIFMaker.me. This tool enables the generation of quick and attractive Gifs in a matter of a few minutes. No matter you use Mac, Windows, or Linux, this tool will effortlessly create GIFs from images and videos.
04Gifs.com
Next on our list of best gif template makers is Gifs.com. The website claims to be “the fastest way to make and edit Gifs and short videos”. Gifs.com allows you to access a free and easy-to-use media editor which makes it the fastest GIF creator.
05Imgur
Last but not least to feature in our list of Imgur. Imgur is both a Gif gallery as well as a creator. This tool offers various functions to edit the GIFs you create with features like crop, rotate, resize, etc.
● Ending Thoughts →
● So guys, now it’s time to end the article. After reading this article you might have understood the meaning of Gifs. Gifs could be a fun way to interact on social media and also they could be an important tool in the marketing of your products.
● You can learn to design email templates from the examples provided in the articles. This will help you to boost the marketing of your products online.
● If you want to create Gifs as per your requirements then you can go for any of the five Gif makers suggested in the article but we suggest to go with Filmora first as it is the best and easiest of all the mentioned Gifs makers.
VSDC Free Video Editor Review 2023
If you are a Window user and you are looking for a free video editor without a watermark, VSDC free video editor is definitely a great application. There are only a handful of free video editors available where the output video will not have a watermark, and there is no limitation on the video length. VSDC video editor belongs to the non-liner video editor group where you can combine video clips, photos, objects, and blend and overlap them as per your requirements.
For a beginner, VSDC free video editor is undoubtedly one of the best video editors. It supports different types of video and audio formats as well as codes. The system requirements are very basic, and hence, it is perfect for low-end computers? But can you rely on VSDC editor when you need slightly advanced video editing? Check out our VSDC editor review and find a better alternative.
Part 1. How to Download and Install VSDC?
VSDC editor download is only available for Windows users. It is tailor-made for those who have a low-end computer with older Windows version OS. The software is compatible with Windows 2000 to Windows 11. The minimum RAM requirement is 128MB and free disk space of 200 MB. Here are the steps to download and install VSDC editor.
Step 1: Open your web browser and visit ‘www.videosoftdev.com/free-video-editor/download” .
Step 2: Click on Download Video Editor button based on 32-bit or 64-bit version of your computer. If you have Windows XP, you have to download VDSC video editor version 6.4 instead of the latest version for compatibility.
Step 3: Give some time for the installer file to get downloaded. It is merely 100 MB and it should not take long. After downloading the installer, launch it and follow the on-screen instruction to complete the installation.
Step 4: After proper installation, launch VSDC video editor. You will get the options to create a new project and capture screen, start editing an existing video and export the finished project in a proper video format.
Part 2. Key Features of VSDC
There are two versions of VSDC video editor available – Free video editor and Pro video editor. The free version has limited features while Pro version has advanced features. Here are going to discuss the key features of VSDC Free Video Editor.
Low System Requirements – One of the reasons for the wide popularity of VSDC video editor is that it does not demand high system configurations like most other video editors. If you have a low-end computer with an outdated Windows operating system, you can use VSDC video editor without any issue.
Basic Editing – Among the basic editing tools, you can cut, trim, split and join video clips. There are options for rotating and resizing videos. You can also go for color correction and put overlays on videos as applicable. Besides, you can edit 36-degree videos with zoom and chart tools.
Effects – VSDC has a wide collection of video, audio and text effects. You can also add objects to your video and apply different ready-made filters. There are also transitions to apply in between video clips and slides. You can also use green screen effect to change your background. The special split-screen effect and picture-in-picture effects are quite eye-catching.
Capture Video – VSDC video editor is equally competent in capturing videos from your webcam as well as recording your screen video. In fact, there is a dedicated option available for creating slideshow videos from photos. You can even record your voiceover if you want to.
File Formats - VSDC supports all the popular file formats for importing and exporting video and audio files. There are different export profiles available so that you can save your edited video for different devices conveniently.
Apart from these, if you opt for the Pro version, you get motion tracking, video masking, video stabilization, and much more such advanced video editing tools.
Part 3. How to Edit Videos with VSDC
If you have the recorded video and you want to edit it with VSDC video editor, the steps are quite simple. You can even record your webcam and screen video with audio if you want to start from scratch. Coming to the editing part, you can split large video files, merge video clips, add transitions in between, add objects in the video as well as crop and rotate videos. There are different effects you can apply to uplift video content. Here are the steps to edit videos with VSDC editor.
Step 1: Open VSDC Video Editor and click on Blank Project option. Name the project and change parameters, and click on Finish.

Step 2: Click on Add Object option at the top and select Video. Import the video clips saved on your hard drive. Similarly, you can go to Add Objects> Audio to import audio files.

Step 3: All the imported media files will appear on the timeline. If you have multiple video clips, you can shift the position of clips on the timeline so that one video clip ends and the other begins.
Step 4: If you want to add transitions in between the video clips, go to Video Effects> Transitions> select the effect you want to apply. Check the on-screen parameters such as duration and click on Ok button.

Step 5: If you want to add objects, go to Add Object and select shapes, texts, animations, charts, and much more. You can also add Audio Effects as well as Text Effects from the top bar.
Step 6: Once you are happy with the preview of the edited video, go to Export Project and check all the parameters. Click on Export Project option.

Part 4. Best VSDC Alternative Video Editor
Since VSDC video editor is available completely free, there is no hard in downloading the application and trying it out. But soon, you will understand that the video editor is limited as far as tools and features are concerned. If you want to get more than just basic tools, you will have to upgrade to its Pro version. However, there are better premium video editors available. We recommend Wondershare Filmora as a better alternative to VSDC video editor.
Filmora is extremely popular in the professional video editing world as it has an intuitive interface and does not demand high-end computers. There are tons of transitions, effects, filters, and objects available to add to your edit. You can perform all standard and advanced video editing to take your video to the next level. Here are all the steps to edit videos on Filmora.
For Win 7 or later (64-bit)
For macOS 10.12 or later
Step 1: Download and install Filmora and it is available for Windows and Mac. Launch Filmora and click on New Project. Import all your media files into Project Media folder by drag and drop action.

Step 2: Arrange the video clips and audio clips on the timeline by drag and drop action. You should be placing the video and audio files on different tracks. This is where you can do all the basic editing such as trimming, cutting, splitting, and merging.

Step 3: To add transitions in between the video clips, go to Transitions from the top bar and drag and drop any transition in between the clips. Check out Titles, Effects, and Elements from the top bar and insert them on the timeline as you think appropriate.

Step 4: Play the video to see if everything is perfect and click on Export button to save your video to your hard drive.

Part 5. FAQs about VSDC
1. Is VSDC video editor really free?
Yes, VSDC video editor is completely free to use. However, there is a pro version available where more features are present. But the free version does not put watermark on the output video and has all the standard tools for video editing without any limitation.
2. Is VSDC better than Adobe Premiere Pro?
No, VSDC is not better than Adobe Premiere Pro. VSDC is a free video tor while Adobe Premiere Pro is a premium one. Naturally, Adobe Premiere Pro has more features and functionalities. However, VSDC is better for beginners and those who have low-end computers if you compare it with Adobe Premiere Pro.
3. Is VSDC safe?
Yes VSDC video editor is safe and stable to use. However, there was an incident in 2019 where VSDC video editor’s official website was hacked, but the software itself is safe to use on Windows computers.
For macOS 10.12 or later
Step 1: Download and install Filmora and it is available for Windows and Mac. Launch Filmora and click on New Project. Import all your media files into Project Media folder by drag and drop action.
Step 2: Arrange the video clips and audio clips on the timeline by drag and drop action. You should be placing the video and audio files on different tracks. This is where you can do all the basic editing such as trimming, cutting, splitting, and merging.
Step 3: To add transitions in between the video clips, go to Transitions from the top bar and drag and drop any transition in between the clips. Check out Titles, Effects, and Elements from the top bar and insert them on the timeline as you think appropriate.
Step 4: Play the video to see if everything is perfect and click on Export button to save your video to your hard drive.
Part 5. FAQs about VSDC
1. Is VSDC video editor really free?
Yes, VSDC video editor is completely free to use. However, there is a pro version available where more features are present. But the free version does not put watermark on the output video and has all the standard tools for video editing without any limitation.
2. Is VSDC better than Adobe Premiere Pro?
No, VSDC is not better than Adobe Premiere Pro. VSDC is a free video tor while Adobe Premiere Pro is a premium one. Naturally, Adobe Premiere Pro has more features and functionalities. However, VSDC is better for beginners and those who have low-end computers if you compare it with Adobe Premiere Pro.
3. Is VSDC safe?
Yes VSDC video editor is safe and stable to use. However, there was an incident in 2019 where VSDC video editor’s official website was hacked, but the software itself is safe to use on Windows computers.
Mastering OpenCV Object Tracking: A Comprehensive Guide for Beginners and Experts
OpenCV Tracking is a popular method used for tracking objects in a video in real-time. OpenCV is a powerful library used for image processing and computer vision applications.
From real-time video analysis to Augmented Reality, OpenCV Tracking has a wide range of uses and can help both private and public sectors to detect and track the desired object in an image or video.
In this comprehensive guide, we’ll explore OpenCV Tracking and its pre-built trackers**.** We will use the OpenCV library and Python to implement this Object Tracking application.
- What Is OpenCV
- The Pre-Built Algorithms OpenCV Offers For Object Tracking
- Implementation In Python And OpenCV
Part 1. What Is Object Tracking?
Object Tracking determines the location of an object in a video and can be used for a variety of purposes, including surveillance, security, traffic control, digital forensics, anomaly detection, gesture recognition, visual surveillance, human-computer interaction, augmented reality, and robot vision.
Even though it may seem easy for an average person, object tracking is quite complex for computers because they have to analyze a set of frames and estimate the object’s trajectory based on numbers instead of images.
Because of how complicated it is, Object Tracking is considered one of the most difficult tasks in computer vision. Even though it’s a challenge, it’s not impossible to accomplish.
And there are two levels of Object Tracking that you should learn about:
1. SOT & MOT
- Single Object Tracking (SOT): SOT is a tracking algorithm that creates advanced appearance models and/or motion models to manage difficult issues like out-of-plane rotations, illumination variations, or scale changes.
- Multiple Object Tracking (MOT): MOT tracks every part of a video and is mainly concerned with mid-level tasks and serves as a foundation for high-level tasks.
2. The Difference Between Tracking And Detection
After knowing what Object Tracking is, there is another concept you should also be aware of - Object Detection.
The Object Tracking and Object Detection are two important methods in computer vision. Object Tracking tracks the position of a given object in an image in real-time, while Object Detection identifies and localizes objects in an image or video. That is the difference.
Part 2. Types Of Object Tracking
Image Tracking
Image tracking allows users to interact with digital content more naturally and helps users move and interact with digital objects in the same manner as they will with real-world physical objects.
Image tracking can be used in various augmented reality (AR) applications, such as AR gaming, shopping, and navigation. Moreover, you can also use it for educational purposes, such as teaching anatomy or providing instructions for a difficult task.
Video Tracking
Video tracking is the process of tracking objects in a video sequence and can be used for various applications, such as detecting and counting objects in a scene, understanding their motions, and recognizing activities.
Part 3. What Are The Difficulties Of Object Tracking?
As what has been mentioned above, the use of object tracking is versatile. However, there are some challenges associated with Object Tracking, such as:
Background Clutter: The background can impact extracting an object’s features. If the background is more densely populated, detecting or tracking the object of interest can be more difficult.
Occlusion: This is a phenomenon where the object being tracked is affected by the background or foreground. This causes the tracking algorithm to get confused due to multiple objects coming close together, hence, losing track of the object.
Varying spatial scales: Varying spatial scales refer to the target object being of a different size or shape, which can confuse the algorithm, leading to errors.
Training and Tracking Speed: If the object is moving too fast or is too small, it can be difficult to track. Therefore, the tracking module has to be designed to track, identify, and localize objects in a matter of seconds.
Part 4. Stages Of The Object Tracking Process
After the introduction of object tracking technically, let’s learn about its mechanism of it from two sides: periods of the working process and the way it tracks.
1. Stages Of The Object Tracking Process
Following are the stages of the Object Tracking process:
Target Initialization
Target initialization is the first step in Object Tracking and involves defining the targets or objects of interest and drawing a bounding box around them in the initial frame. After that, the tracker has to detect the position of the object in the frame while drawing the bounding box.
Appearance Modeling
Appearance modeling is important for understanding how an object will look under different circumstances. If the object being tracked changes appearance due to different lighting, angle, or speed, the tracking algorithm may lose its information and the object itself. Therefore, it has to be conducted to let the algorithm detect the changes and distortion.
Motion Estimation
Motion estimation entails the capacity of the model to anticipate an object’s future position with precision.
Target Positioning
Motion estimation is a process of approximating the most likely region where an object could be present. After the object’s location is approximated, a visual model can be used to determine the target’s location more accurately.
2. Methods Of Object Tracking
Here’re some methods of Object Tracking:
OpenCV-Based Object Tracking
OpenCV Object Tracking method is widely used because it offers several built-in functions designed specifically for this purpose, such as GOTURN, MIL, MediandFlow, and CSRT. The tracker type you select will depend on your specific application design. Each tracker has its pros and cons, so there is not a single type of tracker ideal for all applications.
MDNet
Multi-Domain Convolutional Neural Network Tracker is a convolutional neural-based visual tracker and has won the VOT2015 challenge. Moreover, it is composed of domain-specific layers, branches, and multiple shared layers.
The MDNetT tracker is a deep neural network that is trained on numerous Object Tracking datasets. The tracker is designed to work in multiple domains, including video, text, and images.
DeepSort
DeepSort algorithm can track objects in real-time and uses YOLO v3 to compute the bounding boxes around the objects in a frame.
DeepSort uses Kalman filter from Simple Online and Realtime Tracking algorithm and an identification model, ReID to interlink bounding boxes and object tracks.
ROLO
ROLO is a novel Object Tracking method that uses recurrent neural networks (RNNs) to learn object-specific Spatio-temporal representations. This method works with YOLO, an object detection algorithm, and an LTSM for determining the trajectory of an object.
Part 5. The powerful backup: OpenCV
We have demonstrated how powerful OpenCV Tracking is and how it works. However, do you wonder what OpenCV is? How it supports the tracking goals being achieved? In this part, we will focus on OpenCV and help you better understand the the underlying mechanisms.
1. What Is OpenCV?
OpenCV is a powerful library that allows you to perform image processing, deep learning, machine learning, and computer vision tasks on live video feeds. Moreover, it can be used to detect objects, track their movements, and recognize faces.
It can help process the data that have videos and images and has been used in various applications, such as object recognition and detection, autonomous cars, robots, medical image analysis, automated surveillance, and anomaly detection.
2. The Pre-Built Algorithms OpenCV Offers For Object Tracking
There are 8 pre-built algorithms that OpenCV offers for Objects Tracking. All of them have their uniquility and here we will present their pros and cons for your better understadning.
| Tracker | Pros | Cons |
|---|---|---|
| BOOSTING Tracker | Track objects accurately. | Relatively slow. Unable to stop when an object is lost. |
| MIL Tracker | Strong resistance to noise. Gives accurate results. | Low speed. Unable to stop tracking once the object is lost. |
| KCF Tracker | High speed and accuracy. Stops tracking when the object is lost. | Inability to continue tracking objects once lost. |
| TLD Tracker | Resistance to overlapping and object scaling. | Unstable in object detection and tracking. Constantly loses object. |
| MEDIANFLOW Tracker | High accuracy and speed. Accurate in determining the object’s loss. | Loses object quickly due to high speed. |
| GOTURN Tracker | Shows resistance to obstructions and noise. | If the speed of an object is high, it shifts to another object. |
| MOSSE Tracker | Able to continue tracking after the object is lost. High speed. | Loses object easily if very high speed. |
| CSRT Tracker | Good resistance to overlapping. High accuracy. | Low speed. Unstable when an object is lost. |
3. Implementation In Python And OpenCV
Now, after theoretical explanation of OpenCV and OpenCV Tracking, let’s learn Object Tracking OpenCV Python with coding and our simple and step-by-step instructions:
Install The Dependencies
Install the pycharm app on your PC, and launch it. Create a new project and go to Terminal. Install the opencv-contrib-python package by pasting the following command into the Terminal.
Set Up the Trackers
Now, create a Jupyter-notebook and set up the trackers with this code:
Tasks:
- cv2. version returns the OpenCV library version number.
- Save the name of the eight trackers.
- Check the list for the version you are working on and create a tracker object based on the number.
Capture The Video Input
For capturing the video input, write the following lines of code:
Tasks:
- Use the VideoCapture class to capture a video via the webcam or get a saved one from your PC.
- In VideoCapture - line 2, give the path to your video.
- Comment on the second line to use the webcam for tracking and uncomment the third one.
Creating The Bounding Box And Initializing The Tracker
Define an initial random bounding box or select the choices for the object you want to track with the following code:
Start The Tracker And Check The Output
Finally, write the below code lines to start the tracker:
Tasks
- Read each video frame.
- Start the timer and, through the tracker, determine the trajectory of the object.
- Use the trajectory to draw the bounding box.
- The program will start tracking. Afterward, press the space bar to stop tracking.
Video – Object Tracking with Opencv and Python
Conclusion
In this article, we’ve discussed Object Tracking in detail and how it compares with Object Detection. Furthermore, we explored the methods used for tracking objects and provided complete guidance on the OpenCV Tracking method and its built-in functionalities.
Hopefully, you find this guide helpful, and you can now track objects in real-time without any issues.
Free Download For Win 7 or later(64-bit)
Free Download For macOS 10.14 or later
- Image Tracking
- Video Tracking
- What Are The Difficulties Of Object Tracking
- Stages Of The Object Tracking Process
- What Is OpenCV
- The Pre-Built Algorithms OpenCV Offers For Object Tracking
- Implementation In Python And OpenCV
Part 1. What Is Object Tracking?
Object Tracking determines the location of an object in a video and can be used for a variety of purposes, including surveillance, security, traffic control, digital forensics, anomaly detection, gesture recognition, visual surveillance, human-computer interaction, augmented reality, and robot vision.
Even though it may seem easy for an average person, object tracking is quite complex for computers because they have to analyze a set of frames and estimate the object’s trajectory based on numbers instead of images.
Because of how complicated it is, Object Tracking is considered one of the most difficult tasks in computer vision. Even though it’s a challenge, it’s not impossible to accomplish.
And there are two levels of Object Tracking that you should learn about:
1. SOT & MOT
- Single Object Tracking (SOT): SOT is a tracking algorithm that creates advanced appearance models and/or motion models to manage difficult issues like out-of-plane rotations, illumination variations, or scale changes.
- Multiple Object Tracking (MOT): MOT tracks every part of a video and is mainly concerned with mid-level tasks and serves as a foundation for high-level tasks.
2. The Difference Between Tracking And Detection
After knowing what Object Tracking is, there is another concept you should also be aware of - Object Detection.
The Object Tracking and Object Detection are two important methods in computer vision. Object Tracking tracks the position of a given object in an image in real-time, while Object Detection identifies and localizes objects in an image or video. That is the difference.
Part 2. Types Of Object Tracking
Image Tracking
Image tracking allows users to interact with digital content more naturally and helps users move and interact with digital objects in the same manner as they will with real-world physical objects.
Image tracking can be used in various augmented reality (AR) applications, such as AR gaming, shopping, and navigation. Moreover, you can also use it for educational purposes, such as teaching anatomy or providing instructions for a difficult task.
Video Tracking
Video tracking is the process of tracking objects in a video sequence and can be used for various applications, such as detecting and counting objects in a scene, understanding their motions, and recognizing activities.
Part 3. What Are The Difficulties Of Object Tracking?
As what has been mentioned above, the use of object tracking is versatile. However, there are some challenges associated with Object Tracking, such as:
Background Clutter: The background can impact extracting an object’s features. If the background is more densely populated, detecting or tracking the object of interest can be more difficult.
Occlusion: This is a phenomenon where the object being tracked is affected by the background or foreground. This causes the tracking algorithm to get confused due to multiple objects coming close together, hence, losing track of the object.
Varying spatial scales: Varying spatial scales refer to the target object being of a different size or shape, which can confuse the algorithm, leading to errors.
Training and Tracking Speed: If the object is moving too fast or is too small, it can be difficult to track. Therefore, the tracking module has to be designed to track, identify, and localize objects in a matter of seconds.
Part 4. Stages Of The Object Tracking Process
After the introduction of object tracking technically, let’s learn about its mechanism of it from two sides: periods of the working process and the way it tracks.
1. Stages Of The Object Tracking Process
Following are the stages of the Object Tracking process:
Target Initialization
Target initialization is the first step in Object Tracking and involves defining the targets or objects of interest and drawing a bounding box around them in the initial frame. After that, the tracker has to detect the position of the object in the frame while drawing the bounding box.
Appearance Modeling
Appearance modeling is important for understanding how an object will look under different circumstances. If the object being tracked changes appearance due to different lighting, angle, or speed, the tracking algorithm may lose its information and the object itself. Therefore, it has to be conducted to let the algorithm detect the changes and distortion.
Motion Estimation
Motion estimation entails the capacity of the model to anticipate an object’s future position with precision.
Target Positioning
Motion estimation is a process of approximating the most likely region where an object could be present. After the object’s location is approximated, a visual model can be used to determine the target’s location more accurately.
2. Methods Of Object Tracking
Here’re some methods of Object Tracking:
OpenCV-Based Object Tracking
OpenCV Object Tracking method is widely used because it offers several built-in functions designed specifically for this purpose, such as GOTURN, MIL, MediandFlow, and CSRT. The tracker type you select will depend on your specific application design. Each tracker has its pros and cons, so there is not a single type of tracker ideal for all applications.
MDNet
Multi-Domain Convolutional Neural Network Tracker is a convolutional neural-based visual tracker and has won the VOT2015 challenge. Moreover, it is composed of domain-specific layers, branches, and multiple shared layers.
The MDNetT tracker is a deep neural network that is trained on numerous Object Tracking datasets. The tracker is designed to work in multiple domains, including video, text, and images.
DeepSort
DeepSort algorithm can track objects in real-time and uses YOLO v3 to compute the bounding boxes around the objects in a frame.
DeepSort uses Kalman filter from Simple Online and Realtime Tracking algorithm and an identification model, ReID to interlink bounding boxes and object tracks.
ROLO
ROLO is a novel Object Tracking method that uses recurrent neural networks (RNNs) to learn object-specific Spatio-temporal representations. This method works with YOLO, an object detection algorithm, and an LTSM for determining the trajectory of an object.
Part 5. The powerful backup: OpenCV
We have demonstrated how powerful OpenCV Tracking is and how it works. However, do you wonder what OpenCV is? How it supports the tracking goals being achieved? In this part, we will focus on OpenCV and help you better understand the the underlying mechanisms.
1. What Is OpenCV?
OpenCV is a powerful library that allows you to perform image processing, deep learning, machine learning, and computer vision tasks on live video feeds. Moreover, it can be used to detect objects, track their movements, and recognize faces.
It can help process the data that have videos and images and has been used in various applications, such as object recognition and detection, autonomous cars, robots, medical image analysis, automated surveillance, and anomaly detection.
2. The Pre-Built Algorithms OpenCV Offers For Object Tracking
There are 8 pre-built algorithms that OpenCV offers for Objects Tracking. All of them have their uniquility and here we will present their pros and cons for your better understadning.
| Tracker | Pros | Cons |
|---|---|---|
| BOOSTING Tracker | Track objects accurately. | Relatively slow. Unable to stop when an object is lost. |
| MIL Tracker | Strong resistance to noise. Gives accurate results. | Low speed. Unable to stop tracking once the object is lost. |
| KCF Tracker | High speed and accuracy. Stops tracking when the object is lost. | Inability to continue tracking objects once lost. |
| TLD Tracker | Resistance to overlapping and object scaling. | Unstable in object detection and tracking. Constantly loses object. |
| MEDIANFLOW Tracker | High accuracy and speed. Accurate in determining the object’s loss. | Loses object quickly due to high speed. |
| GOTURN Tracker | Shows resistance to obstructions and noise. | If the speed of an object is high, it shifts to another object. |
| MOSSE Tracker | Able to continue tracking after the object is lost. High speed. | Loses object easily if very high speed. |
| CSRT Tracker | Good resistance to overlapping. High accuracy. | Low speed. Unstable when an object is lost. |
3. Implementation In Python And OpenCV
Now, after theoretical explanation of OpenCV and OpenCV Tracking, let’s learn Object Tracking OpenCV Python with coding and our simple and step-by-step instructions:
Install The Dependencies
Install the pycharm app on your PC, and launch it. Create a new project and go to Terminal. Install the opencv-contrib-python package by pasting the following command into the Terminal.
Set Up the Trackers
Now, create a Jupyter-notebook and set up the trackers with this code:
Tasks:
- cv2. version returns the OpenCV library version number.
- Save the name of the eight trackers.
- Check the list for the version you are working on and create a tracker object based on the number.
Capture The Video Input
For capturing the video input, write the following lines of code:
Tasks:
- Use the VideoCapture class to capture a video via the webcam or get a saved one from your PC.
- In VideoCapture - line 2, give the path to your video.
- Comment on the second line to use the webcam for tracking and uncomment the third one.
Creating The Bounding Box And Initializing The Tracker
Define an initial random bounding box or select the choices for the object you want to track with the following code:
Start The Tracker And Check The Output
Finally, write the below code lines to start the tracker:
Tasks
- Read each video frame.
- Start the timer and, through the tracker, determine the trajectory of the object.
- Use the trajectory to draw the bounding box.
- The program will start tracking. Afterward, press the space bar to stop tracking.
Video – Object Tracking with Opencv and Python
Conclusion
In this article, we’ve discussed Object Tracking in detail and how it compares with Object Detection. Furthermore, we explored the methods used for tracking objects and provided complete guidance on the OpenCV Tracking method and its built-in functionalities.
Hopefully, you find this guide helpful, and you can now track objects in real-time without any issues.
Free Download For Win 7 or later(64-bit)
Free Download For macOS 10.14 or later
Also read:
- How To Add Motion Blur In Davinci Resolve, In 2024
- Updated 8 Ways to Merge SRT with MP4
- Have You Ever Tried to Remove Motion Blur From Photos? This Article Will Address How to Remove the Motion Blur Effect Using Photoshop and Its Alternatives
- Updated Ultimate Guide on How to Plan and Storyboard a Music Video
- New How to Make A Funny Vlog for TikTok?
- 2024 Approved How to Create Discord GIF Avatar in Depth Guide
- Updated 2024 Approved Best iOS Slow Motion Apps To Work With
- New Converting an SRT (SRT/Sorted Reader) Into a DOCX File Is a Process. Here We Will Discuss Converting a Set File to a Docx File and More Details About This
- How to Loop a Video on Android
- Updated 2024 Approved Adding Text to Your Collage Not only Makes It Look Sophisticated but Also Versatile. So, if You Too Are Looking for Ways to Create a Collage Text, Check Out Our Article
- Updated Control Playback Speed in Premiere Pro
- New How To Make Ninja Jump Effect for 2024
- Updated 8 Best Free Photo Collage with Music Video Maker for 2024
- New 2024 Approved General Knowledge About MP4 Format and Best MP4 Video Editor
- 2024 Approved Steps to Create Makeup Videos
- New 2024 Approved How to Change Video Thumbnail in Google Drive
- Updated Troubleshoot Snapchat Camera Zoomed in Issue 4 Tips
- Updated Vintage Film Effect 1990S - How to Make for 2024
- Updated In 2024, What Is the Best Filmora Slideshow Templates? Experts Choice
- Easy Guide How To Bypass Nokia FRP Android 10/11/12/13
- 8 Quick Fixes Unfortunately, Snapchat has Stopped on Oppo K11x | Dr.fone
- How To Bypass Google FRP on X6
- In 2024, 7 Ways to Unlock a Locked Samsung Galaxy XCover 7 Phone
- How To Reset iPhone 14? | Dr.fone
- In 2024, How to Unlock Nokia G22 Phone with Broken Screen
- In 2024, Does find my friends work on Poco C65 | Dr.fone
- 9 Best Phone Monitoring Apps for Infinix Smart 8 HD | Dr.fone
- In 2024, How To Unlock Apple iPhone XS Max Without Swiping Up? 6 Ways
- 15 Best Strongest Pokémon To Use in Pokémon GO PvP Leagues For Honor Magic 6 Lite | Dr.fone
- In 2024, The Ultimate Guide to Get the Rare Candy on Pokemon Go Fire Red On Samsung Galaxy S23 | Dr.fone
- updated The Best Translator to Translate Videos Online
- 9 Mind-Blowing Tricks to Hatch Eggs in Pokemon Go Without Walking On Asus ROG Phone 7 Ultimate | Dr.fone
- In 2024, Is Your iPhone 12 in Security Lockout? Proper Ways To Unlock | Dr.fone
- In 2024, How to Use Pokémon Emerald Master Ball Cheat On Vivo T2 5G | Dr.fone
- In 2024, 9 Mind-Blowing Tricks to Hatch Eggs in Pokemon Go Without Walking On Lava Blaze Curve 5G | Dr.fone
- How to Factory Reset Tecno Camon 20 Premier 5G in 5 Easy Ways | Dr.fone
- Title: 2024 Approved How to Trim/Crop Video in Microsoft Powerpoint
- Author: Chloe
- Created at : 2024-05-20 03:38:12
- Updated at : 2024-05-21 03:38:12
- Link: https://ai-editing-video.techidaily.com/2024-approved-how-to-trimcrop-video-in-microsoft-powerpoint/
- License: This work is licensed under CC BY-NC-SA 4.0.
