
:max_bytes(150000):strip_icc():format(webp)/family-hanging-out-watching-videos-online-1166432791-309c6f7ac8cb4cc99875db5a77fd6f35.jpg)
2024 Approved How to Use LUTs in VN Editor – Complete Guide and Best LUTs Download
How to Use LUTs in VN Editor – Complete Guide and Best LUTs Download
Hello and welcome to another article full of information and excitement. The topic of this article is LUT for the VN editor. So it will be exciting for those who want to use LUTs in their video to make them look nice and well. As we will discuss today that what is VN editor and how you can add LUTs to your videos using it on the devices it is compatible for. Moreover, where you can download some fantastic LUTs like moody LUTs, which help your videos to look nice, and which software you should use for this purpose if you are running a device on which the VN editor is not compatible. So let’s begin!
Part 1. What is VN editor?
VN editor is one of the best choices for video editing on mobiles and Mac. Fast editing, transitions, effects, filters, colors, subtitles, music, and many other features make the VN video editing app a great tool for producing and editing videos. It aims to make editing shorter and more feature-rich, empowering everyone to take control of their own lives. You cannot only produce great videos but good films as well. In the following, we will discuss how you can add LUTs to your videos using it.

Part 2. How to use LUTs in VN editor?
First, we must know that it is compatible with which platforms. So, it is now available for Android, iOS, and Mac OS only. However, you can also use it on Windows with some Android or iOS emulators, but it is not a very continent way in our suggestions. Even after doing this, it does not work well on your Windows. Maybe you will face some glitches or malfunctioning problems. So it is better to use it on only those platforms for which it is primarily available. Please read the instructions below since we will go through how to use LUTs in it later on.
On Mac:
First of all, we will learn how you can do it on Mac:
- Download the VN Editor for Mac and open it.
- Add your video and then tap the filters option.
- Now choose custom filters and then select the LUTs pack.

- Select the desired LUT and apply.
On Mobile:
Secondly, we will discuss how we can do this on our mobiles (Android or iOS). The procedure on both devices (Android or iOS) is almost comparable. Therefore, we will discuss the steps from the perspective of both of these here:
- First, download the VN editor from your mobile app store (Android or iOS) and the LUTs pack you want to use in your video.
- After downloading them on your mobile, open the VN editor application.
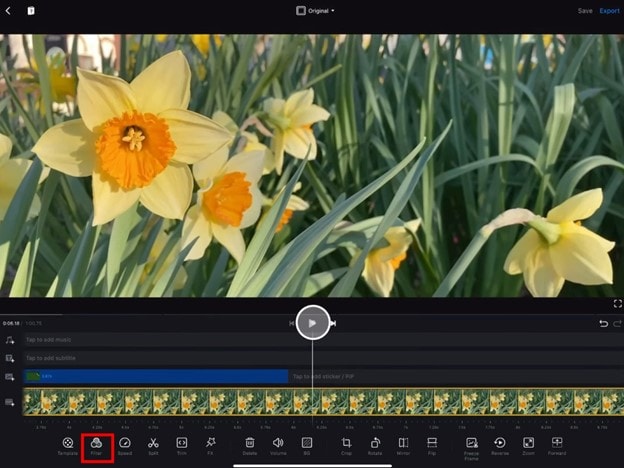
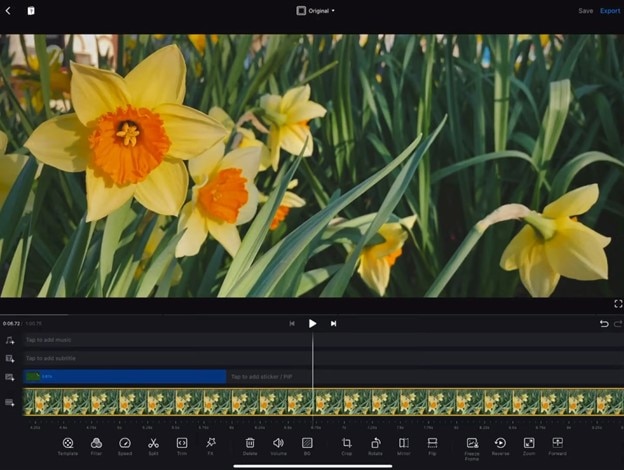
- Create a new project and add your video to it.

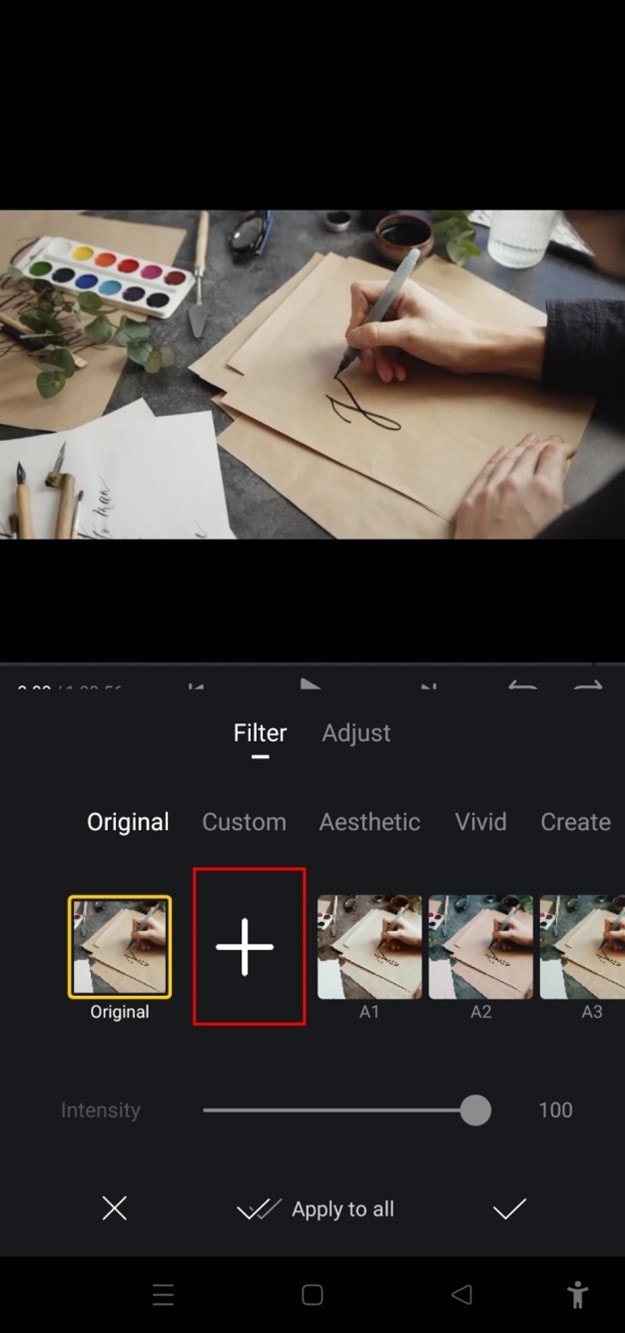
- Then click on the Filters option and select add external or custom filters option next to the existing filters.
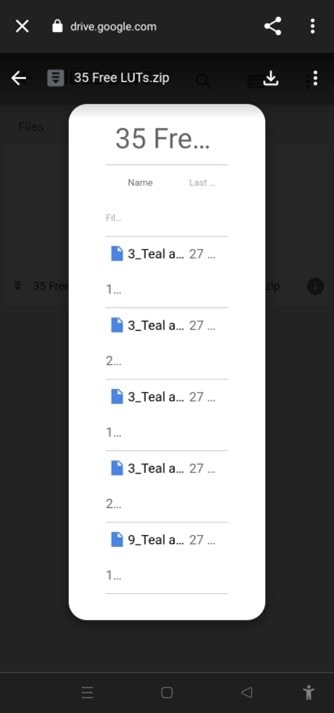
- It will take you to the File manager of your mobile, from which you have to find the folder in which you have stored your LUTs.
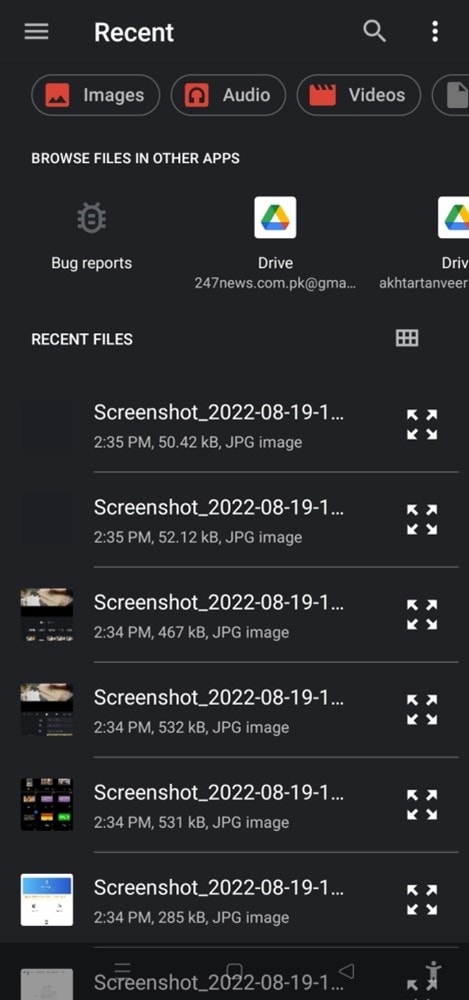
- After finding them, you can select those LUTs you want to use in your video and then click on the done or select button.
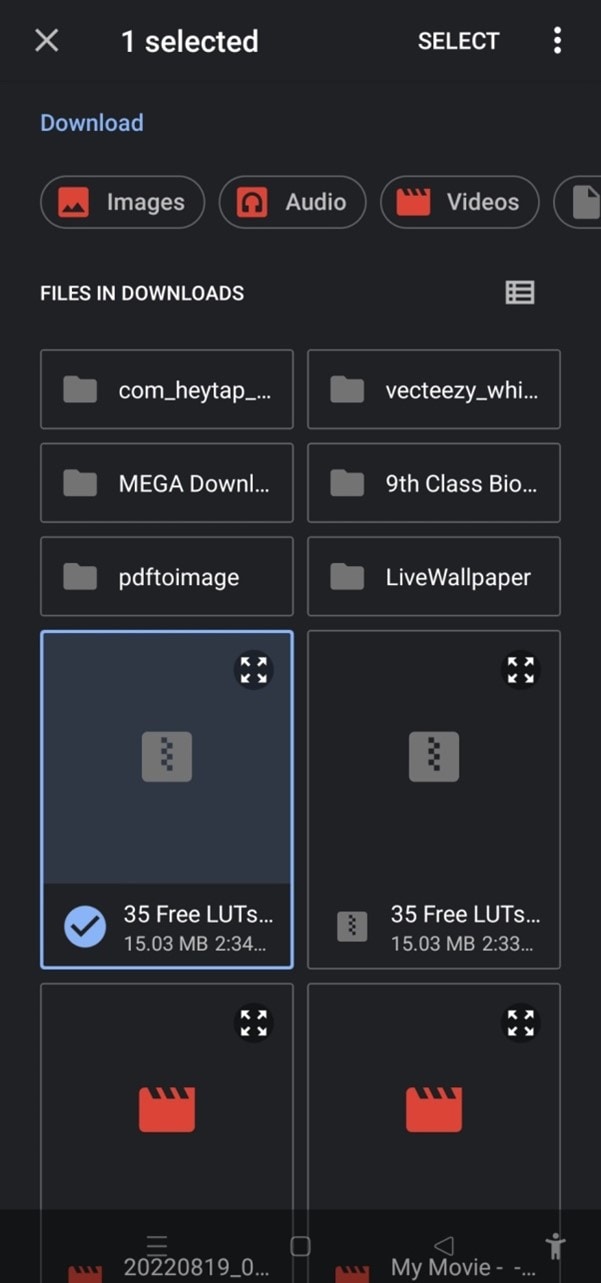
- Your downloaded LUTs start showing in the VN editor, and you can use them in your videos as you want.
Part 3. Best LUTs resource for VN video editor
1. Presets Store
Presets Store is an online platform that helps you with various Filters, LUTs, and other presets. So you can download LUTs for your videos for the VN editor using it. However, it’s not a free service. You have to pay for the LUTs you want to download from here. You can visit their YouTube channel to follow the latest LUTs, Filters and other presets on this platform.
2. Apna Editz
Apna Editz is another online platform you can use for this purpose. It also provides you with a fantastic variety of Presets like LUTs, Filters, and many other similar effects, which you can use in your video using the VN editor. The main Pros of this recommendation are that it’s a free website. So you can download LUTs for your videos from it for free. Keep an eye on their YouTube channel to be updated about the latest LUTs.
3. Lut Preset
Lut Preset is another alternative to all the above ones. You can get almost all your favorite LUTs for VN editor for free here and then use them in your videos as you want. They also share the latest LUTs on their YouTube Channel.
4. Pencil Hub
Pencil Hub is also a good option in this concern. However, it does not have too much variety of VN LUTs, but you can still use it to download some of the best LUTs for VN editors. To get informed of their every new effect and LUTs, their YouTube channel is the primary source.
5. YRP EDITZ
YRP ETIDZ is another good option if you are still looking for some fantastic VN LUTs. They, too not have a large variety of presets and LUTs. However, if you want some most commonly used LUTs for VN Editor, then they are a good option. You’ll notify of their most website updates by checking their YouTube channel.
Part 4. How to add LUTs to the best alternative to the VN editor?
VN Editor is undoubtedly an excellent choice to add LUTs to your videos. However, the VN editor is best suitable for mobile devices. To enhance your LUTs and effects, it would be great if you used some desktop software. Wondershare Filmora offers a great variety of built-in LUTs to choose from. Let’s look at how we can use Filmora to add LUTs:
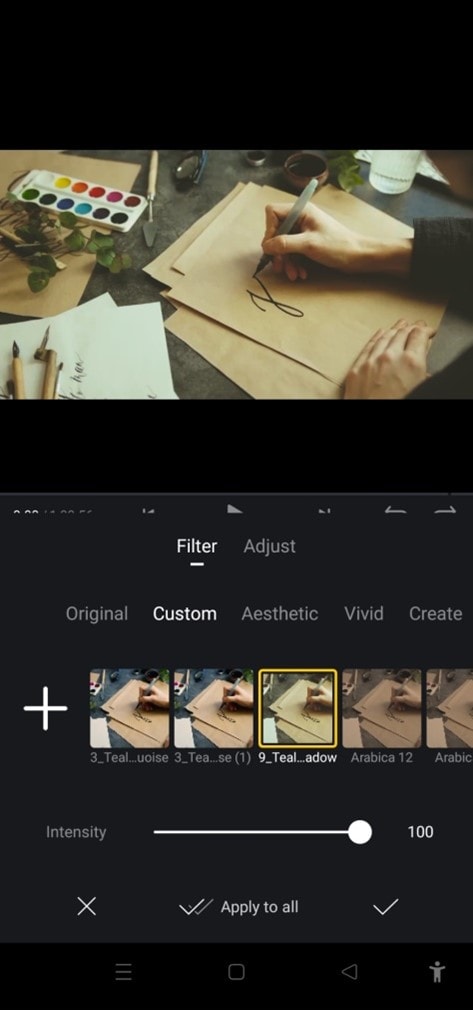
- Add your video and tap the tools, then click the Color option.
- Now select the Color Correction option and then choose 3D LUT.
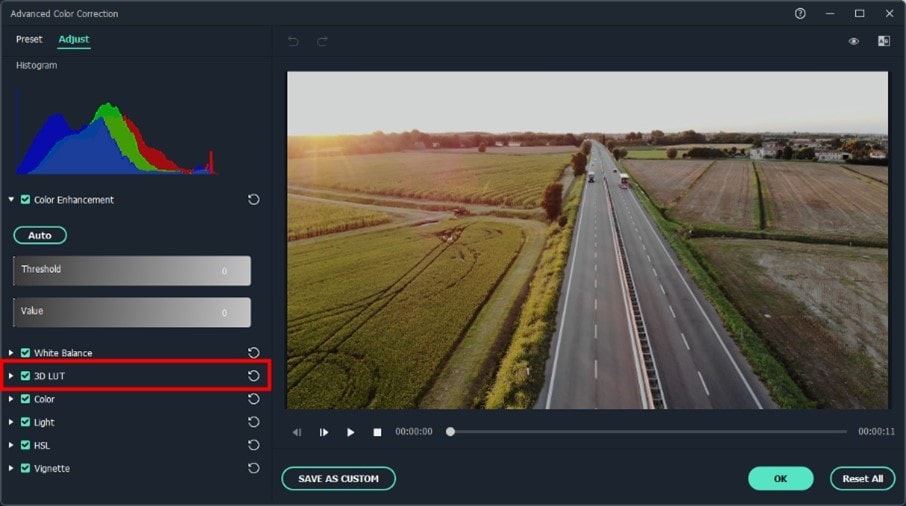
- Click the drop-down menu and select the Load new LUT option. Here you can import other downloaded preset LUTs to use
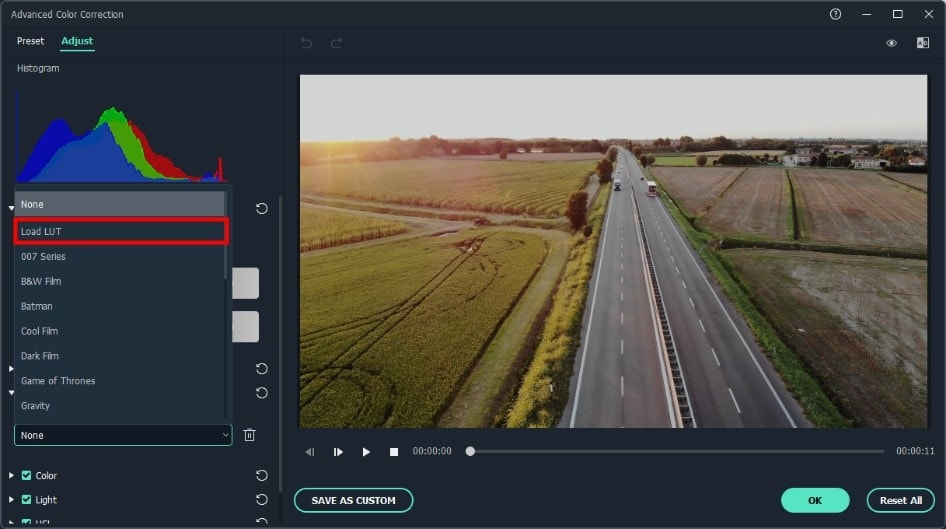
- Choose the LUT and click OK. Your new fantastic video is ready now.

Closing Thoughts
This post recommends several lut resources and demonstrates how to import them if you are a devoted user of VN editor and want to learn how to utilize it for video color grading. The more potent desktop editor Wondershare Filmora, which offers a range of built-in LUT sources and supports color grading settings, is of course recommended if you want to take your videos to the next level. Thanks for reading.
Free Download For Win 7 or later(64-bit)
Free Download For macOS 10.14 or later
2. Apna Editz
Apna Editz is another online platform you can use for this purpose. It also provides you with a fantastic variety of Presets like LUTs, Filters, and many other similar effects, which you can use in your video using the VN editor. The main Pros of this recommendation are that it’s a free website. So you can download LUTs for your videos from it for free. Keep an eye on their YouTube channel to be updated about the latest LUTs.
3. Lut Preset
Lut Preset is another alternative to all the above ones. You can get almost all your favorite LUTs for VN editor for free here and then use them in your videos as you want. They also share the latest LUTs on their YouTube Channel.
4. Pencil Hub
Pencil Hub is also a good option in this concern. However, it does not have too much variety of VN LUTs, but you can still use it to download some of the best LUTs for VN editors. To get informed of their every new effect and LUTs, their YouTube channel is the primary source.
5. YRP EDITZ
YRP ETIDZ is another good option if you are still looking for some fantastic VN LUTs. They, too not have a large variety of presets and LUTs. However, if you want some most commonly used LUTs for VN Editor, then they are a good option. You’ll notify of their most website updates by checking their YouTube channel.
Part 4. How to add LUTs to the best alternative to the VN editor?
VN Editor is undoubtedly an excellent choice to add LUTs to your videos. However, the VN editor is best suitable for mobile devices. To enhance your LUTs and effects, it would be great if you used some desktop software. Wondershare Filmora offers a great variety of built-in LUTs to choose from. Let’s look at how we can use Filmora to add LUTs:
- Add your video and tap the tools, then click the Color option.
- Now select the Color Correction option and then choose 3D LUT.
- Click the drop-down menu and select the Load new LUT option. Here you can import other downloaded preset LUTs to use
- Choose the LUT and click OK. Your new fantastic video is ready now.
Closing Thoughts
This post recommends several lut resources and demonstrates how to import them if you are a devoted user of VN editor and want to learn how to utilize it for video color grading. The more potent desktop editor Wondershare Filmora, which offers a range of built-in LUT sources and supports color grading settings, is of course recommended if you want to take your videos to the next level. Thanks for reading.
Free Download For Win 7 or later(64-bit)
Free Download For macOS 10.14 or later
How to Add Miniature Effect in Video with Filmora
Want to add selective blur to make everything look smaller? Don’t have any idea how to focus on specific mini-things? Then don’t worry! In this article, you’ll get a step-by-step process to add miniature effects to your video. At the end of the process, you’ll have cinematic shots. Then start with us now! Scroll more to get pro tips!
What Is a Miniature Effect?

But first, let’s learn the logic of making the miniature effect. As many video editing pros present on Tiktok, the miniature effect is a fun way to brighten up your photography or video shots. For example, when taking a video or a time-lapse of a landscape, we always have a bigger depth of field, so most objects in the frame are in focus.
However, when we film a miniature model, the depth of field is shallow. So, we only see some objects in focus, and the rest is blurry. This visual trick makes our brain believe that the big landscape we’re seeing is actually a tiny model.

To create a miniature look, we can use specific effects to fake a shallow depth of field, and then the landscape view will look like a tiny model. While some keys to notice before making the miniature effect are:
- It utilizes selective blur to make things appear like small
- The miniature effect works best for footage filmed from a high angle.
- The tiny effect is usually used in drone footage, time lapses, or landscape photography.
Are you all set to add miniature effects to your video and make film-like shots? Then scroll more and get the step-by-step process.
How to Make a Miniature effect?
You are excited to add a miniature effect, and enjoy the rest! Without any further delay, follow the below instructions and get results!
Step1 Download the Wondershare Filmora
- First of all, you have to download the Wondershare Filmora .
- It’s packed with new features and effects plugins that make editing more filmy and fun!
![]()
Note: filmora has a unique “stock media” option that enables us to use all these elements and more to boost our videos!
Step2 Choose any stock footage
If you don’t have good-quality footage, but want to boost your video, here is how. You can get the miniature effect without a big format view camera or specialized lens.
- Open Filmora and select any stock footage in Wondershare Filmora.

Move to the stock media folder on the above bar in the Wondershare Filmora. Or you can look towards the left window, where you will see the sample videos tab.
- Click on the sample videos tab, and a new window will appear on the library screen.
Here you will see almost more than 20 videos. So, instead of using the actual recorded footage, we’ll make do with what we have by default. After selecting and adding the stock footage of your choice. Then you have to follow the below process:
- First, hold the Stock Footage as shown in the folder section.
- Then Drag and Drop it to the timeline section for further editing.

Who will get Stock Media?
Want to get stock media? You can only have access to the stock media library if you already buy the license of Wondershare Filmora.
- The latest version has an unlimited stock library.
- After purchasing any plan, you can access Stock Media (Unsplash, Giphy, Pixabay, Pixel).
Step3 Head to the effect panel
As we are working on miniature effects, what do we need first? First, we ensure that we have a Blur effect on the video.

To add a blur effect from the panel, follow the below-mentioned steps:
- First of all, move toward the above tabs.
- Then click on the 5th section, which is Effect
- After selecting the effect tab, a new window will pop up.
- In this section, we have 500+ different effects.
- Then, click on the search bar.
- Search for the Blur effect.
- After that, click on the Blur 2
- Then Download this effect if you haven’t done this already.
Step4 Add the blur effect to the video
After selecting and downloading the blur effect, it’s time to add it to the video. Again, see how precise it turned out. To add effect, follow below steps:
- First, drag and Drop the effect toward the timeline.
- Then, make sure to release the effect on the video to give it a lens blur appearance.

Step5 Add the effect multiple times
Want to get an ideal blur level? If you need more blur level in your video and make it more cinematic, then follow the below steps:
- First, ensure that the opacity of the blur effect is 100%.
- Then, if you still want more blurriness, add Blur 2 effect multiple times on the video.
- Finally, add effect by just the Drag and Drop

Step6 Drop the same video clip
- Add the same video clip 2nd time on the timeline.
- Add it by just the Drag and Drop
- Make sure you add it to 2nd video track in the timeline above the first one.

Step7 Add masks on the Video
Now, it’s time to select a specific video portion and add a mask. Due to this, we will have a selective blur portion. For this, follow the below guidelines:
- Double-click on the video present in 2nd track.
- The settings tab will be open in the top left section.
- Then find the Mask section and click on it.
- After this, click on the Double-line.
- Set the mask on video according to your style and choice.

![]()
Note: you can adjust the mask size and position by rotating and changing its shape.
Watch the rotating and adjusting actions as shown below!

For example, when we add a mask in the below time-lapse video, follow the above mask adjustments. Unfortunately, we can’t get good results. Therefore, we will apply another way to add a mask by changing shape and position. Follow the instructions for modifications:

- Make a building or any object Blurry near the camera because it is not present within the depth of field.
- While the object is far from the camera, it is focused because it is in the depth of the field.
- Then adjust the mask, as per your choice.
Want to change the shape of the mask? Then follow the below steps:

- Double-click on the video present in 2nd video track.
- Settings will activate on the top left side.
- Then click on the Mask tab to open it.
- Select the Rectangular mask from the list and apply it.
![]()
Note: make sure you are masking the same extent and excluding the object you want to be out of focus.
Now, it’s time to mask the whole object, which is far, but we want to make it in focus! For this, follow these steps:
- Add the same stock video clip a third time on the third video track of the timeline.
- Then add a mask in a Rectangle shape on the building.
- Don’t blur the edge of this mask.

Step8 Final Look
You are excited now to see the final look of your miniature effect! Finally, it’s in front of you! Just modify it more if you want to make it more precise.

Have you tried to add a miniature effect before? If yes, then share your experience with us! Try with more mask shapes and add more blur effects. Make sure that you are using Wondershare Filmora to make more filmy shots. Feel free to try out different effects and enjoy the following results!
Free Download For Win 7 or later(64-bit)
Free Download For macOS 10.14 or later
Step2 Choose any stock footage
If you don’t have good-quality footage, but want to boost your video, here is how. You can get the miniature effect without a big format view camera or specialized lens.
- Open Filmora and select any stock footage in Wondershare Filmora.
Move to the stock media folder on the above bar in the Wondershare Filmora. Or you can look towards the left window, where you will see the sample videos tab.
- Click on the sample videos tab, and a new window will appear on the library screen.
Here you will see almost more than 20 videos. So, instead of using the actual recorded footage, we’ll make do with what we have by default. After selecting and adding the stock footage of your choice. Then you have to follow the below process:
- First, hold the Stock Footage as shown in the folder section.
- Then Drag and Drop it to the timeline section for further editing.
Who will get Stock Media?
Want to get stock media? You can only have access to the stock media library if you already buy the license of Wondershare Filmora.
- The latest version has an unlimited stock library.
- After purchasing any plan, you can access Stock Media (Unsplash, Giphy, Pixabay, Pixel).
Step3 Head to the effect panel
As we are working on miniature effects, what do we need first? First, we ensure that we have a Blur effect on the video.
To add a blur effect from the panel, follow the below-mentioned steps:
- First of all, move toward the above tabs.
- Then click on the 5th section, which is Effect
- After selecting the effect tab, a new window will pop up.
- In this section, we have 500+ different effects.
- Then, click on the search bar.
- Search for the Blur effect.
- After that, click on the Blur 2
- Then Download this effect if you haven’t done this already.
Step4 Add the blur effect to the video
After selecting and downloading the blur effect, it’s time to add it to the video. Again, see how precise it turned out. To add effect, follow below steps:
- First, drag and Drop the effect toward the timeline.
- Then, make sure to release the effect on the video to give it a lens blur appearance.
Step5 Add the effect multiple times
Want to get an ideal blur level? If you need more blur level in your video and make it more cinematic, then follow the below steps:
- First, ensure that the opacity of the blur effect is 100%.
- Then, if you still want more blurriness, add Blur 2 effect multiple times on the video.
- Finally, add effect by just the Drag and Drop
Step6 Drop the same video clip
- Add the same video clip 2nd time on the timeline.
- Add it by just the Drag and Drop
- Make sure you add it to 2nd video track in the timeline above the first one.
Step7 Add masks on the Video
Now, it’s time to select a specific video portion and add a mask. Due to this, we will have a selective blur portion. For this, follow the below guidelines:
- Double-click on the video present in 2nd track.
- The settings tab will be open in the top left section.
- Then find the Mask section and click on it.
- After this, click on the Double-line.
- Set the mask on video according to your style and choice.
![]()
Note: you can adjust the mask size and position by rotating and changing its shape.
Watch the rotating and adjusting actions as shown below!
For example, when we add a mask in the below time-lapse video, follow the above mask adjustments. Unfortunately, we can’t get good results. Therefore, we will apply another way to add a mask by changing shape and position. Follow the instructions for modifications:
- Make a building or any object Blurry near the camera because it is not present within the depth of field.
- While the object is far from the camera, it is focused because it is in the depth of the field.
- Then adjust the mask, as per your choice.
Want to change the shape of the mask? Then follow the below steps:
- Double-click on the video present in 2nd video track.
- Settings will activate on the top left side.
- Then click on the Mask tab to open it.
- Select the Rectangular mask from the list and apply it.
![]()
Note: make sure you are masking the same extent and excluding the object you want to be out of focus.
Now, it’s time to mask the whole object, which is far, but we want to make it in focus! For this, follow these steps:
- Add the same stock video clip a third time on the third video track of the timeline.
- Then add a mask in a Rectangle shape on the building.
- Don’t blur the edge of this mask.
Step8 Final Look
You are excited now to see the final look of your miniature effect! Finally, it’s in front of you! Just modify it more if you want to make it more precise.
Have you tried to add a miniature effect before? If yes, then share your experience with us! Try with more mask shapes and add more blur effects. Make sure that you are using Wondershare Filmora to make more filmy shots. Feel free to try out different effects and enjoy the following results!
Free Download For Win 7 or later(64-bit)
Free Download For macOS 10.14 or later
How to Change Aspect Ratio of Video?
Versatile Video Editor - Wondershare Filmora
Videos are a great way to complete the whole story in one go. In social media, videography, entertainment, educational video sharing, or many more areas, viewers and their viewing experience matter a lot. For instance, if a person visited YouTube to see some educational content but finds it out that the overall view of the video content is not up to the mark. Then, what will happen? That person will switch to another channel, which is not good for your business area. Thus, knowing the correct aspect ratio for your video is very important. Here, the aspect ratio refers to the ratio of width to the height of the Video or image visible on the screen. So, here you will learn about ways to change the ratio of a video and how to change video dimensions on premiere pro or iOS devices.

In this article
01 [Change aspect Ratio with Softwares](#Part 1)
02 [Change Video aspect Ratio Online](#Part 2)
03 [Make sure which aspect Ratio You Want to Change](#Part 3)
Part 1 Change aspect Ratio with Softwares
1.1 For beginners & most people
This part is for beginners or people who are not aware of the technicalities related to video size, dimensions, or changing the ratio of Video. A quick and easy-to-use application is Wondershare Filmora, one of the widely used platforms for video editing and adopting it s per the video requirement.
Thus, let’s try to understand how you can change the Video’s aspect ratio using Filmora.
Step1 Download and open the Software
First, visit the official link of Wondershare Filmora and download, install and lunch the tool on your system.
Step2 Set the aspect ratio and upload your file
Right from the main interface, you will find the aspect ratio option. Using the drop-down menu, select the desired one to change the ratio of Video. After that, click on the new project to upload your video file.
Step3 Save and Export
Now, when you upload the video file, it will automatically modify the chosen aspect ratio for the video. Then export the file to save at the desired location on your system.

1.2 For Professional People
Now, here comes the guidance to those professional videographers, movie maker who needs an advanced version to change video size or aspect ratio.
Since you are already aware of technicalities to a certain extent, it becomes easy to use some advanced tools to change the aspect ratio of Video using adobe and OBS Software.
● Adobe PR
The first tool that we shall discuss is Adobe PR, and we will learn how to use Adobe Premiere Pro to change the Video’s aspect ratio. This tool is valuable for worldwide users explicitly working in the video editing field or dedicated professionals who need some technical knowledge to understand the interface. Here are the required steps to handle the adobe PR to change aspect Ratio iPhone Video devices.
Open the ‘File’ Menu> then Go to the ‘New’ Folder > after that, visit the ‘Sequence’ (dialog box) That will give the option of ‘Settings,’ select it> then visit the ‘Video’ section. Then, from the Video section, you need to adjust the Frame size for height and the Horizontal value for width.
Then opt for ‘OK.’
● OBS Studio
Those who know are pretty aware of the professional OBS studio full of features and technical detailing. In this part, you shall see how to use OBS software to change the iMovie aspect ratio following the mentioned steps.
Here, you need to open the ‘Settings .’ Under the ‘Video’ subsection, you will see ‘Output Resolution’ (click on drop-down), then from the given aspect ratios, change the ratio of your Video. Then, press the OK button to apply the changes at the end. That’s it.
Using this professional software will make you able to change the aspect ratio on iPhone Video and change the aspect ratio MP4, MKV, FLV, or other formats. The only need is to have a basic understanding of the technical knowledge related to the software. If you’re already a professional video maker, this software will be the most option.
Part 2 Change Video aspect Ratio Online
Till now, we have covered different software as per the user requirements. Suppose you are not comfortable with downloading any software on your devices. In that case, there are some alternatives for Online Video Editors to change video aspect ratio with ease. Let’s take a look over some of the easy-to-use online tools to change the ratio of the Video. Such tools are quick to use and accessible worldwide. Some of them are mentioned below:
1. veed.io
You can effortlessly change the aspect ratio of your video using ‘Veed.io’. Which supports multiple video formats such as .wmv, .mp4, .mkv, .flv, .3gp and many more. While uploading the video, you need to mention the required width and height of the video and then click on the ‘Resize’ button.
2. Kapwing (kapwing.com)
Another helpful tool while searching for some quick tools to change the ratio of Video through online mode is Kapwing Online Convertor. You can scale, resize your Video by simply uploading your file or pasting the URL there. The interface is quite simple to use and changes the aspect ratio of MP4 or other format videosThere is noNo doubt accessing some online tools to change the Video’s aspect ratio in quick and easy steps. Though there exist certain limitations such as internet connection speed should be good to upload or download the Video. In addition, there is a certain limitation in terms of the size of the Video or other factors. Otherwise, it comes out to be a practical option for small files.
Part 3 Make sure which aspect Ratio You Want to Change
Technical specifications needed by different online platforms are different, such as YouTube, Instagram, Facebook, or other social media platform that needed a video with different aspect ratios to make them suitable s per their criteria. Thus, accordingly, you need to modify or change the aspect ratio on MP4 as per these social media requirements. Here are some famous social media platforms, and their aspect ratio requirements are listed. Let’s check them out one by one:
Twitter: The aspect ratio range that works for Twitter is between 1.1 to 2.1
Instagram: For it, the standard ratios are: 1.91:1, 4:5
Tiktok: Required ratio is 9:16 (Smartphone screen)
YouTube: Standard aspect Ratio for YouTube is 16:9. If the video uploaded is not in this ratio, then YouTube will make an internal adjustment and show the video with an outer band of the black or white strip around the video screen.
Vimeo: Both the options are available with Vimeo that is 16:9, 4:3
Wondershare Filmora
Get started easily with Filmora’s powerful performance, intuitive interface, and countless effects!
Try It Free Try It Free Try It Free Learn More >

Conclusion
Getting the correct information about the iMovie aspect ratio change and Adobe premiere pro-change aspect ratio is crucial to uplift the viewer base to your Video. Furthermore, to a great extent, it matters which platform your Video will launch on as different devices need different aspect ratios. Thus, this article focused on covering all the points covered under how to change the Aspect Ratio of MP4 videos. Thus, whether you are a novice in video making or a professional videographer, or a moviemaker, learn about changing the ratio of Video to open new vistas to your efforts with Wondershare Filmora, Adobe, and OBS web applications.
Videos are a great way to complete the whole story in one go. In social media, videography, entertainment, educational video sharing, or many more areas, viewers and their viewing experience matter a lot. For instance, if a person visited YouTube to see some educational content but finds it out that the overall view of the video content is not up to the mark. Then, what will happen? That person will switch to another channel, which is not good for your business area. Thus, knowing the correct aspect ratio for your video is very important. Here, the aspect ratio refers to the ratio of width to the height of the Video or image visible on the screen. So, here you will learn about ways to change the ratio of a video and how to change video dimensions on premiere pro or iOS devices.
In this article
01 [Change aspect Ratio with Softwares](#Part 1)
02 [Change Video aspect Ratio Online](#Part 2)
03 [Make sure which aspect Ratio You Want to Change](#Part 3)
Part 1 Change aspect Ratio with Softwares
1.1 For beginners & most people
This part is for beginners or people who are not aware of the technicalities related to video size, dimensions, or changing the ratio of Video. A quick and easy-to-use application is Wondershare Filmora, one of the widely used platforms for video editing and adopting it s per the video requirement.
Thus, let’s try to understand how you can change the Video’s aspect ratio using Filmora.
Step1 Download and open the Software
First, visit the official link of Wondershare Filmora and download, install and lunch the tool on your system.
Step2 Set the aspect ratio and upload your file
Right from the main interface, you will find the aspect ratio option. Using the drop-down menu, select the desired one to change the ratio of Video. After that, click on the new project to upload your video file.
Step3 Save and Export
Now, when you upload the video file, it will automatically modify the chosen aspect ratio for the video. Then export the file to save at the desired location on your system.
1.2 For Professional People
Now, here comes the guidance to those professional videographers, movie maker who needs an advanced version to change video size or aspect ratio.
Since you are already aware of technicalities to a certain extent, it becomes easy to use some advanced tools to change the aspect ratio of Video using adobe and OBS Software.
● Adobe PR
The first tool that we shall discuss is Adobe PR, and we will learn how to use Adobe Premiere Pro to change the Video’s aspect ratio. This tool is valuable for worldwide users explicitly working in the video editing field or dedicated professionals who need some technical knowledge to understand the interface. Here are the required steps to handle the adobe PR to change aspect Ratio iPhone Video devices.
Open the ‘File’ Menu> then Go to the ‘New’ Folder > after that, visit the ‘Sequence’ (dialog box) That will give the option of ‘Settings,’ select it> then visit the ‘Video’ section. Then, from the Video section, you need to adjust the Frame size for height and the Horizontal value for width.
Then opt for ‘OK.’
● OBS Studio
Those who know are pretty aware of the professional OBS studio full of features and technical detailing. In this part, you shall see how to use OBS software to change the iMovie aspect ratio following the mentioned steps.
Here, you need to open the ‘Settings .’ Under the ‘Video’ subsection, you will see ‘Output Resolution’ (click on drop-down), then from the given aspect ratios, change the ratio of your Video. Then, press the OK button to apply the changes at the end. That’s it.
Using this professional software will make you able to change the aspect ratio on iPhone Video and change the aspect ratio MP4, MKV, FLV, or other formats. The only need is to have a basic understanding of the technical knowledge related to the software. If you’re already a professional video maker, this software will be the most option.
Part 2 Change Video aspect Ratio Online
Till now, we have covered different software as per the user requirements. Suppose you are not comfortable with downloading any software on your devices. In that case, there are some alternatives for Online Video Editors to change video aspect ratio with ease. Let’s take a look over some of the easy-to-use online tools to change the ratio of the Video. Such tools are quick to use and accessible worldwide. Some of them are mentioned below:
1. veed.io
You can effortlessly change the aspect ratio of your video using ‘Veed.io’. Which supports multiple video formats such as .wmv, .mp4, .mkv, .flv, .3gp and many more. While uploading the video, you need to mention the required width and height of the video and then click on the ‘Resize’ button.
2. Kapwing (kapwing.com)
Another helpful tool while searching for some quick tools to change the ratio of Video through online mode is Kapwing Online Convertor. You can scale, resize your Video by simply uploading your file or pasting the URL there. The interface is quite simple to use and changes the aspect ratio of MP4 or other format videosThere is noNo doubt accessing some online tools to change the Video’s aspect ratio in quick and easy steps. Though there exist certain limitations such as internet connection speed should be good to upload or download the Video. In addition, there is a certain limitation in terms of the size of the Video or other factors. Otherwise, it comes out to be a practical option for small files.
Part 3 Make sure which aspect Ratio You Want to Change
Technical specifications needed by different online platforms are different, such as YouTube, Instagram, Facebook, or other social media platform that needed a video with different aspect ratios to make them suitable s per their criteria. Thus, accordingly, you need to modify or change the aspect ratio on MP4 as per these social media requirements. Here are some famous social media platforms, and their aspect ratio requirements are listed. Let’s check them out one by one:
Twitter: The aspect ratio range that works for Twitter is between 1.1 to 2.1
Instagram: For it, the standard ratios are: 1.91:1, 4:5
Tiktok: Required ratio is 9:16 (Smartphone screen)
YouTube: Standard aspect Ratio for YouTube is 16:9. If the video uploaded is not in this ratio, then YouTube will make an internal adjustment and show the video with an outer band of the black or white strip around the video screen.
Vimeo: Both the options are available with Vimeo that is 16:9, 4:3
Wondershare Filmora
Get started easily with Filmora’s powerful performance, intuitive interface, and countless effects!
Try It Free Try It Free Try It Free Learn More >
Conclusion
Getting the correct information about the iMovie aspect ratio change and Adobe premiere pro-change aspect ratio is crucial to uplift the viewer base to your Video. Furthermore, to a great extent, it matters which platform your Video will launch on as different devices need different aspect ratios. Thus, this article focused on covering all the points covered under how to change the Aspect Ratio of MP4 videos. Thus, whether you are a novice in video making or a professional videographer, or a moviemaker, learn about changing the ratio of Video to open new vistas to your efforts with Wondershare Filmora, Adobe, and OBS web applications.
Best Ways to Blur Zoom Background for Free
Zoom’s blurred backdrop function, as the name indicates, distorts the background of a video conversation. Use this zoom blur background download free guide if you wish to keep your personal area hidden during Zoom conversations in order to protect your privacy. There is a backdrop with a zoom blur all throughout. It hides the turmoil or other version of a mess from your colleagues, and it just slightly makes your hair appear odd. You may learn how to blur your backdrop using different operating systems from this page. We’ll walk you through a workaround to get a blurred backdrop because the functionality is presently unavailable for mobile devices.
On your updated Zoom application, this new high res zoom background tool might be useful for a variety of reasons, whether you want to protect your privacy or conceal your filthy room. Consider a scenario in which you have a Zoom meeting but your usual workspace at home is occupied. Panic sets in because you don’t have time to clean everything up or locate a private, neutral location to set up. You have features built in into Zoom to use the zoom blurred background image that would cover the area behind you, including background blurring, that’s it. This simple toggleable feature is already present in Zoom and may be used to keep your area private or to make cluttered spaces uncertain. We’ll provide you a step-by-step tutorial in this post on how to activate blurred backdrop for your next meeting.
Part 1: How to blur Zoom background on Windows
Before and during meetings, users of the official Zoom desktop client for Windows have the option to blur the backdrop. Before a meeting, login into Zoom on the desktop application to activate backdrop blur. After that, choose Settings by clicking on the profile symbol in the upper left corner. Click the “Blur” option under “Backgrounds & Filters” after making your selection. The user may attend the meeting when the backdrop becomes blurry. Here are the steps to blur a Zoom backdrop during a meeting:
During a Zoom call on Windows 10, blur your backdrop as follows:
Step1Find the bar at the bottom of the meeting screen. To make it visible, you may need to move your mouse to the bottom.

Step2Find the “Stop Video” button, which has a chevron pointing upward.

Step3Then choose “Video Settings” > “Backgrounds & Filters” by clicking the arrow.

Step4Then choose “Blur,” and your backdrop will instantly seem blurred.

Part 2: How to blur Zoom background on Mac
Backdrop blur is the next best thing when a virtual background is unsuitable for a video conference but a consumer still needs privacy. As you can see from the description above, the blurred backdrop is just another style of the Zoom background. Customers may therefore directly adjust it from the Virtual Background setting area. Prior doing anything further, confirm that your MacBook is running the Zoom desktop client (software).
Before your Zoom call on a Mac, follow these instructions to blur your background:
Step1Start Zoom and log in to your account.

Step2In the next step, Click the “Settings” gear icon in the top-right corner and then select “Backgrounds & Filters” under Settings as shown below:

Step3Then choose “Blur,” and your backdrop will instantly seem blurred. You can also Select Stop Video by clicking the arrow next to it in the list of choices in the bar below the live video. A little list will start to appear. By using the “Choose Virtual Backdrop” option, you may choose a virtual background.
Step4Select “Blur” under the “Virtual Backgrounds” tab. You may choose a virtual backdrop from this page if you’d like. You need to verify that you have the right Zoom desktop program version and all the technical specs if you can’t locate the Blur option.
Part 3: How to Blur Zoom Background on iPhone
The option isn’t accessible on all Apple devices since a simulated or blurred backdrop requires more computing power. First, you should visit the Zoom virtual background system requirements page to see whether your device is supported. You should continue using Zoom without a virtual or blurred backdrop if your device doesn’t meet the criteria. To manually conceal your backdrop, consider standing close to a wall or sitting in a corner. Here are the instructions on how to blur your backdrop for Zoom meetings on iOS devices. Take these actions:
Step1Launch the Zoom app on your iOS phone in foremost step. To begin or join a new meeting, tap the “New Meeting” or “Join” icon.

Step2During the meeting, tap anywhere on the screen to access the controls that appear below the video.
Step3Select “More” by tapping the three-dot symbol.

Step4A brief list will start to appear. Next, on your iOS device, choose “Background and Filters.”

Step5Below your camera video, you’ll see a few possibilities. Tap “Blur” to make the background blurry.

Part 4: How to blur Zoom background on Android
Additionally, Zoom blur backdrops are the ideal option for first video conversations with clients, coworkers, or supervisors. On its Android app, Zoom offers customers the option to blur their backdrop. However, there is a catch: the function can only be activated once the user has entered a meeting. If a virtual backdrop isn’t your style on Android, you may choose to blur the background instead. Everything in the backdrop will be blurred, keeping just your picture apparent throughout the conversation. Remember that all of your next meetings will have the blur function turned on. How? Read on.
Step1Only while you’re in a meeting can you alter your backdrop. Tap the More icon in the bottom right corner after joining one.

Step2Select Virtual background after that. then choose a picture from the choices offered.

Step3The backdrop of a picture or video added from your gallery using the Add icon will likewise successfully blur the background on your Zoom Android device. Now place Zoom calls as usual, and the backdrop of your live video will be automatically blurred.
Conclusion
For individuals who prefer to obscure their surroundings while on a video conversation, Zoom’s blur background function is helpful. The function was added to the video-conferencing app in 2021 and has since gained popularity. The greatest thing you can do is choose a blur out backdrop if you can’t determine which of our Zoom background categories would best fit the video chat occasion. These are impartial backdrops that don’t necessarily depict any particular environment. They only provide a lovely, unobtrusive background that will take away any possible obstructions during the video connection. Perhaps a professional setting might be too much for a particular video chat, whilst a humorous backdrop wouldn’t work. In this situation, a blurred picture backdrop will be the difference between putting little to no effort into your call and being ready to portray yourself in the best possible way.
Zoom’s blurred backdrop function, as the name indicates, distorts the background of a video conversation. Use this zoom blur background download free guide if you wish to keep your personal area hidden during Zoom conversations in order to protect your privacy. There is a backdrop with a zoom blur all throughout. It hides the turmoil or other version of a mess from your colleagues, and it just slightly makes your hair appear odd. You may learn how to blur your backdrop using different operating systems from this page. We’ll walk you through a workaround to get a blurred backdrop because the functionality is presently unavailable for mobile devices.
On your updated Zoom application, this new high res zoom background tool might be useful for a variety of reasons, whether you want to protect your privacy or conceal your filthy room. Consider a scenario in which you have a Zoom meeting but your usual workspace at home is occupied. Panic sets in because you don’t have time to clean everything up or locate a private, neutral location to set up. You have features built in into Zoom to use the zoom blurred background image that would cover the area behind you, including background blurring, that’s it. This simple toggleable feature is already present in Zoom and may be used to keep your area private or to make cluttered spaces uncertain. We’ll provide you a step-by-step tutorial in this post on how to activate blurred backdrop for your next meeting.
Part 1: How to blur Zoom background on Windows
Before and during meetings, users of the official Zoom desktop client for Windows have the option to blur the backdrop. Before a meeting, login into Zoom on the desktop application to activate backdrop blur. After that, choose Settings by clicking on the profile symbol in the upper left corner. Click the “Blur” option under “Backgrounds & Filters” after making your selection. The user may attend the meeting when the backdrop becomes blurry. Here are the steps to blur a Zoom backdrop during a meeting:
During a Zoom call on Windows 10, blur your backdrop as follows:
Step1Find the bar at the bottom of the meeting screen. To make it visible, you may need to move your mouse to the bottom.
Step2Find the “Stop Video” button, which has a chevron pointing upward.
Step3Then choose “Video Settings” > “Backgrounds & Filters” by clicking the arrow.
Step4Then choose “Blur,” and your backdrop will instantly seem blurred.
Part 2: How to blur Zoom background on Mac
Backdrop blur is the next best thing when a virtual background is unsuitable for a video conference but a consumer still needs privacy. As you can see from the description above, the blurred backdrop is just another style of the Zoom background. Customers may therefore directly adjust it from the Virtual Background setting area. Prior doing anything further, confirm that your MacBook is running the Zoom desktop client (software).
Before your Zoom call on a Mac, follow these instructions to blur your background:
Step1Start Zoom and log in to your account.
Step2In the next step, Click the “Settings” gear icon in the top-right corner and then select “Backgrounds & Filters” under Settings as shown below:
Step3Then choose “Blur,” and your backdrop will instantly seem blurred. You can also Select Stop Video by clicking the arrow next to it in the list of choices in the bar below the live video. A little list will start to appear. By using the “Choose Virtual Backdrop” option, you may choose a virtual background.
Step4Select “Blur” under the “Virtual Backgrounds” tab. You may choose a virtual backdrop from this page if you’d like. You need to verify that you have the right Zoom desktop program version and all the technical specs if you can’t locate the Blur option.
Part 3: How to Blur Zoom Background on iPhone
The option isn’t accessible on all Apple devices since a simulated or blurred backdrop requires more computing power. First, you should visit the Zoom virtual background system requirements page to see whether your device is supported. You should continue using Zoom without a virtual or blurred backdrop if your device doesn’t meet the criteria. To manually conceal your backdrop, consider standing close to a wall or sitting in a corner. Here are the instructions on how to blur your backdrop for Zoom meetings on iOS devices. Take these actions:
Step1Launch the Zoom app on your iOS phone in foremost step. To begin or join a new meeting, tap the “New Meeting” or “Join” icon.
Step2During the meeting, tap anywhere on the screen to access the controls that appear below the video.
Step3Select “More” by tapping the three-dot symbol.
Step4A brief list will start to appear. Next, on your iOS device, choose “Background and Filters.”
Step5Below your camera video, you’ll see a few possibilities. Tap “Blur” to make the background blurry.
Part 4: How to blur Zoom background on Android
Additionally, Zoom blur backdrops are the ideal option for first video conversations with clients, coworkers, or supervisors. On its Android app, Zoom offers customers the option to blur their backdrop. However, there is a catch: the function can only be activated once the user has entered a meeting. If a virtual backdrop isn’t your style on Android, you may choose to blur the background instead. Everything in the backdrop will be blurred, keeping just your picture apparent throughout the conversation. Remember that all of your next meetings will have the blur function turned on. How? Read on.
Step1Only while you’re in a meeting can you alter your backdrop. Tap the More icon in the bottom right corner after joining one.
Step2Select Virtual background after that. then choose a picture from the choices offered.
Step3The backdrop of a picture or video added from your gallery using the Add icon will likewise successfully blur the background on your Zoom Android device. Now place Zoom calls as usual, and the backdrop of your live video will be automatically blurred.
Conclusion
For individuals who prefer to obscure their surroundings while on a video conversation, Zoom’s blur background function is helpful. The function was added to the video-conferencing app in 2021 and has since gained popularity. The greatest thing you can do is choose a blur out backdrop if you can’t determine which of our Zoom background categories would best fit the video chat occasion. These are impartial backdrops that don’t necessarily depict any particular environment. They only provide a lovely, unobtrusive background that will take away any possible obstructions during the video connection. Perhaps a professional setting might be too much for a particular video chat, whilst a humorous backdrop wouldn’t work. In this situation, a blurred picture backdrop will be the difference between putting little to no effort into your call and being ready to portray yourself in the best possible way.
Also read:
- How to Blur a Still or Moving Part of Video for 2024
- Best 5 AI Music Video Examples and Makers to Make Them
- 2024 Approved Slow-Motion Edits Are Pretty Mesmerizing, and Weve All Imagined Ourselves in One of Those Visually Appealing, Slowed-Down Movies. Well Teach You How to Make a Smooth Slo-Mo Video Using Twixtor in This Article. Stay Tuned Until the End
- New So, without Wasting Time, Let Me Show You How to Mask a Video in Wondershare Filmora. Lets Get Started
- New How to Windows Online Movie Maker Complete Guide
- New Overview of FPS for YouTube Videos
- Updated 2024 Approved How to Create a Smooth Cut Transition Effect?
- In 2024, The Article Introduces Three Recommended Apps to Download Royalty-Free Cinematic Music and Covers an Extensive Procedure to Create a Cinematic Travel Intro for a Travel Vlog
- New Practical Way to Resize Video in Handbrake
- YouTube Zoom to Fill Is a Great Feature for Viewing Things in Depth. This Article Answers All Questions About Fixing YouTube Zoom to Fill Not Working on Your Device
- 2024 Approved Best Practical Tips to Improve Your Lighting in the Sun
- Updated Create Your Face Zoom TikTok Now for 2024
- In 2024, Vintage Film Effect 1920S - How to Make
- New Effective 10 Ways to Convert YouTube to MOV at Ease PC & Online
- New Add Motion Blur in After Effects
- Everything You Need to Know about Lock Screen Settings on your Nubia Red Magic 9 Pro+
- How To Bypass iCloud By Checkra1n Even From iPhone 6 If Youve Tried Everything
- In 2024, Amazing Ways to Find Suitable Animated Graphic Maker
- Full Guide to Catch 100 IV Pokémon Using a Map On Honor Magic Vs 2 | Dr.fone
- New Best 10 Free Manga Sites to Read Online for 2024
- In 2024, Tips and Tricks for Setting Up your Xiaomi Redmi Note 13 Pro 5G Phone Pattern Lock
- In 2024, Pokémon Go Cooldown Chart On Oppo A1 5G | Dr.fone
- In 2024, How PGSharp Save You from Ban While Spoofing Pokemon Go On Samsung Galaxy F34 5G? | Dr.fone
- Full Guide How To Fix Connection Is Not Private on Infinix Smart 8 Pro | Dr.fone
- 5 Ways to Track Apple iPhone XR without App | Dr.fone
- How to Unlock Samsung Galaxy A25 5G Phone without PIN
- Can I Bypass a Forgotten Phone Password Of Poco F5 Pro 5G?
- In 2024, Best Pokemons for PVP Matches in Pokemon Go For Vivo Y56 5G | Dr.fone
- In 2024, How to Transfer Contacts from Xiaomi Redmi 12 5G To Phone | Dr.fone
- How To Change Your SIM PIN Code on Your Vivo X100 Phone
- Title: 2024 Approved How to Use LUTs in VN Editor – Complete Guide and Best LUTs Download
- Author: Chloe
- Created at : 2024-04-24 07:08:12
- Updated at : 2024-04-25 07:08:12
- Link: https://ai-editing-video.techidaily.com/2024-approved-how-to-use-luts-in-vn-editor-complete-guide-and-best-luts-download/
- License: This work is licensed under CC BY-NC-SA 4.0.
