
:max_bytes(150000):strip_icc():format(webp)/001_the-16-best-shows-to-watch-on-discovery-plus-right-now-5116795-b17411d87cfd4bd690fda5be50ea188c.jpg)
2024 Approved How to Zoom Webcam on PC
How to Zoom Webcam on PC
Making certain our digital presence is the best it can be pays dividends as more and more of what we do online; similar is the case with how to zoom out webcam windows 10. The majority of experts advise against using the built-in camera that comes with your laptop or computer and instead advocate getting a webcam or an HD camera. These, however, may be hard to come by and pricy if you locate a nice one. If the built-in camera on your laptop doesn’t perform effectively during Zoom meetings, you may want to consider about investing in a separate, better webcam. Webcams offer automatic settings that are intended to function with the largest variety of lighting situations possible. This suggests that they average out a great number of responses to the content of the frame. Because of this, we have incorporated basic PC webcam zooming settings. These answers may be found in the portions that follow.
It’s vital to know how to zoom in on a webcam before visiting there. The camera wasn’t always as vital as it is today, and only very large corporations could afford to employ it as a convenience. But today, nearly everyone, from huge organizations to little firms, acknowledges its value. Everybody needs a webcam that works properly. The camera control software you are using determines the zoom function. The resolution of your picture window and the capabilities of the application dictate how far you can zoom in on the webcam’s video image. You can zoom in and out on camera photos using tools like YouCam and Windows Live Messenger. The most critical camera capabilities for the ideal video conferencing experience are zoom in and zoom out, which at first look may appear trivial. Here, we’ll walk you through each step, in detail. Continue reading, and we’ll check your understanding of webcam zoom in and zoom out skills!
Way 1: Zoom with Windows Live Messenger
When utilizing a camera for video conferencing, you may zoom in on a user’s face to get rid of the background. Webcam settings are not accessible by default in Microsoft Windows. However, camera zoom settings may be changed in instant chat systems. Through an instant messaging tool, such as Windows Live Messenger, you may simply access these options. This application provides private offline chat, video messaging, image and video sharing, and video chatting.
Step1Start Windows Live Messenger on your PC or laptop first. Enter your login name and password by clicking the “Sign In” button.

Step2On the top menu bar, pick “Tools.” And then select the “Audio and Video Setup”. Drag the slider next to “Speaker” to modify the speaker volume. Drag the slider next to “Microphone” to modify the microphone sensitivity. Press “Next.”

Step3From the drop-down list, pick the webcam. The “Camera Control” option is situated on the top; pick “Webcam Settings” after that.
Step4Now, to alter the zoom settings, drag the “Zoom” slider. To zoom in or out, drag the slider to the left or right. Press “OK.”
Way 2: Use Windows 10 Camera App
Wondering how to zoom your camera in the Windows 10 Camera app? The Camera app enables you to zoom in or out on your webcam in both image and video modes. To accomplish so, click or push the Magnification button, and then use the slider to modify the webcam’s zoom level. To operate the zoom feature manually, pick “Manual Zoom.” In the preview window, a square appears when you pick this option. To zoom in on a specific region of the capture window, drag the square there. To expand the image that was acquired by the webcam, slide the slider bar. In simply, The Camera app enables you zoom in or out of photographs and movies shot with your webcam. To do this, click on the “Zoom” button and drag the slider to the left or right as appropriate on your Windows 10 camera. the following steps:
Step1To open the “Start Menu,” make a right-click on “Start.” Now, to access the Camera app, type “Camera App” into the start menu’s search box.

Step2Tap the Camera Control icon when you start or join a meeting. To zoom and pan the camera to the appropriate spot, utilize the icons on the Camera Control panel.
![]()
Step3To exit the Camera Control window and return to the Meeting Controls, touch outside of it.
Way 3: Zoom with YouCam
Unfortunately, the default cameras or webcams bundled with the majority of Windows laptops and desktops don’t have an automatic zoom option. In fact, the only method to adjust their crop is to switch from “Standard” to “Widescreen,” which does slightly zoom in on you but not in the manner we’d want. This makes it inescapable that the only method to manually alter a webcam’s magnification is to acquire one separately and apply its software settings. , like YouCam. YouCam provides video calling, streaming, and broadcasting. includes an integrated app. To employ Zoom with YouCam, refer to the methods given below:
Step1Launch the YouCam camera program and activate the webcam.

Step2In the camera preview window, pick Settings. Then, select “Enable Video Zoom” from the menu.
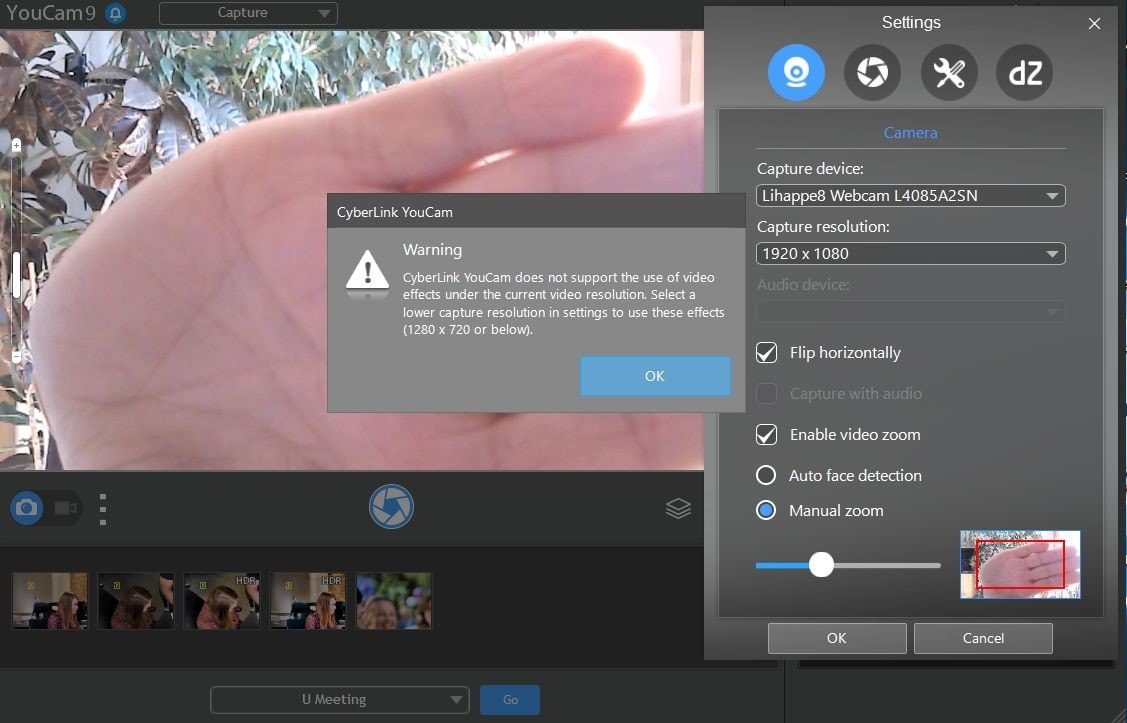
Step3Select “Automatic Face Detection” from the menu. As you wander about in the capture window, the camera watches your face and automatically zooms in on your photo as shown above.
Step4To handle the zoom feature manually, pick “Manual Zoom.” In the preview window, a square appears when you pick this option. To zoom in on a specific region of the capture window, drag the square there. To expand the image that was acquired by the webcam, slide the slider bar.

Way 4: Use iGlasses on Mac
For the perfect webcam look on a MAC, install the Chrome plugin iGlasses for video effects and style tweaks. Your videos will appear better on Zoom as a consequence. You may instantly enhance the appearance of your video interactions by utilizing the digital zoom on your iGlasses. Digital pan, tilt, and zoom are all possible with easy controls. For Macs that support it, an Apple Remote may be used to operate. iGlasses will become an option in Zoom’s video settings when it has been installed. You may improve your camera by altering the settings in iGlasses. You may experiment with a range of amusing effects, like 3-D distortions, using the virtual camera. Let’s learn how to utilize iGlasses on a Mac:
Step1Installing Ecamm’s iGlasses on a MacBook in the first step.
Step2To activate the camera, go to your video settings and pick iGlasses.
Step3Choose the Zoom window and execute the appropriate operations using the Zoom and Flip options. You may now zoom in and out using the camera on your MacBook as you like.

Conclusion
In conclusion, so many people currently take part in online conferences and virtual meetings. You want to create a lasting impression, don’t you? Not or whether you are the host of an online meeting or event, you must now maintain a professional image to prevent turning off attendees. You have discovered how to utilize the tools at your disposal to boost the zoom in and out quality of your camera in this post. However, as will be explained in the sections ahead, you may do it without the third-party plugins. With just one quick plugin, you can significantly transform how you look on a camera. Hence, try out the easy method from the above enlisted ones to get hold on your PC webcam to zoom in or out purposes.
Making certain our digital presence is the best it can be pays dividends as more and more of what we do online; similar is the case with how to zoom out webcam windows 10. The majority of experts advise against using the built-in camera that comes with your laptop or computer and instead advocate getting a webcam or an HD camera. These, however, may be hard to come by and pricy if you locate a nice one. If the built-in camera on your laptop doesn’t perform effectively during Zoom meetings, you may want to consider about investing in a separate, better webcam. Webcams offer automatic settings that are intended to function with the largest variety of lighting situations possible. This suggests that they average out a great number of responses to the content of the frame. Because of this, we have incorporated basic PC webcam zooming settings. These answers may be found in the portions that follow.
It’s vital to know how to zoom in on a webcam before visiting there. The camera wasn’t always as vital as it is today, and only very large corporations could afford to employ it as a convenience. But today, nearly everyone, from huge organizations to little firms, acknowledges its value. Everybody needs a webcam that works properly. The camera control software you are using determines the zoom function. The resolution of your picture window and the capabilities of the application dictate how far you can zoom in on the webcam’s video image. You can zoom in and out on camera photos using tools like YouCam and Windows Live Messenger. The most critical camera capabilities for the ideal video conferencing experience are zoom in and zoom out, which at first look may appear trivial. Here, we’ll walk you through each step, in detail. Continue reading, and we’ll check your understanding of webcam zoom in and zoom out skills!
Way 1: Zoom with Windows Live Messenger
When utilizing a camera for video conferencing, you may zoom in on a user’s face to get rid of the background. Webcam settings are not accessible by default in Microsoft Windows. However, camera zoom settings may be changed in instant chat systems. Through an instant messaging tool, such as Windows Live Messenger, you may simply access these options. This application provides private offline chat, video messaging, image and video sharing, and video chatting.
Step1Start Windows Live Messenger on your PC or laptop first. Enter your login name and password by clicking the “Sign In” button.
Step2On the top menu bar, pick “Tools.” And then select the “Audio and Video Setup”. Drag the slider next to “Speaker” to modify the speaker volume. Drag the slider next to “Microphone” to modify the microphone sensitivity. Press “Next.”
Step3From the drop-down list, pick the webcam. The “Camera Control” option is situated on the top; pick “Webcam Settings” after that.
Step4Now, to alter the zoom settings, drag the “Zoom” slider. To zoom in or out, drag the slider to the left or right. Press “OK.”
Way 2: Use Windows 10 Camera App
Wondering how to zoom your camera in the Windows 10 Camera app? The Camera app enables you to zoom in or out on your webcam in both image and video modes. To accomplish so, click or push the Magnification button, and then use the slider to modify the webcam’s zoom level. To operate the zoom feature manually, pick “Manual Zoom.” In the preview window, a square appears when you pick this option. To zoom in on a specific region of the capture window, drag the square there. To expand the image that was acquired by the webcam, slide the slider bar. In simply, The Camera app enables you zoom in or out of photographs and movies shot with your webcam. To do this, click on the “Zoom” button and drag the slider to the left or right as appropriate on your Windows 10 camera. the following steps:
Step1To open the “Start Menu,” make a right-click on “Start.” Now, to access the Camera app, type “Camera App” into the start menu’s search box.
Step2Tap the Camera Control icon when you start or join a meeting. To zoom and pan the camera to the appropriate spot, utilize the icons on the Camera Control panel.
![]()
Step3To exit the Camera Control window and return to the Meeting Controls, touch outside of it.
Way 3: Zoom with YouCam
Unfortunately, the default cameras or webcams bundled with the majority of Windows laptops and desktops don’t have an automatic zoom option. In fact, the only method to adjust their crop is to switch from “Standard” to “Widescreen,” which does slightly zoom in on you but not in the manner we’d want. This makes it inescapable that the only method to manually alter a webcam’s magnification is to acquire one separately and apply its software settings. , like YouCam. YouCam provides video calling, streaming, and broadcasting. includes an integrated app. To employ Zoom with YouCam, refer to the methods given below:
Step1Launch the YouCam camera program and activate the webcam.
Step2In the camera preview window, pick Settings. Then, select “Enable Video Zoom” from the menu.
Step3Select “Automatic Face Detection” from the menu. As you wander about in the capture window, the camera watches your face and automatically zooms in on your photo as shown above.
Step4To handle the zoom feature manually, pick “Manual Zoom.” In the preview window, a square appears when you pick this option. To zoom in on a specific region of the capture window, drag the square there. To expand the image that was acquired by the webcam, slide the slider bar.
Way 4: Use iGlasses on Mac
For the perfect webcam look on a MAC, install the Chrome plugin iGlasses for video effects and style tweaks. Your videos will appear better on Zoom as a consequence. You may instantly enhance the appearance of your video interactions by utilizing the digital zoom on your iGlasses. Digital pan, tilt, and zoom are all possible with easy controls. For Macs that support it, an Apple Remote may be used to operate. iGlasses will become an option in Zoom’s video settings when it has been installed. You may improve your camera by altering the settings in iGlasses. You may experiment with a range of amusing effects, like 3-D distortions, using the virtual camera. Let’s learn how to utilize iGlasses on a Mac:
Step1Installing Ecamm’s iGlasses on a MacBook in the first step.
Step2To activate the camera, go to your video settings and pick iGlasses.
Step3Choose the Zoom window and execute the appropriate operations using the Zoom and Flip options. You may now zoom in and out using the camera on your MacBook as you like.
Conclusion
In conclusion, so many people currently take part in online conferences and virtual meetings. You want to create a lasting impression, don’t you? Not or whether you are the host of an online meeting or event, you must now maintain a professional image to prevent turning off attendees. You have discovered how to utilize the tools at your disposal to boost the zoom in and out quality of your camera in this post. However, as will be explained in the sections ahead, you may do it without the third-party plugins. With just one quick plugin, you can significantly transform how you look on a camera. Hence, try out the easy method from the above enlisted ones to get hold on your PC webcam to zoom in or out purposes.
Tutorial to Add Effects with Movavi Slideshow Maker
Many video editors won’t be late in their artwork. They tend to use different effects to light up their crafts. For them, editing videos with effects applications gives more life to the story. In this composition, you will learn more about Effects, and if you are just about to do your video editing right now, these details are definitely for you.
What are Video Effects?
According to the dictionary, an effect is brought about by a cause or an agency.
In video editing, there are a few video effects you must know to apply them to your video project. Video effects can alter the speed and produce distortions, reflections, aesthetic filters, stylistic color grading, animation transitions, and more. They can also contain 3D features like CGI. When used well, these effects improve the narrative, the atmosphere, and the images’ overall impact.
Let’s dissect a few of the major effects, which will be most helpful to you.
Pans and Tilts
Your first thought upon hearing these two words may be tripod motions. Pans and tilts are a quick way to add additional movement and sensation to your video, making it more dynamic.
Change the Speed/Duration
One feature that virtually every NLE or Non-Linear Editing software gives us is the option to modify the playback speed of your video while reducing or increasing the actual duration and tempo of your segments. Slowing down your footage to match the frame rate at which the video was initially captured is one of the critical explanations for doing this.
To incorporate some frantic or chaotic moments into your production, you can use this to generate slow-motion shots and fast-forward effects. This effect can also quickly pan through footage for humorous effect. Find the “Speed/Duration” option under Effects controls to accomplish this.
Light Leaks and Flares
Nothing gives your video a more ethereal vibe than gentle, warm light emerging from the scene. A direct source visible in the photo may be the source of this light, or it may enter the frame from the edge. You’ve probably seen these flares and leaks countless times in movies, whether they were added in post-production or resulted from the cinematographer’s lens choice. You can select where the light comes from if it doesn’t distract from the task. Remember that these spills and flares must contribute to the narrative while remaining barely perceptible to the viewer.
Retro/VHS Effects
While light leaks and lens flares give your movie or film a timeless feel, nothing gives it a dated or, one would say, “scrappy” vibe. The grunge appearance of the ‘90s is in right now, and one of the most popular effects is the VHS look.
There are several ways to get this effect. Applying a preset, essentially a LUT (look-up table or filter), to your color grade will make the image appear fuzzier, desaturated, and blurrier (using the different alpha and gamma channels). This will cause “chroma errors,” which result from poor recordings and a lack of a flying erase head (a function that enables you to record over previously filmed video; imagine formatting your SD card while the video is still present on the card and you are simply recording over it), giving your images an outline of distorted blues and reds.
Color Grading and Color Correction
Besides actual editing, color grading and correction are arguably the most significant post-production steps. With the help of these tools, you may alter skin tones, highlight, and shadow levels, add vignettes, experiment with contrast, and much more. We’ll briefly go through one aspect of color grading—the ability to adjust particular colors in your image—even though this subject needs its ebook.
Adding Overlays
Although we’ve talked about adding overlays, such as VHS effects or light leaks, you may use many other editing overlays to add particular components to your shot, including weather particles!
Using Titles and Motion Graphics
Motion graphics and clean titles are essential for any video that wishes to appear professional. These could be subtitles, and the animation logo reveals post-credits, lower thirds, or even major titles. There are various free typefaces available that you may use to make your project stand out, regardless of the program you’re working in.
Once you’ve selected the appropriate font, color, and weight, it’s time to move on to motion graphics. These are crucial because they may transform a clear, ageless title or text into a lively, entertaining illustration of the product or concept your movie is attempting to market.
The abundance of tutorials nowadays makes learning the fundamentals of motion graphics a piece of cake. As I previously stated, you can access all the various effects and movements you might need, regardless of the editing program, you use.
These various methods and approaches need the practice to perfect, just like any other component of filmmaking. As you add these video editing effects to your editing toolkit, there will undoubtedly be a lot of trial and error. Still, eventually, they will become second nature to your workflow.
Importance of Applying Effects to your Video
Almost from the first motion film, cinematic storytelling and video effects have gone hand in hand. They can improve a scene, create something that doesn’t exist, hide an error, and do much more. In essence, they assist a filmmaker in telling a tale in the manner they desire.
Applying Effects using Movavi Slideshow Maker
Making picture collages is less appealing than slide show presentations. This method is ideal for presenting a gallery of images or creating a polished photo-video presentation for your brand and goods. You’ll need a creative slideshow program with loads of capabilities to create a polished slideshow that will enhance your production. The Movavi Slideshow Maker now comes into play.
In this composition, I will show you how to apply “Effects” on your video using Movavi Slideshow Maker video editing software. A professional slideshow program called Movavi slideshow creator is made for usage by both professional and amateur picture editors. It is a Mac and Windows PC freemium program with many options to give your slideshow presentation a polished and distinctive appearance.
Features of Movavi Slideshow Maker
- It offers an easy-to-use UI
- Includes a complete toolbox for altering photos
- Advanced features for improving slideshows
- Internal media tools
- Native recording capability
- Features scalable video adjustment.
Take note that this software is not just for editing pictures but also for videos.
Step1 Click the Import tab.

Step2 Click “Add Files” and locate your desired video to edit.

Step3 Drag the imported video that you want to edit onto the video track.

Applying Filter effects
A video filter is software that modifies a multimedia stream somehow. A filter graph is a series of filters that each accept input from an upstream filter, process the information, and then output the edited video to their downstream counterparts.
Step1 Click the Filter tab.

Step2 Choose your desired Filter effects depending on your preferred category.

Step3 You can see the preview of a Filter effect by clicking it before applying it to your desired video to be edited.

Step4 If you finally chose a Filter effect, drag it onto the imported video.
Step5 And now you will see the changes. The “star” symbol on the imported video means you have already applied a Filter effect on it.

Raw Footage vs With Applied Filter Effect
Raw Footage

Brush – Sketch Filter effect

Adding Transition Effect
Transitions guide your audience.
From the opening to the very end, they structure the movie. There are numerous typical forms, including the wipe, dissolve, split-cut, and many others. Film editors use transitions to transfer a scene from one video clip to another practice. Transitions don’t need to be visible.
Step1 Click the Transition tab.

Step2 Choose your desired Transition effect depending on your preferred category.

Step3 You can see the preview of a Transition effect by clicking it before applying it to your desired video to be edited.
Step4 If you finally chose a Transition effect, drag it between each imported video.

Step5 Now you will see this kind of symbol, which means you have already put a Transition effect between the imported videos.
![]()
Note: Transition effects can also be applied even if you have only one video. You can put transitions effects either at the start of the video, which could make your video introduction more appealing. Also, you can set the Transition effect at the end of the video, which could give you a pleasant closing.
Transition Effect at the start
Transition Effect at the end
Also, you can make your Transition effect longer or shorter simply by clicking this symbol then it will turn yellow. Point your cursor either on the left side of the symbol; the cursor will become a horizontal double-arrow to change the span of your Transition effect on the left video or on the right end side of the symbol to change the span of the Transition effect on the right video.
Applying Titling Motion Effect
Most video editing applications come with built-in titling choices, and many of them vary from basic letters to a collection of motion graphics that have already been pre-programmed. Enter your text into a template to insert them.
The majority of video projects have crucial titles. You can use them to build a mood, label key elements of the film, and convey information.
Step1 Click the Title tab.

Step2 Choose your desired Titling motion effect depending on your preferred category. You can also see the preview of a title effect by clicking it before applying it to your selected video to be edited.

Step3 To apply the Title Motion effect, drag the effect onto the title track, just above the video track.

Step4 You can place your Title Motion effect on your desired time where you want it to appear.

Step5 To edit your Title texts, you can double-click the applied title on the title track or right-click on it and click the “edit” option. You can also edit the text by double-clicking the title portion on the current video editing.

Step6 In this step, you can edit the Title text in the “clip editing” section, as seen in the red color box. You can change the color, text style, and font size on the yellow color box. And in the green color box, you can change the alignment of the text; you can Bold it, Italizing, and make it an Underlined text.

Step7 You can also adjust the time duration of the Titling Motion effect in two ways. First, by clicking the Title effect from the title track and placing your cursor on either side (the cursor will become a double-headed arrow), you have to shorten or lengthen the Title effect. The second step is to click the “Clip” section and adjust the duration.

These are some ways to apply effects on Movavi Slideshow Maker video editing software. You can choose your desired effects that can make an excellent contribution to your video project. You can download other effects not included in this software by simply going to their store. Click the Help tab to find “Movavi Store” or “Movavi Effects Store.”

You know many video editing software you can find on the internet, and most of them need your subscription to unlock all their features. But of course, there are also several video editing software that is free to use, which could be very helpful for you, especially when you are just a beginner in this field. Choosing the best video editing software is recommended to develop your skills gradually. You can start with a basic one before working on a professional type of video editing software.
Overall, I hope you learn more about applying effects to video editing. I hope this article helps you decide what video effects you will be using when you start editing videos. Remember that too many effects can ruin your work, so sometimes you need to keep it simple. Just be sure that you will guide the audience very well and lead them to your beautiful story.
Free Download For Win 7 or later(64-bit)
Free Download For macOS 10.14 or later
Transition Effect at the start
Transition Effect at the end
Also, you can make your Transition effect longer or shorter simply by clicking this symbol then it will turn yellow. Point your cursor either on the left side of the symbol; the cursor will become a horizontal double-arrow to change the span of your Transition effect on the left video or on the right end side of the symbol to change the span of the Transition effect on the right video.
Applying Titling Motion Effect
Most video editing applications come with built-in titling choices, and many of them vary from basic letters to a collection of motion graphics that have already been pre-programmed. Enter your text into a template to insert them.
The majority of video projects have crucial titles. You can use them to build a mood, label key elements of the film, and convey information.
Step1 Click the Title tab.
Step2 Choose your desired Titling motion effect depending on your preferred category. You can also see the preview of a title effect by clicking it before applying it to your selected video to be edited.
Step3 To apply the Title Motion effect, drag the effect onto the title track, just above the video track.
Step4 You can place your Title Motion effect on your desired time where you want it to appear.
Step5 To edit your Title texts, you can double-click the applied title on the title track or right-click on it and click the “edit” option. You can also edit the text by double-clicking the title portion on the current video editing.
Step6 In this step, you can edit the Title text in the “clip editing” section, as seen in the red color box. You can change the color, text style, and font size on the yellow color box. And in the green color box, you can change the alignment of the text; you can Bold it, Italizing, and make it an Underlined text.
Step7 You can also adjust the time duration of the Titling Motion effect in two ways. First, by clicking the Title effect from the title track and placing your cursor on either side (the cursor will become a double-headed arrow), you have to shorten or lengthen the Title effect. The second step is to click the “Clip” section and adjust the duration.
These are some ways to apply effects on Movavi Slideshow Maker video editing software. You can choose your desired effects that can make an excellent contribution to your video project. You can download other effects not included in this software by simply going to their store. Click the Help tab to find “Movavi Store” or “Movavi Effects Store.”
You know many video editing software you can find on the internet, and most of them need your subscription to unlock all their features. But of course, there are also several video editing software that is free to use, which could be very helpful for you, especially when you are just a beginner in this field. Choosing the best video editing software is recommended to develop your skills gradually. You can start with a basic one before working on a professional type of video editing software.
Overall, I hope you learn more about applying effects to video editing. I hope this article helps you decide what video effects you will be using when you start editing videos. Remember that too many effects can ruin your work, so sometimes you need to keep it simple. Just be sure that you will guide the audience very well and lead them to your beautiful story.
Free Download For Win 7 or later(64-bit)
Free Download For macOS 10.14 or later
Discover the Art of Masking in After Effects: A Comprehensive Guide
Masking is a powerful feature in After Effects that allows you to hide, reveal, or manipulate specific parts of a layer. Whether creating animations, visual effects, or enhancing your video content, masking can be a valuable tool in your arsenal. However, it can be intimidating for beginners, as it requires a good understanding of key concepts and techniques.
This article aims to demystify masking in After Effects and provide a comprehensive guide on getting started. Whether a beginner or an experienced user, you’ll find useful tips, tricks, and a creative alternative to masking that will take your skills to the next level. So let’s dive in and discover the art of masking in After Effects!

Overview of Masking in After Effects
Masking in After Effects hides or reveals certain layer parts, such as an image or video. This is achieved through masks, paths that determine the visibility of specific layer parts. Masks are an incredibly versatile tool in Adobe After Effects, allowing users to cut out and combine elements, create professional transitions, isolate objects in photos or videos, and build shapes, among other things.
Masks in After Effects are made up of two parts: the mask and the fill. The mask controls what is visible, while the fill determines the color or image used to fill the masked area.
By default, when a mask is created, it is set to “inverted,” meaning the masked area is visible, and the rest is hidden. However, this can easily be changed by pressing “M” to access the mask settings in the timeline and selecting the invert checkmark. Alternatively, the mode can be changed to subtract.
Overall, masks are an essential tool in After Effects, and it’s worth taking the time to learn as much as possible about them. The possibilities are endless, and mastering masks can greatly enhance your projects.
How To Do Masking in AE Using Shape Tools
Shape tools provide a quick and easy way to create masks in AE and are a great starting point for beginners. With these tools, you can easily create masks in various shapes and sizes to hide, reveal, or manipulate parts of a layer. We’ll guide you through creating masks using different shape tools, including the rectangle, ellipse, and polygon tools. So let’s get started!
Step1 Choose the layer to which you want to apply the mask.

Step2 Choose one of the shape tools from the toolbar.

Step3 Drag the mouse and select the area you want to apply the shape tool mask.

![]()
Note:
- Holding down the “CTRL“ key for Windows or the “CMD“ key for Mac will draw the shape from the center.
- Holding down the “Shift“ key will maintain equal sides and create symmetrical shapes such as squares or circles.
How To Use Pen Tool for Masking in After Effects
The Pen Tool in After Effects is a powerful, flexible option for creating masks. This section will explore using the Pen Tool to create masks in After Effects.
Whether you need to create a complex or a simple mask, the Pen Tool provides precise control over the mask shape and can create any shape you desire. From freehand masks to geometric shapes, the Pen Tool is the tool of choice for many After Effects users. Let’s take a closer look at how to use the Pen Tool for masking in After Effects.
Step1 Import image to project and add to timeline.

Step2 Click on the “Pen“ icon to activate Pen Tool, and use it to mask out the background.

Step3 Place a new image behind a masked image for a new background.

Step4 Add a masked image feather if needed.

Step5 Add text, and create a “shape layer“ to place on the text.

Step6 Use “Alpha Inverted Matte“ to mask the text.

Wondershare Filmora - A Great Alternative to After Effects Masking
Wondershare Filmora is a popular video editing software that offers a range of features and tools for video editing. One of the most useful features is its masking capability, which provides a great alternative to the masking feature in Adobe After Effects.
Filmora’s masking feature is designed to be user-friendly, making it ideal for both beginner and advanced users. With its intuitive interface, users can easily create masks to hide, reveal, or manipulate parts of a video. The software offers a range of masking tools, including shape, freehand, and gradient masks, providing a wide range of options.
Free Download For Win 7 or later(64-bit)
Free Download For macOS 10.14 or later
In addition to its masking feature, Filmora offers various tools and features that make it a great choice for video editing. Its keyframe animation allows users to create smooth and professional transitions, and its audio editing features allow users to add music, sound effects, and voiceovers easily. The software also supports various file formats, making it easy to import and export videos for sharing and distribution.
Overall, Wondershare Filmora is a great alternative to After Effects, particularly for users looking for a more user-friendly and affordable video editing and masking option. With its comprehensive features, Filmora provides an excellent option for users who want to create professional-looking videos without needing advanced technical skills.
How To Use Shape Tool In Masking Using Filmora
The Shape Tool in Filmora is a feature in the video editing software Wondershare Filmora, which allows users to create masks with various shapes such as rectangles, circles, double lines, single lines, love, and star, as well as custom shapes using the draw mask feature. Masks in Filmora can hide or reveal specific parts of a video clip, add animations, and create composite images and videos.
Discover how to use the Shape Tool in Wondershare Filmora for masking, a great alternative to After Effects masking. Easy to use for beginners and advanced users alike, Filmora’s Shape Tool provides options for creating masks to manipulate video content.
Step1 Enter the Video panel, and switch to the Mask tab in Wondershare Filmora. Choose from basic mask shapes or create your own.

Step2 Select a shape; see only the masked area in the Preview window.

Step3 Add keyframes to animate the mask and adjust position, rotation, size, and blur strength.

How To Use Pen Tool In Masking Using Filmora
Pen Tool in Masking Using Filmora is a feature that enables users to create complex masks by dragging control points and modifying B-Splines. The tool allows users to draw the mask shape precisely by zooming in and out on the player screen and to create smooth curves by holding the Alt/Option key to adjust the Bessel curve for drawn masks.
The mask created using the Pen Tool can be edited, resized, repositioned, and adjusted using sliders and handles in the Preview window. The tool also enables users to invert the mask, making the original visible part invisible and the hidden part visible.
Learn how to use the Pen Tool in Wondershare Filmora for masking, a versatile alternative to After Effects masking. With the Pen Tool, you can easily outline and manipulate specific areas in your video to create unique and professional effects.

Step1 Create a project and add the media to the timeline**. Enter** the Mask tab.
Step2 Edit the mask by adjusting the sliders in the Mask tab to resize, reposition, and change orientation. Also, adjust the blur strength, width, height, and radius, or invert the mask.

Conclusion
Masking is an important aspect of video editing and opens up a new world of creative possibilities. After Effects provides a comprehensive set of tools for masking, and Filmora is a great alternative for those looking for a more user-friendly option.
Whether you’re using After Effects or Filmora, you can use masks to control the visibility of parts of your image, make shapes, build transitions, and much more. Following this article’s simple steps, you can start masking and bringing your creative vision to life.
- Holding down the “CTRL“ key for Windows or the “CMD“ key for Mac will draw the shape from the center.
- Holding down the “Shift“ key will maintain equal sides and create symmetrical shapes such as squares or circles.
How To Use Pen Tool for Masking in After Effects
The Pen Tool in After Effects is a powerful, flexible option for creating masks. This section will explore using the Pen Tool to create masks in After Effects.
Whether you need to create a complex or a simple mask, the Pen Tool provides precise control over the mask shape and can create any shape you desire. From freehand masks to geometric shapes, the Pen Tool is the tool of choice for many After Effects users. Let’s take a closer look at how to use the Pen Tool for masking in After Effects.
Step1 Import image to project and add to timeline.
Step2 Click on the “Pen“ icon to activate Pen Tool, and use it to mask out the background.
Step3 Place a new image behind a masked image for a new background.
Step4 Add a masked image feather if needed.
Step5 Add text, and create a “shape layer“ to place on the text.
Step6 Use “Alpha Inverted Matte“ to mask the text.
Wondershare Filmora - A Great Alternative to After Effects Masking
Wondershare Filmora is a popular video editing software that offers a range of features and tools for video editing. One of the most useful features is its masking capability, which provides a great alternative to the masking feature in Adobe After Effects.
Filmora’s masking feature is designed to be user-friendly, making it ideal for both beginner and advanced users. With its intuitive interface, users can easily create masks to hide, reveal, or manipulate parts of a video. The software offers a range of masking tools, including shape, freehand, and gradient masks, providing a wide range of options.
Free Download For Win 7 or later(64-bit)
Free Download For macOS 10.14 or later
In addition to its masking feature, Filmora offers various tools and features that make it a great choice for video editing. Its keyframe animation allows users to create smooth and professional transitions, and its audio editing features allow users to add music, sound effects, and voiceovers easily. The software also supports various file formats, making it easy to import and export videos for sharing and distribution.
Overall, Wondershare Filmora is a great alternative to After Effects, particularly for users looking for a more user-friendly and affordable video editing and masking option. With its comprehensive features, Filmora provides an excellent option for users who want to create professional-looking videos without needing advanced technical skills.
How To Use Shape Tool In Masking Using Filmora
The Shape Tool in Filmora is a feature in the video editing software Wondershare Filmora, which allows users to create masks with various shapes such as rectangles, circles, double lines, single lines, love, and star, as well as custom shapes using the draw mask feature. Masks in Filmora can hide or reveal specific parts of a video clip, add animations, and create composite images and videos.
Discover how to use the Shape Tool in Wondershare Filmora for masking, a great alternative to After Effects masking. Easy to use for beginners and advanced users alike, Filmora’s Shape Tool provides options for creating masks to manipulate video content.
Step1 Enter the Video panel, and switch to the Mask tab in Wondershare Filmora. Choose from basic mask shapes or create your own.
Step2 Select a shape; see only the masked area in the Preview window.
Step3 Add keyframes to animate the mask and adjust position, rotation, size, and blur strength.
How To Use Pen Tool In Masking Using Filmora
Pen Tool in Masking Using Filmora is a feature that enables users to create complex masks by dragging control points and modifying B-Splines. The tool allows users to draw the mask shape precisely by zooming in and out on the player screen and to create smooth curves by holding the Alt/Option key to adjust the Bessel curve for drawn masks.
The mask created using the Pen Tool can be edited, resized, repositioned, and adjusted using sliders and handles in the Preview window. The tool also enables users to invert the mask, making the original visible part invisible and the hidden part visible.
Learn how to use the Pen Tool in Wondershare Filmora for masking, a versatile alternative to After Effects masking. With the Pen Tool, you can easily outline and manipulate specific areas in your video to create unique and professional effects.
Step1 Create a project and add the media to the timeline**. Enter** the Mask tab.
Step2 Edit the mask by adjusting the sliders in the Mask tab to resize, reposition, and change orientation. Also, adjust the blur strength, width, height, and radius, or invert the mask.
Conclusion
Masking is an important aspect of video editing and opens up a new world of creative possibilities. After Effects provides a comprehensive set of tools for masking, and Filmora is a great alternative for those looking for a more user-friendly option.
Whether you’re using After Effects or Filmora, you can use masks to control the visibility of parts of your image, make shapes, build transitions, and much more. Following this article’s simple steps, you can start masking and bringing your creative vision to life.
The Ultimate Guide to GIF for Discord Profile
The Ultimate Guide to GIF for Discord Profile
An easy yet powerful editor
Numerous effects to choose from
Detailed tutorials provided by the official channel
Discord is the future of digital communication. After all, it is a new platform with unique and amazing features that most people need. Discord is a digital platform where users communicate via video calls, audio calls, media, files, and text in private chats. It works under multiple operating systems, including Mac, Windows, Linux, iPadOS, Web browsers, and Android. In other words, it is excellent for various users with different devices.
Discord GIF profile pic is one of the most popular topics related to the platform. Of course, the platform is new; hence developing a discord animated profile pic can be a hustle to newbies. Fortunately, this article is here with the right questions and responses. Do you wish to learn how to get a discord animated profile picture? If yes, journey with us to learn about discord GIF profile pics and get animated profile pictures on discord. Read on!
In this article
01 [What’s GIF for Discord profile?](#Part 1)
02 [How to Get Animated Profile Picture without having Discord Nitro?](#Part 2)
03 [How to make Discord PFP a GIF?](#Part 3)
04 [How to Put a GIF in Discord profile Picture?](#Part 4)
Part 1 What’s GIF for Discord profile?
Before reviewing the meaning of a GIF in Discord, it is essential to understand what it generally means. Technically, GIF in full means Graphical Interchange Format referring to an image format. In other words, it is an animated image. The file size is probably the smallest, with images looping continuously in a soundless video without the user doing much.
In this case, we are talking about discord and gifs. That is the animated profile picture discord. Think about how you have profile images for different social media accounts. It is the same case, but you settle for a GIF discord profile instead of photos**.**
Why use GIF for Discord Profile?
It is no hush-hush that many people are gradually adopting the idea of gifs in their discord profiles. After all, gifs aren’t new, and they are everywhere. This fact leaves us wondering why you should use it and its effect on your account.
● GIFs are the best way to grab attention and create a connection with your friends. From its definition, gif contains loops that quickly get the attention you wish for your work.
● They display a friendly side that helps you create a connection with people.
● It gives your account more emotion and a sense of friendliness that leaves people wanting to communicate with you.
● Gifs are the current trend; hence, they indicate a direction. In other words, you pay attention to trends.
● It provides a sense of entertainment and youthfulness in your work.
GIFs are everywhere; hence, it is fantastic to adapt to the current trends that young people follow to keep up with technological evolutions. Create a GIF profile on discord and realize the fun you miss out on discord. And if you are yet to create a discord account, ensure that you join the platform and freely communicate with your friends.
Part 2 How to Get Animated Profile Picture without having Discord Nitro?
Are you a Discord user, or are you get to create an account? If yes, you are familiar with discord nitro and all the advantages that come with it. And if you are not a user, you probably are confused about discord Nitro. Let’s start with basic information on discord nitro and its use. Discord Nitro is the genre version of discord with multiple features, making it a worthy option. It enhances your experience with discord voice, text, video, and most importantly, creating profile pictures.
The Nitro version promotes animated discord profile pics. It is a great option but, what do you do when you can’t afford it? Is it still possible to get cool animated discord profile pics? Yes. You can comfortably get a profile discord GIF without Discord Nitro. And you are lucky since this section will cover this necessary topic.
Of course, we have to thank content writer Ubaid Ullah for the article on how to get Discord GIF profile without nitro. After all, it is one of our reference points.
Step 1: Create a GIF or download one that meets your taste from different websites. Currently, we have many sites offering free GIFs; hence you don’t have to worry about copyright issues. Some top websites to consider are Giphy, Gifer, etc.
Step 2: Look for a site that can translate a GIF document to the APNG file. Don’t worry about this step since you can always google the top options. We currently have the ezgif site but technology changes every day; hence you can expect rising websites.
Step 3: Let’s use the ezgif website. Upon accessing it, ensure that you settle for the APNG maker icon. It is on the top left of the website.

Step 4: Check on the Crossfade Frames option. Note that you need to choose images with at most thirty frames. Finally, click on the Make APNG option

Step 6: You can add multiple after-effects after creating the GIF to customize the final look
Step 7: Download the final file and save it on your PC with the name you wish
Step 8: Upload on Discord
Important things to note when uploading GIFs on Discord
● Discord only allows a file that is at least 8MBs. So, if yours isn’t, you can compress it via different websites.
● A gif with nitro is neater, but a GIF without nitro works better than having an image.
● Even without discord Nitro, you still have access to the cool animated discord profile pics if you have a discord server. Suppose you have an animated discord profile, and then we can only see one frame without discord nitro.
Part 3 How to make Discord PFP a GIF?
From the beginning of this piece until now, all we have discussed is getting or making a GIF. However, we will define the simplest way to make your profile pic a GIF in Discord in this case. Ensure that you read through this section.
Generally, discord nitro users are more privileged compared to normal discord users. Of course, the Nitro subscribers pay a fee to access these privileges. There are two options:
● Making your profile picture a GIF
● Utilizing the Tenor GIFs
● Uploading them from your files
02How to create your profile picture a GIF?
Step 1: Log into your Discord account

Step 2: Visit the user settings gear icon and go to edit profile to access your account details.
Step 3: Click on your current profile or click on the Change Avatar option
Step 5: Use the available GIF search engine or upload files from your device. It depends on whether you are a Nitro subscriber or a normal user. Select your GIF and go to the Apply option to save the file
Step 6: Move to the escape button to exit the settings, and you realize that your PFP is officially a GIF.
02Key points on discord GIF profile
● You only have access to the discord nitro profile GIFs if you are a nitro subscriber. Otherwise, you need to look for GIFs from different websites and upload them.
● The maximum resolution of a GIF is 128 by 128 pixels hence you need to be careful.
● The GIF file size for discord is at most 8MBs.
● You can create a GIF instead of uploading it from free websites.
Part 4 How to Put a GIF in Discord profile Picture?
Discord is quite a popular platform with millions of users worldwide. Thanks to the user-friendly interface it includes, this number is enormous, especially when you wish to edit your profile picture. In our case, we explain facts about having a GIF as a PFP in discord.
Like most social media platforms, this process is relatively easy. It only requires you to be a discord user, and it is better if you are a nitro subscriber. Why? Because the latter have the discord GIF options easing the process. Note that you can still add a GIF even without nitro.
The first point is to log into your account, go to setting and click on the edit your profile option. Upon clicking on the available PFP, you will automatically access a file dialogue that prompts you to include your GIF. Later save these changes and get a GIF profile in discord.
GIFs are like looping or repetitive short videos; hence they need editing. Fortunately, we have the Wondershare Filmora Video Editor editor, which includes multiple features which assist in editing your work. Filmora features scene detection, video stabilization, noise removal, text editor, etc. All these features work together to deliver high-quality discord profile GIFs.

Wondershare Filmora - Best Video Editor for Mac/Windows
5,481,435 people have downloaded it.
Build unique custom animations without breaking a sweat.
Focus on creating epic stories and leave the details to Filmora’s auto features.
Start a creative adventure with drag & drop effects and endless possibilities.
Filmora simplifies advanced features to save you time and effort.
Filmora cuts out repetition so you can move on to your next creative breakthrough.
● Ending Thoughts →
● It is possible to have unique GIFs in your Discord account as a normal discord user
●> Editing Discord profile is convenient for all
● There are countless websites available that can assist you in getting a good GIF
● Generally, discord is a powerful platform with millions of users. It is pretty new but has received positive feedback from people. Discord includes amazing unique features, including animated discord profile pictures. However, there is maximum confusion on setting discord gif profiles, which is the area that this article addresses. Clear all doubts on profile discord GIFs by reading the content above.
Discord is the future of digital communication. After all, it is a new platform with unique and amazing features that most people need. Discord is a digital platform where users communicate via video calls, audio calls, media, files, and text in private chats. It works under multiple operating systems, including Mac, Windows, Linux, iPadOS, Web browsers, and Android. In other words, it is excellent for various users with different devices.
Discord GIF profile pic is one of the most popular topics related to the platform. Of course, the platform is new; hence developing a discord animated profile pic can be a hustle to newbies. Fortunately, this article is here with the right questions and responses. Do you wish to learn how to get a discord animated profile picture? If yes, journey with us to learn about discord GIF profile pics and get animated profile pictures on discord. Read on!
In this article
01 [What’s GIF for Discord profile?](#Part 1)
02 [How to Get Animated Profile Picture without having Discord Nitro?](#Part 2)
03 [How to make Discord PFP a GIF?](#Part 3)
04 [How to Put a GIF in Discord profile Picture?](#Part 4)
Part 1 What’s GIF for Discord profile?
Before reviewing the meaning of a GIF in Discord, it is essential to understand what it generally means. Technically, GIF in full means Graphical Interchange Format referring to an image format. In other words, it is an animated image. The file size is probably the smallest, with images looping continuously in a soundless video without the user doing much.
In this case, we are talking about discord and gifs. That is the animated profile picture discord. Think about how you have profile images for different social media accounts. It is the same case, but you settle for a GIF discord profile instead of photos**.**
Why use GIF for Discord Profile?
It is no hush-hush that many people are gradually adopting the idea of gifs in their discord profiles. After all, gifs aren’t new, and they are everywhere. This fact leaves us wondering why you should use it and its effect on your account.
● GIFs are the best way to grab attention and create a connection with your friends. From its definition, gif contains loops that quickly get the attention you wish for your work.
● They display a friendly side that helps you create a connection with people.
● It gives your account more emotion and a sense of friendliness that leaves people wanting to communicate with you.
● Gifs are the current trend; hence, they indicate a direction. In other words, you pay attention to trends.
● It provides a sense of entertainment and youthfulness in your work.
GIFs are everywhere; hence, it is fantastic to adapt to the current trends that young people follow to keep up with technological evolutions. Create a GIF profile on discord and realize the fun you miss out on discord. And if you are yet to create a discord account, ensure that you join the platform and freely communicate with your friends.
Part 2 How to Get Animated Profile Picture without having Discord Nitro?
Are you a Discord user, or are you get to create an account? If yes, you are familiar with discord nitro and all the advantages that come with it. And if you are not a user, you probably are confused about discord Nitro. Let’s start with basic information on discord nitro and its use. Discord Nitro is the genre version of discord with multiple features, making it a worthy option. It enhances your experience with discord voice, text, video, and most importantly, creating profile pictures.
The Nitro version promotes animated discord profile pics. It is a great option but, what do you do when you can’t afford it? Is it still possible to get cool animated discord profile pics? Yes. You can comfortably get a profile discord GIF without Discord Nitro. And you are lucky since this section will cover this necessary topic.
Of course, we have to thank content writer Ubaid Ullah for the article on how to get Discord GIF profile without nitro. After all, it is one of our reference points.
Step 1: Create a GIF or download one that meets your taste from different websites. Currently, we have many sites offering free GIFs; hence you don’t have to worry about copyright issues. Some top websites to consider are Giphy, Gifer, etc.
Step 2: Look for a site that can translate a GIF document to the APNG file. Don’t worry about this step since you can always google the top options. We currently have the ezgif site but technology changes every day; hence you can expect rising websites.
Step 3: Let’s use the ezgif website. Upon accessing it, ensure that you settle for the APNG maker icon. It is on the top left of the website.
Step 4: Check on the Crossfade Frames option. Note that you need to choose images with at most thirty frames. Finally, click on the Make APNG option
Step 6: You can add multiple after-effects after creating the GIF to customize the final look
Step 7: Download the final file and save it on your PC with the name you wish
Step 8: Upload on Discord
Important things to note when uploading GIFs on Discord
● Discord only allows a file that is at least 8MBs. So, if yours isn’t, you can compress it via different websites.
● A gif with nitro is neater, but a GIF without nitro works better than having an image.
● Even without discord Nitro, you still have access to the cool animated discord profile pics if you have a discord server. Suppose you have an animated discord profile, and then we can only see one frame without discord nitro.
Part 3 How to make Discord PFP a GIF?
From the beginning of this piece until now, all we have discussed is getting or making a GIF. However, we will define the simplest way to make your profile pic a GIF in Discord in this case. Ensure that you read through this section.
Generally, discord nitro users are more privileged compared to normal discord users. Of course, the Nitro subscribers pay a fee to access these privileges. There are two options:
● Making your profile picture a GIF
● Utilizing the Tenor GIFs
● Uploading them from your files
02How to create your profile picture a GIF?
Step 1: Log into your Discord account
Step 2: Visit the user settings gear icon and go to edit profile to access your account details.
Step 3: Click on your current profile or click on the Change Avatar option
Step 5: Use the available GIF search engine or upload files from your device. It depends on whether you are a Nitro subscriber or a normal user. Select your GIF and go to the Apply option to save the file
Step 6: Move to the escape button to exit the settings, and you realize that your PFP is officially a GIF.
02Key points on discord GIF profile
● You only have access to the discord nitro profile GIFs if you are a nitro subscriber. Otherwise, you need to look for GIFs from different websites and upload them.
● The maximum resolution of a GIF is 128 by 128 pixels hence you need to be careful.
● The GIF file size for discord is at most 8MBs.
● You can create a GIF instead of uploading it from free websites.
Part 4 How to Put a GIF in Discord profile Picture?
Discord is quite a popular platform with millions of users worldwide. Thanks to the user-friendly interface it includes, this number is enormous, especially when you wish to edit your profile picture. In our case, we explain facts about having a GIF as a PFP in discord.
Like most social media platforms, this process is relatively easy. It only requires you to be a discord user, and it is better if you are a nitro subscriber. Why? Because the latter have the discord GIF options easing the process. Note that you can still add a GIF even without nitro.
The first point is to log into your account, go to setting and click on the edit your profile option. Upon clicking on the available PFP, you will automatically access a file dialogue that prompts you to include your GIF. Later save these changes and get a GIF profile in discord.
GIFs are like looping or repetitive short videos; hence they need editing. Fortunately, we have the Wondershare Filmora Video Editor editor, which includes multiple features which assist in editing your work. Filmora features scene detection, video stabilization, noise removal, text editor, etc. All these features work together to deliver high-quality discord profile GIFs.
Wondershare Filmora - Best Video Editor for Mac/Windows
5,481,435 people have downloaded it.
Build unique custom animations without breaking a sweat.
Focus on creating epic stories and leave the details to Filmora’s auto features.
Start a creative adventure with drag & drop effects and endless possibilities.
Filmora simplifies advanced features to save you time and effort.
Filmora cuts out repetition so you can move on to your next creative breakthrough.
● Ending Thoughts →
● It is possible to have unique GIFs in your Discord account as a normal discord user
●> Editing Discord profile is convenient for all
● There are countless websites available that can assist you in getting a good GIF
● Generally, discord is a powerful platform with millions of users. It is pretty new but has received positive feedback from people. Discord includes amazing unique features, including animated discord profile pictures. However, there is maximum confusion on setting discord gif profiles, which is the area that this article addresses. Clear all doubts on profile discord GIFs by reading the content above.
Also read:
- New In 2024, 3D Ray Traced Settings In After Effects A Comprehensive Guide
- In 2024, In This Article, We Are Going to Learn the Simplest Procedure on How to Cut And/Or Trim Videos Using VLC Media Player. Each Step Is Carefully Explained, with Screenshots Attached
- New Best 8 AR Apps for Android and iOS | Help You See the World of AR
- In 2024, 11 Best Video Editing Apps for iPhone
- In 2024, What Slideshow Templates Can Teach You About Aesthetic
- In 2024, The Glitch Filter Is Similar to an Error or a Distorted Effect in the Video. The Article Enables the Users to Get the VHS Filter in One of Their Travel Videos and Instagram Accounts
- In 2024, Are You Convincingly Fascinated by the Whole Idea of Augmented Reality and Want to Level up Your Marketing Skills with an AR Integration? Rest Assured, Youve Found the Right Place
- 2024 Approved In This Article Let Me Share with You How to Start a Vlog? Ideas and Any Tips for You to Start Your Own Vlogging Channel
- Easy Steps to Make Glitch Effect with Filmora
- Updated A Comprehensive Guide on VHS Technology and Its Influence on Video Editing for 2024
- 8 Frame Rate Video Converters You Must Try for 2024
- New In 2024, VN Video Editor Templates A Game-Changer for Your Videos
- Updated Top 5 Video Filter Software Improve Your Videos with Filters for 2024
- In 2024, If You Want to Keep Your Memories in Form of Video or Slideshow Then Keynote Is Great App for You. It Has Amazing and Powerful Tools Which Give Your Slideshow a Great and Beautiful Look
- Want to Learn How to Trim Videos in Premiere Pro. Read on; Our Guide Will Help You Trim Videos with This Timeline-Based Video Editing Software Application to Make Them Engaging to Viewers for 2024
- Updated 3D Ray Traced Settings In After Effects A Comprehensive Guide
- New 2024 Approved Best 12 Best Freeze Frame Video Editing Examples
- New How to Create A Freeze Frame Sequence in Video
- New How to Add Freeze Frame to Your Video From Any Device for 2024
- Updated 2024 Approved Learn to Merge Clips in DaVinci Resolve with Simple Steps
- Which Is the Best Video Slideshow Maker Available Online, In 2024 Methods to Prepare Custom Slideshows for Google Presentation. How to Make a Slide Show Video?
- The Complete Guide to Making Fortnite Montage
- Updated How to Edit GoPro Videos on Mac for 2024
- 2024 Approved Something About Skin Care Vlog Ideas
- Updated In 2024, Best Ways to Blur Zoom Background for Free
- New 2024 Approved How to Create Vintage Film Effect 1990S
- Updated 2024 Approved Recording Video in Slow Motion Some Considerable Points
- Updated 8 Free Photo Collage with Music Video Maker for 2024
- Updated How to Use 3D Camera Tracking Effects in After Effects
- Updated 2024 Approved Video Inspiration for Birthday Slideshow
- Updated Easy Steps to Slow Down a Video on iPhone and Android
- New Find Out the Best Animated Text Video Tools and Learn How to Animate Text in a Video in Simple Steps. Discover the Best Fonts to Animate Text Along with the Text Animation Templates
- New In 2024, How to Add Custom Subtitles to Netflix
- Updated Detailed Steps to Rotate Videos in Davinci Resolve
- New In 2024, How to Loop Video in Canva
- New 2024 Approved Guide of 8 Photo Collage Apps for PC
- Come And Pick! Best MOV to GIF Converters for 2024
- New Back up and Organize Your Files to Protect Any Misfortune Befalling Them. The Article Will Guide You on How to Back up and Manage Your Footage
- New How to Make Text Reveal Effect for Your Video
- New Easily Combine Videos and Audios with 5 Simple Online Tools for 2024
- In 2024, How to Create Your Own LOL Montage Video
- New Find Out The Best Dark Moody LUTs During Editing for 2024
- New 2024 Approved Split Audio From Video in Adobe Premiere Pro Step by Step
- Updated Learning How to Create LUTs with LUTs Generator for 2024
- Samples of Cartoon Character Face to Inspire You for 2024
- In 2024, How Can I Catch the Regional Pokémon without Traveling On Oppo Reno 11F 5G | Dr.fone
- Does find my friends work on Apple iPhone 14 Plus | Dr.fone
- In 2024, Getting the Pokemon Go GPS Signal Not Found 11 Error in Nokia G310 | Dr.fone
- My Videos Arent Playing on Nokia C300 – What Can I Do? | Dr.fone
- 8 Workable Fixes to the SIM not provisioned MM#2 Error on Itel A05s | Dr.fone
- How To Repair System of Apple iPhone 12? | Dr.fone
- Life360 Circle Everything You Need to Know On Realme GT 5 | Dr.fone
- Android Screen Stuck General Motorola Edge+ (2023) Partly Screen Unresponsive | Dr.fone
- How To Transfer WhatsApp From iPhone 12 mini to other iPhone 13 Pro Max devices? | Dr.fone
- In 2024, How to Transfer Contacts from Poco X6 To Phone | Dr.fone
- Fake Android Location without Rooting For Your Google Pixel 8 | Dr.fone
- In 2024, Unlock Your Itel A05s Phone with Ease The 3 Best Lock Screen Removal Tools
- Motorola Razr 40 Not Receiving Texts? 10 Hassle-Free Solutions Here | Dr.fone
- In 2024, 5 Ways to Track Vivo V27e without App | Dr.fone
- In 2024, 5 Easy Ways to Copy Contacts from Oppo A58 4G to iPhone 14 and 15 | Dr.fone
- How to Screen Mirroring Nokia C32 to PC? | Dr.fone
- In 2024, The Best iSpoofer Alternative to Try On Realme 12 Pro+ 5G | Dr.fone
- New 2024 Approved New Essential Details of Making Perfect Talking Face
- In 2024, How to Fake GPS on Android without Mock Location For your Motorola Edge 40 Pro | Dr.fone
- In 2024, How Can We Bypass Samsung Galaxy F34 5G FRP?
- How To Unlock a Realme GT 3 Easily?
- How To Fix Auto Lock Greyed Out on Apple iPhone SE
- In 2024, Can You Unlock iPhone SE (2020) After Forgetting the Passcode? | Dr.fone
- In 2024, 3 Ways for Android Pokemon Go Spoofing On Vivo S17 Pro | Dr.fone
- How to Unlock locked iPhone 12 Pro Max without Face ID
- Title: 2024 Approved How to Zoom Webcam on PC
- Author: Chloe
- Created at : 2024-04-24 07:08:13
- Updated at : 2024-04-25 07:08:13
- Link: https://ai-editing-video.techidaily.com/2024-approved-how-to-zoom-webcam-on-pc/
- License: This work is licensed under CC BY-NC-SA 4.0.
