
:max_bytes(150000):strip_icc():format(webp)/are-you-really-getting-dolby-atmos-sound-135ec4330d004250883e2acab9423191.jpg)
2024 Approved Looking for Efficient Ways to Create a Slow-Motion Video? Read the Article for Reliable Solutions that Provide Excellent Results
Looking for Efficient Ways to Create a Slow-Motion Video? Read the Article for Reliable Solutions that Provide Excellent Results
The slow-motion effect has been used for years to add dramatic effects to movies. An important scene is always highlighted and looks better with a slow-motion effect. Applying slow motion is beneficial, too, as it can give you a better preview of the scene. The effect is easily accessible in many video editing applications.
How would you find an app that gives good final cut slow-motion results? This article has got you all covered on that. Here, you will find the Final Cut Pro slow-motion effect that works fantastic without ruining your video’s quality. So, follow the article to learn more about using FCP slow motion.
Slow Motion Video Maker Slow your video’s speed with better control of your keyframes to create unique cinematic effects!
Make A Slow Motion Video Make A Slow Motion Video More Features

Part 1: What Makes a Perfect Slow-Motion Video?
An ideal FCP slow-motion video requires careful attention to technical details and aesthetics. Below are some essential things to think about bringing perfection in slow-motion videos:
- Resolution: A slow-motion video with visual appeal and a high resolution is crucial. This is especially vital if you intend to crop or zoom in on the video while editing.
- Storytelling: Make sure the slow-motion clip supports the idea you’re attempting to portray. Your scenes will have more impact if you tell them with a thoughtful narrative.
- Editing: Try different speeds when editing your clip to achieve the best impact. Consider including sound effects or music to accompany the slow-motion images.
- Timing: Select the appropriate times to record in slow motion. You shouldn’t slow down your entire video. Instead, you can apply the effect to draw attention to acts or feelings.
- Frame Rate: Slow-motion videos are usually shot at a greater frame rate. Frame rates of 60, 120, 240, or even higher are common as they make the video look smoother.
- Shutter Speed: For precise and sharp results, use a fast shutter speed camera. This lessens the likelihood of motion blur in every slow-motion frame.
Part 2: Learning All Essential Techniques to Perform Slow Motion in Final Cut Pro X
Apple created Final Cut Pro , and it is only accessible to macOS users. Professional video editors can utilize the software’s array of capabilities. The tool offers incredible video editing functions. Its features are tailored to handle high-resolution video material. The tool has an AI object tracker that detects faces and objects. Its cinematic mode helps you create professional videos.
Final cut slow motion gives a dramatic and intense effect to your videos. You can create an entirely different video with the power of its editing features. Slow-mo Final Cut Pro gives high-resolution results. Follow the steps below to use this tool for slow-motion effects. However, you can choose any method that seems suitable and convenient to you:
Method 1
Import your video into the app and drag it into the timeline. Click on the video and select the “Speed Meter” icon from the timeline. If you want to access the retime menu directly, use the “Command+R” command. Now, select the “Slow” option, and from here, you can select the slow speed percentage at which you want your clip.

Method 2
Bring your video into the timeline and click on it. Select the “Speed Meter” icon; now, choose the “Custom” option. You can access customized settings directly using the “Control+Option+R” command to apply FCPX slow motion. Once you have opened the customization menu, manually set the speed rate and duration to how much you want.

Method 3
Drag the timeline cursor to where you want to make a speed change, select “Speed Meter,” and hit “Blade Speed” to create a cut and separate the clip. Make as many cuts as you want to, depending on how many speed changes you require. Now click on the clip whose speed you want changed and select “Custom” from the “Speed Meter” icon. Customize your clips’ speed rate and duration and save the video once you’re done.

Part 3: Wondershare Filmora: A Multi-Purpose Solution to Making Effective Slow-Motion Videos
Final Cut Pro can be difficult for beginners to understand. The tool has a variety of tutorials available online, but it’s still hard for many users to follow them. In this case, Wondershare Filmora is a great option for slow motion and other effects. It is an excellent alternative to final cut slow motion. Filmora offers many more wonderful features that will surely amaze you.
It can assist you in generating engaging content despite just cutting, trimming, and editing videos. With AI integration, this platform can automate your editing tasks.
Free Download For Win 7 or later(64-bit)
Free Download For macOS 10.14 or later
Step By Step Guide to Make Slow Motion Videos in Filmora
Unlike Final Cut Pro’s slow motion, Wondershare Filmora is more straightforward to operate. Follow the step-by-step guide below to apply slow-motion effects to your video.
Method 1: Uniform Speed
If you want to adjust the speed and retain its high quality, use the uniform speed option. You can access this option by following the stepwise method below. Using the advanced features, you don’t need any other tool to ensure the video’s original worth:
Step 1Import Your Project and Start a New Project
After launching Filmora, head to its “New Project” option from the home screen. You will enter the main editing screen this way. Import your project in the media panel and then drag it to the timeline.

Step 2Explore Uniform Speed and Adjust the Speed
Go to your video in the timeline and right-click on it. Now, explore the “Uniform Speed” option and tap on it to get an editing panel at the right. From that panel, move the “Speed” slider to the right and get a slow-motion video preview. You can see the “Duration” of the video after slowing it down and adjusting it accordingly.

Step 3Use Advanced Features to Ensure Quality of Videos
Move down and toggle the “Reverse Speed” option if required. You can enable the “Maintain Pitch” and “Ripple Edit” options to enhance the video automatically. Lastly, extend the “AI Frame Interpolation” menu using its downward symbol and choose “Optical Flow.” It will ensure that the video will remain slow with high quality.

Method 2: Speed Ramping
This method aims to bring smooth transitions in slow-motion videos. Instead of an abrupt change, a gradual increase in speed can impose a professional look. So, there are the steps to access this feature and get a preview of smooth playback.
Step 1Discover the Speed Ramping Feature
Access the Speed Ramping option next to the “Uniform Speed” in the right-side editing panel. Alternatively, you can right-click on the video and look for the “Speed Ramping” option from the list.

Step 2Pick a Template for Speed Ramping or Customize It
From the speed ramping section, you can choose any template from 6 options. Also, users can pick the “Customize” option to adjust the speed ramping as desired.

Step 3Use the Render Preview Option for Smooth Playback
To get a high-quality preview of your videos, look for Render Preview. In this regard, go to the top toolbar of the timeline section on the right side. Click the “Render Preview” icon next to the “Copilot Editor.” Wait for a while and get a smooth playback of your slow-motion video.

Integral Features of Filmora
Slowing down videos is easier than slow-mo Final Cut Pro. Filmora automates the process with an optical flow, ensuring the project’s high quality with one click. Without any wait, learn more about some top-rated features in the given section.
1. AI Thumbnail Creator
The AI Thumbnail Creator of Filmora makes thumbnail creation a matter of seconds. The tool is a treasure for YouTubers as it creates appealing thumbnails to attract viewers. It works with machine learning algorithms to detect the 3 best shots out of your video for thumbnail. Besides, there are over 58 thumbnail templates that can be customized after picking the right one.
2. AI Copilot Editing
AI Copilot is your personal assistant who guides you through everything related to Filmora. You can ask about any editing queries, and the AI will tell you the whole procedure within a second. It will also provide you with navigation towards the right feature. The tool is a big help for beginners; it makes using Filmora much faster and easier.
3. Motion Tracking
If you love giving an artistic touch to your videos, then motion tracking is exactly what you need. This feature automatically tracks the object throughout the video. You can add graphics, stickers, or even blur an object in the video. Furthermore, it allows you to add text with the tracked objects, like a name title with a running athlete.
4. Auto Reframe
With the help of the Auto Reframe feature, you can use one video on all social media platforms. The tool reframes your video in such a way that the main object doesn’t get removed. AI allows you to turn your landscape video into a vertical with a 19:6 aspect ratio. It saves you time and the trouble of creating different videos for every platform.
Conclusion
Slow-motion videos have become a trend due to social media, but they have been an essential film factor forever. Because of the rising demand for this effect, developers added the feature to their software. Many apps are developed to provide a slow-motion effect, which makes it tricky to choose one.
This article addresses your problem by showing you the use of final cut slow-motion. You have discovered a much simpler, faster, and effective platform, Wondershare Filmora. With proven statements in this article, it’s been easier to try Filmora and explore it fully instantly.
Make A Slow Motion Video Make A Slow Motion Video More Features
Part 1: What Makes a Perfect Slow-Motion Video?
An ideal FCP slow-motion video requires careful attention to technical details and aesthetics. Below are some essential things to think about bringing perfection in slow-motion videos:
- Resolution: A slow-motion video with visual appeal and a high resolution is crucial. This is especially vital if you intend to crop or zoom in on the video while editing.
- Storytelling: Make sure the slow-motion clip supports the idea you’re attempting to portray. Your scenes will have more impact if you tell them with a thoughtful narrative.
- Editing: Try different speeds when editing your clip to achieve the best impact. Consider including sound effects or music to accompany the slow-motion images.
- Timing: Select the appropriate times to record in slow motion. You shouldn’t slow down your entire video. Instead, you can apply the effect to draw attention to acts or feelings.
- Frame Rate: Slow-motion videos are usually shot at a greater frame rate. Frame rates of 60, 120, 240, or even higher are common as they make the video look smoother.
- Shutter Speed: For precise and sharp results, use a fast shutter speed camera. This lessens the likelihood of motion blur in every slow-motion frame.
Part 2: Learning All Essential Techniques to Perform Slow Motion in Final Cut Pro X
Apple created Final Cut Pro , and it is only accessible to macOS users. Professional video editors can utilize the software’s array of capabilities. The tool offers incredible video editing functions. Its features are tailored to handle high-resolution video material. The tool has an AI object tracker that detects faces and objects. Its cinematic mode helps you create professional videos.
Final cut slow motion gives a dramatic and intense effect to your videos. You can create an entirely different video with the power of its editing features. Slow-mo Final Cut Pro gives high-resolution results. Follow the steps below to use this tool for slow-motion effects. However, you can choose any method that seems suitable and convenient to you:
Method 1
Import your video into the app and drag it into the timeline. Click on the video and select the “Speed Meter” icon from the timeline. If you want to access the retime menu directly, use the “Command+R” command. Now, select the “Slow” option, and from here, you can select the slow speed percentage at which you want your clip.
Method 2
Bring your video into the timeline and click on it. Select the “Speed Meter” icon; now, choose the “Custom” option. You can access customized settings directly using the “Control+Option+R” command to apply FCPX slow motion. Once you have opened the customization menu, manually set the speed rate and duration to how much you want.
Method 3
Drag the timeline cursor to where you want to make a speed change, select “Speed Meter,” and hit “Blade Speed” to create a cut and separate the clip. Make as many cuts as you want to, depending on how many speed changes you require. Now click on the clip whose speed you want changed and select “Custom” from the “Speed Meter” icon. Customize your clips’ speed rate and duration and save the video once you’re done.
Part 3: Wondershare Filmora: A Multi-Purpose Solution to Making Effective Slow-Motion Videos
Final Cut Pro can be difficult for beginners to understand. The tool has a variety of tutorials available online, but it’s still hard for many users to follow them. In this case, Wondershare Filmora is a great option for slow motion and other effects. It is an excellent alternative to final cut slow motion. Filmora offers many more wonderful features that will surely amaze you.
It can assist you in generating engaging content despite just cutting, trimming, and editing videos. With AI integration, this platform can automate your editing tasks.
Free Download For Win 7 or later(64-bit)
Free Download For macOS 10.14 or later
Step By Step Guide to Make Slow Motion Videos in Filmora
Unlike Final Cut Pro’s slow motion, Wondershare Filmora is more straightforward to operate. Follow the step-by-step guide below to apply slow-motion effects to your video.
Method 1: Uniform Speed
If you want to adjust the speed and retain its high quality, use the uniform speed option. You can access this option by following the stepwise method below. Using the advanced features, you don’t need any other tool to ensure the video’s original worth:
Step 1Import Your Project and Start a New Project
After launching Filmora, head to its “New Project” option from the home screen. You will enter the main editing screen this way. Import your project in the media panel and then drag it to the timeline.
Step 2Explore Uniform Speed and Adjust the Speed
Go to your video in the timeline and right-click on it. Now, explore the “Uniform Speed” option and tap on it to get an editing panel at the right. From that panel, move the “Speed” slider to the right and get a slow-motion video preview. You can see the “Duration” of the video after slowing it down and adjusting it accordingly.
Step 3Use Advanced Features to Ensure Quality of Videos
Move down and toggle the “Reverse Speed” option if required. You can enable the “Maintain Pitch” and “Ripple Edit” options to enhance the video automatically. Lastly, extend the “AI Frame Interpolation” menu using its downward symbol and choose “Optical Flow.” It will ensure that the video will remain slow with high quality.
Method 2: Speed Ramping
This method aims to bring smooth transitions in slow-motion videos. Instead of an abrupt change, a gradual increase in speed can impose a professional look. So, there are the steps to access this feature and get a preview of smooth playback.
Step 1Discover the Speed Ramping Feature
Access the Speed Ramping option next to the “Uniform Speed” in the right-side editing panel. Alternatively, you can right-click on the video and look for the “Speed Ramping” option from the list.
Step 2Pick a Template for Speed Ramping or Customize It
From the speed ramping section, you can choose any template from 6 options. Also, users can pick the “Customize” option to adjust the speed ramping as desired.
Step 3Use the Render Preview Option for Smooth Playback
To get a high-quality preview of your videos, look for Render Preview. In this regard, go to the top toolbar of the timeline section on the right side. Click the “Render Preview” icon next to the “Copilot Editor.” Wait for a while and get a smooth playback of your slow-motion video.
Integral Features of Filmora
Slowing down videos is easier than slow-mo Final Cut Pro. Filmora automates the process with an optical flow, ensuring the project’s high quality with one click. Without any wait, learn more about some top-rated features in the given section.
1. AI Thumbnail Creator
The AI Thumbnail Creator of Filmora makes thumbnail creation a matter of seconds. The tool is a treasure for YouTubers as it creates appealing thumbnails to attract viewers. It works with machine learning algorithms to detect the 3 best shots out of your video for thumbnail. Besides, there are over 58 thumbnail templates that can be customized after picking the right one.
2. AI Copilot Editing
AI Copilot is your personal assistant who guides you through everything related to Filmora. You can ask about any editing queries, and the AI will tell you the whole procedure within a second. It will also provide you with navigation towards the right feature. The tool is a big help for beginners; it makes using Filmora much faster and easier.
3. Motion Tracking
If you love giving an artistic touch to your videos, then motion tracking is exactly what you need. This feature automatically tracks the object throughout the video. You can add graphics, stickers, or even blur an object in the video. Furthermore, it allows you to add text with the tracked objects, like a name title with a running athlete.
4. Auto Reframe
With the help of the Auto Reframe feature, you can use one video on all social media platforms. The tool reframes your video in such a way that the main object doesn’t get removed. AI allows you to turn your landscape video into a vertical with a 19:6 aspect ratio. It saves you time and the trouble of creating different videos for every platform.
Conclusion
Slow-motion videos have become a trend due to social media, but they have been an essential film factor forever. Because of the rising demand for this effect, developers added the feature to their software. Many apps are developed to provide a slow-motion effect, which makes it tricky to choose one.
This article addresses your problem by showing you the use of final cut slow-motion. You have discovered a much simpler, faster, and effective platform, Wondershare Filmora. With proven statements in this article, it’s been easier to try Filmora and explore it fully instantly.
How to Zoom Desktop Screen
A video port that enables the connection of an external display to a modern laptop is often included in these devices; however, this might require you to learn how to un-zoom desktop. You could wish to use a laptop with a big display as a business professional to present data, images, or other media to users or coworkers during a meeting. However, if sat far away from the display, some individuals could find it difficult to read text or distinguish items on the screen. To better visibility, you may adjust the screen magnification as necessary. Users of the most recent versions of Windows and its programs may zoom in on the screen to expand any areas that are difficult for them to view, hence, learning how to zoom in on desktop is a necessary choice to make. You may zoom out to return to the regular screen after you’ve determined what is in the particular location.
There are methods and keyboard shortcuts that enable users to zoom in on the screen to expand anything that may be tough for certain users to read in Windows or even in various programs. Here are a few ways to zoom in Desktop or out the screen, if you unintentionally zoom on a Windows desktop screen or in an app like a web browser, depending on the circumstance. Have you ever had a zoomed-in screen? Your screen’s text, graphics, and icons all suddenly enlarge dramatically. You may need to zoom out at this point. Both PC and Mac users may change the magnification and resolution of a screen. If you notice bigger text or icons, you can be confused between these two. For further advice on how to zoom desktop screen, keep reading. In conclusion, there are several methods for doing this. We’ll go through the top 5 techniques with you.
- Method 1: Using a Keyboard
- Method 2: Touchscreen Method
- Method 3: Use Keyboard and Mouse Commands
- Method 4: Use the Desktop Magnifier Feature
- Method 5: Web Browser Method
Part 1: The Need to Zoom Computer Screen
You’ve been looking at your screen nonstop, but you can’t figure out what it says. You could find the answer you’re searching for by zooming in on your computer. On your computer screen, reading small type might be too difficult at times. There are several fast and simple methods to magnify your whole screen or zoom in on a specific area, whether you’re using a MacBook or a Windows 10 PC.
Many users who are utilizing the Windows desktop, reading text, or surfing the web claim that the screen suddenly becomes stuck on zoom. Having such huge icons, graphics, and text on your windows computer is annoying. You must zoom out on Windows in order to resolve this problem. Microsoft offers options for customizing desktop display settings, whether you want to keep the zoomed-in desktop or change the display settings. This might alter the settings for Windows’ Magnifier magnification, desktop icon size, or screen resolution.
Additionally, depending on the programs and utilities you have open, your computer’s desktop may sometimes resemble a broad landscape. Its size and expanse provide you a bird’s-eye perspective of the landscape. It may become a little challenging to read what’s on it, particularly if your vision isn’t as good as it once was. Popular desktop operating systems like Windows 10 and macOS include features that enable you to swiftly and eagle-like zoom in on just what you need.
Similar to this, if you aren’t careful and cautious while using your computer, you could accidentally activate a feature like its zoom function. If you’re using a shared computer, another user may utilize the zoom feature to make it easier for them to see tiny type on the screen. In any event, learning how to zoom out once more will allow you to utilize your computer anyway you see fit. Tools that zoom in on the desktop and make icons seem bigger than normal include screen resolution, icon views, and Windows Magnifier. These tools provide the greatest personalized settings to optimize display since they are made to enhance monitor display by making images and text understandable.
Part 2: How to Zoom in/out PC screen
Here are the top 5 methods to know how to zoom out on desktop or subsequently, how to zoom desktop screen. Use the easiest method for you from the guide below:
Method 1: Using a Keyboard
To zoom out or in on a webpage or document, hold down the Ctrl key while pressing the - (minus) or + (plus) key. You may utilize the - and + keys on the numeric keypad as well as those adjacent to the backspace key.
Step1Using the handy keyboard keys listed below is one of the most common methods to zoom in or out just in a certain window, website, or program.
- Ctrl + (+) to zoom in.
- Ctrl + (-) will zoom out.
Step2You may keep holding down the Command key while pressing the - or + keys to zoom as much as you like. Go ahead and try it.
Method 2: Touchscreen Method
You have access to yet another fantastic single window zooming option if you’re using a laptop with a trackpad. Simply squeeze two fingers together or spread them apart on your trackpad to zoom in or out. The Touch Bar at the bottom of your screen may be made bigger and simpler to read by choosing “Enable Touch Bar Zoom.” To try it out, all you have to do is touch and hold the Touch Bar.
Step1You may use a “reverse-pinch” motion on a laptop with a touch screen or trackpad to zoom in or out in a variety of programs as well as on the desktop. This is really simple and will work in most applications (including Microsoft Office apps).

However, this motion may not be supported by all applications. This functionality won’t work if you’ve turned off gestures on your trackpad or touchscreen.
Step2Put two fingers together on the touchscreen or trackpad. On the trackpad, you should place two fingers closely apart (they may even be touching).
Step3Put your fingers together directly over the region you wish to zoom out on while using a touchscreen display to focus in on a certain area.
Step4On the trackpad, spread your two fingers widely apart. The chosen website or app will zoom out to show more content when your two fingers separate from one another on the trackpad or touchscreen.
Method 3: Use Keyboard and Mouse Commands
Using the keyboard and Mouse shortcuts is the easiest method to zoom in and out desktop screen on computers. Follow the steps below to learn this technique hassle-free.
Steps to Use Keyboard and Mouse Method:
Step1To zoom in, scroll your mouse wheel up while holding down the Ctrl key. You may already use this to zoom in on your browser, for instance.

Step2Now for the Zoom out, hold the Ctrl key on the Keyboard and move the mouse wheel down to zoom out to the desired extent as shown here:
Method 4: Use the Desktop Magnifier Feature
The magnifier tool allows you to temporarily increase the size of a specific area of the screen. It is a built-in function of the Windows family. The user may enlarge the screen with the use of the magnifying tool. This function is highly beneficial for those who have hazy vision as well as for enlarging the specific picture shown to viewers through projectors. The magnifier app’s default view, Full Screen, may enlarge the whole screen. However, the user is unable to see the complete screen at once since a section of it enlarges and moves with your mouse pointer. By selecting the “Options” option, the user may modify the Magnifier app’s settings and access a variety of additional capabilities. Anyway, let’s get started to learn the processes.
Steps to Use Magnifier to Zoom Desktop Screen:
Step1Open the Windows search (a magnifier icon or a long search box on the taskbar). To launch Magnifier, enter “magnifier” into Windows search and then click the first result.
Step2The Windows 10 Magnifier window will appear. Then, at any moment, you may zoom in on your app, your web browser, or a few other applications by pressing the + button.

Step3Press the Windows logo key and + to enlarge the view (plus). or use the Magnifier controls’ + (plus) button.
Step4Press the Windows key and - to zoom out (minus). Or use the Magnifier controls’ - (minus) button.
Step5Press Windows logo key + Esc to close the Magnifier. In the top-right corner of the Magnifier controls, click the X (close) button.
Method 5: Web Browser Method
You may enhance your web browser reading experience in a number of different ways. One method is to zoom in on the online sites you wish to read and enlarge the text, photos, and icons. It’s possible that you need to do this since your eyes are weary or the screen’s quality isn’t the best. To restore items to their original state, you may need to reset the zoom level or zoom out at some point. On Windows 10, you may zoom in for a clearer view of the screen if you can’t read the text or the pictures on your computer screen.
Steps to Use Web Browser Method to Zoom Desktop Screen:
You may use the zoom in shortcut on any web browser to increase the browser’s zoom level. In other words, you may zoom in on your web browser using the keyboard.
Step1Launch a web browser. To zoom in on your web browser, hold down the Ctrl key while pressing the “+” key on your keyboard.

Step2Now, within the browser, hit the 3-dot menu at the right top corner. (This is available in every browser).
Step3To enlarge the view in your web browser, click the + sign next to Zoom. Clicking the minus button on your web browser will let you to un-zoom or zoom out.
Conclusion
Numerous features on modern computers are intended to simplify user tasks. The ability to zoom in and out on the screen is one feature that might make using a computer easier. Learning how to zoom in and out may be helpful if you have trouble seeing little text or pictures on your computer or if you need more screen real estate to view many things at once. You can see from reading this that using your computer to zoom in and out is fairly simple. You may simply choose one approach based on your needs to assist you. The zoom settings in Windows may be the cause of the abnormally huge graphics on the desktop.
Part 1: The Need to Zoom Computer Screen
You’ve been looking at your screen nonstop, but you can’t figure out what it says. You could find the answer you’re searching for by zooming in on your computer. On your computer screen, reading small type might be too difficult at times. There are several fast and simple methods to magnify your whole screen or zoom in on a specific area, whether you’re using a MacBook or a Windows 10 PC.
Many users who are utilizing the Windows desktop, reading text, or surfing the web claim that the screen suddenly becomes stuck on zoom. Having such huge icons, graphics, and text on your windows computer is annoying. You must zoom out on Windows in order to resolve this problem. Microsoft offers options for customizing desktop display settings, whether you want to keep the zoomed-in desktop or change the display settings. This might alter the settings for Windows’ Magnifier magnification, desktop icon size, or screen resolution.
Additionally, depending on the programs and utilities you have open, your computer’s desktop may sometimes resemble a broad landscape. Its size and expanse provide you a bird’s-eye perspective of the landscape. It may become a little challenging to read what’s on it, particularly if your vision isn’t as good as it once was. Popular desktop operating systems like Windows 10 and macOS include features that enable you to swiftly and eagle-like zoom in on just what you need.
Similar to this, if you aren’t careful and cautious while using your computer, you could accidentally activate a feature like its zoom function. If you’re using a shared computer, another user may utilize the zoom feature to make it easier for them to see tiny type on the screen. In any event, learning how to zoom out once more will allow you to utilize your computer anyway you see fit. Tools that zoom in on the desktop and make icons seem bigger than normal include screen resolution, icon views, and Windows Magnifier. These tools provide the greatest personalized settings to optimize display since they are made to enhance monitor display by making images and text understandable.
Part 2: How to Zoom in/out PC screen
Here are the top 5 methods to know how to zoom out on desktop or subsequently, how to zoom desktop screen. Use the easiest method for you from the guide below:
Method 1: Using a Keyboard
To zoom out or in on a webpage or document, hold down the Ctrl key while pressing the - (minus) or + (plus) key. You may utilize the - and + keys on the numeric keypad as well as those adjacent to the backspace key.
Step1Using the handy keyboard keys listed below is one of the most common methods to zoom in or out just in a certain window, website, or program.
- Ctrl + (+) to zoom in.
- Ctrl + (-) will zoom out.
Step2You may keep holding down the Command key while pressing the - or + keys to zoom as much as you like. Go ahead and try it.
Method 2: Touchscreen Method
You have access to yet another fantastic single window zooming option if you’re using a laptop with a trackpad. Simply squeeze two fingers together or spread them apart on your trackpad to zoom in or out. The Touch Bar at the bottom of your screen may be made bigger and simpler to read by choosing “Enable Touch Bar Zoom.” To try it out, all you have to do is touch and hold the Touch Bar.
Step1You may use a “reverse-pinch” motion on a laptop with a touch screen or trackpad to zoom in or out in a variety of programs as well as on the desktop. This is really simple and will work in most applications (including Microsoft Office apps).
However, this motion may not be supported by all applications. This functionality won’t work if you’ve turned off gestures on your trackpad or touchscreen.
Step2Put two fingers together on the touchscreen or trackpad. On the trackpad, you should place two fingers closely apart (they may even be touching).
Step3Put your fingers together directly over the region you wish to zoom out on while using a touchscreen display to focus in on a certain area.
Step4On the trackpad, spread your two fingers widely apart. The chosen website or app will zoom out to show more content when your two fingers separate from one another on the trackpad or touchscreen.
Method 3: Use Keyboard and Mouse Commands
Using the keyboard and Mouse shortcuts is the easiest method to zoom in and out desktop screen on computers. Follow the steps below to learn this technique hassle-free.
Steps to Use Keyboard and Mouse Method:
Step1To zoom in, scroll your mouse wheel up while holding down the Ctrl key. You may already use this to zoom in on your browser, for instance.
Step2Now for the Zoom out, hold the Ctrl key on the Keyboard and move the mouse wheel down to zoom out to the desired extent as shown here:
Method 4: Use the Desktop Magnifier Feature
The magnifier tool allows you to temporarily increase the size of a specific area of the screen. It is a built-in function of the Windows family. The user may enlarge the screen with the use of the magnifying tool. This function is highly beneficial for those who have hazy vision as well as for enlarging the specific picture shown to viewers through projectors. The magnifier app’s default view, Full Screen, may enlarge the whole screen. However, the user is unable to see the complete screen at once since a section of it enlarges and moves with your mouse pointer. By selecting the “Options” option, the user may modify the Magnifier app’s settings and access a variety of additional capabilities. Anyway, let’s get started to learn the processes.
Steps to Use Magnifier to Zoom Desktop Screen:
Step1Open the Windows search (a magnifier icon or a long search box on the taskbar). To launch Magnifier, enter “magnifier” into Windows search and then click the first result.
Step2The Windows 10 Magnifier window will appear. Then, at any moment, you may zoom in on your app, your web browser, or a few other applications by pressing the + button.
Step3Press the Windows logo key and + to enlarge the view (plus). or use the Magnifier controls’ + (plus) button.
Step4Press the Windows key and - to zoom out (minus). Or use the Magnifier controls’ - (minus) button.
Step5Press Windows logo key + Esc to close the Magnifier. In the top-right corner of the Magnifier controls, click the X (close) button.
Method 5: Web Browser Method
You may enhance your web browser reading experience in a number of different ways. One method is to zoom in on the online sites you wish to read and enlarge the text, photos, and icons. It’s possible that you need to do this since your eyes are weary or the screen’s quality isn’t the best. To restore items to their original state, you may need to reset the zoom level or zoom out at some point. On Windows 10, you may zoom in for a clearer view of the screen if you can’t read the text or the pictures on your computer screen.
Steps to Use Web Browser Method to Zoom Desktop Screen:
You may use the zoom in shortcut on any web browser to increase the browser’s zoom level. In other words, you may zoom in on your web browser using the keyboard.
Step1Launch a web browser. To zoom in on your web browser, hold down the Ctrl key while pressing the “+” key on your keyboard.
Step2Now, within the browser, hit the 3-dot menu at the right top corner. (This is available in every browser).
Step3To enlarge the view in your web browser, click the + sign next to Zoom. Clicking the minus button on your web browser will let you to un-zoom or zoom out.
Conclusion
Numerous features on modern computers are intended to simplify user tasks. The ability to zoom in and out on the screen is one feature that might make using a computer easier. Learning how to zoom in and out may be helpful if you have trouble seeing little text or pictures on your computer or if you need more screen real estate to view many things at once. You can see from reading this that using your computer to zoom in and out is fairly simple. You may simply choose one approach based on your needs to assist you. The zoom settings in Windows may be the cause of the abnormally huge graphics on the desktop.
How to Add Text Animation Online
Before you can publish your recorded video to your viewers, you need to polish the video so that you can get everyone’s appreciation. This is where the magic of video editing comes into the scene. Editing your video is not just about trimming unnecessary parts and adding transitions and effects. The titles and texts you display on your video play a major role in your video content. In fact, you can create a video based on texts and titles only.
Instead of showing static texts, you should create animated texts and place them in the video wherever appropriate. You do not need to download a video editor on your computer or smartphone to add animated text to your video. You can make text animation online using an online text animation maker. We will illustrate the steps to create animated text with three different online editors.
Part 1. Use Biteable Animated Text
Biteable is a popular online platform where you can create amazing animated text video using Biteable text video maker. You can add animated text to your videos as well as photos. The user interface of Biteable is extremely easy for all users. You have to first create an account for free to get started. There are various templates available to create your animated text video from scratch. Here are the steps to use Biteable online text animation maker to create a video based on animated texts.
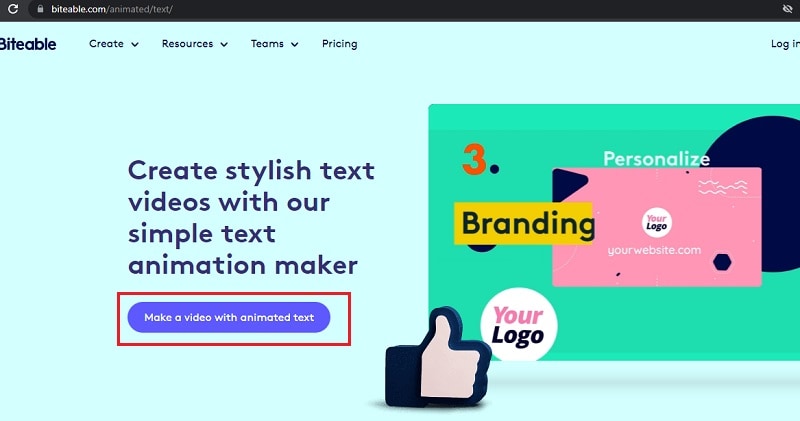
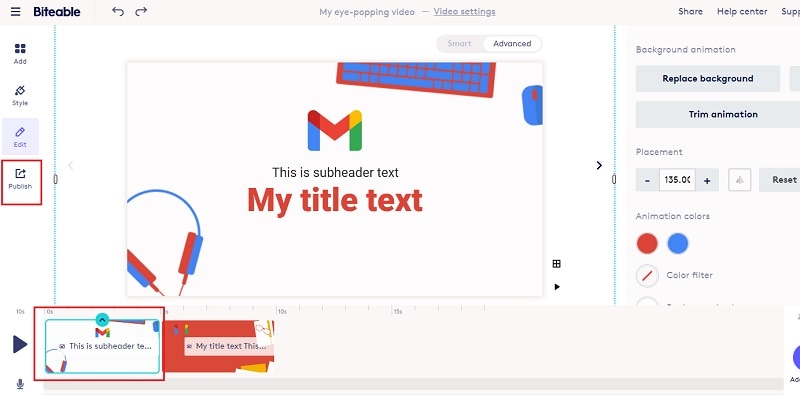
Step1Open your web browser and visit “biteable.com/animated/text”. Click on “Make a video with animated text” button.
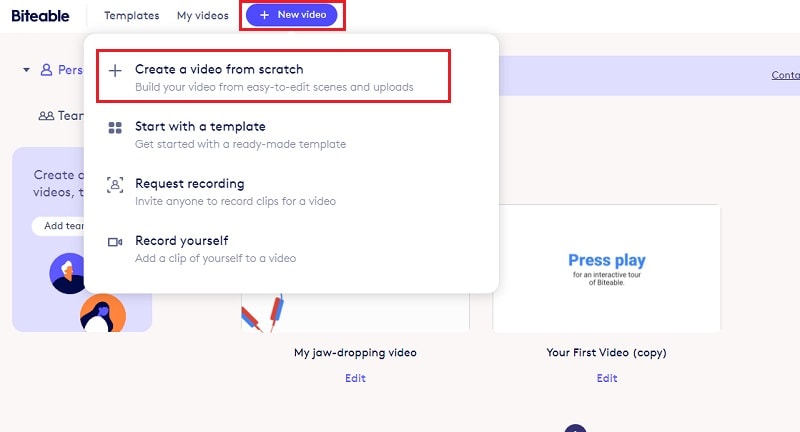
Step2Create an account by following the on-screen instructions. Click on New Video button and select “Create a video from scratch”.
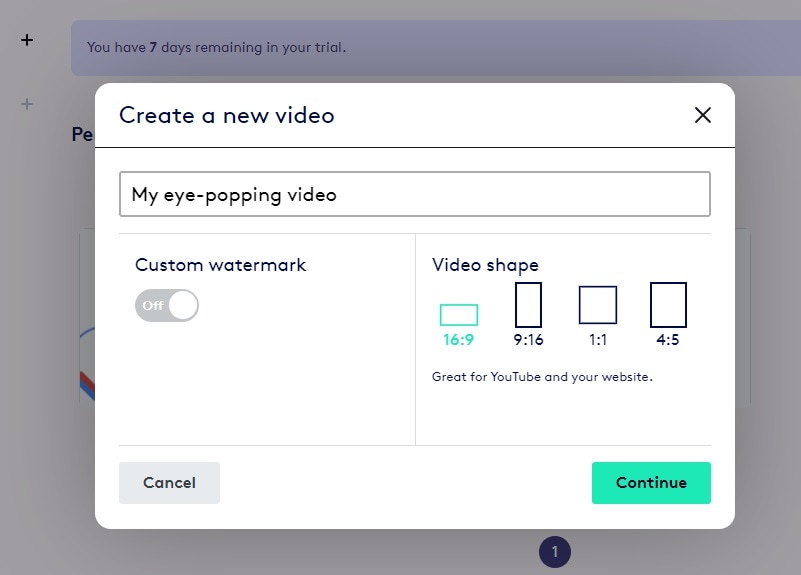
Step3Enter a name for the video and select a video shape as per your preference. Click on Continue button.
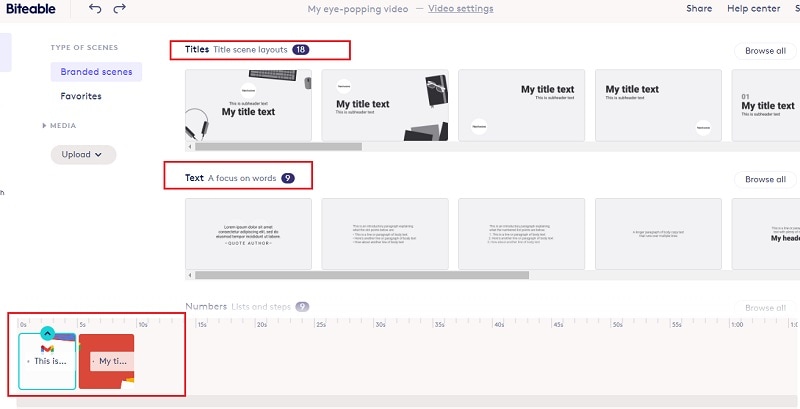
Step4Under Titles, select any template and it will be added to the Timeline. Similarly, you can add multiple titles templates, text templates, number templates and likewise. You will see them in the Timeline placed side by side. You can stretch their durations as per your requirements.
Step5Double-click on each template to edit the text in them and select the text animations as per your preference. Play the video and if you are satisfied, click on Publish button to save the video.
Part 2. Use Motionden Video Maker
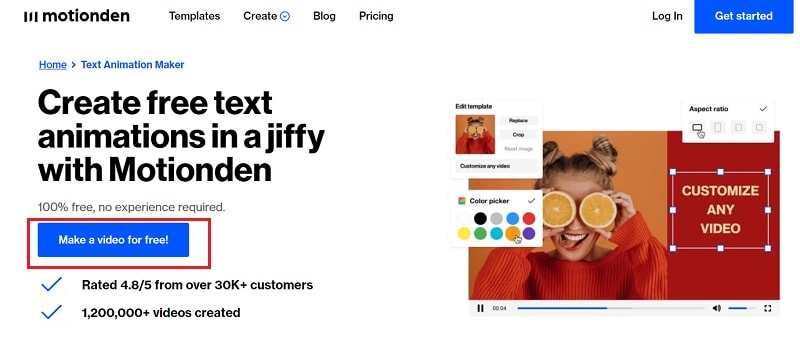
Motionden is yet another powerful text animation maker where you can create free text animations instantly. There are over 1500 templates available to choose from in order to create text videos from scratch. You can choose video templates from any category as per the video theme you want. Besides, you can upload your video or photo and add texts and music as per your preference. Here are the steps to create animated text online using Motionden Video Maker.
Step1Open your web browser and visit “motionden.com/video-maker/text-animation”. Click on “Make a video for free” button.
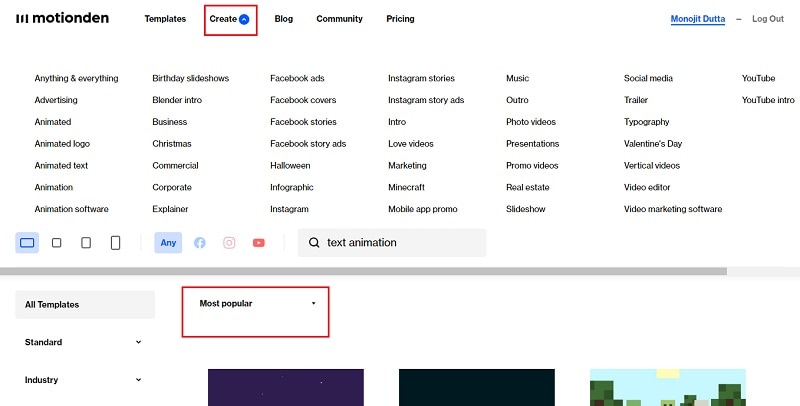
Step2Go to Create menu option and select any category of video templates. You can also check out the popular video templates and select anyone as per your preference.
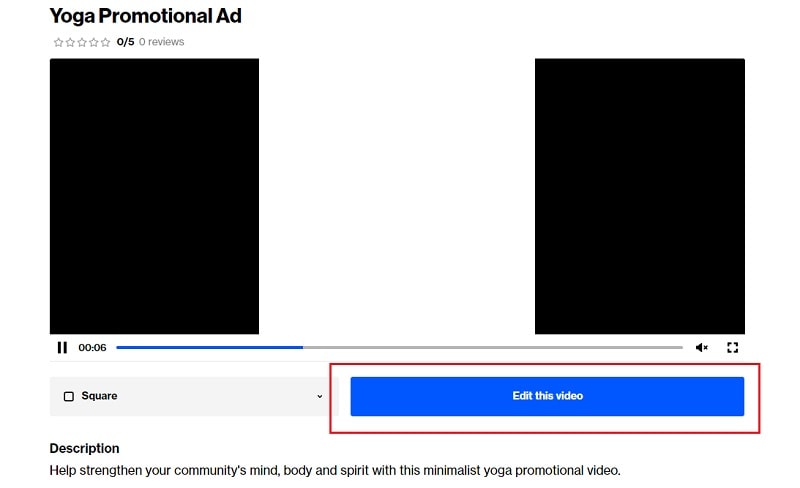
Step3For the selected category, you need to select the desired video template. Click on Edit Video and you can make changes to the template on the video editor as per your requirements. You need to sign up for free in order to continue and edit the template.
Step4Click on individual scenes and click on texts to customize them. Once the editing is done for each scene, click on Make Video button to build and save the text video.

Part 3. Use Flexclip Text Animation Tool
You can use Flexclip Text Animation Tool to create text video from scratch as well as add text to your recorded video. You should use Biteable and Motionden to create video with text effects only directly using video template while you should use Flexclip to edit your video and add text. You can add text effects to photos and videos and here are the steps to follow.
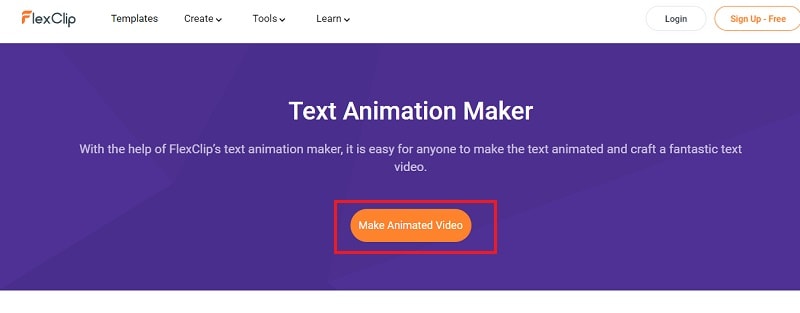
Step1Open web browser and visit “flexclip.com/features/text-animation.html”. Click on Make Animated Video button.
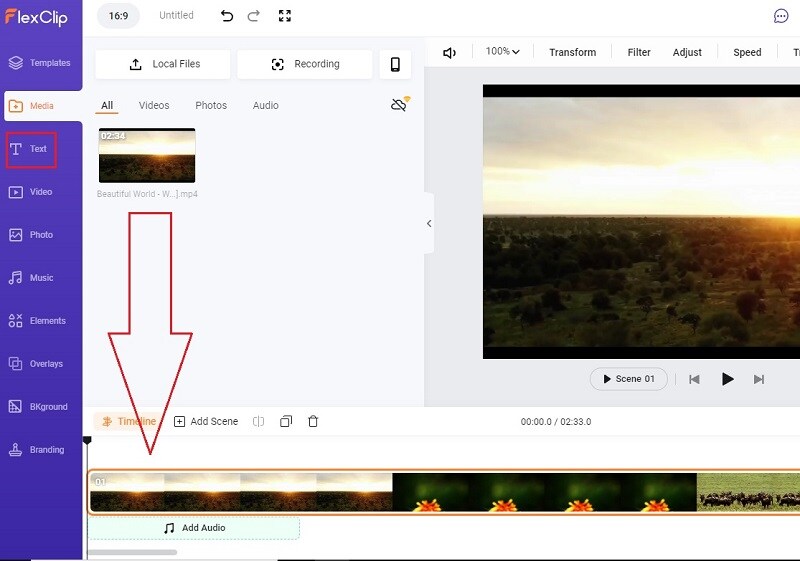
Step2You can choose from the available templates to create video with text from scratch. If you want to add text to your recorded video, go to Media tab. Click on Local Files button and upload your recorded video.

Step3Drag and drop the uploaded video into the Timeline. Thereafter, go to Text tab.
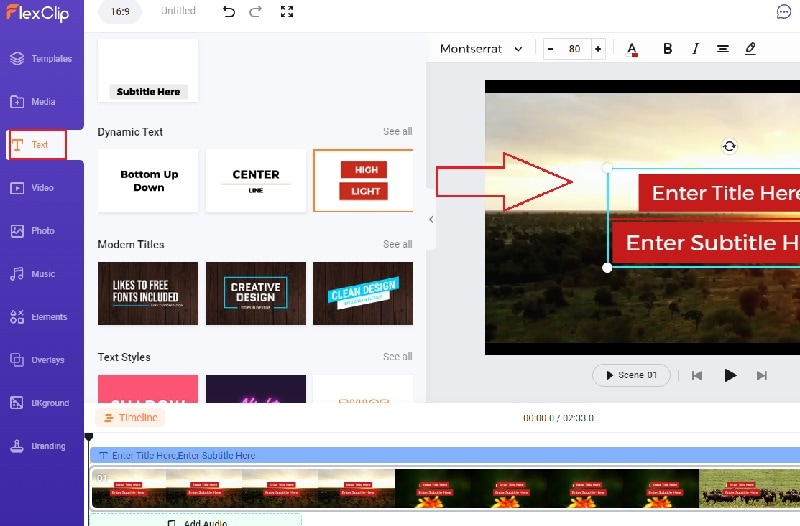
Step4You will see all the different text effects and animations. Place your mouse pointer to preview the animation. Drag and drop the select text template to the video on the Viewer. You can check the Timeline and stretch or compress the text layer as per your requirements.
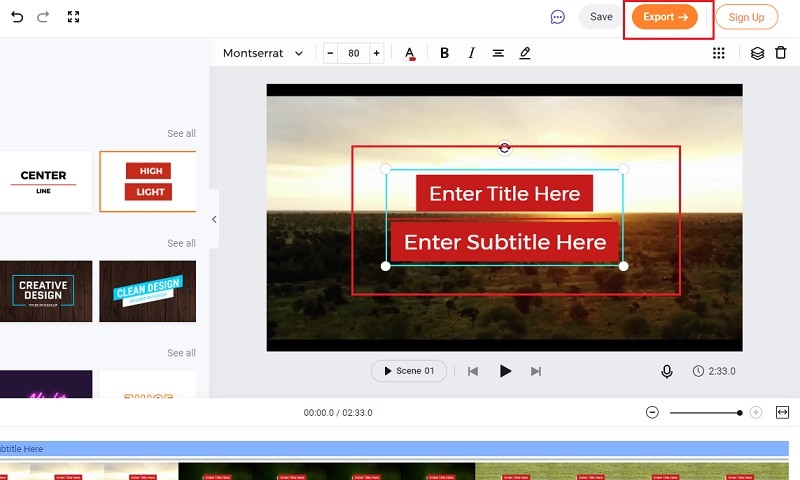
Step5Double-click on the text on Viewer window and customize the text as per your preference. Finally, click on Export button to save the edited video.
Conclusion
You can make video with animated text to make your presentation video eye-catching and attention-grabbing. We have mentioned three different online text animation makers that you can use to create animated text video from scratch by choosing different video templates. You can also edit your recorded video and add animated text wherever you want using Flexclip Text Animation Tool.
Free Download For Win 7 or later(64-bit)
Free Download For macOS 10.14 or later
The Benefits Of Using Video For Social Media Marketing
When it comes to social media marketing, video is one of the most powerful tools at your disposal. Videos can be used to create engaging content that draws in new followers, and they can also be used to promote your products or services. In fact, videos are so effective that nearly 90% of businesses now use them as part of their social media marketing strategy. So, if you’re not using video yet, now is the time to start. In this post, we’ll discuss the benefits of using video for social media marketing and provide tips for getting started. Keep reading to learn more!
1. More Engaging Than Text or Images
When you’re scrolling through your feed, what’s more, likely to stop you in your tracks: a picture or a video? For most people, the answer is video. In general, video is more engaging than image because it captures our attention more effectively and holds it for longer. Studies have shown that the human brain processes video 60,000 times faster than text, and that viewers retain 95% of a message when they watch it in a video, as opposed to 10% when they read it in text. Furthermore, video is more likely to evoke an emotional response than an image. We can’t help but be drawn in by the movement, sound, and facial expressions of the people in the video, which makes us more likely to feel connected to them. So next time you’re trying to capture someone’s attention, think about using video instead of a still image.

Video Format
2. Build a Relationship with Audience
Video can help you build a relationship with your audience on social media. That’s because people like to watch videos. They’re fun and interesting. You can show people what you’re doing and what’s going on in your life. And people can leave comments and talk to you on the video. The more you interact with your audience, the more they’ll like you.
Plus, video is a great way to show off your products or services. You can give people a tour of your store or office. Or show them how to use your product. If you have a new product, you can create a video to show it off. People are more likely to buy a product if they can see it in action.

Videos Help You Build a Relationship
3. Promote Your Brand or Product
Video allows you to show, rather than just tell, potential customers what your brand is all about. You can give them a behind-the-scenes look at your company, or showcase your products in action. And because people are more likely to watch a video than read an article or blog post, you’re more likely to reach a wider audience with your message.
Creating a video doesn’t have to be expensive or time-consuming. You can use your smartphone or a simple video camera to get started. And there are plenty of free or low-cost video editing software programs available if you want to get fancier with your finished product.
If you’re not sure where to start, try creating a short video that introduces your brand and tells viewers what they can expect from your products or services. Then post it on your website and social media channels and see how it goes! You might be surprised at how well it performs.

Videos Help Promote Your Brand
4. Drive Traffic to Your Website
Website traffic refers to the number of visitors who visit a website. This can be measured in a number of ways, including the number of unique visitors, the number of page views, and the amount of time spent on the site.
If you’re looking for a way to give your website a boost, you may want to consider using videos. By posting engaging videos on social media sites, you can drive traffic to your site and increase your visibility. And, with more people visiting your site, you’ll have a better chance of converting visitors into customers. Of course, creating videos can be time-consuming and requires some level of creative talent. But it’s worth the effort if you’re looking for a way to improve your web traffic.
So, if you’re ready to take your social media marketing to the next level, why not give video a try?

Videos Help Drive Traffic
5. Increase Your Social Media Reach
Social media reach is the number of people who see your content. It’s the potential audience for your message. The more people who see it, the more likely it is that someone will engage with it. The size of your reach depends on the platform you’re using and how many followers you have. Some platforms, like Facebook, make it easy to reach a large audience.
The best way to increase your reach is to create compelling video content that people want to share. Videos are highly shareable, and if they are well-made and engaging, they can quickly attract a large audience. In addition, videos are a great way to build brand awareness and show potential customers what your business is all about. By including videos in your social media marketing strategy, you can reach a wider audience and create more opportunities for customer engagement.

Videos Help Drive Traffic
6. Boost your SEO
SEO is an acronym that stands for “search engine optimization.” It is a process of improving the visibility and ranking of a website or web page in search engine results pages (SERPs). The higher a website or web page appears in the SERPs, the more likely it is to be clicked by users.
If you’re like most people, you probably spend a good chunk of your day scrolling through social media sites like Facebook, Twitter, and Instagram. And when you’re not scrolling through your feed, you’re probably watching videos. Whether it’s a funny cat video or a cooking tutorial, chances are you’ve watched a video online in the past 24 hours. What you may not realize is that videos can also be used to boost your SEO.
That’s right - by creating and posting engaging videos, you can attract more visitors to your website and improve your search engine ranking. Here’s how it works: when people watch your videos and share them with their friends, they are effectively giving your website a “vote” of approval. This helps to improve your visibility on search engines and attracts more visitors to your site. In addition, videos help to keep people on your website for longer periods of time, which is also a positive signal to search engines. So if you’re looking for a new way to improve your SEO, consider adding videos to your website. You might just be surprised at the results.

Videos Help Boost Your SEO
Wrap Up
- Now that you know the importance of using video for your social media marketing, it’s time to start planning your next campaign.
- Keep in mind the different ways you can use video to engage with your audience and think about what kind of content will resonate best with them.
- Don’t be afraid to try something new – after all, that’s how we learn and grow. What are some ideas you have for using video in your social media marketing? We want to hear from you! Comment down below and let us know.

Videos Conclusion
When it comes to social media marketing, video is one of the most powerful tools at your disposal. Videos can be used to create engaging content that draws in new followers, and they can also be used to promote your products or services. In fact, videos are so effective that nearly 90% of businesses now use them as part of their social media marketing strategy. So, if you’re not using video yet, now is the time to start. In this post, we’ll discuss the benefits of using video for social media marketing and provide tips for getting started. Keep reading to learn more!
1. More Engaging Than Text or Images
When you’re scrolling through your feed, what’s more, likely to stop you in your tracks: a picture or a video? For most people, the answer is video. In general, video is more engaging than image because it captures our attention more effectively and holds it for longer. Studies have shown that the human brain processes video 60,000 times faster than text, and that viewers retain 95% of a message when they watch it in a video, as opposed to 10% when they read it in text. Furthermore, video is more likely to evoke an emotional response than an image. We can’t help but be drawn in by the movement, sound, and facial expressions of the people in the video, which makes us more likely to feel connected to them. So next time you’re trying to capture someone’s attention, think about using video instead of a still image.
Video Format
2. Build a Relationship with Audience
Video can help you build a relationship with your audience on social media. That’s because people like to watch videos. They’re fun and interesting. You can show people what you’re doing and what’s going on in your life. And people can leave comments and talk to you on the video. The more you interact with your audience, the more they’ll like you.
Plus, video is a great way to show off your products or services. You can give people a tour of your store or office. Or show them how to use your product. If you have a new product, you can create a video to show it off. People are more likely to buy a product if they can see it in action.
Videos Help You Build a Relationship
3. Promote Your Brand or Product
Video allows you to show, rather than just tell, potential customers what your brand is all about. You can give them a behind-the-scenes look at your company, or showcase your products in action. And because people are more likely to watch a video than read an article or blog post, you’re more likely to reach a wider audience with your message.
Creating a video doesn’t have to be expensive or time-consuming. You can use your smartphone or a simple video camera to get started. And there are plenty of free or low-cost video editing software programs available if you want to get fancier with your finished product.
If you’re not sure where to start, try creating a short video that introduces your brand and tells viewers what they can expect from your products or services. Then post it on your website and social media channels and see how it goes! You might be surprised at how well it performs.
Videos Help Promote Your Brand
4. Drive Traffic to Your Website
Website traffic refers to the number of visitors who visit a website. This can be measured in a number of ways, including the number of unique visitors, the number of page views, and the amount of time spent on the site.
If you’re looking for a way to give your website a boost, you may want to consider using videos. By posting engaging videos on social media sites, you can drive traffic to your site and increase your visibility. And, with more people visiting your site, you’ll have a better chance of converting visitors into customers. Of course, creating videos can be time-consuming and requires some level of creative talent. But it’s worth the effort if you’re looking for a way to improve your web traffic.
So, if you’re ready to take your social media marketing to the next level, why not give video a try?
Videos Help Drive Traffic
5. Increase Your Social Media Reach
Social media reach is the number of people who see your content. It’s the potential audience for your message. The more people who see it, the more likely it is that someone will engage with it. The size of your reach depends on the platform you’re using and how many followers you have. Some platforms, like Facebook, make it easy to reach a large audience.
The best way to increase your reach is to create compelling video content that people want to share. Videos are highly shareable, and if they are well-made and engaging, they can quickly attract a large audience. In addition, videos are a great way to build brand awareness and show potential customers what your business is all about. By including videos in your social media marketing strategy, you can reach a wider audience and create more opportunities for customer engagement.
Videos Help Drive Traffic
6. Boost your SEO
SEO is an acronym that stands for “search engine optimization.” It is a process of improving the visibility and ranking of a website or web page in search engine results pages (SERPs). The higher a website or web page appears in the SERPs, the more likely it is to be clicked by users.
If you’re like most people, you probably spend a good chunk of your day scrolling through social media sites like Facebook, Twitter, and Instagram. And when you’re not scrolling through your feed, you’re probably watching videos. Whether it’s a funny cat video or a cooking tutorial, chances are you’ve watched a video online in the past 24 hours. What you may not realize is that videos can also be used to boost your SEO.
That’s right - by creating and posting engaging videos, you can attract more visitors to your website and improve your search engine ranking. Here’s how it works: when people watch your videos and share them with their friends, they are effectively giving your website a “vote” of approval. This helps to improve your visibility on search engines and attracts more visitors to your site. In addition, videos help to keep people on your website for longer periods of time, which is also a positive signal to search engines. So if you’re looking for a new way to improve your SEO, consider adding videos to your website. You might just be surprised at the results.
Videos Help Boost Your SEO
Wrap Up
- Now that you know the importance of using video for your social media marketing, it’s time to start planning your next campaign.
- Keep in mind the different ways you can use video to engage with your audience and think about what kind of content will resonate best with them.
- Don’t be afraid to try something new – after all, that’s how we learn and grow. What are some ideas you have for using video in your social media marketing? We want to hear from you! Comment down below and let us know.
Videos Conclusion
Also read:
- Updated How to Make a Video Slideshow in iMovie
- New Create A Freeze Frame Sequence In Your Videos for 2024
- How to Overlay Video in Premiere Pro for 2024
- Turn Your Text Into a Podcast Made Possible for 2024
- 2024 Approved How Can You Import and Adjust the Video Clips on Wondershare Filmora?
- Updated Are You Eager to Discover All About Dynamic Videos? You Are in the Right Place because This Article Provides Insight Into Dynamic Video Collages
- 2024 Approved How to Create Intro Video with KineMaster
- Updated 2024 Approved A Guide to Effective Video Marketing
- Your Search for the Best GIF Creator Tools Ends Here for 2024
- New Best 12 Best Freeze Frame Video Editing Examples for 2024
- Find Out About MAGIX Vegas Pro Pricing Plan and Features to See How the Software Can Help You with Your Video Editing Tasks for 2024
- Want to Add an Exciting Countdown Timer to Your Wedding, Product Launch or Any Other Video Using After Effects or an Alternative Tool? This Article Will Help You Learn All About After Effects Countdown and the Procedure for 2024
- 2024 Approved Top 22 Free Video Editing Software
- New In 2024, A Detailed Guide to Do Color Correction in OBS
- New In 2024, 4 Methods to Crop a Video on Android Easily
- In 2024, Video in Text Cinematic Intro【Filmora Tutorial】
- Updated Useful Guide to Speed Up/Down Videos in VLC for 2024
- New 2024 Approved Expolring Top 6 Best Alternatives to Clownfish Voice Changer
- Updated 2024 Approved How to Cut Videos on Mac without Using FFmpeg?
- In 2024, Best Method to Split Video Into Parts Online
- Troubleshoot Snapchat Camera Zoomed in Issue
- 2024 Approved How to Make Eye Zoom Transition Effect with Filmora
- New How to Vlog? A Ultimate Guide for Beginners
- Fun & Easy Masking Tricks in Filmora for 2024
- Updated HDR Photography How to Use HDR Mode on Your Android Devices
- Several Tips Can Facilitate How You Edit Videos Faster and Easier. All You Need to Do Is to Read This Article to Find Out What They Are
- New In 2024, Best Tools To Create Blend Image Collage
- In 2024, 5 Quick Methods to Bypass Vivo Y100t FRP
- Hacks to do pokemon go trainer battles For Apple iPhone 15 Plus | Dr.fone
- Fix the Error of Unfortunately the Process.com.android.phone Has Stopped on Xiaomi Redmi Note 13 Pro 5G | Dr.fone
- In 2024, Easiest Guide How to Clone Vivo Y200 Phone? | Dr.fone
- 3 Ways to Track Samsung Galaxy F04 without Them Knowing | Dr.fone
- In 2024, How can I get more stardust in pokemon go On Apple iPhone 15? | Dr.fone
- In 2024, How to Detect and Stop mSpy from Spying on Your Nubia Z50S Pro | Dr.fone
- In 2024, Pokemon Go Error 12 Failed to Detect Location On Honor X50i+? | Dr.fone
- Is pgsharp legal when you are playing pokemon On Vivo Y100 5G? | Dr.fone
- What To Do if Your Infinix Zero 5G 2023 Turbo Auto Does Not Work | Dr.fone
- In 2024, The Magnificent Art of Pokemon Go Streaming On Honor Magic Vs 2? | Dr.fone
- In 2024, 5 Ways To Teach You To Transfer Files from Motorola Edge 40 to Other Android Devices Easily | Dr.fone
- How to recover lost data from Galaxy A15 4G?
- Tips and Tricks for Setting Up your Infinix Zero 30 5G Phone Pattern Lock
- Find My App Troubleshooting No Location Found vs. Location Not Available & How to Fix Them On Apple iPhone 11 | Dr.fone
- In 2024, Which Pokémon can Evolve with a Moon Stone For Motorola Edge 40 Neo? | Dr.fone
- Complete guide for recovering contacts files on Samsung Galaxy S24 Ultra.
- In 2024, Detailed guide of ispoofer for pogo installation On Nokia C22 | Dr.fone
- In 2024, How to Hide/Fake Snapchat Location on Your Motorola Moto G73 5G | Dr.fone
- Methods to Change GPS Location On Infinix Note 30 VIP | Dr.fone
- Title: 2024 Approved Looking for Efficient Ways to Create a Slow-Motion Video? Read the Article for Reliable Solutions that Provide Excellent Results
- Author: Chloe
- Created at : 2024-04-24 07:08:22
- Updated at : 2024-04-25 07:08:22
- Link: https://ai-editing-video.techidaily.com/2024-approved-looking-for-efficient-ways-to-create-a-slow-motion-video-read-the-article-for-reliable-solutions-that-provide-excellent-results/
- License: This work is licensed under CC BY-NC-SA 4.0.
