
2024 Approved Motion Blur Photo With GIMP Step-By-Step Guide

Motion Blur Photo With GIMP: Step-By-Step Guide
GIMP is a cross-platform image editing software that you can use to edit photos and create graphics. The software is available for Linux, Windows, and macOS and can add a motion blur effect (A sense of movement in the photo), making your pictures look more realistic and professional.
So to help you tone your skills, we’ve written a comprehensive guide on how to apply the GIMP motion blur effect to your photos!
Part I. What Is GIMP?
GIMP software, a GNU Image Manipulation Program, is an open-source raster graphics editor used for image editing and retouching, converting between different image formats, free-form drawing, and more.
GIMP is frequently used as a Photoshop alternative. The software boasts a wide range of features, including support for layers, masks, color management, and third-party plugins.
Key Features
Here are some key features of the GIMP software:
- Quickly hide panels and menus to let you switch to a full-screen mode to preview pictures
- Fixes distorted images
- Available for Windows, Linux, Mac OS, and other operating systems
- Automatic image enhancement tool
- Lets you remove all the panels and tools from the workflow except the one you are working with.
- Released under a license called GNU General Public License v3 and later, which makes it free to use and distribute
- Add overlays and crop or resize an image
- Wide range of file formats that it can read and write, making it a versatile tool for working with images
Part II. How To Add The Motion Blur Effect To Your Photos in GIMP?
Below we’ve provided the step-by-step tutorial to add a motion blur effect to your photos in GIMP:
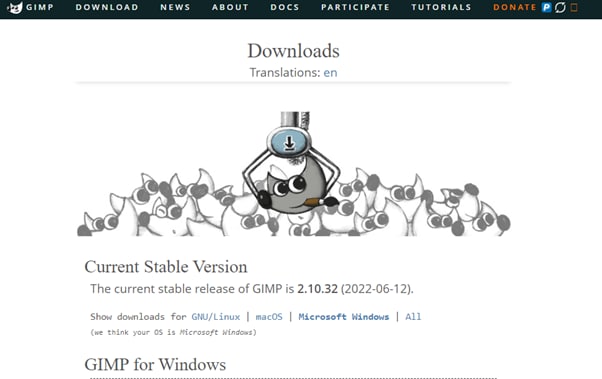
Step1 In the first step, launch a browser on your device, head to the GIMP website , and download the installation file according to your operating system. Now, click the downloaded installer, install the software on your system and launch it.
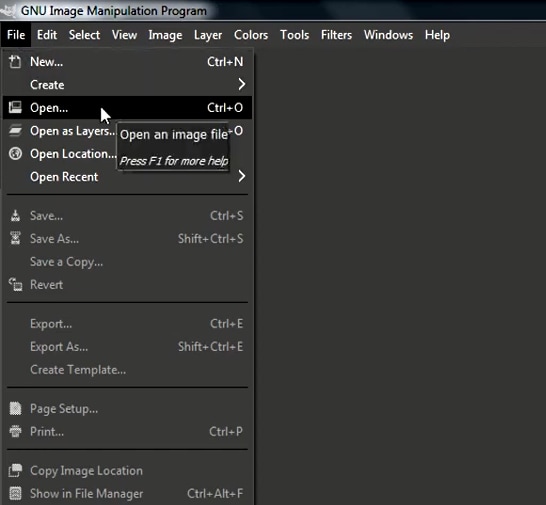
Step2 In the next step, click “File” on the GIMP dashboard, and select “Open” to access the Open Image window. Select your image file from your system and click “Open” to import the file.
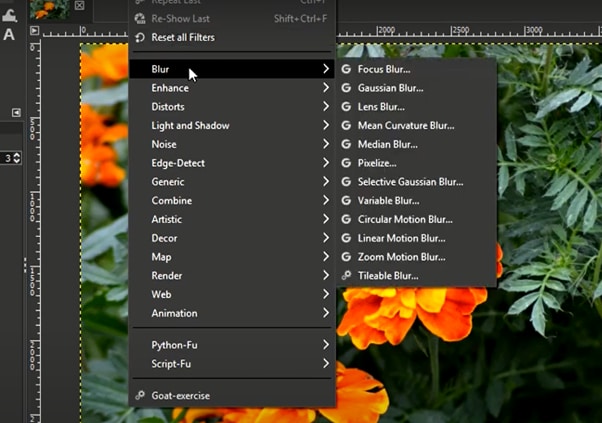
Step3 Next, click the “Filters” option from the top toolbar, select “Blur,” and choose “Motion Blur” from the drop-down menu. A dialogue box will now open where you can preview the effect and adjust the settings, including Blur Type, Blur Center, and Blur Parameters.
Step4 Once you are satisfied with your changes, click “OK” to apply the effect to the image, and make some other edits if needed. Finally, click “File” from the top toolbar, choose “Export As,” click “File Type” to select the format, and select the “Export” option to save your file.
Bonus Tips – The Alternative To GIMP To Create Motion Blur Effect
GIMP is a popular image editor that you can use to create motion blur effects. However, some users find it difficult to use the software for this purpose.
To simplify the process, we recommend usingWondershare Filmora an all-in-one editing software that offers multiple advanced features to help you quickly enhance your project.
Free Download For Win 7 or later(64-bit)
Free Download For macOS 10.14 or later
Here’s why Filmora is the best alternative to GIMP for creating motion blur effects:
- A user-friendly interface where you can quickly create the motion blur effect without spending hours learning the process
- Advanced video editing tools, such as keyframing, speed ramping, green screen, title editing, motion tracking, screen recorder, and preset templates
- Royalty-free music library where you can access millions of music and soundtracks
- Adds the motion blur effect to your videos as well as images
- Comes with multiple parameters to adjust the effect on your clip or image
To add the radial blur effect to images using Filmora, here are the quick and easy-to-follow steps:
Step1 Download the Filmora software on your PC, launch it, and click “Create New Project” on the main panel. Use the “Click Here to Import your Media File” option to import your photo and drag and drop it into the timeline.

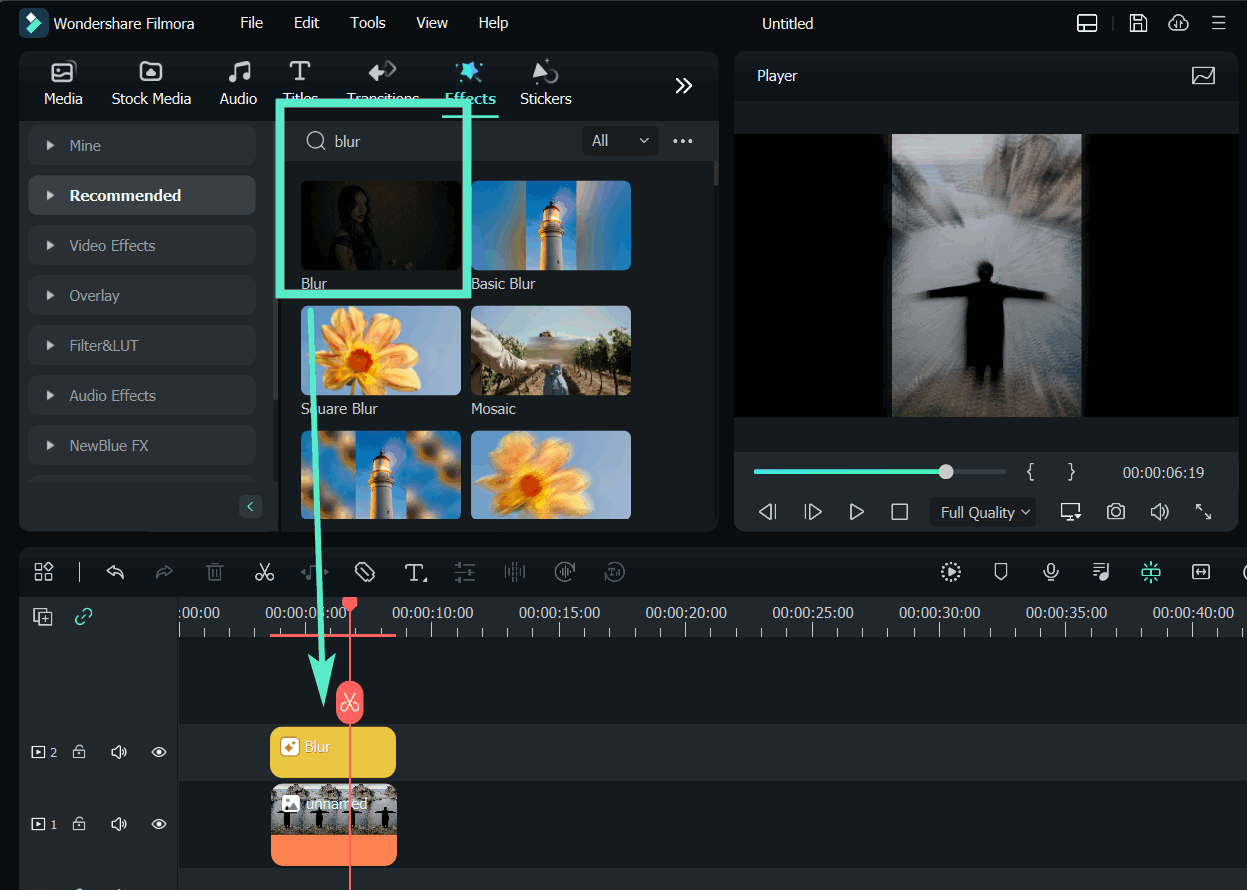
Step2 Now, head to the “Effects” tab from the taskbar. Use the search option to find the Blur effect. Afterward, drag & drop it in the timeline and adjust it on your selected clip.
Step3 Please note that motion blur is now a dynamic effect on the image. That means you can add multiple photos and make them into a slideshow with a blur effect transition. Or, press the “Play” icon to preview your photo and pause the clip where you think motion blur works best.
Step4 Click the effect in the timeline to open its settings. Now, play your clip to preview and adjust the parameters as you want to smooth down the motion effect.
Step5 Once satisfied with the outcome, click the “Export” option, go to the “Local” tab, select a file format to save the images, and click “Export” again to save your project.
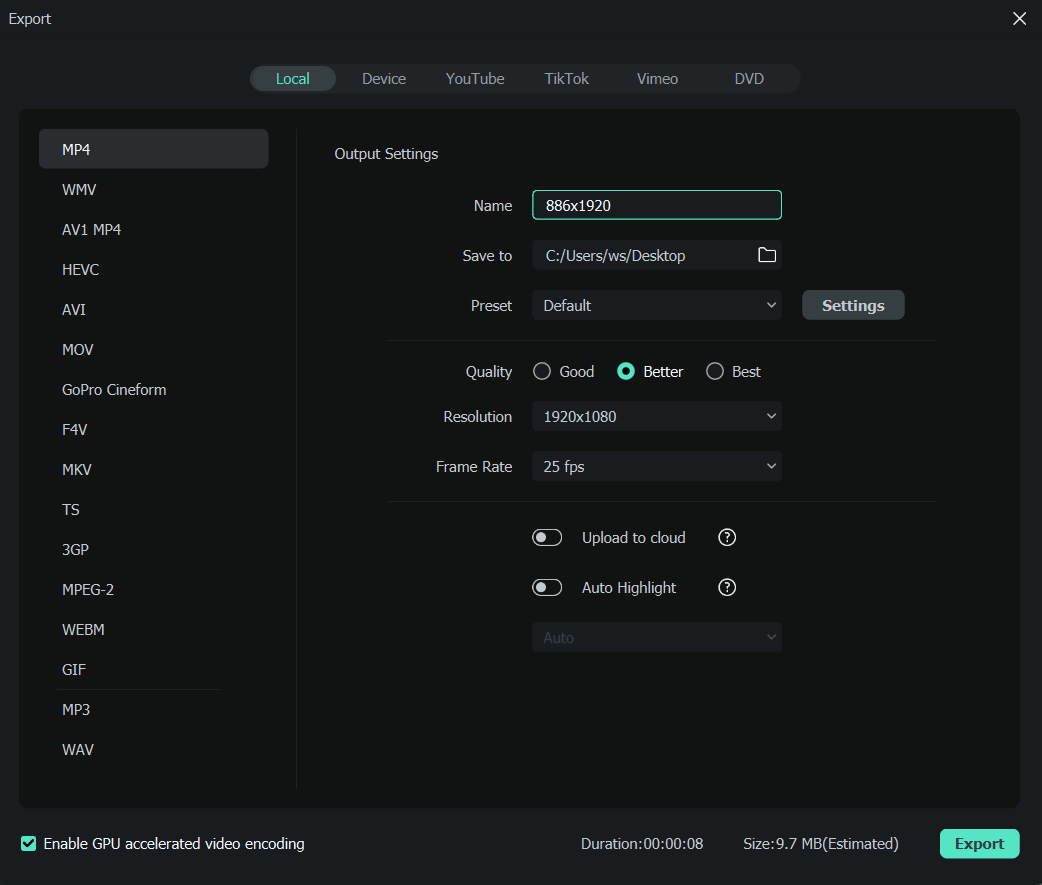
Filmora offers many export options, such as your device, YouTube, Vimeo, and DVD, with just a few clicks.
Last Words
In this detailed tutorial, we’ve discussed what GIMP is and its key features. We’ve provided a step-by-step guide to walk you through the process of creating the motion blur effect using the GIMP software.
In addition, we’ve provided a bonus tip to recommend Filmora as the best alternative to GIMP for creating the motion blur effect.
Hopefully, you found this article helpful in resolving your queries, and you can now add a smooth motion blur effect to your images.
Free Download For macOS 10.14 or later
Here’s why Filmora is the best alternative to GIMP for creating motion blur effects:
- A user-friendly interface where you can quickly create the motion blur effect without spending hours learning the process
- Advanced video editing tools, such as keyframing, speed ramping, green screen, title editing, motion tracking, screen recorder, and preset templates
- Royalty-free music library where you can access millions of music and soundtracks
- Adds the motion blur effect to your videos as well as images
- Comes with multiple parameters to adjust the effect on your clip or image
To add the radial blur effect to images using Filmora, here are the quick and easy-to-follow steps:
Step1 Download the Filmora software on your PC, launch it, and click “Create New Project” on the main panel. Use the “Click Here to Import your Media File” option to import your photo and drag and drop it into the timeline.

Step2 Now, head to the “Effects” tab from the taskbar. Use the search option to find the Blur effect. Afterward, drag & drop it in the timeline and adjust it on your selected clip.

Step3 Please note that motion blur is now a dynamic effect on the image. That means you can add multiple photos and make them into a slideshow with a blur effect transition. Or, press the “Play” icon to preview your photo and pause the clip where you think motion blur works best.
Step4 Click the effect in the timeline to open its settings. Now, play your clip to preview and adjust the parameters as you want to smooth down the motion effect.
Step5 Once satisfied with the outcome, click the “Export” option, go to the “Local” tab, select a file format to save the images, and click “Export” again to save your project.

Filmora offers many export options, such as your device, YouTube, Vimeo, and DVD, with just a few clicks.
Last Words
In this detailed tutorial, we’ve discussed what GIMP is and its key features. We’ve provided a step-by-step guide to walk you through the process of creating the motion blur effect using the GIMP software.
In addition, we’ve provided a bonus tip to recommend Filmora as the best alternative to GIMP for creating the motion blur effect.
Hopefully, you found this article helpful in resolving your queries, and you can now add a smooth motion blur effect to your images.
How to Be a Good Podcast Host
You may be a blogger who has the habit of writing long articles. Or you may be a YouTuber with a hi-fi channel with many subscribers, but a podcast is a different thing in general.
This article will look at how to prepare, call guests, warm them up, and give practical ideas about how to host a podcast. Let’s start the article by learning how to get prepared to host a podcast.
#1 Get prepared to host a podcast
A good podcast host always gets prepared, sets up his goals, and gets easy tips to set apart from everyone in the marketplace. For this, you have to follow the below instructions and tips:
1. A proper pre-interview process
Before starting the podcast, the host should have quality and organic content. The content is related to the guest or any foremost personality related to the topic.
The host should be confident and relaxed to kill the anxiety process. If the host has low confidence, he may suffer from nervousness. This will kill the authenticity.
2. Share questions with the audience
A good understanding of how to pan out a situation makes you a good host. You must share the question on and off during podcasts to build engaging criteria with the audience.
You don’t need to sound the script on the screen like a robot. Scripts can be helpful but only if read in a conversational mood.
3. Find the right location
A good location means good conversation. A proper set prepared for the guest and the podcast will help you boost your conversation skills and get yourself and the guest into the mood of your show.
Before the show, you can change the settings or have a monotone set that fits every mood.
#2 Warm up the audience
Warming up is a necessary part of the show. A warmup works just like gas in a car before a long drive. You have to do this by asking any question or by telling them an inspirational or motivational story.
A good host must realize that a warm show has a high chance of becoming viral, and you won’t get that if the guest is nervous, tired, or not in the mood.
Tip 1. Setting the mood
Your goal is to set the mood of the audience according to the topic. Warming up the audience before getting to the guest.
You have to set the tone according to the topic of your podcast to warm them up. In this way, you need to make the connection between the guest, you, and your voice.
Tip 2. Build an emotional connection
Building an emotional connection helps to engage the audience till the end of the show. To make this possible, you can share a funny story with them or about a recent event or any recent incident.
Tip 3. Polls and questionnaires
Modern media has connected everything through the internet. You need to interact with the audience by asking questions from them and giving them a chance to answer them by live calling or on social media.
You can also do this on Instagram polls or by posting a story and asking them to select an upcoming topic for the podcast. Introducing this concept will boost your podcast views and help you engage more followers on your other social media platforms.
#3 Try to be authenticity
You need to have authenticity if you want your podcast to be successful. An authentic show attracts a larger audience, while a show whose mood resembles a person with a multiple personality disorder will throw off the whole vibe of the podcast. And the listeners will eventually press back buttons to escape the colossal wreck.
Tips to have authentic content
- Your topic may be emotional, happy, or of any other information.
- A good host needs to have the skills of a good actor to convey the emotions that the audience will perceive more efficiently.
- An idea of how the audience will perceive you and how to make your voice tone with emotions on podcasts.
- Don’t go for a more serious tone.
Things to Avoid
- What you should opt away from is, faking
- Don’t try to get excited about something that you’re not.
- Do not pretend to care about something when you do not.
- The fakeness will only result in the downfall of your podcast, as the listeners will eventually grow tired and leave.
- You must act well and sell yourself more efficiently to develop that trust with the audience.
The more the audience trusts you, the more authentic you seem.
#4 Storytelling
Tales are as old as time. As time moves on, more and more stories pile up. Your podcast has the potential to be the best if you know how to utilize those storytelling skills of yours. It’s never about information alone!
You may have a bland topic to discuss or a guest who is tough to break character. These are the situations where your charm and concern will play their part. So you also want to learn how to make your podcasts enjoyable through stories? Then check out the short tips below:
How to add stories to your podcasts
- First, you should have the skill to read the room and the mood.
- If you start telling a story about yourself that has no relation to the topic whatsoever will only lead to the guest being annoyed.
- You may have called the guest for a reason. This reason should tally with your topic as it will make you ask about their experience.
- Asking the right questions is important.
- You’d better not begin with leading statements such as, “Obi-wan Kenobi is a good TV show.” the guest may simply reply, “I do not care.”
- You should approach with question statements such as, “Did you know that your son is a big fan of the Obi-wan Kenobi TV show.” These are indulging questions to help your audience be more involved in your podcasts.
The audience and the guest will also develop an interest in the conversation that will lead to a successful show for the day.
#5 Transcribe your episodes
A good podcast also looks to give you quality content for each episode. You may call on guests upon guests and promote your podcasts in many ways. One of the ways you can also allow your podcasts to be recognized more is by the use of transcribing.
What is transcribing?
Transcribing means converting the speech in the audio of your podcasts to a text format. Your podcast may raise some eyes if the content is desirable to the audience.
It may happen your podcast gets around a person whose brother suffers from hearing loss. By a transcription, you offer a chance to let them involved in your podcast. You can accomplish this feat in one of two ways.
- Either use an AI-powered audio editing program, like Wondershare Filmora , to get you through the speech-to-text transcription by default or a more auto way.
- Convert your text into audio, but this article will not look at it.
Free Download For Win 7 or later(64-bit)
Free Download For macOS 10.14 or later
Our main focus would be manually converting speech to text using a human transcriber. And we will be doing so by using the Wondershare Filmora app.
Transcribing podcasts with Wondershare Filmora
Filmora is an all-in-one video editing tool. In the following steps, we will learn the step-by-step process of transcribing podcast by using Wondershare Filmora.
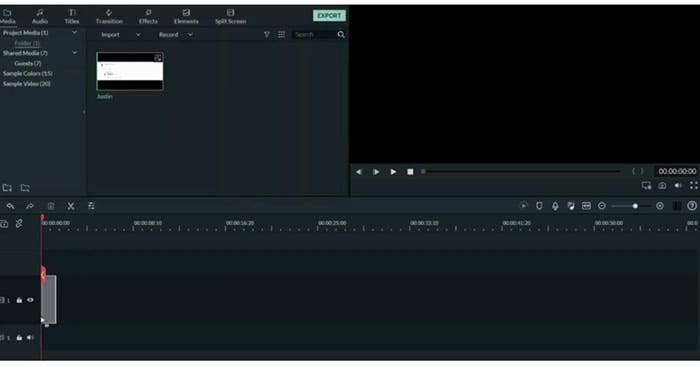
Step1Add audio files or footage
- First of all, drag the imported audio files or footage into the timeline.
Step2Add subtitles
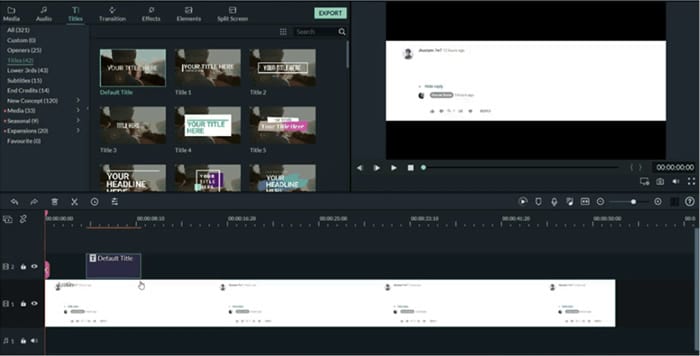
To show the transcription of the podcast’s audio, you have to add sbtitles for better understanding. For this, perform these steps:
- Select the tile icon on the bar above.
- In the window that pops up, select your favorite subtitle format.
Step3Adjust the size
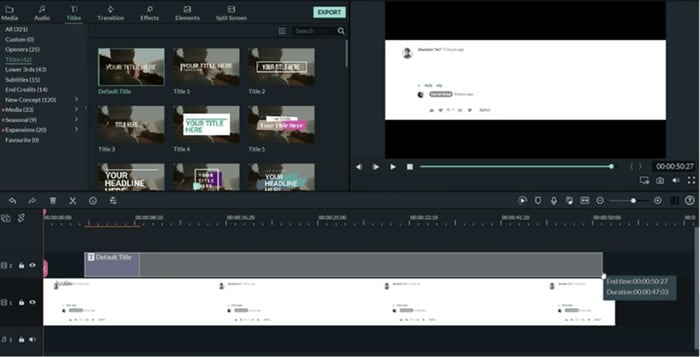
For better playout and matching the audio with subtitles, you have to adjust the size of the video as:
- Add a subtitle tile above the video.
- Then adjust the size of the video.
Step4Convert speech into text
- At last, type the speech into text in the subtitle box.
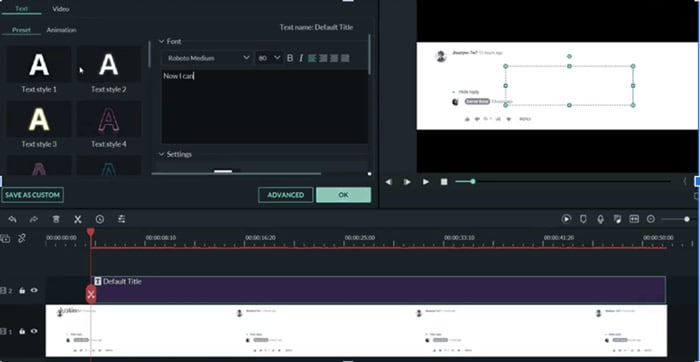
In this way, you have created speech-to-text using a human transcriber rather than an AI. Doing this will ensure no mistakes are recorded and make it even more efficient.
#6 Put yourself in audiences’ shoes
And if you feel like the general audience would want to make sense of a particular statement, ask the guest about it. This is what differentiates a good host from a bad one! A general understanding of the audience’s point of view would always allow you to process your podcast accordingly.
- You should understand the general sentiments of the audience.
- When you feel a particular subject will attract more audience, do the process accordingly.
- Maybe they like how you process a story and evaluate it. Do that!
All qualities of a good podcast are there, and it’s your job to identify them and make the most of them.
#7 Understand why the guest is here
You are the host of the podcast. Your job is to be sincere with the guest. Moreover, useful information or a valued thought might be a reason why the guest has come to your show. Understand that reason and try to make the most of it.
- The guest might have heard about your podcast, or they could be a constant
- Your approach to the guest should tally with the topic of the podcast.
- The guest might be going through a tough time that makes them a suitable guest for that particular episode.
- Or it could be that your podcast attracted them, and now they want to use your interview to promote a book or any other service they think is best.
- As a host, you should allow the guest to have some control over the podcast.
- Develop a sense of trust between the host and the guest.
- The more you allow the guest to speak freely about themselves, the more they will feel interested in your podcast.
Your goal should be to captivate the guest as much as you can. If the guest is entertained, the more chances are that they will recommend you to other guests. An experience gone wrong will be bad for the podcast.
#8 Invite the right guest
A podcast can be an excellent tool for attracting the audience to your content. And as podcast hosts guests, your first step is finding the right guests for your audience.
Is it necessary to search for a host before calling? Yes! It’s quite a complicated and sensitive step to call out guests. A guest is the only one who can make or break the Podcast show. It’s important to study the nature of guests too. Because a guest is also considered as a co-host of the show.
If a guest is bored and doesn’t take much interest, then there are 100% chance that the show will fail. To find who is more compatible, we have to take assistance from a tool.
You can do this by plugging your podcast into a tool like Sparktoro. Sparktoro allows you to see what your audience is engaging with. It could be other platforms of podcasts such as youtube or other social media platforms.
For example, If we search for “the art of product podcast” on the Sparktoro website. It will direct us to demographic data, providing information about the content the audience is interacting with.
- It will show different hashtags and frequently used phrases.
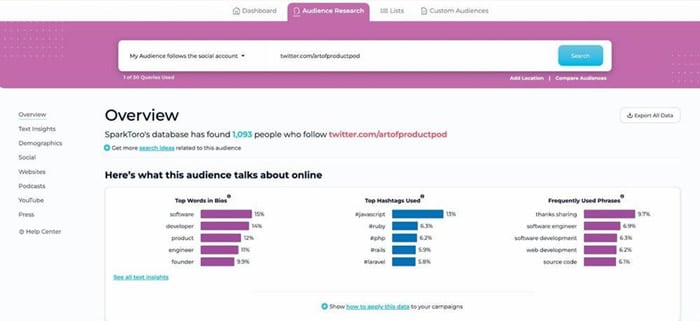
- Here you can see the top words in bios, hashtags, and frequent phrases.
- On the left window, you can search for other related podcasts your viewers are watching.

- Similarly, you can also use the YouTube option to look at what kind of content your audience watches on youtube.
Following the above methods could give you 50-100 potential clients. Your main goal will be creating a list allowing you to call guests on your show. You can divide the list according to the priorities.
- Close friends: the ones who are going to be available whenever you call upon them.
- The probable list: the ones who would most probably agree to come on your podcast.
- The premium list: these guests will resemble a dream list of guests you want to call on your podcast.
Start by writing emails and promoting content that will attract these guests. Your chances are increased by how much you polish your podcast into creating premium content. The more premium the content is, the more premium your chances are of inviting those dream guests.
The Bottom Line
Podcasts are tricky to promote. Many other alternatives are available in the market that provides a more Visual representation. And it’s no lie; an audience like to sit and watch rather than sit and listen.
Following the steps, tips, and tricks mentioned above, you can build a strong base for being a good podcast host. Although it will take time to set off on your dreams, consistency and determination will eventually bear fruit.
Free Download For macOS 10.14 or later
Our main focus would be manually converting speech to text using a human transcriber. And we will be doing so by using the Wondershare Filmora app.
Transcribing podcasts with Wondershare Filmora
Filmora is an all-in-one video editing tool. In the following steps, we will learn the step-by-step process of transcribing podcast by using Wondershare Filmora.
Step1Add audio files or footage
- First of all, drag the imported audio files or footage into the timeline.

Step2Add subtitles
To show the transcription of the podcast’s audio, you have to add sbtitles for better understanding. For this, perform these steps:
- Select the tile icon on the bar above.
- In the window that pops up, select your favorite subtitle format.

Step3Adjust the size
For better playout and matching the audio with subtitles, you have to adjust the size of the video as:
- Add a subtitle tile above the video.
- Then adjust the size of the video.

Step4Convert speech into text
- At last, type the speech into text in the subtitle box.

In this way, you have created speech-to-text using a human transcriber rather than an AI. Doing this will ensure no mistakes are recorded and make it even more efficient.
#6 Put yourself in audiences’ shoes
And if you feel like the general audience would want to make sense of a particular statement, ask the guest about it. This is what differentiates a good host from a bad one! A general understanding of the audience’s point of view would always allow you to process your podcast accordingly.
- You should understand the general sentiments of the audience.
- When you feel a particular subject will attract more audience, do the process accordingly.
- Maybe they like how you process a story and evaluate it. Do that!
All qualities of a good podcast are there, and it’s your job to identify them and make the most of them.
#7 Understand why the guest is here
You are the host of the podcast. Your job is to be sincere with the guest. Moreover, useful information or a valued thought might be a reason why the guest has come to your show. Understand that reason and try to make the most of it.
- The guest might have heard about your podcast, or they could be a constant
- Your approach to the guest should tally with the topic of the podcast.
- The guest might be going through a tough time that makes them a suitable guest for that particular episode.
- Or it could be that your podcast attracted them, and now they want to use your interview to promote a book or any other service they think is best.
- As a host, you should allow the guest to have some control over the podcast.
- Develop a sense of trust between the host and the guest.
- The more you allow the guest to speak freely about themselves, the more they will feel interested in your podcast.
Your goal should be to captivate the guest as much as you can. If the guest is entertained, the more chances are that they will recommend you to other guests. An experience gone wrong will be bad for the podcast.
#8 Invite the right guest
A podcast can be an excellent tool for attracting the audience to your content. And as podcast hosts guests, your first step is finding the right guests for your audience.
Is it necessary to search for a host before calling? Yes! It’s quite a complicated and sensitive step to call out guests. A guest is the only one who can make or break the Podcast show. It’s important to study the nature of guests too. Because a guest is also considered as a co-host of the show.
If a guest is bored and doesn’t take much interest, then there are 100% chance that the show will fail. To find who is more compatible, we have to take assistance from a tool.
You can do this by plugging your podcast into a tool like Sparktoro. Sparktoro allows you to see what your audience is engaging with. It could be other platforms of podcasts such as youtube or other social media platforms.
For example, If we search for “the art of product podcast” on the Sparktoro website. It will direct us to demographic data, providing information about the content the audience is interacting with.
- It will show different hashtags and frequently used phrases.

- Here you can see the top words in bios, hashtags, and frequent phrases.
- On the left window, you can search for other related podcasts your viewers are watching.

- Similarly, you can also use the YouTube option to look at what kind of content your audience watches on youtube.
Following the above methods could give you 50-100 potential clients. Your main goal will be creating a list allowing you to call guests on your show. You can divide the list according to the priorities.
- Close friends: the ones who are going to be available whenever you call upon them.
- The probable list: the ones who would most probably agree to come on your podcast.
- The premium list: these guests will resemble a dream list of guests you want to call on your podcast.
Start by writing emails and promoting content that will attract these guests. Your chances are increased by how much you polish your podcast into creating premium content. The more premium the content is, the more premium your chances are of inviting those dream guests.
The Bottom Line
Podcasts are tricky to promote. Many other alternatives are available in the market that provides a more Visual representation. And it’s no lie; an audience like to sit and watch rather than sit and listen.
Following the steps, tips, and tricks mentioned above, you can build a strong base for being a good podcast host. Although it will take time to set off on your dreams, consistency and determination will eventually bear fruit.
How to Create Vintage Film Effect 1920S
Do you want to roll back the hands of time and shoot a film like you were in WWI or Charlie Chaplin’s era? That’s what a vintage film effect is all about. In other words, this video effect will give your videos an old-film look and feel. So, without wasting time, let’s learn how to convert a normal video into a film shot in the 1920s with Wondershare Filmora.
Preparation
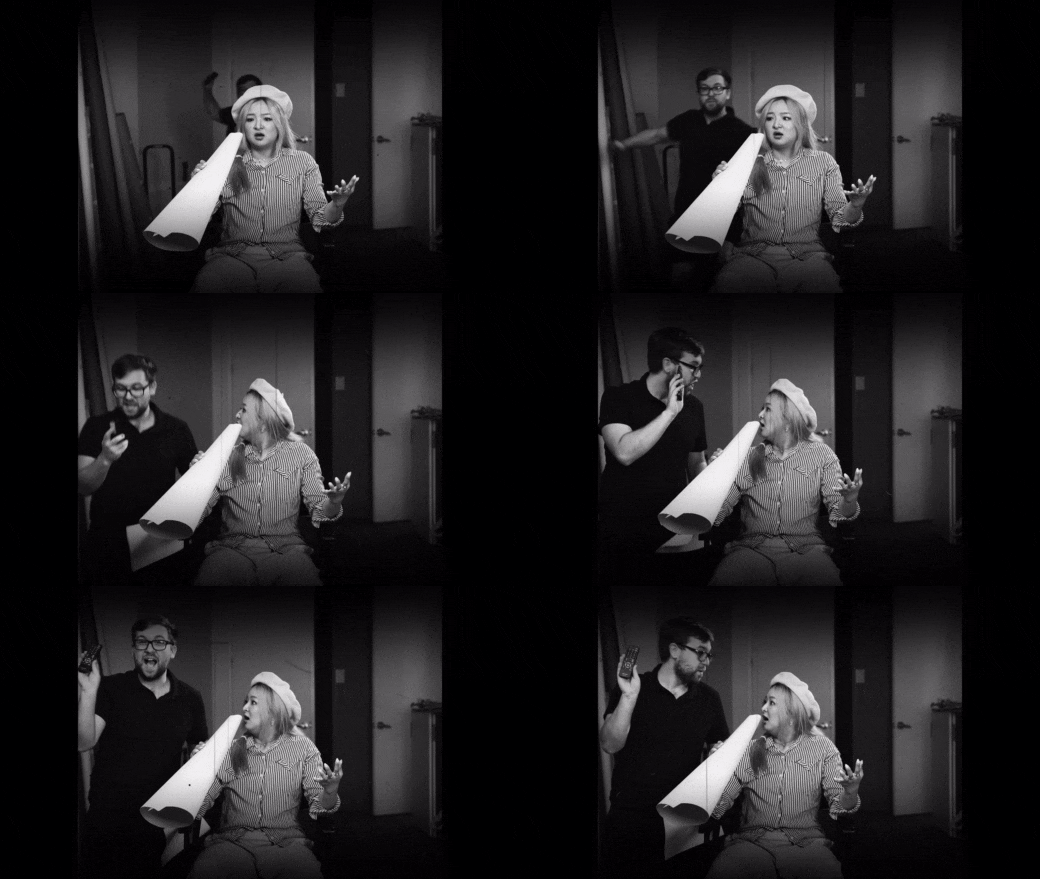
In this tutorial, you don’t need a lot of creativity to create a vintage film, as Wondershare Filmora will be doing the heavy lifting. Just shoot an action video like chasing each other around, chatting with friends, running away from something, or doing anything else. Let’s learn how to do that below!
Free Download For Win 7 or later(64-bit)
Free Download For macOS 10.14 or later
Step1 Add a video you want to edit
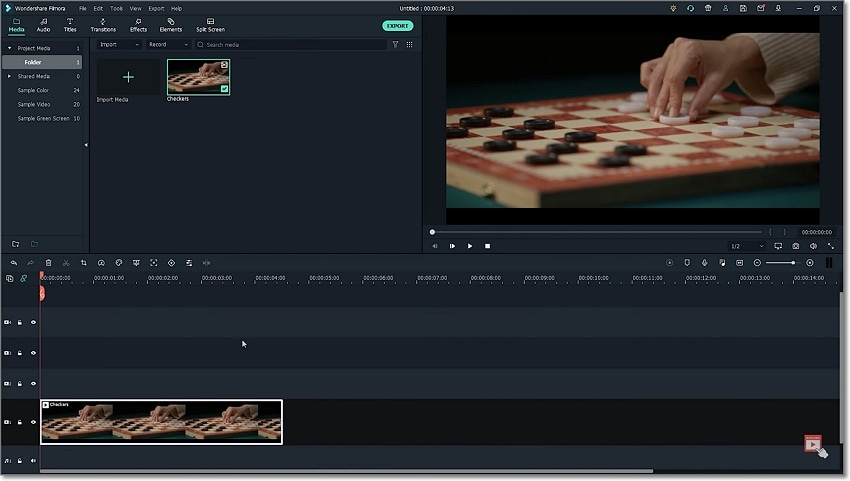
Upload your video on Filmora, then move it to the editing timeline by dragging it. This should take a second or two.
Step2 Add a crop effect
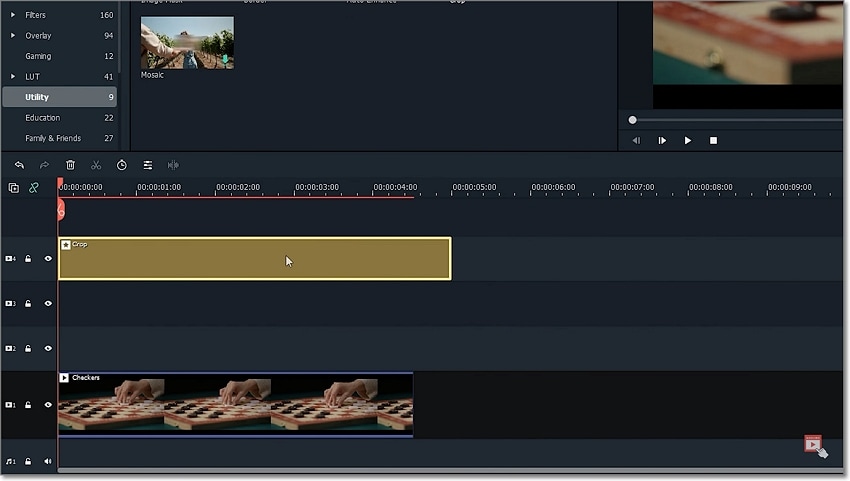
After successfully adding your video to the timeline, tap the Effect tab on top of the screen and click Utility. Then, choose the Crop effect and add a few tracks above the video clip.
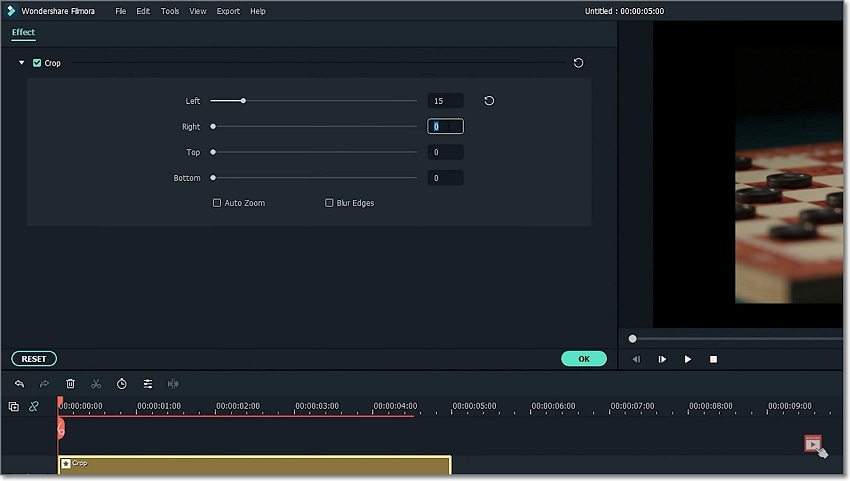
Next, double-tap the Crop effect on the editing timeline to open the effect editing tools. Now change the crop amount to 15 to add a vintage feel to your video. Just enter 15 on the Left and Right boxes.
Step3 Add the Dirty Film and Silent Film effects
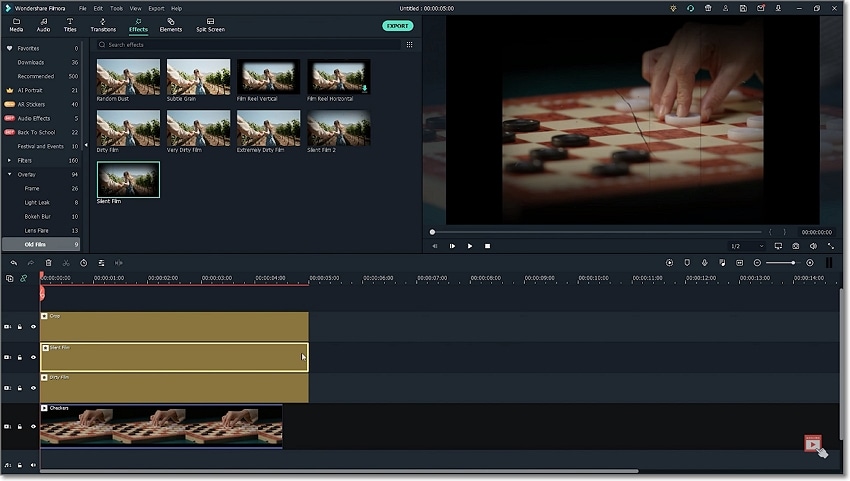
Tap the Effect tab, then open the Overlay drop-down menu. Then, choose the Old Film category before adding a Dirty Film effect above the clip. To apply a more vintage feel to your video, add a Silent Film effect to the track above the Dirty Film effect.
Step4 Add a black & white effect to your video

Up to this point, your film should now start having a more vintage feel. But to make it look even older, double-click the video clip and tap the Color tab. After that, open the 3D LUT arrow and choose the B&W Film option. Now play the video and enjoy.
Summary
See, you don’t need to break a sweat to add a vintage feel to your funny video. With Filmora, you’ll access multiple tools and effects to create an old-looking film with just a single click. And don’t forget to play around with other Filmora overlays and effects to bring out the inner video editor in you. Thanks for reading!
Free Download For macOS 10.14 or later
Step1 Add a video you want to edit

Upload your video on Filmora, then move it to the editing timeline by dragging it. This should take a second or two.
Step2 Add a crop effect

After successfully adding your video to the timeline, tap the Effect tab on top of the screen and click Utility. Then, choose the Crop effect and add a few tracks above the video clip.

Next, double-tap the Crop effect on the editing timeline to open the effect editing tools. Now change the crop amount to 15 to add a vintage feel to your video. Just enter 15 on the Left and Right boxes.
Step3 Add the Dirty Film and Silent Film effects

Tap the Effect tab, then open the Overlay drop-down menu. Then, choose the Old Film category before adding a Dirty Film effect above the clip. To apply a more vintage feel to your video, add a Silent Film effect to the track above the Dirty Film effect.
Step4 Add a black & white effect to your video

Up to this point, your film should now start having a more vintage feel. But to make it look even older, double-click the video clip and tap the Color tab. After that, open the 3D LUT arrow and choose the B&W Film option. Now play the video and enjoy.
Summary
See, you don’t need to break a sweat to add a vintage feel to your funny video. With Filmora, you’ll access multiple tools and effects to create an old-looking film with just a single click. And don’t forget to play around with other Filmora overlays and effects to bring out the inner video editor in you. Thanks for reading!
Free Download For macOS 10.14 or later
Step1 Add a video you want to edit

Upload your video on Filmora, then move it to the editing timeline by dragging it. This should take a second or two.
Step2 Add a crop effect

After successfully adding your video to the timeline, tap the Effect tab on top of the screen and click Utility. Then, choose the Crop effect and add a few tracks above the video clip.

Next, double-tap the Crop effect on the editing timeline to open the effect editing tools. Now change the crop amount to 15 to add a vintage feel to your video. Just enter 15 on the Left and Right boxes.
Step3 Add the Dirty Film and Silent Film effects

Tap the Effect tab, then open the Overlay drop-down menu. Then, choose the Old Film category before adding a Dirty Film effect above the clip. To apply a more vintage feel to your video, add a Silent Film effect to the track above the Dirty Film effect.
Step4 Add a black & white effect to your video

Up to this point, your film should now start having a more vintage feel. But to make it look even older, double-click the video clip and tap the Color tab. After that, open the 3D LUT arrow and choose the B&W Film option. Now play the video and enjoy.
Summary
See, you don’t need to break a sweat to add a vintage feel to your funny video. With Filmora, you’ll access multiple tools and effects to create an old-looking film with just a single click. And don’t forget to play around with other Filmora overlays and effects to bring out the inner video editor in you. Thanks for reading!
Free Download For macOS 10.14 or later
Step1 Add a video you want to edit

Upload your video on Filmora, then move it to the editing timeline by dragging it. This should take a second or two.
Step2 Add a crop effect

After successfully adding your video to the timeline, tap the Effect tab on top of the screen and click Utility. Then, choose the Crop effect and add a few tracks above the video clip.

Next, double-tap the Crop effect on the editing timeline to open the effect editing tools. Now change the crop amount to 15 to add a vintage feel to your video. Just enter 15 on the Left and Right boxes.
Step3 Add the Dirty Film and Silent Film effects

Tap the Effect tab, then open the Overlay drop-down menu. Then, choose the Old Film category before adding a Dirty Film effect above the clip. To apply a more vintage feel to your video, add a Silent Film effect to the track above the Dirty Film effect.
Step4 Add a black & white effect to your video

Up to this point, your film should now start having a more vintage feel. But to make it look even older, double-click the video clip and tap the Color tab. After that, open the 3D LUT arrow and choose the B&W Film option. Now play the video and enjoy.
Summary
See, you don’t need to break a sweat to add a vintage feel to your funny video. With Filmora, you’ll access multiple tools and effects to create an old-looking film with just a single click. And don’t forget to play around with other Filmora overlays and effects to bring out the inner video editor in you. Thanks for reading!
10 Best Websites to Discover Free Premiere Pro Video Templates
The Premiere Pro templates are a great help to start working on the video right away. You don’t need to create your video from scratch thus, saving time. Moreover, there are fully adaptable features that make your video eye-catching. The article provides knowledge about 10 free Premiere Pro templates. So, let us commence this! Are you with us?
Part 1: 10 Popular Websites to Find Premiere Pro Templates
There is an extensive range of websites to access the free Adobe Premiere templates. It is important to know the workability of such websites and what they bring to the house. Therefore, the sub-section of this write-up would shed light on 10 of such websites where you can download Adobe Premiere templates and find them compatible with the software.
So, what are we waiting for? Let us begin the process!
1. Envato Elements
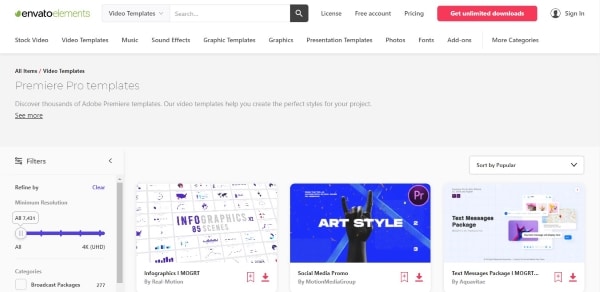
The first website offering Adobe Premiere templates is known as Envato Elements. One can count on this webpage to access millions of creative assets. Envato Elements comes up with Adobe Premiere Pro templates free, stock videos, graphic templates, photos, and website templates.
Moreover, if you are into print and website design, you will find Envato Elements beside you. The search bar makes the search effective as you can choose between categories or applications. The search filter has made life easy for designers and creators.
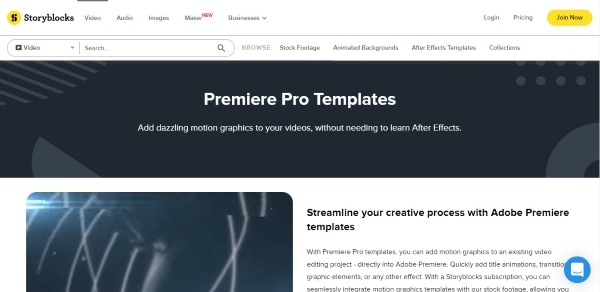
2. Storyblocks
Storyblocks are the next big thing if you need to download Premiere templates without much effort. This website presents an awful load of green screen footage, music and sound effects, animated backgrounds, royalty stock footage, and templates for Premiere Pro. It also has a Maker, enabling the user to make the professional video in seconds.
The filtering option of Storyblocks is to die for. Style or software can filter the templates and effects to have what we need without wasting much time.
3. MotionElements
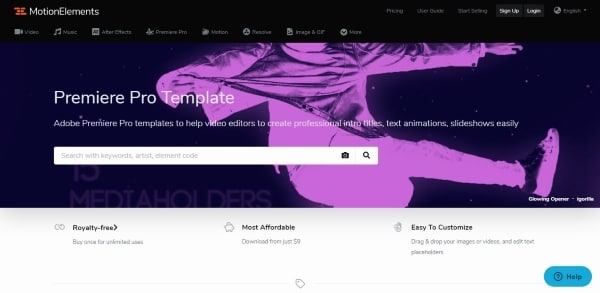
The third royalty-free marketplace making a brand name for itself is MotionElements. The website offers more than 3 million assets for its users in different industry sectors. You can access Premiere Pro templates free download with other stock videos and audio files.
From images, music, templates, effects to transitions, logos, and animations, MotionElements has covered its basis. The search filter gives multiple categories, including software, category, and style.
4. Motion Array
Claiming to be an all-in-one video and filmmaker’s platform, Motion Array takes complete responsibility for making your projects successful. The website takes the raw concept of your project and turns it into completion. Adobe Premiere Pro templates can be downloaded via Motion Array with other effects.
You can have Adobe Premiere Pro, Final Cut, DaVinci, and After Effects templates. The stock motion graphics, sound effects, videos, and photos are some of the strengths of Motion Array. The unlimited downloads save you from emptying your wallet.

5. Adobe Stock
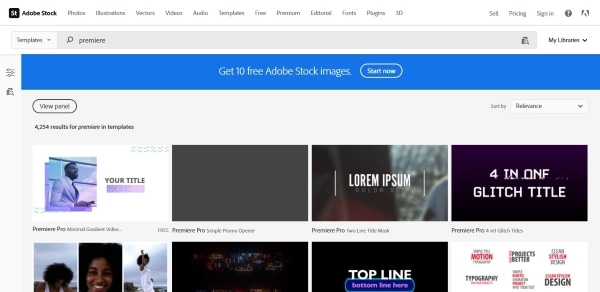
While we are on the subject of template Adobe Premiere free, how can we forget about Adobe Stock? Adobe Stock is a serious archive for templates, especially for Adobe Creative Suite applications. Moreover, getting hands-on an impeccable library of stock photos, audio, and videos, is one of the strongest traits of Adobe Stock.
The search filter has different options to make the search easier, for instance, application, categories, transitions, and whatnot. If you type free in the search bar, you will find Premiere Pro video templates so that downloading them wouldn’t cost a penny.
6. Mixkit
Mixkit is the top choice for getting Premiere Pro split-screen template among other royalty-free assets. Mixkit offers free Premiere Pro templates with After Effects, Final Cut Pro, DaVinci Resolve, and much more.
Moreover, Mixkit can be used for stock videos, music, sound effects, and music tracks. The quality is always high, so you don’t need to worry about that.

7. VideoHive
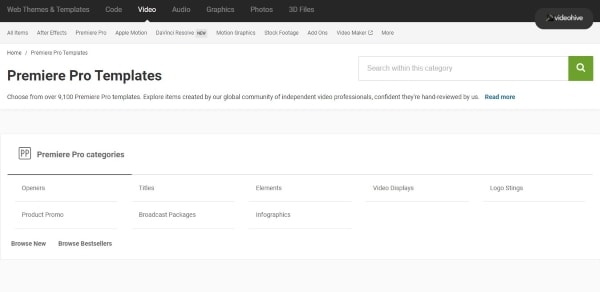
VideoHive offers the best quality and fast researched Premiere Pro templates. With more than 9,100 free Adobe Premiere templates, VideoHive helps add motion graphics and effects to your videos. Most filmmakers prefer the usage of motion graphics as it improves time and cost-effectiveness and enhances ease in adding animations to the projects.
If you are interested in making a slideshow, animated title, transition, or logo stings, you will find VideoHive there for you.
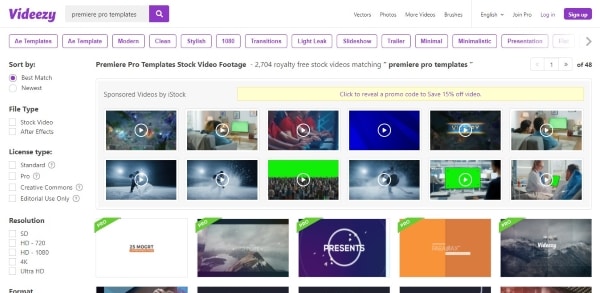
8. Videezy
Videezy is a fair choice if you need to access Premiere templates free in the most effortless fashion. The search bar of Videezy stock marketplace has interactive filter options. The user is free to navigate by sorting the results based on their presence on the website. Moreover, you can choose between the file type and bring productivity to the media industry.
The resolution can also be decided as Videezy offers SD, HD 720, HD 1080, 4K, and Ultra HD. Doesn’t it feel like a dream come true?
9. Videvo
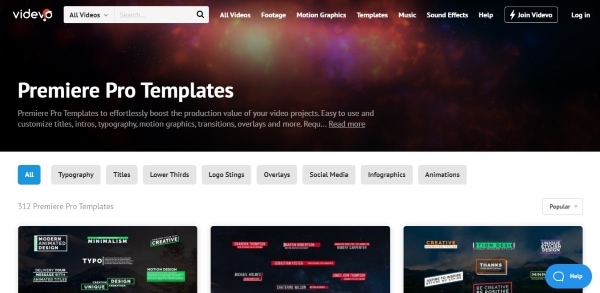
Videvo is the right shop for you if you prefer the ease-of-use over-complicated workability. Offering an interactive interface and progressive search results, Videvo boosts the production value of your projects multifold. Furthermore, this free Premiere Pro templates provider is an allrounder from the video footage, motion graphics, templates, music, and sound effects.
The user is free to customize titles, intros, typographs, overlays, and transitions. Launch the website, download the template, and get into the process.
10. Monsterone
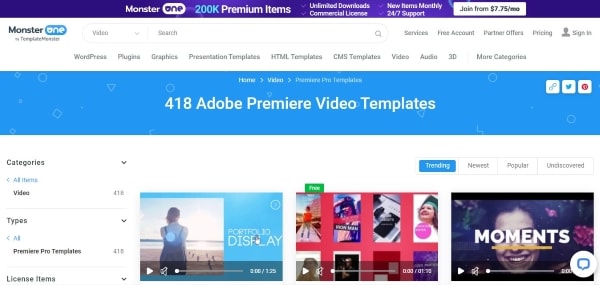
Offering Trending, Newest, Popular, and Undiscovered filtering options and choosing the right tags, Monsterone has made it to the bucket list of professionals in the field. More than 400 Premiere Pro templates can be downloaded to start working on the deadline right away.
The templates can be effortlessly previewed and launched before accessing them. It helps the user make a conscious choice. The resolution can also be set as the user deems necessary.
The Bottom Line
We are surrounded by videos 24/7. It is true for most creative professionals in the industry who are expected to edit the video to make it more captivating and attractive. One needs to have access to free Premiere Pro templates to obtain a sense of originality as we save money and time on making videos from scratch.
For this very reason, the article discussed 10 compatible and popular websites where Premiere templates free are found. We expect the user to make the right choice based on their niche in the industry. The video editing process can be accelerated by using a phenomenal tool which is Wondershare Filmora.
Filmora has the right toolbox set to make video editing easier and flawless. From cropping to flipping and motion tracking to adding keyframes, Filmora knows it all. One can also count on this tool to add backgrounds in Hollywood effect to gain innovation at all costs.
Wondershare Filmstock is your one-stop shop for royalty-free effects, video footage, clips, video effects, and audio tracks. Do not forget to review Filmora and Filmstock about their workability in the flesh.
Click here to find 10 Free After Effects Logo Templates .
Wondershare Filmora
Get started easily with Filmora’s powerful performance, intuitive interface, and countless effects!
Try It Free Try It Free Try It Free Learn More >


Also read:
- [Updated] Optimal Steps to Record Silent Videos for 2024
- 「無料・劣化なし! AVCHDフォーマットをMP4に簡単に変換するオンラインアプリ」
- 2024 Approved 11 Tips to Make Product Ad Videos
- 2024 Approved Keyframes Interval Everything You Need To Know
- Best Image (JPG/PNG) to GIF Converters
- Decoding the Asus X441BA Experience: A Balanced Review for Enthusiasts Weighing Its Large Screen Against Tradeoffs
- Effective Solutions for AOC Screen Compatibility Issues in New Windows 11 Environments
- Exploring the DJI Mini 3 Pro: Silent Flight & Compact Design with Built-In Power Bank - Initial Reviews and Insights | TechSavvyZDNet
- In 2024, Easy Way to Add Transitions to Videos
- New Applying the Effect of Camera Shake in Video Creation
- New Create Glitch Text Effect for 2024
- New In 2024, How to Convert Time-Lapse to Normal Video
- Optimizing Web Experiences with Advanced Cookiebot Technology
- Ultimate Guide to Catch the Regional-Located Pokemon For Nokia C12 | Dr.fone
- Wireless Perfection: Easily Hook Up Your Computer to a Bluetooth Speaker
- Title: 2024 Approved Motion Blur Photo With GIMP Step-By-Step Guide
- Author: Chloe
- Created at : 2024-12-08 01:13:18
- Updated at : 2024-12-11 19:22:43
- Link: https://ai-editing-video.techidaily.com/2024-approved-motion-blur-photo-with-gimp-step-by-step-guide/
- License: This work is licensed under CC BY-NC-SA 4.0.