:max_bytes(150000):strip_icc():format(webp)/tropical-beach-wallpaper-beach-backgrounds-587fbb765f9b584db3241860.jpg)
2024 Approved Step by Step to Cut Video in Adobe Premiere Pro

Step by Step to Cut Video in Adobe Premiere Pro
Video editing is an essential skill in a world that has a growing focus on creative fields. And if you work with videos, knowing which clips to use and where to cut is essential in conveying your story and increasing its impact. So, if you are a beginner and want to familiarise yourself with steps and terms used in video editing, in this article, we will go through the steps you will need to cut your video file in Adobe Premiere Pro and Wondershare Filmora.
This guide uses Adobe Premiere Pro 2022 and Wondershare Filmora X.
How to cut video in Adobe Premiere Pro?
Once you have Adobe Premiere Pro open on your computer, follow the steps listed below.
Step 1: Create a new project in Premiere Pro.
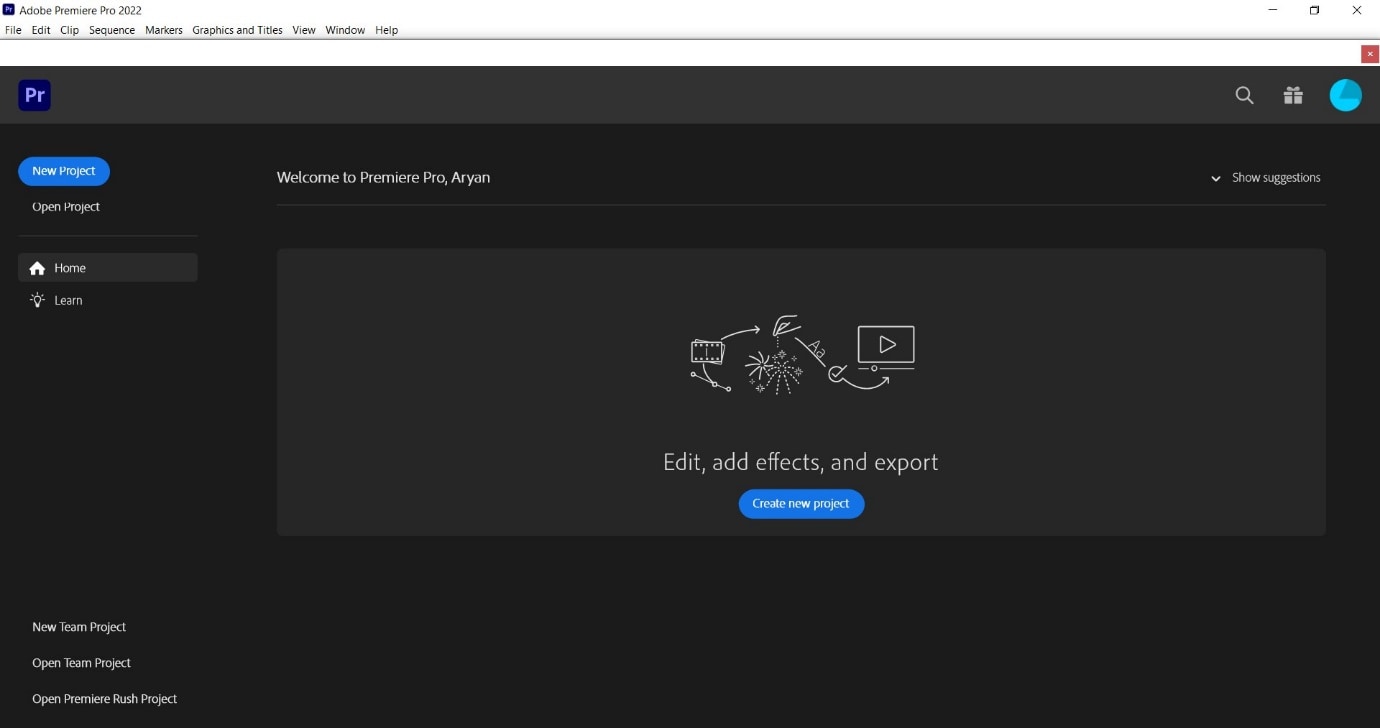
During project creation, we recommend keeping an eye on the file name set and the storage location; this can help reduce the time spent in locating the Premiere Project.
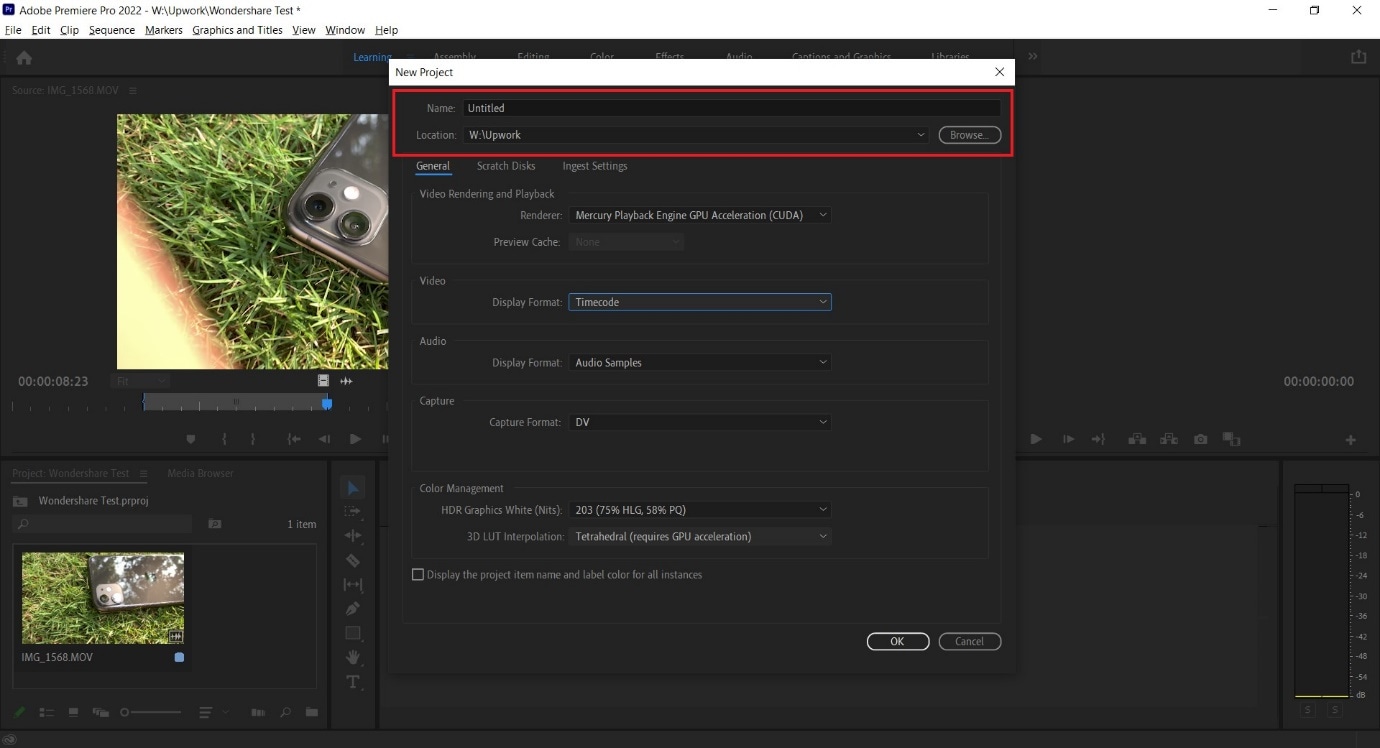
Step 2: Import a video file into Premiere Pro with a double click in the marked area and choose the file from its stored location.
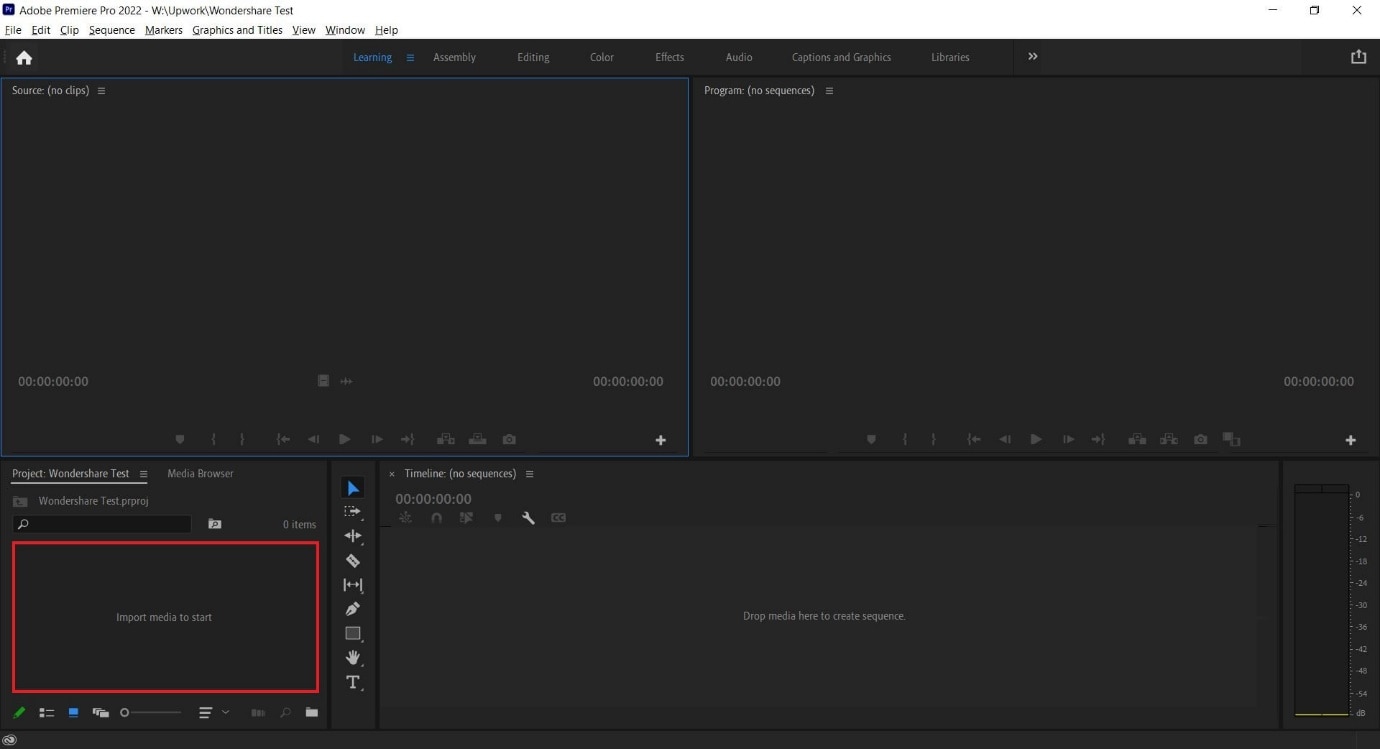
Step 3: Double click on any imported media to activate it and send it to the Source Window.
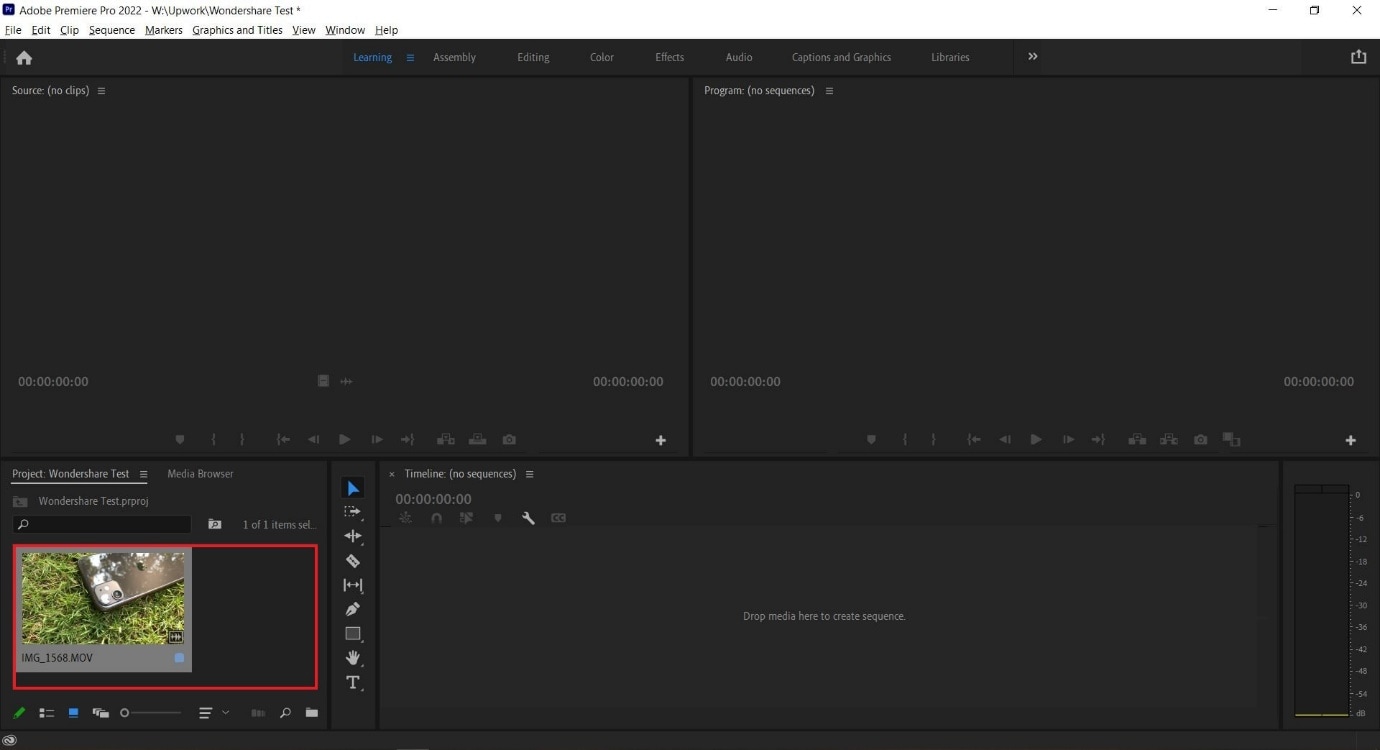
You can continue to import more media by double-clicking within the marked area. For better organization, users can also create Bins, which are folders within a Premiere Pro File that are often in use to sort out imported media.
Users can create Bins with a right-click in the red box marked area (refer to image above).
Step 4: Select either the whole clip or a part of it from the Source Window and drag it onto the Timeline.
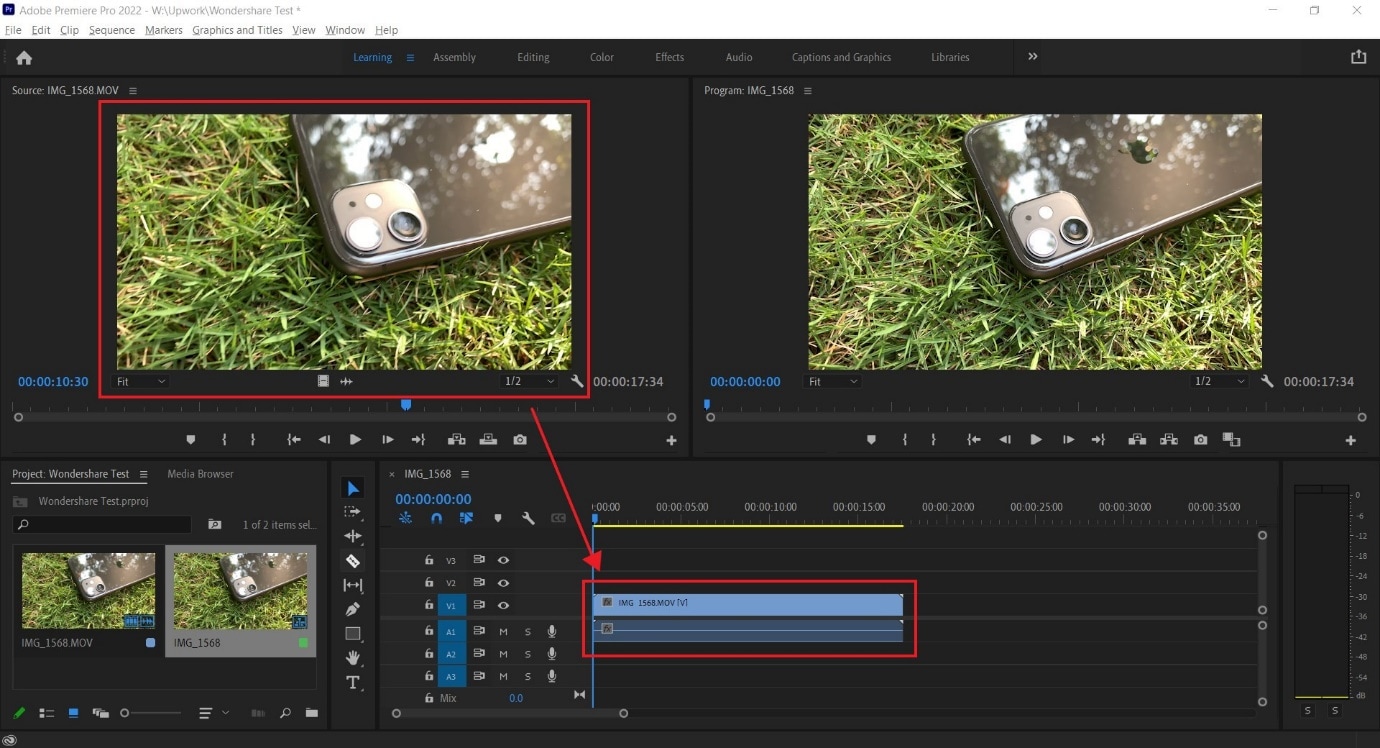
Step 5: Select the Razor Tool from the Tools Window. Now, pick the point where you want to introduce a cut and confirm with your left mouse button; this will split your video track into two parts.
Make a second cut where desired, following which you can move around the newly generated clip or delete it.
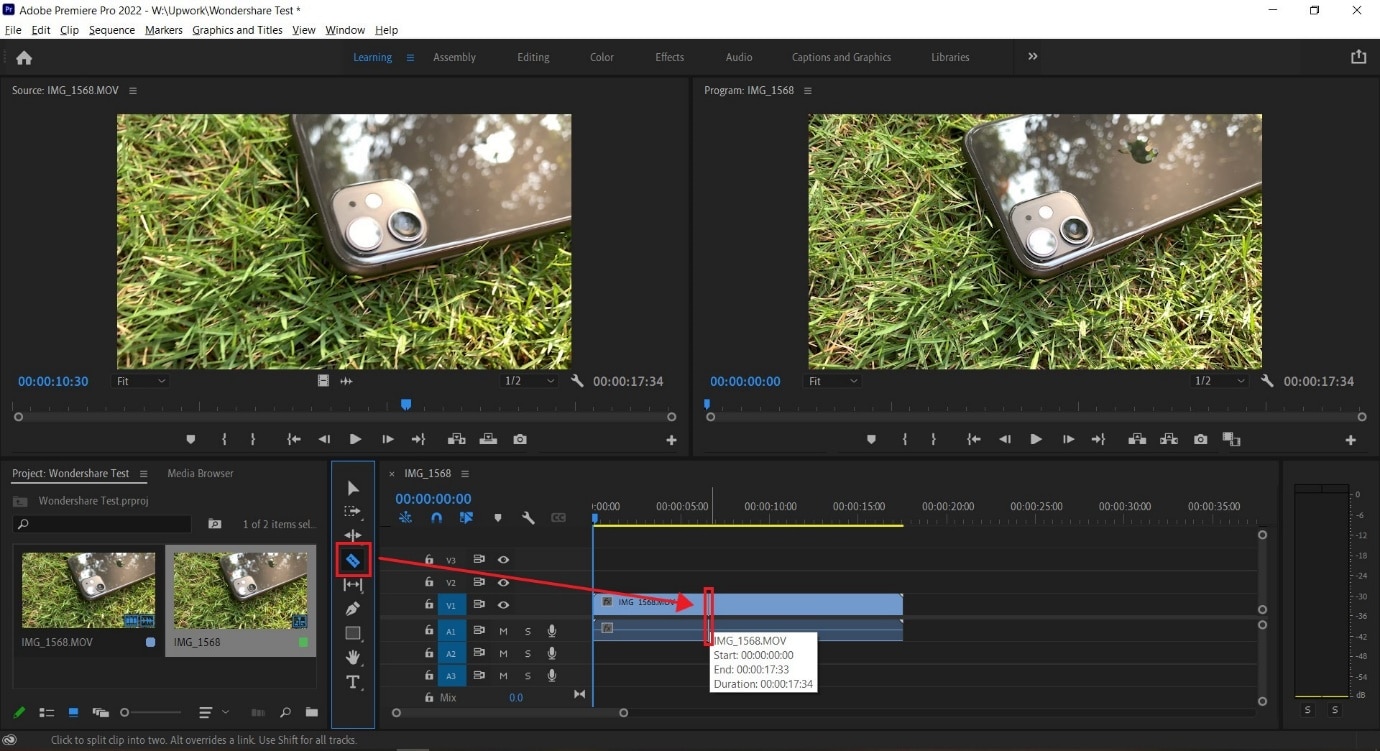
**Tip:**You can also select the Razor Tool by pressing C on the keyboard_._
We also recommend using the Snap in Timeline feature (activated with (S) on your keyboard or by choosing the magnet option), which will match your mouse pointer with the Playhead to ensure your cut will match the exact frame shown on your screen.
-—————————————————————————————————————————————-
Some more tips for Adobe Premiere Pro:
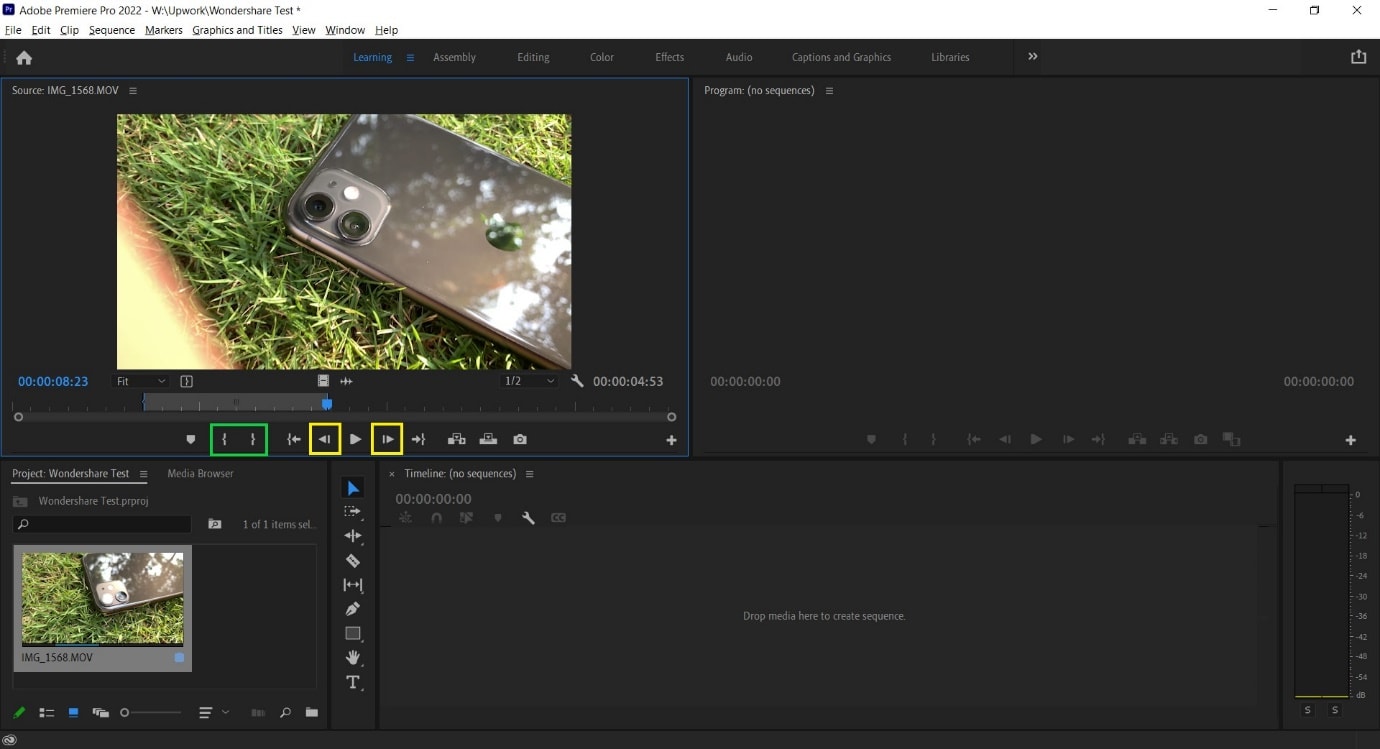
- Using the I and O keys on your keyboard while playing a video in the Source Window will allow you to set an In Pointand an Out Point. These markers will allow you to move a specific part of your video file into the Timeline, thus, reducing the amount of time spent making the right cut.
We have tagged the Mark In and Mark Out buttons with a Green Box in the image below.
- Clicking on the Step Frame Buttons [marked in Yellow] will also help increase the accuracy of your cut by allowing you to select the exact moment you desire.
- You can also mark a Point of Interest in your video file with the help of Markers in Premiere Pro. These afford you the ability to come back to the moment at a later time and see why it interested you in the first place, as editing sessions can often take hours at an end.
An alternative way to cut video with Wondershare Filmora
In Wondershare Filmora Video Editor , the steps to cut a video are simplified and don’t require as many steps as seen earlier. Opening the application throws you straight into a project, and following this, you can import a video file and begin editing. From the process you will learn below, it is easy to assume that Wondershare Filmora is more convenient for beginners and provides software features that match paid professional software.
For Win 7 or later (64-bit)
For macOS 10.14 or later
Note: If you don’t have Wondershare Filmora installed, you can get the video editor by visiting its official website . Once the setup program download completes, execute it and begin the installation process.
Once you have the editing software open, follow the steps listed below.
Step 1: Import a video file by clicking on the import window.
The default project setting for Filmora X is 1920x1080 at 25 frames per second. Users can change this to match their video file by going into Project Settings under the File tab or by accepting the automatic prompt that appears when dragging the video file onto the Timeline.

Note: If you have a PC with weak hardware, Wondershare Filmora gives you the option to create Video Proxies that will reduce the load on your computer by creating smaller clips that are lower in size, resulting in a smoother and faster experience. You can also do this in Premiere Pro, but Filmora does it for you automatically once given permission.
Step 2: Drag the video file onto the Timeline to begin previewing it in the Playback Window and commence editing operations.

Step 3: Locate where you want to cut in the video file and click on the orange scissors option to split the video file.
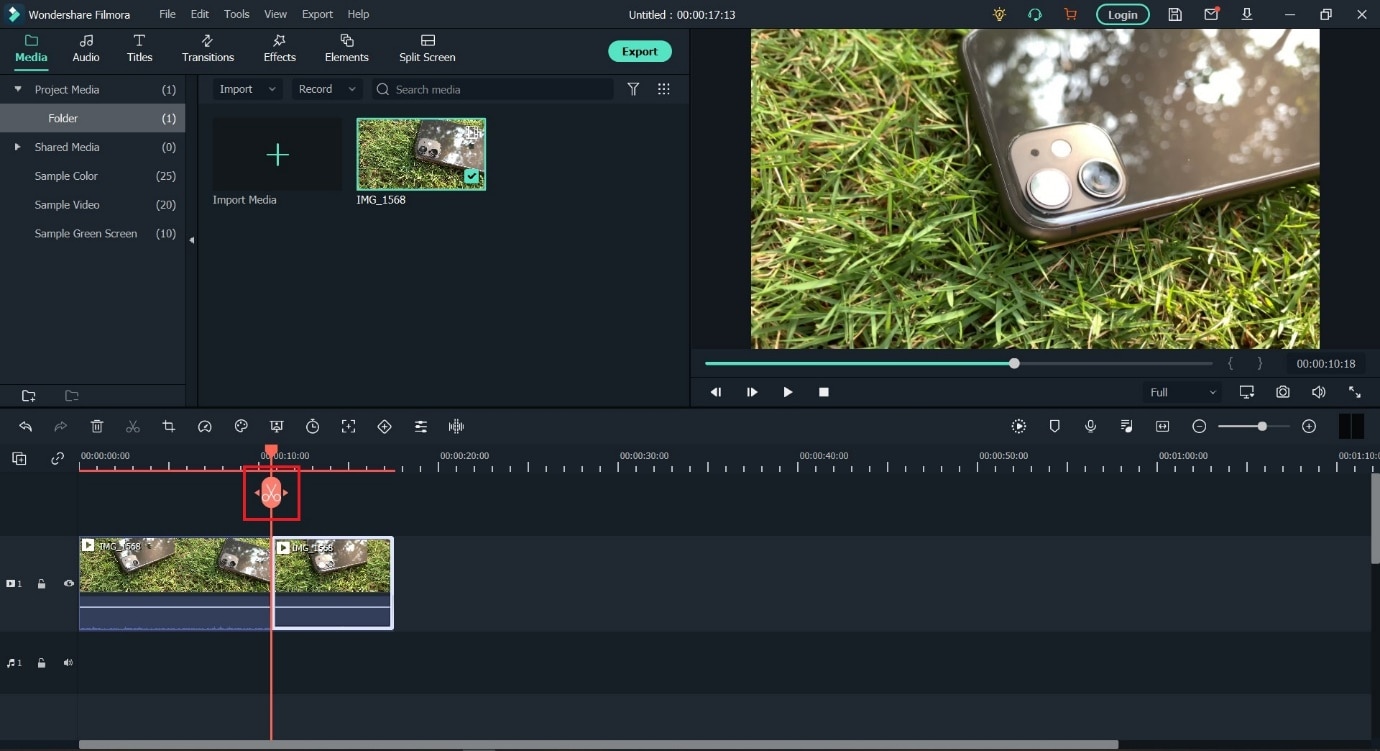
Tip: You can also use the keyboard shortcut (CTRL+B) to cut without using a mouse click, in case you make use of a trackpad while editing.
The Bottom Line
As said earlier, knowing where to cut is essential in improving the feel of your video, and we hope this guide showed you exactly how to perform the actions to create your best project. If you are a beginner, the simplistic approach of Wondershare Filmora will be more welcoming and easier to navigate. In addition, the software is also free to download, with added features that you can activate by paying a monthly, yearly, or one-time fee. Adobe Premiere Pro is an option worth considering if you plan on using third-party plugins and other applications from the Creative Cloud Suite.
During project creation, we recommend keeping an eye on the file name set and the storage location; this can help reduce the time spent in locating the Premiere Project.

Step 2: Import a video file into Premiere Pro with a double click in the marked area and choose the file from its stored location.

Step 3: Double click on any imported media to activate it and send it to the Source Window.

You can continue to import more media by double-clicking within the marked area. For better organization, users can also create Bins, which are folders within a Premiere Pro File that are often in use to sort out imported media.
Users can create Bins with a right-click in the red box marked area (refer to image above).
Step 4: Select either the whole clip or a part of it from the Source Window and drag it onto the Timeline.

Step 5: Select the Razor Tool from the Tools Window. Now, pick the point where you want to introduce a cut and confirm with your left mouse button; this will split your video track into two parts.
Make a second cut where desired, following which you can move around the newly generated clip or delete it.

**Tip:**You can also select the Razor Tool by pressing C on the keyboard_._
We also recommend using the Snap in Timeline feature (activated with (S) on your keyboard or by choosing the magnet option), which will match your mouse pointer with the Playhead to ensure your cut will match the exact frame shown on your screen.
-—————————————————————————————————————————————-
Some more tips for Adobe Premiere Pro:
- Using the I and O keys on your keyboard while playing a video in the Source Window will allow you to set an In Pointand an Out Point. These markers will allow you to move a specific part of your video file into the Timeline, thus, reducing the amount of time spent making the right cut.
We have tagged the Mark In and Mark Out buttons with a Green Box in the image below.
- Clicking on the Step Frame Buttons [marked in Yellow] will also help increase the accuracy of your cut by allowing you to select the exact moment you desire.
- You can also mark a Point of Interest in your video file with the help of Markers in Premiere Pro. These afford you the ability to come back to the moment at a later time and see why it interested you in the first place, as editing sessions can often take hours at an end.

An alternative way to cut video with Wondershare Filmora
In Wondershare Filmora Video Editor , the steps to cut a video are simplified and don’t require as many steps as seen earlier. Opening the application throws you straight into a project, and following this, you can import a video file and begin editing. From the process you will learn below, it is easy to assume that Wondershare Filmora is more convenient for beginners and provides software features that match paid professional software.
For Win 7 or later (64-bit)
For macOS 10.14 or later
Note: If you don’t have Wondershare Filmora installed, you can get the video editor by visiting its official website . Once the setup program download completes, execute it and begin the installation process.
Once you have the editing software open, follow the steps listed below.
Step 1: Import a video file by clicking on the import window.
The default project setting for Filmora X is 1920x1080 at 25 frames per second. Users can change this to match their video file by going into Project Settings under the File tab or by accepting the automatic prompt that appears when dragging the video file onto the Timeline.

Note: If you have a PC with weak hardware, Wondershare Filmora gives you the option to create Video Proxies that will reduce the load on your computer by creating smaller clips that are lower in size, resulting in a smoother and faster experience. You can also do this in Premiere Pro, but Filmora does it for you automatically once given permission.
Step 2: Drag the video file onto the Timeline to begin previewing it in the Playback Window and commence editing operations.

Step 3: Locate where you want to cut in the video file and click on the orange scissors option to split the video file.

Tip: You can also use the keyboard shortcut (CTRL+B) to cut without using a mouse click, in case you make use of a trackpad while editing.
The Bottom Line
As said earlier, knowing where to cut is essential in improving the feel of your video, and we hope this guide showed you exactly how to perform the actions to create your best project. If you are a beginner, the simplistic approach of Wondershare Filmora will be more welcoming and easier to navigate. In addition, the software is also free to download, with added features that you can activate by paying a monthly, yearly, or one-time fee. Adobe Premiere Pro is an option worth considering if you plan on using third-party plugins and other applications from the Creative Cloud Suite.
During project creation, we recommend keeping an eye on the file name set and the storage location; this can help reduce the time spent in locating the Premiere Project.

Step 2: Import a video file into Premiere Pro with a double click in the marked area and choose the file from its stored location.

Step 3: Double click on any imported media to activate it and send it to the Source Window.

You can continue to import more media by double-clicking within the marked area. For better organization, users can also create Bins, which are folders within a Premiere Pro File that are often in use to sort out imported media.
Users can create Bins with a right-click in the red box marked area (refer to image above).
Step 4: Select either the whole clip or a part of it from the Source Window and drag it onto the Timeline.

Step 5: Select the Razor Tool from the Tools Window. Now, pick the point where you want to introduce a cut and confirm with your left mouse button; this will split your video track into two parts.
Make a second cut where desired, following which you can move around the newly generated clip or delete it.

**Tip:**You can also select the Razor Tool by pressing C on the keyboard_._
We also recommend using the Snap in Timeline feature (activated with (S) on your keyboard or by choosing the magnet option), which will match your mouse pointer with the Playhead to ensure your cut will match the exact frame shown on your screen.
-—————————————————————————————————————————————-
Some more tips for Adobe Premiere Pro:
- Using the I and O keys on your keyboard while playing a video in the Source Window will allow you to set an In Pointand an Out Point. These markers will allow you to move a specific part of your video file into the Timeline, thus, reducing the amount of time spent making the right cut.
We have tagged the Mark In and Mark Out buttons with a Green Box in the image below.
- Clicking on the Step Frame Buttons [marked in Yellow] will also help increase the accuracy of your cut by allowing you to select the exact moment you desire.
- You can also mark a Point of Interest in your video file with the help of Markers in Premiere Pro. These afford you the ability to come back to the moment at a later time and see why it interested you in the first place, as editing sessions can often take hours at an end.

An alternative way to cut video with Wondershare Filmora
In Wondershare Filmora Video Editor , the steps to cut a video are simplified and don’t require as many steps as seen earlier. Opening the application throws you straight into a project, and following this, you can import a video file and begin editing. From the process you will learn below, it is easy to assume that Wondershare Filmora is more convenient for beginners and provides software features that match paid professional software.
For Win 7 or later (64-bit)
For macOS 10.14 or later
Note: If you don’t have Wondershare Filmora installed, you can get the video editor by visiting its official website . Once the setup program download completes, execute it and begin the installation process.
Once you have the editing software open, follow the steps listed below.
Step 1: Import a video file by clicking on the import window.
The default project setting for Filmora X is 1920x1080 at 25 frames per second. Users can change this to match their video file by going into Project Settings under the File tab or by accepting the automatic prompt that appears when dragging the video file onto the Timeline.

Note: If you have a PC with weak hardware, Wondershare Filmora gives you the option to create Video Proxies that will reduce the load on your computer by creating smaller clips that are lower in size, resulting in a smoother and faster experience. You can also do this in Premiere Pro, but Filmora does it for you automatically once given permission.
Step 2: Drag the video file onto the Timeline to begin previewing it in the Playback Window and commence editing operations.

Step 3: Locate where you want to cut in the video file and click on the orange scissors option to split the video file.

Tip: You can also use the keyboard shortcut (CTRL+B) to cut without using a mouse click, in case you make use of a trackpad while editing.
The Bottom Line
As said earlier, knowing where to cut is essential in improving the feel of your video, and we hope this guide showed you exactly how to perform the actions to create your best project. If you are a beginner, the simplistic approach of Wondershare Filmora will be more welcoming and easier to navigate. In addition, the software is also free to download, with added features that you can activate by paying a monthly, yearly, or one-time fee. Adobe Premiere Pro is an option worth considering if you plan on using third-party plugins and other applications from the Creative Cloud Suite.
During project creation, we recommend keeping an eye on the file name set and the storage location; this can help reduce the time spent in locating the Premiere Project.

Step 2: Import a video file into Premiere Pro with a double click in the marked area and choose the file from its stored location.

Step 3: Double click on any imported media to activate it and send it to the Source Window.

You can continue to import more media by double-clicking within the marked area. For better organization, users can also create Bins, which are folders within a Premiere Pro File that are often in use to sort out imported media.
Users can create Bins with a right-click in the red box marked area (refer to image above).
Step 4: Select either the whole clip or a part of it from the Source Window and drag it onto the Timeline.

Step 5: Select the Razor Tool from the Tools Window. Now, pick the point where you want to introduce a cut and confirm with your left mouse button; this will split your video track into two parts.
Make a second cut where desired, following which you can move around the newly generated clip or delete it.

**Tip:**You can also select the Razor Tool by pressing C on the keyboard_._
We also recommend using the Snap in Timeline feature (activated with (S) on your keyboard or by choosing the magnet option), which will match your mouse pointer with the Playhead to ensure your cut will match the exact frame shown on your screen.
-—————————————————————————————————————————————-
Some more tips for Adobe Premiere Pro:
- Using the I and O keys on your keyboard while playing a video in the Source Window will allow you to set an In Pointand an Out Point. These markers will allow you to move a specific part of your video file into the Timeline, thus, reducing the amount of time spent making the right cut.
We have tagged the Mark In and Mark Out buttons with a Green Box in the image below.
- Clicking on the Step Frame Buttons [marked in Yellow] will also help increase the accuracy of your cut by allowing you to select the exact moment you desire.
- You can also mark a Point of Interest in your video file with the help of Markers in Premiere Pro. These afford you the ability to come back to the moment at a later time and see why it interested you in the first place, as editing sessions can often take hours at an end.

An alternative way to cut video with Wondershare Filmora
In Wondershare Filmora Video Editor , the steps to cut a video are simplified and don’t require as many steps as seen earlier. Opening the application throws you straight into a project, and following this, you can import a video file and begin editing. From the process you will learn below, it is easy to assume that Wondershare Filmora is more convenient for beginners and provides software features that match paid professional software.
For Win 7 or later (64-bit)
For macOS 10.14 or later
Note: If you don’t have Wondershare Filmora installed, you can get the video editor by visiting its official website . Once the setup program download completes, execute it and begin the installation process.
Once you have the editing software open, follow the steps listed below.
Step 1: Import a video file by clicking on the import window.
The default project setting for Filmora X is 1920x1080 at 25 frames per second. Users can change this to match their video file by going into Project Settings under the File tab or by accepting the automatic prompt that appears when dragging the video file onto the Timeline.

Note: If you have a PC with weak hardware, Wondershare Filmora gives you the option to create Video Proxies that will reduce the load on your computer by creating smaller clips that are lower in size, resulting in a smoother and faster experience. You can also do this in Premiere Pro, but Filmora does it for you automatically once given permission.
Step 2: Drag the video file onto the Timeline to begin previewing it in the Playback Window and commence editing operations.

Step 3: Locate where you want to cut in the video file and click on the orange scissors option to split the video file.

Tip: You can also use the keyboard shortcut (CTRL+B) to cut without using a mouse click, in case you make use of a trackpad while editing.
The Bottom Line
As said earlier, knowing where to cut is essential in improving the feel of your video, and we hope this guide showed you exactly how to perform the actions to create your best project. If you are a beginner, the simplistic approach of Wondershare Filmora will be more welcoming and easier to navigate. In addition, the software is also free to download, with added features that you can activate by paying a monthly, yearly, or one-time fee. Adobe Premiere Pro is an option worth considering if you plan on using third-party plugins and other applications from the Creative Cloud Suite.
| Live Stream on YouTube Using Zoom
Abundant Video Effects - Wondershare Filmora
Provide abundant video effects - A creative video editor
Powerful color correction and grading
Detailed tutorials provided by the official channel
Zoom sessions have made daily meetings a lot easier as it offers great flexibility to the people. You can conduct long and important business meetings or educational class lessons in the comfort of your home. As Zoom meetings are widely adopted as a new medium of communication, many people have started to stream live Zoom sessions across various online platforms.
One of the popular online platforms is YouTube, so one must know how to Zoom YouTube live streaming instantly. Through this article, you will come to know about simple and basic steps regarding stream Zoom to YouTube flawlessly.
In this article
Part 1: Software Requirements
Part 2: Live Stream on YouTube Using Zoom
Part 1: Software Requirements
In this part, we will mention software requirements for Zoom meetings and webinars to conduct Zoom live streams on YouTube comfortably on your devices.
Streaming for Zoom Meeting
- Pro, Business, Education, or Enterprise Account
- The Host is Licensed
- Zoom Desktop Client
- **Windows:**Version 4.4.53582 or Higher
- **macOS:**Version 4.4.53582 or Higher
- Zoom Mobile Client
- **Android:**Version 5.4.0 or Higher
- **iOS:**Version 5.4.0 or Higher
- Live streaming is enabled on YouTube
Streaming for Zoom Webinar
- Pro, Business, Education, or Enterprise Account
- The Host is Assigned a Zoom Webinar License
- Zoom Desktop Client
- **Windows:**Version 4.0 or Higher
- **macOS:**Version 4.0 or Higher
- Zoom Mobile Client
- **Android:**Version 5.4.0 or Higher
- **iOS:**Version 5.4.0 or Higher
- Live Streaming Enabled on YouTube
Part 2: Live Stream on YouTube Using Zoom
To Zoom YouTube live, this part contains detailed steps that will assist you throughout the whole process.
Steps to Execute Before Live Streaming
Before going live on YouTube, the first step is to schedule the meeting in Zoom for successful live streaming. To do so, open your Zoom account and schedule a suitable time for the meeting or webinar you want to conduct.

Activating the Live Streaming Option
Step 1: To begin, first sign in to your Zoom account and then navigate to “Zoom meeting settings.” On this menu, scroll down to find the option “In Meeting (Advanced)” on the left side.
Step 2: Now turn on the toggle of “Allow live streaming meetings” to activate the feature of live streaming. Afterward, you would see four checkboxes on your screen through which you can control where to stream Zoom meetings.
Step 3: Start by unchecking the Facebook box if you don’t want to want live stream Zoom on the Facebook platform. Then, tap on the checkbox of YouTube to allow the live streaming of Zoom meetings on your YouTube account.
Step 4: Now, click on the checkbox for “Custom live streaming service” to enable the live streaming before your meeting starts. Also, on the displayed text box, you can enter any instructions for the host who will live stream your Zoom meeting. Once done with all the changes, tap on “Save” and continue with the steps given below.

Settings Up Live Streaming of Scheduled Meeting
If you want to live stream the scheduled Zoom meeting through the option of “Custom live streaming,” you should have your stream key, stream URL, and the URL of the live streaming page of your streaming site. Now read the below instructions to set up live streaming settings on YouTube.
Step 1: Navigate to the site Youtube.com by entering the internet ID and password. Then tap on the button “Create a video or post” displayed in the top right corner.

Step 2: From the displayed options, click on “Go Live” and create your channel for the live streaming videos. Verify your account from the phone call or received text message. Now from the YouTube home page, tap on the “Create a video or post” button to proceed further.

Step 3: After clicking on the option of “Go Live” again, enter the information about your live streaming video in the pop-up window. For this, you should navigate to the “Stream” tab to build an “Event title.” You can also enter a description along with the title. Now you can control the viewability of your live stream video such as public, private and unlisted.

Step 4: From the appeared drop-down menu, tap on the category of your live stream video. You can also turn on the toggle of “Schedule for later” if you want to live stream later and enter the date and time simultaneously.
Step 5: You can also add a thumbnail to your live stream video so that people can easily search. Afterward, choose the option either “Yes” or “No” of the heading saying, “Is this video made for kids?”. Once done, tap on the “Create Stream” button.
Step 6: A new window will appear containing your “Stream URL” and “Stream Key.” Copy and save this information for pre-scheduled live streaming on a text file. Now tap on the “Share” option from the top right and then also copy the “Livestream URL” and save it in a text file.

How to Set Up the Live Stream on Zoom
Step 1: On your Zoom account, go to the lists of upcoming meetings and locate your scheduled meeting. After finding the scheduled meeting, choose the meeting topic to continue.

Step 2: Now scroll down the page to select the option called “Live Streaming.” Click on this tab and then click on the option saying “configure live stream settings.”

Step 3: On the pop-up screen, enter all the information you saved before, such as “Stream key,” “Stream URL,” and “Live streaming page URL” on their respective boxes. Once done, click on the “Save” button.

Guidelines to Perform Quickly Before Your Live Stream
Step 1: Start this process before half an hour of your meeting and click to begin your Zoom meeting. Then tap on the “More” option displayed on the toolbar.

Step 2: From the more options, select “Live on custom live streaming service.” Now proceed with the live streaming on your streaming platform.

Step 3: If you are utilizing YouTube live from the settings of “Live on custom live streaming service,” navigate to your YouTube live window. If you don’t have this window open, tap on the “Create a video or post” button and click on “Go Live.” From the “Manage” tab, select the title of your live stream video and then tap on the “Go Live” option from the top right corner.

How to Go Live from Your Zoom Meeting
Step 1: Through your Zoom meeting, tap on the “More” button and then click on “Live on YouTube.” A new window will display the form where you select your account.

Step 2: On the next page, enter the title of the YouTube live stream video and choose the viewability options such as public, private and unlisted. Once done with privacy options, tap on the “Go Live” button.

How to Stop the Stop the Live Stream and End the Zoom Meeting
Ending the Live Stream through Custom Streaming Service
For live-streaming YouTube videos through “Live on custom live streaming service,” tap on the “End Stream” button displayed in the top right corner that will end your live session.
Ending the Live Stream and Zoom Meeting
From your Zoom meeting, tap on the “More” button and tap on the option called “Stop live stream.” Afterward, select the “End Meeting” option to end the Zoom meeting for all participants. Then tap on the “End Meeting for All” option for confirmation.

Conclusion
Many people across the world use online platforms like YouTube to live stream their videos for more connectivity. As Zoom meetings and webinars are getting recognition, it’s a great idea to stream Zoom to YouTube live to have a larger audience. Using this article, you can find easy and simple steps to Zoom YouTube live according to your convenience.
Zoom sessions have made daily meetings a lot easier as it offers great flexibility to the people. You can conduct long and important business meetings or educational class lessons in the comfort of your home. As Zoom meetings are widely adopted as a new medium of communication, many people have started to stream live Zoom sessions across various online platforms.
One of the popular online platforms is YouTube, so one must know how to Zoom YouTube live streaming instantly. Through this article, you will come to know about simple and basic steps regarding stream Zoom to YouTube flawlessly.
In this article
Part 1: Software Requirements
Part 2: Live Stream on YouTube Using Zoom
Part 1: Software Requirements
In this part, we will mention software requirements for Zoom meetings and webinars to conduct Zoom live streams on YouTube comfortably on your devices.
Streaming for Zoom Meeting
- Pro, Business, Education, or Enterprise Account
- The Host is Licensed
- Zoom Desktop Client
- **Windows:**Version 4.4.53582 or Higher
- **macOS:**Version 4.4.53582 or Higher
- Zoom Mobile Client
- **Android:**Version 5.4.0 or Higher
- **iOS:**Version 5.4.0 or Higher
- Live streaming is enabled on YouTube
Streaming for Zoom Webinar
- Pro, Business, Education, or Enterprise Account
- The Host is Assigned a Zoom Webinar License
- Zoom Desktop Client
- **Windows:**Version 4.0 or Higher
- **macOS:**Version 4.0 or Higher
- Zoom Mobile Client
- **Android:**Version 5.4.0 or Higher
- **iOS:**Version 5.4.0 or Higher
- Live Streaming Enabled on YouTube
Part 2: Live Stream on YouTube Using Zoom
To Zoom YouTube live, this part contains detailed steps that will assist you throughout the whole process.
Steps to Execute Before Live Streaming
Before going live on YouTube, the first step is to schedule the meeting in Zoom for successful live streaming. To do so, open your Zoom account and schedule a suitable time for the meeting or webinar you want to conduct.

Activating the Live Streaming Option
Step 1: To begin, first sign in to your Zoom account and then navigate to “Zoom meeting settings.” On this menu, scroll down to find the option “In Meeting (Advanced)” on the left side.
Step 2: Now turn on the toggle of “Allow live streaming meetings” to activate the feature of live streaming. Afterward, you would see four checkboxes on your screen through which you can control where to stream Zoom meetings.
Step 3: Start by unchecking the Facebook box if you don’t want to want live stream Zoom on the Facebook platform. Then, tap on the checkbox of YouTube to allow the live streaming of Zoom meetings on your YouTube account.
Step 4: Now, click on the checkbox for “Custom live streaming service” to enable the live streaming before your meeting starts. Also, on the displayed text box, you can enter any instructions for the host who will live stream your Zoom meeting. Once done with all the changes, tap on “Save” and continue with the steps given below.

Settings Up Live Streaming of Scheduled Meeting
If you want to live stream the scheduled Zoom meeting through the option of “Custom live streaming,” you should have your stream key, stream URL, and the URL of the live streaming page of your streaming site. Now read the below instructions to set up live streaming settings on YouTube.
Step 1: Navigate to the site Youtube.com by entering the internet ID and password. Then tap on the button “Create a video or post” displayed in the top right corner.

Step 2: From the displayed options, click on “Go Live” and create your channel for the live streaming videos. Verify your account from the phone call or received text message. Now from the YouTube home page, tap on the “Create a video or post” button to proceed further.

Step 3: After clicking on the option of “Go Live” again, enter the information about your live streaming video in the pop-up window. For this, you should navigate to the “Stream” tab to build an “Event title.” You can also enter a description along with the title. Now you can control the viewability of your live stream video such as public, private and unlisted.

Step 4: From the appeared drop-down menu, tap on the category of your live stream video. You can also turn on the toggle of “Schedule for later” if you want to live stream later and enter the date and time simultaneously.
Step 5: You can also add a thumbnail to your live stream video so that people can easily search. Afterward, choose the option either “Yes” or “No” of the heading saying, “Is this video made for kids?”. Once done, tap on the “Create Stream” button.
Step 6: A new window will appear containing your “Stream URL” and “Stream Key.” Copy and save this information for pre-scheduled live streaming on a text file. Now tap on the “Share” option from the top right and then also copy the “Livestream URL” and save it in a text file.

How to Set Up the Live Stream on Zoom
Step 1: On your Zoom account, go to the lists of upcoming meetings and locate your scheduled meeting. After finding the scheduled meeting, choose the meeting topic to continue.

Step 2: Now scroll down the page to select the option called “Live Streaming.” Click on this tab and then click on the option saying “configure live stream settings.”

Step 3: On the pop-up screen, enter all the information you saved before, such as “Stream key,” “Stream URL,” and “Live streaming page URL” on their respective boxes. Once done, click on the “Save” button.

Guidelines to Perform Quickly Before Your Live Stream
Step 1: Start this process before half an hour of your meeting and click to begin your Zoom meeting. Then tap on the “More” option displayed on the toolbar.

Step 2: From the more options, select “Live on custom live streaming service.” Now proceed with the live streaming on your streaming platform.

Step 3: If you are utilizing YouTube live from the settings of “Live on custom live streaming service,” navigate to your YouTube live window. If you don’t have this window open, tap on the “Create a video or post” button and click on “Go Live.” From the “Manage” tab, select the title of your live stream video and then tap on the “Go Live” option from the top right corner.

How to Go Live from Your Zoom Meeting
Step 1: Through your Zoom meeting, tap on the “More” button and then click on “Live on YouTube.” A new window will display the form where you select your account.

Step 2: On the next page, enter the title of the YouTube live stream video and choose the viewability options such as public, private and unlisted. Once done with privacy options, tap on the “Go Live” button.

How to Stop the Stop the Live Stream and End the Zoom Meeting
Ending the Live Stream through Custom Streaming Service
For live-streaming YouTube videos through “Live on custom live streaming service,” tap on the “End Stream” button displayed in the top right corner that will end your live session.
Ending the Live Stream and Zoom Meeting
From your Zoom meeting, tap on the “More” button and tap on the option called “Stop live stream.” Afterward, select the “End Meeting” option to end the Zoom meeting for all participants. Then tap on the “End Meeting for All” option for confirmation.

Conclusion
Many people across the world use online platforms like YouTube to live stream their videos for more connectivity. As Zoom meetings and webinars are getting recognition, it’s a great idea to stream Zoom to YouTube live to have a larger audience. Using this article, you can find easy and simple steps to Zoom YouTube live according to your convenience.
Zoom sessions have made daily meetings a lot easier as it offers great flexibility to the people. You can conduct long and important business meetings or educational class lessons in the comfort of your home. As Zoom meetings are widely adopted as a new medium of communication, many people have started to stream live Zoom sessions across various online platforms.
One of the popular online platforms is YouTube, so one must know how to Zoom YouTube live streaming instantly. Through this article, you will come to know about simple and basic steps regarding stream Zoom to YouTube flawlessly.
In this article
Part 1: Software Requirements
Part 2: Live Stream on YouTube Using Zoom
Part 1: Software Requirements
In this part, we will mention software requirements for Zoom meetings and webinars to conduct Zoom live streams on YouTube comfortably on your devices.
Streaming for Zoom Meeting
- Pro, Business, Education, or Enterprise Account
- The Host is Licensed
- Zoom Desktop Client
- **Windows:**Version 4.4.53582 or Higher
- **macOS:**Version 4.4.53582 or Higher
- Zoom Mobile Client
- **Android:**Version 5.4.0 or Higher
- **iOS:**Version 5.4.0 or Higher
- Live streaming is enabled on YouTube
Streaming for Zoom Webinar
- Pro, Business, Education, or Enterprise Account
- The Host is Assigned a Zoom Webinar License
- Zoom Desktop Client
- **Windows:**Version 4.0 or Higher
- **macOS:**Version 4.0 or Higher
- Zoom Mobile Client
- **Android:**Version 5.4.0 or Higher
- **iOS:**Version 5.4.0 or Higher
- Live Streaming Enabled on YouTube
Part 2: Live Stream on YouTube Using Zoom
To Zoom YouTube live, this part contains detailed steps that will assist you throughout the whole process.
Steps to Execute Before Live Streaming
Before going live on YouTube, the first step is to schedule the meeting in Zoom for successful live streaming. To do so, open your Zoom account and schedule a suitable time for the meeting or webinar you want to conduct.

Activating the Live Streaming Option
Step 1: To begin, first sign in to your Zoom account and then navigate to “Zoom meeting settings.” On this menu, scroll down to find the option “In Meeting (Advanced)” on the left side.
Step 2: Now turn on the toggle of “Allow live streaming meetings” to activate the feature of live streaming. Afterward, you would see four checkboxes on your screen through which you can control where to stream Zoom meetings.
Step 3: Start by unchecking the Facebook box if you don’t want to want live stream Zoom on the Facebook platform. Then, tap on the checkbox of YouTube to allow the live streaming of Zoom meetings on your YouTube account.
Step 4: Now, click on the checkbox for “Custom live streaming service” to enable the live streaming before your meeting starts. Also, on the displayed text box, you can enter any instructions for the host who will live stream your Zoom meeting. Once done with all the changes, tap on “Save” and continue with the steps given below.

Settings Up Live Streaming of Scheduled Meeting
If you want to live stream the scheduled Zoom meeting through the option of “Custom live streaming,” you should have your stream key, stream URL, and the URL of the live streaming page of your streaming site. Now read the below instructions to set up live streaming settings on YouTube.
Step 1: Navigate to the site Youtube.com by entering the internet ID and password. Then tap on the button “Create a video or post” displayed in the top right corner.

Step 2: From the displayed options, click on “Go Live” and create your channel for the live streaming videos. Verify your account from the phone call or received text message. Now from the YouTube home page, tap on the “Create a video or post” button to proceed further.

Step 3: After clicking on the option of “Go Live” again, enter the information about your live streaming video in the pop-up window. For this, you should navigate to the “Stream” tab to build an “Event title.” You can also enter a description along with the title. Now you can control the viewability of your live stream video such as public, private and unlisted.

Step 4: From the appeared drop-down menu, tap on the category of your live stream video. You can also turn on the toggle of “Schedule for later” if you want to live stream later and enter the date and time simultaneously.
Step 5: You can also add a thumbnail to your live stream video so that people can easily search. Afterward, choose the option either “Yes” or “No” of the heading saying, “Is this video made for kids?”. Once done, tap on the “Create Stream” button.
Step 6: A new window will appear containing your “Stream URL” and “Stream Key.” Copy and save this information for pre-scheduled live streaming on a text file. Now tap on the “Share” option from the top right and then also copy the “Livestream URL” and save it in a text file.

How to Set Up the Live Stream on Zoom
Step 1: On your Zoom account, go to the lists of upcoming meetings and locate your scheduled meeting. After finding the scheduled meeting, choose the meeting topic to continue.

Step 2: Now scroll down the page to select the option called “Live Streaming.” Click on this tab and then click on the option saying “configure live stream settings.”

Step 3: On the pop-up screen, enter all the information you saved before, such as “Stream key,” “Stream URL,” and “Live streaming page URL” on their respective boxes. Once done, click on the “Save” button.

Guidelines to Perform Quickly Before Your Live Stream
Step 1: Start this process before half an hour of your meeting and click to begin your Zoom meeting. Then tap on the “More” option displayed on the toolbar.

Step 2: From the more options, select “Live on custom live streaming service.” Now proceed with the live streaming on your streaming platform.

Step 3: If you are utilizing YouTube live from the settings of “Live on custom live streaming service,” navigate to your YouTube live window. If you don’t have this window open, tap on the “Create a video or post” button and click on “Go Live.” From the “Manage” tab, select the title of your live stream video and then tap on the “Go Live” option from the top right corner.

How to Go Live from Your Zoom Meeting
Step 1: Through your Zoom meeting, tap on the “More” button and then click on “Live on YouTube.” A new window will display the form where you select your account.

Step 2: On the next page, enter the title of the YouTube live stream video and choose the viewability options such as public, private and unlisted. Once done with privacy options, tap on the “Go Live” button.

How to Stop the Stop the Live Stream and End the Zoom Meeting
Ending the Live Stream through Custom Streaming Service
For live-streaming YouTube videos through “Live on custom live streaming service,” tap on the “End Stream” button displayed in the top right corner that will end your live session.
Ending the Live Stream and Zoom Meeting
From your Zoom meeting, tap on the “More” button and tap on the option called “Stop live stream.” Afterward, select the “End Meeting” option to end the Zoom meeting for all participants. Then tap on the “End Meeting for All” option for confirmation.

Conclusion
Many people across the world use online platforms like YouTube to live stream their videos for more connectivity. As Zoom meetings and webinars are getting recognition, it’s a great idea to stream Zoom to YouTube live to have a larger audience. Using this article, you can find easy and simple steps to Zoom YouTube live according to your convenience.
Zoom sessions have made daily meetings a lot easier as it offers great flexibility to the people. You can conduct long and important business meetings or educational class lessons in the comfort of your home. As Zoom meetings are widely adopted as a new medium of communication, many people have started to stream live Zoom sessions across various online platforms.
One of the popular online platforms is YouTube, so one must know how to Zoom YouTube live streaming instantly. Through this article, you will come to know about simple and basic steps regarding stream Zoom to YouTube flawlessly.
In this article
Part 1: Software Requirements
Part 2: Live Stream on YouTube Using Zoom
Part 1: Software Requirements
In this part, we will mention software requirements for Zoom meetings and webinars to conduct Zoom live streams on YouTube comfortably on your devices.
Streaming for Zoom Meeting
- Pro, Business, Education, or Enterprise Account
- The Host is Licensed
- Zoom Desktop Client
- **Windows:**Version 4.4.53582 or Higher
- **macOS:**Version 4.4.53582 or Higher
- Zoom Mobile Client
- **Android:**Version 5.4.0 or Higher
- **iOS:**Version 5.4.0 or Higher
- Live streaming is enabled on YouTube
Streaming for Zoom Webinar
- Pro, Business, Education, or Enterprise Account
- The Host is Assigned a Zoom Webinar License
- Zoom Desktop Client
- **Windows:**Version 4.0 or Higher
- **macOS:**Version 4.0 or Higher
- Zoom Mobile Client
- **Android:**Version 5.4.0 or Higher
- **iOS:**Version 5.4.0 or Higher
- Live Streaming Enabled on YouTube
Part 2: Live Stream on YouTube Using Zoom
To Zoom YouTube live, this part contains detailed steps that will assist you throughout the whole process.
Steps to Execute Before Live Streaming
Before going live on YouTube, the first step is to schedule the meeting in Zoom for successful live streaming. To do so, open your Zoom account and schedule a suitable time for the meeting or webinar you want to conduct.

Activating the Live Streaming Option
Step 1: To begin, first sign in to your Zoom account and then navigate to “Zoom meeting settings.” On this menu, scroll down to find the option “In Meeting (Advanced)” on the left side.
Step 2: Now turn on the toggle of “Allow live streaming meetings” to activate the feature of live streaming. Afterward, you would see four checkboxes on your screen through which you can control where to stream Zoom meetings.
Step 3: Start by unchecking the Facebook box if you don’t want to want live stream Zoom on the Facebook platform. Then, tap on the checkbox of YouTube to allow the live streaming of Zoom meetings on your YouTube account.
Step 4: Now, click on the checkbox for “Custom live streaming service” to enable the live streaming before your meeting starts. Also, on the displayed text box, you can enter any instructions for the host who will live stream your Zoom meeting. Once done with all the changes, tap on “Save” and continue with the steps given below.

Settings Up Live Streaming of Scheduled Meeting
If you want to live stream the scheduled Zoom meeting through the option of “Custom live streaming,” you should have your stream key, stream URL, and the URL of the live streaming page of your streaming site. Now read the below instructions to set up live streaming settings on YouTube.
Step 1: Navigate to the site Youtube.com by entering the internet ID and password. Then tap on the button “Create a video or post” displayed in the top right corner.

Step 2: From the displayed options, click on “Go Live” and create your channel for the live streaming videos. Verify your account from the phone call or received text message. Now from the YouTube home page, tap on the “Create a video or post” button to proceed further.

Step 3: After clicking on the option of “Go Live” again, enter the information about your live streaming video in the pop-up window. For this, you should navigate to the “Stream” tab to build an “Event title.” You can also enter a description along with the title. Now you can control the viewability of your live stream video such as public, private and unlisted.

Step 4: From the appeared drop-down menu, tap on the category of your live stream video. You can also turn on the toggle of “Schedule for later” if you want to live stream later and enter the date and time simultaneously.
Step 5: You can also add a thumbnail to your live stream video so that people can easily search. Afterward, choose the option either “Yes” or “No” of the heading saying, “Is this video made for kids?”. Once done, tap on the “Create Stream” button.
Step 6: A new window will appear containing your “Stream URL” and “Stream Key.” Copy and save this information for pre-scheduled live streaming on a text file. Now tap on the “Share” option from the top right and then also copy the “Livestream URL” and save it in a text file.

How to Set Up the Live Stream on Zoom
Step 1: On your Zoom account, go to the lists of upcoming meetings and locate your scheduled meeting. After finding the scheduled meeting, choose the meeting topic to continue.

Step 2: Now scroll down the page to select the option called “Live Streaming.” Click on this tab and then click on the option saying “configure live stream settings.”

Step 3: On the pop-up screen, enter all the information you saved before, such as “Stream key,” “Stream URL,” and “Live streaming page URL” on their respective boxes. Once done, click on the “Save” button.

Guidelines to Perform Quickly Before Your Live Stream
Step 1: Start this process before half an hour of your meeting and click to begin your Zoom meeting. Then tap on the “More” option displayed on the toolbar.

Step 2: From the more options, select “Live on custom live streaming service.” Now proceed with the live streaming on your streaming platform.

Step 3: If you are utilizing YouTube live from the settings of “Live on custom live streaming service,” navigate to your YouTube live window. If you don’t have this window open, tap on the “Create a video or post” button and click on “Go Live.” From the “Manage” tab, select the title of your live stream video and then tap on the “Go Live” option from the top right corner.

How to Go Live from Your Zoom Meeting
Step 1: Through your Zoom meeting, tap on the “More” button and then click on “Live on YouTube.” A new window will display the form where you select your account.

Step 2: On the next page, enter the title of the YouTube live stream video and choose the viewability options such as public, private and unlisted. Once done with privacy options, tap on the “Go Live” button.

How to Stop the Stop the Live Stream and End the Zoom Meeting
Ending the Live Stream through Custom Streaming Service
For live-streaming YouTube videos through “Live on custom live streaming service,” tap on the “End Stream” button displayed in the top right corner that will end your live session.
Ending the Live Stream and Zoom Meeting
From your Zoom meeting, tap on the “More” button and tap on the option called “Stop live stream.” Afterward, select the “End Meeting” option to end the Zoom meeting for all participants. Then tap on the “End Meeting for All” option for confirmation.

Conclusion
Many people across the world use online platforms like YouTube to live stream their videos for more connectivity. As Zoom meetings and webinars are getting recognition, it’s a great idea to stream Zoom to YouTube live to have a larger audience. Using this article, you can find easy and simple steps to Zoom YouTube live according to your convenience.
How to Edit GoPro Videos on Mac
Having a well-polished video is beyond just shooting the video. Once you shoot your GoPro videos, the next thing to do is use a video editor to make necessary corrections. These video editors’ effects and stabilizations turn your videos into a sophisticated presentation. However, there are several GoPro video editors for different video formats. So if you are thinking about how to edit GoPro videos on Mac, you’re in luck.
In this article, we’ll help you through editing your GoPro video on Mac and a list of these GoPro video editors. We will also explore paid and free GoPro video editors to help pick the right editor. So, if you are ready to impress audiences with your outstanding videos, let’s begin.
Import GoPro Videos to Mac before Editing
After filming your GoPro videos, you probably wonder how to send them to your Mac to begin editing. There are two ways you can about importing your GoPro videos to Mac before editing. The use of SD adapter and GoPro quick app. Use any of these methods to import your GoPro videos before you can begin editing. So with no further ado, let’s quickly dive into importing GoPro videos to Mac using an SD adapter and GoPro quick app.
Import GoPro Videos to Mac Before Editing – SD Adapter
This is actually one of the easiest ways to import GoPro videos to Mac. How does it work? It simply works by connecting GoPro’s SD card to the Mac. Simply remove the GoPro’s SD card and input it to Mac. By doing this, all content on the SD card will display on the Mac as external files. Let’s look at the step-by-step method of importing GoPro videos to Mac with an SD adapter.
- Step 1: First thing first, you have to power off the device
- Step 2: Next, you have to open the opening presentation just at the bottom of the GoPro camera. After successfully unlocking it, then direct access to the SD card.
- Step 3: This is where you insert the SD card into the SD card adapter or reader.
- Step 4: Now, you connect the SD card adapter or reader to your Mac
- Step 5: After a successful connection, it will display on your Mac desktop. Now, click on it to open all its content for accessibility.
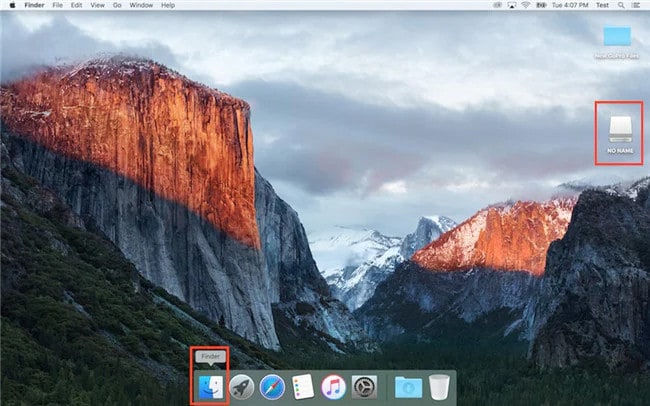
- Step 6: Once you open it, two folders will display. These folders are DCIM and MISC.
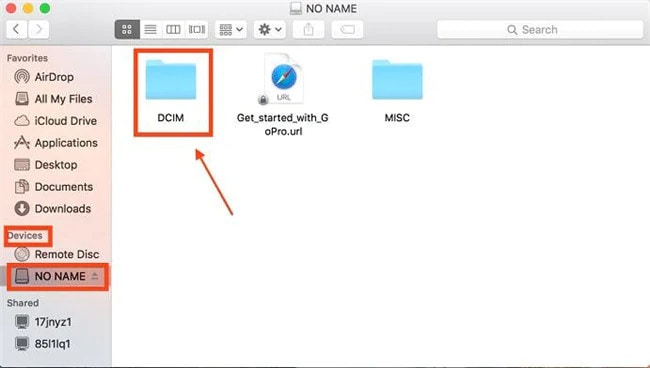
- Step 7: Click on the DCIM folder to find all videos stored on the device.
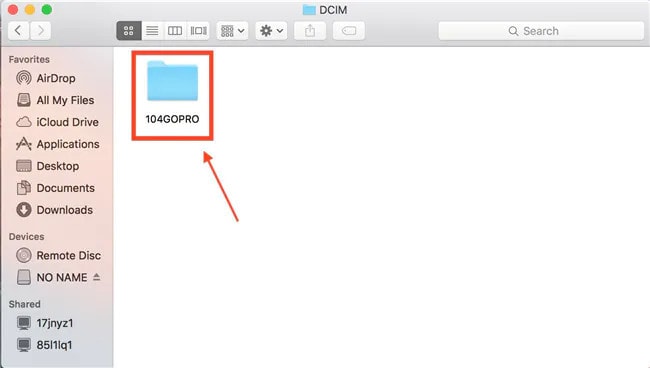
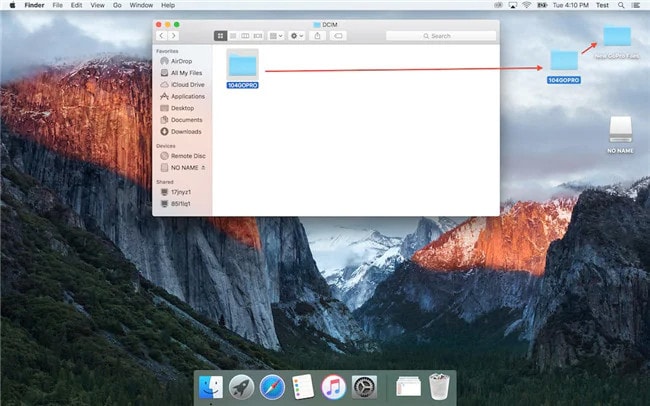
- Step 8: Finally, you can now begin uploading all your GoPro videos to Mac by simply copying and pasting.
Import GoPro Videos to Mac before editing – GoPro Quick App
Another option to import GoPro videos to Mac is the GoPro Quick app. GoPro quick app is a tool by GoPro designed to help view GoPro videos on Mac and import them. Having this app on your Mac device is relatively easy. First, you have to download its setup from the GoPro website and install it. So far, this app is one of the best tools to view and import GoPro files to your Mac device. Here are the steps to importing GoPro videos to Mac while getting set to edit.
- Step 1: First thing first, Launch the app. However, if you have not installed the app, you should quickly download and install the app.

- Step 2: Now, you can connect the GoPro camera to your Mac. You can do this by using a USB cable.
- Step 3: After launching the app, you will see an icon labeled Import Filesdisplayed at the interface.
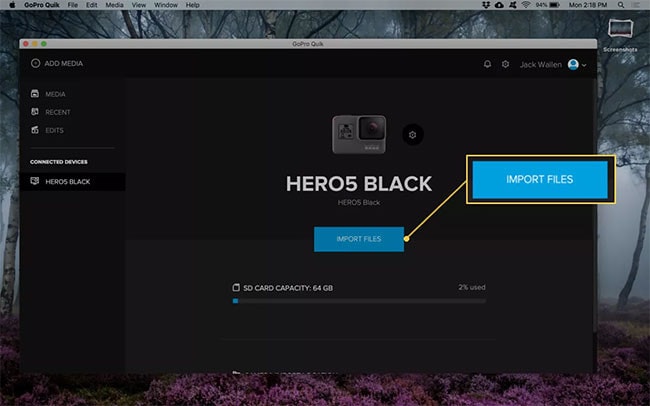
- Step 4: from here on, you will also see an icon to import the videos from your GoPro camera into your Mac device.
When the import is complete, you can now locate your GoPro videos in the folder of your choice. Now, you can close the GoPro quick app, unplug the GoPro camera and get ready to edit your videos.
Best GoPro Video Editor on Mac
A lot of people understand that GoPro is the best way to make your video look like a professional shot. After shooting the video, you’ll obviously want to make some edits to make them look more professional before sharing them. After all, no one wants to watch poor-quality videos, bad noises, and other unprofessional clips. Therefore, we have a list of the best GoPro editor for Mac in this article. Keep reading to learn about the best GoPro video editor on Mac.
Best GoPro Video Editor on Mac – Filmora Video Editor
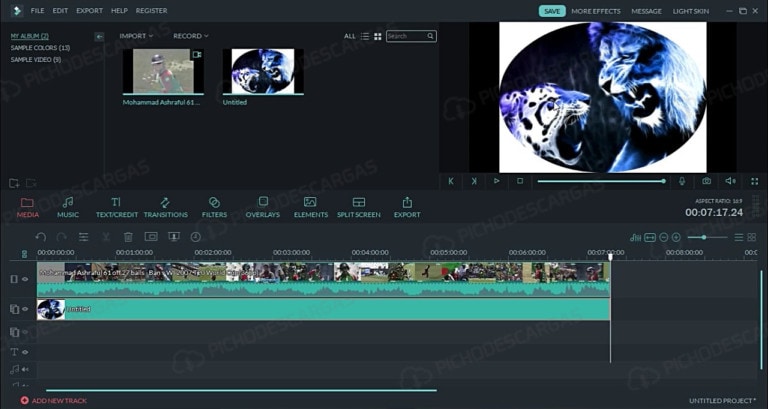
Supported System: Mac and Windows
A lot of free video editing software usually comes as either too straightforward or too challenging to understand. While other video editing software lacks vital editing features such as color correction and audio or noise editing features. However, the Filmora Video Editor for Mac bridges the gap and is undoubtedly the best GoPro Video editor on Mac.
This video editing software is an easy-to-use editing tool totally equipped with a lot of video editing functions. With Filmora, you can edit your GoPro videos on your Mac like an expert and expect a professional outcome. Filmora offers excellent performance and enhances video quality taking the user experience to a whole new level.
Additionally, Filmora is an editing tool with helpful functionality taking the user experience to a whole new level. Finally, this tool is indispensable due to its speed, intuitive user interface, and other file format support.
For Win 7 or later (64-bit)
For macOS 10.14 or later
Filmora Features
- Filmora editing tool is versatile and supports other video formats like MP4, MOV, MKV, AVCHD, etc.
- You can cut, crop, split, trim, and even combine clips with just a few clicks.
- Filmora has access to several advanced video effects such as royalty-free music, transition, animated titles, and motion elements.
- With Filmora color tuning features, your videos can look like professional Hollywood videos.
- You can also edit sounds on your video with a noise removal feature, audio equalizer, and audio keyframing tools.
- You get 500+ free special video effects to create and customize your videos yourself.
- Filmora has access to advanced video effects like PIP, audio mixer, and green screen, which you can add to your videos.
- Access to 1000+ effects downloading resources to make videos in any desired styles.
Steps to Editing Videos on Mac Using Filmora
Want to edit your GoPro videos the right way? Editing your GoPro videos on Mac with Filmora is relatively easy and will only take a few clicks. Read and follow these steps below to learn to edit GoPro videos on Mac with this easy-to-use GoPro video editor.
- Step 1: Import the GoPro video files
First, you launch the GoPro video editor and then click the “Import Media here” button. This will upload the GoPro video clips to the program. You can save these files in a suitable location for easy access before you begin editing.

- Step 2: Edit the GoPro Video clips
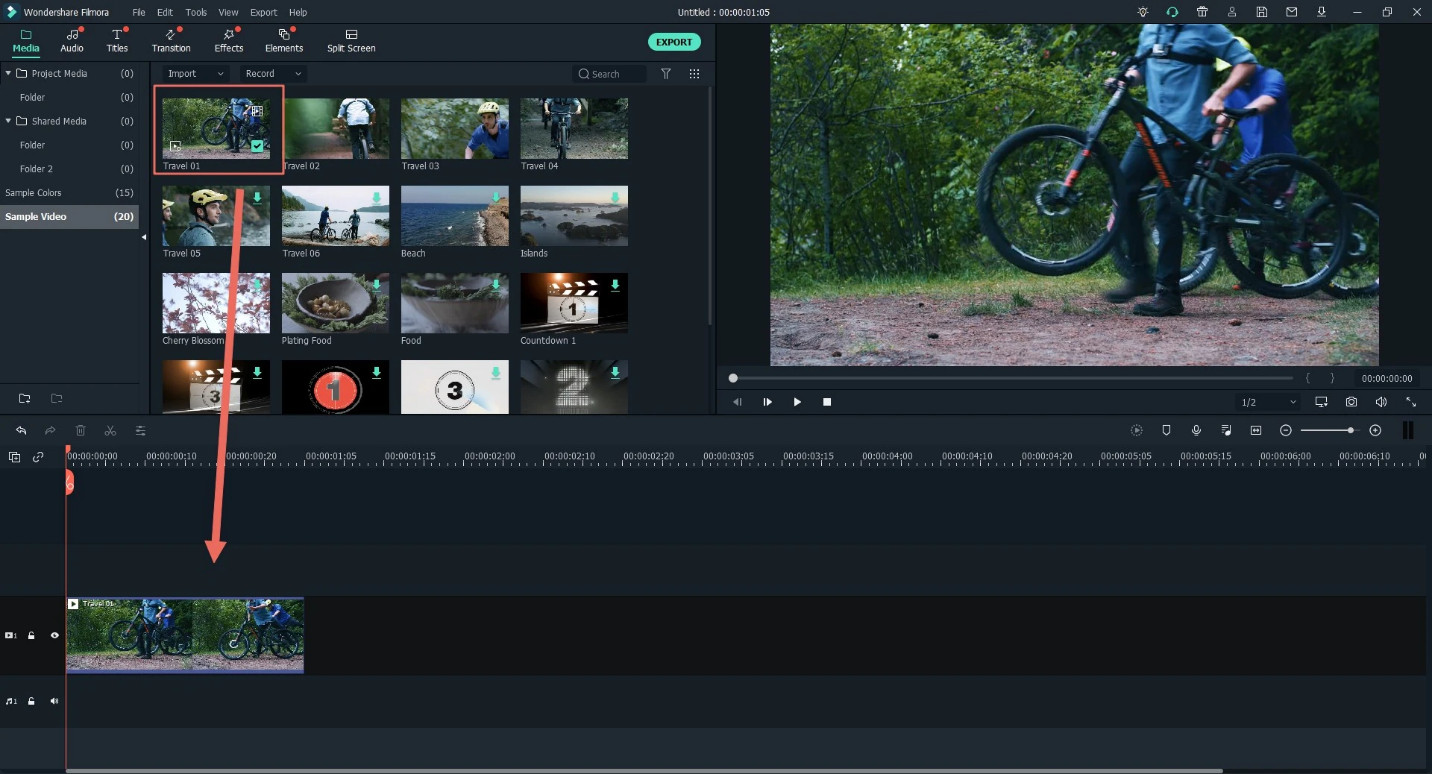
Secondly, you should drag the GoPro video clips from the folder or User’s album to the timeline and begin editing.
To trim your GoPro videos, simply mouser over the clip from the beginning to the end of the video. You should do this until the trim icon is displayed. The trim icon is labeled as “I” on the editing timeline. You can drag the trim icon forward or backward to trim the video as you desire.
Aside from the trimming option, you can also apply split footage, video stabilization, and even add transitions between two clips. You can also combine GoPro videos and rotate GoPro videos by simply tapping the icons respectively.
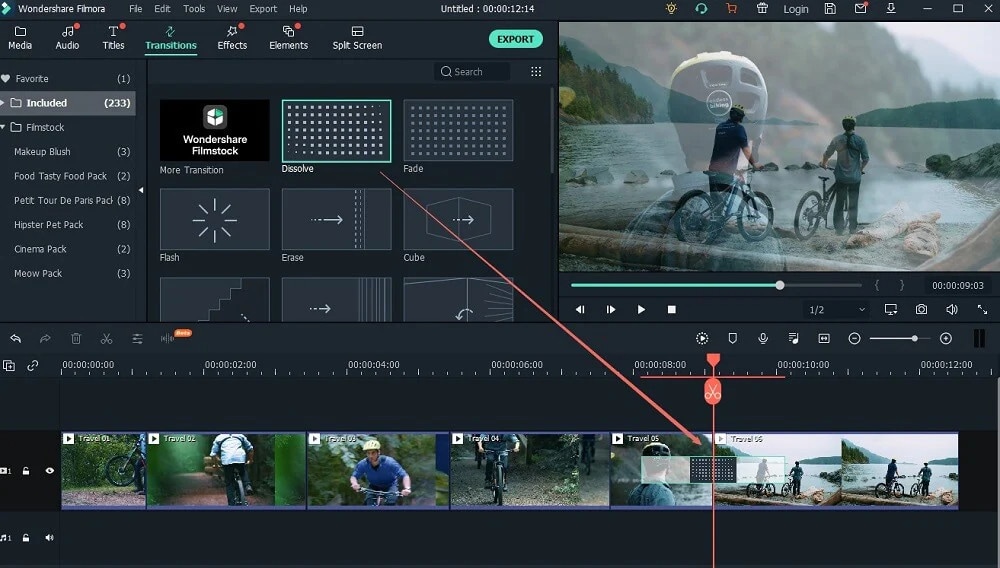
- Step 3: Export the edited GoPro video files
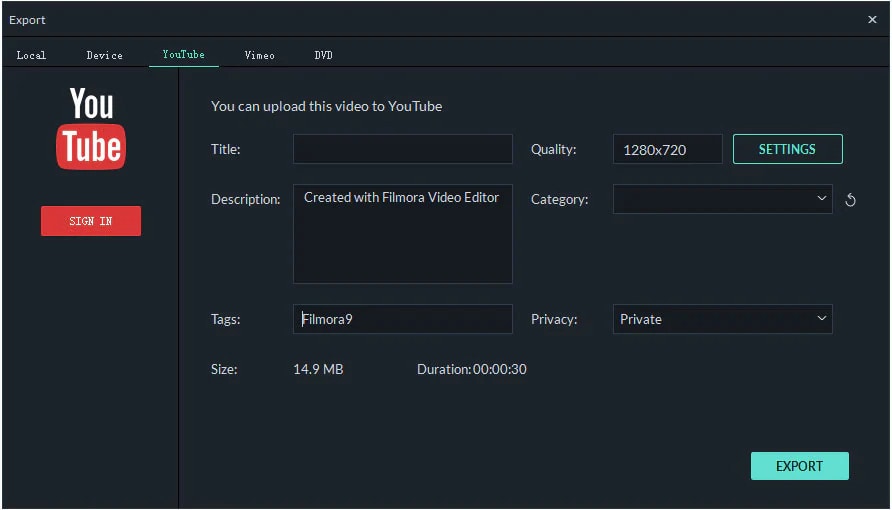
Once you finish editing, you can now navigate to the “Export” icon. Furthermore, you can also select the save path and file format from the displayed output window. After this selection, you can finally choose the “Export” icon. Once you complete this, you can find your edited video file in the same path.
More Free GoPro video editor on Mac to Edit Gopro Videos
In this section, we will list out some of the best free GoPro video editors to successfully edit your videos on Mac. These programs are, but you will have to download them to enjoy all the editing tools.
PowerDirector

Supported System: Windows and Mac
We have PowerDirector as the best overall editor on our list of best free GoPro video editors on Mac. This free GoPro video editor is compatible with Mac and has a robust video editing program. If you are looking for a free GoPro video editor with a wide range of exciting editing features, this is one of the best options. One of the benefits of using this GoPro video editor is that it comes with an Action Camera Center.
It has tons of cool effects, titles, filters, and templates to explore, especially if you want to make more action camera masterpieces. In addition, this video editor has special editing and effects tools to improve your action camera video. For example, you can stabilize your shaky video, apply cool speed effects, and correct fish-eye distortion in some minutes. You can also use the slow-motion effect, zoom, correct color problems, and freeze frame with just a few clicks.
The GoPro editor also comes with noise correction and video denoise to make your video crystal clear and remove unwanted audio noise. In addition, PowerDirector has thousands of royalty-free stock assets such as sound effects and background music. In essence, PowerDirector is a GoPro video editor that offers everything you need to produce, enhance and cut thrilling action videos. It is versatile, best for action footage editing, and supports several video formats.
Pros
- It is beginner-friendly
- It comes with easy-to-use action camera-specific editing tools
Cons
- While it is free, you need a subscription to enjoy the latest features.
Steps to Edit using PowerDirector
- Step 1: Launch the app and select ‘full mode’ to begin editing your video
- Step 2: Select’ import media folder’ to get the videos you wish to edit
- Step 3: You can now browse the folder on your Mac device and select the folder with the videos. Then Click ‘Select folder’ to move them into the editor’s media library.
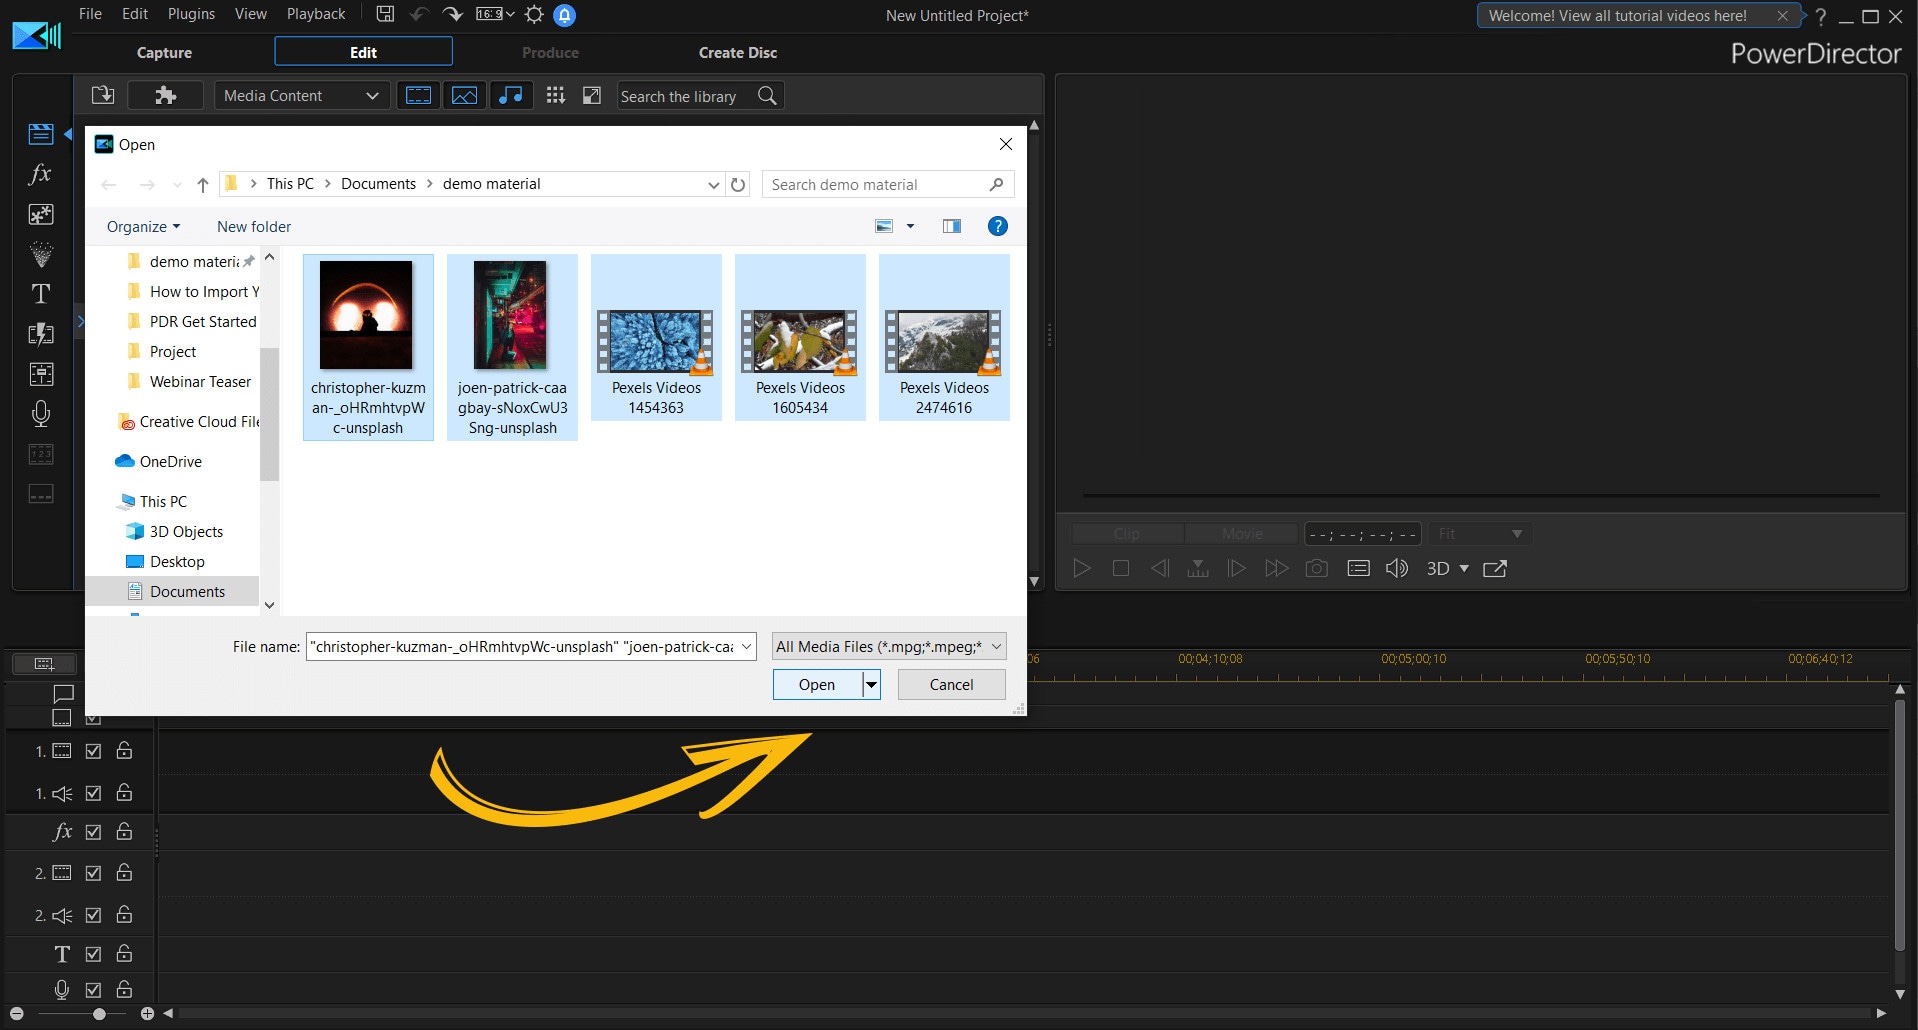
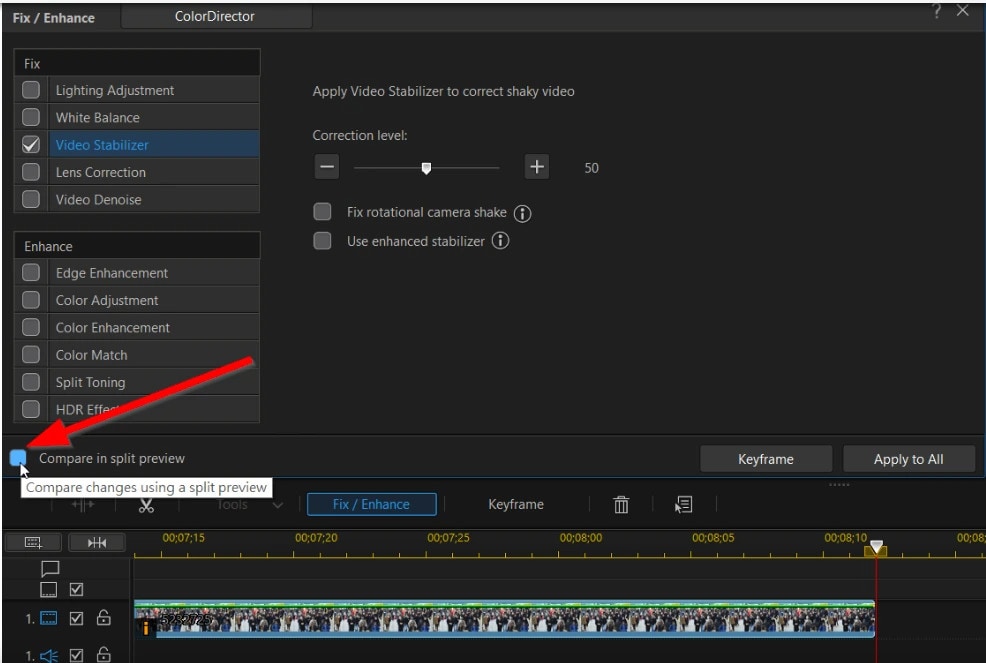
- Step 4: Now, the editing process can begin. You can stabilize and change the speed of your videos with PowerDirector.
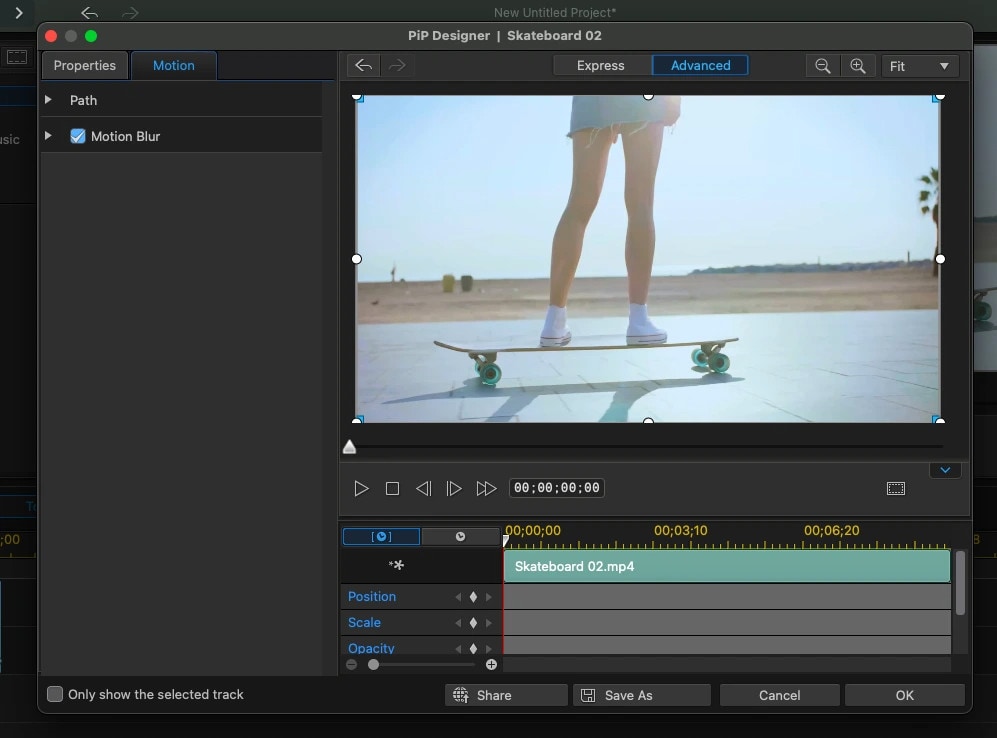
- You can add title text and motion blur to your GoPro videos if you like that.
- If you want to include transitions, you can do so by selecting the transition room.
- Step 5: Next, select the ‘produce’ button to export your video once you are sure that the editing is complete.
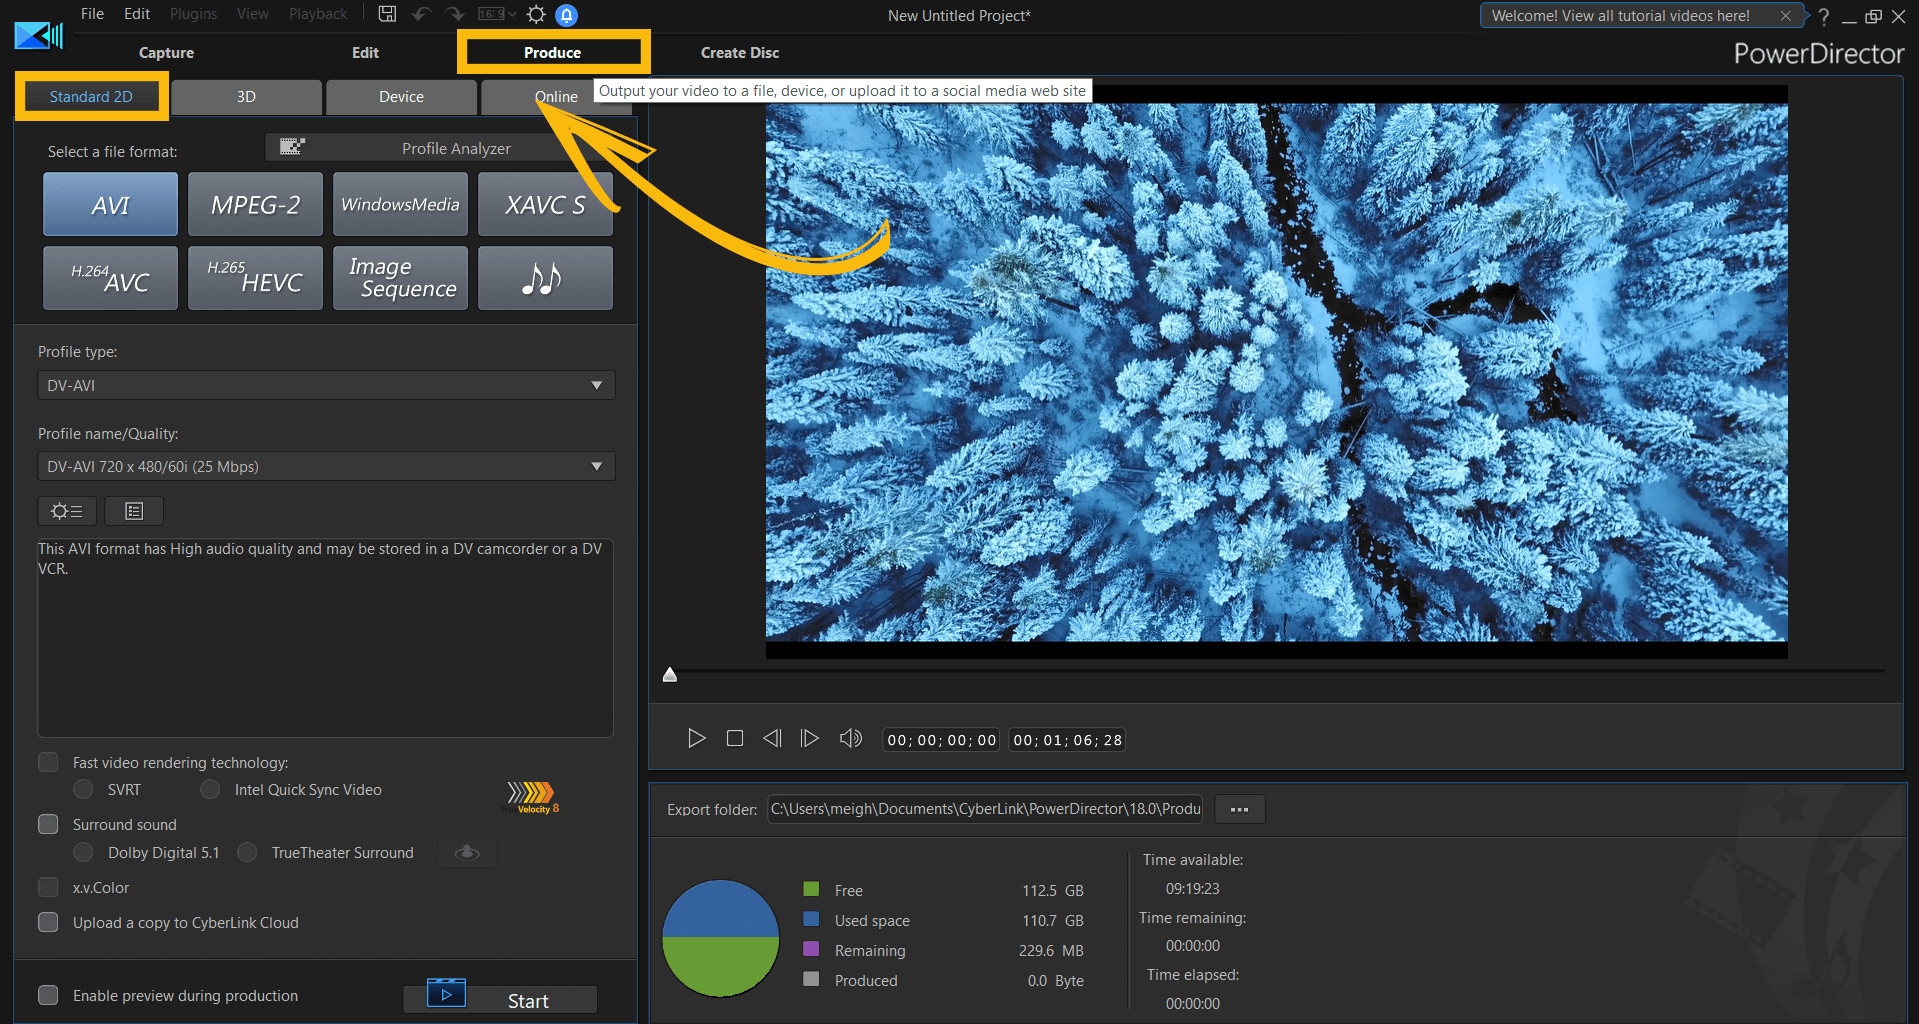
- Step 6: Change the video format before exporting.
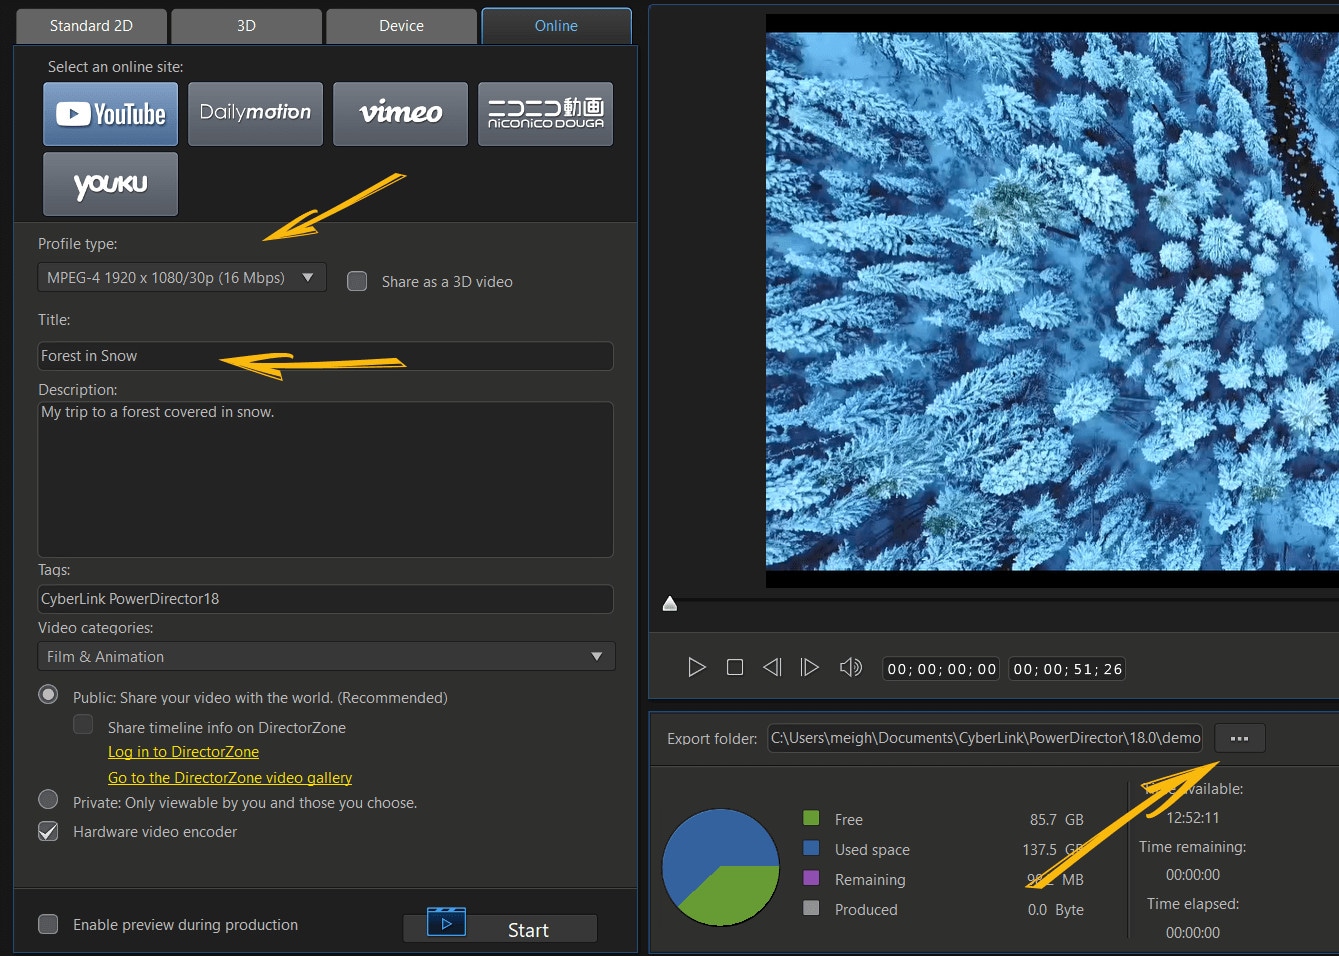
Once you select the video format you prefer, you will be able to save your GoPro video.
VideoProc Vlogger
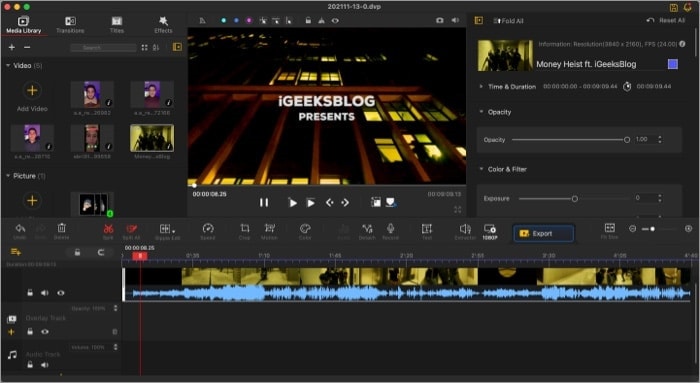
Supported System: Windows and Mac
VideoProc Vlogger is the best GoPro editor for anyone looking for speed adjustment. The video editor uses visualized speed ramping to alter the speed throughout a clip. This program contains over 20-speed features to help you quickly change the tone and tempo of your GoPro video. Furthermore, VideoProc Vlogger is beginner-friendly with a lot of advanced editing features. These features include automatic keyframes and flexible Bezier curves to slow parts of a video without splitting it.
This free GoPro video editor can simulate motion roll, dolly, tilt, and even truck effects. You can also push in and out and stylize your video clips with rotation, fast zooms, and shakes. With VideoProc Vlogger, you fix grain video, remove fish-eye, extract audio and apply motion crops to your video. The video editor is best at creating new motion trails to change the action of the video.
Although VideoProc Vlogger is a free video editor, it definitely lacks some advanced editing features. For example, you can edit your videos without the annoying ads or watermarks. In addition, the video editor is designed for beginners, content creators, and hobbyists as it lacks features like video stabilization. So while the video editor is not for professionals, it’s worth trying out.
Pros
- Requires low system requirements
- It is entirely free with no ads and watermarks
Cons
- It lacks advanced editing features
- Rendering is somewhat slow
Steps to Edit using VideoProc Vlogger
- Step 1: First, import your GoPro videos from your Mac device to VideoProc Vlogger.

Simply Launch VideoProc Vlogger on your Mac, hit the plus icon in the media library, and add and import the videos.
- Step 2: Now, split and cut the GoPro Videos.
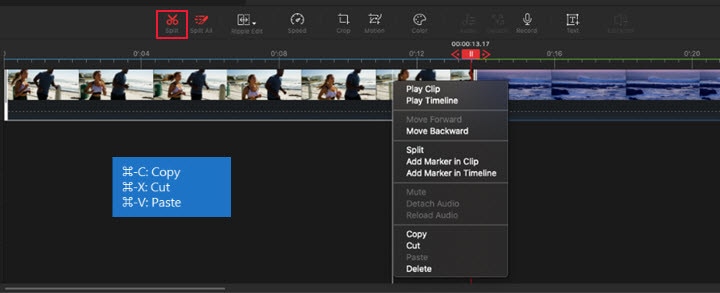
Simply drag the video clips to the timeline and begin editing. Now, put the playhead to exactly where you want to split the video and tap the split button.
- Step 3: You can also fix GoPro lens distortion.
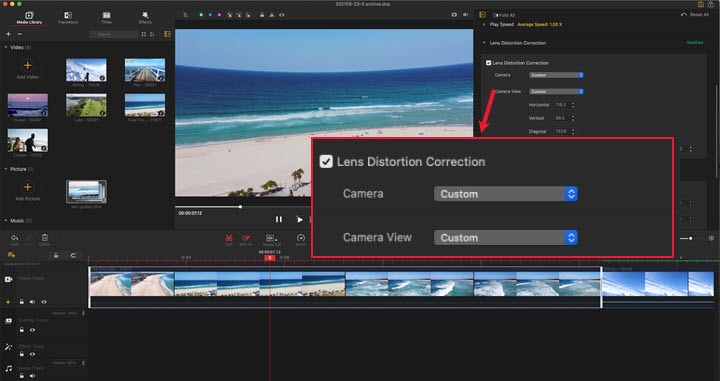
If you feel that your video looks distorted, tick the lens distortion box to resolve the issue.
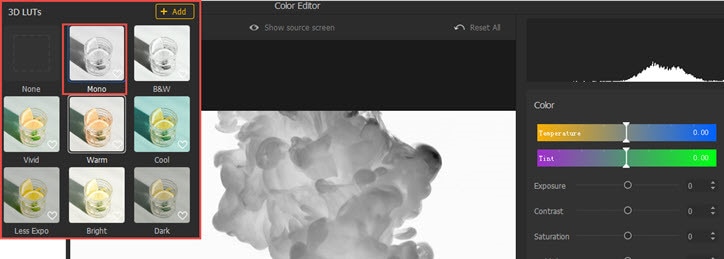
- Step 4: You can do the color correction or grading for any dark GoPro videos. Simply apply a preset aesthetic filter or simply adjust color normally.
- Step 5: Adjust the speed of the GoPro video.
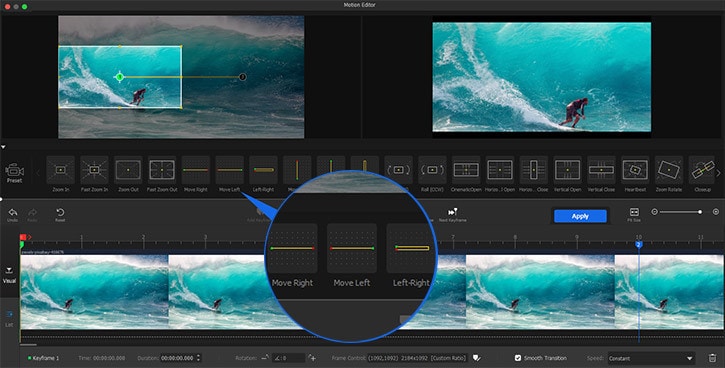
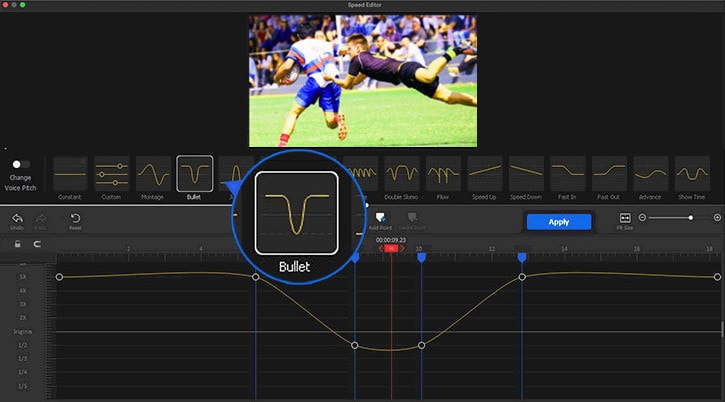
To adjust the speed of the video, click speed in the toolbar to open the speed editor. Then change as you desire.
- Step 6: You can also add transitions, titles, and effects by opening the panels of transitions, effects, and tiles.
- Then drag a transition to the space between two video clips, same with titles to the subtitle and effect to the effect track.
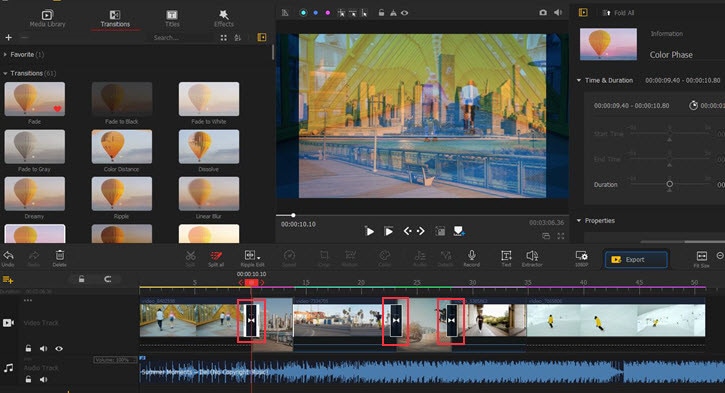
- Step 7: Next, remove noise and background music by clicking the video track and tapping “detach” to separate the audio from the video.
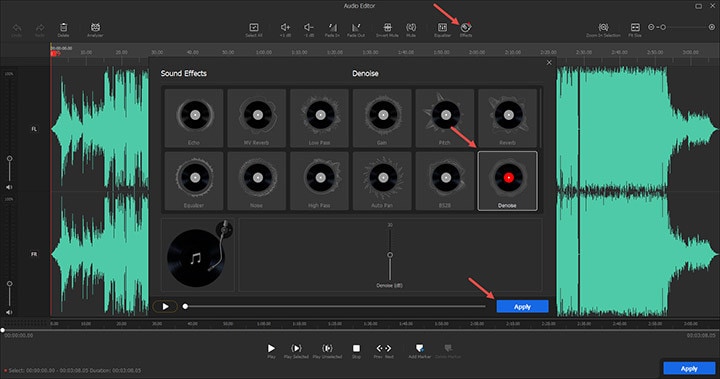
- You can also add music to replace the background noise.
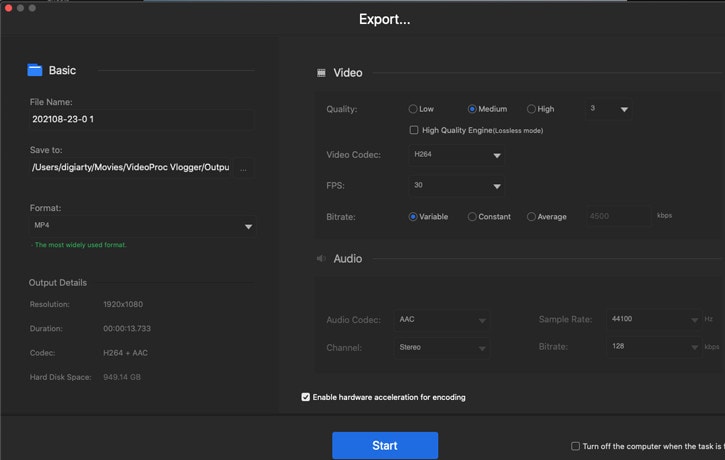
- Step 8: Finally, after the editing, you can export the GoPro video to your Mac device by setting the file name, format, file location, and video quality.
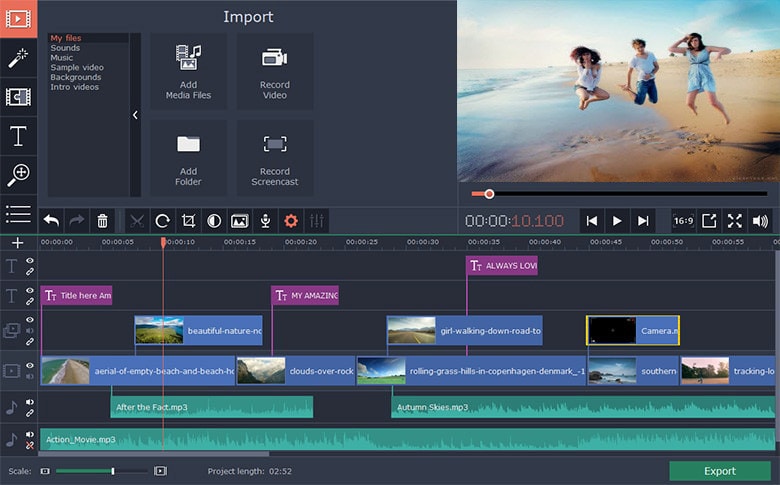
iMovie
Supported System: Mac only
This editor is designed to ensure an excelling editing process for Mac users. Therefore, beginners, content creators, and even hobbyists can utilize this video editor to edit their videos. Although iMovie is a free GoPro video editor, it offers incredible editing features to make your video look more professional. These features include HD and 4K video support and speed adjustment tools that can slow down or speed up your video clips.
Although it comes free on all Mac devices, iMovie also has tons of themes, templates, and presets to make editing a breeze. For example, you can select the video clips that will be automatically styled and edited with titles, transitions, and music. You can make all these changes with just a few clicks. In addition, you can also rearrange, trim, split, and even delete your ready-made video clips.
Furthermore, you can always modify the shift focus and depth of field while editing your video. However, it lacks some advanced features you will need while editing, such as Multicam, motion tracking, and 360 editing. On the other hand, it has a user-friendly interface with essential editing functions.
Pros
- It has a simple and user-friendly interface
- It is definitely beginner-friendly
Cons
- It lacks essential and advanced GoPro editing features and functions
Steps to Edit using iMovie
- Step 1: first, you have to launch the iMovie and create a video project.
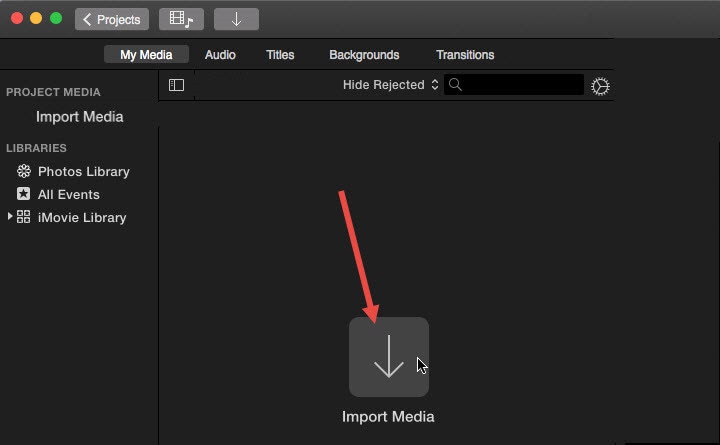
- Step 2: Now, you can click the Import button to import your GoPro video files from your Mac to it.
- Step 3: Drag the video files from the program media library to the timeline for editing.
- Step 4: Load a song to the audio track if you wish to add background music to your video.
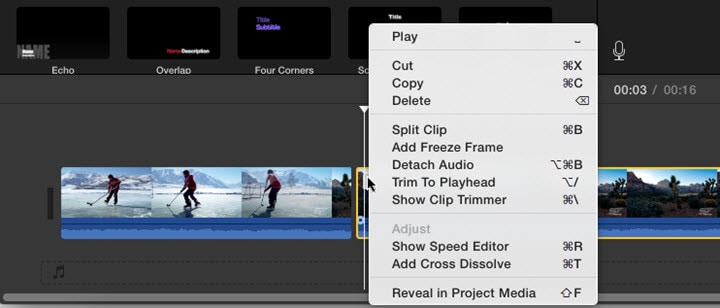
- Step 5: To split your video into smaller parts, right-click on a clip.
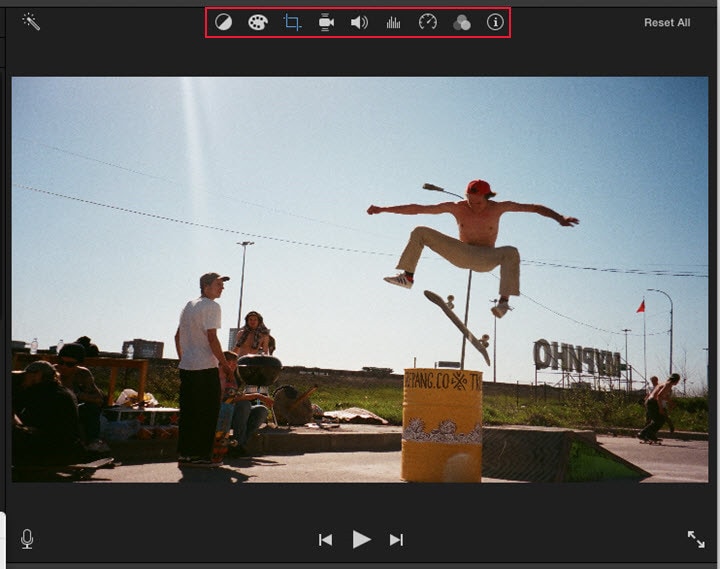
- Step 6: to edit your GoPro video with advanced tools like color correction, crop, grading, speed, and volume, simply move to the toolbar just above the timeline.
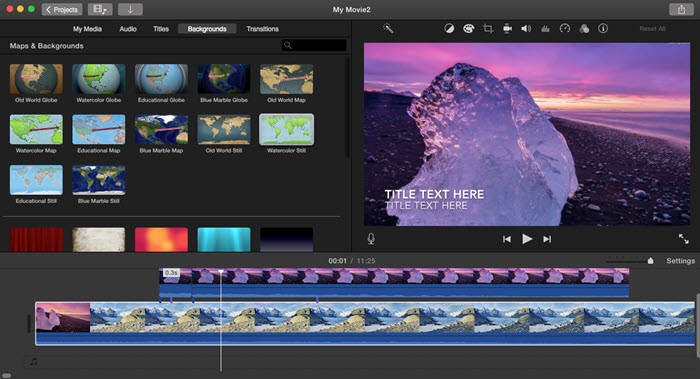
- Step 7: to add title, and transitions, you can drag a title and transition to the desired space between two clips.
- Step 8: preview and export your GoPro video from iMovie in the preferred format.
More Paid GoPro video editor on Mac to Cut MP4 Videos
If you desire GoPro video editors that offer more than just the basic editing features, you should try the paid GoPro video editors. The paid GoPro video editors offer more professional editing features for Mac users. In this section, you’ll learn about our top three paid GoPro video editors to edit your GoPro videos on Mac.
Adobe Premiere Pro
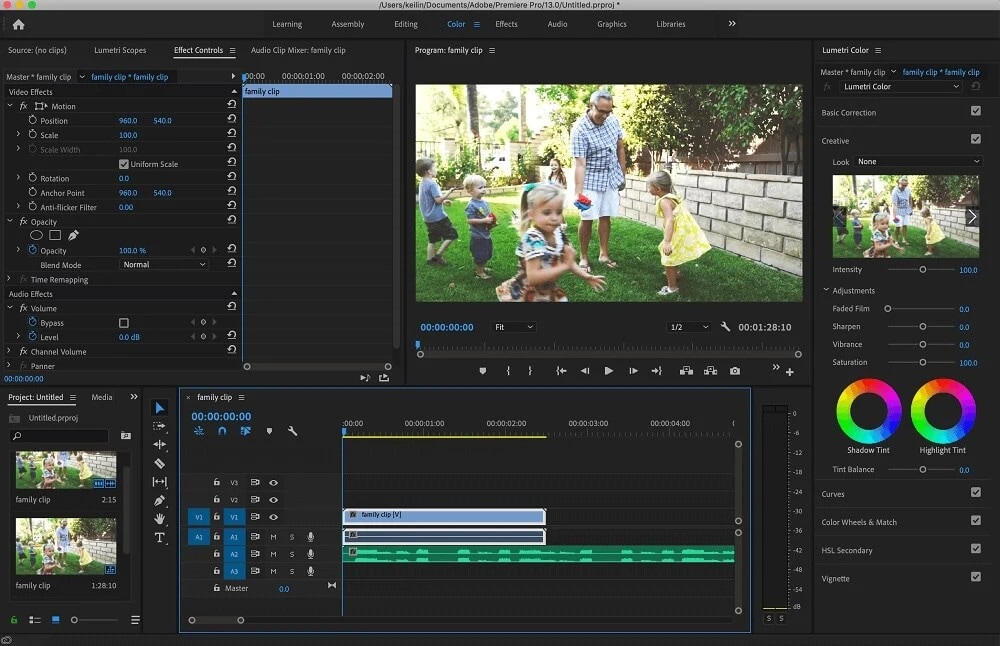
Supported System: Windows and Mac
This paid GoPro video editor is best for professionals who have experience creating video projects. This GoPro editing tool is compatible with Mac and Windows devices and also supports several video formats. Professionals use this video editor to edit top-notch videos such as Hollywood action movies and TV shows. In addition, it offers a long list of powerful features ideal for standard and action video editing.
Some of these professional features include Multicam, 360-degree, VR editing, and will export in up to 8k. The GoPro video editors also have a lot of sophisticated video stabilization tools, such as the warp stabilizer effect. The video stabilizer function help reduce camera shake, especially when zooming in. Other features include unlimited video tracks, lens distortion, access to the creative cloud and will match video to music.
In addition, the GoPro video editor only offers a 7-days free trial and is relatively expensive. Although Adobe Premiere Pro video editor is professional and high-quality, it has a steep learning curve. The steep learning curve is not appropriate for beginners.
Pros
- It supports all video formats
- It supports real-time video editing
Cons
- The system requirements are resource-intensive
- Not ideal for beginners
Steps to Edit using Adobe Premiere Pro
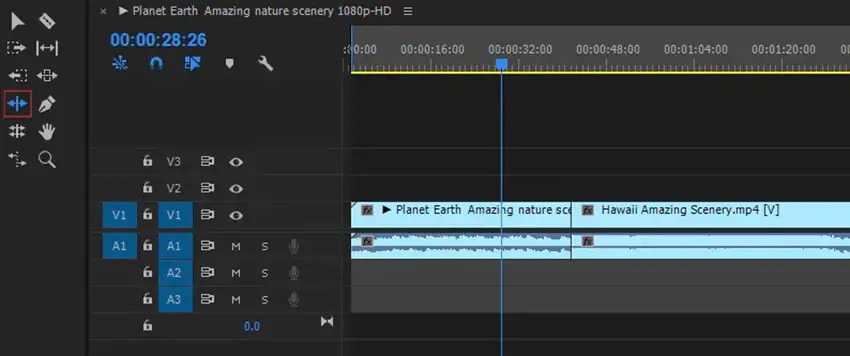
- Step 1: Import and cut your video files on PowerDirector. You can begin by cutting out any unnecessary parts from the video. You can also add text transitions, text, and other edits.
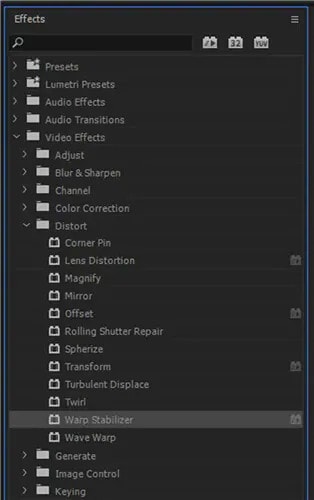
- Step 2: Next, stabilize the video using the Warp stabilizer. Double click on Warp stabilizer on the Effects menu to stabile the video.
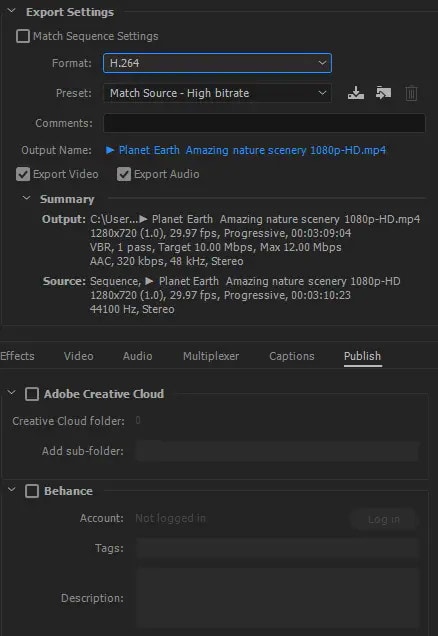
- Step 3: Finally, you can add audio and export the edited video file. Click on file, tap on export and select the format, presets, and the location to export your file.
Adobe After Effect
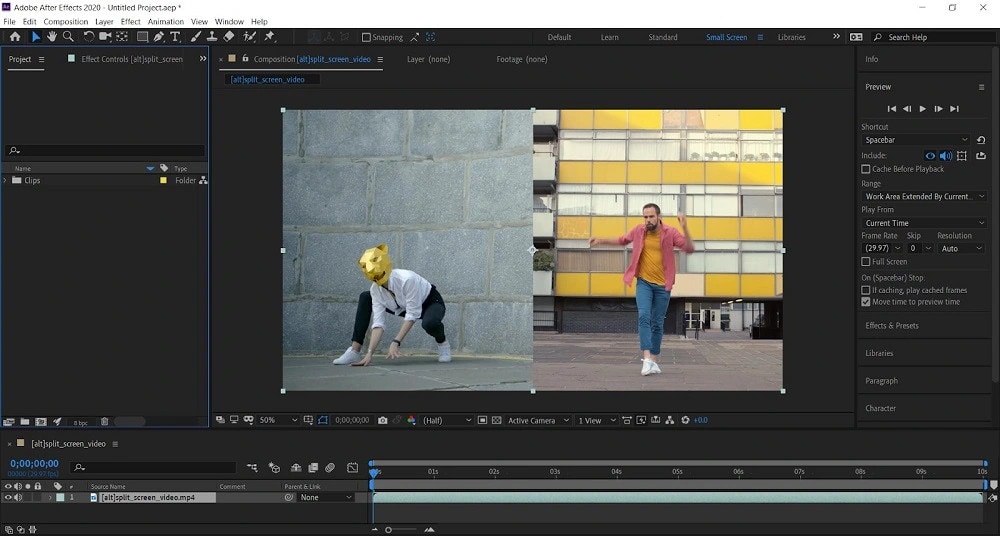
Supported System: Windows and Mac
This GoPro editor is compatible with Mac and offers many basic video editing features to ensure top-notch results. This GoPro editor is great for editors who want to add special effects like motion tracking to their videos. The after-effect function allows you to add a graphical element to a moving person, animal, car, or camera. You can also create cartoon effects, logos, stickers, or text to move seamlessly with the action onscreen.
In addition to its essential editing tools, you can also remove elements from your video with the pro-level digital rotoscoping tools. You can also use the after-effect to add elements to the missing video. Other features include 360, 3D, VR editing, transitions, lens distortions, and distortion effects for professional editing.
This GoPro video editor is an effective software and is best for adding visual effects to action camera videos. However, it lacks some essential video editing tools that you might need to make your video Hollywood standard. In addition, it also has a steep learning curve which makes it not ideal for beginners. Furthermore, as a GoPro video editor looking to do just the basic edits, then the After Effects is definitely not for you.
Pros
- It comes with realistic special effects
- It has a high-quality noise reduction
Cons
- It is not for beginners due to the steep learning curve
- It comes with only a 7-day free trial
- It is quite expensive
Steps to Edit using Adobe After Effects
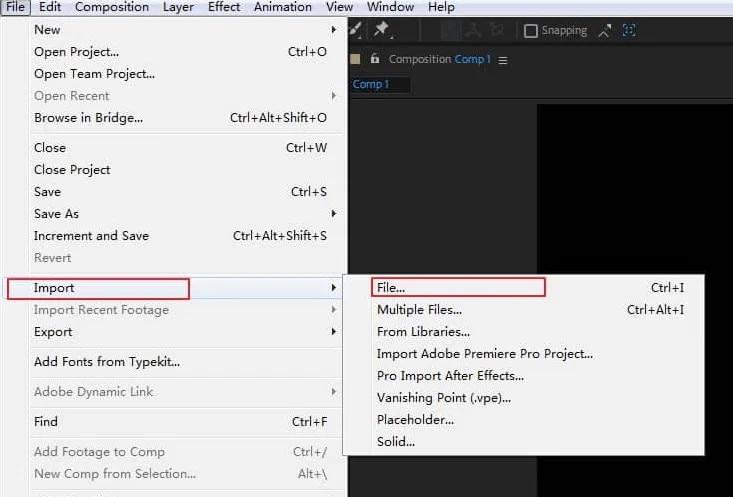
- Step 1: Import your video by going to ‘file’ on the menu and clicking ‘import’ from the dropdown menu.
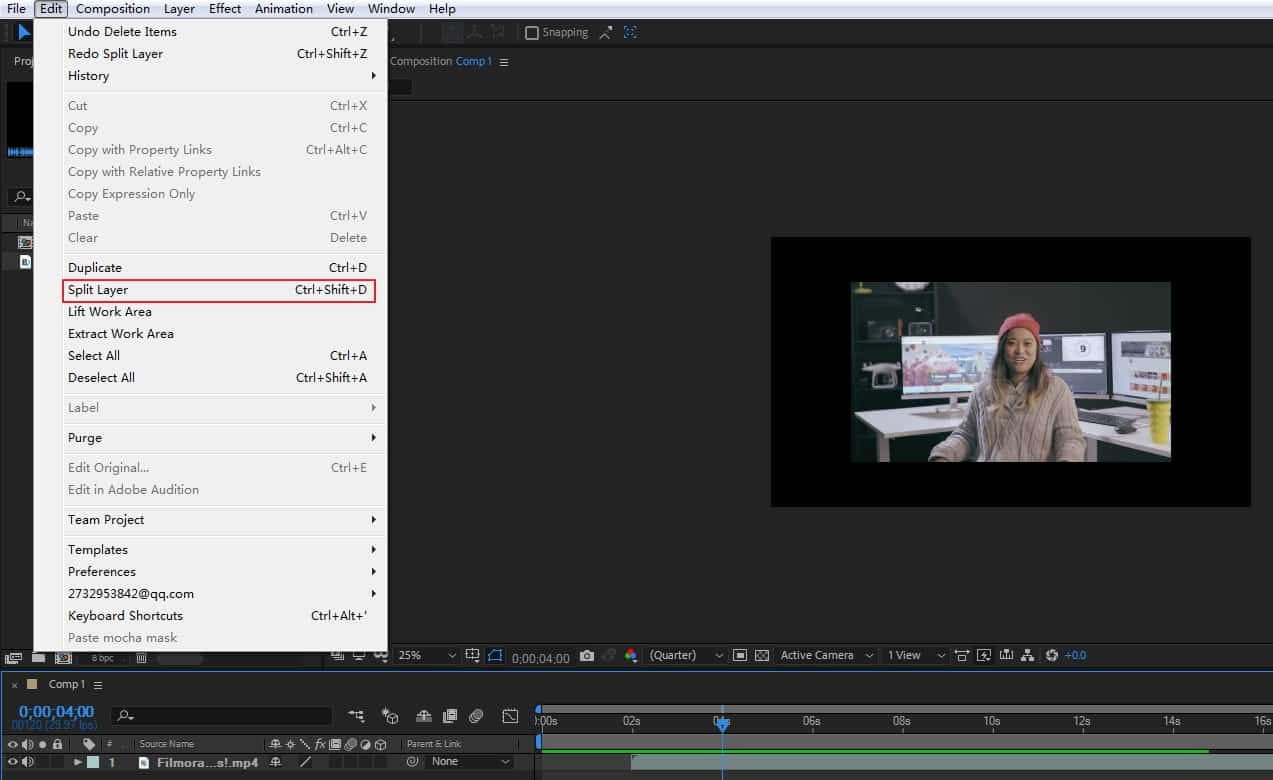
- You can begin by cutting out any unnecessary parts from the video. You can also add text transitions, text, and other edits.
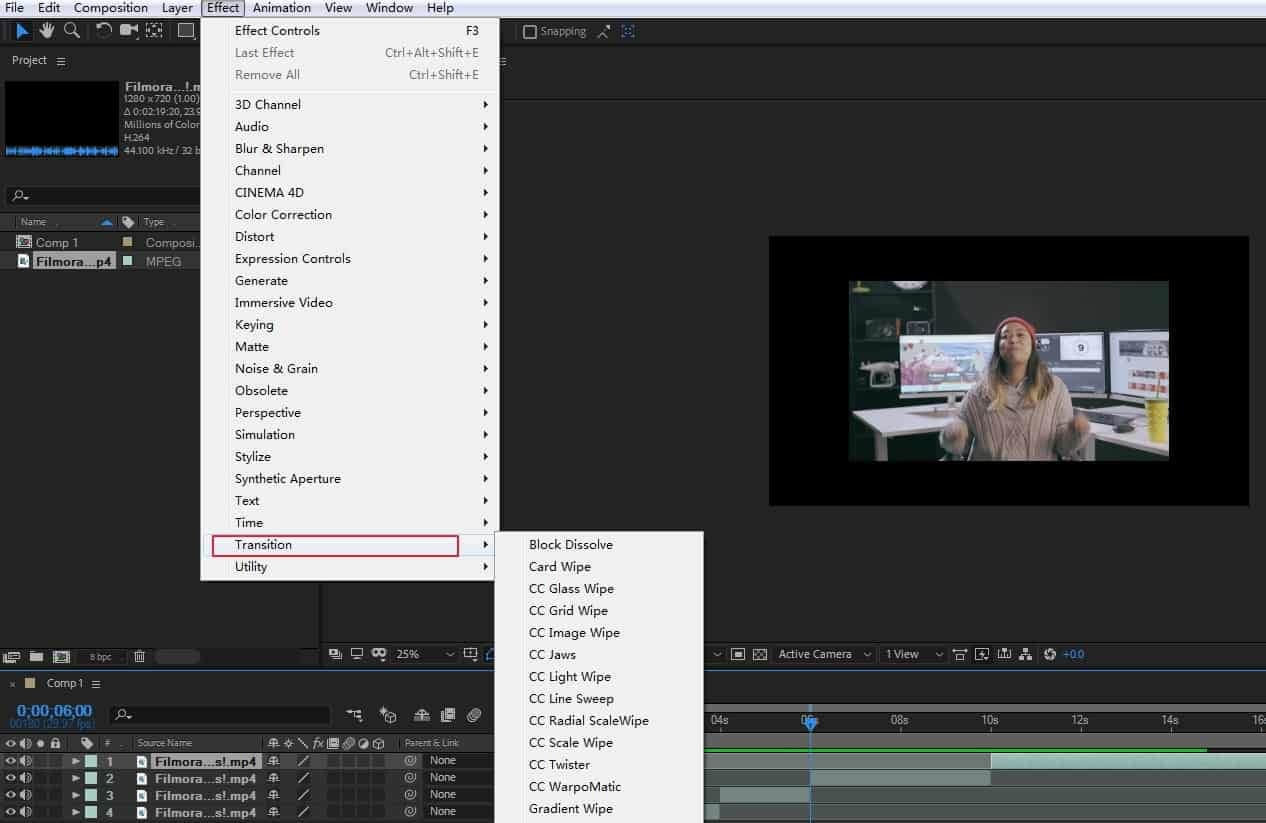
- Step 2: Next, you can apply necessary editing such as trimming, transitioning, and other edits.
- Step 3: Finally, you can add audio and export the edited video file. Click on file, tap on export and select the format, presets, and the location to export your file.

Final Cut Pro
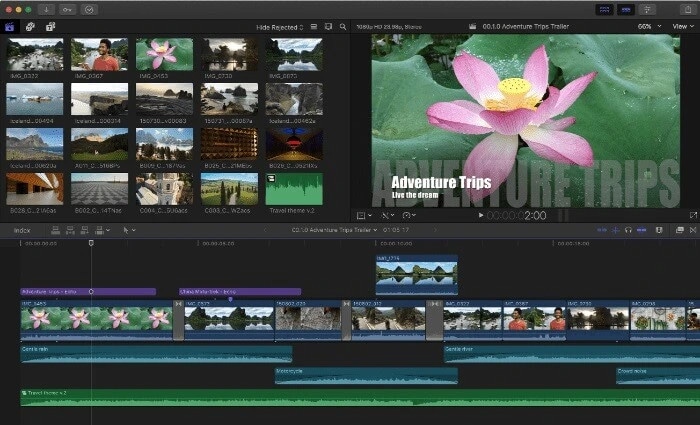
Supported System: Mac only
The Final Cut Pro is another best-paid GoPro video editor for editing GoPro videos on Mac. This video editor is ideal for editing 360 GoPro videos. This is because it offers all the editing tools you need to edit, import, and deliver both stereoscopic and monoscopic 360 videos. The GoPro video editors come with a lot of powerful features such as background noise removal, Multicam editing, color adjustment tools, and an object tracker.
You can use the GoPro video editor to visualize, remove camera rigs, change orientation, or straighten the horizon. Final Cut Pro can also easily apply graphics and effects to 360 videos and add 360 videos to regular videos with the tiny planet effect. With electronic stabilization, you can clean up your video and enhance your audience’s viewing experience. The magnetic timeline feature eliminates clip collisions and streamlines the video editing process.
Although the GoPro video editor has some notable GoPro features, it is expensive to purchase. However, it has a generous 90-day free trial to explore. It is also not beginner-friendly and requires time to learn, especially for new GoPro editors to understand. In addition, it supports several Video formats.
Pros
- It has convenient asset management functions
- Precision editing is sure with the magnetic timeline function
Cons
- It is expensive
- It is not ideal for GoPro beginners
Steps to Edit using Final Cut Pro
- Step 1: First, Launch the program
- Step 2: Import your video files to the timeline and begin editing.

- Step 3: Next, you can apply necessary editing such as trimming, transitioning, and other edits.
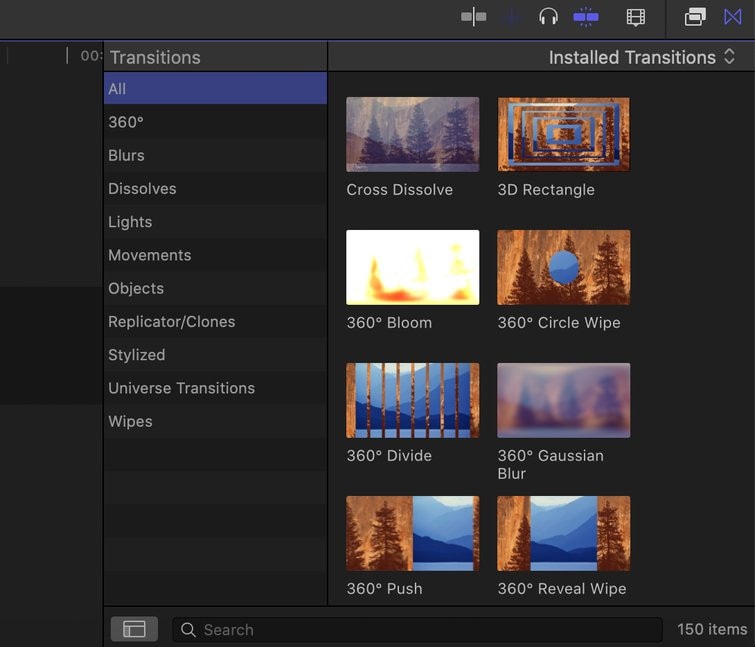
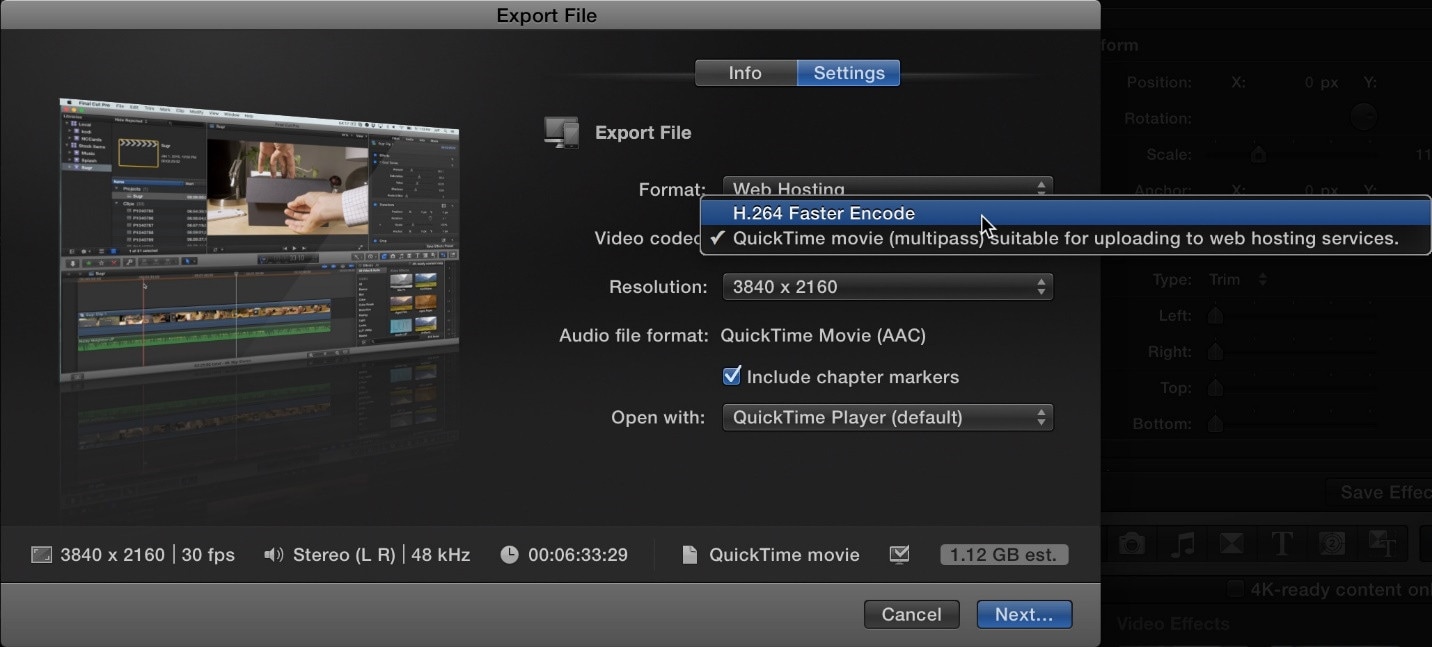
- Step 4: Finally, you can add audio and export the edited video file. Click on file, tap on export and select the format, presets, and the location to export your file.
Which should I Choose: Free or Paid GoPro Video Editor?
Many of these GoPro video editors for Mac (free and paid) are available on the internet. Therefore, it can be hard sometimes to choose the right GoPro video editor for Mac. However, you’ll need to consider factors before making your choice. Here are some of these factors.
Level of Expertise
This is a vital factor you should put into consideration before choosing a GoPro video editor. As a beginner, you wouldn’t need a GoPro editor that offers complex editing functions that you can’t use. Also, as a professional, you shouldn’t go for an editor that lacks the necessary editing tools to meet your editing needs. As an editor, you should totally be on the lookout for an editor that supports both beginners and professionals. This will remove the need to search for a new video editor at any experience level.
Interface
Another factor to consider is the user interface of your chosen video editor. When you go for a more friendly user interface, you will be saving yourself the time to get familiar with the software. Is the video editor free or paid? Regardless of the answer, check out the user interface before choosing one.
Formats
You also need to ensure that the editing software doesn’t limit you to specific video formats. You should go for a GoPro video editor that supports the common and trendy video formats. This will allow you to convert your edited videos when you need to share them.
Now, most free GoPro video editors offer just limited features to users, limiting your editing course. Furthermore, most paid GoPro video editors focus on a professional level, making it difficult for new editors to use. Therefore, you should totally opt for a GoPro video editor that succinctly supports all your editing needs.
FAQs About Editing Gopro Videos
- Can I edit GoPro videos like a Professional? Yes, you can. Learn to use advanced video editing features. The ideal thing to do is pick a GoPro video editor with a user-friendly interface to enable you to learn these professional methods.
- What is the best GoPro video editor for Mac? The best GoPro video editor for Mac devices depends on your level of expertise and what you want to achieve.
- Can I edit a GoPro video? Yes, you can. Find a GoPro editing software compatible with your Mac devices and ideal for your level of experience.
Conclusion
There are several GoPro video editors, and the editor you choose depends on your needs and your budget. It also depends on your level of experience and the equipment on the ground. However, we have a list of different GoPro video editors for you. Examine our reviews of these GoPro video editors and see which is perfect for you.

- Step 6: Once you open it, two folders will display. These folders are DCIM and MISC.

- Step 7: Click on the DCIM folder to find all videos stored on the device.

- Step 8: Finally, you can now begin uploading all your GoPro videos to Mac by simply copying and pasting.

Import GoPro Videos to Mac before editing – GoPro Quick App
Another option to import GoPro videos to Mac is the GoPro Quick app. GoPro quick app is a tool by GoPro designed to help view GoPro videos on Mac and import them. Having this app on your Mac device is relatively easy. First, you have to download its setup from the GoPro website and install it. So far, this app is one of the best tools to view and import GoPro files to your Mac device. Here are the steps to importing GoPro videos to Mac while getting set to edit.
- Step 1: First thing first, Launch the app. However, if you have not installed the app, you should quickly download and install the app.

- Step 2: Now, you can connect the GoPro camera to your Mac. You can do this by using a USB cable.
- Step 3: After launching the app, you will see an icon labeled Import Filesdisplayed at the interface.

- Step 4: from here on, you will also see an icon to import the videos from your GoPro camera into your Mac device.
When the import is complete, you can now locate your GoPro videos in the folder of your choice. Now, you can close the GoPro quick app, unplug the GoPro camera and get ready to edit your videos.
Best GoPro Video Editor on Mac
A lot of people understand that GoPro is the best way to make your video look like a professional shot. After shooting the video, you’ll obviously want to make some edits to make them look more professional before sharing them. After all, no one wants to watch poor-quality videos, bad noises, and other unprofessional clips. Therefore, we have a list of the best GoPro editor for Mac in this article. Keep reading to learn about the best GoPro video editor on Mac.
Best GoPro Video Editor on Mac – Filmora Video Editor

Supported System: Mac and Windows
A lot of free video editing software usually comes as either too straightforward or too challenging to understand. While other video editing software lacks vital editing features such as color correction and audio or noise editing features. However, the Filmora Video Editor for Mac bridges the gap and is undoubtedly the best GoPro Video editor on Mac.
This video editing software is an easy-to-use editing tool totally equipped with a lot of video editing functions. With Filmora, you can edit your GoPro videos on your Mac like an expert and expect a professional outcome. Filmora offers excellent performance and enhances video quality taking the user experience to a whole new level.
Additionally, Filmora is an editing tool with helpful functionality taking the user experience to a whole new level. Finally, this tool is indispensable due to its speed, intuitive user interface, and other file format support.
For Win 7 or later (64-bit)
For macOS 10.14 or later
Filmora Features
- Filmora editing tool is versatile and supports other video formats like MP4, MOV, MKV, AVCHD, etc.
- You can cut, crop, split, trim, and even combine clips with just a few clicks.
- Filmora has access to several advanced video effects such as royalty-free music, transition, animated titles, and motion elements.
- With Filmora color tuning features, your videos can look like professional Hollywood videos.
- You can also edit sounds on your video with a noise removal feature, audio equalizer, and audio keyframing tools.
- You get 500+ free special video effects to create and customize your videos yourself.
- Filmora has access to advanced video effects like PIP, audio mixer, and green screen, which you can add to your videos.
- Access to 1000+ effects downloading resources to make videos in any desired styles.
Steps to Editing Videos on Mac Using Filmora
Want to edit your GoPro videos the right way? Editing your GoPro videos on Mac with Filmora is relatively easy and will only take a few clicks. Read and follow these steps below to learn to edit GoPro videos on Mac with this easy-to-use GoPro video editor.
- Step 1: Import the GoPro video files
First, you launch the GoPro video editor and then click the “Import Media here” button. This will upload the GoPro video clips to the program. You can save these files in a suitable location for easy access before you begin editing.

- Step 2: Edit the GoPro Video clips

Secondly, you should drag the GoPro video clips from the folder or User’s album to the timeline and begin editing.
To trim your GoPro videos, simply mouser over the clip from the beginning to the end of the video. You should do this until the trim icon is displayed. The trim icon is labeled as “I” on the editing timeline. You can drag the trim icon forward or backward to trim the video as you desire.
Aside from the trimming option, you can also apply split footage, video stabilization, and even add transitions between two clips. You can also combine GoPro videos and rotate GoPro videos by simply tapping the icons respectively.

- Step 3: Export the edited GoPro video files

Once you finish editing, you can now navigate to the “Export” icon. Furthermore, you can also select the save path and file format from the displayed output window. After this selection, you can finally choose the “Export” icon. Once you complete this, you can find your edited video file in the same path.
More Free GoPro video editor on Mac to Edit Gopro Videos
In this section, we will list out some of the best free GoPro video editors to successfully edit your videos on Mac. These programs are, but you will have to download them to enjoy all the editing tools.
PowerDirector

Supported System: Windows and Mac
We have PowerDirector as the best overall editor on our list of best free GoPro video editors on Mac. This free GoPro video editor is compatible with Mac and has a robust video editing program. If you are looking for a free GoPro video editor with a wide range of exciting editing features, this is one of the best options. One of the benefits of using this GoPro video editor is that it comes with an Action Camera Center.
It has tons of cool effects, titles, filters, and templates to explore, especially if you want to make more action camera masterpieces. In addition, this video editor has special editing and effects tools to improve your action camera video. For example, you can stabilize your shaky video, apply cool speed effects, and correct fish-eye distortion in some minutes. You can also use the slow-motion effect, zoom, correct color problems, and freeze frame with just a few clicks.
The GoPro editor also comes with noise correction and video denoise to make your video crystal clear and remove unwanted audio noise. In addition, PowerDirector has thousands of royalty-free stock assets such as sound effects and background music. In essence, PowerDirector is a GoPro video editor that offers everything you need to produce, enhance and cut thrilling action videos. It is versatile, best for action footage editing, and supports several video formats.
Pros
- It is beginner-friendly
- It comes with easy-to-use action camera-specific editing tools
Cons
- While it is free, you need a subscription to enjoy the latest features.
Steps to Edit using PowerDirector
- Step 1: Launch the app and select ‘full mode’ to begin editing your video
- Step 2: Select’ import media folder’ to get the videos you wish to edit
- Step 3: You can now browse the folder on your Mac device and select the folder with the videos. Then Click ‘Select folder’ to move them into the editor’s media library.

- Step 4: Now, the editing process can begin. You can stabilize and change the speed of your videos with PowerDirector.

- You can add title text and motion blur to your GoPro videos if you like that.

- If you want to include transitions, you can do so by selecting the transition room.
- Step 5: Next, select the ‘produce’ button to export your video once you are sure that the editing is complete.

- Step 6: Change the video format before exporting.

Once you select the video format you prefer, you will be able to save your GoPro video.
VideoProc Vlogger

Supported System: Windows and Mac
VideoProc Vlogger is the best GoPro editor for anyone looking for speed adjustment. The video editor uses visualized speed ramping to alter the speed throughout a clip. This program contains over 20-speed features to help you quickly change the tone and tempo of your GoPro video. Furthermore, VideoProc Vlogger is beginner-friendly with a lot of advanced editing features. These features include automatic keyframes and flexible Bezier curves to slow parts of a video without splitting it.
This free GoPro video editor can simulate motion roll, dolly, tilt, and even truck effects. You can also push in and out and stylize your video clips with rotation, fast zooms, and shakes. With VideoProc Vlogger, you fix grain video, remove fish-eye, extract audio and apply motion crops to your video. The video editor is best at creating new motion trails to change the action of the video.
Although VideoProc Vlogger is a free video editor, it definitely lacks some advanced editing features. For example, you can edit your videos without the annoying ads or watermarks. In addition, the video editor is designed for beginners, content creators, and hobbyists as it lacks features like video stabilization. So while the video editor is not for professionals, it’s worth trying out.
Pros
- Requires low system requirements
- It is entirely free with no ads and watermarks
Cons
- It lacks advanced editing features
- Rendering is somewhat slow
Steps to Edit using VideoProc Vlogger
- Step 1: First, import your GoPro videos from your Mac device to VideoProc Vlogger.

Simply Launch VideoProc Vlogger on your Mac, hit the plus icon in the media library, and add and import the videos.
- Step 2: Now, split and cut the GoPro Videos.

Simply drag the video clips to the timeline and begin editing. Now, put the playhead to exactly where you want to split the video and tap the split button.
- Step 3: You can also fix GoPro lens distortion.

If you feel that your video looks distorted, tick the lens distortion box to resolve the issue.

- Step 4: You can do the color correction or grading for any dark GoPro videos. Simply apply a preset aesthetic filter or simply adjust color normally.
- Step 5: Adjust the speed of the GoPro video.

To adjust the speed of the video, click speed in the toolbar to open the speed editor. Then change as you desire.
- Step 6: You can also add transitions, titles, and effects by opening the panels of transitions, effects, and tiles.

- Then drag a transition to the space between two video clips, same with titles to the subtitle and effect to the effect track.

- Step 7: Next, remove noise and background music by clicking the video track and tapping “detach” to separate the audio from the video.

- You can also add music to replace the background noise.
- Step 8: Finally, after the editing, you can export the GoPro video to your Mac device by setting the file name, format, file location, and video quality.

iMovie

Supported System: Mac only
This editor is designed to ensure an excelling editing process for Mac users. Therefore, beginners, content creators, and even hobbyists can utilize this video editor to edit their videos. Although iMovie is a free GoPro video editor, it offers incredible editing features to make your video look more professional. These features include HD and 4K video support and speed adjustment tools that can slow down or speed up your video clips.
Although it comes free on all Mac devices, iMovie also has tons of themes, templates, and presets to make editing a breeze. For example, you can select the video clips that will be automatically styled and edited with titles, transitions, and music. You can make all these changes with just a few clicks. In addition, you can also rearrange, trim, split, and even delete your ready-made video clips.
Furthermore, you can always modify the shift focus and depth of field while editing your video. However, it lacks some advanced features you will need while editing, such as Multicam, motion tracking, and 360 editing. On the other hand, it has a user-friendly interface with essential editing functions.
Pros
- It has a simple and user-friendly interface
- It is definitely beginner-friendly
Cons
- It lacks essential and advanced GoPro editing features and functions
Steps to Edit using iMovie
- Step 1: first, you have to launch the iMovie and create a video project.

- Step 2: Now, you can click the Import button to import your GoPro video files from your Mac to it.

- Step 3: Drag the video files from the program media library to the timeline for editing.

- Step 4: Load a song to the audio track if you wish to add background music to your video.
- Step 5: To split your video into smaller parts, right-click on a clip.
- Step 6: to edit your GoPro video with advanced tools like color correction, crop, grading, speed, and volume, simply move to the toolbar just above the timeline.
- Step 7: to add title, and transitions, you can drag a title and transition to the desired space between two clips.
- Step 8: preview and export your GoPro video from iMovie in the preferred format.

More Paid GoPro video editor on Mac to Cut MP4 Videos
If you desire GoPro video editors that offer more than just the basic editing features, you should try the paid GoPro video editors. The paid GoPro video editors offer more professional editing features for Mac users. In this section, you’ll learn about our top three paid GoPro video editors to edit your GoPro videos on Mac.
Adobe Premiere Pro

Supported System: Windows and Mac
This paid GoPro video editor is best for professionals who have experience creating video projects. This GoPro editing tool is compatible with Mac and Windows devices and also supports several video formats. Professionals use this video editor to edit top-notch videos such as Hollywood action movies and TV shows. In addition, it offers a long list of powerful features ideal for standard and action video editing.
Some of these professional features include Multicam, 360-degree, VR editing, and will export in up to 8k. The GoPro video editors also have a lot of sophisticated video stabilization tools, such as the warp stabilizer effect. The video stabilizer function help reduce camera shake, especially when zooming in. Other features include unlimited video tracks, lens distortion, access to the creative cloud and will match video to music.
In addition, the GoPro video editor only offers a 7-days free trial and is relatively expensive. Although Adobe Premiere Pro video editor is professional and high-quality, it has a steep learning curve. The steep learning curve is not appropriate for beginners.
Pros
- It supports all video formats
- It supports real-time video editing
Cons
- The system requirements are resource-intensive
- Not ideal for beginners
Steps to Edit using Adobe Premiere Pro
- Step 1: Import and cut your video files on PowerDirector. You can begin by cutting out any unnecessary parts from the video. You can also add text transitions, text, and other edits.

- Step 2: Next, stabilize the video using the Warp stabilizer. Double click on Warp stabilizer on the Effects menu to stabile the video.

- Step 3: Finally, you can add audio and export the edited video file. Click on file, tap on export and select the format, presets, and the location to export your file.

Adobe After Effect

Supported System: Windows and Mac
This GoPro editor is compatible with Mac and offers many basic video editing features to ensure top-notch results. This GoPro editor is great for editors who want to add special effects like motion tracking to their videos. The after-effect function allows you to add a graphical element to a moving person, animal, car, or camera. You can also create cartoon effects, logos, stickers, or text to move seamlessly with the action onscreen.
In addition to its essential editing tools, you can also remove elements from your video with the pro-level digital rotoscoping tools. You can also use the after-effect to add elements to the missing video. Other features include 360, 3D, VR editing, transitions, lens distortions, and distortion effects for professional editing.
This GoPro video editor is an effective software and is best for adding visual effects to action camera videos. However, it lacks some essential video editing tools that you might need to make your video Hollywood standard. In addition, it also has a steep learning curve which makes it not ideal for beginners. Furthermore, as a GoPro video editor looking to do just the basic edits, then the After Effects is definitely not for you.
Pros
- It comes with realistic special effects
- It has a high-quality noise reduction
Cons
- It is not for beginners due to the steep learning curve
- It comes with only a 7-day free trial
- It is quite expensive
Steps to Edit using Adobe After Effects
- Step 1: Import your video by going to ‘file’ on the menu and clicking ‘import’ from the dropdown menu.

- You can begin by cutting out any unnecessary parts from the video. You can also add text transitions, text, and other edits.

- Step 2: Next, you can apply necessary editing such as trimming, transitioning, and other edits.

- Step 3: Finally, you can add audio and export the edited video file. Click on file, tap on export and select the format, presets, and the location to export your file.

Final Cut Pro

Supported System: Mac only
The Final Cut Pro is another best-paid GoPro video editor for editing GoPro videos on Mac. This video editor is ideal for editing 360 GoPro videos. This is because it offers all the editing tools you need to edit, import, and deliver both stereoscopic and monoscopic 360 videos. The GoPro video editors come with a lot of powerful features such as background noise removal, Multicam editing, color adjustment tools, and an object tracker.
You can use the GoPro video editor to visualize, remove camera rigs, change orientation, or straighten the horizon. Final Cut Pro can also easily apply graphics and effects to 360 videos and add 360 videos to regular videos with the tiny planet effect. With electronic stabilization, you can clean up your video and enhance your audience’s viewing experience. The magnetic timeline feature eliminates clip collisions and streamlines the video editing process.
Although the GoPro video editor has some notable GoPro features, it is expensive to purchase. However, it has a generous 90-day free trial to explore. It is also not beginner-friendly and requires time to learn, especially for new GoPro editors to understand. In addition, it supports several Video formats.
Pros
- It has convenient asset management functions
- Precision editing is sure with the magnetic timeline function
Cons
- It is expensive
- It is not ideal for GoPro beginners
Steps to Edit using Final Cut Pro
- Step 1: First, Launch the program
- Step 2: Import your video files to the timeline and begin editing.

- Step 3: Next, you can apply necessary editing such as trimming, transitioning, and other edits.

- Step 4: Finally, you can add audio and export the edited video file. Click on file, tap on export and select the format, presets, and the location to export your file.

Which should I Choose: Free or Paid GoPro Video Editor?
Many of these GoPro video editors for Mac (free and paid) are available on the internet. Therefore, it can be hard sometimes to choose the right GoPro video editor for Mac. However, you’ll need to consider factors before making your choice. Here are some of these factors.
Level of Expertise
This is a vital factor you should put into consideration before choosing a GoPro video editor. As a beginner, you wouldn’t need a GoPro editor that offers complex editing functions that you can’t use. Also, as a professional, you shouldn’t go for an editor that lacks the necessary editing tools to meet your editing needs. As an editor, you should totally be on the lookout for an editor that supports both beginners and professionals. This will remove the need to search for a new video editor at any experience level.
Interface
Another factor to consider is the user interface of your chosen video editor. When you go for a more friendly user interface, you will be saving yourself the time to get familiar with the software. Is the video editor free or paid? Regardless of the answer, check out the user interface before choosing one.
Formats
You also need to ensure that the editing software doesn’t limit you to specific video formats. You should go for a GoPro video editor that supports the common and trendy video formats. This will allow you to convert your edited videos when you need to share them.
Now, most free GoPro video editors offer just limited features to users, limiting your editing course. Furthermore, most paid GoPro video editors focus on a professional level, making it difficult for new editors to use. Therefore, you should totally opt for a GoPro video editor that succinctly supports all your editing needs.
FAQs About Editing Gopro Videos
- Can I edit GoPro videos like a Professional? Yes, you can. Learn to use advanced video editing features. The ideal thing to do is pick a GoPro video editor with a user-friendly interface to enable you to learn these professional methods.
- What is the best GoPro video editor for Mac? The best GoPro video editor for Mac devices depends on your level of expertise and what you want to achieve.
- Can I edit a GoPro video? Yes, you can. Find a GoPro editing software compatible with your Mac devices and ideal for your level of experience.
Conclusion
There are several GoPro video editors, and the editor you choose depends on your needs and your budget. It also depends on your level of experience and the equipment on the ground. However, we have a list of different GoPro video editors for you. Examine our reviews of these GoPro video editors and see which is perfect for you.

- Step 6: Once you open it, two folders will display. These folders are DCIM and MISC.

- Step 7: Click on the DCIM folder to find all videos stored on the device.

- Step 8: Finally, you can now begin uploading all your GoPro videos to Mac by simply copying and pasting.

Import GoPro Videos to Mac before editing – GoPro Quick App
Another option to import GoPro videos to Mac is the GoPro Quick app. GoPro quick app is a tool by GoPro designed to help view GoPro videos on Mac and import them. Having this app on your Mac device is relatively easy. First, you have to download its setup from the GoPro website and install it. So far, this app is one of the best tools to view and import GoPro files to your Mac device. Here are the steps to importing GoPro videos to Mac while getting set to edit.
- Step 1: First thing first, Launch the app. However, if you have not installed the app, you should quickly download and install the app.

- Step 2: Now, you can connect the GoPro camera to your Mac. You can do this by using a USB cable.
- Step 3: After launching the app, you will see an icon labeled Import Filesdisplayed at the interface.

- Step 4: from here on, you will also see an icon to import the videos from your GoPro camera into your Mac device.
When the import is complete, you can now locate your GoPro videos in the folder of your choice. Now, you can close the GoPro quick app, unplug the GoPro camera and get ready to edit your videos.
Best GoPro Video Editor on Mac
A lot of people understand that GoPro is the best way to make your video look like a professional shot. After shooting the video, you’ll obviously want to make some edits to make them look more professional before sharing them. After all, no one wants to watch poor-quality videos, bad noises, and other unprofessional clips. Therefore, we have a list of the best GoPro editor for Mac in this article. Keep reading to learn about the best GoPro video editor on Mac.
Best GoPro Video Editor on Mac – Filmora Video Editor

Supported System: Mac and Windows
A lot of free video editing software usually comes as either too straightforward or too challenging to understand. While other video editing software lacks vital editing features such as color correction and audio or noise editing features. However, the Filmora Video Editor for Mac bridges the gap and is undoubtedly the best GoPro Video editor on Mac.
This video editing software is an easy-to-use editing tool totally equipped with a lot of video editing functions. With Filmora, you can edit your GoPro videos on your Mac like an expert and expect a professional outcome. Filmora offers excellent performance and enhances video quality taking the user experience to a whole new level.
Additionally, Filmora is an editing tool with helpful functionality taking the user experience to a whole new level. Finally, this tool is indispensable due to its speed, intuitive user interface, and other file format support.
For Win 7 or later (64-bit)
For macOS 10.14 or later
Filmora Features
- Filmora editing tool is versatile and supports other video formats like MP4, MOV, MKV, AVCHD, etc.
- You can cut, crop, split, trim, and even combine clips with just a few clicks.
- Filmora has access to several advanced video effects such as royalty-free music, transition, animated titles, and motion elements.
- With Filmora color tuning features, your videos can look like professional Hollywood videos.
- You can also edit sounds on your video with a noise removal feature, audio equalizer, and audio keyframing tools.
- You get 500+ free special video effects to create and customize your videos yourself.
- Filmora has access to advanced video effects like PIP, audio mixer, and green screen, which you can add to your videos.
- Access to 1000+ effects downloading resources to make videos in any desired styles.
Steps to Editing Videos on Mac Using Filmora
Want to edit your GoPro videos the right way? Editing your GoPro videos on Mac with Filmora is relatively easy and will only take a few clicks. Read and follow these steps below to learn to edit GoPro videos on Mac with this easy-to-use GoPro video editor.
- Step 1: Import the GoPro video files
First, you launch the GoPro video editor and then click the “Import Media here” button. This will upload the GoPro video clips to the program. You can save these files in a suitable location for easy access before you begin editing.

- Step 2: Edit the GoPro Video clips

Secondly, you should drag the GoPro video clips from the folder or User’s album to the timeline and begin editing.
To trim your GoPro videos, simply mouser over the clip from the beginning to the end of the video. You should do this until the trim icon is displayed. The trim icon is labeled as “I” on the editing timeline. You can drag the trim icon forward or backward to trim the video as you desire.
Aside from the trimming option, you can also apply split footage, video stabilization, and even add transitions between two clips. You can also combine GoPro videos and rotate GoPro videos by simply tapping the icons respectively.

- Step 3: Export the edited GoPro video files

Once you finish editing, you can now navigate to the “Export” icon. Furthermore, you can also select the save path and file format from the displayed output window. After this selection, you can finally choose the “Export” icon. Once you complete this, you can find your edited video file in the same path.
More Free GoPro video editor on Mac to Edit Gopro Videos
In this section, we will list out some of the best free GoPro video editors to successfully edit your videos on Mac. These programs are, but you will have to download them to enjoy all the editing tools.
PowerDirector

Supported System: Windows and Mac
We have PowerDirector as the best overall editor on our list of best free GoPro video editors on Mac. This free GoPro video editor is compatible with Mac and has a robust video editing program. If you are looking for a free GoPro video editor with a wide range of exciting editing features, this is one of the best options. One of the benefits of using this GoPro video editor is that it comes with an Action Camera Center.
It has tons of cool effects, titles, filters, and templates to explore, especially if you want to make more action camera masterpieces. In addition, this video editor has special editing and effects tools to improve your action camera video. For example, you can stabilize your shaky video, apply cool speed effects, and correct fish-eye distortion in some minutes. You can also use the slow-motion effect, zoom, correct color problems, and freeze frame with just a few clicks.
The GoPro editor also comes with noise correction and video denoise to make your video crystal clear and remove unwanted audio noise. In addition, PowerDirector has thousands of royalty-free stock assets such as sound effects and background music. In essence, PowerDirector is a GoPro video editor that offers everything you need to produce, enhance and cut thrilling action videos. It is versatile, best for action footage editing, and supports several video formats.
Pros
- It is beginner-friendly
- It comes with easy-to-use action camera-specific editing tools
Cons
- While it is free, you need a subscription to enjoy the latest features.
Steps to Edit using PowerDirector
- Step 1: Launch the app and select ‘full mode’ to begin editing your video
- Step 2: Select’ import media folder’ to get the videos you wish to edit
- Step 3: You can now browse the folder on your Mac device and select the folder with the videos. Then Click ‘Select folder’ to move them into the editor’s media library.

- Step 4: Now, the editing process can begin. You can stabilize and change the speed of your videos with PowerDirector.

- You can add title text and motion blur to your GoPro videos if you like that.

- If you want to include transitions, you can do so by selecting the transition room.
- Step 5: Next, select the ‘produce’ button to export your video once you are sure that the editing is complete.

- Step 6: Change the video format before exporting.

Once you select the video format you prefer, you will be able to save your GoPro video.
VideoProc Vlogger

Supported System: Windows and Mac
VideoProc Vlogger is the best GoPro editor for anyone looking for speed adjustment. The video editor uses visualized speed ramping to alter the speed throughout a clip. This program contains over 20-speed features to help you quickly change the tone and tempo of your GoPro video. Furthermore, VideoProc Vlogger is beginner-friendly with a lot of advanced editing features. These features include automatic keyframes and flexible Bezier curves to slow parts of a video without splitting it.
This free GoPro video editor can simulate motion roll, dolly, tilt, and even truck effects. You can also push in and out and stylize your video clips with rotation, fast zooms, and shakes. With VideoProc Vlogger, you fix grain video, remove fish-eye, extract audio and apply motion crops to your video. The video editor is best at creating new motion trails to change the action of the video.
Although VideoProc Vlogger is a free video editor, it definitely lacks some advanced editing features. For example, you can edit your videos without the annoying ads or watermarks. In addition, the video editor is designed for beginners, content creators, and hobbyists as it lacks features like video stabilization. So while the video editor is not for professionals, it’s worth trying out.
Pros
- Requires low system requirements
- It is entirely free with no ads and watermarks
Cons
- It lacks advanced editing features
- Rendering is somewhat slow
Steps to Edit using VideoProc Vlogger
- Step 1: First, import your GoPro videos from your Mac device to VideoProc Vlogger.

Simply Launch VideoProc Vlogger on your Mac, hit the plus icon in the media library, and add and import the videos.
- Step 2: Now, split and cut the GoPro Videos.

Simply drag the video clips to the timeline and begin editing. Now, put the playhead to exactly where you want to split the video and tap the split button.
- Step 3: You can also fix GoPro lens distortion.

If you feel that your video looks distorted, tick the lens distortion box to resolve the issue.

- Step 4: You can do the color correction or grading for any dark GoPro videos. Simply apply a preset aesthetic filter or simply adjust color normally.
- Step 5: Adjust the speed of the GoPro video.

To adjust the speed of the video, click speed in the toolbar to open the speed editor. Then change as you desire.
- Step 6: You can also add transitions, titles, and effects by opening the panels of transitions, effects, and tiles.

- Then drag a transition to the space between two video clips, same with titles to the subtitle and effect to the effect track.

- Step 7: Next, remove noise and background music by clicking the video track and tapping “detach” to separate the audio from the video.

- You can also add music to replace the background noise.
- Step 8: Finally, after the editing, you can export the GoPro video to your Mac device by setting the file name, format, file location, and video quality.

iMovie

Supported System: Mac only
This editor is designed to ensure an excelling editing process for Mac users. Therefore, beginners, content creators, and even hobbyists can utilize this video editor to edit their videos. Although iMovie is a free GoPro video editor, it offers incredible editing features to make your video look more professional. These features include HD and 4K video support and speed adjustment tools that can slow down or speed up your video clips.
Although it comes free on all Mac devices, iMovie also has tons of themes, templates, and presets to make editing a breeze. For example, you can select the video clips that will be automatically styled and edited with titles, transitions, and music. You can make all these changes with just a few clicks. In addition, you can also rearrange, trim, split, and even delete your ready-made video clips.
Furthermore, you can always modify the shift focus and depth of field while editing your video. However, it lacks some advanced features you will need while editing, such as Multicam, motion tracking, and 360 editing. On the other hand, it has a user-friendly interface with essential editing functions.
Pros
- It has a simple and user-friendly interface
- It is definitely beginner-friendly
Cons
- It lacks essential and advanced GoPro editing features and functions
Steps to Edit using iMovie
- Step 1: first, you have to launch the iMovie and create a video project.

- Step 2: Now, you can click the Import button to import your GoPro video files from your Mac to it.

- Step 3: Drag the video files from the program media library to the timeline for editing.

- Step 4: Load a song to the audio track if you wish to add background music to your video.
- Step 5: To split your video into smaller parts, right-click on a clip.
- Step 6: to edit your GoPro video with advanced tools like color correction, crop, grading, speed, and volume, simply move to the toolbar just above the timeline.
- Step 7: to add title, and transitions, you can drag a title and transition to the desired space between two clips.
- Step 8: preview and export your GoPro video from iMovie in the preferred format.

More Paid GoPro video editor on Mac to Cut MP4 Videos
If you desire GoPro video editors that offer more than just the basic editing features, you should try the paid GoPro video editors. The paid GoPro video editors offer more professional editing features for Mac users. In this section, you’ll learn about our top three paid GoPro video editors to edit your GoPro videos on Mac.
Adobe Premiere Pro

Supported System: Windows and Mac
This paid GoPro video editor is best for professionals who have experience creating video projects. This GoPro editing tool is compatible with Mac and Windows devices and also supports several video formats. Professionals use this video editor to edit top-notch videos such as Hollywood action movies and TV shows. In addition, it offers a long list of powerful features ideal for standard and action video editing.
Some of these professional features include Multicam, 360-degree, VR editing, and will export in up to 8k. The GoPro video editors also have a lot of sophisticated video stabilization tools, such as the warp stabilizer effect. The video stabilizer function help reduce camera shake, especially when zooming in. Other features include unlimited video tracks, lens distortion, access to the creative cloud and will match video to music.
In addition, the GoPro video editor only offers a 7-days free trial and is relatively expensive. Although Adobe Premiere Pro video editor is professional and high-quality, it has a steep learning curve. The steep learning curve is not appropriate for beginners.
Pros
- It supports all video formats
- It supports real-time video editing
Cons
- The system requirements are resource-intensive
- Not ideal for beginners
Steps to Edit using Adobe Premiere Pro
- Step 1: Import and cut your video files on PowerDirector. You can begin by cutting out any unnecessary parts from the video. You can also add text transitions, text, and other edits.

- Step 2: Next, stabilize the video using the Warp stabilizer. Double click on Warp stabilizer on the Effects menu to stabile the video.

- Step 3: Finally, you can add audio and export the edited video file. Click on file, tap on export and select the format, presets, and the location to export your file.

Adobe After Effect

Supported System: Windows and Mac
This GoPro editor is compatible with Mac and offers many basic video editing features to ensure top-notch results. This GoPro editor is great for editors who want to add special effects like motion tracking to their videos. The after-effect function allows you to add a graphical element to a moving person, animal, car, or camera. You can also create cartoon effects, logos, stickers, or text to move seamlessly with the action onscreen.
In addition to its essential editing tools, you can also remove elements from your video with the pro-level digital rotoscoping tools. You can also use the after-effect to add elements to the missing video. Other features include 360, 3D, VR editing, transitions, lens distortions, and distortion effects for professional editing.
This GoPro video editor is an effective software and is best for adding visual effects to action camera videos. However, it lacks some essential video editing tools that you might need to make your video Hollywood standard. In addition, it also has a steep learning curve which makes it not ideal for beginners. Furthermore, as a GoPro video editor looking to do just the basic edits, then the After Effects is definitely not for you.
Pros
- It comes with realistic special effects
- It has a high-quality noise reduction
Cons
- It is not for beginners due to the steep learning curve
- It comes with only a 7-day free trial
- It is quite expensive
Steps to Edit using Adobe After Effects
- Step 1: Import your video by going to ‘file’ on the menu and clicking ‘import’ from the dropdown menu.

- You can begin by cutting out any unnecessary parts from the video. You can also add text transitions, text, and other edits.

- Step 2: Next, you can apply necessary editing such as trimming, transitioning, and other edits.

- Step 3: Finally, you can add audio and export the edited video file. Click on file, tap on export and select the format, presets, and the location to export your file.

Final Cut Pro

Supported System: Mac only
The Final Cut Pro is another best-paid GoPro video editor for editing GoPro videos on Mac. This video editor is ideal for editing 360 GoPro videos. This is because it offers all the editing tools you need to edit, import, and deliver both stereoscopic and monoscopic 360 videos. The GoPro video editors come with a lot of powerful features such as background noise removal, Multicam editing, color adjustment tools, and an object tracker.
You can use the GoPro video editor to visualize, remove camera rigs, change orientation, or straighten the horizon. Final Cut Pro can also easily apply graphics and effects to 360 videos and add 360 videos to regular videos with the tiny planet effect. With electronic stabilization, you can clean up your video and enhance your audience’s viewing experience. The magnetic timeline feature eliminates clip collisions and streamlines the video editing process.
Although the GoPro video editor has some notable GoPro features, it is expensive to purchase. However, it has a generous 90-day free trial to explore. It is also not beginner-friendly and requires time to learn, especially for new GoPro editors to understand. In addition, it supports several Video formats.
Pros
- It has convenient asset management functions
- Precision editing is sure with the magnetic timeline function
Cons
- It is expensive
- It is not ideal for GoPro beginners
Steps to Edit using Final Cut Pro
- Step 1: First, Launch the program
- Step 2: Import your video files to the timeline and begin editing.

- Step 3: Next, you can apply necessary editing such as trimming, transitioning, and other edits.

- Step 4: Finally, you can add audio and export the edited video file. Click on file, tap on export and select the format, presets, and the location to export your file.

Which should I Choose: Free or Paid GoPro Video Editor?
Many of these GoPro video editors for Mac (free and paid) are available on the internet. Therefore, it can be hard sometimes to choose the right GoPro video editor for Mac. However, you’ll need to consider factors before making your choice. Here are some of these factors.
Level of Expertise
This is a vital factor you should put into consideration before choosing a GoPro video editor. As a beginner, you wouldn’t need a GoPro editor that offers complex editing functions that you can’t use. Also, as a professional, you shouldn’t go for an editor that lacks the necessary editing tools to meet your editing needs. As an editor, you should totally be on the lookout for an editor that supports both beginners and professionals. This will remove the need to search for a new video editor at any experience level.
Interface
Another factor to consider is the user interface of your chosen video editor. When you go for a more friendly user interface, you will be saving yourself the time to get familiar with the software. Is the video editor free or paid? Regardless of the answer, check out the user interface before choosing one.
Formats
You also need to ensure that the editing software doesn’t limit you to specific video formats. You should go for a GoPro video editor that supports the common and trendy video formats. This will allow you to convert your edited videos when you need to share them.
Now, most free GoPro video editors offer just limited features to users, limiting your editing course. Furthermore, most paid GoPro video editors focus on a professional level, making it difficult for new editors to use. Therefore, you should totally opt for a GoPro video editor that succinctly supports all your editing needs.
FAQs About Editing Gopro Videos
- Can I edit GoPro videos like a Professional? Yes, you can. Learn to use advanced video editing features. The ideal thing to do is pick a GoPro video editor with a user-friendly interface to enable you to learn these professional methods.
- What is the best GoPro video editor for Mac? The best GoPro video editor for Mac devices depends on your level of expertise and what you want to achieve.
- Can I edit a GoPro video? Yes, you can. Find a GoPro editing software compatible with your Mac devices and ideal for your level of experience.
Conclusion
There are several GoPro video editors, and the editor you choose depends on your needs and your budget. It also depends on your level of experience and the equipment on the ground. However, we have a list of different GoPro video editors for you. Examine our reviews of these GoPro video editors and see which is perfect for you.

- Step 6: Once you open it, two folders will display. These folders are DCIM and MISC.

- Step 7: Click on the DCIM folder to find all videos stored on the device.

- Step 8: Finally, you can now begin uploading all your GoPro videos to Mac by simply copying and pasting.

Import GoPro Videos to Mac before editing – GoPro Quick App
Another option to import GoPro videos to Mac is the GoPro Quick app. GoPro quick app is a tool by GoPro designed to help view GoPro videos on Mac and import them. Having this app on your Mac device is relatively easy. First, you have to download its setup from the GoPro website and install it. So far, this app is one of the best tools to view and import GoPro files to your Mac device. Here are the steps to importing GoPro videos to Mac while getting set to edit.
- Step 1: First thing first, Launch the app. However, if you have not installed the app, you should quickly download and install the app.

- Step 2: Now, you can connect the GoPro camera to your Mac. You can do this by using a USB cable.
- Step 3: After launching the app, you will see an icon labeled Import Filesdisplayed at the interface.

- Step 4: from here on, you will also see an icon to import the videos from your GoPro camera into your Mac device.
When the import is complete, you can now locate your GoPro videos in the folder of your choice. Now, you can close the GoPro quick app, unplug the GoPro camera and get ready to edit your videos.
Best GoPro Video Editor on Mac
A lot of people understand that GoPro is the best way to make your video look like a professional shot. After shooting the video, you’ll obviously want to make some edits to make them look more professional before sharing them. After all, no one wants to watch poor-quality videos, bad noises, and other unprofessional clips. Therefore, we have a list of the best GoPro editor for Mac in this article. Keep reading to learn about the best GoPro video editor on Mac.
Best GoPro Video Editor on Mac – Filmora Video Editor

Supported System: Mac and Windows
A lot of free video editing software usually comes as either too straightforward or too challenging to understand. While other video editing software lacks vital editing features such as color correction and audio or noise editing features. However, the Filmora Video Editor for Mac bridges the gap and is undoubtedly the best GoPro Video editor on Mac.
This video editing software is an easy-to-use editing tool totally equipped with a lot of video editing functions. With Filmora, you can edit your GoPro videos on your Mac like an expert and expect a professional outcome. Filmora offers excellent performance and enhances video quality taking the user experience to a whole new level.
Additionally, Filmora is an editing tool with helpful functionality taking the user experience to a whole new level. Finally, this tool is indispensable due to its speed, intuitive user interface, and other file format support.
For Win 7 or later (64-bit)
For macOS 10.14 or later
Filmora Features
- Filmora editing tool is versatile and supports other video formats like MP4, MOV, MKV, AVCHD, etc.
- You can cut, crop, split, trim, and even combine clips with just a few clicks.
- Filmora has access to several advanced video effects such as royalty-free music, transition, animated titles, and motion elements.
- With Filmora color tuning features, your videos can look like professional Hollywood videos.
- You can also edit sounds on your video with a noise removal feature, audio equalizer, and audio keyframing tools.
- You get 500+ free special video effects to create and customize your videos yourself.
- Filmora has access to advanced video effects like PIP, audio mixer, and green screen, which you can add to your videos.
- Access to 1000+ effects downloading resources to make videos in any desired styles.
Steps to Editing Videos on Mac Using Filmora
Want to edit your GoPro videos the right way? Editing your GoPro videos on Mac with Filmora is relatively easy and will only take a few clicks. Read and follow these steps below to learn to edit GoPro videos on Mac with this easy-to-use GoPro video editor.
- Step 1: Import the GoPro video files
First, you launch the GoPro video editor and then click the “Import Media here” button. This will upload the GoPro video clips to the program. You can save these files in a suitable location for easy access before you begin editing.

- Step 2: Edit the GoPro Video clips

Secondly, you should drag the GoPro video clips from the folder or User’s album to the timeline and begin editing.
To trim your GoPro videos, simply mouser over the clip from the beginning to the end of the video. You should do this until the trim icon is displayed. The trim icon is labeled as “I” on the editing timeline. You can drag the trim icon forward or backward to trim the video as you desire.
Aside from the trimming option, you can also apply split footage, video stabilization, and even add transitions between two clips. You can also combine GoPro videos and rotate GoPro videos by simply tapping the icons respectively.

- Step 3: Export the edited GoPro video files

Once you finish editing, you can now navigate to the “Export” icon. Furthermore, you can also select the save path and file format from the displayed output window. After this selection, you can finally choose the “Export” icon. Once you complete this, you can find your edited video file in the same path.
More Free GoPro video editor on Mac to Edit Gopro Videos
In this section, we will list out some of the best free GoPro video editors to successfully edit your videos on Mac. These programs are, but you will have to download them to enjoy all the editing tools.
PowerDirector

Supported System: Windows and Mac
We have PowerDirector as the best overall editor on our list of best free GoPro video editors on Mac. This free GoPro video editor is compatible with Mac and has a robust video editing program. If you are looking for a free GoPro video editor with a wide range of exciting editing features, this is one of the best options. One of the benefits of using this GoPro video editor is that it comes with an Action Camera Center.
It has tons of cool effects, titles, filters, and templates to explore, especially if you want to make more action camera masterpieces. In addition, this video editor has special editing and effects tools to improve your action camera video. For example, you can stabilize your shaky video, apply cool speed effects, and correct fish-eye distortion in some minutes. You can also use the slow-motion effect, zoom, correct color problems, and freeze frame with just a few clicks.
The GoPro editor also comes with noise correction and video denoise to make your video crystal clear and remove unwanted audio noise. In addition, PowerDirector has thousands of royalty-free stock assets such as sound effects and background music. In essence, PowerDirector is a GoPro video editor that offers everything you need to produce, enhance and cut thrilling action videos. It is versatile, best for action footage editing, and supports several video formats.
Pros
- It is beginner-friendly
- It comes with easy-to-use action camera-specific editing tools
Cons
- While it is free, you need a subscription to enjoy the latest features.
Steps to Edit using PowerDirector
- Step 1: Launch the app and select ‘full mode’ to begin editing your video
- Step 2: Select’ import media folder’ to get the videos you wish to edit
- Step 3: You can now browse the folder on your Mac device and select the folder with the videos. Then Click ‘Select folder’ to move them into the editor’s media library.

- Step 4: Now, the editing process can begin. You can stabilize and change the speed of your videos with PowerDirector.

- You can add title text and motion blur to your GoPro videos if you like that.

- If you want to include transitions, you can do so by selecting the transition room.
- Step 5: Next, select the ‘produce’ button to export your video once you are sure that the editing is complete.

- Step 6: Change the video format before exporting.

Once you select the video format you prefer, you will be able to save your GoPro video.
VideoProc Vlogger

Supported System: Windows and Mac
VideoProc Vlogger is the best GoPro editor for anyone looking for speed adjustment. The video editor uses visualized speed ramping to alter the speed throughout a clip. This program contains over 20-speed features to help you quickly change the tone and tempo of your GoPro video. Furthermore, VideoProc Vlogger is beginner-friendly with a lot of advanced editing features. These features include automatic keyframes and flexible Bezier curves to slow parts of a video without splitting it.
This free GoPro video editor can simulate motion roll, dolly, tilt, and even truck effects. You can also push in and out and stylize your video clips with rotation, fast zooms, and shakes. With VideoProc Vlogger, you fix grain video, remove fish-eye, extract audio and apply motion crops to your video. The video editor is best at creating new motion trails to change the action of the video.
Although VideoProc Vlogger is a free video editor, it definitely lacks some advanced editing features. For example, you can edit your videos without the annoying ads or watermarks. In addition, the video editor is designed for beginners, content creators, and hobbyists as it lacks features like video stabilization. So while the video editor is not for professionals, it’s worth trying out.
Pros
- Requires low system requirements
- It is entirely free with no ads and watermarks
Cons
- It lacks advanced editing features
- Rendering is somewhat slow
Steps to Edit using VideoProc Vlogger
- Step 1: First, import your GoPro videos from your Mac device to VideoProc Vlogger.

Simply Launch VideoProc Vlogger on your Mac, hit the plus icon in the media library, and add and import the videos.
- Step 2: Now, split and cut the GoPro Videos.

Simply drag the video clips to the timeline and begin editing. Now, put the playhead to exactly where you want to split the video and tap the split button.
- Step 3: You can also fix GoPro lens distortion.

If you feel that your video looks distorted, tick the lens distortion box to resolve the issue.

- Step 4: You can do the color correction or grading for any dark GoPro videos. Simply apply a preset aesthetic filter or simply adjust color normally.
- Step 5: Adjust the speed of the GoPro video.

To adjust the speed of the video, click speed in the toolbar to open the speed editor. Then change as you desire.
- Step 6: You can also add transitions, titles, and effects by opening the panels of transitions, effects, and tiles.

- Then drag a transition to the space between two video clips, same with titles to the subtitle and effect to the effect track.

- Step 7: Next, remove noise and background music by clicking the video track and tapping “detach” to separate the audio from the video.

- You can also add music to replace the background noise.
- Step 8: Finally, after the editing, you can export the GoPro video to your Mac device by setting the file name, format, file location, and video quality.

iMovie

Supported System: Mac only
This editor is designed to ensure an excelling editing process for Mac users. Therefore, beginners, content creators, and even hobbyists can utilize this video editor to edit their videos. Although iMovie is a free GoPro video editor, it offers incredible editing features to make your video look more professional. These features include HD and 4K video support and speed adjustment tools that can slow down or speed up your video clips.
Although it comes free on all Mac devices, iMovie also has tons of themes, templates, and presets to make editing a breeze. For example, you can select the video clips that will be automatically styled and edited with titles, transitions, and music. You can make all these changes with just a few clicks. In addition, you can also rearrange, trim, split, and even delete your ready-made video clips.
Furthermore, you can always modify the shift focus and depth of field while editing your video. However, it lacks some advanced features you will need while editing, such as Multicam, motion tracking, and 360 editing. On the other hand, it has a user-friendly interface with essential editing functions.
Pros
- It has a simple and user-friendly interface
- It is definitely beginner-friendly
Cons
- It lacks essential and advanced GoPro editing features and functions
Steps to Edit using iMovie
- Step 1: first, you have to launch the iMovie and create a video project.

- Step 2: Now, you can click the Import button to import your GoPro video files from your Mac to it.

- Step 3: Drag the video files from the program media library to the timeline for editing.

- Step 4: Load a song to the audio track if you wish to add background music to your video.
- Step 5: To split your video into smaller parts, right-click on a clip.
- Step 6: to edit your GoPro video with advanced tools like color correction, crop, grading, speed, and volume, simply move to the toolbar just above the timeline.
- Step 7: to add title, and transitions, you can drag a title and transition to the desired space between two clips.
- Step 8: preview and export your GoPro video from iMovie in the preferred format.

More Paid GoPro video editor on Mac to Cut MP4 Videos
If you desire GoPro video editors that offer more than just the basic editing features, you should try the paid GoPro video editors. The paid GoPro video editors offer more professional editing features for Mac users. In this section, you’ll learn about our top three paid GoPro video editors to edit your GoPro videos on Mac.
Adobe Premiere Pro

Supported System: Windows and Mac
This paid GoPro video editor is best for professionals who have experience creating video projects. This GoPro editing tool is compatible with Mac and Windows devices and also supports several video formats. Professionals use this video editor to edit top-notch videos such as Hollywood action movies and TV shows. In addition, it offers a long list of powerful features ideal for standard and action video editing.
Some of these professional features include Multicam, 360-degree, VR editing, and will export in up to 8k. The GoPro video editors also have a lot of sophisticated video stabilization tools, such as the warp stabilizer effect. The video stabilizer function help reduce camera shake, especially when zooming in. Other features include unlimited video tracks, lens distortion, access to the creative cloud and will match video to music.
In addition, the GoPro video editor only offers a 7-days free trial and is relatively expensive. Although Adobe Premiere Pro video editor is professional and high-quality, it has a steep learning curve. The steep learning curve is not appropriate for beginners.
Pros
- It supports all video formats
- It supports real-time video editing
Cons
- The system requirements are resource-intensive
- Not ideal for beginners
Steps to Edit using Adobe Premiere Pro
- Step 1: Import and cut your video files on PowerDirector. You can begin by cutting out any unnecessary parts from the video. You can also add text transitions, text, and other edits.

- Step 2: Next, stabilize the video using the Warp stabilizer. Double click on Warp stabilizer on the Effects menu to stabile the video.

- Step 3: Finally, you can add audio and export the edited video file. Click on file, tap on export and select the format, presets, and the location to export your file.

Adobe After Effect

Supported System: Windows and Mac
This GoPro editor is compatible with Mac and offers many basic video editing features to ensure top-notch results. This GoPro editor is great for editors who want to add special effects like motion tracking to their videos. The after-effect function allows you to add a graphical element to a moving person, animal, car, or camera. You can also create cartoon effects, logos, stickers, or text to move seamlessly with the action onscreen.
In addition to its essential editing tools, you can also remove elements from your video with the pro-level digital rotoscoping tools. You can also use the after-effect to add elements to the missing video. Other features include 360, 3D, VR editing, transitions, lens distortions, and distortion effects for professional editing.
This GoPro video editor is an effective software and is best for adding visual effects to action camera videos. However, it lacks some essential video editing tools that you might need to make your video Hollywood standard. In addition, it also has a steep learning curve which makes it not ideal for beginners. Furthermore, as a GoPro video editor looking to do just the basic edits, then the After Effects is definitely not for you.
Pros
- It comes with realistic special effects
- It has a high-quality noise reduction
Cons
- It is not for beginners due to the steep learning curve
- It comes with only a 7-day free trial
- It is quite expensive
Steps to Edit using Adobe After Effects
- Step 1: Import your video by going to ‘file’ on the menu and clicking ‘import’ from the dropdown menu.

- You can begin by cutting out any unnecessary parts from the video. You can also add text transitions, text, and other edits.

- Step 2: Next, you can apply necessary editing such as trimming, transitioning, and other edits.

- Step 3: Finally, you can add audio and export the edited video file. Click on file, tap on export and select the format, presets, and the location to export your file.

Final Cut Pro

Supported System: Mac only
The Final Cut Pro is another best-paid GoPro video editor for editing GoPro videos on Mac. This video editor is ideal for editing 360 GoPro videos. This is because it offers all the editing tools you need to edit, import, and deliver both stereoscopic and monoscopic 360 videos. The GoPro video editors come with a lot of powerful features such as background noise removal, Multicam editing, color adjustment tools, and an object tracker.
You can use the GoPro video editor to visualize, remove camera rigs, change orientation, or straighten the horizon. Final Cut Pro can also easily apply graphics and effects to 360 videos and add 360 videos to regular videos with the tiny planet effect. With electronic stabilization, you can clean up your video and enhance your audience’s viewing experience. The magnetic timeline feature eliminates clip collisions and streamlines the video editing process.
Although the GoPro video editor has some notable GoPro features, it is expensive to purchase. However, it has a generous 90-day free trial to explore. It is also not beginner-friendly and requires time to learn, especially for new GoPro editors to understand. In addition, it supports several Video formats.
Pros
- It has convenient asset management functions
- Precision editing is sure with the magnetic timeline function
Cons
- It is expensive
- It is not ideal for GoPro beginners
Steps to Edit using Final Cut Pro
- Step 1: First, Launch the program
- Step 2: Import your video files to the timeline and begin editing.

- Step 3: Next, you can apply necessary editing such as trimming, transitioning, and other edits.

- Step 4: Finally, you can add audio and export the edited video file. Click on file, tap on export and select the format, presets, and the location to export your file.

Which should I Choose: Free or Paid GoPro Video Editor?
Many of these GoPro video editors for Mac (free and paid) are available on the internet. Therefore, it can be hard sometimes to choose the right GoPro video editor for Mac. However, you’ll need to consider factors before making your choice. Here are some of these factors.
Level of Expertise
This is a vital factor you should put into consideration before choosing a GoPro video editor. As a beginner, you wouldn’t need a GoPro editor that offers complex editing functions that you can’t use. Also, as a professional, you shouldn’t go for an editor that lacks the necessary editing tools to meet your editing needs. As an editor, you should totally be on the lookout for an editor that supports both beginners and professionals. This will remove the need to search for a new video editor at any experience level.
Interface
Another factor to consider is the user interface of your chosen video editor. When you go for a more friendly user interface, you will be saving yourself the time to get familiar with the software. Is the video editor free or paid? Regardless of the answer, check out the user interface before choosing one.
Formats
You also need to ensure that the editing software doesn’t limit you to specific video formats. You should go for a GoPro video editor that supports the common and trendy video formats. This will allow you to convert your edited videos when you need to share them.
Now, most free GoPro video editors offer just limited features to users, limiting your editing course. Furthermore, most paid GoPro video editors focus on a professional level, making it difficult for new editors to use. Therefore, you should totally opt for a GoPro video editor that succinctly supports all your editing needs.
FAQs About Editing Gopro Videos
- Can I edit GoPro videos like a Professional? Yes, you can. Learn to use advanced video editing features. The ideal thing to do is pick a GoPro video editor with a user-friendly interface to enable you to learn these professional methods.
- What is the best GoPro video editor for Mac? The best GoPro video editor for Mac devices depends on your level of expertise and what you want to achieve.
- Can I edit a GoPro video? Yes, you can. Find a GoPro editing software compatible with your Mac devices and ideal for your level of experience.
Conclusion
There are several GoPro video editors, and the editor you choose depends on your needs and your budget. It also depends on your level of experience and the equipment on the ground. However, we have a list of different GoPro video editors for you. Examine our reviews of these GoPro video editors and see which is perfect for you.
How to Make a Gaming Montage - Guide & Tips
The popularity of gaming montage is growing every day in today’s pop culture. There are currently more than 2.5 billion gamers, and most of them love watching gaming video content on YouTube. Whether people use a montage to parody gaming montages themselves or show off their skills, the effort and time put into them create impressive results.
We will explain how to create gaming montages and give you some tips that you might want to keep in mind to make epic videos.
How to Make a Gaming Montage
You have several options when it comes to creating gaming montages. You can include a random cut of great scenes, a mixture of the highlighted moments you found thrilling and would like to share with other gamers. In other cases, you’ll have to think of an engaging story in advance, then base your gameplay on this story.
Essentially, the workflow will be slightly different for these two scenarios. It’s much easier with the random cut type, especially when using a reliable video editor. Editing montages is as exciting as playing the game.
With that in mind, here is how to make a gaming montage.
1) Decide Your Montage Story/Type
Deciding your montage type beforehand helps clear your mind and create an epic gaming montage that will keep viewers watching. It allows you to choose the relevant video clips for your gaming montage.
Choose the topic of the video and decide the length of each clip and the sequence of the clips. Be sure to put the most epic or funny clips in the last section of your video. And this will make your viewers watch the video until the end.
2) Record Your Gameplay Footage
The methods to capture the gameplay varies depending on the platform where the game is. The most important thing you have to keep in mind is to ensure your recorder supports Replay Buffer; this will allow you to record scenes that occurred minutes or seconds ago.
That means you do not need to record the gameplay the whole time and burn your hardware. Instead, you’ll capture the moment after interesting things occur.
Game consoles like PS4 allow you to record the video natively for a maximum of one hour with the gamepad. A capture card lets you record it longer than 60 minutes.
Once you’ve all the clips you want on your PC, head over to https://filmora.wondershare.net/filmora-video-editor.html and download Filmora and install the software on your computer. This program allows you to edit your video clips and add cool effects that will make viewers keep watching.
3) Import You Videos to Media Library
You only have to import the videos to Filmora’s media library and then drag and drop them into the timeline, where you can start making the edits.
By right-clicking on the clip in your timeline, you’ll see the options to zoom, speed, change, split, or trim your videos. You can also add sound effects by going to the Audio Tab.
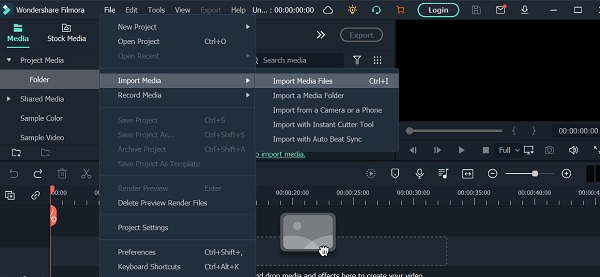
Import Videos
4) Choose Background Music for Your Montage
Music will help make your gaming montage engaging. Make sure you use a license-free track if you plan to post it on social media.
Using copyrighted music tracks and uploading the video on social media platforms can lead to video strikes. Luckily, Filmora has loads of non-copyrighted music tracks.
Navigate to Stock Media, where you’ll find non-copyrighted music on Pixabay, and choose the one you prefer.

Choose Background Music
5) Edit the Gaming Montage
With Filmora’s auto gaming montage maker, you can watch the video clip with the music you have selected. This tool will analyze beat points to change the video and effects.
Additionally, the tool can identify any bad parts in your video and delete them so that the video matches the music.
The Effects tab allows you to add multiple overlays and filters to your gaming montage video. Filmora has different categories of overlays that let you add emotions or personality to your montage. You can also use it to set the tone in your video.
Filters allow you to spice up your gaming videos. There are also different types of filters on Filmora.
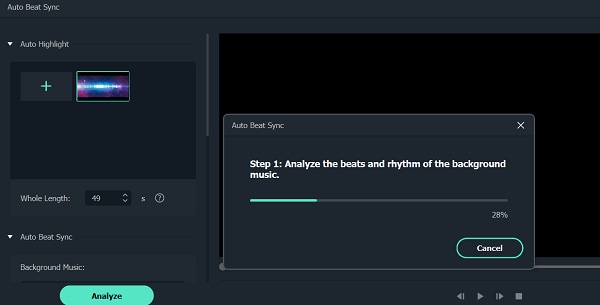
Edit Gaming Montage
6) Export Your Gaming Montage Video
Once you have finished editing your video and added music, hit the Export button. Doing this will allow you to export your edited video and save it on your computer.
You can now enter your login details and upload your gaming montage video on your YouTube channel to share it with other players.
Useful Tips for Making a Gaming Montage
Making gaming montages can help you build a large online community if you do the right thing. When making a gaming montage, there are a few tips that you should keep in mind. They include:
1. Apply Velocity Effects
Adding velocity effects to your montage will help get the attention of viewers. You can couple the transition between scenes with a speed ramping effect.
Include slow motion where there is a gunshot or other big gaming moment. You can then speed up things to quickly move into another scene. You can create these velocity effects in Filmora and make it smooth.
2. Avoid Game Loading Scenes
Do not include game loading scenes or any unnecessary clips in the gaming montage. Your audience does not have the time to wait for the scenes to load because they want to see action fast.
3. Sync Gunshot with Music Beat
Try to match gunshot sounds with beats and rhythms in shooter video games. The beats of the music and the soothing sync of gunshots will catch viewers’ attention and your video will become popular among gamers.
4. Add Creative Transitions
You can spice up your gaming montage by adding transitions, especially when you have loads of clips for the montage. But avoid overusing it, as you could confuse your audience with a range of dazzling and glaring transitions.
5. Color Grade the Video for the Mood
Use color grading to your advantage, as it can set the mood of your viewers. You can decide to make some scenes black and white to catch the viewers’ attention.
6. Add Video Vignettes for Special Occasions
You can add dark edges around the corners of your video to highlight action or create a certain mood. For gameplay based on a story, use vignetting to add a sense of nostalgia or as a flashback that shows viewers the past.
You can use Filmora to apply the vignetting effect by heading to Advanced Color Tuning, then clicking the Vignette option. You can then add the vignette effect to the video. Additionally, you can adjust the vignette’s exposure, feather, roundness, size, and highlights.
Best Gaming Montage for Studying
Here are three gaming montages that are good for studying.
1. Call of Duty: Modern Warfare
Uploaded by DemixB, the Call of Duty Game Montage uses Jacques Offenbach’s Can Can Music track. It’s a happy song that has a tempo of 81 BPM. The track has average danceable energy, and it’s somewhat danceable.
DemixB set the gunshot in the montage video to the music tune. The track builds up to the climax when the gunshot echoes with the attention-grabbing orchestral explosions.

Call of Duty: Modern Warfare
2. ShutteR’s Gaming Montage
In the gaming montage uploaded by ShutteR on his YouTube channel, he used velocity effects to enhance the video. You’ll see that the transition in each scene is paired with adrenaline-pumping, speed-ramping effects.
ShutteR used a slow-motion to highlight action in each scene, then speeds up again when he wants to fast out into the next scene.; this makes the video more engaging to keep viewers glued to their screens.

ShutteR’s Gaming Montage
3. NEVERMORE [CS: GO]
NEVERMORE [CS: GO] was uploaded by Fuze on his YouTube channel, and it has creative gameplay. The gaming montage is based on a story. He did the project with Apel, an artist who designed the Fever Dream series skins in the video.
The basic idea of this gaming montage was that the main game character is a corrupted policeman with purple glowing eyes because he’s not human.
When the edits begin, the shape of the main character will shift from CS: GO CT models and turn into his real corrupt CT shape. So that’s why his name keeps changing. You can get his real identity by pausing some of the frames and looking at the “Killfeed.”
NEVERMORE [CS: GO]
Closing Thoughts:
Gaming montage involves picking and editing a range of video clips, which are brought together to create engaging video content. It consists of the best scenes from gameplay and non-copyrighted background music.
Use Filmora to edit and add effects to your video, including transitions and overlays. Your gaming montage will get more views, hence becoming popular among players.
The popularity of gaming montage is growing every day in today’s pop culture. There are currently more than 2.5 billion gamers, and most of them love watching gaming video content on YouTube. Whether people use a montage to parody gaming montages themselves or show off their skills, the effort and time put into them create impressive results.
We will explain how to create gaming montages and give you some tips that you might want to keep in mind to make epic videos.
How to Make a Gaming Montage
You have several options when it comes to creating gaming montages. You can include a random cut of great scenes, a mixture of the highlighted moments you found thrilling and would like to share with other gamers. In other cases, you’ll have to think of an engaging story in advance, then base your gameplay on this story.
Essentially, the workflow will be slightly different for these two scenarios. It’s much easier with the random cut type, especially when using a reliable video editor. Editing montages is as exciting as playing the game.
With that in mind, here is how to make a gaming montage.
1) Decide Your Montage Story/Type
Deciding your montage type beforehand helps clear your mind and create an epic gaming montage that will keep viewers watching. It allows you to choose the relevant video clips for your gaming montage.
Choose the topic of the video and decide the length of each clip and the sequence of the clips. Be sure to put the most epic or funny clips in the last section of your video. And this will make your viewers watch the video until the end.
2) Record Your Gameplay Footage
The methods to capture the gameplay varies depending on the platform where the game is. The most important thing you have to keep in mind is to ensure your recorder supports Replay Buffer; this will allow you to record scenes that occurred minutes or seconds ago.
That means you do not need to record the gameplay the whole time and burn your hardware. Instead, you’ll capture the moment after interesting things occur.
Game consoles like PS4 allow you to record the video natively for a maximum of one hour with the gamepad. A capture card lets you record it longer than 60 minutes.
Once you’ve all the clips you want on your PC, head over to https://filmora.wondershare.net/filmora-video-editor.html and download Filmora and install the software on your computer. This program allows you to edit your video clips and add cool effects that will make viewers keep watching.
3) Import You Videos to Media Library
You only have to import the videos to Filmora’s media library and then drag and drop them into the timeline, where you can start making the edits.
By right-clicking on the clip in your timeline, you’ll see the options to zoom, speed, change, split, or trim your videos. You can also add sound effects by going to the Audio Tab.

Import Videos
4) Choose Background Music for Your Montage
Music will help make your gaming montage engaging. Make sure you use a license-free track if you plan to post it on social media.
Using copyrighted music tracks and uploading the video on social media platforms can lead to video strikes. Luckily, Filmora has loads of non-copyrighted music tracks.
Navigate to Stock Media, where you’ll find non-copyrighted music on Pixabay, and choose the one you prefer.

Choose Background Music
5) Edit the Gaming Montage
With Filmora’s auto gaming montage maker, you can watch the video clip with the music you have selected. This tool will analyze beat points to change the video and effects.
Additionally, the tool can identify any bad parts in your video and delete them so that the video matches the music.
The Effects tab allows you to add multiple overlays and filters to your gaming montage video. Filmora has different categories of overlays that let you add emotions or personality to your montage. You can also use it to set the tone in your video.
Filters allow you to spice up your gaming videos. There are also different types of filters on Filmora.

Edit Gaming Montage
6) Export Your Gaming Montage Video
Once you have finished editing your video and added music, hit the Export button. Doing this will allow you to export your edited video and save it on your computer.
You can now enter your login details and upload your gaming montage video on your YouTube channel to share it with other players.
Useful Tips for Making a Gaming Montage
Making gaming montages can help you build a large online community if you do the right thing. When making a gaming montage, there are a few tips that you should keep in mind. They include:
1. Apply Velocity Effects
Adding velocity effects to your montage will help get the attention of viewers. You can couple the transition between scenes with a speed ramping effect.
Include slow motion where there is a gunshot or other big gaming moment. You can then speed up things to quickly move into another scene. You can create these velocity effects in Filmora and make it smooth.
2. Avoid Game Loading Scenes
Do not include game loading scenes or any unnecessary clips in the gaming montage. Your audience does not have the time to wait for the scenes to load because they want to see action fast.
3. Sync Gunshot with Music Beat
Try to match gunshot sounds with beats and rhythms in shooter video games. The beats of the music and the soothing sync of gunshots will catch viewers’ attention and your video will become popular among gamers.
4. Add Creative Transitions
You can spice up your gaming montage by adding transitions, especially when you have loads of clips for the montage. But avoid overusing it, as you could confuse your audience with a range of dazzling and glaring transitions.
5. Color Grade the Video for the Mood
Use color grading to your advantage, as it can set the mood of your viewers. You can decide to make some scenes black and white to catch the viewers’ attention.
6. Add Video Vignettes for Special Occasions
You can add dark edges around the corners of your video to highlight action or create a certain mood. For gameplay based on a story, use vignetting to add a sense of nostalgia or as a flashback that shows viewers the past.
You can use Filmora to apply the vignetting effect by heading to Advanced Color Tuning, then clicking the Vignette option. You can then add the vignette effect to the video. Additionally, you can adjust the vignette’s exposure, feather, roundness, size, and highlights.
Best Gaming Montage for Studying
Here are three gaming montages that are good for studying.
1. Call of Duty: Modern Warfare
Uploaded by DemixB, the Call of Duty Game Montage uses Jacques Offenbach’s Can Can Music track. It’s a happy song that has a tempo of 81 BPM. The track has average danceable energy, and it’s somewhat danceable.
DemixB set the gunshot in the montage video to the music tune. The track builds up to the climax when the gunshot echoes with the attention-grabbing orchestral explosions.

Call of Duty: Modern Warfare
2. ShutteR’s Gaming Montage
In the gaming montage uploaded by ShutteR on his YouTube channel, he used velocity effects to enhance the video. You’ll see that the transition in each scene is paired with adrenaline-pumping, speed-ramping effects.
ShutteR used a slow-motion to highlight action in each scene, then speeds up again when he wants to fast out into the next scene.; this makes the video more engaging to keep viewers glued to their screens.

ShutteR’s Gaming Montage
3. NEVERMORE [CS: GO]
NEVERMORE [CS: GO] was uploaded by Fuze on his YouTube channel, and it has creative gameplay. The gaming montage is based on a story. He did the project with Apel, an artist who designed the Fever Dream series skins in the video.
The basic idea of this gaming montage was that the main game character is a corrupted policeman with purple glowing eyes because he’s not human.
When the edits begin, the shape of the main character will shift from CS: GO CT models and turn into his real corrupt CT shape. So that’s why his name keeps changing. You can get his real identity by pausing some of the frames and looking at the “Killfeed.”

NEVERMORE [CS: GO]
Closing Thoughts:
Gaming montage involves picking and editing a range of video clips, which are brought together to create engaging video content. It consists of the best scenes from gameplay and non-copyrighted background music.
Use Filmora to edit and add effects to your video, including transitions and overlays. Your gaming montage will get more views, hence becoming popular among players.
Also read:
- New 2024 Approved 11 Ways To Radial Blur To Images (iPhone/Android/Mac/Windows)
- New In 2024, 2 Methods to Crop Video in VLC
- Updated How to Add a Lower Third to Your Video for 2024
- 2024 Approved Color Correction Basics (S-LOG Footage)
- 2024 Approved Why Vimeo Slideshow Maker Become Popular
- New 2024 Approved 7 Best MP4 Editors for Mac Edit MP4 in Mac
- Premiere Pro Text Effects Beginner Guide for 2024
- New Do You Want a LUT that You Can Use for Your High-Definition Content? You Can Use Rec 709 LUT Premiere Pro for Your HD Digital Media to Give the Perfect Result
- New In 2024, Bandicut Video Editor Review
- Updated Top List The Best Slow Motion Video Editors Available
- New Get 15 Absolutely-Free LUTs From This Article as Well as Get an Insight on How Cinematic LUTs Affect Your Film
- 2024 Approved How to Make Text Reveal Effect for Your Video
- Updated Powerpoint Supported Video Format and User Tips
- In 2024, Vintage Film Effect 1920S - How to Make
- New In 2024, Best Animated Video Makers
- How to Slow Down Time-Lapse Videos on iPhone for 2024
- Updated How to Create Loop Videos with Filmora
- In 2024, Shoot Video with Virtual Green Screen
- In 2024, How to Create Video Contents That Convert Sales
- New 2024 Approved A Complete Guide to the Best Brand Story Videos |2023|
- Tutorial How To Add Motion Blur in Blender, In 2024
- How to Change Netflix Location to Get More Country Version On Realme GT 5 | Dr.fone
- Reset pattern lock Tutorial for Asus ROG Phone 8 Pro
- How Do I Stop Someone From Tracking My Oppo Reno 10 5G? | Dr.fone
- How to Factory Reset Vivo Y100i Power 5G If I Forgot Security Code or Password? | Dr.fone
- How to Unlock Apple iPhone 15, Apples New iPhone
- How To Enable USB Debugging on a Locked Vivo Y100 5G Phone
- In 2024, How to Transfer Data from Realme Narzo N55 to BlackBerry | Dr.fone
- In 2024, Full Guide to Fix iToolab AnyGO Not Working On Apple iPhone 11 Pro | Dr.fone
- Forgot iPhone XS Max Backup Password? Heres What to Do
- In 2024, How To Use Special Features - Virtual Location On Apple iPhone XR? | Dr.fone
- How to Share/Fake Location on WhatsApp for Realme V30 | Dr.fone
- In 2024, Hassle-Free Ways to Remove FRP Lock from Vivo G2 Phones with/without a PC
- In 2024, 10 Fake GPS Location Apps on Android Of your Tecno Pova 6 Pro 5G | Dr.fone
- 9 Best Phone Monitoring Apps for Vivo V29 Pro | Dr.fone
- Is GSM Flasher ADB Legit? Full Review To Bypass Your Xiaomi 13T ProFRP Lock
- Downloading SamFw FRP Tool 3.0 for Vivo Y100A
- How to Factory Reset Vivo V27 without Losing Data | Dr.fone
- How To Change Your SIM PIN Code on Your Honor X50 GT Phone
- Title: 2024 Approved Step by Step to Cut Video in Adobe Premiere Pro
- Author: Chloe
- Created at : 2024-05-20 03:38:17
- Updated at : 2024-05-21 03:38:17
- Link: https://ai-editing-video.techidaily.com/2024-approved-step-by-step-to-cut-video-in-adobe-premiere-pro/
- License: This work is licensed under CC BY-NC-SA 4.0.

