
:max_bytes(150000):strip_icc():format(webp)/how-to-choose-a-wireless-charger-5191283-cb27ceee3fea4547b5720b4934713a93.jpg)
2024 Approved Steps To Fade Audio In Premier Pro
Steps To Fade Audio In Premier Pro
Audio is a very big part of any video project and it can make or break the video project. This is why it is very important to not just choose a video editor that also offers audio editing, but one that is easy to use and offers a lot of editing options. This way, you can edit the audio in your project to suit your video’s production and end up with a great professional final product.
One of the video editing tools that offer features that can accomplish all that is Adobe Premier Pro. In this article, we will look at how you can use Premier Pro to fade audio in or out.
Steps to Fade Audio in Premier Pro
Premier Pro gives you two different options to fade audio in or out. Let’s look at both options and then you can choose the one that suits you best;
Fade Audio using Crossfade Audio Transition
Step1To begin, open Premier Pro on your computer and then open the audio that you want to edit.
Step2Once it is open, select the audio clip in the timeline and then click on “Sequence” at the top menu and select “Apply Audio Transition.”
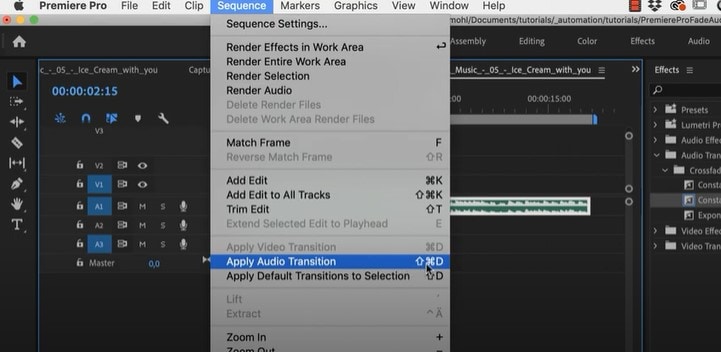
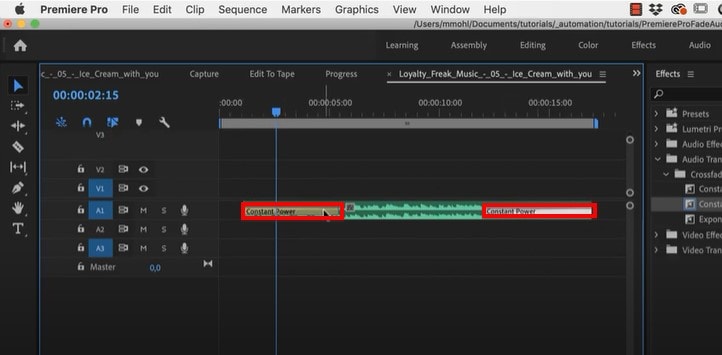
You can also use the keyboard shortcut Shift + Command + D (macOS) or Shift+ Ctrl + D (PC). This will add the “Constant Power Cross Fade” effect at the beginning and the end of the clip.
Step3You can then just change the duration of the effect by simply dragging the end of the transition.
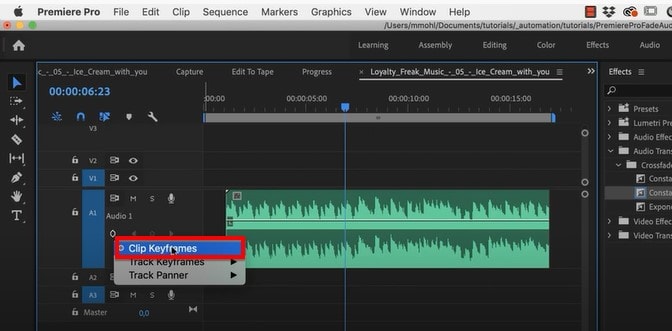
Fade Audio using Clip Keyframes
Step1Adobe Premier Pro has two volume keyframes; Track and Clip. Make the audio larger so you can see the volume line and then under the audio name, click on the volume keyframes option to make sure “Clip Keyframes” is enabled.
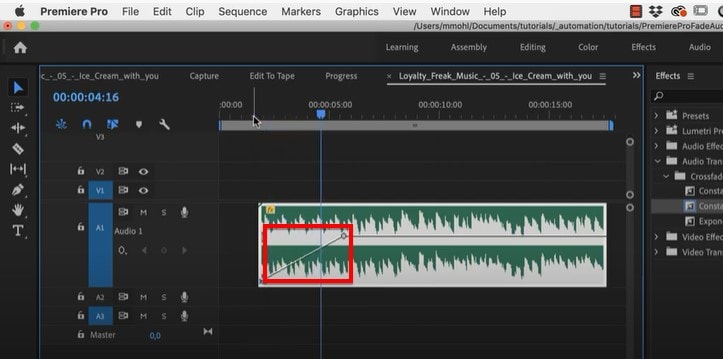
Step2You can then press down on the Command Key (macOS) or the Control Key (PC) and drag the volume line down to add a fade-in or fade-out effect.
Adobe Premiere Alternative Way to Fade Audio
If you are like most people and you find Adobe Premier Pro to be very difficult you use, we have a tool that is just as effective but also simplifies the process. This is the very simple to use Wondershare Filmora .
Just like Premier Pro, Filmora gives you two options to fade audio in and out. Let’s look at both options;
Adding Fade in and Out in Audio Pane
Step1Download and install Wondershare Filmora onto your computer, open the program and then import the audio clip that you want to edit.
Step2Once the video has been added to the timeline, double-click on it to access the “Audio” editing panel.
Step3Here, you can very simply add the fade-in and fade-out effects by simply dragging the sliders to the desired duration or by manually entering the duration in seconds.

Using the Audio Waveform
You can also use the fade icons on the left and right edges of the audio waveform to quickly add a fade in and out.
To add a fade-in effect, drag the fade-in maker to the right. Then go to the end of the clip to drag the fade-out maker to the left to add a fade-out effect.

Related FAQs about Audio Fade
1. How Do I Fade to Black in Adobe Premiere Pro?
You can easily add the Fade to Black transition in Adobe Premiere Pro using the “Effects” tab. Just open the two clips in Premiere Pro and go to “Effects.” Type in “dip to black” in the search box and when you find the effect, drag it between the two clips in the timeline. The effect will appear on the right side of the project.
You also have several customization options that you can apply to the effect to get it just right. To see these options, go to Effect Controls and you should be able to change the alignment of the effect to “Center at Cut” so that the first video fades out to black before the second video appears.
2. Premiere Pro Audio Fade Not Working?
Sometimes you can complete all the editing steps we have described above but you are unable to tell if the fade-in and fade-out effects are working because you can’t play the audio in Premiere. This is a very common problem that can easily be fixed using the following troubleshooting steps;
Check the master volume on your computer to see if this is the problem
Then check the volume in Premiere to see if the audio meter is moving as you play the clip. It is the green bar usually in the lower right corner.
If your volume is fine but you still can’t hear the audio, you may need to adjust several settings. Go to Edit > Preferences (on PC) or Preferences menu under the main Premiere Pro CC menu (macOS) and select “Audio Hardware” in the options that appear. You can then change the “Default Output” device to something else.
3. How Do You do Audio Transitions in Premiere Pro
Adding audio transitions in Premiere Pro is very easy; just open the audio that you want to edit and then Right-click (PC) or Control- Click (macOS) on either the “Constant Gain” or “Constant Power” effect from the Effects panel. Then choose “Set Selected as Default Transition” from the options in the menu.
To add a duration for the audio transitions, go to Edit > Preferences > Timeline (PC) or Premiere Pro Menu > Preferences (macOS) and enter the duration value under “Audio Transition Default Duration.”
Free Download For Win 7 or later(64-bit)
Free Download For macOS 10.14 or later
10 Best Old Film Overlays to Make Your Videos Look Vintage
Versatile Video Editor - Wondershare Filmora
An easy yet powerful editor
Numerous effects to choose from
Detailed tutorials provided by the official channel
If you like the old film mood in your videos and films, then this guide is for you. In this article, we will go through the best old film overlays to make your videos look vintage.
In this article
01 What is the Old Film Effect Called?
02 10 Amazing Old Film Overlays that Deserve a Try
03 How to Make a Video Look Old?
04 Pro Tips to Create Stunning Retro Video
Part 1: What is the Old Film Effect Called?
The old film effect that has been getting popular over the past years is called film grain and is defined as a random optical texture due to small particles appearing in the film. It is usually described as having a grainy effect and appearing old.
Part 2: 10 Amazing Old Film Overlays that Deserve a Try
In this list, we will present you with some great options that deserve your attention if you are looking to add old film aspects to your videos.
1. The Super 8 Film Grain Overlays Collection
With this collection, you have at your disposal 82 high-resolution clips of a real Super 8 film grain. With features that are easy to use in your videos, like 20-second loopable duration, 1080P Quicktime Pro resolution, each overlay has a small difference in texture and tint, and you also get 37 clips that show you visible areas with sprocket holes.
2. The Old Film Look Collection
This collection brings a large variety of film elements. From flash frames, film clutter, light leaks, countdown leader, film sprockets, 16mm and Super 8mm film. Plus, with this collection, you also get 29 video files and ProRes 1080P.
3. The Damaged 35mm Film Collection
With this collection, you have animated scans of damaged slides of 35mm film. The transparency effects are easy to use because of the white areas. You can add a file that you choose over an existing video and “darken” or “multiply” blending modes. Apart from those features, the Damaged 35mm Film Collection comes with 10 ProRes HD files.

4. The 4K 16 mm Film Overlays Collection
These overlays come from Authentic Old 16mm film, and inside this collection, you can find many effects of film dirt, scratches or dust to bring that old vintage look to your videos. It also comes with 79 ProRes video files, 4K (ULTRA HD) 3840 x 2160, 24fps resolution.
5. The Film Dirt and Scratches Collection
This collection comes with a variety of scratches and dirt textures. From authentic 16mm and Super 8mm film to give you a great old film look effect to your videos. The Film Dirt and Scratches collection comes with 28 video files, 13 minutes of footage, and ProRes 1080P.
6. 4K Super 8 Film Burn Overlays Collection - Kodak 50D
A collection like this is rare to come across. These easy-to-use effects are great for any level of expertise in editing videos. Just place them over the video and click “screen” or “lighten” modes. This collection pack comes with 47 ProRes files, 4 minutes of footage, and 4K High-Quality Scans.
7. 4K 16mm Film Grain Overlays
This collection has three great files of real film grain with dust and grain at your disposal. They use a 16mm camera for a better quality of overlays. This amazing package comes with three video files of 16mm film grain plus three bonus files.
8. 4K Film Burn Effects on 16mm
Shot in an authentic 16mm, this collection has real film burning in a projector. It has close-ups that fit a width of 16/9 screen. It also comes with 33 ProRes Files and 4 minutes of footage.
9. The VHS Effects Collection
This collection has real VHS effects to give your videos an old 80’s tape look to your videos. The collection contains many analog textures, tracking problems, and glitches. It also contains 10 minutes of footage, Quicktime ProRes 1080P file support, and 94 HD files of authentic VHS Retro Effects.
10. The Film Leaders Collection - Super 8mm and 16mm Effects
With authentic vintage countdowns, tail leaders, and old retro heads, this bundle offer you a great range of choices to add an old look to your films and videos.
Part 3: How to Make a Video Look Old?
In Filmora, you can make your videos have that old effect with simple steps.
Wondershare Filmora
Get started easily with Filmora’s powerful performance, intuitive interface, and countless effects!
Try It Free Try It Free Try It Free Learn More >

Step 1: Open Filmora and remove all the pieces of the footage. Then arrange the rest of the footage as you see fit. Click on “Effects” on the upper left corner of your screen and then on “Filters”. Click on the Old Video effect and then drop it. After you add the filter on the segment of your video, you can drag the end of it to cover the whole duration of the movies. Click twice on the filter if you want to adjust the filter settings. Enter the desired values on the “Fade” parameter, “Frequency”, and “Alpha” options. Press “OK”, and this step is concluded.

Step 2: You can apply the black and white filters to any project in Filmora. It is very simple. Add one of the filters above the video you want to add the effect and drag one of the corners to adjust the duration. You can change the intensity through the alpha slider.

Step 3: In Filmora, you can add sepia tone rise or sun-kissed filters to your video. You are able to add desaturated filters while keeping colors like blue and green and with that create the old film style. If you want more brown and red tones, you can use the Sun-Kisser filter that highlights those colors. Adjust the filters with the alpha slider to change intensity.

Step 4: Under the black and white subcategory, you can find Ash and Willow filters. What these do is desaturate the contrast or exposure values as well as preset brightness and bring an older tone to your videos.
Step 5: You can correct any kind of filter. With the Advanced Color Correction Tab, you can navigate through features like Preset and Adjustment and desaturate your video. By clicking on the “Preset tab,” you can open a larger variety of presets, including the Old Film and Black & White presets.

Part 4: Pro Tips to Create Stunning Retro Video
You can make your video look retro with a few simple tips:
- Use several vintage apps like Retro VHS, 8mm Camcorder, and others.
- Keep low highlights and low contrasts.
- Keep low saturation and control the hue, saturation, and luminance of your video.
- Film Overlays. With this, you can bring the mood just right. If you add a soft light overall to start with, it will instantly look slightly more vintage.
- By decreasing contrast, you are darkening your videos and giving them a grainier old look.
- If you bring up the black levels, you will leave more space for other tones to shine and turn the mood around your videos.
- In contrast, if you bring down the whites in your videos, making even the brightest colors turn grey.
Conclusion
There are various ways to turn your videos into old relics. Using Filmora, you have a powerful tool in your hands to change any desired media, and with this step-by-step guide, you will get there in no time.
If you like the old film mood in your videos and films, then this guide is for you. In this article, we will go through the best old film overlays to make your videos look vintage.
In this article
01 What is the Old Film Effect Called?
02 10 Amazing Old Film Overlays that Deserve a Try
03 How to Make a Video Look Old?
04 Pro Tips to Create Stunning Retro Video
Part 1: What is the Old Film Effect Called?
The old film effect that has been getting popular over the past years is called film grain and is defined as a random optical texture due to small particles appearing in the film. It is usually described as having a grainy effect and appearing old.
Part 2: 10 Amazing Old Film Overlays that Deserve a Try
In this list, we will present you with some great options that deserve your attention if you are looking to add old film aspects to your videos.
1. The Super 8 Film Grain Overlays Collection
With this collection, you have at your disposal 82 high-resolution clips of a real Super 8 film grain. With features that are easy to use in your videos, like 20-second loopable duration, 1080P Quicktime Pro resolution, each overlay has a small difference in texture and tint, and you also get 37 clips that show you visible areas with sprocket holes.
2. The Old Film Look Collection
This collection brings a large variety of film elements. From flash frames, film clutter, light leaks, countdown leader, film sprockets, 16mm and Super 8mm film. Plus, with this collection, you also get 29 video files and ProRes 1080P.
3. The Damaged 35mm Film Collection
With this collection, you have animated scans of damaged slides of 35mm film. The transparency effects are easy to use because of the white areas. You can add a file that you choose over an existing video and “darken” or “multiply” blending modes. Apart from those features, the Damaged 35mm Film Collection comes with 10 ProRes HD files.
4. The 4K 16 mm Film Overlays Collection
These overlays come from Authentic Old 16mm film, and inside this collection, you can find many effects of film dirt, scratches or dust to bring that old vintage look to your videos. It also comes with 79 ProRes video files, 4K (ULTRA HD) 3840 x 2160, 24fps resolution.
5. The Film Dirt and Scratches Collection
This collection comes with a variety of scratches and dirt textures. From authentic 16mm and Super 8mm film to give you a great old film look effect to your videos. The Film Dirt and Scratches collection comes with 28 video files, 13 minutes of footage, and ProRes 1080P.
6. 4K Super 8 Film Burn Overlays Collection - Kodak 50D
A collection like this is rare to come across. These easy-to-use effects are great for any level of expertise in editing videos. Just place them over the video and click “screen” or “lighten” modes. This collection pack comes with 47 ProRes files, 4 minutes of footage, and 4K High-Quality Scans.
7. 4K 16mm Film Grain Overlays
This collection has three great files of real film grain with dust and grain at your disposal. They use a 16mm camera for a better quality of overlays. This amazing package comes with three video files of 16mm film grain plus three bonus files.
8. 4K Film Burn Effects on 16mm
Shot in an authentic 16mm, this collection has real film burning in a projector. It has close-ups that fit a width of 16/9 screen. It also comes with 33 ProRes Files and 4 minutes of footage.
9. The VHS Effects Collection
This collection has real VHS effects to give your videos an old 80’s tape look to your videos. The collection contains many analog textures, tracking problems, and glitches. It also contains 10 minutes of footage, Quicktime ProRes 1080P file support, and 94 HD files of authentic VHS Retro Effects.
10. The Film Leaders Collection - Super 8mm and 16mm Effects
With authentic vintage countdowns, tail leaders, and old retro heads, this bundle offer you a great range of choices to add an old look to your films and videos.
Part 3: How to Make a Video Look Old?
In Filmora, you can make your videos have that old effect with simple steps.
Wondershare Filmora
Get started easily with Filmora’s powerful performance, intuitive interface, and countless effects!
Try It Free Try It Free Try It Free Learn More >
Step 1: Open Filmora and remove all the pieces of the footage. Then arrange the rest of the footage as you see fit. Click on “Effects” on the upper left corner of your screen and then on “Filters”. Click on the Old Video effect and then drop it. After you add the filter on the segment of your video, you can drag the end of it to cover the whole duration of the movies. Click twice on the filter if you want to adjust the filter settings. Enter the desired values on the “Fade” parameter, “Frequency”, and “Alpha” options. Press “OK”, and this step is concluded.
Step 2: You can apply the black and white filters to any project in Filmora. It is very simple. Add one of the filters above the video you want to add the effect and drag one of the corners to adjust the duration. You can change the intensity through the alpha slider.
Step 3: In Filmora, you can add sepia tone rise or sun-kissed filters to your video. You are able to add desaturated filters while keeping colors like blue and green and with that create the old film style. If you want more brown and red tones, you can use the Sun-Kisser filter that highlights those colors. Adjust the filters with the alpha slider to change intensity.
Step 4: Under the black and white subcategory, you can find Ash and Willow filters. What these do is desaturate the contrast or exposure values as well as preset brightness and bring an older tone to your videos.
Step 5: You can correct any kind of filter. With the Advanced Color Correction Tab, you can navigate through features like Preset and Adjustment and desaturate your video. By clicking on the “Preset tab,” you can open a larger variety of presets, including the Old Film and Black & White presets.
Part 4: Pro Tips to Create Stunning Retro Video
You can make your video look retro with a few simple tips:
- Use several vintage apps like Retro VHS, 8mm Camcorder, and others.
- Keep low highlights and low contrasts.
- Keep low saturation and control the hue, saturation, and luminance of your video.
- Film Overlays. With this, you can bring the mood just right. If you add a soft light overall to start with, it will instantly look slightly more vintage.
- By decreasing contrast, you are darkening your videos and giving them a grainier old look.
- If you bring up the black levels, you will leave more space for other tones to shine and turn the mood around your videos.
- In contrast, if you bring down the whites in your videos, making even the brightest colors turn grey.
Conclusion
There are various ways to turn your videos into old relics. Using Filmora, you have a powerful tool in your hands to change any desired media, and with this step-by-step guide, you will get there in no time.
Free Ways To Split Video For Whatsapp Status On All Platforms
WhatsApp Status is a unique feature that allows you to post an image, video, text, or animated video, all of which will be deleted after 24 hours, on your mobile device. As long as each video is no longer than thirty seconds, you can choose to post numerous videos at once. So, if you have been looking for free ways to split video for WhatsApp on all platforms, this article is for you. It provides you with the best video editors for trimming videos for WhatsApp statuses on the Google Play Store and Apple Appstore.
How to usePhone’s built-in function to split videos for Whatsapp status
When the length of your intended videos on WhatsApp status is more than thirty seconds, you have a few choices: to cut or split them up into smaller pieces.
Android Devices
You do not require a third-party app to split or trim your videos however you see fit. If You are making use of an Android device, be sure to follow each of the procedures below very carefully:
- On your Android device, launch the app known as Gallery.
- Tap on the video you want to trim or split into segments.
- Go to the bottom of your device and tap the ‘edit’ button.

- When you go to the next screen, you can adjust the sliders to include your desired footage on the next screen.
- Proceed to save the clip by tapping the ‘Save’ button in the screen’s upper-right corner.

Please note that the feature’s availability depends on the Android device manufacturer, Although most Android devices have the inbuilt feature.
iOS Devices
Using the Photos app, you can modify the length of your videos from your iPhone, Mac, or iPad. You can modify your video’s start and finish times using the Photos app, allowing you to create a shorter clip. You can accomplish this by carefully following the procedures that are mentioned below:
- Launch the Photos app, then select the video clip you wish to edit from the gallery.
- Tap on the ‘edit’ button.

- To adjust the beginning and end times of the video, simply move the sliders on either side of the timeline. Tap on the ‘play’ button to see a preview of the video that you have trimmed.
- Tap “Done,” and then tap “Save Video“ or “Save Video as New Clip.”

WhatsApp Inbuilt Function
You can use WhatsApp’s built-in trimming feature when you want to upload videos on WhatsApp status longer than thirty seconds. It’s effortless and straightforward to trim and split the video this way. To do this, carefully follow the steps below:
- Launch the WhatsApp application on your mobile device.
- Then select the Status button from the menu that appears.
- After that, navigate to the top of the page and select the My Status
- Now add the video you intend to use as a status update from the gallery on your phone.
- A slider will display at the top of your device as soon as the video is chosen to play. Slide this bar to the left or right to select a thirty-second segment of the video to be used.
- You can choose to adjust the position of the slider to cut off either the beginning or the end of the clip as necessary.
- You may also decide to add text to the video by utilizing the icons at the top of the screen of your device, cropping the area, and adding stickers or emojis to your creation.
- Now click the “Send“ icon once the video has been shortened to precisely 30 seconds, and it will be uploaded immediately as your status.
How to use Other Apps to split and edit video for Whatsapp status
You can choose to split or trim your videos using one of several third-party apps that are readily available. You can look into downloading these apps from either Google Play Store or the App Store, depending on the type of device you have.
Android Apps
There are many 3rd-party apps available for Android that extend the functionality of popular official apps. Fortunately, many video splitting and trimming apps are accessible from the Google Play Store, so you may choose the one that best suits your needs. However, we have compiled a selection of Apps for your consideration.
Filmora – This app allows you to split up large videos into thirty-second segments or any desired length and post them as a single story. Splitting videos to update your Whatsapp status doesn’t require using different apps. Video Splitter allows you to split your videos and share them to Facebook, Twitter, Instagram, and other social media accounts directly from your desktop.
Free Download For Win 7 or later(64-bit)
Free Download For macOS 10.14 or later

Crop, Cut & TrimVideo Editor - This program makes trimming and cropping easier. It’s also possible to enhance the colors and blur the video, just like in Photoshop. Easy-to-use controls allow you to quickly crop, blur, or cut any area of a video you’d like.

Easy Video Cutter – Here is another video splitter app that does the required task well. It is an editing tool without a watermark in edited videos. Its main features are to cut videos, merge videos, and extract MP3.

Other apps are Video Editor & Maker, Story Video Cutter, Easy Video cutter PRO and lots more.
iOS App
On the other hand, the Apple App Store does not contain nearly as many third-party applications as the Google Play Store does. However, there are still certain apps capable of doing the job reasonably well.
Video Cutter and Clip Splitter - With this app, you can effortlessly cut and split your large videos into smaller segments and just keep what you need. When the video is in the desired position, you may easily split it into segments by pressing the split button.

Cut, Trim, Split Video Editor – You can simply Cut/Delete undesired bits of a video using this app. You can use the right frames to trim your video clips, cut them in half, and save them as two separate pieces. It has an extra feature that allows you to import your videos from Cloud and via Wi-Fi.
Other Apps in the App Store are VidTrim, Video Splitter, and lots more.
How to use Online Sites to split videos for Whatsapp status
There are numerous video splitter web programs available on the internet. These programs provide a very basic and easy way to trim any small video file. You don’t need to install anything, as they operate from your browser. The tool is made so that you can move two markers that let you choose where the videos start and end.
Are you looking for a web app that can provide you with a quick video editing solution? Then this online video splitter is what you require. This video cutter supports nearly every format, including MP4, AVI, MPG, MOV, and VOB. The application provides extensive security for your files. Your files are protected to a great extent by this web app as well.
Video Cutter Online - This online tool splits your video into pieces and is an excellent solution for editing any short video file. This program, on the other hand, does not require any installation. Not only can you split videos with this tool, but you can also decide to frame them to your liking and modify the frame proportion.
Split Video – If you are ever tired of having to deal with splitting large or lengthy video files, then this web app is designed for you. This is one of the best online tools for splitting video and audio. With an easy-to-use interface, this app gives you an effective way to split your videos online for free.
Other online tools are Ezgif, Kapwing, Apowersoft Split Video Online, and lots more.
Conclusion
So there you have it, the best free ways to split video for WhatsApp on all platforms. It is essential to point out that while third-party mobile apps are easy to use, you risk becoming irritated by unfriendly interfaces and unwanted advertisements if you choose to download and use them. But it must be acknowledged that third-party video editing applications can be helpful in giving videos more possibilities. The built-in function on smartphone devices and the WhatsApp app will always be more reliable than third-party apps for splitting, trimming, and cutting small videos. So, while these apps are adequate for basic splitting and trimming, they do not provide advanced editing features. Nevertheless, if you need more advanced features, employing the tools available online is the best option.
How to usePhone’s built-in function to split videos for Whatsapp status
When the length of your intended videos on WhatsApp status is more than thirty seconds, you have a few choices: to cut or split them up into smaller pieces.
Android Devices
You do not require a third-party app to split or trim your videos however you see fit. If You are making use of an Android device, be sure to follow each of the procedures below very carefully:
- On your Android device, launch the app known as Gallery.
- Tap on the video you want to trim or split into segments.
- Go to the bottom of your device and tap the ‘edit’ button.
- When you go to the next screen, you can adjust the sliders to include your desired footage on the next screen.
- Proceed to save the clip by tapping the ‘Save’ button in the screen’s upper-right corner.
Please note that the feature’s availability depends on the Android device manufacturer, Although most Android devices have the inbuilt feature.
iOS Devices
Using the Photos app, you can modify the length of your videos from your iPhone, Mac, or iPad. You can modify your video’s start and finish times using the Photos app, allowing you to create a shorter clip. You can accomplish this by carefully following the procedures that are mentioned below:
- Launch the Photos app, then select the video clip you wish to edit from the gallery.
- Tap on the ‘edit’ button.
- To adjust the beginning and end times of the video, simply move the sliders on either side of the timeline. Tap on the ‘play’ button to see a preview of the video that you have trimmed.
- Tap “Done,” and then tap “Save Video“ or “Save Video as New Clip.”
WhatsApp Inbuilt Function
You can use WhatsApp’s built-in trimming feature when you want to upload videos on WhatsApp status longer than thirty seconds. It’s effortless and straightforward to trim and split the video this way. To do this, carefully follow the steps below:
- Launch the WhatsApp application on your mobile device.
- Then select the Status button from the menu that appears.
- After that, navigate to the top of the page and select the My Status
- Now add the video you intend to use as a status update from the gallery on your phone.
- A slider will display at the top of your device as soon as the video is chosen to play. Slide this bar to the left or right to select a thirty-second segment of the video to be used.
- You can choose to adjust the position of the slider to cut off either the beginning or the end of the clip as necessary.
- You may also decide to add text to the video by utilizing the icons at the top of the screen of your device, cropping the area, and adding stickers or emojis to your creation.
- Now click the “Send“ icon once the video has been shortened to precisely 30 seconds, and it will be uploaded immediately as your status.
How to use Other Apps to split and edit video for Whatsapp status
You can choose to split or trim your videos using one of several third-party apps that are readily available. You can look into downloading these apps from either Google Play Store or the App Store, depending on the type of device you have.
Android Apps
There are many 3rd-party apps available for Android that extend the functionality of popular official apps. Fortunately, many video splitting and trimming apps are accessible from the Google Play Store, so you may choose the one that best suits your needs. However, we have compiled a selection of Apps for your consideration.
Filmora – This app allows you to split up large videos into thirty-second segments or any desired length and post them as a single story. Splitting videos to update your Whatsapp status doesn’t require using different apps. Video Splitter allows you to split your videos and share them to Facebook, Twitter, Instagram, and other social media accounts directly from your desktop.
Free Download For Win 7 or later(64-bit)
Free Download For macOS 10.14 or later
Crop, Cut & TrimVideo Editor - This program makes trimming and cropping easier. It’s also possible to enhance the colors and blur the video, just like in Photoshop. Easy-to-use controls allow you to quickly crop, blur, or cut any area of a video you’d like.
Easy Video Cutter – Here is another video splitter app that does the required task well. It is an editing tool without a watermark in edited videos. Its main features are to cut videos, merge videos, and extract MP3.
Other apps are Video Editor & Maker, Story Video Cutter, Easy Video cutter PRO and lots more.
iOS App
On the other hand, the Apple App Store does not contain nearly as many third-party applications as the Google Play Store does. However, there are still certain apps capable of doing the job reasonably well.
Video Cutter and Clip Splitter - With this app, you can effortlessly cut and split your large videos into smaller segments and just keep what you need. When the video is in the desired position, you may easily split it into segments by pressing the split button.
Cut, Trim, Split Video Editor – You can simply Cut/Delete undesired bits of a video using this app. You can use the right frames to trim your video clips, cut them in half, and save them as two separate pieces. It has an extra feature that allows you to import your videos from Cloud and via Wi-Fi.
Other Apps in the App Store are VidTrim, Video Splitter, and lots more.
How to use Online Sites to split videos for Whatsapp status
There are numerous video splitter web programs available on the internet. These programs provide a very basic and easy way to trim any small video file. You don’t need to install anything, as they operate from your browser. The tool is made so that you can move two markers that let you choose where the videos start and end.
Are you looking for a web app that can provide you with a quick video editing solution? Then this online video splitter is what you require. This video cutter supports nearly every format, including MP4, AVI, MPG, MOV, and VOB. The application provides extensive security for your files. Your files are protected to a great extent by this web app as well.
Video Cutter Online - This online tool splits your video into pieces and is an excellent solution for editing any short video file. This program, on the other hand, does not require any installation. Not only can you split videos with this tool, but you can also decide to frame them to your liking and modify the frame proportion.
Split Video – If you are ever tired of having to deal with splitting large or lengthy video files, then this web app is designed for you. This is one of the best online tools for splitting video and audio. With an easy-to-use interface, this app gives you an effective way to split your videos online for free.
Other online tools are Ezgif, Kapwing, Apowersoft Split Video Online, and lots more.
Conclusion
So there you have it, the best free ways to split video for WhatsApp on all platforms. It is essential to point out that while third-party mobile apps are easy to use, you risk becoming irritated by unfriendly interfaces and unwanted advertisements if you choose to download and use them. But it must be acknowledged that third-party video editing applications can be helpful in giving videos more possibilities. The built-in function on smartphone devices and the WhatsApp app will always be more reliable than third-party apps for splitting, trimming, and cutting small videos. So, while these apps are adequate for basic splitting and trimming, they do not provide advanced editing features. Nevertheless, if you need more advanced features, employing the tools available online is the best option.
Do You Want to Apply Professional-Looking Color Grading on Your iPhone’s Photos and Videos? You Can Use Different iPhone LUTs for Your Pictures and Videos
LUTs are pre-made color settings that you can apply to your pictures and videos to change how they look. These are used by professionals like photographers, filmmakers, and video editors for their work. They can change an image or video’s colors, brightness, and contrast to create different moods. Nowadays, LUTs are even available on smartphones, including iPhones.
This article will explain how to use iPhone LUTs and suggest some excellent apps. You can apply LUTs to your work to give it a more creative and professional touch. Using these, you can take your photo and video editing skills to a whole other level.
- How to Apply LUTs to Edit Video on iPhone?
- What Should a Good LUT Video Editing App Have?
- Wondershare Filmora: A Computer Alternative for Applying LUTs
Part 1: The Top Best Apps for Applying LUTs on iPhone
Lookup Tables are a great way to improve your photos and videos. However, these LUTs are not only available for PCs or Macs but also for smartphones. There are many LUTs for iPhone available that you can apply using these apps.
1. VideoLUT
If you’re looking for an iPhone app to apply LUTs, the VideoLUT app for iPhone is a good choice. This iPhone application has over 2500 LUT presets available for color grading any photo or video. Furthermore, you can change your media files’ Hue, Saturation, and Lighting to make them look better. With so many color grading options available, make your content stand out from the rest.

pros
- This LUTs iPhone app lets you make your own preset of your liking.
- Furthermore, this application supports different formats, including .cube and .3dl.
pros
- Some of the users find the user interface difficult to navigate, slowing the editing process.
Compatibility
iOS: 13.2 and higher
2.Filmic Pro
Filmic Pro is an app that lets you apply LUTs to your media files. With this app, you can import up to 7 LUTs and use them to color-correct your digital content. Apart from this, its camera lets you capture high-quality videos and pictures with manual controls. With these controls, you can adjust the focus, exposure, and other settings to capture a professional-looking image.

pros
- It has a Quick Action Modals feature, which lets all the essential options within your reach.
- Moreover, you can change the speed of your video without compromising the quality.
pros
- Many users are complaining because of the switching from a one-time payment to a subscription model.
Compatibility
iOS: 14.1 and higher
3.VideoGrade
Use the VideoGrade app on your iPhone if you want to give your videos a professional look. This fantastic app lets you import and apply different LUTs to your video footage. Moreover, you can correct the color cast or even poor lighting to improve the color composition. VideoGrade app lets you easily color grade or enhance your videos by changing brightness, saturation, and contrast.

pros
- This iPhone application has in-built filters that you can apply to get a specific color tone.
- You can save your videos in HD, and additionally, you can capture frames from your videos as well.
pros
- On some iPhone versions, this app gets stuck and crashes by deleting the current edit.
Compatibility
iOS: 13.0 and higher
4.Darkroom
Darkroom is another iPhone LUTs free photo and video editing app with many features and options. One of its prominent features is the ability to apply LUTs and filters. LUTs and filters can change the look of your photo or video to create a different mood or style. Besides this, this app allows you to create your own color adjustment and correction presets.

pros
- With its AI technology, you can modify your background, subject, and foreground.
- You can even edit multiple photos simultaneously with its batch-processing feature.
pros
- In some photos, the app automatically changes the white balance even when it’s unnecessary.
Compatibility
iOS: 14.0 and higher
5.Prequel
Prequel is an excellent iOS option to set the tone of your video and image. This powerful app allows you to apply different LUTs, overlays, and filters to your media files. It has over 800 filters and effects available to change the mood and feel of your content. Furthermore, with its editing options, you can enhance your media as much as you want by adjusting its settings.

pros
- Other than the availability of LUTs for iPhone videos, you can also use different in-built templates.
- You can add music, stickers, and even text to your videos and photos.
pros
- The filters you apply are not high quality, and the editing process is a bit complex.
Compatibility
iOS: 13.0 and higher
Empower your videos with a new mood using different LUTs. Filmora now offers 800+ top-quality 3D LUTs cover a broad range of scenarios. Transform your videos with Filmora’s powerful 3D LUTs.
Apply LUT on Videos Apply LUT on Videos Learn More


Part 2: How to Apply LUTs to Edit Video on iPhone?
If you’re having trouble applying LUTs for iPhone videos and images, then don’t worry. Follow these easy and simple steps and apply the LUTs of your choice on your media files. For the guide, we use VideoLUT to help you understand how to apply LUTs on iOS devices.
Step1
Before applying LUT using an iOS device, you must install the application first. Go to the App Store and search for the application. Download the VideoLUT app to make further edits to your image or video footage.

Step2
Open the application and select the “Open” button on the right corner of the screen. After tapping the button, navigate to “LUT Image” and import the LUT of your choice.

Step3
Once you’ve imported your preferred LUT, select the image on which you want it to be applied. To do so, go to the “Open” button and select “Image/Video.” After selecting your desired option, choose the photo or video you want to edit.

Step4
Tap the “Imported” option from the drop-down menu right next to the Open button. Then choose the “IMG” option to access the imported LUT on the mobile application. On the bottom of your screen, select your LUT by tapping it. You can also change the intensity of your LUT for iPhone.

Step5
Once done with your editing, you can download your file by selecting the Save button on the right corner of the screen.

Part 3: What Should a Good LUT Video Editing App Have?
When looking for a good LUT to apply to your videos and photos, there are many things to look for. Some of the important options that a good LUT app should have been discussed here.
- Multiple LUT Formats: A good iPhone LUT app should support different LUT formats such as .cube, .3dl, .look, and more. It allows you to use LUTs from different sources and import them easily into your application.
- Easy LUT Import and Export: The app you are choosing should have an easy-to-use interface. The interface should allow you to import and export LUTs quickly. It saves you time and helps you do the editing quicker.
- Customizable LUTs: You should be able to create custom LUTs for your content. The app should allow you to adjust colors, contrasts, and saturation settings to make editing easy.
- Preview Options: A preview function also is a good option to have in your app. This option allows you to see the LUT effect in your digital media before applying it.
- Multiple Formats Compatibility: Furthermore, the app should be compatible with popular video formats like MP4, AVI, and MOV. With this option, you can edit and export your videos in the format you need.
- Non-Destructive Editing: Moreover, the app should allow you to edit your footage by keeping the original settings alongside. This feature will not affect the original, letting you revert to the original settings if needed.
- User-Friendly Interface: An easy-to-use interface lets you focus on your creativity. A good interface makes the editing process more fluid and easier.
Part 4: Wondershare Filmora: A Computer Alternative for Applying LUTs
Wondershare Filmora is a video editing tool that has been popular for recent years. This tool offers multiple color grading and adjustment options. With its newest update, you get access to over 200 LUTs to change the tone and look of your videos. Besides LUTs, you can also add effects and transitions to your videos to make them look more engaging.
Add LUTs on Video For Win 7 or later(64-bit)
Add LUTs on Video For macOS 10.14 or later
Additionally, this tool has built-in color grading tools that you can use to give your videos a more cinematic feel. Moreover, you can save your edits in up to 4k resolution, giving it a sharper and crispier quality. Its latest update offers many AI features to make your video editing easier. Lastly, users can access its library to choose different filters, overlays, and stock media.

Key Features of Wondershare Filmora
- Wondershare Filmora is a professional video editing tool that offers masking options. You can easily mask any subject in a video with its AI technology for your video edits.
- You can use the same font and text style in all your video clips with batch editing. With this feature, all your texts will be in a similar fashion across all your videos.
- With the integration of AI now, you can generate images using text prompts. This feature allows you to be creative with words to generate a unique image.
Conclusion
To sum up, there are many color correction and adjustment options to change the mood of your content. Similarly, LUTs are a great option to color grade your photos and videos. By integrating LUTs with smartphones, you can now apply LUTs using your iOS devices. There are many LUTs for iPhone footage and images, but more importantly, choosing a good app is important.
- What Should a Good LUT Video Editing App Have?
- Wondershare Filmora: A Computer Alternative for Applying LUTs
Part 1: The Top Best Apps for Applying LUTs on iPhone
Lookup Tables are a great way to improve your photos and videos. However, these LUTs are not only available for PCs or Macs but also for smartphones. There are many LUTs for iPhone available that you can apply using these apps.
1. VideoLUT
If you’re looking for an iPhone app to apply LUTs, the VideoLUT app for iPhone is a good choice. This iPhone application has over 2500 LUT presets available for color grading any photo or video. Furthermore, you can change your media files’ Hue, Saturation, and Lighting to make them look better. With so many color grading options available, make your content stand out from the rest.
pros
- This LUTs iPhone app lets you make your own preset of your liking.
- Furthermore, this application supports different formats, including .cube and .3dl.
pros
- Some of the users find the user interface difficult to navigate, slowing the editing process.
Compatibility
iOS: 13.2 and higher
2.Filmic Pro
Filmic Pro is an app that lets you apply LUTs to your media files. With this app, you can import up to 7 LUTs and use them to color-correct your digital content. Apart from this, its camera lets you capture high-quality videos and pictures with manual controls. With these controls, you can adjust the focus, exposure, and other settings to capture a professional-looking image.
pros
- It has a Quick Action Modals feature, which lets all the essential options within your reach.
- Moreover, you can change the speed of your video without compromising the quality.
pros
- Many users are complaining because of the switching from a one-time payment to a subscription model.
Compatibility
iOS: 14.1 and higher
3.VideoGrade
Use the VideoGrade app on your iPhone if you want to give your videos a professional look. This fantastic app lets you import and apply different LUTs to your video footage. Moreover, you can correct the color cast or even poor lighting to improve the color composition. VideoGrade app lets you easily color grade or enhance your videos by changing brightness, saturation, and contrast.
pros
- This iPhone application has in-built filters that you can apply to get a specific color tone.
- You can save your videos in HD, and additionally, you can capture frames from your videos as well.
pros
- On some iPhone versions, this app gets stuck and crashes by deleting the current edit.
Compatibility
iOS: 13.0 and higher
4.Darkroom
Darkroom is another iPhone LUTs free photo and video editing app with many features and options. One of its prominent features is the ability to apply LUTs and filters. LUTs and filters can change the look of your photo or video to create a different mood or style. Besides this, this app allows you to create your own color adjustment and correction presets.
pros
- With its AI technology, you can modify your background, subject, and foreground.
- You can even edit multiple photos simultaneously with its batch-processing feature.
pros
- In some photos, the app automatically changes the white balance even when it’s unnecessary.
Compatibility
iOS: 14.0 and higher
5.Prequel
Prequel is an excellent iOS option to set the tone of your video and image. This powerful app allows you to apply different LUTs, overlays, and filters to your media files. It has over 800 filters and effects available to change the mood and feel of your content. Furthermore, with its editing options, you can enhance your media as much as you want by adjusting its settings.
pros
- Other than the availability of LUTs for iPhone videos, you can also use different in-built templates.
- You can add music, stickers, and even text to your videos and photos.
pros
- The filters you apply are not high quality, and the editing process is a bit complex.
Compatibility
iOS: 13.0 and higher
Empower your videos with a new mood using different LUTs. Filmora now offers 800+ top-quality 3D LUTs cover a broad range of scenarios. Transform your videos with Filmora’s powerful 3D LUTs.
Apply LUT on Videos Apply LUT on Videos Learn More
Part 2: How to Apply LUTs to Edit Video on iPhone?
If you’re having trouble applying LUTs for iPhone videos and images, then don’t worry. Follow these easy and simple steps and apply the LUTs of your choice on your media files. For the guide, we use VideoLUT to help you understand how to apply LUTs on iOS devices.
Step1
Before applying LUT using an iOS device, you must install the application first. Go to the App Store and search for the application. Download the VideoLUT app to make further edits to your image or video footage.
Step2
Open the application and select the “Open” button on the right corner of the screen. After tapping the button, navigate to “LUT Image” and import the LUT of your choice.
Step3
Once you’ve imported your preferred LUT, select the image on which you want it to be applied. To do so, go to the “Open” button and select “Image/Video.” After selecting your desired option, choose the photo or video you want to edit.
Step4
Tap the “Imported” option from the drop-down menu right next to the Open button. Then choose the “IMG” option to access the imported LUT on the mobile application. On the bottom of your screen, select your LUT by tapping it. You can also change the intensity of your LUT for iPhone.
Step5
Once done with your editing, you can download your file by selecting the Save button on the right corner of the screen.
Part 3: What Should a Good LUT Video Editing App Have?
When looking for a good LUT to apply to your videos and photos, there are many things to look for. Some of the important options that a good LUT app should have been discussed here.
- Multiple LUT Formats: A good iPhone LUT app should support different LUT formats such as .cube, .3dl, .look, and more. It allows you to use LUTs from different sources and import them easily into your application.
- Easy LUT Import and Export: The app you are choosing should have an easy-to-use interface. The interface should allow you to import and export LUTs quickly. It saves you time and helps you do the editing quicker.
- Customizable LUTs: You should be able to create custom LUTs for your content. The app should allow you to adjust colors, contrasts, and saturation settings to make editing easy.
- Preview Options: A preview function also is a good option to have in your app. This option allows you to see the LUT effect in your digital media before applying it.
- Multiple Formats Compatibility: Furthermore, the app should be compatible with popular video formats like MP4, AVI, and MOV. With this option, you can edit and export your videos in the format you need.
- Non-Destructive Editing: Moreover, the app should allow you to edit your footage by keeping the original settings alongside. This feature will not affect the original, letting you revert to the original settings if needed.
- User-Friendly Interface: An easy-to-use interface lets you focus on your creativity. A good interface makes the editing process more fluid and easier.
Part 4: Wondershare Filmora: A Computer Alternative for Applying LUTs
Wondershare Filmora is a video editing tool that has been popular for recent years. This tool offers multiple color grading and adjustment options. With its newest update, you get access to over 200 LUTs to change the tone and look of your videos. Besides LUTs, you can also add effects and transitions to your videos to make them look more engaging.
Add LUTs on Video For Win 7 or later(64-bit)
Add LUTs on Video For macOS 10.14 or later
Additionally, this tool has built-in color grading tools that you can use to give your videos a more cinematic feel. Moreover, you can save your edits in up to 4k resolution, giving it a sharper and crispier quality. Its latest update offers many AI features to make your video editing easier. Lastly, users can access its library to choose different filters, overlays, and stock media.
Key Features of Wondershare Filmora
- Wondershare Filmora is a professional video editing tool that offers masking options. You can easily mask any subject in a video with its AI technology for your video edits.
- You can use the same font and text style in all your video clips with batch editing. With this feature, all your texts will be in a similar fashion across all your videos.
- With the integration of AI now, you can generate images using text prompts. This feature allows you to be creative with words to generate a unique image.
Conclusion
To sum up, there are many color correction and adjustment options to change the mood of your content. Similarly, LUTs are a great option to color grade your photos and videos. By integrating LUTs with smartphones, you can now apply LUTs using your iOS devices. There are many LUTs for iPhone footage and images, but more importantly, choosing a good app is important.
Also read:
- Updated 6 Best Methods to Make a Video Longer
- Do You Want to Learn How to Film a TikTok with Multiple Clips? Worry No More because You Can Do This by Following the Methods Instructed in This Article
- There Are Several Video Players that You Can Use to Watch Videos on Your PC. To Have a Better Experience Viewing Videos and Enhancing Them Across a Similar Platform, You Can Try Out VLC Media Player for PC for 2024
- 2024 Approved How to Make a Slideshow with Movavi Slideshow Maker
- 2024 Approved Want to Know the Full Process of Adding the Falling Text Effect as a Video Introduction? Detailed Guidelines on All the Steps Are Mentioned Here for Filmora Users
- New Easy Ways to Change Aspect Ratio in iMovie for 2024
- Updated 2024 Approved How to Add VHS Green Screen to Your Video
- New 2024 Approved 11 Ways To Radial Blur To Images (iPhone/Android/Mac/Windows)
- How to Create a Slideshow with Movavi Slideshow Maker
- Updated In 2024, Create Your Face Zoom TikTok Now
- New In 2024, An Ultimate Guide to Edit a Music Video Aspect Ratio and First Cut
- Updated In 2024, Best Ways to Merge FLV Files Windows, Mac,Android, iPhone & Online
- Are You the One Who Is Confused About What to Opt Between Camtasia vs Captivate? No More Confusion! Here We Are Going to Reveal the Answer to Camtasia vs Captivate Which Is Better? Learn More
- 2024 Approved Keyframes Interval Everything You Need To Know | Filmora
- MP3 Cutter Download for Computer and Mobile for 2024
- Updated In 2024, A Comprehensive Guide on VHS Technology and Its Influence on Video Editing
- New Want to Make Professional-Looking Videos? Keep Reading to Give Your Videos a Cinematic Feel with the Audio Mixer of Filmora
- New Quick Answer What Is a GIF File?
- 2024 Approved Converting an SRT (SRT/Sorted Reader) Into a DOCX File Is a Process. Here We Will Discuss Converting a Set File to a Docx File and More Details About This
- New In 2024, Facts About GIF Background You Didnt Know
- How to Use Twixtor Effect to Add Slow-Motion Effect to Video?
- New How to Crop Videos in Windows Media Player for 2024
- Updated Final Cut Pro - How to Download and Install It for 2024
- Updated In 2024, Easy Ways to Add Text Overlay to Video
- Updated Discovering The Best Wedding LUTs for Premiere Pro | An Overview for 2024
- Updated In 2024, 15 Camera Shake Preset for Premiere Pro
- In 2024, Two Ways to Track My Boyfriends Samsung Galaxy S24+ without Him Knowing | Dr.fone
- In 2024, The 10 Best Tools to Bypass iCloud Activation Lock On iPhone 11 Pro Max You Should Try Out
- 5 Best Route Generator Apps You Should Try On Nokia XR21 | Dr.fone
- In 2024, How to Sign Out of Apple ID From Apple iPhone 6 Plus without Password?
- All Things You Need to Know about Wipe Data/Factory Reset For Vivo V27e | Dr.fone
- How to Fix the Apple iPhone 12 mini GPS not Working Issue | Dr.fone
- In 2024, Network Locked SIM Card Inserted On Your Motorola Moto G34 5G Phone? Unlock It Now
- In 2024, How To Use Special Features - Virtual Location On Honor Play 8T? | Dr.fone
- 2 Ways to Monitor OnePlus Nord CE 3 Lite 5G Activity | Dr.fone
- 6 Fixes to Unfortunately WhatsApp has stopped Error Popups On Samsung Galaxy F15 5G | Dr.fone
- In 2024, How to Delete iCloud Account On Apple iPhone XR without Password?
- In 2024, Catch or Beat Sleeping Snorlax on Pokemon Go For Tecno Spark 20 Pro | Dr.fone
- In 2024, How does the stardust trade cost In pokemon go On Vivo Y100? | Dr.fone
- In 2024, Ultimate guide to get the meltan box pokemon go For Poco M6 Pro 5G | Dr.fone
- Fix Unfortunately Settings Has Stopped on Motorola Edge 2023 Quickly | Dr.fone
- In 2024, How to Change Credit Card on Your Apple iPhone 11 Pro Max Apple ID and Apple Pay
- In 2024, How to Unlock iCloud Activation Lock and iCloud Account On iPhone 7 Plus?
- Guide How To Unbrick a Bricked Vivo V30 Lite 5G Phone | Dr.fone
- How Itel A60s Mirror Screen to PC? | Dr.fone
- How to Lock Apps on Vivo Y100 to Protect Your Individual Information
- Fix Apple iPhone 11 Pro Stuck on Data Transfer Verified Solution! | Dr.fone
- How to Screen Mirroring Motorola G54 5G to PC? | Dr.fone
- How to Check Distance and Radius on Google Maps For your Poco X6 | Dr.fone
- Does Life360 Notify When You Log Out On Xiaomi 14? | Dr.fone
- 7 Solutions to Fix Error Code 963 on Google Play Of Honor Magic V2 | Dr.fone
- Title: 2024 Approved Steps To Fade Audio In Premier Pro
- Author: Chloe
- Created at : 2024-04-24 07:08:14
- Updated at : 2024-04-25 07:08:14
- Link: https://ai-editing-video.techidaily.com/2024-approved-steps-to-fade-audio-in-premier-pro/
- License: This work is licensed under CC BY-NC-SA 4.0.
