

2024 Approved Techniques You Never Heard of for Learning AI Marketing YouTube
Techniques You Never Heard of for Learning AI Marketing YouTube
Techniques You Never Heard of for Learning AI Marketing YouTube
An easy yet powerful editor
Numerous effects to choose from
Detailed tutorials provided by the official channel
YouTube is one of the largest entertainment websites, where you can watch, share, and create videos. Millions of active users on YouTube have taken premium subscriptions on YouTube to enjoy hassle-free entertainment. YouTube was launched back in 2005. With the passage of time and advancements in technology, YouTube has also evolved.

Artificial intelligence is one of the recent and most famous advancements in technology. The introduction of artificial intelligence in the industry has proved to be a boon. The introduction of artificial intelligence has made things easy to manage in every industry. AI can easily be applied in any industry be it manufacturing or the IT sector. Artificial intelligence has made work easier and increased the efficiency of people working in different areas. Even YouTube has started using AI techniques for many tasks. In this article, we have listed some of the applications of AI on YouTube.
In this article
01 [How Is YouTube Using Artificial Intelligence?](#Part 1)
02 [How Is YouTube Using AI to Recommend Videos?](#Part 2)
Part 1 How Is YouTube Using Artificial Intelligence?
Tools like artificial intelligence and machine learning have made things easier to manage. Even the introduction of Artificial Intelligence on YouTube has helped a lot to smoothen its procedure. YouTube being one of the most engaging websites has applied YouTube Intelligence to manage all its activities smoothly. Read further to know how YouTube is using artificial intelligence currently!

01Automatic Removal of Inappropriate Content
One of the main applications of AI on YouTube is to remove inappropriate content automatically. YouTube uses artificial intelligence and machine learning to remove the violative and inappropriate content from the platform. As this content was one of the main reasons for the rise in racism and terrorism. To avoid all these harmful after effects, YouTube introduced the “Trashy Video Classifier” to scan and examine the feedback.
Although these algorithms might not be 100% accurate, they can perform the task more easily and efficiently than the manual examination of the content. Due to these algorithms, it has become easier to automatically remove the controversial content from the platform immediately. AI aided feature helps in determining the inappropriate content faster. However, it doesn’t provide 100% accurate results. This is the reason why YouTube has a large team of human specialists to check the accuracy of determining violative content.
02Add New Video Effects
The introduction of artificial intelligence and machine learning in the market has made it easier to add new video effects without the use of any external equipment. You can now swap out backgrounds from videos with just one click due to the in-built AI features on YouTube. This AI neural feature is prepared by Google’s AI YouTube researchers to make it easier for the AI algorithms to understand video patterns. This feature makes it easier for the system to maintain the correct pace with the video.
03Maintain Age Restrictions
Being an online platform, YouTube is open to everyone. There are many creators and viewers on the platform with different interests. Moreover, it is accessible to all age groups, which makes it necessary to optimize the content according to the age groups. YouTube has always been very particular about the age-restricted content. A lot of content is published on the platform that can be harmful to the children’s minds and growth. YouTube uses different AI tools and algorithms to maintain the age restrictions of adult content.
YouTube has guaranteed that the mature content will not be accessible to the kids and youngsters aged below 13 years. It has also created a separate application for the kids to maintain the age restrictions from the matured content.
Earlier, the YouTubers used to flag their content as mature themselves, but now the platform is planning to flag the content using machine learning technology. YouTube had also used machine learning technology to thwart the age-restricted content automatically in 2017.
04”Up Next” Feature
The “Up Next” feature of YouTube is also a result of artificial intelligence. With many creators uploading a large number of videos every minute, it was becoming difficult for the platform to manage the suggestion engine properly. So, YouTube has introduced the AI technique to streamline the recommendation process to maintain the real-time and latest suggestion.
This feature is a mix of two algorithms, one is used to optimize the suggestion engine according to the search history and watch history of the user, and the other is to determine according to the ranking. As the main aim is to provide the content so that the user can spend his/her maximum time watching YouTube videos. This helps in creating a better sidebar full of user-specific recommendations. YouTube’s special recommendation feature ensures to recommend different videos to the different viewers as per their interests.
05Training on Depth Prediction
YouTube has a lot of data stored that provides easy knowledge of AI algorithms. According to the recent data and announcement, it is now clear that Google’s AI YouTube researchers used the “mannequin challenge” to understand depth predictions.
In this challenge, they researched around 2000 groups, with 1 group in each video. Video had many people standing still like they have been frozen and one person was going through the scene to shoot the video. A better understanding of depth prediction can further help in generating the development of Augmented Reality (AR).
06Tackle Fake News
Among the different features of the most engaging online platform comes the ability to detect and tackle fake news and misleading content. YouTube can understand and detect fake news. With so many users on different social media platforms, it has now become common to spread fake and false news. Unlike other platforms, YouTube is using artificial intelligence to detect and remove misleading content that is against YouTube’s privacy policy.
YouTube understands that this type of content can be harmful to the audience and can be the reason for disputes among different communities. Hence, giving rise to racism and terrorism. To reduce its wrong impact on society, YouTube is using AI technology and removing this type of fake and misleading content. Around 11 million videos were removed from the platform within a single quarter. The introduction of AI has also proved that the technology works more effectively and efficiently rather than the manual removal of such content.
Part 2 How Is YouTube Using AI to Recommend Videos?

YouTube aims at finding the perfect video for each user separately and anticipating the users to spend more time on the platform. Keeping both these things in mind, it decided to use AI technology to recommend videos and optimize the suggestion panel. Just like Netflix, AI technology makes it easier for the platform to determine the best suggestions for different viewers. It recommends the videos after researching the user’s age, interests, watch time, etc.
YouTube generally focuses on increasing the watch time of the viewer, that’s why it recommends the videos keeping the user’s interests on priority. The goal is to watch more rather than watch the best.
YouTube uses different AI algorithms to understand things and recommend optimized videos to stand out from the crowd. First of all, it uses AI algorithms to understand the user’s interest by scanning his/her search history and watching history. It creates a list based on the findings and then ranks the videos as per the google rankings. Each video on YouTube has a different ranking.
YouTube has been changing its algorithms over time. Earlier, it used to rank videos according to view counts. But soon people understood the technique and started using the eye-catchy title and thumbnail to gain a large number of views. Due to this, viewers even started complaining about the content and YouTube changed its algorithms to resolve this issue.
YouTube introduced AI and ML technology to customize the recommendations in 2016. This introduction has made things easier for YouTube as well as its viewers. It has now announced to ban the “borderline content”.
For Win 7 or later (64-bit)
For macOS 10.12 or later
● Ending Thoughts →
● Applying AI on YouTube has made it easier for the platform to manage activities more effectively and efficiently. As a result, many new features are added to enhance the convenience and maintain the quality of the user experience.
● Moreover, YouTube is now experimenting with AI and ML for automatically adding video chapters. This feature will be beneficial for the content creators.
● It will assist them in creating and uploading, resulting in the elimination of the time used in adding timestamps manually. Even the creators are uploading AI-generated YouTube videos that are created with the help of an AI YouTube video maker.
● You can even learn about the different applications of AI and ML from different YouTube channels. Many accessible YouTube channels for machine learning are available on the platform.
● YouTube intelligence can also be seen on the homepage, recommendations, notifications, and subscriptions. The latest trending videos are also ranked with the help of artificial intelligence and machine learning.
YouTube is one of the largest entertainment websites, where you can watch, share, and create videos. Millions of active users on YouTube have taken premium subscriptions on YouTube to enjoy hassle-free entertainment. YouTube was launched back in 2005. With the passage of time and advancements in technology, YouTube has also evolved.
Artificial intelligence is one of the recent and most famous advancements in technology. The introduction of artificial intelligence in the industry has proved to be a boon. The introduction of artificial intelligence has made things easy to manage in every industry. AI can easily be applied in any industry be it manufacturing or the IT sector. Artificial intelligence has made work easier and increased the efficiency of people working in different areas. Even YouTube has started using AI techniques for many tasks. In this article, we have listed some of the applications of AI on YouTube.
In this article
01 [How Is YouTube Using Artificial Intelligence?](#Part 1)
02 [How Is YouTube Using AI to Recommend Videos?](#Part 2)
Part 1 How Is YouTube Using Artificial Intelligence?
Tools like artificial intelligence and machine learning have made things easier to manage. Even the introduction of Artificial Intelligence on YouTube has helped a lot to smoothen its procedure. YouTube being one of the most engaging websites has applied YouTube Intelligence to manage all its activities smoothly. Read further to know how YouTube is using artificial intelligence currently!
01Automatic Removal of Inappropriate Content
One of the main applications of AI on YouTube is to remove inappropriate content automatically. YouTube uses artificial intelligence and machine learning to remove the violative and inappropriate content from the platform. As this content was one of the main reasons for the rise in racism and terrorism. To avoid all these harmful after effects, YouTube introduced the “Trashy Video Classifier” to scan and examine the feedback.
Although these algorithms might not be 100% accurate, they can perform the task more easily and efficiently than the manual examination of the content. Due to these algorithms, it has become easier to automatically remove the controversial content from the platform immediately. AI aided feature helps in determining the inappropriate content faster. However, it doesn’t provide 100% accurate results. This is the reason why YouTube has a large team of human specialists to check the accuracy of determining violative content.
02Add New Video Effects
The introduction of artificial intelligence and machine learning in the market has made it easier to add new video effects without the use of any external equipment. You can now swap out backgrounds from videos with just one click due to the in-built AI features on YouTube. This AI neural feature is prepared by Google’s AI YouTube researchers to make it easier for the AI algorithms to understand video patterns. This feature makes it easier for the system to maintain the correct pace with the video.
03Maintain Age Restrictions
Being an online platform, YouTube is open to everyone. There are many creators and viewers on the platform with different interests. Moreover, it is accessible to all age groups, which makes it necessary to optimize the content according to the age groups. YouTube has always been very particular about the age-restricted content. A lot of content is published on the platform that can be harmful to the children’s minds and growth. YouTube uses different AI tools and algorithms to maintain the age restrictions of adult content.
YouTube has guaranteed that the mature content will not be accessible to the kids and youngsters aged below 13 years. It has also created a separate application for the kids to maintain the age restrictions from the matured content.
Earlier, the YouTubers used to flag their content as mature themselves, but now the platform is planning to flag the content using machine learning technology. YouTube had also used machine learning technology to thwart the age-restricted content automatically in 2017.
04”Up Next” Feature
The “Up Next” feature of YouTube is also a result of artificial intelligence. With many creators uploading a large number of videos every minute, it was becoming difficult for the platform to manage the suggestion engine properly. So, YouTube has introduced the AI technique to streamline the recommendation process to maintain the real-time and latest suggestion.
This feature is a mix of two algorithms, one is used to optimize the suggestion engine according to the search history and watch history of the user, and the other is to determine according to the ranking. As the main aim is to provide the content so that the user can spend his/her maximum time watching YouTube videos. This helps in creating a better sidebar full of user-specific recommendations. YouTube’s special recommendation feature ensures to recommend different videos to the different viewers as per their interests.
05Training on Depth Prediction
YouTube has a lot of data stored that provides easy knowledge of AI algorithms. According to the recent data and announcement, it is now clear that Google’s AI YouTube researchers used the “mannequin challenge” to understand depth predictions.
In this challenge, they researched around 2000 groups, with 1 group in each video. Video had many people standing still like they have been frozen and one person was going through the scene to shoot the video. A better understanding of depth prediction can further help in generating the development of Augmented Reality (AR).
06Tackle Fake News
Among the different features of the most engaging online platform comes the ability to detect and tackle fake news and misleading content. YouTube can understand and detect fake news. With so many users on different social media platforms, it has now become common to spread fake and false news. Unlike other platforms, YouTube is using artificial intelligence to detect and remove misleading content that is against YouTube’s privacy policy.
YouTube understands that this type of content can be harmful to the audience and can be the reason for disputes among different communities. Hence, giving rise to racism and terrorism. To reduce its wrong impact on society, YouTube is using AI technology and removing this type of fake and misleading content. Around 11 million videos were removed from the platform within a single quarter. The introduction of AI has also proved that the technology works more effectively and efficiently rather than the manual removal of such content.
Part 2 How Is YouTube Using AI to Recommend Videos?
YouTube aims at finding the perfect video for each user separately and anticipating the users to spend more time on the platform. Keeping both these things in mind, it decided to use AI technology to recommend videos and optimize the suggestion panel. Just like Netflix, AI technology makes it easier for the platform to determine the best suggestions for different viewers. It recommends the videos after researching the user’s age, interests, watch time, etc.
YouTube generally focuses on increasing the watch time of the viewer, that’s why it recommends the videos keeping the user’s interests on priority. The goal is to watch more rather than watch the best.
YouTube uses different AI algorithms to understand things and recommend optimized videos to stand out from the crowd. First of all, it uses AI algorithms to understand the user’s interest by scanning his/her search history and watching history. It creates a list based on the findings and then ranks the videos as per the google rankings. Each video on YouTube has a different ranking.
YouTube has been changing its algorithms over time. Earlier, it used to rank videos according to view counts. But soon people understood the technique and started using the eye-catchy title and thumbnail to gain a large number of views. Due to this, viewers even started complaining about the content and YouTube changed its algorithms to resolve this issue.
YouTube introduced AI and ML technology to customize the recommendations in 2016. This introduction has made things easier for YouTube as well as its viewers. It has now announced to ban the “borderline content”.
For Win 7 or later (64-bit)
For macOS 10.12 or later
● Ending Thoughts →
● Applying AI on YouTube has made it easier for the platform to manage activities more effectively and efficiently. As a result, many new features are added to enhance the convenience and maintain the quality of the user experience.
● Moreover, YouTube is now experimenting with AI and ML for automatically adding video chapters. This feature will be beneficial for the content creators.
● It will assist them in creating and uploading, resulting in the elimination of the time used in adding timestamps manually. Even the creators are uploading AI-generated YouTube videos that are created with the help of an AI YouTube video maker.
● You can even learn about the different applications of AI and ML from different YouTube channels. Many accessible YouTube channels for machine learning are available on the platform.
● YouTube intelligence can also be seen on the homepage, recommendations, notifications, and subscriptions. The latest trending videos are also ranked with the help of artificial intelligence and machine learning.
End Screen Makers
A YouTube end screen is the final section of a YouTube video and generally makes up the final 5-20 seconds of the video. Video creators often use this section of the video to add calls-to-action, playlists, links to videos, and more.
It can therefore be a very crucial 5-20 seconds and you may want to make sure that the end screen works for your brand. To do that, you need to make use of a good end screen maker that will ensure you are taking full advantage of this final part of the video. Here, we will look at some of the best end screen makers for you to choose from.
Best End Screen Makers
The following are the best end screen makers that you can use to finish your YouTube videos in style;
Filmora
Wondershare Filmora is one of the best video creation and editing tools in the market and as such you can be sure that it has all the necessary features to help you create and edit an end screen for your YouTube video that users will interact with. It has a lot of different features that make the process easy and allows you to customize our video in so many ways.

You can add all kinds of assets to the video project including images, video clips, text, and more, and use Filmora’s filters, animated elements, and video effects to put them together. All these features come in a very simple-to-use interface that makes the often-complicated process of creating and editing videos very easy.
For Win 7 or later (64-bit)
For macOS 10.12 or later
Key Features
- You can export the completed video in very high quality
- It can be used to create and edit GIFs
- It has numerous editing tools including noise removal options, advanced color tuning, advanced text editor, scene stabilization, and more.
- You can add audio including voiceover and music to the video
- It has a very simple user interface that makes it very easy to use
Canva
Canva is a simple-to-use animated YouTube end screen maker that has a large library of resources ideal for creating different types of end screens. One of the best things about Canva is the numerous templates that you can choose from, along with effects and media files including stock photos that can be very useful when creating your video.

Although most of the features, including many of the templates, are free, the best resources are only available on the premium plan. Using a premium photo or template will mean that a watermark is added to your design.
Key Features
- Most of the resources you need to create your end screen on Canva are free
- The interface is very easy to use, with tutorials that can help when you get stuck.
- It has many great resources including stock images and unique templates
- You can add many effects to the end screen
Fotor
Fotor is another great solution that can be very useful in creating the YouTube end screen. It comes with a lot of different templates to choose from, allowing you to customize the end screen for maximum engagement. You can also upload your images to use in the project or choose from the Fotor library which offers options for different kinds of videos.

Key Features
- Most of the templates that you can choose are completely free to use
- The templates also come in different sizes to suit all needs
- You can use one of the many effects to further customize the end screen.
- The templates and effects are also customizable
Snappa
Snappa can also be a good way to create the perfect end screen for your YouTube video. It is a versatile solution with a lot of options to help you customize the end screen to suit your brand and targets. One such resource is the huge library of stock images as well as icons and shapes that you can choose from. Snappa makes the process much easier by allowing you to start from a suitable template that you can then customize as desired.

Key Features
- There are a lot of templates to choose from
- You can import your media files to customize the design
- You can also start from a blank canvas and work from there
- There is also a large library of stock photos that you can choose from
Placeit.net
This is an online solution that is one of the best ways to create an end screen for your YouTube video. The user interface is very simple to navigate and very well designed, allowing you to easily create the end screen even if you are a beginner.

You can upload your images to add to the design or choose from the large library of resources that Placeit.net provides. You also have numerous export options to choose from.
Key Features
- There are numerous templates to choose from
- You can export the end screen with transparency
- The interface is very easy to use
- Most of the resources are available for free
Kapwing
Kapwing is an online video editing solution that you can also use to create an end screen for your YouTube video. It has extensive features that can allow you to customize your end screen any way you want to. It has numerous templates to choose from and the simple drag-and-drop interface makes creating the end screen very easy.

Key Features
- You can choose the size of the end screen to use
- There are a lot of templates to choose from
- You can upload your images and other elements to the project
- You get to choose the duration of the end screen before you begin the project
How to Make an End Screen with Filmora
Creating an end screen for your YouTube video using Filmora is a very simple process. Use these steps to do it;
Step 1: The first thing you need to do is install Filmora on your computer. You can download the setup file from the main website and then follow the instructions on the setup wizard to install the program.
Once the installation is complete, open the program and click on “New Project” to start.
Step 2: Click on the “Titles” section and search for “End Screen” using the search bar. Select the best template for your end screen and drag it into the timeline.
Step 3: Now you are ready to add elements to the end screen. Add your profile picture on a new track across the timeline and stretch it to fit the screen as desired.
Step 4: Click on “Effects” and use the search function to search for the “Mask” effect. When you find it, add it across the timeline and double-click on it to open its settings and adjust the effect accordingly.
Step 5: You may also want to add your social media handles to the end screen. To do that, use the “Titles” tab to find the different social media handles and add each one to the timeline.
You are now ready to save and export the end screen and add it to your YouTube video.
Related FAQs About End Screen Maker
1. How Do You Make an End Screen?
Making an end screen is different depending on the tool that you use to create the end screen as well as the number of elements that you choose to add to it. But usually, you would start with a template and begin adding elements to the project one by one.
2.What is the Best Free Outro Maker?
The best tool to create an end screen for YouTube videos is Filmora simply because it makes the process very easy while allowing you to customize your creation as much as you need. But even though it has a free trial version, most of the features you need to create a unique end screen are not available on the free plan.
A good free solution would be Canva because it has numerous free resources that can create a decent end screen. Although we must point out that many of the best templates and elements on Canva are also not available for free.
3.How Long can a YouTube End Screen Be?
A typical end screen is often 5-20 seconds long. You don’t need any more than 20 seconds because it is only used as a way to promote additional content or add a call to action. So when creating an End screen, ensure that all elements are clear enough as your audience will have only 20 seconds to see it.
Even though it is just 20 seconds long, the end screen of your YouTube video can be the most important aspect of the entire video. It is a great way to further engage with your audience and with the tools on
this list, you can now create the best end screen for your video.
For macOS 10.12 or later
Key Features
- You can export the completed video in very high quality
- It can be used to create and edit GIFs
- It has numerous editing tools including noise removal options, advanced color tuning, advanced text editor, scene stabilization, and more.
- You can add audio including voiceover and music to the video
- It has a very simple user interface that makes it very easy to use
Canva
Canva is a simple-to-use animated YouTube end screen maker that has a large library of resources ideal for creating different types of end screens. One of the best things about Canva is the numerous templates that you can choose from, along with effects and media files including stock photos that can be very useful when creating your video.
Although most of the features, including many of the templates, are free, the best resources are only available on the premium plan. Using a premium photo or template will mean that a watermark is added to your design.
Key Features
- Most of the resources you need to create your end screen on Canva are free
- The interface is very easy to use, with tutorials that can help when you get stuck.
- It has many great resources including stock images and unique templates
- You can add many effects to the end screen
Fotor
Fotor is another great solution that can be very useful in creating the YouTube end screen. It comes with a lot of different templates to choose from, allowing you to customize the end screen for maximum engagement. You can also upload your images to use in the project or choose from the Fotor library which offers options for different kinds of videos.
Key Features
- Most of the templates that you can choose are completely free to use
- The templates also come in different sizes to suit all needs
- You can use one of the many effects to further customize the end screen.
- The templates and effects are also customizable
Snappa
Snappa can also be a good way to create the perfect end screen for your YouTube video. It is a versatile solution with a lot of options to help you customize the end screen to suit your brand and targets. One such resource is the huge library of stock images as well as icons and shapes that you can choose from. Snappa makes the process much easier by allowing you to start from a suitable template that you can then customize as desired.
Key Features
- There are a lot of templates to choose from
- You can import your media files to customize the design
- You can also start from a blank canvas and work from there
- There is also a large library of stock photos that you can choose from
Placeit.net
This is an online solution that is one of the best ways to create an end screen for your YouTube video. The user interface is very simple to navigate and very well designed, allowing you to easily create the end screen even if you are a beginner.
You can upload your images to add to the design or choose from the large library of resources that Placeit.net provides. You also have numerous export options to choose from.
Key Features
- There are numerous templates to choose from
- You can export the end screen with transparency
- The interface is very easy to use
- Most of the resources are available for free
Kapwing
Kapwing is an online video editing solution that you can also use to create an end screen for your YouTube video. It has extensive features that can allow you to customize your end screen any way you want to. It has numerous templates to choose from and the simple drag-and-drop interface makes creating the end screen very easy.
Key Features
- You can choose the size of the end screen to use
- There are a lot of templates to choose from
- You can upload your images and other elements to the project
- You get to choose the duration of the end screen before you begin the project
How to Make an End Screen with Filmora
Creating an end screen for your YouTube video using Filmora is a very simple process. Use these steps to do it;
Step 1: The first thing you need to do is install Filmora on your computer. You can download the setup file from the main website and then follow the instructions on the setup wizard to install the program.
Once the installation is complete, open the program and click on “New Project” to start.
Step 2: Click on the “Titles” section and search for “End Screen” using the search bar. Select the best template for your end screen and drag it into the timeline.
Step 3: Now you are ready to add elements to the end screen. Add your profile picture on a new track across the timeline and stretch it to fit the screen as desired.
Step 4: Click on “Effects” and use the search function to search for the “Mask” effect. When you find it, add it across the timeline and double-click on it to open its settings and adjust the effect accordingly.
Step 5: You may also want to add your social media handles to the end screen. To do that, use the “Titles” tab to find the different social media handles and add each one to the timeline.
You are now ready to save and export the end screen and add it to your YouTube video.
Related FAQs About End Screen Maker
1. How Do You Make an End Screen?
Making an end screen is different depending on the tool that you use to create the end screen as well as the number of elements that you choose to add to it. But usually, you would start with a template and begin adding elements to the project one by one.
2.What is the Best Free Outro Maker?
The best tool to create an end screen for YouTube videos is Filmora simply because it makes the process very easy while allowing you to customize your creation as much as you need. But even though it has a free trial version, most of the features you need to create a unique end screen are not available on the free plan.
A good free solution would be Canva because it has numerous free resources that can create a decent end screen. Although we must point out that many of the best templates and elements on Canva are also not available for free.
3.How Long can a YouTube End Screen Be?
A typical end screen is often 5-20 seconds long. You don’t need any more than 20 seconds because it is only used as a way to promote additional content or add a call to action. So when creating an End screen, ensure that all elements are clear enough as your audience will have only 20 seconds to see it.
Even though it is just 20 seconds long, the end screen of your YouTube video can be the most important aspect of the entire video. It is a great way to further engage with your audience and with the tools on
this list, you can now create the best end screen for your video.
How to Zoom Picture in Picture [Easy Solution]
Zoom is one of the greatest options on the market for video conferencing. It doesn’t matter whether you use it at home or in an office environment; it will quickly link the team members. One of the most popular video conferencing programs is Zoom. When in-person meetings aren’t feasible, it enables you to communicate electronically with employees, and it’s been a major popularity for social occasions as well. In case you’re not acquainted, picture-in-picture mode enables you to watch videos from one app while using your PC normally. The movie will keep playing in a tiny thumbnail window so that two applications may work simultaneously on your smartphone.
You may create virtual audio and video conferences, webinars, live chats, screen sharing, and other collaboration tools with Zoom, a cloud-based video communications solution. Zoom’s most recent iPhone apps let you dismiss a Zoom Meeting while keeping the Zoom video call open in a picture-in-picture mode. To join a Zoom conference, you don’t need an account, and because the software works with Mac, Windows, Linux, iOS, and Android devices, nearly anybody can use it. Since using Zoom’s picture-in-picture mode is the same as using it with other applications, you shouldn’t have any trouble if you often use PiP mode. Here are the top 4 methods you can refer to picture in picture in Zoom.
Method 1: Swap Shared Screen with Video
You may move the Zoom Meeting PiP window across the screen, change the thumbnail’s size, and utilize other applications while it remains open, just like any other picture-in-picture window. Before leaving the meeting if you’re not giving a presentation or speaking, you should definitely mute Zoom on your iPhone to prevent noises from your typing or other activities from entering the conversation. Additionally, keep in mind to switch off the camera if you’re engaged in something distracting, at least for the duration of your activity. To reopen the Zoom Meeting and go back to the Zoom app, touch the Picture-in-Picture mode pane. Here are some actions to keep in mind:
Steps to Swap Shared Screen for Zoom Picture in Picture
Step1Launch or enter a Zoom meeting. Keep the video on your main screen at all times, closing the chat and participant list as necessary.
Step2Tap the Home button or swipe up from the bottom of the screen.
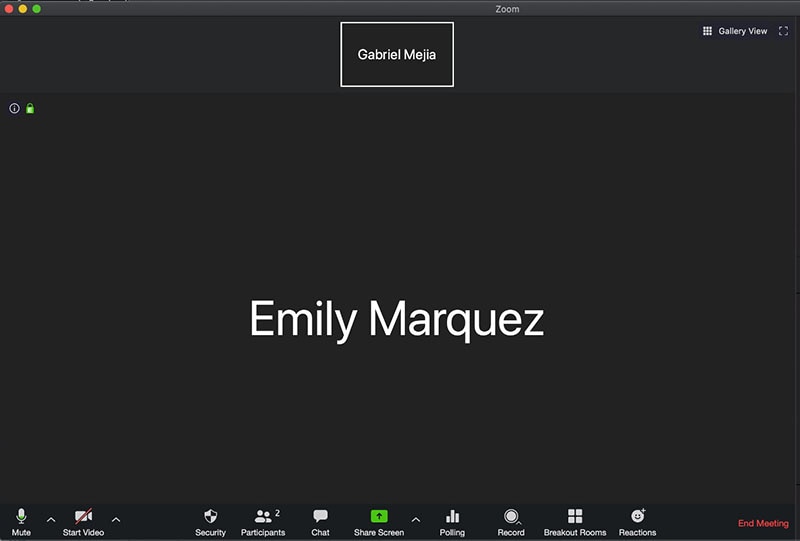
Step3Picture-in-picture mode should be activated automatically throughout the meeting.
Method 2: Use Ecamm Live
Live streaming is a fantastic way to provide original content and stand out from the crowd. To prevent any operational difficulties, a more sophisticated virtual camera is absolutely necessary. You now have magical abilities thanks to Ecamm virtual cam, including the ability to add text, animations, observe a live stream, post viewer comments, play music, share your screen, use sound effects, and many more. It offers the Ecamm live virtual camera zoom function for video conferences so you may improve your Zoom discussions by sending output to other PC programs. You could see a quality difference between what you view in Ecamm Live and what your Zoom visitors see while utilizing virtual camera with Zoom. The quality of a Zoom video stream cannot be improved using Ecamm Live. Simply broadcast the Zoom app using Ecamm Live’s Screen Share mode to utilize Ecamm Live for picture-in-picture virtual presentations on Zoom.
Steps to Use Ecamm Live for Zoom Picture in Picture
Step1Download the Ecamm Application
Install Ecamm Live on your computer, then choose the center button in the source switcher at the top of the main window to enter Screen Share mode.
Step2Create Scenes
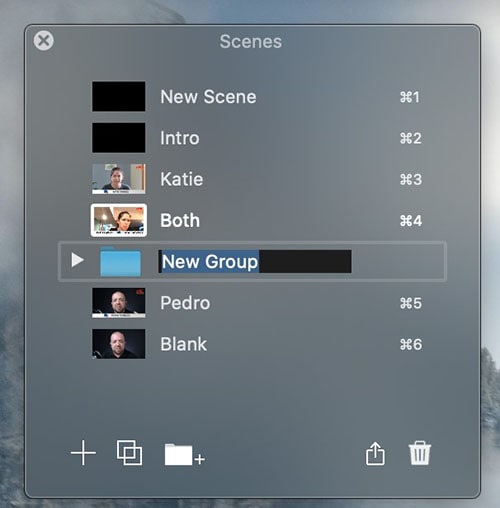
With the use of Ecamm Live’s Virtual Camera and Virtual Mic capabilities, you may transfer Ecamm Live’s output to almost any other Mac software, including Zoom. After setting, create the scenes in the program to quickly switch between various cameras.
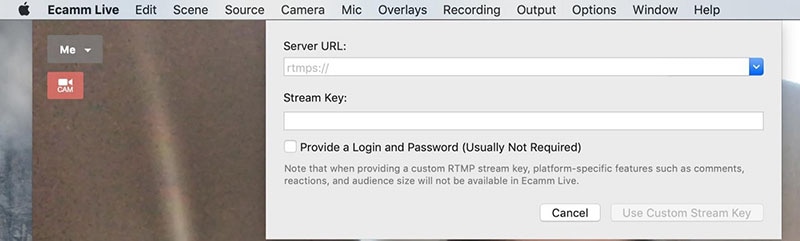
Step3Select Ecamm on Zoom
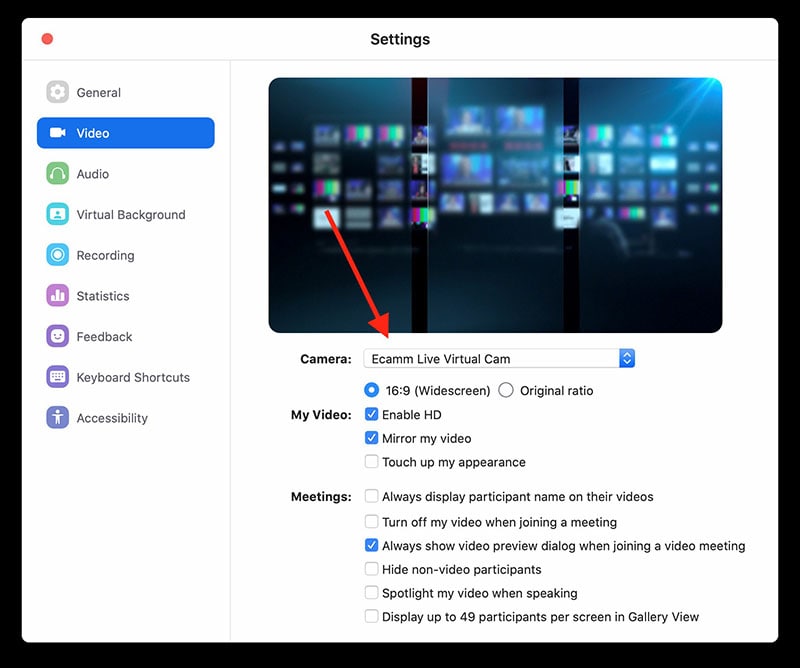
You may also utilize Ecamm Live’s Sharing Window capability to feed Ecamm Live output into Zoom. Simply activate the virtual camera, and then, as seen below, choose Ecamm Live Virtual Camera in Zoom’s video settings:
Step4Begin Your Presentation
Finally, click the PC share option to show your Zoom app to your audience. To conceal a picture-in-picture window that displays your camera image while live streaming, click the PIP button.
Method 3: Use Filmora as A Switcher
Zoom has solutions that will make your meetings simple and secure. It gives your remote staff a secure setting to interact and share crucial information. Ideal control over your film and configuration options to make them aesthetically pleasing is something Zoom lacks. To overcome the drawbacks and improve the quality of your online meetings, you may take use of the capabilities of Zoom in conjunction with Filmora. Filmora was developed with the intention of easing user burden and supporting applications. Though complicated, the program is simple to use. The perhaps most popular web information that may be saved on your computer can be easily captured by just angling your screen. For more information on how to record and save your Zoom for picture in picture, see the guide here.
To broadcast a variety of situations in a grid style, you may also combine inputs from your camera, microphone, computer screen, and web conferencing software. Wondershare -the finest desktop application for recording a Zoom Picture in Picture meeting- is Filmora. With the majority of cameras, this app’s screen recording capability is both user-friendly and feature-rich. Here, users may either choose a particular region to record or record their zoom meetings in Fullscreen mode. Additionally, you may choose the camera and input microphone that will be used while recording a video overlay. The addition of relevant comments like phrases, lines, drawings, symbols, etc. is also possible by users. The detailed procedure for recording a Zoom Picture-in-Picture meeting using a Filmora recorder is given below:
Free Download For Win 7 or later(64-bit)
Free Download For macOS 10.14 or later
Step1Download and Install Filmora Zoom Recorder
You may find both types, i.e., the most recent Windows and Mac versions, by first visiting the usual website and then using this Zoom. Install the program on your computer once you download it to get started.

Step2Initiate Filmora Recorder
After finishing the installation process for this Reside Zoom recorder, launch it from the main menus and choose “New Task” when prompted. It will take you to Filmora’s streamlined user interface where you can immediately start filming. Then, as seen in the picture below, you may adjust the screen recording using your preferred camera, microphone, and system settings:

Step3Begin/End the Recording
When you are through configuring this Zoom picture in picture recorder, click the Record button, and it will immediately begin recording your customized screen. Similar to that, after you’re done recording, click Stop, which will take you inside the video editor where you may edit your recorded information.

Step4Share Recordings
When you have everything ready, export your recording right away. After you’re done with the editing part, you do have a lot of options to choose from when displaying your screen capture and webcam stories. To do so, click the Export button in the item user interface’s top-right corner as shown below:
You may easily choose your preferred way to share from there if you choose to upload your work of zoom picture in picture recordings straight to the YouTube or other reputable websites right now. Simply refer to the Sharing plug-ins in the Export window to find out more.
Method 4: Use Hardware Switcher ATEM Mini Pro
Particularly on Zoom, the ATEM Mini is excellent for video conferences. The Blackmagic ATEM Mini is a USB video interface and HDMI switcher. Four HDMI inputs, or four cameras that can produce an HDMI video stream, may be switched between live. This device integrates Zoom meetings fast and makes it incredibly simple to set up your audio, a sometimes-forgotten aspect of video broadcasting. This sophisticated video switcher promises to offer broadcast-quality multi-camera footage with ease and is targeted at gamers, streamers, and online reviewers. It connects to a computer via a USB-C to USB-A connection. The video feed may then be sent to distant colleagues via a number of well-liked videos streaming services, including Zoom.
Step1The ATEM Mini Pro is a basic control switcher with pro-broadcast performance. Your ATEM Mini Pro is really simple to set up. You can connect a full setup with several cameras and microphones in around 30 minutes.
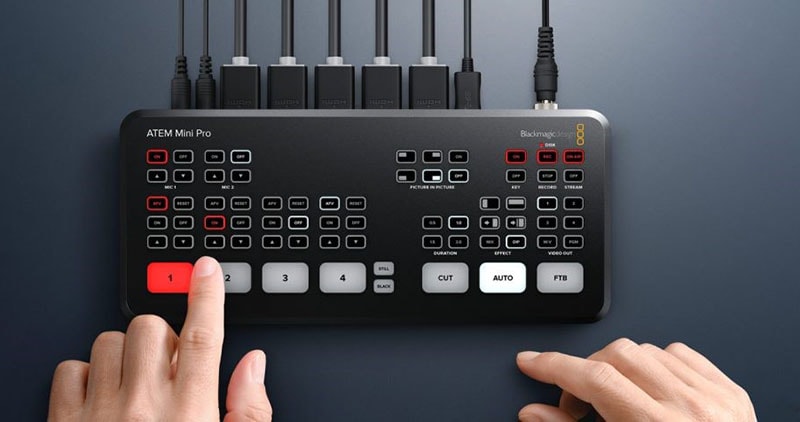
Step2You may connect several camera sources to the inputs of the ATEM Mini Pro. The 4 HDMI inputs each have a separate standards converter built in. As a result, the ATEM Mini can automatically convert inputs that are 1080p, 1080i, or 720p to the switcher’s video standard. You may make quick changes between inputs with no latency or disruption to your video output by using the ergonomic buttons.
Step3As a third option, Zoom offers ATEM Mini, which enables you to switch between several inputs, add custom visuals, and adjust audio levels all from a single interface. To improve the quality of your production, you may even use smooth transitions like wipes or fades. You can even test any input stream before making it live.
Conclusion
When you are doing a Zoom Meeting and share your screen, only to discover that what the other attendees see is a split screen with your material and the other Attendee cams, it is highly annoying. You may move the Zoom Meeting PiP window across the screen, change the thumbnail’s size, and utilize other applications while it remains open, just like any other picture-in-picture window. Someone must be sharing information in the Zoom conference for the Picture in Picture, or “Split Screen” option, to be active. We’ve listed the top techniques for doing it effectively above. To do this work without difficulty, use them as your guide.
Free Download For macOS 10.14 or later
Step1Download and Install Filmora Zoom Recorder
You may find both types, i.e., the most recent Windows and Mac versions, by first visiting the usual website and then using this Zoom. Install the program on your computer once you download it to get started.
Step2Initiate Filmora Recorder
After finishing the installation process for this Reside Zoom recorder, launch it from the main menus and choose “New Task” when prompted. It will take you to Filmora’s streamlined user interface where you can immediately start filming. Then, as seen in the picture below, you may adjust the screen recording using your preferred camera, microphone, and system settings:
Step3Begin/End the Recording
When you are through configuring this Zoom picture in picture recorder, click the Record button, and it will immediately begin recording your customized screen. Similar to that, after you’re done recording, click Stop, which will take you inside the video editor where you may edit your recorded information.
Step4Share Recordings
When you have everything ready, export your recording right away. After you’re done with the editing part, you do have a lot of options to choose from when displaying your screen capture and webcam stories. To do so, click the Export button in the item user interface’s top-right corner as shown below:
You may easily choose your preferred way to share from there if you choose to upload your work of zoom picture in picture recordings straight to the YouTube or other reputable websites right now. Simply refer to the Sharing plug-ins in the Export window to find out more.
Method 4: Use Hardware Switcher ATEM Mini Pro
Particularly on Zoom, the ATEM Mini is excellent for video conferences. The Blackmagic ATEM Mini is a USB video interface and HDMI switcher. Four HDMI inputs, or four cameras that can produce an HDMI video stream, may be switched between live. This device integrates Zoom meetings fast and makes it incredibly simple to set up your audio, a sometimes-forgotten aspect of video broadcasting. This sophisticated video switcher promises to offer broadcast-quality multi-camera footage with ease and is targeted at gamers, streamers, and online reviewers. It connects to a computer via a USB-C to USB-A connection. The video feed may then be sent to distant colleagues via a number of well-liked videos streaming services, including Zoom.
Step1The ATEM Mini Pro is a basic control switcher with pro-broadcast performance. Your ATEM Mini Pro is really simple to set up. You can connect a full setup with several cameras and microphones in around 30 minutes.
Step2You may connect several camera sources to the inputs of the ATEM Mini Pro. The 4 HDMI inputs each have a separate standards converter built in. As a result, the ATEM Mini can automatically convert inputs that are 1080p, 1080i, or 720p to the switcher’s video standard. You may make quick changes between inputs with no latency or disruption to your video output by using the ergonomic buttons.
Step3As a third option, Zoom offers ATEM Mini, which enables you to switch between several inputs, add custom visuals, and adjust audio levels all from a single interface. To improve the quality of your production, you may even use smooth transitions like wipes or fades. You can even test any input stream before making it live.
Conclusion
When you are doing a Zoom Meeting and share your screen, only to discover that what the other attendees see is a split screen with your material and the other Attendee cams, it is highly annoying. You may move the Zoom Meeting PiP window across the screen, change the thumbnail’s size, and utilize other applications while it remains open, just like any other picture-in-picture window. Someone must be sharing information in the Zoom conference for the Picture in Picture, or “Split Screen” option, to be active. We’ve listed the top techniques for doing it effectively above. To do this work without difficulty, use them as your guide.
Split Videos in the Lightworks [Step by Step]
Lightworks is among the best programs for editing the videos available for the Windows and Mac operating systems with no watermark. Through the accessible version of Lightworks, it is easy to export the videos into the MP4 format along with the resolution of 720p. There are different tools available in Lightworks so you can make videos for your YouTube channels, Vimeo, film making projects and different social media platforms.
Lightworks has become famous because it has been used for editing the popular movies of Hollywood. Along with the videos, it is straightforward to enhance the images by blending the colours. This article has a detailed description of how you can split the videos in Lightworks including the the discussion of splitting the Wondershare Filmora as an alternative. It is also a suitable choice.
How can you split the video clips in Lightworks?
Lightworks is software based on the cloud that consists of particular functionalities. It only includes editing and trimming, cutting, and splitting your video clips according to your requirements. Following are the easy-to-follow steps for splitting the clips in Lightworks:
Part1 - Splitting of one clip:
Step 1: The first step is importing the video into the timeline. It is simply through dragging the file on which you have to work.

Step 2: When the uploading is complete, you can cut and split the clips depending on your needs. Now, keep moving the play head in the specific direction from where you have to cut the clips—Press “C” on your keyboard.

Step 3: After getting the split clip, you can delete the remaining part that is not in use. For this, selecting the particular part is necessary and selecting the option of “Delete”. Even, you can press the “delete” key on your keyboard.

Step 4: When your video is ready, simply export the video by clicking right on the option of “All”. On the left lower side of the timeline, it is now clicked on “Export”.


Part 2- trimming of the clips in Lightworks
To trim the video clips in Lightworks, you require to hover the mouse towards the last of the video clip. Keep moving until and unless that part of the clip gets highlighted. After this step, start dragging till the previous where you want it.


An easier way to split the video clip
Even though Lightworks is a wonderful software for editing videos and images, its interface is easy to handle. But it is not supportive of different formats and 4K videos. For a few features, you might need the paid version of Lightworks. The most acquired solution to resolve this issue is Filmora Video Editor . It is freely available, and use all the tools according to your needs. That’s why it is gaining popularity, and users are increasing day by day. The latest versions of the Wondershare Filmora are available to enhance user experiences. You can export the outcome with ease from the tools.
For Win 7 or later (64-bit)
For macOS 10.14 or later
Features:
- Availability of drag and drag feature
- Can preview the functionalities you apply
- Easy to customize the images and videos
- Involvement of the animation
- Huge library available for the effects of visual and audio
- Splitting and merging the clips
Wondershare Filmora always offers to split the clips from the creative techniques. This tool is extremely useful, particularly when creating commentaries, tutorials, or interviews. The exact footage has to be on the timeline. All the options are on the main panel. Add anything you like, such as animation, text, images, or other media, to make an outstanding outcome. These are very easy to understand, so go through the following steps for splitting the video clips. Two ways are trimming and splitting the clips in Wondershare Filmora.
First method: splitting on the timeline
Step 1. Selection of the clip in the timeline that you want to split. Your play head should be precisely at this particular place from where you need the splitting.

Step 2. When your play head is on the correct point of the timeline, right-click on the clip for opening the menu. Select the option of “Split” or click on the scissor icon in red colour.

There is also a possibility of hiding the red icon of the scissor present. You can do it by tapping on the options of Wondershare Filmora. Then go to Preferencesàediting. Now uncheck the button of Split.

Second method: detection of the scene
If there are different shots in your clips or separation in the scenes, you can use the tool of “scene detection” in the Wondershare Filmora.
Step 1. Select your video clip from the media library that you want to split. After right-clicking on it, select the option of “Scene detection” from the menu.

Step 2. The new window of the scene detection appears and then click on “Detect”. Depending on the transitions of the video clips, it is divided into different parts.

There are hundreds of editing software present in the marketplace, but Wondershare Filmora’s success rate is the highest. It is just because of its simplicity and advanced tools that fulfil the users’ needs. The whole interface is hassle-free and clean no matter which operating system you use. It is also helpful in saving your time in terms of applying the settings of colour correction on more than one clip at all at once.
Exploration of the transition effects with the filters allows motion elements in your images and videos. Even you can split the screens to present your videos in a different style. Must discover the Wondershare Filmora whether you are using it casually or professionally. Keep going with the flow and go through the available guidelines. You will definitely consider Wondershare Filmora the best software for your managing and editing tasks.
Step 2: When the uploading is complete, you can cut and split the clips depending on your needs. Now, keep moving the play head in the specific direction from where you have to cut the clips—Press “C” on your keyboard.
Step 3: After getting the split clip, you can delete the remaining part that is not in use. For this, selecting the particular part is necessary and selecting the option of “Delete”. Even, you can press the “delete” key on your keyboard.
Step 4: When your video is ready, simply export the video by clicking right on the option of “All”. On the left lower side of the timeline, it is now clicked on “Export”.
Part 2- trimming of the clips in Lightworks
To trim the video clips in Lightworks, you require to hover the mouse towards the last of the video clip. Keep moving until and unless that part of the clip gets highlighted. After this step, start dragging till the previous where you want it.
An easier way to split the video clip
Even though Lightworks is a wonderful software for editing videos and images, its interface is easy to handle. But it is not supportive of different formats and 4K videos. For a few features, you might need the paid version of Lightworks. The most acquired solution to resolve this issue is Filmora Video Editor . It is freely available, and use all the tools according to your needs. That’s why it is gaining popularity, and users are increasing day by day. The latest versions of the Wondershare Filmora are available to enhance user experiences. You can export the outcome with ease from the tools.
For Win 7 or later (64-bit)
For macOS 10.14 or later
Features:
- Availability of drag and drag feature
- Can preview the functionalities you apply
- Easy to customize the images and videos
- Involvement of the animation
- Huge library available for the effects of visual and audio
- Splitting and merging the clips
Wondershare Filmora always offers to split the clips from the creative techniques. This tool is extremely useful, particularly when creating commentaries, tutorials, or interviews. The exact footage has to be on the timeline. All the options are on the main panel. Add anything you like, such as animation, text, images, or other media, to make an outstanding outcome. These are very easy to understand, so go through the following steps for splitting the video clips. Two ways are trimming and splitting the clips in Wondershare Filmora.
First method: splitting on the timeline
Step 1. Selection of the clip in the timeline that you want to split. Your play head should be precisely at this particular place from where you need the splitting.
Step 2. When your play head is on the correct point of the timeline, right-click on the clip for opening the menu. Select the option of “Split” or click on the scissor icon in red colour.
There is also a possibility of hiding the red icon of the scissor present. You can do it by tapping on the options of Wondershare Filmora. Then go to Preferencesàediting. Now uncheck the button of Split.
Second method: detection of the scene
If there are different shots in your clips or separation in the scenes, you can use the tool of “scene detection” in the Wondershare Filmora.
Step 1. Select your video clip from the media library that you want to split. After right-clicking on it, select the option of “Scene detection” from the menu.
Step 2. The new window of the scene detection appears and then click on “Detect”. Depending on the transitions of the video clips, it is divided into different parts.
There are hundreds of editing software present in the marketplace, but Wondershare Filmora’s success rate is the highest. It is just because of its simplicity and advanced tools that fulfil the users’ needs. The whole interface is hassle-free and clean no matter which operating system you use. It is also helpful in saving your time in terms of applying the settings of colour correction on more than one clip at all at once.
Exploration of the transition effects with the filters allows motion elements in your images and videos. Even you can split the screens to present your videos in a different style. Must discover the Wondershare Filmora whether you are using it casually or professionally. Keep going with the flow and go through the available guidelines. You will definitely consider Wondershare Filmora the best software for your managing and editing tasks.
Also read:
- Updated In 2024, How to Create a Clideo Slideshow Simply
- 2024 Approved Top 6 Text to Speech Generators for YouTube Videos Windows, Mac, And
- Updated 2024 Approved Best Cinematic LUTs For Premiere Pro Recommendation
- In 2024, Best 15 Subtitle Apps 2023 Windows, Mac, iPhone, Android & Online
- Updated 2024 Approved 6 Best Methods to Make a Video Longer
- New 2024 Approved Final Cut Pro for iPad
- New 2024 Approved Learn to Use Montage with These Movies
- In 2024, Timeline Template Is a Visual Representation Showing the Passage of Time. It Includes Text, Diagrams, Images and Icons. They Are Perfect for Telling Stories, Events Etc
- 2024 Approved Best 10 iPad Slideshow Apps to Create a Slideshow
- 2024 Approved Srt File Creator
- How to Make Eye Zoom Transition Effect with Filmora for 2024
- Guide to Create an Intro Video with Filmora for 2024
- New Gifs Can Convey Your Emotions in a Way that Words Cannot, so They Are Becoming a Popular Way to Express Yourself, and You Must Know How to Make a Gif and You Wont Believe that Its Not Difficult to Do
- New 5 Tips for Aquasoft Slideshow for 2024
- New Liquid Water Text Reveal Intro Offers an Impressive Opening to Any Video Content. Go Through the Detailed Steps to Create Liquid Water Reveal Intro in Wondershare Filmora
- In 2024, Double Location Dongle All to Know About Apple iPhone 15/iPad GPS Spoofing | Dr.fone
- 10 Fake GPS Location Apps on Android Of your Vivo Y78 5G | Dr.fone
- In 2024, Recommended Best Applications for Mirroring Your Samsung Galaxy F34 5G Screen | Dr.fone
- In 2024, How to Make the Most of Your Apple iPhone SE Lock Screen with Notifications? | Dr.fone
- In 2024, How to Unlock Infinix Hot 30 5G Phone without PIN
- In 2024, How Can I Catch the Regional Pokémon without Traveling On Sony Xperia 1 V | Dr.fone
- Calls on Vivo S18 Pro Go Straight to Voicemail? 12 Fixes | Dr.fone
- How to Unlock Apple iPhone 15 Plus, Apples New iPhone | Dr.fone
- In 2024, How To Use Allshare Cast To Turn On Screen Mirroring On Motorola G54 5G | Dr.fone
- The Ultimate Guide to Vivo V30 Pattern Lock Screen Everything You Need to Know
- Title: 2024 Approved Techniques You Never Heard of for Learning AI Marketing YouTube
- Author: Chloe
- Created at : 2024-06-09 16:15:19
- Updated at : 2024-06-10 16:15:19
- Link: https://ai-editing-video.techidaily.com/2024-approved-techniques-you-never-heard-of-for-learning-ai-marketing-youtube/
- License: This work is licensed under CC BY-NC-SA 4.0.
