
:max_bytes(150000):strip_icc():format(webp)/GettyImages-591408071-5bc7767d4cedfd0026a2ce3f.jpg)
2024 Approved Top 7 Easy Ways to Convert a Video to a GIF Online
Top 7 Easy Ways to Convert a Video to a GIF Online
Looking for the best video to gif online conversion tools? No worries, as we have done all the research work and have shortlisted the best tools that can assist you with the task. GIF is short and cute animated files that help in interestingly conveying a message. These short-animated visuals help in reaching and creating an impact on the target audience. So, if you have some videos, GIF animations can be created from them using a good converter tool which can be an online program or system software.
Online programs are preferred by the users owing to their simple and hassle-free use, support for basic features, and cost-saving options. So, here in this topic, we will discuss the top and easy ways to convert video to GIF online.

Part 1: Top 7 Easy Ways to Convert a Video to a GIF Online
Several online tools can be used for converting a video file into GIF, but all do not stand up to the tall claims it makes. So, if you are in search of an easy yet effective tool, shortlisted below are the top 7 tools for video into GIF online conversion.
1. Adobe Express
Powered by Adobe Premiere, this is an excellent online tool that allows converting videos in all key formats in GIF format. The free version allows adding videos for up to 1 hour and the processed files can be downloaded to the local system.
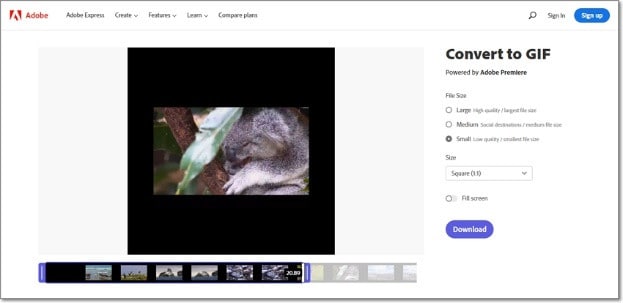
Key features
- Video files in all key formats can be converted to GIF.
- Allows selecting the aspect ratio and the file size of the target file.
- This video to GIF converter online tool support drag and drop feature.
- Allows trimming the video so that the file portion can be selected.
Pros:
- Simple and clean interface.
- Quick file processing.
- Allows selecting aspect ratio and file size.
Cons:
- Only one file at a time can be processed.
- Only desktop files can be added.
- To download the file, you need to free sign-up.
User Review:
A good online multi-platform service that works with interesting features. -TechRadar
This is one of the best programs that comes packed with wide range of features that can assist you in getting the target customized files.
2. Ezgif
Using this browser-based tool, local as well as online videos in key formats can be converted to GIFs. The interface is simple where you just need to add the file and the conversion will be done automatically.
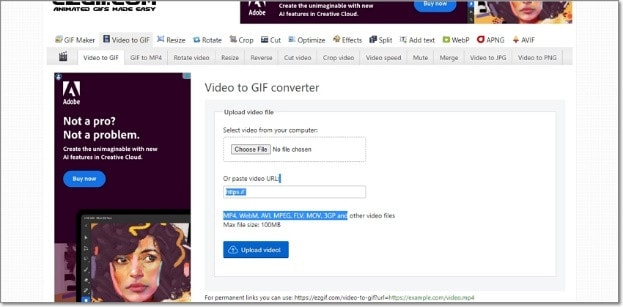
Key features
- GIF can be created from the local and online video files in all key formats.
- Choose the video part for creating the GIF file else by default, the first 5 seconds of the video are used.
Pros:
- All popular video formats like MP4, MPEG, FLV, MOV, and others are supported for conversion to GIF.
- Local, as well as file links in case of online files, can be added.
- Allows selecting the video part for which the GIF has to be created.
- Allows choosing the frame rate, and the size of the video.
This online GIF converter has an option to set static background.
Cons:
- File size limitation of 100 MB.
- Internet dependency.
User Review
“A website with many important and good tools that facilitates making your task easier. You get all features in one place. -Sasa011, Mywot.
This simple online tool is a pocket friendly option for converting your videos into GIF with added option for editing them. Supporting all key formats, the program supports additional tools as well.
3. Img2Go
Your videos on the system, cloud storage, as well as using URLs can be added to this online tool for conversion to GIF format. The look and the quality of GIFs can be adjusted by making changes in the file parameters.

Key features
- Convert all key video files like MP4, MOV, MPEG, and others to GIF.
- Customize the GIF look by editing the file size and applying the color filter.
- This online video to GIF converter allows to choose to enhance, sharpen, equalize, and edit files in other ways.
- Files to be converted can be added from the desktop, Google Drive, Dropbox, as well as URL.
- Processed files can be saved to the cloud storage in addition to the local system.
Pros:
- Multiple sources to add the video file.
- Customize the file parameters and enhance its look.
- Converted file is downloaded automatically to the local system.
Cons:
- Free version allows converting only 3 files at a time.
- Dependency on internet connectivity.
User review:
“This is the best online converter app I have discovered. It is really easy and fast to use. I absolutely recommend it and it really works.”-Maria Ancil, ChromeStats
When you need to convert only a few files at a time in a hassle-free manner consider this simple online tool. After the conversion is done, you would not have any hassles of file downloading as it is automatically saved to the system.
4. CloudConvert
Convert your videos in MP4, FLV, WebM, and other key formats to GIF using this browser-based tool that is simple and free to use. Multiple file parameters can be changed using the tool to get the desired file.

Key Features:
- Allows converting all key video formats.
- Files to be converted can be added from the desktop, URL, Dropbox, Google Drive, and OneDrive.
- Allows adjusting the fit, codec, resolution, aspect ratio, and fps.
- Option to trim the file and also add a watermark.
Pros:
- Files to be converted can be added from multiple sources.
- All key video formats supported.
- Option to control the video size, quality, and aspect ratio.
Cons:
- Free version allows only 25 conversions per day.
- Converted files need to be downloaded.
User Review
“Instant way of converting small-sized files online in many different formats.”
-Sushil, SoftwareAdvice
When conversion of cloud-based files is needed, this works a good online tool that also allows you to edit and change the key file parameters.
5. io
This is a free browser-based tool that allows creating of animated GIF files from videos. There are several video editing options also supported by the tool like split, cut, adding text, and more. You can even add a YouTube video or its link to create a GIF.

Key features:
- Free online tool for creating a GIF file.
- Support all key video formats like MP4, MOV, FLV, and others.
- Local, YouTube as well as videos from Dropbox can be added.
- Option to record the video and create its GIF.
- ‘Allows choosing the size, duration, background color, and several other file parameters.
Pros:
- Videos from multiple sources can be added.
- YouTube videos can also be converted to GIFs.
- Option to record the video and create its GIF.
- Support multiple video editing options.
Cons:
- Slow processing speed.
- Files processed through the free version have a watermark.
- Free version allows processing files under 10 minutes and of 250Mb in size.
User Review:
“It is just a perfect tool and easy to use. It supports a wide variety of media files.” - Koi, Trustpilot.
Option to convert the YouTube videos as well as the recorded videos make this tool different from the others. All popular file formats are supported and you can even customize and change the file parameters as per your requirements.
6. VistaCreate
This is another simple-to-use tool that allows converting all key video formats to a GIF file. The program allows setting various parameters as needed.
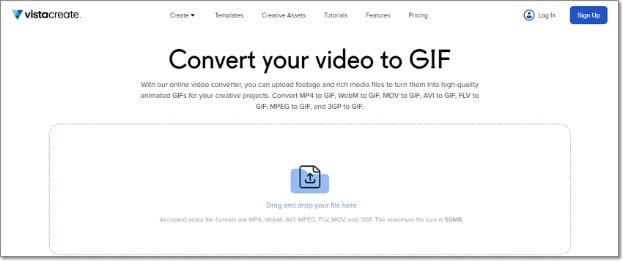
Key Features
- Convert MP4, WebM, AVI, MPEG, FLV, MOV, and 3GP to GIF.
- Support Drag and Drop feature.
- Videos up to 50MB can be processed.
- Allows choosing the video start and the end time for which GIF is to be created. If no time is selected, the first 5 seconds of the video are used.
Pros:
- Simple user interface.
- Allows selecting the video part for which GIF is to be created.
- Choose the frame rate and the speed.
Cons:
- Limited format support.
- Free version has a limitation of 50Mb file size.
- Processing speed is slow.
User Review:
“It is a simple and fast online tool that works. The program allows creating eye-catchy visuals and is free to use.”-Kshitij T, G2. Com
Simple to use, this online tool is apt when you need selected parts of the video for creating a GIF. Though it is compatible with a few selected formats, the process of conversion is simple.
7. XConvert
This online tool support conversion of wide range of file types and formats including videos to GIF. The supported video formats are MP4, WebM, MOV, and MKV. The tool also allows changing the target file parameters.

Key Features
- Free to use online tool with a simple interface.
- Allows converting MO4, MOV, WebM, and MKV videos to GIF.
- Frame Rate and resolution of the target GIF file can be selected.
- Allows adding local as well as files saved to the cloud storage.
Pros:
- Add videos from the desktop, Google Drive, and Dropbox.
- Choose the desired frame rate and resolution.
- Option to save the processed file to the system or Dropbox. Option to get the converted file download link.
Cons:
- Limited file support.
- Converted files need to be downloaded.
- Internet dependency.
User Review:
Portable, nice UI, cross-platform tool and has a lot of actions and run fast. -Roflpancake, Alternativeto
When simple conversion with basic file editing is needed, consider this online tool for your task. In addition to the local system, you can even save the files to your cloud storage.
Part 2: Comparison Table of the Best Video to GIF Converters
The table below compares the above 7 listed tools based on the formats supports, speed of file processing, and the watermark on the processed files.
| Features/Tool | Supported Format | Free Version with watermark or not | Speed of conversion |
|---|---|---|---|
| Adobe Express | All key video formats | No watermark | 2 (Fast) |
| Ezgif | All key formats including MP4, MPEG, FLV, MOV, and others. | No watermark. | 4 (Slow) |
| Img2Go | MP4, FLV, MOV, and all key video formats. | No Watermark | 2 (Fast) |
| CloudConvert | All popular video formats including MP4, MOV, FLV, MPEG, and more. | No Watermark | 2(Fast) |
| Veed.io | All key formats | Yes, free version has a watermark. | 5 (very Slow) |
| VistaCreate | MP4, WebM, AVI, MPEG, FLV, MOV, and 3GP. | No watermark | 5 (Very Slow) |
| XConvert | MP4, WebM, MOV, MKV. | No watermark | 3 (Average) |
Part 3: Best Solution to Convert Video to GIF on Windows/Mac
To convert videos to GIF on your Windows and Mac without worrying about any limitations or internet dependency, desktop software works as the best option. If you too have been looking for one such desktop program, we recommend Filmora Video Editor as the best choice. Though the software is used majorly for advanced video editing options, it is capable of performing a variety of other tasks as well including video to GIF conversion. The software allows file conversion through its export feature.
For Win 7 or later (64-bit)
For macOS 10.14 or later
Key Features
- Almost all video formats like MOV, MP4, MKV, FLV, and others can be converted to GIF.
- High-quality conversion at a fast speed.
- Support batch processing so that multiple files can be processed at a time.
- Allows editing and customizing videos using the built-in features of the software like effects, subtitles, crop, cut, and more.
Pros:
- The interface is simple which makes the software suitable even for beginners.
- Almost all popular video formats are supported.
- High-quality conversion in a hassle-free manner.
- Windows and Mac support.
Cons:
- Being a desktop software, it needs download and installation.
- Need to purchase the software subscription.
Steps to convert videos to GIF using Wondershare Filmora
Step 1. Launch the installed software on your system and the main interface select Create Project > New Project.

Step 2. Click on Import Media Files Here option under the Media tab to browse and add the local video file. Multiple files for batch processing can be added here.

Step 3. After the files are added, now it’s time to move them to the time and for this, you can simply drag and drop them to the bottom. Now at the timeline, using the built-in editing features, customization can be done as required.

Step 4. Finally, tap on the Export button and then choose GIF as the desired target format and also the location to save the converted files.

Conclusion
If one of the above-listed online tools serves your videos for GIF conversion purposes, it’s great. If not, you can use the Wondershare Filmora software. Once downloaded, the software can be used for several editing and other video-related tasks.
For macOS 10.14 or later
Key Features
- Almost all video formats like MOV, MP4, MKV, FLV, and others can be converted to GIF.
- High-quality conversion at a fast speed.
- Support batch processing so that multiple files can be processed at a time.
- Allows editing and customizing videos using the built-in features of the software like effects, subtitles, crop, cut, and more.
Pros:
- The interface is simple which makes the software suitable even for beginners.
- Almost all popular video formats are supported.
- High-quality conversion in a hassle-free manner.
- Windows and Mac support.
Cons:
- Being a desktop software, it needs download and installation.
- Need to purchase the software subscription.
Steps to convert videos to GIF using Wondershare Filmora
Step 1. Launch the installed software on your system and the main interface select Create Project > New Project.
Step 2. Click on Import Media Files Here option under the Media tab to browse and add the local video file. Multiple files for batch processing can be added here.
Step 3. After the files are added, now it’s time to move them to the time and for this, you can simply drag and drop them to the bottom. Now at the timeline, using the built-in editing features, customization can be done as required.
Step 4. Finally, tap on the Export button and then choose GIF as the desired target format and also the location to save the converted files.
Conclusion
If one of the above-listed online tools serves your videos for GIF conversion purposes, it’s great. If not, you can use the Wondershare Filmora software. Once downloaded, the software can be used for several editing and other video-related tasks.
In This Guidepost, You’ll Learn What an HDRI Photo Is and How to Use the Best Free HDRI Program to Edit Photos. You’ll Also Know the Difference Between HDR and HDRI
Photography is like art itself. Photographers must carefully select the setting and use the right camera to capture images with lossless quality. However, you’ll realize that some photos appear darker or brighter than in actual life.
In that case, use free HDRI software to change that straightway. But HDRI being a relatively new technique, beginners might struggle to edit the photos, let alone find the perfect HDRI software.
So, in this simple guidepost, we’ll learn how to create an HDRI 3D picture using HDRI for Blender. But first, let’s understand what an HDRI file is and the difference between HDRI and HDR.
Part 1: What is HDRI?
HDRI (High Dynamic Range Image) is simply an image created using multiple image overlays of the same background but with varying exposures. The exposures can range from the brightest highlights to the darkest shadows. So, in short, HDRI expands an image’s dynamic range to brighten or darken it and make it look more natural.
Having said that, HDRI is a raster image created using color pixels. HDRI photos are generally significant in size, so they won’t quickly lose quality like other raster photos such as PNG and JPG. Many formats can store HDRI images, although the most common are OpenEXR (.exr) and Radiance RGBE (.hdr).
Pros
- You can easily create one using HDRI for Blender, Photoshop, EasyHDRI, etc.
- HDRI photos are compatible with many image editing programs.
- Produces crisp images with excellent detail and lighting control.
Cons
- 32-bit HDRI files have significant sizes.
- HDRI can quickly be poorly done without prior experience.
Part 2: What’s the difference between HDR and HDRI
According to Wikipedia, HDR and HDRI are the same things. But is it true? For starters, HDRI is basically a photo with High Dynamic Range qualities. So, yes, HDR and HDRI can mean the same thing in digital image editing.
However, some photo editors argue that there is a difference between these two regarding basic workflow. First, HDR technology increases brightness to show more image details. On the other hand, HDRI performs unique optimization of content and lighting to deliver crisp images. In other words, HDRI brightens the dark shadows without necessarily overexposing the bright image areas.
Some photographers can also consider HDR as images with pixel values higher than 1 or 255. That means that the pixels can be much higher than pure white. But technically speaking, HDR and HDRI can be used interchangeably.
Part 3: When to use HDRI
Now that you have all the information about HDRI, let’s learn about some industries where HDRI is applicable.
1. HDRI for 3D visualization and 3D animation
HDRI 3D is commonplace these days. 3D animation creators can use programs like HDRI Blender to add HDR environments and make the content look detailed and more realistic in high lighting reflections. To put it simply, HDRI makes 3D scenes look lighter, less cartoonish, and more professional. This technology can also be used in interior visualizations in animations.
2. HDRI for architect rendering
Creating HDRI environments is a common practice in 3D architectural designs. For example, designers can create panoramic house designs with varying light tones and interior moods. HDRI helps them give a natural 3D lighting effect on scenes and objects.
3. HDRI monitors and TVs
You’ve probably heard of HDRI 4K when shopping for a smart TV or computer monitor. These TVs offer a lot more than just a wide color gamut, high brightness, and advanced contrast ratio. In addition, HDR TVs and monitors can recognize HDR signals, allowing viewers to watch the content with all studio quality. In short, viewers can see more color details in shadowy and lighter scenes, making them perfect for avid gamers.
Part 4: How do you open an HDRI?
Because HDRIs use low dynamic range rendering, a standard display panel won’t open HDR images. So, to open an HDRI file on a non-HDR display, you’ll need to convert it to a different low dynamic range format using tone mapping technology. For example, you convert HDRI to JPEG or PNG and enjoy regular bitmaps while maintaining the HDRI properties. You can also open and edit HDRI using desktop programs like EasyHDR, Photoshop, and Blender.
Part 5: How to set up an HDR environment background?
Before wrapping up this blog post, let’s discuss how to use HDRI for Blender to apply HDR effects to an image’s background. Blender is a 100% free program for creating jaw-dropping 3D rendering and animations on Mac and Windows computers. With Blender, you’ll get an advanced modeling toolset like retopology, curves, sculpting, and more. But in this post, we’ll learn how to create an HDR environment or add lighting to your image project. Let’s get started!
Step1Install and run Blender and then tap the World Properties tab. Then, click the Color icon and add Environment Texture.

Step2Next, split the window into two and launch the Shader Editor tool. Then, open the Object drop-down menu at the top-left corner and choose World. You’ll see the Environment Texture hooked into the background.

Step3On the Environment Texture, tap Open Image before opening the 3.2 folder inside the Blender Foundation folder. Then, click Data files > Studiolights > Word. Now open a .exr file. For example, open the Interior.exr image.

Step4Click the Viewport Shading icon and tap the drop-down button to choose Interior. You’ll see all the lighting reflections inside the room and customize it as you wish. That’s it!

Conclusion
Using the environment maps is the simplest and most effective way to lighten up your 3D scenes in Blender. This program lets you achieve realistic 3D scenes, mimicking natural world lighting. But note that Blender can be a little confusing for beginners. So, play around with this HDRI tool, and you’ll be a pro in no time.
Free Download For Win 7 or later(64-bit)
Free Download For macOS 10.14 or later
Part 2: What’s the difference between HDR and HDRI
According to Wikipedia, HDR and HDRI are the same things. But is it true? For starters, HDRI is basically a photo with High Dynamic Range qualities. So, yes, HDR and HDRI can mean the same thing in digital image editing.
However, some photo editors argue that there is a difference between these two regarding basic workflow. First, HDR technology increases brightness to show more image details. On the other hand, HDRI performs unique optimization of content and lighting to deliver crisp images. In other words, HDRI brightens the dark shadows without necessarily overexposing the bright image areas.
Some photographers can also consider HDR as images with pixel values higher than 1 or 255. That means that the pixels can be much higher than pure white. But technically speaking, HDR and HDRI can be used interchangeably.
Part 3: When to use HDRI
Now that you have all the information about HDRI, let’s learn about some industries where HDRI is applicable.
1. HDRI for 3D visualization and 3D animation
HDRI 3D is commonplace these days. 3D animation creators can use programs like HDRI Blender to add HDR environments and make the content look detailed and more realistic in high lighting reflections. To put it simply, HDRI makes 3D scenes look lighter, less cartoonish, and more professional. This technology can also be used in interior visualizations in animations.
2. HDRI for architect rendering
Creating HDRI environments is a common practice in 3D architectural designs. For example, designers can create panoramic house designs with varying light tones and interior moods. HDRI helps them give a natural 3D lighting effect on scenes and objects.
3. HDRI monitors and TVs
You’ve probably heard of HDRI 4K when shopping for a smart TV or computer monitor. These TVs offer a lot more than just a wide color gamut, high brightness, and advanced contrast ratio. In addition, HDR TVs and monitors can recognize HDR signals, allowing viewers to watch the content with all studio quality. In short, viewers can see more color details in shadowy and lighter scenes, making them perfect for avid gamers.
Part 4: How do you open an HDRI?
Because HDRIs use low dynamic range rendering, a standard display panel won’t open HDR images. So, to open an HDRI file on a non-HDR display, you’ll need to convert it to a different low dynamic range format using tone mapping technology. For example, you convert HDRI to JPEG or PNG and enjoy regular bitmaps while maintaining the HDRI properties. You can also open and edit HDRI using desktop programs like EasyHDR, Photoshop, and Blender.
Part 5: How to set up an HDR environment background?
Before wrapping up this blog post, let’s discuss how to use HDRI for Blender to apply HDR effects to an image’s background. Blender is a 100% free program for creating jaw-dropping 3D rendering and animations on Mac and Windows computers. With Blender, you’ll get an advanced modeling toolset like retopology, curves, sculpting, and more. But in this post, we’ll learn how to create an HDR environment or add lighting to your image project. Let’s get started!
Step1Install and run Blender and then tap the World Properties tab. Then, click the Color icon and add Environment Texture.
Step2Next, split the window into two and launch the Shader Editor tool. Then, open the Object drop-down menu at the top-left corner and choose World. You’ll see the Environment Texture hooked into the background.
Step3On the Environment Texture, tap Open Image before opening the 3.2 folder inside the Blender Foundation folder. Then, click Data files > Studiolights > Word. Now open a .exr file. For example, open the Interior.exr image.
Step4Click the Viewport Shading icon and tap the drop-down button to choose Interior. You’ll see all the lighting reflections inside the room and customize it as you wish. That’s it!
Conclusion
Using the environment maps is the simplest and most effective way to lighten up your 3D scenes in Blender. This program lets you achieve realistic 3D scenes, mimicking natural world lighting. But note that Blender can be a little confusing for beginners. So, play around with this HDRI tool, and you’ll be a pro in no time.
Free Download For Win 7 or later(64-bit)
Free Download For macOS 10.14 or later
4 Ways to Add White Borders on Mobile and Desktop
Would you like to add white borders to your videos?
Are you looking to put white backgrounds to your videos without cutting them?
You have seen many videos with attractive borders on different social media platforms (Instagram, YouTube, Facebook, LinkedIn, etc.) Adding borders allows you to create an evocative effect and also adjust the cropping issues. It plays a good role in redesigning a video. It should be noted that a border can change the entire style of the video.
There are hundreds of video editing software that allow adding borders to the videos for mobile and desktop. In this article, we shall discuss different ways to add white borders in movies used on different social media platforms.

4 Ways to Add White Borders to Video
The following 4 ways can be used to add white borders to the videos.
- Add a white border to the video on the computer (using Filmora)
- Add a white border to the video online
- Add a white border to the video on Android
- Add a white border to the video on iOS
Recommended way to add a white border to the video on the computer - using Filmora
Filmora Video Editor is one of the best video editing software. It allows editing the videos in a professional way. It has built-in editing features like splitting/cutting, trimming, cropping, adding watermark, changing speed, recording voice, and many more Along with this, you can rely on this application to add borders with different colors including white borders, black borders, colored border, and customized border. Add white borders on a computer, all this can be done in a few simple steps.
For Win 7 or later (64-bit)
For macOS 10.14 or later
Let’s download the free Wonder Share Filmora 11 software to proceed.
- Go to media, and import the video from your storage.
- Drag the video into the timeline.

- Select the video by clicking on the video.
- Hit the effects You can select the colorful effects from the panel.
- Now, write borders in the search engine. You will find various borders styles in the panel.
- Select the white border at the top of the panel.
- Simply drag and drop the border to the video/image.

- You will see the white border on the selected video.

- You can change the color of the border.
- Select the video by double-clicking on it.
- Hit the Effect tab from the Image and then click on Borders.
- Here you can change the color of your borders.
- Hit the OK

Add a white border to the video online
You can change white borders without launching software by editing online. Kapwing is an online video editing tool that is used to edit videos, images, and GIFs. It is very easy to use and the good thing about Kapwing is, it’s free and you don’t need to sign up or add watermarks to your edited videos/images.
However, it allows you to edit a video up to 250MB or you can only upload a video of almost 7 minutes in length. What you would need is to have a good internet connection and a Web.
Let’s start editing to add white borders step by step:
- Visit Kapwing collage maker and hit start collage maker
- You will see the below window.

- Click on Add media and select the desired video or image.
- Drag and drop the video into the timeline.

- Click on the video and drag the 4 corners to resize your video.
- It will eventually provide you with a white background and you can use it as a white border.

- Hit the Lock ratio tab once you got satisfied with your image borders.
- Double click the border to set the background color.

- You can change the background colors of your choice.

Add a white border to the video on Android
You can add white borders to your videos using android. BeeCut is a very simple and useful application for video editing. It presents a lot of stylish and beautiful frames and effects to make your video amazing. Along with this, it allows you to add text, filters, transitions, and many features to make your video stand out. It is very easy to use as takes a few steps to add frames to your video in android. To start the process follow these steps;
- Launch BeeCut on your mobile/android.
- Open the app and click on Media.
- Hit on Import file.

- Drag the video into the timeline or hit the +
- Hit the overlays
- Select your desired border.

- Drag the desired overlay border over the timeline. Here you can edit your design (change color, effect, etc.)
- Now, hit the export tab and choose the quality and format of your video.
- Save the file on your android.
Add a white border to the video on iOS
The PicsArt app is commonly used to edit videos on iPhone as well as on android. It is a very simple app, even a layman can use PicsArt and make professional white borders. This app is familiar among Instagram users. It changes the rectangular video or image into a square format. The aspect ratio of 1:1 is used for Instagram videos. It not only adds borders to the videos but also provides editing features like cut, resize, rotate, trims, text, etc. Let’s start with step-by-step instructions to add white borders to the video.
- Go to the app store and download the PicsArt app.
- Open the app and select the desired video.
- Hit the Fit tab from the bottom center.

- Select the color tool from the bottom.
- Choose the white color for white borders and you can also choose the desired color.
- Hit the ütab and the video will be saved to your phone gallery or you can directly share the video on Instagram.

Conclusion:
In the above content, we have introduced four methods to add white borders in your videos using windows, android, iPhone, and online. All the methods are free to use.
Wonder Share Filmora 11 is highly recommended to get the best and most professional results. It not only allows you to add borders but also provides you with an advanced editing panel. You can easily edit your videos and share with your social circle.
4 Ways to Add White Borders to Video
The following 4 ways can be used to add white borders to the videos.
- Add a white border to the video on the computer (using Filmora)
- Add a white border to the video online
- Add a white border to the video on Android
- Add a white border to the video on iOS
Recommended way to add a white border to the video on the computer - using Filmora
Filmora Video Editor is one of the best video editing software. It allows editing the videos in a professional way. It has built-in editing features like splitting/cutting, trimming, cropping, adding watermark, changing speed, recording voice, and many more Along with this, you can rely on this application to add borders with different colors including white borders, black borders, colored border, and customized border. Add white borders on a computer, all this can be done in a few simple steps.
For Win 7 or later (64-bit)
For macOS 10.14 or later
Let’s download the free Wonder Share Filmora 11 software to proceed.
- Go to media, and import the video from your storage.
- Drag the video into the timeline.
- Select the video by clicking on the video.
- Hit the effects You can select the colorful effects from the panel.
- Now, write borders in the search engine. You will find various borders styles in the panel.
- Select the white border at the top of the panel.
- Simply drag and drop the border to the video/image.
- You will see the white border on the selected video.
- You can change the color of the border.
- Select the video by double-clicking on it.
- Hit the Effect tab from the Image and then click on Borders.
- Here you can change the color of your borders.
- Hit the OK
Add a white border to the video online
You can change white borders without launching software by editing online. Kapwing is an online video editing tool that is used to edit videos, images, and GIFs. It is very easy to use and the good thing about Kapwing is, it’s free and you don’t need to sign up or add watermarks to your edited videos/images.
However, it allows you to edit a video up to 250MB or you can only upload a video of almost 7 minutes in length. What you would need is to have a good internet connection and a Web.
Let’s start editing to add white borders step by step:
- Visit Kapwing collage maker and hit start collage maker
- You will see the below window.
- Click on Add media and select the desired video or image.
- Drag and drop the video into the timeline.
- Click on the video and drag the 4 corners to resize your video.
- It will eventually provide you with a white background and you can use it as a white border.
- Hit the Lock ratio tab once you got satisfied with your image borders.
- Double click the border to set the background color.
- You can change the background colors of your choice.
Add a white border to the video on Android
You can add white borders to your videos using android. BeeCut is a very simple and useful application for video editing. It presents a lot of stylish and beautiful frames and effects to make your video amazing. Along with this, it allows you to add text, filters, transitions, and many features to make your video stand out. It is very easy to use as takes a few steps to add frames to your video in android. To start the process follow these steps;
- Launch BeeCut on your mobile/android.
- Open the app and click on Media.
- Hit on Import file.
- Drag the video into the timeline or hit the +
- Hit the overlays
- Select your desired border.
- Drag the desired overlay border over the timeline. Here you can edit your design (change color, effect, etc.)
- Now, hit the export tab and choose the quality and format of your video.
- Save the file on your android.
Add a white border to the video on iOS
The PicsArt app is commonly used to edit videos on iPhone as well as on android. It is a very simple app, even a layman can use PicsArt and make professional white borders. This app is familiar among Instagram users. It changes the rectangular video or image into a square format. The aspect ratio of 1:1 is used for Instagram videos. It not only adds borders to the videos but also provides editing features like cut, resize, rotate, trims, text, etc. Let’s start with step-by-step instructions to add white borders to the video.
- Go to the app store and download the PicsArt app.
- Open the app and select the desired video.
- Hit the Fit tab from the bottom center.
- Select the color tool from the bottom.
- Choose the white color for white borders and you can also choose the desired color.
- Hit the ütab and the video will be saved to your phone gallery or you can directly share the video on Instagram.
Conclusion:
In the above content, we have introduced four methods to add white borders in your videos using windows, android, iPhone, and online. All the methods are free to use.
Wonder Share Filmora 11 is highly recommended to get the best and most professional results. It not only allows you to add borders but also provides you with an advanced editing panel. You can easily edit your videos and share with your social circle.
Color Match Game Tips for You
Color Match Game Top Tips for You
An easy yet powerful editor
Numerous effects to choose from
Detailed tutorials provided by the official channel
A child is like a soft, unmolded clay; how you shape them, they will acquire precisely those features. And so, it is necessary to introduce them to the different and crucial tasks and activities that are beneficial for them.
And one of the various tasks is the Color Match Game which helps them get introduced to and familiar with the different colors. Children need something fun and exciting every time, and so, when you make them learn the color through a game, they learn about the color with enthusiasm and will.
We have put forth the following discussion about this fun activity; including the name of the six best color matching games and the best tool for it as well. So, without any further delay, let us start with our discussion.
In this article
01 [Why is Learning about Colors Useful for Children?](#Part 1)
02 [Top 6 Color Match Games](#Part 2)
03 [Where to Experience Professional Color Match Function?](#Part 3)
Part 1 Why is Learning about Colors Useful for Children?
There is always a reason behind every beneficial or a ‘must-do’ task. So, there are reasons behind introducing your child and making them aware of colours as well. So, we will be starting our discussing by understanding and discussing why it is useful for the children to learn about different colours.

The following list points out the importance of learning colours for children.
● Integrates basic knowledge
Knowing about the different colours is the basic and the most initial information that every child must have. We need colours in every instance of our lives. Therefore, it is vital for the children to learn about them from the initial stages of their lives.
So, learning about the colours integrates the basic knowledge of colours in their minds which is to stay with them throughout their lives and utilize them as and when the necessity arises.
● Offers them a means for verbal communication
When a child learns about colours, they attain a way to describe the world around them. Therefore, it helps in enhancing their method of communication. As a result, it also nurtures and improves their verbal skills to a large extent.
When they know about the colours, it inaugurates a novel hallway of set communicating and knowing about the world around them.
● Offers a way of describing the world
For the children, this world is an absolutely new place. They have been introduced to this planet quite recently and are exploring and discovering the different aspects. And one of the major aspects of the world is its colour.
So, when they learn about colours, they tend to find a way to describe the environment. It gives them a better understanding of the world and their surrounding as they learn about the colours.
● Learning to classify and sort
When a child learns about colours, they tend to learn about sorting things and classifying the different objects based on colours. For example, they might be able to separate blue balloons from the red ones from a bunch of balloons in front of them.
Though it is based on colours, they learn the process of classification and sorting, which then gets applied to the other factors in life.
● Learning about safety and health through colours
The colour red is commonly associated with danger, and the colour danger is associated with safety. And this is generalized across almost all cultures. That is commonly reflected through the traffic lights, where we stop at red colour, get ready to move in the colour tallow and the green colour gives us the signal to move or the message of being out of danger.
Also, the colour blue indicates paleness or bruises in the skin. The colour red indicates rashes or blood. So, the knowledge of colour helps the children learn about safety and health.
● Learn about association
The above point of learning about health and safety with the help of colours includes learning another important aspect in life, which is association. If a child is unable to understand that the colour red is associated with danger, green is associated with safety and the like; then the knowledge will be of no use.
So, when the child learns about colours and connects them to the different safety and health measures, they automatically learn how to associate one thing with another. This process is crucial and will benefit them throughout their lives.
● Learn about letters
Eventually, as the child learns about colours, they would spell them as well. So, as a result, they will learn how to spell different colours. That will be a way to practice spelling, and this will result in them learning about letters and words a lot more efficiently and excitingly.
Part 2 Top 6 Color Match Games
Now that we have discussed about the importance and benefits of learning colors for the kids, it is important that we know about the top six such Color Match Games that will help your children learn about learn in the most exciting way.
Here is the list of the top 6 color matching games online.
01Blendoku
Blendoku is one of the simplest yet most exciting color games for your children. This color matching game was designed based on color principles. The children are provided with a grid and blocks of varied colors in the game. Their task is to put the color blocks in their appropriate location on the grid.
Here, your children have to study the shades of the colors and arrange the color blocks to show lighter shades to the darker shades. The game includes four levels, and you can play each of them whenever you want. The levels are simple, medium, hard and master level.

02Pigments
Pigments is an exciting game that involves creativity and skills as well. In this game, one needs to mix two primary colors to form a secondary color. And then, the secondary color they create is the color of the pigment they need to strike away.
For example, in the game, you can mix yellow and blue colors, which are primary colors, which will form the color blue, a secondary color. And then, you will have to stroke off the blue color. It gives your kids a chance to explore, be creative and learn the vast sphere of colors, hues and shades.

03Color Kids: Coloring Game
Color Kids: Coloring Game is the best coloring video game for kids. The concept of this game is simple. It requires your children to color the different shapes. The design of the game is simple and emphasizes the matching, tracing, and building skills essential for your kids.

04I Love Hue
I Love Hue is the prettiest color matching game online based on arranging the colour tiles based on their shades, similar to that of Blendoku. You get a specified time limit or a particular number of lives for the game.
So, along with the knowledge of colors, your kids can also gain time management from the very initial levels of their lives.

05Polyforge
Polyforge has a fantastic outlook, and it deals with it just colors but also geometrical shapes. Thus, one gets to know about the different hues and at the same time about the shapes as well. This game also acts as a way of bringing peace and relaxation. So, this color matching game is a multi-purpose game indeed!

06Kami
Kami is a Japanese art-styled, origami puzzle game involving colors. Here, adding to the unique art style of the game, there is soothing Japanese zen music that relaxes. The rule of the game is pretty simple. One has to turn the papers into the same color.

Part 3 Where to Experience Professional Color Match Function?
Did you know you too can play with colors, match them and create incredible videos? And that is possible through the most wonderful video editing tool- Wondershare Filmora Video Editor . Its “Color Match” feature enables you to color correct the videos effectively and here are the steps for it.
● Drag the photos or the videos you want to edit
● Choose the portion of the video you want to edit and select the “Color Match” feature
● Opt for a frame as a reference page and then click on the “Match” option.
● You can compare and edit the video’s color settings or the image after using the “Color Match” function and make your videos and photos the way you want!
For Win 7 or later (64-bit)
For macOS 10.12 or later
● Key Takeaways from This Episode →
● In the above discussion, we have enveloped the following topics.
● We discussed why it is necessary for the kids to be introduced to colors, why it is essential to learn about the use of colors, and how this knowledge will benefit them in their lives.
● Next, we discussed the top 6 color matching games online that are fun, exciting and interesting to play.
● Lastly, we introduced Filmora 1which can help you create beautiful videos and edit them in the most creative and colorful way you want through its color match function!
A child is like a soft, unmolded clay; how you shape them, they will acquire precisely those features. And so, it is necessary to introduce them to the different and crucial tasks and activities that are beneficial for them.
And one of the various tasks is the Color Match Game which helps them get introduced to and familiar with the different colors. Children need something fun and exciting every time, and so, when you make them learn the color through a game, they learn about the color with enthusiasm and will.
We have put forth the following discussion about this fun activity; including the name of the six best color matching games and the best tool for it as well. So, without any further delay, let us start with our discussion.
In this article
01 [Why is Learning about Colors Useful for Children?](#Part 1)
02 [Top 6 Color Match Games](#Part 2)
03 [Where to Experience Professional Color Match Function?](#Part 3)
Part 1 Why is Learning about Colors Useful for Children?
There is always a reason behind every beneficial or a ‘must-do’ task. So, there are reasons behind introducing your child and making them aware of colours as well. So, we will be starting our discussing by understanding and discussing why it is useful for the children to learn about different colours.
The following list points out the importance of learning colours for children.
● Integrates basic knowledge
Knowing about the different colours is the basic and the most initial information that every child must have. We need colours in every instance of our lives. Therefore, it is vital for the children to learn about them from the initial stages of their lives.
So, learning about the colours integrates the basic knowledge of colours in their minds which is to stay with them throughout their lives and utilize them as and when the necessity arises.
● Offers them a means for verbal communication
When a child learns about colours, they attain a way to describe the world around them. Therefore, it helps in enhancing their method of communication. As a result, it also nurtures and improves their verbal skills to a large extent.
When they know about the colours, it inaugurates a novel hallway of set communicating and knowing about the world around them.
● Offers a way of describing the world
For the children, this world is an absolutely new place. They have been introduced to this planet quite recently and are exploring and discovering the different aspects. And one of the major aspects of the world is its colour.
So, when they learn about colours, they tend to find a way to describe the environment. It gives them a better understanding of the world and their surrounding as they learn about the colours.
● Learning to classify and sort
When a child learns about colours, they tend to learn about sorting things and classifying the different objects based on colours. For example, they might be able to separate blue balloons from the red ones from a bunch of balloons in front of them.
Though it is based on colours, they learn the process of classification and sorting, which then gets applied to the other factors in life.
● Learning about safety and health through colours
The colour red is commonly associated with danger, and the colour danger is associated with safety. And this is generalized across almost all cultures. That is commonly reflected through the traffic lights, where we stop at red colour, get ready to move in the colour tallow and the green colour gives us the signal to move or the message of being out of danger.
Also, the colour blue indicates paleness or bruises in the skin. The colour red indicates rashes or blood. So, the knowledge of colour helps the children learn about safety and health.
● Learn about association
The above point of learning about health and safety with the help of colours includes learning another important aspect in life, which is association. If a child is unable to understand that the colour red is associated with danger, green is associated with safety and the like; then the knowledge will be of no use.
So, when the child learns about colours and connects them to the different safety and health measures, they automatically learn how to associate one thing with another. This process is crucial and will benefit them throughout their lives.
● Learn about letters
Eventually, as the child learns about colours, they would spell them as well. So, as a result, they will learn how to spell different colours. That will be a way to practice spelling, and this will result in them learning about letters and words a lot more efficiently and excitingly.
Part 2 Top 6 Color Match Games
Now that we have discussed about the importance and benefits of learning colors for the kids, it is important that we know about the top six such Color Match Games that will help your children learn about learn in the most exciting way.
Here is the list of the top 6 color matching games online.
01Blendoku
Blendoku is one of the simplest yet most exciting color games for your children. This color matching game was designed based on color principles. The children are provided with a grid and blocks of varied colors in the game. Their task is to put the color blocks in their appropriate location on the grid.
Here, your children have to study the shades of the colors and arrange the color blocks to show lighter shades to the darker shades. The game includes four levels, and you can play each of them whenever you want. The levels are simple, medium, hard and master level.
02Pigments
Pigments is an exciting game that involves creativity and skills as well. In this game, one needs to mix two primary colors to form a secondary color. And then, the secondary color they create is the color of the pigment they need to strike away.
For example, in the game, you can mix yellow and blue colors, which are primary colors, which will form the color blue, a secondary color. And then, you will have to stroke off the blue color. It gives your kids a chance to explore, be creative and learn the vast sphere of colors, hues and shades.
03Color Kids: Coloring Game
Color Kids: Coloring Game is the best coloring video game for kids. The concept of this game is simple. It requires your children to color the different shapes. The design of the game is simple and emphasizes the matching, tracing, and building skills essential for your kids.
04I Love Hue
I Love Hue is the prettiest color matching game online based on arranging the colour tiles based on their shades, similar to that of Blendoku. You get a specified time limit or a particular number of lives for the game.
So, along with the knowledge of colors, your kids can also gain time management from the very initial levels of their lives.
05Polyforge
Polyforge has a fantastic outlook, and it deals with it just colors but also geometrical shapes. Thus, one gets to know about the different hues and at the same time about the shapes as well. This game also acts as a way of bringing peace and relaxation. So, this color matching game is a multi-purpose game indeed!
06Kami
Kami is a Japanese art-styled, origami puzzle game involving colors. Here, adding to the unique art style of the game, there is soothing Japanese zen music that relaxes. The rule of the game is pretty simple. One has to turn the papers into the same color.
Part 3 Where to Experience Professional Color Match Function?
Did you know you too can play with colors, match them and create incredible videos? And that is possible through the most wonderful video editing tool- Wondershare Filmora Video Editor . Its “Color Match” feature enables you to color correct the videos effectively and here are the steps for it.
● Drag the photos or the videos you want to edit
● Choose the portion of the video you want to edit and select the “Color Match” feature
● Opt for a frame as a reference page and then click on the “Match” option.
● You can compare and edit the video’s color settings or the image after using the “Color Match” function and make your videos and photos the way you want!
For Win 7 or later (64-bit)
For macOS 10.12 or later
● Key Takeaways from This Episode →
● In the above discussion, we have enveloped the following topics.
● We discussed why it is necessary for the kids to be introduced to colors, why it is essential to learn about the use of colors, and how this knowledge will benefit them in their lives.
● Next, we discussed the top 6 color matching games online that are fun, exciting and interesting to play.
● Lastly, we introduced Filmora 1which can help you create beautiful videos and edit them in the most creative and colorful way you want through its color match function!
Also read:
- With Looping Videos, People Stay on Your Site Longer, Boosting Engagement. With Video Being Watched on Mobile over 3X More than Any Other Content, Its an Essential Part of Mobile Advertising
- Learn More About the Video Editing Interface of Wondershare Filmora for 2024
- New 2024 Approved 5 Tips for Faster Editing in Filmora
- 2024 Approved Learn How to Create Inspiring Motivational Videos Using AI. Explore Tools Like Midjourney, Runway Gen2, Chat-GPT, and Filmora AI for Seamless Content Creation. Start Your Journey
- New Have You Ever Heard Hyperlapse and Tume Lapse Videos? Do You Know the Differences Between Them? This Article Will Introduce the Concepts, Features and Differnces of Them
- Updated Free Ways To Split Video For Whatsapp Status On All Platforms
- What Slideshow Templates Can Teach You About Aesthetic for 2024
- New In 2024, VSCO Slow Motion
- 2024 Approved Do You Want to Learn How to Use Premiere Pro Distortion Effects in Your Videos? We Have Provided a List of Distortion Premiere Pro Effects and How to Use Them
- In 2024, How to Zoom In and Out on Mac
- Updated In 2024, Finding the Best Game Recorder for PC
- 2024 Approved How to Share YouTube Video on Zoom?
- Updated In 2024, Techniques You Never Heard of for Learning AI Marketing YouTube
- In 2024, Here Is a Complete Overview of VSCO Video Editor; the Best Photo-Editing App that Helps You Adjust Your Pictures Right After You Capture Them
- 2024 Approved There Are a Few Ways to Remove or Mute Audio in a Video, but How? Read This Article and Learn How to Do It Using Recommended Android Apps
- Minecraft Pixel Art Is a Trending Subject, and They Simply Consist of In-Game Pixel Artworks, Besides the Minecraft Houses, Farms, or Cities. Lets Explore the Fantastic World of Minecraft Pixel Art
- Updated How To Create Quiz Videos Detailed Guide for 2024
- Updated In 2024, Top LUTs for Sony HLG to Download
- New In 2024, Progressive Solutions to Add VHS Effects to Video with Ease
- How To Add Motion Blur In Davinci Resolve, In 2024
- New In 2024, How to Make Glitch Effect with Filmora
- Updated In 2024, How to Polish Your Music Video Edits Using Filmora
- How to Transfer Photos from Oppo Reno 10 Pro+ 5G to New Android? | Dr.fone
- How to Change Location on TikTok to See More Content On your OnePlus 12 | Dr.fone
- In 2024, Why Apple Account Disabled From your Apple iPhone XS? How to Fix
- Effective Guide to Cast Apple iPhone 15 Pro Max to MacBook without Hindrance | Dr.fone
- How To Open Your Apple iPhone 14 Pro Max Without a Home Button | Dr.fone
- How to Reset Sony Xperia 5 V without Losing Data | Dr.fone
- How To Fix iPhone XS Max Could Not Be Activated/Reached Issue
- In 2024, How to Cast Oppo Find X7 Ultra to Computer for iPhone and Android? | Dr.fone
- In 2024, Solutions to Spy on Vivo X90S with and without jailbreak | Dr.fone
- Hard Reset Samsung Galaxy M14 4G in 3 Efficient Ways | Dr.fone
- How to Check Distance and Radius on Google Maps For your Oppo Find X7 | Dr.fone
- How to Rescue Lost Messages from Motorola
- All You Need To Know About Mega Greninja For Samsung Galaxy A05s | Dr.fone
- How to Fix My Vivo V30 Location Is Wrong | Dr.fone
- In 2024, The Most Useful Tips for Pokemon Go Ultra League On Realme V30 | Dr.fone
- All About Factory Reset, What Is It and What It Does to Your Nokia C02? | Dr.fone
- Updated How to Create an Animated Sticky Navbar
- In 2024, How To Bypass Honor Magic 5 FRP In 3 Different Ways
- In 2024, How to Unlock iPhone 6s Plus Passcode Screen? | Dr.fone
- Title: 2024 Approved Top 7 Easy Ways to Convert a Video to a GIF Online
- Author: Chloe
- Created at : 2024-04-24 07:08:15
- Updated at : 2024-04-25 07:08:15
- Link: https://ai-editing-video.techidaily.com/2024-approved-top-7-easy-ways-to-convert-a-video-to-a-gif-online/
- License: This work is licensed under CC BY-NC-SA 4.0.
