
:max_bytes(150000):strip_icc():format(webp)/gopro-2619915_1920-2ca3364339c348e5ba44afb3fa79458b.jpg)
2024 Approved Top 8 AR Apps for Android and iOS | Help You See the World of AR
Top 8 AR Apps for Android and iOS | Help You See the World of AR
Top 8 AR Apps for Android and Ios Help You See the World of AR
An easy yet powerful editor
Numerous effects to choose from
Detailed tutorials provided by the official channel
Suppose you want to buy a pair of eyeglasses and don’t know which pair would suit your look. Now you might wish to look at how your face would look on different frames. Here you can use AR and see which pair of glasses would fit you using AR. AR can be used to share and receive various kinds of tacit knowledge. Augmented Reality is often synonymously used for “Computed-mediated reality” and “Mixed- Reality.”
Despite such an exceptional concept, many users raised questions about the privacy issues of this app. AR technology constantly needs to record the real environment, which involves real human beings. Recording their movement breaches their privacy which can cause legal trouble for the user. If the videos are recorded with consent, they will not harm anyone.
In this article
01 [What Is Augmented Reality?](#Part 1)
02 [The 4 Best Augmented Reality Apps for iPhone](#Part 2)
03 [The 4 Best Augmented Reality Apps for Android](#Part 3)
Part 1 What Is Augmented Reality?
Augmented Reality is a technology that uses the real-world environment where virtual objects reside. This process involves an experience where the real or physical world interweaves with virtually created objects. It interweaves so perfectly that the artificial seems a part of the natural. This is an artificial experience, and it adds to the real environment. AR gained popularity in the fields of entertainment and video games.
You might think that AR (Augmented Reality) is the same as VR (Virtual Reality). They are not the same. When someone looks through a VR, everything, including the object’s environment, is virtual or an illusion. When AR is used, the object is virtual, but the environment is real. Suppose you want to buy an item of furniture and you do not know whether it would match your home décor; here, you can use AR to see whether the furniture would fit your décor or not.
Part 2 The 4 Best Augmented Reality Apps for iPhone
Have you ever wondered how it would be to purchase furniture sitting in your bedroom? How would it be like to not worry about which color would fit the home décor o which position would be the best for the product? You can experience these exciting features using this Augmented Reality or AR powered apps. These four apps will give you the best iPhone ar video experience.
01Amikasa
Amikasa is basically a home furnishing AR app. It is exclusive to iOS users only. You can use this app to view products from different brands and websites. This app will improve your shopping experience without going to different stores to get the right product for your room. You can just walk around your house and find the best-fitted product for your house using AR models of the products. Since there are no boundaries to websites and brands, it gives you more opportunity to choose your product wisely. The most interesting part about this app is that you can make your purchases without exiting from this app.

02Wanna Kicks
Wanna Kicks is a fashion-based AR app. To be precise, this app focuses on footwear. This app is also exclusive to iOS users only. You can look into different brands and websites and choose the best footwear for yourself. You can virtually look at how a pair of shoes would look on you when you wear them. You do not browse around to find the most suitable footwear and do it sitting on your bed. These interesting features of this app have gained people’s attention from various countries. This app can push your apple ar video experience to a different level.

03Augment
Augment is a home furnishing goods-based AR app. The app needs to be purchased at $10/month for corporate uses. This app mainly targets e-commerce store owners to make their selling process smooth by creating AR pictures of their products. The seller creates 3D images or models of products that the customers can use to find the best fit for their house. The images created by this app are uploaded for common people’s Augmented Reality experience through mobile apps, websites, or some other source. It comes to great use when the products are sold in the field like event sales, pop-up shops, e-commerce markets, etc.

04Roar
Roar is another AR technology-based app that needs to be purchased at $49 by the creators or hosts. This app aims at business owners. Business owners can use this app in many ways possible, like creating an online store using AR technology using which the consumers can scan the product packages from their homes, using AR technology in advertisements, and many other ways possible.
This app can be used by car sellers to show 3D models or AR images of different cars. Roar is a very popular app used by educators to make educational videos more game-like and make the process of learning fun by including animations and models for teaching.

Part 3 The 4 Best Augmented Reality Apps for Android
Augmented Reality or AR is a very interesting technology, and anybody would want to have this feature in their phone. So here are some apps mentioned below which will help you get ar video app android experience. These four apps top the list of best AR videos for android.
01Google Lens
Google Lens is an image-recognizing application based on AR technology developed by Google, which can be used for free. This app top the list of best Augmented Reality apps. This app can be used to identify objects, texts, images, landmarks, and so much more. Instead of typing your query, you can just scan the product you want to know about.
If you want to buy a product you searched for, the app will provide you with websites selling that particular product. The object needs to be placed in front of the mobile’s camera, and the app uses its Augmented Reality technology to recognize the object and gives appropriate results. You can access Google Lenses by downloading the app or the Google Photos app itself.

02Snapchat
Snapchat is a very popular app, especially among the youngsters. Snapchat is a free app with very minimum system requirements and thus can be accessed by anyone. It has some cool features like fun image effects and exciting texting features. This app offers quirky face filters where the Augmented Reality technology comes to use.
You can transform into anything like a cat, dog, or even another person using this app’s appropriate filter. You can also send funny videos of yourself using those quirky filters through this app. This app gives you a fun and silly experience with taking pictures of yourself or taking a selfie, as popularly known.

03IKEA Place
IKEA Place is a free home décor-based Augmented Reality app. This app is a bridge between Swedish furniture retailers and shoppers. The shoppers or the consumers get the opportunity to place or put out the furniture in their house and decide whether it is suitable for the room or the house. The app considers the whole area and shows the product concerning the space of the area of the room where the product is to be kept. This “drag-and-drop” function helps the users select colors according to the place where they want to keep the product. These features make the shoppers’ experience smooth and hustle-free. This app is one of the best apps for ar video app android users.

04Houzz
Houzz is a home furnishing goods or furniture selling app that uses Augmented Reality for advertising its goods. This app can be used to do interior planning to decide on designs, positions, or layouts of the products. You can view products of different brands and buy the products without exiting the app because of its e-commerce functionality.
This app has an interesting feature: the “View in My Room,” an Augmented Reality powered feature. You can decide the product’s position by virtually placing it in your room. You might not get the most accurate result, but you can get a slight idea of the product and how it would look in your house.
For Win 7 or later (64-bit)
For macOS 10.12 or later
● Ending Thoughts →
● I hope now you know what Augmented Reality is and in which fields it is used.
● It has gained popularity in the marketing industry because it gives a multi-dimensional opportunity to buy and sell products.
● Most importantly, you know how Augmented Reality is different from Virtual Reality.
● This article also highlights the best apple ar video apps and ar video apps android. The apps mentioned in this article are very easy to use. These apps can give you a smooth AR using experience and take it to a different level.
Suppose you want to buy a pair of eyeglasses and don’t know which pair would suit your look. Now you might wish to look at how your face would look on different frames. Here you can use AR and see which pair of glasses would fit you using AR. AR can be used to share and receive various kinds of tacit knowledge. Augmented Reality is often synonymously used for “Computed-mediated reality” and “Mixed- Reality.”
Despite such an exceptional concept, many users raised questions about the privacy issues of this app. AR technology constantly needs to record the real environment, which involves real human beings. Recording their movement breaches their privacy which can cause legal trouble for the user. If the videos are recorded with consent, they will not harm anyone.
In this article
01 [What Is Augmented Reality?](#Part 1)
02 [The 4 Best Augmented Reality Apps for iPhone](#Part 2)
03 [The 4 Best Augmented Reality Apps for Android](#Part 3)
Part 1 What Is Augmented Reality?
Augmented Reality is a technology that uses the real-world environment where virtual objects reside. This process involves an experience where the real or physical world interweaves with virtually created objects. It interweaves so perfectly that the artificial seems a part of the natural. This is an artificial experience, and it adds to the real environment. AR gained popularity in the fields of entertainment and video games.
You might think that AR (Augmented Reality) is the same as VR (Virtual Reality). They are not the same. When someone looks through a VR, everything, including the object’s environment, is virtual or an illusion. When AR is used, the object is virtual, but the environment is real. Suppose you want to buy an item of furniture and you do not know whether it would match your home décor; here, you can use AR to see whether the furniture would fit your décor or not.
Part 2 The 4 Best Augmented Reality Apps for iPhone
Have you ever wondered how it would be to purchase furniture sitting in your bedroom? How would it be like to not worry about which color would fit the home décor o which position would be the best for the product? You can experience these exciting features using this Augmented Reality or AR powered apps. These four apps will give you the best iPhone ar video experience.
01Amikasa
Amikasa is basically a home furnishing AR app. It is exclusive to iOS users only. You can use this app to view products from different brands and websites. This app will improve your shopping experience without going to different stores to get the right product for your room. You can just walk around your house and find the best-fitted product for your house using AR models of the products. Since there are no boundaries to websites and brands, it gives you more opportunity to choose your product wisely. The most interesting part about this app is that you can make your purchases without exiting from this app.
02Wanna Kicks
Wanna Kicks is a fashion-based AR app. To be precise, this app focuses on footwear. This app is also exclusive to iOS users only. You can look into different brands and websites and choose the best footwear for yourself. You can virtually look at how a pair of shoes would look on you when you wear them. You do not browse around to find the most suitable footwear and do it sitting on your bed. These interesting features of this app have gained people’s attention from various countries. This app can push your apple ar video experience to a different level.
03Augment
Augment is a home furnishing goods-based AR app. The app needs to be purchased at $10/month for corporate uses. This app mainly targets e-commerce store owners to make their selling process smooth by creating AR pictures of their products. The seller creates 3D images or models of products that the customers can use to find the best fit for their house. The images created by this app are uploaded for common people’s Augmented Reality experience through mobile apps, websites, or some other source. It comes to great use when the products are sold in the field like event sales, pop-up shops, e-commerce markets, etc.
04Roar
Roar is another AR technology-based app that needs to be purchased at $49 by the creators or hosts. This app aims at business owners. Business owners can use this app in many ways possible, like creating an online store using AR technology using which the consumers can scan the product packages from their homes, using AR technology in advertisements, and many other ways possible.
This app can be used by car sellers to show 3D models or AR images of different cars. Roar is a very popular app used by educators to make educational videos more game-like and make the process of learning fun by including animations and models for teaching.
Part 3 The 4 Best Augmented Reality Apps for Android
Augmented Reality or AR is a very interesting technology, and anybody would want to have this feature in their phone. So here are some apps mentioned below which will help you get ar video app android experience. These four apps top the list of best AR videos for android.
01Google Lens
Google Lens is an image-recognizing application based on AR technology developed by Google, which can be used for free. This app top the list of best Augmented Reality apps. This app can be used to identify objects, texts, images, landmarks, and so much more. Instead of typing your query, you can just scan the product you want to know about.
If you want to buy a product you searched for, the app will provide you with websites selling that particular product. The object needs to be placed in front of the mobile’s camera, and the app uses its Augmented Reality technology to recognize the object and gives appropriate results. You can access Google Lenses by downloading the app or the Google Photos app itself.
02Snapchat
Snapchat is a very popular app, especially among the youngsters. Snapchat is a free app with very minimum system requirements and thus can be accessed by anyone. It has some cool features like fun image effects and exciting texting features. This app offers quirky face filters where the Augmented Reality technology comes to use.
You can transform into anything like a cat, dog, or even another person using this app’s appropriate filter. You can also send funny videos of yourself using those quirky filters through this app. This app gives you a fun and silly experience with taking pictures of yourself or taking a selfie, as popularly known.
03IKEA Place
IKEA Place is a free home décor-based Augmented Reality app. This app is a bridge between Swedish furniture retailers and shoppers. The shoppers or the consumers get the opportunity to place or put out the furniture in their house and decide whether it is suitable for the room or the house. The app considers the whole area and shows the product concerning the space of the area of the room where the product is to be kept. This “drag-and-drop” function helps the users select colors according to the place where they want to keep the product. These features make the shoppers’ experience smooth and hustle-free. This app is one of the best apps for ar video app android users.
04Houzz
Houzz is a home furnishing goods or furniture selling app that uses Augmented Reality for advertising its goods. This app can be used to do interior planning to decide on designs, positions, or layouts of the products. You can view products of different brands and buy the products without exiting the app because of its e-commerce functionality.
This app has an interesting feature: the “View in My Room,” an Augmented Reality powered feature. You can decide the product’s position by virtually placing it in your room. You might not get the most accurate result, but you can get a slight idea of the product and how it would look in your house.
For Win 7 or later (64-bit)
For macOS 10.12 or later
● Ending Thoughts →
● I hope now you know what Augmented Reality is and in which fields it is used.
● It has gained popularity in the marketing industry because it gives a multi-dimensional opportunity to buy and sell products.
● Most importantly, you know how Augmented Reality is different from Virtual Reality.
● This article also highlights the best apple ar video apps and ar video apps android. The apps mentioned in this article are very easy to use. These apps can give you a smooth AR using experience and take it to a different level.
Some Facts About GIF Background You Didn’t Know
Some Facts About GIF Background You Didn’t Know
An easy yet powerful editor
Numerous effects to choose from
Detailed tutorials provided by the official channel
Once you start using GIFs in your everyday conversations, there’s no going back. GIFs make the conversation more immersive and enjoyable and add a sense of emotion that is not possible with ordinary text. You probably loved some gifs more than others, or there were moments when you wanted to turn them into gifs and wished you could use them as a gif background on your device or presentation but couldn’t figure out how to do it. But, now you don’t have to bury your wish any longer. During this article, you will learn everything there is to know about all the different ways you can use gifs as your background and many more. In addition, you will learn how to use them as your background and how to create them.
In this article
01 [How to Use a GIF as Your Desktop Background on Windows](#Part 1)
02 [How to Make GIF Background on Windows/Mac/Android/iPhone](#Part 2)
03 [How to Make GIF Powerpoint Background](#Part 3)
04 [How to Make GIF Without Background - Free & Efficiently?](#Part 4)
Part 1 How to Use a GIF as Your Desktop Background on Windows?
Although Windows doesn’t have native support to keep animated gif backgrounds, you can use third-party services to keep gifs as background images.
Using Plastuer or BioniX wallpaper changer as a 3rd party software is the best way to use animated gifs for your desktop.
As a starting point, we’ll cover plastuer, which uses WebGL and chromium-browser to make gifs as your background.

The software includes selecting different screens where you want the wallpaper to appear, making it possible to apply it to different screens at once.
To select the gif you want:
● You can paste the URL of the gif you want to use.
● You can also use the “create playlist” field to add multiple gifs as your background.
● You can select a file from your device using the “select file” option.
● Or you can choose from hundreds of gifs present in the plastuer library.
● You can disable the wallpaper whenever you wish by clicking on the “disable wallpaper” option.

How to use the bioniX wallpaper changer?
BioniX comes with several options that one may need to apply to their Windows device’s background, and animated gif backgrounds are one of them.

You will need to download the software and once it is installed, launch it on your PC to apply cool gif backgrounds. To choose files from the device itself, you will have to use the shortcut command “CTRL+F”, or you can also choose to insert the URL of the gif you want to use as your background.
Once your image gets uploaded into the software, double click on it to set it as your windows wallpaper. You can also choose a launch of gifs, create a playlist, and select the timer to change wallpaper regularly.
Part 2 How to Make GIF Background on Windows/Mac/Android/iPhone?
So, how can you create moving background gifs on your different devices like Windows/Mac/Android/iPhone?
In case you thought that was hard, you were entirely mistaken. Now, you can easily create or customize cool background gifs for your computer, tablet, phone, or other devices that you own. The best part is that you don’t need any technical skills to use different tools.
You can create gifs with the help of many tools such as Giphy and share them with your family, friends, and coworkers.
01Giphy
Giphy is a one-stop destination for all of your gifs needs. You can create or choose from thousands of gifs present in their library. Furthermore, one can make personalized gifs with all the tools they provide and add custom stickers, texts or different filters. There is also a live wallpaper section present in giphy, from where you can download hundreds of cool gif backgrounds and make your old machine look fabulous again.

02Pinterest
It’s no secret that Pinterest has a lot of great images, but did you know you can also find gif backgrounds here in various genres that you like and then download them?
It’s straightforward to use, and you can also find anime gif backgrounds on Pinterest if you are an anime fan.

03Tenor
This site offers online gif backgrounds. One may choose from a wide selection of wallpapers and backgrounds available on this site. Online Library is filled up with all sorts of aesthetic gif backgrounds and other types of background that people like.
A few more tools fit the need, but most of them are not reliable, and the tools mentioned above are currently the best ones available for you to use.

Part 3 How to Make a GIF Powerpoint Background?
If you make PowerPoint presentations, you can use various tools to modify your presentation. But did you know that you can also include an aesthetic gif background as part of your presentation?
The steps to creating a gif PowerPoint background are very simple, and below you will find all the steps you need to follow:
● You’ll need to choose the PPTx file that you want to use the GIF background on to get started. Then you can choose the specific slide.
● Navigate to the “design” tab, then to the “background” section. You will see a “background styles” option where you will have to select “format background” to complete the process.
● Select “fill” in the left-hand side panel of the appeared window. Now, select “picture or texture fill” and choose the “file” button, which will lead to another window.
● In the “look in” menu, find the folder or file where the required gif is present. Go on to select the “ok” option. You can either select “close” to apply the gif to a particular slide or “apply to all” to use the gif background in the whole presentation.
Part 4 How to Make GIF Without Background - Free & Efficiently?
One may also look for transparent gif maker websites that will help them make gifs without background and use them on different devices they own.
Here are a few websites that are best for this job; they won’t only help you make transparent gifs but also edit various features like delay time, animation speed etc.
01Using EzGif
Using EzGif is probably one of the best options available in the market at the moment. You can go to their website and create a transparent gif background of high resolution.
Doing that is easy; you need to upload PNG type images that don’t have a background or combine transparent background to form a gif. You can choose up to 2000 images with a maximum file size of 100 MB for all images combined.
To create a gif, go on their site, then to the “gif maker” section to upload the images, and click on “make a gif” to make a transparent gif from the selected images. Once the gif is created, you can use it as a moving gif background and share it with friends or family.
02Use animizer.net to create a gif without background
It is effortless to use software to create transparent gifs by uploading multiple transparent PNG images and combining them to form a gif.
You can use unlimited images for your gif and animated gif background. It also lets you adjust various settings for your transparent gifs like loops, animation speed and much more.
03Use filmora for making gifs without background easily
Wondershare Filmora Video Editor is an all in one tool that will help you create all sorts of gifs, including transparent gifs. You can take advantage of their easy to use tools that are fir for people who have no technical skills at all.
You can easily upload the images and remove their background in the software itself and later use it in the gif you are willing to create.

Wondershare Filmora - Best Video Editor for Mac/Windows
5,481,435 people have downloaded it.
Build unique custom animations without breaking a sweat.
Focus on creating epic stories and leave the details to Filmora’s auto features.
Start a creative adventure with drag & drop effects and endless possibilities.
Filmora simplifies advanced features to save you time and effort.
Filmora cuts out repetition so you can move on to your next creative breakthrough.
This is probably one of the best options if you are looking for an all in one tool for all your needs.
● Ending Thoughts →
● The techniques that we have talked about in this guide may help you discover things about gif backgrounds you have not known before.
● They are incredible and can help you utilize gifs in ways you hadn’t even considered.
● Create a moving gif background and apply it to any device easily.
● Of course, a simple background won’t provide the same type of effect as a moving gif. With this guide, you’ll learn about every tool that you may use and how to apply or create a cool gif background on your own.
Once you start using GIFs in your everyday conversations, there’s no going back. GIFs make the conversation more immersive and enjoyable and add a sense of emotion that is not possible with ordinary text. You probably loved some gifs more than others, or there were moments when you wanted to turn them into gifs and wished you could use them as a gif background on your device or presentation but couldn’t figure out how to do it. But, now you don’t have to bury your wish any longer. During this article, you will learn everything there is to know about all the different ways you can use gifs as your background and many more. In addition, you will learn how to use them as your background and how to create them.
In this article
01 [How to Use a GIF as Your Desktop Background on Windows](#Part 1)
02 [How to Make GIF Background on Windows/Mac/Android/iPhone](#Part 2)
03 [How to Make GIF Powerpoint Background](#Part 3)
04 [How to Make GIF Without Background - Free & Efficiently?](#Part 4)
Part 1 How to Use a GIF as Your Desktop Background on Windows?
Although Windows doesn’t have native support to keep animated gif backgrounds, you can use third-party services to keep gifs as background images.
Using Plastuer or BioniX wallpaper changer as a 3rd party software is the best way to use animated gifs for your desktop.
As a starting point, we’ll cover plastuer, which uses WebGL and chromium-browser to make gifs as your background.
The software includes selecting different screens where you want the wallpaper to appear, making it possible to apply it to different screens at once.
To select the gif you want:
● You can paste the URL of the gif you want to use.
● You can also use the “create playlist” field to add multiple gifs as your background.
● You can select a file from your device using the “select file” option.
● Or you can choose from hundreds of gifs present in the plastuer library.
● You can disable the wallpaper whenever you wish by clicking on the “disable wallpaper” option.
How to use the bioniX wallpaper changer?
BioniX comes with several options that one may need to apply to their Windows device’s background, and animated gif backgrounds are one of them.
You will need to download the software and once it is installed, launch it on your PC to apply cool gif backgrounds. To choose files from the device itself, you will have to use the shortcut command “CTRL+F”, or you can also choose to insert the URL of the gif you want to use as your background.
Once your image gets uploaded into the software, double click on it to set it as your windows wallpaper. You can also choose a launch of gifs, create a playlist, and select the timer to change wallpaper regularly.
Part 2 How to Make GIF Background on Windows/Mac/Android/iPhone?
So, how can you create moving background gifs on your different devices like Windows/Mac/Android/iPhone?
In case you thought that was hard, you were entirely mistaken. Now, you can easily create or customize cool background gifs for your computer, tablet, phone, or other devices that you own. The best part is that you don’t need any technical skills to use different tools.
You can create gifs with the help of many tools such as Giphy and share them with your family, friends, and coworkers.
01Giphy
Giphy is a one-stop destination for all of your gifs needs. You can create or choose from thousands of gifs present in their library. Furthermore, one can make personalized gifs with all the tools they provide and add custom stickers, texts or different filters. There is also a live wallpaper section present in giphy, from where you can download hundreds of cool gif backgrounds and make your old machine look fabulous again.
02Pinterest
It’s no secret that Pinterest has a lot of great images, but did you know you can also find gif backgrounds here in various genres that you like and then download them?
It’s straightforward to use, and you can also find anime gif backgrounds on Pinterest if you are an anime fan.
03Tenor
This site offers online gif backgrounds. One may choose from a wide selection of wallpapers and backgrounds available on this site. Online Library is filled up with all sorts of aesthetic gif backgrounds and other types of background that people like.
A few more tools fit the need, but most of them are not reliable, and the tools mentioned above are currently the best ones available for you to use.
Part 3 How to Make a GIF Powerpoint Background?
If you make PowerPoint presentations, you can use various tools to modify your presentation. But did you know that you can also include an aesthetic gif background as part of your presentation?
The steps to creating a gif PowerPoint background are very simple, and below you will find all the steps you need to follow:
● You’ll need to choose the PPTx file that you want to use the GIF background on to get started. Then you can choose the specific slide.
● Navigate to the “design” tab, then to the “background” section. You will see a “background styles” option where you will have to select “format background” to complete the process.
● Select “fill” in the left-hand side panel of the appeared window. Now, select “picture or texture fill” and choose the “file” button, which will lead to another window.
● In the “look in” menu, find the folder or file where the required gif is present. Go on to select the “ok” option. You can either select “close” to apply the gif to a particular slide or “apply to all” to use the gif background in the whole presentation.
Part 4 How to Make GIF Without Background - Free & Efficiently?
One may also look for transparent gif maker websites that will help them make gifs without background and use them on different devices they own.
Here are a few websites that are best for this job; they won’t only help you make transparent gifs but also edit various features like delay time, animation speed etc.
01Using EzGif
Using EzGif is probably one of the best options available in the market at the moment. You can go to their website and create a transparent gif background of high resolution.
Doing that is easy; you need to upload PNG type images that don’t have a background or combine transparent background to form a gif. You can choose up to 2000 images with a maximum file size of 100 MB for all images combined.
To create a gif, go on their site, then to the “gif maker” section to upload the images, and click on “make a gif” to make a transparent gif from the selected images. Once the gif is created, you can use it as a moving gif background and share it with friends or family.
02Use animizer.net to create a gif without background
It is effortless to use software to create transparent gifs by uploading multiple transparent PNG images and combining them to form a gif.
You can use unlimited images for your gif and animated gif background. It also lets you adjust various settings for your transparent gifs like loops, animation speed and much more.
03Use filmora for making gifs without background easily
Wondershare Filmora Video Editor is an all in one tool that will help you create all sorts of gifs, including transparent gifs. You can take advantage of their easy to use tools that are fir for people who have no technical skills at all.
You can easily upload the images and remove their background in the software itself and later use it in the gif you are willing to create.
Wondershare Filmora - Best Video Editor for Mac/Windows
5,481,435 people have downloaded it.
Build unique custom animations without breaking a sweat.
Focus on creating epic stories and leave the details to Filmora’s auto features.
Start a creative adventure with drag & drop effects and endless possibilities.
Filmora simplifies advanced features to save you time and effort.
Filmora cuts out repetition so you can move on to your next creative breakthrough.
This is probably one of the best options if you are looking for an all in one tool for all your needs.
● Ending Thoughts →
● The techniques that we have talked about in this guide may help you discover things about gif backgrounds you have not known before.
● They are incredible and can help you utilize gifs in ways you hadn’t even considered.
● Create a moving gif background and apply it to any device easily.
● Of course, a simple background won’t provide the same type of effect as a moving gif. With this guide, you’ll learn about every tool that you may use and how to apply or create a cool gif background on your own.
3 Ways To Stream And Record At The Same Time
The popularity of live streaming has exploded recently. A live stream is simply a video broadcast in real-time over the internet. It’s a great way to connect with people directly, whether for a gaming session, a cooking show, or a Q&A.
Many reasons are there for which why you might want to live stream and record at the same time. For instance, keep a record of your gameplay or stream highlights for future editing or use your live stream to generate content for your YouTube channel.
Whatever your reasons, this article will show you how to do live streaming and recording at the same time using three different methods.
Way 1. Use OBS To Stream And Record Video At The Same Time
OBS, or Open Broadcaster Software, is a free and open-source tool that allows you to stream and record video at the same time, which can be useful if you want to live-stream your gameplay on Twitch or record a tutorial for YouTube.
Key Features of OBS
- Compatible with Mac OS X, Linux, and Windows operating systems.
- Requires at least 4 GB of storage space and an Intel i5 2000-series processor or higher DirectX 10 capable graphics card.
- High-performance video capturing and mixing in real-time.
- With Custom Transitions, you can set up an unlimited number of scenes you can switch between seamlessly.
- Intuitive audio mixer.
- Easy-to-use and simple configuration options.
Steps
Here’s an easy and quick guide on how to use OBS Studio to stream and record videos simultaneously:
Step1 Download OBS Studio from the official website and install it on your computer or laptop.
Step2 Launch OBS Studio and go to the Settings menu. Find the Recording section under the Output tab.
Step3 Click “Start Recording” to manually start the recording or head to the General Tab and checkmark the box before “Automatically Record When Streaming.”
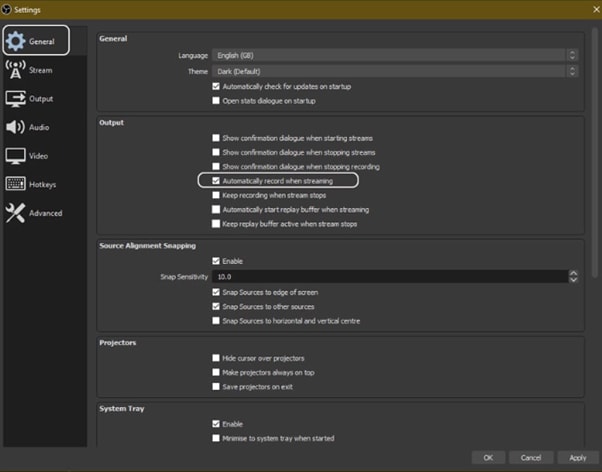
Step4 Finally, click “Apply” to save your settings. Now when you start your stream, the recording will also begin simultaneously.
Way 2. Use Twitch To Save Your Streams
Twitch is the most popular and best live streaming platform that allows gamers to broadcast their gameplay to a live audience and also gives them the ability to save their past broadcasts, or “streams.”
This feature can be useful to save your live stream for later viewing or share your stream with someone who missed it.
Features
Twitch offers a variety of features that make it a unique and powerful game streaming platform. Some of the most notable ones are:
- Live streaming: Twitch allows gamers to share their gameplay in real-time with other gamers around the world. This live aspect of the platform makes it unique and engaging.
- Social interaction: Twitch offers a variety of features that allow gamers to connect with each other, including chat rooms, forums, and user-generated content.
You can save your stream on Twitch in two ways:
- Use the “Highlights” feature, which allows you to save specific moments from your live stream.
- Download your stream’s entire VOD (video on demand) after it has ended.
Steps
Here are the quick steps to saving a stream on your PC from Twitch. But first, you need to enable Twitch VODs before starting your broadcast in the following way:
Step1 Visit Twitch and sign in to your account. Now, click the “Profile” icons and go to “Creator Dashboard.”
Step2 Head to Setting from the left-sidebar and click the “Stream” option. Scroll down and find the VOD Settings. Toggle the buttons next to “Store Past Broadcasts.”
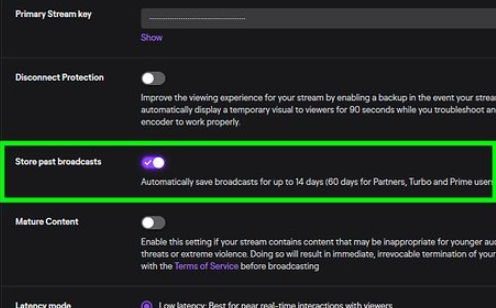
Step3 To publish your VODs instantly after broadcasting, toggle the button next to “Always Publish VODs.”
Now, to download the recordings of your broadcasts to your PC, do the following steps in sequence:
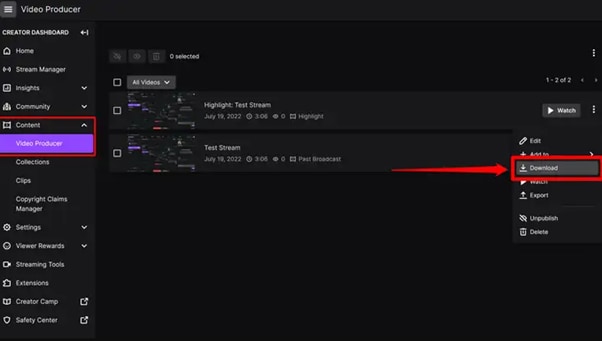
Step1 Head to the Creator Dashboard, find the “Content” section in the left sidebar, and click “Video Producer.”
Step2 Find the stream (VOD or Highlights) you want to download and on the right side, click the three dots.
Step3 Finally, click the “Download” option and let Twitch prepare your video. You will then get the stream’s recording in MP4 format.
Way 3. Use Screen Recorder To Record Your Streams
Using a screen recorder is a great way to record your live stream because it lets you capture the full screen of your PC. Although there are many different screen recorders to choose from, we recommend using Filmora.
Wondershare Filmora is a powerful editor with easy-to-use screen recording capabilities, giving you everything you need to record and stream your video at the same time. The software is free to use and has an intuitive interface.
Features of Filmora
- Support for both Mac OS X and Windows operating systems.
- Ability to record your PC screen, audio, and webcam all at once
- A variety of video editing features
- An easy-to-use interface
Steps
Here’s how to use Filmora for recording while streaming:
Step1 Head to the official Filmora website, download the software and install it on your PC.
Step2 Launch Filmora 11 and click “New project” in the main interface. Click “File” from the top toolbar and scroll down to “Record media.” From the drop-down menu, select “Record PC Screen.”
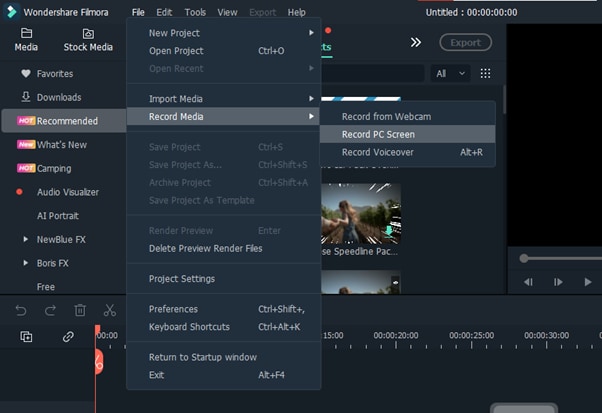
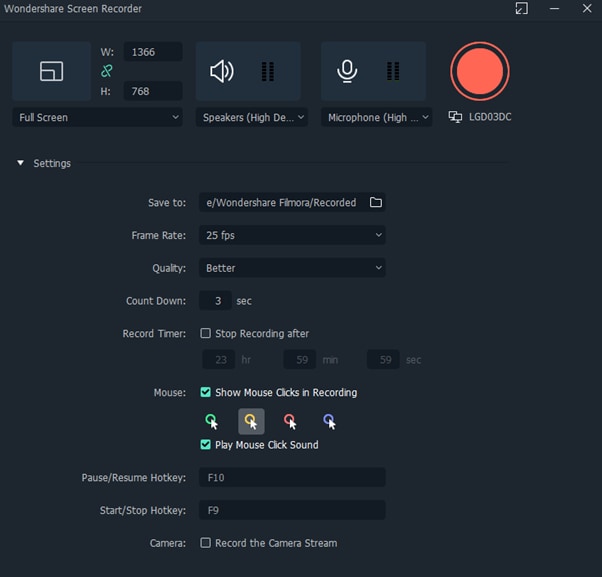
Step3 A new “Wondershare Screen Recorder” window will pop up. You can set up a full screen, custom or target screen recording, speaker, and microphone settings. If you want more Settings, click the drop-down icon.
Step4 Click the Start icon to begin your recording. Afterward, click the Stop icon to stop the recording, and your stream will be saved in the selected destination.
Conclusion
In this article, we’ve discussed three step-by-step methods to help you do live streaming and recording at the same time. With these solutions at your disposal, you’ll be able to save your VODs with ease.
It is best to choose only one software to start with to avoid the time-consuming trial-and-error process. If you want to add another tool, do so later; otherwise, you will waste your precious time and resources.
Give these methods a shot, and eventually, you will find your groove—and become accustomed to just how easy it is to record and stream a video simultaneously.
Free Download For Win 7 or later(64-bit)
Free Download For macOS 10.14 or later
Free Download For macOS 10.14 or later
TXT to SRT: 3 Effective Ways to Convert TXT to SRT
Adding subtitles to your videos allow more people to understand and relate to your content.
If your video script is in a text file (.txt), and you need to convert the TXT to SRT to create a subtitles file for your video.
You can create your subtitles files just by using plain text that contains your video script. If you are wondering how you can convert text to SRT, then we have all the answers.
Let’s find out.
- Solution 3: How to Edit TXT File and Save It into .SRT Without Any Tools
- Bonus Tip: Editing SRT Subtitles with Fancy Effects to Make Your Video More Impressive
Can You Convert TXT to SRT?
Yes, you can convert .txt to .srt document. Let’s understand a little bit of context first. You can even hardcode your subtitles to your video, and automatically generate subtitle files and transcriptions from any audio and video file format. There are many online and offline tools come to help. And we’ll introduce some in detail in the following part.
Why Do You Need to Convert TXT to SRT?
A word file in TXT format or having a script of the video doesn’t indicate the start and stop time of the subtitle content. An SRT file, on the other hand, has the information about captioning and the start and stop times of the subtitles.
To put it simply, a TXT file is unformatted and needs to be converted into an SRT file so it has all the necessary information to be used as subtitles.
There are different ways to do that, and we’ll discuss three solutions in this article.
Solution 1: Get a TXT-to-SRT Converter Online
Out of the different ways to convert TXT to SRT, using an online converter is the easiest one. You can access it online without having to download it on your computer.
Most online TXT to SRT converters allow drag & drop functionality and are easy to use. While plenty of such tools are available online, we’ll review a few here.
Ebby

Ebby is essentially a transcription tool that converts audio to text. You can use it to create an automatic transcription and to convert one TXT to SRT format. It uses voice recognition technology to create text with timestamps, making them subtitles for your videos. It supports over 100 languages and dialects. You can export transcripts in different formats.
Pros
- Equipped with speech recognition technology
- Features playback controls
- Offers 24/7 support
- Offers a free trial
Cons
- Only available online
- Not suitable for manual transcription
Features
- You can upload both audio and video files.
- It can create automatic transcriptions.
- Supports multiple languages to produce subtitles in all popular languages.
- It’s equipped with speech recognition technology.
- Apart from subtitles, it produces closed captions as well to help deaf people.
- You can edit the text within the tool.
Best for
Podcasters, lawyers, journalists, authors, and marketing experts.
Rev

Another transcription tool, Rev is widely used by more than 170,000 users. It can cater to the growing needs of its users. Its pricing model is a bit different from other names in the industry.
Pros
- Supports both automated and manual transcription
- Up to 99% accuracy in manual transcription
- Closed captions
Cons
- Per video-based pricing model
Features
- It works on AI and Machine Learning models to produce accurate subtitles.
- It allows you to annotate subtitles for better understanding.
- File sharing is allowed on Rev.
- You can search particular text using its Full-Text Search functionality.
- It supports 16 different languages.
- It is capable of Natural Language Processing.
Best for
Rev’s users belong to a variety of industries including journalism, video production, medical, podcasters, and writers.
ToolSlick

It’s an online platform dedicated to a variety of functions, and converting files from one format to another is one of them. It has tools for handling and processing finance, math, editing, and other tasks.
Pros
- Easy to use
- Supports major languages
- Manually select start and end times
Cons
- Ads on the website can be inconvenient
Features
- It has a dedicated section for financial calculations.
- You can perform mathematics calculations using its Math section.
- It allows you to generate code in different programming languages.
- It has video editing tools.
Best for
ToolSlick is an easy to use online tool to convert TXT to SRT for beginners.
How to Convert Txt to SRT Using an Online Converter
Here, we take ToolSlick as an example to show you how to use an online tool to convert text to an SRT file. Let’s get into it now.
1. Open ToolSlick online converter on your browser. In the below image, you can see how its interface looks. All you need to do is to input or paste the TXT content in the Input box. Make sure to write each line separately.

2. After writing the content, go to the Settings section and specify the subtitle’s Start Time and End Time. You can also change the target language.

3. Now, you can hit the CONVERT button to convert TXT to SRT. The output file will be automatically downloaded to your computer. Also, the SRT file content appears in the Output box.

Solution 2: Convert TXT to SRT Using Converting Software
Having an online TXT to SRT converter means you can access it online without downloading it on your computer. But, you’ll always have to rely on an internet connection to access one. Instead, you can download and install software on your laptop or computer and have the freedom to convert TXT to SRT on the go.
There’s a variety of converting software available in the market. Let’s review some of them.
UniConverter

Formerly known as Wondershare Video Converter Ultimate, Wondershare Uniconverter is an best subtitle editor for Mac and Windows, and it enables everyone to create subtitles, add, convert subtitles for videos and movies permanently.
Besides, it is also a powerful video file converter, video compressor, video editor, DVD burner, and more.
Pros
- Support converting subtitles in more than 18 formats, export in AAS/SSA/SRT, etc
- 30x faster converting speed without losing information
- Free trial available
Cons
- Not fast while rendering big files
Features
- It’s an all-in-one tool for video, audio and subtitle compression, conversion, download, and more.
- You can preview to check the quality of the output.
- It offers 90x faster-converting speed.
- It can auto-generate subtitles and add them to the video.
- It can solve the problem of video jitter.
- You can convert normal videos to VR videos and enjoy them on your VR headset.
Best for
For download, burn, compress, and conversion.
Batch Subtitles Converter

It’s a dedicated subtitles converting program. You can create subtitles in a variety of formats for videos in multiple formats. It’s very easy to use with a simple interface.
Pros
- Supports batch processing
- Free to use
- Framerate and encoding can be set as required
Cons
- It might seem like an outdated tool
Features
- It supports more than 20 output formats.
- You can set custom font sizes for the subtitles.
- You can convert 3 files simultaneously.
- It allows you to change the encoding and frame rate.
Best for
For anyone who’s looking for a free and easy tool
Jubler

It’s a basic tool that can be used to edit text-based subtitles. You can use it to author new subtitles or convert text files to subtitles. In addition, you can transform, correct, and refine existing subtitles.
Pros
- Free to use
- A powerful tool to create and edit subtitles
Cons
- Outdated interface, not easy-to-use
Features
- It supports most of the popular formats.
- You can preview subtitles to see whether or not they serve the purpose.
- It has spell-checking capabilities to indicate mistakes in your subtitles.
- It has a translation mode to change the language.
Best for
Anyone who’s looking for a powerful and free subtitle creator.
After getting an overview of all of these txt-to-srt converting software, we are here to tell take Wondershare UniConverter as an example to show you concrete how-to steps.
Here’s how you can do it:
1. Download and install UniConverter on your computer and launch it.
2. Access the Subtitle Editor and upload the file you want to add subtitles to.

3. Here, you can either import a subtitle file, manually add subtitles, or opt for Text to Subtitles.

4. You can set the font style, color, size, and timeline as you want.

5. Now, hit the Export button and select SRT Files to download the subtitles file. You can also export it as an MP4 video file.

Since you selected to save the file as SRT Files, the text you wrote in the manual subtitles section will convert to an SRT file.
Solution 3: How to Edit TXT File and Save It into .SRT Without Any Tools
While there are different online and downloadable TXT to SRT converting tools available out there, you might not have access to them all the time. That’s when knowing “how to edit TXT file and save it as SRT file” would come in handy.
Here’s how you can edit the TXT file without using any external software and online tools:
- If you’re using a Windows computer, then you can open your TXT document in Microsoft Notepad. For a Mac computer, you can use TextEdit. On the very first line of the document, type a number to identify the subtitle’s section. Each section indicates an individual subtitle, which could be a sound or one sentence from a dialogue.
- The next line would be the timestamp of the subtitle. Timestamp follows this formatting: hours: minutes: seconds, milliseconds.
- In the next line, write your caption.
- Now add double space between the next section and write it as you did for the previous section.
Now that you’ve formatted the TXT file to use it as a subtitle file, let’s save it .SRT format. Here’s how to save your file as .SRT:
1. Go to the File tab and select Save as.

2. Now, save the document with a .**SRT** extension.

![]()
Note: the advantage of converting TXT file to SRT manually is that it does not require tools and is free, but it does have disadvantages. The bad site is that it is troublesome, time-consuming, and easy to get format mistakes. That is why we recommend professional converting tools most for TXT to SRT conversion.
Now, you can use this file as the subtitle file while watching the video on any video playback software such as the VLC media player.
Bonus Tip: Editing SRT Subtitles with Fancy Effects to Make Your Video More Impressive
When you add subtitles to your video, they typically appear in plain font. If you only need subtitles for their functionality, then a plain font would do the job. However, if you want to make your videos more appealing and engaging, then it calls for adding fancy effects to your subtitles.
No TXT-to-SRT converting tool will make your subtitles fancy by adding effects to them, so you need a professional video editing tool like Filmora .
Wondershare Filmora is a high-quality and professional video editing software with a lot of features. From cut, merge, crop, trim, to transition, effects, and more – a lot can be done using Filmora.
How to Edit SRT Subtitles with Filmora
Following are the steps to add effects to your SRT subtitles and make them look appealing:
Free Download For Win 7 or later(64-bit)
Free Download For macOS 10.14 or later
Step1 Download and install Filmora
Firstly, you need to go to Wondershare Filmora’s official website and download it on your computer. Then, launch the setup and install it on your computer.

Step2 Open Filmora and import the video
After installation, open Filmora and import the video to which you want to add subtitles.

Step3 Add SRT subtitles file
Once your video is open in the editor, use the import option and select your SRT subtitle file, and choose “Advanced Edit” to change styling of the SRT subtitles.

Customize the subtitle styles and then edit it in the subtitle editing window.

After you’re done editing, click the Export button to save the video.
Hot FAQs on Converting TXT to SRT
1. How to Open and Edit a Text File on a Mac
You can open and edit a text file on a Mac computer using its built-in TextEdit software.
2. What is the difference between SRT and TXT?
TXT is a file format for a text file or Word document. A TXT file might have caption content for a video, but it can’t be used as a subtitle file since it’s unformatted. An SRT file, on the other hand, has the information about captioning and the start and stop times of the subtitles. It’s in a proper format to be used as a subtitle file.
3. Is TXT a subtitle file?
TXT, itself isn’t a subtitle file. It might have the content for subtitles but can’t be used as a subtitle file.
Final Words
This article has shown you some best tools and a concrete step-by-step guide on how you can convert TXT to SRT and use it as your subtitle file. We hope you find it resourceful and are now aware of the different methods to TXT to SRT conversion.
- UniConverter
- Batch Subtitles Converter
- Jubler
- Solution 3: How to Edit TXT File and Save It into .SRT Without Any Tools
- Bonus Tip: Editing SRT Subtitles with Fancy Effects to Make Your Video More Impressive
Can You Convert TXT to SRT?
Yes, you can convert .txt to .srt document. Let’s understand a little bit of context first. You can even hardcode your subtitles to your video, and automatically generate subtitle files and transcriptions from any audio and video file format. There are many online and offline tools come to help. And we’ll introduce some in detail in the following part.
Why Do You Need to Convert TXT to SRT?
A word file in TXT format or having a script of the video doesn’t indicate the start and stop time of the subtitle content. An SRT file, on the other hand, has the information about captioning and the start and stop times of the subtitles.
To put it simply, a TXT file is unformatted and needs to be converted into an SRT file so it has all the necessary information to be used as subtitles.
There are different ways to do that, and we’ll discuss three solutions in this article.
Solution 1: Get a TXT-to-SRT Converter Online
Out of the different ways to convert TXT to SRT, using an online converter is the easiest one. You can access it online without having to download it on your computer.
Most online TXT to SRT converters allow drag & drop functionality and are easy to use. While plenty of such tools are available online, we’ll review a few here.
Ebby
Ebby is essentially a transcription tool that converts audio to text. You can use it to create an automatic transcription and to convert one TXT to SRT format. It uses voice recognition technology to create text with timestamps, making them subtitles for your videos. It supports over 100 languages and dialects. You can export transcripts in different formats.
Pros
- Equipped with speech recognition technology
- Features playback controls
- Offers 24/7 support
- Offers a free trial
Cons
- Only available online
- Not suitable for manual transcription
Features
- You can upload both audio and video files.
- It can create automatic transcriptions.
- Supports multiple languages to produce subtitles in all popular languages.
- It’s equipped with speech recognition technology.
- Apart from subtitles, it produces closed captions as well to help deaf people.
- You can edit the text within the tool.
Best for
Podcasters, lawyers, journalists, authors, and marketing experts.
Rev
Another transcription tool, Rev is widely used by more than 170,000 users. It can cater to the growing needs of its users. Its pricing model is a bit different from other names in the industry.
Pros
- Supports both automated and manual transcription
- Up to 99% accuracy in manual transcription
- Closed captions
Cons
- Per video-based pricing model
Features
- It works on AI and Machine Learning models to produce accurate subtitles.
- It allows you to annotate subtitles for better understanding.
- File sharing is allowed on Rev.
- You can search particular text using its Full-Text Search functionality.
- It supports 16 different languages.
- It is capable of Natural Language Processing.
Best for
Rev’s users belong to a variety of industries including journalism, video production, medical, podcasters, and writers.
ToolSlick
It’s an online platform dedicated to a variety of functions, and converting files from one format to another is one of them. It has tools for handling and processing finance, math, editing, and other tasks.
Pros
- Easy to use
- Supports major languages
- Manually select start and end times
Cons
- Ads on the website can be inconvenient
Features
- It has a dedicated section for financial calculations.
- You can perform mathematics calculations using its Math section.
- It allows you to generate code in different programming languages.
- It has video editing tools.
Best for
ToolSlick is an easy to use online tool to convert TXT to SRT for beginners.
How to Convert Txt to SRT Using an Online Converter
Here, we take ToolSlick as an example to show you how to use an online tool to convert text to an SRT file. Let’s get into it now.
1. Open ToolSlick online converter on your browser. In the below image, you can see how its interface looks. All you need to do is to input or paste the TXT content in the Input box. Make sure to write each line separately.
2. After writing the content, go to the Settings section and specify the subtitle’s Start Time and End Time. You can also change the target language.
3. Now, you can hit the CONVERT button to convert TXT to SRT. The output file will be automatically downloaded to your computer. Also, the SRT file content appears in the Output box.
Solution 2: Convert TXT to SRT Using Converting Software
Having an online TXT to SRT converter means you can access it online without downloading it on your computer. But, you’ll always have to rely on an internet connection to access one. Instead, you can download and install software on your laptop or computer and have the freedom to convert TXT to SRT on the go.
There’s a variety of converting software available in the market. Let’s review some of them.
UniConverter
Formerly known as Wondershare Video Converter Ultimate, Wondershare Uniconverter is an best subtitle editor for Mac and Windows, and it enables everyone to create subtitles, add, convert subtitles for videos and movies permanently.
Besides, it is also a powerful video file converter, video compressor, video editor, DVD burner, and more.
Pros
- Support converting subtitles in more than 18 formats, export in AAS/SSA/SRT, etc
- 30x faster converting speed without losing information
- Free trial available
Cons
- Not fast while rendering big files
Features
- It’s an all-in-one tool for video, audio and subtitle compression, conversion, download, and more.
- You can preview to check the quality of the output.
- It offers 90x faster-converting speed.
- It can auto-generate subtitles and add them to the video.
- It can solve the problem of video jitter.
- You can convert normal videos to VR videos and enjoy them on your VR headset.
Best for
For download, burn, compress, and conversion.
Batch Subtitles Converter
It’s a dedicated subtitles converting program. You can create subtitles in a variety of formats for videos in multiple formats. It’s very easy to use with a simple interface.
Pros
- Supports batch processing
- Free to use
- Framerate and encoding can be set as required
Cons
- It might seem like an outdated tool
Features
- It supports more than 20 output formats.
- You can set custom font sizes for the subtitles.
- You can convert 3 files simultaneously.
- It allows you to change the encoding and frame rate.
Best for
For anyone who’s looking for a free and easy tool
Jubler
It’s a basic tool that can be used to edit text-based subtitles. You can use it to author new subtitles or convert text files to subtitles. In addition, you can transform, correct, and refine existing subtitles.
Pros
- Free to use
- A powerful tool to create and edit subtitles
Cons
- Outdated interface, not easy-to-use
Features
- It supports most of the popular formats.
- You can preview subtitles to see whether or not they serve the purpose.
- It has spell-checking capabilities to indicate mistakes in your subtitles.
- It has a translation mode to change the language.
Best for
Anyone who’s looking for a powerful and free subtitle creator.
After getting an overview of all of these txt-to-srt converting software, we are here to tell take Wondershare UniConverter as an example to show you concrete how-to steps.
Here’s how you can do it:
1. Download and install UniConverter on your computer and launch it.
2. Access the Subtitle Editor and upload the file you want to add subtitles to.
3. Here, you can either import a subtitle file, manually add subtitles, or opt for Text to Subtitles.
4. You can set the font style, color, size, and timeline as you want.
5. Now, hit the Export button and select SRT Files to download the subtitles file. You can also export it as an MP4 video file.
Since you selected to save the file as SRT Files, the text you wrote in the manual subtitles section will convert to an SRT file.
Solution 3: How to Edit TXT File and Save It into .SRT Without Any Tools
While there are different online and downloadable TXT to SRT converting tools available out there, you might not have access to them all the time. That’s when knowing “how to edit TXT file and save it as SRT file” would come in handy.
Here’s how you can edit the TXT file without using any external software and online tools:
- If you’re using a Windows computer, then you can open your TXT document in Microsoft Notepad. For a Mac computer, you can use TextEdit. On the very first line of the document, type a number to identify the subtitle’s section. Each section indicates an individual subtitle, which could be a sound or one sentence from a dialogue.
- The next line would be the timestamp of the subtitle. Timestamp follows this formatting: hours: minutes: seconds, milliseconds.
- In the next line, write your caption.
- Now add double space between the next section and write it as you did for the previous section.
Now that you’ve formatted the TXT file to use it as a subtitle file, let’s save it .SRT format. Here’s how to save your file as .SRT:
1. Go to the File tab and select Save as.
2. Now, save the document with a .**SRT** extension.
![]()
Note: the advantage of converting TXT file to SRT manually is that it does not require tools and is free, but it does have disadvantages. The bad site is that it is troublesome, time-consuming, and easy to get format mistakes. That is why we recommend professional converting tools most for TXT to SRT conversion.
Now, you can use this file as the subtitle file while watching the video on any video playback software such as the VLC media player.
Bonus Tip: Editing SRT Subtitles with Fancy Effects to Make Your Video More Impressive
When you add subtitles to your video, they typically appear in plain font. If you only need subtitles for their functionality, then a plain font would do the job. However, if you want to make your videos more appealing and engaging, then it calls for adding fancy effects to your subtitles.
No TXT-to-SRT converting tool will make your subtitles fancy by adding effects to them, so you need a professional video editing tool like Filmora .
Wondershare Filmora is a high-quality and professional video editing software with a lot of features. From cut, merge, crop, trim, to transition, effects, and more – a lot can be done using Filmora.
How to Edit SRT Subtitles with Filmora
Following are the steps to add effects to your SRT subtitles and make them look appealing:
Free Download For Win 7 or later(64-bit)
Free Download For macOS 10.14 or later
Step1 Download and install Filmora
Firstly, you need to go to Wondershare Filmora’s official website and download it on your computer. Then, launch the setup and install it on your computer.
Step2 Open Filmora and import the video
After installation, open Filmora and import the video to which you want to add subtitles.
Step3 Add SRT subtitles file
Once your video is open in the editor, use the import option and select your SRT subtitle file, and choose “Advanced Edit” to change styling of the SRT subtitles.
Customize the subtitle styles and then edit it in the subtitle editing window.
After you’re done editing, click the Export button to save the video.
Hot FAQs on Converting TXT to SRT
1. How to Open and Edit a Text File on a Mac
You can open and edit a text file on a Mac computer using its built-in TextEdit software.
2. What is the difference between SRT and TXT?
TXT is a file format for a text file or Word document. A TXT file might have caption content for a video, but it can’t be used as a subtitle file since it’s unformatted. An SRT file, on the other hand, has the information about captioning and the start and stop times of the subtitles. It’s in a proper format to be used as a subtitle file.
3. Is TXT a subtitle file?
TXT, itself isn’t a subtitle file. It might have the content for subtitles but can’t be used as a subtitle file.
Final Words
This article has shown you some best tools and a concrete step-by-step guide on how you can convert TXT to SRT and use it as your subtitle file. We hope you find it resourceful and are now aware of the different methods to TXT to SRT conversion.
Also read:
- 2024 Approved Want to Add a Motion Blur Effect to Your Photos? This Step-by-Step Tutorial Will Show You How to Use GIMP Software to Get the Effect You Want
- Updated The Best Cinematic LUTs in The Market
- Updated Splice Video Editor Online - Get Your Videos Splice Easily
- New In 2024, Best Tips for Better Event Videography
- New 2024 Approved 6 Best Text to Speech Generators for YouTube Videos Windows, Mac, Android, iPhone & Online
- Get 15 Absolutely-Free LUTs From This Article as Well as Get an Insight on How Cinematic LUTs Affect Your Film
- In 2024, “Create. Edit. Share. Transform Your Videos with KineMaster! Powerful Tools, Easy to Use.” – a Few Words We Read when We Come up with the Official Web-Site of KineMaster, a Mobile Video Editing Application
- New How Have Game Recording Software Improved Their Stature in the Market? An Overview for 2024
- In 2024, How to Create Cinematic Style Videos?
- 22 Free Video Editing Software to Save Your Money and Time for 2024
- In 2024, Montage Makes It Easy to Create and Share Videos. This Article Will Explain What It Can Do and Show You Examples of Movies that Use Montage
- In 2024, What Is Lumetri Color and How Do You Use It in Adobe After Effects? Find Out the Numerous Functions of Lumetri Panel and Ways to Apply Them to Your Video
- Updated YouTube Being One of the Most Used Video Platforms Uses Artificial Intelligence to Recommend Videos. Click Here to Know About YouTube AI in Detail
- In 2024, How to Create Sports Intro and YouTube Endscreen?
- 2024 Approved Learn How to Feather Shapes in After Effects and Add a Professional Touch to Your Designs. This Comprehensive Guide Covers Everything From the Basics to Advanced Techniques. Perfect for Beginners and Experts Alike
- 2024 Approved Best 6 WebM to GIF Converters
- 7 Best GoPro Video Editors for Mac
- New 2024 Approved Hitfilm Express Video Editor Review
- How To Add Motion Blur In Davinci Resolve?
- How to Create and Use Adjustment Layers in After Effects for 2024
- Updated Have a Desire to Uplift Your Editing Creativity with Trying Hands at Working with Storyboards? Keep Reading to Have a Comprehensive Understating of the Workflow Through Stepwise User Guides
- Updated 10 Best Voice Over Generators Windows, Mac, Android, iPhone, and Online for 2024
- Updated Top-Rated Android Apps For Slowing Down Motion
- New How To Edit Youtube Videos In Simple Steps for 2024
- Updated Best Free LUTs to Use for 2024
- New 2024 Approved Want Make a Slide Show Video? Heres How
- New 2024 Approved 10 Catchy Pixel Art Wallpapers and How to Custom Your Own with Ease
- Updated The Glitch Effect Shows Errors and Flaws in the Image or a Video. The Write-Up Presents the Complete Procedure of Adding Premiere Pros Glitch Effect and Introduces Eight Free Glitch Effects
- Updated A Complete Overview of VSCO Video Editor for 2024
- 2024 Approved Slideshow Makers Are On-Demand as They Come with Multiple Possibilities for Both Professional and Personal Uses. Gradually, the Best Software to Make Slideshows Is Always Welcomed to Save Time and Effort without Compromising the Quality
- 2024 Approved Hitfilm Express Video Editor Review
- Updated In 2024, Little Known Ways of Adding Emojis to Photos on iPhone & Android
- In 2024, Unlocking the Power of Smart Lock A Beginners Guide for Vivo Y17s Users
- In 2024, A Step-by-Step Guide on Using ADB and Fastboot to Remove FRP Lock from your Oppo Find N3 Flip
- In 2024, CatchEmAll Celebrate National Pokémon Day with Virtual Location On Vivo Y36 | Dr.fone
- Infinix Hot 30i Bootloop Problem, How to Fix it Without Data Loss | Dr.fone
- Ways to trade pokemon go from far away On Honor X9a? | Dr.fone
- In 2024, Forgot iPhone Passcode Again? Unlock iPhone 11 Pro Without Passcode Now | Dr.fone
- In 2024, How to Change Lock Screen Wallpaper on Samsung Galaxy F15 5G
- New 2024 Approved Translate Live Video Making It Possible With The Best Tool
- In 2024, 10 Fake GPS Location Apps on Android Of your Oppo A56s 5G | Dr.fone
- How To Stream Anything From OnePlus Open to Apple TV | Dr.fone
- 15 Best Strongest Pokémon To Use in Pokémon GO PvP Leagues For Xiaomi Mix Fold 3 | Dr.fone
- 10 Free Location Spoofers to Fake GPS Location on your Samsung Galaxy XCover 7 | Dr.fone
- In 2024, Techniques on How to Make After Effects 2D Animation
- In 2024, How to use Snapchat Location Spoofer to Protect Your Privacy On OnePlus 12? | Dr.fone
- In 2024, How To Unlock Any Vivo Y200 Phone Password Using Emergency Call
- In 2024, 9 Mind-Blowing Tricks to Hatch Eggs in Pokemon Go Without Walking On Motorola Edge 40 | Dr.fone
- Fake the Location to Get Around the MLB Blackouts on Infinix Smart 8 HD | Dr.fone
- How to Intercept Text Messages on Vivo Y36i | Dr.fone
- A Full Review for iTools Virtual Location and Top 5 Alternatives For Apple iPhone 15/iPad | Dr.fone
- New Top 10 AI Avatar Generators for 2024
- Reliable User Guide to Fix Xiaomi Redmi K70 Running Slow and Freezing | Dr.fone
- Fix the Error of Unfortunately the Process.com.android.phone Has Stopped on Vivo S18 Pro | Dr.fone
- All About Factory Reset, What Is It and What It Does to Your OnePlus Nord CE 3 Lite 5G? | Dr.fone
- In 2024, How to Show Wi-Fi Password on Oppo Find N3
- In 2024, How Poco M6 Pro 5G Mirror Screen to PC? | Dr.fone
- Title: 2024 Approved Top 8 AR Apps for Android and iOS | Help You See the World of AR
- Author: Chloe
- Created at : 2024-05-20 03:38:21
- Updated at : 2024-05-21 03:38:21
- Link: https://ai-editing-video.techidaily.com/2024-approved-top-8-ar-apps-for-android-and-ios-help-you-see-the-world-of-ar/
- License: This work is licensed under CC BY-NC-SA 4.0.
