
:max_bytes(150000):strip_icc():format(webp)/GettyImages-155096051-5b1bf60d43a1030036cfac94.jpg)
2024 Approved Top Tips for Camtasia Freeze-Frame
Top Tips for Camtasia Freeze-Frame
Best Tips of Camtasia Freeze Frame
An easy yet powerful editor
Numerous effects to choose from
Detailed tutorials provided by the official channel
A freeze-frame is a technique whereby editors can suddenly halt motion in a film to make it look like a photograph. Then the still shot in the movie is usually used to create suspense or add emphasis to a scene. When freeze-frame gets added at the film’s end, it leaves the viewer guessing what will happen next.

Freezing or extending a frame will allow users to pace their video better. More importantly, freeze-frame applies on a per track basis, which helps buy users more time for a voiceover or an annotation. This article will teach you how to freeze-frame in Camtasia perfectly.
In this article
01 [How to Do Freeze-frame or Extended Frame in Camtasia?](#Part 1)
02 [What’s the Best Freeze-frame Video Editing Effect in Camtasia?](#Part 2)
03 [Best 5 Alternatives to Freeze-frame](#Part 3)
Part 1 How to Do Freeze-frame or Extended Frame in Camtasia?
If you are looking to bring in more creativity to your video clips by doing freeze-frame in Camtasia or extend frame, here is a step-by-step guide:
Step 1: Select the Video Part and Enter Duration
You have to move the Playhead to the frame if you want to extend. Then right-click on the track you wish to extend to choose the Extend Frame option or press shift+E.
For the keyboard shortcut to work, select the track first.

Now, enter the desired duration in seconds.

This will, in turn, create a stitched clip, provided that the auto-stitch in preferences hasn’t been disabled.

In addition, if the auto-stitch has been disabled, the clip will be split into three, as shown below, with the middle clip containing the extended frame.

Step 2: Change the Duration
To change the freeze duration in Camtasia freeze frame, right-click on the still portion of the clip and choose the Duration option. However, this will work with both split segments and stitched segments.

Part 2 What’s the Best Freeze-frame Video Editing Effect in Camtasia?
The freeze-frame effect in Camtasia is an excellent feature with a unique, elegant glitch and warp design. This well-organized and straightforward template is perfect for any event and features a full HD version and different freeze time effects. It is easy to use and customize, render your new awesome video, and drop media.
Here is the best Camtasia freeze-frame video editing effect of 2021, which is how to extend the frame and customize the amount of time in Camtasia Studio:

Step 1: Upload the Video
Download the Camtasia software, install and open it on your PC. Then drag and drop the video that must be freeze-frame on the timeline.
Step 2: Select Video Portion and Duration
Play the click on the timeline and when it gets to the position, you want to freeze-frame, pause the video and left-click on the Playhead to select extend the frame.
Now, select the desired duration you want to extend the freeze-frame
Step 3: Extend Frame
Next is to go back to the timeline and left-click on the Playhead to select extend frame, then, click on split tool. After that, drag the extended frame to the upper new layer.
Step 4: Add Clip Speed
Right-click on the extended frame and apply “add clip speed” to select the amount of time required.
Step 5: Export and Save
Finally, reposition it back to the main track and play your video. Then, when you feel satisfied with the result, export and save it on your device.
For a more detailed, interactive explanation and understanding, watch the video
https://m.youtube.com/watch?v=j4zHxtflMsM
Part 3 Best 5 Alternatives to Freeze-frame
Here are the top five (5) alternatives to Camtasia freeze frames. We have mentioned their pros and cons for better understanding.
01**Wondershare Filmora Video Editor **
For Win 7 or later (64-bit)
For macOS 10.12 or later
Filmora is our first alternative for freeze frames in Camtasia. It is an easy-to-use video editing software with excellent tools and an outline of creative video effects. Being the best Mac video editor, it is safe to say you can directly make your freeze-frame effect from scratch.
Filmora is free to download, supports Mac and Windows devices, and has a practical freeze-frame effect function.
Pros:
● Ease of use
● No payment until required
● The full-featured video editing tool
● Tons of effects are available
Cons:
● Some effects are not free.

02Kinemaster
This is a free video editing application that edits your smartphone with much more fun and accessibility. It is equipped with top-notch editing tools and features and supports iOS and Android devices. Kinemaster is also a powerful application you can get creative with and makes it the top 5 alternatives to Camtasia freeze frame.
Pros:
● Easy-to-use editing tools.
● User-friendly interface.
Cons:
● There is a watermark at the end of the video
● Limited video format support.

03InShot
This is a free iOS and Android video editing application and a multi-featured application that assits you to get creative and edit videos with limitless features and the freeze-frame effect inclusive of its element.
Pros:
● Easy to use
● A wide range of quick, accessible features and editing tools to use.
Cons:
● Purchase needed to access the top features.
● Hardly intuitive.

04Videoshop video editor.
This is an effortless video editing application that is specifically for iOS devices. In addition, it comes furnished with remarkable video editing tools and stunning features to transform your video. This freeze-frame Camtasia alternative app is easy to use and gives your videos a creative shine.
Pros
● It is straightforward to use
● It has a detailed UI design
Cons:
● It has some glitches
● It has limited resolution support.
● The CIT can support a large amount of content.

05iMovie
iMovie application is popularly known to create and edit videos into a movie-like shine. However, the application is accessible for iOS video editing software equipped with the freeze-frame effect. iMovie is stocked with a bonus of powerful features to make your pop and stand out amongst others.
Pros:
● it has a user-friendly interface
● Allow users to share videos directly after editing
● It is straightforward and intuitive to use without guidelines
Cons:
● It supports a limited video format
● Video edits take up lots of phone storage.
● It crashes if video content is significant.

● Ending Thoughts →
● This article guided using the Camtasia freeze-frame and explained extending the freeze-frame features.
● The report also included the top 5 alternatives to freeze-frame Camtasia and rated Filmora as the number one due to its many latest effects in the upgraded version.
A freeze-frame is a technique whereby editors can suddenly halt motion in a film to make it look like a photograph. Then the still shot in the movie is usually used to create suspense or add emphasis to a scene. When freeze-frame gets added at the film’s end, it leaves the viewer guessing what will happen next.
Freezing or extending a frame will allow users to pace their video better. More importantly, freeze-frame applies on a per track basis, which helps buy users more time for a voiceover or an annotation. This article will teach you how to freeze-frame in Camtasia perfectly.
In this article
01 [How to Do Freeze-frame or Extended Frame in Camtasia?](#Part 1)
02 [What’s the Best Freeze-frame Video Editing Effect in Camtasia?](#Part 2)
03 [Best 5 Alternatives to Freeze-frame](#Part 3)
Part 1 How to Do Freeze-frame or Extended Frame in Camtasia?
If you are looking to bring in more creativity to your video clips by doing freeze-frame in Camtasia or extend frame, here is a step-by-step guide:
Step 1: Select the Video Part and Enter Duration
You have to move the Playhead to the frame if you want to extend. Then right-click on the track you wish to extend to choose the Extend Frame option or press shift+E.
For the keyboard shortcut to work, select the track first.
Now, enter the desired duration in seconds.
This will, in turn, create a stitched clip, provided that the auto-stitch in preferences hasn’t been disabled.
In addition, if the auto-stitch has been disabled, the clip will be split into three, as shown below, with the middle clip containing the extended frame.
Step 2: Change the Duration
To change the freeze duration in Camtasia freeze frame, right-click on the still portion of the clip and choose the Duration option. However, this will work with both split segments and stitched segments.
Part 2 What’s the Best Freeze-frame Video Editing Effect in Camtasia?
The freeze-frame effect in Camtasia is an excellent feature with a unique, elegant glitch and warp design. This well-organized and straightforward template is perfect for any event and features a full HD version and different freeze time effects. It is easy to use and customize, render your new awesome video, and drop media.
Here is the best Camtasia freeze-frame video editing effect of 2021, which is how to extend the frame and customize the amount of time in Camtasia Studio:
Step 1: Upload the Video
Download the Camtasia software, install and open it on your PC. Then drag and drop the video that must be freeze-frame on the timeline.
Step 2: Select Video Portion and Duration
Play the click on the timeline and when it gets to the position, you want to freeze-frame, pause the video and left-click on the Playhead to select extend the frame.
Now, select the desired duration you want to extend the freeze-frame
Step 3: Extend Frame
Next is to go back to the timeline and left-click on the Playhead to select extend frame, then, click on split tool. After that, drag the extended frame to the upper new layer.
Step 4: Add Clip Speed
Right-click on the extended frame and apply “add clip speed” to select the amount of time required.
Step 5: Export and Save
Finally, reposition it back to the main track and play your video. Then, when you feel satisfied with the result, export and save it on your device.
For a more detailed, interactive explanation and understanding, watch the video
https://m.youtube.com/watch?v=j4zHxtflMsM
Part 3 Best 5 Alternatives to Freeze-frame
Here are the top five (5) alternatives to Camtasia freeze frames. We have mentioned their pros and cons for better understanding.
01**Wondershare Filmora Video Editor **
For Win 7 or later (64-bit)
For macOS 10.12 or later
Filmora is our first alternative for freeze frames in Camtasia. It is an easy-to-use video editing software with excellent tools and an outline of creative video effects. Being the best Mac video editor, it is safe to say you can directly make your freeze-frame effect from scratch.
Filmora is free to download, supports Mac and Windows devices, and has a practical freeze-frame effect function.
Pros:
● Ease of use
● No payment until required
● The full-featured video editing tool
● Tons of effects are available
Cons:
● Some effects are not free.
02Kinemaster
This is a free video editing application that edits your smartphone with much more fun and accessibility. It is equipped with top-notch editing tools and features and supports iOS and Android devices. Kinemaster is also a powerful application you can get creative with and makes it the top 5 alternatives to Camtasia freeze frame.
Pros:
● Easy-to-use editing tools.
● User-friendly interface.
Cons:
● There is a watermark at the end of the video
● Limited video format support.
03InShot
This is a free iOS and Android video editing application and a multi-featured application that assits you to get creative and edit videos with limitless features and the freeze-frame effect inclusive of its element.
Pros:
● Easy to use
● A wide range of quick, accessible features and editing tools to use.
Cons:
● Purchase needed to access the top features.
● Hardly intuitive.
04Videoshop video editor.
This is an effortless video editing application that is specifically for iOS devices. In addition, it comes furnished with remarkable video editing tools and stunning features to transform your video. This freeze-frame Camtasia alternative app is easy to use and gives your videos a creative shine.
Pros
● It is straightforward to use
● It has a detailed UI design
Cons:
● It has some glitches
● It has limited resolution support.
● The CIT can support a large amount of content.
05iMovie
iMovie application is popularly known to create and edit videos into a movie-like shine. However, the application is accessible for iOS video editing software equipped with the freeze-frame effect. iMovie is stocked with a bonus of powerful features to make your pop and stand out amongst others.
Pros:
● it has a user-friendly interface
● Allow users to share videos directly after editing
● It is straightforward and intuitive to use without guidelines
Cons:
● It supports a limited video format
● Video edits take up lots of phone storage.
● It crashes if video content is significant.
● Ending Thoughts →
● This article guided using the Camtasia freeze-frame and explained extending the freeze-frame features.
● The report also included the top 5 alternatives to freeze-frame Camtasia and rated Filmora as the number one due to its many latest effects in the upgraded version.
Step by Step to Rotate Videos in Davinci Resolve
The first video editing machine in 1924 (Moviola) left an indelible print on the minds of the media industry. It was a maiden attempt to make edits while simultaneously viewing the film. Over time, editing videos followed the trajectory of various transitions letting the imagination run wild. According to a survey, the video editing software market will grow to 932.7 million U.S. dollars by 2025.
As video editing has become a pillar stone in post-production work, you might need to upgrade your knowledge about it. In this article, you will learn how to rotate the video.
Whether your video has an issue in the aspect ratio or you want the desired output in the mirror or flipped version, you need not panic. By exploring different options of Davinci Resolve and Filmora, you can easily change the orientation of your video.
You’ll see a complete picture guide of the above-mentioned softwares.
Changing the orientation of video by Davinci Resolve
Davinci Resolve is a comprehensive video editing software. It performs functions from colour grading to auto-enhancement for the post-production work. Though, professionals usually use this and pitch it as comparatively complex. But even novices need not worry. It comes with features that can change the entire output of the video. One of such functions is the rotation of the videos. You can give a professional and top-notch touch to your post-production work by changing the orientation of the videos. That will bring a new dimension to your project. The flipped version of videos can make the output more prompt and subtle as they stitch different videos scenes together.
Here is the step by step guide for rotating the video
Step 1: Entering the Edit Mode
Set DaVinci Resolve to Edit mode and in the upper-right corner of your workspace, select the Inspector tab.

The drop-down menu with different options will appear. Search for the Transform section. There you have to select the **Rotation Angle.**You can also enter the value of rotation.After entering the value, you will notice that your vidoe is rotated.

Tip: By pressing Ctrl + R, you can rotate the video 90 degrees clockwise.
Editing a portrait video in DaVinci Resolve
The Transform Panel has the XY Zoom fields. You can use this to scale your video to fit the vertical frame by increasing the size to ~1.750.
Voilà, you now have a vertical video you can edit and export.
Horizontal and Vertical Flip in DaVinci Resolve
You want to create a mirror effect for your video. Flipp it. You would love the results.
You can edit it by going to the same Inspector drop-down menu.

Select the kind of flip you want at the bottom of the Transform section. It can be horizontal or vertical.

How to change the direction of animation in the DaVinci Resolve?
Keyframes are an essential part of video animations. Davinci Resolve facilitates you to play a little with its keyframes parameters.
The keyframe system is not that complex.
All you need to do is select a region on your Timeline. Choose the parameters that need animation by clicking the small diamond. You can see the small diamond next to each parameter’s value.
Apart from Davinci Resolve, there is also an alternate software which has this versatility.You can also use Filmora Wonder for rotation of your vidoes
Changing the direction of video using Filmora Wondershare
If you have mistakenly taken a video at the wrong angle and don’t want to lose it. Filmora Video Editor is there to keep you out of trouble. It comes with the option of changing the orientation of your videos in your desired way. You can even zoom in or crop the unwanted parts in the videos. Adding more to it, it offers you preset ratios (16:9, 9:16; 4:5, 1:1) to find the perfect aspect ratio for YuoTube, Instagram, etc.
For Win 7 or later (64-bit)
For macOS 10.14 or later
Here is the step-by-step guide to rotating the direction of the video by using it.
Step 1: Drag and Drop
It starts with importing the desired file you wish to edit. Afterwards, you have to drag-drop it to the timeline.

Step 2: Enter the video-editing Panel
To start editing, you need to double-click on the video clip in the timeline. You’ll see various tabs above the timeline header from transformation to auto-enhance.

Step 3: Explore your options
Click on the Transform menu. It will display various options from rotation to scaling. You’ll find the “Rotate” option.

Either you can drag the slider or enter the specific value to adjust to the desired rotation.
For example, if you want to rotate this clip 170 degrees, enter the value in the box.

Moreover, you can adjust the scale. You have to drag the Scale slider to have a full-screen image. You can also edit the shape, size and position in the Viewer Panel.

Step 4:Ready to Export
Now, you have achieved the desired rotation for your video. You can export it and select the option that you want.

You can flip the direction of your video in a jiff by following these simple steps.
Conclusion
Stitching different scenes by video rotation has brought video editing to a new dimension altogether. Creating transitions in the videos has become easy more than ever. By adding effects in video editing, you can achieve your editing goals. Hence, you can have that “wow part of editing” without breaking a sweat. When the scenes with different directions are combined, they help in creating the subtle mood prompts for creating the desired flow. You can even adjust the angle of your video if you captured it at the wrong angle.
There are a variety of softwares in the digital world for this purpose. Davinci Resolve and Filmora Wondershare come with dynamic options for your post-production work. Owing to their versatility, these also have the feature of rotating your videos. Their user-friendly interface has made the entire experience of post-production work enjoyable.
The drop-down menu with different options will appear. Search for the Transform section. There you have to select the **Rotation Angle.**You can also enter the value of rotation.After entering the value, you will notice that your vidoe is rotated.
Tip: By pressing Ctrl + R, you can rotate the video 90 degrees clockwise.
Editing a portrait video in DaVinci Resolve
The Transform Panel has the XY Zoom fields. You can use this to scale your video to fit the vertical frame by increasing the size to ~1.750.
Voilà, you now have a vertical video you can edit and export.
Horizontal and Vertical Flip in DaVinci Resolve
You want to create a mirror effect for your video. Flipp it. You would love the results.
You can edit it by going to the same Inspector drop-down menu.
Select the kind of flip you want at the bottom of the Transform section. It can be horizontal or vertical.
How to change the direction of animation in the DaVinci Resolve?
Keyframes are an essential part of video animations. Davinci Resolve facilitates you to play a little with its keyframes parameters.
The keyframe system is not that complex.
All you need to do is select a region on your Timeline. Choose the parameters that need animation by clicking the small diamond. You can see the small diamond next to each parameter’s value.
Apart from Davinci Resolve, there is also an alternate software which has this versatility.You can also use Filmora Wonder for rotation of your vidoes
Changing the direction of video using Filmora Wondershare
If you have mistakenly taken a video at the wrong angle and don’t want to lose it. Filmora Video Editor is there to keep you out of trouble. It comes with the option of changing the orientation of your videos in your desired way. You can even zoom in or crop the unwanted parts in the videos. Adding more to it, it offers you preset ratios (16:9, 9:16; 4:5, 1:1) to find the perfect aspect ratio for YuoTube, Instagram, etc.
For Win 7 or later (64-bit)
For macOS 10.14 or later
Here is the step-by-step guide to rotating the direction of the video by using it.
Step 1: Drag and Drop
It starts with importing the desired file you wish to edit. Afterwards, you have to drag-drop it to the timeline.
Step 2: Enter the video-editing Panel
To start editing, you need to double-click on the video clip in the timeline. You’ll see various tabs above the timeline header from transformation to auto-enhance.
Step 3: Explore your options
Click on the Transform menu. It will display various options from rotation to scaling. You’ll find the “Rotate” option.
Either you can drag the slider or enter the specific value to adjust to the desired rotation.
For example, if you want to rotate this clip 170 degrees, enter the value in the box.
Moreover, you can adjust the scale. You have to drag the Scale slider to have a full-screen image. You can also edit the shape, size and position in the Viewer Panel.
Step 4:Ready to Export
Now, you have achieved the desired rotation for your video. You can export it and select the option that you want.
You can flip the direction of your video in a jiff by following these simple steps.
Conclusion
Stitching different scenes by video rotation has brought video editing to a new dimension altogether. Creating transitions in the videos has become easy more than ever. By adding effects in video editing, you can achieve your editing goals. Hence, you can have that “wow part of editing” without breaking a sweat. When the scenes with different directions are combined, they help in creating the subtle mood prompts for creating the desired flow. You can even adjust the angle of your video if you captured it at the wrong angle.
There are a variety of softwares in the digital world for this purpose. Davinci Resolve and Filmora Wondershare come with dynamic options for your post-production work. Owing to their versatility, these also have the feature of rotating your videos. Their user-friendly interface has made the entire experience of post-production work enjoyable.
Add Green Screen Effects in Final Cut Pro
No matter the type of video you are shooting, the background of the video plays a major play. The background determines how eye-pleasing the frame of the entire video looks. A beautiful background enhances the video content while a distracting background can deteriorate the video outlook. You do not need to be in exotic locations or have eye-catching backgrounds in reality while shooting a video thanks to the use of the green screen effect.
Once you shoot a video with green screen background, you can replace the green screen with anything you want. You will need a video editor to replace the green screen, and Final Cut Pro is the most widely used video editor among Mac Users. We will illustrate how to add green screen in Final Cut Pro and get any background for your recorded video. We will also recommend an alternative watt to add green screen effect to your video.
Part 1. How to add green screen on Final Cut Pro
Final Cut Pro is the most popular professional video editor among Mac users. The learning curve is slightly steep, but once you get used to Final Cut Pro, you can take your recorded video to the next level with profound editing. The most important part of adding green screen effect to a video is shooting the video with a proper green screen in the background. Once you have successfully recorded your video, here are the steps on how to add background to green screen Final Cut Pro.
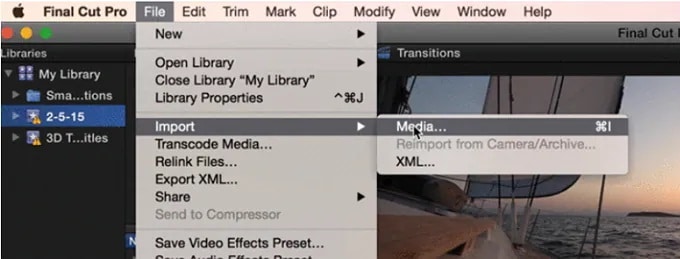
Step1 Launch Final Cut Pro and go to File> Import> Media. Select the video file with green screen background from your storage to import the file into FCP. Similarly, you should import the video or photo with which you want to replace the green screen.
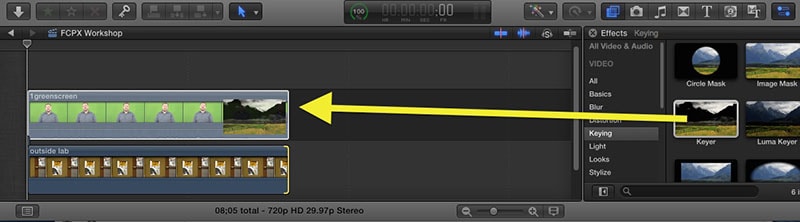
Step2 Drag the video clip with green screen background (called foreground clip) to Timeline and place it to Primary Storyline. Drag the replacement video (called background clip) below the foreground clip in Timeline.
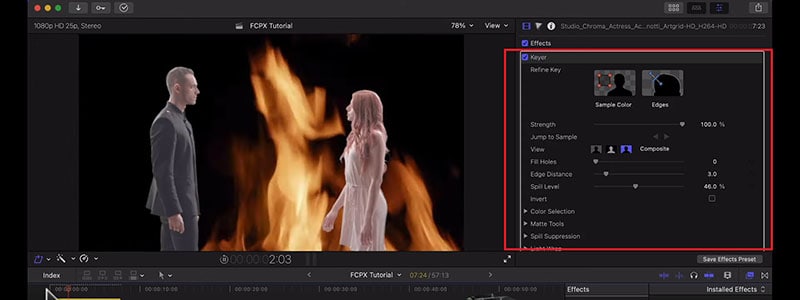
Step3 Select the foreground clip and click on Effects button present at the extreme top-right corner of the Timeline.
Step4 From the Effects options, select Keyer effect. If you cannot spot it immediately, you can search for it from the search field.
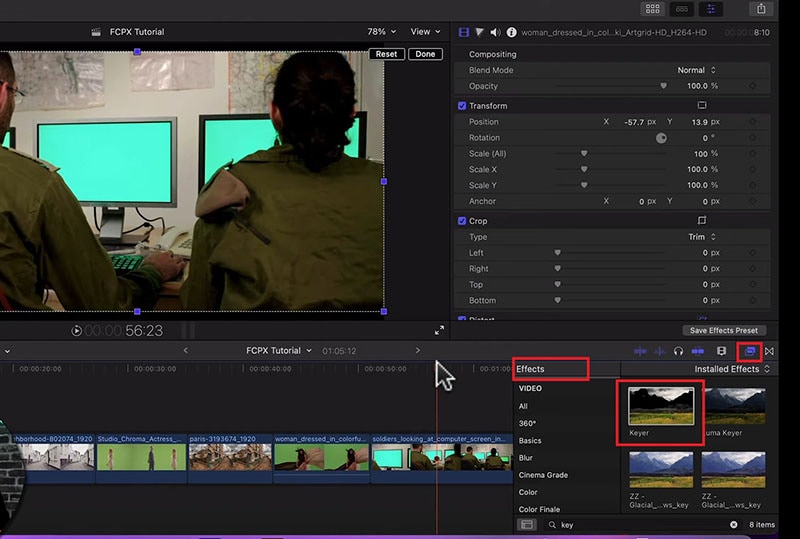
Step5 Drag and drop Keyer effect to the foreground clip. The effect detects the green screen and replaces it with the available background clip.
Step6 You might have to adjust the Keyer effect settings to get the green screen effect perfectly. Go to Inspector Window and click on Sample color and fine-tune the available settings to get it correct.
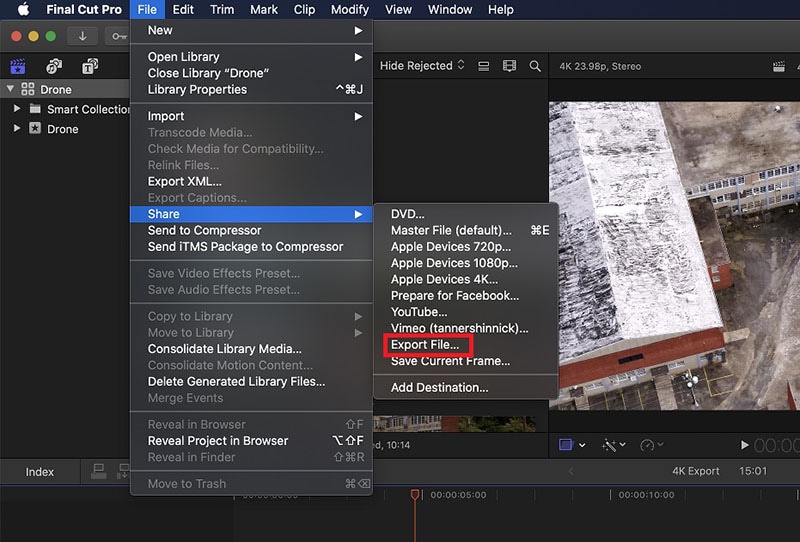
Step7 Once you are satisfied with the effect, go to File> Share> Export File and save the modified video.
Part 2. Alternative Way to Add Green Screen to Videos
Final Cut Pro is a professional but highly expensive video editor. The learning curve is not very suitable for amateur video editors. That is why if you are looking for a better alternative way to add green screen to videos, we recommend Wondershare Filmora . Filmora is a popular video editor that is available for Mac and Windows users. The user interface is extremely intuitive, and adding green screen effect is super easy. Here are the steps on how to add background to green screen effect.
Free Download For Win 7 or later(64-bit)
Free Download For macOS 10.14 or later
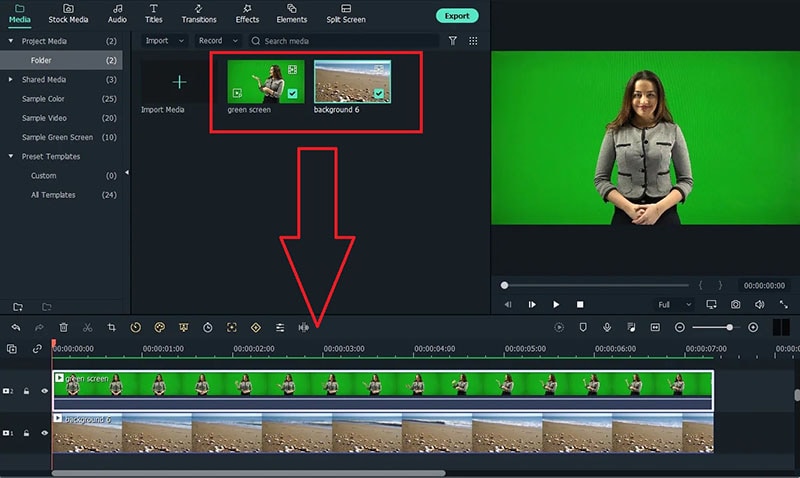
Step1 Download and install Filmora on your computer. Launch Filmora and click on New Projects.
Step2 Under Project Media folder, Drag and drop the video clip with green screen background as well as the photo or video with which you want to replace the green screen.
Step3 Drag and drop the video clips on the Timeline. The video with green screen should be at the top while the replacement video or photo should be below it.
Step4 Double-click on the green screen video clip on Timeline. Go to Video>Basic and turn on Chroma key option.
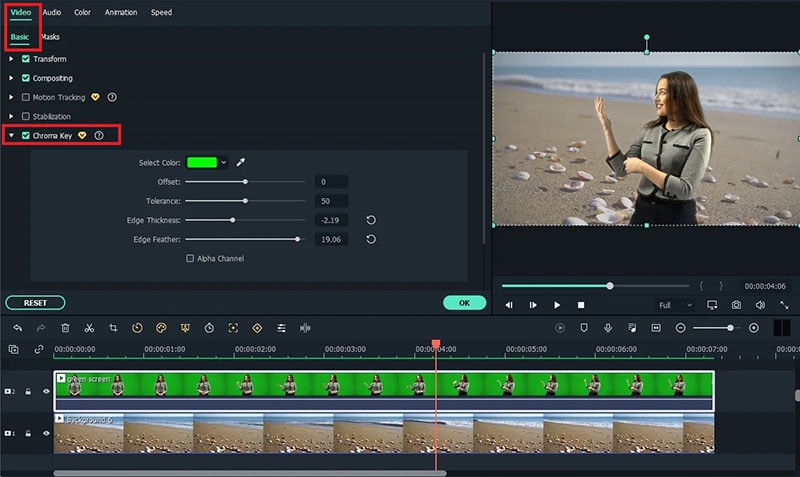
Step5 Adjust the different parameters such as offset to get the effect perfect and click on Ok button.
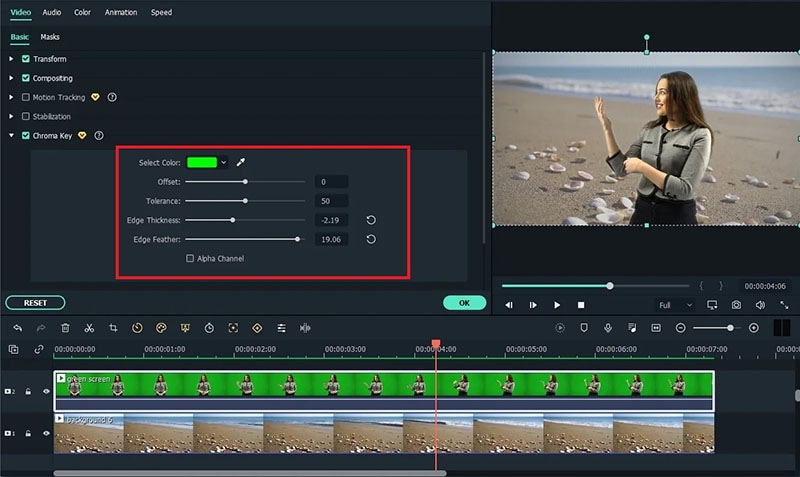
Step6 Play the video and if you are satisfied with the result, click on Export button to save the modified video file.
Part 3. Green Screen Video Tips to Use
We have already stated that replacing green screen in your video with an eye-catching background is the easiest part. On the contrary, shooting the green screen video is the most important part. If you shoot the video perfectly, replacing the background accurately in the video editor becomes super easy. Here are some important tips to use while shooting green screen video.
Distance – There should be enough distance between the subject and the green screen background so that the subject does not cast a shadow on the green screen. This distance is also important to place lights in between so that the green screen is perfectly lit for a great video shooting session.
Quality – You should opt for a high-quality green screen cloth for the background. This means the green screen should have a solid color instead of light and dark patches here and there. Besides, you should ensure that there are no wrinkles on the green screen.
Otherwise, when you will apply green screen effect through the video editor, the transformation will be uneven. You have to spend a lot of time adjusting the parameters to cover up uneven patches in the background.
Lighting – The way you set up your lights plays a major role in shooting green screen video perfectly. The light falling on the green screen will light up the screen evenly so that there are no light and dark patches. Transforming the green screen in the video editor will become that much easier.
You should focus on soft and even lighting for the entire green screen, and you should check through your camera to ensure the lighting is perfect. Sometimes, you can place lights behind the subject if the subject is staying stationary throughout the video. Otherwise, you can place the light above the subject for even distribution.
Aperture – The settings of your camera are equally important to smoothen out the green screen in the background and focus on the subject sharply. That is where aperture comes into the scene, and you need to use low aperture while shooting green screen videos. Low aperture opens up the camera lens, and the green screen turns softer in the background. The subject stands out while the background turns uniformly green.
Shutter Speed – While shooting a green screen video, you should keep a high shutter speed to prevent motion blur and uneven background. If the subject stays fixed throughout, the shutter speed should be double the frame rate. If the subject is moving throughout, the shutter speed should be around 4 times the frame rate such as 1/100.
ISO – The last thing you want in a green screen video is grainy footage. Your life will turn upside down editing the video and getting the green screen effect perfectly in any video editor. ISO determines the sensitivity and thereby, the grainy effect in your video. When the ISO is too high, the chance of getting grains in the video is high. It is better to use a native ISO for green screen effect, but you need to check with a sample recording and adjust if required.
Conclusion
We have answered how to add background to green screen Final Cut Pro. You can replace any green screen in your video with any video or photo for the background of the video. If you do not have Final Cut Pro or you find the steps slightly complicated, we recommend you to use Wondershare Filmora for instant green screen effect and quick adjustments for the best outcome.
Free Download For macOS 10.14 or later
Step1 Download and install Filmora on your computer. Launch Filmora and click on New Projects.
Step2 Under Project Media folder, Drag and drop the video clip with green screen background as well as the photo or video with which you want to replace the green screen.
Step3 Drag and drop the video clips on the Timeline. The video with green screen should be at the top while the replacement video or photo should be below it.
Step4 Double-click on the green screen video clip on Timeline. Go to Video>Basic and turn on Chroma key option.
Step5 Adjust the different parameters such as offset to get the effect perfect and click on Ok button.
Step6 Play the video and if you are satisfied with the result, click on Export button to save the modified video file.
Part 3. Green Screen Video Tips to Use
We have already stated that replacing green screen in your video with an eye-catching background is the easiest part. On the contrary, shooting the green screen video is the most important part. If you shoot the video perfectly, replacing the background accurately in the video editor becomes super easy. Here are some important tips to use while shooting green screen video.
Distance – There should be enough distance between the subject and the green screen background so that the subject does not cast a shadow on the green screen. This distance is also important to place lights in between so that the green screen is perfectly lit for a great video shooting session.
Quality – You should opt for a high-quality green screen cloth for the background. This means the green screen should have a solid color instead of light and dark patches here and there. Besides, you should ensure that there are no wrinkles on the green screen.
Otherwise, when you will apply green screen effect through the video editor, the transformation will be uneven. You have to spend a lot of time adjusting the parameters to cover up uneven patches in the background.
Lighting – The way you set up your lights plays a major role in shooting green screen video perfectly. The light falling on the green screen will light up the screen evenly so that there are no light and dark patches. Transforming the green screen in the video editor will become that much easier.
You should focus on soft and even lighting for the entire green screen, and you should check through your camera to ensure the lighting is perfect. Sometimes, you can place lights behind the subject if the subject is staying stationary throughout the video. Otherwise, you can place the light above the subject for even distribution.
Aperture – The settings of your camera are equally important to smoothen out the green screen in the background and focus on the subject sharply. That is where aperture comes into the scene, and you need to use low aperture while shooting green screen videos. Low aperture opens up the camera lens, and the green screen turns softer in the background. The subject stands out while the background turns uniformly green.
Shutter Speed – While shooting a green screen video, you should keep a high shutter speed to prevent motion blur and uneven background. If the subject stays fixed throughout, the shutter speed should be double the frame rate. If the subject is moving throughout, the shutter speed should be around 4 times the frame rate such as 1/100.
ISO – The last thing you want in a green screen video is grainy footage. Your life will turn upside down editing the video and getting the green screen effect perfectly in any video editor. ISO determines the sensitivity and thereby, the grainy effect in your video. When the ISO is too high, the chance of getting grains in the video is high. It is better to use a native ISO for green screen effect, but you need to check with a sample recording and adjust if required.
Conclusion
We have answered how to add background to green screen Final Cut Pro. You can replace any green screen in your video with any video or photo for the background of the video. If you do not have Final Cut Pro or you find the steps slightly complicated, we recommend you to use Wondershare Filmora for instant green screen effect and quick adjustments for the best outcome.
Dollar-Store DIY Hacks to Use for Filmmaking
Filmmaking is usually an expensive hobby, but slowly over time, it’s become more affordable. Regular gear like cameras and lights are slightly cheaper, but there are plenty of ways to DIY regular items to use as film gear.
Making DIY film gear may not give you the same look as professional gear, but it could be a fun project and give you similar looks on a budget. In this article, let’s look at some dollar-store DIY hacks that you can use for filmmaking on a budget.

Tip 1. Add foreground elements to improve the frame of videos
Let’s start with something we can do to enhance your framing. Sometimes we want to direct our audience’s attention to a specific part of the frame. In this case, it’s the talent of placing an object in the shot’s foreground that can help us do that. While also making a more attractive frame. At the dollar store, try using something like these fake plants.

You can place it in front of your lens. Then focus on the talent behind it, giving a blurry foreground that perfectly frames the talent. Here’s how the shot looks with and without foreground elements.

![]()
Note: Remember, you can also use a different angle than simply approaching the object from the front. You can try and use different perspectives until you find the shot or footage you are looking for.
Tip 2. Adjust lights with poster boards
The shot below looks dark and boring because the background has no light. Here’s the shot with and without the lights.

A practical light is a light that shows up on screen rather than lighting talent from off-screen. For example, some dollar stores have small LED accent lights for around three dollars.
Others even have lights with adhesive backings that allow you to place them all over the room—creating great lighting accents with small eye-catching pockets of light.

On film sets, crews use a bounce to reflect light from one light source in another direction. At the dollar store, we can find something like this poster board to get a similar effect.

By reflecting the light onto the bounce, we get softer, more spread-out light when it’s reflected. Then you will get the result in a nicer look. Using poster boards, you can do multiple things with light.
- Use white to bounce light.
- Use black as a flag to shape or block light.

- You can also use green for a small green screen when filming a product video
You might have seen how big production companies create those alienated landscapes, such as in the movie Avatar and many more.
The concept is recording your object in front of a green screen behind it. Then, it’s much easier to add a separately filmed background to the final footage with a video editor like Filmora.

Tip 3. Smooth audio with felt pads or socks
Do you ever have audio pop while you are recording? It can get annoying. So, to fix the issues, we are now teaching you three practical ways.
1. Felt pads
Felt pads with adhesive backs can be stuck onto noisy props like a coffee mug. This way, we won’t hear the mug hitting the table when we’re recording sound.

2. Socks as pop filters
Professionals use what they call a pop filter because a pop filter can reduce the loud pops from their mouths. But what is pop? Pops usually occur when people say words that start with the letter P or B.
Then what is a pop filter? You might have seen in some YouTube videos, especially live streamers, where they use a microphone with a plate on its head; that’s called a pop filter. You can purchase pricey gear like a pop filter, or we can get a pack of cheap socks at the dollar store and place them over the mic.
It will make your voiceover slightly quieter, but it should also get rid of the popping. So keep adding socks until you hear no more pops in your voiceover.

Conclusion
See how easy it was! Keep in mind these dollar store hacks in your next video. And you can edit your footage like a pro with an easy-to-use video editor like Wondershare Filmora . Keep exploring different ideas and perspectives to record.
Free Download For Win 7 or later(64-bit)
Free Download For macOS 10.14 or later
Tip 2. Adjust lights with poster boards
The shot below looks dark and boring because the background has no light. Here’s the shot with and without the lights.
A practical light is a light that shows up on screen rather than lighting talent from off-screen. For example, some dollar stores have small LED accent lights for around three dollars.
Others even have lights with adhesive backings that allow you to place them all over the room—creating great lighting accents with small eye-catching pockets of light.
On film sets, crews use a bounce to reflect light from one light source in another direction. At the dollar store, we can find something like this poster board to get a similar effect.
By reflecting the light onto the bounce, we get softer, more spread-out light when it’s reflected. Then you will get the result in a nicer look. Using poster boards, you can do multiple things with light.
- Use white to bounce light.
- Use black as a flag to shape or block light.
- You can also use green for a small green screen when filming a product video
You might have seen how big production companies create those alienated landscapes, such as in the movie Avatar and many more.
The concept is recording your object in front of a green screen behind it. Then, it’s much easier to add a separately filmed background to the final footage with a video editor like Filmora.
Tip 3. Smooth audio with felt pads or socks
Do you ever have audio pop while you are recording? It can get annoying. So, to fix the issues, we are now teaching you three practical ways.
1. Felt pads
Felt pads with adhesive backs can be stuck onto noisy props like a coffee mug. This way, we won’t hear the mug hitting the table when we’re recording sound.
2. Socks as pop filters
Professionals use what they call a pop filter because a pop filter can reduce the loud pops from their mouths. But what is pop? Pops usually occur when people say words that start with the letter P or B.
Then what is a pop filter? You might have seen in some YouTube videos, especially live streamers, where they use a microphone with a plate on its head; that’s called a pop filter. You can purchase pricey gear like a pop filter, or we can get a pack of cheap socks at the dollar store and place them over the mic.
It will make your voiceover slightly quieter, but it should also get rid of the popping. So keep adding socks until you hear no more pops in your voiceover.
Conclusion
See how easy it was! Keep in mind these dollar store hacks in your next video. And you can edit your footage like a pro with an easy-to-use video editor like Wondershare Filmora . Keep exploring different ideas and perspectives to record.
Free Download For Win 7 or later(64-bit)
Free Download For macOS 10.14 or later
Also read:
- New Top 5 Solutions on How to Add Emojis to iPhone
- New 2024 Approved How to Create Intro with Renderforest
- 2024 Approved Quick Solved How to Add Subtitles to a Video on iPhones
- 2024 Approved If You Are Looking Forward to Make Attractive and Customized Slideshows, Lightroom Is One of the Best Options that You Can Consider
- How to Use Color Grading in Final Cut Pro for 2024
- Updated What Anime Character Are You Look Like?
- Updated 2024 Approved End Screen Makers
- New In 2024, Doable Ways to Create Transparent Background in Procreate
- 2024 Approved Featuring The Use of Camera Shake in Creating the Best Videos
- Mask Tracking Is Believed to Be a Helpful Procedure for Marking Proper Areas in Videos. Learn How to Perform Premiere Pro Mask Tracking in This Guide
- In 2024, Best Video Editors to Add Text to a Video
- Updated In 2024, 5 Methods to Denoise a Video
- Updated You Can Create a Photo Video Slideshow on YouTube. In Slideshow on YouTube You Can Add Photos and Videos, Effects and Transitions and Make a Quality Slideshow
- 2024 Approved Do You Wish to Create the Best Video Collages ? No Problem, because Wondershare Filmora Will Help You Make the Best Video Collages
- Top 8 AI Video Denoise Software for 2024
- In 2024, How to Add Green Screen Effects In Phhotoshop
- Updated Do You Know Anything About the Video Format Supported by WhatsApp? If Not, Then This Is the Right Time to Learn About WhatsApp-Supported Video Formats for 2024
- Green Screen Is a Widely Used Effect in After Effects. Many Professional Photographers Use It to Make Creative Video Effects. This Guide Will Show You How to Use Green Screen to Videos in After Effects
- 2024 Approved How to Correct Lens Distortion in Videos
- New 2024 Approved How to Convert SRT to DOCX
- Updated 2024 Approved How to Create Discord Logo GIF
- Want to Learn How to Trim Videos in Premiere Pro. Read on; Our Guide Will Help You Trim Videos with This Timeline-Based Video Editing Software Application to Make Them Engaging to Viewers for 2024
- In 2024, Do You Need to Create a Video for Your Business Online but Feel You Do Not Have the Skill and Time to Do That? Try Out These AI Video Generators that Will Work for You to Carry Out Tasks Effectively
- Updated 8 Frame Rate Video Converters You Must Try
- New 2024 Approved How to Add Adjustment Layer in Premiere Pro
- Do You Wish to Learn About some Tools to Slow Down a Video? Discover How to Slow Down Time Lapse on iPhone Throughout This Article for 2024
- New In 2024, Convert MP4 to 60 FPS GIF A Step-by-Step Guide
- 4 Solutions to Add White Borders on Mobile and Desktop
- Updated In 2024, 11 Tools To Create Radial Blur Photo Mobile And Desktop
- Updated In 2024, General Information That You Need To Know About MKV Format
- Every Compositor Should Know The Trick of Color Match in After Effects
- New In 2024, How to Add a Spooky Shadow Effect
- New 2024 Approved What You Should Know About Speech-to-Text Technology
- 2024 Approved What Are the Best 15 Slideshow Presentation Examples Your Audience Will Love
- New How to Add Text to Video for 2024
- Updated Step by Step to Split Clips in VLC
- In 2024, AddROM Bypass An Android Tool to Unlock FRP Lock Screen For your Samsung Galaxy S24
- In 2024, How to Bypass Google FRP Lock from Vivo X100 Devices
- Recover your photos after Nokia C22 has been deleted.
- Hard Resetting an Google Pixel Fold Device Made Easy | Dr.fone
- A Full Review for iTools Virtual Location and Top 5 Alternatives For Apple iPhone SE (2022)/iPad | Dr.fone
- How to Unlock Poco C65 Phone Password Without Factory Reset?
- In 2024, How to fix iCloud lock from your iPhone 15 and iPad
- 6 Solutions to Fix Error 505 in Google Play Store on Xiaomi Redmi Note 12T Pro | Dr.fone
- In 2024, 9 Mind-Blowing Tricks to Hatch Eggs in Pokemon Go Without Walking On Samsung Galaxy M14 5G | Dr.fone
- Complete Tutorial to Use VPNa to Fake GPS Location On Poco C50 | Dr.fone
- In 2024, Ways to trade pokemon go from far away On Huawei Nova Y71? | Dr.fone
- A Perfect Guide To Remove or Disable Google Smart Lock On Realme V30
- Ways to stop parent tracking your Apple iPhone 15 Pro Max | Dr.fone
- In 2024, How to Check Distance and Radius on Google Maps For your Vivo S17 Pro | Dr.fone
- In 2024, Preparation to Beat Giovani in Pokemon Go For Poco C50 | Dr.fone
- In 2024, How to Unlock Vivo Y200 Phone with Broken Screen
- In 2024, Nokia G22 ADB Format Tool for PC vs. Other Unlocking Tools Which One is the Best?
- 3 Ways for Android Pokemon Go Spoofing On Realme 10T 5G | Dr.fone
- All About Factory Reset, What Is It and What It Does to Your Samsung Galaxy F54 5G? | Dr.fone
- Prank Your Friends! Easy Ways to Fake and Share Google Maps Location On Honor X50i+ | Dr.fone
- Here Are Some Reliable Ways to Get Pokemon Go Friend Codes For Lava Blaze Curve 5G | Dr.fone
- Top-Notch Solutions for Disabled Apple ID On iPhone 15 Pro Max Making It Possible
- Spotify Keeps Crashing A Complete List of Fixes You Can Use on Lava Yuva 2 | Dr.fone
- How to Remove an AirTag from Your Apple ID Account On Apple iPhone 14 Pro Max?
- In 2024, How to Transfer Contacts from Samsung Galaxy XCover 7 to iPhone XS/11 | Dr.fone
- Updated 2024 Approved How to Create an Animated Sticky Navbar
- Top 5 Car Locator Apps for Xiaomi Redmi Note 12 Pro+ 5G | Dr.fone
- Set Your Preferred Job Location on LinkedIn App of your Oppo Reno 10 5G | Dr.fone
- In 2024, Tips and Tricks for Setting Up your Samsung Galaxy A24 Phone Pattern Lock
- In 2024, A Perfect Guide To Remove or Disable Google Smart Lock On Xiaomi 13T
- Title: 2024 Approved Top Tips for Camtasia Freeze-Frame
- Author: Chloe
- Created at : 2024-04-24 07:08:15
- Updated at : 2024-04-25 07:08:15
- Link: https://ai-editing-video.techidaily.com/2024-approved-top-tips-for-camtasia-freeze-frame/
- License: This work is licensed under CC BY-NC-SA 4.0.
