
2024 Approved Use Path Blur In Photoshop To Create Motion Effect

Use Path Blur In Photoshop To Create Motion Effect
There are different kinds of blur effects that redefine the movement and intensity of an image. By applying a suitable blur effect, you can increase the visual appeal of your still photo by emphasizing a certain motion. Path blur is one of the trending motion blur effects that people use to enhance their photos instantly. Through this article, you can learn how to use path blur in Photoshop conveniently.
Part 1: What is Path Blur and How Does It Work?
Path blur is a kind of motion blur that highlights a motion and speed in a certain direction. It helps to create a sense of movement by adjusting the blur intensity and central point. If you want to display a stimulating motion in an image, path blur can assist you in this regard.
Path blur works by adjusting two variables: Speed and Taper. By adjusting the speed slider, you can specify the amount of path blur. In addition to speed, you can adjust the taper value accordingly to determine the blur trail.

This effect can instantly add new dimensions to your captured photo. For instance, if you have captured a photo of a racing car, you can add a path blur effect to give a sense of speed to it. You can easily find this special effect in Adobe Photoshop. By using the selection tools, you can effectively add a path blur effect to your image in the selected area. To know more about path blur in Photoshop, continue reading this article.
Part 2: How to Use Path Blur in Photoshop?
Photoshop is undoubtedly the most commonly used tool to edit pictures with great configuration options. After uploading the image, you can quickly transform it by adding new effects, filters, and layers. You can retouch your photography efficiently through this tool by increasing the quality of pictures. Moreover, the clean user interface of Photoshop allows you to utilize the advanced functions without any interruptions.
Are you ready to use Photoshop path blur? Read this part of the article to find out two interesting ways to create a path blur effect in the images.
Add Dynamic Effect to Your Static Images
Step1 Open Photoshop and import the desired picture. Once done, go to the “Layers” section and copy the background layer. For this, press “Ctrl + J” in Windows and “Command + J” for MacBook.

Step2 Now proceed to the “Filter” section and locate the option “Blur Gallery”. From there, choose the “Path Blur” option. Now you would be able to see an arrow on your screen. Using this arrow, you can specify the path blur motion. Drag and close the arrow where you want to show the speed. Also, set a higher value for the speed given on the right side. Once done, hit the “OK” button.

Create a Long Exposure Picture
Step1 Navigate to the Adobe Photoshop tool and begin by uploading a picture. Afterward, go to the “Filter” tab and select “Convert for Small Filters.”

Step2 Now go to the “Filter” tab again and choose the “Blur Gallery” option. From there, select the “Path Blur” option. Now adjust the displayed arrow in a particular direction to decide the starting and endpoint of the path blur. Moreover, modify the “Speed” slider according to your choice.

Step3 After dragging the arrow in a particular direction, a blue dot will appear at the center. Press the “Delete” button to eliminate that point. Now select the endpoint of the arrow and change its blur shape.

Step4 Utilize the noise section to add a grainy effect in the blurred area. Once done, click on the “OK” button. Now select the masking tool to select the area in your picture. Afterward, choose the “Smart Mask” filter and then navigate to the “Fill” option given in the “Edit” section.

Step5 In the fill menu, choose the color “Black.” Now go to the “Select” section and click “Deselect.” To soften the whole look, you can go to the “Properties” panel and adjust the “Feather” properties.

Step6 Now add the first layer and choose the option “Convert for Smart Filters.” Again, go to the “Filter” section, select “Blur Gallery,” and uncheck the option called “Edit Blur Screen.”

Step7 Now increase the length of the arrow and press “Ctrl + Click” for Windows or “Command + Click” for Mac to reposition the path. You can also add a curve to the arrow. Enhance the speed from the right panel and uncheck the option of “Center Blur.” You can increase the taper value to make the blur gradually trail off. Add a grainy filter for more enhancements.

Bonus Tips – The Alternative to Photoshop to Create Motion Blur Effect
Many users find the interface of Adobe Photoshop intimidating or challenging to operate. If you want an alternative to Photoshop, the best choice you can make is to use Wondershare Filmora . For beginners, this tool adds built-in presets that are professionally made.
Free Download For Win 7 or later(64-bit)
Free Download For macOS 10.14 or later
It offers more than 900 effects that you can use to add new dimensions to your photos and videos. Moreover, it provides fast processing speed for photo and video editing to help you achieve your goals conveniently.
Steps to Produce Motion Blur Effect in Filmora
If you are a beginner and want to create a motion blur effect, then use the steps mentioned below:
Step1 Add the Image to Timeline
After launching Filmora, select “Create New Project” and import the desired picture. After dragging it to the timeline, you have to split it to proceed.

Step2 Choose the Background Blur
To split, choose the starting and ending point in the clip where you want to add the motion blur effect. Once done, go to the “Effects” tab and search for the “Background Blur” effect section. Pick and apply the desired blur filter to the split section of the video.

Step3 Apply the Transition
Once you have added the motion blur effect, you can check the results from the preview window. You can also apply the “Dissolve” transition from the “Transitions” tab to generate a smooth result.

Conclusion
If you want to display a sense of speed and movement in the picture, you can add a path blur effect. It’s one of the types of motion blur effects that many people use in their pictures to add a dynamic element. By reading this article, you have learned how to add path blur in Photoshop through simple means. Moreover, you can also explore the tool Filmora to create a motion blur effect in the photos effortlessly.
Free Download For macOS 10.14 or later
It offers more than 900 effects that you can use to add new dimensions to your photos and videos. Moreover, it provides fast processing speed for photo and video editing to help you achieve your goals conveniently.
Steps to Produce Motion Blur Effect in Filmora
If you are a beginner and want to create a motion blur effect, then use the steps mentioned below:
Step1 Add the Image to Timeline
After launching Filmora, select “Create New Project” and import the desired picture. After dragging it to the timeline, you have to split it to proceed.

Step2 Choose the Background Blur
To split, choose the starting and ending point in the clip where you want to add the motion blur effect. Once done, go to the “Effects” tab and search for the “Background Blur” effect section. Pick and apply the desired blur filter to the split section of the video.

Step3 Apply the Transition
Once you have added the motion blur effect, you can check the results from the preview window. You can also apply the “Dissolve” transition from the “Transitions” tab to generate a smooth result.

Conclusion
If you want to display a sense of speed and movement in the picture, you can add a path blur effect. It’s one of the types of motion blur effects that many people use in their pictures to add a dynamic element. By reading this article, you have learned how to add path blur in Photoshop through simple means. Moreover, you can also explore the tool Filmora to create a motion blur effect in the photos effortlessly.
How to Add Subtitles in Canva?
Have you ever used Canva before? It is a famous online tool that is also available on Windows, Mac, Android, and iOS platforms. It contains various basic editing features that you can use to crop, trim, resize, and rotate your video clips and images. Apart from these basic tools, you can also navigate to the built-in library of Canva to explore its vibrant templates.
As more than 100 million individuals use Canva every month, it’s a well-trusted tool. If you are a frequent user of Canva, this article can help you how to add subtitles in Canva. Keep reading this article to find out the quickest way to add subtitles to videos using Canva.

Part 1: What is Canva?
To create and edit videos flawlessly, Canva offers great options. It contains pre-sized video formats for YouTube, Facebook, and other social media platforms. If you are a beginner and struggling with ideas, Canva offers various templates of different categories, such as fitness, education, fashion, and real estate. Apart from using the built-in media library, you have complete freedom to upload your media files to add further modifications.
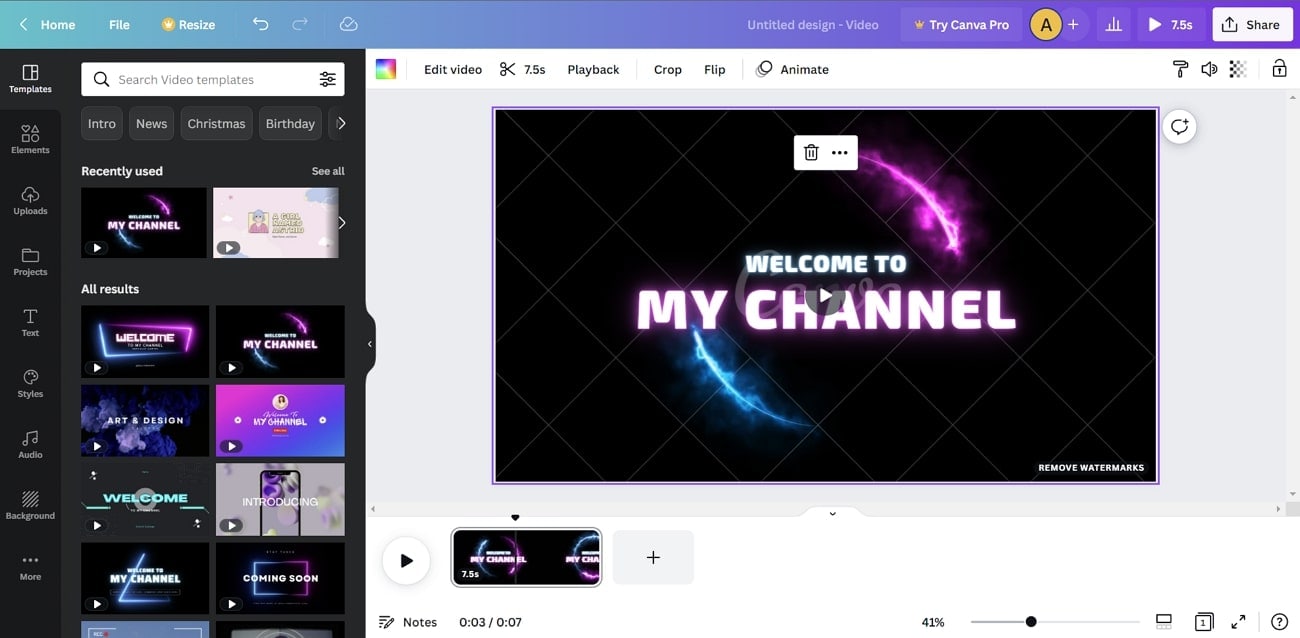
Furthermore, using Canva, you can also add exciting animations and transitions to your videos to generate a smooth look. You can also add multiple overlays to add more dimensions to your video clips. Also, you can use the Canvas captions feature to generate customized subtitles for your video files. To learn more about Canva, let’s shed light on its key features, advantages, and pricing plans:
Key Features of Canva
- Multiple Export Options: Canva offers various export formats such as MP3, PNG, GIF, MP4, PPTX, etc. You can also check the video quality before exporting it to your device.
- Add Audio Tracks: To make your videos more engaging, you can add audio tracks and sound effects using this professional tool.
- Background Remover: To remove a dull background from your video without a green screen or professional software, you can use the background remover of Canva. Through this advanced feature, you can remove the background from your videos with a single click.
- Magic Resize: It offers a Magic Resize option that enables you to resize videos in different formats for multiple platforms.
- Brand Tools: Canva’s branding tools allow users to create and save branded templates, colors, and fonts. This makes it easy to maintain consistency across all design materials and ensures that all designs align with the brand’s visual identity.
- Collaboration Features: Canva’s collaboration features make it easy for teams to work together on a design project. Users can share designs with team members and assign roles and permissions, allowing for seamless collaboration and feedback.
Advantages of Using Canva
- If you want to share your videos on social media platforms instantly, Canva is the best option. Using this software, you can share your videos on Instagram or other social media platforms with a single tap.
- Canva can also add voice-overs and narrations to your videos in high audio quality.
- This tool provides various elements such as lines, shapes, stickers, and frames that you can add to your videos.
Pricing Plans
If you want to learn more about Canva’s detailed plan, you can visit its official website .
| Plan Name | Price |
|---|---|
| Canva Pro | $54.99/Year for 1 Person |
| Canva for Teams | $84.90/Year for 5 Person |
Part 2: How to Add Captions to Videos in Canva?
Do you want to know how to add subtitles in Canva? Adding subtitles in Canva is extremely simple and quick. In this section, we have jotted down accurate and simple instructions to add subtitles using the Canva tool:
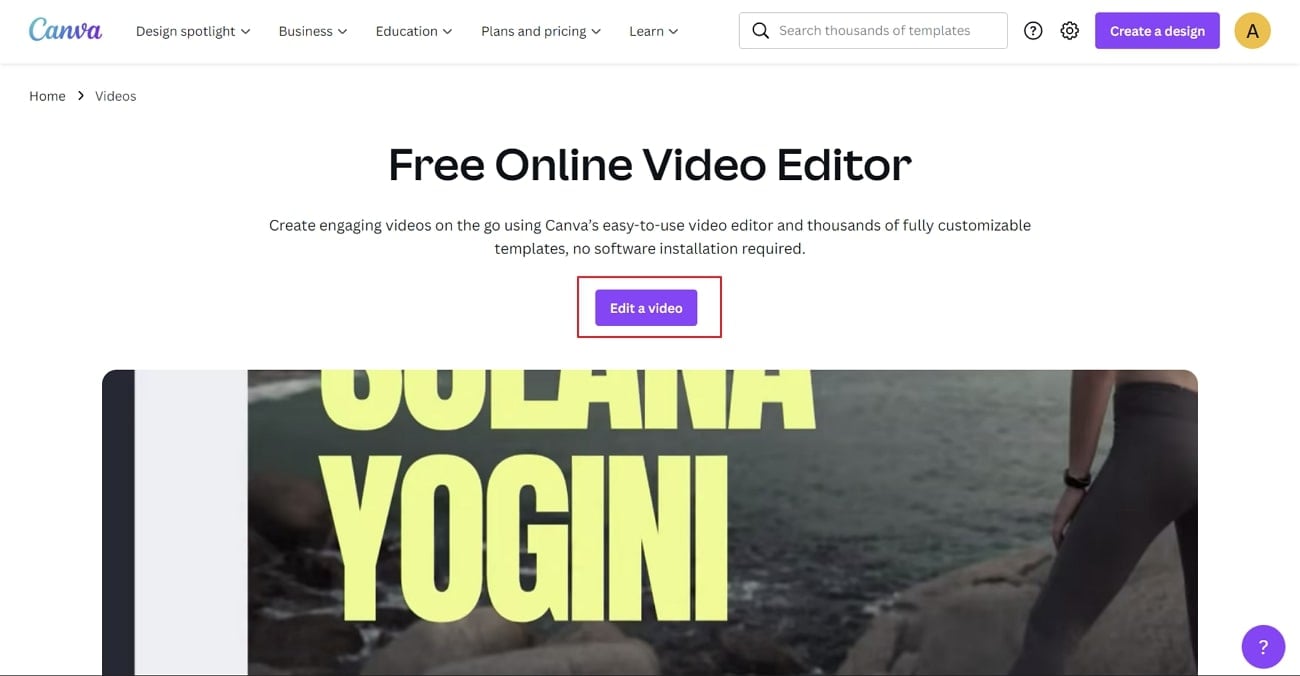
Step1 Begin by visiting the video editor tool page of Canva through any web browser. After accessing the tool page, click on “Edit a Video.” This will open a new window on your screen.
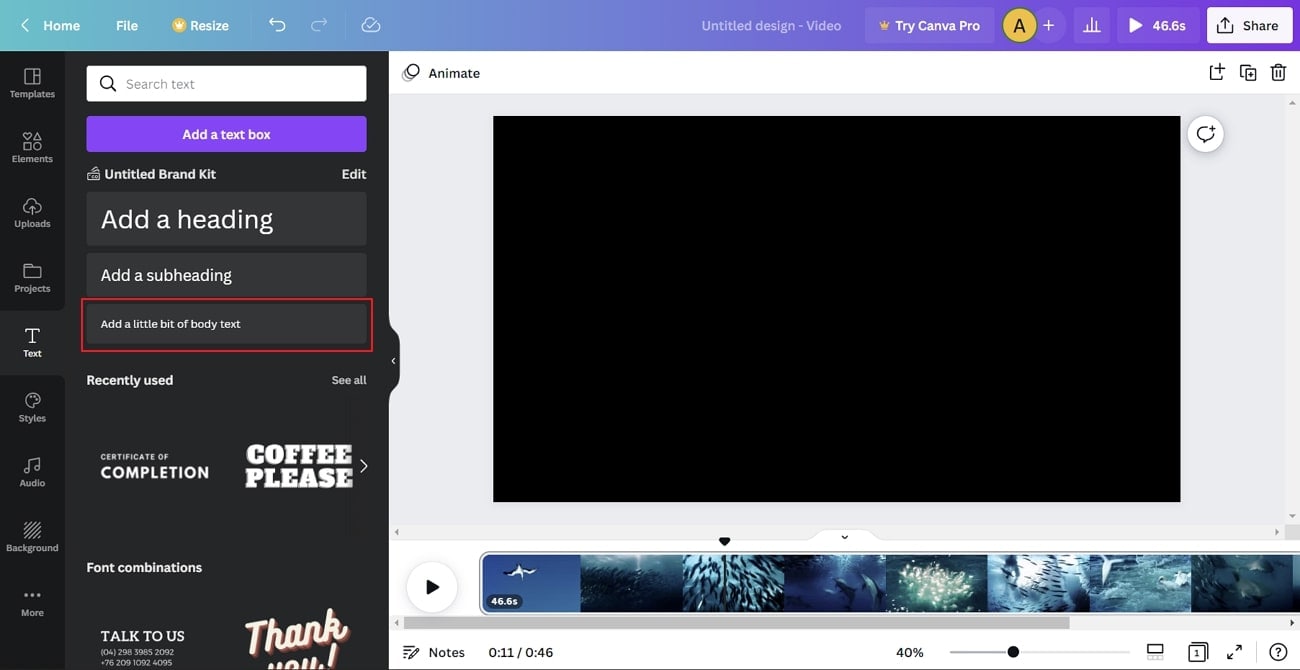
Step2 Now, hit the “Upload Files” button from the left panel and import the video file on this tool. Once done, navigate to the “Text” tab and tap “Add a little bit of body text.” Now adjust the position of the text box according to your desire. You can write your Canva captions by choosing your preferred font, color, size, and style.
Step3 You can also add effects and animation to your added subtitles for more enhancements. Once done with customizations, click on the “Share” button. Here select MP4 as the video file format and save the video on your system.

Part 3: Is There a Good Alternative to Add Subtitles to Videos?
Canva provides a very basic user interface to create subtitles. If you want to enhance your added subtitles with more possibilities, Wondershare Filmora is the best alternative. You can add subtitles through this tool in multiple ways. You can either add subtitles manually or use its “Speech-to-Text” feature. Through this feature, you can transcribe your voice to generate subtitles automatically.
Free Download For Win 7 or later(64-bit)
Free Download For macOS 10.14 or later
Filmora also offers great styles and font options to customize the subtitles. You can easily check the results from the preview window of this efficient video editor. Hence, Filmora acts as a complete and well-trusted platform to generate subtitles in different ways.
Instructions to Create Subtitles Using Filmora
Are you tired of writing subtitles manually in Canva? Read the precise instructions guided below to create the subtitles automatically in more than 16 languages:
Step1 Upload the Video File
Download and launch Filmora on your desktop to initiate the process. On its main interface, tap “Create New Project,” which will open a new window. Afterward, upload your desired video on the Project Media to proceed.

Step2 Select Speech-to-Text Feature
Once done with uploading the file, drag the video file to the timeline. Click on the “Speech-to-Text” icon displayed on the timeline and hit the “OK” button after selecting the required language and file. After some seconds, subtitles would be automatically added to the timeline.

Step3 Add Modifications to Subtitles
On your timeline, double-click on the auto-generated subtitles to open the edit settings. By going to the Presets section, you can select the subtitle styles. To add more modifications, you can head to the Custom tab as displayed on your screen. From here, you can change the font, style, color, and size of the subtitles. To confirm the subtitles edits, press the “OK” button.

Step4 Export the Video File
Once you are done with all the subtitle edits, click on the “Export” button. Filmora provides you with various export resolution options and file formats that you can choose. Moreover, you can also share the video file to your desired social media platform, such as YouTube, Vimeo, or TikTok.

Conclusion
Being a non-technical individual, adding subtitles may sound tricky. To provide you with complete assistance, this article has shed light on how to add subtitles in Canva. But, Canva has some limitations in generating subtitles. Hence, we recommend you try and explore Wondershare Filmora to craft subtitles. This tool comprises a Speech-to-Text feature through which you can produce subtitles automatically without hassle.
Part 2: How to Add Captions to Videos in Canva?
Do you want to know how to add subtitles in Canva? Adding subtitles in Canva is extremely simple and quick. In this section, we have jotted down accurate and simple instructions to add subtitles using the Canva tool:
Step1 Begin by visiting the video editor tool page of Canva through any web browser. After accessing the tool page, click on “Edit a Video.” This will open a new window on your screen.

Step2 Now, hit the “Upload Files” button from the left panel and import the video file on this tool. Once done, navigate to the “Text” tab and tap “Add a little bit of body text.” Now adjust the position of the text box according to your desire. You can write your Canva captions by choosing your preferred font, color, size, and style.

Step3 You can also add effects and animation to your added subtitles for more enhancements. Once done with customizations, click on the “Share” button. Here select MP4 as the video file format and save the video on your system.

Part 3: Is There a Good Alternative to Add Subtitles to Videos?
Canva provides a very basic user interface to create subtitles. If you want to enhance your added subtitles with more possibilities, Wondershare Filmora is the best alternative. You can add subtitles through this tool in multiple ways. You can either add subtitles manually or use its “Speech-to-Text” feature. Through this feature, you can transcribe your voice to generate subtitles automatically.
Free Download For Win 7 or later(64-bit)
Free Download For macOS 10.14 or later
Filmora also offers great styles and font options to customize the subtitles. You can easily check the results from the preview window of this efficient video editor. Hence, Filmora acts as a complete and well-trusted platform to generate subtitles in different ways.
Instructions to Create Subtitles Using Filmora
Are you tired of writing subtitles manually in Canva? Read the precise instructions guided below to create the subtitles automatically in more than 16 languages:
Step1 Upload the Video File
Download and launch Filmora on your desktop to initiate the process. On its main interface, tap “Create New Project,” which will open a new window. Afterward, upload your desired video on the Project Media to proceed.

Step2 Select Speech-to-Text Feature
Once done with uploading the file, drag the video file to the timeline. Click on the “Speech-to-Text” icon displayed on the timeline and hit the “OK” button after selecting the required language and file. After some seconds, subtitles would be automatically added to the timeline.

Step3 Add Modifications to Subtitles
On your timeline, double-click on the auto-generated subtitles to open the edit settings. By going to the Presets section, you can select the subtitle styles. To add more modifications, you can head to the Custom tab as displayed on your screen. From here, you can change the font, style, color, and size of the subtitles. To confirm the subtitles edits, press the “OK” button.

Step4 Export the Video File
Once you are done with all the subtitle edits, click on the “Export” button. Filmora provides you with various export resolution options and file formats that you can choose. Moreover, you can also share the video file to your desired social media platform, such as YouTube, Vimeo, or TikTok.

Conclusion
Being a non-technical individual, adding subtitles may sound tricky. To provide you with complete assistance, this article has shed light on how to add subtitles in Canva. But, Canva has some limitations in generating subtitles. Hence, we recommend you try and explore Wondershare Filmora to craft subtitles. This tool comprises a Speech-to-Text feature through which you can produce subtitles automatically without hassle.
A Comprehensive Review of LUTs: Finding LUTs Made by Danny Gevirtz
Danny Gevirtz is a talented video editor known for his creative skills that bring videos to life. His unique approach to video editing sets him apart. One factor that makes Danny’s content so amazing is his mastery of color grading. Through his expert use of color, he can transform ordinary videos into extraordinary ones. You can even download Danny Gevirtz LUTs for your work.
In this way, you can apply his signature style to your videos to make them look great. Moreover, you can achieve a cinematic-style look for your media content. There are so many Danny Gevirtz-influenced LUTs available, both paid and free. You can download any one of them to replicate the color grading style of your favorite video editor.
Part 1: Introducing the Basics of LUTs in Video Editing
LUTs are like magic formulas that make your videos and images look better. They tweak the colors and tones in your footage to create a new visual experience. Following are the basic details of using and applying LUTs in basic video editing operations.
Types of LUTs
- Technical LUTs: These are for technical stuff like adjusting color spaces or correcting gamma. They ensure your colors and tones stay consistent across different devices and platforms.
- Creative LUTs: This type is a fun type of LUT. Creative LUTs help you achieve specific looks or styles. They can make your videos look like they were shot on film or create different moods and visual effects.
Apply LUTs with the Correct LUT Format
You can apply LUTs using different video editing software. For instance, there is Adobe Premiere Pro, DaVinci Resolve, Final Cut Pro, and others to apply LUT. Just load the LUT and apply it to your video clips or the whole project. Moreover, you can make adjustments to the LUT according to your preference.
In addition, LUTs come in different file formats, such as .cube, .3dl, .look, or .icc. The most common one is .cube. Furthermore, different video editing tools support different formats. Moreover, choose the right format for your editing software and the colors you want.
Customizing LUTs and Non-Destructive Editing
You don’t have to stick with pre-made LUTs. Additionally, you can create your own or modify existing ones to match your needs and style. Advanced color grading software lets you tweak individual colors, contrast, saturation, and more. Save these adjustments as custom LUTs for future use.
The great thing about LUTs is that they don’t mess with your original video file. They’re like a layer that sits on top, making real-time changes during playback or rendering. Moreover, you can always return to the original footage or make further adjustments without losing data.
Empower your videos with a new mood using different LUTs. Filmora now offers 100+ top-quality 3D LUTs cover a broad range of scenarios. Transform your videos with Filmora’s powerful 3D LUTs.
Apply LUT on Videos Apply LUT on Videos Learn More

Part 2: What are the Benefits and Drawbacks of Having LUTs in Video Editing?
LUTs are an amazing tool in video editing to improve the color scheme of your videos. However, Look-up Tables also have advantages and disadvantages, which are to be discussed as follows.
Advantages of LUTs in Video Editing
1. Time Efficiency: LUTs save time by quickly applying color grading adjustments. Furthermore, it streamlines the editing process, especially for large volumes of media files.
2. Consistent Look: Using the same LUT across multiple clips ensures consistent color and tone. Moreover, even working with different cameras or lighting conditions throughout your video.
3. Creative Flexibility: LUTs offer a wide range of creative options. It allows you to achieve specific moods and styles or emulate film aesthetics. Similarly, you can enhance your storytelling with correct color grading.
4. Real-Time Preview: Moreover, LUTs provide a real-time preview of the final look. It enables you to make informed, creative decisions. Additionally, you can experiment with different looks during the editing process.
Disadvantages of LUTs in Video Editing
1. Generic Look: Pre-made LUTs may not perfectly match your creative vision. Similarly, it results in a generic or overused appearance that lacks uniqueness or creativity.
2. Limited Control: LUTs offer overall color and tone adjustments, but limitations exist. They may not provide precise control over individual color parameters. It limits the customization options for each clip.
3. Compatibility Issues: Not all LUTs are compatible with every editing software or color space. Furthermore, it potentially leads to below-par results. Moreover, it can also lead to compatibility problems with specific file formats.
Part 3: Danny Gevirtz LUTs: An Iconic List of LUTs Available for Effective Video Editing
Does the work of Danny Gevirtz inspire you? Here are some of the most popular Danny Gevirtz-style LUTs you can use for your content.
1. Creative Filmmaking LUTs
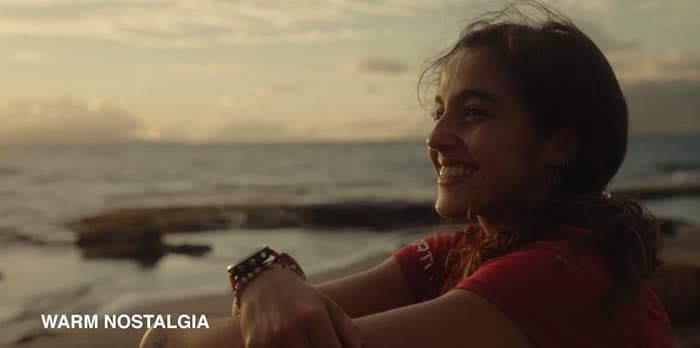
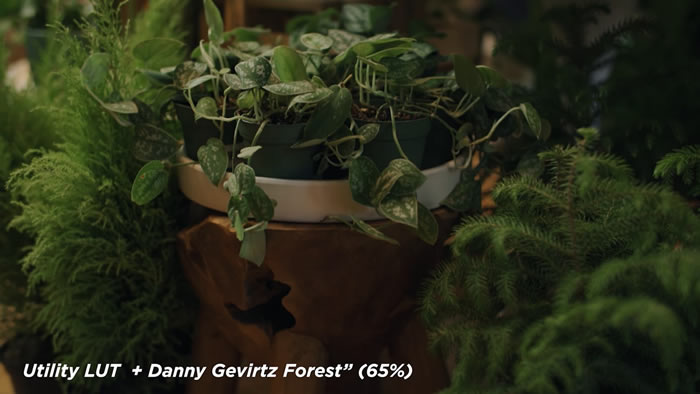
The creative Filmmaking LUT pack consists of 7 unique LUTs designed to enhance your videos. Each LUT offers a unique look, from vintage vibes to the iconic Nolan Blue. Inspired by Christopher Nolan’s film “Dunkirk,” the Nolan Blue LUT gives you a similar color grading. Moreover, you can achieve the perfect sunset color grading with the Warm Nostalgia LUT. There are so many more to explore in this pack that you can use.
2. Sellfy Danny Gevirtz Filmmaker LUT Pack
Danny Gevirtz’s color grading inspires this LUT pack. It provides a collection of 8 unique LUTs designed to give your content a different look. Furthermore, this LUT pack has LUTs from moody and cinematic to basic skin tone LUTs. This pack’s Teal and Orange LUT are designed to enhance skin tones in a video or photo. Moreover, this pack also offers LUT for outdoor scenery and nature footage.
Conclusion
To conclude, LUTs that are inspired capture the essence of a particular style of color grading. Choose your favorite content creator by exploring the world of LUTs and color grading. In addition, many influencers have their LUTs available on the internet. One such content creator is Danny Gevirtz, with some amazing color-grading skills. You can search for Danny Gevirtz LUTs free download to download yours.
Apply LUT on Videos Apply LUT on Videos Learn More

Part 2: What are the Benefits and Drawbacks of Having LUTs in Video Editing?
LUTs are an amazing tool in video editing to improve the color scheme of your videos. However, Look-up Tables also have advantages and disadvantages, which are to be discussed as follows.
Advantages of LUTs in Video Editing
1. Time Efficiency: LUTs save time by quickly applying color grading adjustments. Furthermore, it streamlines the editing process, especially for large volumes of media files.
2. Consistent Look: Using the same LUT across multiple clips ensures consistent color and tone. Moreover, even working with different cameras or lighting conditions throughout your video.
3. Creative Flexibility: LUTs offer a wide range of creative options. It allows you to achieve specific moods and styles or emulate film aesthetics. Similarly, you can enhance your storytelling with correct color grading.
4. Real-Time Preview: Moreover, LUTs provide a real-time preview of the final look. It enables you to make informed, creative decisions. Additionally, you can experiment with different looks during the editing process.
Disadvantages of LUTs in Video Editing
1. Generic Look: Pre-made LUTs may not perfectly match your creative vision. Similarly, it results in a generic or overused appearance that lacks uniqueness or creativity.
2. Limited Control: LUTs offer overall color and tone adjustments, but limitations exist. They may not provide precise control over individual color parameters. It limits the customization options for each clip.
3. Compatibility Issues: Not all LUTs are compatible with every editing software or color space. Furthermore, it potentially leads to below-par results. Moreover, it can also lead to compatibility problems with specific file formats.
Part 3: Danny Gevirtz LUTs: An Iconic List of LUTs Available for Effective Video Editing
Does the work of Danny Gevirtz inspire you? Here are some of the most popular Danny Gevirtz-style LUTs you can use for your content.
1. Creative Filmmaking LUTs
The creative Filmmaking LUT pack consists of 7 unique LUTs designed to enhance your videos. Each LUT offers a unique look, from vintage vibes to the iconic Nolan Blue. Inspired by Christopher Nolan’s film “Dunkirk,” the Nolan Blue LUT gives you a similar color grading. Moreover, you can achieve the perfect sunset color grading with the Warm Nostalgia LUT. There are so many more to explore in this pack that you can use.

2. Sellfy Danny Gevirtz Filmmaker LUT Pack
Danny Gevirtz’s color grading inspires this LUT pack. It provides a collection of 8 unique LUTs designed to give your content a different look. Furthermore, this LUT pack has LUTs from moody and cinematic to basic skin tone LUTs. This pack’s Teal and Orange LUT are designed to enhance skin tones in a video or photo. Moreover, this pack also offers LUT for outdoor scenery and nature footage.

Conclusion
To conclude, LUTs that are inspired capture the essence of a particular style of color grading. Choose your favorite content creator by exploring the world of LUTs and color grading. In addition, many influencers have their LUTs available on the internet. One such content creator is Danny Gevirtz, with some amazing color-grading skills. You can search for Danny Gevirtz LUTs free download to download yours.
How to Create A Freeze Frame Sequence in Video
Are you considering getting your video editing skills to a new high level? Are you worried about spicing your videos with stylish shots and bringing attention to particular aspects of your video?
Freeze frame sequence is one the most stunning effects that can help you greatly. The freeze frame sequence has been used in many classic and present-day movies. And it will never go out of fashion.
Here, we will guide you on creating freeze frame sequences in your videos using Filmora. It is critical here to know what exactly the freeze frame sequence is. So let’s jump right into it!
Part 1. What Is A Freeze Frame?
A freeze frame is a specific single frame of the video clip shown repeatedly in the video. It gives the illusion of a static picture. It is used to draw the viewers’ attention to the minute details of a specific moment, to set up a powerful narrative, or to introduce your main characters.
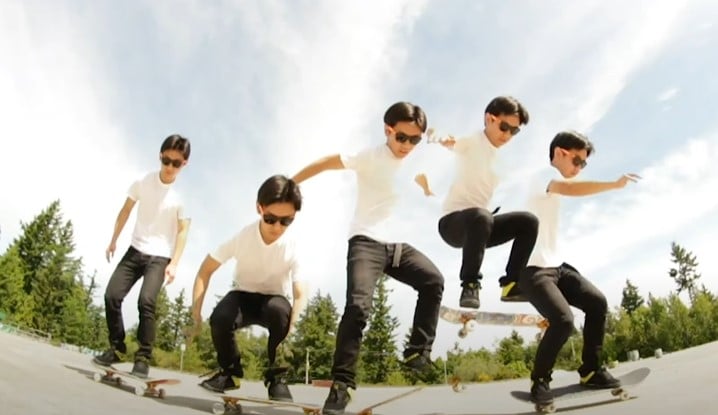
Content creators can also use the freeze-frame effect on fast-moving objects to draw the viewers’ attention. Have a few examples of the most popular freeze frames used in the movies.
Examples of freeze frames in popular movies
Alfred Hitchcock used the first-ever freeze-frame in his film Champagne (1928). There is a long list of many famous tv shows and movies in which the freeze frame effect has been used since then. But to count a few, three examples are given here.
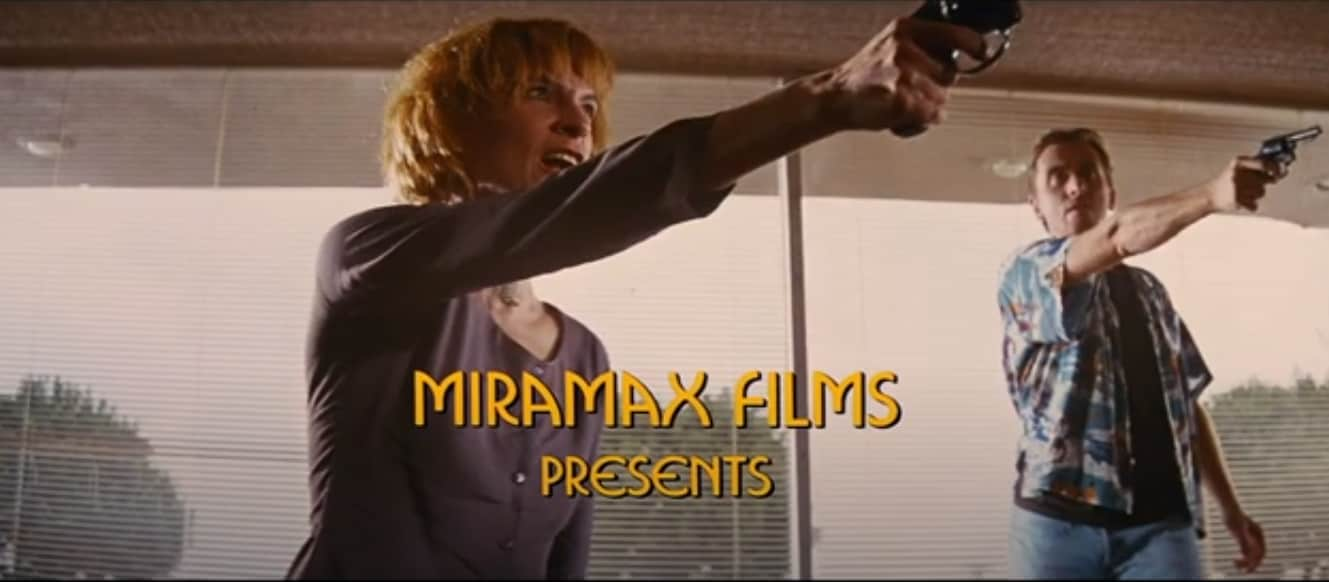
1. Pulp Fiction (1994)
In the beginning scene of Pulp Fiction, where robbery is about to occur, a freeze-frame effect is used to engage the audience. Later in the movie, it was relieved what would happen next. It was a dramatic pause to draw attention. It is a strong example of the freeze-frame effect.
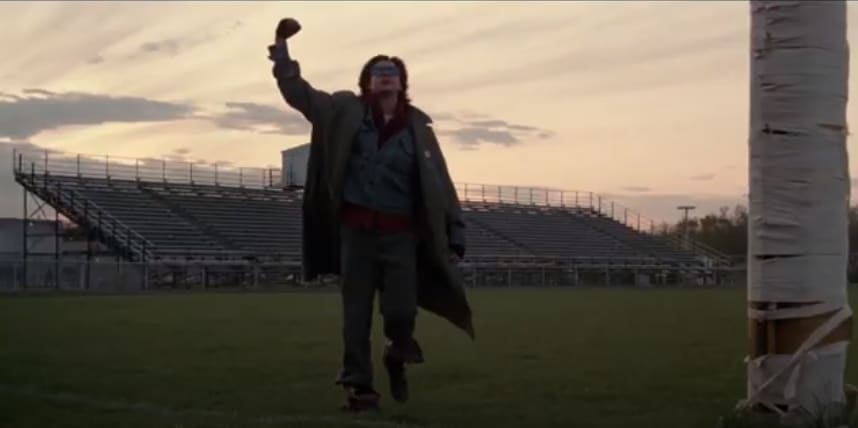
2. The Breakfast Club (1985)
The ending of Breakfast Club is an iconic example of the freeze-frame effect. With a powerful narration, the freeze frame conveys the movie’s central idea to the audience.
3. Suicide Squad (2016)
In the trailer of Suicide Squad, freeze frames were used by the director to introduce the characters. This trailer used stylish animations to give relevant information about the film’s main characters.

Having discussed the famous examples, let’s learn about the power of freeze frames.
The power of freeze frame
The old freeze frames give a retro vibe. However, with the advancement in editing technology, this special effect has proved that there is no end. Furthermore, it has shown that you can do many things with pauses.
Especially when you are a content creator, this effect empowers you by advertising your skills impressively. It also conveys your message convincingly.
Being a content creator, you always want to reach the maximum audience. This special effect will serve this too. It will ultimately get you more viewership, more likes, and more subscriptions. But how to create a freeze frame?
Part 2. How To Create Freeze Frame Sequence? [Step-Wise Guide]
Let’s see how to add a freeze frame sequence in your video step-wise and get started.
Step1 Download Wondershare Filmora
Wondershare Filmora is an all-in-one video editing platform. It is enhanced with multiple practical media resources. You can head to Wondershare Filmora official site to download or upgrade your Filmora.
Free Download For Win 7 or later(64-bit)
Free Download For macOS 10.14 or later
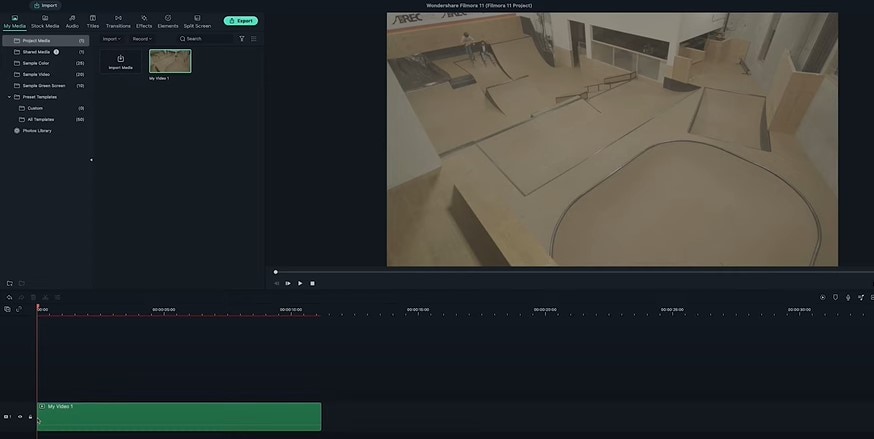
Step2 Import your clips and add them to the timeline
Open Filmora and create a new project. Import your clip into the media library. Add your clips to the first video layer on the timeline.
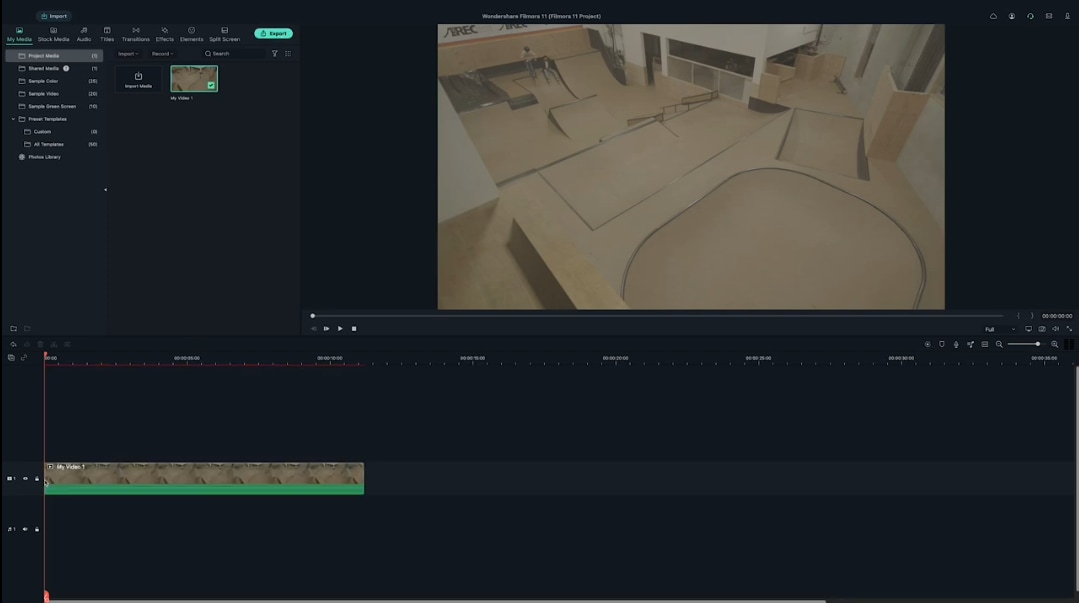
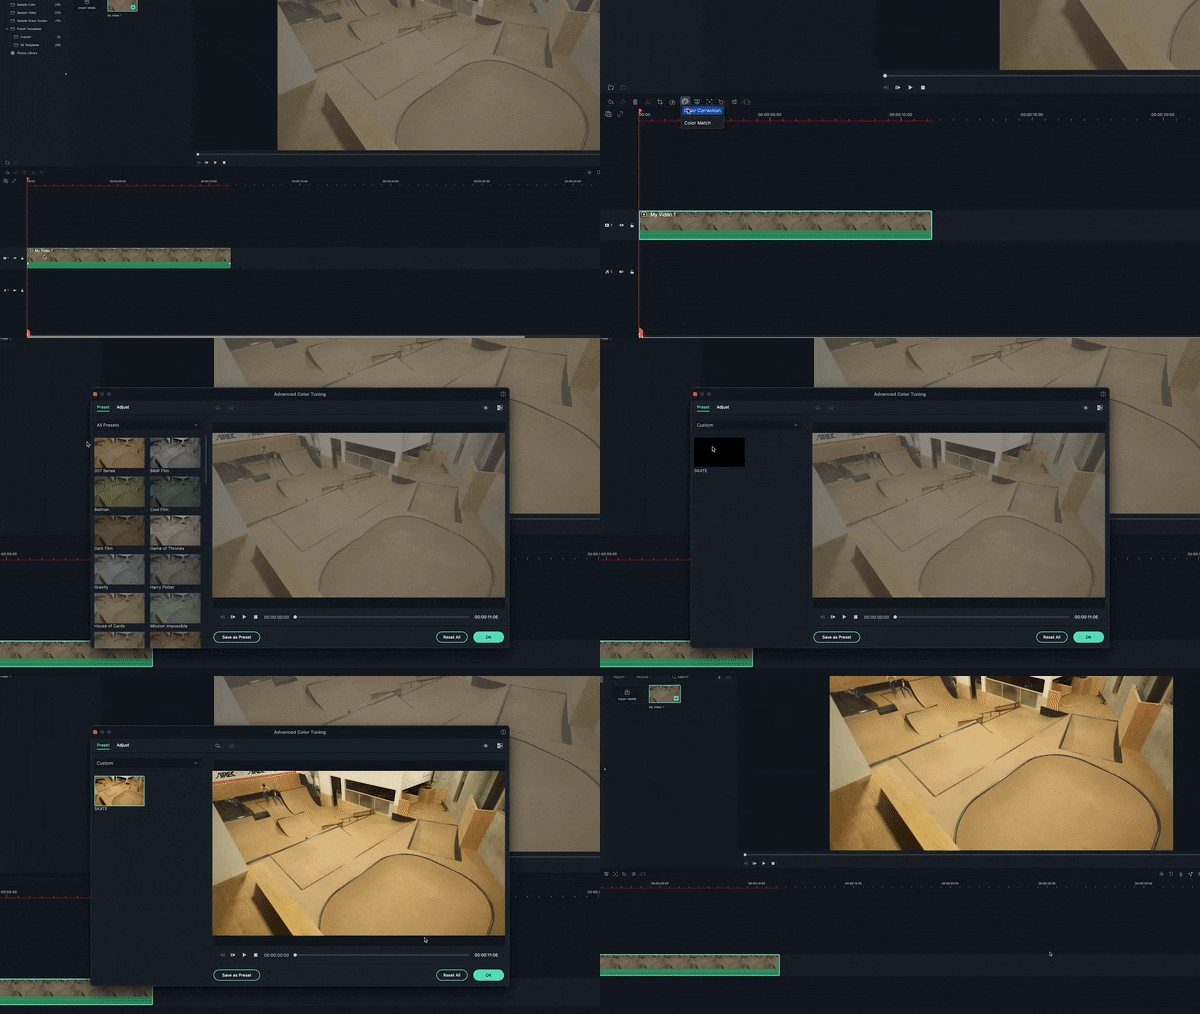
Step3 Apply color correction to the footage
Before we start our edit, let’s color correct our footage, so the corrected color is already applied when we take the screenshots.
Step4 Find your first action frame
Next, scrub through the clip to find your first action frame. For example, in this video, this is our first action frame.
Step5 Take a screenshot of the action frame
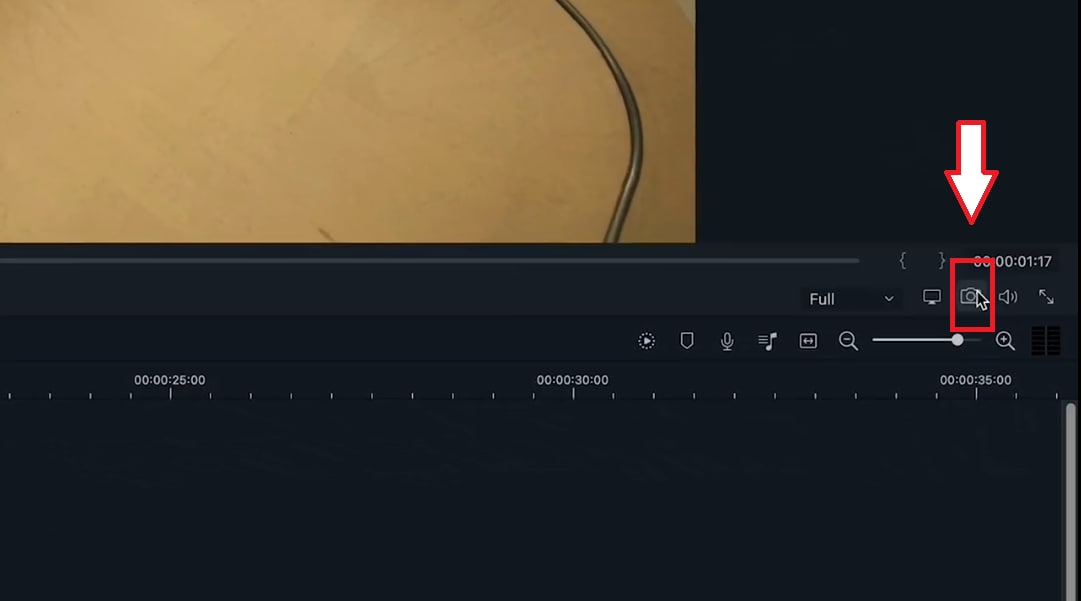
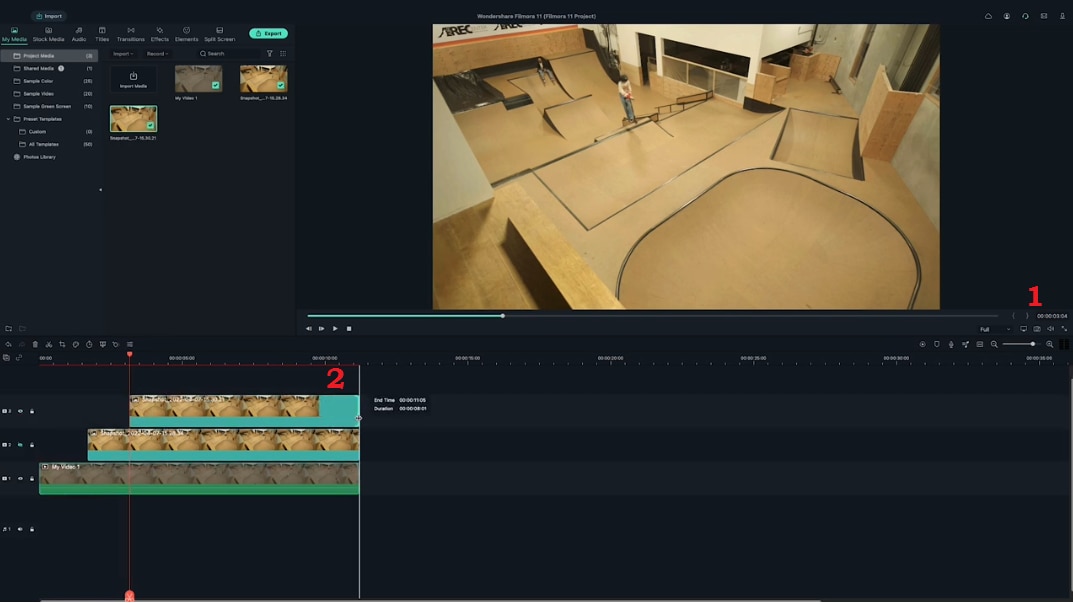
Let’s head to the camera icon under the preview screen and click the icon. It will take a screenshot of the current frame that the playhead is on the timeline.
Make sure to keep the playhead the same after you’ve taken the snapshot. You can find your screenshot in the media tab.
Step6 Add the screenshot to timeline
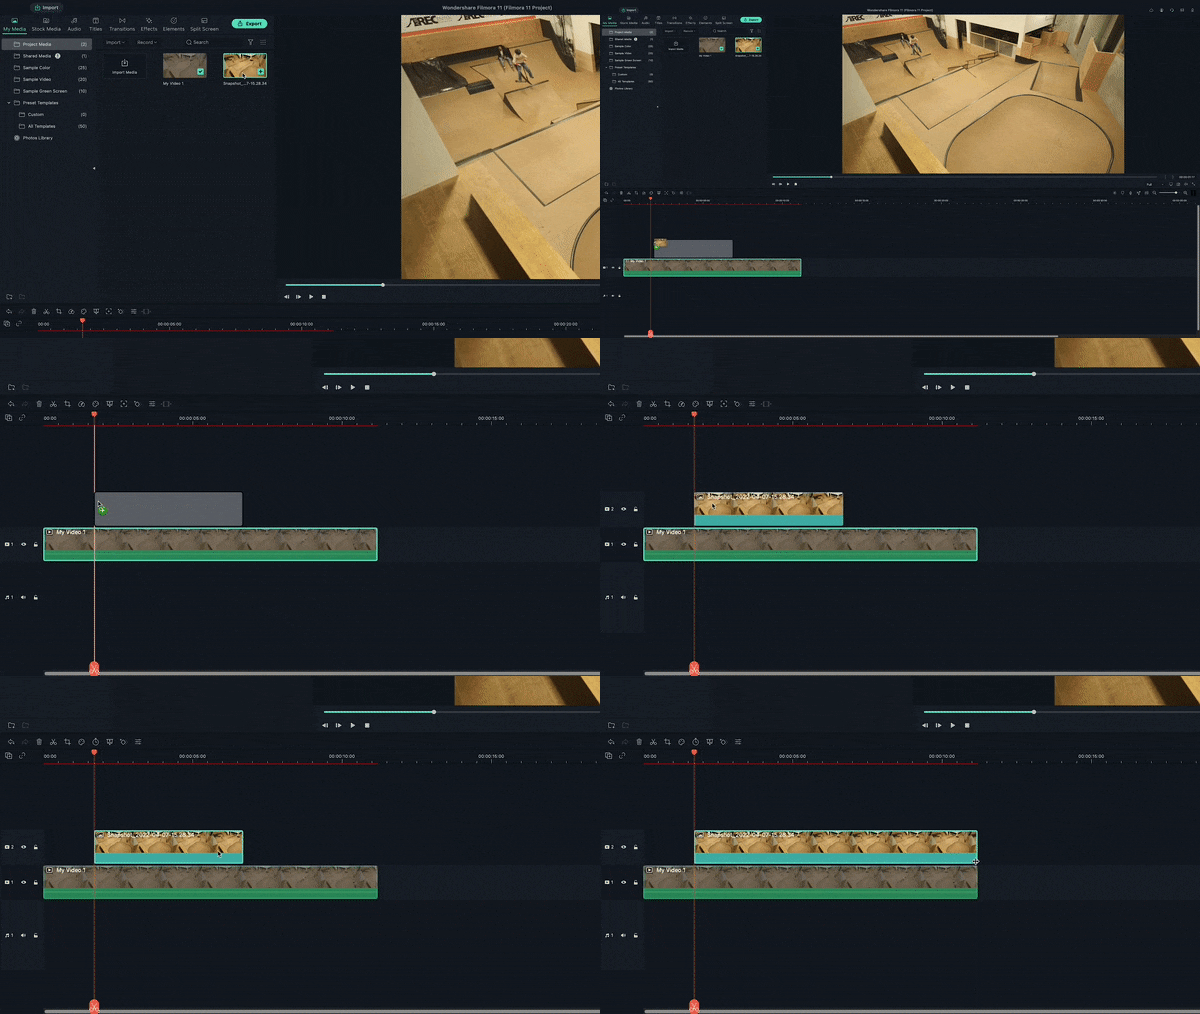
Let’s drag your screenshot onto video layer 2 and align it on the right side of the playhead. Then extend the screenshot so it lasts as long as your central clip.

Step7 Apply masks to the screenshot
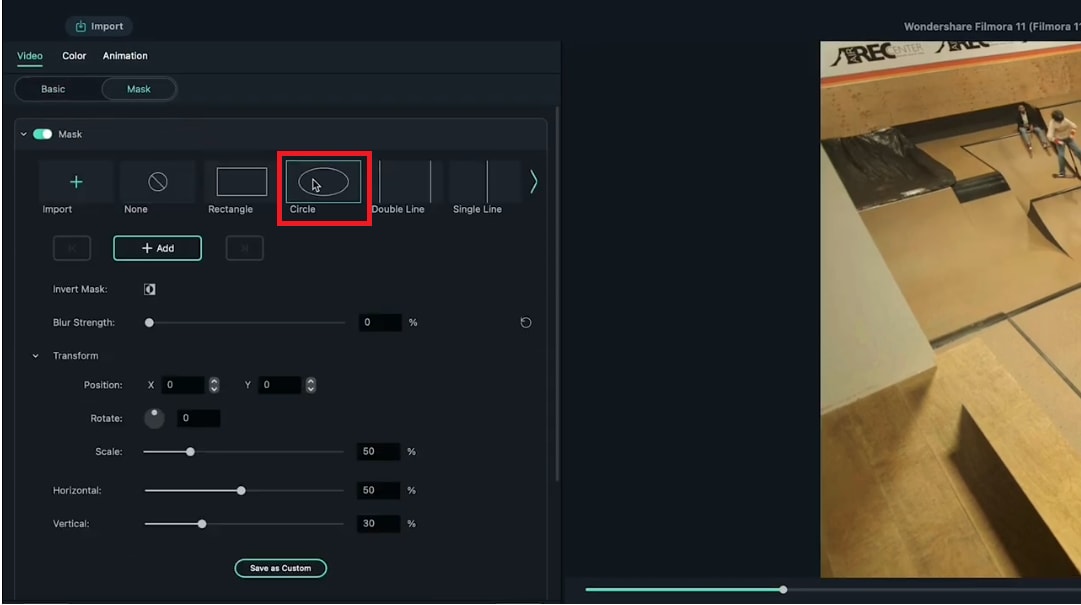
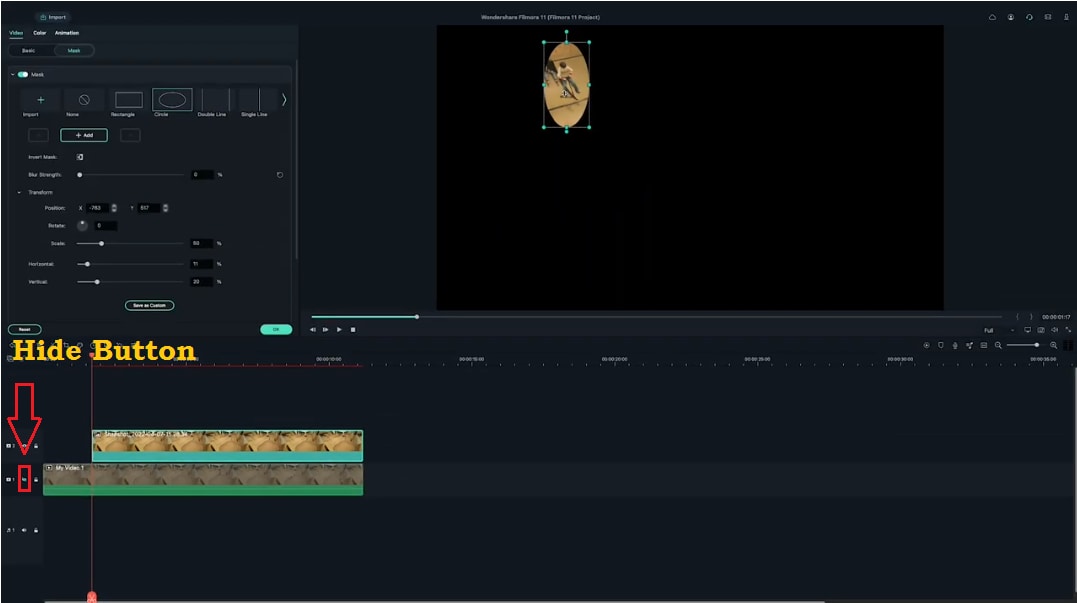
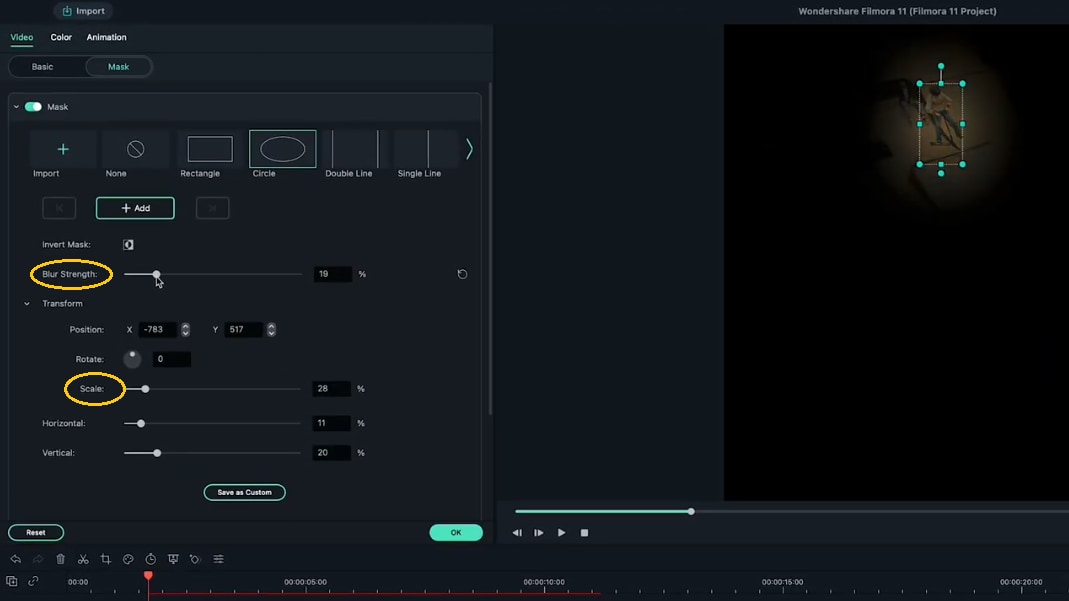
Now, double-click on the screenshot. It will open the “Video” menu, then go into the “Mask” menu. Choose a mask shape and edit it so that it only covers where your subject is in the screenshot. For example, we choose the **”**Circle” mask shape in this video.
If you need help seeing what you’re masking, hide the main video layer and edit your mask like this.
Move the playhead forward and clean up your “mask.” Next, Increase the blur to soften the edges. But not too much because it may become visible on your subject.
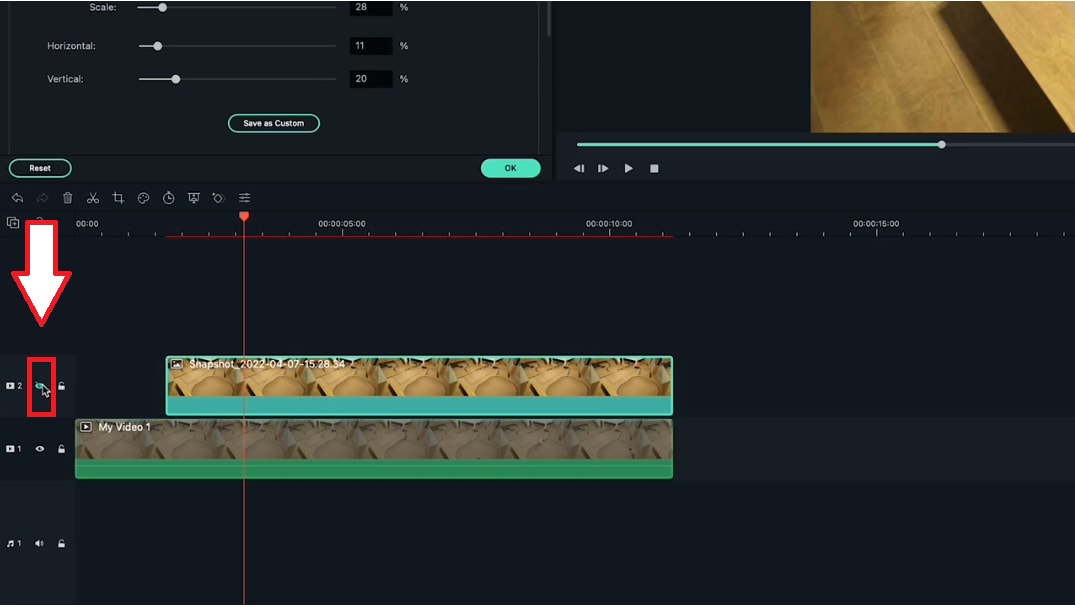
Step8 Hide the first screenshot
Let’s layer a couple more action frames! First, hide the first screenshot so it doesn’t appear in your new screenshot.
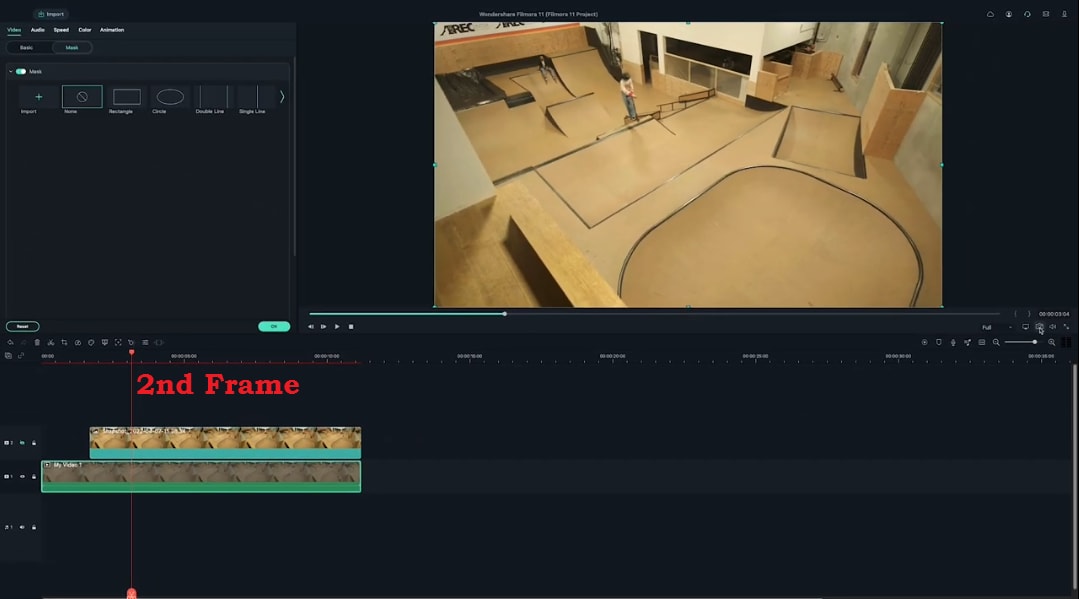
Step9 Select your second action frame
Then, pick a new frame.
- Click the camera icon.
- Drag the screenshot at the new playhead spot.
- Extend the clip.
- Double-click to mask this frame.
- And play it back to make sure it looks good.
- It would help if you did this a couple more times until you have several frames.
Please have a look at the final product and how it looks!
And that’s how you create a freeze-frame video effect in Filmora.
Part 3. Tips To Use Freeze Frame Sequence
You’ve known how to make the freeze frame sequence. However, don’t miss essential tips to improve your video at the next stage.
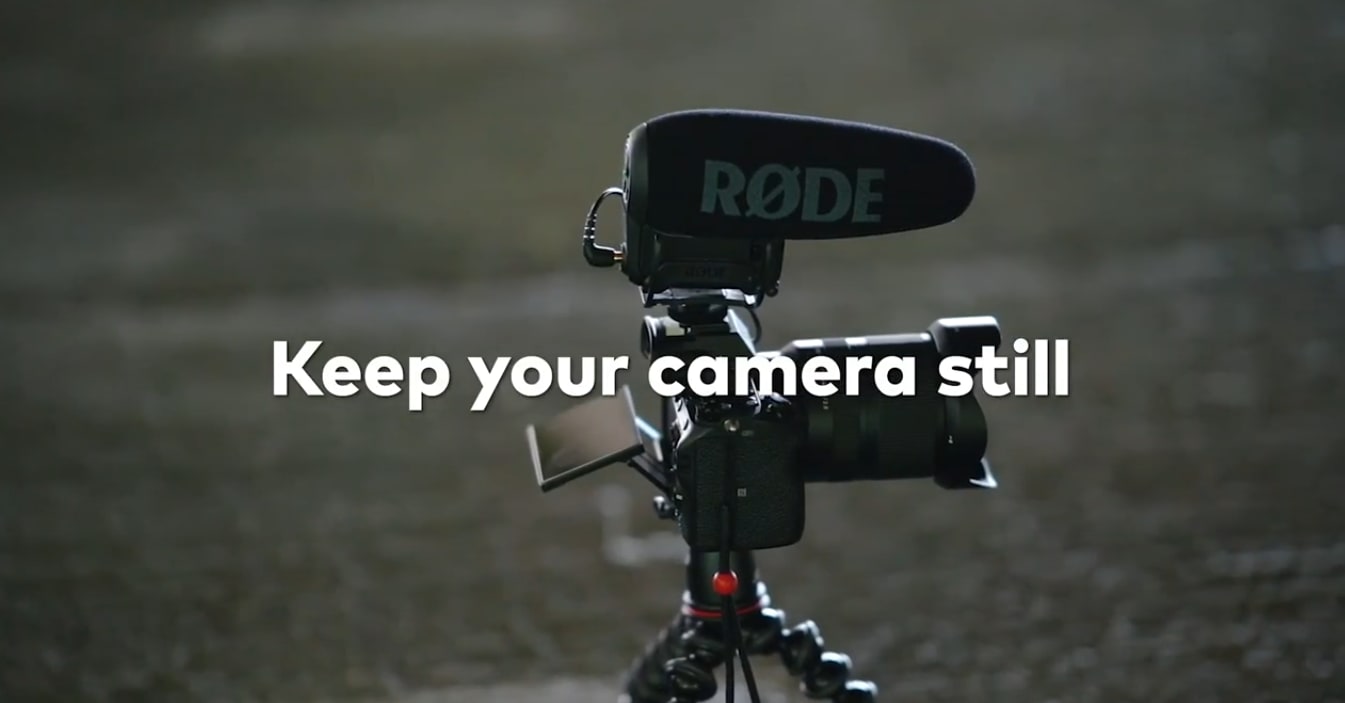
Tip 1: Making a steady shot is important
First, ensure a steady shot with no camera shake while filming. You can use a tripod or a stable surface to keep your camera still.
Why is it necessary to make a steady shot?
- It helps you to make smooth, fluid shots.
- It is much more professional.
- It will take your editing skills to a new level.
- It grabs the attention of the viewers.
- It makes your editing easier.
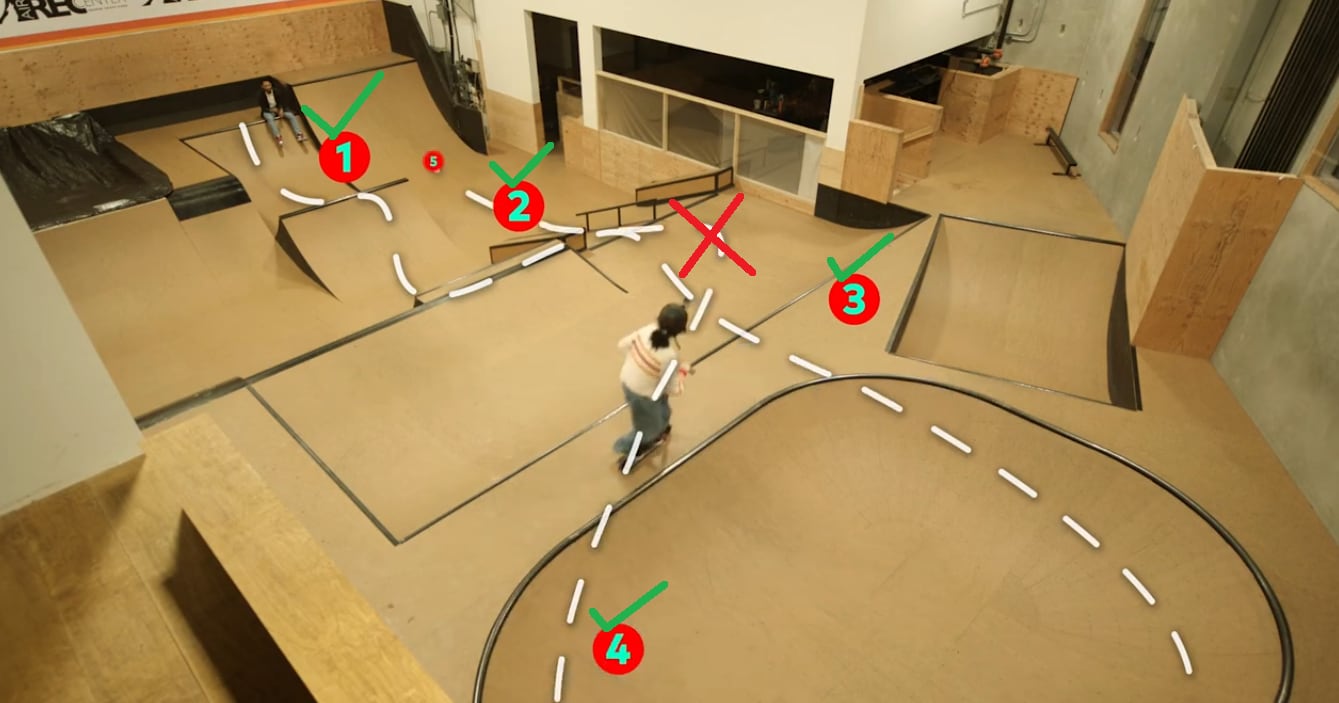
Tip 2: No crossing over
Make sure your subject only crosses the same spot once. Otherwise, you would need help editing the video.
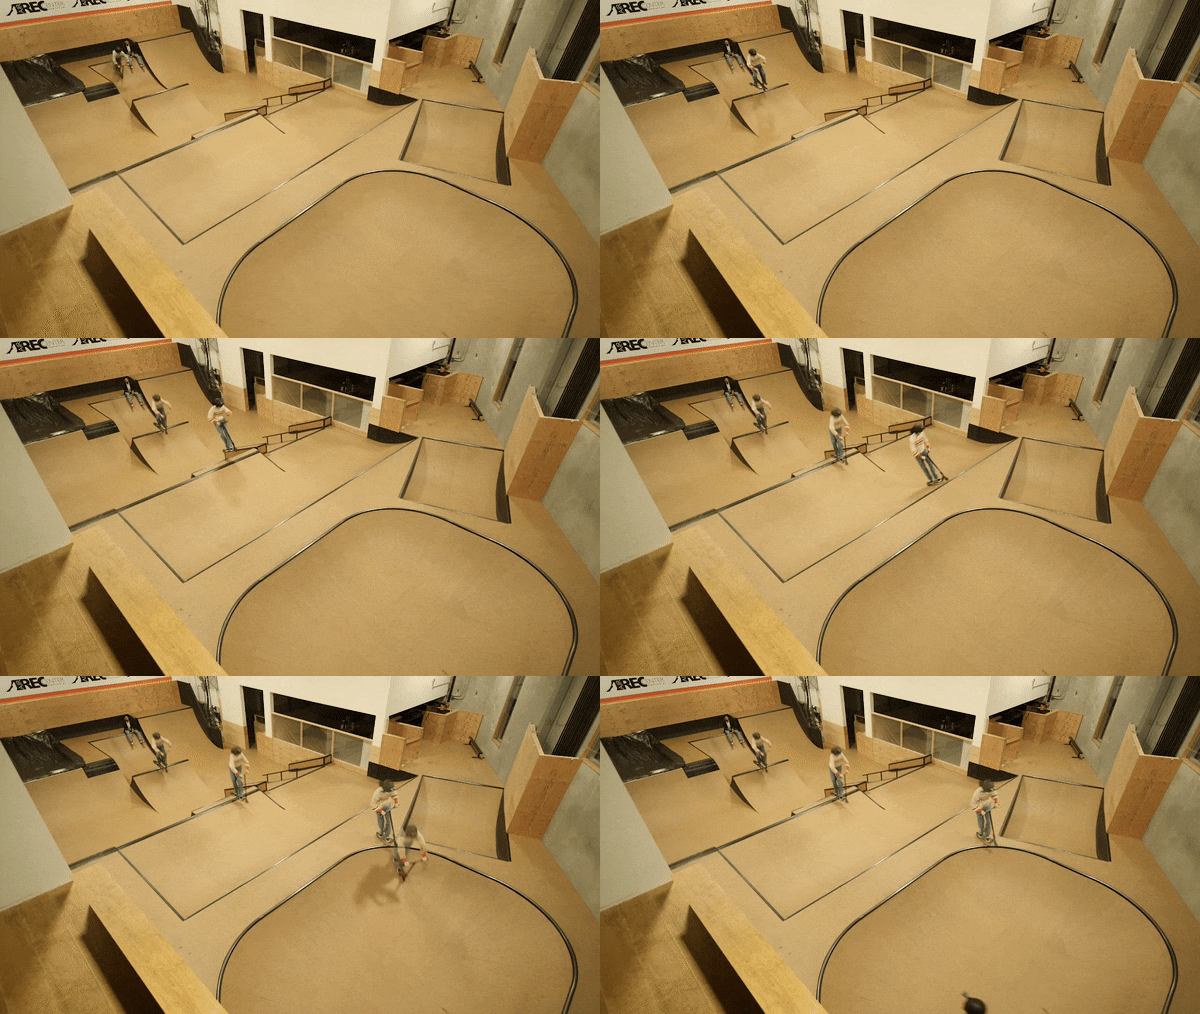
Why is it necessary to avoid crossing the same spot?
- It prevents misalignment of the shots, and your print won’t get damaged, primarily when you use pieces of the same image.
- It helps to create an illusion of holding specific moments.
Final Words
The Freeze Frame Sequence looks professional but much more manageable. The creator’s confidence gets to the next level when they learn how to create it. This step-wise guide using Wondershare Filmora is all for your ease.
Free Download For macOS 10.14 or later
Step2 Import your clips and add them to the timeline
Open Filmora and create a new project. Import your clip into the media library. Add your clips to the first video layer on the timeline.

Step3 Apply color correction to the footage
Before we start our edit, let’s color correct our footage, so the corrected color is already applied when we take the screenshots.

Step4 Find your first action frame
Next, scrub through the clip to find your first action frame. For example, in this video, this is our first action frame.

Step5 Take a screenshot of the action frame
Let’s head to the camera icon under the preview screen and click the icon. It will take a screenshot of the current frame that the playhead is on the timeline.

Make sure to keep the playhead the same after you’ve taken the snapshot. You can find your screenshot in the media tab.
Step6 Add the screenshot to timeline
Let’s drag your screenshot onto video layer 2 and align it on the right side of the playhead. Then extend the screenshot so it lasts as long as your central clip.

Step7 Apply masks to the screenshot
Now, double-click on the screenshot. It will open the “Video” menu, then go into the “Mask” menu. Choose a mask shape and edit it so that it only covers where your subject is in the screenshot. For example, we choose the **”**Circle” mask shape in this video.

If you need help seeing what you’re masking, hide the main video layer and edit your mask like this.

Move the playhead forward and clean up your “mask.” Next, Increase the blur to soften the edges. But not too much because it may become visible on your subject.

Step8 Hide the first screenshot
Let’s layer a couple more action frames! First, hide the first screenshot so it doesn’t appear in your new screenshot.

Step9 Select your second action frame
Then, pick a new frame.

- Click the camera icon.
- Drag the screenshot at the new playhead spot.
- Extend the clip.

- Double-click to mask this frame.
- And play it back to make sure it looks good.
- It would help if you did this a couple more times until you have several frames.
Please have a look at the final product and how it looks!

And that’s how you create a freeze-frame video effect in Filmora.
Part 3. Tips To Use Freeze Frame Sequence
You’ve known how to make the freeze frame sequence. However, don’t miss essential tips to improve your video at the next stage.
Tip 1: Making a steady shot is important
First, ensure a steady shot with no camera shake while filming. You can use a tripod or a stable surface to keep your camera still.

Why is it necessary to make a steady shot?
- It helps you to make smooth, fluid shots.
- It is much more professional.
- It will take your editing skills to a new level.
- It grabs the attention of the viewers.
- It makes your editing easier.
Tip 2: No crossing over
Make sure your subject only crosses the same spot once. Otherwise, you would need help editing the video.

Why is it necessary to avoid crossing the same spot?
- It prevents misalignment of the shots, and your print won’t get damaged, primarily when you use pieces of the same image.
- It helps to create an illusion of holding specific moments.
Final Words
The Freeze Frame Sequence looks professional but much more manageable. The creator’s confidence gets to the next level when they learn how to create it. This step-wise guide using Wondershare Filmora is all for your ease.
Also read:
- [New] Precision-Based Adjustments for Maximum Impact on Instagram TV for 2024
- [Updated] 2024 Approved Step-by-Step Guide Countdown Timer Setup for Broadcasts
- [Updated] In 2024, Unravel the Power of Live Streaming with OBS on YouTube & Twitch
- 2024 Approved Easiest Fix Included! Top 5 Ways to Convert HDR to SDR Videos
- 2024 Approved In This Article, You Will Learn Easy Ways to Edit Videos Using a Mouse in Wondershare Filmora. You Can Do Video Editing without a Keyboard After Reading This Article
- 2024 Approved Innovative Approach to Enhance MP4s with SRT
- Comprehensive Huion Kamvas GT-191 Graphics Tablet Assessment: The Ideal Artistic Companion
- How Can Filmora Create an Audio Visualizer Project for a Song? All Steps, From Launching the App to Editing the Text, Are Detailed Here for 2024
- How to Use AgentGPT to Deploy AI Agents From Your Browser
- In 2024, How to Make Coin Magic With Filmora
- In 2024, How to Make Video Fade to Black in Movie Maker
- In 2024, How to share/fake gps on Uber for Google Pixel 7a | Dr.fone
- In 2024, Prevent Cross-Site Tracking on Xiaomi Redmi Note 12 4G and Browser | Dr.fone
- New How to Make Glitch Effect with Filmora
- New How to Share YouTube Video on Zoom, In 2024
- New In 2024, MP3 Cutter Download for Computer and Mobile
- Skip Unwanted Podcast Advice on the Spotify App for 2024
- Step-by-Step Guide to Maximizing Your ROI on Spotify Ads
- This Article Will Help You Make Cinematic Shots with Simple DIY Hacks Using Stuff From Your Nearest Dollar Store. You Can Edit Your Video to Get Pro Results by Wondershare Filmora for 2024
- Title: 2024 Approved Use Path Blur In Photoshop To Create Motion Effect
- Author: Chloe
- Created at : 2024-12-06 01:09:19
- Updated at : 2024-12-12 08:10:38
- Link: https://ai-editing-video.techidaily.com/2024-approved-use-path-blur-in-photoshop-to-create-motion-effect/
- License: This work is licensed under CC BY-NC-SA 4.0.

