
:max_bytes(150000):strip_icc():format(webp)/GettyImages-538600261-56c643115f9b5879cc3d6bde.jpg)
2024 Approved What Slideshow Templates Can Teach You About Aesthetic
What Slideshow Templates Can Teach You About Aesthetic
What Slideshow Templates Can Teach You About Aesthetic
An easy yet powerful editor
Numerous effects to choose from
Detailed tutorials provided by the official channel
The Slideshows are more capable of easily sums-up your trip or an event with some beautiful moments in an organised way to put things all-together.”Aesthetics” is not just about design style, instead it is a lifestyle and when you are making use of PowerPoint slideshow templates there should be some room for the trends, retro or a vintage style. By having aesthetically designed templates for the Google Slides & PowerPoint, you can have better opportunity to highlight the desired information in an attractive and beautiful manner.

Whether it is about representing your company or organization with beautiful contents or making a slideshow for your loved ones on their special occasion, aesthetic designed templates can overcome the complications in an organized and memorable manner.When it comes to enhancing productivity in a creative manner then coming up with the professional-looking presentations can help you to draw attention to your audience.
Part 1 Best Slideshow Video Templates
No matter what sort of topic you choose, a great looking and successful video presentation mainly depends on the key factors namely: PowerPoint’s designing tools, the attention to presentation process by the speaker or presenter, and devotion to the consistent styling.This is the reason it comes really important for you to get through with the process of making PowerPoint Slide Show right from the group but with addition of little bit of creativity. The templates can make your PowerPoint slideshow much more attractive.
Here is what you are going to get with the help of best possible slide show PowerPoint templates that you can use for business presentation or any other relevant event.
So, lets for go for it.
For Free
These 6 free slideshow templates can let you amaze each & everyone in your audience.
01Surprise Birthday Video Template
Make use of this template to amaze each & everyone in just a few clicks. The surprise birthdaySlideshow presentationtemplate can allow you to design as well as organize surprised, memorable parties with lots of fun.
02Rainbow Gradients Template
Comes with colourful backgrounds & some abstract gradients, it is perfect for making your presentation astounding in no time. In terms of giving you originality, this rainbow template is creative, artistic and much more smoothening to the eyes.
03Composition Book Template
Among the list of free slideshow templates, the composition book presentation template is capable of placing the contents in terms of ruled book pages. You can make use of this template to highlight educational importance, talk about education or write exercises for your students in a funny manner.

04Neutral Colours based Presentation Theme
Don’t want to be overcomplicated in terms of designing? Then it is the perfect template to consider for your presentation in order to stand out among the competition. Grilled with natural colours, strong images and clearer composition based slideshow designsthis will help you to convey better information in terms calm and composed manner to the desired audience.
05Vintage Moodboard Slides
All set to leave great impression on your audience with genuinely great presentation template with small details on every slide and to make it more unique you can customize it as per your needs.

06Birthday Card Presentation Template
The powerful and professionally oriented birthday designed template is fully handcrafted, for giving an organic feel. Just keep it simple by adapting any colour of your choice, layout with some customizable pages for the agendas, ideas and topics on your loved one’s birthday.
For Paid
With this collection of premium Google Slides and PowerPoint templates you can easily steal the show for both personal and commercial usages.
07Realistic Galaxy Consulting-Toolkit
Why limiting yourself to customers from planet Earth when you can be the best company in the entire Milky Way? But to aim that high, you’ll need the help

08Corporate Typography Plus
You will be amazed by how much typography one can do with this template. In terms of mixing as well as matching charts, text you can define stories on a pretty serious notes. It is a data drive template for the professionals.
09Aqua Marketing
The aqua marketing plan can clearly put some impact to your contents; you can trust this template for instantly appealing water-colour details in the best possible manner.
10Pastel Portfolio
If there is any creative portfolio which can open a lot of opportunities for your contents more than your imagination then, it is Pastel Portfolio template. You can easily showcase your skills and working style.

11Minimalist Korean Aesthetic Pitch Deck Presentation
This template is based on the minimalist style and usually comes with varieties of shades for the business presentations and clearly capable of making your audience focus on relatable contents.
12College Candy Aesthetics
The explosion of colours will welcome you, the moment you started using this template. It is a perfect blend of “aesthetics” style which is super cool & capable of shaking latest trends in the market for art. With subscription you can edit as well as add much more information apart from its free version.
Why not go for Filmora Wonderful from which you can make amazing slideshows with blend of custom audio and video?
Well Filmora is pretty awesome for Making your Presentation much more convenient and unique in all perspectives and comes with features like:-
● Entirely customizable slides
● Comes in different nodes & colors.
● Slides here are available in 16:9 as well as 4:3 format.
● You can easily change slide colours quickly.
● Get access to well-crafted templates with instant facility to download it.
● Some Pre-designed templates to help you in making it much more engaging and convenient as per the presentation.
● Best designed templatesto use in the market for special occasions
Part 2 5 Slideshow Websites to Help You Find Aesthetic Slideshow
The slideshow design for PowerPointis really time consuming &you need to create slides right from the scratch. If you are not into a mood of spending so much time in slideshow designs then with thousands of templates already present in the market you can save your time and efforts.

Here, the list of five slideshows, describe various number of slideshow templates designing resources to use so that you can download beautiful as well as professionally designed slideshow templates not just for the PowerPoint, but also for the Keynote &Google Slides.
01Power-User: Range Of Attractive Templates To Use In Offline Mode Directly
The Power-user is one of the most powerful add-onscrafted by the experts for PowerPoint and easily let you browse &insert varieties of attractive templates directly to your presentations.
With access to one million plus pictures, 250 editable maps and around 6,000 icons, charts, diagrams etc. you are getting a tool to save your time for the excel.
02Slide Model: Professionally Designed Templates &Themes
It’s aslideshow websitewith thirty thousand PowerPoint templates that are designed professionally to use for increasing the productivity and quality. You will get unlimited downloads for the 1st year with a subscription. When it comes to design a presentation with a minimal efforts, then simply download a preferred template from this website.
03Powered Template: Outstanding Powerpoint Templates
You will get access to a wide range of entirely royalty-free, attractively designed Google Slides and PowerPoint templates for the business making presentations or for the personal use. You can choose either a free plan or go with the subscription plan.
04Envato Elements: Professionally Implemented Templates By Designers
Right from the creative group of people or community, you will get access to wide range of visual elements on a monthly subscription with features of unlimited downloads& wide range of cataloguethat contains 300,000 plus stock photos & around 34,000 and more graphic assets. You can also download the whole presentation for the specified topics like investor pitch, sales presentation, Real-Estate project, etc. that can be used as a template for Slideshow PowerPoint.
05Aiippt.Com: Free Access To Powerpoint Templates, Diagrams And Designs
Thisslide show websitecan surely help for you to find a perfect match for the Aesthetic Slideshows. AIPPT is a great tool for providing value to your slide show at free of cost. Availability of delivering backgrounds, cover pages for the presentation in terms of real templates really makes it look beautiful. With some interesting elements you can adjust the template as per your needs.
Part 3 FAQ of Slideshow Templates
The ultimate goal of the PowerPoint templates is to deliver solutions to the customer’s queries with a straightforward approach. Slideshow templates are meant to give attractive features to the PowerPoint Presentation. One can easily comply with the updating as well as editing of the template following your taste. With some striking background themes & well-designed presentation templates, you can make your presentation looks even much more eye-catching to truly amaze the audience.
Here are a few FAQs about PowerPoint templates to help you in understanding Aesthetic slideshows:-
How to make an aesthetic slideshow?
You can make use of PowerPoint slideshow templates available in order to effortlessly apply attractive themes, subtle shades of highlighted pictures, and minimalistic text-based designs/fonts in your slides.
Which one is the best tool for creating an aesthetic slideshow?
If you want to have an all-rounder application for taking care of your designing needs with great tools and amazing features of its own then Filmora is the best you can have. With aesthetically pleasing templates, you can access almost 600 plus filters, innumerable templates, and effects with uncountable features in order to make your PowerPoint slides minimalistic & aesthetic.
How to use Filmora for aesthetic slideshow making?
With several varieties of Slideshow templates, Wondershare Filmora Video Editor reflects an idea of minimalistic design. You can make use of filters in order to provide a subtle pastel tone to the existing slides. Also, multiple motion control benefits & fonts available on the help can clearly make a huge difference in providing an aesthetically pleasing slideshow design.
For Win 7 or later (64-bit)
For macOS 10.12 or later
● Ending Thoughts →
● Creating a good looking PowerPoint presentation is a skill that professionals are using it to take the benefit. It is really easy for anyone to go wrong, but with custom designed templates you can have better choices to go fanatic.
●You can find varieties of attractive templates for your business and personal needs without any worries.
●It is easy to customize as well as edit the templates as per your convenient so that you can focus on your attractive ideas.
The Slideshows are more capable of easily sums-up your trip or an event with some beautiful moments in an organised way to put things all-together.”Aesthetics” is not just about design style, instead it is a lifestyle and when you are making use of PowerPoint slideshow templates there should be some room for the trends, retro or a vintage style. By having aesthetically designed templates for the Google Slides & PowerPoint, you can have better opportunity to highlight the desired information in an attractive and beautiful manner.
Whether it is about representing your company or organization with beautiful contents or making a slideshow for your loved ones on their special occasion, aesthetic designed templates can overcome the complications in an organized and memorable manner.When it comes to enhancing productivity in a creative manner then coming up with the professional-looking presentations can help you to draw attention to your audience.
Part 1 Best Slideshow Video Templates
No matter what sort of topic you choose, a great looking and successful video presentation mainly depends on the key factors namely: PowerPoint’s designing tools, the attention to presentation process by the speaker or presenter, and devotion to the consistent styling.This is the reason it comes really important for you to get through with the process of making PowerPoint Slide Show right from the group but with addition of little bit of creativity. The templates can make your PowerPoint slideshow much more attractive.
Here is what you are going to get with the help of best possible slide show PowerPoint templates that you can use for business presentation or any other relevant event.
So, lets for go for it.
For Free
These 6 free slideshow templates can let you amaze each & everyone in your audience.
01Surprise Birthday Video Template
Make use of this template to amaze each & everyone in just a few clicks. The surprise birthdaySlideshow presentationtemplate can allow you to design as well as organize surprised, memorable parties with lots of fun.
02Rainbow Gradients Template
Comes with colourful backgrounds & some abstract gradients, it is perfect for making your presentation astounding in no time. In terms of giving you originality, this rainbow template is creative, artistic and much more smoothening to the eyes.
03Composition Book Template
Among the list of free slideshow templates, the composition book presentation template is capable of placing the contents in terms of ruled book pages. You can make use of this template to highlight educational importance, talk about education or write exercises for your students in a funny manner.
04Neutral Colours based Presentation Theme
Don’t want to be overcomplicated in terms of designing? Then it is the perfect template to consider for your presentation in order to stand out among the competition. Grilled with natural colours, strong images and clearer composition based slideshow designsthis will help you to convey better information in terms calm and composed manner to the desired audience.
05Vintage Moodboard Slides
All set to leave great impression on your audience with genuinely great presentation template with small details on every slide and to make it more unique you can customize it as per your needs.
06Birthday Card Presentation Template
The powerful and professionally oriented birthday designed template is fully handcrafted, for giving an organic feel. Just keep it simple by adapting any colour of your choice, layout with some customizable pages for the agendas, ideas and topics on your loved one’s birthday.
For Paid
With this collection of premium Google Slides and PowerPoint templates you can easily steal the show for both personal and commercial usages.
07Realistic Galaxy Consulting-Toolkit
Why limiting yourself to customers from planet Earth when you can be the best company in the entire Milky Way? But to aim that high, you’ll need the help
08Corporate Typography Plus
You will be amazed by how much typography one can do with this template. In terms of mixing as well as matching charts, text you can define stories on a pretty serious notes. It is a data drive template for the professionals.
09Aqua Marketing
The aqua marketing plan can clearly put some impact to your contents; you can trust this template for instantly appealing water-colour details in the best possible manner.
10Pastel Portfolio
If there is any creative portfolio which can open a lot of opportunities for your contents more than your imagination then, it is Pastel Portfolio template. You can easily showcase your skills and working style.
11Minimalist Korean Aesthetic Pitch Deck Presentation
This template is based on the minimalist style and usually comes with varieties of shades for the business presentations and clearly capable of making your audience focus on relatable contents.
12College Candy Aesthetics
The explosion of colours will welcome you, the moment you started using this template. It is a perfect blend of “aesthetics” style which is super cool & capable of shaking latest trends in the market for art. With subscription you can edit as well as add much more information apart from its free version.
Why not go for Filmora Wonderful from which you can make amazing slideshows with blend of custom audio and video?
Well Filmora is pretty awesome for Making your Presentation much more convenient and unique in all perspectives and comes with features like:-
● Entirely customizable slides
● Comes in different nodes & colors.
● Slides here are available in 16:9 as well as 4:3 format.
● You can easily change slide colours quickly.
● Get access to well-crafted templates with instant facility to download it.
● Some Pre-designed templates to help you in making it much more engaging and convenient as per the presentation.
● Best designed templatesto use in the market for special occasions
Part 2 5 Slideshow Websites to Help You Find Aesthetic Slideshow
The slideshow design for PowerPointis really time consuming &you need to create slides right from the scratch. If you are not into a mood of spending so much time in slideshow designs then with thousands of templates already present in the market you can save your time and efforts.
Here, the list of five slideshows, describe various number of slideshow templates designing resources to use so that you can download beautiful as well as professionally designed slideshow templates not just for the PowerPoint, but also for the Keynote &Google Slides.
01Power-User: Range Of Attractive Templates To Use In Offline Mode Directly
The Power-user is one of the most powerful add-onscrafted by the experts for PowerPoint and easily let you browse &insert varieties of attractive templates directly to your presentations.
With access to one million plus pictures, 250 editable maps and around 6,000 icons, charts, diagrams etc. you are getting a tool to save your time for the excel.
02Slide Model: Professionally Designed Templates &Themes
It’s aslideshow websitewith thirty thousand PowerPoint templates that are designed professionally to use for increasing the productivity and quality. You will get unlimited downloads for the 1st year with a subscription. When it comes to design a presentation with a minimal efforts, then simply download a preferred template from this website.
03Powered Template: Outstanding Powerpoint Templates
You will get access to a wide range of entirely royalty-free, attractively designed Google Slides and PowerPoint templates for the business making presentations or for the personal use. You can choose either a free plan or go with the subscription plan.
04Envato Elements: Professionally Implemented Templates By Designers
Right from the creative group of people or community, you will get access to wide range of visual elements on a monthly subscription with features of unlimited downloads& wide range of cataloguethat contains 300,000 plus stock photos & around 34,000 and more graphic assets. You can also download the whole presentation for the specified topics like investor pitch, sales presentation, Real-Estate project, etc. that can be used as a template for Slideshow PowerPoint.
05Aiippt.Com: Free Access To Powerpoint Templates, Diagrams And Designs
Thisslide show websitecan surely help for you to find a perfect match for the Aesthetic Slideshows. AIPPT is a great tool for providing value to your slide show at free of cost. Availability of delivering backgrounds, cover pages for the presentation in terms of real templates really makes it look beautiful. With some interesting elements you can adjust the template as per your needs.
Part 3 FAQ of Slideshow Templates
The ultimate goal of the PowerPoint templates is to deliver solutions to the customer’s queries with a straightforward approach. Slideshow templates are meant to give attractive features to the PowerPoint Presentation. One can easily comply with the updating as well as editing of the template following your taste. With some striking background themes & well-designed presentation templates, you can make your presentation looks even much more eye-catching to truly amaze the audience.
Here are a few FAQs about PowerPoint templates to help you in understanding Aesthetic slideshows:-
How to make an aesthetic slideshow?
You can make use of PowerPoint slideshow templates available in order to effortlessly apply attractive themes, subtle shades of highlighted pictures, and minimalistic text-based designs/fonts in your slides.
Which one is the best tool for creating an aesthetic slideshow?
If you want to have an all-rounder application for taking care of your designing needs with great tools and amazing features of its own then Filmora is the best you can have. With aesthetically pleasing templates, you can access almost 600 plus filters, innumerable templates, and effects with uncountable features in order to make your PowerPoint slides minimalistic & aesthetic.
How to use Filmora for aesthetic slideshow making?
With several varieties of Slideshow templates, Wondershare Filmora Video Editor reflects an idea of minimalistic design. You can make use of filters in order to provide a subtle pastel tone to the existing slides. Also, multiple motion control benefits & fonts available on the help can clearly make a huge difference in providing an aesthetically pleasing slideshow design.
For Win 7 or later (64-bit)
For macOS 10.12 or later
● Ending Thoughts →
● Creating a good looking PowerPoint presentation is a skill that professionals are using it to take the benefit. It is really easy for anyone to go wrong, but with custom designed templates you can have better choices to go fanatic.
●You can find varieties of attractive templates for your business and personal needs without any worries.
●It is easy to customize as well as edit the templates as per your convenient so that you can focus on your attractive ideas.
Best LUTs for Vlog: A 2024 Overview
Color grading and color correction are essential tools in post-production videos and photos. Many tools can be used for this purpose, such as LUTs. LUTs, or Look Up Tables, are among the most popular color grading and correction tools. It can help to apply a specific color grade or look at your videos and photos.
However, you can choose from different LUT styles if you are a vlogger or a traveler. There are many LUTs vlog options available to choose from, each with a unique look and feel. This article will provide you with different vlog LUTs options that you can try.
- Best LUTs for Vlog to Use in 2024 Editing
- How Has Wondershare Filmora Changed the Dynamics of LUTs in Video Editing?
Part 1: How Can LUTs Help in Vlogging?
If you want to make your vlogs look more professional, try using LUTs. These tables can help you correct the color of your footage easily and quickly while you’re on the go. You can use LUTs for vlogs to fix issues like your clips’ white balance and exposure. Furthermore, many other uses of LUTs for vlogging are discussed below.
Consistency
Consistency is the key when it comes to vlogging. You want your vlog to have a consistent look and feel thorough. With LUTs, you can ensure that the color grading of all your clips is the same. It gives your vlog a cohesive look and makes it stand out from others in the same genre.
Creative Look
Vlog LUTs also allow you to add a unique and creative look to your vlogs. You can set the mood of your vlog by adjusting the colors and tones to match the overall tone of your content. It helps you create a recognizable brand and establish your unique style.
Time-Saving
If you’re short on time, LUTs can help you vlog more efficiently. They save time, allowing you to focus on the storytelling aspect of your vlog. LUTs can also help you to edit your videos and publish them online quickly. It lets you stay on top of trends and maintain an active presence on social media.
Lighting Correction
Sometimes, capturing footage under mixed lighting conditions can be challenging. LUTs can help you to correct this and create a cohesive look for your vlog. You can even use LUTs on mobile editing apps to quickly edit your vlogs to publish them on the go.
Part 2: Best LUTs for Vlog to Use in 2024 Editing
Besides benefits and uses, the real part is to choose the best LUTs for vlogging. With so many LUTs vlog options, choosing a good one takes time and effort. Here are some of the best LUTs that you can use for vlogs.
1. Artist Found LUTs Collection
Are you a vlogger looking for a LUT that can help enhance the colors and brightness of your videos? The Artist Found LUTs Collection is a great option. This LUT is perfect for giving your vlogs a professional look that will capture the attention of your viewers. Furthermore, you can make your videos brighter and more vibrant with this LUTs pack.

2. B&W
B&W is the best LUT for vlog that can be a great addition to your vlogging toolkit. This LUT allows you to transform your videos into black and white. It gives your vlogs and videos a more serious and dramatic look. You can add a touch of nostalgia and a vintage feel to your videos, giving them an artistic feel. With B&W, you can create a timeless and classic look for your vlogs, making them more memorable and impactful.

3. Travel Video LUTs by Matteo Martignago
If you’re looking for a LUT to use in your travel vlogs, consider the Travel Video LUTs by Matteo Martignago. In this LUT pack, you’ll find five different LUTs, each with its unique look and feel. Moreover, this pack has warm and cold LUTs, giving you multiple options. The warm LUTs give your videos a cozy feel, while the cold LUTs can create a sense of adventure and excitement.

4. BRIGHT INSTA LUTS
Bright Insta LUTs is the suitable LUT vlog pack for you if you’re a makeup or fashion vlogger. This LUT pack gives your makeup or fashion vlogs a bright and vibrant look. With 20 different LUTs, for instance, you can experiment with various color palettes and find the perfect look for your videos. These LUTs can help you achieve a bright, vibrant, and exposed feel for better fashion and makeup vlogs.

5. Kurt Von Studios Retro Film LUTs
Kurt Von Studios Retro Film LUTs is a great tool for outdoor vloggers who want to add a vintage feel to their videos. It creates a cinematic look with earthy tones and rusty textures that give your content an authentic vintage feel. With this LUT, you can achieve a retro-style feel, adding character to your vlogs and making them more visually appealing.

6. Limit Color
Give your indoor vlogs and podcasts more feel by using Limit Color. This vlog LUT adds an artistic touch to your footage by limiting the color and light in your videos. It creates darker shadows and underexposed colors by focusing on the subject. Similarly, it helps to create a dramatic look that adds emotion to your vlogs and podcasts.

Part 3: How Has Wondershare Filmora Changed the Dynamics of LUTs in Video Editing?
Wondershare Filmora is an excellent video editing software option if you’re a vlogger. The most important element in vlogging is its lighting and color composition. With its latest update, you can use different LUTs to enhance your vlogs. Filmora provides over 200+ LUTs, including many free vlog LUTs, to help you achieve your videos’ desired look and feel.
Apart from LUTs, you can also make color adjustments and corrections to your vlogs. Moreover, you can adjust brightness, contrast, saturation, and hue to create a perfect vlog. If you’re a travel vlogger, you can make certain adjustments to give your vlogs an earthy and warm feel. You can also use different in-built filters and effects to create the perfect ambiance for your travel vlogs.

Key Features
- With this powerful AI video editing tool, you can use its motion tracking feature. This feature tracks the subject in motion so that you can add creative effects to your videos.
- Wondershare Filmora has over 1000 video templates available. You can choose any desired template that suits the style and mood of your vlog.
- This tool provides you with more control with its speed ramping feature. Using this feature, you can increase or decrease the speed of your videos at any point.
Empower your videos with a new mood using different LUTs. Filmora now offers 100+ top-quality 3D LUTs cover a broad range of scenarios. Transform your videos with Filmora’s powerful 3D LUTs.
Apply LUT on Videos Apply LUT on Videos Learn More


Conclusion
To sum up, LUTs are not an option but more of becoming a necessity, especially for vloggers. LUTs not only color-grade your videos but also add depth and perspective to your videos. Your content looks more engaging and interactive with the correct colors and lighting. However, you can use the best LUTs for vlogs even in the Wondershare Filmora tool. This tool lets you create and edit creative vlogs in no time.
Part 1: How Can LUTs Help in Vlogging?
If you want to make your vlogs look more professional, try using LUTs. These tables can help you correct the color of your footage easily and quickly while you’re on the go. You can use LUTs for vlogs to fix issues like your clips’ white balance and exposure. Furthermore, many other uses of LUTs for vlogging are discussed below.
Consistency
Consistency is the key when it comes to vlogging. You want your vlog to have a consistent look and feel thorough. With LUTs, you can ensure that the color grading of all your clips is the same. It gives your vlog a cohesive look and makes it stand out from others in the same genre.
Creative Look
Vlog LUTs also allow you to add a unique and creative look to your vlogs. You can set the mood of your vlog by adjusting the colors and tones to match the overall tone of your content. It helps you create a recognizable brand and establish your unique style.
Time-Saving
If you’re short on time, LUTs can help you vlog more efficiently. They save time, allowing you to focus on the storytelling aspect of your vlog. LUTs can also help you to edit your videos and publish them online quickly. It lets you stay on top of trends and maintain an active presence on social media.
Lighting Correction
Sometimes, capturing footage under mixed lighting conditions can be challenging. LUTs can help you to correct this and create a cohesive look for your vlog. You can even use LUTs on mobile editing apps to quickly edit your vlogs to publish them on the go.
Part 2: Best LUTs for Vlog to Use in 2024 Editing
Besides benefits and uses, the real part is to choose the best LUTs for vlogging. With so many LUTs vlog options, choosing a good one takes time and effort. Here are some of the best LUTs that you can use for vlogs.
1. Artist Found LUTs Collection
Are you a vlogger looking for a LUT that can help enhance the colors and brightness of your videos? The Artist Found LUTs Collection is a great option. This LUT is perfect for giving your vlogs a professional look that will capture the attention of your viewers. Furthermore, you can make your videos brighter and more vibrant with this LUTs pack.
2. B&W
B&W is the best LUT for vlog that can be a great addition to your vlogging toolkit. This LUT allows you to transform your videos into black and white. It gives your vlogs and videos a more serious and dramatic look. You can add a touch of nostalgia and a vintage feel to your videos, giving them an artistic feel. With B&W, you can create a timeless and classic look for your vlogs, making them more memorable and impactful.
3. Travel Video LUTs by Matteo Martignago
If you’re looking for a LUT to use in your travel vlogs, consider the Travel Video LUTs by Matteo Martignago. In this LUT pack, you’ll find five different LUTs, each with its unique look and feel. Moreover, this pack has warm and cold LUTs, giving you multiple options. The warm LUTs give your videos a cozy feel, while the cold LUTs can create a sense of adventure and excitement.
4. BRIGHT INSTA LUTS
Bright Insta LUTs is the suitable LUT vlog pack for you if you’re a makeup or fashion vlogger. This LUT pack gives your makeup or fashion vlogs a bright and vibrant look. With 20 different LUTs, for instance, you can experiment with various color palettes and find the perfect look for your videos. These LUTs can help you achieve a bright, vibrant, and exposed feel for better fashion and makeup vlogs.
5. Kurt Von Studios Retro Film LUTs
Kurt Von Studios Retro Film LUTs is a great tool for outdoor vloggers who want to add a vintage feel to their videos. It creates a cinematic look with earthy tones and rusty textures that give your content an authentic vintage feel. With this LUT, you can achieve a retro-style feel, adding character to your vlogs and making them more visually appealing.
6. Limit Color
Give your indoor vlogs and podcasts more feel by using Limit Color. This vlog LUT adds an artistic touch to your footage by limiting the color and light in your videos. It creates darker shadows and underexposed colors by focusing on the subject. Similarly, it helps to create a dramatic look that adds emotion to your vlogs and podcasts.
Part 3: How Has Wondershare Filmora Changed the Dynamics of LUTs in Video Editing?
Wondershare Filmora is an excellent video editing software option if you’re a vlogger. The most important element in vlogging is its lighting and color composition. With its latest update, you can use different LUTs to enhance your vlogs. Filmora provides over 200+ LUTs, including many free vlog LUTs, to help you achieve your videos’ desired look and feel.
Apart from LUTs, you can also make color adjustments and corrections to your vlogs. Moreover, you can adjust brightness, contrast, saturation, and hue to create a perfect vlog. If you’re a travel vlogger, you can make certain adjustments to give your vlogs an earthy and warm feel. You can also use different in-built filters and effects to create the perfect ambiance for your travel vlogs.
Key Features
- With this powerful AI video editing tool, you can use its motion tracking feature. This feature tracks the subject in motion so that you can add creative effects to your videos.
- Wondershare Filmora has over 1000 video templates available. You can choose any desired template that suits the style and mood of your vlog.
- This tool provides you with more control with its speed ramping feature. Using this feature, you can increase or decrease the speed of your videos at any point.
Empower your videos with a new mood using different LUTs. Filmora now offers 100+ top-quality 3D LUTs cover a broad range of scenarios. Transform your videos with Filmora’s powerful 3D LUTs.
Apply LUT on Videos Apply LUT on Videos Learn More
Conclusion
To sum up, LUTs are not an option but more of becoming a necessity, especially for vloggers. LUTs not only color-grade your videos but also add depth and perspective to your videos. Your content looks more engaging and interactive with the correct colors and lighting. However, you can use the best LUTs for vlogs even in the Wondershare Filmora tool. This tool lets you create and edit creative vlogs in no time.
How to Edit FLV Video Files with FLV Editor [Windows, Mac,Android, iPhone & Online]
FLV is a common container format for transferring digital video and audio information over the Internet. A.flv file is a flash video that may be seen on your computer with Adobe Flash Player, Adobe Air, or some third-party Adobe Flash plugins.
FLV has become the standard video format for web-based streaming video service providers such as Hulu and VEVO due to its superior functionality and tiny size. It’s also the default format for Quicktime on Mac systems.
If you wish to edit FLV videos without any problems, you should utilize a multipurpose video editor that supports the FLV file format.
Best FLV Editor to Edit FlV Video on Windows and Mac - Filmroa Video Editor
Filmora Video Editor is a professional FLV video editing application. This software allows you to edit 4K video files, share completed films directly on social media platforms, and add subtitles and audio files.
You may mix multiple films and enhance your footage with numerous transitions and other effects using this FLV video editing software. Furthermore, the free Filmora application is ideal for adding audio files or video clips from the wide library and uploading your soundtrack.
For Win 7 or later (64-bit)
For macOS 10.14 or later
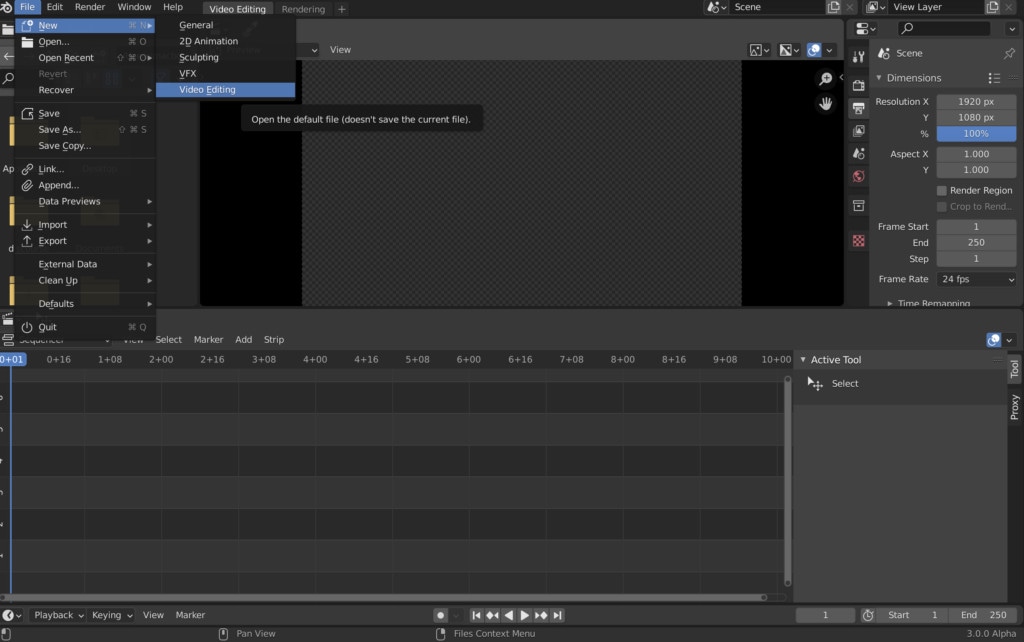
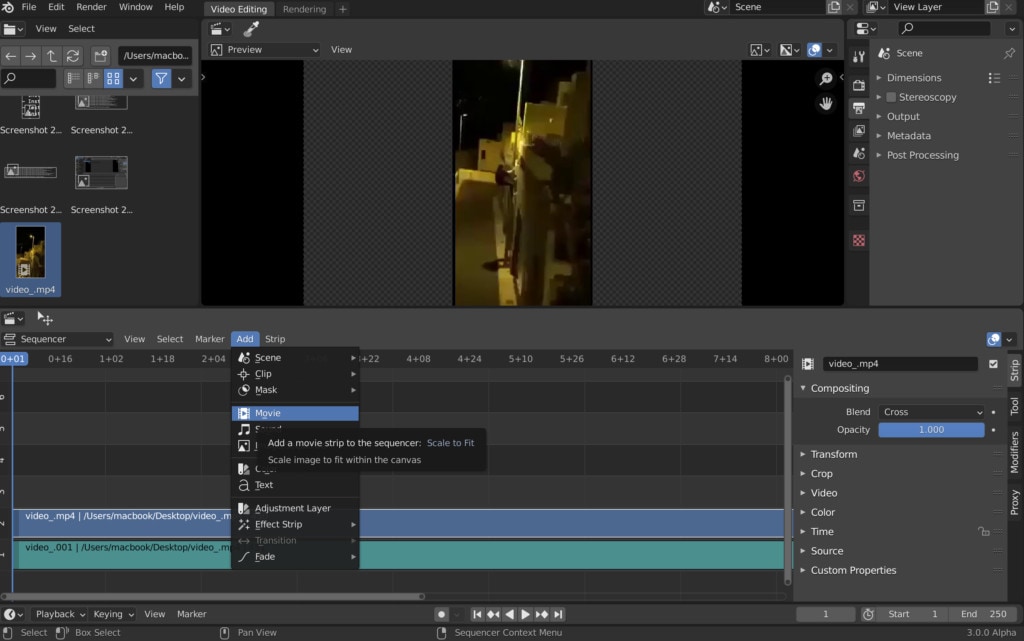
Therefore, you can use the following steps to edit FLV video on Windows and Mac:
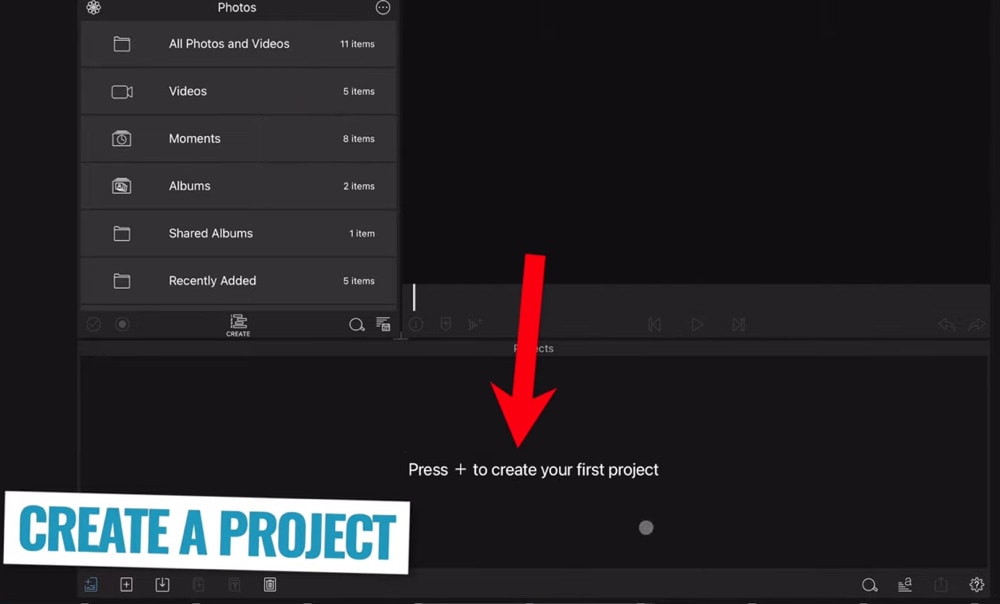
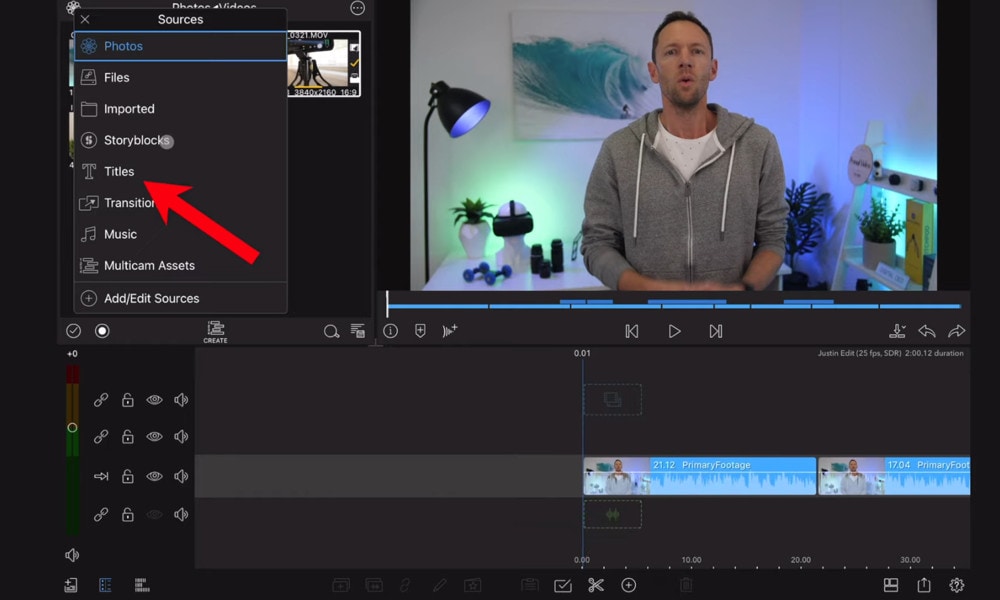
Step 1: Import file:

Step 2: Edit the FLV file:
Acquire the perfect tool in your palm for anything you want to do, such as clipping, cropping, rotating, and more.
Furthermore, all editing capabilities in the toolbar allow drag-and-drop, making it even easier to touch up your films quickly. Consider the following scenario:
- Drag and drop a transition into the video/photo, or right-click it and select “Apply to All.”
- Please drag & drop a title template to the position where you want it to appear, then adjust it.
- To use the effects, select one from the 50+ available video effects, select it, and apply it to your photos/videos instantaneously.
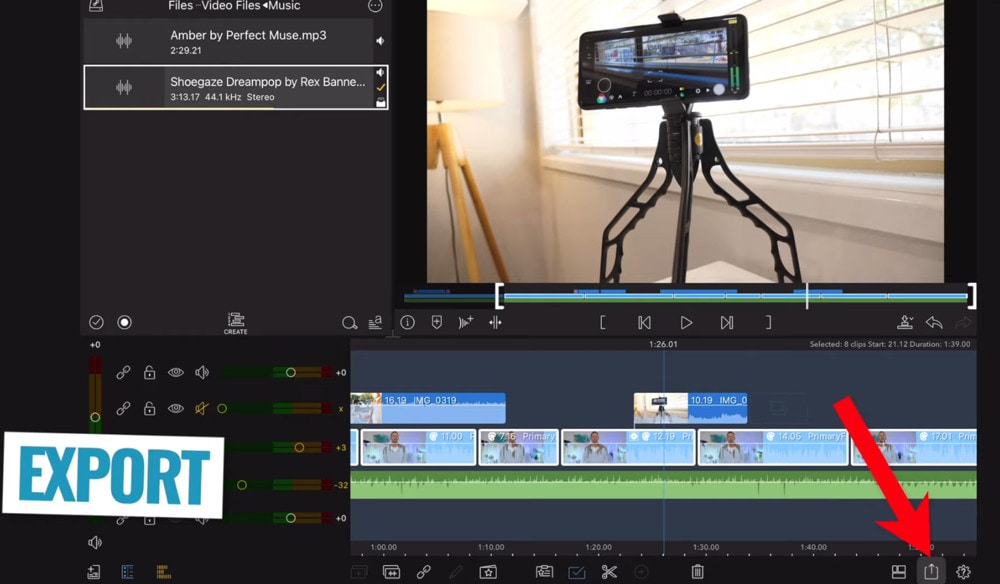
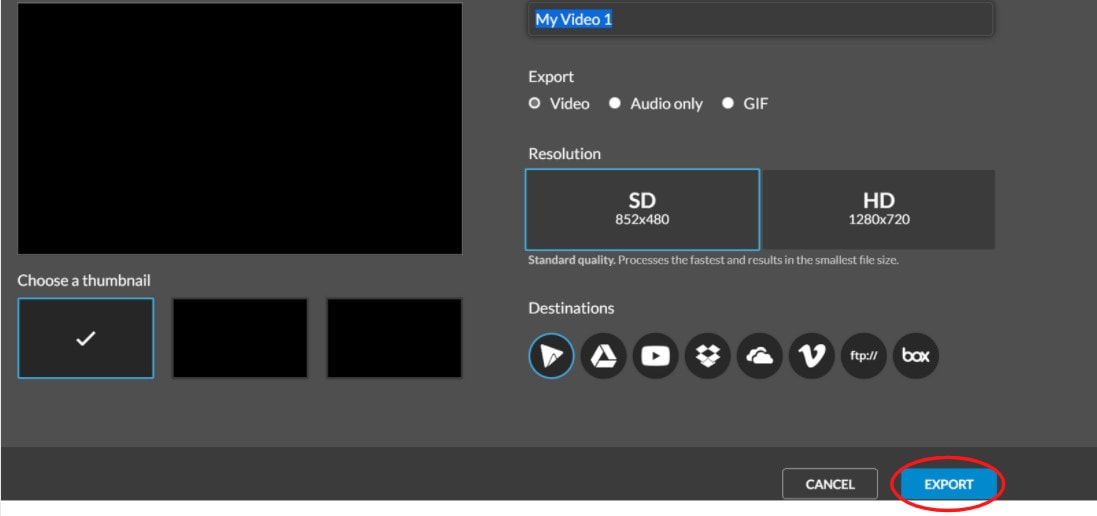
Step 3: Save or Export the file:

When you’re done, export your modified MP4 files to Windows/Mac and quickly share them on YouTube, with the option of sending a message to Facebook and Twitter. When you click Create in the program window’s middle right corner, you’ll be taken to the Output window below.
Alternative Way to Edit FlV Video on Windows
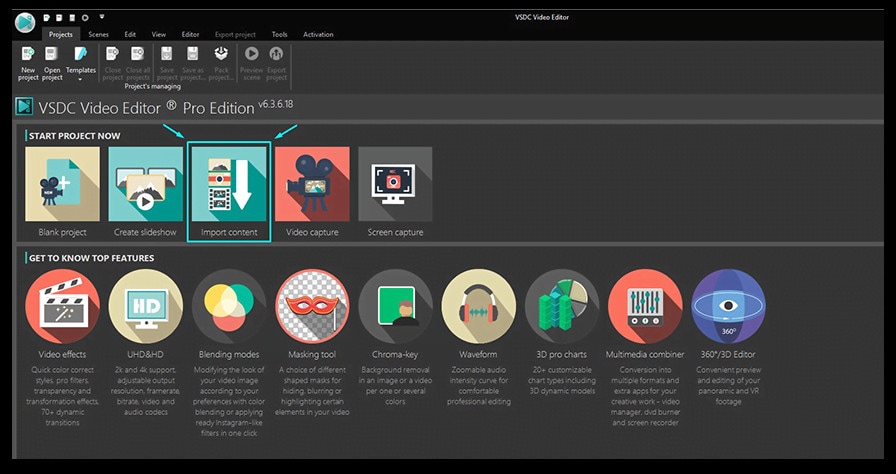
1. VSDC
VSDC is a free video editor along with a lot of advanced features. Cut, combine, trim, crop, and other editing capabilities are available to help you polish your FLV films.
Although it may not look logical, learning the editing capabilities hidden within modular boxes is simple. One noteworthy aspect of VSDC is its ability to produce good visual effects using many trendy video effects, transitions, and filters.
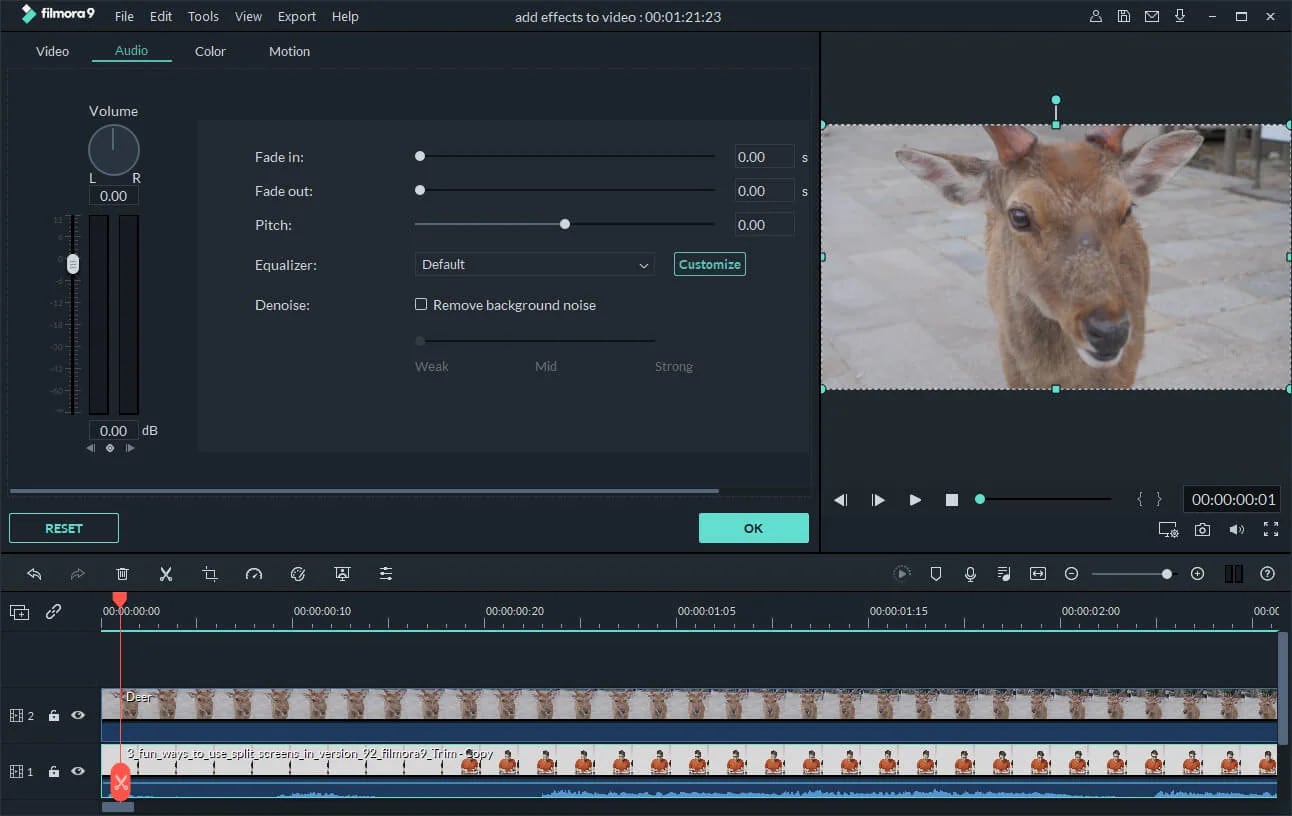
Furthermore, strong chroma keys, color correction, object modification, and other editing tools can be utilized to edit FLV videos. It not only creates excellent FLV videos, but it also supports a wide range of media conversion, allowing you to convert FLV files to various formats and export them without a watermark.
Therefore, follow the below mentioned steps to edit FLV video using VSDC:
Step 1: Install the software on the Windows. Open the application and import the video.
Step 2: Use cutting and splitting tools to edit the video.
The first icon is a picture of a pair of scissors, which is a cutting tool. It’s very useful when you need to cut the beginning or end of a film. Place the cursor exactly where you want to cut, then select “Trim start” or “Trim finish” from the dropdown cutting menu (the small triangle next to the scissors icon).
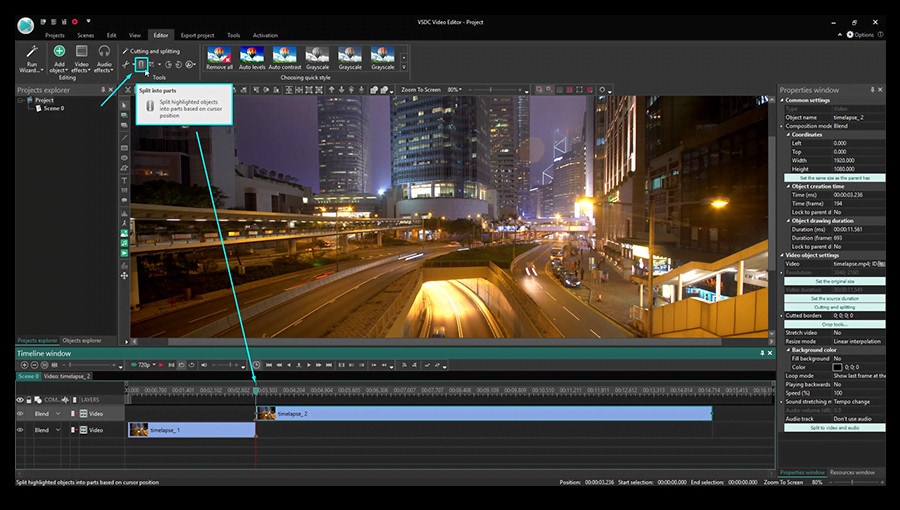
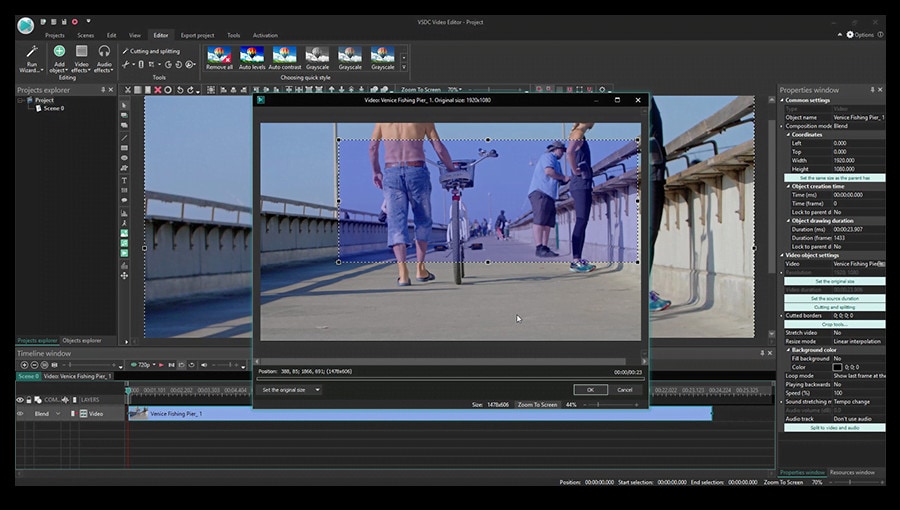
Cropping is also simple. If you have too much additional space around the scene object recorded, just choose the file you want to trim and select the cropping icon from the “Cutting and Splitting” option. A new window will appear, allowing you to select the region of the scene that should stay.
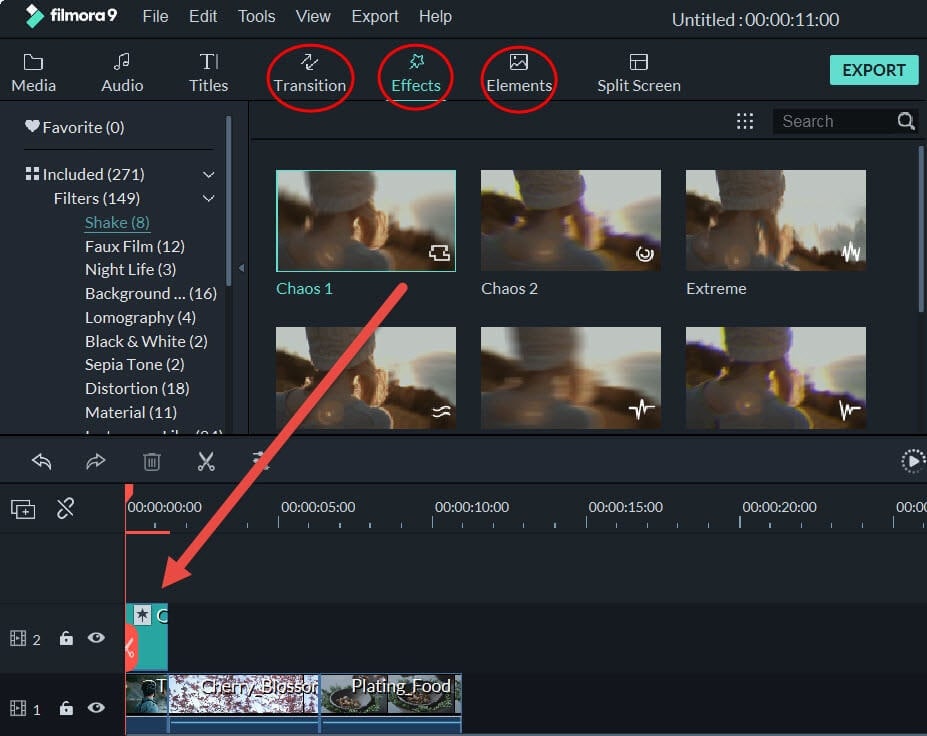
Step 3: Apply effects and transitions.
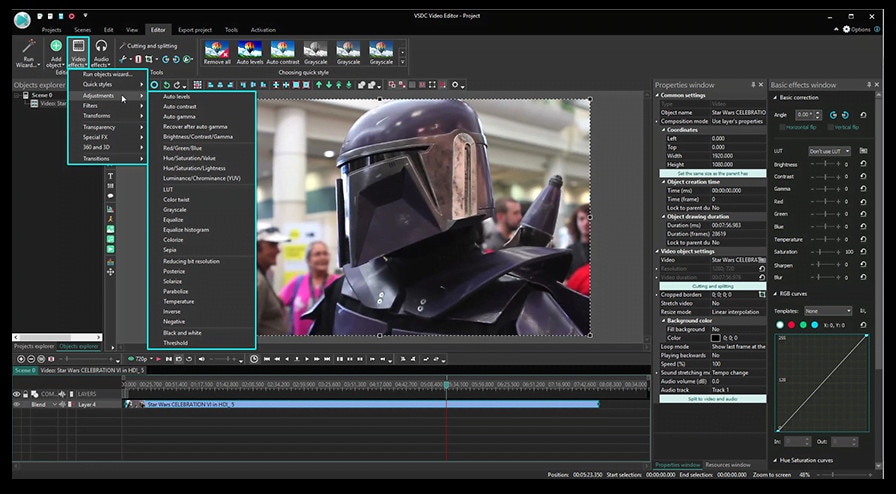
To use one, first select the video file you wish to edit, then go to the Video effects tab and select the effect you want to use. On the timeline, a new tab will appear, containing all of the effects done to the selected object. You can alter the effect’s duration and position in time by dragging it with the mouse there. The properties pane on the right-hand side can be used to change other parameters.
Transitions follow the same rule. Place your cursor where you want the transition to begin, then choose a transition from the Video effects dropdown menu and manually adjust the duration.
Step 4: Save changes and export video.
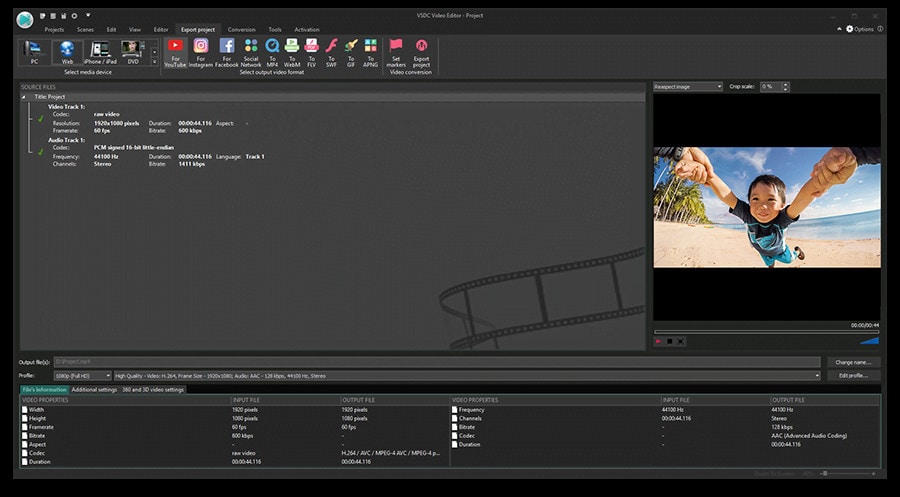
Make sure your movie appears exactly how you want it to before exporting it. If the video appears choppy, use the red preview button and lower the preview quality. When the PC’s resources are insufficient to process the video in real time, lagging can occur. Keep in mind that it has no bearing on the outcome. When you’re finished, navigate to the Export project tab and select an export format.
2. Adobe Premiere Pro:
Professional video editors use Premiere Pro to make everything from YouTube videos to Hollywood films like Mank, a 2021 Oscar candidate. It’s also widely utilized in the workflows of designers, animators, and VFX artists, and we can see why after lengthy testing.
We found the software’s UI to be simple to use, and it increased our productivity by separating things into various workspaces, such as editing, effects, and audio. When we tested it on both Mac and PC, we discovered that each workspace helps handle a specific activity while minimizing distraction.
Edit the FLV video with Adobe Premiere Pro using the following steps:
Step 1: Import the video and create initial sequence.
Step 2: In the Timeline, trim and rearrange clips, add audio, and transitions.
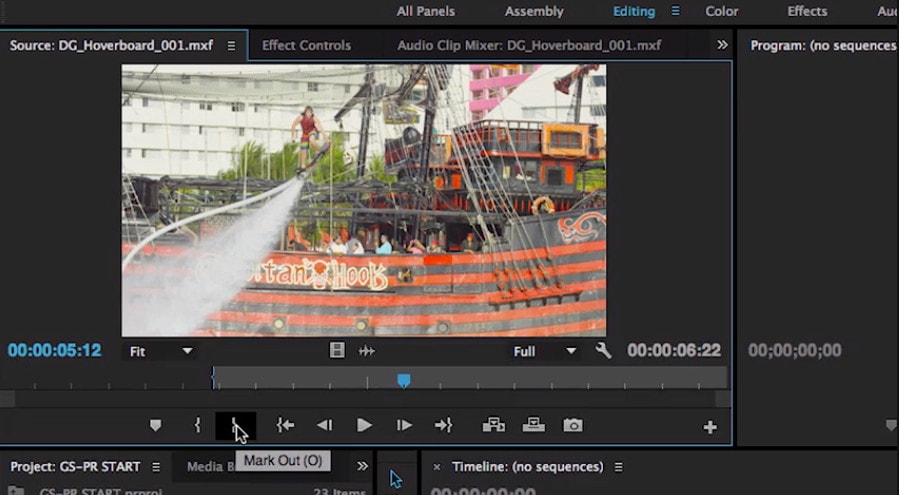
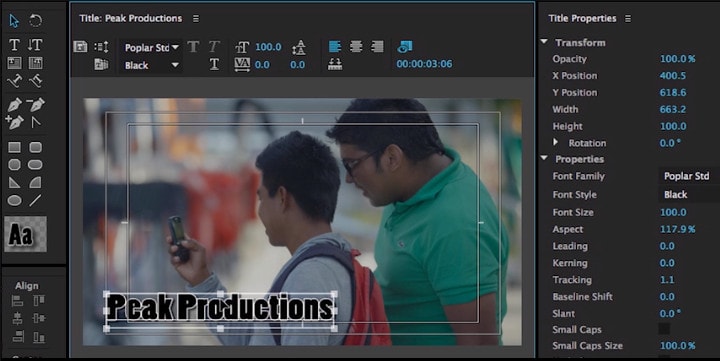
Step 3: Add title and graphics.
In Premiere Pro, you may make onscreen titles, as well as stylize and animate your images.
Step 4: Export your video.

Alternative Way to Edit FlV Video on Mac
1. Blender:
Under the GNU General Public License, Blender is a free, open-source 3D content production program that runs on all major operating systems. Blender is one of the greatest video editors for both Windows and Mac, with advanced features such as modifier-based modeling tools, powerful character animation capabilities, a node-based material, etc.
Because it is developed for professionals, it is tough to use as a beginner. However, it is unrestricted in its use and distribution. In addition, color options are changeable and versatile in the UI.
In contrast, this free video editor is perfect for semi-pros or those who want to enhance their video editing skills. However, you’ll need a lot of time and effort to learn it.
Step 1: Open the application.
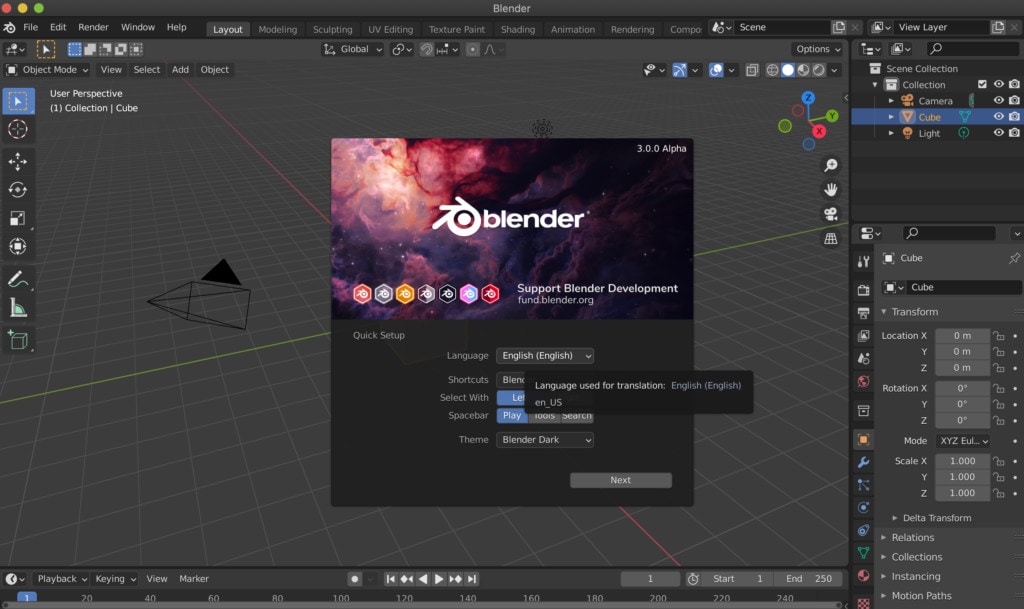
Step 2: Then, go into File->New->Video Editing to open the video editor.
Step 3: Import the video and start editing using the editing tools.
Step 4: Save and export the video.

2. Final Cut Pro:
When it comes to video editing software, Apple’s Final Cut Pro is one of the industry standards. As a result, it’s widely utilized in the television and film industries - at least among Mac users. However, one of the truly convincing reasons to choose it over Premiere Pro is because it is subscription-free: you only pay once.
The software’s Magnetic Timeline, grouping tools, a vast selection of effects, solid organizational capabilities, and simple ways to add and edit audio make it a favorite among professional video editors. 360° video, HDR, and powerful color correcting tools are among the other capabilities. It’s a strong software with a lot of features.
Follow the steps to edit FLV video using Final Cut Pro:
Step 1: Create Project.
To make a movie in Final Cut Pro, you must first establish a project, which keeps track of your editing selections and the media you utilize.
Step 2: Select and add clips to the timeline:
The second stage in making a movie with Final Cut Pro is to add and arrange clips in your project. In the timeline, you can move and reorder clips.
Step 3: Cut and trim video:
Final Cut Pro has a number of features for altering the start and stop points of clips in the timeline, as well as regulating the pacing of shots from one to the next.
Step 4: Edit the video by adding effects and transitions:
Final Cut Pro includes a number of advanced editing features that make it simple to create a professional film. Visual enhancements and colour correction are among the finishing touches.

Step 5: Save and export video:
2 Ways to Edit FlV Video on Android:
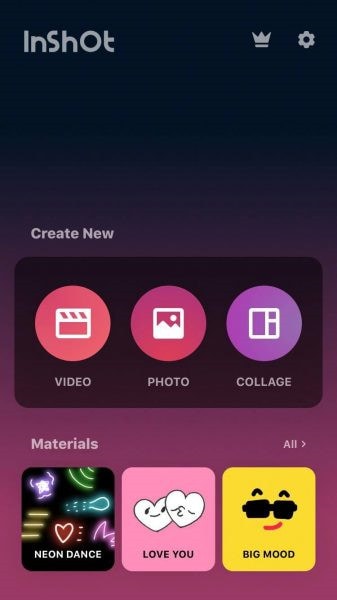
1. Inshot:
For Android users, Inshot is a fantastic image and video editor. This Android video editor allows you to add popular stickers and emoticons to your films, making them more fashionable and unique.
The program supports HD video output, allowing you more control over your footage. Moreover, the additional sound and video can be synchronized with the available video chronology.
You can quickly blend more than two movies into one with rich effects and sound with this Android editor app. In addition, you can generate a watermark using unique text provided in the app, and subtitles support allow you to produce one with a variety of fonts.
Following are the steps that you can follow to edit FLV video using Inshot:
Step 1: Open the app and import the video.
Tap “Video” to open your phone’s gallery folder and begin editing a video in the InShot app. Select a video to work with. Adjust the canvass after your video has been loaded into the InShot App. For your other social media accounts, there are aspect ratios and sizes that work well with the video. It also has the option of being in portrait or landscape mode.
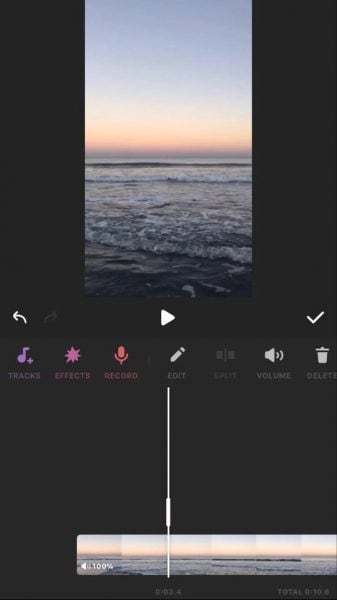
Step 2: Trim and split videos.
Step 3: Merge videos (optional):
By combining clips, you can combine them into a single film or project. Simply choose the videos you want to import from the drop-down menu. By tapping the “+” button on the lower left of the screen, you can insert and merge more videos. Your project will then be updated using the selected video.
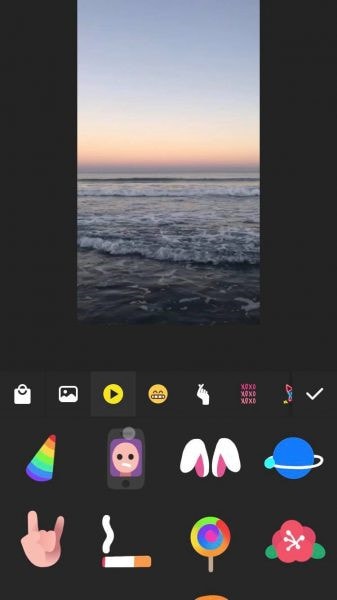
Step 4: Apply filters, add music, text and stickers.
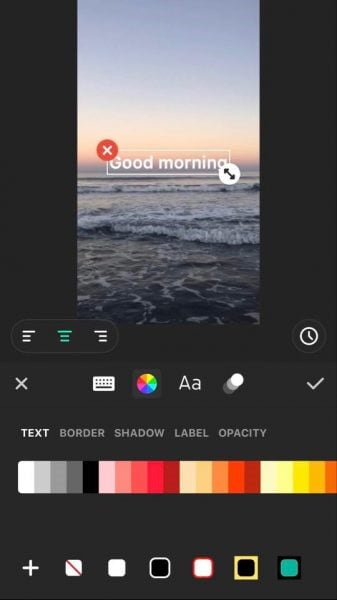
Step 5: Once you are done with the editing process, save the file.
2. Videoshow:
VideoShow has a lot of video editing options. It is a simple and practical video editing program and movie scene maker for art directors and beginners. Using this video cutter, you may reverse, blur, duplicate, edit, merge and split collage clips or films.
You can also use VideoShow to adjust the audio or add subtitles to any video. It also allows you to use different filters on any video on your device. Over 50 intricate themes are included in the program, allowing you to create gorgeous music videos, slide shows, and vlogs in no time.
The annual subscription package is for $135.19, or you can also make a one-time purchase for $225.78.
However, to edit the video, you can use the following steps:
Step 1: Download and install the videoshow application and open it. Upload the video that you want to edit.
Step 2: Edit the video by applying filters or cutting and trimming the part of the video that you want to remove.
Step 3: Save changes and export the video to your preferred location.
2 Ways to Edit FlV Video on iPhone:
1. LumaFusion:
No other software program on the iPhone comes close to the feature set that LumaFusion offers for video editing. It is the only premium app on this list, and it is well worth every penny.
But, of course, YouTubers aren’t the only ones who use the program; mobile journalists and professional video producers who don’t want to lug along their bulky camera equipment and editing apparatus also use it.
LumaFusion deals with up to six video and audio tracks for photographs, movies, audio, titles, and graphics, and six audio tracks for narration, music, and sound effects. You also receive a magnetic timeline; importing clips is a breeze once they’ve been imported.
There are many transitions and effects to choose from, all of which can be layered. Finally, it includes much royalty-free music, sound effects, and other assets. So if you need a professional video editing tool for your iPhone, LumaFusion ($29.99) is the way to go.
Follow these steps to edit FLV video using LumaFusion:
Step 1: To create your first project, press + at the bottom of the screen. You can create a new project by tapping that area or by tapping the Plus button.
Step 2: Import video:
The Import section is located in the top left corner of the screen. This defaults to the Photos tab when you initially launch a new project. All of the photographs and videos can be seen here.
Step 3: Check layout and adjust volume levels
Step 4: Edit the video and add titles.
Step 5: Export the video.
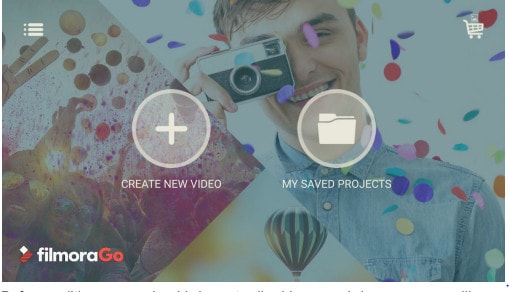
2. Filmora Go:
Without a doubt, Filmora is one of the greatest free video editors for iPhone that does not contain any watermarks. In addition, it’s compatible with both iPhones and Android devices and has a simple user interface.
Filmora is the greatest iPhone video editor for beginners, with themed filters and effects that add flair to your videos without any work.
Filmora has many unique features, including themes for your videos and ‘Materials,’ which are visual effects created by the program. Unfortunately, materials are only available with Filmora Pro, so keep that in mind.
Aside from that, you’ll find all of the typical features here. You can also add titles to videos, utilize stickers and effects, and add music to the background of your movie. You may also add another clip in picture-in-picture mode, which is beneficial.
Below are the following steps to edit FLV video:
Step 1: Open the application and select ‘Create new video’. Now, import the video by choosing the video icon.
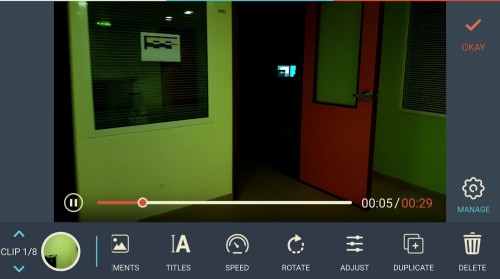
Step 2: Edit the video. Within the edit tool, you can trim and split the video. You can also improve the video quality by adding titles, transitions, and music, and voiceovers.


Step 3: After editing the video, select ‘SAVE’ and export the video or download it.
2 Ways to Edit FlV Video Online:
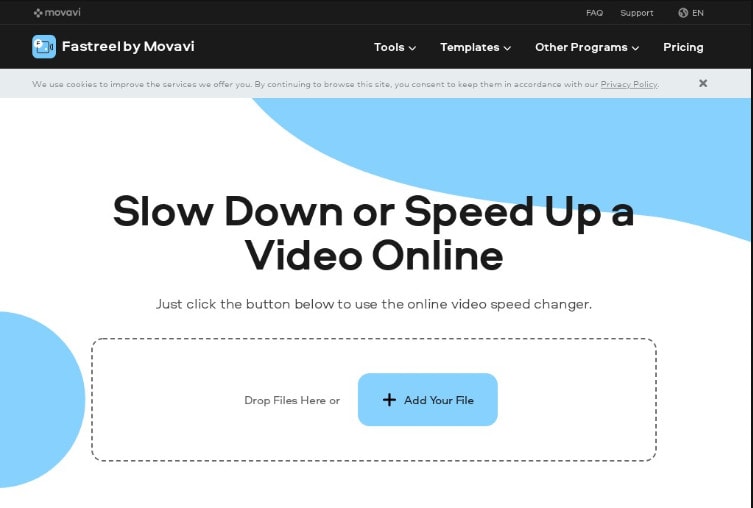
1. Fastreel:
If you’re seeking the finest free online video editor, Fastreel is a terrific tool to start with. This online video editing software provides a wide range of editing options. It can merge, edit, crop, and compress videos to make sharing easier.
It also includes many pre-made templates that you can change to create titles and transitions and other editing features like reverse, looping, and rotating. It’s also quite simple to use, and you can have polished videos in minutes.
There are also numerous pricing options to suit different customers, ranging from a completely free plan with watermarks to paid subscriptions with no limitations.
Use the following steps to edit FLV video:
Step 1: Open Fastreel web and import the video.
Step 2: Use templates to make it look attractive.
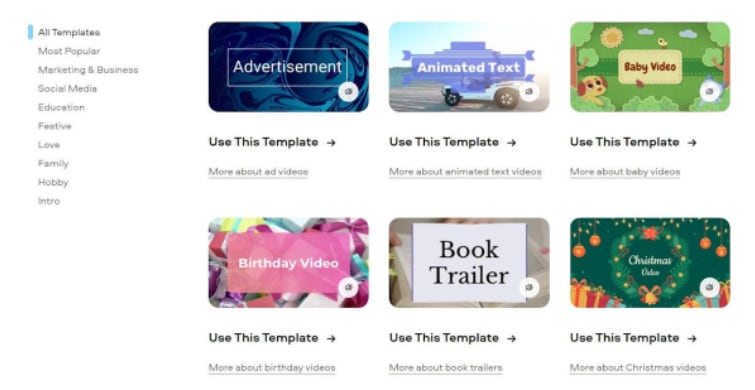
Step 3: Edit the video using the template.
Templates are unfinished videos with all of the effects already applied, such as backdrops, transitions, animated stickers, and titles. There are blank spots for your photos or videos, and you can arrange them in any sequence you like. You can also add music from the Fastreel library or upload your own track after entering your text.
Step 4: Once you are done with edits, save the video and export it.
2. WeVideo:
When you’re seeking the greatest video producer online, another wonderful choice to explore is WeVideo.
Google, Dropbox, Rover, and Roche are just a few of the huge names that trust our online editor. Its fast, versatile editing engine and vast stock content collection for adding stock movies, photos, and audio tracks to your productions are ideal for business users.
WeVideo also stands out since it provides unlimited cloud storage for all of your videos, which you can download and watch on any device. The only drawback is that all of this comes at a price, with WeVideo offering a variety of payment plans ranging from $4.99 to $36.99 a month.
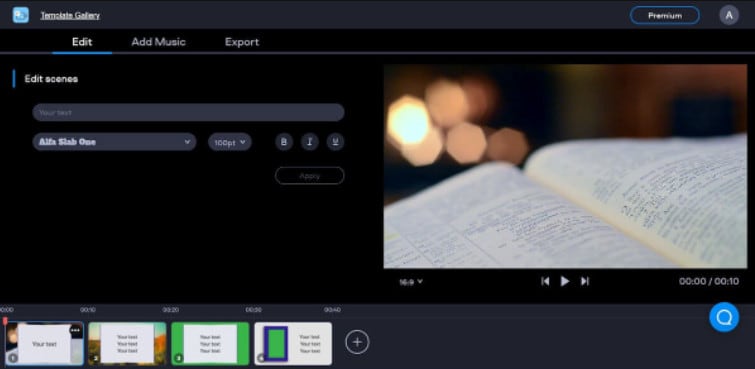
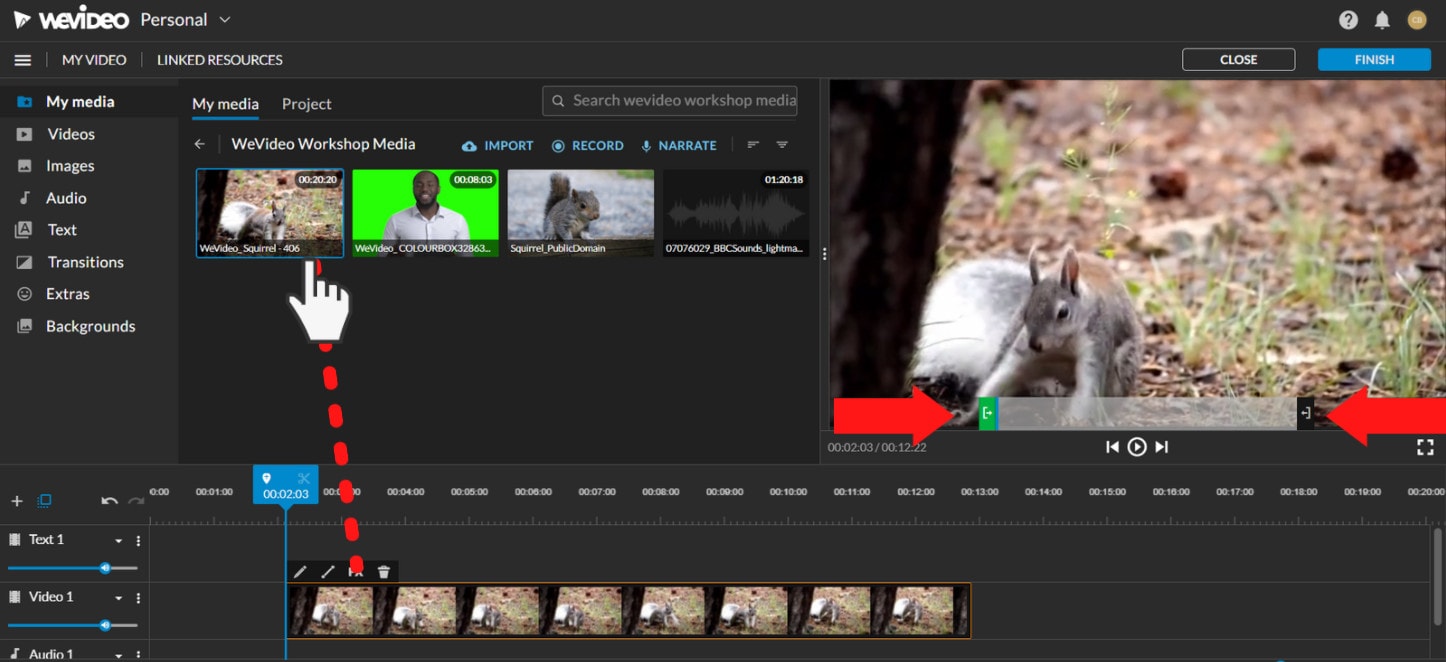
Follow the steps to edit videos using WeVideo:
Step 1: Open WeVideo and import the video file.
Step 2: Click on create new video in the left-hand corner of the screen.
Step 3: Edit the video.
The video clip you imported will appear in the viewing window to the right once you click on it. By moving the arrows and either end, you can edit out the beginning or end of your footage.
- Drag the clip into your timeline from your media pool.
- Place the clip on your timeline by dragging and dropping it.
- Click the scissor symbol after moving the blue marker to the spot where you want to cut your clip.
- Once the material has been chopped, you can erase bits of it by selecting it with your mouse and then pressing delete on your keyboard or rearrange the clips in the timeline by dragging and dropping them to other positions.
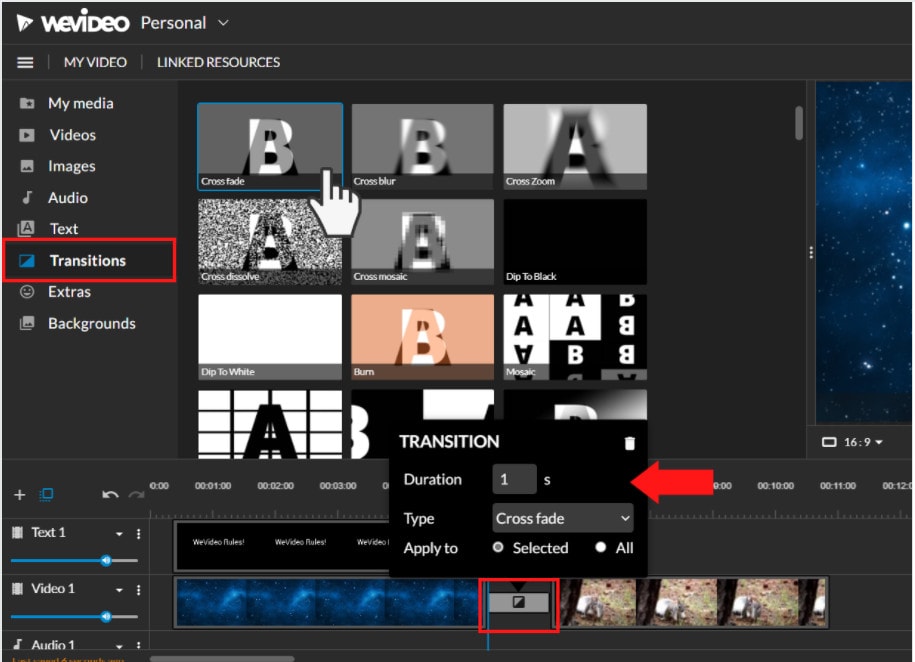
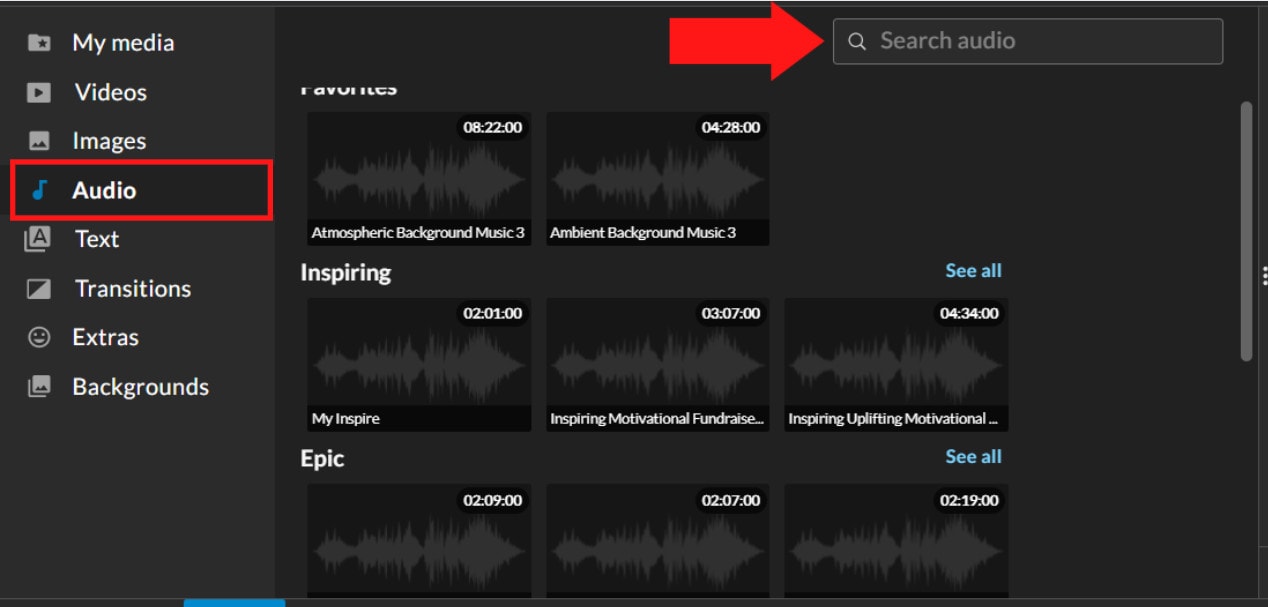
Step 4: Add effects, transitions, and music to the video.
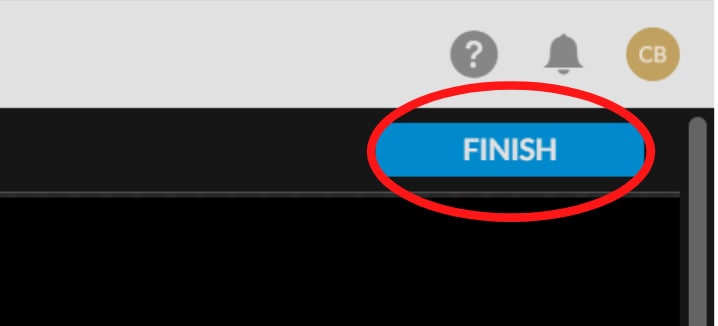
Step 5: Save and export the video by clicking on the Finish tab.
FAQs about editing FLV video
- How to open FLV files?
Any FLV player is required to view FLV files. Various players are available, including VLC, FLV Player, Sothink FLV Player for Mac, Tonec Free FLV Player, Any FLV Player, and others.
- Is Filmora compatible with Mac?
Filmora requires macOS Sierra (version 10.12) or later and the Big Sur (version 11) and Apple M1 chips. Touch Bar compatibility for MacBook Pro users and custom shortcuts to speed up editing.
- What is the best online FLV editor?
There are numerous free online editors to choose from. Fastreel, WeVideo, and FlexClip Video Maker are a few of the most popular.
- Is FLV better than MP4?
Because FLV and MP4 are the two most popular video file formats, it’s crucial to know which one is preferable. Adobe’s proprietary format is FLV. Both formats employ video and audio codecs and have equal performance levels. In their unprocessed state, MP4 files are more adaptable. You can, however, use an FLV file at the same time if you have the correct player.
- How do I choose a video editor?
When comparing video editing software, there are six crucial elements to consider.
- Budget and cost
- Ease of use/learning curve
- Multi-GPGPU acceleration and video format support
- Tools for advanced editing
- Music, special effects, and other goodies
- Customer service is second to none.
For macOS 10.14 or later
Therefore, you can use the following steps to edit FLV video on Windows and Mac:
Step 1: Import file:
Step 2: Edit the FLV file:
Acquire the perfect tool in your palm for anything you want to do, such as clipping, cropping, rotating, and more.
Furthermore, all editing capabilities in the toolbar allow drag-and-drop, making it even easier to touch up your films quickly. Consider the following scenario:
- Drag and drop a transition into the video/photo, or right-click it and select “Apply to All.”
- Please drag & drop a title template to the position where you want it to appear, then adjust it.
- To use the effects, select one from the 50+ available video effects, select it, and apply it to your photos/videos instantaneously.
Step 3: Save or Export the file:
When you’re done, export your modified MP4 files to Windows/Mac and quickly share them on YouTube, with the option of sending a message to Facebook and Twitter. When you click Create in the program window’s middle right corner, you’ll be taken to the Output window below.
Alternative Way to Edit FlV Video on Windows
1. VSDC
VSDC is a free video editor along with a lot of advanced features. Cut, combine, trim, crop, and other editing capabilities are available to help you polish your FLV films.
Although it may not look logical, learning the editing capabilities hidden within modular boxes is simple. One noteworthy aspect of VSDC is its ability to produce good visual effects using many trendy video effects, transitions, and filters.
Furthermore, strong chroma keys, color correction, object modification, and other editing tools can be utilized to edit FLV videos. It not only creates excellent FLV videos, but it also supports a wide range of media conversion, allowing you to convert FLV files to various formats and export them without a watermark.
Therefore, follow the below mentioned steps to edit FLV video using VSDC:
Step 1: Install the software on the Windows. Open the application and import the video.
Step 2: Use cutting and splitting tools to edit the video.
The first icon is a picture of a pair of scissors, which is a cutting tool. It’s very useful when you need to cut the beginning or end of a film. Place the cursor exactly where you want to cut, then select “Trim start” or “Trim finish” from the dropdown cutting menu (the small triangle next to the scissors icon).
Cropping is also simple. If you have too much additional space around the scene object recorded, just choose the file you want to trim and select the cropping icon from the “Cutting and Splitting” option. A new window will appear, allowing you to select the region of the scene that should stay.
Step 3: Apply effects and transitions.
To use one, first select the video file you wish to edit, then go to the Video effects tab and select the effect you want to use. On the timeline, a new tab will appear, containing all of the effects done to the selected object. You can alter the effect’s duration and position in time by dragging it with the mouse there. The properties pane on the right-hand side can be used to change other parameters.
Transitions follow the same rule. Place your cursor where you want the transition to begin, then choose a transition from the Video effects dropdown menu and manually adjust the duration.
Step 4: Save changes and export video.
Make sure your movie appears exactly how you want it to before exporting it. If the video appears choppy, use the red preview button and lower the preview quality. When the PC’s resources are insufficient to process the video in real time, lagging can occur. Keep in mind that it has no bearing on the outcome. When you’re finished, navigate to the Export project tab and select an export format.
2. Adobe Premiere Pro:
Professional video editors use Premiere Pro to make everything from YouTube videos to Hollywood films like Mank, a 2021 Oscar candidate. It’s also widely utilized in the workflows of designers, animators, and VFX artists, and we can see why after lengthy testing.
We found the software’s UI to be simple to use, and it increased our productivity by separating things into various workspaces, such as editing, effects, and audio. When we tested it on both Mac and PC, we discovered that each workspace helps handle a specific activity while minimizing distraction.
Edit the FLV video with Adobe Premiere Pro using the following steps:
Step 1: Import the video and create initial sequence.
Step 2: In the Timeline, trim and rearrange clips, add audio, and transitions.
Step 3: Add title and graphics.
In Premiere Pro, you may make onscreen titles, as well as stylize and animate your images.
Step 4: Export your video.
Alternative Way to Edit FlV Video on Mac
1. Blender:
Under the GNU General Public License, Blender is a free, open-source 3D content production program that runs on all major operating systems. Blender is one of the greatest video editors for both Windows and Mac, with advanced features such as modifier-based modeling tools, powerful character animation capabilities, a node-based material, etc.
Because it is developed for professionals, it is tough to use as a beginner. However, it is unrestricted in its use and distribution. In addition, color options are changeable and versatile in the UI.
In contrast, this free video editor is perfect for semi-pros or those who want to enhance their video editing skills. However, you’ll need a lot of time and effort to learn it.
Step 1: Open the application.
Step 2: Then, go into File->New->Video Editing to open the video editor.
Step 3: Import the video and start editing using the editing tools.
Step 4: Save and export the video.
2. Final Cut Pro:
When it comes to video editing software, Apple’s Final Cut Pro is one of the industry standards. As a result, it’s widely utilized in the television and film industries - at least among Mac users. However, one of the truly convincing reasons to choose it over Premiere Pro is because it is subscription-free: you only pay once.
The software’s Magnetic Timeline, grouping tools, a vast selection of effects, solid organizational capabilities, and simple ways to add and edit audio make it a favorite among professional video editors. 360° video, HDR, and powerful color correcting tools are among the other capabilities. It’s a strong software with a lot of features.
Follow the steps to edit FLV video using Final Cut Pro:
Step 1: Create Project.
To make a movie in Final Cut Pro, you must first establish a project, which keeps track of your editing selections and the media you utilize.
Step 2: Select and add clips to the timeline:
The second stage in making a movie with Final Cut Pro is to add and arrange clips in your project. In the timeline, you can move and reorder clips.
Step 3: Cut and trim video:
Final Cut Pro has a number of features for altering the start and stop points of clips in the timeline, as well as regulating the pacing of shots from one to the next.
Step 4: Edit the video by adding effects and transitions:
Final Cut Pro includes a number of advanced editing features that make it simple to create a professional film. Visual enhancements and colour correction are among the finishing touches.
Step 5: Save and export video:
2 Ways to Edit FlV Video on Android:
1. Inshot:
For Android users, Inshot is a fantastic image and video editor. This Android video editor allows you to add popular stickers and emoticons to your films, making them more fashionable and unique.
The program supports HD video output, allowing you more control over your footage. Moreover, the additional sound and video can be synchronized with the available video chronology.
You can quickly blend more than two movies into one with rich effects and sound with this Android editor app. In addition, you can generate a watermark using unique text provided in the app, and subtitles support allow you to produce one with a variety of fonts.
Following are the steps that you can follow to edit FLV video using Inshot:
Step 1: Open the app and import the video.
Tap “Video” to open your phone’s gallery folder and begin editing a video in the InShot app. Select a video to work with. Adjust the canvass after your video has been loaded into the InShot App. For your other social media accounts, there are aspect ratios and sizes that work well with the video. It also has the option of being in portrait or landscape mode.
Step 2: Trim and split videos.
Step 3: Merge videos (optional):
By combining clips, you can combine them into a single film or project. Simply choose the videos you want to import from the drop-down menu. By tapping the “+” button on the lower left of the screen, you can insert and merge more videos. Your project will then be updated using the selected video.
Step 4: Apply filters, add music, text and stickers.
Step 5: Once you are done with the editing process, save the file.
2. Videoshow:
VideoShow has a lot of video editing options. It is a simple and practical video editing program and movie scene maker for art directors and beginners. Using this video cutter, you may reverse, blur, duplicate, edit, merge and split collage clips or films.
You can also use VideoShow to adjust the audio or add subtitles to any video. It also allows you to use different filters on any video on your device. Over 50 intricate themes are included in the program, allowing you to create gorgeous music videos, slide shows, and vlogs in no time.
The annual subscription package is for $135.19, or you can also make a one-time purchase for $225.78.
However, to edit the video, you can use the following steps:
Step 1: Download and install the videoshow application and open it. Upload the video that you want to edit.
Step 2: Edit the video by applying filters or cutting and trimming the part of the video that you want to remove.
Step 3: Save changes and export the video to your preferred location.
2 Ways to Edit FlV Video on iPhone:
1. LumaFusion:
No other software program on the iPhone comes close to the feature set that LumaFusion offers for video editing. It is the only premium app on this list, and it is well worth every penny.
But, of course, YouTubers aren’t the only ones who use the program; mobile journalists and professional video producers who don’t want to lug along their bulky camera equipment and editing apparatus also use it.
LumaFusion deals with up to six video and audio tracks for photographs, movies, audio, titles, and graphics, and six audio tracks for narration, music, and sound effects. You also receive a magnetic timeline; importing clips is a breeze once they’ve been imported.
There are many transitions and effects to choose from, all of which can be layered. Finally, it includes much royalty-free music, sound effects, and other assets. So if you need a professional video editing tool for your iPhone, LumaFusion ($29.99) is the way to go.
Follow these steps to edit FLV video using LumaFusion:
Step 1: To create your first project, press + at the bottom of the screen. You can create a new project by tapping that area or by tapping the Plus button.
Step 2: Import video:
The Import section is located in the top left corner of the screen. This defaults to the Photos tab when you initially launch a new project. All of the photographs and videos can be seen here.
Step 3: Check layout and adjust volume levels
Step 4: Edit the video and add titles.
Step 5: Export the video.
2. Filmora Go:
Without a doubt, Filmora is one of the greatest free video editors for iPhone that does not contain any watermarks. In addition, it’s compatible with both iPhones and Android devices and has a simple user interface.
Filmora is the greatest iPhone video editor for beginners, with themed filters and effects that add flair to your videos without any work.
Filmora has many unique features, including themes for your videos and ‘Materials,’ which are visual effects created by the program. Unfortunately, materials are only available with Filmora Pro, so keep that in mind.
Aside from that, you’ll find all of the typical features here. You can also add titles to videos, utilize stickers and effects, and add music to the background of your movie. You may also add another clip in picture-in-picture mode, which is beneficial.
Below are the following steps to edit FLV video:
Step 1: Open the application and select ‘Create new video’. Now, import the video by choosing the video icon.
Step 2: Edit the video. Within the edit tool, you can trim and split the video. You can also improve the video quality by adding titles, transitions, and music, and voiceovers.
Step 3: After editing the video, select ‘SAVE’ and export the video or download it.
2 Ways to Edit FlV Video Online:
1. Fastreel:
If you’re seeking the finest free online video editor, Fastreel is a terrific tool to start with. This online video editing software provides a wide range of editing options. It can merge, edit, crop, and compress videos to make sharing easier.
It also includes many pre-made templates that you can change to create titles and transitions and other editing features like reverse, looping, and rotating. It’s also quite simple to use, and you can have polished videos in minutes.
There are also numerous pricing options to suit different customers, ranging from a completely free plan with watermarks to paid subscriptions with no limitations.
Use the following steps to edit FLV video:
Step 1: Open Fastreel web and import the video.
Step 2: Use templates to make it look attractive.
Step 3: Edit the video using the template.
Templates are unfinished videos with all of the effects already applied, such as backdrops, transitions, animated stickers, and titles. There are blank spots for your photos or videos, and you can arrange them in any sequence you like. You can also add music from the Fastreel library or upload your own track after entering your text.
Step 4: Once you are done with edits, save the video and export it.
2. WeVideo:
When you’re seeking the greatest video producer online, another wonderful choice to explore is WeVideo.
Google, Dropbox, Rover, and Roche are just a few of the huge names that trust our online editor. Its fast, versatile editing engine and vast stock content collection for adding stock movies, photos, and audio tracks to your productions are ideal for business users.
WeVideo also stands out since it provides unlimited cloud storage for all of your videos, which you can download and watch on any device. The only drawback is that all of this comes at a price, with WeVideo offering a variety of payment plans ranging from $4.99 to $36.99 a month.
Follow the steps to edit videos using WeVideo:
Step 1: Open WeVideo and import the video file.
Step 2: Click on create new video in the left-hand corner of the screen.
Step 3: Edit the video.
The video clip you imported will appear in the viewing window to the right once you click on it. By moving the arrows and either end, you can edit out the beginning or end of your footage.
- Drag the clip into your timeline from your media pool.
- Place the clip on your timeline by dragging and dropping it.
- Click the scissor symbol after moving the blue marker to the spot where you want to cut your clip.
- Once the material has been chopped, you can erase bits of it by selecting it with your mouse and then pressing delete on your keyboard or rearrange the clips in the timeline by dragging and dropping them to other positions.
Step 4: Add effects, transitions, and music to the video.
Step 5: Save and export the video by clicking on the Finish tab.
FAQs about editing FLV video
- How to open FLV files?
Any FLV player is required to view FLV files. Various players are available, including VLC, FLV Player, Sothink FLV Player for Mac, Tonec Free FLV Player, Any FLV Player, and others.
- Is Filmora compatible with Mac?
Filmora requires macOS Sierra (version 10.12) or later and the Big Sur (version 11) and Apple M1 chips. Touch Bar compatibility for MacBook Pro users and custom shortcuts to speed up editing.
- What is the best online FLV editor?
There are numerous free online editors to choose from. Fastreel, WeVideo, and FlexClip Video Maker are a few of the most popular.
- Is FLV better than MP4?
Because FLV and MP4 are the two most popular video file formats, it’s crucial to know which one is preferable. Adobe’s proprietary format is FLV. Both formats employ video and audio codecs and have equal performance levels. In their unprocessed state, MP4 files are more adaptable. You can, however, use an FLV file at the same time if you have the correct player.
- How do I choose a video editor?
When comparing video editing software, there are six crucial elements to consider.
- Budget and cost
- Ease of use/learning curve
- Multi-GPGPU acceleration and video format support
- Tools for advanced editing
- Music, special effects, and other goodies
- Customer service is second to none.
4 Methods to Merge MP4 and MP3
The rising trends in audio and visual effects have introduced the media industry to new dimensions of technology. The screens around us are flickering 24/7 with videos on several topics. But, without the perfect background audios, their underlying message remains unheard. Hence, a balance of sound and picture is necessary to entice the audience and break the monotony. You can also create personalized videos by merging various video clips and adding the background sound afterwards. For this purpose, all you need is a tool that can add audio to your videos.
Let’s look at four different ways of merging audios and videos. The tools will help you craft high-end videos without involving any complex steps. You can make your videos beautiful by using the following easy to use tools.
- Filmora Wondershare
- VLC
- Photos App on Windows 10
- Using the Online Converter
Merge MP4 and MP3 Using Filmora Wondershare
Filmora Video Editor is an editing tool that brings your creativity and productivity to a whole new level. It comes with several editing options for both audio and video. All you need is to let your imagination run wild to give a personalized touch to your videos.
If you want to record podcasts, narration or voiceovers with lowered background music under speech, itsaudio ducking feature comes in handy. Filmora’sauto-synchronization feature is the cherry on top. It facilitates matching your audio with your video in a crispy way. Thus, making the whole experience of customizing video more professional.
Adding more to it, the Filmora Montage maker edits your video automatically to make it smooth with the music of your choice. Thisauto-beat sync feature is user friendly and convenient. Hence, you cannot deny that from beginners to intermediate, Filmora is empowering creators over the globe.
Filmora comes with an in-built audio library that serves the purpose of adding different sounds in the background. Its drag and drop feature make its interface more user friendly.It allows you to add audio files (.MP3, or .WMA) to videos (.Avi, .MP4, .MKV).It supports different audio and video formats that help you create awesome videos.
For Win 7 or later (64-bit)
For macOS 10.14 or later
Here is a step-by-step guide for adding sound to your videos.
Step 1: Importing the Media files (Both Audio and Video)
After you finish installing Wondershare Filmora from the official website on your computer, launch it.
You can import the MP4 and MP3 files by going to the File menu and then selecting import media files.

Tip: The software comes with a huge built-in library. You can also use it to add sound to your project.
Step 2: Adding media files to Timeline
- Now, hover the mouse over the media files that you have imported.
- Use the drag and drop feature to add the mp4 and mp3 files to the timeline.

If you want to modify the audio, the audio panel can be seen by double-tapping the audio from the timeline. This panel will appear at the top of the screen.

You can explore different options ranging from ducking to denoising.
Step 3: Exporting the File
Now that the audio has been added to the video, select the ‘Export’ tab so that you can export your video.

The exported file can be saved in different formats. (MP4, WMV, etc)
Tip: You can rename and define the resolution for better output.
Merge MP4 and MP3 Using VLC Media Player
VLC is an open-source media player that works for different platforms (Windows, Mac and Linux). The media player comes with features ranging from compression to conversion. This multimedia framework supports audio formats like AC-3, DV Audio, FLAC, MP3, Speex, Vorbis. It also supports different video formats.
If your video has no background sound, you can add it to your videos by following simple steps. Not only that, but you can also change the original audio track to make your video an exquisite piece of art.
The majority of people consider VLC as only a media player. But, it works as a video editor as well. Therefore, it allows you to add background sound to your videos. This handy tool supports various streaming protocols along with almost all multimedia files.
Here is a demonstration for adding audio to your video.
Step 1: Installation
The first step would be installing the VLC media player on your computer and launching it afterward.
Click on Media and then select Convert/Save.

A pop-up window will appear in which you have to select the Add option. This will help you load the targeted video.

Step 2: Playing both audio and video in a synchronous manner
- After loading the video, at the bottom of the dialogue box, tick the Show more options.
- Select the option named ‘Play another media synchronously.

Click Browse to import your desired audio. It will open another window.

Step 3: Adding audio
Click + Add on the second Open Media window. It will load the audio files for the video.
- Now, you’ll have your video and audio files in the formats of mp4 and mp3 respectively.

- Click on Convert/Save
- A pop-up window will appear asking about the format you wish to have for your video.

- Also, by selecting Browse, select the destination where you want to save your video.

- Click on Start so that the video and audio can be merged.

Merge MP4 and MP3 Using Windows Photo App
Windows Photo App is home to all audio and video files on your PC. You can view, edit and store your audio and video files in it. It also allows you to share those among your family and friends. The tool comes with an AI-powered assistant to manage your media efficiently. Hence, you can find your required media files faster.
With its editing features, you can bring dull moments to life. It lets you integrate photos and videos into third-party apps so that you may transform your mundane videos into extraordinary ones.
The App also comes with a backup feature that makes it a safe home for your life’s memories.
If you want to merge recordings of small video clips in no time, then Windows Photo App will assist you in doing it in a jiff. It is a built-in app for Windows 10 and comes with the easiest ways of adding sound to your videos.
Have a look at the following steps.
You can find the Windows Photo app on your desktop or press the Windows + S to open the Start menu search and type Photos in the search box.

- Click on the video editor tab.
- Select the New Video project to start a blank project.

A dialogue box will appear asking to add the desired project name. Enter the name.

You’ll see an add button on the left side. By selecting it, a drop-down menu will appear. It will show you different options for adding video to your project.

Select the desired option and add the video clips.

Adjust the order of your videos by dragging the videos in the storyboard.

- You can trim, split and rotate your videos here.
- It also allows you to use various filters, texts and 3D effects.
- After completing the editing, select the finish video button on the menu bar.
- Select your preferred video quality.
You can add audio by selecting the Custom Audio option.

You will see a window-pane on the right side with different options for adding the sound. You can add it by the drag and drop feature or by clicking on the add file option.


- Select Done to complete the process.
- You have successfully added mp3 to your video file**.**
- Tap on Finish video in the upper right corner to complete the process.

- You can also select the quality of your video.

Click on Export to save your file to your desired destination.
Merge MP4 and MP3 Using Using Online Converter
Different online resources on the internet will help combine videos. You do not have to go through the hassle of downloading and installing third-party apps. Online Converter supports different formats like MP4, AVI, FLV, MOV, 3GP, MKV, etc. With it, you can combine multiple video files into a single file in no time. The most popular output format is MP4.
The procedure is simple. You have to upload your video clips on Online Converter in the order that you want in the final output.

You’ll navigate to a page with options for adding the media files by clicking on the choose file.

After uploading the media files. You will also see options for the audio in a drop-down menu.

Select the Add option to merge mp3 to mp4.

After the mp3 is merged to the mp4, you can download the converted file or share it via social media as well.

Disadvantages
- If your internet connectivity is poor, the videos may take longer to upload.
- If the response time is slow, you need to cancel the process and re-submit the data.
- Encrypted or protected video files are not supported for the merger of the videos.
Conclusion
Each tool comes with its pros and cons. With the wide range of video editing options, you can explore these different platforms and add life to your moments. Whether you are a beginner or an intermediate, editing multimedia files has been made easy by these different tools.
For macOS 10.14 or later
Here is a step-by-step guide for adding sound to your videos.
Step 1: Importing the Media files (Both Audio and Video)
After you finish installing Wondershare Filmora from the official website on your computer, launch it.
You can import the MP4 and MP3 files by going to the File menu and then selecting import media files.
Tip: The software comes with a huge built-in library. You can also use it to add sound to your project.
Step 2: Adding media files to Timeline
- Now, hover the mouse over the media files that you have imported.
- Use the drag and drop feature to add the mp4 and mp3 files to the timeline.
If you want to modify the audio, the audio panel can be seen by double-tapping the audio from the timeline. This panel will appear at the top of the screen.
You can explore different options ranging from ducking to denoising.
Step 3: Exporting the File
Now that the audio has been added to the video, select the ‘Export’ tab so that you can export your video.
The exported file can be saved in different formats. (MP4, WMV, etc)
Tip: You can rename and define the resolution for better output.
Merge MP4 and MP3 Using VLC Media Player
VLC is an open-source media player that works for different platforms (Windows, Mac and Linux). The media player comes with features ranging from compression to conversion. This multimedia framework supports audio formats like AC-3, DV Audio, FLAC, MP3, Speex, Vorbis. It also supports different video formats.
If your video has no background sound, you can add it to your videos by following simple steps. Not only that, but you can also change the original audio track to make your video an exquisite piece of art.
The majority of people consider VLC as only a media player. But, it works as a video editor as well. Therefore, it allows you to add background sound to your videos. This handy tool supports various streaming protocols along with almost all multimedia files.
Here is a demonstration for adding audio to your video.
Step 1: Installation
The first step would be installing the VLC media player on your computer and launching it afterward.
Click on Media and then select Convert/Save.
A pop-up window will appear in which you have to select the Add option. This will help you load the targeted video.
Step 2: Playing both audio and video in a synchronous manner
- After loading the video, at the bottom of the dialogue box, tick the Show more options.
- Select the option named ‘Play another media synchronously.
Click Browse to import your desired audio. It will open another window.
Step 3: Adding audio
Click + Add on the second Open Media window. It will load the audio files for the video.
- Now, you’ll have your video and audio files in the formats of mp4 and mp3 respectively.
- Click on Convert/Save
- A pop-up window will appear asking about the format you wish to have for your video.
- Also, by selecting Browse, select the destination where you want to save your video.
- Click on Start so that the video and audio can be merged.
Merge MP4 and MP3 Using Windows Photo App
Windows Photo App is home to all audio and video files on your PC. You can view, edit and store your audio and video files in it. It also allows you to share those among your family and friends. The tool comes with an AI-powered assistant to manage your media efficiently. Hence, you can find your required media files faster.
With its editing features, you can bring dull moments to life. It lets you integrate photos and videos into third-party apps so that you may transform your mundane videos into extraordinary ones.
The App also comes with a backup feature that makes it a safe home for your life’s memories.
If you want to merge recordings of small video clips in no time, then Windows Photo App will assist you in doing it in a jiff. It is a built-in app for Windows 10 and comes with the easiest ways of adding sound to your videos.
Have a look at the following steps.
You can find the Windows Photo app on your desktop or press the Windows + S to open the Start menu search and type Photos in the search box.
- Click on the video editor tab.
- Select the New Video project to start a blank project.
A dialogue box will appear asking to add the desired project name. Enter the name.
You’ll see an add button on the left side. By selecting it, a drop-down menu will appear. It will show you different options for adding video to your project.
Select the desired option and add the video clips.
Adjust the order of your videos by dragging the videos in the storyboard.
- You can trim, split and rotate your videos here.
- It also allows you to use various filters, texts and 3D effects.
- After completing the editing, select the finish video button on the menu bar.
- Select your preferred video quality.
You can add audio by selecting the Custom Audio option.
You will see a window-pane on the right side with different options for adding the sound. You can add it by the drag and drop feature or by clicking on the add file option.
- Select Done to complete the process.
- You have successfully added mp3 to your video file**.**
- Tap on Finish video in the upper right corner to complete the process.
- You can also select the quality of your video.
Click on Export to save your file to your desired destination.
Merge MP4 and MP3 Using Using Online Converter
Different online resources on the internet will help combine videos. You do not have to go through the hassle of downloading and installing third-party apps. Online Converter supports different formats like MP4, AVI, FLV, MOV, 3GP, MKV, etc. With it, you can combine multiple video files into a single file in no time. The most popular output format is MP4.
The procedure is simple. You have to upload your video clips on Online Converter in the order that you want in the final output.
You’ll navigate to a page with options for adding the media files by clicking on the choose file.
After uploading the media files. You will also see options for the audio in a drop-down menu.
Select the Add option to merge mp3 to mp4.
After the mp3 is merged to the mp4, you can download the converted file or share it via social media as well.
Disadvantages
- If your internet connectivity is poor, the videos may take longer to upload.
- If the response time is slow, you need to cancel the process and re-submit the data.
- Encrypted or protected video files are not supported for the merger of the videos.
Conclusion
Each tool comes with its pros and cons. With the wide range of video editing options, you can explore these different platforms and add life to your moments. Whether you are a beginner or an intermediate, editing multimedia files has been made easy by these different tools.
Also read:
- How to Loop a Video in PowerPoint for 2024
- How to Create an Instant Slideshow on Mac
- Updated In 2024, Featuring The Use of Camera Shake in Creating the Best Videos
- Updated 2024 Approved Best Youtube Video Meme Maker
- New 2024 Approved Detailed Steps to Rotate Video Using KMPlayer
- New In 2024, Add Neon Effects to Your Dance Videos with the Help of Wondershare Filmora After Reading This Article. It Will Give a More Thrilling and Exciting Appearance
- In 2024, AI Has Influenced All Video Editors to Speed up Editing. This Article Discusses the Significance of AI Slow Motion and the Tools that Offer It
- 2024 Approved How to Make Canva Collages
- Updated In This Article You Will Learn How to Crop a Video Through Windows Media Player and with Filmora Wondershare. Here Are Ways to Crop Your Video Clip
- New Do You Want to Create Slow-Motion Videos? This Article Shows Methods to Create Slow-Mo Videos without Changing the Medias Quality
- New Looking Into The Top Free Slow Motion Apps (Android & iOS)
- Best Text Animations In After Effects
- 2024 Approved Do You Want to Know About the Photo Video Maker with Song? Are You Ready to Discover It in Detail? This Article Will Give You Valuable Insights on This Topic
- Updated 15 Best Travel Vloggers That You Should Follow
- Updated Top 6 Best Alternatives to Clownfish Voice Changer
- Updated Best 5 Tips to Freeze-Frame in After Effects for 2024
- 2024 Approved 10 Apps to Make Videos with Pictures and Music
- Looking for a Way to Learn How to Merge Videos in HandBrake? Theres a Better Solution Waiting for You Inside for 2024
- Updated 2 Easy Methods | How To Zoom In On TikTok Videos?
- How to Loop a Video with iMovie on Mac and iPhone
- Updated In 2024, Top Online Video Background Changers Transform Your Videos with Ease
- New What Is HDRI? Everything You Need to Know About HDRI
- New Kinetic Typography Text Effect 【EASY&FAST】
- 2024 Approved Phone Aspect Ratio Vertical Definition, Types and Tips
- New In 2024, Best Animated Text Generator
- Updated Ideas for Time-Lapse Video
- New Detailed Tutorial to Rotate a Video in Cyberlink PowerDirector
- Updated 10 Best Vlogging Cameras for Beginners for 2024
- Updated In 2024, How to Add a Custom Transition to OBS
- New In 2024, Stunning Glitch Effect and Its Creation Steps for Premiere Pro
- In 2024, Looking for a Great Way to Make Your Own Anime Music Video? The Following Are the Top AMV Makers to Choose From
- New AVI Editor for Windows 11/10/8.1/8/7 Easily Edit AVI Files on PC
- Bored with Those Normal Background Images and that Ordinary Still Capture Feel? Take Your Creativity to the Next Level with Amazing Image Transparency Ideas
- New 2024 Approved How to Set Up Twitch Green Screen
- 2024 Approved 10 Best Mp3 Visualizers Windows, Mac, Android, iPhone & Online
- Updated In 2024, Easy Guide to Overlay Videos in Premiere Pro
- New In 2024, Create Kinetice Typography Text Effect in Filmora
- Updated In 2024, How to Make Split Screen Videos in Filmora
- New In 2024, How to Concatenate Videos Using FFmpeg
- Top 5 Tips to Freeze-Frame in After Effects
- New Basic Introduction of LumaFusion Color Grading
- Updated In 2024, Adobe Lightroom Color Grading Tutorial
- Updated Are You Excited to Learn About a File Format that Helps in Easy Transfer? We Are Talking About the 3GP Format. Stay with Us and Get to Know More About It
- Updated 2024 Approved What Is the Best Filmora Slideshow Templates? Experts Choice
- 2024 Approved Create Amazing Slow-Motion Videos 8 Affordable Slow-Motion Cameras
- 2024 Approved Best Free Slow Motion Apps For Android and iPhone
- In 2024, 7 Top Ways To Resolve Apple ID Not Active Issue For iPhone SE
- 6 Methods for Switching from Apple iPhone XR to Samsung | Dr.fone
- How to Lock Apps on Vivo S18 to Protect Your Individual Information
- In 2024, 5 Easy Ways to Copy Contacts from Huawei Nova Y71 to iPhone 14 and 15 | Dr.fone
- Fix Realme Note 50 Android System Webview Crash 2024 Issue | Dr.fone
- In 2024, Unlocking Apple iPhone 14 Plus Passcode without a Computer | Dr.fone
- How to Fake GPS on Android without Mock Location For your Meizu 21 | Dr.fone
- How To Activate and Use Life360 Ghost Mode On Motorola Moto G24 | Dr.fone
- How to Perform Hard Reset on Realme 11 Pro? | Dr.fone
- In 2024, 3 Ways to Unlock Apple iPhone XS Max without Passcode or Face ID
- Top 6 Apps/Services to Trace Any Oppo A18 Location By Mobile Number | Dr.fone
- What Wikipedia Cant Tell You About the 10 Best Batman Cartoons
- In 2024, The Ultimate Guide to Get the Rare Candy on Pokemon Go Fire Red On Vivo Y27s | Dr.fone
- iPogo will be the new iSpoofer On Apple iPhone 12 mini? | Dr.fone
- In 2024, How to Fake GPS on Android without Mock Location For your Lava Blaze 2 | Dr.fone
- In 2024, 3 Facts You Need to Know about Screen Mirroring Motorola Defy 2 | Dr.fone
- In 2024, Tips and Tricks for Setting Up your Nokia C12 Phone Pattern Lock
- In 2024, Mastering Android Device Manager The Ultimate Guide to Unlocking Your Poco X5 Pro Device
- How to Share/Fake Location on WhatsApp for Poco C65 | Dr.fone
- Can You Unlock iPhone 11 After Forgetting the Passcode? | Dr.fone
- Mastering Lock Screen Settings How to Enable and Disable on Itel A60
- How to Sign Excel 2000 document with Digital Signature - (Tutorial)
- In 2024, How to Change GPS Location on Xiaomi 13T Pro Easily & Safely | Dr.fone
- Title: 2024 Approved What Slideshow Templates Can Teach You About Aesthetic
- Author: Chloe
- Created at : 2024-05-20 03:38:23
- Updated at : 2024-05-21 03:38:23
- Link: https://ai-editing-video.techidaily.com/2024-approved-what-slideshow-templates-can-teach-you-about-aesthetic/
- License: This work is licensed under CC BY-NC-SA 4.0.
