:max_bytes(150000):strip_icc():format(webp)/GettyImages-104288650-cd3f369f8ead449f94d1a1ce6f55c9de.jpg)
3 Best Effects to Appear on Camera Made with Filmora for 2024

3 Best Effects to Appear on Camera Made with Filmora
We all want to improve our video editing skills and give them more of a wow factor. A fantastic method of achieving this is using different effects and tricks on Filmora .
Appearance effects are optical illusions used to replicate imagined occurrences in a narrative or made-up universe. These effects can be effective narrative devices. As a result, they are widely employed in the theater, film, television, and video game industries. Here is what you need to do to add appearance effects to your videos:
Part 1: Why are Appearance Effects Important?
A good branding and advertising strategy must include video. You can raise the caliber of clients who utilize your product by improving the image you provide.
How can video help you build your brand? How well do you look? Although there is no quick fix to seem nice on-screen instantly, you can employ several appearance effects to enhance the general flow of your videos. Appearance effects are significant because they add a slight twist to your videos. They can help you stand out, add some humor and draw attention from your audience. These simple tricks could add extra fun and Spark to your videos.
Part 2: How to Make Cloth Appearance
Let’s start with the first one. Before you start, make sure you put the camera on a tripod or a steady surface, so it doesn’t move while filming.
Step1 For the first shot, you must throw a jacket on a stool. Make sure it lands on the stool or wherever your talent is going to sit.
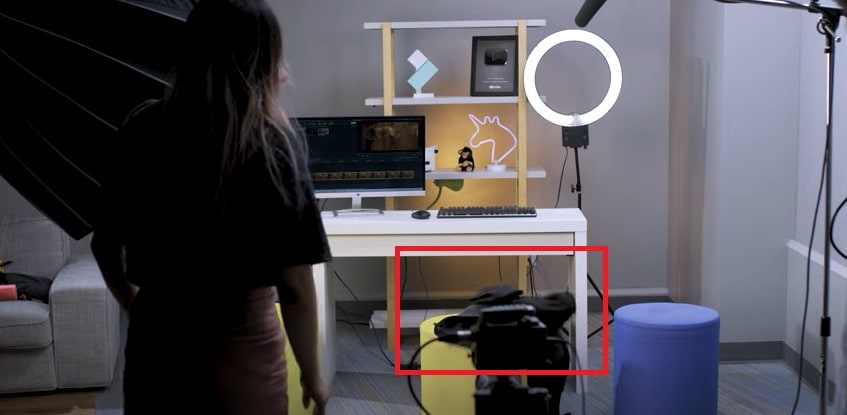
Step2 Make a shot of your talent appearing from where the jacket landed. You can add some acting skills to make this shot more realistic.
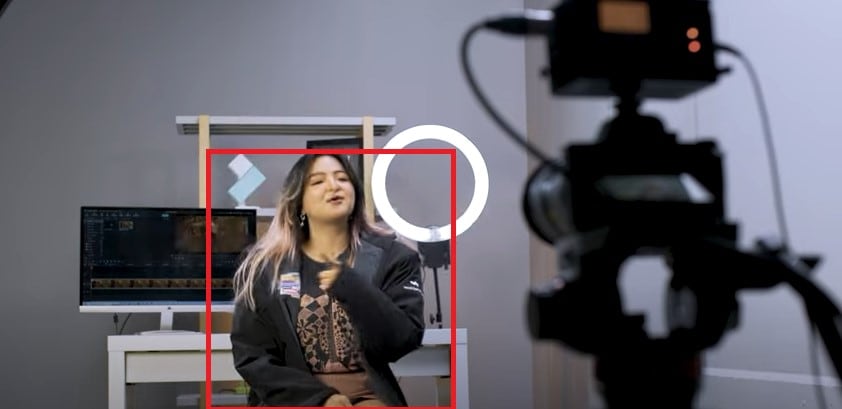
Step3 Download Filmora to edit your footage. You can get started by going to their official website.
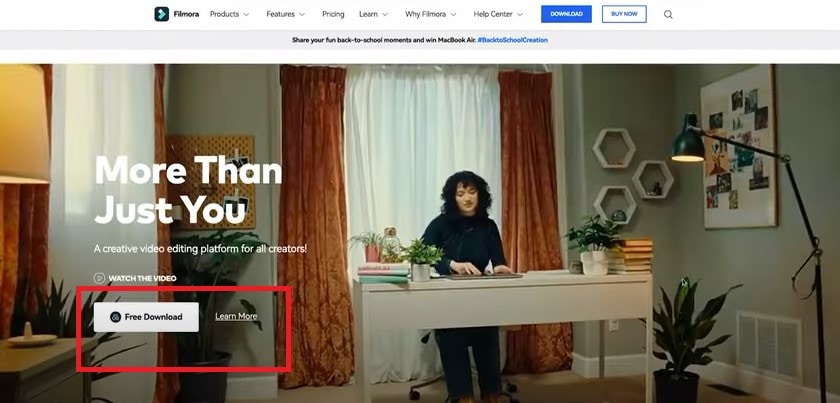
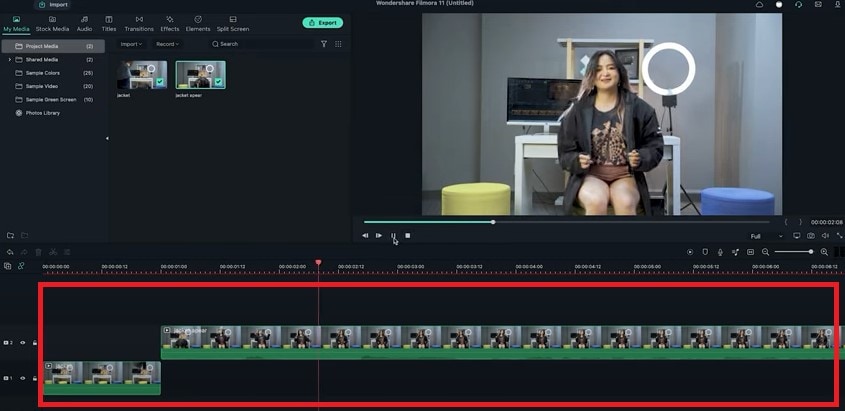
Step4 Now split the first clip on the frame where your jacket lands on the stool. Place it on the first track.
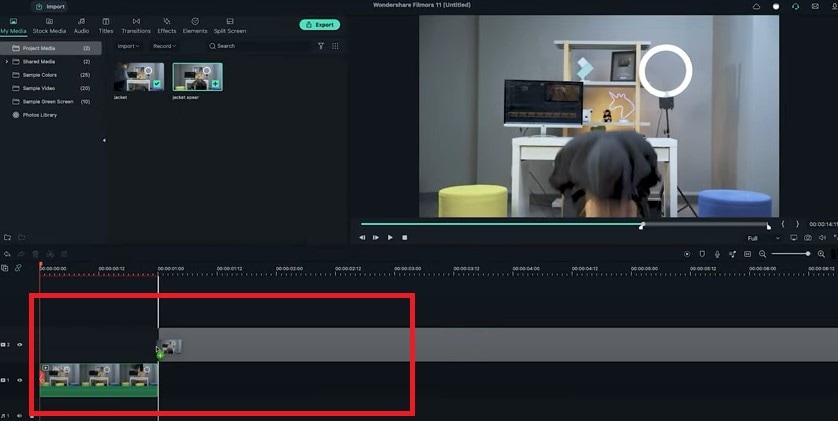
Step5 Trim the second shot until the talents start acting and place it on the second track to match the first clip.
Part 3: How to Make an Explosion Appearance
Step1 This effect is the easiest. You need to film the empty plate with just a background. Then let the talent enter the frame and jump into the place.
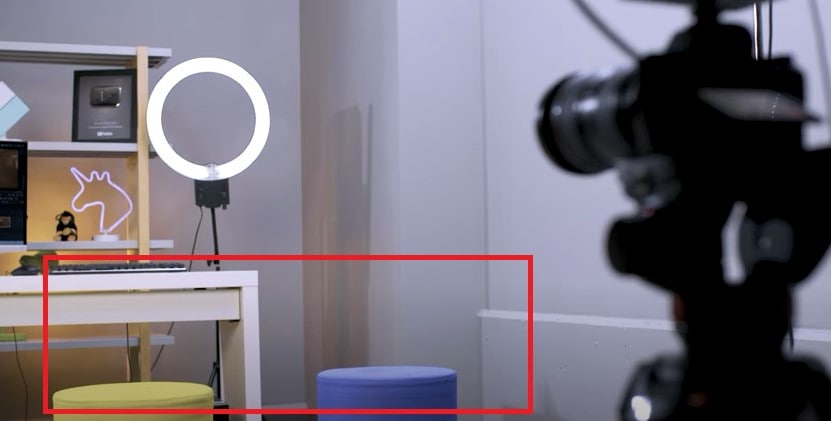
Step2 Now import the clip into Filmora and place it onto the first video track.
Step3 Freeze the frame of the empty plate with just the background and extend it as necessary. Place the clip onto the second video track and trim it until the action of the talent jump starts.
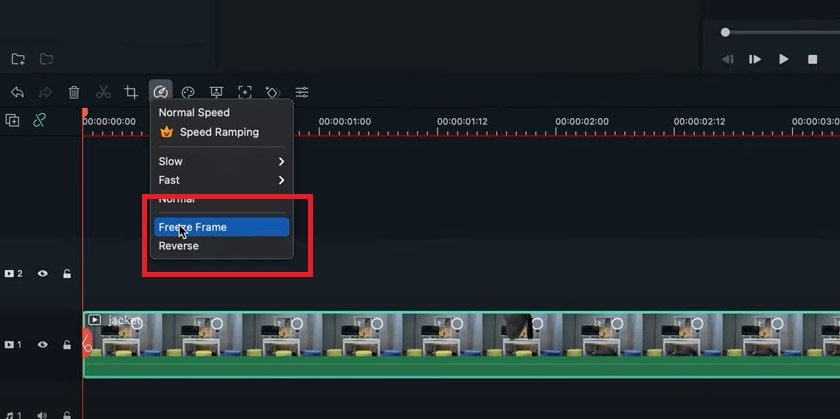
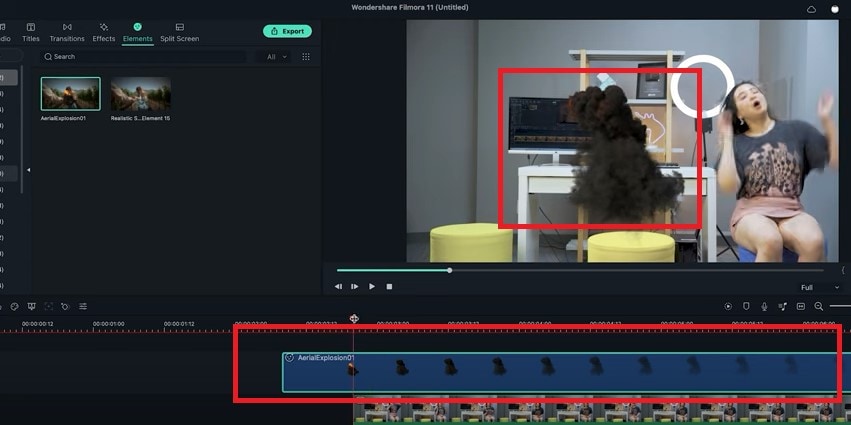
Step4 Delete the rest on the left. The trick is to use some explosion or smoke effect to hide the transition.
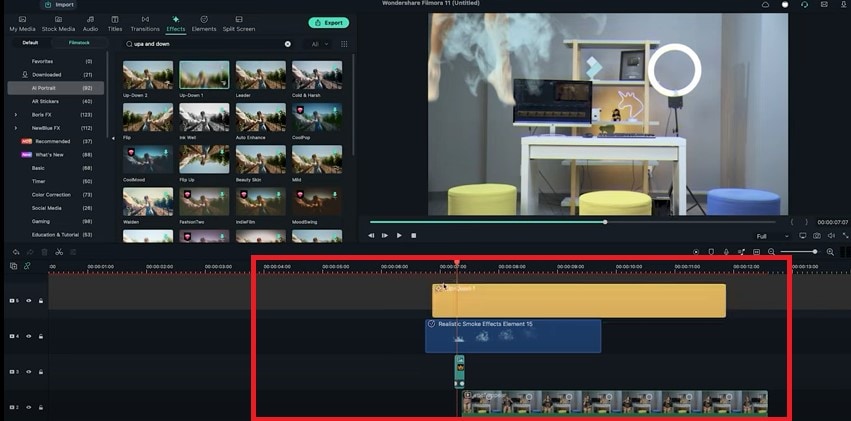
Step5 Use the green screen sample in the default menu here. Add some smoke effects available in film stock. Place it on the third video track and move it to hide the transition.
Part 4: How to Make Roof Appearance
The last trick here is combining the techniques from the two previous effects.
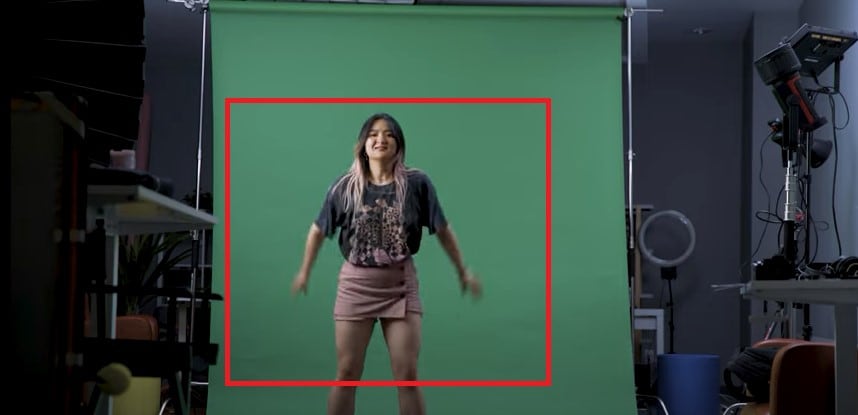
Step1 First, record the empty plate with just a background. Let the talent jump in the frame and set up a green screen for the talent to jump in front of it. It will look like they’re falling from the ceiling.
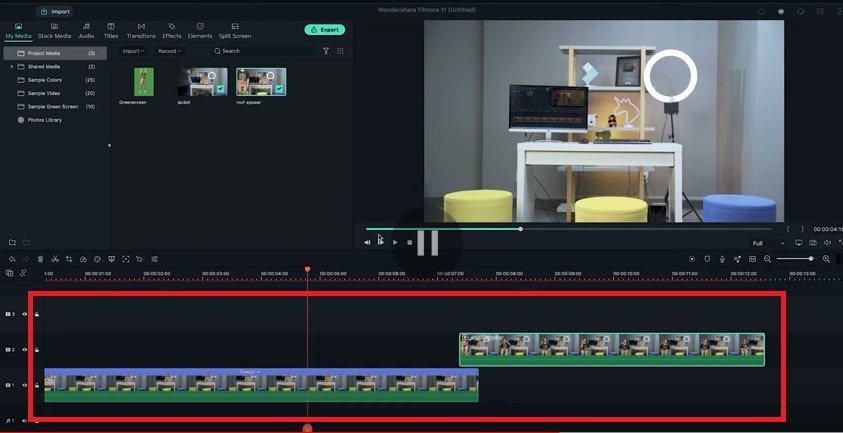
Step2 Now import the clip into Filmora again. Follow the steps from the second example so we have the subject appearing on the screen like this.
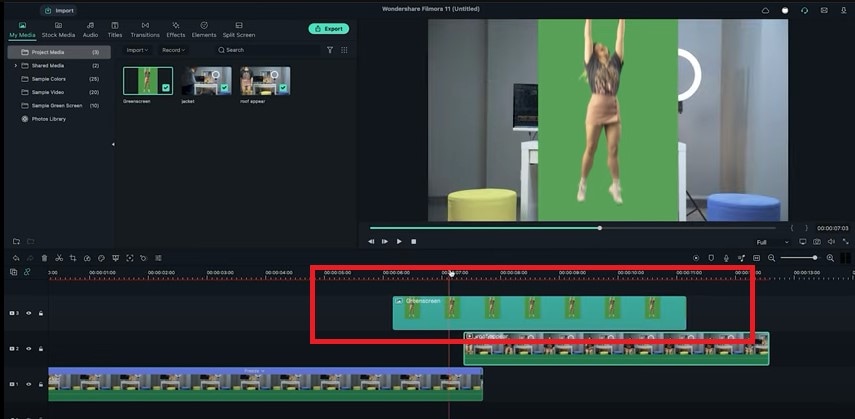
Step3 Add the green screenshot onto the third video track.
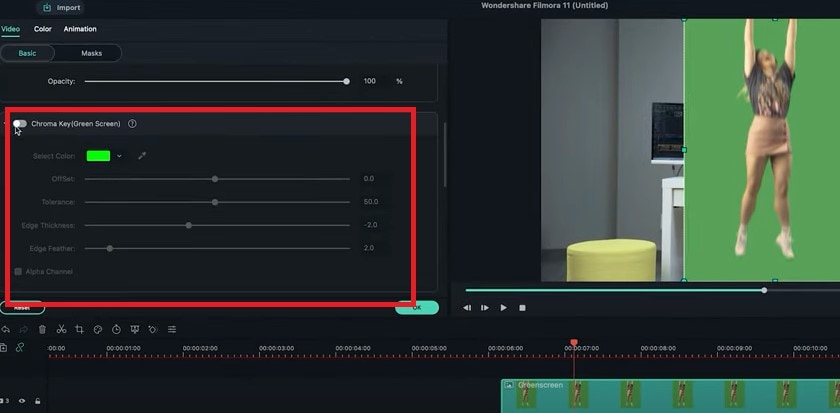
Step4 Double-click on it, activate the setting window and then key out the background using the chroma key feature.
Step5 Move the clip until it covers only the first frame of the appearing clip. Now keyframe the following subject from the outer frame to the final position.
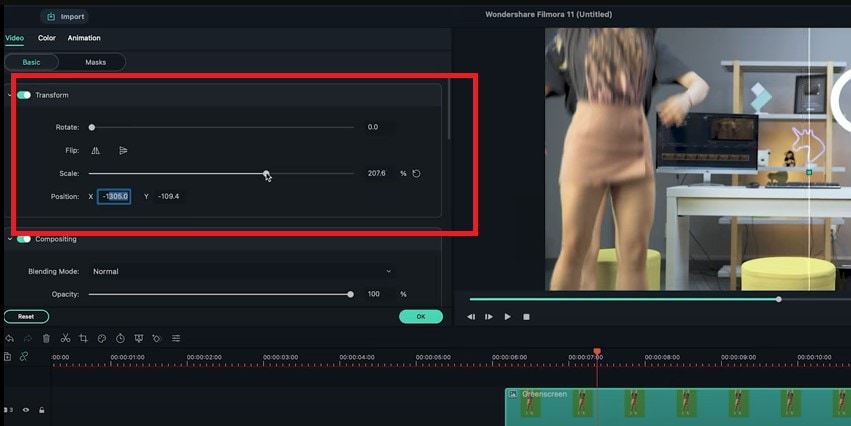
Step6 Now search for some smoke effects and put it upside down. So it looks like the ceiling is broken when the subject falls. Then add some camera shake to the fall.
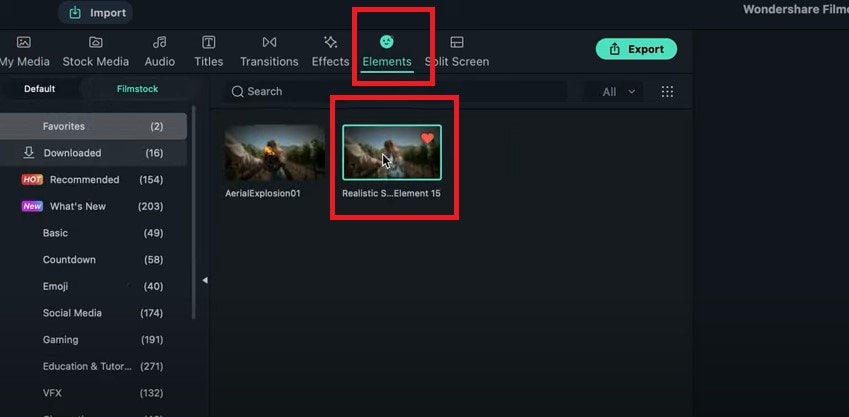
Step7 Drag the camera shake effect back to the top track and shorten it to an ideal length. You can also add some sound effects if you want to this video.
Part 5: Tips to Look Good in Your Next Video
1. Be Clear About the Topic
Intellectuals frequently complain that everyone has attention deficit disorder due to the Internet. According to studies, we only have an attention span of 8 seconds today. You need a punchy, concise message to keep viewers watching your video.
2. Don’t Forget to Smile
Individuals who smile frequently are perceived to be more confident and successful. Therefore, showing your audience that you are confident in your company and services is the best method to gain their trust.
3. Look into the Camera
Direct eye contact with the camera lens is essential. Although it may seem enticing, your sole audience is the person directly in front of you when you’re speaking.
Be mindful of the camera’s confined area. Bring it up to eye level and keep your gaze there rather than elsewhere.
Summary
There are several fantastic camera effects that you can experiment with in your videos. While some are well-known, others are less well-known and often used. We have mentioned the three fun ways to appear on camera above. We suggest using video editing software like Filmora to use these effects more effectively. You can use these appearance effects to create an atmosphere, make your story more understandable, or spice up the video.
Free Download For Win 7 or later(64-bit)
Free Download For macOS 10.14 or later
Free Download For macOS 10.14 or later
Little Tricks to Make Canva Slideshow No One Is Telling You
Little Tricks to Create Canva Slideshow No One is Telling You
An easy yet powerful editor
Numerous effects to choose from
Detailed tutorials provided by the official channel
You can make slideshows in innumerable ways. And we all are aware of how important it is to present slideshows, no matter what our profession or purpose is. And one of the ways of making slideshows is by using the canvas slideshow.
You can make the best type of slideshows on any device you prefer with Canva. So, in the following discussion, we will be talking about how you can make a slideshow on a PC or Mac with Canvas. Then, we will point out the steps for adding music to your slideshow in Canva. We will also mention how you can turn a slideshow into a video with Canva.
Lastly, we will discuss the answers and solutions to some common questions regarding converting slides to digital, following with the discussion of the best video editing tool for slideshow videos. So, without o further ado, let us get started with our discussion.
In this article
01 [How to Make a Slideshow on a PC or Mac with Canva?](#Part 1)
02 [How to Add Music to Your Slideshow in This Canva?](#Part 2)
03 [How to Turn Your Slideshows into Videos with Canva?](#Part 3)
04 [FAQ of Converting Slides to Digital](#Part 4)
Part 1 How to Make a Slideshow on a PC or Mac with Canva?
You can make the best Canva slide show in just five simple steps. You can choose any device for making a slideshow with canva. The best choice is to use a PC or Mac to get the entire display, thereby helping you make better edits, changes and integrations in your slideshows.
So, let us start the discussion with the five simple steps for making a slideshow on PC or Mac with Canva. The steps are as follows.
● Step 1: Launch the application
The first step is to download, launch and install the application of Canva on your preferred device, that is, either your PC or your Mac. The application is available for free, and you need not pay any charges for downloading and installing Canva on your Mac or PC.
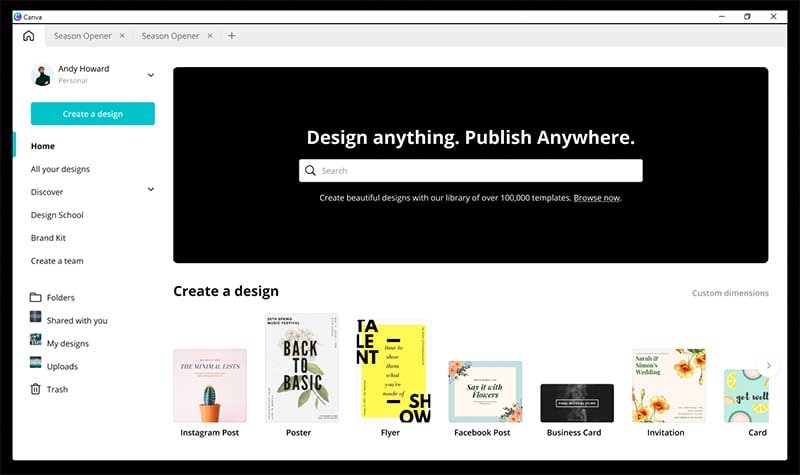
● Step 2: Choose the template
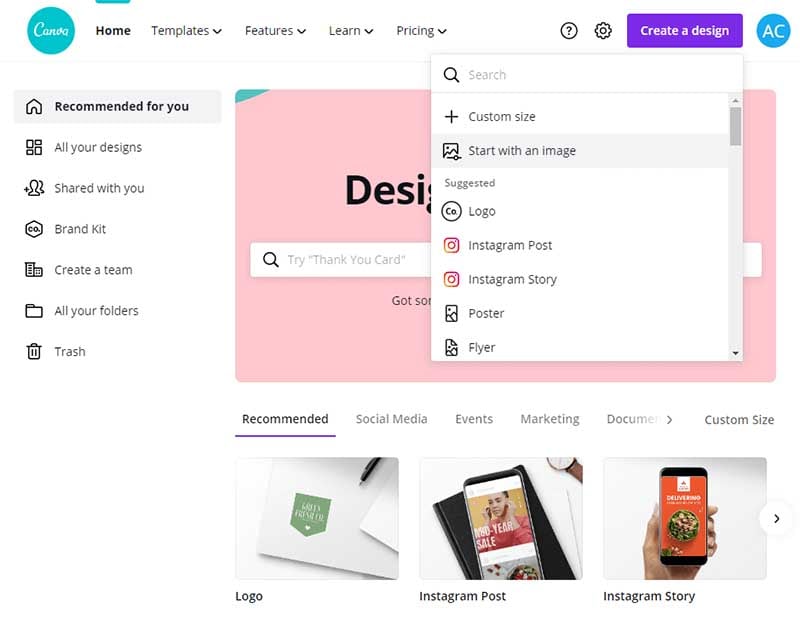
The next step is to choose the template you want for your sideshow. Choose from among the many canva slideshow templates that are available.

● Step 3: Make the required edits with the features of Canva.
There are numerous features available at Canva. Use them to make the necessary edits and integrations in your slideshow. Use the different features and make your slideshow the way you want. You can add images, texts and designs to your slideshow at Canva.
● Step 4: Customize accordingly
You can add your images and change the templates and designs at Canva. It helps in bringing more uniqueness, creativity and originality, as you can integrate your imagination, skills and creativity in the slideshow you are making at Canva.
● Step 5: Save your work and export
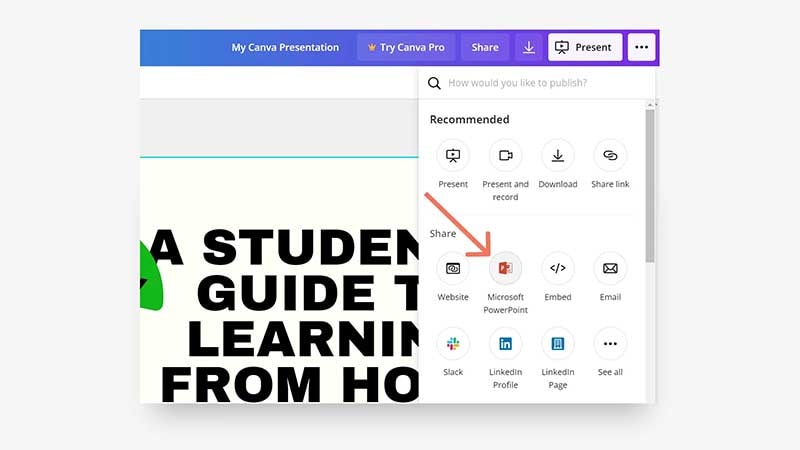
All the hard work is finfish by now. Now you have to have the slideshow that you have made so far. And then, share it in whichever file format you prefer on any social media platform or other places you want.
Part 2 How to Add Music to Your Slideshow in This Canva?
You can customize your slideshow at Canva in numerous ways. And one of the ways is by adding music to your slideshow in Canva. A slideshow in canva can have music in it, which can be any music. You can record yourself or even integrate any readymade music file.
You need only a single step to add music to your slideshow at Canva. The steps for making the slideshow remain the same, and you can refer to the steps mentioned above for reference. In the above steps, pause at Step 3.
You can add the required music file or media file at that step. In the next step, that is, in Step 4, you can customize that media file. You can integrate any audio file that you record for your slideshow.

Part 3 How to Turn Your Slideshows into Videos with Canva?
We have discussed the steps for making canva photo slideshow. The steps are simple to perform and easy to follow. But what if you need or want to turn that slideshow into a video? You definitely can do so! The steps for this, too, are straightforward and effortless.
So, now we will discuss the steps for turning slideshows at Canva into videos. There are four simple steps for this, and they are as follows.
● Step 1: Choose your preferred presentation type
By this, we mean that you must decide the size of your presentation. It is better to determine the type of presentation, for it helps in better and faster making of your presentation.
● Step 2: Integrate all the components you want in your presentation
Then, integrate all the images, soundtracks, texts, designs and templates and all the other necessary components you want to be present in your presentation. You can use numerous features in your presentation at Canva.
● Step 3: Customize the presentation based on your choice and needs
You can change the components of your presentation according to your needs and choice, and you can bring about as much customization as you want. So, customize according to and as much you want.
● Step 4: Download and share
Lastly, save the presentation. Then go to the blue bar, and in the options present in the top right corner, you will find “presenting”. You can save your file from there, and then the “Download” option will help you download the file to your device.
Part 4 FAQ of Converting Slides to Digital
Now, we will discuss solutions or answers to the common questions relating to converting slides into digital format. Here are the frequently asked issues or questions regarding this aspect.
01How do I convert my slides to digital?
We can recommend a few ways in which you can digitise your old slides. The methods are as follows.
● Hiring a proficient professional at this work is the easiest and the most effective method.
● A slide copier tool or application can also effectively serve this purpose.
● Use a device that converts the images or slides digitally.
● Use a flatbed scanner to scan your slides.
● Photographing your slides is an intelligent way to digitise your old slides.
02Can I use Filmora to turn my slides to digital?
You can readily use Filmora to transform your slideshows into slideshow videos, digitising your slides effectively. You have to make your slideshow at Filmora, edit and customise it according to your preference and then save, share or download the file. It will automatically turn your slide into digital format or help you make a successful slideshow video.
03What is the best method for turning slides into digital?
The most effortless method is to hire a professional, and it will guarantee saucerful results. But, if you want to do it yourself, you can readily opt for Filmora. It is the best video editing application that can readily help you digitise your slides.
04Can I turn my slideshow into videos?
Yes, you can effortlessly turn your slideshows into videos. You need a video editing tool that enables you to share and download your slideshow in a video format. And the best tool for it is Filmora. You can unhesitant opt for Filmora if you want to turn your slideshows into videos and share them effortlessly on any platform.
Now, we will discuss the best video editing tool or application, Wondershare Filmora Video Editor . You can use this tool to make the best slideshows and convert them into videos. You have the liberty f using any device for editing and making slideshow videos. You can customise as much you want and use the tons of features for editing available in the tool.
For Win 7 or later (64-bit)
For macOS 10.12 or later
You can opt for the free version. It has tools and features that are more than sufficient for making the most incredible slideshow videos. And when you choose its paid version, you are bestowed with the most advanced professional tools and features for editing. You can use the 800+ filters available, the texts, designs, templates, and other components for editing at Filmora.
So, if you want to make the best and the most incredible slideshows videos, you can readily opt for Filmora!
● Ending Thoughts →
● So, this was all about the different aspects and factors of a slideshow at Canva. Let us have a quick recap of the topic and discussions we have touched on in the above discussion.
● The five steps for making A slideshow in canva on your PC or Mac.
● The steps for adding music to your slideshow at Canva, also, how can you turn your slideshows into videos in Canva in four simple steps
● Lastly, we have discussed the answers or solutions to the common questions relating to converting slides to digital. And we have ended our discussion by introducing the best video editing tool, Filmora, that can help you make the most fantastic slideshows on any device, be it a PC or Mac.
You can make slideshows in innumerable ways. And we all are aware of how important it is to present slideshows, no matter what our profession or purpose is. And one of the ways of making slideshows is by using the canvas slideshow.
You can make the best type of slideshows on any device you prefer with Canva. So, in the following discussion, we will be talking about how you can make a slideshow on a PC or Mac with Canvas. Then, we will point out the steps for adding music to your slideshow in Canva. We will also mention how you can turn a slideshow into a video with Canva.
Lastly, we will discuss the answers and solutions to some common questions regarding converting slides to digital, following with the discussion of the best video editing tool for slideshow videos. So, without o further ado, let us get started with our discussion.
In this article
01 [How to Make a Slideshow on a PC or Mac with Canva?](#Part 1)
02 [How to Add Music to Your Slideshow in This Canva?](#Part 2)
03 [How to Turn Your Slideshows into Videos with Canva?](#Part 3)
04 [FAQ of Converting Slides to Digital](#Part 4)
Part 1 How to Make a Slideshow on a PC or Mac with Canva?
You can make the best Canva slide show in just five simple steps. You can choose any device for making a slideshow with canva. The best choice is to use a PC or Mac to get the entire display, thereby helping you make better edits, changes and integrations in your slideshows.
So, let us start the discussion with the five simple steps for making a slideshow on PC or Mac with Canva. The steps are as follows.
● Step 1: Launch the application
The first step is to download, launch and install the application of Canva on your preferred device, that is, either your PC or your Mac. The application is available for free, and you need not pay any charges for downloading and installing Canva on your Mac or PC.

● Step 2: Choose the template
The next step is to choose the template you want for your sideshow. Choose from among the many canva slideshow templates that are available.

● Step 3: Make the required edits with the features of Canva.
There are numerous features available at Canva. Use them to make the necessary edits and integrations in your slideshow. Use the different features and make your slideshow the way you want. You can add images, texts and designs to your slideshow at Canva.

● Step 4: Customize accordingly
You can add your images and change the templates and designs at Canva. It helps in bringing more uniqueness, creativity and originality, as you can integrate your imagination, skills and creativity in the slideshow you are making at Canva.
● Step 5: Save your work and export
All the hard work is finfish by now. Now you have to have the slideshow that you have made so far. And then, share it in whichever file format you prefer on any social media platform or other places you want.

Part 2 How to Add Music to Your Slideshow in This Canva?
You can customize your slideshow at Canva in numerous ways. And one of the ways is by adding music to your slideshow in Canva. A slideshow in canva can have music in it, which can be any music. You can record yourself or even integrate any readymade music file.
You need only a single step to add music to your slideshow at Canva. The steps for making the slideshow remain the same, and you can refer to the steps mentioned above for reference. In the above steps, pause at Step 3.
You can add the required music file or media file at that step. In the next step, that is, in Step 4, you can customize that media file. You can integrate any audio file that you record for your slideshow.

Part 3 How to Turn Your Slideshows into Videos with Canva?
We have discussed the steps for making canva photo slideshow. The steps are simple to perform and easy to follow. But what if you need or want to turn that slideshow into a video? You definitely can do so! The steps for this, too, are straightforward and effortless.
So, now we will discuss the steps for turning slideshows at Canva into videos. There are four simple steps for this, and they are as follows.
● Step 1: Choose your preferred presentation type
By this, we mean that you must decide the size of your presentation. It is better to determine the type of presentation, for it helps in better and faster making of your presentation.
● Step 2: Integrate all the components you want in your presentation
Then, integrate all the images, soundtracks, texts, designs and templates and all the other necessary components you want to be present in your presentation. You can use numerous features in your presentation at Canva.
● Step 3: Customize the presentation based on your choice and needs
You can change the components of your presentation according to your needs and choice, and you can bring about as much customization as you want. So, customize according to and as much you want.
● Step 4: Download and share
Lastly, save the presentation. Then go to the blue bar, and in the options present in the top right corner, you will find “presenting”. You can save your file from there, and then the “Download” option will help you download the file to your device.
Part 4 FAQ of Converting Slides to Digital
Now, we will discuss solutions or answers to the common questions relating to converting slides into digital format. Here are the frequently asked issues or questions regarding this aspect.
01How do I convert my slides to digital?
We can recommend a few ways in which you can digitise your old slides. The methods are as follows.
● Hiring a proficient professional at this work is the easiest and the most effective method.
● A slide copier tool or application can also effectively serve this purpose.
● Use a device that converts the images or slides digitally.
● Use a flatbed scanner to scan your slides.
● Photographing your slides is an intelligent way to digitise your old slides.
02Can I use Filmora to turn my slides to digital?
You can readily use Filmora to transform your slideshows into slideshow videos, digitising your slides effectively. You have to make your slideshow at Filmora, edit and customise it according to your preference and then save, share or download the file. It will automatically turn your slide into digital format or help you make a successful slideshow video.
03What is the best method for turning slides into digital?
The most effortless method is to hire a professional, and it will guarantee saucerful results. But, if you want to do it yourself, you can readily opt for Filmora. It is the best video editing application that can readily help you digitise your slides.
04Can I turn my slideshow into videos?
Yes, you can effortlessly turn your slideshows into videos. You need a video editing tool that enables you to share and download your slideshow in a video format. And the best tool for it is Filmora. You can unhesitant opt for Filmora if you want to turn your slideshows into videos and share them effortlessly on any platform.
Now, we will discuss the best video editing tool or application, Wondershare Filmora Video Editor . You can use this tool to make the best slideshows and convert them into videos. You have the liberty f using any device for editing and making slideshow videos. You can customise as much you want and use the tons of features for editing available in the tool.
For Win 7 or later (64-bit)
For macOS 10.12 or later
You can opt for the free version. It has tools and features that are more than sufficient for making the most incredible slideshow videos. And when you choose its paid version, you are bestowed with the most advanced professional tools and features for editing. You can use the 800+ filters available, the texts, designs, templates, and other components for editing at Filmora.
So, if you want to make the best and the most incredible slideshows videos, you can readily opt for Filmora!
● Ending Thoughts →
● So, this was all about the different aspects and factors of a slideshow at Canva. Let us have a quick recap of the topic and discussions we have touched on in the above discussion.
● The five steps for making A slideshow in canva on your PC or Mac.
● The steps for adding music to your slideshow at Canva, also, how can you turn your slideshows into videos in Canva in four simple steps
● Lastly, we have discussed the answers or solutions to the common questions relating to converting slides to digital. And we have ended our discussion by introducing the best video editing tool, Filmora, that can help you make the most fantastic slideshows on any device, be it a PC or Mac.
You can make slideshows in innumerable ways. And we all are aware of how important it is to present slideshows, no matter what our profession or purpose is. And one of the ways of making slideshows is by using the canvas slideshow.
You can make the best type of slideshows on any device you prefer with Canva. So, in the following discussion, we will be talking about how you can make a slideshow on a PC or Mac with Canvas. Then, we will point out the steps for adding music to your slideshow in Canva. We will also mention how you can turn a slideshow into a video with Canva.
Lastly, we will discuss the answers and solutions to some common questions regarding converting slides to digital, following with the discussion of the best video editing tool for slideshow videos. So, without o further ado, let us get started with our discussion.
In this article
01 [How to Make a Slideshow on a PC or Mac with Canva?](#Part 1)
02 [How to Add Music to Your Slideshow in This Canva?](#Part 2)
03 [How to Turn Your Slideshows into Videos with Canva?](#Part 3)
04 [FAQ of Converting Slides to Digital](#Part 4)
Part 1 How to Make a Slideshow on a PC or Mac with Canva?
You can make the best Canva slide show in just five simple steps. You can choose any device for making a slideshow with canva. The best choice is to use a PC or Mac to get the entire display, thereby helping you make better edits, changes and integrations in your slideshows.
So, let us start the discussion with the five simple steps for making a slideshow on PC or Mac with Canva. The steps are as follows.
● Step 1: Launch the application
The first step is to download, launch and install the application of Canva on your preferred device, that is, either your PC or your Mac. The application is available for free, and you need not pay any charges for downloading and installing Canva on your Mac or PC.

● Step 2: Choose the template
The next step is to choose the template you want for your sideshow. Choose from among the many canva slideshow templates that are available.

● Step 3: Make the required edits with the features of Canva.
There are numerous features available at Canva. Use them to make the necessary edits and integrations in your slideshow. Use the different features and make your slideshow the way you want. You can add images, texts and designs to your slideshow at Canva.

● Step 4: Customize accordingly
You can add your images and change the templates and designs at Canva. It helps in bringing more uniqueness, creativity and originality, as you can integrate your imagination, skills and creativity in the slideshow you are making at Canva.
● Step 5: Save your work and export
All the hard work is finfish by now. Now you have to have the slideshow that you have made so far. And then, share it in whichever file format you prefer on any social media platform or other places you want.

Part 2 How to Add Music to Your Slideshow in This Canva?
You can customize your slideshow at Canva in numerous ways. And one of the ways is by adding music to your slideshow in Canva. A slideshow in canva can have music in it, which can be any music. You can record yourself or even integrate any readymade music file.
You need only a single step to add music to your slideshow at Canva. The steps for making the slideshow remain the same, and you can refer to the steps mentioned above for reference. In the above steps, pause at Step 3.
You can add the required music file or media file at that step. In the next step, that is, in Step 4, you can customize that media file. You can integrate any audio file that you record for your slideshow.

Part 3 How to Turn Your Slideshows into Videos with Canva?
We have discussed the steps for making canva photo slideshow. The steps are simple to perform and easy to follow. But what if you need or want to turn that slideshow into a video? You definitely can do so! The steps for this, too, are straightforward and effortless.
So, now we will discuss the steps for turning slideshows at Canva into videos. There are four simple steps for this, and they are as follows.
● Step 1: Choose your preferred presentation type
By this, we mean that you must decide the size of your presentation. It is better to determine the type of presentation, for it helps in better and faster making of your presentation.
● Step 2: Integrate all the components you want in your presentation
Then, integrate all the images, soundtracks, texts, designs and templates and all the other necessary components you want to be present in your presentation. You can use numerous features in your presentation at Canva.
● Step 3: Customize the presentation based on your choice and needs
You can change the components of your presentation according to your needs and choice, and you can bring about as much customization as you want. So, customize according to and as much you want.
● Step 4: Download and share
Lastly, save the presentation. Then go to the blue bar, and in the options present in the top right corner, you will find “presenting”. You can save your file from there, and then the “Download” option will help you download the file to your device.
Part 4 FAQ of Converting Slides to Digital
Now, we will discuss solutions or answers to the common questions relating to converting slides into digital format. Here are the frequently asked issues or questions regarding this aspect.
01How do I convert my slides to digital?
We can recommend a few ways in which you can digitise your old slides. The methods are as follows.
● Hiring a proficient professional at this work is the easiest and the most effective method.
● A slide copier tool or application can also effectively serve this purpose.
● Use a device that converts the images or slides digitally.
● Use a flatbed scanner to scan your slides.
● Photographing your slides is an intelligent way to digitise your old slides.
02Can I use Filmora to turn my slides to digital?
You can readily use Filmora to transform your slideshows into slideshow videos, digitising your slides effectively. You have to make your slideshow at Filmora, edit and customise it according to your preference and then save, share or download the file. It will automatically turn your slide into digital format or help you make a successful slideshow video.
03What is the best method for turning slides into digital?
The most effortless method is to hire a professional, and it will guarantee saucerful results. But, if you want to do it yourself, you can readily opt for Filmora. It is the best video editing application that can readily help you digitise your slides.
04Can I turn my slideshow into videos?
Yes, you can effortlessly turn your slideshows into videos. You need a video editing tool that enables you to share and download your slideshow in a video format. And the best tool for it is Filmora. You can unhesitant opt for Filmora if you want to turn your slideshows into videos and share them effortlessly on any platform.
Now, we will discuss the best video editing tool or application, Wondershare Filmora Video Editor . You can use this tool to make the best slideshows and convert them into videos. You have the liberty f using any device for editing and making slideshow videos. You can customise as much you want and use the tons of features for editing available in the tool.
For Win 7 or later (64-bit)
For macOS 10.12 or later
You can opt for the free version. It has tools and features that are more than sufficient for making the most incredible slideshow videos. And when you choose its paid version, you are bestowed with the most advanced professional tools and features for editing. You can use the 800+ filters available, the texts, designs, templates, and other components for editing at Filmora.
So, if you want to make the best and the most incredible slideshows videos, you can readily opt for Filmora!
● Ending Thoughts →
● So, this was all about the different aspects and factors of a slideshow at Canva. Let us have a quick recap of the topic and discussions we have touched on in the above discussion.
● The five steps for making A slideshow in canva on your PC or Mac.
● The steps for adding music to your slideshow at Canva, also, how can you turn your slideshows into videos in Canva in four simple steps
● Lastly, we have discussed the answers or solutions to the common questions relating to converting slides to digital. And we have ended our discussion by introducing the best video editing tool, Filmora, that can help you make the most fantastic slideshows on any device, be it a PC or Mac.
You can make slideshows in innumerable ways. And we all are aware of how important it is to present slideshows, no matter what our profession or purpose is. And one of the ways of making slideshows is by using the canvas slideshow.
You can make the best type of slideshows on any device you prefer with Canva. So, in the following discussion, we will be talking about how you can make a slideshow on a PC or Mac with Canvas. Then, we will point out the steps for adding music to your slideshow in Canva. We will also mention how you can turn a slideshow into a video with Canva.
Lastly, we will discuss the answers and solutions to some common questions regarding converting slides to digital, following with the discussion of the best video editing tool for slideshow videos. So, without o further ado, let us get started with our discussion.
In this article
01 [How to Make a Slideshow on a PC or Mac with Canva?](#Part 1)
02 [How to Add Music to Your Slideshow in This Canva?](#Part 2)
03 [How to Turn Your Slideshows into Videos with Canva?](#Part 3)
04 [FAQ of Converting Slides to Digital](#Part 4)
Part 1 How to Make a Slideshow on a PC or Mac with Canva?
You can make the best Canva slide show in just five simple steps. You can choose any device for making a slideshow with canva. The best choice is to use a PC or Mac to get the entire display, thereby helping you make better edits, changes and integrations in your slideshows.
So, let us start the discussion with the five simple steps for making a slideshow on PC or Mac with Canva. The steps are as follows.
● Step 1: Launch the application
The first step is to download, launch and install the application of Canva on your preferred device, that is, either your PC or your Mac. The application is available for free, and you need not pay any charges for downloading and installing Canva on your Mac or PC.

● Step 2: Choose the template
The next step is to choose the template you want for your sideshow. Choose from among the many canva slideshow templates that are available.

● Step 3: Make the required edits with the features of Canva.
There are numerous features available at Canva. Use them to make the necessary edits and integrations in your slideshow. Use the different features and make your slideshow the way you want. You can add images, texts and designs to your slideshow at Canva.

● Step 4: Customize accordingly
You can add your images and change the templates and designs at Canva. It helps in bringing more uniqueness, creativity and originality, as you can integrate your imagination, skills and creativity in the slideshow you are making at Canva.
● Step 5: Save your work and export
All the hard work is finfish by now. Now you have to have the slideshow that you have made so far. And then, share it in whichever file format you prefer on any social media platform or other places you want.

Part 2 How to Add Music to Your Slideshow in This Canva?
You can customize your slideshow at Canva in numerous ways. And one of the ways is by adding music to your slideshow in Canva. A slideshow in canva can have music in it, which can be any music. You can record yourself or even integrate any readymade music file.
You need only a single step to add music to your slideshow at Canva. The steps for making the slideshow remain the same, and you can refer to the steps mentioned above for reference. In the above steps, pause at Step 3.
You can add the required music file or media file at that step. In the next step, that is, in Step 4, you can customize that media file. You can integrate any audio file that you record for your slideshow.

Part 3 How to Turn Your Slideshows into Videos with Canva?
We have discussed the steps for making canva photo slideshow. The steps are simple to perform and easy to follow. But what if you need or want to turn that slideshow into a video? You definitely can do so! The steps for this, too, are straightforward and effortless.
So, now we will discuss the steps for turning slideshows at Canva into videos. There are four simple steps for this, and they are as follows.
● Step 1: Choose your preferred presentation type
By this, we mean that you must decide the size of your presentation. It is better to determine the type of presentation, for it helps in better and faster making of your presentation.
● Step 2: Integrate all the components you want in your presentation
Then, integrate all the images, soundtracks, texts, designs and templates and all the other necessary components you want to be present in your presentation. You can use numerous features in your presentation at Canva.
● Step 3: Customize the presentation based on your choice and needs
You can change the components of your presentation according to your needs and choice, and you can bring about as much customization as you want. So, customize according to and as much you want.
● Step 4: Download and share
Lastly, save the presentation. Then go to the blue bar, and in the options present in the top right corner, you will find “presenting”. You can save your file from there, and then the “Download” option will help you download the file to your device.
Part 4 FAQ of Converting Slides to Digital
Now, we will discuss solutions or answers to the common questions relating to converting slides into digital format. Here are the frequently asked issues or questions regarding this aspect.
01How do I convert my slides to digital?
We can recommend a few ways in which you can digitise your old slides. The methods are as follows.
● Hiring a proficient professional at this work is the easiest and the most effective method.
● A slide copier tool or application can also effectively serve this purpose.
● Use a device that converts the images or slides digitally.
● Use a flatbed scanner to scan your slides.
● Photographing your slides is an intelligent way to digitise your old slides.
02Can I use Filmora to turn my slides to digital?
You can readily use Filmora to transform your slideshows into slideshow videos, digitising your slides effectively. You have to make your slideshow at Filmora, edit and customise it according to your preference and then save, share or download the file. It will automatically turn your slide into digital format or help you make a successful slideshow video.
03What is the best method for turning slides into digital?
The most effortless method is to hire a professional, and it will guarantee saucerful results. But, if you want to do it yourself, you can readily opt for Filmora. It is the best video editing application that can readily help you digitise your slides.
04Can I turn my slideshow into videos?
Yes, you can effortlessly turn your slideshows into videos. You need a video editing tool that enables you to share and download your slideshow in a video format. And the best tool for it is Filmora. You can unhesitant opt for Filmora if you want to turn your slideshows into videos and share them effortlessly on any platform.
Now, we will discuss the best video editing tool or application, Wondershare Filmora Video Editor . You can use this tool to make the best slideshows and convert them into videos. You have the liberty f using any device for editing and making slideshow videos. You can customise as much you want and use the tons of features for editing available in the tool.
For Win 7 or later (64-bit)
For macOS 10.12 or later
You can opt for the free version. It has tools and features that are more than sufficient for making the most incredible slideshow videos. And when you choose its paid version, you are bestowed with the most advanced professional tools and features for editing. You can use the 800+ filters available, the texts, designs, templates, and other components for editing at Filmora.
So, if you want to make the best and the most incredible slideshows videos, you can readily opt for Filmora!
● Ending Thoughts →
● So, this was all about the different aspects and factors of a slideshow at Canva. Let us have a quick recap of the topic and discussions we have touched on in the above discussion.
● The five steps for making A slideshow in canva on your PC or Mac.
● The steps for adding music to your slideshow at Canva, also, how can you turn your slideshows into videos in Canva in four simple steps
● Lastly, we have discussed the answers or solutions to the common questions relating to converting slides to digital. And we have ended our discussion by introducing the best video editing tool, Filmora, that can help you make the most fantastic slideshows on any device, be it a PC or Mac.
In Today’s Article, We Are Going to Show You How Adding a Simple Lower Third to Your Video Can Add a Degree of Professionalism and Polish to Your Videos While Giving It a Higher Perceived Value
Want to bump up the quality and level of your videos? Adding a lower third is one of the easiest ways to impress your audience and improve the quality of your videos. It makes it look like you spent a ton of money on video editing, but in reality, it’s really easy to do.
When you first start video editing, it may seem like a daunting task with so much to learn. The good news is you can cut that learning curve down significantly by using intuitive editing software like Wondershare’s Filmora. Clear and streamlined, Filmora is the choice of many filmmakers.
Until recently, you needed expensive enterprise level software like Sony Vegas or Final Cut Pro to create lower thirds, especially lower thirds with movement. But Filmora makes it easier than ever.
- Use Readable Font
- Don’t Make It Too Long
- Use Branding
- Use Templates
- Keep It Simple
- Emphasize With Your Lower Third
- Step By Step To Explain Filmora
1. What is a Lower Third?

What is a Lower Third
A lower third is text and/or a graphical element put on top of your video for the purpose of sharing information with your audience.
A lower third provides important information but is done without distracting from the actual video content.
Take a look at the shot below. The lower third is used to convey the speaker’s name and profession. This is a type of lower third often used in documentary films and newscasts.
2. Why Add A Lower Third
So the next question a new filmmaker might ask is, “Why add a lower third?”
Funnily enough, despite its name, a lower third does not have to be in the lower third of the video but can be found in other areas of the screen.
In the shot below, the viewer automatically knows he is looking at the rooftops of Alfama, a neighborhood in Lisbon, without someone having to say it - no distractions from the video content.

Why Add A Lower Third
Lower thirds can also create movement. Many lower thirds come gliding onto the screen and add visual interest to a plain shot.
As simple as it may sound, seeing an overlay on a screen or a moving lower third adds professionalism to even the simplest videos. It gives the audience a sense of polish and high perceived value.
![]()
Tips: A lower third lasts approximately 3-6 seconds and is placed in the “title safe area” of your video. A quick explanation of the “title safe area” is that if the video is cropped to fit certain resolutions, your lower third will still appear without the fear of it being cropped out and losing pertinent information for the audience.
3. 6 Quick Tips to Add A Lower Third
As simple as putting in a lower third sounds, here are 6 quick tips to ensure a lower third is effective and conveys the right message.
Wondershare Filmora Video Editor comes equipped with pre-built video-based lower thirds in a ton of unique styles and colors. The cool thing is that you can customize the text easily and quickly, including changing the text color and font style – so you can match your style perfectly.
Tip #1
Use Readable Font
Part of communicating information without distraction is to make sure the font used in the lower third is readable. A lower third only graces the screen for 3-6 seconds, so you want it to be short and easy to read at a glance.
Tip #2
Don’t Make It Too Long
There is a limited amount of space to use. If you need to communicate more information, consider using a title slide instead which will give you more space to communicate your ideas. Less is more when it comes to lower thirds.
Tip #3
Use Branding
A lower third is another way to have people remember and recognize your brand. If you have your own branding colors and logo, use it in your lower third.
Tip #4
Use Templates
Pick one style and stick with it. Consistency in video editing helps communicate trust to your audience. It’s fun to use different styles sometimes, but it can be disjointed. With Filmora you can add elements like lower thirds and title to your favorites – so they are easy to use on your different video projects.
Tip #5
Keep It Simple
Remember the purpose of your lower third - to convey information without being distracting. Don’t use a lot of text. Brevity is the key. Usually, lower thirds are used to detail a name, profession or a location. The most you want is 2 lines of text. Sometimes you may want to use just one line.
Tip #6
Emphasize With Your Lower Third
Often, I might use a lower third to emphasize a certain point, or to use different wording (than I used in my video) if I think it makes the point clearer. This can be helpful if you make a small mistake in your original video and it makes more sense than adding b-roll over the video.
4. Step By Step To Explain Filmora
Using Wondershare Filmora Video Editor it is extremely easy to create a lower third for your video.
Free Download For Win 7 or later(64-bit)
Free Download For macOS 10.14 or later
The following step-by-step tutorial already assumes that you are familiar with some of the workings of Filmora like how to start a project and how to place your media onto the empty timeline.
So here’s how simple it is to add a lower third.
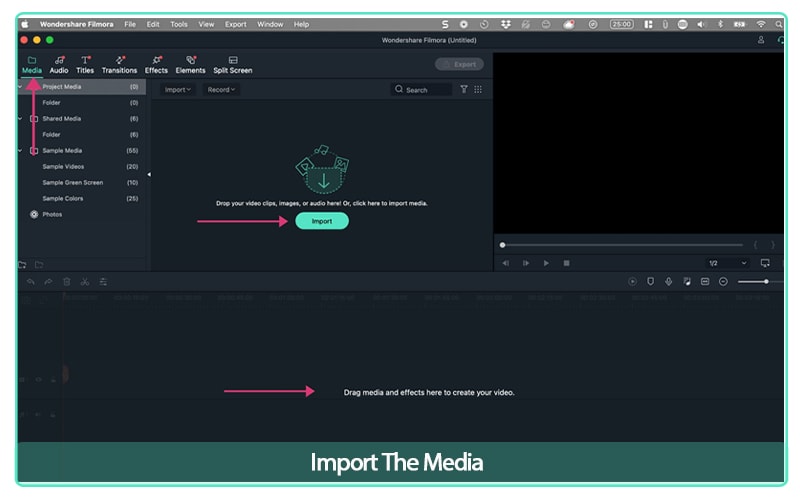
Step 1: Import The Media
In this step, you will create a new project and then import the media and place it on your timeline.
Import The Media
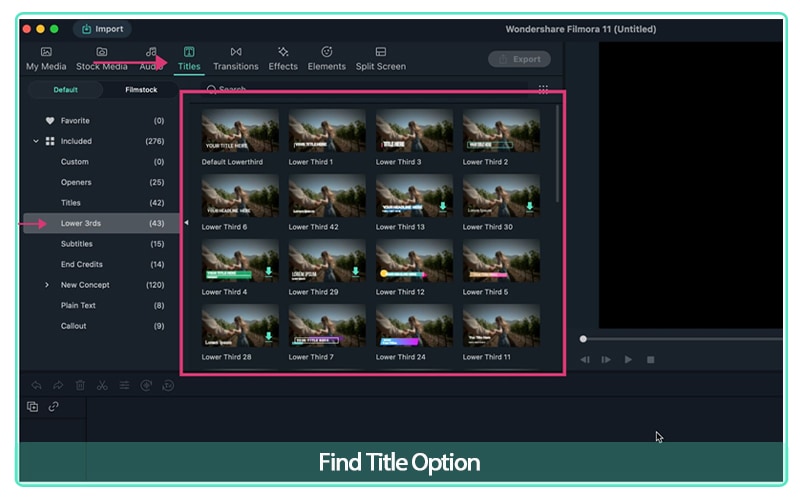
Step 2: Find Title Option
Once you have placed your media onto the project, you will go to the top navigation and click on titles.
It will then open up and you will see a number of choices for titles, including “lower thirds.”
Find Title Option
For lower thirds you want to choose the template that will best compliment your video.
Things to consider are your branding colors and the information you want to convey.
Currently, there are many options to choose from with 43 lower third templates to choose from in Filmora.
Step 3: Choose a Lower Third Template
Choose a lower third template and drag it on top of your media in the timeline. The next step is to edit the template.
Double click on the template and it will allow you to edit the text.
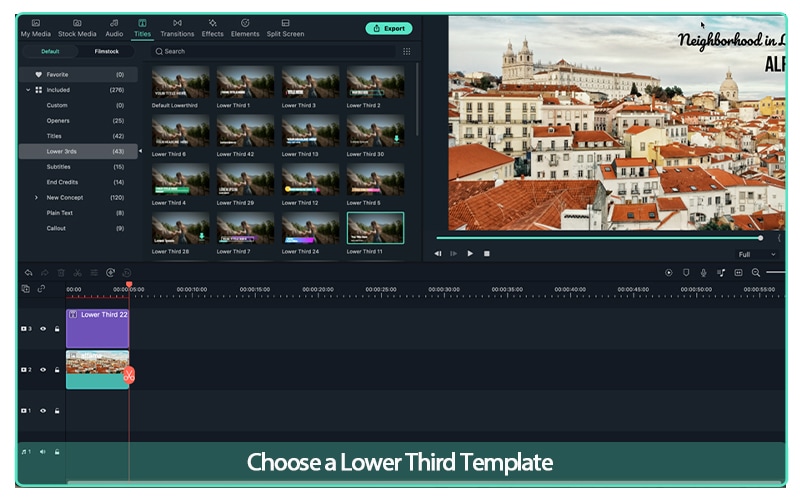
Choose a Lower Third Template
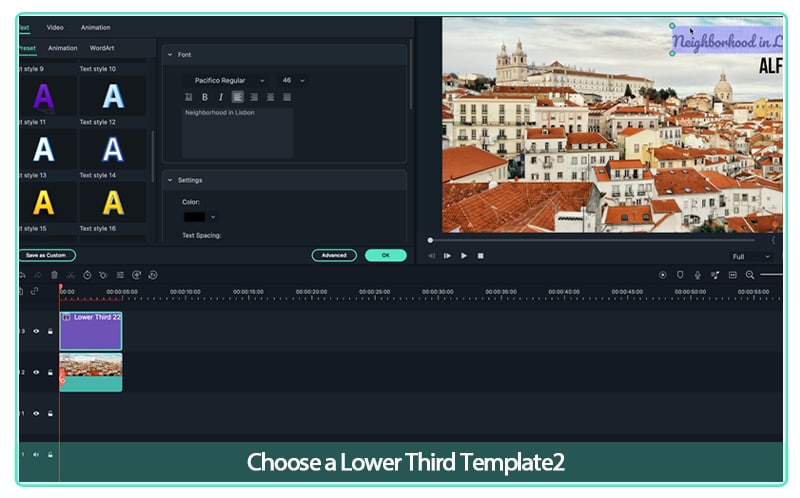
Choose a Lower Third Template2
Also, when deciding how often you need to use a lower third, you only need to use the lower third once - if the speaker appears on the screen again, it only needs to be shown that one time.
You did it. With this new skill you’ve now mastered the quickest way to impress your audience and increase the quality of your videos.
The key is to practice and you’ll get better quickly.
5. Start Using Lower Thirds Today
Lower thirds are a simple but powerful way to enhance your videos.
Using the tips above, start adding lower thirds to your video.
Wrap Up
Whether you are a new filmmaker/editor or a seasoned pro, Wondershare’s Filmora can help take your video editing to the next level. It’s packed with pro-level features that are easy and intuitive to use.
If you’re not using Filmora, download it today and discover how to make your videos look better as you build your audience.
Step By Step To Explain Filmora
1. What is a Lower Third?

What is a Lower Third
A lower third is text and/or a graphical element put on top of your video for the purpose of sharing information with your audience.
A lower third provides important information but is done without distracting from the actual video content.
Take a look at the shot below. The lower third is used to convey the speaker’s name and profession. This is a type of lower third often used in documentary films and newscasts.
2. Why Add A Lower Third
So the next question a new filmmaker might ask is, “Why add a lower third?”
Funnily enough, despite its name, a lower third does not have to be in the lower third of the video but can be found in other areas of the screen.
In the shot below, the viewer automatically knows he is looking at the rooftops of Alfama, a neighborhood in Lisbon, without someone having to say it - no distractions from the video content.

Why Add A Lower Third
Lower thirds can also create movement. Many lower thirds come gliding onto the screen and add visual interest to a plain shot.
As simple as it may sound, seeing an overlay on a screen or a moving lower third adds professionalism to even the simplest videos. It gives the audience a sense of polish and high perceived value.
![]()
Tips: A lower third lasts approximately 3-6 seconds and is placed in the “title safe area” of your video. A quick explanation of the “title safe area” is that if the video is cropped to fit certain resolutions, your lower third will still appear without the fear of it being cropped out and losing pertinent information for the audience.
3. 6 Quick Tips to Add A Lower Third
As simple as putting in a lower third sounds, here are 6 quick tips to ensure a lower third is effective and conveys the right message.
Wondershare Filmora Video Editor comes equipped with pre-built video-based lower thirds in a ton of unique styles and colors. The cool thing is that you can customize the text easily and quickly, including changing the text color and font style – so you can match your style perfectly.
Tip #1
Use Readable Font
Part of communicating information without distraction is to make sure the font used in the lower third is readable. A lower third only graces the screen for 3-6 seconds, so you want it to be short and easy to read at a glance.
Tip #2
Don’t Make It Too Long
There is a limited amount of space to use. If you need to communicate more information, consider using a title slide instead which will give you more space to communicate your ideas. Less is more when it comes to lower thirds.
Tip #3
Use Branding
A lower third is another way to have people remember and recognize your brand. If you have your own branding colors and logo, use it in your lower third.
Tip #4
Use Templates
Pick one style and stick with it. Consistency in video editing helps communicate trust to your audience. It’s fun to use different styles sometimes, but it can be disjointed. With Filmora you can add elements like lower thirds and title to your favorites – so they are easy to use on your different video projects.
Tip #5
Keep It Simple
Remember the purpose of your lower third - to convey information without being distracting. Don’t use a lot of text. Brevity is the key. Usually, lower thirds are used to detail a name, profession or a location. The most you want is 2 lines of text. Sometimes you may want to use just one line.
Tip #6
Emphasize With Your Lower Third
Often, I might use a lower third to emphasize a certain point, or to use different wording (than I used in my video) if I think it makes the point clearer. This can be helpful if you make a small mistake in your original video and it makes more sense than adding b-roll over the video.
4. Step By Step To Explain Filmora
Using Wondershare Filmora Video Editor it is extremely easy to create a lower third for your video.
Free Download For Win 7 or later(64-bit)
Free Download For macOS 10.14 or later
The following step-by-step tutorial already assumes that you are familiar with some of the workings of Filmora like how to start a project and how to place your media onto the empty timeline.
So here’s how simple it is to add a lower third.
Step 1: Import The Media
In this step, you will create a new project and then import the media and place it on your timeline.

Import The Media
Step 2: Find Title Option
Once you have placed your media onto the project, you will go to the top navigation and click on titles.
It will then open up and you will see a number of choices for titles, including “lower thirds.”

Find Title Option
For lower thirds you want to choose the template that will best compliment your video.
Things to consider are your branding colors and the information you want to convey.
Currently, there are many options to choose from with 43 lower third templates to choose from in Filmora.
Step 3: Choose a Lower Third Template
Choose a lower third template and drag it on top of your media in the timeline. The next step is to edit the template.
Double click on the template and it will allow you to edit the text.

Choose a Lower Third Template

Choose a Lower Third Template2
Also, when deciding how often you need to use a lower third, you only need to use the lower third once - if the speaker appears on the screen again, it only needs to be shown that one time.
You did it. With this new skill you’ve now mastered the quickest way to impress your audience and increase the quality of your videos.
The key is to practice and you’ll get better quickly.
5. Start Using Lower Thirds Today
Lower thirds are a simple but powerful way to enhance your videos.
Using the tips above, start adding lower thirds to your video.
Wrap Up
- Whether you are a new filmmaker/editor or a seasoned pro, Wondershare’s Filmora can help take your video editing to the next level. It’s packed with pro-level features that are easy and intuitive to use.
- If you’re not using Filmora, download it today and discover how to make your videos look better as you build your audience.
Doable Ways to Make Transparent Background in Procreate
Doable Ways to Make Transparent Background in Procreate
An easy yet powerful editor
Numerous effects to choose from
Detailed tutorials provided by the official channel
Figuring out the crucial steps to make the canvas excellent is one of the loveliest things users are performing for exporting the closing Procreate-projects. Once after getting expert with things trick you can be able to position the canvas surprisingly on great back for a memorable moment. You can make the most of it for your procreate mission that you have created.
Out of many essentials tools you have ever used for experiencing the benefits of equipment & skills, the Procreate is a kind of solution that comes with one of the most trustworthy as well as brilliant capability to erase the undesired background from the pictures. It is more than a general tool and there are some specified approaches to do so, but in today possible scenario, you can easily focus around choice of right selections to erase a background at ease. People can explore the chances of creating various attractive methods to work in the PNG structure after removing the desired background.
In this article
01 [How to Delete a White Background with Procreate for the IPad?](#Part 1)
02 [How to Make Transparent Background with Procreate for iPhone?](#Part 2)
03 [How to Create Popping Thumbnails or Profile Photos](#Part 3)
Part 1 How to Delete a White Background with Procreate for the IPad?

In case you are facing discoloration problem too then it is always a better idea to cast image with desired background and remove the objects.
Now turning your background with a lovely image or your own is just a matter of few clicks. With great transparent background procreate, you will be heading towards the satisfaction of obtaining transparent background. With few crucial steps you can stay from the other competitors or it will make your posts viral. With stepwise guidelines on removing the background as well as replacing it with a transparent one in Procreate is what you need the most today.
When it comes to deleting the white-background with a Procreate, then with great selection of tools you can easily create amazing performance for your post. If you are still in a dilemma to make use of the white coloured Background. After tapping on the top-left corner of the screen, you can open-up brilliant level of opportunities to make the most out of it. Are you ready to begin? Next you will learn about how to turn the background into a desired canvas for all your Instagram stories.
The following steps will provide you a quick walkthrough of entire process, stepwise:-
Step 1: First you are required to open the picture with Procreate. Get your desired image for the edit or open your picture & turn-off the overall visibility of background layer by layers-icon, tap it, it is presented on the top-right corner. Here, you will see layer labelled as the background, you need to uncheck the layer’s box for turning-off overall visibility at the bottom of Layers menu.
It is an important step to perform as if you want to deleting any white background from the image otherwise background will be treated as transparent with white-background showing through, thus you will experience no changes to the document. You are not required to remove background from image procreate if your image is not having a background layer.
Step 2: Create the selection at around white area of an image & delete background
For you to perform the step of procreate remove white background, you are required to make selection around white area. For this, open-up the selection-menu and it is placed in the form round icon named ‘S’ at the top-left-corner of the screen. At this menu, choose auto & Add. To create such level of perfection in selection, just hold & tap over any area of white-background at this screen. You can also increase threshold of your selection by moving the fingers/stylus at the right. For the opposite process, you can move the same to the left.You need to adjust the desired threshold until selection-area on your screen lines-up in accordance with an edges of the subject. You are now heading towards the process of make background transparent procreatefor your desired image quickly.
With your current selection still in active state, just tap on wrench-icon it the top-left area of your screen, then navigate to Add-menu, and here tap on the Cut option. Congrats, you have effectively deleted the background from an image.
**Step 3:**Just release the selection in the form of tapping on Selection-menu icon and repeat the process again for negative space-areas & at last clean-up stray-pixels with through an Eraser. You can repeat the process further from the step-2 in case any stray pixels still remains there as it is a normal situation to face while removing the pixels background with ‘remove background on procreate’ option.You can also take the Eraser & then manually erase those stray-pixels in there is any.
Step 4: Export your final work as PNG-file to preserve the transparency
After finishing the task of deleting background from the picture you can easily export your work to a desirable file format. The image you want to export can be in the form of PNG to retain the transparency. Other useful formats you can choose is JPEG but this doesn’tsupport transparency. So, be wise & be careful while choose your file formats.You are now having procreate export transparent backgroundand can also place the same to any sort of backdrop like an app, website, or any other workspace.
Part 2 How to Make Transparent Background with Procreate for iPhone?

Let’s dive-in quickly into the process of making the background transparent with procreate, if you are an iPhone User.
● GO Into an option of Canvas
It is up-to you whether you want to create a new canvas or want to work-upon already saved canvas. In your device through procreate app, you can do the same without any worries.
● Tap onto the option of Layers Panel
This option is located at the top-right corner of your toolbar. This option looks similar to the two-squares on the top of one another.
● Replace dull looking background with transparent background
You can quickly go down to the layers-panel placed at the bottom to choose the background color.Transparent background in procreateis always a good option to consider.
● Put uncheck before the box
At the right of toolbar you can be able to see words ‘Background color’ and if it is checked then you need to uncheck it. Now your goal to make the background completely transparent with procreate make background transparent tool, will be achieved. Now your background is completely transparent and ready to use.
Part 3 How to Create Popping Thumbnails or Profile Photos

There are various tools available in the market to make a popping thumbnail for your YouTube or Instagram pages. Thumbnail maker like Filmora can be an interesting option to choose as it is quick and effective. You can also customized as well as download the thumbnails at no cost with the same. However, they comes with certain limitations like overall size of the image to be downloaded. For better versions you can use premium tools. With better creativity and great imagination you can make the thumbnail as crisp as possible.
● Upload your desired photo to Filmora’s thumbnail maker templates.
You can easily create your video thumbnail, but you need some inspiration and for that you can make use of amazing tool like Filmora. With access to more than 50 free templates you can achieve your goal of making popping thumbnails.
● Adding text, clipart, or perfect quality of background can give it a boost
After picking your template, one can make use of thumbnail to stand out different in terms of adding text, clipart or background. For adding custom background to your thumbnail you can make use of procreate that can remove the background with procreateremove white backgroundfeatures and give you better featured image with nice background. Also to clarify the objectives of your thumbnail you can add titles, and also consider placing the same on the top of any dark color background if your thumbnail is light in color. For making the background darker just choose remove white background procreateas discussed above.
● Just Download your finished product to your device
After polishing the thumbnails with creative stuff, you can download the same to your device or export it to your smartphone.
Voila, you just have create your own custom popping thumbnail. With remove background on procreate, you can never feel disappointed.
****Wondershare Filmora Video Editor App to Remove Unwanted Background Easily**
For Win 7 or later (64-bit)
For macOS 10.12 or later
In case you are searching for any professional tool to remove het background and replace the one with any of your favorite picture then there is a tool for you to consider. With greater different functionalities, you can make any Instagram post or story interesting through the help of Fillmora App. This has set of brilliant solutions to provide with most brilliant picture and video editing features. It is interesting, fun-loving as well as attractive enough to turn any moments extraordinary.
Handy features to enjoy:-
● You can make use of this tool to create custom thumbnails for your YouTube or Instagram page.
● Great varieties of templates for making popping thumbnails
● Greater capability to beautifully construct picture editing animations
● Varieties of Effects for every age group
● Attractive filters, GIFs packs and images to turn any dull looking background into an amazing moment.
● Delete white background quickly
● Right selection of tools to make the editing effective
● Flawless features to crop, cut-up, cut, trim & mix operations.
● Single click operation to turn the images into a beauty mode
● Options to save your creations into your device or virtual space
● Share your creations to your community, to your friends via Facebook, Instagram, YouTube, and Twitter quickly.
It is a greater idea to try this app for making use of its image editing features for deleting the white background in an easy manner.
● Ending Thoughts →
● With great varieties of features it is now very easy for you to create some automated selections in just single tap.
● Deleting the white background through a pro-tool like Procreate is smart, quick & seamless process.
● You are not going to get confused, even if you are using it for the very first time.
● It is the trend that every Instagram user is following for posting better images with nice background options.
Figuring out the crucial steps to make the canvas excellent is one of the loveliest things users are performing for exporting the closing Procreate-projects. Once after getting expert with things trick you can be able to position the canvas surprisingly on great back for a memorable moment. You can make the most of it for your procreate mission that you have created.
Out of many essentials tools you have ever used for experiencing the benefits of equipment & skills, the Procreate is a kind of solution that comes with one of the most trustworthy as well as brilliant capability to erase the undesired background from the pictures. It is more than a general tool and there are some specified approaches to do so, but in today possible scenario, you can easily focus around choice of right selections to erase a background at ease. People can explore the chances of creating various attractive methods to work in the PNG structure after removing the desired background.
In this article
01 [How to Delete a White Background with Procreate for the IPad?](#Part 1)
02 [How to Make Transparent Background with Procreate for iPhone?](#Part 2)
03 [How to Create Popping Thumbnails or Profile Photos](#Part 3)
Part 1 How to Delete a White Background with Procreate for the IPad?

In case you are facing discoloration problem too then it is always a better idea to cast image with desired background and remove the objects.
Now turning your background with a lovely image or your own is just a matter of few clicks. With great transparent background procreate, you will be heading towards the satisfaction of obtaining transparent background. With few crucial steps you can stay from the other competitors or it will make your posts viral. With stepwise guidelines on removing the background as well as replacing it with a transparent one in Procreate is what you need the most today.
When it comes to deleting the white-background with a Procreate, then with great selection of tools you can easily create amazing performance for your post. If you are still in a dilemma to make use of the white coloured Background. After tapping on the top-left corner of the screen, you can open-up brilliant level of opportunities to make the most out of it. Are you ready to begin? Next you will learn about how to turn the background into a desired canvas for all your Instagram stories.
The following steps will provide you a quick walkthrough of entire process, stepwise:-
Step 1: First you are required to open the picture with Procreate. Get your desired image for the edit or open your picture & turn-off the overall visibility of background layer by layers-icon, tap it, it is presented on the top-right corner. Here, you will see layer labelled as the background, you need to uncheck the layer’s box for turning-off overall visibility at the bottom of Layers menu.
It is an important step to perform as if you want to deleting any white background from the image otherwise background will be treated as transparent with white-background showing through, thus you will experience no changes to the document. You are not required to remove background from image procreate if your image is not having a background layer.
Step 2: Create the selection at around white area of an image & delete background
For you to perform the step of procreate remove white background, you are required to make selection around white area. For this, open-up the selection-menu and it is placed in the form round icon named ‘S’ at the top-left-corner of the screen. At this menu, choose auto & Add. To create such level of perfection in selection, just hold & tap over any area of white-background at this screen. You can also increase threshold of your selection by moving the fingers/stylus at the right. For the opposite process, you can move the same to the left.You need to adjust the desired threshold until selection-area on your screen lines-up in accordance with an edges of the subject. You are now heading towards the process of make background transparent procreatefor your desired image quickly.
With your current selection still in active state, just tap on wrench-icon it the top-left area of your screen, then navigate to Add-menu, and here tap on the Cut option. Congrats, you have effectively deleted the background from an image.
**Step 3:**Just release the selection in the form of tapping on Selection-menu icon and repeat the process again for negative space-areas & at last clean-up stray-pixels with through an Eraser. You can repeat the process further from the step-2 in case any stray pixels still remains there as it is a normal situation to face while removing the pixels background with ‘remove background on procreate’ option.You can also take the Eraser & then manually erase those stray-pixels in there is any.
Step 4: Export your final work as PNG-file to preserve the transparency
After finishing the task of deleting background from the picture you can easily export your work to a desirable file format. The image you want to export can be in the form of PNG to retain the transparency. Other useful formats you can choose is JPEG but this doesn’tsupport transparency. So, be wise & be careful while choose your file formats.You are now having procreate export transparent backgroundand can also place the same to any sort of backdrop like an app, website, or any other workspace.
Part 2 How to Make Transparent Background with Procreate for iPhone?

Let’s dive-in quickly into the process of making the background transparent with procreate, if you are an iPhone User.
● GO Into an option of Canvas
It is up-to you whether you want to create a new canvas or want to work-upon already saved canvas. In your device through procreate app, you can do the same without any worries.
● Tap onto the option of Layers Panel
This option is located at the top-right corner of your toolbar. This option looks similar to the two-squares on the top of one another.
● Replace dull looking background with transparent background
You can quickly go down to the layers-panel placed at the bottom to choose the background color.Transparent background in procreateis always a good option to consider.
● Put uncheck before the box
At the right of toolbar you can be able to see words ‘Background color’ and if it is checked then you need to uncheck it. Now your goal to make the background completely transparent with procreate make background transparent tool, will be achieved. Now your background is completely transparent and ready to use.
Part 3 How to Create Popping Thumbnails or Profile Photos

There are various tools available in the market to make a popping thumbnail for your YouTube or Instagram pages. Thumbnail maker like Filmora can be an interesting option to choose as it is quick and effective. You can also customized as well as download the thumbnails at no cost with the same. However, they comes with certain limitations like overall size of the image to be downloaded. For better versions you can use premium tools. With better creativity and great imagination you can make the thumbnail as crisp as possible.
● Upload your desired photo to Filmora’s thumbnail maker templates.
You can easily create your video thumbnail, but you need some inspiration and for that you can make use of amazing tool like Filmora. With access to more than 50 free templates you can achieve your goal of making popping thumbnails.
● Adding text, clipart, or perfect quality of background can give it a boost
After picking your template, one can make use of thumbnail to stand out different in terms of adding text, clipart or background. For adding custom background to your thumbnail you can make use of procreate that can remove the background with procreateremove white backgroundfeatures and give you better featured image with nice background. Also to clarify the objectives of your thumbnail you can add titles, and also consider placing the same on the top of any dark color background if your thumbnail is light in color. For making the background darker just choose remove white background procreateas discussed above.
● Just Download your finished product to your device
After polishing the thumbnails with creative stuff, you can download the same to your device or export it to your smartphone.
Voila, you just have create your own custom popping thumbnail. With remove background on procreate, you can never feel disappointed.
****Wondershare Filmora Video Editor App to Remove Unwanted Background Easily**
For Win 7 or later (64-bit)
For macOS 10.12 or later
In case you are searching for any professional tool to remove het background and replace the one with any of your favorite picture then there is a tool for you to consider. With greater different functionalities, you can make any Instagram post or story interesting through the help of Fillmora App. This has set of brilliant solutions to provide with most brilliant picture and video editing features. It is interesting, fun-loving as well as attractive enough to turn any moments extraordinary.
Handy features to enjoy:-
● You can make use of this tool to create custom thumbnails for your YouTube or Instagram page.
● Great varieties of templates for making popping thumbnails
● Greater capability to beautifully construct picture editing animations
● Varieties of Effects for every age group
● Attractive filters, GIFs packs and images to turn any dull looking background into an amazing moment.
● Delete white background quickly
● Right selection of tools to make the editing effective
● Flawless features to crop, cut-up, cut, trim & mix operations.
● Single click operation to turn the images into a beauty mode
● Options to save your creations into your device or virtual space
● Share your creations to your community, to your friends via Facebook, Instagram, YouTube, and Twitter quickly.
It is a greater idea to try this app for making use of its image editing features for deleting the white background in an easy manner.
● Ending Thoughts →
● With great varieties of features it is now very easy for you to create some automated selections in just single tap.
● Deleting the white background through a pro-tool like Procreate is smart, quick & seamless process.
● You are not going to get confused, even if you are using it for the very first time.
● It is the trend that every Instagram user is following for posting better images with nice background options.
Figuring out the crucial steps to make the canvas excellent is one of the loveliest things users are performing for exporting the closing Procreate-projects. Once after getting expert with things trick you can be able to position the canvas surprisingly on great back for a memorable moment. You can make the most of it for your procreate mission that you have created.
Out of many essentials tools you have ever used for experiencing the benefits of equipment & skills, the Procreate is a kind of solution that comes with one of the most trustworthy as well as brilliant capability to erase the undesired background from the pictures. It is more than a general tool and there are some specified approaches to do so, but in today possible scenario, you can easily focus around choice of right selections to erase a background at ease. People can explore the chances of creating various attractive methods to work in the PNG structure after removing the desired background.
In this article
01 [How to Delete a White Background with Procreate for the IPad?](#Part 1)
02 [How to Make Transparent Background with Procreate for iPhone?](#Part 2)
03 [How to Create Popping Thumbnails or Profile Photos](#Part 3)
Part 1 How to Delete a White Background with Procreate for the IPad?

In case you are facing discoloration problem too then it is always a better idea to cast image with desired background and remove the objects.
Now turning your background with a lovely image or your own is just a matter of few clicks. With great transparent background procreate, you will be heading towards the satisfaction of obtaining transparent background. With few crucial steps you can stay from the other competitors or it will make your posts viral. With stepwise guidelines on removing the background as well as replacing it with a transparent one in Procreate is what you need the most today.
When it comes to deleting the white-background with a Procreate, then with great selection of tools you can easily create amazing performance for your post. If you are still in a dilemma to make use of the white coloured Background. After tapping on the top-left corner of the screen, you can open-up brilliant level of opportunities to make the most out of it. Are you ready to begin? Next you will learn about how to turn the background into a desired canvas for all your Instagram stories.
The following steps will provide you a quick walkthrough of entire process, stepwise:-
Step 1: First you are required to open the picture with Procreate. Get your desired image for the edit or open your picture & turn-off the overall visibility of background layer by layers-icon, tap it, it is presented on the top-right corner. Here, you will see layer labelled as the background, you need to uncheck the layer’s box for turning-off overall visibility at the bottom of Layers menu.
It is an important step to perform as if you want to deleting any white background from the image otherwise background will be treated as transparent with white-background showing through, thus you will experience no changes to the document. You are not required to remove background from image procreate if your image is not having a background layer.
Step 2: Create the selection at around white area of an image & delete background
For you to perform the step of procreate remove white background, you are required to make selection around white area. For this, open-up the selection-menu and it is placed in the form round icon named ‘S’ at the top-left-corner of the screen. At this menu, choose auto & Add. To create such level of perfection in selection, just hold & tap over any area of white-background at this screen. You can also increase threshold of your selection by moving the fingers/stylus at the right. For the opposite process, you can move the same to the left.You need to adjust the desired threshold until selection-area on your screen lines-up in accordance with an edges of the subject. You are now heading towards the process of make background transparent procreatefor your desired image quickly.
With your current selection still in active state, just tap on wrench-icon it the top-left area of your screen, then navigate to Add-menu, and here tap on the Cut option. Congrats, you have effectively deleted the background from an image.
**Step 3:**Just release the selection in the form of tapping on Selection-menu icon and repeat the process again for negative space-areas & at last clean-up stray-pixels with through an Eraser. You can repeat the process further from the step-2 in case any stray pixels still remains there as it is a normal situation to face while removing the pixels background with ‘remove background on procreate’ option.You can also take the Eraser & then manually erase those stray-pixels in there is any.
Step 4: Export your final work as PNG-file to preserve the transparency
After finishing the task of deleting background from the picture you can easily export your work to a desirable file format. The image you want to export can be in the form of PNG to retain the transparency. Other useful formats you can choose is JPEG but this doesn’tsupport transparency. So, be wise & be careful while choose your file formats.You are now having procreate export transparent backgroundand can also place the same to any sort of backdrop like an app, website, or any other workspace.
Part 2 How to Make Transparent Background with Procreate for iPhone?

Let’s dive-in quickly into the process of making the background transparent with procreate, if you are an iPhone User.
● GO Into an option of Canvas
It is up-to you whether you want to create a new canvas or want to work-upon already saved canvas. In your device through procreate app, you can do the same without any worries.
● Tap onto the option of Layers Panel
This option is located at the top-right corner of your toolbar. This option looks similar to the two-squares on the top of one another.
● Replace dull looking background with transparent background
You can quickly go down to the layers-panel placed at the bottom to choose the background color.Transparent background in procreateis always a good option to consider.
● Put uncheck before the box
At the right of toolbar you can be able to see words ‘Background color’ and if it is checked then you need to uncheck it. Now your goal to make the background completely transparent with procreate make background transparent tool, will be achieved. Now your background is completely transparent and ready to use.
Part 3 How to Create Popping Thumbnails or Profile Photos

There are various tools available in the market to make a popping thumbnail for your YouTube or Instagram pages. Thumbnail maker like Filmora can be an interesting option to choose as it is quick and effective. You can also customized as well as download the thumbnails at no cost with the same. However, they comes with certain limitations like overall size of the image to be downloaded. For better versions you can use premium tools. With better creativity and great imagination you can make the thumbnail as crisp as possible.
● Upload your desired photo to Filmora’s thumbnail maker templates.
You can easily create your video thumbnail, but you need some inspiration and for that you can make use of amazing tool like Filmora. With access to more than 50 free templates you can achieve your goal of making popping thumbnails.
● Adding text, clipart, or perfect quality of background can give it a boost
After picking your template, one can make use of thumbnail to stand out different in terms of adding text, clipart or background. For adding custom background to your thumbnail you can make use of procreate that can remove the background with procreateremove white backgroundfeatures and give you better featured image with nice background. Also to clarify the objectives of your thumbnail you can add titles, and also consider placing the same on the top of any dark color background if your thumbnail is light in color. For making the background darker just choose remove white background procreateas discussed above.
● Just Download your finished product to your device
After polishing the thumbnails with creative stuff, you can download the same to your device or export it to your smartphone.
Voila, you just have create your own custom popping thumbnail. With remove background on procreate, you can never feel disappointed.
****Wondershare Filmora Video Editor App to Remove Unwanted Background Easily**
For Win 7 or later (64-bit)
For macOS 10.12 or later
In case you are searching for any professional tool to remove het background and replace the one with any of your favorite picture then there is a tool for you to consider. With greater different functionalities, you can make any Instagram post or story interesting through the help of Fillmora App. This has set of brilliant solutions to provide with most brilliant picture and video editing features. It is interesting, fun-loving as well as attractive enough to turn any moments extraordinary.
Handy features to enjoy:-
● You can make use of this tool to create custom thumbnails for your YouTube or Instagram page.
● Great varieties of templates for making popping thumbnails
● Greater capability to beautifully construct picture editing animations
● Varieties of Effects for every age group
● Attractive filters, GIFs packs and images to turn any dull looking background into an amazing moment.
● Delete white background quickly
● Right selection of tools to make the editing effective
● Flawless features to crop, cut-up, cut, trim & mix operations.
● Single click operation to turn the images into a beauty mode
● Options to save your creations into your device or virtual space
● Share your creations to your community, to your friends via Facebook, Instagram, YouTube, and Twitter quickly.
It is a greater idea to try this app for making use of its image editing features for deleting the white background in an easy manner.
● Ending Thoughts →
● With great varieties of features it is now very easy for you to create some automated selections in just single tap.
● Deleting the white background through a pro-tool like Procreate is smart, quick & seamless process.
● You are not going to get confused, even if you are using it for the very first time.
● It is the trend that every Instagram user is following for posting better images with nice background options.
Figuring out the crucial steps to make the canvas excellent is one of the loveliest things users are performing for exporting the closing Procreate-projects. Once after getting expert with things trick you can be able to position the canvas surprisingly on great back for a memorable moment. You can make the most of it for your procreate mission that you have created.
Out of many essentials tools you have ever used for experiencing the benefits of equipment & skills, the Procreate is a kind of solution that comes with one of the most trustworthy as well as brilliant capability to erase the undesired background from the pictures. It is more than a general tool and there are some specified approaches to do so, but in today possible scenario, you can easily focus around choice of right selections to erase a background at ease. People can explore the chances of creating various attractive methods to work in the PNG structure after removing the desired background.
In this article
01 [How to Delete a White Background with Procreate for the IPad?](#Part 1)
02 [How to Make Transparent Background with Procreate for iPhone?](#Part 2)
03 [How to Create Popping Thumbnails or Profile Photos](#Part 3)
Part 1 How to Delete a White Background with Procreate for the IPad?

In case you are facing discoloration problem too then it is always a better idea to cast image with desired background and remove the objects.
Now turning your background with a lovely image or your own is just a matter of few clicks. With great transparent background procreate, you will be heading towards the satisfaction of obtaining transparent background. With few crucial steps you can stay from the other competitors or it will make your posts viral. With stepwise guidelines on removing the background as well as replacing it with a transparent one in Procreate is what you need the most today.
When it comes to deleting the white-background with a Procreate, then with great selection of tools you can easily create amazing performance for your post. If you are still in a dilemma to make use of the white coloured Background. After tapping on the top-left corner of the screen, you can open-up brilliant level of opportunities to make the most out of it. Are you ready to begin? Next you will learn about how to turn the background into a desired canvas for all your Instagram stories.
The following steps will provide you a quick walkthrough of entire process, stepwise:-
Step 1: First you are required to open the picture with Procreate. Get your desired image for the edit or open your picture & turn-off the overall visibility of background layer by layers-icon, tap it, it is presented on the top-right corner. Here, you will see layer labelled as the background, you need to uncheck the layer’s box for turning-off overall visibility at the bottom of Layers menu.
It is an important step to perform as if you want to deleting any white background from the image otherwise background will be treated as transparent with white-background showing through, thus you will experience no changes to the document. You are not required to remove background from image procreate if your image is not having a background layer.
Step 2: Create the selection at around white area of an image & delete background
For you to perform the step of procreate remove white background, you are required to make selection around white area. For this, open-up the selection-menu and it is placed in the form round icon named ‘S’ at the top-left-corner of the screen. At this menu, choose auto & Add. To create such level of perfection in selection, just hold & tap over any area of white-background at this screen. You can also increase threshold of your selection by moving the fingers/stylus at the right. For the opposite process, you can move the same to the left.You need to adjust the desired threshold until selection-area on your screen lines-up in accordance with an edges of the subject. You are now heading towards the process of make background transparent procreatefor your desired image quickly.
With your current selection still in active state, just tap on wrench-icon it the top-left area of your screen, then navigate to Add-menu, and here tap on the Cut option. Congrats, you have effectively deleted the background from an image.
**Step 3:**Just release the selection in the form of tapping on Selection-menu icon and repeat the process again for negative space-areas & at last clean-up stray-pixels with through an Eraser. You can repeat the process further from the step-2 in case any stray pixels still remains there as it is a normal situation to face while removing the pixels background with ‘remove background on procreate’ option.You can also take the Eraser & then manually erase those stray-pixels in there is any.
Step 4: Export your final work as PNG-file to preserve the transparency
After finishing the task of deleting background from the picture you can easily export your work to a desirable file format. The image you want to export can be in the form of PNG to retain the transparency. Other useful formats you can choose is JPEG but this doesn’tsupport transparency. So, be wise & be careful while choose your file formats.You are now having procreate export transparent backgroundand can also place the same to any sort of backdrop like an app, website, or any other workspace.
Part 2 How to Make Transparent Background with Procreate for iPhone?

Let’s dive-in quickly into the process of making the background transparent with procreate, if you are an iPhone User.
● GO Into an option of Canvas
It is up-to you whether you want to create a new canvas or want to work-upon already saved canvas. In your device through procreate app, you can do the same without any worries.
● Tap onto the option of Layers Panel
This option is located at the top-right corner of your toolbar. This option looks similar to the two-squares on the top of one another.
● Replace dull looking background with transparent background
You can quickly go down to the layers-panel placed at the bottom to choose the background color.Transparent background in procreateis always a good option to consider.
● Put uncheck before the box
At the right of toolbar you can be able to see words ‘Background color’ and if it is checked then you need to uncheck it. Now your goal to make the background completely transparent with procreate make background transparent tool, will be achieved. Now your background is completely transparent and ready to use.
Part 3 How to Create Popping Thumbnails or Profile Photos

There are various tools available in the market to make a popping thumbnail for your YouTube or Instagram pages. Thumbnail maker like Filmora can be an interesting option to choose as it is quick and effective. You can also customized as well as download the thumbnails at no cost with the same. However, they comes with certain limitations like overall size of the image to be downloaded. For better versions you can use premium tools. With better creativity and great imagination you can make the thumbnail as crisp as possible.
● Upload your desired photo to Filmora’s thumbnail maker templates.
You can easily create your video thumbnail, but you need some inspiration and for that you can make use of amazing tool like Filmora. With access to more than 50 free templates you can achieve your goal of making popping thumbnails.
● Adding text, clipart, or perfect quality of background can give it a boost
After picking your template, one can make use of thumbnail to stand out different in terms of adding text, clipart or background. For adding custom background to your thumbnail you can make use of procreate that can remove the background with procreateremove white backgroundfeatures and give you better featured image with nice background. Also to clarify the objectives of your thumbnail you can add titles, and also consider placing the same on the top of any dark color background if your thumbnail is light in color. For making the background darker just choose remove white background procreateas discussed above.
● Just Download your finished product to your device
After polishing the thumbnails with creative stuff, you can download the same to your device or export it to your smartphone.
Voila, you just have create your own custom popping thumbnail. With remove background on procreate, you can never feel disappointed.
****Wondershare Filmora Video Editor App to Remove Unwanted Background Easily**
For Win 7 or later (64-bit)
For macOS 10.12 or later
In case you are searching for any professional tool to remove het background and replace the one with any of your favorite picture then there is a tool for you to consider. With greater different functionalities, you can make any Instagram post or story interesting through the help of Fillmora App. This has set of brilliant solutions to provide with most brilliant picture and video editing features. It is interesting, fun-loving as well as attractive enough to turn any moments extraordinary.
Handy features to enjoy:-
● You can make use of this tool to create custom thumbnails for your YouTube or Instagram page.
● Great varieties of templates for making popping thumbnails
● Greater capability to beautifully construct picture editing animations
● Varieties of Effects for every age group
● Attractive filters, GIFs packs and images to turn any dull looking background into an amazing moment.
● Delete white background quickly
● Right selection of tools to make the editing effective
● Flawless features to crop, cut-up, cut, trim & mix operations.
● Single click operation to turn the images into a beauty mode
● Options to save your creations into your device or virtual space
● Share your creations to your community, to your friends via Facebook, Instagram, YouTube, and Twitter quickly.
It is a greater idea to try this app for making use of its image editing features for deleting the white background in an easy manner.
● Ending Thoughts →
● With great varieties of features it is now very easy for you to create some automated selections in just single tap.
● Deleting the white background through a pro-tool like Procreate is smart, quick & seamless process.
● You are not going to get confused, even if you are using it for the very first time.
● It is the trend that every Instagram user is following for posting better images with nice background options.
Also read:
- Free
- Updated 2024 Approved How to Set Up Twitch Green Screen
- Updated Learn to Create Custom Sequence Presets in Premiere Pro for Efficient Video Editing. Ensure Consistency and Speed up Your Workflow with Personalized Settings
- New 2024 Approved 3 Different Methods to Correct Color Distortion in Videos
- In 2024, Do You Have Images in GIF Format, and Do You Find Converting Them to AVI Pretty Tricky? Please Stay on This Article as Well Guide You with Tools Thatll Help You Convert Your GIF to AVI Quickly and with Ease
- Updated In 2024, Before & After Editing Trick - Filmora
- In 2024, How To Use Motion Blur On Video Star?
- Updated A Roster of 8 Top Color Match Generators for 2024
- 2024 Approved Best 7 Color Match Paint Apps
- In 2024, Simple Tricks Make 3D GIF Production of Inspiration Pop Up
- New Best 5 GIF to Video Converters You Cant-Miss
- 2024 Approved Free 3D Intro Makers
- Updated Steps to Rotate Videos Using Handbrake
- New How to to Mimic Professional Filming Gears
- Ways to Merge Videos in HandBrake? Expectation Vs. Reality
- New 2024 Approved Complete Guide to Make an Intro Video
- In 2024, Rootjunky APK To Bypass Google FRP Lock For Xiaomi Redmi K70 Pro
- Remove FRP Lock on Vivo Y27 5G
- How To Enable USB Debugging on a Locked Xiaomi 13T Pro Phone
- Reset iTunes Backup Password Of Apple iPhone 8 Plus Prevention & Solution
- In 2024, How to Bypass Google FRP Lock on Vivo Y02T Devices
- 11 Proven Solutions to Fix Google Play Store Not Working Issue on Samsung Galaxy Z Fold 5 | Dr.fone
- In 2024, Apple iPhone 14 Pro Max Screen Mirroring You Must Know | Dr.fone
- How to install device drivers manually in Windows 11/10
- In 2024, How to Screen Mirroring Xiaomi Redmi K70E? | Dr.fone
- In 2024, How to Screen Mirroring Oppo Reno 9A to PC? | Dr.fone
- iPhone 15 Pro Max iCloud Activation Lock Bypass
- In 2024, Top 5 Car Locator Apps for Vivo Y36i | Dr.fone
- Title: 3 Best Effects to Appear on Camera Made with Filmora for 2024
- Author: Chloe
- Created at : 2024-05-20 03:37:41
- Updated at : 2024-05-21 03:37:41
- Link: https://ai-editing-video.techidaily.com/3-best-effects-to-appear-on-camera-made-with-filmora-for-2024/
- License: This work is licensed under CC BY-NC-SA 4.0.

