
3 Ways To Stream And Record At The Same Time
3 Ways To Stream And Record At The Same Time
The popularity of live streaming has exploded recently. A live stream is simply a video broadcast in real-time over the internet. It’s a great way to connect with people directly, whether for a gaming session, a cooking show, or a Q&A.
Many reasons are there for which why you might want to live stream and record at the same time. For instance, keep a record of your gameplay or stream highlights for future editing or use your live stream to generate content for your YouTube channel.
Whatever your reasons, this article will show you how to do live streaming and recording at the same time using three different methods.
Way 1. Use OBS To Stream And Record Video At The Same Time
OBS, or Open Broadcaster Software, is a free and open-source tool that allows you to stream and record video at the same time, which can be useful if you want to live-stream your gameplay on Twitch or record a tutorial for YouTube.
Key Features of OBS
- Compatible with Mac OS X, Linux, and Windows operating systems.
- Requires at least 4 GB of storage space and an Intel i5 2000-series processor or higher DirectX 10 capable graphics card.
- High-performance video capturing and mixing in real-time.
- With Custom Transitions, you can set up an unlimited number of scenes you can switch between seamlessly.
- Intuitive audio mixer.
- Easy-to-use and simple configuration options.
Steps
Here’s an easy and quick guide on how to use OBS Studio to stream and record videos simultaneously:
Step1 Download OBS Studio from the official website and install it on your computer or laptop.
Step2 Launch OBS Studio and go to the Settings menu. Find the Recording section under the Output tab.
Step3 Click “Start Recording” to manually start the recording or head to the General Tab and checkmark the box before “Automatically Record When Streaming.”
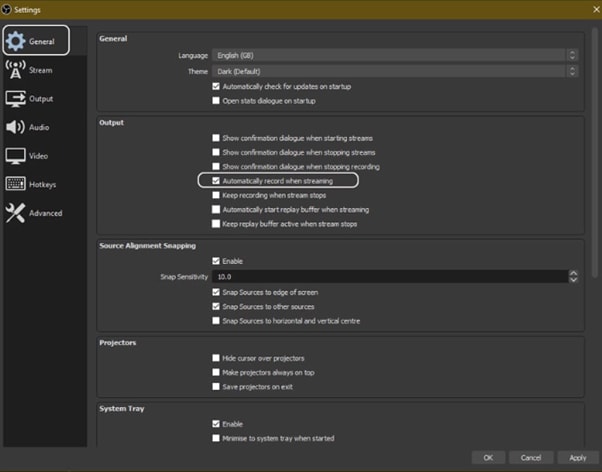
Step4 Finally, click “Apply” to save your settings. Now when you start your stream, the recording will also begin simultaneously.

Way 2. Use Twitch To Save Your Streams
Twitch is the most popular and best live streaming platform that allows gamers to broadcast their gameplay to a live audience and also gives them the ability to save their past broadcasts, or “streams.”
This feature can be useful to save your live stream for later viewing or share your stream with someone who missed it.
Features
Twitch offers a variety of features that make it a unique and powerful game streaming platform. Some of the most notable ones are:
- Live streaming: Twitch allows gamers to share their gameplay in real-time with other gamers around the world. This live aspect of the platform makes it unique and engaging.
- Social interaction: Twitch offers a variety of features that allow gamers to connect with each other, including chat rooms, forums, and user-generated content.
You can save your stream on Twitch in two ways:
- Use the “Highlights” feature, which allows you to save specific moments from your live stream.
- Download your stream’s entire VOD (video on demand) after it has ended.
Steps
Here are the quick steps to saving a stream on your PC from Twitch. But first, you need to enable Twitch VODs before starting your broadcast in the following way:
Step1 Visit Twitch and sign in to your account. Now, click the “Profile” icons and go to “Creator Dashboard.”
Step2 Head to Setting from the left-sidebar and click the “Stream” option. Scroll down and find the VOD Settings. Toggle the buttons next to “Store Past Broadcasts.”
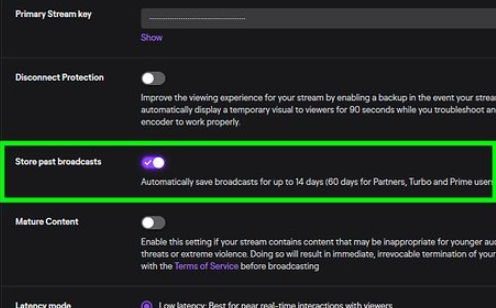
Step3 To publish your VODs instantly after broadcasting, toggle the button next to “Always Publish VODs.”
Now, to download the recordings of your broadcasts to your PC, do the following steps in sequence:
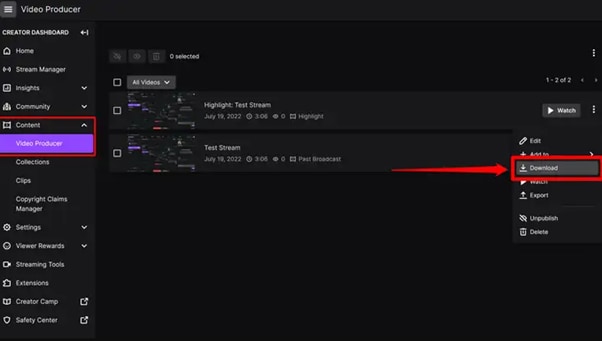
Step1 Head to the Creator Dashboard, find the “Content” section in the left sidebar, and click “Video Producer.”
Step2 Find the stream (VOD or Highlights) you want to download and on the right side, click the three dots.
Step3 Finally, click the “Download” option and let Twitch prepare your video. You will then get the stream’s recording in MP4 format.
Way 3. Use Screen Recorder To Record Your Streams
Using a screen recorder is a great way to record your live stream because it lets you capture the full screen of your PC. Although there are many different screen recorders to choose from, we recommend using Filmora.
Wondershare Filmora is a powerful editor with easy-to-use screen recording capabilities, giving you everything you need to record and stream your video at the same time. The software is free to use and has an intuitive interface.
Features of Filmora
- Support for both Mac OS X and Windows operating systems.
- Ability to record your PC screen, audio, and webcam all at once
- A variety of video editing features
- An easy-to-use interface
Steps
Here’s how to use Filmora for recording while streaming:
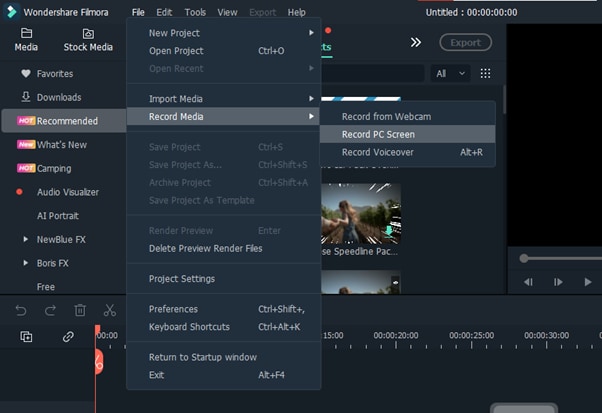
Step1 Head to the official Filmora website, download the software and install it on your PC.
Step2 Launch Filmora 11 and click “New project” in the main interface. Click “File” from the top toolbar and scroll down to “Record media.” From the drop-down menu, select “Record PC Screen.”
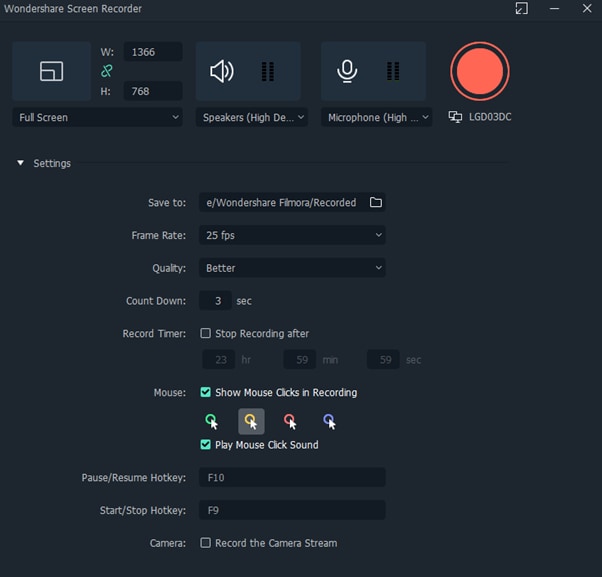
Step3 A new “Wondershare Screen Recorder” window will pop up. You can set up a full screen, custom or target screen recording, speaker, and microphone settings. If you want more Settings, click the drop-down icon.
Step4 Click the Start icon to begin your recording. Afterward, click the Stop icon to stop the recording, and your stream will be saved in the selected destination.
Conclusion
In this article, we’ve discussed three step-by-step methods to help you do live streaming and recording at the same time. With these solutions at your disposal, you’ll be able to save your VODs with ease.
It is best to choose only one software to start with to avoid the time-consuming trial-and-error process. If you want to add another tool, do so later; otherwise, you will waste your precious time and resources.
Give these methods a shot, and eventually, you will find your groove—and become accustomed to just how easy it is to record and stream a video simultaneously.
Free Download For Win 7 or later(64-bit)
Free Download For macOS 10.14 or later
Free Download For macOS 10.14 or later
Learn How Video Montages Were Used over Film History with Examples and the Types of Videos for Shorter Montages. Plus, Learn About the Best Software for It
Video montages are one of the best types of video formats people enjoy, and they are useful for different occasions. Whether you want to create a montage of your memories as an anniversary gift or create a montage of product photos for promotions, uses are multiple here. This prompts the need for users to learn how to make a montage, and that is what we will cover in this post.
These videos, with a series of shots and information edited together cohesively in sequence, are useful for showcasing storyline progress. Here, you will learn about use cases of the process, like a birthday video montage, more ideas, and the process of making them. Read on if any of that interests you.

Part 1. Classic Montage Ideas in Art and Film
Video montages play a major role in films, art productions, and gaming, like the call of duty montage.
In terms of the first example, when you watch movies, you might notice this technique used in many movies, utilized more prominently since the 1920s when Sergei Eisenstein coined the term first. These scenes appear as stitched-together shots of the characters showing time passage, enjoying activities or memories.
Different techniques are common, like rhythmic, metric, intellectual, or tonal. For example, the 2000 movie “Requiem for a Dream” showcased an intellectual/metric style of video montage to show the disorientating effect of the character under drug influence. A relatively recent example would be Benedict Cumberbatch’s 2016 movie “Doctor Strange”, where the montage shows the titular character’s interaction with the villain (no spoilers).
3 Top Montages in Film for All Times
If the above two examples did not fully express what is a montage video, seeing more examples should help. For this, here are three of the top montage examples available in Film History, each version representing a separate video montage style.
1. Rocky (1976)
One of the most notable montages is available in the 1976 action movie, the Sylvester Stallone-starrer “Rocky”. The type of video montage that is visible in this movie is rhythmic in nature, showcasing the training the character undergoes. This is edited with a musical background score, summarising some shots’ full training progression process.
To add an emotive tone to the video, music is added to the video clip that engages audiences to feel the character’s passion. A rhythmic style of video montage technique is used to cut the shorts as per the content. The lengths of each clip are not similar and differ as per the action going on in the scene.
2. Mulan (1998)
Video montages are also visible in animated movies, as seen in the 1998 version of Disney’s “Mulan”. The scene in question is where the song “I’ll Make a Man Out of You” plays while Mulan undergoes strict training for the military from the male lead. A sequence of shots showing her progress is shown.
Here, the video montage is shown with the background music that perfectly aligns with what is occurring in the video. The visuals and the audio in the background cohesively show the main character’s struggle, which creates an emotional response in the audience. Therefore, the style of video montage here falls under tonal or overtonal categories.
Watch this video to get an idea of how music and visuals can partner for tonal video montages.
3. Creed (2015)
Like in the Rocky movie, its 2015 sequel, “Creed”, also has a video montage. Here, the clips in the sequence are also used to depict the intense training progress. However, where it differs from the rhythmic formula is that the sequence highlights the emotional journey or determination of Adonis Creed to succeed.
Plus, this video montage is a homage to the original version; the tonal effect is further noticeable in the scene of Rocky’s health deterioration against Creed’s training. Thus, it juxtaposes the two scenes, creating an emotional impact on viewers to root for the main character.
Watch this video to understand what is a montage video of the tonal type.
Part 2. Creative Montage Ideas for Social Media
Of course, movies and TV shows are the only types of media where video montage techniques are useful. Many non-professionals use options like a fortnite montage editor to create and edit montage videos for other projects they can share across platforms. Some even create video montages to create videos for social media.
These include vlog-like videos that people record and then edit together into a montage which different techniques. Plus, some users create montages of different things that interest them, like gameplay. Then, they share those videos across social media for views, like on TikTok or YouTube.
· Gaming Montages
Different creators focus on developing gaming montages to create projects for the games they operate. These can include videos showcasing the skills or gameplays of the creation, all explaining a specific theme in some cases.
There are different games that the users focus on for showcasing their gaming prowess in action. Common examples include Fortnite, Call of Duty, CSGO, or PUBG montage videos.
Watch this video to get an idea.
· Wedding Montages
Many users turn to edit video montages for specific occasions, adding clips of different moments instead of one long-running documentary. They incorporate stylish effects like slow motion and transitions, incorporate a moving background score, and more.
Many top influencers and celebrities have used this technique for their wedding videos on social media. Additionally, regular people also adopt the style.
Watch this video as an example.
· Birthday Montages
Like wedding videos, users can try out the video montage technique to create videos for birthdays. These can include scenes of the main creator throughout their preparation phase for the party. Alternately, some users create video montages of their experience leading up to the video celebration, through a longer period or the same day.
Watch this video to understand how these videos may look.
Part 3. How Can I Create Easily a Montage Video?
After understanding the types of video montage techniques and ideas, the next point of concern is learning how to make a montage.
One of the best editing software to use for this process is Wondershare Filmora . With this editor, you can create different video montages as per the theme, customized or instantly. Filmora includes premium-quality effects and transitions, including free stock media that you can also add. Plus, the software allows the ability to record voiceover and adjust background scores in the video.
You can also choose the aspect ratio for the video, depending on the platform you post it on. For example, if you are creating a full professional-level scene montage, use the widescreen (16:9) aspect ratio, like in YouTube videos. Or, use the portrait (9:16) for mobile-based videos for TikTok videos or a 1:1 aspect ratio for Instagram videos.
Watch this video to know how it works.
Free Download For Win 7 or later(64-bit)
Free Download For macOS 10.14 or later
Features of Filmora for Video Montage Making
There are multiple top-quality features available in the Filmora software that is useful for creating and editing video montages. Use them and create dynamic videos.
1. Screen Recorder
The Screen Recorder feature is accessible through the home page of the Filmora software after launching. Since the first stage of making a montage involves getting the video clips for it, you can use this to record the video. For example, if you have a movie saved on your desktop, use the screen recorder and tap the Play button to record the screen.

You can adjust further settings, like which headphone or speaker to use for the audio recording.
2. Preset Templates
Next comes the editing process. After completing the recording process for the montage video, you can use preset templates on Filmora via Instant Mode. This is useful for users who do not have enough time to fully edit a long montage video or have the technical skills for it.
You can click on the Instant Mode tab on the home page. Then, choose the specific theme of the video montage you will create, like Birthday, Wedding, Business, etc. After selecting the theme, you can insert multiple video clips into the editor. Adjust the clips in sequence and press the “Auto-Create” button.

3. Abundant Video Effects and Music Resources
If you want to customize the video montage video manually, you can use the various effects and advanced features in the main editor timeline. For example, click on the Effects tab to find your options.

After importing the file(s) into the editor and dragging it to the timeline, you can use the Crop icon to cut clips. Then, rearrange them and merge them. Plus, further editing features are available for premium-level edits, like the Chroma Key. Click on it and add a green screen in the background.

The AI Portrait feature is also available, automatically detecting the main character and accurately removing the background.
You can adjust the speed of transitions in the video with the Speed Ramping function. Many high-quality effects are available under the Effects tab, and you can add audio to the video through the Media tab.

Conclusion
Video montages are one of the tried-and-tested methods used in film-making, gaming videos, and social media videos. You can use Filmora to create such video montages based on the type of video montage technique that fits it. Then, share it directly to YouTube or save it for transferring across different platforms.
Free Download For Win 7 or later(64-bit)
Free Download For macOS 10.14 or later
Part 1. Classic Montage Ideas in Art and Film
Video montages play a major role in films, art productions, and gaming, like the call of duty montage.
In terms of the first example, when you watch movies, you might notice this technique used in many movies, utilized more prominently since the 1920s when Sergei Eisenstein coined the term first. These scenes appear as stitched-together shots of the characters showing time passage, enjoying activities or memories.
Different techniques are common, like rhythmic, metric, intellectual, or tonal. For example, the 2000 movie “Requiem for a Dream” showcased an intellectual/metric style of video montage to show the disorientating effect of the character under drug influence. A relatively recent example would be Benedict Cumberbatch’s 2016 movie “Doctor Strange”, where the montage shows the titular character’s interaction with the villain (no spoilers).
3 Top Montages in Film for All Times
If the above two examples did not fully express what is a montage video, seeing more examples should help. For this, here are three of the top montage examples available in Film History, each version representing a separate video montage style.
1. Rocky (1976)
One of the most notable montages is available in the 1976 action movie, the Sylvester Stallone-starrer “Rocky”. The type of video montage that is visible in this movie is rhythmic in nature, showcasing the training the character undergoes. This is edited with a musical background score, summarising some shots’ full training progression process.
To add an emotive tone to the video, music is added to the video clip that engages audiences to feel the character’s passion. A rhythmic style of video montage technique is used to cut the shorts as per the content. The lengths of each clip are not similar and differ as per the action going on in the scene.
2. Mulan (1998)
Video montages are also visible in animated movies, as seen in the 1998 version of Disney’s “Mulan”. The scene in question is where the song “I’ll Make a Man Out of You” plays while Mulan undergoes strict training for the military from the male lead. A sequence of shots showing her progress is shown.
Here, the video montage is shown with the background music that perfectly aligns with what is occurring in the video. The visuals and the audio in the background cohesively show the main character’s struggle, which creates an emotional response in the audience. Therefore, the style of video montage here falls under tonal or overtonal categories.
Watch this video to get an idea of how music and visuals can partner for tonal video montages.
3. Creed (2015)
Like in the Rocky movie, its 2015 sequel, “Creed”, also has a video montage. Here, the clips in the sequence are also used to depict the intense training progress. However, where it differs from the rhythmic formula is that the sequence highlights the emotional journey or determination of Adonis Creed to succeed.
Plus, this video montage is a homage to the original version; the tonal effect is further noticeable in the scene of Rocky’s health deterioration against Creed’s training. Thus, it juxtaposes the two scenes, creating an emotional impact on viewers to root for the main character.
Watch this video to understand what is a montage video of the tonal type.
Part 2. Creative Montage Ideas for Social Media
Of course, movies and TV shows are the only types of media where video montage techniques are useful. Many non-professionals use options like a fortnite montage editor to create and edit montage videos for other projects they can share across platforms. Some even create video montages to create videos for social media.
These include vlog-like videos that people record and then edit together into a montage which different techniques. Plus, some users create montages of different things that interest them, like gameplay. Then, they share those videos across social media for views, like on TikTok or YouTube.
· Gaming Montages
Different creators focus on developing gaming montages to create projects for the games they operate. These can include videos showcasing the skills or gameplays of the creation, all explaining a specific theme in some cases.
There are different games that the users focus on for showcasing their gaming prowess in action. Common examples include Fortnite, Call of Duty, CSGO, or PUBG montage videos.
Watch this video to get an idea.
· Wedding Montages
Many users turn to edit video montages for specific occasions, adding clips of different moments instead of one long-running documentary. They incorporate stylish effects like slow motion and transitions, incorporate a moving background score, and more.
Many top influencers and celebrities have used this technique for their wedding videos on social media. Additionally, regular people also adopt the style.
Watch this video as an example.
· Birthday Montages
Like wedding videos, users can try out the video montage technique to create videos for birthdays. These can include scenes of the main creator throughout their preparation phase for the party. Alternately, some users create video montages of their experience leading up to the video celebration, through a longer period or the same day.
Watch this video to understand how these videos may look.
Part 3. How Can I Create Easily a Montage Video?
After understanding the types of video montage techniques and ideas, the next point of concern is learning how to make a montage.
One of the best editing software to use for this process is Wondershare Filmora . With this editor, you can create different video montages as per the theme, customized or instantly. Filmora includes premium-quality effects and transitions, including free stock media that you can also add. Plus, the software allows the ability to record voiceover and adjust background scores in the video.
You can also choose the aspect ratio for the video, depending on the platform you post it on. For example, if you are creating a full professional-level scene montage, use the widescreen (16:9) aspect ratio, like in YouTube videos. Or, use the portrait (9:16) for mobile-based videos for TikTok videos or a 1:1 aspect ratio for Instagram videos.
Watch this video to know how it works.
Free Download For Win 7 or later(64-bit)
Free Download For macOS 10.14 or later
Features of Filmora for Video Montage Making
There are multiple top-quality features available in the Filmora software that is useful for creating and editing video montages. Use them and create dynamic videos.
1. Screen Recorder
The Screen Recorder feature is accessible through the home page of the Filmora software after launching. Since the first stage of making a montage involves getting the video clips for it, you can use this to record the video. For example, if you have a movie saved on your desktop, use the screen recorder and tap the Play button to record the screen.
You can adjust further settings, like which headphone or speaker to use for the audio recording.
2. Preset Templates
Next comes the editing process. After completing the recording process for the montage video, you can use preset templates on Filmora via Instant Mode. This is useful for users who do not have enough time to fully edit a long montage video or have the technical skills for it.
You can click on the Instant Mode tab on the home page. Then, choose the specific theme of the video montage you will create, like Birthday, Wedding, Business, etc. After selecting the theme, you can insert multiple video clips into the editor. Adjust the clips in sequence and press the “Auto-Create” button.
3. Abundant Video Effects and Music Resources
If you want to customize the video montage video manually, you can use the various effects and advanced features in the main editor timeline. For example, click on the Effects tab to find your options.
After importing the file(s) into the editor and dragging it to the timeline, you can use the Crop icon to cut clips. Then, rearrange them and merge them. Plus, further editing features are available for premium-level edits, like the Chroma Key. Click on it and add a green screen in the background.
The AI Portrait feature is also available, automatically detecting the main character and accurately removing the background.
You can adjust the speed of transitions in the video with the Speed Ramping function. Many high-quality effects are available under the Effects tab, and you can add audio to the video through the Media tab.
Conclusion
Video montages are one of the tried-and-tested methods used in film-making, gaming videos, and social media videos. You can use Filmora to create such video montages based on the type of video montage technique that fits it. Then, share it directly to YouTube or save it for transferring across different platforms.
Free Download For Win 7 or later(64-bit)
Free Download For macOS 10.14 or later
How To Add Motion Blur Effect To Photos in GIMP
GIMP is a cross-platform image editing software that you can use to edit photos and create graphics. The software is available for Linux, Windows, and macOS and can add a motion blur effect (A sense of movement in the photo), making your pictures look more realistic and professional.
So to help you tone your skills, we’ve written a comprehensive guide on how to apply the GIMP motion blur effect to your photos!
Part I. What Is GIMP?
GIMP software, a GNU Image Manipulation Program, is an open-source raster graphics editor used for image editing and retouching, converting between different image formats, free-form drawing, and more.
GIMP is frequently used as a Photoshop alternative. The software boasts a wide range of features, including support for layers, masks, color management, and third-party plugins.
Key Features
Here are some key features of the GIMP software:
- Quickly hide panels and menus to let you switch to a full-screen mode to preview pictures
- Fixes distorted images
- Available for Windows, Linux, Mac OS, and other operating systems
- Automatic image enhancement tool
- Lets you remove all the panels and tools from the workflow except the one you are working with.
- Released under a license called GNU General Public License v3 and later, which makes it free to use and distribute
- Add overlays and crop or resize an image
- Wide range of file formats that it can read and write, making it a versatile tool for working with images
Part II. How To Add The Motion Blur Effect To Your Photos in GIMP?
Below we’ve provided the step-by-step tutorial to add a motion blur effect to your photos in GIMP:
Step1 In the first step, launch a browser on your device, head to the GIMP website , and download the installation file according to your operating system. Now, click the downloaded installer, install the software on your system and launch it.

Step2 In the next step, click “File” on the GIMP dashboard, and select “Open” to access the Open Image window. Select your image file from your system and click “Open” to import the file.

Step3 Next, click the “Filters” option from the top toolbar, select “Blur,” and choose “Motion Blur” from the drop-down menu. A dialogue box will now open where you can preview the effect and adjust the settings, including Blur Type, Blur Center, and Blur Parameters.

Step4 Once you are satisfied with your changes, click “OK” to apply the effect to the image, and make some other edits if needed. Finally, click “File” from the top toolbar, choose “Export As,” click “File Type” to select the format, and select the “Export” option to save your file.
Bonus Tips – The Alternative To GIMP To Create Motion Blur Effect
GIMP is a popular image editor that you can use to create motion blur effects. However, some users find it difficult to use the software for this purpose.
To simplify the process, we recommend usingWondershare Filmora an all-in-one editing software that offers multiple advanced features to help you quickly enhance your project.
Free Download For Win 7 or later(64-bit)
Free Download For macOS 10.14 or later
Here’s why Filmora is the best alternative to GIMP for creating motion blur effects:
- A user-friendly interface where you can quickly create the motion blur effect without spending hours learning the process
- Advanced video editing tools, such as keyframing, speed ramping, green screen, title editing, motion tracking, screen recorder, and preset templates
- Royalty-free music library where you can access millions of music and soundtracks
- Adds the motion blur effect to your videos as well as images
- Comes with multiple parameters to adjust the effect on your clip or image
To add the radial blur effect to images using Filmora, here are the quick and easy-to-follow steps:
Step1 Download the Filmora software on your PC, launch it, and click “Create New Project” on the main panel. Use the “Click Here to Import your Media File” option to import your photo and drag and drop it into the timeline.

Step2 Now, head to the “Effects” tab from the taskbar. Use the search option to find the Blur effect. Afterward, drag & drop it in the timeline and adjust it on your selected clip.

Step3 Please note that motion blur is now a dynamic effect on the image. That means you can add multiple photos and make them into a slideshow with a blur effect transition. Or, press the “Play” icon to preview your photo and pause the clip where you think motion blur works best.
Step4 Click the effect in the timeline to open its settings. Now, play your clip to preview and adjust the parameters as you want to smooth down the motion effect.
Step5 Once satisfied with the outcome, click the “Export” option, go to the “Local” tab, select a file format to save the images, and click “Export” again to save your project.

Filmora offers many export options, such as your device, YouTube, Vimeo, and DVD, with just a few clicks.
Last Words
In this detailed tutorial, we’ve discussed what GIMP is and its key features. We’ve provided a step-by-step guide to walk you through the process of creating the motion blur effect using the GIMP software.
In addition, we’ve provided a bonus tip to recommend Filmora as the best alternative to GIMP for creating the motion blur effect.
Hopefully, you found this article helpful in resolving your queries, and you can now add a smooth motion blur effect to your images.
Free Download For macOS 10.14 or later
Here’s why Filmora is the best alternative to GIMP for creating motion blur effects:
- A user-friendly interface where you can quickly create the motion blur effect without spending hours learning the process
- Advanced video editing tools, such as keyframing, speed ramping, green screen, title editing, motion tracking, screen recorder, and preset templates
- Royalty-free music library where you can access millions of music and soundtracks
- Adds the motion blur effect to your videos as well as images
- Comes with multiple parameters to adjust the effect on your clip or image
To add the radial blur effect to images using Filmora, here are the quick and easy-to-follow steps:
Step1 Download the Filmora software on your PC, launch it, and click “Create New Project” on the main panel. Use the “Click Here to Import your Media File” option to import your photo and drag and drop it into the timeline.
Step2 Now, head to the “Effects” tab from the taskbar. Use the search option to find the Blur effect. Afterward, drag & drop it in the timeline and adjust it on your selected clip.
Step3 Please note that motion blur is now a dynamic effect on the image. That means you can add multiple photos and make them into a slideshow with a blur effect transition. Or, press the “Play” icon to preview your photo and pause the clip where you think motion blur works best.
Step4 Click the effect in the timeline to open its settings. Now, play your clip to preview and adjust the parameters as you want to smooth down the motion effect.
Step5 Once satisfied with the outcome, click the “Export” option, go to the “Local” tab, select a file format to save the images, and click “Export” again to save your project.
Filmora offers many export options, such as your device, YouTube, Vimeo, and DVD, with just a few clicks.
Last Words
In this detailed tutorial, we’ve discussed what GIMP is and its key features. We’ve provided a step-by-step guide to walk you through the process of creating the motion blur effect using the GIMP software.
In addition, we’ve provided a bonus tip to recommend Filmora as the best alternative to GIMP for creating the motion blur effect.
Hopefully, you found this article helpful in resolving your queries, and you can now add a smooth motion blur effect to your images.
How to Color-Correct an S-Log Footage
S-Log is a gamma curve optimized for digital cameras to maximize the image sensor’s performance. Although these videos may look flat and washed out, they contain lots of color information. Even better, video creators can use color correction to edit the S-Log videos and make them look as natural as possible. That’s what this article is all about.
How to Color-Correct an S-Log Footage
This tutorial assumes that you already have an S-Log footage. If not, you can record S-Log footage using most Canon, Sony, and Panasonic cameras.

Let’s get to the steps!
Step1 Adjust the color settings
Start by adding your video to the timeline on Wondershare Filmora and then double-click the video track. Then, click on the Color tab before tapping Advanced.
Free Download For Win 7 or later(64-bit)
Free Download For macOS 10.14 or later

Step2 Read and study the histogram
Now you’ll see the Advanced Color Correction pop-up window. Here, you’ll see a histogram with the brightest point on the right and the darkest point on the left. From our example, you can see that the video has more dark pixels than bright ones. Horizontally, the histogram shows you how many pixels are in a certain range of brightness.

Step3 Adjust the image colors
Once you’ve understood the histogram, look for pure black and white parts on the video clip. For example, in this video, you can see that the roofs are pure black and the boat at the bottom-right corner is pure white.

After finding the white and black parts in the video, go to the Light section, then adjust the Highlights to see if you can get a pure white on the boat. If the boat or any other image of your choice doesn’t look pure white, increase the Whites slide to make it whiter.

Now adjust the Shadows settings to reduce the effect and make the roofs look closer to pure black. If you want the roofs to look darker, drag the Blacks slider to the left.
Pro tip: Ensure that the darkest and brightest points don’t cross the broken lines on the edge, or the video will start losing details.
Step4 Adjust the color saturation
Does your video still look a little flat? Probably yes! In that case, click the Color section and adjust the Saturation slider to the right to make the video less flat. Saturation simply means how colorful a video clip is to the viewer. Apart from the color saturation, you can also adjust the Vibrance to make your video objects look more colorful.

Step5 Preview and compare the video
Now it’s time to check and compare the results. To make it easier, click the Eye icon at the top-right corner to switch between the original S-Log video and the color-corrected clip. You can also tap the AB icon and choose Split View-Left/Right to view the clips in the side-by-side mode.

Summary
I guess that was easy, right? Up to this juncture, you should be able to perform basic color correction on your video using Wondershare Filmora. Remember, this video editor packs many other editing tools to bring out your creativity. Give it a try!
Free Download For macOS 10.14 or later
Step2 Read and study the histogram
Now you’ll see the Advanced Color Correction pop-up window. Here, you’ll see a histogram with the brightest point on the right and the darkest point on the left. From our example, you can see that the video has more dark pixels than bright ones. Horizontally, the histogram shows you how many pixels are in a certain range of brightness.
Step3 Adjust the image colors
Once you’ve understood the histogram, look for pure black and white parts on the video clip. For example, in this video, you can see that the roofs are pure black and the boat at the bottom-right corner is pure white.
After finding the white and black parts in the video, go to the Light section, then adjust the Highlights to see if you can get a pure white on the boat. If the boat or any other image of your choice doesn’t look pure white, increase the Whites slide to make it whiter.
Now adjust the Shadows settings to reduce the effect and make the roofs look closer to pure black. If you want the roofs to look darker, drag the Blacks slider to the left.
Pro tip: Ensure that the darkest and brightest points don’t cross the broken lines on the edge, or the video will start losing details.
Step4 Adjust the color saturation
Does your video still look a little flat? Probably yes! In that case, click the Color section and adjust the Saturation slider to the right to make the video less flat. Saturation simply means how colorful a video clip is to the viewer. Apart from the color saturation, you can also adjust the Vibrance to make your video objects look more colorful.
Step5 Preview and compare the video
Now it’s time to check and compare the results. To make it easier, click the Eye icon at the top-right corner to switch between the original S-Log video and the color-corrected clip. You can also tap the AB icon and choose Split View-Left/Right to view the clips in the side-by-side mode.
Summary
I guess that was easy, right? Up to this juncture, you should be able to perform basic color correction on your video using Wondershare Filmora. Remember, this video editor packs many other editing tools to bring out your creativity. Give it a try!
Also read:
- [New] ITop's Expert Selection Best Windows Screencasters for 2024
- [Updated] 2024 Approved Effective Use of AdSense on YouTube to Boost Channel Income
- [Updated] 2024 Approved Screen Snatching Solution
- [Updated] In 2024, From Pro to Max The Evolutionary Journey in Apple's M Chips
- Free MP4 a FLAC Converter Online Pelo Site Movavi - Sem Custo
- How to Add Green Screen in OBS
- Learn Languages Effectively at No Cost: Our Highly-Recommended Top 9 Websites
- New 2024 Approved Adobe Photoshop Is the Best Photo Editor to Add Green Screen Effect to Your Photo While Wondershare Filmora Is the Best Video Editor to Add Green Screen Effect to Your Video
- New In 2024, How to Edit Facebook Video Ads for E-Commerce Business
- New In 2024, Shotcut Video Editor Review
- Reinstating Nostalgia: The Instagram Resurgence Story
- Unveiling New Gadgets with Tom - A Journey Through Modern Technology
- Updated A Guide To Adopting Lumetri Color Presets in Effective Color Grading
- Updated How to Add Custom Filters in VN App 2024 Quick Guide
- Updated In 2024, How to Make Vintage Film Effect 1950S
- Title: 3 Ways To Stream And Record At The Same Time
- Author: Chloe
- Created at : 2024-09-28 19:55:10
- Updated at : 2024-10-03 01:02:24
- Link: https://ai-editing-video.techidaily.com/3-ways-to-stream-and-record-at-the-same-time/
- License: This work is licensed under CC BY-NC-SA 4.0.