
:max_bytes(150000):strip_icc():format(webp)/CODA-d4dd2a9b6c3d4a008a05c9718c9bce1e.jpg)
3 Ways To Stream And Record At The Same Time for 2024
3 Ways To Stream And Record At The Same Time
The popularity of live streaming has exploded recently. A live stream is simply a video broadcast in real-time over the internet. It’s a great way to connect with people directly, whether for a gaming session, a cooking show, or a Q&A.
Many reasons are there for which why you might want to live stream and record at the same time. For instance, keep a record of your gameplay or stream highlights for future editing or use your live stream to generate content for your YouTube channel.
Whatever your reasons, this article will show you how to do live streaming and recording at the same time using three different methods.
Way 1. Use OBS To Stream And Record Video At The Same Time
OBS, or Open Broadcaster Software, is a free and open-source tool that allows you to stream and record video at the same time, which can be useful if you want to live-stream your gameplay on Twitch or record a tutorial for YouTube.
Key Features of OBS
- Compatible with Mac OS X, Linux, and Windows operating systems.
- Requires at least 4 GB of storage space and an Intel i5 2000-series processor or higher DirectX 10 capable graphics card.
- High-performance video capturing and mixing in real-time.
- With Custom Transitions, you can set up an unlimited number of scenes you can switch between seamlessly.
- Intuitive audio mixer.
- Easy-to-use and simple configuration options.
Steps
Here’s an easy and quick guide on how to use OBS Studio to stream and record videos simultaneously:
Step1 Download OBS Studio from the official website and install it on your computer or laptop.
Step2 Launch OBS Studio and go to the Settings menu. Find the Recording section under the Output tab.
Step3 Click “Start Recording” to manually start the recording or head to the General Tab and checkmark the box before “Automatically Record When Streaming.”
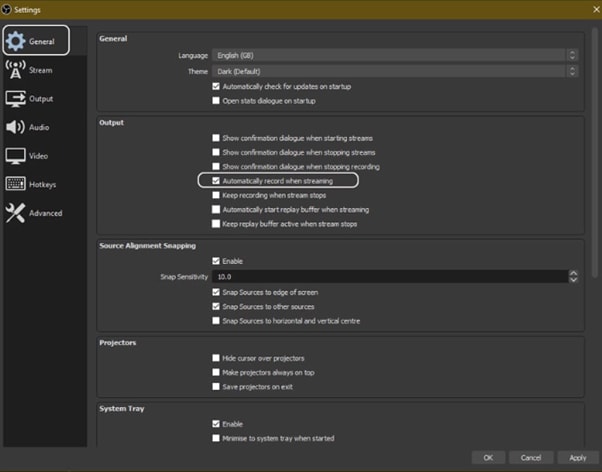
Step4 Finally, click “Apply” to save your settings. Now when you start your stream, the recording will also begin simultaneously.
Way 2. Use Twitch To Save Your Streams
Twitch is the most popular and best live streaming platform that allows gamers to broadcast their gameplay to a live audience and also gives them the ability to save their past broadcasts, or “streams.”
This feature can be useful to save your live stream for later viewing or share your stream with someone who missed it.
Features
Twitch offers a variety of features that make it a unique and powerful game streaming platform. Some of the most notable ones are:
- Live streaming: Twitch allows gamers to share their gameplay in real-time with other gamers around the world. This live aspect of the platform makes it unique and engaging.
- Social interaction: Twitch offers a variety of features that allow gamers to connect with each other, including chat rooms, forums, and user-generated content.
You can save your stream on Twitch in two ways:
- Use the “Highlights” feature, which allows you to save specific moments from your live stream.
- Download your stream’s entire VOD (video on demand) after it has ended.
Steps
Here are the quick steps to saving a stream on your PC from Twitch. But first, you need to enable Twitch VODs before starting your broadcast in the following way:
Step1 Visit Twitch and sign in to your account. Now, click the “Profile” icons and go to “Creator Dashboard.”
Step2 Head to Setting from the left-sidebar and click the “Stream” option. Scroll down and find the VOD Settings. Toggle the buttons next to “Store Past Broadcasts.”
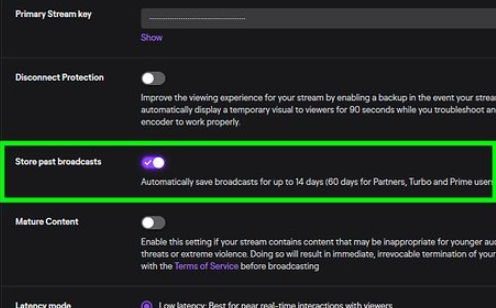
Step3 To publish your VODs instantly after broadcasting, toggle the button next to “Always Publish VODs.”
Now, to download the recordings of your broadcasts to your PC, do the following steps in sequence:
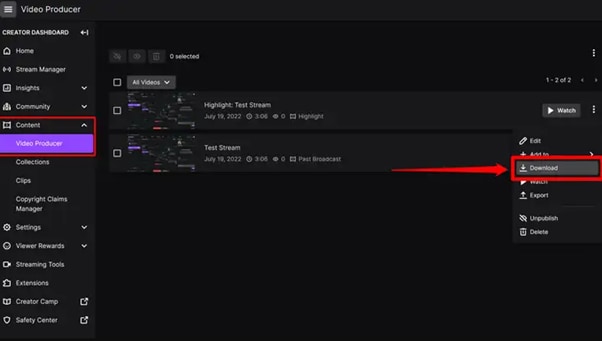
Step1 Head to the Creator Dashboard, find the “Content” section in the left sidebar, and click “Video Producer.”
Step2 Find the stream (VOD or Highlights) you want to download and on the right side, click the three dots.
Step3 Finally, click the “Download” option and let Twitch prepare your video. You will then get the stream’s recording in MP4 format.
Way 3. Use Screen Recorder To Record Your Streams
Using a screen recorder is a great way to record your live stream because it lets you capture the full screen of your PC. Although there are many different screen recorders to choose from, we recommend using Filmora.
Wondershare Filmora is a powerful editor with easy-to-use screen recording capabilities, giving you everything you need to record and stream your video at the same time. The software is free to use and has an intuitive interface.
Features of Filmora
- Support for both Mac OS X and Windows operating systems.
- Ability to record your PC screen, audio, and webcam all at once
- A variety of video editing features
- An easy-to-use interface
Steps
Here’s how to use Filmora for recording while streaming:
Step1 Head to the official Filmora website, download the software and install it on your PC.
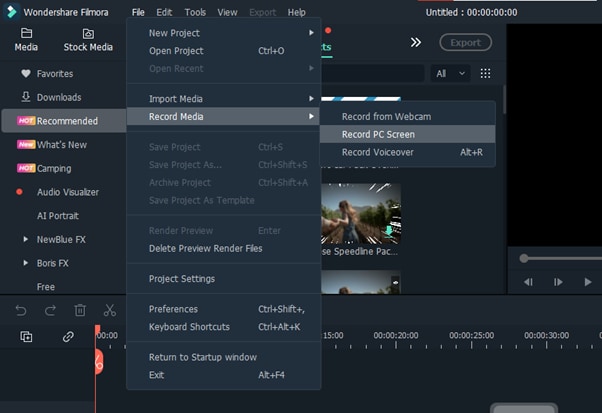
Step2 Launch Filmora 11 and click “New project” in the main interface. Click “File” from the top toolbar and scroll down to “Record media.” From the drop-down menu, select “Record PC Screen.”
Step3 A new “Wondershare Screen Recorder” window will pop up. You can set up a full screen, custom or target screen recording, speaker, and microphone settings. If you want more Settings, click the drop-down icon.
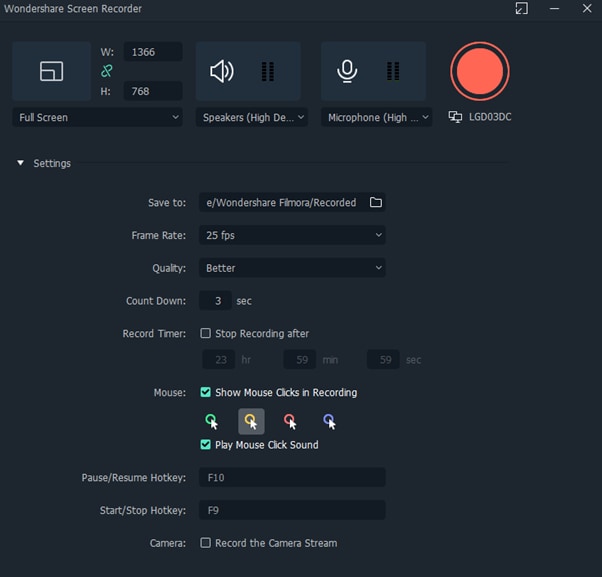
Step4 Click the Start icon to begin your recording. Afterward, click the Stop icon to stop the recording, and your stream will be saved in the selected destination.
Conclusion
In this article, we’ve discussed three step-by-step methods to help you do live streaming and recording at the same time. With these solutions at your disposal, you’ll be able to save your VODs with ease.
It is best to choose only one software to start with to avoid the time-consuming trial-and-error process. If you want to add another tool, do so later; otherwise, you will waste your precious time and resources.
Give these methods a shot, and eventually, you will find your groove—and become accustomed to just how easy it is to record and stream a video simultaneously.
Free Download For Win 7 or later(64-bit)
Free Download For macOS 10.14 or later
Free Download For macOS 10.14 or later
Unlock Your Video Editing Potential With Filmora From Wondershare
Are you looking to make a cool, fun video for a special occasion? Look no further than Wondershare Filmora.
With a range of video editing tools and effects, you can easily create stunning visuals and captivating stories. Whether you are making a video for a special occasion or a social media post, Filmora has the features to help you create the perfect video.
In this article, we will discuss the benefits of using Filmora and look further into some of its main features such as split screens, LUTs, keyframes, and more. So, let your creative juices flow and start making awesome videos with Wondershare Filmora today!
Why Choose Wondershare Filmora?
Wondershare Filmora is one of the most affordable video editors available in the market, with features that are usually very expensive to use. This tool is not only available for desktops but also for mobiles. So, you can also create content on the go!

Free Download For Win 7 or later(64-bit)
Free Download For macOS 10.14 or later
Let’s dig a little deeper to see how Filmora can benefit you.
Benefits of Using Filmora
Filmora, as compared to its contestants, has much more to offer. From a range of tools and effects to an easy-to-use interface to affordability, Filmora has it all!
1.Variety of Video Editing Tools and Effects
Wondershare Filmora has a variety of video editing tools and effects. Some of the advanced editing features to spice up your videos are available such as cropping, trimming, and adjusting the audio, as well as adding motion graphics, motion tracking, and more.
Furthermore, users can also access a library of royalty-free video clips, overlays, and sound effects to add the perfect touch to their videos.
2.Easy-to-Use Interface
Whether you are a beginner or a pro, Filmora’s easy-to-use interface will be your favorite! It is simple, plain, and easy to understand.
With its intuitive interface, you can also quickly and easily customize your videos with an array of special effects, including transitions, text, and music.
3.Affordable
Last but not least, the greatest catch of Wondershare Filmora is its affordability. With the wide variety of features that it offers, it has reasonable prices to offer.
With packages starting at just $49.99 per year to $79.99 perpetual, you can avail a multitude of features that update regularly and with every new version of Filmora. With these packages, you can get around 1GB of Filmora cloud storage.
So, what are you waiting for? Download Filmora now. And don’t worry; we have got you covered with some great tips to begin your Filmora journey.
Some Stunning Features in Filmora
Although Filmora is easy to use, and you can explore it on your own, it never hurts to know a few features before you dive in.
1.Split Screen Presets
Starting with split screens that are a great way of enhancing your videos. You can show multiple videos side by side, which gives a very chic look to your overall video. Here’s how to do it in Filmora.
Free Download For Win 7 or later(64-bit)
Free Download For macOS 10.14 or later
Step1Start a new project
Launch Filmora and click on “New Project.”

Step2Choose a split screen preset
On the top, go to “Templates” and then “Split Screen.”

Choose the preset that you need. You can also preview the layout.
Step3Add to timeline
Add the chosen preset to the timeline track.

Step4Add videos to the layout
Import media from your library or use stock media to add videos to your layout. Drag and drop your media on the layout.

Step5Edit the split screen
Once you have all the videos added to the layout, double-click on the split screen in the timeline panel. The edit options will appear on the left.

Choose how you want to edit your video and then save it.
2.Filters and LUTs
Another cool feature that Filmora offers is Filters and LUTs. In order to do so, follow these simple steps.
Free Download For Win 7 or later(64-bit)
Free Download For macOS 10.14 or later
Step1Add media
Import all the video or audio files that you want to edit to the media section.

Step2Go to “Filter & LUT”
Under the “Effects” tab, go to “Filter & LUT.” Choose the LUT that you want to add to your video.

Step3Add the LUT to your video
Add the LUT to your timeline by drag-n-drop.

Drag it to adjust it according to your video. In order to adjust the strength of the LUT, double-click on it.

You can adjust the opacity of the LUT according to your preference. You can make it as soft or as strong as you want.
3.Animated Keyframes
Moving on, another one of the cool Filmora features is keyframing. Filmora allows you to add animated keyframes in your videos to add moving text or such effects. Follow the steps below to do so.
Free Download For Win 7 or later(64-bit)
Free Download For macOS 10.14 or later
Step1Add videos to the timeline
Add a video to your timeline and double-click on it to open up the editing options. Go to the “Animation” tab.

Here, you have different preset animations that you can use for your video.
Step2Add a keyframe
Add your chosen preset and hit play. You will see how that keyframe works. You can also add multiple keyframes to your video to make it look cooler.

Once you play the video, it will look like this.

This is an easy way of making intros or outros of your videos.
4.Detach Audio
Suppose you have a video where you like the audio and want to use it for another video. How would you separate the audio? This is where the Detach Audio feature comes in.
Free Download For Win 7 or later(64-bit)
Free Download For macOS 10.14 or later
Step1Add video to the timeline
Drag and drop the video on the timeline.

Step2Detach audio
To separate the audio, right-click on the video and choose “Detach Audio.” The audio track will appear separately in the timeline. You can then use it as you wish.

5.Blur Effects
Next up, we have the feature of blurring your video or the background in your video. To do so, follow these simple steps.
Free Download For Win 7 or later(64-bit)
Free Download For macOS 10.14 or later
Step1Go to the effects tab
After adding the video to your timeline, go to the Effects tab on top.

Step2Search for blur effects
In the search bar, type “blur.” You will see several blur effects. Choose any effect and see a preview of it.

Step3Add effects to videos
Add the chosen effect to your video. Then adjust its position accordingly. Double-click on the blur effect in the timeline panel to change its size and opacity.

These are some of the most amazing features that we have listed here. FYI, this is just the brink of the iceberg. There is a whole lot more that Filmora has to offer.
Final Words
If you’re looking for a simple and intuitive video editing platform to help you create stunning videos, look no further than Filmora. It is packed with powerful features that let you turn your raw footage into captivating movies in no time.
With its user-friendly design, you can easily access all the tools you need to make amazing videos, no matter your skill level. Try Filmora today and create unforgettable videos that will leave viewers in awe.
Free Download For macOS 10.14 or later
Let’s dig a little deeper to see how Filmora can benefit you.
Benefits of Using Filmora
Filmora, as compared to its contestants, has much more to offer. From a range of tools and effects to an easy-to-use interface to affordability, Filmora has it all!
1.Variety of Video Editing Tools and Effects
Wondershare Filmora has a variety of video editing tools and effects. Some of the advanced editing features to spice up your videos are available such as cropping, trimming, and adjusting the audio, as well as adding motion graphics, motion tracking, and more.
Furthermore, users can also access a library of royalty-free video clips, overlays, and sound effects to add the perfect touch to their videos.
2.Easy-to-Use Interface
Whether you are a beginner or a pro, Filmora’s easy-to-use interface will be your favorite! It is simple, plain, and easy to understand.
With its intuitive interface, you can also quickly and easily customize your videos with an array of special effects, including transitions, text, and music.
3.Affordable
Last but not least, the greatest catch of Wondershare Filmora is its affordability. With the wide variety of features that it offers, it has reasonable prices to offer.
With packages starting at just $49.99 per year to $79.99 perpetual, you can avail a multitude of features that update regularly and with every new version of Filmora. With these packages, you can get around 1GB of Filmora cloud storage.
So, what are you waiting for? Download Filmora now. And don’t worry; we have got you covered with some great tips to begin your Filmora journey.
Some Stunning Features in Filmora
Although Filmora is easy to use, and you can explore it on your own, it never hurts to know a few features before you dive in.
1.Split Screen Presets
Starting with split screens that are a great way of enhancing your videos. You can show multiple videos side by side, which gives a very chic look to your overall video. Here’s how to do it in Filmora.
Free Download For Win 7 or later(64-bit)
Free Download For macOS 10.14 or later
Step1Start a new project
Launch Filmora and click on “New Project.”
Step2Choose a split screen preset
On the top, go to “Templates” and then “Split Screen.”
Choose the preset that you need. You can also preview the layout.
Step3Add to timeline
Add the chosen preset to the timeline track.
Step4Add videos to the layout
Import media from your library or use stock media to add videos to your layout. Drag and drop your media on the layout.
Step5Edit the split screen
Once you have all the videos added to the layout, double-click on the split screen in the timeline panel. The edit options will appear on the left.
Choose how you want to edit your video and then save it.
2.Filters and LUTs
Another cool feature that Filmora offers is Filters and LUTs. In order to do so, follow these simple steps.
Free Download For Win 7 or later(64-bit)
Free Download For macOS 10.14 or later
Step1Add media
Import all the video or audio files that you want to edit to the media section.
Step2Go to “Filter & LUT”
Under the “Effects” tab, go to “Filter & LUT.” Choose the LUT that you want to add to your video.
Step3Add the LUT to your video
Add the LUT to your timeline by drag-n-drop.
Drag it to adjust it according to your video. In order to adjust the strength of the LUT, double-click on it.
You can adjust the opacity of the LUT according to your preference. You can make it as soft or as strong as you want.
3.Animated Keyframes
Moving on, another one of the cool Filmora features is keyframing. Filmora allows you to add animated keyframes in your videos to add moving text or such effects. Follow the steps below to do so.
Free Download For Win 7 or later(64-bit)
Free Download For macOS 10.14 or later
Step1Add videos to the timeline
Add a video to your timeline and double-click on it to open up the editing options. Go to the “Animation” tab.
Here, you have different preset animations that you can use for your video.
Step2Add a keyframe
Add your chosen preset and hit play. You will see how that keyframe works. You can also add multiple keyframes to your video to make it look cooler.
Once you play the video, it will look like this.
This is an easy way of making intros or outros of your videos.
4.Detach Audio
Suppose you have a video where you like the audio and want to use it for another video. How would you separate the audio? This is where the Detach Audio feature comes in.
Free Download For Win 7 or later(64-bit)
Free Download For macOS 10.14 or later
Step1Add video to the timeline
Drag and drop the video on the timeline.
Step2Detach audio
To separate the audio, right-click on the video and choose “Detach Audio.” The audio track will appear separately in the timeline. You can then use it as you wish.
5.Blur Effects
Next up, we have the feature of blurring your video or the background in your video. To do so, follow these simple steps.
Free Download For Win 7 or later(64-bit)
Free Download For macOS 10.14 or later
Step1Go to the effects tab
After adding the video to your timeline, go to the Effects tab on top.
Step2Search for blur effects
In the search bar, type “blur.” You will see several blur effects. Choose any effect and see a preview of it.
Step3Add effects to videos
Add the chosen effect to your video. Then adjust its position accordingly. Double-click on the blur effect in the timeline panel to change its size and opacity.
These are some of the most amazing features that we have listed here. FYI, this is just the brink of the iceberg. There is a whole lot more that Filmora has to offer.
Final Words
If you’re looking for a simple and intuitive video editing platform to help you create stunning videos, look no further than Filmora. It is packed with powerful features that let you turn your raw footage into captivating movies in no time.
With its user-friendly design, you can easily access all the tools you need to make amazing videos, no matter your skill level. Try Filmora today and create unforgettable videos that will leave viewers in awe.
Adjust Background to Black for Your Product Review Video
Are you planning to make a product review video but wondering how to set up your background? If so, then you’re in the right place. This post will show you how to adjust the background to black for your product review video.
It’s essential to have a smooth black background without texture for your product review videos. Having a clean background is visually appealing and enhances the video. It will make sure that your viewers can see the product clearly without any distractions.
Do the following steps to change the background to black for your product review video:

Part 1. How to change the parameters in Filmora
For this tutorial, we will do it using Wondershare Filmora . So, if you haven’t installed it yet, you can download it here:
Free Download For Win 7 or later(64-bit)
Free Download For macOS 10.14 or later
Step1 Right-click the clip in the editing timeline > Edit Properties.

Step2 Select the Color menu > Advanced.

Step3 Setting the color parameters.
Click the adjust button in the upper left, scroll down to the vignette, and then decrease the amount and size value until the oval surrounds the subject.

Scroll up to the color options and increase the contrast to 100.

Go to the light menu, then decrease the shadows to cover any remaining light spots.

Part 2. Tips: How to improve product review video
Following these tips will help you improve the quality of your product review videos and make them more enjoyable for your audience.
1) Make sure your video has the correct resolution and scale
Having the correct resolution and scale for your video will make sure that it has a high-definition (HD) or high-quality resolution. Also, it will ensure that your video is the correct size when exporting.
If the scale is different from the resolution, then the empty space will be filled with black, and you will get black bars border that makes your video smaller.
2) Use proper lighting to ensure your video looks clear and bright
To get proper lighting, you should use natural lighting whenever possible, such as sunlight. However, if you can’t shoot during the day or it’s difficult to get natural light, you will need to use artificial lighting.
Next, adjust the white balance on your camera. You can also edit the color grading to finalize the look and improve the overall color of your video.
3) Make sure the audio quality of your video is good
Poor audio can make your video harder to listen to and turn off viewers.
Summary
It is essential to know how to adjust the background to black in your product review video. This is because it can help to make your video content more professional and stand out. By the end of this tutorial, you can now try and create a professional-looking video with a black background to improve your product review video.
Free Download For macOS 10.14 or later
Step1 Right-click the clip in the editing timeline > Edit Properties.
Step2 Select the Color menu > Advanced.
Step3 Setting the color parameters.
Click the adjust button in the upper left, scroll down to the vignette, and then decrease the amount and size value until the oval surrounds the subject.
Scroll up to the color options and increase the contrast to 100.
Go to the light menu, then decrease the shadows to cover any remaining light spots.
Part 2. Tips: How to improve product review video
Following these tips will help you improve the quality of your product review videos and make them more enjoyable for your audience.
1) Make sure your video has the correct resolution and scale
Having the correct resolution and scale for your video will make sure that it has a high-definition (HD) or high-quality resolution. Also, it will ensure that your video is the correct size when exporting.
If the scale is different from the resolution, then the empty space will be filled with black, and you will get black bars border that makes your video smaller.
2) Use proper lighting to ensure your video looks clear and bright
To get proper lighting, you should use natural lighting whenever possible, such as sunlight. However, if you can’t shoot during the day or it’s difficult to get natural light, you will need to use artificial lighting.
Next, adjust the white balance on your camera. You can also edit the color grading to finalize the look and improve the overall color of your video.
3) Make sure the audio quality of your video is good
Poor audio can make your video harder to listen to and turn off viewers.
Summary
It is essential to know how to adjust the background to black in your product review video. This is because it can help to make your video content more professional and stand out. By the end of this tutorial, you can now try and create a professional-looking video with a black background to improve your product review video.
Customize PowerPoint Slideshow Icon in 8 Simple Ways
Customise Powerpoint Slideshow Icon in Simple Ways
An easy yet powerful editor
Numerous effects to choose from
Detailed tutorials provided by the official channel
We often need to make different PowerPoint presentations. Be it for school projects, office presentations, college work or corporate presentations, PowerPoint slides are the major and the most commonly used technique for presenting any study or work material.
There are many methods to make your PowerPoint presentation stand out among the rest. Among all the ways, one of the most effective ones is customizing slideshow icons in PowerPoint. If you do not yet know about customizing slideshow icons in a PowerPoint, follow the following discussion, as we will discuss all the necessary information about it.
In this article
01 [Where is the Slide Show Button in PowerPoint?](#Part 1)
02 [What Are the Icons of PowerPoint Presentation?](#Part 2)
03 [How to Get More Icons for PowerPoint?](#Part 3)
04 [How to Customize PowerPoint Slideshow Icon in 8 Simple Ways](#Part 4)
Part 1 Where is the Slide Show Button in PowerPoint?
To present the PowerPoint presentation you make, you will have to find and click on the slide show view icon. The slide show option helps you to present the PowerPoint presentation. You can present each of the slides, one after the other.
You can choose to change the slides manually, or there is also an option where the slides can change automatically. You can readily select either of the options according to your needs. Also, you can fix the time duration that would determine how long would each slide stay on the screen if you choose to present your PowerPoint presentation automatically.
But before accessing all of them, it is crucial, or rather necessary, for you to know the slide show button in PowerPoint. So, here are the different steps that will help you find the slide sorter view icon in PowerPoint.
● Step 1
Open Microsoft PowerPoint.
![]()
● Step 2
Reach out to the top Menu bar.
![]()
● Step 3
You will find the option of “Slide Show” there.
● Step 4
You can make the necessary customization about the slide show setting of your presentation there.
![]()
● Step 5
Select the option “From Beginning” to begin your PowerPoint slide show from the first slide. Or, you can select the option “From Current Slide” if you’re going to start the slide show from the slide you are currently present.
![]()
Part 2 What Are the Icons of PowerPoint Presentation?
Customizing your slides for your slide show with the help of the innumerable icons of the PowerPoint requires you to know about the various groups of available icons. So, we will now discuss the different groups of icons available in the PowerPoint.
The following are the different icons of PowerPoint that you can integrate into your PowerPoint presentation.
● Accessibility
The first groups of icons are about accessibility. It denotes the symbols or icons that depict the differently-abled or specially-abled people. It helps represent and include a large community of specially-abled people.
![]()
● Analytics
The following group represents the different symbols related to Mathematics, analysis, presentation, graphs and the like.
● Animals
This set of icons includes the symbols for various animals and birds that one can include in their presentation and make it look more attractive.
![]()
● Apparel
This group of icons include the different symbols of the outfits, clothes, dresses and the other accessories that we wear.
● Arrows
It includes the symbols for the arrows pointing in different directions. This group of icons can be one of the most useful ones among the rest.
● Art
It includes a group of icons that depict anything and everything artistic.
![]()
● Body Parts
You will get the symbols for all the body parts in this icon group.
![]()
● Bugs
Get the symbols of the bugs and insects under this category.
● Buildings
This set of symbols shows different types of buildings. It can be a house, a church, a bakery, etc.
There are many such groups of icons, which include the follows.
● Business
● Commerce
● Communication
● Celebration
● Education
● Faces
● Dinosaurs
● Food and Drinks
● Holidays
● Home
● Interface
● Landscape
● Location
● Medical
● Nature and Outdoors
● Occupation
● People
● Process
● Puzzles and Games
● Security and Justice
● Signs and Symbols
● Sports
● Technology and electronics
● Tools and Buildings
● Vehicles
● Weather and Seasons
Part 3 How to Get More Icons for PowerPoint?
PowerPoint has an endless variety of icons for your presentation. No matter what your need is or which type of presentation you are making. You will find any type of icon to ornament your presentation to the fullest.
But, how can you get more icons for your PowerPoint presentation? So, here are the steps for integrating as many icons as you want in your PowerPoint presentation.
Step 1
Go to PowerPoint and reach out to the top Menu bar.
![]()
Step 2
Select the option “Insert”.
Step 3
Select the option “Icons.”
Step 4
Search for as many and whatever type of icon you want to integrate into your PowerPoint presentation.
![]()
Step 5
Select “Insert” option.
![]()
Part 4 How to Customize PowerPoint Slideshow Icon in 8 Simple Ways
Here are the eight different ways in which you can customize the PowerPoint Slideshow Icon.
01Using sketchy lines
First thing, insert any icon of PowerPoint and then use the option “Convert to Shape”.
Go to the “Shape Format Tab” and go to the “Shape Outline.”
Select “Sketchpad”.
You can readily customize the icons in PowerPoint using this recently introduced option at PowerPoint.
![]()
02Adding Simple Shapes
Through this step, you can add some additional details and make the icons of PowerPoint even more enhanced and attractive. You have the option of including a simple and basic shape. Or you can also add some detailing to the icons. You have the freedom of letting your creativity flow to the fullest.
● Group your icon
● Make it effortless to copy and paste and move around all over the slide.
03Adding Animations
You can present your icons in the PowerPoint presentation in the form of animations. You can make them appear through different animation speeds and variations. You can resize them and add layers for animating the icons in PowerPoint.
04Changing the properties of the icons
You can also change the icons’ brightness, contrast, or colours to make them look more enhanced and engaging.
05Adding entrances and exists
You can make your icons enter and leave the presentation in many unique ways.
![]()
06Select the icon you prefer to customise
● Choose the “BrightSlide tab.”
● Go to “My Animations”
Choose your preferred way of making your icon enter or exit the slide
07Using mask
For this, here are the steps.
● Cover a part of the entire slide by selecting a rectangle.
● Match your design and change the fill colour.
● Use the “Align” tools to make circles.
● Animate the icons according to the way you prefer.
08Direction
Another exciting yet straightforward way of customising your icons in PowerPoint is by making them appear from a different direction. Although it sounds simple, it will make your presentation look more formal and intreating.
09Fading in and out
You can readily make your icons fade in or fade out and make them appear more exciting and engaging for your presentation.
Another way of making your presentation look entirely out of the box is with one of the best video editing tools: Filmora. Wondershare Filmora Video Editor has been the best tool for editing videos and enhancing them, and you can readily use it for presenting any slide show or presentation.
For Win 7 or later (64-bit)
For macOS 10.12 or later
It will make your presentation unique, as it has some of the most extraordinary and incredible features. Some of the features are as follows.
● Motion Tracking feature- This feature will make your videos look more fascinating. You can use your creativity to customise the motion of your videos and edit them according to your ideas and inspirations.
● Effects-There are as many as more than 800 effects in Filmora. So, if you want to make your presentation look absolutely different and more incredible from the crowd, use Fimlora and its numerous effects to make your presentation the best of the best.
● Text and Titles- Add texts and titles wherever necessary so that you do not miss out on any information about your topic at the presentation.
● Music Library- Add some more uniqueness and exciting feature to your PowerPoint presentation with the help of the various music and tunes present at the Music Library of Filmora.
There are several other features of Filmora that, if we start including them, will make a list unending. It is the ideal tool for editing videos and also using it for producing some of the most wonderful presentations.
● Ending Thoughts →
● So, now you can readily make some of the most exciting and engaging PowerPoint presentations as you are well aware of the different ways of searching for the icons in PowerPoint, searching for the slideshow icon at PowerPoint, and also slideshow icons in PowerPoint.
● Additionally, you can use the best video editing tool, Filmora, for making your presentation stand out among the crowd in the optimal way possible.
● If you enjoyed reading this article, don’t forget to drop a comment below. Also, share your views with us regarding the content or anything related to the topic.
Also read:
- 2024 Approved 10 Best Free Spanish Text To Speech Converter Websites
- Updated In 2024, Add Fade in Windows Video Editor
- New Do You Want to Use a Professional Tool to Add Subtitles? Read This Article to Discover the Best Reliable Tool to Create Subtitles in Your Desired Manner
- How to Make a Slideshow with Movavi Slideshow Maker
- New Using AI to Replace Skies Finding the Right Methods
- Updated How to Create an Instant Slideshow on Mac
- 2024 Approved Looking for the Tools that Can Let You Blend Images Perfectly for Creating an Awesome Collage? Shortlisted for You Are the Best Bend Collage Program for an Effortless Task
- New All You Need to Know About Transparent Logos and How You Can Make Them. Top Transparent Logos You Can Take Inspiration From
- How to Change Video Resolution in Filmora
- New In 2024, Quick Answer What Is a GIF File
- Updated Add Motion Blur in After Effects for 2024
- Updated How to Add Photos to Tik Tok Video for 2024
- Updated Using Slow Motion in Adobe After Effects A Step-by-Step Procession
- New 2024 Approved How to Change the Speed of Video in DaVinci Resolve?
- New 2024 Approved How To Create a Polaroid Collage?
- In 2024, Want to Make a Funny Vlog on TikTok? Trying to Find the Right Topic for It? This Article Presents some Impressive Options for Making a Funny Vlog for TikTok
- Updated 2024 Approved Best Phantom Slow-Mo Camera For Recording Slow Motion Videos
- New In 2024, How to Create Sports Intro and Outro for YouTube Video?
- Do You Need More Time to Explain a Particular Screen or Moment in Your Recording Using an Extended Freeze-Frame? Learn How to Use Camtasia Freeze-Frame to Extend Parts of a Video Effectively
- Updated In 2024, Whatre the Best Alternatives to Pexels?
- New 2024 Approved Color Match Game Tips for You
- Updated In 2024, How to Add Font Effect
- How to DIY VHS Overlay in After Effects for 2024
- In 2024, Have You Ever Heard Hyperlapse and Tume Lapse Videos? Do You Know the Differences Between Them? This Article Will Introduce the Concepts, Features and Differnces of Them
- In 2024, 4 Methods to Merge MP4 and MP3
- New Best Video Title Generators
- 2024 Approved How Long Does It Take To Edit Videos
- Best Video Grabbers for Chrome for 2024
- New Want to Add an Exciting Countdown Timer to Your Wedding, Product Launch or Any Other Video Using After Effects or an Alternative Tool? This Article Will Help You Learn All About After Effects Countdown and the Procedure
- Updated 2024 Approved How to Add Text to Video
- New Explore a Variety of Inexpensive Camera Models Suitable for Making Slow-Motion Footage without Compromising Quality
- In 2024, Here, the Main Discussion Is Regarding the Split of the Audio From the Video in the Sony Vegas Pro. There Are Also some Details About the Substitute, Which Is Wondershare Filmora
- How To Remove iCloud From Apple iPhone 7 Plus Smoothly
- Solutions to Spy on Samsung Galaxy Z Fold 5 with and without jailbreak | Dr.fone
- Honor 90 Stuck on Screen – Finding Solutions For Stuck on Boot | Dr.fone
- How to Mirror Your Xiaomi Redmi Note 12 4G Screen to PC with Chromecast | Dr.fone
- 7 Ways to Unlock a Locked Samsung Galaxy S23 Phone
- In 2024, How to Mirror Tecno Pova 5 to Mac? | Dr.fone
- In 2024, 10 Fake GPS Location Apps on Android Of your Realme 11 Pro | Dr.fone
- In 2024, How To Unlock SIM Cards Of Nokia Without PUK Codes
- How to Unlock the Lock Screen on my ZTE Nubia Z60 Ultra
- Unlock a disable iPhone 14 Plus without itunes or icloud
- Apple iPhone 12 Mirror to PC? Top Apps You Must Know | Dr.fone
- The 6 Best SIM Unlock Services That Actually Work On Your OnePlus Nord N30 5G Device
- 9 Best Free Android Monitoring Apps to Monitor Phone Remotely For your Itel P40+ | Dr.fone
- In 2024, 15 Best Strongest Pokémon To Use in Pokémon GO PvP Leagues For Motorola Moto G34 5G | Dr.fone
- Planning to Use a Pokemon Go Joystick on Oppo A38? | Dr.fone
- New Top 12 Video to GIF Converters High Quality to Check Out
- In 2024, 4 solution to get rid of pokemon fail to detect location On Apple iPhone 14 Plus | Dr.fone
- How to Enable, Disable, and Change Safari Location on Apple iPhone 15 Pro Max | Dr.fone
- 4 Easy Ways for Your Honor Magic5 Ultimate Hard Reset | Dr.fone
- In 2024, Complete Review & Guide to Techeligible FRP Bypass and More For Oppo A79 5G
- Does find my friends work on Poco X5 | Dr.fone
- In 2024, How To Change Realme C33 2023 Lock Screen Password?
- How to Unlock Apple iPhone XS Without Passcode?
- How to Show Wi-Fi Password on Infinix Smart 8 HD
- Ways to stop parent tracking your Xiaomi Redmi Note 12T Pro | Dr.fone
- What Does Enter PUK Code Mean And Why Did The Sim Get PUK Blocked On Vivo S17 Pro Device
- How to Delete iCloud Account From iPhone SE (2022) without Password?
- Title: 3 Ways To Stream And Record At The Same Time for 2024
- Author: Chloe
- Created at : 2024-05-20 03:37:41
- Updated at : 2024-05-21 03:37:41
- Link: https://ai-editing-video.techidaily.com/3-ways-to-stream-and-record-at-the-same-time-for-2024/
- License: This work is licensed under CC BY-NC-SA 4.0.
