:max_bytes(150000):strip_icc():format(webp)/youtube-s-free-streaming-movies-and-tv-shows-1357439-ddbc3cf482e24a539c67009c07310ae1.png)
4 Methods to Crop a Video on Android Easily

4 Methods to Crop a Video on Android Easily
Nowadays, we can use our mobile phones to create almost anything – they have become an indivisible part of our lives. Most of the people check their mobile phones every 2 minutes – did they receive a new message?
What about different kinds of notifications – reactions on social network, or the ones which inform us about breaking news, or, to-do lists? People are well-connected to Facebook, Instagram, TikTok, and sometimes, we just want to update our accounts with just photos or new videos we took on the go. Sometimes, we have a perfect footage we took with our Android, but we have no idea, or just no time to edit our stunning video clips on the computer.
Yes, changing or adjusting a video shouldn’t be that hard – you shouldn’t be obligated to turn to Adobe Premiere Pro or other “heavy” software in order to have a video to your whole liking. Therefore, we have mobile applications just for editing our videos, in a simple, and fast way (thank you, mobile developers!).
In this article, we will be discussing how to crop a video on Android, but since most android devices don’t have this option, you will need to do it externally, by downloading and using different apps. So, more concretely, we will touch upon how to crop our video clips using following apps: Google Photos, Clideo, and Filmora.
Using Google Photos
In case you have Android, the Google Photos app will be there – it’s free and in most cases, already installed and ready to serve you. If you can’t find Google Photos, just find it and download it from the Google Play Store.
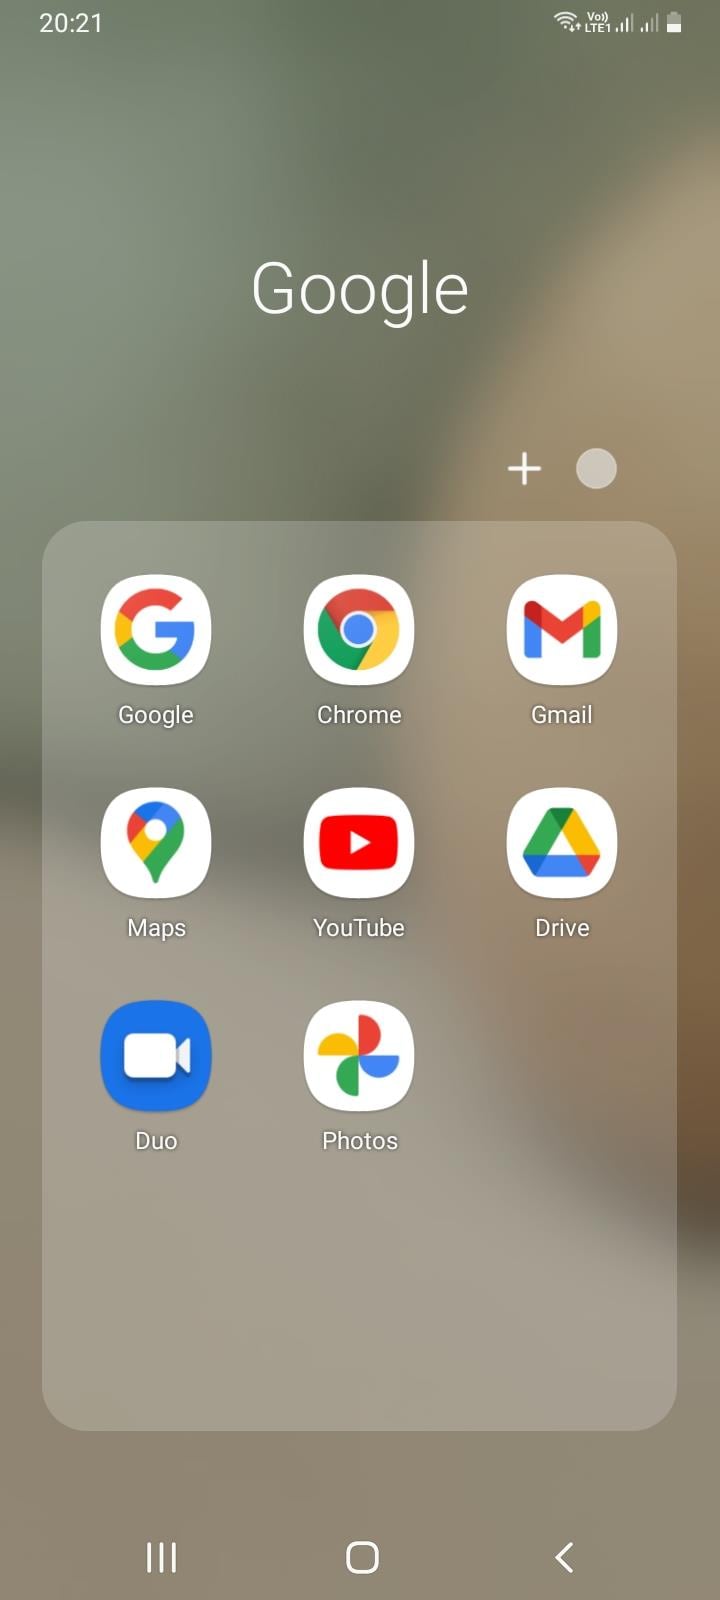
First off, you just open the application and allow it to access photos and media on your device. Tap the video you would like to crop. Then, click on Edit: it will launch the in-app video editor.
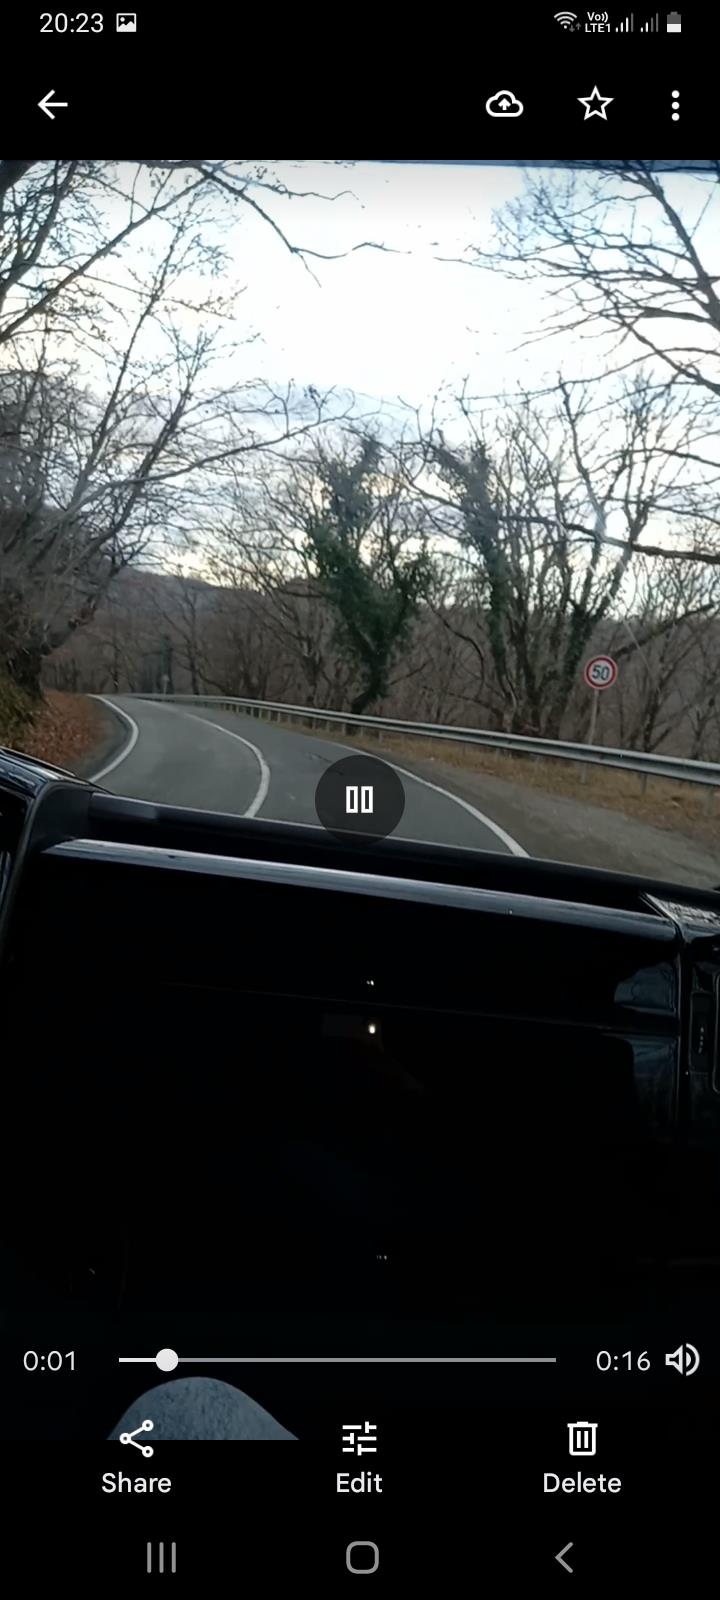
At the bottom, you will see the Crop option and hit on it, which will result in appearing a cropping box around your video clip.
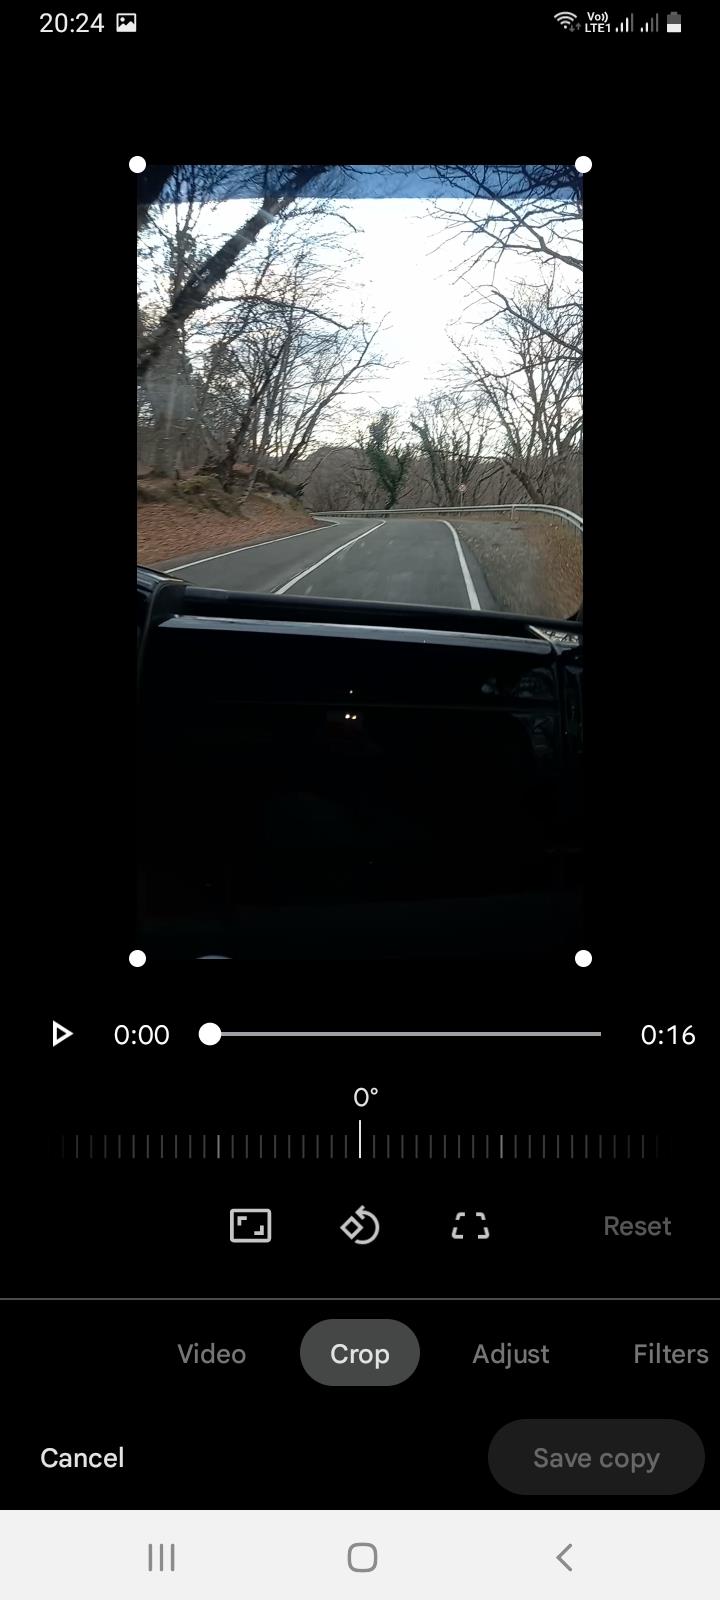
Once you see little icons at the bottom, you need to choose the first one – it’s the Ratio button, through which you can choose the aspect you would like to apply. Your choice is between these several aspect ratios: Free, Original, Square, 5:4, 16:9, 4:3, and 3:2.
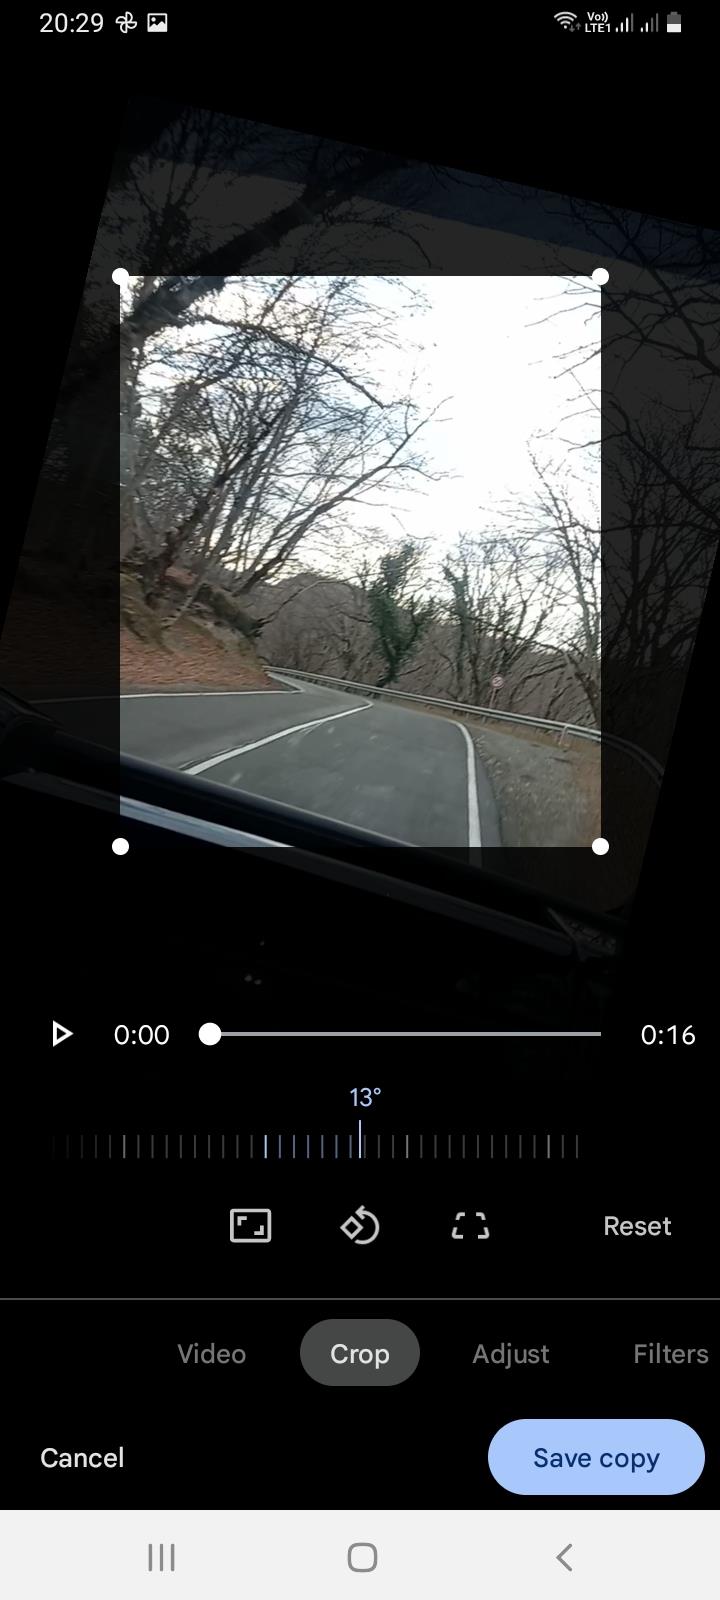
Choosing Free ratio option gives you the freedom to adjust the cropping sliders manually, in order to resize the video to any aspect ratio; it is even possible to rotate the clip, pinch, and zoom in/out.
After you are done with adjusting your video, you need to click on the Save Copy button, which will save a new edited version of your footage. And, meanwhile, don’t worry! – this will not be overwritten on the original one, which will still stand intact.
Using Clideo
Clideo is an interesting one… it doesn’t require you to download anything, because there is a way to crop your video online, through the web browser on Android.
First off, you need to click on Clideo’s Android crop video tool from the browser on the smartphone. You will see a Choose File button and hit on it – this will take you to your gallery and let you find the clip you are about to crop.
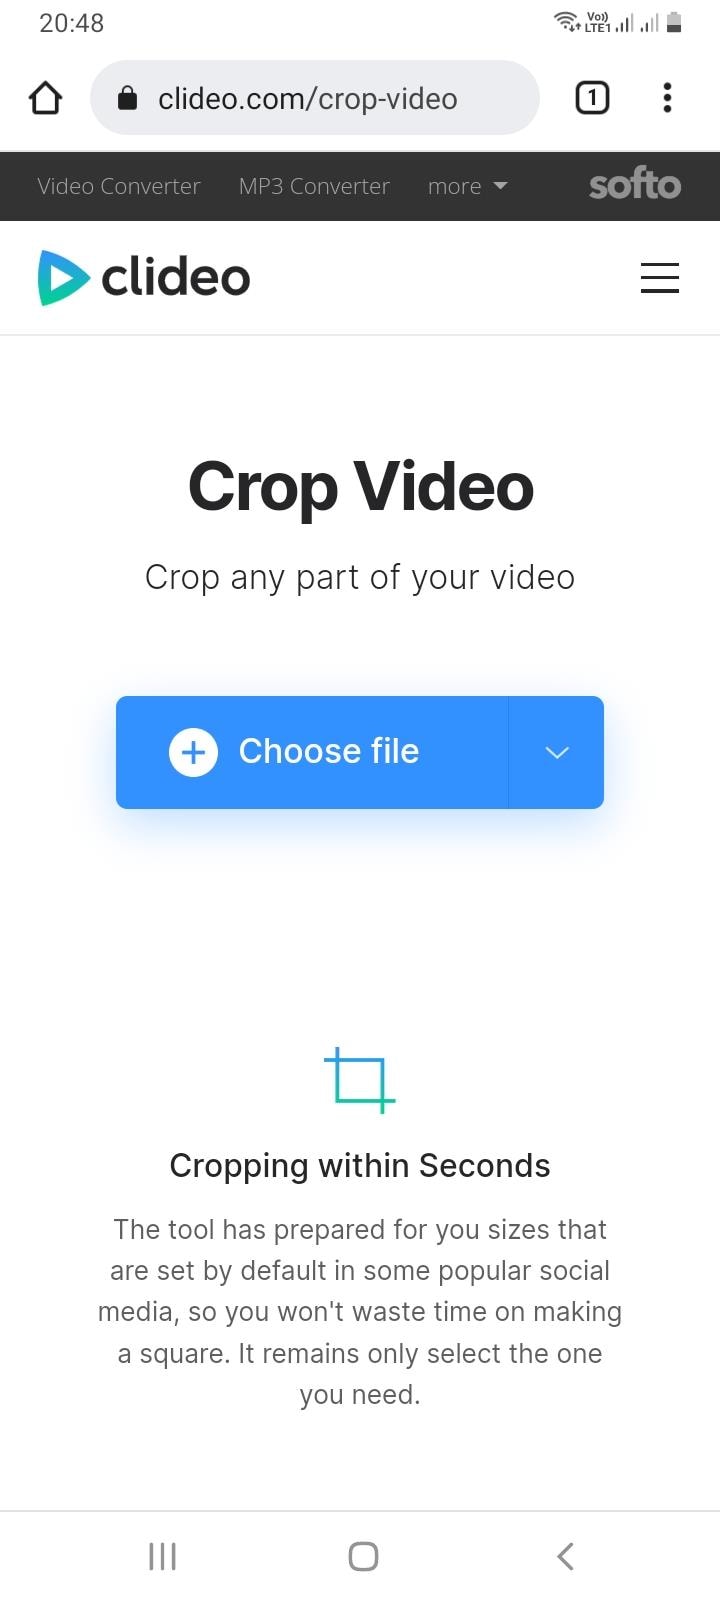
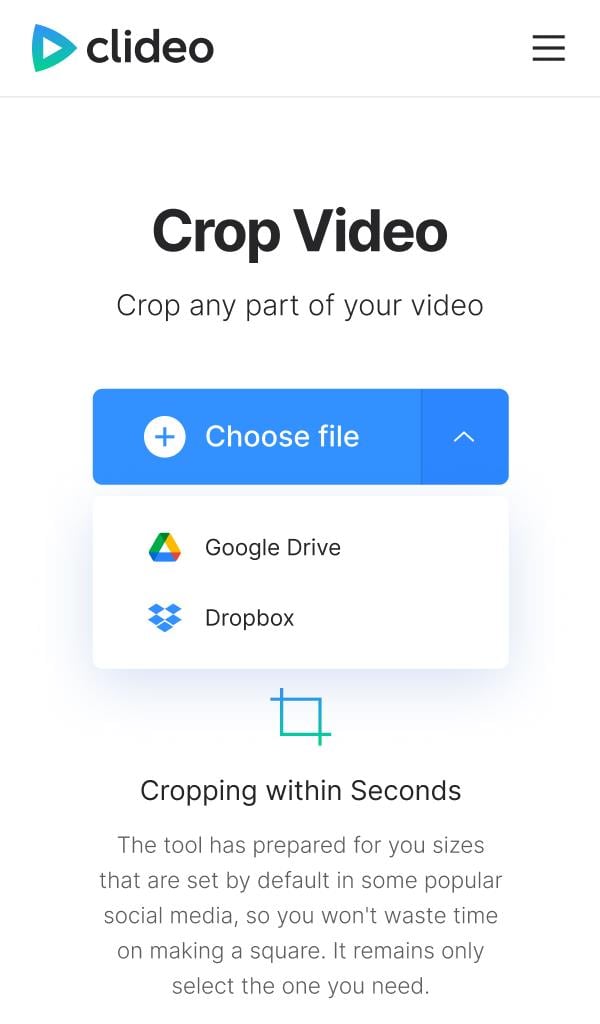
You can also upload your file from Cloud Storage. You need to click on the down-arrow on the right-hand side of the button and you’ll find the option to add a clip from your Dropbox or Google Drive account.
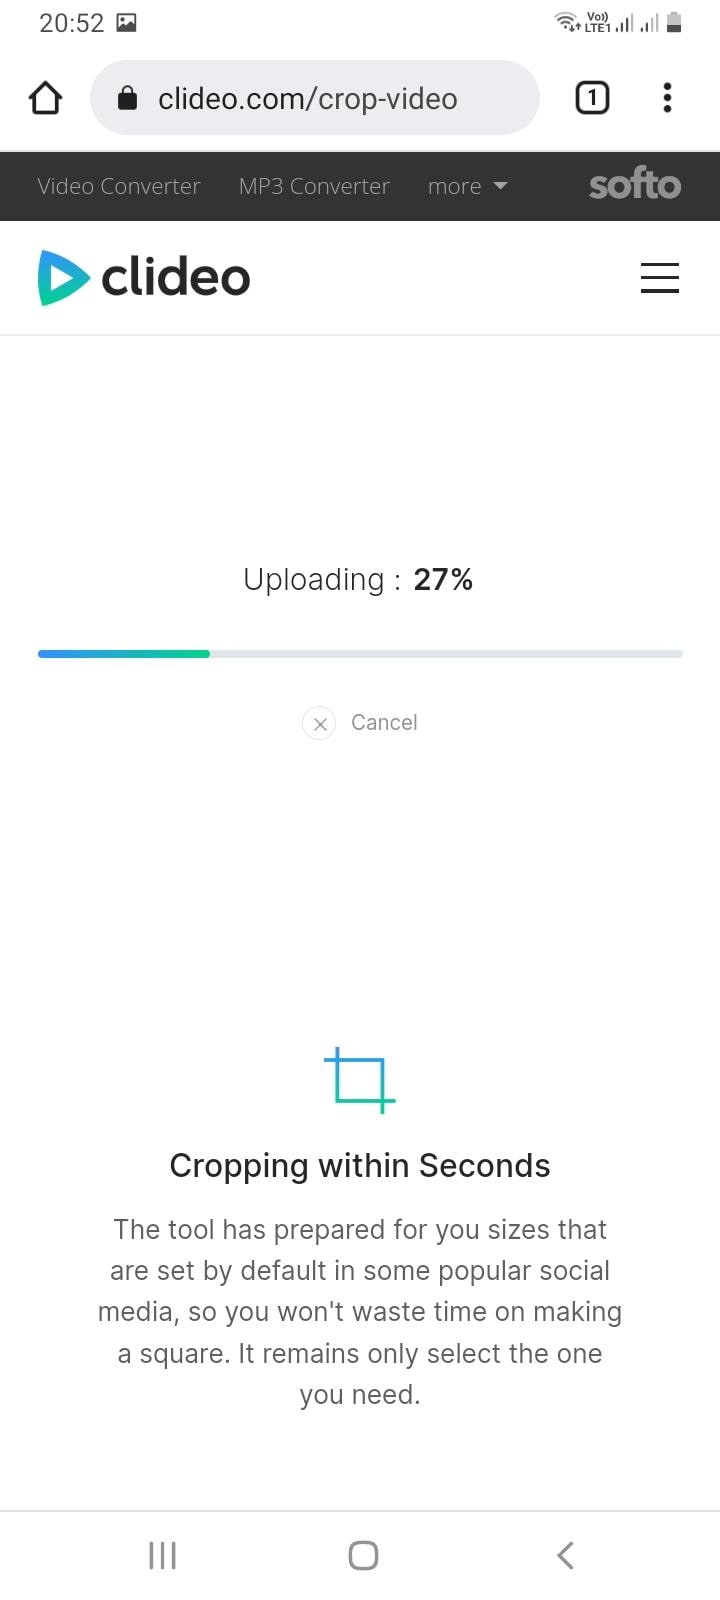
After your file is uploaded, Clideo will take you to the editing page, where you can select the area you would like to be in the edited version, and crop the video. Here, you will be able to choose the aspect ratio, exact size of the video and the format.
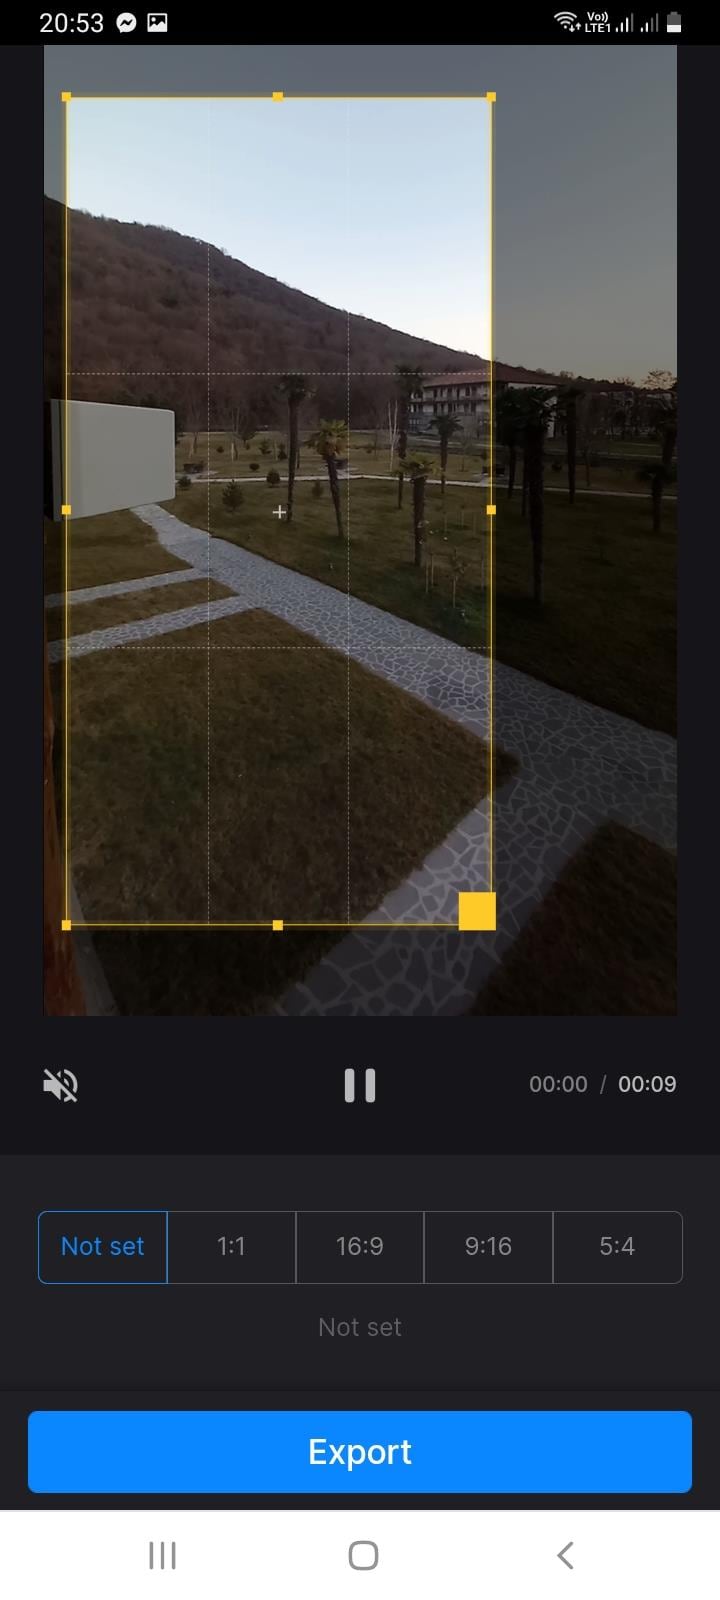
Once you have finished with the cropping and settings, you need to click on Export which will process your edited video clip.
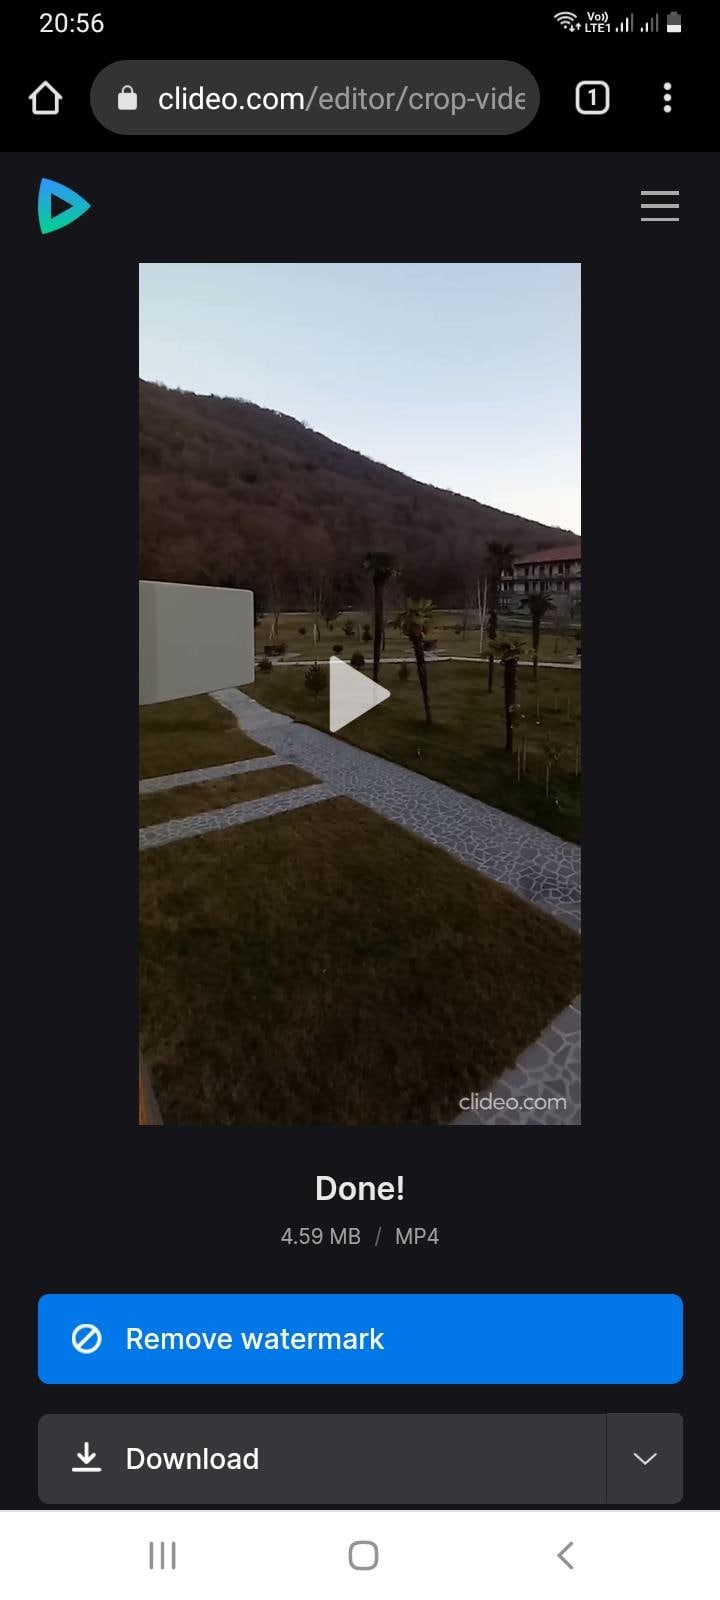
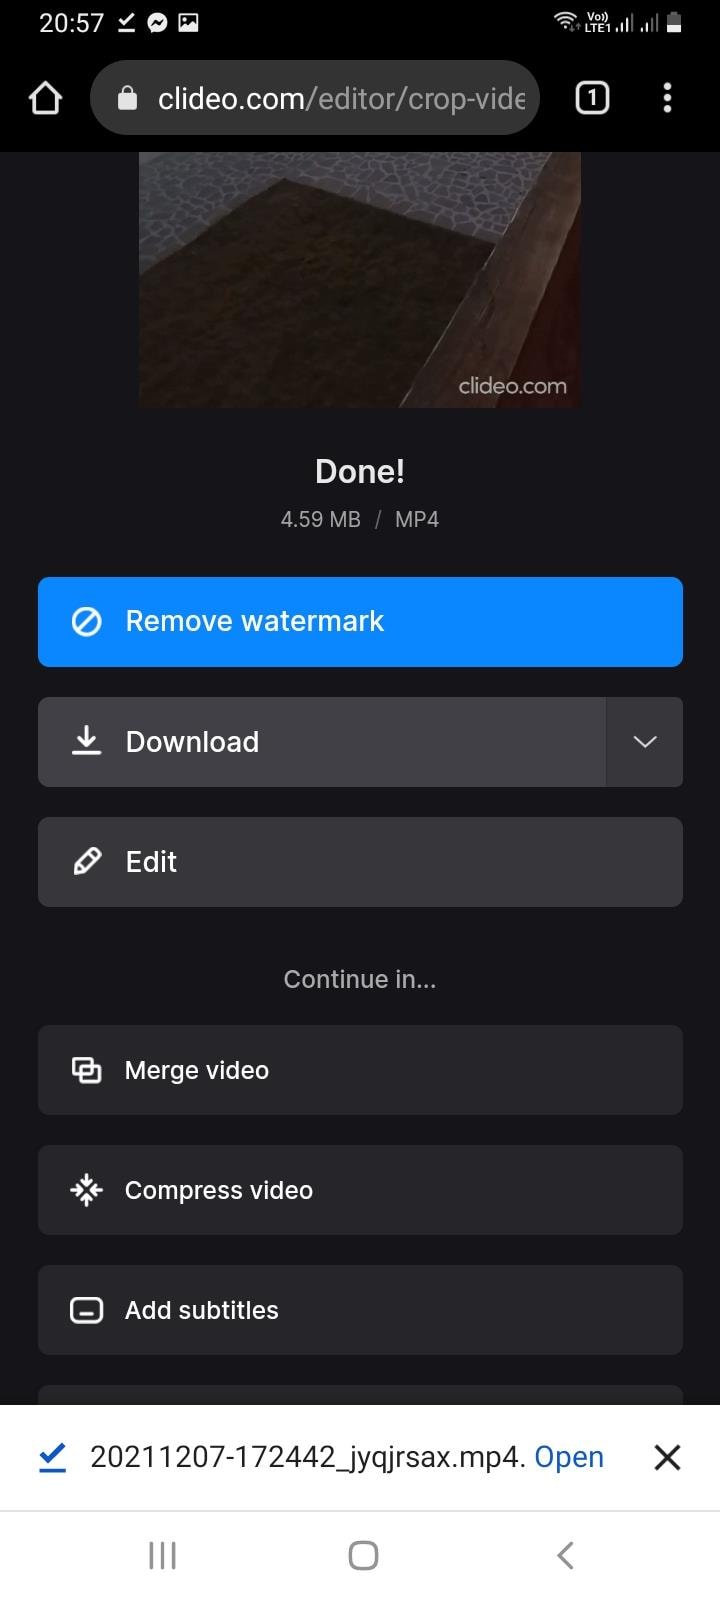
Once it is done, you proceed on the page which lets you do 3 things: Remove watermark (for it, though, you will have to sign in), Edit again, or/and Download!
Using Filmora
Filmora is an android version of software Filmora and it also gives you the opportunity to crop videos and photos with no problem. First, of course, you have to download the application from Google Play Store, and open it;
then, after opening it, you’ll click on New Project. You can choose any photo/video from your albums or stock, you might even select multiple clips.
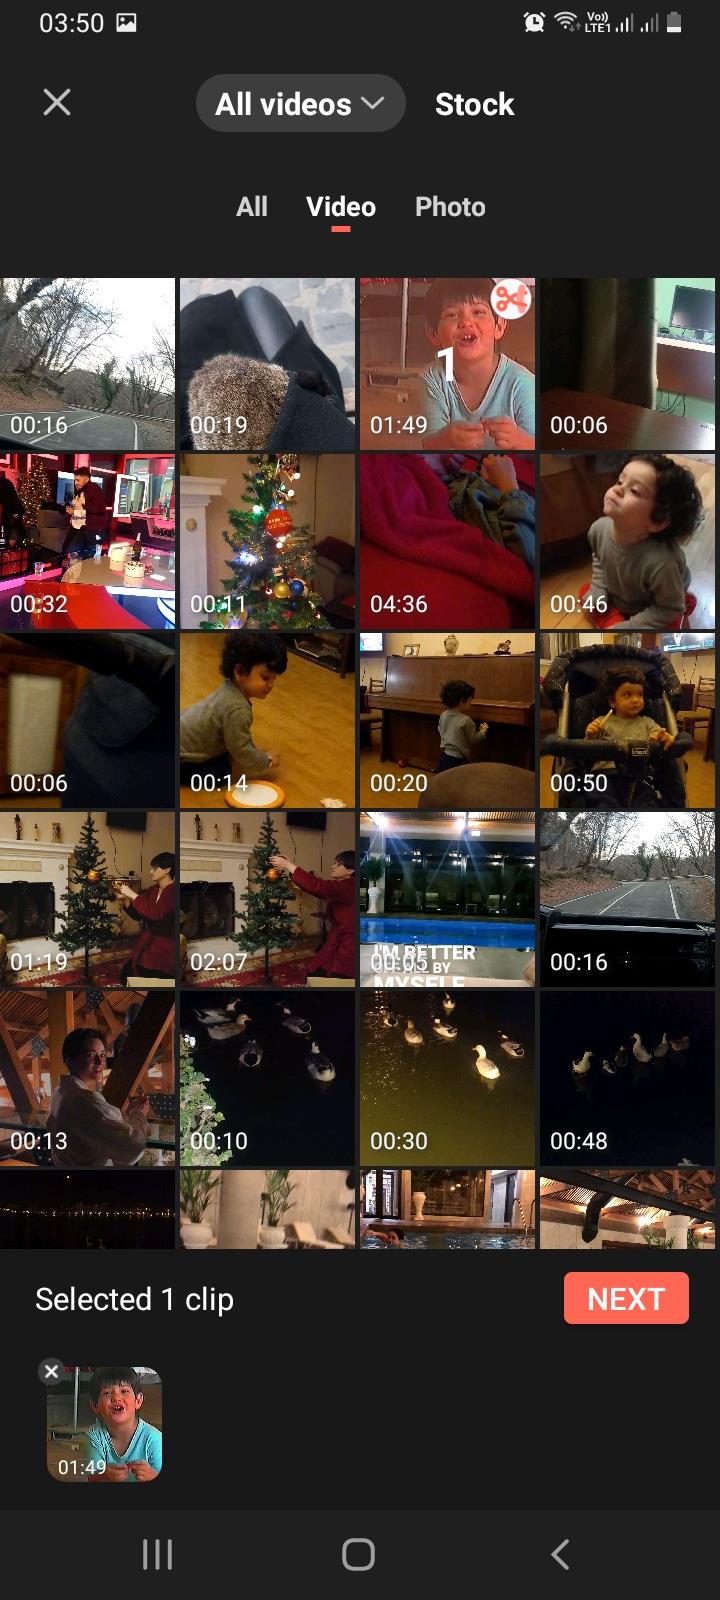
Once you have chosen your file, you click on Next button and you proceed to the editor itself.
There, you will see different options at the bottom of your phone, such as Trim, Music, Text, Sticker, Effect, etc.
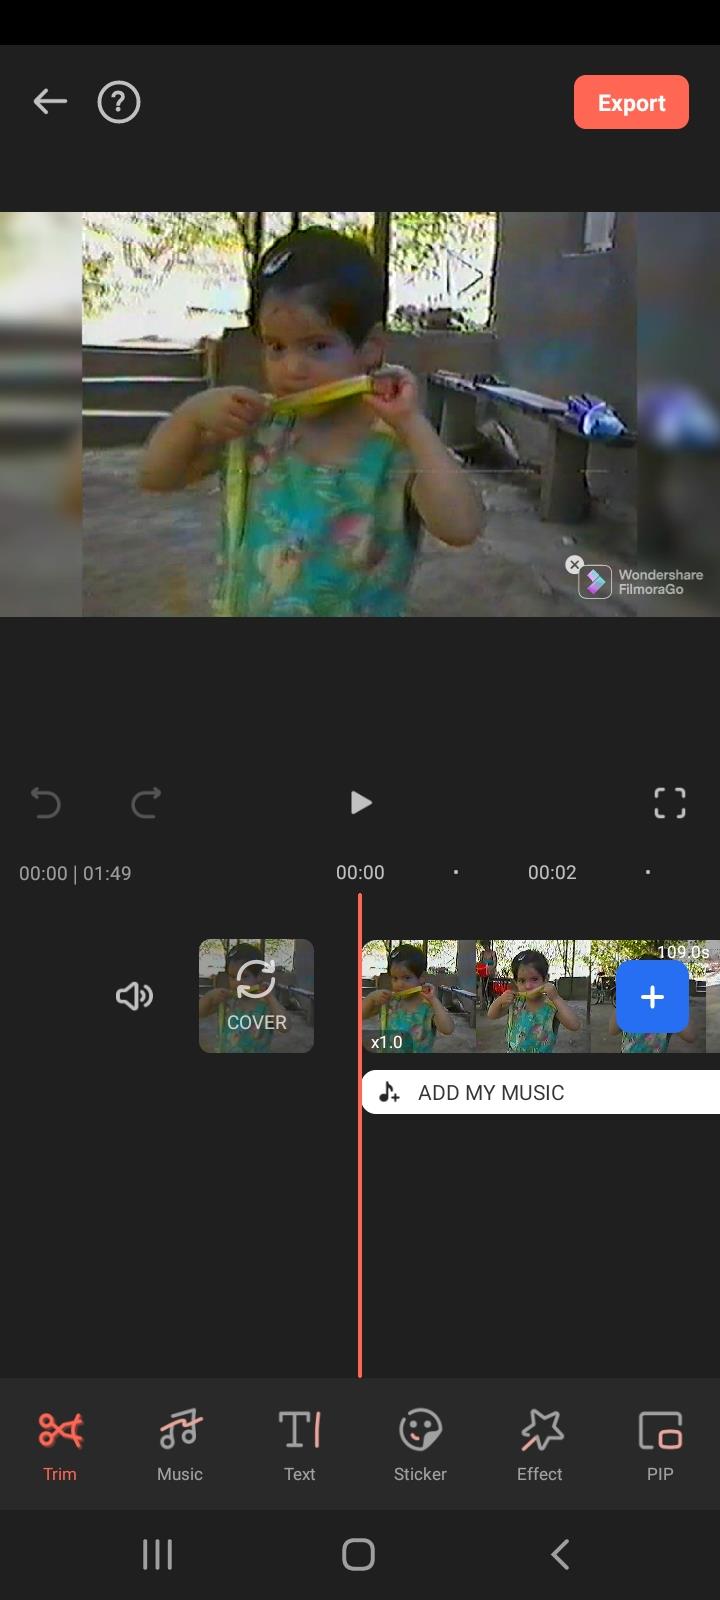
It doesn’t show you the option Crop right away, but Crop is “hidden” behind the Trim button!
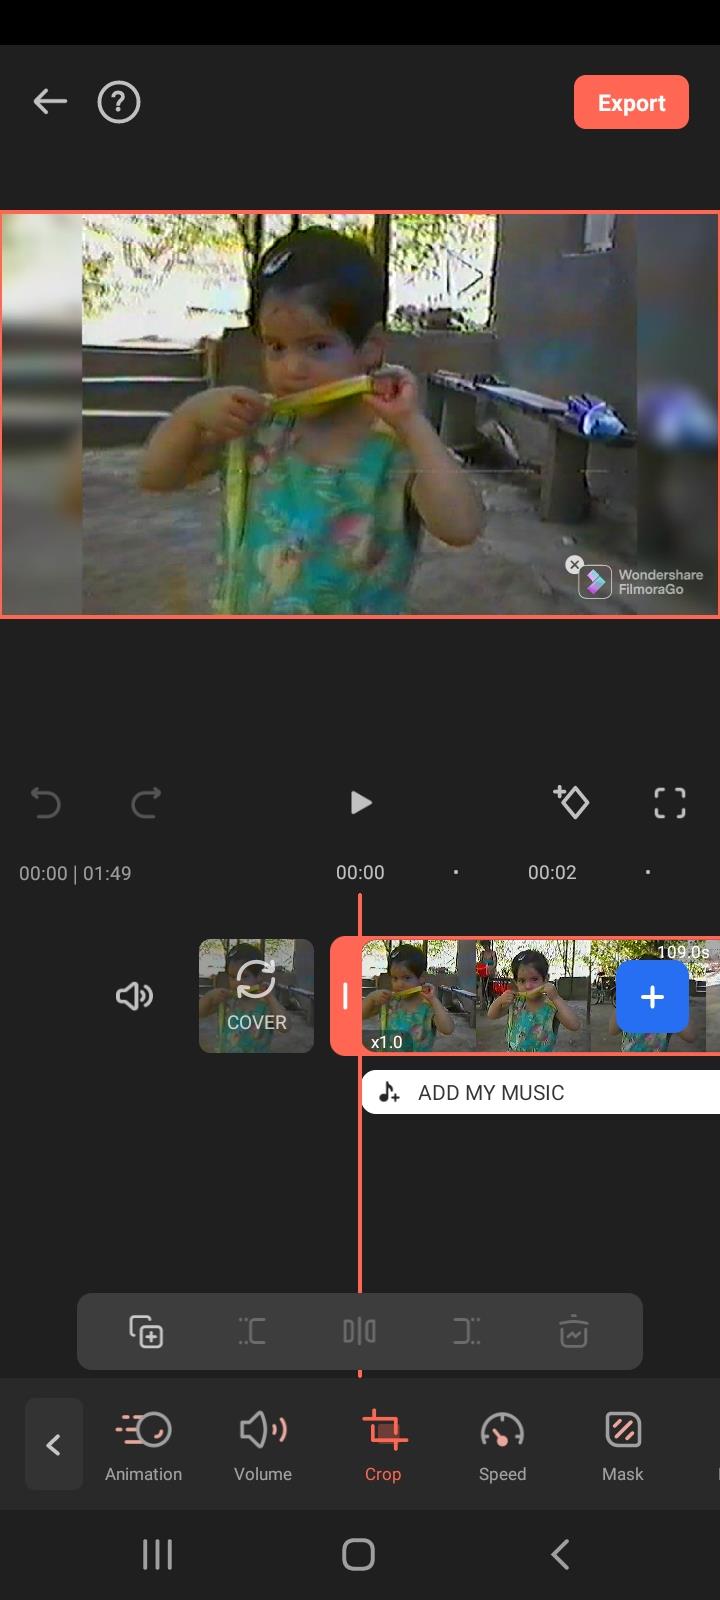
So, you choose Trim, then find Crop and hit that, and then you are free to choose any aspect ratio: 1:1; 4:5; 16:9; 9:16; and 5:4. You can crop the video manually, too, and you are able to adjust where your new “screen” might be wanted most.
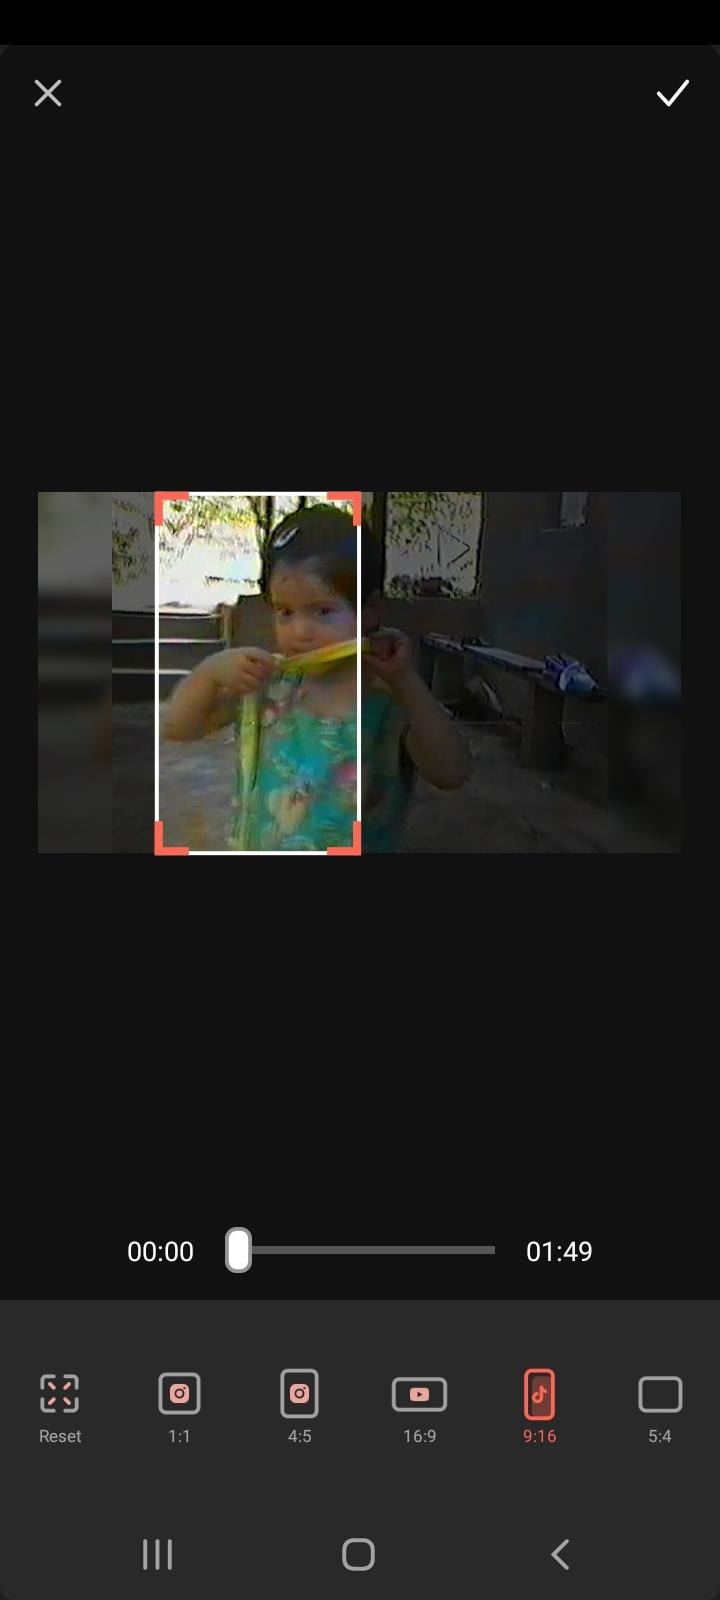
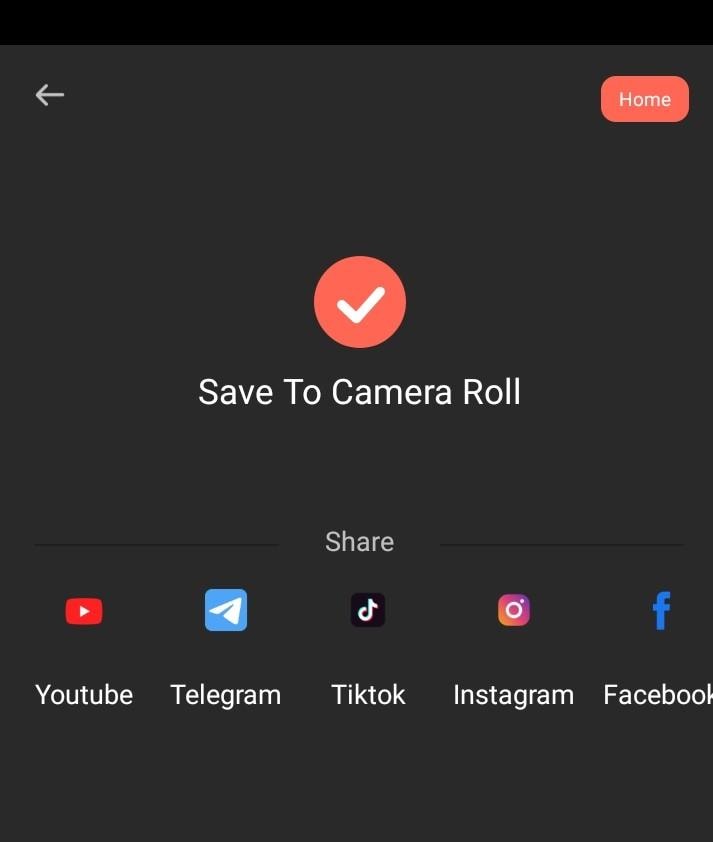
After you have finished with cropping and are satisfied, you can click on Export, which will take a few seconds.
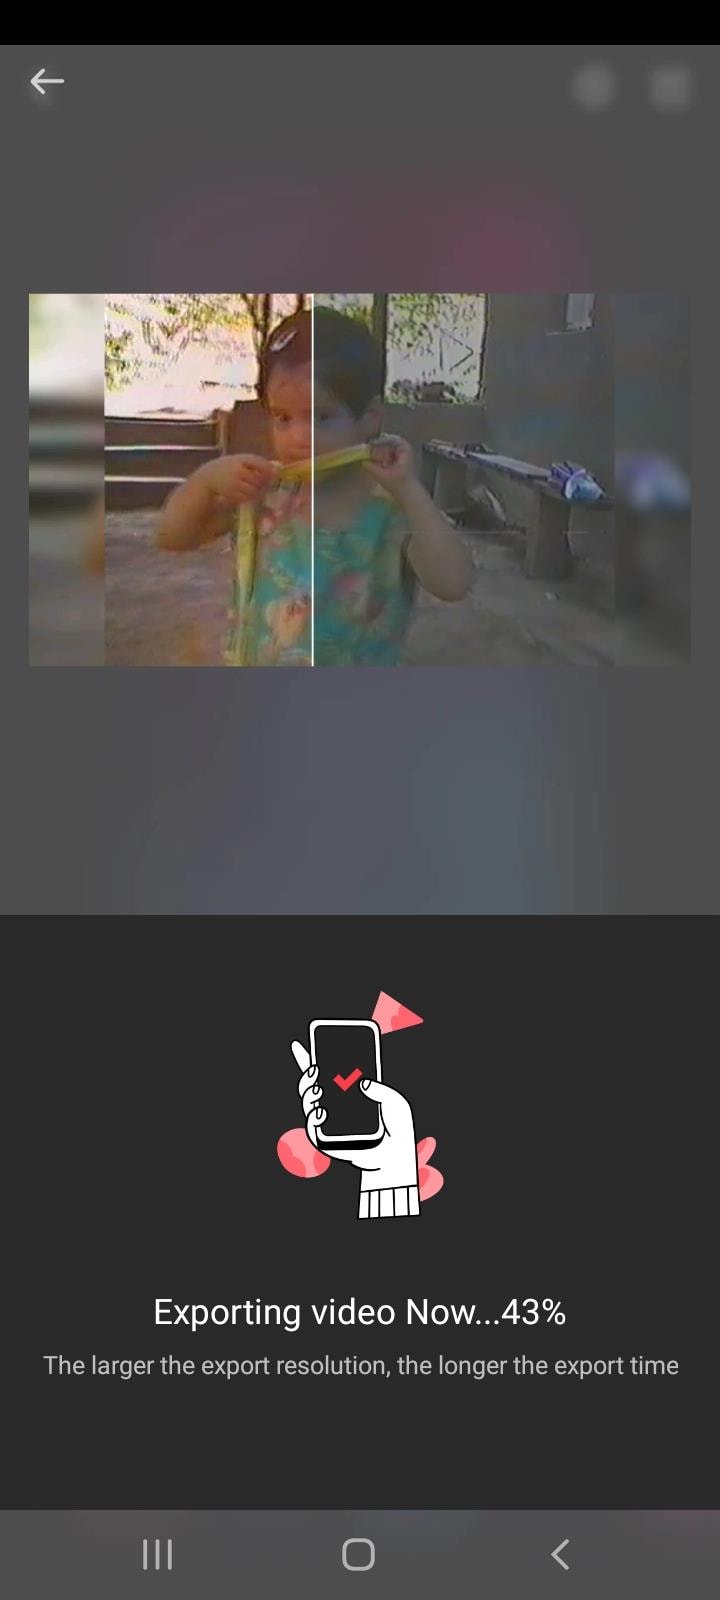
After it is done, you can find your newly-cropped video in your Camera Roll.
Using Wondershare Filmora
As mentioned, Filmora is a mobile version of its desktop edition – Wondershare Filmora Video Editor . So, you can also try your hand at this very handy software which also has a nice interface.
For Win 7 or later (64-bit)
For macOS 10.14 or later
If you download Wondershare Filmora X, you will need to click on Import Media Files Here.
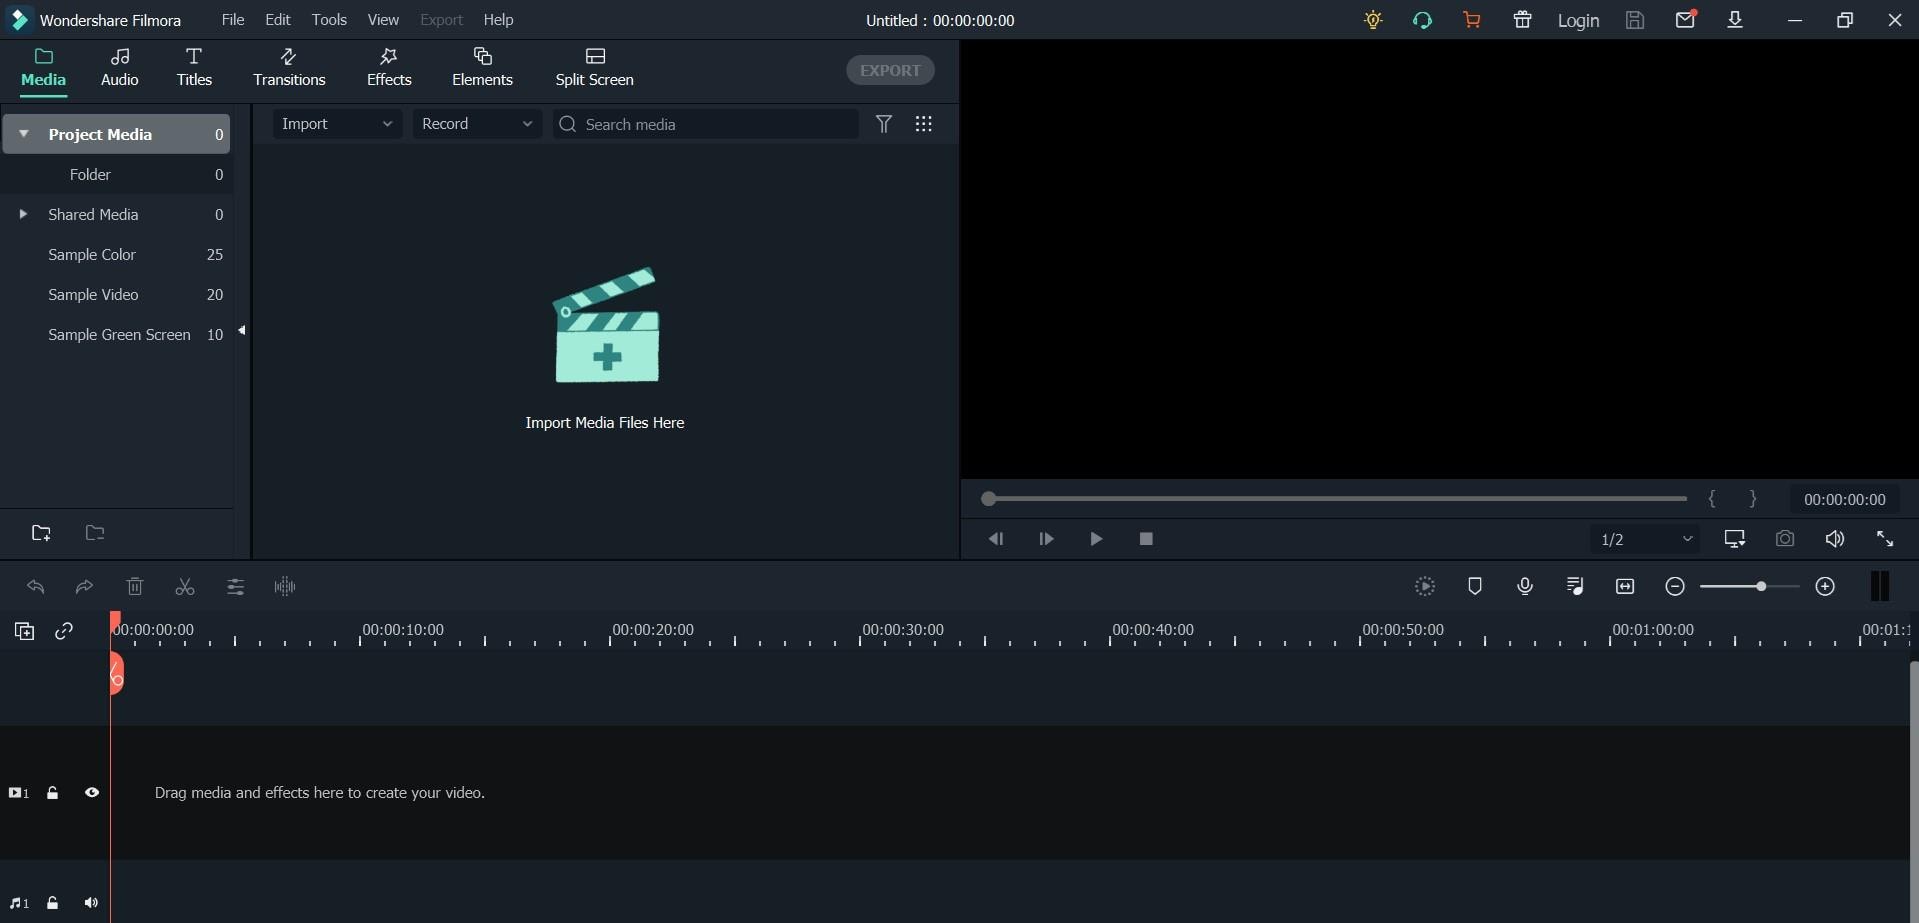
You will choose your clip(s) you would like to crop and then drag and drop it in the sequence.
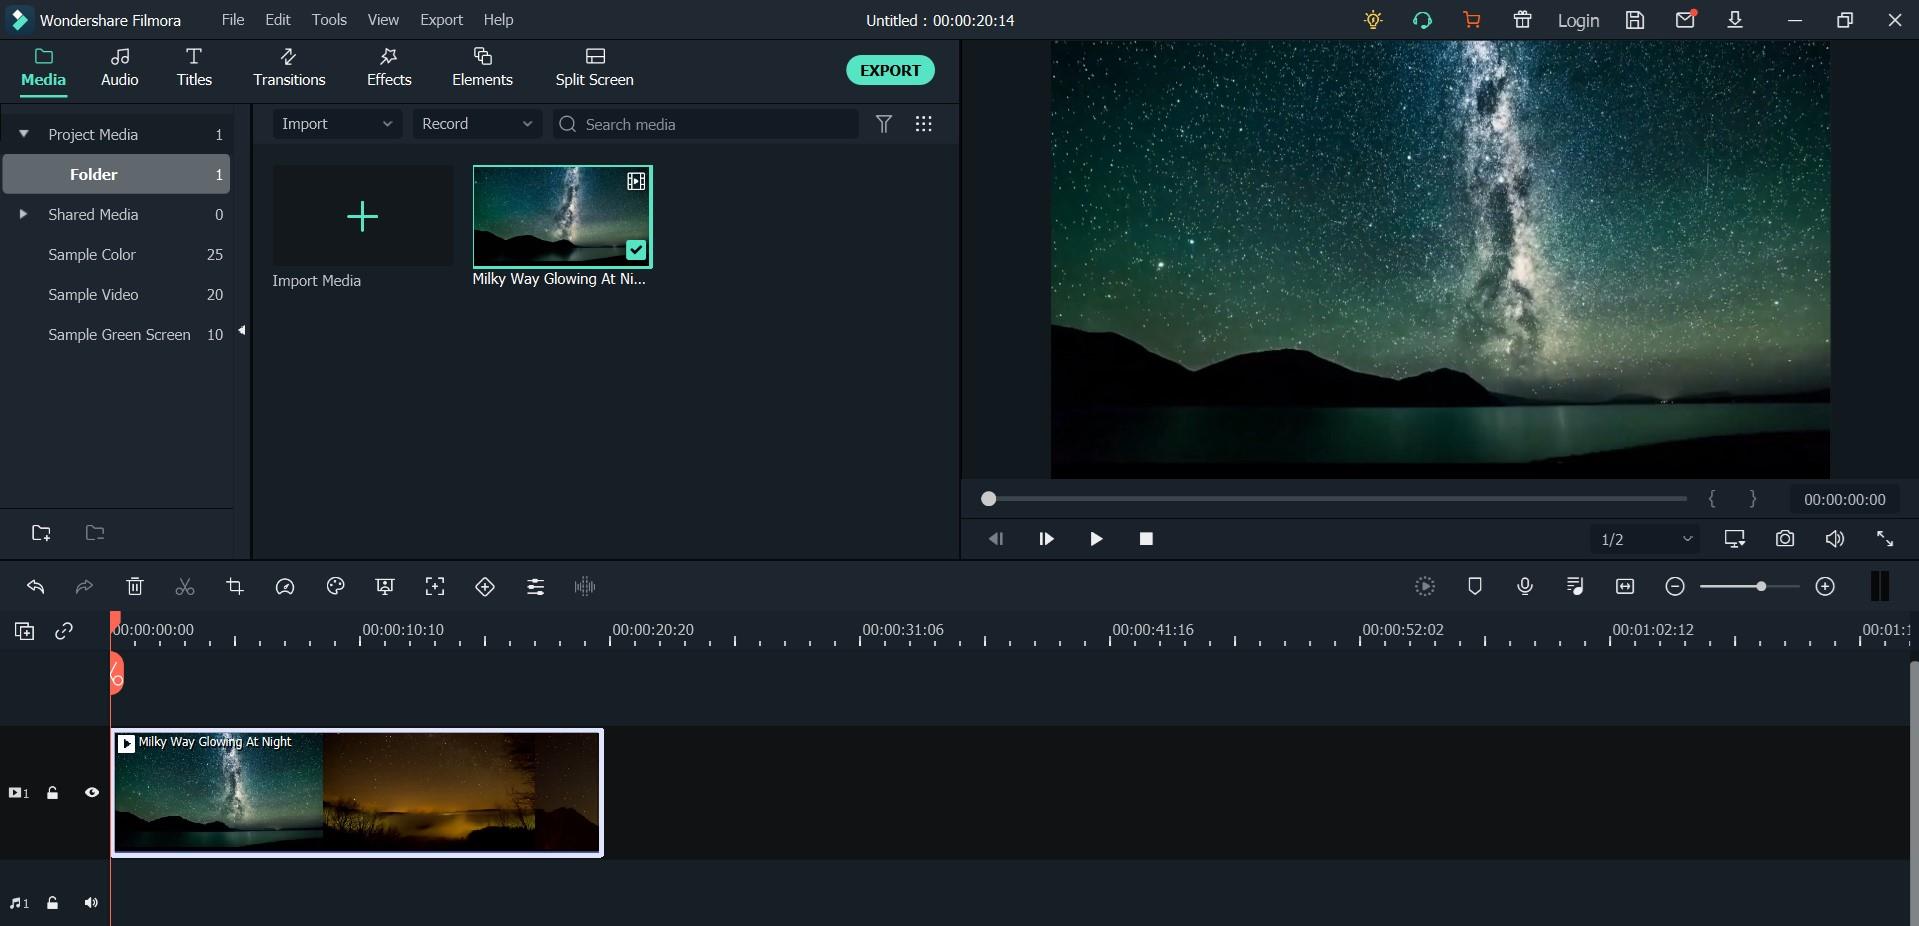
Above your video in the sequence you will see little icons and find a Crop one.
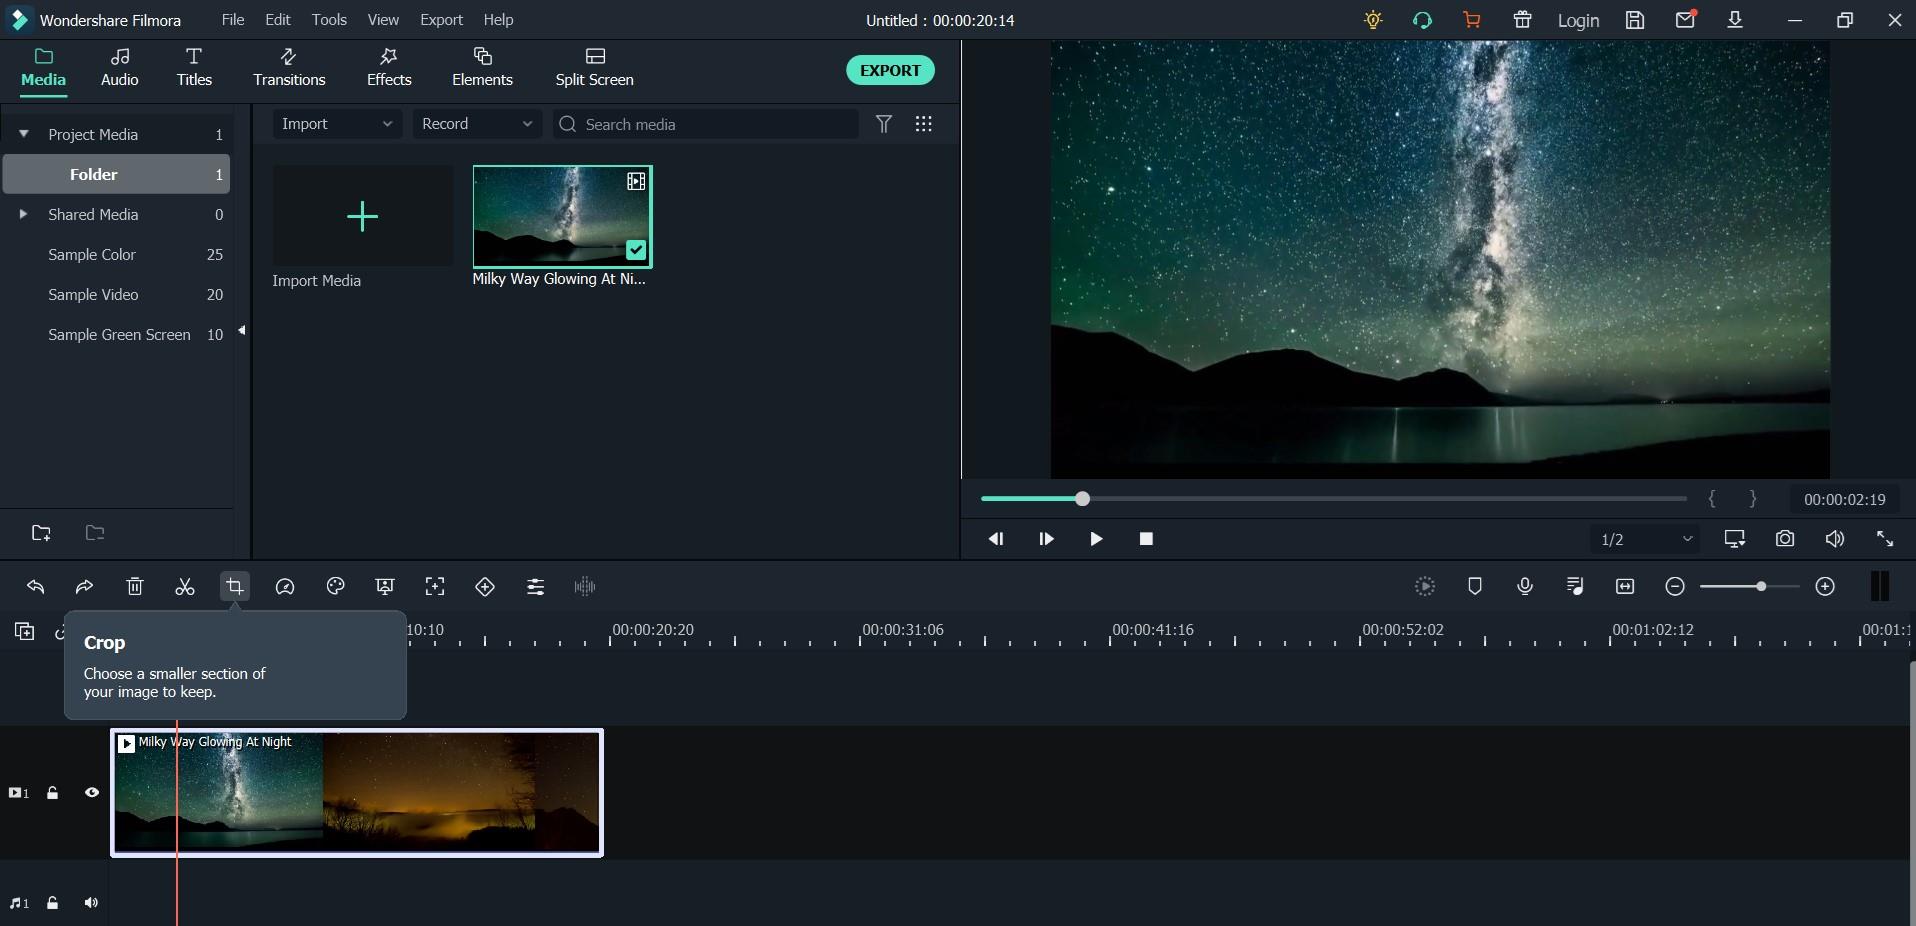
After clicking on it, a new window will open – it’s for Crop and Zoom, where you can choose a needed ratio or do it manually (for it, you have to select Custom first).
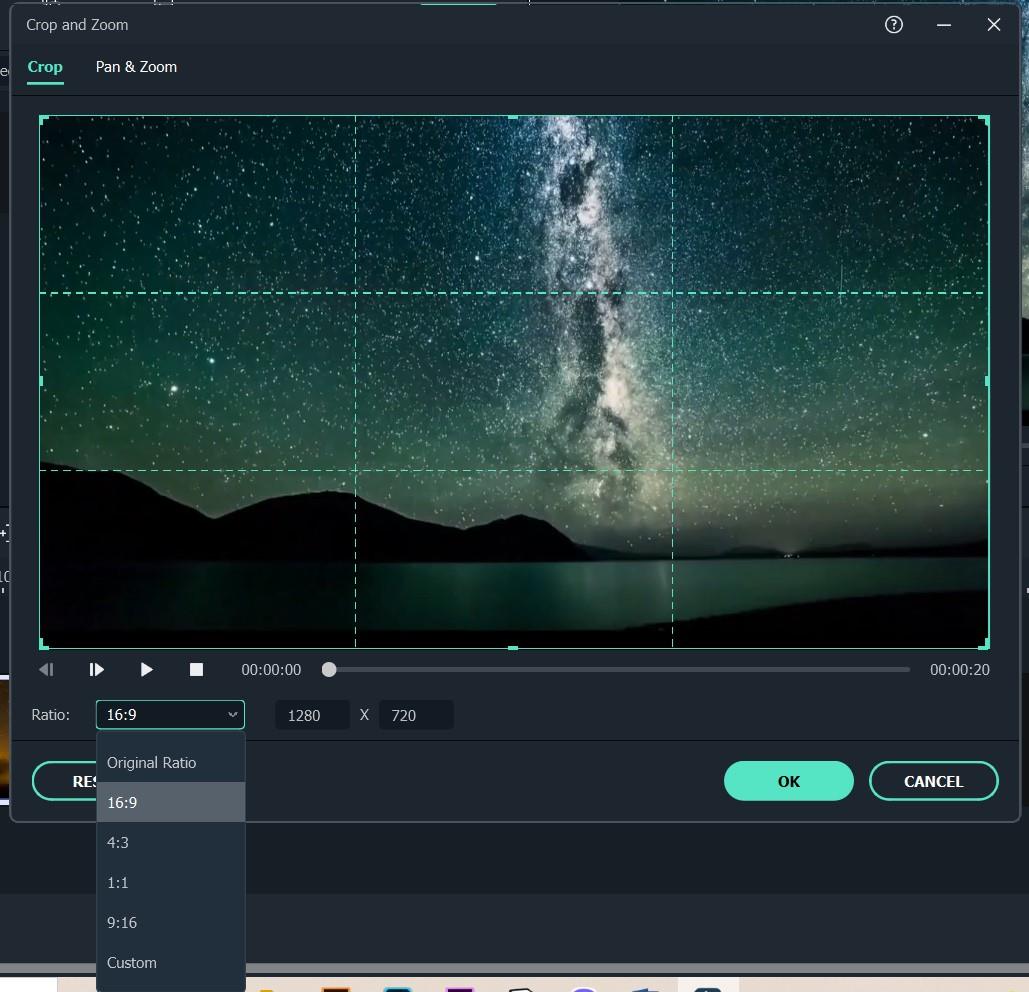
After clicking OK, your video will be cropped as you like. Then, you can proceed with Exporting it – click on Export, choose your preferred settings, and save the video at last.
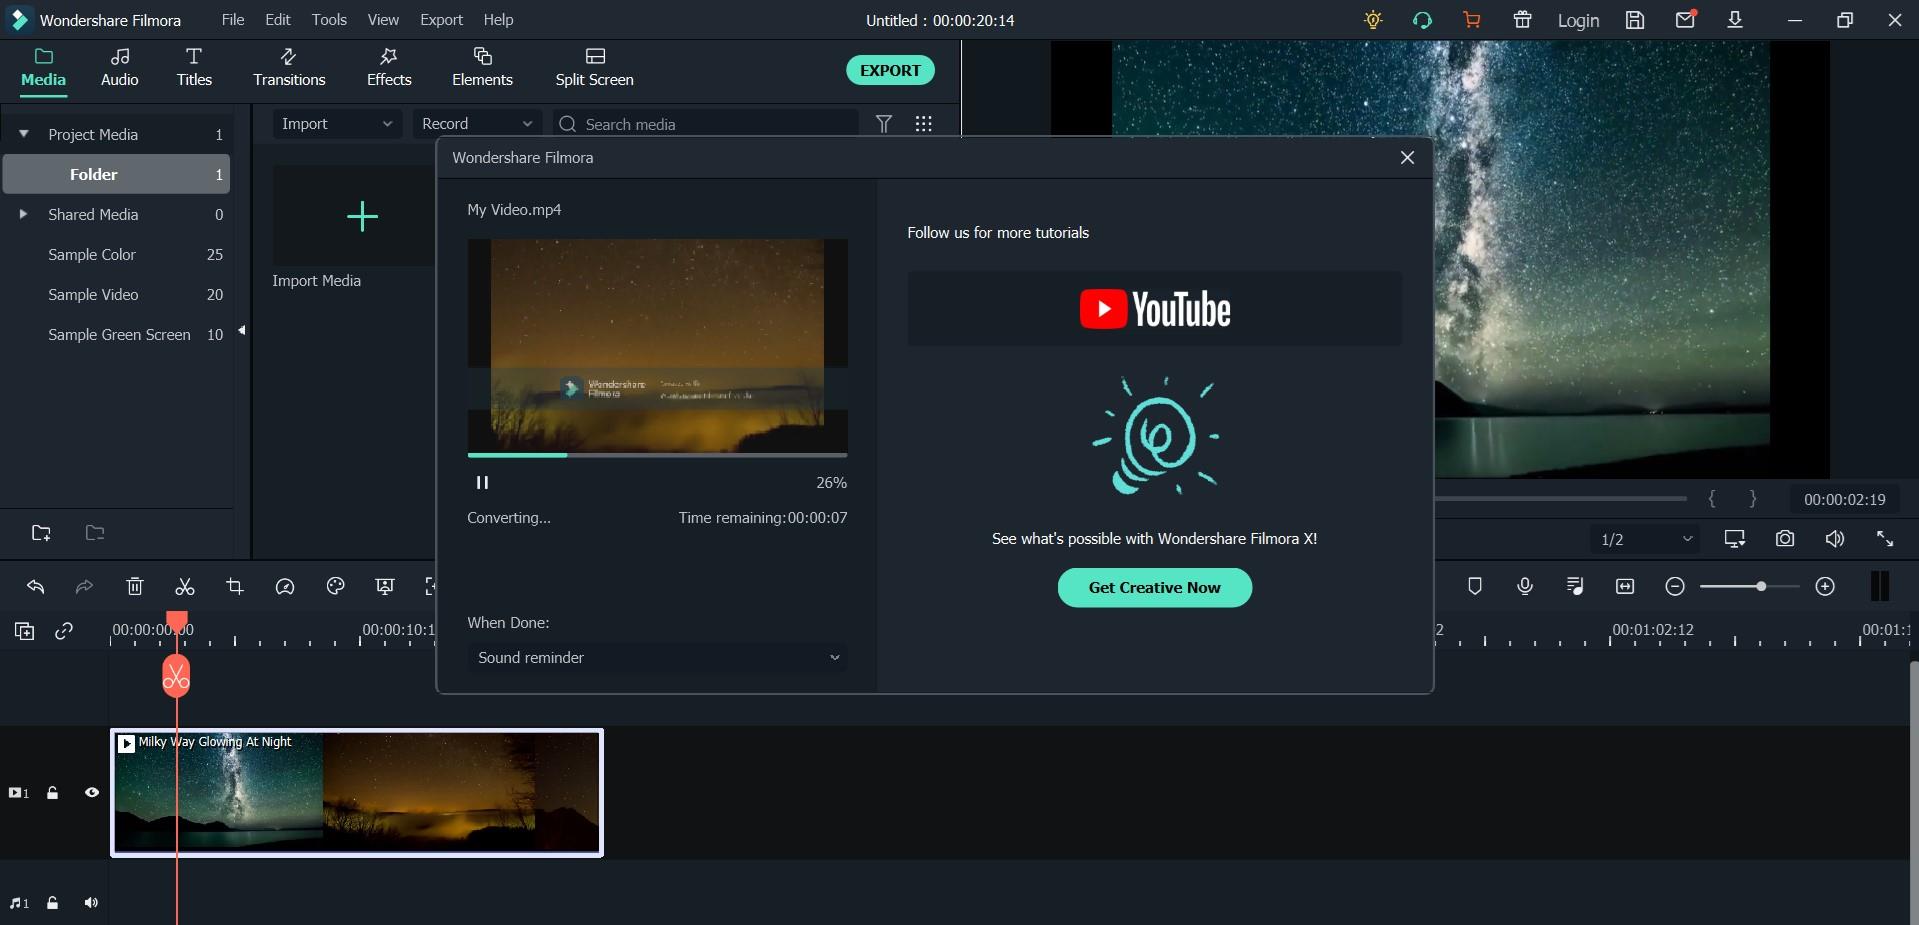
So, that’s all for this article – you have learned how to crop a video on Android, using Google Photos, Clideo, Filmora; lastly, you have learned about how to crop a video using a desktop version of Filmora, namely, Wondershare Filmora. Hopefully, this is the information which will help you make your videos more “on spot” and be satisfied with the results, as well as satisfy your viewers!
First off, you just open the application and allow it to access photos and media on your device. Tap the video you would like to crop. Then, click on Edit: it will launch the in-app video editor.

At the bottom, you will see the Crop option and hit on it, which will result in appearing a cropping box around your video clip.

Once you see little icons at the bottom, you need to choose the first one – it’s the Ratio button, through which you can choose the aspect you would like to apply. Your choice is between these several aspect ratios: Free, Original, Square, 5:4, 16:9, 4:3, and 3:2.

Choosing Free ratio option gives you the freedom to adjust the cropping sliders manually, in order to resize the video to any aspect ratio; it is even possible to rotate the clip, pinch, and zoom in/out.
After you are done with adjusting your video, you need to click on the Save Copy button, which will save a new edited version of your footage. And, meanwhile, don’t worry! – this will not be overwritten on the original one, which will still stand intact.
Using Clideo
Clideo is an interesting one… it doesn’t require you to download anything, because there is a way to crop your video online, through the web browser on Android.
First off, you need to click on Clideo’s Android crop video tool from the browser on the smartphone. You will see a Choose File button and hit on it – this will take you to your gallery and let you find the clip you are about to crop.

You can also upload your file from Cloud Storage. You need to click on the down-arrow on the right-hand side of the button and you’ll find the option to add a clip from your Dropbox or Google Drive account.


After your file is uploaded, Clideo will take you to the editing page, where you can select the area you would like to be in the edited version, and crop the video. Here, you will be able to choose the aspect ratio, exact size of the video and the format.

Once you have finished with the cropping and settings, you need to click on Export which will process your edited video clip.

Once it is done, you proceed on the page which lets you do 3 things: Remove watermark (for it, though, you will have to sign in), Edit again, or/and Download!

Using Filmora
Filmora is an android version of software Filmora and it also gives you the opportunity to crop videos and photos with no problem. First, of course, you have to download the application from Google Play Store, and open it;

then, after opening it, you’ll click on New Project. You can choose any photo/video from your albums or stock, you might even select multiple clips.

Once you have chosen your file, you click on Next button and you proceed to the editor itself.
There, you will see different options at the bottom of your phone, such as Trim, Music, Text, Sticker, Effect, etc.

It doesn’t show you the option Crop right away, but Crop is “hidden” behind the Trim button!

So, you choose Trim, then find Crop and hit that, and then you are free to choose any aspect ratio: 1:1; 4:5; 16:9; 9:16; and 5:4. You can crop the video manually, too, and you are able to adjust where your new “screen” might be wanted most.

After you have finished with cropping and are satisfied, you can click on Export, which will take a few seconds.

After it is done, you can find your newly-cropped video in your Camera Roll.

Using Wondershare Filmora
As mentioned, Filmora is a mobile version of its desktop edition – Wondershare Filmora Video Editor . So, you can also try your hand at this very handy software which also has a nice interface.
For Win 7 or later (64-bit)
For macOS 10.14 or later
If you download Wondershare Filmora X, you will need to click on Import Media Files Here.

You will choose your clip(s) you would like to crop and then drag and drop it in the sequence.

Above your video in the sequence you will see little icons and find a Crop one.

After clicking on it, a new window will open – it’s for Crop and Zoom, where you can choose a needed ratio or do it manually (for it, you have to select Custom first).

After clicking OK, your video will be cropped as you like. Then, you can proceed with Exporting it – click on Export, choose your preferred settings, and save the video at last.

So, that’s all for this article – you have learned how to crop a video on Android, using Google Photos, Clideo, Filmora; lastly, you have learned about how to crop a video using a desktop version of Filmora, namely, Wondershare Filmora. Hopefully, this is the information which will help you make your videos more “on spot” and be satisfied with the results, as well as satisfy your viewers!
First off, you just open the application and allow it to access photos and media on your device. Tap the video you would like to crop. Then, click on Edit: it will launch the in-app video editor.

At the bottom, you will see the Crop option and hit on it, which will result in appearing a cropping box around your video clip.

Once you see little icons at the bottom, you need to choose the first one – it’s the Ratio button, through which you can choose the aspect you would like to apply. Your choice is between these several aspect ratios: Free, Original, Square, 5:4, 16:9, 4:3, and 3:2.

Choosing Free ratio option gives you the freedom to adjust the cropping sliders manually, in order to resize the video to any aspect ratio; it is even possible to rotate the clip, pinch, and zoom in/out.
After you are done with adjusting your video, you need to click on the Save Copy button, which will save a new edited version of your footage. And, meanwhile, don’t worry! – this will not be overwritten on the original one, which will still stand intact.
Using Clideo
Clideo is an interesting one… it doesn’t require you to download anything, because there is a way to crop your video online, through the web browser on Android.
First off, you need to click on Clideo’s Android crop video tool from the browser on the smartphone. You will see a Choose File button and hit on it – this will take you to your gallery and let you find the clip you are about to crop.

You can also upload your file from Cloud Storage. You need to click on the down-arrow on the right-hand side of the button and you’ll find the option to add a clip from your Dropbox or Google Drive account.


After your file is uploaded, Clideo will take you to the editing page, where you can select the area you would like to be in the edited version, and crop the video. Here, you will be able to choose the aspect ratio, exact size of the video and the format.

Once you have finished with the cropping and settings, you need to click on Export which will process your edited video clip.

Once it is done, you proceed on the page which lets you do 3 things: Remove watermark (for it, though, you will have to sign in), Edit again, or/and Download!

Using Filmora
Filmora is an android version of software Filmora and it also gives you the opportunity to crop videos and photos with no problem. First, of course, you have to download the application from Google Play Store, and open it;

then, after opening it, you’ll click on New Project. You can choose any photo/video from your albums or stock, you might even select multiple clips.

Once you have chosen your file, you click on Next button and you proceed to the editor itself.
There, you will see different options at the bottom of your phone, such as Trim, Music, Text, Sticker, Effect, etc.

It doesn’t show you the option Crop right away, but Crop is “hidden” behind the Trim button!

So, you choose Trim, then find Crop and hit that, and then you are free to choose any aspect ratio: 1:1; 4:5; 16:9; 9:16; and 5:4. You can crop the video manually, too, and you are able to adjust where your new “screen” might be wanted most.

After you have finished with cropping and are satisfied, you can click on Export, which will take a few seconds.

After it is done, you can find your newly-cropped video in your Camera Roll.

Using Wondershare Filmora
As mentioned, Filmora is a mobile version of its desktop edition – Wondershare Filmora Video Editor . So, you can also try your hand at this very handy software which also has a nice interface.
For Win 7 or later (64-bit)
For macOS 10.14 or later
If you download Wondershare Filmora X, you will need to click on Import Media Files Here.

You will choose your clip(s) you would like to crop and then drag and drop it in the sequence.

Above your video in the sequence you will see little icons and find a Crop one.

After clicking on it, a new window will open – it’s for Crop and Zoom, where you can choose a needed ratio or do it manually (for it, you have to select Custom first).

After clicking OK, your video will be cropped as you like. Then, you can proceed with Exporting it – click on Export, choose your preferred settings, and save the video at last.

So, that’s all for this article – you have learned how to crop a video on Android, using Google Photos, Clideo, Filmora; lastly, you have learned about how to crop a video using a desktop version of Filmora, namely, Wondershare Filmora. Hopefully, this is the information which will help you make your videos more “on spot” and be satisfied with the results, as well as satisfy your viewers!
First off, you just open the application and allow it to access photos and media on your device. Tap the video you would like to crop. Then, click on Edit: it will launch the in-app video editor.

At the bottom, you will see the Crop option and hit on it, which will result in appearing a cropping box around your video clip.

Once you see little icons at the bottom, you need to choose the first one – it’s the Ratio button, through which you can choose the aspect you would like to apply. Your choice is between these several aspect ratios: Free, Original, Square, 5:4, 16:9, 4:3, and 3:2.

Choosing Free ratio option gives you the freedom to adjust the cropping sliders manually, in order to resize the video to any aspect ratio; it is even possible to rotate the clip, pinch, and zoom in/out.
After you are done with adjusting your video, you need to click on the Save Copy button, which will save a new edited version of your footage. And, meanwhile, don’t worry! – this will not be overwritten on the original one, which will still stand intact.
Using Clideo
Clideo is an interesting one… it doesn’t require you to download anything, because there is a way to crop your video online, through the web browser on Android.
First off, you need to click on Clideo’s Android crop video tool from the browser on the smartphone. You will see a Choose File button and hit on it – this will take you to your gallery and let you find the clip you are about to crop.

You can also upload your file from Cloud Storage. You need to click on the down-arrow on the right-hand side of the button and you’ll find the option to add a clip from your Dropbox or Google Drive account.


After your file is uploaded, Clideo will take you to the editing page, where you can select the area you would like to be in the edited version, and crop the video. Here, you will be able to choose the aspect ratio, exact size of the video and the format.

Once you have finished with the cropping and settings, you need to click on Export which will process your edited video clip.

Once it is done, you proceed on the page which lets you do 3 things: Remove watermark (for it, though, you will have to sign in), Edit again, or/and Download!

Using Filmora
Filmora is an android version of software Filmora and it also gives you the opportunity to crop videos and photos with no problem. First, of course, you have to download the application from Google Play Store, and open it;

then, after opening it, you’ll click on New Project. You can choose any photo/video from your albums or stock, you might even select multiple clips.

Once you have chosen your file, you click on Next button and you proceed to the editor itself.
There, you will see different options at the bottom of your phone, such as Trim, Music, Text, Sticker, Effect, etc.

It doesn’t show you the option Crop right away, but Crop is “hidden” behind the Trim button!

So, you choose Trim, then find Crop and hit that, and then you are free to choose any aspect ratio: 1:1; 4:5; 16:9; 9:16; and 5:4. You can crop the video manually, too, and you are able to adjust where your new “screen” might be wanted most.

After you have finished with cropping and are satisfied, you can click on Export, which will take a few seconds.

After it is done, you can find your newly-cropped video in your Camera Roll.

Using Wondershare Filmora
As mentioned, Filmora is a mobile version of its desktop edition – Wondershare Filmora Video Editor . So, you can also try your hand at this very handy software which also has a nice interface.
For Win 7 or later (64-bit)
For macOS 10.14 or later
If you download Wondershare Filmora X, you will need to click on Import Media Files Here.

You will choose your clip(s) you would like to crop and then drag and drop it in the sequence.

Above your video in the sequence you will see little icons and find a Crop one.

After clicking on it, a new window will open – it’s for Crop and Zoom, where you can choose a needed ratio or do it manually (for it, you have to select Custom first).

After clicking OK, your video will be cropped as you like. Then, you can proceed with Exporting it – click on Export, choose your preferred settings, and save the video at last.

So, that’s all for this article – you have learned how to crop a video on Android, using Google Photos, Clideo, Filmora; lastly, you have learned about how to crop a video using a desktop version of Filmora, namely, Wondershare Filmora. Hopefully, this is the information which will help you make your videos more “on spot” and be satisfied with the results, as well as satisfy your viewers!
Fixes | What If YouTube Zoom to Fill Not Working?
Abundant Video Effects - Wondershare Filmora
Provide abundant video effects - A creative video editor
Powerful color correction and grading
Detailed tutorials are provided by the official channel
YouTube is an application that is in demand by millions of users throughout the globe. With such high demands, there are several features that have been enhanced across the platform for the sake of providing users with better functionality. One such feature comes under the zoom characteristic that provides a better cinematic experience to the user upon its use.
This article is a discussion of the issues caused by the zoom to fill YouTube feature. As it hinders the operability of the user, there are several impacts on the complete operation of the tool. However, to counter it, this article turns up different techniques that can be implemented to resolve this problem.
In this article
Part 1: Fix YouTube Zoom to Fill Not Working on Android or iPhone
Part 2: Fix YouTube Zoom to Fill Not Working on Chrome
Part 1: Fix YouTube Zoom to Fill Not Working on Android or iPhone
If the YouTube zoom to fill not working error is present across the smartphone that you own, there are several remedies that can be considered as a proper solution to this issue. Go through these fixes to know more about how you can resolve it without putting yourselves in miserable conditions:
1. Update YouTube Application
The first remedy that may come into your mind related to resolving the zoom to fill YouTube issues on your smartphone is by updating the application. YouTube requires frequent updates, and an outdated application may not work properly, which may lead to such consequences. To counter this issue, you need to go through the following steps:
For Android
Step 1: Initially, you need to direct yourselves into the “Play Store” and click on the “Profile” icon. Across the list of different options, you will find the “Manage apps and device” section.

Step 2: On the new screen that opens up, select the “Manage” tab and proceed to turn on the “Updates available” filter for your device.

Step 3: Find the update of the YouTube app across the provided list. Click on the tool to open it across a new screen. Click on “Update” to successfully update the application on your Android.

For iPhone
Step 1: Start by launching the App Store across the iPhone. Click on the “Profile” and locate the applications installed across your iPhone.

Step 2: Find YouTube in the list of different available updates. Click on “Update” to put your YouTube application in the latest version.

2. Re-Launch YouTube Application
Restarting the YouTube application across your device may get you out of such miserable issues with platforms that are mere because of software glitches. To counter this problem, you can consider re-launching your YouTube application on smartphones as required:
For Android
Step 1: You need to tap on the ‘rectangular’ icon present at the bottom of the screen to open the applications that are currently running in the background.
Step 2: To close YouTube, you need to swipe right or left the application from the said screen. Re-launch YouTube by accessing the app from the homepage.

For iPhone
Step 1: With YouTube turned on across the iPhone, swipe up from the bottom of the screen at a consistent speed smoothly or double press the Home button according to your iPhone model. This will show the running applications in the background.
Step 2: To close YouTube, you need to swipe up the application. Re-launch it from your iPhone’s homepage.

3. Restart Your Device
This is another extensive zoom to fill YouTube issue solution that can help you recover your device from the illicit software glitches that are preventing it from starting properly. By restarting the devices, you can easily get rid of this problem within no time.
For Android
Step 1: To reboot an Android device, you need to hold the ‘Power’ button of the device until a screen displays on your front.
Step 2: Click on the “Restart” option on your Android to restart your device properly.

For iPhone
Step 1: To restart an iPhone, it is best that you proceed to your “Settings” and access the “General” option.

Step 2: Click on “Shut Down” from the available list of settings to turn off the iPhone. Re-launch the iPhone by holding the “Power” button of the device.

Part 2: Fix YouTube Zoom to Fill Not Working on Chrome
Users who are using YouTube across their browsers can also face the above-mentioned concerns. As an answer to YouTube zoom to fill malfunctioning across Chrome, this part comes up with a discussion of three impressive solutions that can be adopted right away for effective results.
1. Clear Browser’s Cache
To start with the solutions, the first thing that you can do is to clear your Chrome’s cache. A filled cache usually hinders the flow of the application, which in turn leads to a decreased performance. To clear the browser’s cache, you need to look across the following steps:
Step 1: Launch your Chrome browser and click on the “Three-Dotted” icon on the top-right corner of the screen.

Step 2: Select “Clear browsing data…” from the ‘More Tools’ option across the drop-down menu. This leads you to a new window.

Step 3: Make sure you have the right time range selected for this purpose. Select the right options that will clear out the cache of your Chrome and hit “Clear Data.”

2. Update Your Chrome
While seeking the right zoom to fill YouTube solution, you may come up with the idea of updating your Chrome browser. For this, you have to look into the steps shown below:
Step 1: Open Google Chrome on your desktop and click on the three-dotted icon on the top-right section. Find the option of “Help” in the drop-down menu and proceed by clicking ‘About Google Chrome’ from the next menu.

Step 2: The browser detects an update that is due for Chrome. It will automatically start updating the browser if detected. Once the update is complete, you need to restart your Chrome browser.

3. Delete the Extensions
It can be quite surprising to find the extensions across your Chrome being the perpetrator of this problem. With extensions like different ad blockers on your list, the YouTube zoom to fill problem can be caused because of it. To remove these extensions from Chrome, you need to:
Step 1: Lead to the three-dotted icon on the top-right corner of Chrome to open the settings. Direct the cursor to “More Tools” and select “Extensions” in the protruding menu.

Step 2: The new window opens up with the list of extensions installed across your Chrome browser. Click on “Remove” to delete the extension from the browser simply. Tap on “Remove” once again when prompted.

Conclusion
The article has provided you with some comprehensive methods that can be adopted to solve the YouTube zoom to fill problem on your device. With these methods, you can go through all the small glitches that occur on the YouTube app that is hindering your work.
YouTube is an application that is in demand by millions of users throughout the globe. With such high demands, there are several features that have been enhanced across the platform for the sake of providing users with better functionality. One such feature comes under the zoom characteristic that provides a better cinematic experience to the user upon its use.
This article is a discussion of the issues caused by the zoom to fill YouTube feature. As it hinders the operability of the user, there are several impacts on the complete operation of the tool. However, to counter it, this article turns up different techniques that can be implemented to resolve this problem.
In this article
Part 1: Fix YouTube Zoom to Fill Not Working on Android or iPhone
Part 2: Fix YouTube Zoom to Fill Not Working on Chrome
Part 1: Fix YouTube Zoom to Fill Not Working on Android or iPhone
If the YouTube zoom to fill not working error is present across the smartphone that you own, there are several remedies that can be considered as a proper solution to this issue. Go through these fixes to know more about how you can resolve it without putting yourselves in miserable conditions:
1. Update YouTube Application
The first remedy that may come into your mind related to resolving the zoom to fill YouTube issues on your smartphone is by updating the application. YouTube requires frequent updates, and an outdated application may not work properly, which may lead to such consequences. To counter this issue, you need to go through the following steps:
For Android
Step 1: Initially, you need to direct yourselves into the “Play Store” and click on the “Profile” icon. Across the list of different options, you will find the “Manage apps and device” section.

Step 2: On the new screen that opens up, select the “Manage” tab and proceed to turn on the “Updates available” filter for your device.

Step 3: Find the update of the YouTube app across the provided list. Click on the tool to open it across a new screen. Click on “Update” to successfully update the application on your Android.

For iPhone
Step 1: Start by launching the App Store across the iPhone. Click on the “Profile” and locate the applications installed across your iPhone.

Step 2: Find YouTube in the list of different available updates. Click on “Update” to put your YouTube application in the latest version.

2. Re-Launch YouTube Application
Restarting the YouTube application across your device may get you out of such miserable issues with platforms that are mere because of software glitches. To counter this problem, you can consider re-launching your YouTube application on smartphones as required:
For Android
Step 1: You need to tap on the ‘rectangular’ icon present at the bottom of the screen to open the applications that are currently running in the background.
Step 2: To close YouTube, you need to swipe right or left the application from the said screen. Re-launch YouTube by accessing the app from the homepage.

For iPhone
Step 1: With YouTube turned on across the iPhone, swipe up from the bottom of the screen at a consistent speed smoothly or double press the Home button according to your iPhone model. This will show the running applications in the background.
Step 2: To close YouTube, you need to swipe up the application. Re-launch it from your iPhone’s homepage.

3. Restart Your Device
This is another extensive zoom to fill YouTube issue solution that can help you recover your device from the illicit software glitches that are preventing it from starting properly. By restarting the devices, you can easily get rid of this problem within no time.
For Android
Step 1: To reboot an Android device, you need to hold the ‘Power’ button of the device until a screen displays on your front.
Step 2: Click on the “Restart” option on your Android to restart your device properly.

For iPhone
Step 1: To restart an iPhone, it is best that you proceed to your “Settings” and access the “General” option.

Step 2: Click on “Shut Down” from the available list of settings to turn off the iPhone. Re-launch the iPhone by holding the “Power” button of the device.

Part 2: Fix YouTube Zoom to Fill Not Working on Chrome
Users who are using YouTube across their browsers can also face the above-mentioned concerns. As an answer to YouTube zoom to fill malfunctioning across Chrome, this part comes up with a discussion of three impressive solutions that can be adopted right away for effective results.
1. Clear Browser’s Cache
To start with the solutions, the first thing that you can do is to clear your Chrome’s cache. A filled cache usually hinders the flow of the application, which in turn leads to a decreased performance. To clear the browser’s cache, you need to look across the following steps:
Step 1: Launch your Chrome browser and click on the “Three-Dotted” icon on the top-right corner of the screen.

Step 2: Select “Clear browsing data…” from the ‘More Tools’ option across the drop-down menu. This leads you to a new window.

Step 3: Make sure you have the right time range selected for this purpose. Select the right options that will clear out the cache of your Chrome and hit “Clear Data.”

2. Update Your Chrome
While seeking the right zoom to fill YouTube solution, you may come up with the idea of updating your Chrome browser. For this, you have to look into the steps shown below:
Step 1: Open Google Chrome on your desktop and click on the three-dotted icon on the top-right section. Find the option of “Help” in the drop-down menu and proceed by clicking ‘About Google Chrome’ from the next menu.

Step 2: The browser detects an update that is due for Chrome. It will automatically start updating the browser if detected. Once the update is complete, you need to restart your Chrome browser.

3. Delete the Extensions
It can be quite surprising to find the extensions across your Chrome being the perpetrator of this problem. With extensions like different ad blockers on your list, the YouTube zoom to fill problem can be caused because of it. To remove these extensions from Chrome, you need to:
Step 1: Lead to the three-dotted icon on the top-right corner of Chrome to open the settings. Direct the cursor to “More Tools” and select “Extensions” in the protruding menu.

Step 2: The new window opens up with the list of extensions installed across your Chrome browser. Click on “Remove” to delete the extension from the browser simply. Tap on “Remove” once again when prompted.

Conclusion
The article has provided you with some comprehensive methods that can be adopted to solve the YouTube zoom to fill problem on your device. With these methods, you can go through all the small glitches that occur on the YouTube app that is hindering your work.
YouTube is an application that is in demand by millions of users throughout the globe. With such high demands, there are several features that have been enhanced across the platform for the sake of providing users with better functionality. One such feature comes under the zoom characteristic that provides a better cinematic experience to the user upon its use.
This article is a discussion of the issues caused by the zoom to fill YouTube feature. As it hinders the operability of the user, there are several impacts on the complete operation of the tool. However, to counter it, this article turns up different techniques that can be implemented to resolve this problem.
In this article
Part 1: Fix YouTube Zoom to Fill Not Working on Android or iPhone
Part 2: Fix YouTube Zoom to Fill Not Working on Chrome
Part 1: Fix YouTube Zoom to Fill Not Working on Android or iPhone
If the YouTube zoom to fill not working error is present across the smartphone that you own, there are several remedies that can be considered as a proper solution to this issue. Go through these fixes to know more about how you can resolve it without putting yourselves in miserable conditions:
1. Update YouTube Application
The first remedy that may come into your mind related to resolving the zoom to fill YouTube issues on your smartphone is by updating the application. YouTube requires frequent updates, and an outdated application may not work properly, which may lead to such consequences. To counter this issue, you need to go through the following steps:
For Android
Step 1: Initially, you need to direct yourselves into the “Play Store” and click on the “Profile” icon. Across the list of different options, you will find the “Manage apps and device” section.

Step 2: On the new screen that opens up, select the “Manage” tab and proceed to turn on the “Updates available” filter for your device.

Step 3: Find the update of the YouTube app across the provided list. Click on the tool to open it across a new screen. Click on “Update” to successfully update the application on your Android.

For iPhone
Step 1: Start by launching the App Store across the iPhone. Click on the “Profile” and locate the applications installed across your iPhone.

Step 2: Find YouTube in the list of different available updates. Click on “Update” to put your YouTube application in the latest version.

2. Re-Launch YouTube Application
Restarting the YouTube application across your device may get you out of such miserable issues with platforms that are mere because of software glitches. To counter this problem, you can consider re-launching your YouTube application on smartphones as required:
For Android
Step 1: You need to tap on the ‘rectangular’ icon present at the bottom of the screen to open the applications that are currently running in the background.
Step 2: To close YouTube, you need to swipe right or left the application from the said screen. Re-launch YouTube by accessing the app from the homepage.

For iPhone
Step 1: With YouTube turned on across the iPhone, swipe up from the bottom of the screen at a consistent speed smoothly or double press the Home button according to your iPhone model. This will show the running applications in the background.
Step 2: To close YouTube, you need to swipe up the application. Re-launch it from your iPhone’s homepage.

3. Restart Your Device
This is another extensive zoom to fill YouTube issue solution that can help you recover your device from the illicit software glitches that are preventing it from starting properly. By restarting the devices, you can easily get rid of this problem within no time.
For Android
Step 1: To reboot an Android device, you need to hold the ‘Power’ button of the device until a screen displays on your front.
Step 2: Click on the “Restart” option on your Android to restart your device properly.

For iPhone
Step 1: To restart an iPhone, it is best that you proceed to your “Settings” and access the “General” option.

Step 2: Click on “Shut Down” from the available list of settings to turn off the iPhone. Re-launch the iPhone by holding the “Power” button of the device.

Part 2: Fix YouTube Zoom to Fill Not Working on Chrome
Users who are using YouTube across their browsers can also face the above-mentioned concerns. As an answer to YouTube zoom to fill malfunctioning across Chrome, this part comes up with a discussion of three impressive solutions that can be adopted right away for effective results.
1. Clear Browser’s Cache
To start with the solutions, the first thing that you can do is to clear your Chrome’s cache. A filled cache usually hinders the flow of the application, which in turn leads to a decreased performance. To clear the browser’s cache, you need to look across the following steps:
Step 1: Launch your Chrome browser and click on the “Three-Dotted” icon on the top-right corner of the screen.

Step 2: Select “Clear browsing data…” from the ‘More Tools’ option across the drop-down menu. This leads you to a new window.

Step 3: Make sure you have the right time range selected for this purpose. Select the right options that will clear out the cache of your Chrome and hit “Clear Data.”

2. Update Your Chrome
While seeking the right zoom to fill YouTube solution, you may come up with the idea of updating your Chrome browser. For this, you have to look into the steps shown below:
Step 1: Open Google Chrome on your desktop and click on the three-dotted icon on the top-right section. Find the option of “Help” in the drop-down menu and proceed by clicking ‘About Google Chrome’ from the next menu.

Step 2: The browser detects an update that is due for Chrome. It will automatically start updating the browser if detected. Once the update is complete, you need to restart your Chrome browser.

3. Delete the Extensions
It can be quite surprising to find the extensions across your Chrome being the perpetrator of this problem. With extensions like different ad blockers on your list, the YouTube zoom to fill problem can be caused because of it. To remove these extensions from Chrome, you need to:
Step 1: Lead to the three-dotted icon on the top-right corner of Chrome to open the settings. Direct the cursor to “More Tools” and select “Extensions” in the protruding menu.

Step 2: The new window opens up with the list of extensions installed across your Chrome browser. Click on “Remove” to delete the extension from the browser simply. Tap on “Remove” once again when prompted.

Conclusion
The article has provided you with some comprehensive methods that can be adopted to solve the YouTube zoom to fill problem on your device. With these methods, you can go through all the small glitches that occur on the YouTube app that is hindering your work.
YouTube is an application that is in demand by millions of users throughout the globe. With such high demands, there are several features that have been enhanced across the platform for the sake of providing users with better functionality. One such feature comes under the zoom characteristic that provides a better cinematic experience to the user upon its use.
This article is a discussion of the issues caused by the zoom to fill YouTube feature. As it hinders the operability of the user, there are several impacts on the complete operation of the tool. However, to counter it, this article turns up different techniques that can be implemented to resolve this problem.
In this article
Part 1: Fix YouTube Zoom to Fill Not Working on Android or iPhone
Part 2: Fix YouTube Zoom to Fill Not Working on Chrome
Part 1: Fix YouTube Zoom to Fill Not Working on Android or iPhone
If the YouTube zoom to fill not working error is present across the smartphone that you own, there are several remedies that can be considered as a proper solution to this issue. Go through these fixes to know more about how you can resolve it without putting yourselves in miserable conditions:
1. Update YouTube Application
The first remedy that may come into your mind related to resolving the zoom to fill YouTube issues on your smartphone is by updating the application. YouTube requires frequent updates, and an outdated application may not work properly, which may lead to such consequences. To counter this issue, you need to go through the following steps:
For Android
Step 1: Initially, you need to direct yourselves into the “Play Store” and click on the “Profile” icon. Across the list of different options, you will find the “Manage apps and device” section.

Step 2: On the new screen that opens up, select the “Manage” tab and proceed to turn on the “Updates available” filter for your device.

Step 3: Find the update of the YouTube app across the provided list. Click on the tool to open it across a new screen. Click on “Update” to successfully update the application on your Android.

For iPhone
Step 1: Start by launching the App Store across the iPhone. Click on the “Profile” and locate the applications installed across your iPhone.

Step 2: Find YouTube in the list of different available updates. Click on “Update” to put your YouTube application in the latest version.

2. Re-Launch YouTube Application
Restarting the YouTube application across your device may get you out of such miserable issues with platforms that are mere because of software glitches. To counter this problem, you can consider re-launching your YouTube application on smartphones as required:
For Android
Step 1: You need to tap on the ‘rectangular’ icon present at the bottom of the screen to open the applications that are currently running in the background.
Step 2: To close YouTube, you need to swipe right or left the application from the said screen. Re-launch YouTube by accessing the app from the homepage.

For iPhone
Step 1: With YouTube turned on across the iPhone, swipe up from the bottom of the screen at a consistent speed smoothly or double press the Home button according to your iPhone model. This will show the running applications in the background.
Step 2: To close YouTube, you need to swipe up the application. Re-launch it from your iPhone’s homepage.

3. Restart Your Device
This is another extensive zoom to fill YouTube issue solution that can help you recover your device from the illicit software glitches that are preventing it from starting properly. By restarting the devices, you can easily get rid of this problem within no time.
For Android
Step 1: To reboot an Android device, you need to hold the ‘Power’ button of the device until a screen displays on your front.
Step 2: Click on the “Restart” option on your Android to restart your device properly.

For iPhone
Step 1: To restart an iPhone, it is best that you proceed to your “Settings” and access the “General” option.

Step 2: Click on “Shut Down” from the available list of settings to turn off the iPhone. Re-launch the iPhone by holding the “Power” button of the device.

Part 2: Fix YouTube Zoom to Fill Not Working on Chrome
Users who are using YouTube across their browsers can also face the above-mentioned concerns. As an answer to YouTube zoom to fill malfunctioning across Chrome, this part comes up with a discussion of three impressive solutions that can be adopted right away for effective results.
1. Clear Browser’s Cache
To start with the solutions, the first thing that you can do is to clear your Chrome’s cache. A filled cache usually hinders the flow of the application, which in turn leads to a decreased performance. To clear the browser’s cache, you need to look across the following steps:
Step 1: Launch your Chrome browser and click on the “Three-Dotted” icon on the top-right corner of the screen.

Step 2: Select “Clear browsing data…” from the ‘More Tools’ option across the drop-down menu. This leads you to a new window.

Step 3: Make sure you have the right time range selected for this purpose. Select the right options that will clear out the cache of your Chrome and hit “Clear Data.”

2. Update Your Chrome
While seeking the right zoom to fill YouTube solution, you may come up with the idea of updating your Chrome browser. For this, you have to look into the steps shown below:
Step 1: Open Google Chrome on your desktop and click on the three-dotted icon on the top-right section. Find the option of “Help” in the drop-down menu and proceed by clicking ‘About Google Chrome’ from the next menu.

Step 2: The browser detects an update that is due for Chrome. It will automatically start updating the browser if detected. Once the update is complete, you need to restart your Chrome browser.

3. Delete the Extensions
It can be quite surprising to find the extensions across your Chrome being the perpetrator of this problem. With extensions like different ad blockers on your list, the YouTube zoom to fill problem can be caused because of it. To remove these extensions from Chrome, you need to:
Step 1: Lead to the three-dotted icon on the top-right corner of Chrome to open the settings. Direct the cursor to “More Tools” and select “Extensions” in the protruding menu.

Step 2: The new window opens up with the list of extensions installed across your Chrome browser. Click on “Remove” to delete the extension from the browser simply. Tap on “Remove” once again when prompted.

Conclusion
The article has provided you with some comprehensive methods that can be adopted to solve the YouTube zoom to fill problem on your device. With these methods, you can go through all the small glitches that occur on the YouTube app that is hindering your work.
15 Camera Shake Preset for Adobe Premiere Pro
Create High-Quality Video - Wondershare Filmora
An easy and powerful video editor
Numerous video and audio effects to choose from
Detailed tutorials are provided by the official channel
Do you know how professional video footage is made? Most of the time, it’s through small movements on a camera, called Camera Shake. It is used to create realistic and dramatic shots in movies. In contrast, you can accidentally capture some shake on film; most of the time, it has to be created by a team of people. Camera operators will perform different movements with the camera in order to create this effect that we see in many movies, TV shows, and documentaries all around the world.
Putting a shake on footage can add visual interest to your scene. It adds kinetic energy to the shot and can be useful for transitions as well. Are you looking for realistic camera shake effects for your footage? Do you think these effects will help your video stand out from the rest on video sharing sites such as Youtube, Vimeo, or other sites? Look no more. In this article, we will look at 15 camera shake presets for unlimited possibilities! Mix and match to get your favorite camera shake effect. Save your time and costs!
15 Camera Shake Preset for Adobe Premiere Pro
1. Camera Shake Presets By Jorkiy
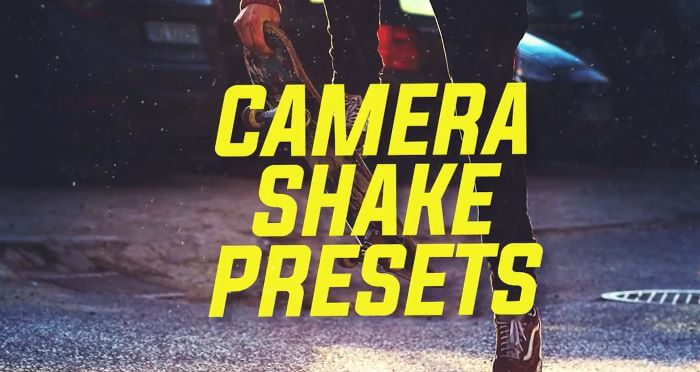
This preset collection contains 15 camera shake presets for Premiere Pro. The presets produce a live camera effect. Three groups of presets are available. A smooth preset, a quick preset, and a jerky preset. Choose one and apply it to your footage. Surprise your audience with dynamic videos courtesy of this pack.
2. Shake The Camera Or Text By 27
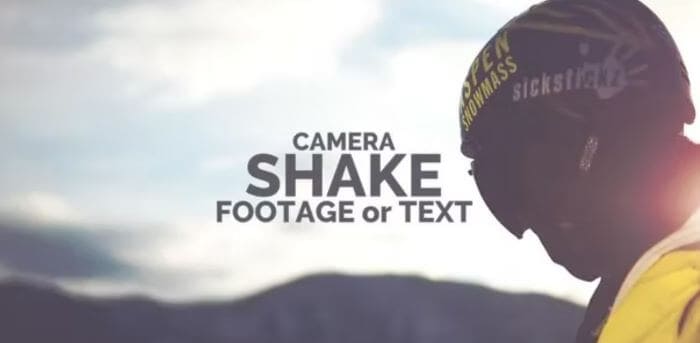
Create a dynamic and realistic camera shake with this awesome preset collection. The length of the presets is 1 minute, and the version for long videos is also included - 10 minutes. The project is perfect for shaking other objects, such as text or particles. Easy to use. Create dynamics in your video using this preset.
3. Real Action Ca1mera Shakes By PlaygroundStudio
12 Action Shakes effects are included in “Real Action Camera Shakes.”. You can use these effects directly in your clips or on adjustment layers. The visuals can be used in presentations, slideshows, TV shows, commercials, promotions, events, and on Facebook and YouTube. This professionally designed and energetically animated Premiere Preset will impress your audience.

4. Camera Shake By Insine
You can add a camera shake to your footage to give it a realistic look. You can also use it to shake other objects like text or particles. Animate your projects with realistic camera movements!
5. Shaking Presets Transitions By Jorkiy
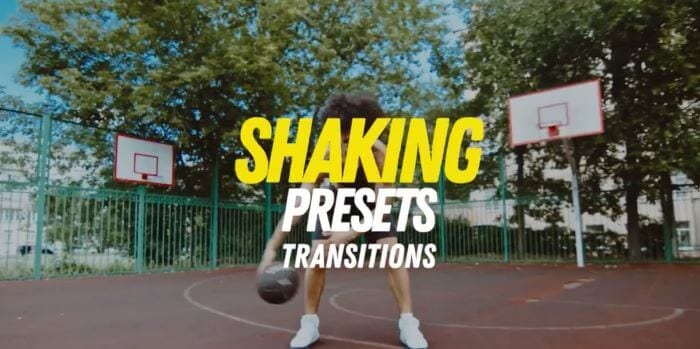
This set of dynamic transitions for Premiere Pro is called Shaking Presets Transitions. There are different kinds of shakes in these transitions. This video pack works with any resolution (4k, full HD, vertical videos, etc.). Impress your audience with breathtaking videos by using this pack.
6. 35 Hit Presets By Animark
Your video will be shaken with these presets. There are 35 presets divided into seven categories. These presets would be ideal for any action, dynamic presentation, trailer, etc. You can choose from FullHD, 4K, Square, Instagram, etc.
7. 30 Shake Transitions By Animark
A stylish shake transition will be added to your video with these presets. Approximately 30 transitions are included in the project. You can create a multitude of different transitions by combining presets. You can use these presets for any action, dynamic social media presentation, trailer, etc.
8. 3D Spin Transitions By PlaygroundStudio
3D With Spin Transitions for Premiere Pro, you get 24 stylish and creative transitioning effects. This feature will look and feel better when presenting slideshows, films, movies, trailers, teasers, promotions, and events videos. PP presets that are action-packed and energetically crafted to impress your audience.
9. Stretched Bounce Transitions By LeftHand
This collection of 12 dynamic transitions presets is called Stretched Bounce Transitions. With these transitions, your videos will look more modern, clean, and cinematic. This transition works with videos and photos with resolutions up to 4K. With presets, you can combine seamless camera movement with an elastic shake. Each of the four directions is included, and there is also a category perfect for music videos with a liquid, psychedelic overlay. You can modify the speed of each preset easily.
10. Shake Transitions By JuliaDesign
Are you capable of creating dynamic videos? Check out these shake transitions to improve them. The pack is small but has a lot of cool effects. Six presets are included, so you can easily pick your favorite. You can customize each transition by adjusting the layer length.

11. Shake Transitions Presets By Jorkiy
The Shake Transitions Presets for Premiere Pro is available for free. Create sharp shaky camera effects by using this set of presets. You can apply a preset to an adjustment layer placed over your frames. The pack is compatible with any resolution (4K, full HD, vertical video, etc.). Surprise your viewers with dynamic videos created with this pack.
12. Camera Shake Flicker Effects By Vesna
14 shake presets are included in this pack, including shake effects and blinking effects. An instructional video is included. Presets last approximately 30 seconds each. It can be used as a camera shake effect, a text shake effect, or a transition effect. The possibilities are endless when you combine them.
13. Smooth Camera Shake By Enduro
Ten smooth camera shake effects are included in this project. Easily applied to the clip or layer above your edit, these are easy to use. You can use presets for effects such as camera shake, text shake, and even transitions. You can combine them to get any unique result you desire.
14. Real Camera Shakes By PlaygroundStudio
You can apply them to a clip or an adjustment layer, and they’re so easy to use. Presentations, slide shows, TV shows, commercials, promotions, events, Facebook, and YouTube videos can all benefit from using them. This energetic and beautifully designed Premiere Preset will impress your audience.
15. Spin Shake Transitions By VSDream
You’re sure to love the 24 dynamic, impactful directional spin shake transitions in the Spin Shake Transitions Premiere Pro template. Sport, travel, action movies, special events, TV shows, sports films, commercials, and trailers are perfect for this project. Anything that requires an extra dose of excitement.
How to import & use Camera Shake Preset in Premiere Pro
The following steps will show you how to use these presets in Premiere Pro.
Firstly, these aren’t just drag-and-drop effects. You must install Adobe Premiere Pro on your computer.
Step1: The first step is to install the presets in your After Effects presets folder. After downloading and unzipping the free presets, copy and paste them.
Step2: As soon as you have copied the presets to the AE presets folder, you can open a PP project and replace the effects in your videos by choosing: Replace with After Effects Composition.
Step3: Verify the composition settings in Premiere Pro, and see if 4K or FHD are selected.
Step4: If you want to start adding presets to NULL objects, you can do so by creating them. To add Motion Blur, you will need footage and the overall composition. Next, you can adjust keyframes and use Motion Tiles.
Conclusion
●If you are tired of the linear style and want to change your videos into cool videos, you can use these 15 Presets for Adobe Premiere Pro. You can even tweak the effects to suit your preferences. These presets have a wide range of uses and can be used easily. It is a completely customizable filter that you can use on any video or audio footage in Adobe Premiere Pro, no matter its format (avi, MPEG, mp4, etc.). You can also control the intensity of these effects, making it suitable for footage.
Do you know how professional video footage is made? Most of the time, it’s through small movements on a camera, called Camera Shake. It is used to create realistic and dramatic shots in movies. In contrast, you can accidentally capture some shake on film; most of the time, it has to be created by a team of people. Camera operators will perform different movements with the camera in order to create this effect that we see in many movies, TV shows, and documentaries all around the world.
Putting a shake on footage can add visual interest to your scene. It adds kinetic energy to the shot and can be useful for transitions as well. Are you looking for realistic camera shake effects for your footage? Do you think these effects will help your video stand out from the rest on video sharing sites such as Youtube, Vimeo, or other sites? Look no more. In this article, we will look at 15 camera shake presets for unlimited possibilities! Mix and match to get your favorite camera shake effect. Save your time and costs!
15 Camera Shake Preset for Adobe Premiere Pro
1. Camera Shake Presets By Jorkiy
This preset collection contains 15 camera shake presets for Premiere Pro. The presets produce a live camera effect. Three groups of presets are available. A smooth preset, a quick preset, and a jerky preset. Choose one and apply it to your footage. Surprise your audience with dynamic videos courtesy of this pack.

2. Shake The Camera Or Text By 27
Create a dynamic and realistic camera shake with this awesome preset collection. The length of the presets is 1 minute, and the version for long videos is also included - 10 minutes. The project is perfect for shaking other objects, such as text or particles. Easy to use. Create dynamics in your video using this preset.

3. Real Action Ca1mera Shakes By PlaygroundStudio
12 Action Shakes effects are included in “Real Action Camera Shakes.”. You can use these effects directly in your clips or on adjustment layers. The visuals can be used in presentations, slideshows, TV shows, commercials, promotions, events, and on Facebook and YouTube. This professionally designed and energetically animated Premiere Preset will impress your audience.

4. Camera Shake By Insine
You can add a camera shake to your footage to give it a realistic look. You can also use it to shake other objects like text or particles. Animate your projects with realistic camera movements!
5. Shaking Presets Transitions By Jorkiy
This set of dynamic transitions for Premiere Pro is called Shaking Presets Transitions. There are different kinds of shakes in these transitions. This video pack works with any resolution (4k, full HD, vertical videos, etc.). Impress your audience with breathtaking videos by using this pack.

6. 35 Hit Presets By Animark
Your video will be shaken with these presets. There are 35 presets divided into seven categories. These presets would be ideal for any action, dynamic presentation, trailer, etc. You can choose from FullHD, 4K, Square, Instagram, etc.
7. 30 Shake Transitions By Animark
A stylish shake transition will be added to your video with these presets. Approximately 30 transitions are included in the project. You can create a multitude of different transitions by combining presets. You can use these presets for any action, dynamic social media presentation, trailer, etc.
8. 3D Spin Transitions By PlaygroundStudio
3D With Spin Transitions for Premiere Pro, you get 24 stylish and creative transitioning effects. This feature will look and feel better when presenting slideshows, films, movies, trailers, teasers, promotions, and events videos. PP presets that are action-packed and energetically crafted to impress your audience.
9. Stretched Bounce Transitions By LeftHand
This collection of 12 dynamic transitions presets is called Stretched Bounce Transitions. With these transitions, your videos will look more modern, clean, and cinematic. This transition works with videos and photos with resolutions up to 4K. With presets, you can combine seamless camera movement with an elastic shake. Each of the four directions is included, and there is also a category perfect for music videos with a liquid, psychedelic overlay. You can modify the speed of each preset easily.
10. Shake Transitions By JuliaDesign
Are you capable of creating dynamic videos? Check out these shake transitions to improve them. The pack is small but has a lot of cool effects. Six presets are included, so you can easily pick your favorite. You can customize each transition by adjusting the layer length.

11. Shake Transitions Presets By Jorkiy
The Shake Transitions Presets for Premiere Pro is available for free. Create sharp shaky camera effects by using this set of presets. You can apply a preset to an adjustment layer placed over your frames. The pack is compatible with any resolution (4K, full HD, vertical video, etc.). Surprise your viewers with dynamic videos created with this pack.
12. Camera Shake Flicker Effects By Vesna
14 shake presets are included in this pack, including shake effects and blinking effects. An instructional video is included. Presets last approximately 30 seconds each. It can be used as a camera shake effect, a text shake effect, or a transition effect. The possibilities are endless when you combine them.
13. Smooth Camera Shake By Enduro
Ten smooth camera shake effects are included in this project. Easily applied to the clip or layer above your edit, these are easy to use. You can use presets for effects such as camera shake, text shake, and even transitions. You can combine them to get any unique result you desire.
14. Real Camera Shakes By PlaygroundStudio
You can apply them to a clip or an adjustment layer, and they’re so easy to use. Presentations, slide shows, TV shows, commercials, promotions, events, Facebook, and YouTube videos can all benefit from using them. This energetic and beautifully designed Premiere Preset will impress your audience.
15. Spin Shake Transitions By VSDream
You’re sure to love the 24 dynamic, impactful directional spin shake transitions in the Spin Shake Transitions Premiere Pro template. Sport, travel, action movies, special events, TV shows, sports films, commercials, and trailers are perfect for this project. Anything that requires an extra dose of excitement.
How to import & use Camera Shake Preset in Premiere Pro
The following steps will show you how to use these presets in Premiere Pro.
Firstly, these aren’t just drag-and-drop effects. You must install Adobe Premiere Pro on your computer.
Step1: The first step is to install the presets in your After Effects presets folder. After downloading and unzipping the free presets, copy and paste them.
Step2: As soon as you have copied the presets to the AE presets folder, you can open a PP project and replace the effects in your videos by choosing: Replace with After Effects Composition.
Step3: Verify the composition settings in Premiere Pro, and see if 4K or FHD are selected.
Step4: If you want to start adding presets to NULL objects, you can do so by creating them. To add Motion Blur, you will need footage and the overall composition. Next, you can adjust keyframes and use Motion Tiles.
Conclusion
●If you are tired of the linear style and want to change your videos into cool videos, you can use these 15 Presets for Adobe Premiere Pro. You can even tweak the effects to suit your preferences. These presets have a wide range of uses and can be used easily. It is a completely customizable filter that you can use on any video or audio footage in Adobe Premiere Pro, no matter its format (avi, MPEG, mp4, etc.). You can also control the intensity of these effects, making it suitable for footage.
Do you know how professional video footage is made? Most of the time, it’s through small movements on a camera, called Camera Shake. It is used to create realistic and dramatic shots in movies. In contrast, you can accidentally capture some shake on film; most of the time, it has to be created by a team of people. Camera operators will perform different movements with the camera in order to create this effect that we see in many movies, TV shows, and documentaries all around the world.
Putting a shake on footage can add visual interest to your scene. It adds kinetic energy to the shot and can be useful for transitions as well. Are you looking for realistic camera shake effects for your footage? Do you think these effects will help your video stand out from the rest on video sharing sites such as Youtube, Vimeo, or other sites? Look no more. In this article, we will look at 15 camera shake presets for unlimited possibilities! Mix and match to get your favorite camera shake effect. Save your time and costs!
15 Camera Shake Preset for Adobe Premiere Pro
1. Camera Shake Presets By Jorkiy
This preset collection contains 15 camera shake presets for Premiere Pro. The presets produce a live camera effect. Three groups of presets are available. A smooth preset, a quick preset, and a jerky preset. Choose one and apply it to your footage. Surprise your audience with dynamic videos courtesy of this pack.

2. Shake The Camera Or Text By 27
Create a dynamic and realistic camera shake with this awesome preset collection. The length of the presets is 1 minute, and the version for long videos is also included - 10 minutes. The project is perfect for shaking other objects, such as text or particles. Easy to use. Create dynamics in your video using this preset.

3. Real Action Ca1mera Shakes By PlaygroundStudio
12 Action Shakes effects are included in “Real Action Camera Shakes.”. You can use these effects directly in your clips or on adjustment layers. The visuals can be used in presentations, slideshows, TV shows, commercials, promotions, events, and on Facebook and YouTube. This professionally designed and energetically animated Premiere Preset will impress your audience.

4. Camera Shake By Insine
You can add a camera shake to your footage to give it a realistic look. You can also use it to shake other objects like text or particles. Animate your projects with realistic camera movements!
5. Shaking Presets Transitions By Jorkiy
This set of dynamic transitions for Premiere Pro is called Shaking Presets Transitions. There are different kinds of shakes in these transitions. This video pack works with any resolution (4k, full HD, vertical videos, etc.). Impress your audience with breathtaking videos by using this pack.

6. 35 Hit Presets By Animark
Your video will be shaken with these presets. There are 35 presets divided into seven categories. These presets would be ideal for any action, dynamic presentation, trailer, etc. You can choose from FullHD, 4K, Square, Instagram, etc.
7. 30 Shake Transitions By Animark
A stylish shake transition will be added to your video with these presets. Approximately 30 transitions are included in the project. You can create a multitude of different transitions by combining presets. You can use these presets for any action, dynamic social media presentation, trailer, etc.
8. 3D Spin Transitions By PlaygroundStudio
3D With Spin Transitions for Premiere Pro, you get 24 stylish and creative transitioning effects. This feature will look and feel better when presenting slideshows, films, movies, trailers, teasers, promotions, and events videos. PP presets that are action-packed and energetically crafted to impress your audience.
9. Stretched Bounce Transitions By LeftHand
This collection of 12 dynamic transitions presets is called Stretched Bounce Transitions. With these transitions, your videos will look more modern, clean, and cinematic. This transition works with videos and photos with resolutions up to 4K. With presets, you can combine seamless camera movement with an elastic shake. Each of the four directions is included, and there is also a category perfect for music videos with a liquid, psychedelic overlay. You can modify the speed of each preset easily.
10. Shake Transitions By JuliaDesign
Are you capable of creating dynamic videos? Check out these shake transitions to improve them. The pack is small but has a lot of cool effects. Six presets are included, so you can easily pick your favorite. You can customize each transition by adjusting the layer length.

11. Shake Transitions Presets By Jorkiy
The Shake Transitions Presets for Premiere Pro is available for free. Create sharp shaky camera effects by using this set of presets. You can apply a preset to an adjustment layer placed over your frames. The pack is compatible with any resolution (4K, full HD, vertical video, etc.). Surprise your viewers with dynamic videos created with this pack.
12. Camera Shake Flicker Effects By Vesna
14 shake presets are included in this pack, including shake effects and blinking effects. An instructional video is included. Presets last approximately 30 seconds each. It can be used as a camera shake effect, a text shake effect, or a transition effect. The possibilities are endless when you combine them.
13. Smooth Camera Shake By Enduro
Ten smooth camera shake effects are included in this project. Easily applied to the clip or layer above your edit, these are easy to use. You can use presets for effects such as camera shake, text shake, and even transitions. You can combine them to get any unique result you desire.
14. Real Camera Shakes By PlaygroundStudio
You can apply them to a clip or an adjustment layer, and they’re so easy to use. Presentations, slide shows, TV shows, commercials, promotions, events, Facebook, and YouTube videos can all benefit from using them. This energetic and beautifully designed Premiere Preset will impress your audience.
15. Spin Shake Transitions By VSDream
You’re sure to love the 24 dynamic, impactful directional spin shake transitions in the Spin Shake Transitions Premiere Pro template. Sport, travel, action movies, special events, TV shows, sports films, commercials, and trailers are perfect for this project. Anything that requires an extra dose of excitement.
How to import & use Camera Shake Preset in Premiere Pro
The following steps will show you how to use these presets in Premiere Pro.
Firstly, these aren’t just drag-and-drop effects. You must install Adobe Premiere Pro on your computer.
Step1: The first step is to install the presets in your After Effects presets folder. After downloading and unzipping the free presets, copy and paste them.
Step2: As soon as you have copied the presets to the AE presets folder, you can open a PP project and replace the effects in your videos by choosing: Replace with After Effects Composition.
Step3: Verify the composition settings in Premiere Pro, and see if 4K or FHD are selected.
Step4: If you want to start adding presets to NULL objects, you can do so by creating them. To add Motion Blur, you will need footage and the overall composition. Next, you can adjust keyframes and use Motion Tiles.
Conclusion
●If you are tired of the linear style and want to change your videos into cool videos, you can use these 15 Presets for Adobe Premiere Pro. You can even tweak the effects to suit your preferences. These presets have a wide range of uses and can be used easily. It is a completely customizable filter that you can use on any video or audio footage in Adobe Premiere Pro, no matter its format (avi, MPEG, mp4, etc.). You can also control the intensity of these effects, making it suitable for footage.
Do you know how professional video footage is made? Most of the time, it’s through small movements on a camera, called Camera Shake. It is used to create realistic and dramatic shots in movies. In contrast, you can accidentally capture some shake on film; most of the time, it has to be created by a team of people. Camera operators will perform different movements with the camera in order to create this effect that we see in many movies, TV shows, and documentaries all around the world.
Putting a shake on footage can add visual interest to your scene. It adds kinetic energy to the shot and can be useful for transitions as well. Are you looking for realistic camera shake effects for your footage? Do you think these effects will help your video stand out from the rest on video sharing sites such as Youtube, Vimeo, or other sites? Look no more. In this article, we will look at 15 camera shake presets for unlimited possibilities! Mix and match to get your favorite camera shake effect. Save your time and costs!
15 Camera Shake Preset for Adobe Premiere Pro
1. Camera Shake Presets By Jorkiy
This preset collection contains 15 camera shake presets for Premiere Pro. The presets produce a live camera effect. Three groups of presets are available. A smooth preset, a quick preset, and a jerky preset. Choose one and apply it to your footage. Surprise your audience with dynamic videos courtesy of this pack.

2. Shake The Camera Or Text By 27
Create a dynamic and realistic camera shake with this awesome preset collection. The length of the presets is 1 minute, and the version for long videos is also included - 10 minutes. The project is perfect for shaking other objects, such as text or particles. Easy to use. Create dynamics in your video using this preset.

3. Real Action Ca1mera Shakes By PlaygroundStudio
12 Action Shakes effects are included in “Real Action Camera Shakes.”. You can use these effects directly in your clips or on adjustment layers. The visuals can be used in presentations, slideshows, TV shows, commercials, promotions, events, and on Facebook and YouTube. This professionally designed and energetically animated Premiere Preset will impress your audience.

4. Camera Shake By Insine
You can add a camera shake to your footage to give it a realistic look. You can also use it to shake other objects like text or particles. Animate your projects with realistic camera movements!
5. Shaking Presets Transitions By Jorkiy
This set of dynamic transitions for Premiere Pro is called Shaking Presets Transitions. There are different kinds of shakes in these transitions. This video pack works with any resolution (4k, full HD, vertical videos, etc.). Impress your audience with breathtaking videos by using this pack.

6. 35 Hit Presets By Animark
Your video will be shaken with these presets. There are 35 presets divided into seven categories. These presets would be ideal for any action, dynamic presentation, trailer, etc. You can choose from FullHD, 4K, Square, Instagram, etc.
7. 30 Shake Transitions By Animark
A stylish shake transition will be added to your video with these presets. Approximately 30 transitions are included in the project. You can create a multitude of different transitions by combining presets. You can use these presets for any action, dynamic social media presentation, trailer, etc.
8. 3D Spin Transitions By PlaygroundStudio
3D With Spin Transitions for Premiere Pro, you get 24 stylish and creative transitioning effects. This feature will look and feel better when presenting slideshows, films, movies, trailers, teasers, promotions, and events videos. PP presets that are action-packed and energetically crafted to impress your audience.
9. Stretched Bounce Transitions By LeftHand
This collection of 12 dynamic transitions presets is called Stretched Bounce Transitions. With these transitions, your videos will look more modern, clean, and cinematic. This transition works with videos and photos with resolutions up to 4K. With presets, you can combine seamless camera movement with an elastic shake. Each of the four directions is included, and there is also a category perfect for music videos with a liquid, psychedelic overlay. You can modify the speed of each preset easily.
10. Shake Transitions By JuliaDesign
Are you capable of creating dynamic videos? Check out these shake transitions to improve them. The pack is small but has a lot of cool effects. Six presets are included, so you can easily pick your favorite. You can customize each transition by adjusting the layer length.

11. Shake Transitions Presets By Jorkiy
The Shake Transitions Presets for Premiere Pro is available for free. Create sharp shaky camera effects by using this set of presets. You can apply a preset to an adjustment layer placed over your frames. The pack is compatible with any resolution (4K, full HD, vertical video, etc.). Surprise your viewers with dynamic videos created with this pack.
12. Camera Shake Flicker Effects By Vesna
14 shake presets are included in this pack, including shake effects and blinking effects. An instructional video is included. Presets last approximately 30 seconds each. It can be used as a camera shake effect, a text shake effect, or a transition effect. The possibilities are endless when you combine them.
13. Smooth Camera Shake By Enduro
Ten smooth camera shake effects are included in this project. Easily applied to the clip or layer above your edit, these are easy to use. You can use presets for effects such as camera shake, text shake, and even transitions. You can combine them to get any unique result you desire.
14. Real Camera Shakes By PlaygroundStudio
You can apply them to a clip or an adjustment layer, and they’re so easy to use. Presentations, slide shows, TV shows, commercials, promotions, events, Facebook, and YouTube videos can all benefit from using them. This energetic and beautifully designed Premiere Preset will impress your audience.
15. Spin Shake Transitions By VSDream
You’re sure to love the 24 dynamic, impactful directional spin shake transitions in the Spin Shake Transitions Premiere Pro template. Sport, travel, action movies, special events, TV shows, sports films, commercials, and trailers are perfect for this project. Anything that requires an extra dose of excitement.
How to import & use Camera Shake Preset in Premiere Pro
The following steps will show you how to use these presets in Premiere Pro.
Firstly, these aren’t just drag-and-drop effects. You must install Adobe Premiere Pro on your computer.
Step1: The first step is to install the presets in your After Effects presets folder. After downloading and unzipping the free presets, copy and paste them.
Step2: As soon as you have copied the presets to the AE presets folder, you can open a PP project and replace the effects in your videos by choosing: Replace with After Effects Composition.
Step3: Verify the composition settings in Premiere Pro, and see if 4K or FHD are selected.
Step4: If you want to start adding presets to NULL objects, you can do so by creating them. To add Motion Blur, you will need footage and the overall composition. Next, you can adjust keyframes and use Motion Tiles.
Conclusion
●If you are tired of the linear style and want to change your videos into cool videos, you can use these 15 Presets for Adobe Premiere Pro. You can even tweak the effects to suit your preferences. These presets have a wide range of uses and can be used easily. It is a completely customizable filter that you can use on any video or audio footage in Adobe Premiere Pro, no matter its format (avi, MPEG, mp4, etc.). You can also control the intensity of these effects, making it suitable for footage.
All You Need to Know About Transparent Logos and How You Can Make Them. Top Transparent Logos You Can Take Inspiration From
Quick Answer: What is a Transparent Logo and Why Do You Need It
An easy yet powerful editor
Numerous effects to choose from
Detailed tutorials provided by the official channel
A logo is a brand image of a company, it’s the face of a company and it represents the company out there in the market. In today’s world, the most famous companies are recognized worldwide via their brand image. Be it the “big M” of McDonald’s or the “horses” of Ferrari, we very well know these brands by their respective logos. A company’s logo is hence one of the most essential parts of branding and marketing. Moreover, a logo is one of the first steps towards brand building. Only after deciding on a specific logo can a company begin its commercial operations. Therefore, an attractive transparent logo is highly essential. Wondering what a transparent logo PNG is? Well, today we shall tell you everything about a transparent logo, for instance, the transparent WhatsApp logo!
In this article
01 [What Is a Transparent Format and Where to Use a Transparent Logo](#Part 1)
02 [When Should You Use the PNG or Vector Format?](#Part 2)
03 [7 Popular Transparent Logo Examples You Might Want to Learn](#Part 3)
04 [How to Create One transparent Logo](#Part 4)
05 [How to Insert Transparent Logo in Video](#Part 5)
Part 1 What Is a Transparent Format and Where to Use a Transparent Logo
A transparent logo is just a format of logos. It is generally in PNG format or vector format. So what differentiates a normal logo from a transparent logo? Well, the key differentiator between a regular logo and a transparent logo is that in a transparent logo, the background of the image file is transparent i.e. you cannot see a white or any other background in a transparent logo. This makes the logo more prominent and attractive. Since a logo is a key part of branding, an attractive transparent becomes all the more important for your brand’s success and prosperity!
Part 2 When Should You Use the PNG or Vector Format?
What’s the difference between a white background and a transparent background? Well, a white background tends to outshine the logo and reduces the fanciness of the logo. On the other hand, a transparent background logo goes well with any background. For instance, if the page behind the logo is black, if you were to place a white background logo on a black page, it’d look absurd. On the other hand, if your logo’s background is transparent, the color of the page wouldn’t matter. Your logo would look good irrespective of the background’s color. Since you will use your logo on not just one but multiple platforms, it becomes highly important to have a transparent background for your logo. For instance, if you use your logo on a website with an off white background, a transparent logo would suit much better than a generic white background logo. Using a white background logo would make it look clumsy and would leave a disregarding first impression.
Using PNG files helps you in multiple ways. Firstly, because PNG format files are generally compressed. They occupy very little space on your website. Moreover, a PNG format file supports lossless compression unlike other counterparts such as JPG and JPEG file formats. PNG files facilitate very high quality and occupy minimum space on your disk. PNG files also describe the features of an image very well. This means that it represents intricate details such as gradient, transparency, and other well-defined features very neatly.
Part 3 7 Popular Transparent Logo Examples You Might Want to Learn
01Instagram Logo Transparent
Instagram’s logo is synonymous with its brand image. The logo is one of the most popular logos and the social media platform is recognized by its logo worldwide. The Instagram transparent logo is simple yet conveys the sole purpose of the application. The popular social media application logo is one of the highest regarded logos. If you’re into logo making and looking waiting for an idea to click, you might want to take inspiration from the Instagram logo!
02Nike logo PNG
Nike is a highly popular sports equipment and sportswear brand. The multinational Brand is highly popular for its logo and tagline, “Just Do It”. The logo is represented by a simple tick mark followed by a full stop. It draws parallels with its tagline. The tagline and the logo are the most famous ones and are the driving force behind the success of the brand!

03Facebook Logo Transparent
Facebook is another popular social media platform. Currently, in the process of rebranding from Facebook to Meta, the company is parent to several other social media apps such as WhatsApp and Instagram. Facebook is one of the first players in the social media market. Since its inception, the logo has not been changed and that shows the prominence of the logo!

04YouTube Logo Transparent
YouTube is the most popular video streaming platform. With a collection of more than a billion videos, YouTube has done an excellent job in establishing a monopoly in the video streaming market! The YouTube logo is indeed one of the smartest logos, it resembles the “play button” and hence explains the functionality of YouTube!
05Twitter Logo Transparent
Twitter is another social media platform that stands alongside its counterparts. Since its inception, Twitter has gained widespread popularity. Today, Twitter has an estimate of 290.5 million users making it one of the most trendy social media platforms. The concept of tweeting was introduced by Twitter. Tweeting means expressing your thoughts in one or two lines. The Twitter logo is a bird that resembles the action of tweeting!

06Snapchat Logo PNG
Snapchat is a social media platform that is highly popular among the younger generation. Snap means picture and chat means texting. Snapchat is an app wherein you can send pictures and text. Snapchat logo PNG is goofy and interesting.
07Transparent Whatsapp Logo
WhatsApp is indeed one of the most important chatting apps. Most of our conversations happen via WhatsApp, such as the market cap of WhatsApp. The logo is simple yet effective, it represents a telephone within a chat bubble. The transparent WhatsApp logo conveys the entire purpose of the app within one image.

Part 4 How To Create One Transparent Logo
Now that you know so much about transparent logos, their usage, and their importance, you must be wondering how to create transparent logos. Well, creating a transparent logo is pretty simple. Here’s how you can make your logo transparent and make it outshine all the other logos.
● Firstly, you need to create a regular logo for your brand.
● Once you have your regular logo, check whether the file format is PNG or not. If the file format is not PNG, then convert the file format to PNG via an online converter.
● Once done, you need to head to a background removal website such as “Removebg.
● Now all you need to do is upload your regular logo and click on “Remove Background”.
● The background will soon be removed and you’ll have a transparent logo with you!
Part 5 How to Insert Transparent Logo in Video
Now you know everything about transparent logos and how you can make your very own transparent logo. Now you must be thinking about how you can add this transparent logo to a video. Videos are a key part of a marketing campaign, they help creating an impact on the target audience. Well, Wondershare has got you covered. With Wondershare Filmora Video Editor , you can create beautiful explainer videos and marketing videos. Through Wondershare, you can easily add your logo onto your videos and put your brand out there in the market with ease! Apart from this, Wondershare has also got several super cool video editing and making features. It helps you make videos all the more attractive and attention-grabbing! Think marketing video? Think Wondershare.
For Win 7 or later (64-bit)
For macOS 10.12 or later
● Ending Thoughts →
● Today, we understood the importance of a transparent logo for a brand. We understood how transparent logos can play a key role in putting your brand out there.
● Further, we took a look at 7 of the most popular transparent logos. We also understood the process of making a transparent logo!
● To top it off with a cherry, we also took a look at a cool video editing software that can help you create a ton of marketing videos. Using Filmora, you can insert your logo onto a video and make it stand out from all your competitors!
A logo is a brand image of a company, it’s the face of a company and it represents the company out there in the market. In today’s world, the most famous companies are recognized worldwide via their brand image. Be it the “big M” of McDonald’s or the “horses” of Ferrari, we very well know these brands by their respective logos. A company’s logo is hence one of the most essential parts of branding and marketing. Moreover, a logo is one of the first steps towards brand building. Only after deciding on a specific logo can a company begin its commercial operations. Therefore, an attractive transparent logo is highly essential. Wondering what a transparent logo PNG is? Well, today we shall tell you everything about a transparent logo, for instance, the transparent WhatsApp logo!
In this article
01 [What Is a Transparent Format and Where to Use a Transparent Logo](#Part 1)
02 [When Should You Use the PNG or Vector Format?](#Part 2)
03 [7 Popular Transparent Logo Examples You Might Want to Learn](#Part 3)
04 [How to Create One transparent Logo](#Part 4)
05 [How to Insert Transparent Logo in Video](#Part 5)
Part 1 What Is a Transparent Format and Where to Use a Transparent Logo
A transparent logo is just a format of logos. It is generally in PNG format or vector format. So what differentiates a normal logo from a transparent logo? Well, the key differentiator between a regular logo and a transparent logo is that in a transparent logo, the background of the image file is transparent i.e. you cannot see a white or any other background in a transparent logo. This makes the logo more prominent and attractive. Since a logo is a key part of branding, an attractive transparent becomes all the more important for your brand’s success and prosperity!
Part 2 When Should You Use the PNG or Vector Format?
What’s the difference between a white background and a transparent background? Well, a white background tends to outshine the logo and reduces the fanciness of the logo. On the other hand, a transparent background logo goes well with any background. For instance, if the page behind the logo is black, if you were to place a white background logo on a black page, it’d look absurd. On the other hand, if your logo’s background is transparent, the color of the page wouldn’t matter. Your logo would look good irrespective of the background’s color. Since you will use your logo on not just one but multiple platforms, it becomes highly important to have a transparent background for your logo. For instance, if you use your logo on a website with an off white background, a transparent logo would suit much better than a generic white background logo. Using a white background logo would make it look clumsy and would leave a disregarding first impression.
Using PNG files helps you in multiple ways. Firstly, because PNG format files are generally compressed. They occupy very little space on your website. Moreover, a PNG format file supports lossless compression unlike other counterparts such as JPG and JPEG file formats. PNG files facilitate very high quality and occupy minimum space on your disk. PNG files also describe the features of an image very well. This means that it represents intricate details such as gradient, transparency, and other well-defined features very neatly.
Part 3 7 Popular Transparent Logo Examples You Might Want to Learn
01Instagram Logo Transparent
Instagram’s logo is synonymous with its brand image. The logo is one of the most popular logos and the social media platform is recognized by its logo worldwide. The Instagram transparent logo is simple yet conveys the sole purpose of the application. The popular social media application logo is one of the highest regarded logos. If you’re into logo making and looking waiting for an idea to click, you might want to take inspiration from the Instagram logo!

02Nike logo PNG
Nike is a highly popular sports equipment and sportswear brand. The multinational Brand is highly popular for its logo and tagline, “Just Do It”. The logo is represented by a simple tick mark followed by a full stop. It draws parallels with its tagline. The tagline and the logo are the most famous ones and are the driving force behind the success of the brand!

03Facebook Logo Transparent
Facebook is another popular social media platform. Currently, in the process of rebranding from Facebook to Meta, the company is parent to several other social media apps such as WhatsApp and Instagram. Facebook is one of the first players in the social media market. Since its inception, the logo has not been changed and that shows the prominence of the logo!

04YouTube Logo Transparent
YouTube is the most popular video streaming platform. With a collection of more than a billion videos, YouTube has done an excellent job in establishing a monopoly in the video streaming market! The YouTube logo is indeed one of the smartest logos, it resembles the “play button” and hence explains the functionality of YouTube!

05Twitter Logo Transparent
Twitter is another social media platform that stands alongside its counterparts. Since its inception, Twitter has gained widespread popularity. Today, Twitter has an estimate of 290.5 million users making it one of the most trendy social media platforms. The concept of tweeting was introduced by Twitter. Tweeting means expressing your thoughts in one or two lines. The Twitter logo is a bird that resembles the action of tweeting!

06Snapchat Logo PNG
Snapchat is a social media platform that is highly popular among the younger generation. Snap means picture and chat means texting. Snapchat is an app wherein you can send pictures and text. Snapchat logo PNG is goofy and interesting.

07Transparent Whatsapp Logo
WhatsApp is indeed one of the most important chatting apps. Most of our conversations happen via WhatsApp, such as the market cap of WhatsApp. The logo is simple yet effective, it represents a telephone within a chat bubble. The transparent WhatsApp logo conveys the entire purpose of the app within one image.

Part 4 How To Create One Transparent Logo
Now that you know so much about transparent logos, their usage, and their importance, you must be wondering how to create transparent logos. Well, creating a transparent logo is pretty simple. Here’s how you can make your logo transparent and make it outshine all the other logos.
● Firstly, you need to create a regular logo for your brand.
● Once you have your regular logo, check whether the file format is PNG or not. If the file format is not PNG, then convert the file format to PNG via an online converter.
● Once done, you need to head to a background removal website such as “Removebg.
● Now all you need to do is upload your regular logo and click on “Remove Background”.
● The background will soon be removed and you’ll have a transparent logo with you!
Part 5 How to Insert Transparent Logo in Video
Now you know everything about transparent logos and how you can make your very own transparent logo. Now you must be thinking about how you can add this transparent logo to a video. Videos are a key part of a marketing campaign, they help creating an impact on the target audience. Well, Wondershare has got you covered. With Wondershare Filmora Video Editor , you can create beautiful explainer videos and marketing videos. Through Wondershare, you can easily add your logo onto your videos and put your brand out there in the market with ease! Apart from this, Wondershare has also got several super cool video editing and making features. It helps you make videos all the more attractive and attention-grabbing! Think marketing video? Think Wondershare.
For Win 7 or later (64-bit)
For macOS 10.12 or later
● Ending Thoughts →
● Today, we understood the importance of a transparent logo for a brand. We understood how transparent logos can play a key role in putting your brand out there.
● Further, we took a look at 7 of the most popular transparent logos. We also understood the process of making a transparent logo!
● To top it off with a cherry, we also took a look at a cool video editing software that can help you create a ton of marketing videos. Using Filmora, you can insert your logo onto a video and make it stand out from all your competitors!
A logo is a brand image of a company, it’s the face of a company and it represents the company out there in the market. In today’s world, the most famous companies are recognized worldwide via their brand image. Be it the “big M” of McDonald’s or the “horses” of Ferrari, we very well know these brands by their respective logos. A company’s logo is hence one of the most essential parts of branding and marketing. Moreover, a logo is one of the first steps towards brand building. Only after deciding on a specific logo can a company begin its commercial operations. Therefore, an attractive transparent logo is highly essential. Wondering what a transparent logo PNG is? Well, today we shall tell you everything about a transparent logo, for instance, the transparent WhatsApp logo!
In this article
01 [What Is a Transparent Format and Where to Use a Transparent Logo](#Part 1)
02 [When Should You Use the PNG or Vector Format?](#Part 2)
03 [7 Popular Transparent Logo Examples You Might Want to Learn](#Part 3)
04 [How to Create One transparent Logo](#Part 4)
05 [How to Insert Transparent Logo in Video](#Part 5)
Part 1 What Is a Transparent Format and Where to Use a Transparent Logo
A transparent logo is just a format of logos. It is generally in PNG format or vector format. So what differentiates a normal logo from a transparent logo? Well, the key differentiator between a regular logo and a transparent logo is that in a transparent logo, the background of the image file is transparent i.e. you cannot see a white or any other background in a transparent logo. This makes the logo more prominent and attractive. Since a logo is a key part of branding, an attractive transparent becomes all the more important for your brand’s success and prosperity!
Part 2 When Should You Use the PNG or Vector Format?
What’s the difference between a white background and a transparent background? Well, a white background tends to outshine the logo and reduces the fanciness of the logo. On the other hand, a transparent background logo goes well with any background. For instance, if the page behind the logo is black, if you were to place a white background logo on a black page, it’d look absurd. On the other hand, if your logo’s background is transparent, the color of the page wouldn’t matter. Your logo would look good irrespective of the background’s color. Since you will use your logo on not just one but multiple platforms, it becomes highly important to have a transparent background for your logo. For instance, if you use your logo on a website with an off white background, a transparent logo would suit much better than a generic white background logo. Using a white background logo would make it look clumsy and would leave a disregarding first impression.
Using PNG files helps you in multiple ways. Firstly, because PNG format files are generally compressed. They occupy very little space on your website. Moreover, a PNG format file supports lossless compression unlike other counterparts such as JPG and JPEG file formats. PNG files facilitate very high quality and occupy minimum space on your disk. PNG files also describe the features of an image very well. This means that it represents intricate details such as gradient, transparency, and other well-defined features very neatly.
Part 3 7 Popular Transparent Logo Examples You Might Want to Learn
01Instagram Logo Transparent
Instagram’s logo is synonymous with its brand image. The logo is one of the most popular logos and the social media platform is recognized by its logo worldwide. The Instagram transparent logo is simple yet conveys the sole purpose of the application. The popular social media application logo is one of the highest regarded logos. If you’re into logo making and looking waiting for an idea to click, you might want to take inspiration from the Instagram logo!

02Nike logo PNG
Nike is a highly popular sports equipment and sportswear brand. The multinational Brand is highly popular for its logo and tagline, “Just Do It”. The logo is represented by a simple tick mark followed by a full stop. It draws parallels with its tagline. The tagline and the logo are the most famous ones and are the driving force behind the success of the brand!

03Facebook Logo Transparent
Facebook is another popular social media platform. Currently, in the process of rebranding from Facebook to Meta, the company is parent to several other social media apps such as WhatsApp and Instagram. Facebook is one of the first players in the social media market. Since its inception, the logo has not been changed and that shows the prominence of the logo!

04YouTube Logo Transparent
YouTube is the most popular video streaming platform. With a collection of more than a billion videos, YouTube has done an excellent job in establishing a monopoly in the video streaming market! The YouTube logo is indeed one of the smartest logos, it resembles the “play button” and hence explains the functionality of YouTube!

05Twitter Logo Transparent
Twitter is another social media platform that stands alongside its counterparts. Since its inception, Twitter has gained widespread popularity. Today, Twitter has an estimate of 290.5 million users making it one of the most trendy social media platforms. The concept of tweeting was introduced by Twitter. Tweeting means expressing your thoughts in one or two lines. The Twitter logo is a bird that resembles the action of tweeting!

06Snapchat Logo PNG
Snapchat is a social media platform that is highly popular among the younger generation. Snap means picture and chat means texting. Snapchat is an app wherein you can send pictures and text. Snapchat logo PNG is goofy and interesting.

07Transparent Whatsapp Logo
WhatsApp is indeed one of the most important chatting apps. Most of our conversations happen via WhatsApp, such as the market cap of WhatsApp. The logo is simple yet effective, it represents a telephone within a chat bubble. The transparent WhatsApp logo conveys the entire purpose of the app within one image.

Part 4 How To Create One Transparent Logo
Now that you know so much about transparent logos, their usage, and their importance, you must be wondering how to create transparent logos. Well, creating a transparent logo is pretty simple. Here’s how you can make your logo transparent and make it outshine all the other logos.
● Firstly, you need to create a regular logo for your brand.
● Once you have your regular logo, check whether the file format is PNG or not. If the file format is not PNG, then convert the file format to PNG via an online converter.
● Once done, you need to head to a background removal website such as “Removebg.
● Now all you need to do is upload your regular logo and click on “Remove Background”.
● The background will soon be removed and you’ll have a transparent logo with you!
Part 5 How to Insert Transparent Logo in Video
Now you know everything about transparent logos and how you can make your very own transparent logo. Now you must be thinking about how you can add this transparent logo to a video. Videos are a key part of a marketing campaign, they help creating an impact on the target audience. Well, Wondershare has got you covered. With Wondershare Filmora Video Editor , you can create beautiful explainer videos and marketing videos. Through Wondershare, you can easily add your logo onto your videos and put your brand out there in the market with ease! Apart from this, Wondershare has also got several super cool video editing and making features. It helps you make videos all the more attractive and attention-grabbing! Think marketing video? Think Wondershare.
For Win 7 or later (64-bit)
For macOS 10.12 or later
● Ending Thoughts →
● Today, we understood the importance of a transparent logo for a brand. We understood how transparent logos can play a key role in putting your brand out there.
● Further, we took a look at 7 of the most popular transparent logos. We also understood the process of making a transparent logo!
● To top it off with a cherry, we also took a look at a cool video editing software that can help you create a ton of marketing videos. Using Filmora, you can insert your logo onto a video and make it stand out from all your competitors!
A logo is a brand image of a company, it’s the face of a company and it represents the company out there in the market. In today’s world, the most famous companies are recognized worldwide via their brand image. Be it the “big M” of McDonald’s or the “horses” of Ferrari, we very well know these brands by their respective logos. A company’s logo is hence one of the most essential parts of branding and marketing. Moreover, a logo is one of the first steps towards brand building. Only after deciding on a specific logo can a company begin its commercial operations. Therefore, an attractive transparent logo is highly essential. Wondering what a transparent logo PNG is? Well, today we shall tell you everything about a transparent logo, for instance, the transparent WhatsApp logo!
In this article
01 [What Is a Transparent Format and Where to Use a Transparent Logo](#Part 1)
02 [When Should You Use the PNG or Vector Format?](#Part 2)
03 [7 Popular Transparent Logo Examples You Might Want to Learn](#Part 3)
04 [How to Create One transparent Logo](#Part 4)
05 [How to Insert Transparent Logo in Video](#Part 5)
Part 1 What Is a Transparent Format and Where to Use a Transparent Logo
A transparent logo is just a format of logos. It is generally in PNG format or vector format. So what differentiates a normal logo from a transparent logo? Well, the key differentiator between a regular logo and a transparent logo is that in a transparent logo, the background of the image file is transparent i.e. you cannot see a white or any other background in a transparent logo. This makes the logo more prominent and attractive. Since a logo is a key part of branding, an attractive transparent becomes all the more important for your brand’s success and prosperity!
Part 2 When Should You Use the PNG or Vector Format?
What’s the difference between a white background and a transparent background? Well, a white background tends to outshine the logo and reduces the fanciness of the logo. On the other hand, a transparent background logo goes well with any background. For instance, if the page behind the logo is black, if you were to place a white background logo on a black page, it’d look absurd. On the other hand, if your logo’s background is transparent, the color of the page wouldn’t matter. Your logo would look good irrespective of the background’s color. Since you will use your logo on not just one but multiple platforms, it becomes highly important to have a transparent background for your logo. For instance, if you use your logo on a website with an off white background, a transparent logo would suit much better than a generic white background logo. Using a white background logo would make it look clumsy and would leave a disregarding first impression.
Using PNG files helps you in multiple ways. Firstly, because PNG format files are generally compressed. They occupy very little space on your website. Moreover, a PNG format file supports lossless compression unlike other counterparts such as JPG and JPEG file formats. PNG files facilitate very high quality and occupy minimum space on your disk. PNG files also describe the features of an image very well. This means that it represents intricate details such as gradient, transparency, and other well-defined features very neatly.
Part 3 7 Popular Transparent Logo Examples You Might Want to Learn
01Instagram Logo Transparent
Instagram’s logo is synonymous with its brand image. The logo is one of the most popular logos and the social media platform is recognized by its logo worldwide. The Instagram transparent logo is simple yet conveys the sole purpose of the application. The popular social media application logo is one of the highest regarded logos. If you’re into logo making and looking waiting for an idea to click, you might want to take inspiration from the Instagram logo!

02Nike logo PNG
Nike is a highly popular sports equipment and sportswear brand. The multinational Brand is highly popular for its logo and tagline, “Just Do It”. The logo is represented by a simple tick mark followed by a full stop. It draws parallels with its tagline. The tagline and the logo are the most famous ones and are the driving force behind the success of the brand!

03Facebook Logo Transparent
Facebook is another popular social media platform. Currently, in the process of rebranding from Facebook to Meta, the company is parent to several other social media apps such as WhatsApp and Instagram. Facebook is one of the first players in the social media market. Since its inception, the logo has not been changed and that shows the prominence of the logo!

04YouTube Logo Transparent
YouTube is the most popular video streaming platform. With a collection of more than a billion videos, YouTube has done an excellent job in establishing a monopoly in the video streaming market! The YouTube logo is indeed one of the smartest logos, it resembles the “play button” and hence explains the functionality of YouTube!

05Twitter Logo Transparent
Twitter is another social media platform that stands alongside its counterparts. Since its inception, Twitter has gained widespread popularity. Today, Twitter has an estimate of 290.5 million users making it one of the most trendy social media platforms. The concept of tweeting was introduced by Twitter. Tweeting means expressing your thoughts in one or two lines. The Twitter logo is a bird that resembles the action of tweeting!

06Snapchat Logo PNG
Snapchat is a social media platform that is highly popular among the younger generation. Snap means picture and chat means texting. Snapchat is an app wherein you can send pictures and text. Snapchat logo PNG is goofy and interesting.

07Transparent Whatsapp Logo
WhatsApp is indeed one of the most important chatting apps. Most of our conversations happen via WhatsApp, such as the market cap of WhatsApp. The logo is simple yet effective, it represents a telephone within a chat bubble. The transparent WhatsApp logo conveys the entire purpose of the app within one image.

Part 4 How To Create One Transparent Logo
Now that you know so much about transparent logos, their usage, and their importance, you must be wondering how to create transparent logos. Well, creating a transparent logo is pretty simple. Here’s how you can make your logo transparent and make it outshine all the other logos.
● Firstly, you need to create a regular logo for your brand.
● Once you have your regular logo, check whether the file format is PNG or not. If the file format is not PNG, then convert the file format to PNG via an online converter.
● Once done, you need to head to a background removal website such as “Removebg.
● Now all you need to do is upload your regular logo and click on “Remove Background”.
● The background will soon be removed and you’ll have a transparent logo with you!
Part 5 How to Insert Transparent Logo in Video
Now you know everything about transparent logos and how you can make your very own transparent logo. Now you must be thinking about how you can add this transparent logo to a video. Videos are a key part of a marketing campaign, they help creating an impact on the target audience. Well, Wondershare has got you covered. With Wondershare Filmora Video Editor , you can create beautiful explainer videos and marketing videos. Through Wondershare, you can easily add your logo onto your videos and put your brand out there in the market with ease! Apart from this, Wondershare has also got several super cool video editing and making features. It helps you make videos all the more attractive and attention-grabbing! Think marketing video? Think Wondershare.
For Win 7 or later (64-bit)
For macOS 10.12 or later
● Ending Thoughts →
● Today, we understood the importance of a transparent logo for a brand. We understood how transparent logos can play a key role in putting your brand out there.
● Further, we took a look at 7 of the most popular transparent logos. We also understood the process of making a transparent logo!
● To top it off with a cherry, we also took a look at a cool video editing software that can help you create a ton of marketing videos. Using Filmora, you can insert your logo onto a video and make it stand out from all your competitors!
Also read:
- Video Marketing Is Adopted by Most Companies in This Digital Era. In This Post, We Are Going to Share some Useful Tips to Create a Better Product Video Ads to Help Prompt Business for 2024
- Updated Top 12 AI Video Generators to Pick for 2024
- New Guiding Principles of Track Matte and Tracking in Adobe After Effects for 2024
- Updated In 2024, Easy Ways to Edit Recorded Video
- Updated In 2024, Adobe Premiere Pro Rec 709 LUTs Finding The Best Choices
- Updated 2024 Approved How to Animate Designs With Canva GIF
- Updated 2024 Approved Adobe Premiere Pro Download and Use Guide In Depth
- New How To Create A Green Screen Video In After Effects
- Updated Detailed Guide to Resize Your Video in VLC for 2024
- In 2024, Are You Aware that You Can Create Your Own Lower Thirds for Video? Read This Article for a Tutorial on How to Customize One
- New Top 4 Free 3D Intro Maker to Use
- 2024 Approved Learn How to Create a Kinetic Typography Text Effect in Filmora, One of the Best Video Editors for All Skill Levels. Check Out This Simple Step-by-Step Guide
- 2024 Approved Top Things People Know About Wedding Slideshow
- In 2024, 15 Amazing GIF Splitter Examples You Need to Bookmark
- Updated 2 Solutions to Cut Video in VLC on Windows
- Updated Discover How to Change Sky Background with The Best Applications? A Review for 2024
- New How to Create Sports Intro and Outro for YouTube Video, In 2024
- Updated 6 Instant Ways to Make Windows 10 Slideshow for 2024
- Updated Convert Slow Motion Videos to Regular Videos in Your iOS Device |A How for 2024
- New In 2024, What Is Animated GIF | GIF Example & Advantages of GIF
- Updated 2024 Approved Applying the Effect of Camera Shake in Video Creation
- Step by Step Guide on Make Gimp Transparent Background PNG for 2024
- New In 2024, Color Lut in Video - Color Grade Your Video
- In 2024, 3GP Video Format What Is 3GP Format And How To Open It?
- In 2024, Editing Videos Was Never so Easy as It Is Now. With Video Enhancer Ai, This Task Is Very Simple to Do and No Trouble Will Be There in Getting the Things Done as Needed. Choose the Right AI Video Enhancer for Task Completion
- New In 2024, Deleting White Background in Photoshop Is Hard? No
- 2024 Approved How to Vlog? A Ultimate Guide for Beginners
- Updated VN Editor A Prominent Option for Adding Luts for Video Editing for 2024
- New In 2024, How to Remove Motion Blur In Photoshop
- 2024 Approved Detailed Tutorial to Crop Video in KineMaster
- Here, You Will Learn How to Add a Realistic Fire Effect Using Wondershare Filmora. That Will Help to Boost Your Channel and Decorate Your YouTube Channel with Creative and Unique Effects
- In 2024, How to Change the Speed of Video in DaVinci Resolve?
- 2024 Approved Top Free LUTs To Use in Shotcut An Overview
- How to Add Filters on iMovie
- New How to Create Glowing Edge Effect in TikTok Dancing Video for 2024
- New In 2024, Step by Step to Rotate Videos Using OBS
- 2024 Approved Want to Make a Single Video From Different Clips? Follow These Ways to Learn About How to Merge Clips in DaVinci Resolve
- How to Fix Pokemon Go Route Not Working On Honor Play 40C? | Dr.fone
- How to Fix My HTC U23 Location Is Wrong | Dr.fone
- In 2024, Is GSM Flasher ADB Legit? Full Review To Bypass Your Vivo T2 Pro 5GFRP Lock
- How to Change Your Oppo Reno 10 Pro 5G Location on life360 Without Anyone Knowing? | Dr.fone
- How to recover deleted contacts from P55.
- Will Pokémon Go Ban the Account if You Use PGSharp On Realme 11 Pro+ | Dr.fone
- In 2024, How To Open Your Apple iPhone 11 Pro Max Without a Home Button | Dr.fone
- Best Methods for Infinix Hot 30 5G Wont Turn On | Dr.fone
- How To Enable USB Debugging on a Locked Samsung Galaxy M14 4G Phone
- How To Change Country on App Store for iPhone 7 Plus With 7 Methods | Dr.fone
- In 2024, Easy Guide How To Bypass Oppo A59 5G FRP Android 10/11/12/13
- In 2024, Top 6 Apps/Services to Trace Any Oppo Reno 10 5G Location By Mobile Number | Dr.fone
- How to Transfer Text Messages from Samsung Galaxy S24 Ultra to New Phone | Dr.fone
- In 2024, Full Guide to Catch 100 IV Pokémon Using a Map On Vivo Y78t | Dr.fone
- In 2024, Dose Life360 Notify Me When Someone Checks My Location On Oppo Find X6 Pro? | Dr.fone
- In 2024, 3 Effective Methods to Fake GPS location on Android For your Infinix Note 30 VIP | Dr.fone
- How To Unlock Any Samsung Galaxy XCover 6 Pro Tactical Edition Phone Password Using Emergency Call
- How To Bypass Google FRP on Honor 90 Lite
- 8 Best Apps for Screen Mirroring Honor 90 PC | Dr.fone
- How to Track Vivo V27e Location by Number | Dr.fone
- Pokémon Go Cooldown Chart On Oppo Find X6 | Dr.fone
- In 2024, Here are Some of the Best Pokemon Discord Servers to Join On Realme Note 50 | Dr.fone
- How To Check if Your Motorola Moto G13 Is Unlocked
- Easy Guide to Infinix Smart 8 FRP Bypass With Best Methods
- In 2024, How To Change Country on App Store for iPhone 14 Pro With 7 Methods
- In 2024, How to Send and Fake Live Location on Facebook Messenger Of your Apple iPhone 13 Pro | Dr.fone
- In 2024, How to jailbreak iCloud locked Apple iPhone X
- Apple ID Locked or Disabled On iPhone 7 Plus? 7 Mehtods You Cant-Miss
- Undelete lost call logs from Oppo Reno 10 Pro 5G
- In 2024, How to Hide/Fake Snapchat Location on Your Vivo V29e | Dr.fone
- In 2024, How to Turn Off Google Location to Stop Tracking You on Oppo Reno 11F 5G | Dr.fone
- In 2024, How To Unlink Apple ID From iPhone SE
- How Can We Bypass Motorola Moto G24 FRP?
- A Quick Guide to Xiaomi 14 FRP Bypass Instantly
- How to Change Google Play Location On Oppo F23 5G | Dr.fone
- Undelete lost messages from Tecno Camon 20
- Title: 4 Methods to Crop a Video on Android Easily
- Author: Chloe
- Created at : 2024-05-20 03:37:18
- Updated at : 2024-05-21 03:37:18
- Link: https://ai-editing-video.techidaily.com/4-methods-to-crop-a-video-on-android-easily/
- License: This work is licensed under CC BY-NC-SA 4.0.

