4 Methods to Merge MP4 and MP3

4 Methods to Merge MP4 and MP3
The rising trends in audio and visual effects have introduced the media industry to new dimensions of technology. The screens around us are flickering 24/7 with videos on several topics. But, without the perfect background audios, their underlying message remains unheard. Hence, a balance of sound and picture is necessary to entice the audience and break the monotony. You can also create personalized videos by merging various video clips and adding the background sound afterwards. For this purpose, all you need is a tool that can add audio to your videos.
Let’s look at four different ways of merging audios and videos. The tools will help you craft high-end videos without involving any complex steps. You can make your videos beautiful by using the following easy to use tools.
- Filmora Wondershare
- VLC
- Photos App on Windows 10
- Using the Online Converter
Merge MP4 and MP3 Using Filmora Wondershare
Filmora Video Editor is an editing tool that brings your creativity and productivity to a whole new level. It comes with several editing options for both audio and video. All you need is to let your imagination run wild to give a personalized touch to your videos.
If you want to record podcasts, narration or voiceovers with lowered background music under speech, itsaudio ducking feature comes in handy. Filmora’sauto-synchronization feature is the cherry on top. It facilitates matching your audio with your video in a crispy way. Thus, making the whole experience of customizing video more professional.
Adding more to it, the Filmora Montage maker edits your video automatically to make it smooth with the music of your choice. Thisauto-beat sync feature is user friendly and convenient. Hence, you cannot deny that from beginners to intermediate, Filmora is empowering creators over the globe.
Filmora comes with an in-built audio library that serves the purpose of adding different sounds in the background. Its drag and drop feature make its interface more user friendly.It allows you to add audio files (.MP3, or .WMA) to videos (.Avi, .MP4, .MKV).It supports different audio and video formats that help you create awesome videos.
For Win 7 or later (64-bit)
For macOS 10.14 or later
Here is a step-by-step guide for adding sound to your videos.
Step 1: Importing the Media files (Both Audio and Video)
After you finish installing Wondershare Filmora from the official website on your computer, launch it.
You can import the MP4 and MP3 files by going to the File menu and then selecting import media files.

Tip: The software comes with a huge built-in library. You can also use it to add sound to your project.
Step 2: Adding media files to Timeline
- Now, hover the mouse over the media files that you have imported.
- Use the drag and drop feature to add the mp4 and mp3 files to the timeline.

If you want to modify the audio, the audio panel can be seen by double-tapping the audio from the timeline. This panel will appear at the top of the screen.

You can explore different options ranging from ducking to denoising.
Step 3: Exporting the File
Now that the audio has been added to the video, select the ‘Export’ tab so that you can export your video.

The exported file can be saved in different formats. (MP4, WMV, etc)
Tip: You can rename and define the resolution for better output.
Merge MP4 and MP3 Using VLC Media Player
VLC is an open-source media player that works for different platforms (Windows, Mac and Linux). The media player comes with features ranging from compression to conversion. This multimedia framework supports audio formats like AC-3, DV Audio, FLAC, MP3, Speex, Vorbis. It also supports different video formats.
If your video has no background sound, you can add it to your videos by following simple steps. Not only that, but you can also change the original audio track to make your video an exquisite piece of art.
The majority of people consider VLC as only a media player. But, it works as a video editor as well. Therefore, it allows you to add background sound to your videos. This handy tool supports various streaming protocols along with almost all multimedia files.
Here is a demonstration for adding audio to your video.
Step 1: Installation
The first step would be installing the VLC media player on your computer and launching it afterward.
Click on Media and then select Convert/Save.

A pop-up window will appear in which you have to select the Add option. This will help you load the targeted video.

Step 2: Playing both audio and video in a synchronous manner
- After loading the video, at the bottom of the dialogue box, tick the Show more options.
- Select the option named ‘Play another media synchronously.

Click Browse to import your desired audio. It will open another window.

Step 3: Adding audio
Click + Add on the second Open Media window. It will load the audio files for the video.
- Now, you’ll have your video and audio files in the formats of mp4 and mp3 respectively.

- Click on Convert/Save
- A pop-up window will appear asking about the format you wish to have for your video.

- Also, by selecting Browse, select the destination where you want to save your video.

- Click on Start so that the video and audio can be merged.

Merge MP4 and MP3 Using Windows Photo App
Windows Photo App is home to all audio and video files on your PC. You can view, edit and store your audio and video files in it. It also allows you to share those among your family and friends. The tool comes with an AI-powered assistant to manage your media efficiently. Hence, you can find your required media files faster.
With its editing features, you can bring dull moments to life. It lets you integrate photos and videos into third-party apps so that you may transform your mundane videos into extraordinary ones.
The App also comes with a backup feature that makes it a safe home for your life’s memories.
If you want to merge recordings of small video clips in no time, then Windows Photo App will assist you in doing it in a jiff. It is a built-in app for Windows 10 and comes with the easiest ways of adding sound to your videos.
Have a look at the following steps.
You can find the Windows Photo app on your desktop or press the Windows + S to open the Start menu search and type Photos in the search box.

- Click on the video editor tab.
- Select the New Video project to start a blank project.

A dialogue box will appear asking to add the desired project name. Enter the name.

You’ll see an add button on the left side. By selecting it, a drop-down menu will appear. It will show you different options for adding video to your project.

Select the desired option and add the video clips.

Adjust the order of your videos by dragging the videos in the storyboard.

- You can trim, split and rotate your videos here.
- It also allows you to use various filters, texts and 3D effects.
- After completing the editing, select the finish video button on the menu bar.
- Select your preferred video quality.
You can add audio by selecting the Custom Audio option.

You will see a window-pane on the right side with different options for adding the sound. You can add it by the drag and drop feature or by clicking on the add file option.


- Select Done to complete the process.
- You have successfully added mp3 to your video file**.**
- Tap on Finish video in the upper right corner to complete the process.

- You can also select the quality of your video.

Click on Export to save your file to your desired destination.
Merge MP4 and MP3 Using Using Online Converter
Different online resources on the internet will help combine videos. You do not have to go through the hassle of downloading and installing third-party apps. Online Converter supports different formats like MP4, AVI, FLV, MOV, 3GP, MKV, etc. With it, you can combine multiple video files into a single file in no time. The most popular output format is MP4.
The procedure is simple. You have to upload your video clips on Online Converter in the order that you want in the final output.

You’ll navigate to a page with options for adding the media files by clicking on the choose file.

After uploading the media files. You will also see options for the audio in a drop-down menu.

Select the Add option to merge mp3 to mp4.

After the mp3 is merged to the mp4, you can download the converted file or share it via social media as well.

Disadvantages
- If your internet connectivity is poor, the videos may take longer to upload.
- If the response time is slow, you need to cancel the process and re-submit the data.
- Encrypted or protected video files are not supported for the merger of the videos.
Conclusion
Each tool comes with its pros and cons. With the wide range of video editing options, you can explore these different platforms and add life to your moments. Whether you are a beginner or an intermediate, editing multimedia files has been made easy by these different tools.
For macOS 10.14 or later
Here is a step-by-step guide for adding sound to your videos.
Step 1: Importing the Media files (Both Audio and Video)
After you finish installing Wondershare Filmora from the official website on your computer, launch it.
You can import the MP4 and MP3 files by going to the File menu and then selecting import media files.

Tip: The software comes with a huge built-in library. You can also use it to add sound to your project.
Step 2: Adding media files to Timeline
- Now, hover the mouse over the media files that you have imported.
- Use the drag and drop feature to add the mp4 and mp3 files to the timeline.

If you want to modify the audio, the audio panel can be seen by double-tapping the audio from the timeline. This panel will appear at the top of the screen.

You can explore different options ranging from ducking to denoising.
Step 3: Exporting the File
Now that the audio has been added to the video, select the ‘Export’ tab so that you can export your video.

The exported file can be saved in different formats. (MP4, WMV, etc)
Tip: You can rename and define the resolution for better output.
Merge MP4 and MP3 Using VLC Media Player
VLC is an open-source media player that works for different platforms (Windows, Mac and Linux). The media player comes with features ranging from compression to conversion. This multimedia framework supports audio formats like AC-3, DV Audio, FLAC, MP3, Speex, Vorbis. It also supports different video formats.
If your video has no background sound, you can add it to your videos by following simple steps. Not only that, but you can also change the original audio track to make your video an exquisite piece of art.
The majority of people consider VLC as only a media player. But, it works as a video editor as well. Therefore, it allows you to add background sound to your videos. This handy tool supports various streaming protocols along with almost all multimedia files.
Here is a demonstration for adding audio to your video.
Step 1: Installation
The first step would be installing the VLC media player on your computer and launching it afterward.
Click on Media and then select Convert/Save.

A pop-up window will appear in which you have to select the Add option. This will help you load the targeted video.

Step 2: Playing both audio and video in a synchronous manner
- After loading the video, at the bottom of the dialogue box, tick the Show more options.
- Select the option named ‘Play another media synchronously.

Click Browse to import your desired audio. It will open another window.

Step 3: Adding audio
Click + Add on the second Open Media window. It will load the audio files for the video.
- Now, you’ll have your video and audio files in the formats of mp4 and mp3 respectively.

- Click on Convert/Save
- A pop-up window will appear asking about the format you wish to have for your video.

- Also, by selecting Browse, select the destination where you want to save your video.

- Click on Start so that the video and audio can be merged.

Merge MP4 and MP3 Using Windows Photo App
Windows Photo App is home to all audio and video files on your PC. You can view, edit and store your audio and video files in it. It also allows you to share those among your family and friends. The tool comes with an AI-powered assistant to manage your media efficiently. Hence, you can find your required media files faster.
With its editing features, you can bring dull moments to life. It lets you integrate photos and videos into third-party apps so that you may transform your mundane videos into extraordinary ones.
The App also comes with a backup feature that makes it a safe home for your life’s memories.
If you want to merge recordings of small video clips in no time, then Windows Photo App will assist you in doing it in a jiff. It is a built-in app for Windows 10 and comes with the easiest ways of adding sound to your videos.
Have a look at the following steps.
You can find the Windows Photo app on your desktop or press the Windows + S to open the Start menu search and type Photos in the search box.

- Click on the video editor tab.
- Select the New Video project to start a blank project.

A dialogue box will appear asking to add the desired project name. Enter the name.

You’ll see an add button on the left side. By selecting it, a drop-down menu will appear. It will show you different options for adding video to your project.

Select the desired option and add the video clips.

Adjust the order of your videos by dragging the videos in the storyboard.

- You can trim, split and rotate your videos here.
- It also allows you to use various filters, texts and 3D effects.
- After completing the editing, select the finish video button on the menu bar.
- Select your preferred video quality.
You can add audio by selecting the Custom Audio option.

You will see a window-pane on the right side with different options for adding the sound. You can add it by the drag and drop feature or by clicking on the add file option.


- Select Done to complete the process.
- You have successfully added mp3 to your video file**.**
- Tap on Finish video in the upper right corner to complete the process.

- You can also select the quality of your video.

Click on Export to save your file to your desired destination.
Merge MP4 and MP3 Using Using Online Converter
Different online resources on the internet will help combine videos. You do not have to go through the hassle of downloading and installing third-party apps. Online Converter supports different formats like MP4, AVI, FLV, MOV, 3GP, MKV, etc. With it, you can combine multiple video files into a single file in no time. The most popular output format is MP4.
The procedure is simple. You have to upload your video clips on Online Converter in the order that you want in the final output.

You’ll navigate to a page with options for adding the media files by clicking on the choose file.

After uploading the media files. You will also see options for the audio in a drop-down menu.

Select the Add option to merge mp3 to mp4.

After the mp3 is merged to the mp4, you can download the converted file or share it via social media as well.

Disadvantages
- If your internet connectivity is poor, the videos may take longer to upload.
- If the response time is slow, you need to cancel the process and re-submit the data.
- Encrypted or protected video files are not supported for the merger of the videos.
Conclusion
Each tool comes with its pros and cons. With the wide range of video editing options, you can explore these different platforms and add life to your moments. Whether you are a beginner or an intermediate, editing multimedia files has been made easy by these different tools.
For macOS 10.14 or later
Here is a step-by-step guide for adding sound to your videos.
Step 1: Importing the Media files (Both Audio and Video)
After you finish installing Wondershare Filmora from the official website on your computer, launch it.
You can import the MP4 and MP3 files by going to the File menu and then selecting import media files.

Tip: The software comes with a huge built-in library. You can also use it to add sound to your project.
Step 2: Adding media files to Timeline
- Now, hover the mouse over the media files that you have imported.
- Use the drag and drop feature to add the mp4 and mp3 files to the timeline.

If you want to modify the audio, the audio panel can be seen by double-tapping the audio from the timeline. This panel will appear at the top of the screen.

You can explore different options ranging from ducking to denoising.
Step 3: Exporting the File
Now that the audio has been added to the video, select the ‘Export’ tab so that you can export your video.

The exported file can be saved in different formats. (MP4, WMV, etc)
Tip: You can rename and define the resolution for better output.
Merge MP4 and MP3 Using VLC Media Player
VLC is an open-source media player that works for different platforms (Windows, Mac and Linux). The media player comes with features ranging from compression to conversion. This multimedia framework supports audio formats like AC-3, DV Audio, FLAC, MP3, Speex, Vorbis. It also supports different video formats.
If your video has no background sound, you can add it to your videos by following simple steps. Not only that, but you can also change the original audio track to make your video an exquisite piece of art.
The majority of people consider VLC as only a media player. But, it works as a video editor as well. Therefore, it allows you to add background sound to your videos. This handy tool supports various streaming protocols along with almost all multimedia files.
Here is a demonstration for adding audio to your video.
Step 1: Installation
The first step would be installing the VLC media player on your computer and launching it afterward.
Click on Media and then select Convert/Save.

A pop-up window will appear in which you have to select the Add option. This will help you load the targeted video.

Step 2: Playing both audio and video in a synchronous manner
- After loading the video, at the bottom of the dialogue box, tick the Show more options.
- Select the option named ‘Play another media synchronously.

Click Browse to import your desired audio. It will open another window.

Step 3: Adding audio
Click + Add on the second Open Media window. It will load the audio files for the video.
- Now, you’ll have your video and audio files in the formats of mp4 and mp3 respectively.

- Click on Convert/Save
- A pop-up window will appear asking about the format you wish to have for your video.

- Also, by selecting Browse, select the destination where you want to save your video.

- Click on Start so that the video and audio can be merged.

Merge MP4 and MP3 Using Windows Photo App
Windows Photo App is home to all audio and video files on your PC. You can view, edit and store your audio and video files in it. It also allows you to share those among your family and friends. The tool comes with an AI-powered assistant to manage your media efficiently. Hence, you can find your required media files faster.
With its editing features, you can bring dull moments to life. It lets you integrate photos and videos into third-party apps so that you may transform your mundane videos into extraordinary ones.
The App also comes with a backup feature that makes it a safe home for your life’s memories.
If you want to merge recordings of small video clips in no time, then Windows Photo App will assist you in doing it in a jiff. It is a built-in app for Windows 10 and comes with the easiest ways of adding sound to your videos.
Have a look at the following steps.
You can find the Windows Photo app on your desktop or press the Windows + S to open the Start menu search and type Photos in the search box.

- Click on the video editor tab.
- Select the New Video project to start a blank project.

A dialogue box will appear asking to add the desired project name. Enter the name.

You’ll see an add button on the left side. By selecting it, a drop-down menu will appear. It will show you different options for adding video to your project.

Select the desired option and add the video clips.

Adjust the order of your videos by dragging the videos in the storyboard.

- You can trim, split and rotate your videos here.
- It also allows you to use various filters, texts and 3D effects.
- After completing the editing, select the finish video button on the menu bar.
- Select your preferred video quality.
You can add audio by selecting the Custom Audio option.

You will see a window-pane on the right side with different options for adding the sound. You can add it by the drag and drop feature or by clicking on the add file option.


- Select Done to complete the process.
- You have successfully added mp3 to your video file**.**
- Tap on Finish video in the upper right corner to complete the process.

- You can also select the quality of your video.

Click on Export to save your file to your desired destination.
Merge MP4 and MP3 Using Using Online Converter
Different online resources on the internet will help combine videos. You do not have to go through the hassle of downloading and installing third-party apps. Online Converter supports different formats like MP4, AVI, FLV, MOV, 3GP, MKV, etc. With it, you can combine multiple video files into a single file in no time. The most popular output format is MP4.
The procedure is simple. You have to upload your video clips on Online Converter in the order that you want in the final output.

You’ll navigate to a page with options for adding the media files by clicking on the choose file.

After uploading the media files. You will also see options for the audio in a drop-down menu.

Select the Add option to merge mp3 to mp4.

After the mp3 is merged to the mp4, you can download the converted file or share it via social media as well.

Disadvantages
- If your internet connectivity is poor, the videos may take longer to upload.
- If the response time is slow, you need to cancel the process and re-submit the data.
- Encrypted or protected video files are not supported for the merger of the videos.
Conclusion
Each tool comes with its pros and cons. With the wide range of video editing options, you can explore these different platforms and add life to your moments. Whether you are a beginner or an intermediate, editing multimedia files has been made easy by these different tools.
For macOS 10.14 or later
Here is a step-by-step guide for adding sound to your videos.
Step 1: Importing the Media files (Both Audio and Video)
After you finish installing Wondershare Filmora from the official website on your computer, launch it.
You can import the MP4 and MP3 files by going to the File menu and then selecting import media files.

Tip: The software comes with a huge built-in library. You can also use it to add sound to your project.
Step 2: Adding media files to Timeline
- Now, hover the mouse over the media files that you have imported.
- Use the drag and drop feature to add the mp4 and mp3 files to the timeline.

If you want to modify the audio, the audio panel can be seen by double-tapping the audio from the timeline. This panel will appear at the top of the screen.

You can explore different options ranging from ducking to denoising.
Step 3: Exporting the File
Now that the audio has been added to the video, select the ‘Export’ tab so that you can export your video.

The exported file can be saved in different formats. (MP4, WMV, etc)
Tip: You can rename and define the resolution for better output.
Merge MP4 and MP3 Using VLC Media Player
VLC is an open-source media player that works for different platforms (Windows, Mac and Linux). The media player comes with features ranging from compression to conversion. This multimedia framework supports audio formats like AC-3, DV Audio, FLAC, MP3, Speex, Vorbis. It also supports different video formats.
If your video has no background sound, you can add it to your videos by following simple steps. Not only that, but you can also change the original audio track to make your video an exquisite piece of art.
The majority of people consider VLC as only a media player. But, it works as a video editor as well. Therefore, it allows you to add background sound to your videos. This handy tool supports various streaming protocols along with almost all multimedia files.
Here is a demonstration for adding audio to your video.
Step 1: Installation
The first step would be installing the VLC media player on your computer and launching it afterward.
Click on Media and then select Convert/Save.

A pop-up window will appear in which you have to select the Add option. This will help you load the targeted video.

Step 2: Playing both audio and video in a synchronous manner
- After loading the video, at the bottom of the dialogue box, tick the Show more options.
- Select the option named ‘Play another media synchronously.

Click Browse to import your desired audio. It will open another window.

Step 3: Adding audio
Click + Add on the second Open Media window. It will load the audio files for the video.
- Now, you’ll have your video and audio files in the formats of mp4 and mp3 respectively.

- Click on Convert/Save
- A pop-up window will appear asking about the format you wish to have for your video.

- Also, by selecting Browse, select the destination where you want to save your video.

- Click on Start so that the video and audio can be merged.

Merge MP4 and MP3 Using Windows Photo App
Windows Photo App is home to all audio and video files on your PC. You can view, edit and store your audio and video files in it. It also allows you to share those among your family and friends. The tool comes with an AI-powered assistant to manage your media efficiently. Hence, you can find your required media files faster.
With its editing features, you can bring dull moments to life. It lets you integrate photos and videos into third-party apps so that you may transform your mundane videos into extraordinary ones.
The App also comes with a backup feature that makes it a safe home for your life’s memories.
If you want to merge recordings of small video clips in no time, then Windows Photo App will assist you in doing it in a jiff. It is a built-in app for Windows 10 and comes with the easiest ways of adding sound to your videos.
Have a look at the following steps.
You can find the Windows Photo app on your desktop or press the Windows + S to open the Start menu search and type Photos in the search box.

- Click on the video editor tab.
- Select the New Video project to start a blank project.

A dialogue box will appear asking to add the desired project name. Enter the name.

You’ll see an add button on the left side. By selecting it, a drop-down menu will appear. It will show you different options for adding video to your project.

Select the desired option and add the video clips.

Adjust the order of your videos by dragging the videos in the storyboard.

- You can trim, split and rotate your videos here.
- It also allows you to use various filters, texts and 3D effects.
- After completing the editing, select the finish video button on the menu bar.
- Select your preferred video quality.
You can add audio by selecting the Custom Audio option.

You will see a window-pane on the right side with different options for adding the sound. You can add it by the drag and drop feature or by clicking on the add file option.


- Select Done to complete the process.
- You have successfully added mp3 to your video file**.**
- Tap on Finish video in the upper right corner to complete the process.

- You can also select the quality of your video.

Click on Export to save your file to your desired destination.
Merge MP4 and MP3 Using Using Online Converter
Different online resources on the internet will help combine videos. You do not have to go through the hassle of downloading and installing third-party apps. Online Converter supports different formats like MP4, AVI, FLV, MOV, 3GP, MKV, etc. With it, you can combine multiple video files into a single file in no time. The most popular output format is MP4.
The procedure is simple. You have to upload your video clips on Online Converter in the order that you want in the final output.

You’ll navigate to a page with options for adding the media files by clicking on the choose file.

After uploading the media files. You will also see options for the audio in a drop-down menu.

Select the Add option to merge mp3 to mp4.

After the mp3 is merged to the mp4, you can download the converted file or share it via social media as well.

Disadvantages
- If your internet connectivity is poor, the videos may take longer to upload.
- If the response time is slow, you need to cancel the process and re-submit the data.
- Encrypted or protected video files are not supported for the merger of the videos.
Conclusion
Each tool comes with its pros and cons. With the wide range of video editing options, you can explore these different platforms and add life to your moments. Whether you are a beginner or an intermediate, editing multimedia files has been made easy by these different tools.
Replace Sky Background in Video: Figuring Out the Best Options
We live in an era that has been advanced by technology and software. Along with assisting in health and customer service, it enhances video outlook. These editors enhance the colors, audio, and other elements of images and videos. One of the major applications of this software is the ability to replace or remove backgrounds. This article will discuss the sky change video background and its sources.
Sky replacement video backgrounds help in covering up the mess behind a video. These backgrounds give your videos a captivating and refreshing look. Such replacement sky video backgrounds fit most of the image and video contexts. Embark on this journey to explore the importance of backgrounds and some useful sites.
Sky Replacement A cross-platform works like magic for background removal or sky replacement photos!
Free Download Free Download Learn More

Part 1: Why Should You Consider Changing the Background of Your Videos?
There are multiple reasons for changing the background of a video . Backgrounds cover the unnecessary things behind us to enhance videos. In addition, inserting video-relevant backgrounds helps in catching the audience’s attention. Discover this section to learn additional advantages of video backgrounds:
1. Imitates Professionalism
Be it your video content for social media or a Zoom call, setting backgrounds is necessary. These backgrounds reflect the personality of the person who is recording the video. It tells viewers how serious you are about the task and reflects professionalism.
2. Consistent Brand Image
Putting product-relevant backgrounds behind your videos is an important part of marketing. They convey a consistent brand image and tell customers you put in effort. Moreover, a steady background for your videos builds and maintains brand identity.
3. Maintain Privacy and Security
If you are creating videos for a blog, removing backgrounds is compulsory. If you create videos at home, removing backgrounds will maintain privacy. They eliminate any additional people or messy surroundings in your videos.
4. Focused and Appealing Content
When you add a theme-relevant background in the video, it tells users about the product. In addition, not removing unprofessional backgrounds may distract the audience. However, adding such backgrounds keeps the audience’s focus on the product. Inserting an aligning background enhances the overall outlook of a video.
5. Enhanced Storytelling and Clarity
Adding a background with appealing colors and good quality uplifts the brand’s narrative. It immerses viewers in the video and helps them understand the theme better. Moreover, the right background complements the product or video and brings clarity.
Part 2: Best Sites for Accessing Sky Video Templates for Changing
Now that you know why we emphasized the importance of backgrounds, let’s move forward. This section will quote some of the leading sites for sky-change video backgrounds. Keep reading the below section to learn more about these sites:
1. Pexel s
Pexels is an online platform that provides stock images and videos for every context. You can join this platform to upload videos and images from your gallery. In addition, there is no limit to images and videos for content creation. You can add an image to your favorites, or you can save this image in your collection. There are trending and suggested categories for you, or you can also use the search bar.
When you go to videos and search for the sky, you’ll find 28.2k sky background videos. These sky-replace video backgrounds have distinct visual appeals. Some videos include skies, while others have both sky and landscapes. In addition, you can save, download, and share these videos with your team. You can also click on the video to see the preview of the video before downloading.

2. Videezy
Are you looking for a colorful and diverse background range to change the sky in a video online? Use Videezy, as it has a collection of 5000+ sky video backgrounds. All the backgrounds are unique in color tones and styles to serve multiple users. You can try a video before downloading it to be sure about what you’re buying. You can search for simple or specific sky images like night sky or others.
Videezy is a diverse platform for stock images and videos with AI integration. It has unlimited categories of images that you can employ in your content. However, if you don’t find what you had in mind, you can take its AI’s assistance. The AI helps you craft your imagination into an image using prompts. Along with images and videos, you’ll find music, sound effects, and templates in it.

3. Pixabay
Are you looking for royalty-free and realistic sky-change video backgrounds? Pixabay offers more than 7000 sky videos in HD and 4K resolution. In addition, you can select a video to see its preview and other properties. It supports MP4 video format, and you can download videos in 4 different resolutions. You can share these sky videos on social sites or add them to your save collection.
Pixabay does not limit itself to videos; it offers illustrations, music, sound effects, and more. You can add a keyword for what you’re looking for, and it will generate results. The images and other media have vibrant colors with realistic outlooks. In its “Explore” section, you can find out about trendy or popular media and use them.

4. Vecteezy
If you feel that the above-mentioned sites have limited collection, visit Vecteezy. The platform offers more than 90K videos related to sky change in videos. Upon clicking the video for a preview, you can explore its features. It has high-quality HD, 4K resolution videos in MP4, MOV, and other formats.
In addition, the tool has generative AI integration to bring diversity and uniqueness. Use the AI prompt section to add a video description, and AI will generate it. In addition, you can also observe the frame rate of a video in its properties. This will help you adjust the speed or duration of the video accordingly. You can customize and edit your chosen videos and images in the “Create” section.

Part 3: Wondershare Filmora: A Perfect Avenue for Replacing Sky Background in Video
Multiple tools in the market offer video background removal. However, for removing the background with precision, we recommend Wondershare Filmora . This is a professional video editing tool that offers AI integration for this purpose. The AI automates the process, and users must activate this functionality.
For a professional outlook, you don’t need to spend hours setting green screens. After that, you can sky change the video background from Filmora’s background options. It offers built-in solid, gradient, and grid options for this purpose.
Free Download For Win 7 or later(64-bit)
Free Download For macOS 10.14 or later
Video Editing Features of Wondershare Filmora
With its vast editing interface and a range of video editing features, Filmora brings diversity. In this section, we will focus on other video editing features of Filmora. Let’s dive into the process of exploring those features without further delay:
1. AI Text-to-Video
If you have no editing experience but want to generate a video, use this feature. The AI text-to-video functionality offers video generation from scripts. This feature is ideal for creating educational or explainer videos. The AI inserts the graphics and a voiceover in your video.

2. AI Text-Based Editing
Free yourself from the complexity of cutting or trimming a video in a precise manner. This functionality generates a transcript of your video, and you can use it for editing. In the relative window, removing text will also remove the video section.

3. AI Vocal Remover
Why upload videos with unclear audio when you can use Filmora’s vocal remover tool? This tool analyzes and separates the vocals of your videos from background noise. You need to enable it after selecting your video, and AI will do the rest. The separated vocals are editable and enhance audio clarity.

4. AI Music Generator
Are you unable to fit music behind your videos? Use Filmora’s music generator with AI-backed algorithms to help you. The AI enables you to set the theme, tone, or emotion of a video and create results on it. It crafts multiple music tracks for users to select a suitable one.

Steps to Remove Video Background in Filmora
In this section, users will learn a simple method to remove video backgrounds in Filmora. You can remove the background and replace the sky video with it. Here is the step-by-step guide to removing video background in Filmora:
Step 1: Import Your Media and Bring it to Timeline
First, download Filmora on your device and log in to access its features. After that, create a “New Project” using the main display options. Upon reaching Filmora’s editing interface, click the “Import” option. Following that, import media and drag and place it onto the timeline panel.

Step 2: Enable Background Removing AI
Once you have placed media on the timeline, navigate towards the right-side settings panel. In the “Video > AI Tools” tab, enable the “AI Smart Cutout” option and click “Click to start Smart Cutout.”

Step 3: Start Background Removing
In the Smart Cutout Video window, trace the background of your video. Move to the right side and click the “Click to start Smart Cutout” button. The tracking will start, and the options will appear on the screen. Afterward, click the “Save” button to add this edited video to the timeline.

Step 4: Add a Background and Export Video
Hover towards the right-side panel and access the “Video > Basic” tabs. Find the “Background” section, enable it, and choose any given background. Following that, click the “Export” button to download this video on your device.

Free Download For Win 7 or later(64-bit)
Free Download For macOS 10.14 or later
Conclusion
Reading this article has helped readers to understand the value of backgrounds. They learned about how sky change video backgrounds can enhance your content. Such backgrounds are ideal for product marketing and brand image. Moreover, users learned about how to change video backgrounds in Filmora. With its AI integration and diverse tools, one must explore it to upgrade their content.
Free Download Free Download Learn More

Part 1: Why Should You Consider Changing the Background of Your Videos?
There are multiple reasons for changing the background of a video . Backgrounds cover the unnecessary things behind us to enhance videos. In addition, inserting video-relevant backgrounds helps in catching the audience’s attention. Discover this section to learn additional advantages of video backgrounds:
1. Imitates Professionalism
Be it your video content for social media or a Zoom call, setting backgrounds is necessary. These backgrounds reflect the personality of the person who is recording the video. It tells viewers how serious you are about the task and reflects professionalism.
2. Consistent Brand Image
Putting product-relevant backgrounds behind your videos is an important part of marketing. They convey a consistent brand image and tell customers you put in effort. Moreover, a steady background for your videos builds and maintains brand identity.
3. Maintain Privacy and Security
If you are creating videos for a blog, removing backgrounds is compulsory. If you create videos at home, removing backgrounds will maintain privacy. They eliminate any additional people or messy surroundings in your videos.
4. Focused and Appealing Content
When you add a theme-relevant background in the video, it tells users about the product. In addition, not removing unprofessional backgrounds may distract the audience. However, adding such backgrounds keeps the audience’s focus on the product. Inserting an aligning background enhances the overall outlook of a video.
5. Enhanced Storytelling and Clarity
Adding a background with appealing colors and good quality uplifts the brand’s narrative. It immerses viewers in the video and helps them understand the theme better. Moreover, the right background complements the product or video and brings clarity.
Part 2: Best Sites for Accessing Sky Video Templates for Changing
Now that you know why we emphasized the importance of backgrounds, let’s move forward. This section will quote some of the leading sites for sky-change video backgrounds. Keep reading the below section to learn more about these sites:
1. Pexel s
Pexels is an online platform that provides stock images and videos for every context. You can join this platform to upload videos and images from your gallery. In addition, there is no limit to images and videos for content creation. You can add an image to your favorites, or you can save this image in your collection. There are trending and suggested categories for you, or you can also use the search bar.
When you go to videos and search for the sky, you’ll find 28.2k sky background videos. These sky-replace video backgrounds have distinct visual appeals. Some videos include skies, while others have both sky and landscapes. In addition, you can save, download, and share these videos with your team. You can also click on the video to see the preview of the video before downloading.

2. Videezy
Are you looking for a colorful and diverse background range to change the sky in a video online? Use Videezy, as it has a collection of 5000+ sky video backgrounds. All the backgrounds are unique in color tones and styles to serve multiple users. You can try a video before downloading it to be sure about what you’re buying. You can search for simple or specific sky images like night sky or others.
Videezy is a diverse platform for stock images and videos with AI integration. It has unlimited categories of images that you can employ in your content. However, if you don’t find what you had in mind, you can take its AI’s assistance. The AI helps you craft your imagination into an image using prompts. Along with images and videos, you’ll find music, sound effects, and templates in it.

3. Pixabay
Are you looking for royalty-free and realistic sky-change video backgrounds? Pixabay offers more than 7000 sky videos in HD and 4K resolution. In addition, you can select a video to see its preview and other properties. It supports MP4 video format, and you can download videos in 4 different resolutions. You can share these sky videos on social sites or add them to your save collection.
Pixabay does not limit itself to videos; it offers illustrations, music, sound effects, and more. You can add a keyword for what you’re looking for, and it will generate results. The images and other media have vibrant colors with realistic outlooks. In its “Explore” section, you can find out about trendy or popular media and use them.

4. Vecteezy
If you feel that the above-mentioned sites have limited collection, visit Vecteezy. The platform offers more than 90K videos related to sky change in videos. Upon clicking the video for a preview, you can explore its features. It has high-quality HD, 4K resolution videos in MP4, MOV, and other formats.
In addition, the tool has generative AI integration to bring diversity and uniqueness. Use the AI prompt section to add a video description, and AI will generate it. In addition, you can also observe the frame rate of a video in its properties. This will help you adjust the speed or duration of the video accordingly. You can customize and edit your chosen videos and images in the “Create” section.

Part 3: Wondershare Filmora: A Perfect Avenue for Replacing Sky Background in Video
Multiple tools in the market offer video background removal. However, for removing the background with precision, we recommend Wondershare Filmora . This is a professional video editing tool that offers AI integration for this purpose. The AI automates the process, and users must activate this functionality.
For a professional outlook, you don’t need to spend hours setting green screens. After that, you can sky change the video background from Filmora’s background options. It offers built-in solid, gradient, and grid options for this purpose.
Free Download For Win 7 or later(64-bit)
Free Download For macOS 10.14 or later
Video Editing Features of Wondershare Filmora
With its vast editing interface and a range of video editing features, Filmora brings diversity. In this section, we will focus on other video editing features of Filmora. Let’s dive into the process of exploring those features without further delay:
1. AI Text-to-Video
If you have no editing experience but want to generate a video, use this feature. The AI text-to-video functionality offers video generation from scripts. This feature is ideal for creating educational or explainer videos. The AI inserts the graphics and a voiceover in your video.

2. AI Text-Based Editing
Free yourself from the complexity of cutting or trimming a video in a precise manner. This functionality generates a transcript of your video, and you can use it for editing. In the relative window, removing text will also remove the video section.

3. AI Vocal Remover
Why upload videos with unclear audio when you can use Filmora’s vocal remover tool? This tool analyzes and separates the vocals of your videos from background noise. You need to enable it after selecting your video, and AI will do the rest. The separated vocals are editable and enhance audio clarity.

4. AI Music Generator
Are you unable to fit music behind your videos? Use Filmora’s music generator with AI-backed algorithms to help you. The AI enables you to set the theme, tone, or emotion of a video and create results on it. It crafts multiple music tracks for users to select a suitable one.

Steps to Remove Video Background in Filmora
In this section, users will learn a simple method to remove video backgrounds in Filmora. You can remove the background and replace the sky video with it. Here is the step-by-step guide to removing video background in Filmora:
Step 1: Import Your Media and Bring it to Timeline
First, download Filmora on your device and log in to access its features. After that, create a “New Project” using the main display options. Upon reaching Filmora’s editing interface, click the “Import” option. Following that, import media and drag and place it onto the timeline panel.

Step 2: Enable Background Removing AI
Once you have placed media on the timeline, navigate towards the right-side settings panel. In the “Video > AI Tools” tab, enable the “AI Smart Cutout” option and click “Click to start Smart Cutout.”

Step 3: Start Background Removing
In the Smart Cutout Video window, trace the background of your video. Move to the right side and click the “Click to start Smart Cutout” button. The tracking will start, and the options will appear on the screen. Afterward, click the “Save” button to add this edited video to the timeline.

Step 4: Add a Background and Export Video
Hover towards the right-side panel and access the “Video > Basic” tabs. Find the “Background” section, enable it, and choose any given background. Following that, click the “Export” button to download this video on your device.

Free Download For Win 7 or later(64-bit)
Free Download For macOS 10.14 or later
Conclusion
Reading this article has helped readers to understand the value of backgrounds. They learned about how sky change video backgrounds can enhance your content. Such backgrounds are ideal for product marketing and brand image. Moreover, users learned about how to change video backgrounds in Filmora. With its AI integration and diverse tools, one must explore it to upgrade their content.
How to Create a PowerPoint Looping Slideshow
How to make a PowerPoint looping slideshow
An easy yet powerful editor
Numerous effects to choose from
Detailed tutorials provided by the official channel
A PowerPoint Looping slideshow automatically starts over from the beginning after displaying the last slide. A particular slide is displayed for a certain amount of time interval. Once the time has elapsed, the slide automatically moves to the next one. It is sometimes used in seminars to keep the audience busy before the main presentation commences. In most tradeshows, the videos or information you notice repeatedly playing on its own are in a loop. The transition and slide sets get tweaked to work that way. In Nigeria, most banks use looped slides to display their welcome message. Looping slides make display work more accessible and give time to face other activities while your slide runs automatically.
In this article
01 [Advantages of PowerPoint looping slide](#Part 1)
02 [How to loop a PowerPoint in simple steps.](#Part 2)
Part 1 Advantages of PowerPoint Looping Slide.
PowerPoint slideshows aid and develop visual resources. Looping a PowerPoint slideshowmakes a presentation more accessible and more attractive. Studies show that humans tend to remember more of what they see than what they hear. You should use a PowerPoint-loop slideshow if you want to make a lasting impression while holding that conference, pitch to your boss at work, or even bid for that project**.** Here are some other reasons you should consider looping in your nextPowerPoint slide show.
A looping PowerPoint slideshow runs automatically. A typical PowerPoint presentation moves to the next slide when the presenter clicks the mouse, but a looping slideshow does not need human participation. It displays the next slide automatically after the time interval has elapsed.
It can be helpful to welcome guests to a meeting or Newcomers to an office reception area.
It ensures that latecomers do not miss any significant part of the presentation because a PowerPoint automatic slideshow loop starts all over again after displaying the last slide.
Setting up a looping slideshow is easy and does not require much equipment. You’re all set to go if you have a computer and projector.
It gives the speaker more time to focus on the audience and interact with them rather than concentrating on getting the next slide correctly.
With or without the presence of an operator, the PowerPoint presentation can display the slides configured to display.
It saves you the stress of arranging and rearranging slides during a meeting or an event.
It makes presentation easy and allows the large audience to flow with the speaker as they do not have to read from documents while trying to keep up with the speaker.
A PowerPoint configured to loop continuously can be used to pass general information.
Not everyone likes speaking in public or making a presentation in front of a large crowd. Someone like me immediately starts sweating profusely and has heart palpitations when many eyes are on me. In this kind of situation, a looped PowerPoint slideshow helps take the tension off a nervous speaker as the audience will most likely be concentrating on the slideshows instead of you.
Part 2 How to Loop a PowerPoint in Simple Steps.
Have you been wondering how to make PowerPoint looping slideshows? It seems like a challenging feat, but I’ll show you how to go about it. A looping PowerPoint presentation can create Visual presentations at various events like trade shows, kiosks, conferences, seminars, and many more gatherings. It can display automatically without the intervention of the presenter. With the correct procedure, you’ll be able to create a looping PowerPoint slideshow that will run without hitches. Setting up a looping PowerPoint presentation is relatively easy and doesn’t require rocket science as most people think. Below are simple steps on how to loop a slideshow on PowerPoint;
An easy way to set up looping slideshows is to apply automatic transitions and then set up your desired slideshow settings.
Step 1: Open your PowerPoint presentation
First, open and select the particular PowerPoint presentation you would like to loop.
Step 2: Set up the slideshow
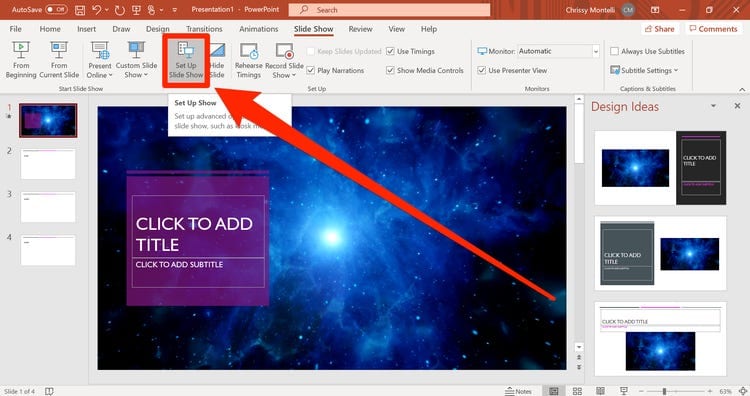
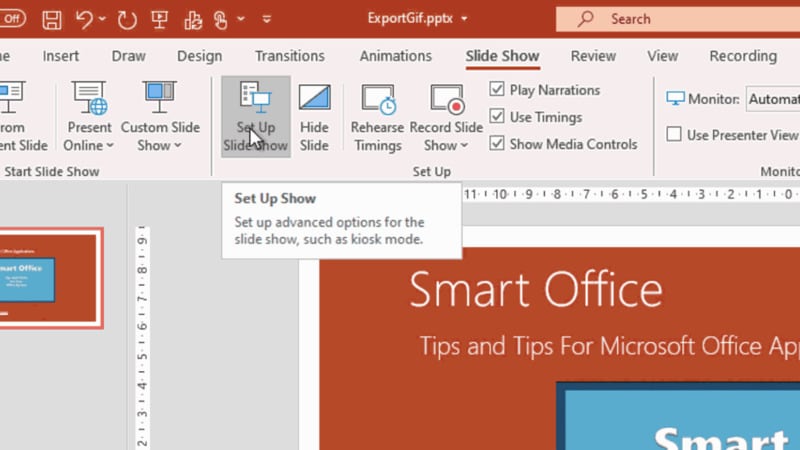
Once your desired presentation is open, go to the “Set Up” group on the “Slide Show” tab and then click on the “Set Up Slide Show” button. Once your desired presentation is open, go to the “Set Up” group on the “Slide Show” tab and then click on the “Set Up Slide Show” button.
Step 3: Choose your mode of control over the slides.
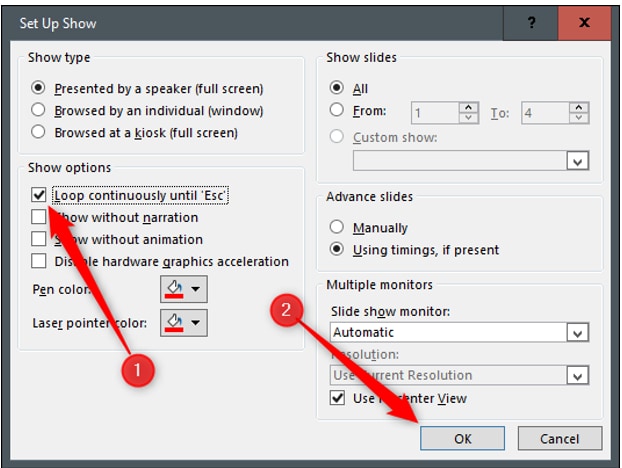
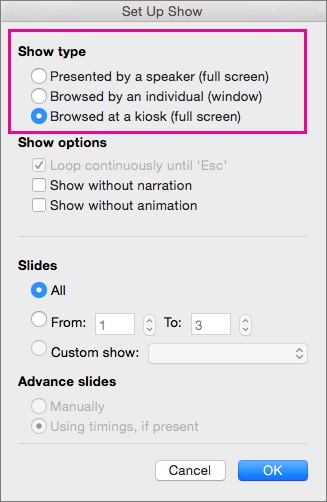
Adialogue box will come up. In the” show options, “select if you want it to get presented by a speaker, which is the default setting of PowerPoint. This option gives the speaker or presenter control over when to advance the slide. The second option, which an individual browses, restricts the control of the speaker over the advancement of the slide, likewise the third option. Checkbox next to “Loop continuously until ‘Esc.’ Then click [OK]. The slide keeps looping automatically until the speaker or presenter presses ok.
Step 4: Select the number of slides you want to be displayed.
From the “Slides” preview side panel, tap your first slide, press and hold [Shift] and click your last slide or input the number of slides you want to display. This option will select all of the slides you want to display.
Step 5: Set up Transitions mode
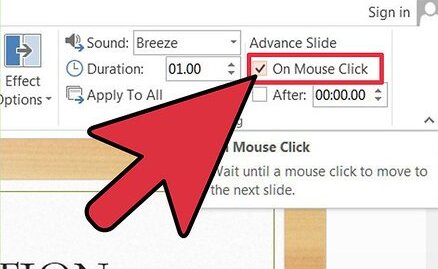
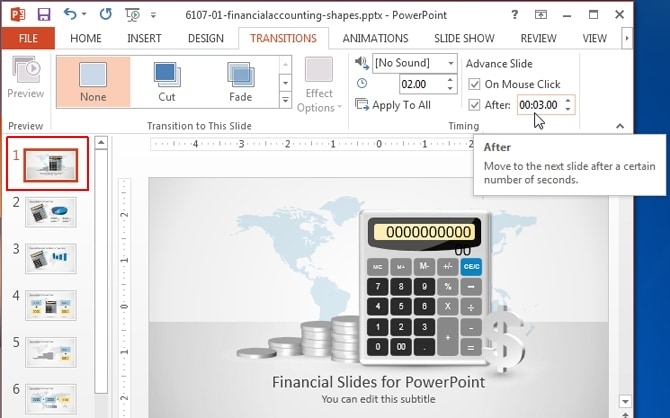
Click the [Transitions] tab. The transition appears between slides when a slideshow is displayed. In the Transitions tab in PowerPoint, you can choose the type of transition (such as Fade). From the “Timing” group, uncheck the box next to “On Mouse Click” and check “After .”This setting enables the transition to occur after your preferred time and not when you click the mouse.
Step 6: Adjust the time interval
To adjust the duration you would like each slide to display, click the up and down arrows in the “After:” field within the “Timing” group. When your slideshow reaches the last slide, it will automatically loop back to the beginning.
****Wondershare Filmora Video Editor Software**
There are many video editing software, but one that stands out amongst them is filmora because of its unique video editing features. The Filmora software is undoubtedly one of the best beginner and professional-level video editing tools.
For Win 7 or later (64-bit)
For macOS 10.12 or later
Making loop videos is relatively easy with its timeline features. Video loops are short clips that replay for a particular duration or unlimited times without the user having to click the play button repeatedly. This kind of video is quite trendy on social media platforms. Filmora software also creates photo and video slideshows and can add music, texts, filters, different transition effects, and even animation to your slideshow. Many tools can help you create these kinds of videos, and Filmora is one of them.
● Ending Thoughts →
● I’m sure that post reading this guide, you will be able to create a PowerPoint looping slideshow and know what software to use in creating loop videos.
● Learning how to loop a PowerPoint slideshow is a game-changer for organizations and meetings that require a large audience or attendees. The major shortcoming of using a PowerPoint presentation slideshow is that a display cannot hold without a laptop and projector.
A PowerPoint Looping slideshow automatically starts over from the beginning after displaying the last slide. A particular slide is displayed for a certain amount of time interval. Once the time has elapsed, the slide automatically moves to the next one. It is sometimes used in seminars to keep the audience busy before the main presentation commences. In most tradeshows, the videos or information you notice repeatedly playing on its own are in a loop. The transition and slide sets get tweaked to work that way. In Nigeria, most banks use looped slides to display their welcome message. Looping slides make display work more accessible and give time to face other activities while your slide runs automatically.
In this article
01 [Advantages of PowerPoint looping slide](#Part 1)
02 [How to loop a PowerPoint in simple steps.](#Part 2)
Part 1 Advantages of PowerPoint Looping Slide.
PowerPoint slideshows aid and develop visual resources. Looping a PowerPoint slideshowmakes a presentation more accessible and more attractive. Studies show that humans tend to remember more of what they see than what they hear. You should use a PowerPoint-loop slideshow if you want to make a lasting impression while holding that conference, pitch to your boss at work, or even bid for that project**.** Here are some other reasons you should consider looping in your nextPowerPoint slide show.
A looping PowerPoint slideshow runs automatically. A typical PowerPoint presentation moves to the next slide when the presenter clicks the mouse, but a looping slideshow does not need human participation. It displays the next slide automatically after the time interval has elapsed.
It can be helpful to welcome guests to a meeting or Newcomers to an office reception area.
It ensures that latecomers do not miss any significant part of the presentation because a PowerPoint automatic slideshow loop starts all over again after displaying the last slide.
Setting up a looping slideshow is easy and does not require much equipment. You’re all set to go if you have a computer and projector.
It gives the speaker more time to focus on the audience and interact with them rather than concentrating on getting the next slide correctly.
With or without the presence of an operator, the PowerPoint presentation can display the slides configured to display.
It saves you the stress of arranging and rearranging slides during a meeting or an event.
It makes presentation easy and allows the large audience to flow with the speaker as they do not have to read from documents while trying to keep up with the speaker.
A PowerPoint configured to loop continuously can be used to pass general information.
Not everyone likes speaking in public or making a presentation in front of a large crowd. Someone like me immediately starts sweating profusely and has heart palpitations when many eyes are on me. In this kind of situation, a looped PowerPoint slideshow helps take the tension off a nervous speaker as the audience will most likely be concentrating on the slideshows instead of you.
Part 2 How to Loop a PowerPoint in Simple Steps.
Have you been wondering how to make PowerPoint looping slideshows? It seems like a challenging feat, but I’ll show you how to go about it. A looping PowerPoint presentation can create Visual presentations at various events like trade shows, kiosks, conferences, seminars, and many more gatherings. It can display automatically without the intervention of the presenter. With the correct procedure, you’ll be able to create a looping PowerPoint slideshow that will run without hitches. Setting up a looping PowerPoint presentation is relatively easy and doesn’t require rocket science as most people think. Below are simple steps on how to loop a slideshow on PowerPoint;
An easy way to set up looping slideshows is to apply automatic transitions and then set up your desired slideshow settings.
Step 1: Open your PowerPoint presentation
First, open and select the particular PowerPoint presentation you would like to loop.

Step 2: Set up the slideshow
Once your desired presentation is open, go to the “Set Up” group on the “Slide Show” tab and then click on the “Set Up Slide Show” button. Once your desired presentation is open, go to the “Set Up” group on the “Slide Show” tab and then click on the “Set Up Slide Show” button.

Step 3: Choose your mode of control over the slides.
Adialogue box will come up. In the” show options, “select if you want it to get presented by a speaker, which is the default setting of PowerPoint. This option gives the speaker or presenter control over when to advance the slide. The second option, which an individual browses, restricts the control of the speaker over the advancement of the slide, likewise the third option. Checkbox next to “Loop continuously until ‘Esc.’ Then click [OK]. The slide keeps looping automatically until the speaker or presenter presses ok.

Step 4: Select the number of slides you want to be displayed.
From the “Slides” preview side panel, tap your first slide, press and hold [Shift] and click your last slide or input the number of slides you want to display. This option will select all of the slides you want to display.

Step 5: Set up Transitions mode
Click the [Transitions] tab. The transition appears between slides when a slideshow is displayed. In the Transitions tab in PowerPoint, you can choose the type of transition (such as Fade). From the “Timing” group, uncheck the box next to “On Mouse Click” and check “After .”This setting enables the transition to occur after your preferred time and not when you click the mouse.

Step 6: Adjust the time interval
To adjust the duration you would like each slide to display, click the up and down arrows in the “After:” field within the “Timing” group. When your slideshow reaches the last slide, it will automatically loop back to the beginning.

****Wondershare Filmora Video Editor Software**
There are many video editing software, but one that stands out amongst them is filmora because of its unique video editing features. The Filmora software is undoubtedly one of the best beginner and professional-level video editing tools.
For Win 7 or later (64-bit)
For macOS 10.12 or later
Making loop videos is relatively easy with its timeline features. Video loops are short clips that replay for a particular duration or unlimited times without the user having to click the play button repeatedly. This kind of video is quite trendy on social media platforms. Filmora software also creates photo and video slideshows and can add music, texts, filters, different transition effects, and even animation to your slideshow. Many tools can help you create these kinds of videos, and Filmora is one of them.
● Ending Thoughts →
● I’m sure that post reading this guide, you will be able to create a PowerPoint looping slideshow and know what software to use in creating loop videos.
● Learning how to loop a PowerPoint slideshow is a game-changer for organizations and meetings that require a large audience or attendees. The major shortcoming of using a PowerPoint presentation slideshow is that a display cannot hold without a laptop and projector.
A PowerPoint Looping slideshow automatically starts over from the beginning after displaying the last slide. A particular slide is displayed for a certain amount of time interval. Once the time has elapsed, the slide automatically moves to the next one. It is sometimes used in seminars to keep the audience busy before the main presentation commences. In most tradeshows, the videos or information you notice repeatedly playing on its own are in a loop. The transition and slide sets get tweaked to work that way. In Nigeria, most banks use looped slides to display their welcome message. Looping slides make display work more accessible and give time to face other activities while your slide runs automatically.
In this article
01 [Advantages of PowerPoint looping slide](#Part 1)
02 [How to loop a PowerPoint in simple steps.](#Part 2)
Part 1 Advantages of PowerPoint Looping Slide.
PowerPoint slideshows aid and develop visual resources. Looping a PowerPoint slideshowmakes a presentation more accessible and more attractive. Studies show that humans tend to remember more of what they see than what they hear. You should use a PowerPoint-loop slideshow if you want to make a lasting impression while holding that conference, pitch to your boss at work, or even bid for that project**.** Here are some other reasons you should consider looping in your nextPowerPoint slide show.
A looping PowerPoint slideshow runs automatically. A typical PowerPoint presentation moves to the next slide when the presenter clicks the mouse, but a looping slideshow does not need human participation. It displays the next slide automatically after the time interval has elapsed.
It can be helpful to welcome guests to a meeting or Newcomers to an office reception area.
It ensures that latecomers do not miss any significant part of the presentation because a PowerPoint automatic slideshow loop starts all over again after displaying the last slide.
Setting up a looping slideshow is easy and does not require much equipment. You’re all set to go if you have a computer and projector.
It gives the speaker more time to focus on the audience and interact with them rather than concentrating on getting the next slide correctly.
With or without the presence of an operator, the PowerPoint presentation can display the slides configured to display.
It saves you the stress of arranging and rearranging slides during a meeting or an event.
It makes presentation easy and allows the large audience to flow with the speaker as they do not have to read from documents while trying to keep up with the speaker.
A PowerPoint configured to loop continuously can be used to pass general information.
Not everyone likes speaking in public or making a presentation in front of a large crowd. Someone like me immediately starts sweating profusely and has heart palpitations when many eyes are on me. In this kind of situation, a looped PowerPoint slideshow helps take the tension off a nervous speaker as the audience will most likely be concentrating on the slideshows instead of you.
Part 2 How to Loop a PowerPoint in Simple Steps.
Have you been wondering how to make PowerPoint looping slideshows? It seems like a challenging feat, but I’ll show you how to go about it. A looping PowerPoint presentation can create Visual presentations at various events like trade shows, kiosks, conferences, seminars, and many more gatherings. It can display automatically without the intervention of the presenter. With the correct procedure, you’ll be able to create a looping PowerPoint slideshow that will run without hitches. Setting up a looping PowerPoint presentation is relatively easy and doesn’t require rocket science as most people think. Below are simple steps on how to loop a slideshow on PowerPoint;
An easy way to set up looping slideshows is to apply automatic transitions and then set up your desired slideshow settings.
Step 1: Open your PowerPoint presentation
First, open and select the particular PowerPoint presentation you would like to loop.

Step 2: Set up the slideshow
Once your desired presentation is open, go to the “Set Up” group on the “Slide Show” tab and then click on the “Set Up Slide Show” button. Once your desired presentation is open, go to the “Set Up” group on the “Slide Show” tab and then click on the “Set Up Slide Show” button.

Step 3: Choose your mode of control over the slides.
Adialogue box will come up. In the” show options, “select if you want it to get presented by a speaker, which is the default setting of PowerPoint. This option gives the speaker or presenter control over when to advance the slide. The second option, which an individual browses, restricts the control of the speaker over the advancement of the slide, likewise the third option. Checkbox next to “Loop continuously until ‘Esc.’ Then click [OK]. The slide keeps looping automatically until the speaker or presenter presses ok.

Step 4: Select the number of slides you want to be displayed.
From the “Slides” preview side panel, tap your first slide, press and hold [Shift] and click your last slide or input the number of slides you want to display. This option will select all of the slides you want to display.

Step 5: Set up Transitions mode
Click the [Transitions] tab. The transition appears between slides when a slideshow is displayed. In the Transitions tab in PowerPoint, you can choose the type of transition (such as Fade). From the “Timing” group, uncheck the box next to “On Mouse Click” and check “After .”This setting enables the transition to occur after your preferred time and not when you click the mouse.

Step 6: Adjust the time interval
To adjust the duration you would like each slide to display, click the up and down arrows in the “After:” field within the “Timing” group. When your slideshow reaches the last slide, it will automatically loop back to the beginning.

****Wondershare Filmora Video Editor Software**
There are many video editing software, but one that stands out amongst them is filmora because of its unique video editing features. The Filmora software is undoubtedly one of the best beginner and professional-level video editing tools.
For Win 7 or later (64-bit)
For macOS 10.12 or later
Making loop videos is relatively easy with its timeline features. Video loops are short clips that replay for a particular duration or unlimited times without the user having to click the play button repeatedly. This kind of video is quite trendy on social media platforms. Filmora software also creates photo and video slideshows and can add music, texts, filters, different transition effects, and even animation to your slideshow. Many tools can help you create these kinds of videos, and Filmora is one of them.
● Ending Thoughts →
● I’m sure that post reading this guide, you will be able to create a PowerPoint looping slideshow and know what software to use in creating loop videos.
● Learning how to loop a PowerPoint slideshow is a game-changer for organizations and meetings that require a large audience or attendees. The major shortcoming of using a PowerPoint presentation slideshow is that a display cannot hold without a laptop and projector.
A PowerPoint Looping slideshow automatically starts over from the beginning after displaying the last slide. A particular slide is displayed for a certain amount of time interval. Once the time has elapsed, the slide automatically moves to the next one. It is sometimes used in seminars to keep the audience busy before the main presentation commences. In most tradeshows, the videos or information you notice repeatedly playing on its own are in a loop. The transition and slide sets get tweaked to work that way. In Nigeria, most banks use looped slides to display their welcome message. Looping slides make display work more accessible and give time to face other activities while your slide runs automatically.
In this article
01 [Advantages of PowerPoint looping slide](#Part 1)
02 [How to loop a PowerPoint in simple steps.](#Part 2)
Part 1 Advantages of PowerPoint Looping Slide.
PowerPoint slideshows aid and develop visual resources. Looping a PowerPoint slideshowmakes a presentation more accessible and more attractive. Studies show that humans tend to remember more of what they see than what they hear. You should use a PowerPoint-loop slideshow if you want to make a lasting impression while holding that conference, pitch to your boss at work, or even bid for that project**.** Here are some other reasons you should consider looping in your nextPowerPoint slide show.
A looping PowerPoint slideshow runs automatically. A typical PowerPoint presentation moves to the next slide when the presenter clicks the mouse, but a looping slideshow does not need human participation. It displays the next slide automatically after the time interval has elapsed.
It can be helpful to welcome guests to a meeting or Newcomers to an office reception area.
It ensures that latecomers do not miss any significant part of the presentation because a PowerPoint automatic slideshow loop starts all over again after displaying the last slide.
Setting up a looping slideshow is easy and does not require much equipment. You’re all set to go if you have a computer and projector.
It gives the speaker more time to focus on the audience and interact with them rather than concentrating on getting the next slide correctly.
With or without the presence of an operator, the PowerPoint presentation can display the slides configured to display.
It saves you the stress of arranging and rearranging slides during a meeting or an event.
It makes presentation easy and allows the large audience to flow with the speaker as they do not have to read from documents while trying to keep up with the speaker.
A PowerPoint configured to loop continuously can be used to pass general information.
Not everyone likes speaking in public or making a presentation in front of a large crowd. Someone like me immediately starts sweating profusely and has heart palpitations when many eyes are on me. In this kind of situation, a looped PowerPoint slideshow helps take the tension off a nervous speaker as the audience will most likely be concentrating on the slideshows instead of you.
Part 2 How to Loop a PowerPoint in Simple Steps.
Have you been wondering how to make PowerPoint looping slideshows? It seems like a challenging feat, but I’ll show you how to go about it. A looping PowerPoint presentation can create Visual presentations at various events like trade shows, kiosks, conferences, seminars, and many more gatherings. It can display automatically without the intervention of the presenter. With the correct procedure, you’ll be able to create a looping PowerPoint slideshow that will run without hitches. Setting up a looping PowerPoint presentation is relatively easy and doesn’t require rocket science as most people think. Below are simple steps on how to loop a slideshow on PowerPoint;
An easy way to set up looping slideshows is to apply automatic transitions and then set up your desired slideshow settings.
Step 1: Open your PowerPoint presentation
First, open and select the particular PowerPoint presentation you would like to loop.

Step 2: Set up the slideshow
Once your desired presentation is open, go to the “Set Up” group on the “Slide Show” tab and then click on the “Set Up Slide Show” button. Once your desired presentation is open, go to the “Set Up” group on the “Slide Show” tab and then click on the “Set Up Slide Show” button.

Step 3: Choose your mode of control over the slides.
Adialogue box will come up. In the” show options, “select if you want it to get presented by a speaker, which is the default setting of PowerPoint. This option gives the speaker or presenter control over when to advance the slide. The second option, which an individual browses, restricts the control of the speaker over the advancement of the slide, likewise the third option. Checkbox next to “Loop continuously until ‘Esc.’ Then click [OK]. The slide keeps looping automatically until the speaker or presenter presses ok.

Step 4: Select the number of slides you want to be displayed.
From the “Slides” preview side panel, tap your first slide, press and hold [Shift] and click your last slide or input the number of slides you want to display. This option will select all of the slides you want to display.

Step 5: Set up Transitions mode
Click the [Transitions] tab. The transition appears between slides when a slideshow is displayed. In the Transitions tab in PowerPoint, you can choose the type of transition (such as Fade). From the “Timing” group, uncheck the box next to “On Mouse Click” and check “After .”This setting enables the transition to occur after your preferred time and not when you click the mouse.

Step 6: Adjust the time interval
To adjust the duration you would like each slide to display, click the up and down arrows in the “After:” field within the “Timing” group. When your slideshow reaches the last slide, it will automatically loop back to the beginning.

****Wondershare Filmora Video Editor Software**
There are many video editing software, but one that stands out amongst them is filmora because of its unique video editing features. The Filmora software is undoubtedly one of the best beginner and professional-level video editing tools.
For Win 7 or later (64-bit)
For macOS 10.12 or later
Making loop videos is relatively easy with its timeline features. Video loops are short clips that replay for a particular duration or unlimited times without the user having to click the play button repeatedly. This kind of video is quite trendy on social media platforms. Filmora software also creates photo and video slideshows and can add music, texts, filters, different transition effects, and even animation to your slideshow. Many tools can help you create these kinds of videos, and Filmora is one of them.
● Ending Thoughts →
● I’m sure that post reading this guide, you will be able to create a PowerPoint looping slideshow and know what software to use in creating loop videos.
● Learning how to loop a PowerPoint slideshow is a game-changer for organizations and meetings that require a large audience or attendees. The major shortcoming of using a PowerPoint presentation slideshow is that a display cannot hold without a laptop and projector.
Learning The Details Of How To Replace Sky in Lightroom
People look for sky replacements in their images to improve their appearance. Sometimes, we need to do this because of overexposed images in sunlight. Replacing the surroundings of images is a common post-processing technique in photography. For this purpose, advanced editing tools like Lightroom and Adobe Photoshop are required.
Lightroom Sky replacement requires certain editing skills to effectively edit the media. This article will help you to learn how to do sky replacement in Lightroom. Before delving into the steps, read the first part to know the reason for changing the surroundings in Lightroom to replace the sky system.
Sky Replacement A cross-platform works like magic for background removal or sky replacement photos!
Free Download Free Download Learn More

Part 1: Why Do Creators Look Forward to Changing the Environment Across Their Recorded or Captured Media?
Humans love to show creativity and express themselves from different perspectives. Creative works provide entertainment and prove therapeutic in some way. That’s why creators and artists try to change the surroundings of recorded media. Such changes make the captured media virtually stunning and creative. Let’s explore more reasons that push creators towards sky replacement in Lightroom:
- Artistic Storytelling: A creative art piece shows a story of a thousand words. Thus, artists look for visual elements to convey particular moods and messages in their media.
- Symbolism: In many art competitions, creators are asked to show symbolic media. For this purpose, they might replace Sky in Lightroom to symbolize rebirth and growth.
- World-Building: The science fiction and fantasy genre needs such changes to build another world. Creators turn the media into imaginative settings to inspire the audience.
- Entertainment: Another aim of the creator is to provide new and exciting content to the audience. It allows them to temporarily escape their world and enjoy it.
- Discovery: You might have seen virtual landscapes in video games that uncover hidden secrets. Such backgrounds are designed to facilitate adventure through media.
Part 2: A Guide to Replace Sky in Lightroom: Step-by-Step
As discussed earlier, changing the sky in Lightroom proves fruitful for many reasons. Altering media scenes can also create a powerful emotional impact. Likewise, shifting from a green meadow to a messy landscape can turn a calm mood into chaos. If you intend to replace your current media background, then let us help you. Here are the steps below to change the environment in Lightroom:
Step 1: Lightroom can enhance your surroundings by using certain effects. To replace the sky, right-click on your image and select the “Edit in Photoshop” option. Before that, ensure that you have Adobe Photoshop installed on your system.

Step 2: Now, go to the top toolbar and press the “Edit” option next to “File.” From the drop-down list, access the “Sky Replacement” option. Head to the “Sky Replacement” panel and click the downward icon next to the sky preview. Scroll to pick one sky of your choice and hit the “OK” button.

Step 3: To import more skies, press the “Settings” icon on the Sky Replacement panel. Select the first option of “Get More Skies” and click on “Import Images.” You can explore skies from the Blue Skies, Spectacular, and Sunsets folders from that panel.

Step 4: Bring this picture back to the Lightroom and go to its right-side panel. There, use the Exposure, Contrast, and Highlights sliders below the “Light” downward icon. After enhancing your image, right-click on it and look for the “Export” option to save the file.

Part 3: Make Background Changing Easy with Wondershare Filmora
Sky Replacement in Lightroom and Photoshop requires some basic editing skills. Not everyone has such skills, so they have to acquire skills from video tutorials. It wastes a lot of time and effort just to learn editing from scratch. As an easier solution, they should try Wondershare Filmora to change image surroundings.
Notably, it’s a better solution that accommodates all users from beginner professionals. You can use Filmora for video editing to effortlessly expand your creativity. This tool is available online for Desktop, macOS, mobile, and online with the latest AI features.
Free Download For Win 7 or later(64-bit)
Free Download For macOS 10.14 or later
Key Features Marking Filmora’s Importance
Instantly remove or change your videos and image backgrounds with Filmora. Reimagine your world by knowing the given key features of Filmora in changing backgrounds:
1. Chroma Key (Green Screen)
Applying green-screen in effect in video and images will generate professional content. With AI support, you can remove a certain color from overlay images and videos. It can make your chosen colors transparent in the imported media. To fine-tune the media, you can use Tolerance, Edge Thickness, and Feather sliders.

2. AI Portrait
If you want to focus on the portrait while ignoring the background, use this feature. It can remove the background with accuracy by recognizing the main object. Filmora detects humans with AI and allows manual adjustments after removing the background. You can change the Edge Thickness and Edge Feature to the required extent.

3. Basic Background
While editing any media, you might require a blur option to hide distortion in the background. Filmora offers background blur options with different types and styles in them. You can opt for a Pattern, Color, and blur option from blur types. Then, it allows you to choose from blur styles like Grainy, Direction, and Radial. Afterward, users can select the level of blur as per their choice.

4. AI Image Stylizer
Aside from changing background, you can unleash your creativity with an AI Image stylizer. It’s the latest feature of Filmora that can turn your image into a devil, clown, or zombie. If you want to follow certain social media trends of making anime, explore this feature. You can find 19 styles that also include soft image looks like Flower and Angel image styles.

Steps to Change Background with Different Ways Using Filmora
Instead of lightroom sky replacement, Filmora offers the simplest way to edit images and videos. Let’s explore the quickest ways to change backgrounds using Filmora.
- Method 1: Using Chroma Key
- Method 2: Accessing AI Portrait
- Method 3: Change the Background through Masking
Method 1: Using Chroma Key
Step 1: Get the Latest Version of Filmora in Your system
Successfully launch the latest version of Filmora in your system. Double-tap on it to enter the home screen. Click on “New Project” and access the editing screen of Filmora.

Step 2: Use the Chroma Key and Change the Background
From the media panel, use “Import” and bring your media to the Timeline section. Place the background video first and then bring the Main Clip below it. Head to the right-side panel and press the “AI Tools” option from the top. Now enable the “Chroma Key” option, and the background will be replaced. You can adjust the edges through “Edge Thickness” and “Edge Feather” sliders.

Step 3: Continue Editing or Export Media at Desired Location
When you have finished the editing, move to the “Export” option at the top right. Using the “Export” window, define parameters and export the file wherever you want.

Method 2: Accessing AI Portrait
Step 1: Set the Videos at the Correct Place in the Timeline
Import your Background video and main clips in the media panel. Drag the main video in the second track and the background video in the first track, respectively.

Step 2: Explore and Utilize AI Portrait for Changing Background
Head to the right-side panel and access the AI tools option for choosing “AI Portrait.” Toggle this option and get the background automatically changed. To further enhance, you can use “Edge Thickness” and “Edge Feather” sliders.

Method 3: Change the Background through Masking
Step 1: Get Stock Media and Place it in the Timeline
Drag your main video in the timeline. Then, tap the “Stock Media” icon from the toolbar of the media panel. Browse one background clip and bring it to the timeline at the second track.

Step 2: Draw a Mask to Replace the Background with Stock Media
Look for the “Mask” option before the “AI tools” option on the right-side panel. Pick the “Draw Mask” icon and try to draw the lines around the main figure. When you finish drawing, the background will be replaced. You can use the “Blur Strength” slider to give a natural look.

Conclusion
In short, sky replacement is a feature of Adobe Photoshop that turns clear skies into sunsets. To do so, you can follow the steps highlighted in this article. Changing sky in the Lightroom needs some editing skills in Photoshop, and not everyone has it. Thus, you should use Wondershare Filmora as the top-notch solution. It can change your media’s background with AI and other manual changing options.
Free Download Free Download Learn More

Part 1: Why Do Creators Look Forward to Changing the Environment Across Their Recorded or Captured Media?
Humans love to show creativity and express themselves from different perspectives. Creative works provide entertainment and prove therapeutic in some way. That’s why creators and artists try to change the surroundings of recorded media. Such changes make the captured media virtually stunning and creative. Let’s explore more reasons that push creators towards sky replacement in Lightroom:
- Artistic Storytelling: A creative art piece shows a story of a thousand words. Thus, artists look for visual elements to convey particular moods and messages in their media.
- Symbolism: In many art competitions, creators are asked to show symbolic media. For this purpose, they might replace Sky in Lightroom to symbolize rebirth and growth.
- World-Building: The science fiction and fantasy genre needs such changes to build another world. Creators turn the media into imaginative settings to inspire the audience.
- Entertainment: Another aim of the creator is to provide new and exciting content to the audience. It allows them to temporarily escape their world and enjoy it.
- Discovery: You might have seen virtual landscapes in video games that uncover hidden secrets. Such backgrounds are designed to facilitate adventure through media.
Part 2: A Guide to Replace Sky in Lightroom: Step-by-Step
As discussed earlier, changing the sky in Lightroom proves fruitful for many reasons. Altering media scenes can also create a powerful emotional impact. Likewise, shifting from a green meadow to a messy landscape can turn a calm mood into chaos. If you intend to replace your current media background, then let us help you. Here are the steps below to change the environment in Lightroom:
Step 1: Lightroom can enhance your surroundings by using certain effects. To replace the sky, right-click on your image and select the “Edit in Photoshop” option. Before that, ensure that you have Adobe Photoshop installed on your system.

Step 2: Now, go to the top toolbar and press the “Edit” option next to “File.” From the drop-down list, access the “Sky Replacement” option. Head to the “Sky Replacement” panel and click the downward icon next to the sky preview. Scroll to pick one sky of your choice and hit the “OK” button.

Step 3: To import more skies, press the “Settings” icon on the Sky Replacement panel. Select the first option of “Get More Skies” and click on “Import Images.” You can explore skies from the Blue Skies, Spectacular, and Sunsets folders from that panel.

Step 4: Bring this picture back to the Lightroom and go to its right-side panel. There, use the Exposure, Contrast, and Highlights sliders below the “Light” downward icon. After enhancing your image, right-click on it and look for the “Export” option to save the file.

Part 3: Make Background Changing Easy with Wondershare Filmora
Sky Replacement in Lightroom and Photoshop requires some basic editing skills. Not everyone has such skills, so they have to acquire skills from video tutorials. It wastes a lot of time and effort just to learn editing from scratch. As an easier solution, they should try Wondershare Filmora to change image surroundings.
Notably, it’s a better solution that accommodates all users from beginner professionals. You can use Filmora for video editing to effortlessly expand your creativity. This tool is available online for Desktop, macOS, mobile, and online with the latest AI features.
Free Download For Win 7 or later(64-bit)
Free Download For macOS 10.14 or later
Key Features Marking Filmora’s Importance
Instantly remove or change your videos and image backgrounds with Filmora. Reimagine your world by knowing the given key features of Filmora in changing backgrounds:
1. Chroma Key (Green Screen)
Applying green-screen in effect in video and images will generate professional content. With AI support, you can remove a certain color from overlay images and videos. It can make your chosen colors transparent in the imported media. To fine-tune the media, you can use Tolerance, Edge Thickness, and Feather sliders.

2. AI Portrait
If you want to focus on the portrait while ignoring the background, use this feature. It can remove the background with accuracy by recognizing the main object. Filmora detects humans with AI and allows manual adjustments after removing the background. You can change the Edge Thickness and Edge Feature to the required extent.

3. Basic Background
While editing any media, you might require a blur option to hide distortion in the background. Filmora offers background blur options with different types and styles in them. You can opt for a Pattern, Color, and blur option from blur types. Then, it allows you to choose from blur styles like Grainy, Direction, and Radial. Afterward, users can select the level of blur as per their choice.

4. AI Image Stylizer
Aside from changing background, you can unleash your creativity with an AI Image stylizer. It’s the latest feature of Filmora that can turn your image into a devil, clown, or zombie. If you want to follow certain social media trends of making anime, explore this feature. You can find 19 styles that also include soft image looks like Flower and Angel image styles.

Steps to Change Background with Different Ways Using Filmora
Instead of lightroom sky replacement, Filmora offers the simplest way to edit images and videos. Let’s explore the quickest ways to change backgrounds using Filmora.
- Method 1: Using Chroma Key
- Method 2: Accessing AI Portrait
- Method 3: Change the Background through Masking
Method 1: Using Chroma Key
Step 1: Get the Latest Version of Filmora in Your system
Successfully launch the latest version of Filmora in your system. Double-tap on it to enter the home screen. Click on “New Project” and access the editing screen of Filmora.

Step 2: Use the Chroma Key and Change the Background
From the media panel, use “Import” and bring your media to the Timeline section. Place the background video first and then bring the Main Clip below it. Head to the right-side panel and press the “AI Tools” option from the top. Now enable the “Chroma Key” option, and the background will be replaced. You can adjust the edges through “Edge Thickness” and “Edge Feather” sliders.

Step 3: Continue Editing or Export Media at Desired Location
When you have finished the editing, move to the “Export” option at the top right. Using the “Export” window, define parameters and export the file wherever you want.

Method 2: Accessing AI Portrait
Step 1: Set the Videos at the Correct Place in the Timeline
Import your Background video and main clips in the media panel. Drag the main video in the second track and the background video in the first track, respectively.

Step 2: Explore and Utilize AI Portrait for Changing Background
Head to the right-side panel and access the AI tools option for choosing “AI Portrait.” Toggle this option and get the background automatically changed. To further enhance, you can use “Edge Thickness” and “Edge Feather” sliders.

Method 3: Change the Background through Masking
Step 1: Get Stock Media and Place it in the Timeline
Drag your main video in the timeline. Then, tap the “Stock Media” icon from the toolbar of the media panel. Browse one background clip and bring it to the timeline at the second track.

Step 2: Draw a Mask to Replace the Background with Stock Media
Look for the “Mask” option before the “AI tools” option on the right-side panel. Pick the “Draw Mask” icon and try to draw the lines around the main figure. When you finish drawing, the background will be replaced. You can use the “Blur Strength” slider to give a natural look.

Conclusion
In short, sky replacement is a feature of Adobe Photoshop that turns clear skies into sunsets. To do so, you can follow the steps highlighted in this article. Changing sky in the Lightroom needs some editing skills in Photoshop, and not everyone has it. Thus, you should use Wondershare Filmora as the top-notch solution. It can change your media’s background with AI and other manual changing options.
Also read:
- 2024 Approved 10 Best Video Editing Apps With Templates
- New 2024 Approved 15 Must-Use Gifs Editors
- In 2024, Easy Ways to Create Procreate GIFs
- New 2024 Approved How to Create Vintage Film Effect 1950S
- In 2024, Try These 10 Music Video Templates To Make Your Work Easy
- 2024 Approved Best Text Animations In After Effects
- 2024 Approved Ever Wondered About the Similarity You Bear with an Anime Character? If You Have Not yet Looked Into This Exciting Aspect of Motion Graphic Design, You Can Very Well Break the Ice Here
- New In 2024, Top 5 Best Video to PPT Converters
- This Article Covers a Lot of Information About the Freeze-Frame Effect. It Includes Its Power, Its Usage in Films, and How to Create It in Your Videos Using Filmora. It Will Get You a Super Exciting Cinematic Effect for 2024
- New Now, You Can Also Apply the Stranger Things Upside Down Effect to Your Video! This Effect Combines Camera Tricks and Video Editing Within Filmora to Transition From the Normal World Into the Upside Down
- In 2024, How To Make a Photo Collage in Microsoft Word
- New In 2024, Ultimate Guide on How to Plan and Storyboard a Music Video
- Looking for the Steps to Add Transitions Effects in Premiere Pro? Here Are the Steps to Add and Edit Transitions in Premiere Pro and an Alternative Way to Video Transitions
- New How to Create a Smooth Cut Transition Effect?
- Updated Hitfilm Express Video Editor Review
- New 2024 Approved Learning Some Perfect Ways to Convert a Slow-Motion Video to Normal
- In 2024, With This Article, We Will Be Looking at Steps to Rotate a Video in Cyberlink PowerDirector to Help You when Required. We Have Also Mentioned the Steps You Will Need to Follow in Wondershare Filmora
- New Have You Tried Creating an Engaging Video? Try Out Impressive AI Video Ideas that Give You a Clue on How to Create an Attention Catching Video. Here Is a Breakdown of What an AI Video Idea Generator Is and How to Utilize It Efficiently
- How to Retrieve deleted photos on Pixel 8 Pro
- In 2024, 5 Ways to Transfer Music from Honor 90 to Other Android Devices Easily | Dr.fone
- How to Bypass Activation Lock from iPhone 6 Plus or iPad?
- How to Change Location on TikTok to See More Content On your Huawei Nova Y71 | Dr.fone
- In 2024, Ultimate Guide to Catch the Regional-Located Pokemon For Tecno Spark 10C | Dr.fone
- Disabling iPhone 13 mini Parental Restrictions With/Without Password
- Full Guide How To Fix Connection Is Not Private on Oppo A1 5G | Dr.fone
- New 10 Trendy & Stylish Free Logo Animation Templates
- How to add a digital signature block to JPG
- How to Change Spotify Location After Moving to Another Country On Xiaomi Redmi Note 12 4G | Dr.fone
- How to Stop Life360 from Tracking You On Infinix Note 30 5G? | Dr.fone
- How to Fix Microsoft Excel 2003 Error Code 0x800A03EC? | Stellar
- In 2024, How to Watch Hulu Outside US On Poco C55 | Dr.fone
- How to Unlock Your Apple iPhone 15 Pro Passcode 4 Easy Methods (With or Without iTunes) | Dr.fone
- How to Bypass FRP from Oppo Find N3 Flip?
- Set Your Preferred Job Location on LinkedIn App of your Meizu 21 Pro | Dr.fone
- How to Change OnePlus Ace 2V Location on Skout | Dr.fone
- In 2024, Still Using Pattern Locks with Oppo A59 5G? Tips, Tricks and Helpful Advice
- Title: 4 Methods to Merge MP4 and MP3
- Author: Chloe
- Created at : 2024-05-20 03:37:18
- Updated at : 2024-05-21 03:37:18
- Link: https://ai-editing-video.techidaily.com/4-methods-to-merge-mp4-and-mp3/
- License: This work is licensed under CC BY-NC-SA 4.0.

