:max_bytes(150000):strip_icc():format(webp)/GettyImages-1365158534-d6952b03afff43f7a1c5f0405f31dc92.jpg)
4 Solutions to Resize a WebM File

4 Solutions to Resize a WebM File
People resize videos for many reasons, the most common one being to reduce file size. Others might be to meet a specification, or for compatibility. When you resize a video file, you reduce its file size considerably- making it load faster on devices, reduce processing time, and save a lot of space. Most people prefer watching videos that are smaller in size compared to larger ones, that’s why some social media sites like Instagram, Tiktok, etc have preferred video resolutions, so if you are a user on these sites you might want to resize your video to fit.
The biggest concern most people have about resizing videos is whether it will retain its quality, another concern is that you don’t want to crop out your video while resizing. If the format of the video is mp4, wmv, avi, etc which usually have very large size, resizing it might be a bit of a problem because the video quality will reduce a lot, but if it’s a WebM video file, you can still achieve a good video quality even after multiple compression or changing its resolution, that’s because its codecs- VP8 and VP9 were designed specifically for that, and it’s supported by all browsers.
In the course of this article, we’re assuming you already have a WebM video and you want to resize it, and still maintain its quality so you can upload on your favourite websites without any hassles. We have handpicked some proven methods to help you with that, let’s see them:
Method 1: Resize WebM file with Wondershare Filmora
Wondershare Filmora Video Editor is a great video editing software that comes with a lot of features. You can easily perform basic editing techniques in a few minutes. It also comes with lots of filters to make your videos pop.
For video resizing, Filmora offers you a couple of options: First you have an option of changing the resolution just before you export your video; you also have the option of cropping your videos to your preferred size and cutting out redundant parts of your videos to save space; but the third option is what we’ll show you in this guide, because we imagine you already have your video exported and you just want to resize. You can easily do that by changing the aspect ratio and we’ll show you in a few steps:
For Win 7 or later (64-bit)
For macOS 10.14 or later
Step 1: Go to the official Wondershare Filmora website and download the software.
Step 2: Install Wondershare Filmora on your PC and double click to launch.
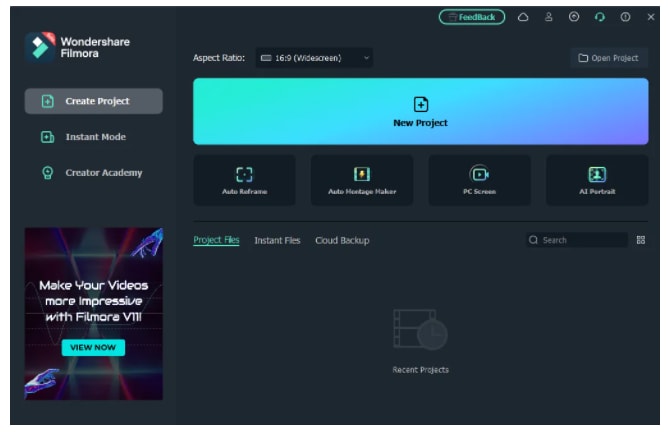
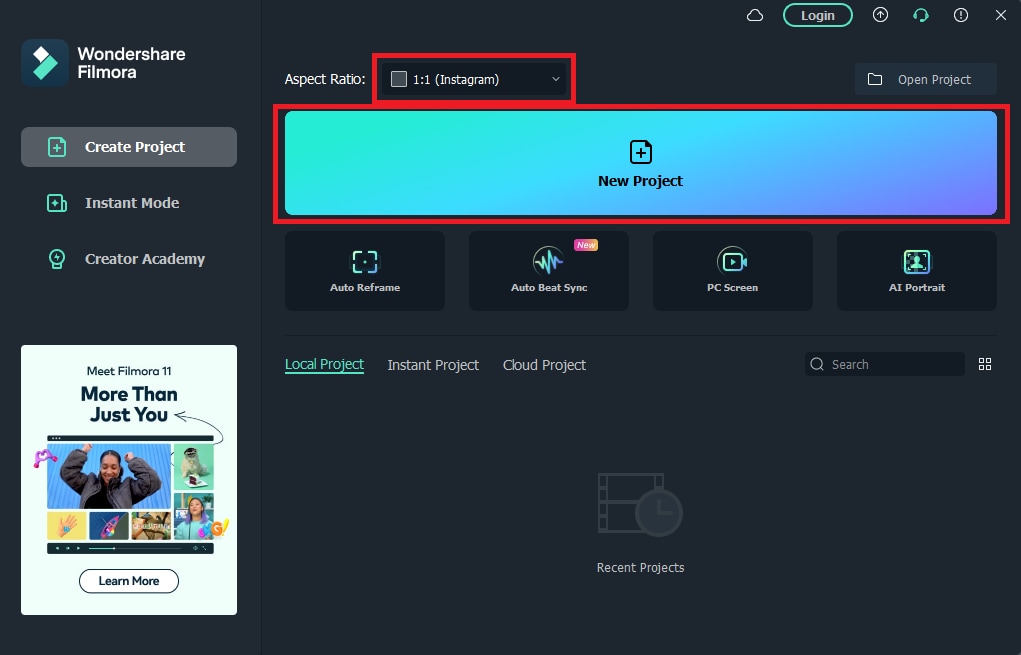
Step 3: Change your aspect ratio. When you launch Filmora, you’re allowed to choose your preferred aspect ratio on the start page.
Select your preferred aspect ratio from the list of options- 16:9 (widescreen), 4:3 (standard), 1:1 (Instagram), 9:16 (portrait). For example, if you import a 16:9 video file into Filmora, and set it to 1:1 aspect ratio then, the final output file will be 1:1, which is the perfect aspect ratio for Instagram posts.
You’ll see below that I selected 1:1 for instagram. After you are done selecting your preferred aspect ratio, hit ‘New Project’.
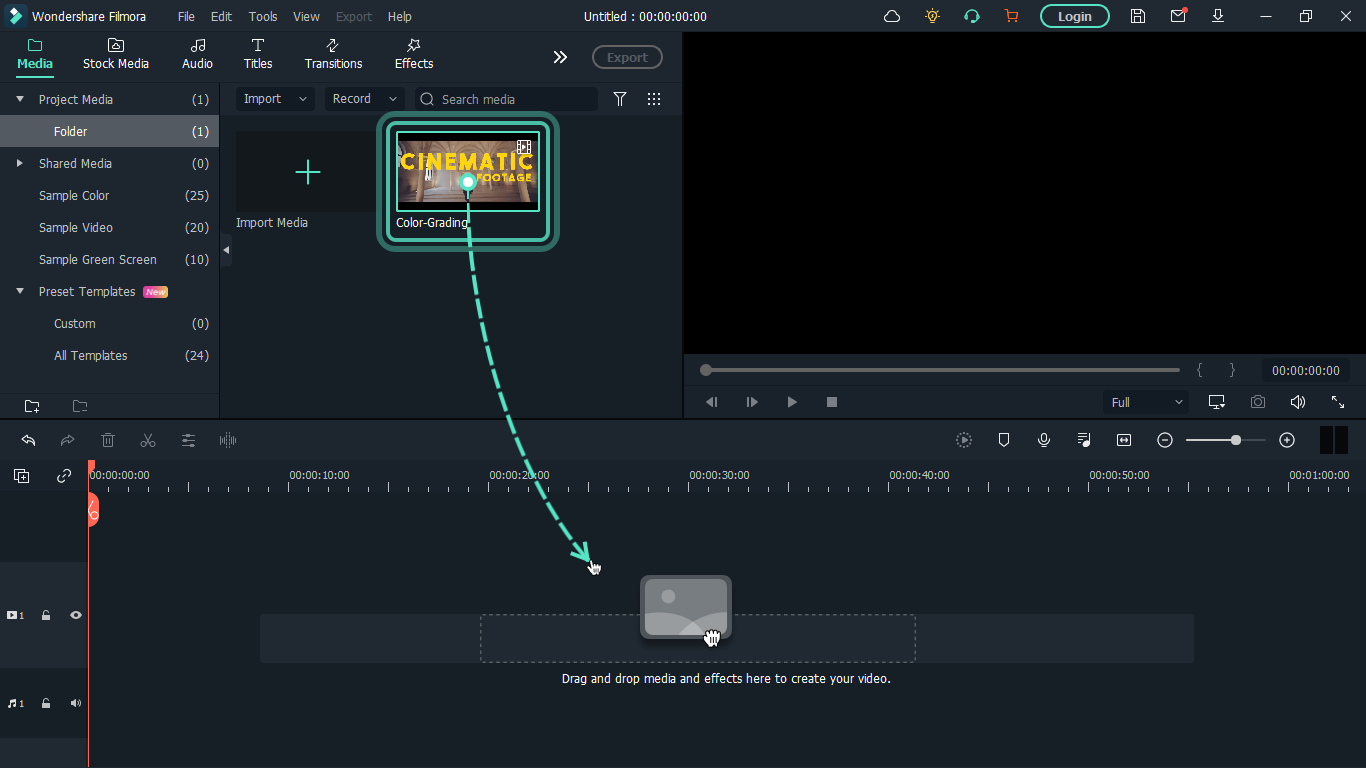
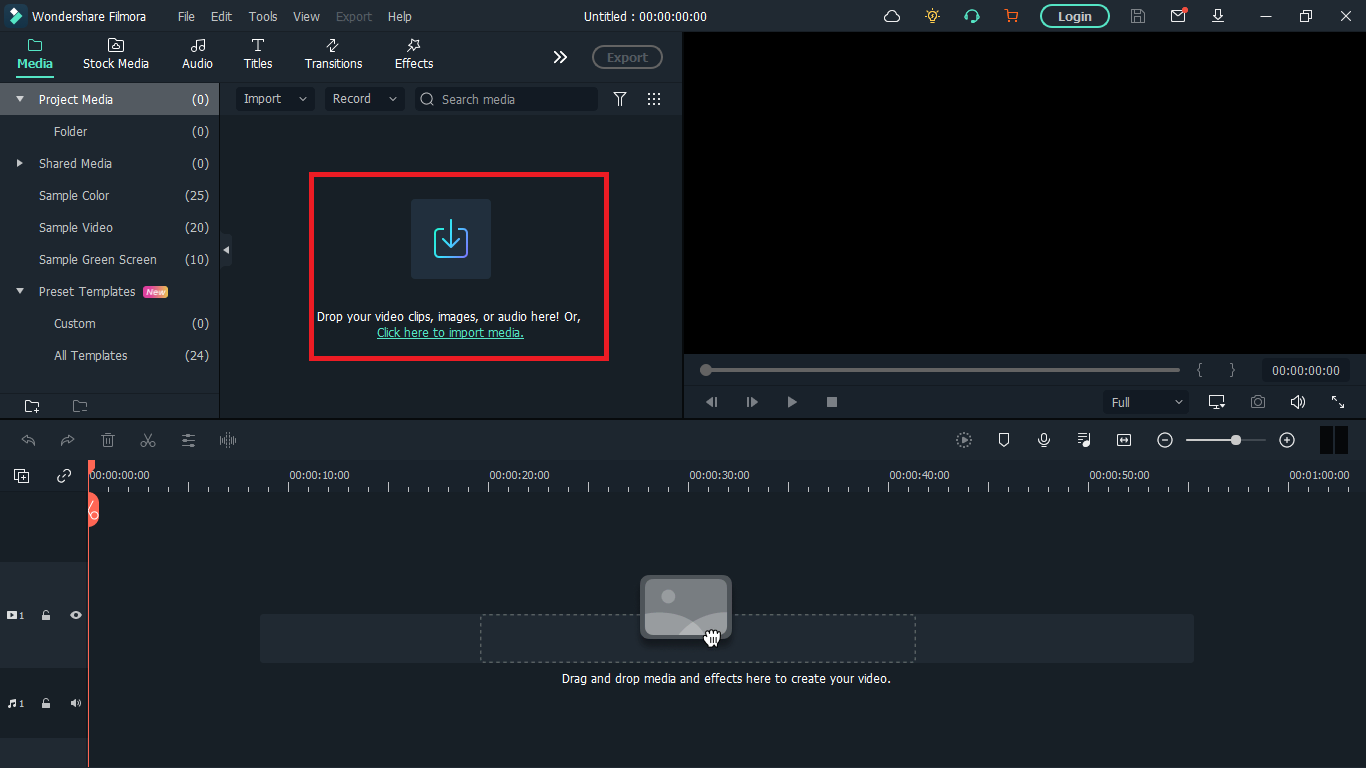
Step 4: Import your WebM video. After you must have selected your preferred aspect ratio, the next step is to import the video you want to resize; you can do this by clicking on the import icon shown below. Once done, drag the video to the timeline also shown below.
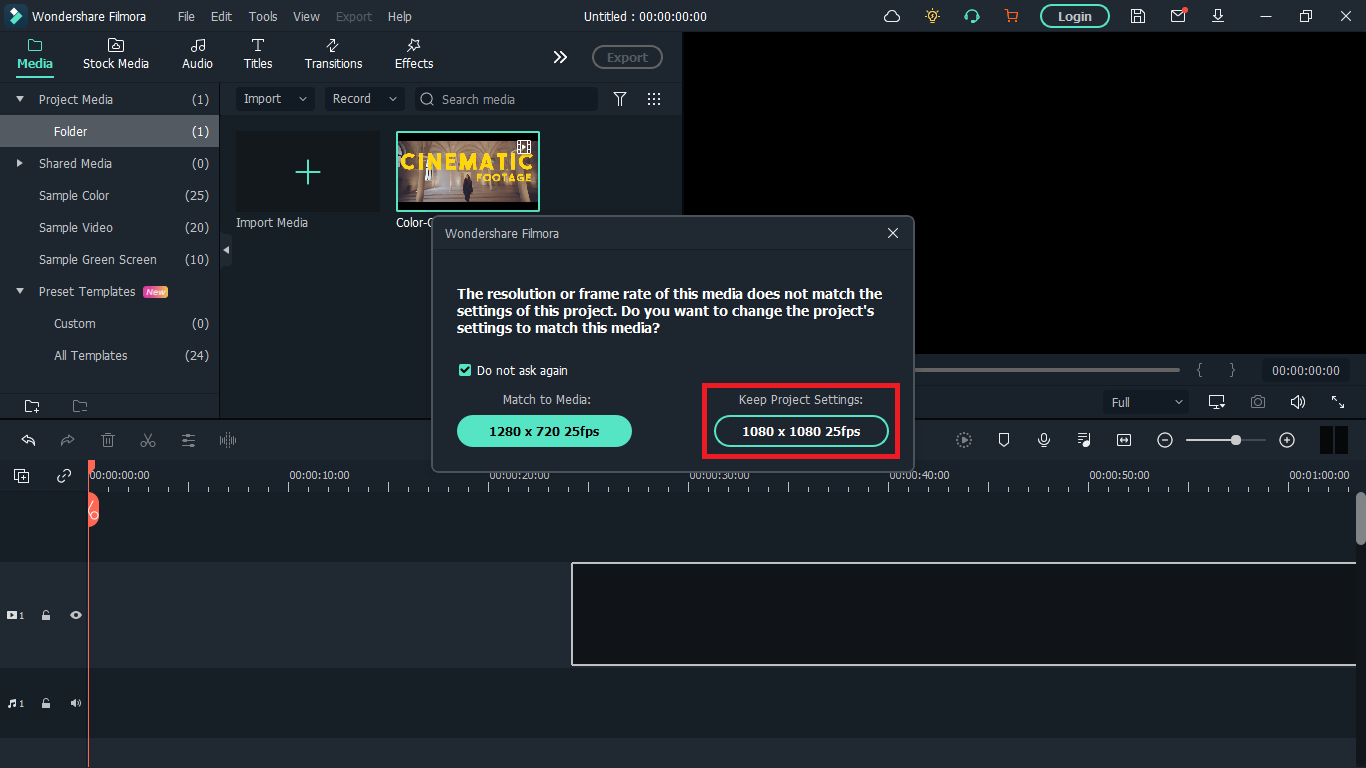
A floating window will appear and you’ll be asked to change project settings to match the media. Click on ‘Keep project settings’. Filmora will change the aspect ratio of the original video you imported to your preferred aspect ratio.
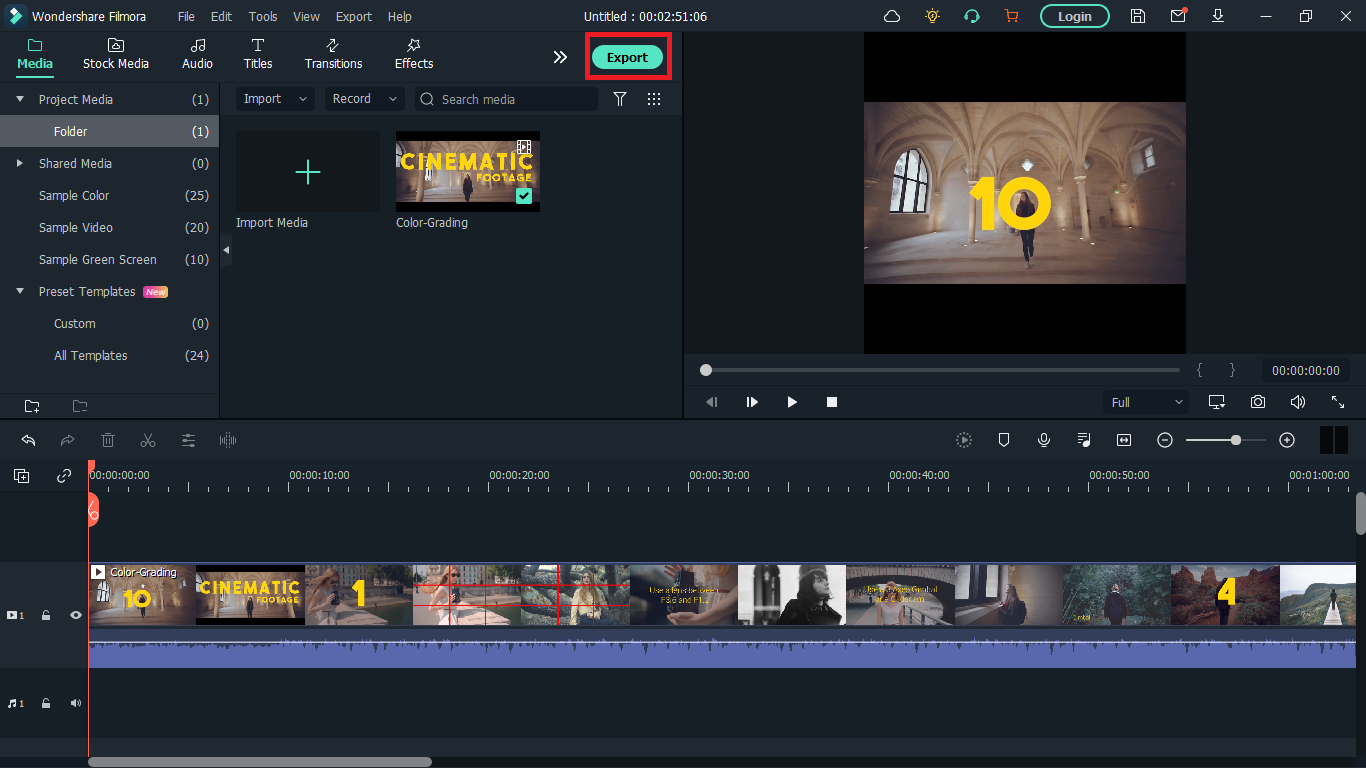
Step 5: Save your video. Once the video is now properly placed in the timeline, next thing is hit ‘export’ to save your video. You can go to the ‘format tab’ to change the video output format to WebM or whatever format you choose then hit ‘Export’.
Method 2: How to resize WebM file with VLC
VLC is a free and open source multimedia player. It is arguably the best media player out there and that’s for a reason- it can play almost everything without the need for any external codecs.
The playback feature is amazing but that’s not the only thing it can do. VLC outshines most other media players because of some extra features it possesses. It resizes and converts media files, downloads and adds subtitles, records screen, as well as is customizable in settings and expandable via plugins.
What we want to use in this guide is its media resizing feature, so let’s show you how you can use it in these steps:
Step 1: Download VLC Media player from the official VLC page and install it on your windows or Mac PC.
Step 2: Launch VLC after installing by double-clicking on the software.
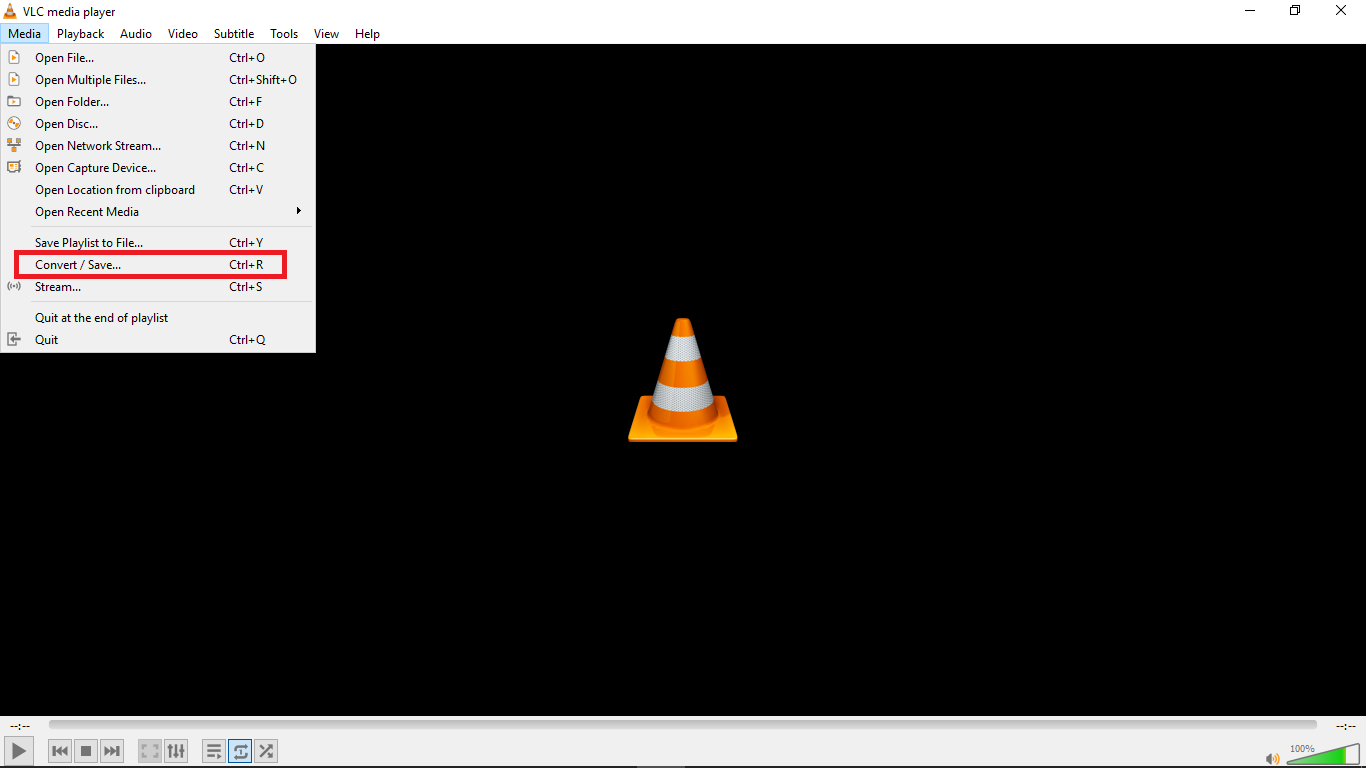
Step 3: Click “Media” in the toolbar.
Step 4: Select “Convert / Save”. You can also tap shortcut keys Ctrl + R to quickly open a new window.
Step 5: Click “Add”. You can load one or more video files. Here, I’ll choose a colour grading video on my desktop. You can see it has the extension ‘.webm’. After loading the video file you want to resize, click “Convert / Save” again.
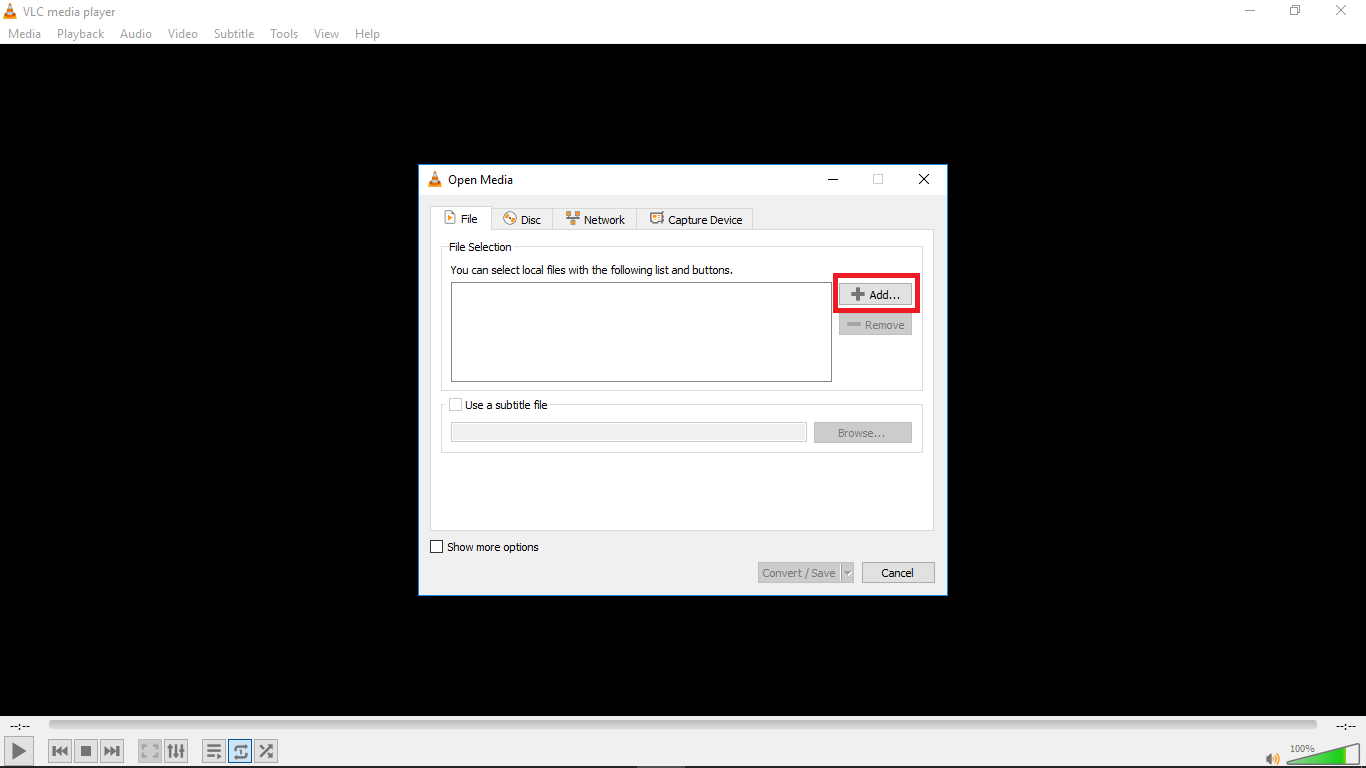
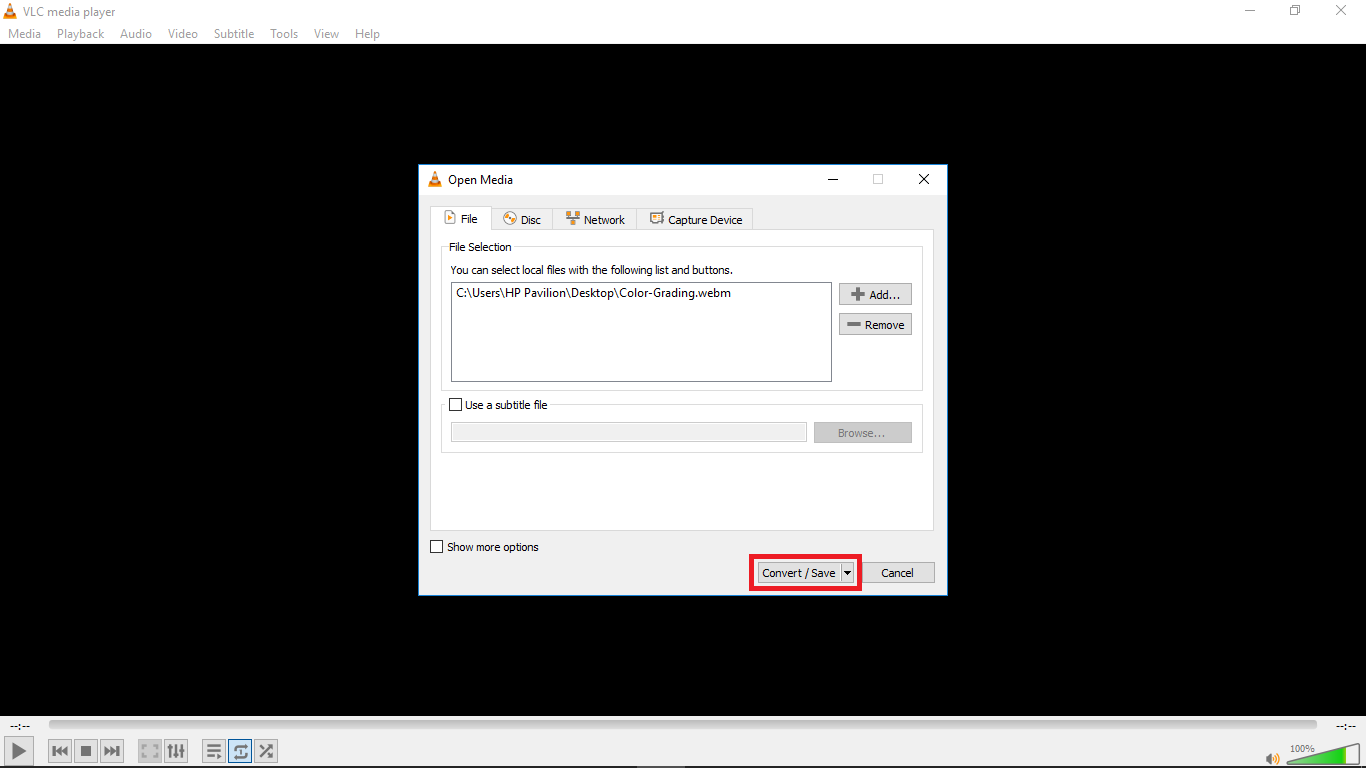
Step 6: Choose your desired output profile type. With VLC, you can resize video to MP4, WebM, TS, and other formats.
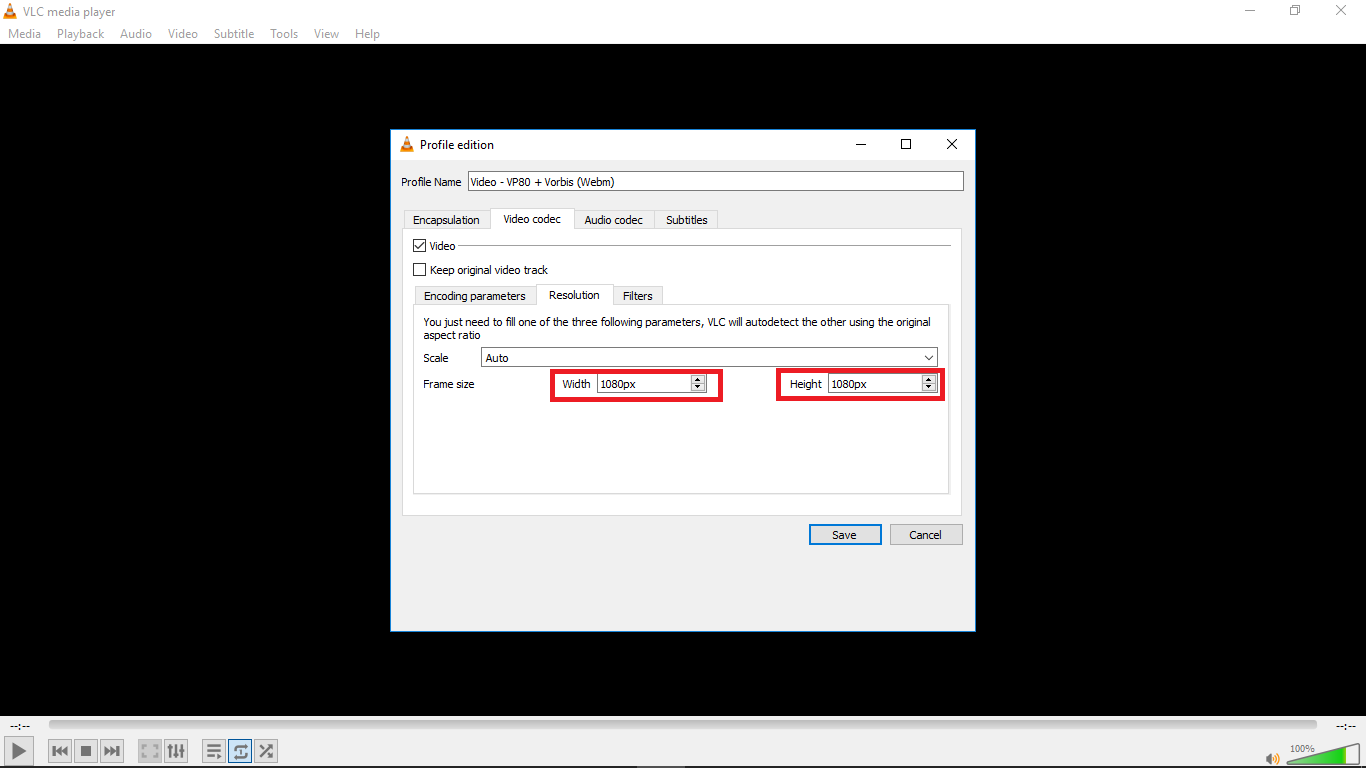
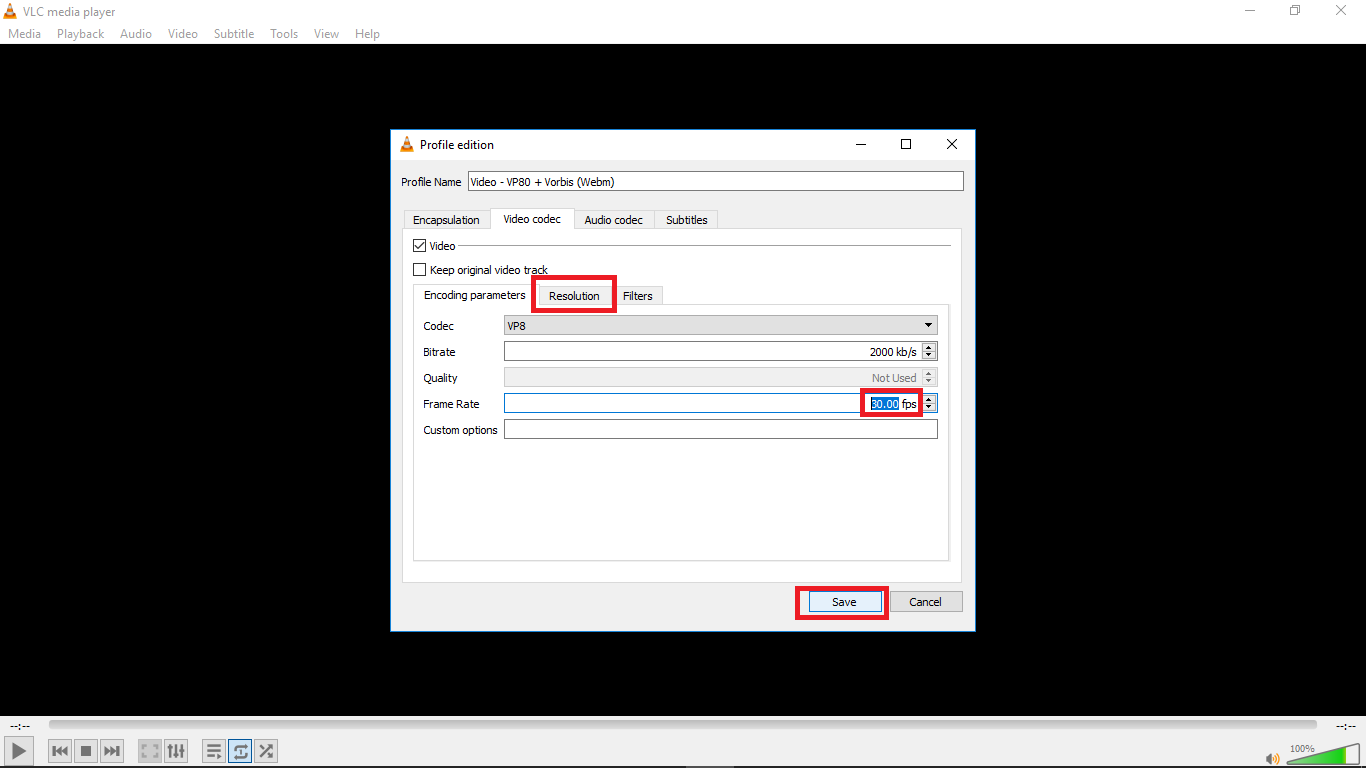
Step 8: Click the settings icon to access the settings window and select the video codec where you can adjust parameters like frame rate, bitrate, resolution, etc to change video file size. I changed the frame rate of my video to 30fps which is ideal for high quality videos. Also click the resolution tab and set your desired resolution then click save.
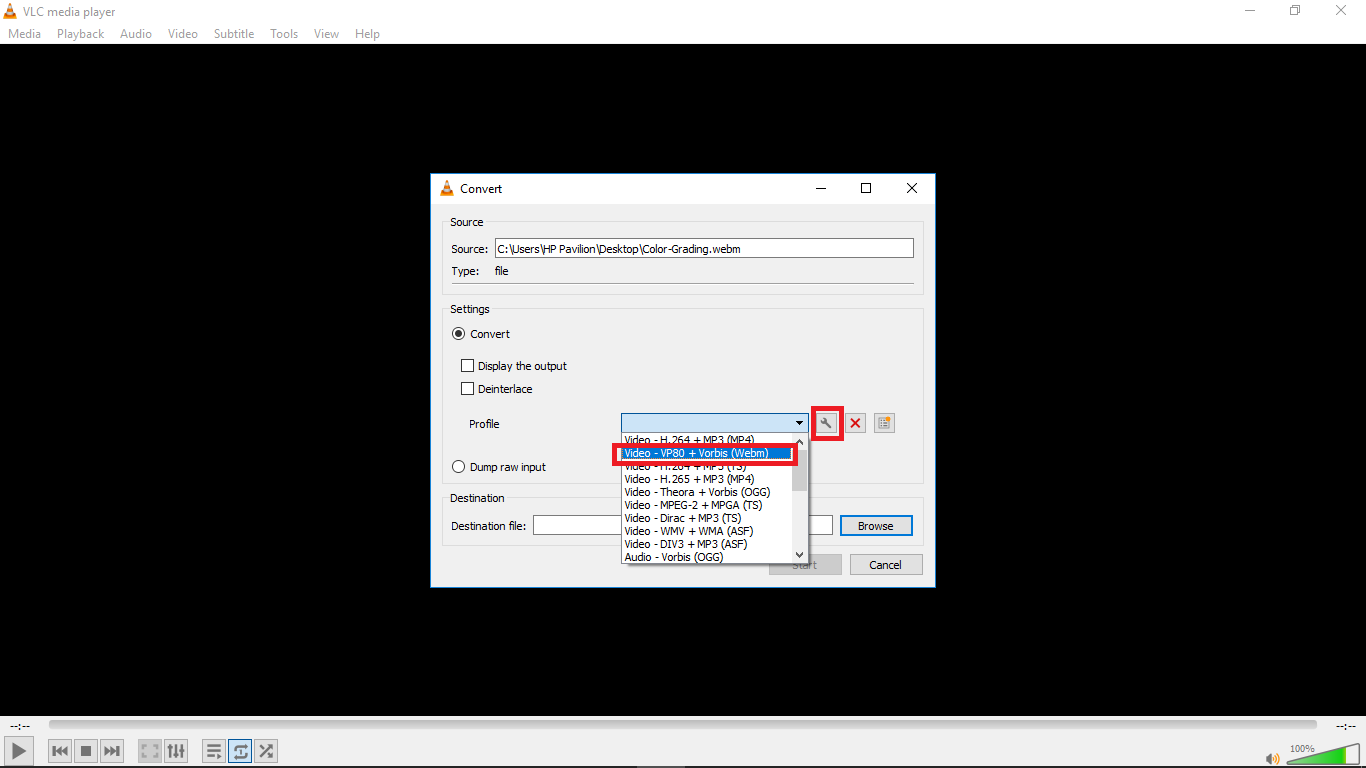
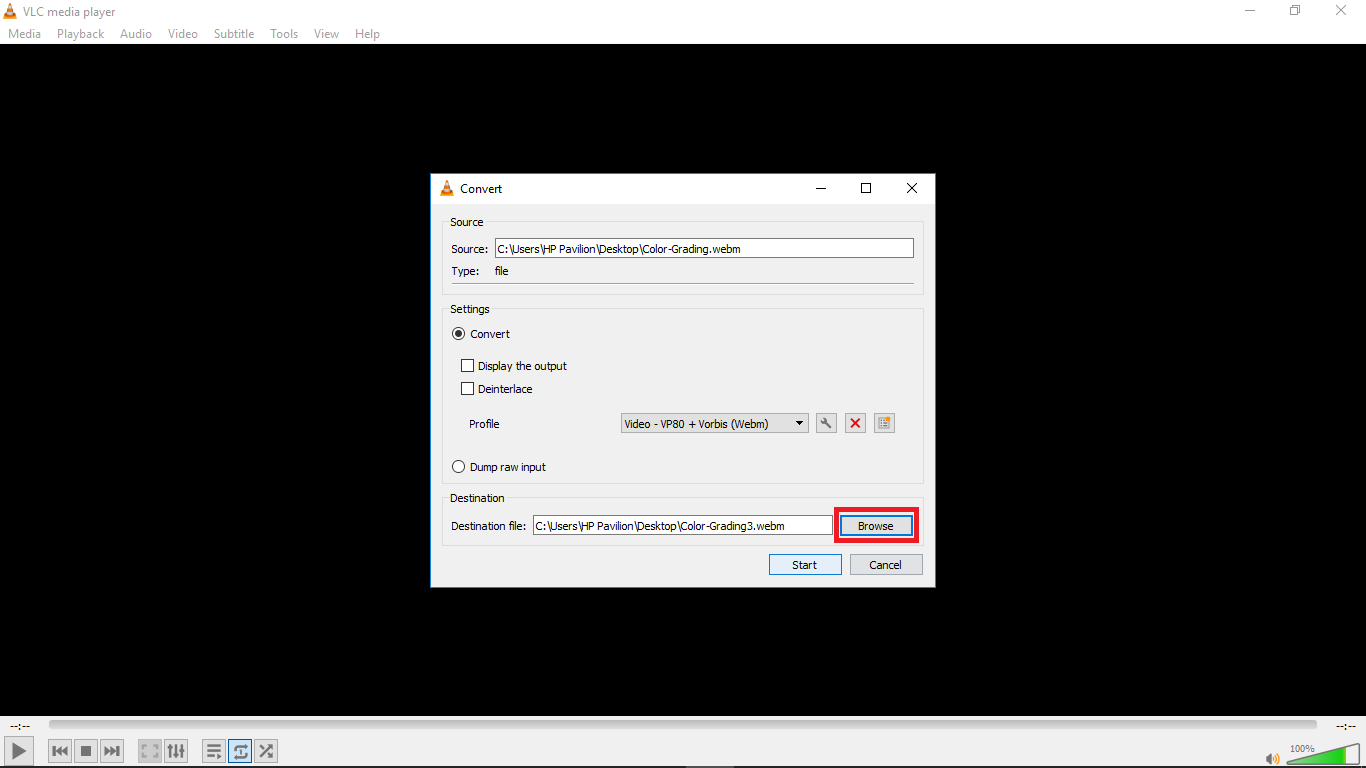
Step 9: Select the destination folder and click start. VLC will resize the video and retain most of its quality.
Method 3: Resize Videos With Ezgif
An alternative way to resize videos is by using Ezgif Video Resizer. If you are looking for a quick way to resize your WebM videos, this is a great tool. Ezgif is a free online video resizer with a very simple interface that can aid easy navigation for new users. The whole video resizing operation is pretty quick so you don’t have to worry about wasting so much time.
Ezgif supports various video formats like MP4, MOV, FLV, WEBM, MPEG, 3GP and more. Aside from the basic size change, it also allows you to rotate, crop, cut, mute, speed, reverse and add subtitles.
Here’s how you can resize your WebM video with Ezgif in a few steps:
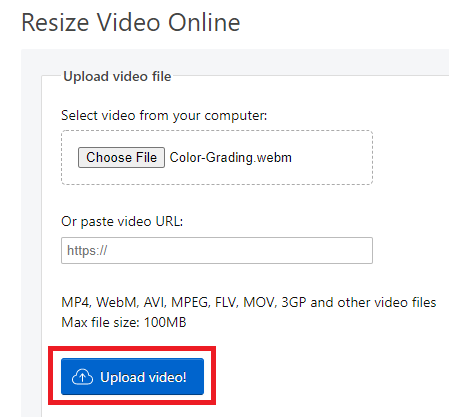
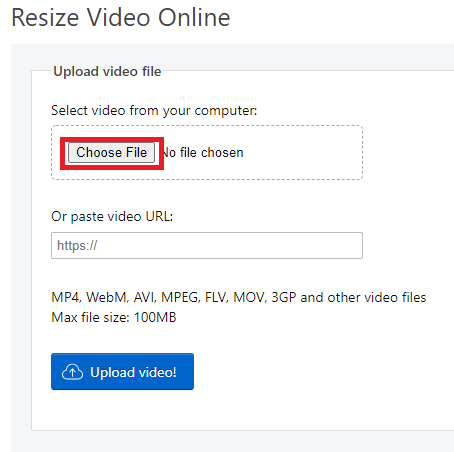
Step 1: Go to Ezgif Resize Video on your web browser and add your WebM file by clicking “Choose File” or pasting the video URL.
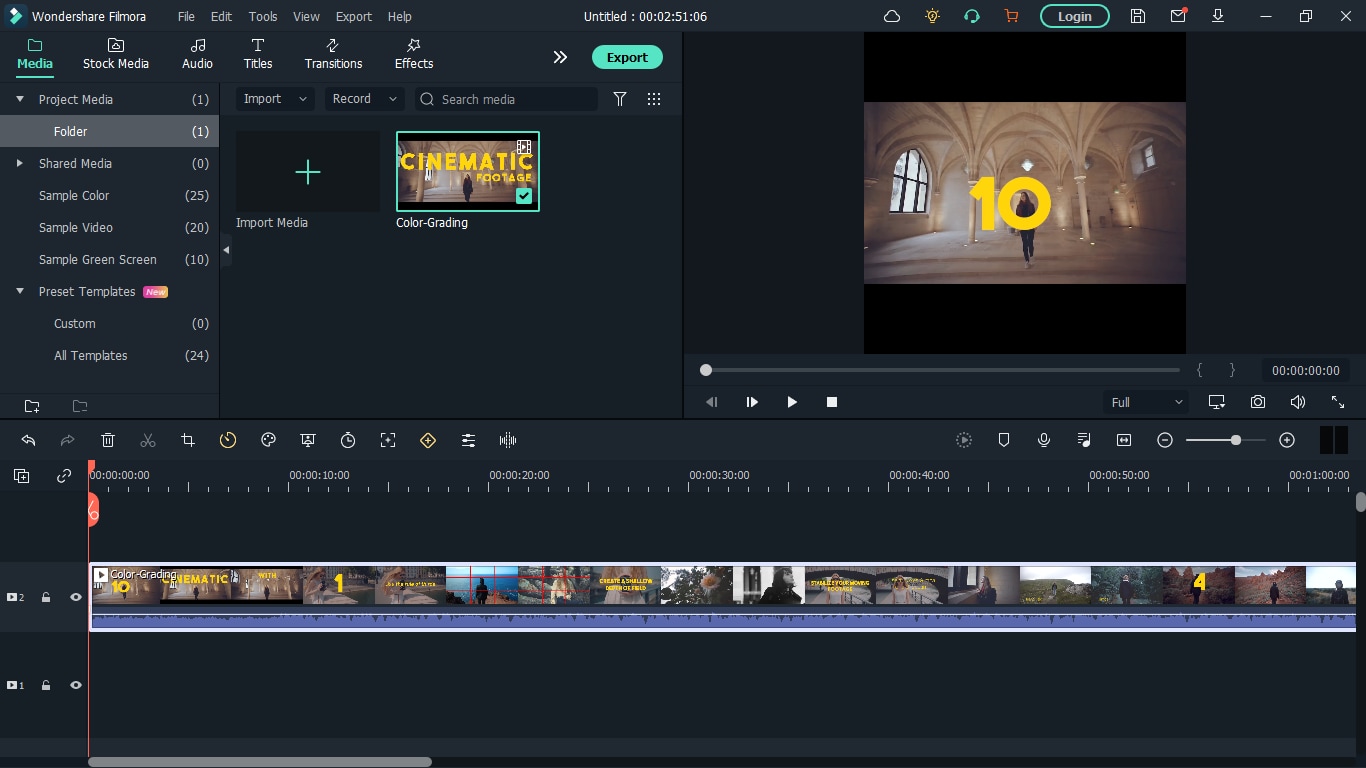
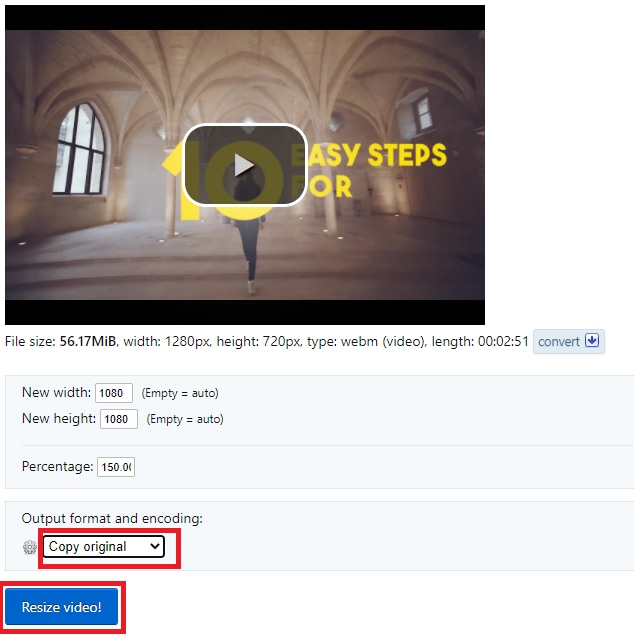
Step 2: Click “Upload Video”. You’ll see that I chose a colour grading video with the .webm extension which I want to resize. After clicking ‘Upload Video’, a floating window will appear with the video details displayed.
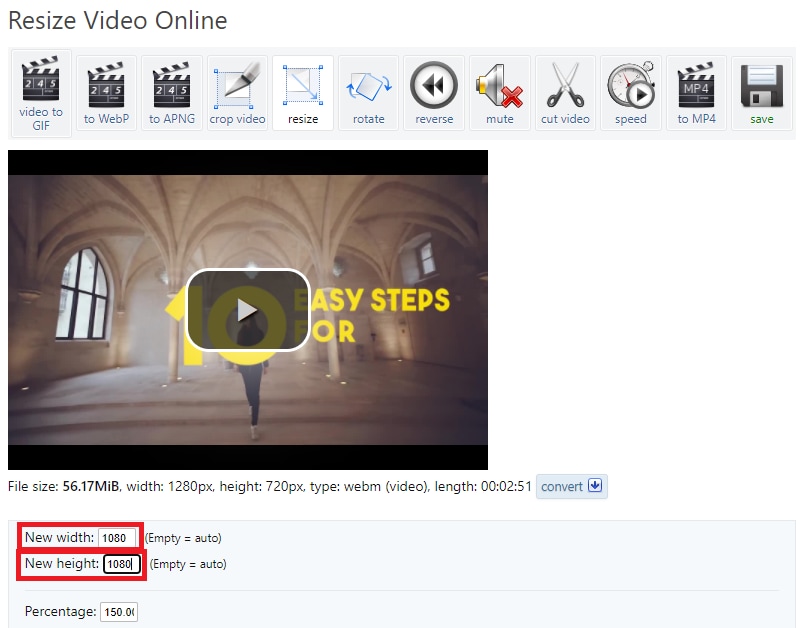
Step 3: Type in specific “New width” and “New height” to confirm a new size.
Step 4: Check “output format and encoding” and press “Resize video!” to save your WebM file.
Whether you are a content creator or a social media influencer, resizing videos is one thing you’ll be doing regularly and these tools will come in handy. Maybe you are a video editor and your client wants a different video format after you are done exporting, these tools will definitely save you all the stress of readjusting and hours or re-exporting.
For macOS 10.14 or later
Step 1: Go to the official Wondershare Filmora website and download the software.
Step 2: Install Wondershare Filmora on your PC and double click to launch.
Step 3: Change your aspect ratio. When you launch Filmora, you’re allowed to choose your preferred aspect ratio on the start page.

Select your preferred aspect ratio from the list of options- 16:9 (widescreen), 4:3 (standard), 1:1 (Instagram), 9:16 (portrait). For example, if you import a 16:9 video file into Filmora, and set it to 1:1 aspect ratio then, the final output file will be 1:1, which is the perfect aspect ratio for Instagram posts.
You’ll see below that I selected 1:1 for instagram. After you are done selecting your preferred aspect ratio, hit ‘New Project’.

Step 4: Import your WebM video. After you must have selected your preferred aspect ratio, the next step is to import the video you want to resize; you can do this by clicking on the import icon shown below. Once done, drag the video to the timeline also shown below.


A floating window will appear and you’ll be asked to change project settings to match the media. Click on ‘Keep project settings’. Filmora will change the aspect ratio of the original video you imported to your preferred aspect ratio.


Step 5: Save your video. Once the video is now properly placed in the timeline, next thing is hit ‘export’ to save your video. You can go to the ‘format tab’ to change the video output format to WebM or whatever format you choose then hit ‘Export’.

Method 2: How to resize WebM file with VLC
VLC is a free and open source multimedia player. It is arguably the best media player out there and that’s for a reason- it can play almost everything without the need for any external codecs.
The playback feature is amazing but that’s not the only thing it can do. VLC outshines most other media players because of some extra features it possesses. It resizes and converts media files, downloads and adds subtitles, records screen, as well as is customizable in settings and expandable via plugins.
What we want to use in this guide is its media resizing feature, so let’s show you how you can use it in these steps:
Step 1: Download VLC Media player from the official VLC page and install it on your windows or Mac PC.
Step 2: Launch VLC after installing by double-clicking on the software.
Step 3: Click “Media” in the toolbar.
Step 4: Select “Convert / Save”. You can also tap shortcut keys Ctrl + R to quickly open a new window.

Step 5: Click “Add”. You can load one or more video files. Here, I’ll choose a colour grading video on my desktop. You can see it has the extension ‘.webm’. After loading the video file you want to resize, click “Convert / Save” again.


Step 6: Choose your desired output profile type. With VLC, you can resize video to MP4, WebM, TS, and other formats.
Step 8: Click the settings icon to access the settings window and select the video codec where you can adjust parameters like frame rate, bitrate, resolution, etc to change video file size. I changed the frame rate of my video to 30fps which is ideal for high quality videos. Also click the resolution tab and set your desired resolution then click save.


Step 9: Select the destination folder and click start. VLC will resize the video and retain most of its quality.

Method 3: Resize Videos With Ezgif
An alternative way to resize videos is by using Ezgif Video Resizer. If you are looking for a quick way to resize your WebM videos, this is a great tool. Ezgif is a free online video resizer with a very simple interface that can aid easy navigation for new users. The whole video resizing operation is pretty quick so you don’t have to worry about wasting so much time.
Ezgif supports various video formats like MP4, MOV, FLV, WEBM, MPEG, 3GP and more. Aside from the basic size change, it also allows you to rotate, crop, cut, mute, speed, reverse and add subtitles.
Here’s how you can resize your WebM video with Ezgif in a few steps:
Step 1: Go to Ezgif Resize Video on your web browser and add your WebM file by clicking “Choose File” or pasting the video URL.

Step 2: Click “Upload Video”. You’ll see that I chose a colour grading video with the .webm extension which I want to resize. After clicking ‘Upload Video’, a floating window will appear with the video details displayed.

Step 3: Type in specific “New width” and “New height” to confirm a new size.

Step 4: Check “output format and encoding” and press “Resize video!” to save your WebM file.

Whether you are a content creator or a social media influencer, resizing videos is one thing you’ll be doing regularly and these tools will come in handy. Maybe you are a video editor and your client wants a different video format after you are done exporting, these tools will definitely save you all the stress of readjusting and hours or re-exporting.
For macOS 10.14 or later
Step 1: Go to the official Wondershare Filmora website and download the software.
Step 2: Install Wondershare Filmora on your PC and double click to launch.
Step 3: Change your aspect ratio. When you launch Filmora, you’re allowed to choose your preferred aspect ratio on the start page.

Select your preferred aspect ratio from the list of options- 16:9 (widescreen), 4:3 (standard), 1:1 (Instagram), 9:16 (portrait). For example, if you import a 16:9 video file into Filmora, and set it to 1:1 aspect ratio then, the final output file will be 1:1, which is the perfect aspect ratio for Instagram posts.
You’ll see below that I selected 1:1 for instagram. After you are done selecting your preferred aspect ratio, hit ‘New Project’.

Step 4: Import your WebM video. After you must have selected your preferred aspect ratio, the next step is to import the video you want to resize; you can do this by clicking on the import icon shown below. Once done, drag the video to the timeline also shown below.


A floating window will appear and you’ll be asked to change project settings to match the media. Click on ‘Keep project settings’. Filmora will change the aspect ratio of the original video you imported to your preferred aspect ratio.


Step 5: Save your video. Once the video is now properly placed in the timeline, next thing is hit ‘export’ to save your video. You can go to the ‘format tab’ to change the video output format to WebM or whatever format you choose then hit ‘Export’.

Method 2: How to resize WebM file with VLC
VLC is a free and open source multimedia player. It is arguably the best media player out there and that’s for a reason- it can play almost everything without the need for any external codecs.
The playback feature is amazing but that’s not the only thing it can do. VLC outshines most other media players because of some extra features it possesses. It resizes and converts media files, downloads and adds subtitles, records screen, as well as is customizable in settings and expandable via plugins.
What we want to use in this guide is its media resizing feature, so let’s show you how you can use it in these steps:
Step 1: Download VLC Media player from the official VLC page and install it on your windows or Mac PC.
Step 2: Launch VLC after installing by double-clicking on the software.
Step 3: Click “Media” in the toolbar.
Step 4: Select “Convert / Save”. You can also tap shortcut keys Ctrl + R to quickly open a new window.

Step 5: Click “Add”. You can load one or more video files. Here, I’ll choose a colour grading video on my desktop. You can see it has the extension ‘.webm’. After loading the video file you want to resize, click “Convert / Save” again.


Step 6: Choose your desired output profile type. With VLC, you can resize video to MP4, WebM, TS, and other formats.
Step 8: Click the settings icon to access the settings window and select the video codec where you can adjust parameters like frame rate, bitrate, resolution, etc to change video file size. I changed the frame rate of my video to 30fps which is ideal for high quality videos. Also click the resolution tab and set your desired resolution then click save.


Step 9: Select the destination folder and click start. VLC will resize the video and retain most of its quality.

Method 3: Resize Videos With Ezgif
An alternative way to resize videos is by using Ezgif Video Resizer. If you are looking for a quick way to resize your WebM videos, this is a great tool. Ezgif is a free online video resizer with a very simple interface that can aid easy navigation for new users. The whole video resizing operation is pretty quick so you don’t have to worry about wasting so much time.
Ezgif supports various video formats like MP4, MOV, FLV, WEBM, MPEG, 3GP and more. Aside from the basic size change, it also allows you to rotate, crop, cut, mute, speed, reverse and add subtitles.
Here’s how you can resize your WebM video with Ezgif in a few steps:
Step 1: Go to Ezgif Resize Video on your web browser and add your WebM file by clicking “Choose File” or pasting the video URL.

Step 2: Click “Upload Video”. You’ll see that I chose a colour grading video with the .webm extension which I want to resize. After clicking ‘Upload Video’, a floating window will appear with the video details displayed.

Step 3: Type in specific “New width” and “New height” to confirm a new size.

Step 4: Check “output format and encoding” and press “Resize video!” to save your WebM file.

Whether you are a content creator or a social media influencer, resizing videos is one thing you’ll be doing regularly and these tools will come in handy. Maybe you are a video editor and your client wants a different video format after you are done exporting, these tools will definitely save you all the stress of readjusting and hours or re-exporting.
For macOS 10.14 or later
Step 1: Go to the official Wondershare Filmora website and download the software.
Step 2: Install Wondershare Filmora on your PC and double click to launch.
Step 3: Change your aspect ratio. When you launch Filmora, you’re allowed to choose your preferred aspect ratio on the start page.

Select your preferred aspect ratio from the list of options- 16:9 (widescreen), 4:3 (standard), 1:1 (Instagram), 9:16 (portrait). For example, if you import a 16:9 video file into Filmora, and set it to 1:1 aspect ratio then, the final output file will be 1:1, which is the perfect aspect ratio for Instagram posts.
You’ll see below that I selected 1:1 for instagram. After you are done selecting your preferred aspect ratio, hit ‘New Project’.

Step 4: Import your WebM video. After you must have selected your preferred aspect ratio, the next step is to import the video you want to resize; you can do this by clicking on the import icon shown below. Once done, drag the video to the timeline also shown below.


A floating window will appear and you’ll be asked to change project settings to match the media. Click on ‘Keep project settings’. Filmora will change the aspect ratio of the original video you imported to your preferred aspect ratio.


Step 5: Save your video. Once the video is now properly placed in the timeline, next thing is hit ‘export’ to save your video. You can go to the ‘format tab’ to change the video output format to WebM or whatever format you choose then hit ‘Export’.

Method 2: How to resize WebM file with VLC
VLC is a free and open source multimedia player. It is arguably the best media player out there and that’s for a reason- it can play almost everything without the need for any external codecs.
The playback feature is amazing but that’s not the only thing it can do. VLC outshines most other media players because of some extra features it possesses. It resizes and converts media files, downloads and adds subtitles, records screen, as well as is customizable in settings and expandable via plugins.
What we want to use in this guide is its media resizing feature, so let’s show you how you can use it in these steps:
Step 1: Download VLC Media player from the official VLC page and install it on your windows or Mac PC.
Step 2: Launch VLC after installing by double-clicking on the software.
Step 3: Click “Media” in the toolbar.
Step 4: Select “Convert / Save”. You can also tap shortcut keys Ctrl + R to quickly open a new window.

Step 5: Click “Add”. You can load one or more video files. Here, I’ll choose a colour grading video on my desktop. You can see it has the extension ‘.webm’. After loading the video file you want to resize, click “Convert / Save” again.


Step 6: Choose your desired output profile type. With VLC, you can resize video to MP4, WebM, TS, and other formats.
Step 8: Click the settings icon to access the settings window and select the video codec where you can adjust parameters like frame rate, bitrate, resolution, etc to change video file size. I changed the frame rate of my video to 30fps which is ideal for high quality videos. Also click the resolution tab and set your desired resolution then click save.


Step 9: Select the destination folder and click start. VLC will resize the video and retain most of its quality.

Method 3: Resize Videos With Ezgif
An alternative way to resize videos is by using Ezgif Video Resizer. If you are looking for a quick way to resize your WebM videos, this is a great tool. Ezgif is a free online video resizer with a very simple interface that can aid easy navigation for new users. The whole video resizing operation is pretty quick so you don’t have to worry about wasting so much time.
Ezgif supports various video formats like MP4, MOV, FLV, WEBM, MPEG, 3GP and more. Aside from the basic size change, it also allows you to rotate, crop, cut, mute, speed, reverse and add subtitles.
Here’s how you can resize your WebM video with Ezgif in a few steps:
Step 1: Go to Ezgif Resize Video on your web browser and add your WebM file by clicking “Choose File” or pasting the video URL.

Step 2: Click “Upload Video”. You’ll see that I chose a colour grading video with the .webm extension which I want to resize. After clicking ‘Upload Video’, a floating window will appear with the video details displayed.

Step 3: Type in specific “New width” and “New height” to confirm a new size.

Step 4: Check “output format and encoding” and press “Resize video!” to save your WebM file.

Whether you are a content creator or a social media influencer, resizing videos is one thing you’ll be doing regularly and these tools will come in handy. Maybe you are a video editor and your client wants a different video format after you are done exporting, these tools will definitely save you all the stress of readjusting and hours or re-exporting.
How to Make A Tattoo Disappear Like A Magic
Do you have any tattoos that you don’t like anymore? Have you ever wished you had the superpower to make unwanted tattoos vanish? Then, keep reading this article since this article will provide you with how to use masking and colour correction to make a tattoo disappear in Filmora .
Part 1: What You’ll Need to Getting ready
Step1 The first thing you need is a video clip of your arm. Next, place the camera on a tripod, and tilt down to show the table from the top.
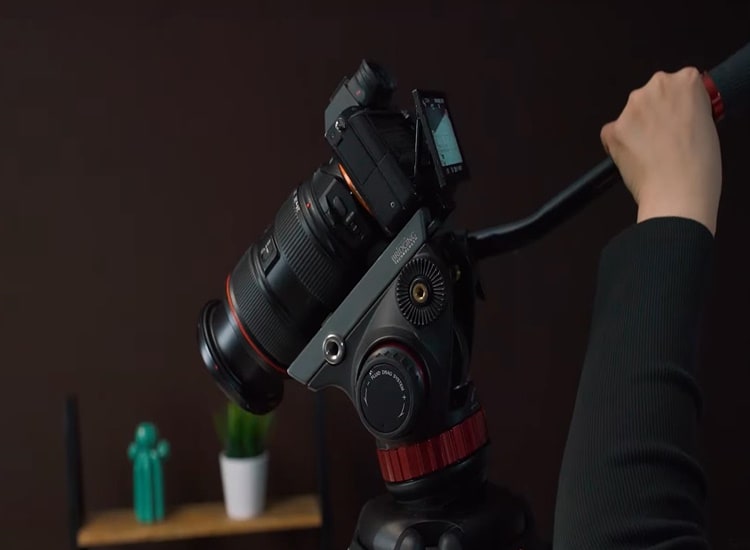
Step2 After that, put the arm on the tableand keep it still while filming. Meanwhile, have another hand perform on the other side of the frame and pretend to use magic to remove the tattoo.

Step3 Next, you need a picture of a tattoo. Indeed, it would be better to have the tattoo in the same position on the arm so it can match the video clip we just filmed.
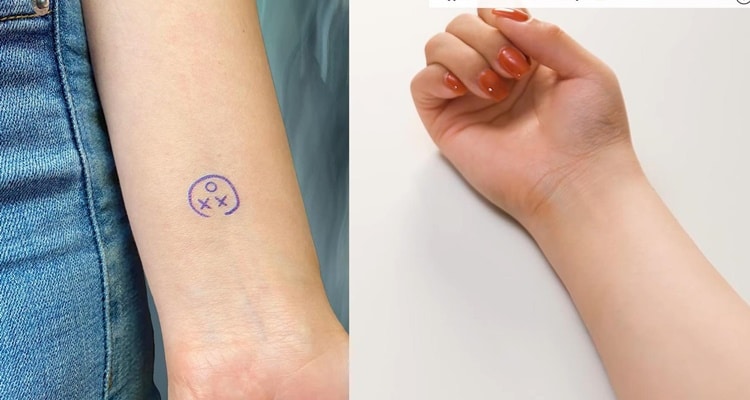
After preparing everything, you need to go to Filmora 11 and start editing. If you haven’t downloaded Filmora already, you can visit filmora.wondershare.com.
Part 2: Editing Tutorial
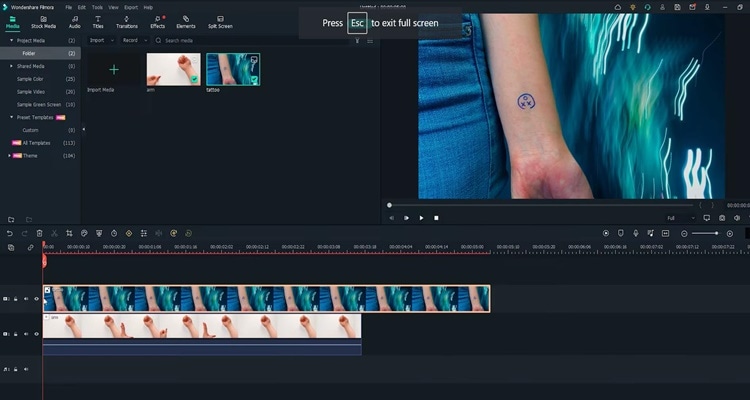
Step1 First, drag and drop the arm video clip onto the first video track and the tattoo picture on the second video track.
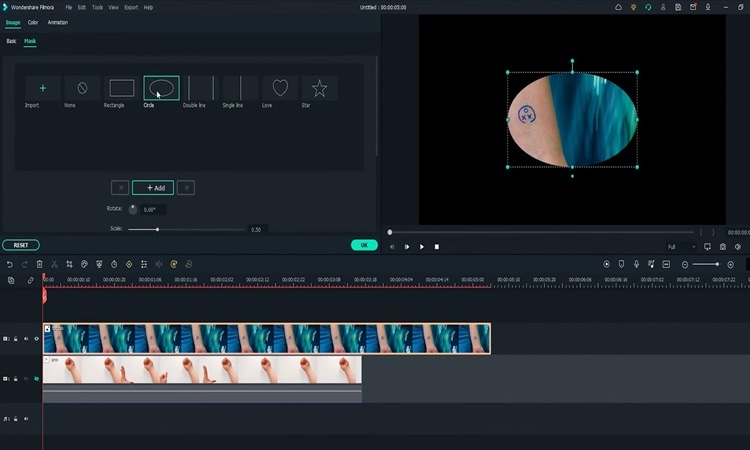
Step2 Add a mask around the tattoo part from the picture. You must hide the first video track to see the mask clearly.Then, double-click on the picture on the timeline and go to the setting window on the top left. Find the Mask Section and select the circle shape. Now you can see the mask is applied.
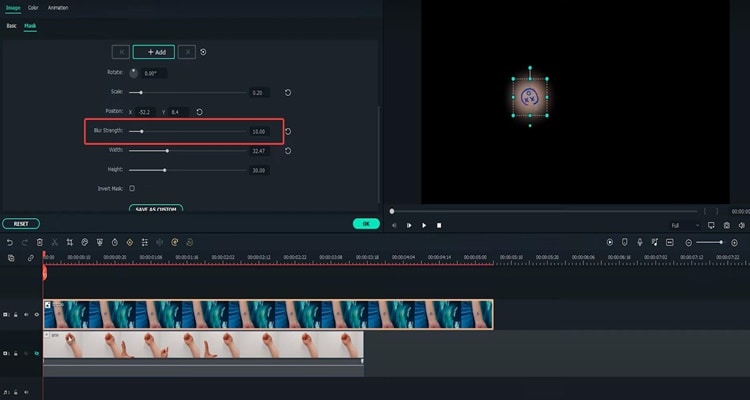
Step3 Adjust the position and size of the mask to reveal only the tattoo part. Then you must change the “Blur Strength” to add more blur to the edge of the mask.
Step4 With the mask finalized,unhide the first video track with the arm video clip. Next, adjust the position and size of the tattoo and make it fit the arm clip.
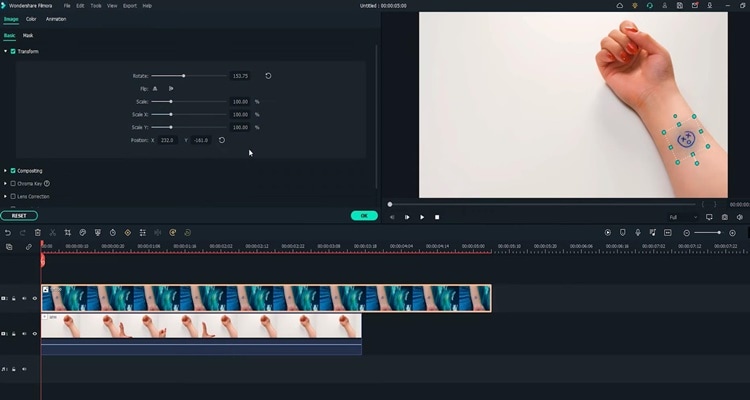
Step5 Go to do colour correction on the tattoo image so that it matches better with the arm skin. Double-click on the tattoo on the timeline and go to the setting window on the top left. Find the “Color” Section and open the “Tone” menu. First, you have to adjust the brightness first.
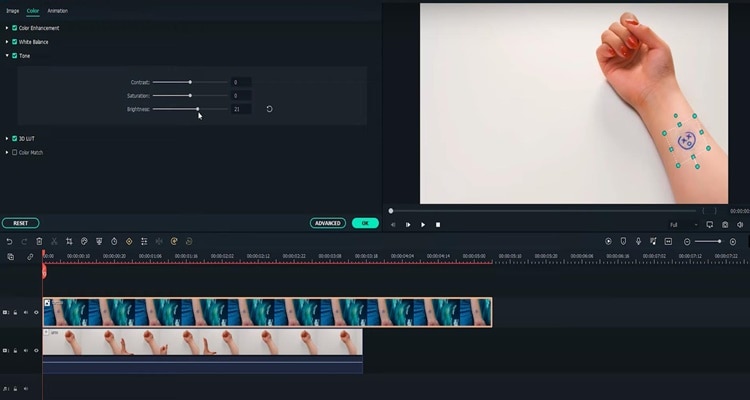
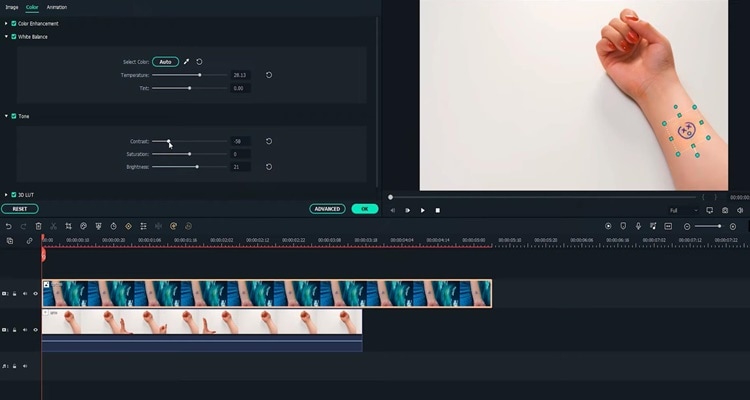
Step6 Afterwards, open the “White Balance”menu and adjust the temperature. Indeed, you can also adjust the contrast and saturation if needed. Once done, click “OK.” The tattoo should look like it blends into the arm video.
Part 3: Make the tattoo disappear
Step1 Move the play head to where you want the tattoo fades, and adjust the length of the tattoo picture there.
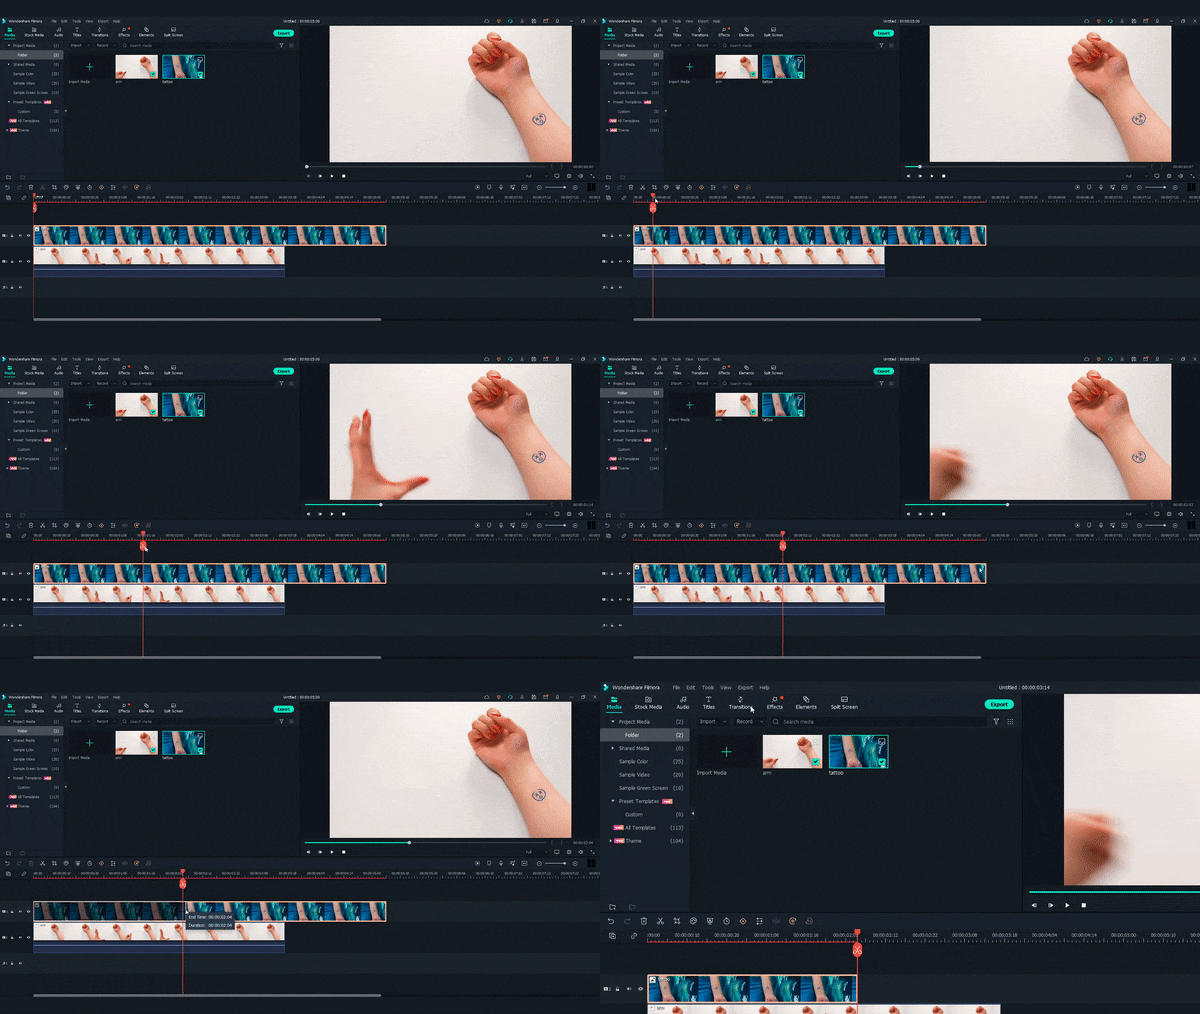
Step2 Next, find the “Evaporate 1” from the “Transitions” window. Drag and drop it to the end of the tattoo clip.
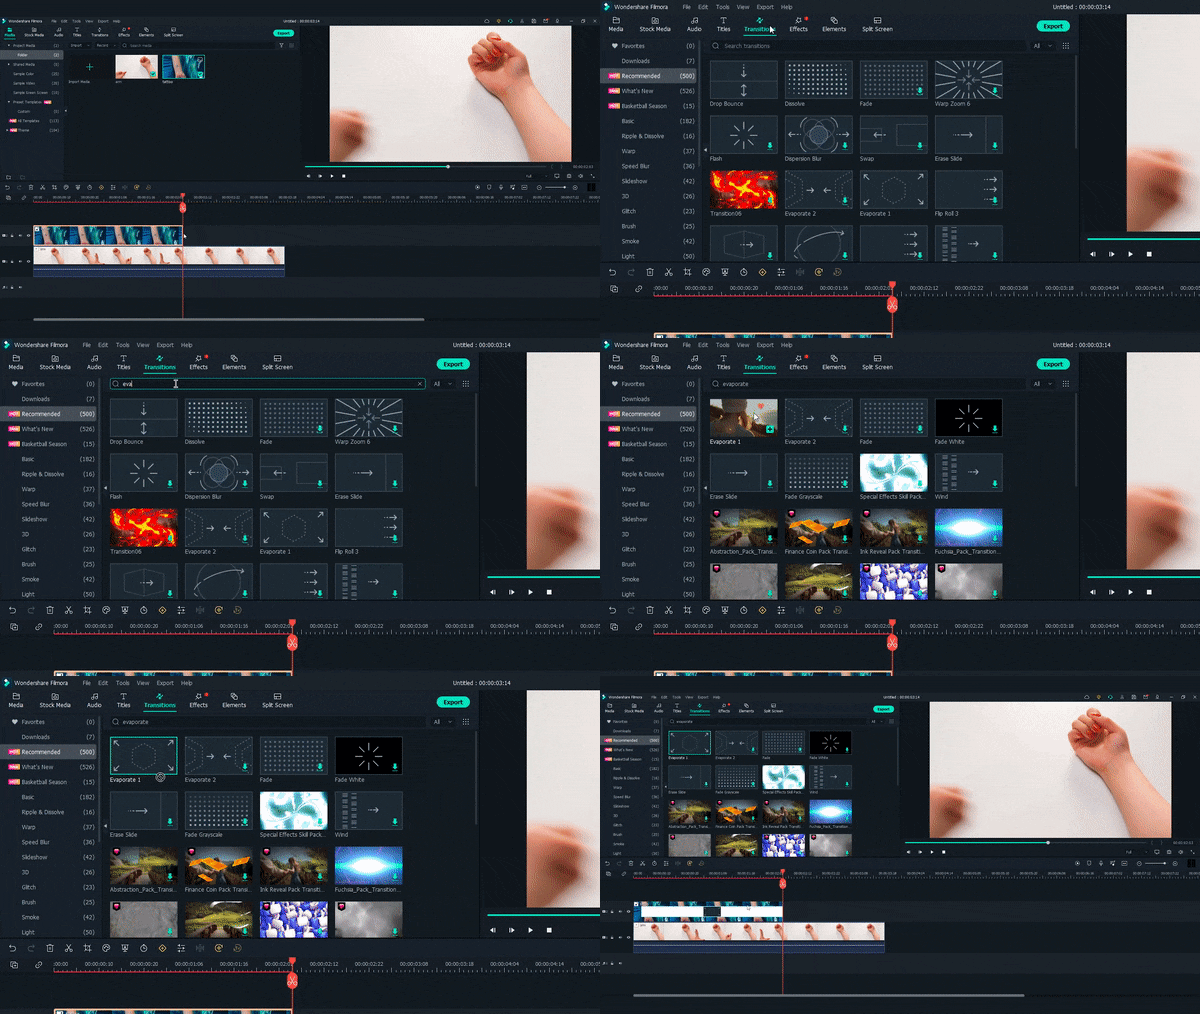
Step3 Adjust the length if needed. Finally, Let’s playback and see how it looks!
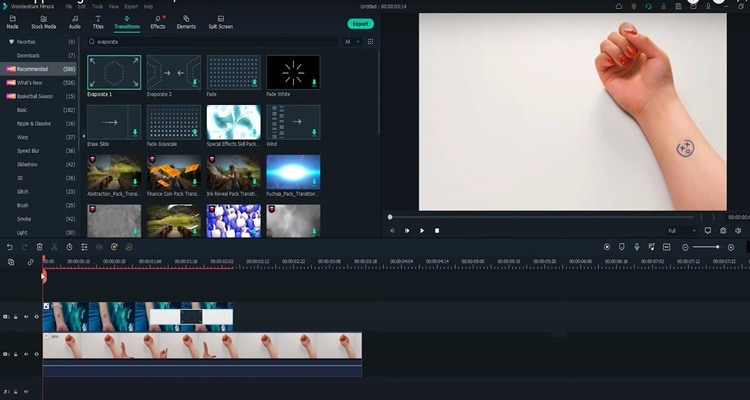
Summary
That’s how to make a tattoo disappear in Filmora 11. With Filmora 11, you can get as many new tattoos as possible. Indeed, you can follow all the steps above carefully to get the perfect result.
Free Download For Win 7 or later(64-bit)
Free Download For macOS 10.14 or later
Free Download For macOS 10.14 or later
The Ultimate Guide to Using Shotcut To Rotate Videos
Video editing has come a long way in recent years, and with the advancement of technology, it’s now easier than ever to produce high-quality videos. However, one common issue that many video editors encounter is uneven footage. Various reasons can cause this, but the solution is simple - rotating your videos. Shotcut is a powerful video editing software that provides various tools to help you rotate your videos easily.
This guide will explore the ins and outs of using Shotcut to rotate your videos. Whether you’re a seasoned editor or just starting, this guide will provide you with everything you need to know to get the perfect shot every time. This guide has everything from rotating your footage to more advanced tips and tricks. So, if you’re ready to take your video editing skills to the next level, keep reading!
Overview of Shotcut Video Editor
Shotcut is a free, open-source video editing software that offers a range of features for basic video editing. Before downloading Shotcut, it is important to know its features to determine if it suits your video editing needs. Here are the key features of Shotcut that stand out:

- Video Capture. Shotcut allows for screen and webcam capture and audio capture from the system or external microphone. It supports 4K resolution.
- Standard Editing. Shotcut allows for trimming, cutting/copying/pasting of clips and keyframes for video filters and markers. It also uses proxy editing for high-resolution video files.
- Audio Features. Shotcut includes several audio filters for enhancing audio clips and volume control, audio mixing, tone generator, and pitch adjustment options.
- Video Effects. Shotcut offers a range of effects and filters, including blending modes, track compositing, and transitions. It also supports 360-degree filters, reverse video clips, and video scopes.
- Wide Support. Shotcut supports a variety of video and audio formats, as well as photo file formats. The multi-format timeline allows for the mixing of different parameters, and the software supports network streaming and alpha-channel videos.
Shotcut is a versatile video editor that offers a range of features for basic video editing and is a great choice for those looking for a free and open-source video editor.
How To Rotate Videos in Shotcut?
Rotating videos in Shotcut is a simple process. With its user-friendly interface, you can quickly and easily adjust the orientation of your videos to get the perfect shot every time. Whether you need to rotate your footage 90 degrees or make more subtle adjustments, Shotcut has all the tools you need to get the job done.
In this section, we’ll walk you through the steps to rotate your videos in Shotcut and provide you with tips and tricks to ensure that your footage is perfectly aligned every time. So, if you’re ready to rotate your videos, let’s get started!
Step1 Start a new Shotcut project and import the video
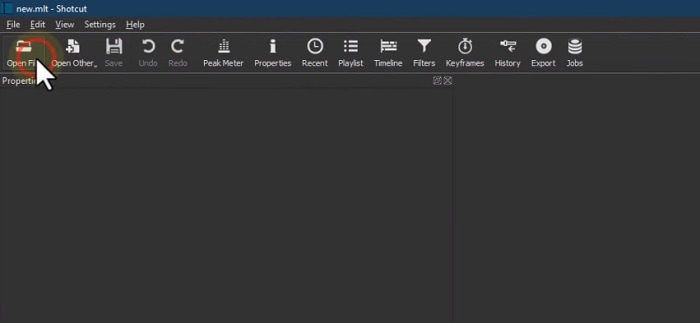
Step2 Drag the video to the Timeline
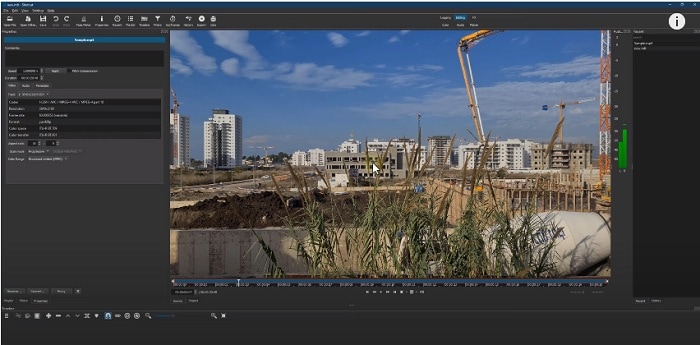
Step3 Go to “Filters“ and press the “+” icon
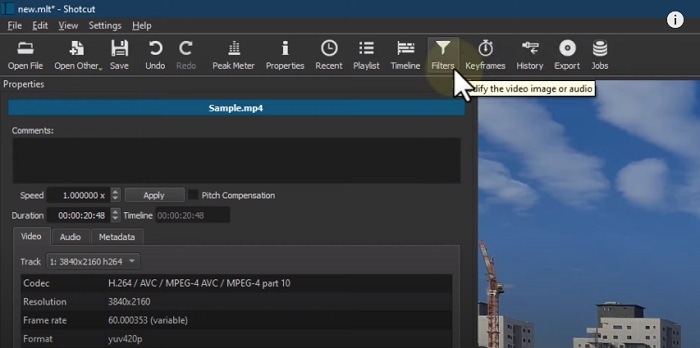
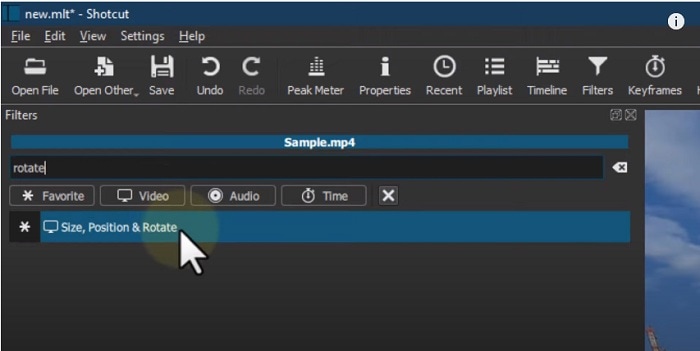
Step4 Search for “Rotate“ and select “Size, Position & Rotate.”
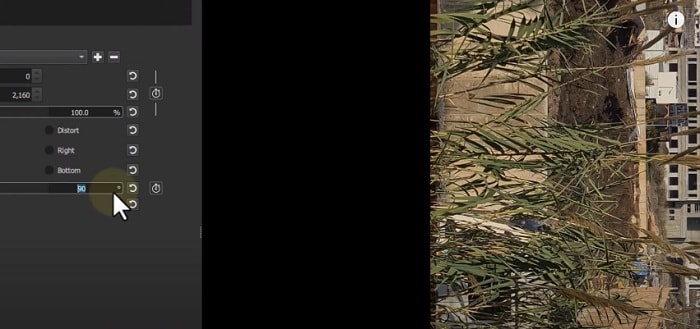
Step5 Use the bar or enter degrees in numbers to rotate the video.
How To Mirror or Flip Videos in Shotcut?
Do you want to flip or mirror your videos in Shotcut? This feature can add a creative twist to your footage and make your videos stand out. Luckily, Shotcut makes it easy to mirror or flip your videos with just a few simple steps.
Whether you want to add a reflection effect or change the direction of your footage, Shotcut has the tools you need to get the job done. So, get ready to take your videos to the next level with Shotcut’s mirroring and flipping capabilities!
For Steps 1-3, follow the steps from the “How To Rotate Videos in Shotcut?“ section.
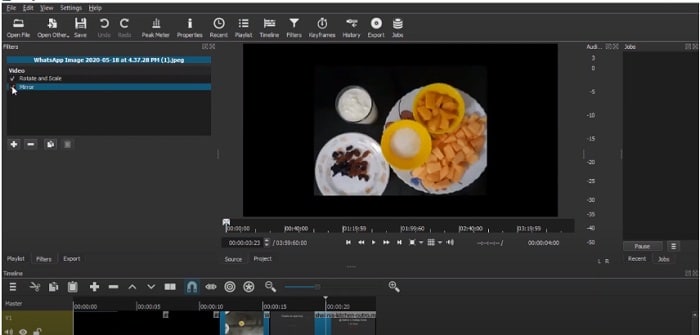
Step4 Search for the “Mirror“ effect.
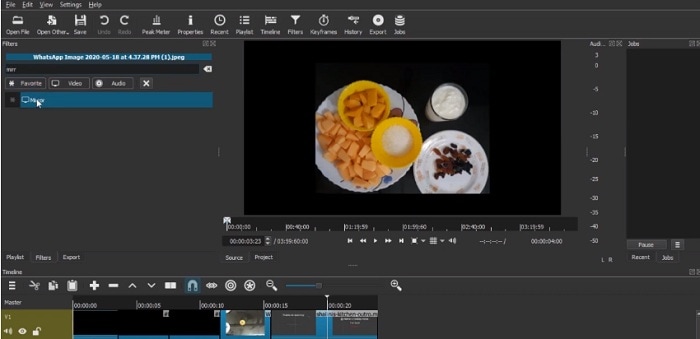
Step5 Select the “Mirror“ effect, and your video will be automatically flipped or mirrored.
How To Make a Vertical Video Horizontal in Shotcut
Are you tired of having a vertical video that doesn’t fit the standard aspect ratio? Don’t worry; Shotcut makes it easy to convert your vertical video into a horizontal format. By converting your vertical video into a horizontal format, you’ll be able to showcase your footage in a more professional and visually appealing manner.
In this section, we’ll walk you through making your vertical video horizontal in Shotcut. With these simple steps, you’ll be able to turn your vertical footage into a horizontal masterpiece in no time!
Step1 Drag the video to the timeline
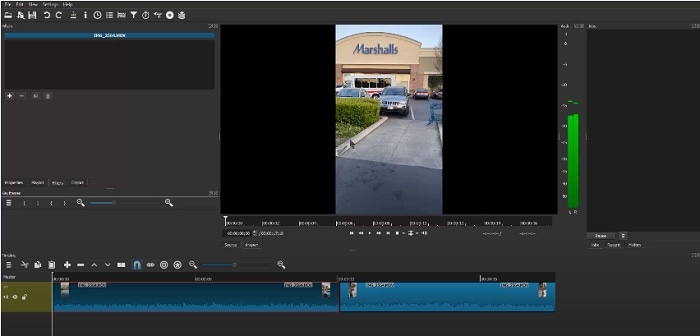
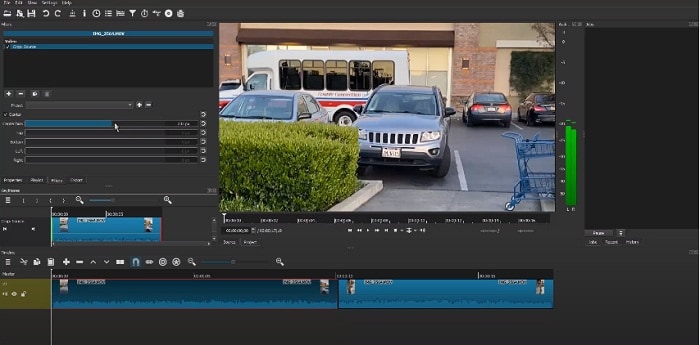
Step2 Go to “Filters“ and press the “+” icon. Search for the “Crop Source“ effect.
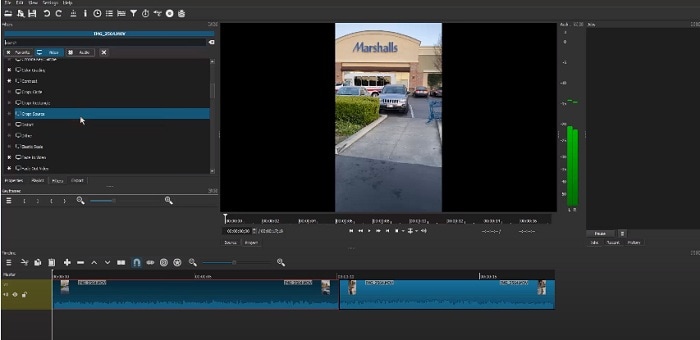
Step3 Toggle “Center“ and notice that it removed the black padding of the horizontal video.
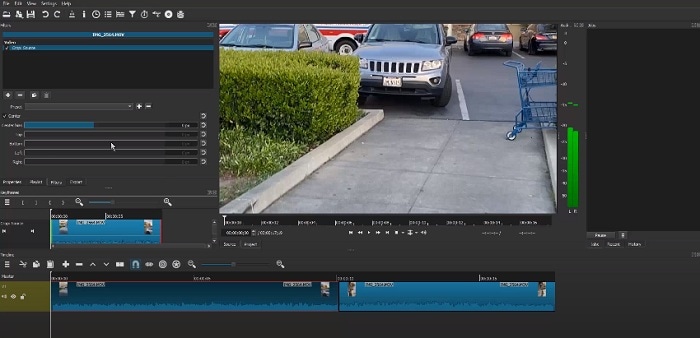
Step4 Adjust the part you want your video to focus on.
Wondershare Filmora – Shotcut’s Alternative To Rotate Videos
If you’re looking for an alternative to Shotcut for rotating your videos, consider Wondershare Filmora . This powerful video editing software is packed with features and is ideal for both beginners and professionals. While Shotcut is a great option for rotating videos, Filmora offers additional capabilities that make it an excellent choice for those who need a more advanced video editing solution.
Free Download For Win 7 or later(64-bit)
Free Download For macOS 10.14 or later

With Wondershare Filmora, you’ll be able to rotate your videos with ease, as well as perform a variety of other editing tasks. From adding music, filters, and text to splitting, trimming, and merging videos, Filmora has you covered.
Additionally, you’ll enjoy the user-friendly interface of Filmora that makes it easy to navigate and find the features you need. Whether you’re just starting with video editing or are a seasoned professional, Wondershare Filmora is the perfect solution for rotating videos and more.
How To Rotate or Flip a Video With Wondershare Filmora?
Wondershare Filmora is a great alternative to Shotcut for those looking to rotate or flip their video clips. It offers an intuitive and user-friendly interface, making rotating or flipping a video simple.
To mirror your video in Filmora, you follow a few easy steps. Whether you want to flip your video horizontally or vertically, Filmora’s rotating tool will help you achieve the perfect reflection with just a few clicks.
In addition to its rotating capabilities, Wondershare Filmora also offers a wide range of features for video editing. From basic video editing tools like trimming and cutting to advanced features like color correction and audio editing, Filmora has everything you need to take your video projects to the next level.
With its user-friendly interface and comprehensive feature set, Wondershare Filmora is a great option for anyone looking for an alternative to Shotcut for their video editing needs.
Step1 Choose between “Flip Horizontal“ or “Flip Vertical“ in the “Flip“ section to mirror the clip left to right or turn it upside down.

Step2 Select either the “Clockwise“ or “Counterclockwise“ icon under the “Rotate“ section to rotate the clip.

Step3 Enter a specific angle value in the “Rotate“ tab or adjust the dot in the circle to reach the desired rotation angle.

How To Make a Vertical Video Horizontal With Filmora?
Are you looking for a solution to convert a vertical video into a horizontal one? Filmora is a great video editing software that can help you do that!
Step1 Launch Filmora and import the video.

Step2 Drag the video to the timeline.

Step3 Right-click on the video and then click on “Crop and Zoom.”
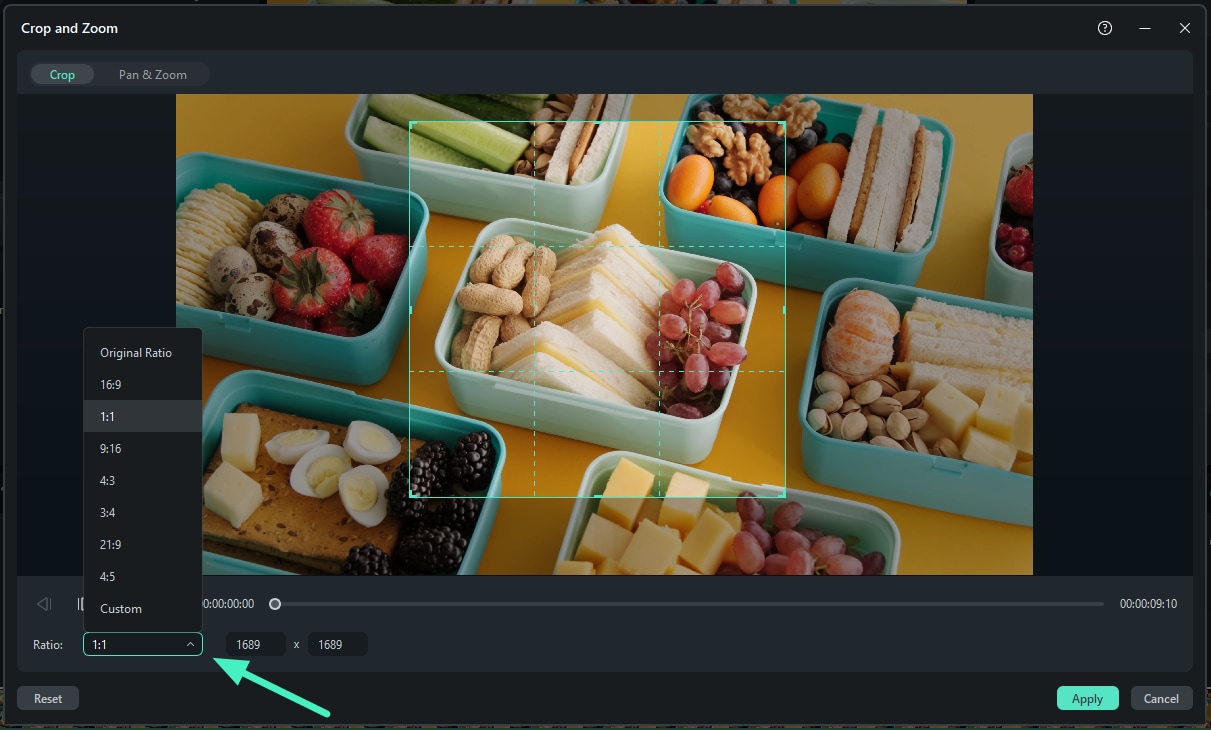
Step4 Click on the “Aspect Ratio“ option and change it to “16:9.”
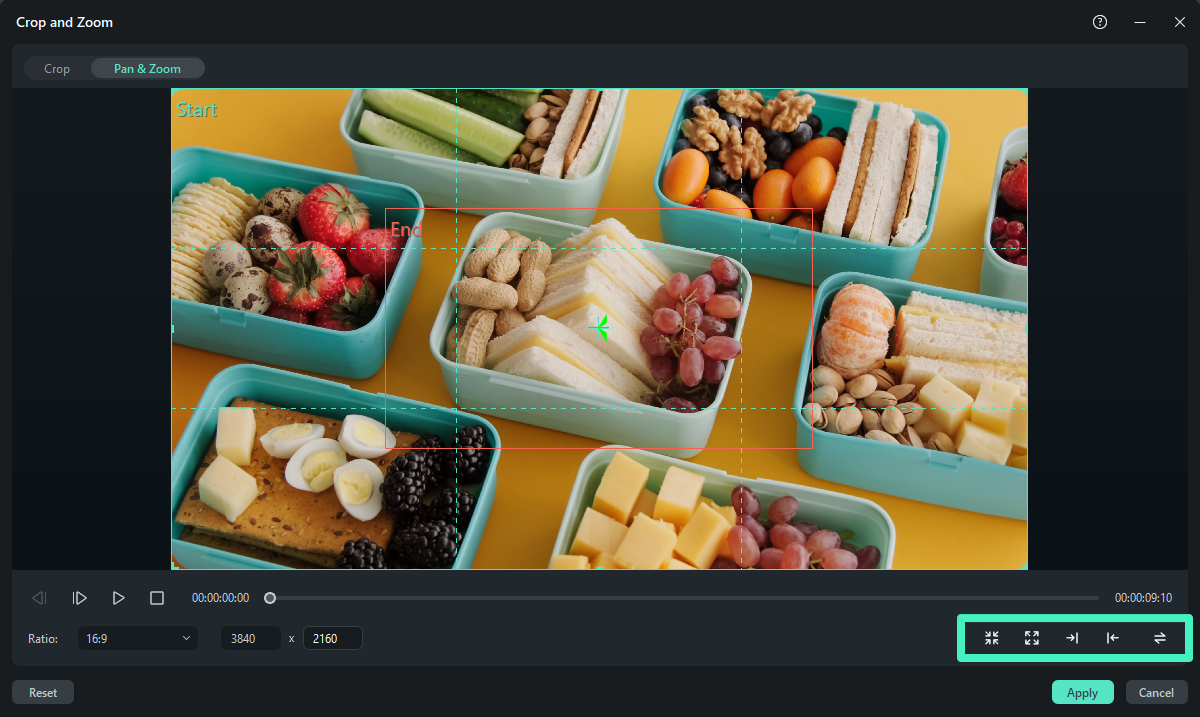
Step5 Keep the video part that you want to focus on, then click “OK.”
Step6 Your vertical video is now horizontal.
Conclusion
Rotating a video in Shotcut or Wondershare Filmora is a simple process. Both video editing software provides a user-friendly interface and various options to achieve the desired result. Shotcut and Filmora can help you achieve the perfect reflection with a few clicks, whether you want to rotate, flip, or make a horizontal or vertical video. So, choose the one that fits your needs and start creating stunning videos.
Free Download For macOS 10.14 or later

With Wondershare Filmora, you’ll be able to rotate your videos with ease, as well as perform a variety of other editing tasks. From adding music, filters, and text to splitting, trimming, and merging videos, Filmora has you covered.
Additionally, you’ll enjoy the user-friendly interface of Filmora that makes it easy to navigate and find the features you need. Whether you’re just starting with video editing or are a seasoned professional, Wondershare Filmora is the perfect solution for rotating videos and more.
How To Rotate or Flip a Video With Wondershare Filmora?
Wondershare Filmora is a great alternative to Shotcut for those looking to rotate or flip their video clips. It offers an intuitive and user-friendly interface, making rotating or flipping a video simple.
To mirror your video in Filmora, you follow a few easy steps. Whether you want to flip your video horizontally or vertically, Filmora’s rotating tool will help you achieve the perfect reflection with just a few clicks.
In addition to its rotating capabilities, Wondershare Filmora also offers a wide range of features for video editing. From basic video editing tools like trimming and cutting to advanced features like color correction and audio editing, Filmora has everything you need to take your video projects to the next level.
With its user-friendly interface and comprehensive feature set, Wondershare Filmora is a great option for anyone looking for an alternative to Shotcut for their video editing needs.
Step1 Choose between “Flip Horizontal“ or “Flip Vertical“ in the “Flip“ section to mirror the clip left to right or turn it upside down.

Step2 Select either the “Clockwise“ or “Counterclockwise“ icon under the “Rotate“ section to rotate the clip.

Step3 Enter a specific angle value in the “Rotate“ tab or adjust the dot in the circle to reach the desired rotation angle.

How To Make a Vertical Video Horizontal With Filmora?
Are you looking for a solution to convert a vertical video into a horizontal one? Filmora is a great video editing software that can help you do that!
Step1 Launch Filmora and import the video.

Step2 Drag the video to the timeline.

Step3 Right-click on the video and then click on “Crop and Zoom.”

Step4 Click on the “Aspect Ratio“ option and change it to “16:9.”

Step5 Keep the video part that you want to focus on, then click “OK.”
Step6 Your vertical video is now horizontal.
Conclusion
Rotating a video in Shotcut or Wondershare Filmora is a simple process. Both video editing software provides a user-friendly interface and various options to achieve the desired result. Shotcut and Filmora can help you achieve the perfect reflection with a few clicks, whether you want to rotate, flip, or make a horizontal or vertical video. So, choose the one that fits your needs and start creating stunning videos.
Create the Stranger Things Upside Down Effect Video
With stranger things season 4 ending, it seems like great timing to make a stranger things style transition to the Upside Down. In the Netflix series Stranger Things, there is an opposite version of our world called the Upside Down. The Upside Down is dark, creepy, and possibly filled with aliens, monsters, creatures, and other things.
Now, you can also apply the Stranger Things Upside Down Effect to your video! This effect combines camera tricks and video editing within Filmora to transition from the normal world into the Upside Down.
How-to Guide
1) Preparation
To make this effect, you will need two footage shots: one with the camera moving down and one with the camera coming back up.
When shooting for the footage, follow the steps below:
First shot
- Find any item close enough to the ground that we can block our frame with.

- Once you have your talent lined up, rotate your camera while lowering it below the foreground item at a constant speed and leaving the camera there. The key is making sure when you go behind the object, the frame is nothing but black.

For the next scene, have your actor change positions, or you can change the set around to look like the Upside Down. For instance, adding fake plants and flickering lights.
Second shot
Start bringing your camera back up at the same speed and rotate it again in the direction it was moving.

2) Steps
After you have all the footage, you can start editing it on Filmora. If you haven’t installed it yet, you can download Filmora at their official website at https://filmora.wondershare.com .
Free Download For Win 7 or later(64-bit)
Free Download For macOS 10.14 or later
Now, launch Filmora on your PC and follow the steps below:
Step1 Take your first clip in the “normal” world and drag it down to a video track on the timeline. Trim the edge of the clip, so it ends on pure black and in a downward motion.

Step2 Drag the second clip (in the Upside Down) onto the video track on the timeline after the first clip. Trim this video, so it begins in pure black and an upward motion.

Cut the clips to get the timing right since it should be a very fast transition. You can cut in the black frames so they won’t be too apparent.
If you don’t have a perfectly smooth transition, you can add a dissolve by going to Transitions > Basic > Dissolve.

Color Grading and Effects
After the transition, you can make the clip look a lot more like the Upside Down from the show with a color grade and Filmora effects. Follow the steps below:
Step1 Double-click on your second clip, then go to Color > Advanced. For a quick edit, you can try one of the presets available, such as “cool film.” It will give you the colder blue tones that Stranger Things used for the Upside Down.

Step2 You can further edit the color grading in the white balance menu. Drag the slider to the left to get a blue, cold vibe for the Upside Down.
The “cool” or “warm” color grading technically talks about color temperature. A “warmer” look will be more orange, and a “colder” look will be bluer. You can also use the tint slider to fine-tune the look.

Step3 Next, move down to the color, lower the brightness and increase contrast. It makes the scene darker and more sinister than the normal world.

Step4 Finally, go down to the vignette and drag the amount slider a tiny bit to give a Vinnette around your clip.

3) Pro Tips
You can still make your clip look even more like Upside Down with some Filmora elements.
Go to Elements > Smoke > Smokescreen 2. Drag this element on top of your Upside Down clip and trim it, so it starts at the same time the clip leaves the black frame.

You can adjust the opacity by double-clicking the smoke effect to open the setting.
Finally, go to the Transition > Basic > Dissolve to the start of the smoke and adjust it when the smoke gradually appears.

Resources from Filmostock
You can also use filmstock effects to bring our video to the next level. Go to Elements > Fire > Large Scale 12 and drag it down on top of your clip and the smoke.

Double-click the clip and change the scale of the effect to your needs. Then, go to compositing to change the blending mode to the screen to help the effect blend in more.

Now, go to color and open the white balance menu. Drag the two sliders to change the color of the particles to match your clip.

Summary
That is all you need to make a Stranger Things Upside Down effects to your video. Let us know if there are any other effects from tv shows you want to learn how to make.
Free Download For macOS 10.14 or later
Now, launch Filmora on your PC and follow the steps below:
Step1 Take your first clip in the “normal” world and drag it down to a video track on the timeline. Trim the edge of the clip, so it ends on pure black and in a downward motion.

Step2 Drag the second clip (in the Upside Down) onto the video track on the timeline after the first clip. Trim this video, so it begins in pure black and an upward motion.

Cut the clips to get the timing right since it should be a very fast transition. You can cut in the black frames so they won’t be too apparent.
If you don’t have a perfectly smooth transition, you can add a dissolve by going to Transitions > Basic > Dissolve.

Color Grading and Effects
After the transition, you can make the clip look a lot more like the Upside Down from the show with a color grade and Filmora effects. Follow the steps below:
Step1 Double-click on your second clip, then go to Color > Advanced. For a quick edit, you can try one of the presets available, such as “cool film.” It will give you the colder blue tones that Stranger Things used for the Upside Down.

Step2 You can further edit the color grading in the white balance menu. Drag the slider to the left to get a blue, cold vibe for the Upside Down.
The “cool” or “warm” color grading technically talks about color temperature. A “warmer” look will be more orange, and a “colder” look will be bluer. You can also use the tint slider to fine-tune the look.

Step3 Next, move down to the color, lower the brightness and increase contrast. It makes the scene darker and more sinister than the normal world.

Step4 Finally, go down to the vignette and drag the amount slider a tiny bit to give a Vinnette around your clip.

3) Pro Tips
You can still make your clip look even more like Upside Down with some Filmora elements.
Go to Elements > Smoke > Smokescreen 2. Drag this element on top of your Upside Down clip and trim it, so it starts at the same time the clip leaves the black frame.

You can adjust the opacity by double-clicking the smoke effect to open the setting.
Finally, go to the Transition > Basic > Dissolve to the start of the smoke and adjust it when the smoke gradually appears.

Resources from Filmostock
You can also use filmstock effects to bring our video to the next level. Go to Elements > Fire > Large Scale 12 and drag it down on top of your clip and the smoke.

Double-click the clip and change the scale of the effect to your needs. Then, go to compositing to change the blending mode to the screen to help the effect blend in more.

Now, go to color and open the white balance menu. Drag the two sliders to change the color of the particles to match your clip.

Summary
That is all you need to make a Stranger Things Upside Down effects to your video. Let us know if there are any other effects from tv shows you want to learn how to make.
Also read:
- New Do You Know How AI Is Helping Video Editors and Enthusiasts? Many Video Editing Software Allows an Auto Reframe Option to Use that Can Help Manage Videos
- New Do You Want to Learn About the iPhone LUT? Have You Used Them on Your iOS Device? Use This Article to Get Valuable Insights on the Same
- New Guide to Making Cinematography for Music Video
- New A Guide to Create Your Own LOL Montage Video
- Updated Using the Best Templates to Create Slow Motion Videos on CapCut
- In 2024, Understanding More About CapCut Lenta Template and Slow-Motion Videos
- If You Are Into GIFs and Want to Know a Great Extent of Information About It Then We Have Got You Covered in This Article. Here Is What We Have Learned so Far About It
- 8 Top Premiere Pro Slideshow Templates for 2024
- In 2024, The Complete Guide to Zoho Slides with Ease
- Powerpoint Supported Video Format and User Tips
- New How to Use Frame Blending in Adobe Premiere Pro
- 2024 Approved How to Blur Faces in Your Video on iPhone
- 2024 Approved Guaranteed 10 Storyboard Creators To Make Animation Easier
- In 2024, Gimp Green Screen
- Updated How To Make Ninja Jump Effect for 2024
- Updated 3D Ray Traced Settings In After Effects
- Updated How to Create OBS Slideshow
- New How to Set Up Twitch Green Screen for 2024
- New In 2024, Ideas That Will Help You Out in Converting AVI to GIF
- New 2024 Approved How to Crop Videos in Windows Media Player
- New In 2024, Create Kinetice Typography Text Effect in Filmora
- 2024 Approved You Can Easily Cut or Crop a Part of Your Video by Using Its Editing Tools Such as Crop (To Remove Unwanted Black Borders), Trim (To Remove the Unwanted Front and End Parts of Your Video Clip)
- What Is the Selective Color Effect, and How Can You Add This Effect to Your Videos Using Wondershare Filmora? A Complete Guide for Beginners
- 2024 Approved Ways to Merge Videos in HandBrake? Expectation Vs. Reality
- How to Remove Motion Blur In Photoshop
- Different Ways To Trim Video In Premiere Pro for 2024
- New 2024 Approved 8 Best Free Photo Collage with Music Video Maker
- Guide To Selecting and Using the Best Braw Luts for 2024
- 2024 Approved Looking Forward to Try Hands at Using the Icecream Slideshow Maker Program to Create High End Slideshow Presentations? Stay Here for a Complete Insight Into the Process
- New 2024 Approved Blender Green Screen Effects
- Updated 2024 Approved A Vacation Slideshow Is a Great Way to Relive the Vacation Memories and Also Share Them with Your Loved Ones. If You Are Looking for Ways to Create a Slideshow in Just a Few Minutes, We Will Help You with the Best Tool
- Updated How to Resize FLV Videos Efficiently Windows, Mac,Android, iPhone & Online for 2024
- Updated In 2024, Zoom In and Out on Snapchat
- Updated A Guide to Color Grade Your Picture in LightRoom
- 2024 Approved How to Make Loop Video in PowerPoint
- Updated Vintage Film Effect 1920S - How to Make
- New Best 8 Educational Video Websites for Teachers
- 2024 Approved Read on to Learn About OpenCV Object Tracking, What It Is, and How to Implement It in Python, and OpenCV
- Updated How to Add Subtitles to Videos With Kapwing for 2024
- New 3 Ways To Stream And Record At The Same Time
- Updated 2024 Approved A Review On 3D LUT Creator
- Updated How to Make Boring Videos Look Cool By B Rolls
- New Lets Create a New Premiere Pro Project, Import some Video, and Control Video Playback Speed. Also, Find Alternative Software (WonderShare Filmora) to Control Playback Speed in Minutes
- New 2024 Approved How To Mirror a Video Clip in Premiere Pro
- 2024 Approved Are You Looking to Vlog Across Your Next Stop at the Café? Get Aware of the Significant Elements that Make up the Café Vlog
- Updated How to Create Sports Intro and Outro for YouTube Video?
- 3 Actionable Ways to Create Countdown Animation for Videos for 2024
- How to Recover Deleted Excel 2019 Files on Mac Complete Guide | Stellar
- 4 Easy Ways for Your Tecno Spark 20 Hard Reset | Dr.fone
- In 2024, 3 Ways to Track Meizu 21 without Them Knowing | Dr.fone
- Does Redmi K70 Pro has native MKV support?
- Guide to Mirror Your Lava Storm 5G to Other Android devices | Dr.fone
- Does Airplane Mode Turn off GPS Location On Lava Blaze Curve 5G? | Dr.fone
- Top IMEI Unlokers for Your Vivo Y27 5G Phone
- Guide to Mirror Your Honor X50 GT to Other Android devices | Dr.fone
- Thinking About Changing Your Netflix Region Without a VPN On Motorola Edge 40 Neo? | Dr.fone
- In 2024, Top 11 Free Apps to Check IMEI on iPhone 11
- How to Transfer Data After Switching From Realme C53 to Latest Samsung | Dr.fone
- In 2024, 5 Best Apps for Voice Translation From English to Bangla
- How to Fix Android.Process.Media Has Stopped on Xiaomi Civi 3 | Dr.fone
- In 2024, Full Guide to Unlock iPhone 6s Plus with iTunes
- In 2024, How to Use Pokémon Emerald Master Ball Cheat On Samsung Galaxy S23 FE | Dr.fone
- How to Remove a Previously Synced Google Account from Your Realme C67 4G
- How to Recover FaceTime Call History on iPhone 13 Pro | Stellar
- Top IMEI Unlokers for Your Vivo S17t Phone
- Factory Reset Apple iPhone 11 | Dr.fone
- New Best 15 2D Animation Software Free That Worth to Try
- Fixing Foneazy MockGo Not Working On Tecno Pova 6 Pro 5G | Dr.fone
- In 2024, How to use Snapchat Location Spoofer to Protect Your Privacy On Samsung Galaxy A54 5G? | Dr.fone
- In 2024, How to Screen Mirroring Motorola G24 Power? | Dr.fone
- How To Pause Life360 Location Sharing For Realme Narzo N53 | Dr.fone
- 7 Ways to Lock Apps on iPhone SE and iPad Securely
- In 2024, Fake the Location to Get Around the MLB Blackouts on Apple iPhone 13 mini | Dr.fone
- Which is the Best Fake GPS Joystick App On Oppo Find X6? | Dr.fone
- In 2024, Why Apple Account Disabled From your Apple iPhone XS Max? How to Fix
- In 2024, What is the best Pokemon for pokemon pvp ranking On HTC U23? | Dr.fone
- How To Pause Life360 Location Sharing For Apple iPhone X | Dr.fone
- Best Pokemons for PVP Matches in Pokemon Go For Tecno Pova 5 | Dr.fone
- A How-To Guide on Bypassing the iPhone 7 iCloud Lock
- In 2024, What Pokémon Evolve with A Dawn Stone For Oppo K11x? | Dr.fone
- How To Track IMEI Number Of Poco M6 5G Through Google Earth?
- How to Intercept Text Messages on OnePlus Ace 2 Pro | Dr.fone
- In 2024, How to Reset your Vivo Y27s Lock Screen Password
- Cellular Network Not Available for Voice Calls On Oppo Reno 10 Pro 5G | Dr.fone
- Title: 4 Solutions to Resize a WebM File
- Author: Chloe
- Created at : 2024-05-20 03:37:18
- Updated at : 2024-05-21 03:37:18
- Link: https://ai-editing-video.techidaily.com/4-solutions-to-resize-a-webm-file/
- License: This work is licensed under CC BY-NC-SA 4.0.


