:max_bytes(150000):strip_icc():format(webp)/man-attaching-action-camera-to-chest-664655587-5c8c2559c9e77c0001ac184b.jpg)
6 Ways to Mimic Professional Filming Gears for 2024

6 Ways to Mimic Professional Filming Gears
The professional and expensive gears are primarily out of budget for starters. But there is no need to stop filming because household things will give good output.
In this article, you will learn 6 pro tips to make professional filming gear using cardboard, container, and tape. It will turn out into POV and barrel roll shots. Scroll more to learn the top ways, and then enjoy the rest with your audience.
Part 1. Things to Remember Before Making Gears
Before using tools for professional videos, you should remember some side effects and cautions to make everything reliable and simple. Read the below outlines!
Not Professional Results
You should remember that homemade tools will give you different results than professional gear because they are expensive for a purpose. But you can experiment and get fun during filming with these products.
Safety Measures
If you use any heavy or temperature-sensitive equipment, you should take safety before operating them.
Handle Carefully
Before experimenting, make sure that you are holding everything tightly. Ensure that no accident occurs during filming!
After taking precautions and understanding the output, it’s time to make tools and film!
Part 2. Smooth Camera Movement with A Door
With a simple mobile camera, you can make smooth shots of any action, like walking, running, and playing. There is no need to get any professional gear.
It easy to achieve by attaching a camera to the door. You can use duct or any other tape which is easily available in the home. Fasten the mobile phone to the side of the door with tape, as shown below!
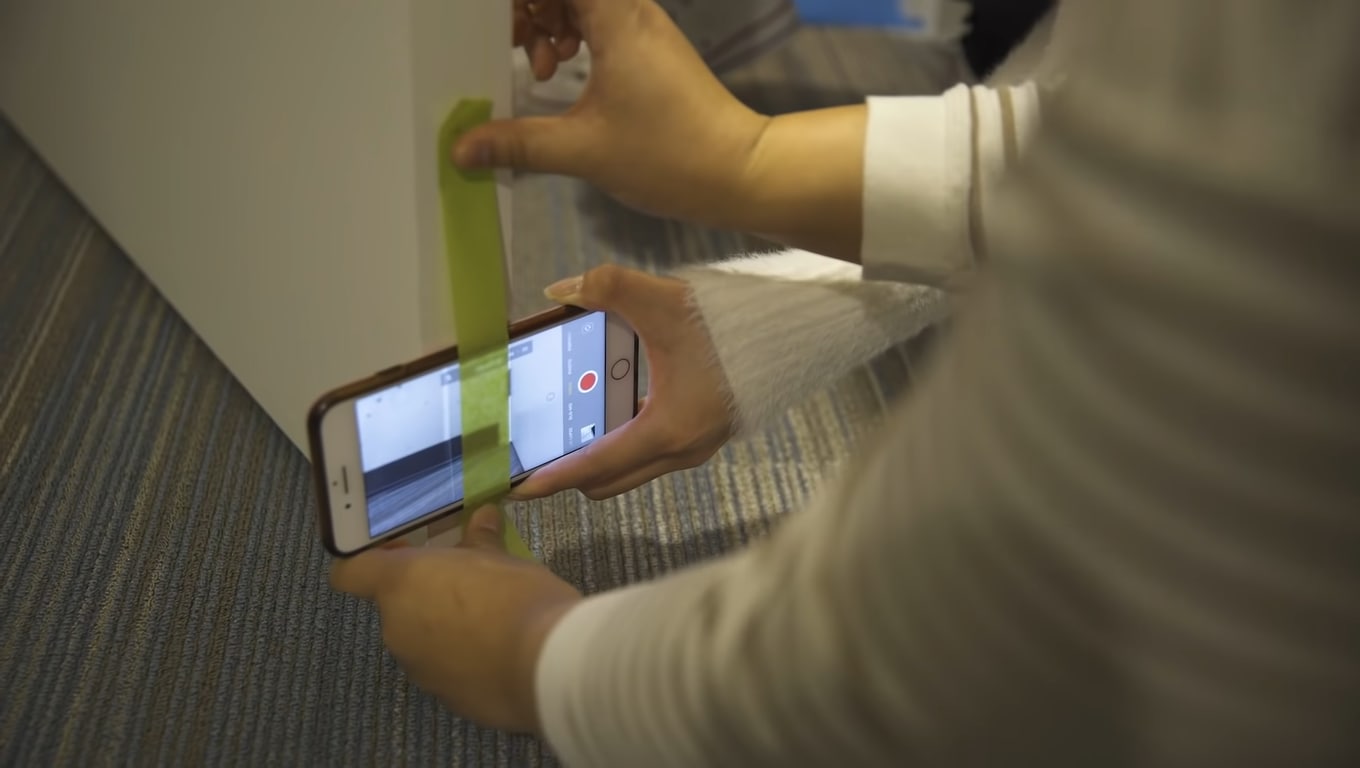
Moving the door while performing any action will result in smooth shots. Check out the final results below.
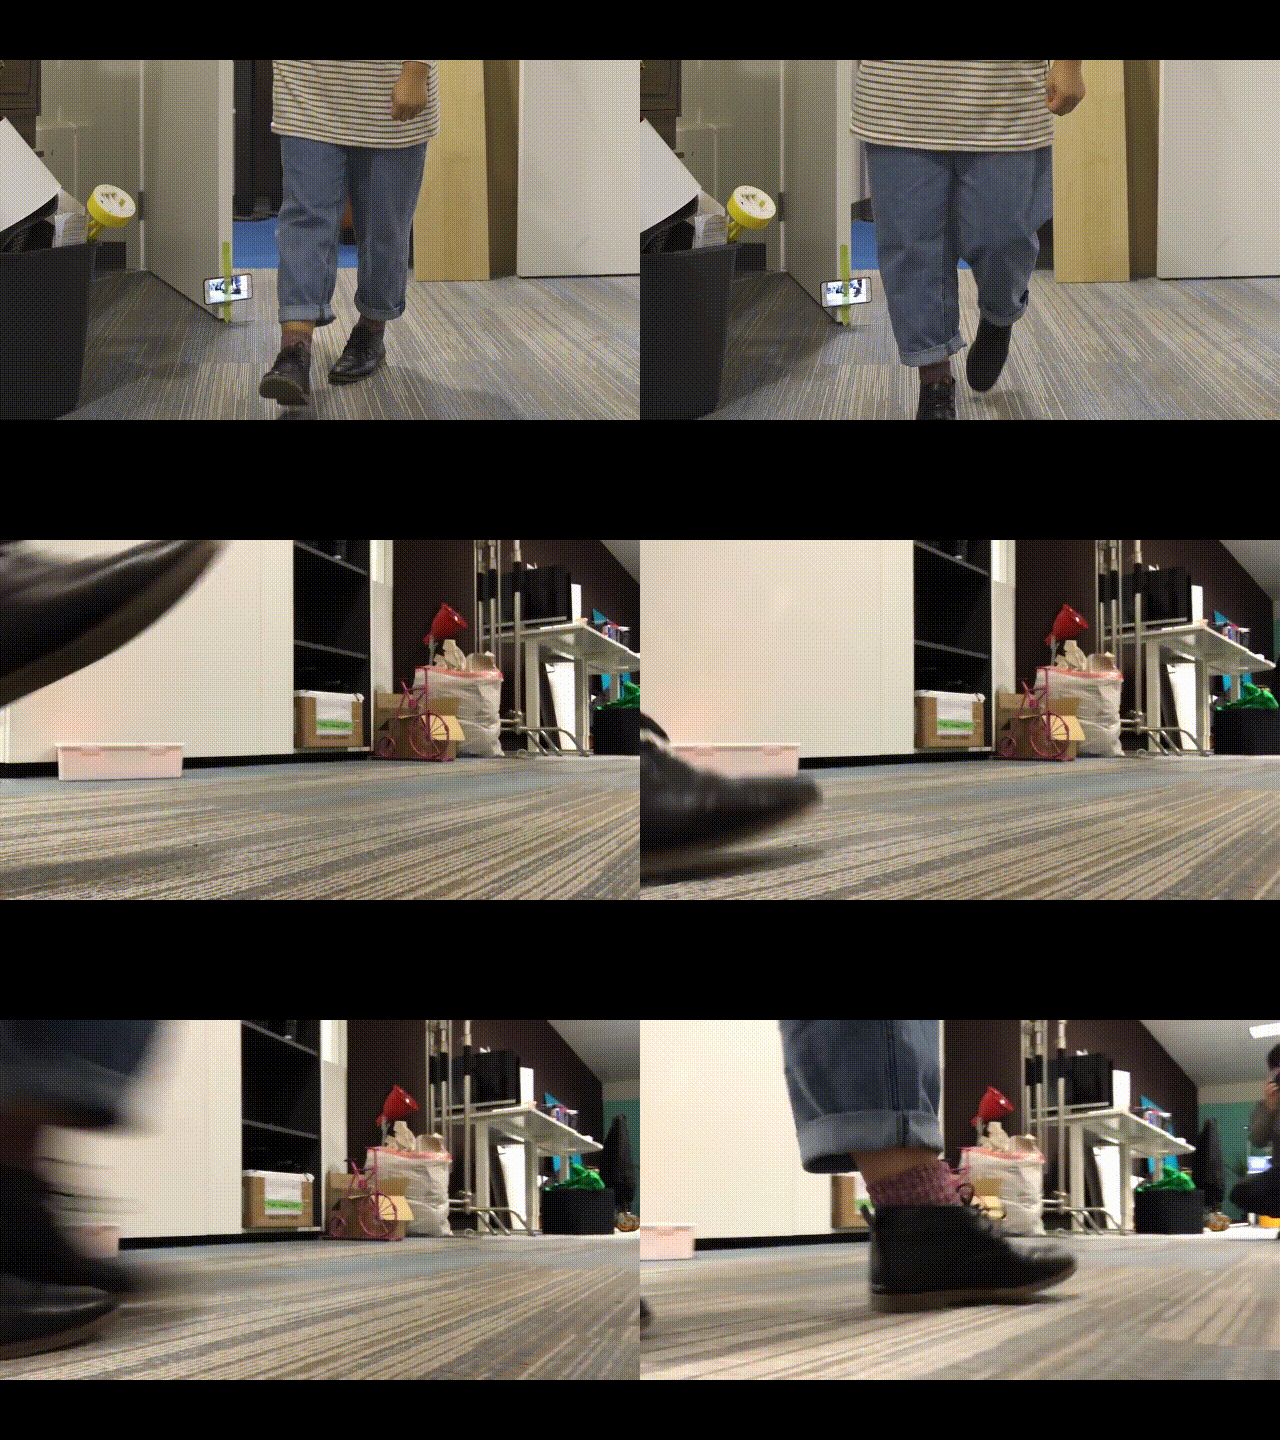
Part 3. Film Shots of Underwater
Filming underwater is always a dream of any videographer, but we were limited to get shots from the water’s surface. So now it’s time to add more creativity to your video.
First, you need to take a transparent container or any glass container. Pour water according to your need in it.
![]()
Note: Ensure the container is light enough to put on the phone.
Then, place the container on the lens of the phone to make a video. Then, take care of the phone from the water.
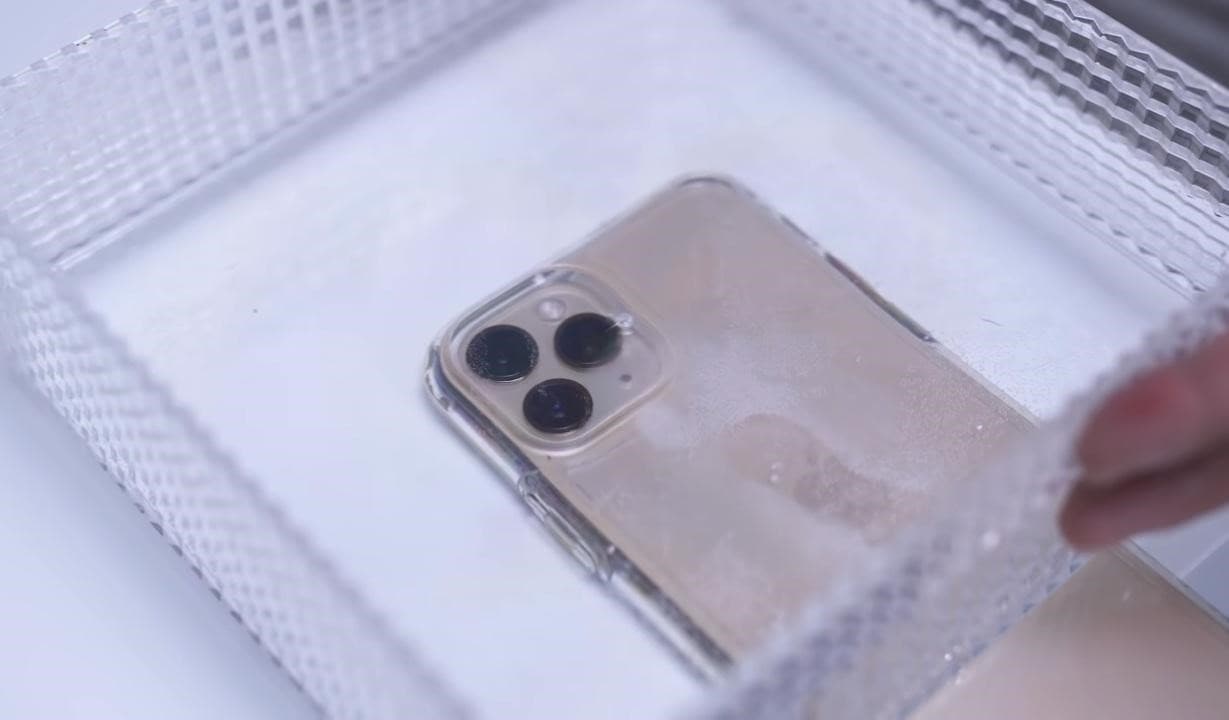
Pro Tip: You can also shine light source in water and add glitter or colors to get more astonishing shots.
Part 4. Make Colourful Shots Without Coloured Lights
All filmmakers love party lights and want to add colors like that in the video. Different colored lights in videos usually represent different mood swings and enhance the creativity of storytellers.
Professional videographers use expensive lights to give these effects. But you don’t need to purchase any expensive gear. Because you can make colorful shots easily with colored plastic binder dividers, or you can also use cellophane wraps.
First, wrap the colored divider around the LED light or any light you use to shoot video.
![]()
Note: Check the light temperature after short intervals because it melts or burns the dividers when the light source gets hot.
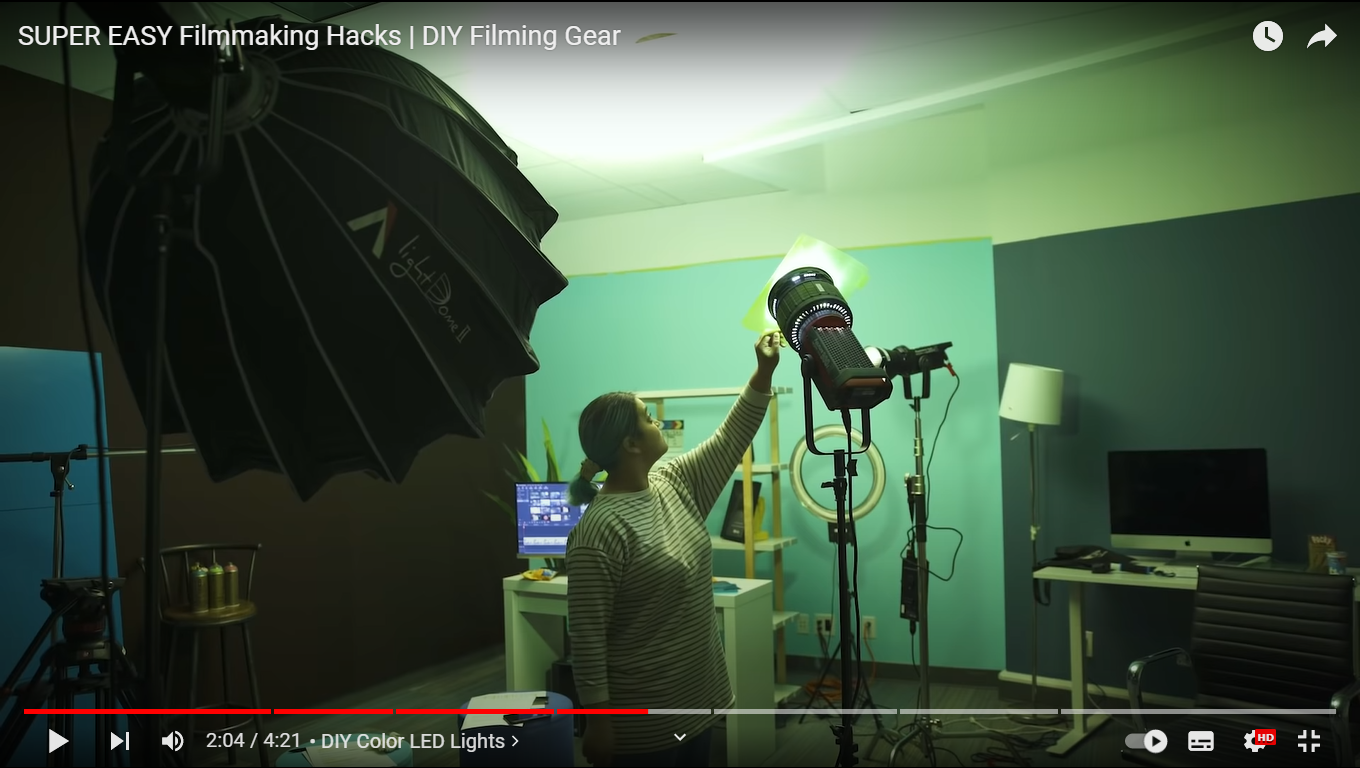
Now make the video and try with different colors to add suspense, horror, and happy effects to the video.
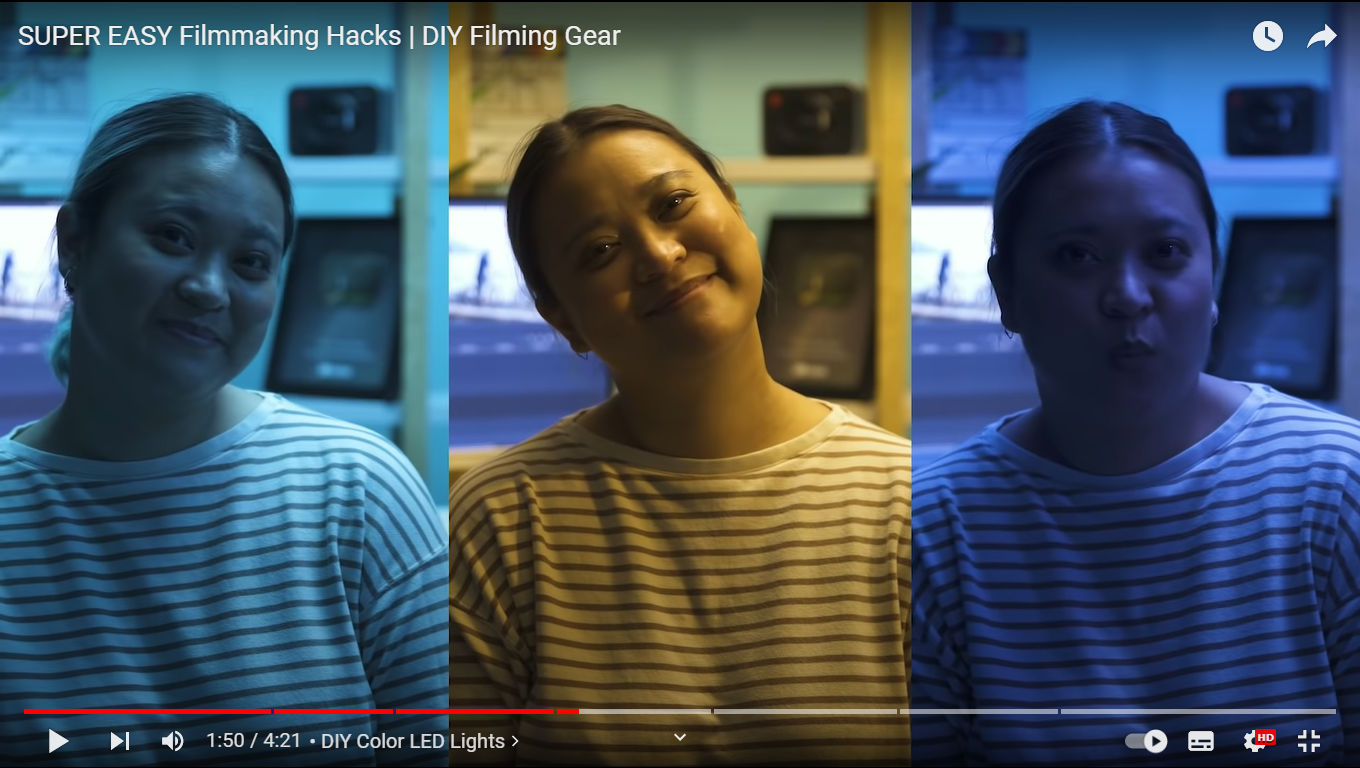
The video still needs more creative effects and designs; scroll more to read exciting tips.
Part 5. Different Shapes of Light with Cardboard
To add a fantasy location in the video and make light effects in the form of shapes, try out easily available cardboard. Most of the time, aesthetic videos are made by these hacks, giving viewers different vibes.
Only a professional photographer and videographer know how to attract the audience to the shots by doing these simple hacks.
The interesting thing is that if light has more shape, it will precisely describe more about the scene’s backstory, location, and context. Give it a try!
Step1 Cutting of cardboards
Cut the cardboard in any shape, whatever you want. We will experiment by cutting cardboard in window blinds shape.
![]()
Note: There is no specific recommendation for the cardboard, you can use any size or shape which suits you the best.

Step2 Make shots in different shapes of light
After giving shape, now move the cardboard around the light source and make a video. It seems like the subject is sitting near the window and has aesthetic vibes.
![]()
Note: The more precise the cutting of cardboard, the more professional it looks.

Become more creative and make more shapes with cardboard because the audience always prefers new content in the market.
Part 6. Create Point of View Shots
After adding colors and shapes, now it’s time to get some Point of View (POV) shots. Most of the time, viewers become bored by watching framing and filming coverages.
POV shots are mostly captured from a specific angle to show an object’s characters. They are mostly seen in food commercials, and videographers of snacks just love to make these shots.
To make POV shots, there is nothing specific required. You just have to make a suitable position for the lens. Follow the below guidelines and capture it!
Step1 Cut ends of packet
To create POV shots of your favorite snack, first of all, cut down both ends of the packets.
Step2 Attach packet on a camera
After cutting, attach the packet of snacks to the camera lens or phone with the help of old-fashioned tape.
Ensure the camera is turned on, and then make a POV shot. Now, it’s time to enjoy the rest part with the audience. Check out the final results, as shown below!

Due to this, the food seems good, and you can notice the number of spices too. This one actually looks amazing!
What if we add the rotatory shots, too, in the video? For this, check out the last tip and try that!
Part 7. Create a Barrel Roll Shot
Barrel roll shots are the full axial shot by spinning the camera lens. Epic shots that formerly required costly gimbals and sophisticated techniques are now as simple as strolling.
It’s pretty easy to make a rotatory shot at 360° by using equipment easily available at home. Rolling may feel anxiety and disorientation. Filmmakers utilize it to confuse or unnerve audiences in movies.
There is no need to purchase expensive gambles to make barrel roll clips. Instead, try this hack by utilizing a power drill present at your home. Then, follow the below steps to give it a professional look!
Step1 Take equipment
First, take a camera lens or smartphone, whatever you are using to make a video, and a power drill as a gimbal.
Step2 Camera with drill
Attach the camera to the power drill with the help of old-fashioned tape.
![]()
Note: You should have a piece of square foam or soft block placed between the camera and drill to assist.
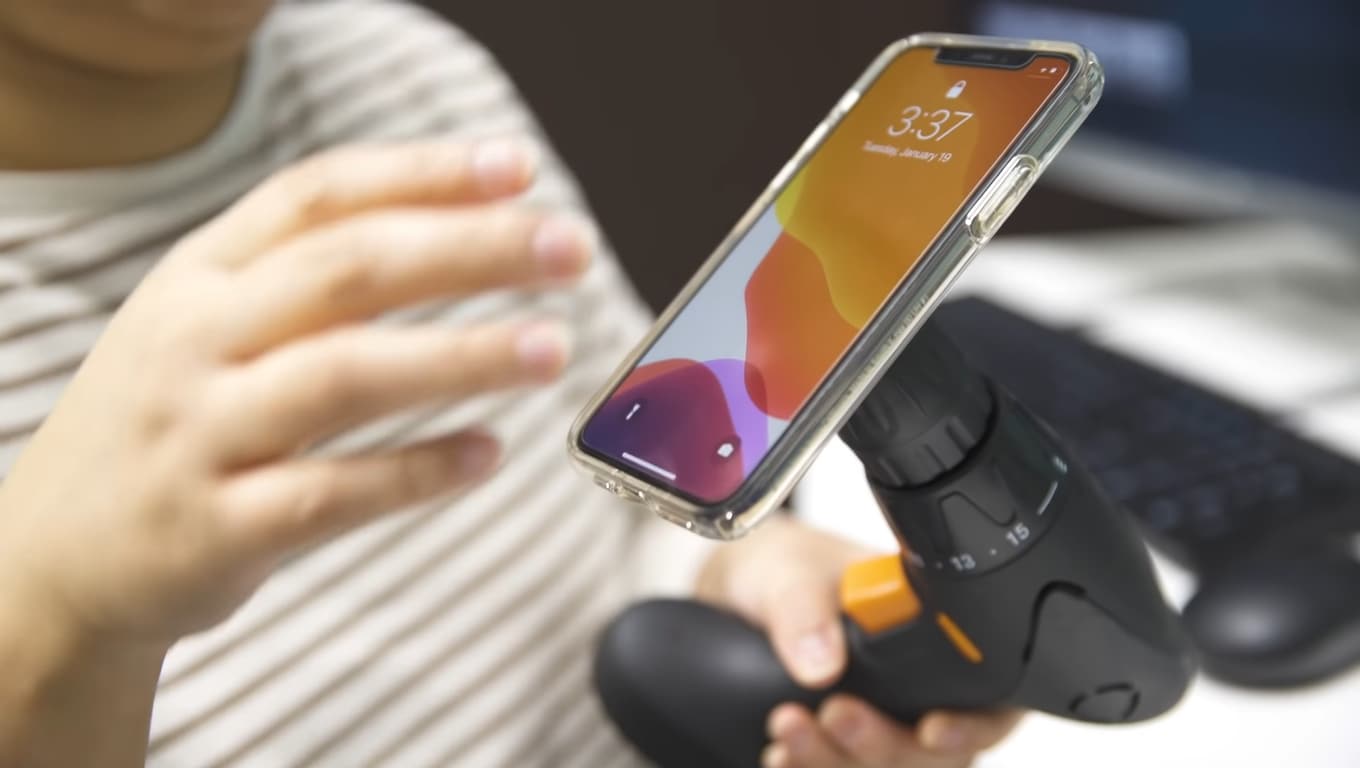
Now, it’s time to turn on the drill and ensure that the video option is “Turn On” in the camera. Then, enjoy the shots of 360° with your audience!

Conclusion
Finally, you get a filmy video after performing above mentioned 6 DIY hacks without expensive gear. More creativity in a video attracts more audience, which makes you more prior in the videography industry.
You can also try more tools at home and share your ideas with others to get reviews on them and make better changes. Make sure that you are taking all safety measures and precautions.
Then, place the container on the lens of the phone to make a video. Then, take care of the phone from the water.

Pro Tip: You can also shine light source in water and add glitter or colors to get more astonishing shots.
Part 4. Make Colourful Shots Without Coloured Lights
All filmmakers love party lights and want to add colors like that in the video. Different colored lights in videos usually represent different mood swings and enhance the creativity of storytellers.
Professional videographers use expensive lights to give these effects. But you don’t need to purchase any expensive gear. Because you can make colorful shots easily with colored plastic binder dividers, or you can also use cellophane wraps.
First, wrap the colored divider around the LED light or any light you use to shoot video.
![]()
Note: Check the light temperature after short intervals because it melts or burns the dividers when the light source gets hot.

Now make the video and try with different colors to add suspense, horror, and happy effects to the video.

The video still needs more creative effects and designs; scroll more to read exciting tips.
Part 5. Different Shapes of Light with Cardboard
To add a fantasy location in the video and make light effects in the form of shapes, try out easily available cardboard. Most of the time, aesthetic videos are made by these hacks, giving viewers different vibes.
Only a professional photographer and videographer know how to attract the audience to the shots by doing these simple hacks.
The interesting thing is that if light has more shape, it will precisely describe more about the scene’s backstory, location, and context. Give it a try!
Step1 Cutting of cardboards
Cut the cardboard in any shape, whatever you want. We will experiment by cutting cardboard in window blinds shape.
![]()
Note: There is no specific recommendation for the cardboard, you can use any size or shape which suits you the best.

Step2 Make shots in different shapes of light
After giving shape, now move the cardboard around the light source and make a video. It seems like the subject is sitting near the window and has aesthetic vibes.
![]()
Note: The more precise the cutting of cardboard, the more professional it looks.

Become more creative and make more shapes with cardboard because the audience always prefers new content in the market.
Part 6. Create Point of View Shots
After adding colors and shapes, now it’s time to get some Point of View (POV) shots. Most of the time, viewers become bored by watching framing and filming coverages.
POV shots are mostly captured from a specific angle to show an object’s characters. They are mostly seen in food commercials, and videographers of snacks just love to make these shots.
To make POV shots, there is nothing specific required. You just have to make a suitable position for the lens. Follow the below guidelines and capture it!
Step1 Cut ends of packet
To create POV shots of your favorite snack, first of all, cut down both ends of the packets.
Step2 Attach packet on a camera
After cutting, attach the packet of snacks to the camera lens or phone with the help of old-fashioned tape.
Ensure the camera is turned on, and then make a POV shot. Now, it’s time to enjoy the rest part with the audience. Check out the final results, as shown below!

Due to this, the food seems good, and you can notice the number of spices too. This one actually looks amazing!
What if we add the rotatory shots, too, in the video? For this, check out the last tip and try that!
Part 7. Create a Barrel Roll Shot
Barrel roll shots are the full axial shot by spinning the camera lens. Epic shots that formerly required costly gimbals and sophisticated techniques are now as simple as strolling.
It’s pretty easy to make a rotatory shot at 360° by using equipment easily available at home. Rolling may feel anxiety and disorientation. Filmmakers utilize it to confuse or unnerve audiences in movies.
There is no need to purchase expensive gambles to make barrel roll clips. Instead, try this hack by utilizing a power drill present at your home. Then, follow the below steps to give it a professional look!
Step1 Take equipment
First, take a camera lens or smartphone, whatever you are using to make a video, and a power drill as a gimbal.
Step2 Camera with drill
Attach the camera to the power drill with the help of old-fashioned tape.
![]()
Note: You should have a piece of square foam or soft block placed between the camera and drill to assist.

Now, it’s time to turn on the drill and ensure that the video option is “Turn On” in the camera. Then, enjoy the shots of 360° with your audience!

Conclusion
Finally, you get a filmy video after performing above mentioned 6 DIY hacks without expensive gear. More creativity in a video attracts more audience, which makes you more prior in the videography industry.
You can also try more tools at home and share your ideas with others to get reviews on them and make better changes. Make sure that you are taking all safety measures and precautions.
Do You Intend to Include Motion Blur on Your Video Using Video Star? This Article Explains How to Use Motion Blur on Video Star with Exquisite Control
Many smartphone video editing apps provide quick services for creating content. However, few offer privileges of including features like motion blur within the videos. The motion blur effect is one of the most recommended features in a video to give it a realistic touch. Where many tools fail to offer this effect, Video Star stands in the line of applications that do not disappoint users.
For this article, we will work on a guideline for how to use motion blur on Video Star. Through the provided details, you can verify and work through a similar model for creating a perfect video.
Part 1: What is Video Star?
We will first review the Video Star application and its features for a better overview of the tool. Video Star is a video editing tool designed to present impressive music videos with appropriate lip-syncing and fan edits. While the application is known for its music editing, Video Star has embedded a variety of features in its package that makes the process interesting.
It includes the option of managing the color and animation in the video. You can also find the tool appropriate for enhancing, combining, and timing clips. Video Star is a complete package when it comes to creating videos on smartphones. With its free features and advanced functionalities, Video Star does not disappoint.
The application has multiple power packs available that can be bought from a subscription plan. With the authoritative control and connection offered, this application makes quite a mark regardless of its mobility.

Download: App Store
Key Features
There are options available on Video Star, which makes it a great video editing option. Those who are up for quick editing should try this option. For that, let’s check out its prominent features:
- You can customize the background and mode of the application according to your needs. Personalize the outlook of your Video Star application as per your desires.
- Add multiple songs of your choice within the video to perfection.
- The tool is integrated with iCloud, providing a dedicated button for connecting the application with the assorted data.
- Features an “Insider” page showing all essential details and updates about the application.
Review
The review of Video Star is quite promising; but mixed. You can add effects within your videos, such as motion blur. But the application still has some concerns which might need some addressing.
When it comes to updating and managing it, there are some drawbacks to its operation. Sometimes, it might even lag for no reason. Along with that, there are some complaints about the text effects included in the application. An overall review might sound good, but some tweaking is needed.
Part 2: How to Use Motion Blur on Video Star?
We will now look into some details about using the motion blur effect on Video Star. While you learn how to target the Video Star motion blur effect to perfection, a comparison in procedure will also be highlighted for better understanding. Look through the details to know more about how to use motion blur to perfection:
Steps to Perform Motion Blur Through Transform on Video Star
Step1 As you download and install Video Star, launch and tap the “+” icon on the top-right to add a video. You must select the “Edit Video” option to proceed further.

Step2 After adding the video, you must use the “Set Start” and “Set End” buttons to trim out the unnecessary part of the video. Select the “Make Video” button on the top and lead to the next part.

Step3 As the video is trimmed, tap the “New” button on the bottom-right and proceed to select “Transform” from the available options.

Step4 You must select the “Motion Blur” effect from the options below. As you are led into the parameter settings of the effect, you will find multiple things to cover on the screen. While you can set the blur element using the slider, set whether the effect will be “Trailing,” “Leading,” or “Both.”

Step5 You can set the video on a lower frame rate using the “Dial” icon. Set the slider under the “Blend” option and proceed to click the “Create” button.

Steps to Perform Motion Blur Through Re-Effects on Video Star
Step1 While you try another technique to perform motion blur on Video Star, you must import the video and set its starting and ending points. As you edit the video, select “New” and find the “Re-Effect” option.

Step2 Continue to the next screen and tap the “+” icon to add an effect. You can find the “Motion Blur” effect by using the “Search” icon present on the screen. As the motion blur effect is added, you have to set the effect using the slider.

Bonus Tips – Add Motion Blur with Filmora on Desktop
What if you search for a better option than the motion blur effect on Video Star? Though there are many tools, the quickest option to look for on the desktop is Wondershare Filmora . This easy-going, effective, and diverse software provides the smoothest experience in video editing. The variety of tools offered within the platform is exquisite.
Free Download For Win 7 or later(64-bit)
Free Download For macOS 10.14 or later
To learn more about Wondershare Filmora, you can also observe the features provided below:
- While you can add effects like motion blur, Filmora provides an extended list of effects to try out.
- There are multiple video resolution qualities offered while exporting the video. It also includes setting the video parameters according to a specific device or platform.
- Wondershare Filmora induces a high-quality result for the user in a simple environment. This makes it an easy tool to use with quality adjustments.
- Along with adding effects and transitions, Filmora provides an Instant Mode to help users create videos within minutes.
Steps For Adding Motion Blur to Wondershare Filmora on Desktop
We will now direct ourselves to discuss the steps for adding motion blur on Filmora with ease:
Step1 Launch Filmora and Create Video Project
You must launch Wondershare Filmora and click the “Create New Project” button to initiate a new project. Select the folder-like icon on the screen for importing the video file that is to be edited. On adding the file, drag and drop it on the timeline.

Step2 Split Video to Add Effect
With the help of the play head offered on the timeline, lead to the specific part where you wish to start adding the motion blur effect. Use the “Scissors” icon from the timeline to cut the video from the specific part.

Step3 Add the Motion Blur Effect
On splitting, navigate to the “Effects” tab on the top and find the “Blur” effects from the “Video Effects” category. After finding the right motion blur effect, drag and drop it on the part where the video was split.

Step4 Use Dissolve Transition and Export Video
Use the “Dissolve” transition from the “Transitions” tab to add more adjustments. Once the video is smoothened, click the “Export” button to get the edited file out.

Last Words
The article has provided a complete overview of the Video Star Motion Blur effect. With the provided details and a guideline on adding motion blur to a video, it is prominent how one can add the effect to make their video look realistic. For a better editing experience, you can consider using Wondershare Filmora on your desktop for better results.
Free Download For macOS 10.14 or later
To learn more about Wondershare Filmora, you can also observe the features provided below:
- While you can add effects like motion blur, Filmora provides an extended list of effects to try out.
- There are multiple video resolution qualities offered while exporting the video. It also includes setting the video parameters according to a specific device or platform.
- Wondershare Filmora induces a high-quality result for the user in a simple environment. This makes it an easy tool to use with quality adjustments.
- Along with adding effects and transitions, Filmora provides an Instant Mode to help users create videos within minutes.
Steps For Adding Motion Blur to Wondershare Filmora on Desktop
We will now direct ourselves to discuss the steps for adding motion blur on Filmora with ease:
Step1 Launch Filmora and Create Video Project
You must launch Wondershare Filmora and click the “Create New Project” button to initiate a new project. Select the folder-like icon on the screen for importing the video file that is to be edited. On adding the file, drag and drop it on the timeline.

Step2 Split Video to Add Effect
With the help of the play head offered on the timeline, lead to the specific part where you wish to start adding the motion blur effect. Use the “Scissors” icon from the timeline to cut the video from the specific part.

Step3 Add the Motion Blur Effect
On splitting, navigate to the “Effects” tab on the top and find the “Blur” effects from the “Video Effects” category. After finding the right motion blur effect, drag and drop it on the part where the video was split.

Step4 Use Dissolve Transition and Export Video
Use the “Dissolve” transition from the “Transitions” tab to add more adjustments. Once the video is smoothened, click the “Export” button to get the edited file out.

Last Words
The article has provided a complete overview of the Video Star Motion Blur effect. With the provided details and a guideline on adding motion blur to a video, it is prominent how one can add the effect to make their video look realistic. For a better editing experience, you can consider using Wondershare Filmora on your desktop for better results.
How To Import and Adjust the Video Clips on Wondershare Filmora?
Video editing surely improves the quality and impact of your video projects. By refining and polishing your video, editing can elevate your content from ordinary to extraordinary. It not only improves the overall look of the video but also enhances the narrative as well. Additionally, this makes the video more appealing, and more and more people want to see your video.
The editing process in a video project is essential as it allows you to present your video uniformly. It helps you remove unwanted sections, rearrange clips, and more to create a seamless flow. Editing might be difficult initially, but you can start from the basics and gradually build your skills. Begin by learning how to import and adjust clips. In this way, you will learn video editing step by step and get to a professional level.
Part 1: How Should Video Clips Be Integrated To Make the Perfect Video?
Video Clip Editor Use Wondershare Filmora to Import and Adjust the Video Clips to Make the Perfect Video.
Free Download Free Download Learn More

You can make YouTube video clips or clips for other platforms by integrating video clips. If you want to know how combining clips can help you, this portion will help you. In this part, you will learn a few tips on making a perfect video by integrating videos.
1. Establish a Clear Narrative
You can determine the purpose and message of your video. It doesn’t matter whether it’s a story, tutorial, promotional content, or documentary. However, having a clear narrative or message will guide your clip selection and arrangement.
2. Plan the Storyboard or Structure
Before editing, create a storyboard or outline to visualize the flow and structure of your video. It will help you organize your clips and determine the sequencing of scenes. Additionally, similar shots support the narrative of your project.
3. Start with a Strong Opening
If you want to grab the viewer’s attention from the beginning, follow this trick. It would be best to choose a compelling opening shot or sequence for your project. It can set the tone and hook the audience, encouraging them to continue watching.
4. Maintain Visual Continuity
Ensure visual continuity between clips by considering different factors. Lighting, color, composition, and camera angles are a few factors to be considered. Furthermore, smooth transitions between shots help maintain a seamless viewing experience.
5. Vary Shot Types and Perspectives
Incorporate various shot types and perspectives to add visual interest and engagement. You can use a mix of wide shots, close-ups, and medium shots. Additionally, unique camera angles also matter to provide a dynamic viewing experience.
6. Consider Shot Length and Pacing
What else you can do is pay attention to each clip’s duration and arrangement to maintain pace. Longer shots can create a sense of calmness or allow for more detailed storytelling. However, short video clips can create a sense of energy and keep the viewer’s attention.
7. Use Transitions Wisely
Choose appropriate transitions to connect different clips smoothly. Transitions like cuts, fades, dissolves, or wipes can help create continuity. Furthermore, such transitions indicate time or location changes or add a stylistic touch. However, avoid overusing flashy transitions that may distract from the content.
8. Sync Video with Audio
Some videos include audio, so ensure the video clips are synchronized properly. Moreover, align dialogue, music, or sound effects with the corresponding video. This will enhance the overall impact and coherence of your video project.
9. Enhance with Visual Effects or Graphics
Consider using effects, graphics, or text overlays to improve your video. It will even improve the storytelling or provide additional information. Additionally, you can use these elements purposefully to complement the narrative.
10. End Strong
The ending of a video with a memorable and impactful closing shot or sequence also matters. By doing so, your video will surely leave a lasting impression. It can summarize the main message, provide a call to action, or create an emotional impact.
11. Smooth Transitions Between Scenes
Another way is to add smooth transitions if your video includes multiple scenes or locations. Use techniques like matching action or complementary visuals to create seamless transitions. It will surely enhance the viewer’s experience.
12. Test and Refine
Lastly, preview your edited video and gather feedback from others to ensure its effectiveness. Adjust the sequence, pacing, or elements as necessary to improve the overall flow and impact. It will help you to finalize your video with a little touch-up using the feedback.
Part 2: Wondershare Filmora and Video Editing: A Heaven For Video Editors
Wondershare Filmora is a video editing solution for all of your boring videos. If you’re a content creator and want to up your game, use a good editing tool like Filmora. This platform provides you with different templates and presets that you can apply to your content. Furthermore, you don’t need extensive training to learn this tool, as it is pretty straightforward.
However, this tool has a lot to offer, including its new AI-powered features and options. You can automatically audio duct using this tool and much more. If you can’t find any suitable music for your video, simply search, listen, and use audio files in the tool. Wondershare Filmora is indeed heaven for video editors and enthusiasts, as it offers so much. Be it long or short video clips; this tool will help you easily edit them.
Free Download For Win 7 or later(64-bit)
Free Download For macOS 10.14 or later
Part 3: Learning Different Ways of Importing Video Clips in Filmora
If you’re searching for ways to import videos in Wondershare Filmora, you’re in luck. This portion is going to discuss different ways to import long and short video clips in the tool.
Filmora Tutorial - Import And Organize Media Files
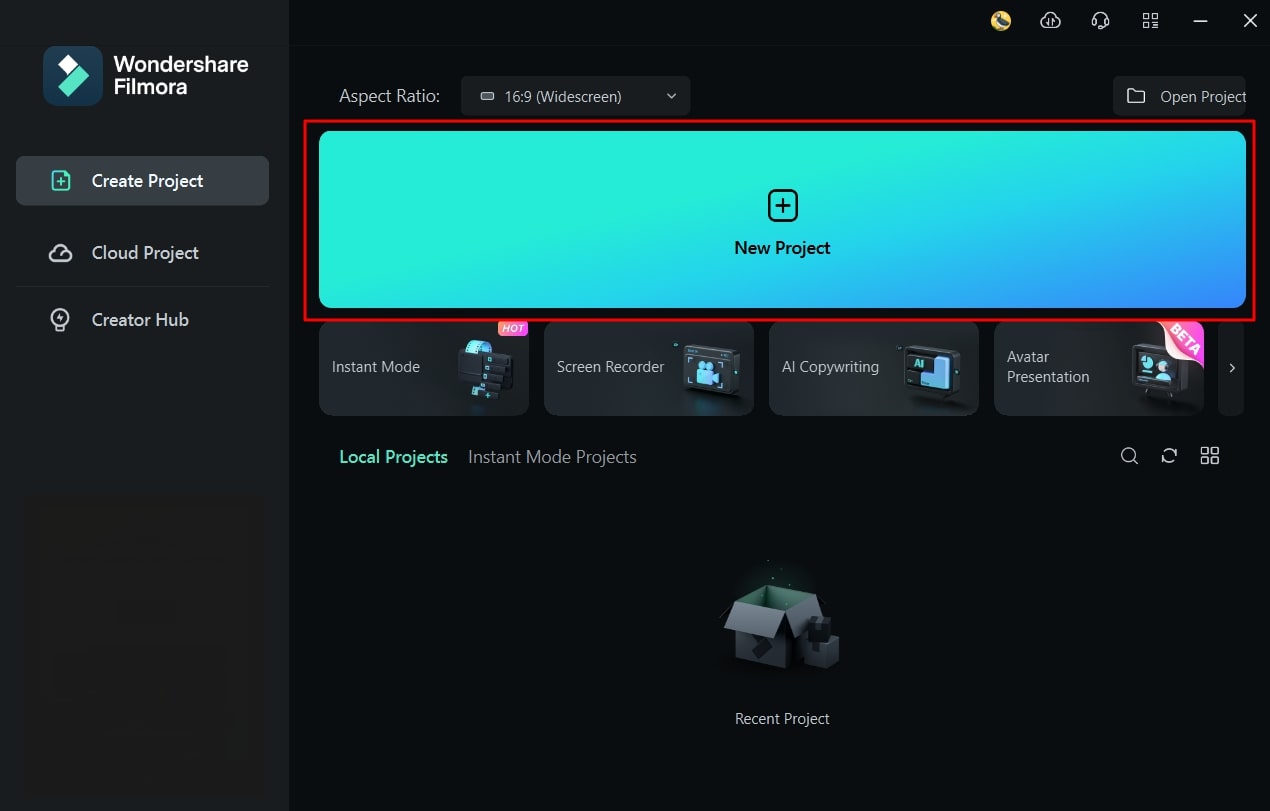
Step 1Launch Wondershare Filmora and Create a New Project
Access Wondershare Filmora on your system. Start a new project by selecting “New Project.”
Step 2Select the Import Option
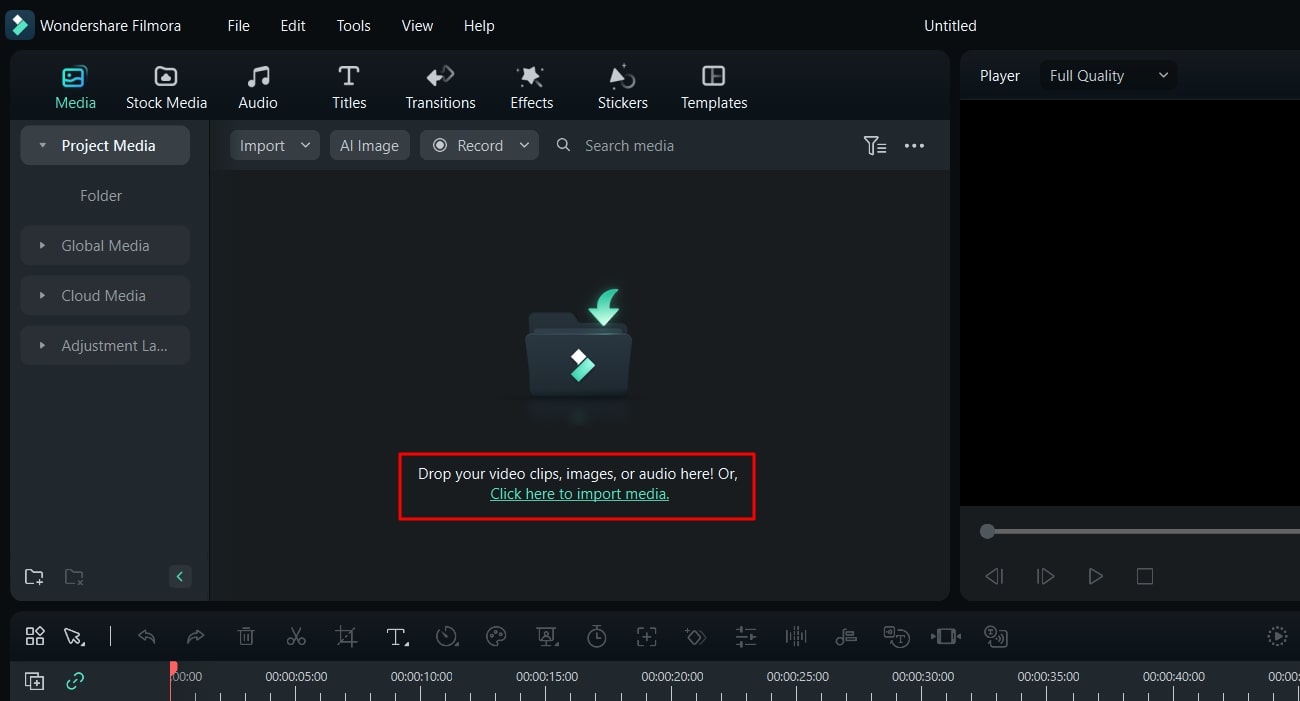
In the new window, select “Click here to import media” and choose the files you want to import into the tool.
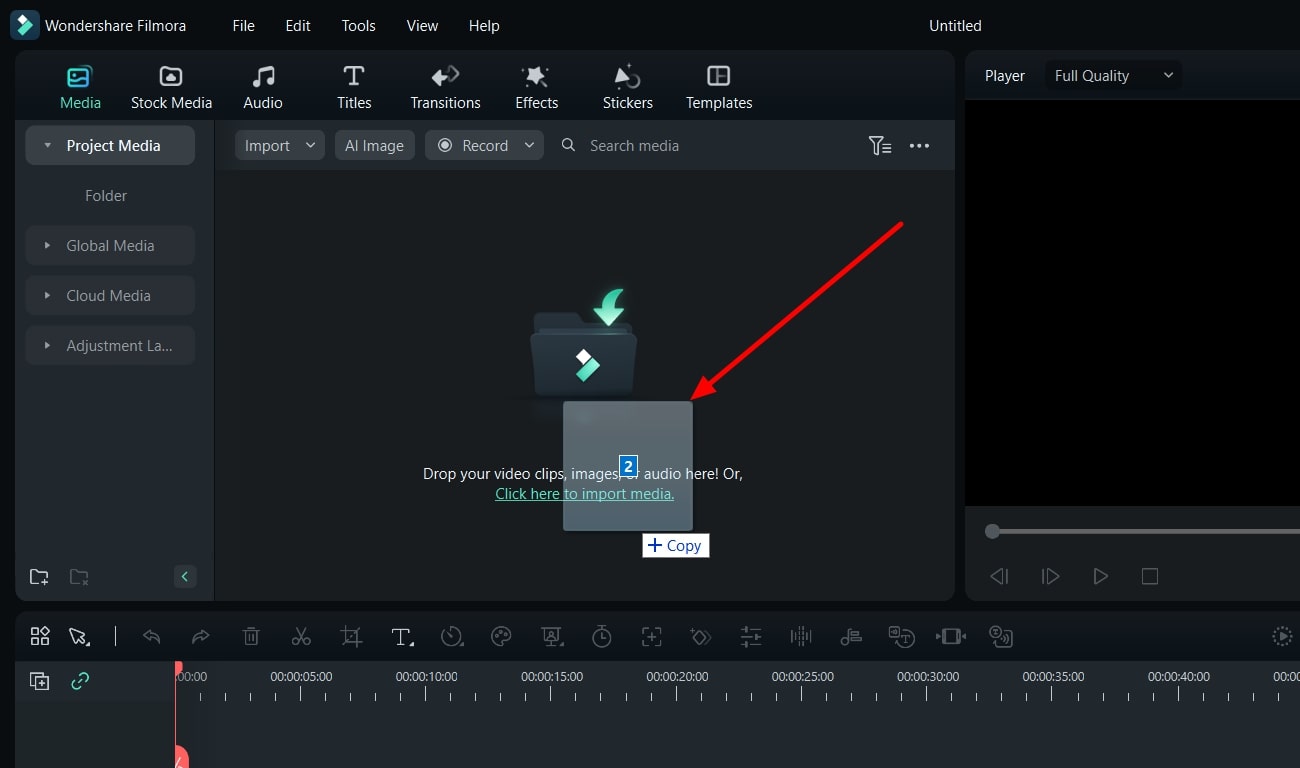
Step 3Import Files by Drag and Down
Alternatively, drag and drop your media files into the Media Import section. In this way, you can choose your media using dragging and dropping.
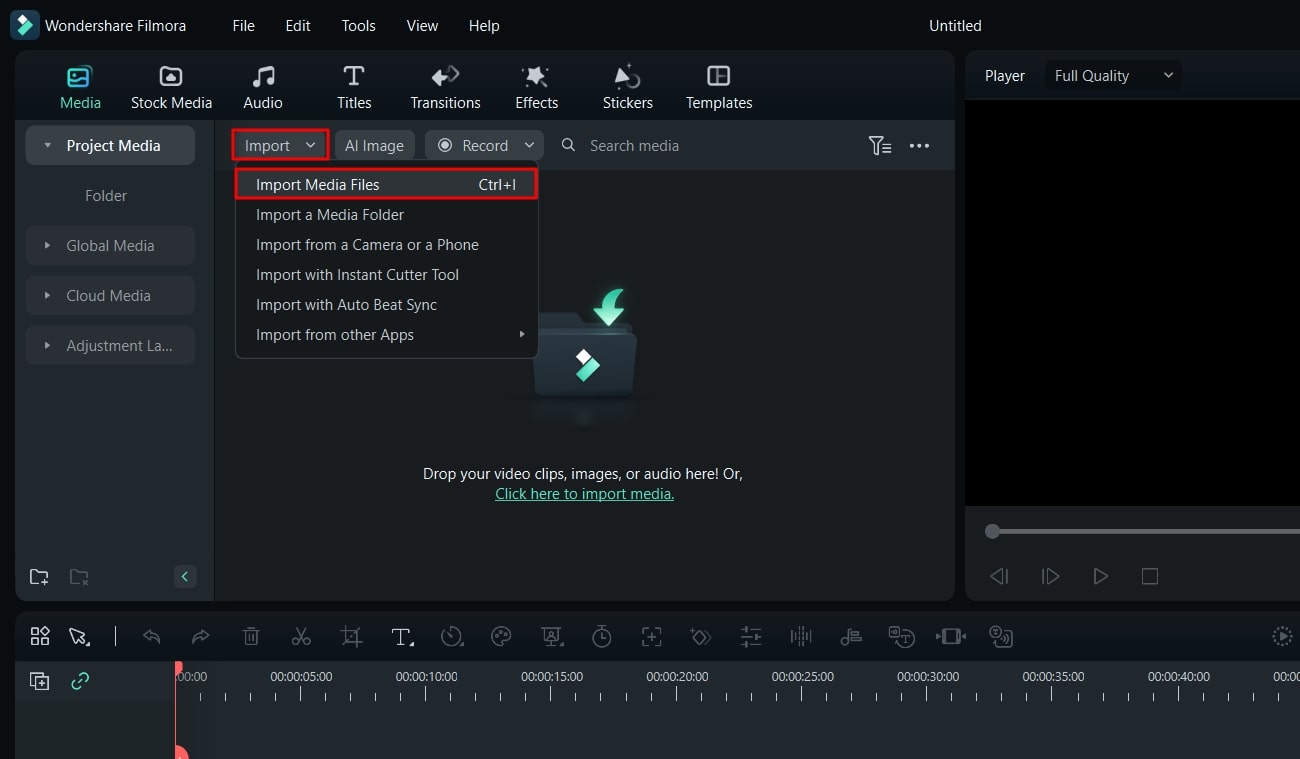
Step 4Import Your Media Files from Drop-Down Menu
Another way to import files is by locating the Media Import section and clicking the “Import” drop-down menu. Then select “Import Media Files” and browse to choose your media file.
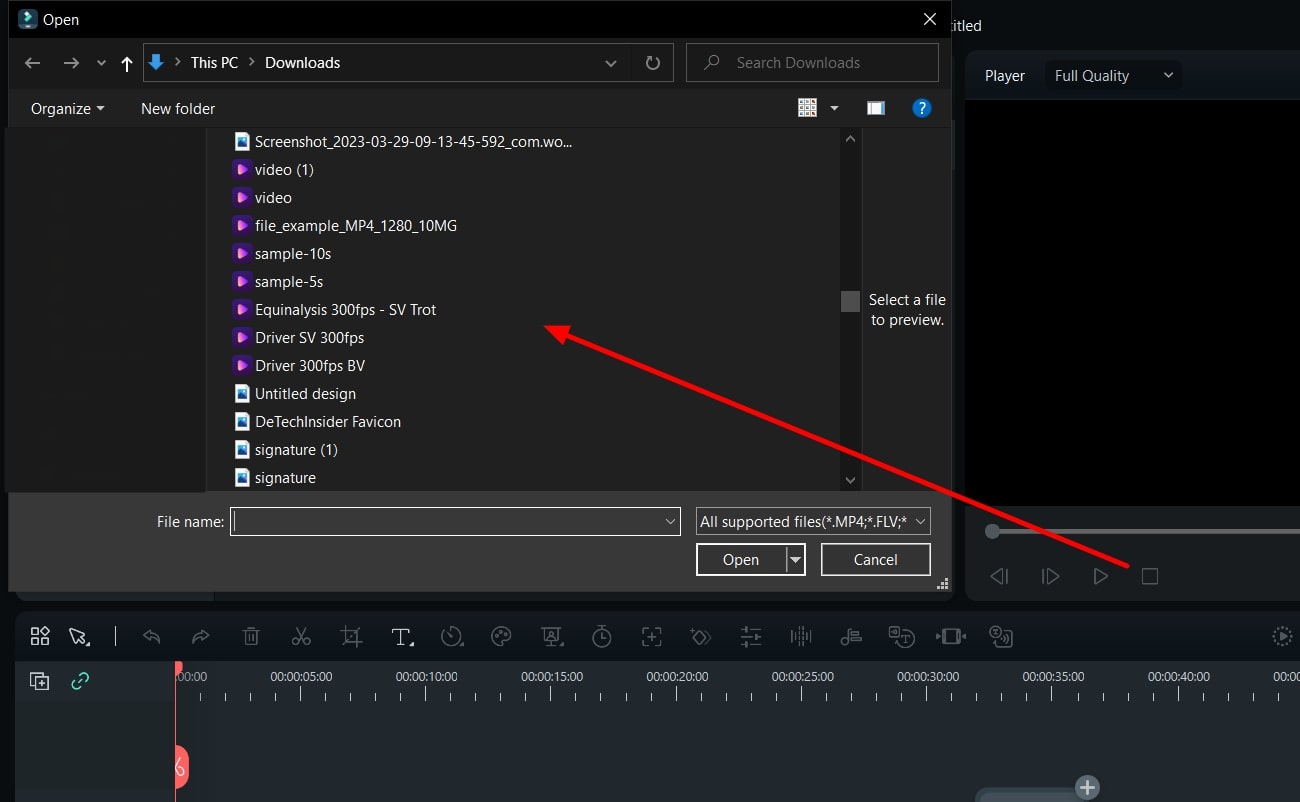
Step 5Import Using Shortcut Keys
You can use shortcut keys by launching the tool and pressing “Ctrl + I.” A new window will appear where you can add media files.
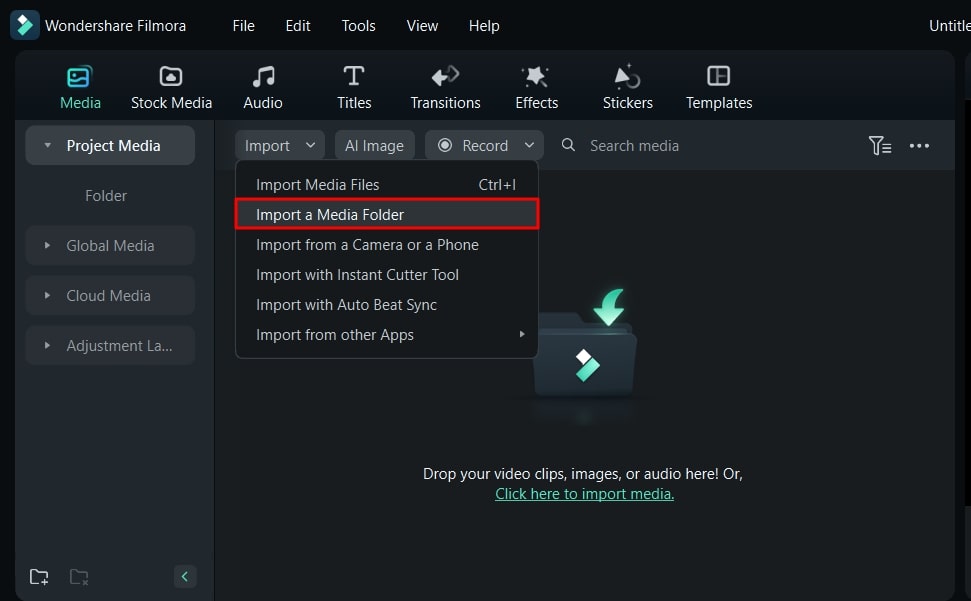
Step 6Import Your Media Folder
To import a media folder, go to the Media Import section and click the “Import” drop-down menu. Then, select “Import a Media Folder” and choose the media you want to import.
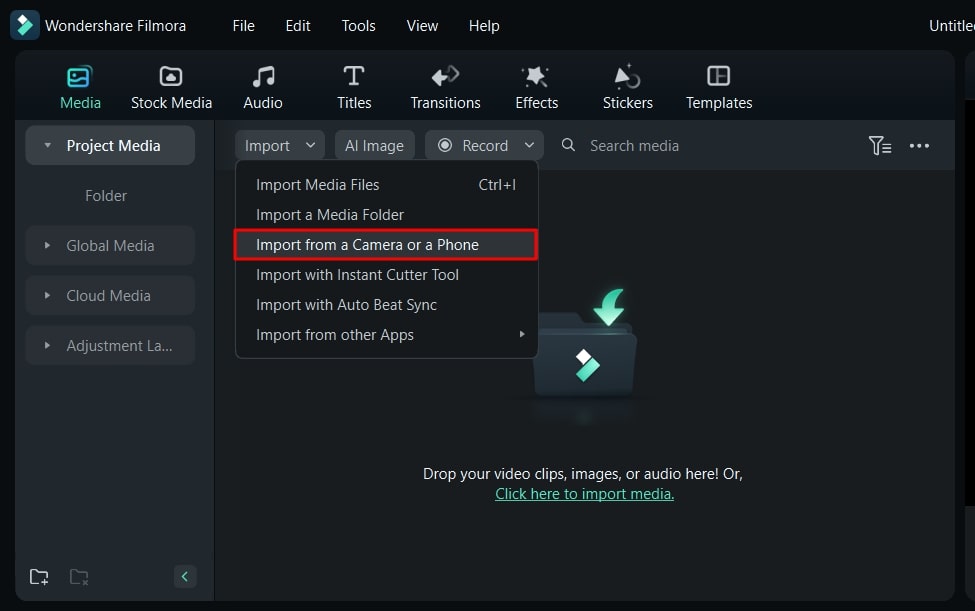
Step 7Import from a Device
Wondershare Filmora also allows you to import media directly from an external camera or phone. Attach the device, go to the “Import” drop-down menu, and select “Import from a Camera or a Phone.” Next, choose the media from your device folder and click “OK.”
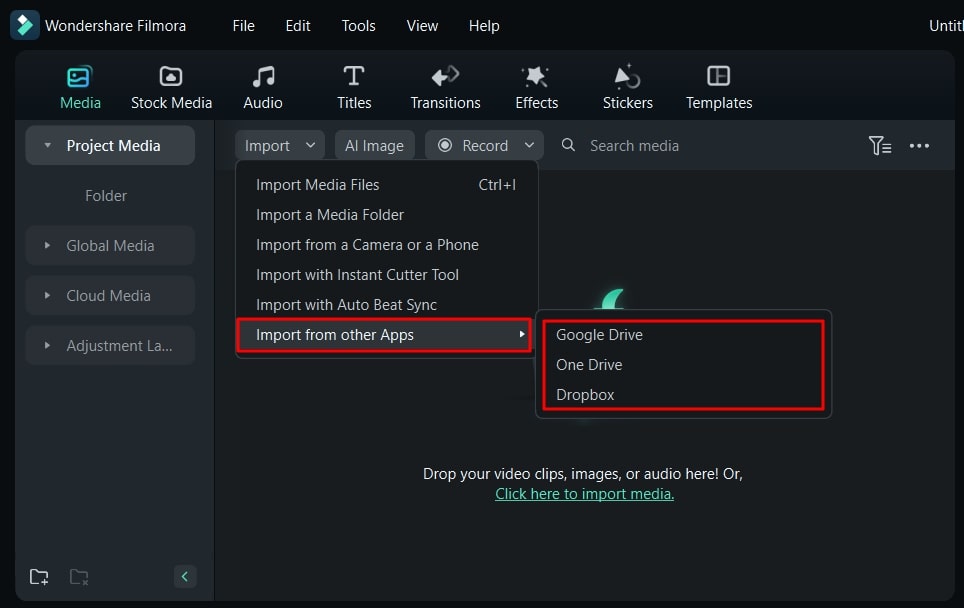
Step 8Import from Your Cloud Storage
You can also import media files from your cloud storage. In the “Import” drop-down menu, find “Import from other Apps” and select it. Further, select the storage app from where you want to import your media files. Once your storage account is linked to your computer, you can easily import media files from there as well.
Part 4: Adjustment Layers: A New Thing in Filmora?
Wondershare Filmora is the ultimate editing tool that even lets you add layers to your video. The Filmora adjustment layer will allow you to make changes without changing the original footage.
Filmroa Tutorial - Adjustment Layers in Filmora Files
Free Download For Win 7 or later(64-bit)
Free Download For macOS 10.14 or later
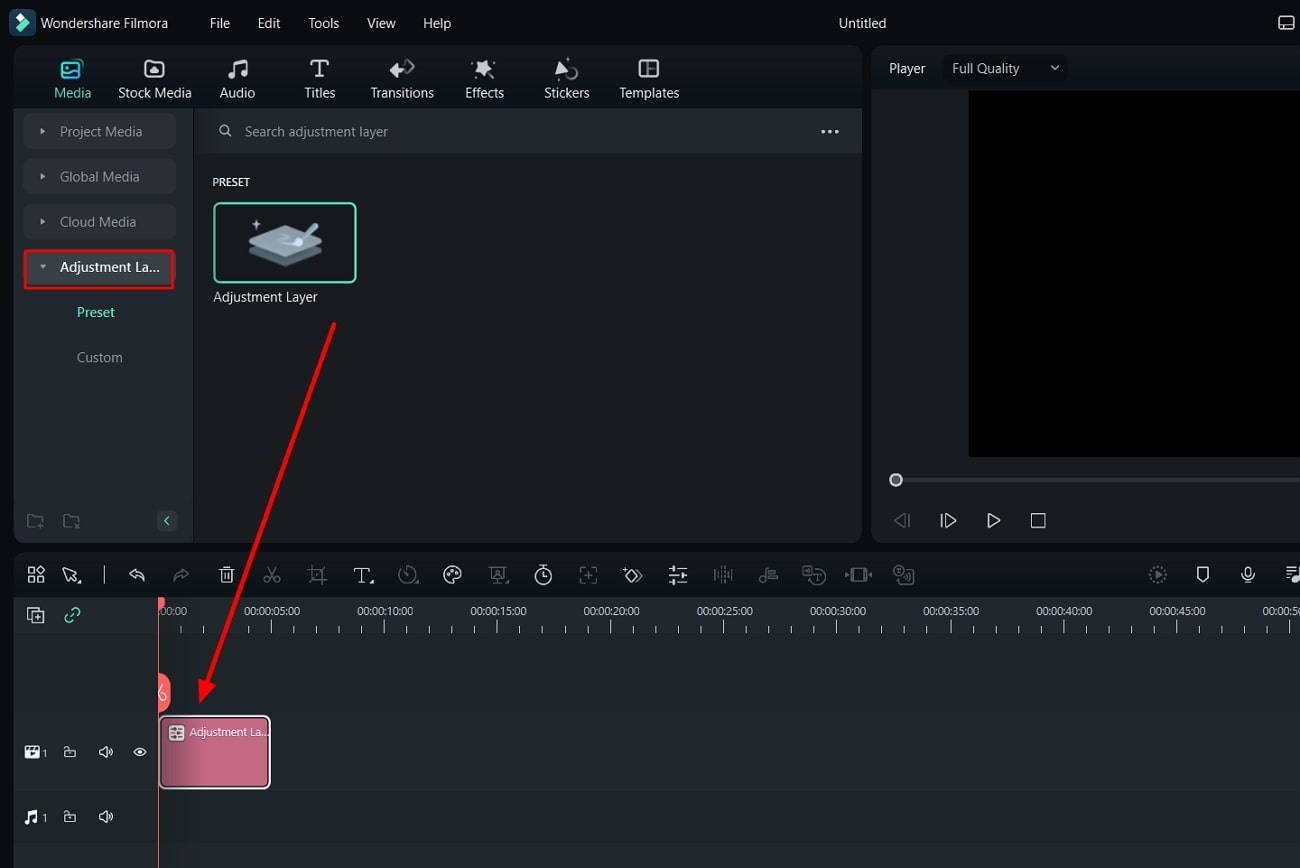
Step 1Add an Adjustment Layer
To create a video slideshow using a Filmora adjustment layer, open the tool and create a new project. Once you’ve imported all the video clips in the timeline then, select the “Media” button. Proceed next by choosing the “Adjustment Layer” tab in the bottom panel. Then, click on the layer and drop it in the timeline above your video.
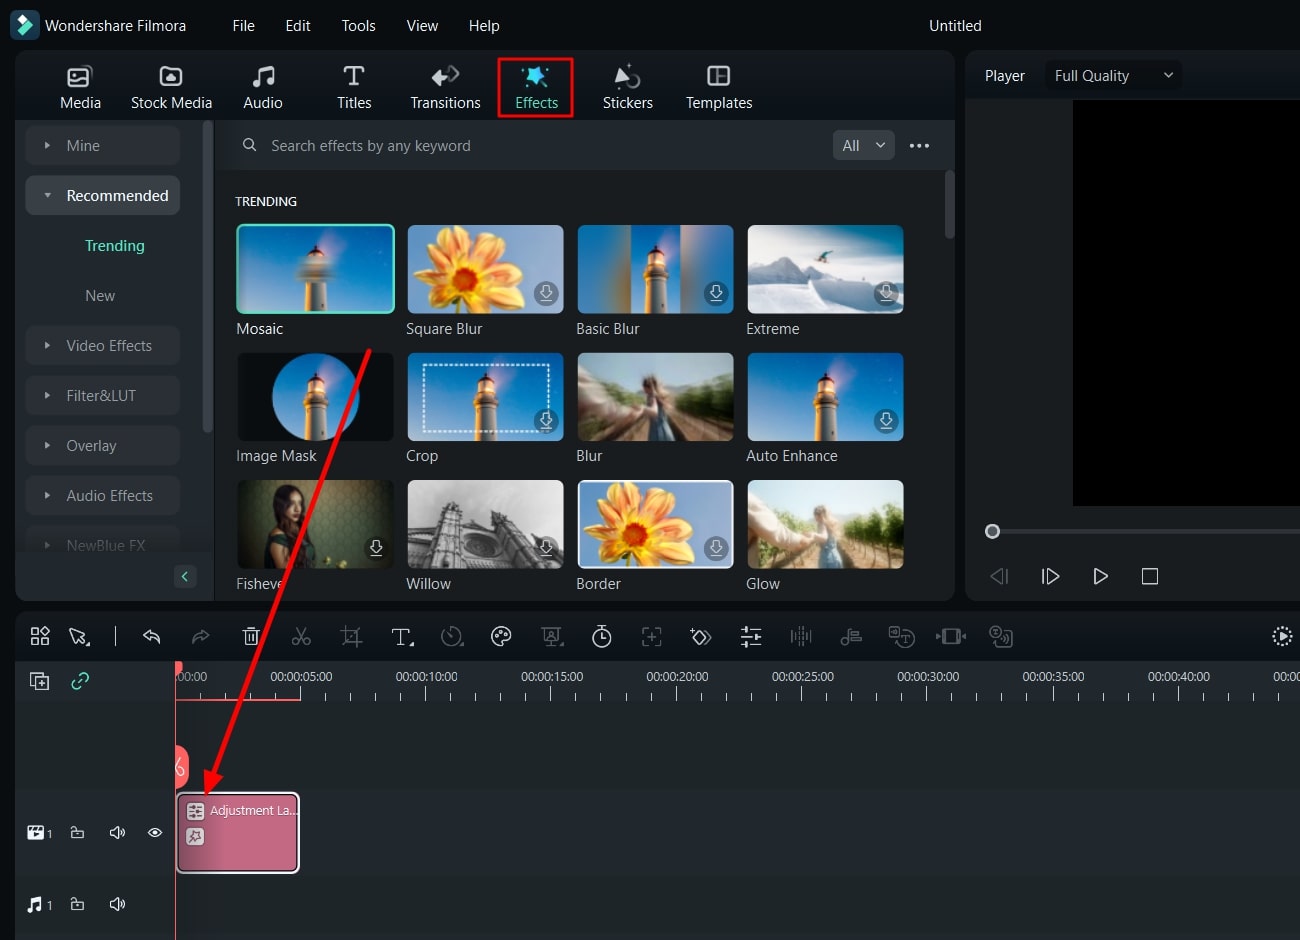
Step 2Apply Effects to the Adjustment Layer
If you want to add effects, select the adjustment layer and locate the “Effects” button. Next, drag and drop the effect onto the adjustment layer.
Step 3Color Correct Your Adjustment Layer
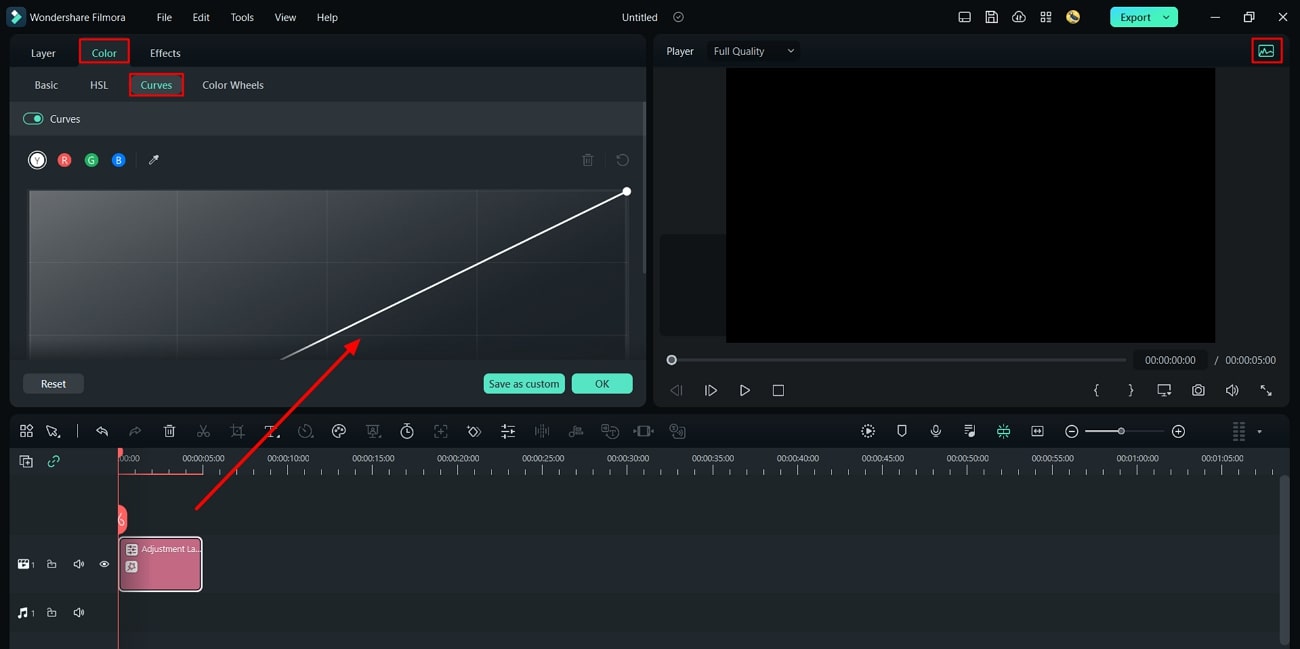
Adjust the color toning of your video by finding the “Histogram” icon in the “Preview” section. Modify the curves according to your preference while turning on this function. Continue to select the “Adjustment Layer” and lead to the “Color” tab to look for the “Curves” option.
Step 4Add Multiple Adjustment Layers
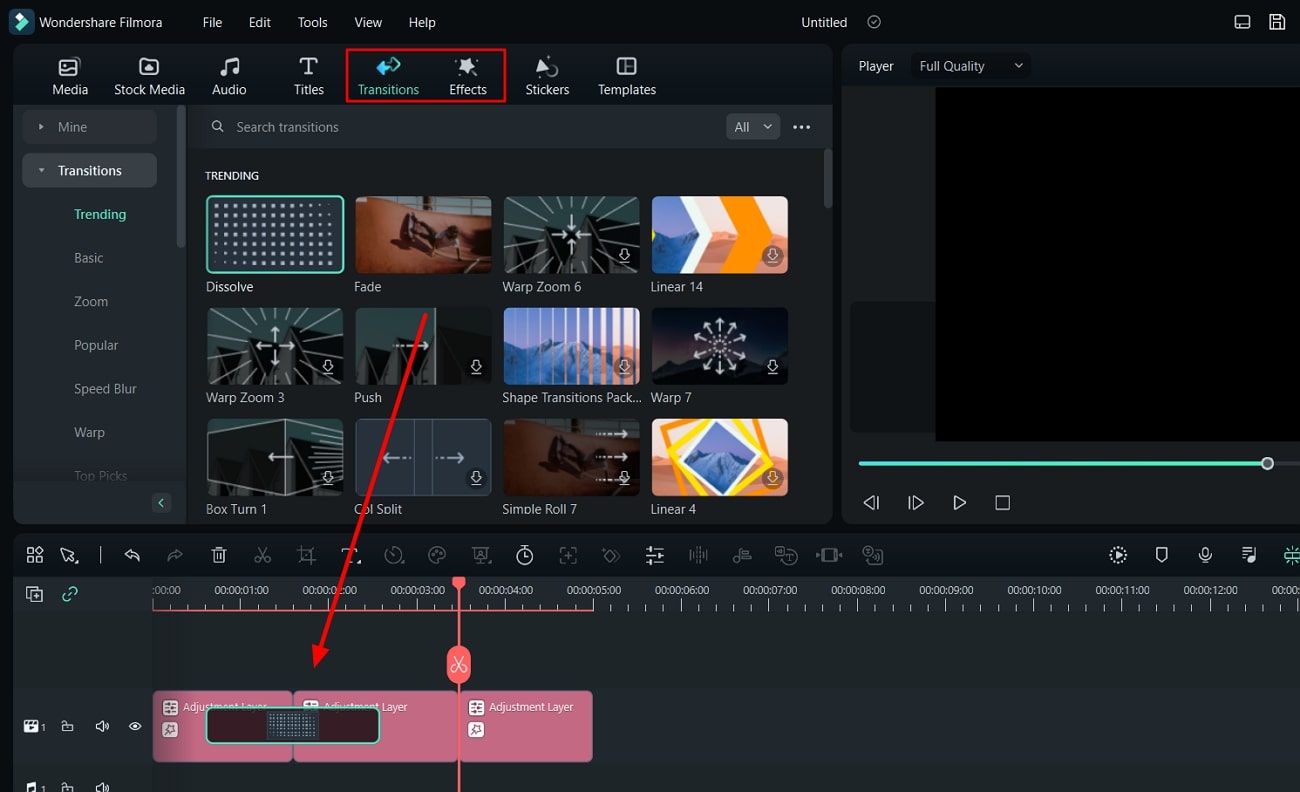
Additionally, you can apply different effects at different durations and drag the adjustment layer to the end of the layer. Further, split the adjustment layer using the “Playhead” slider at the desired duration to add a new effect. To make your slideshow better, you can also add transition effects by dragging and dropping them between two clips.
Step 5Save as a Preset
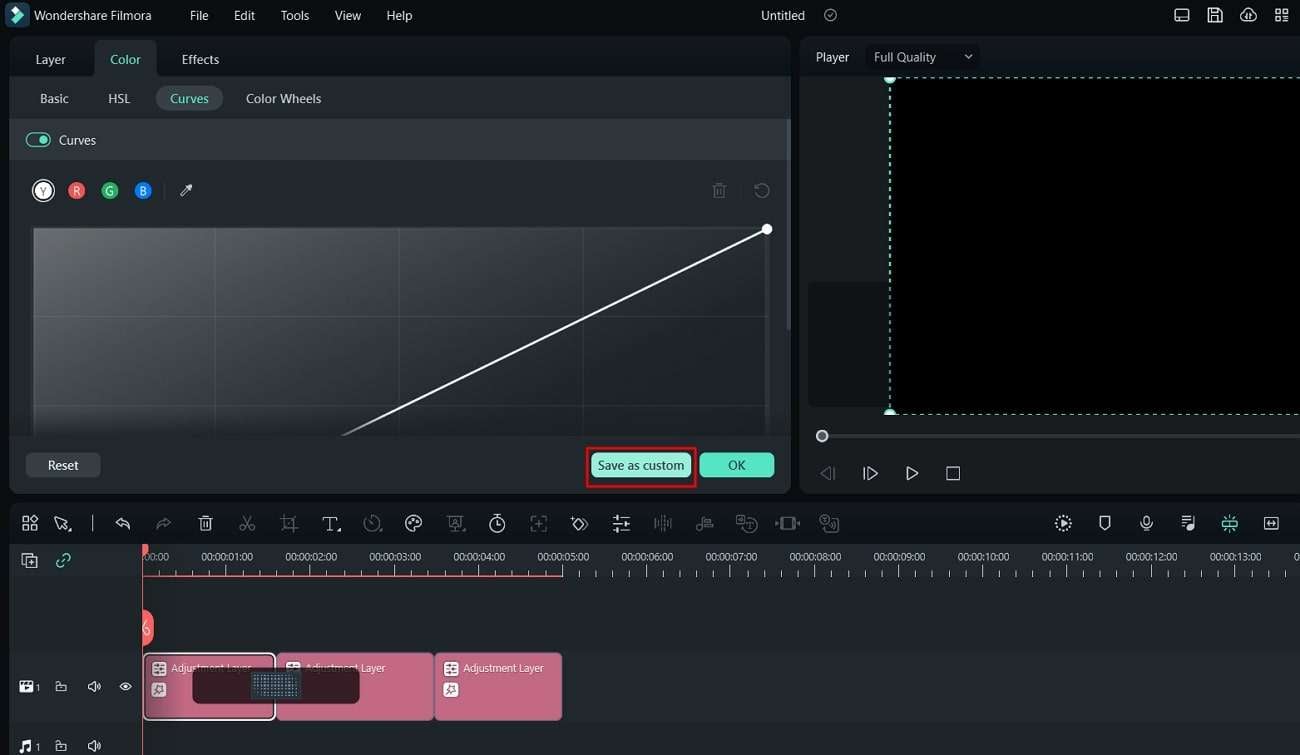
You can also save your adjustment layer as a preset. Select your adjustment layer, locate the “Save as Custom” option in the right panel, and click on it. This will save the adjustment layer as a preset. Your preset will be in the “Adjustment Layer” section of the “Media” tab.
Conclusion
Video editing might not be as easy as you think. It is a skill that requires time, effort, and even knowledge. There are many people who took video editing and post-production as a professional career. You can also learn to edit videos like a professional by taking baby steps. Firstly you can learn how to adjust clips and import them in Wondershare Filmora, a great tool.
Free Download Free Download Learn More

You can make YouTube video clips or clips for other platforms by integrating video clips. If you want to know how combining clips can help you, this portion will help you. In this part, you will learn a few tips on making a perfect video by integrating videos.
1. Establish a Clear Narrative
You can determine the purpose and message of your video. It doesn’t matter whether it’s a story, tutorial, promotional content, or documentary. However, having a clear narrative or message will guide your clip selection and arrangement.
2. Plan the Storyboard or Structure
Before editing, create a storyboard or outline to visualize the flow and structure of your video. It will help you organize your clips and determine the sequencing of scenes. Additionally, similar shots support the narrative of your project.
3. Start with a Strong Opening
If you want to grab the viewer’s attention from the beginning, follow this trick. It would be best to choose a compelling opening shot or sequence for your project. It can set the tone and hook the audience, encouraging them to continue watching.
4. Maintain Visual Continuity
Ensure visual continuity between clips by considering different factors. Lighting, color, composition, and camera angles are a few factors to be considered. Furthermore, smooth transitions between shots help maintain a seamless viewing experience.
5. Vary Shot Types and Perspectives
Incorporate various shot types and perspectives to add visual interest and engagement. You can use a mix of wide shots, close-ups, and medium shots. Additionally, unique camera angles also matter to provide a dynamic viewing experience.
6. Consider Shot Length and Pacing
What else you can do is pay attention to each clip’s duration and arrangement to maintain pace. Longer shots can create a sense of calmness or allow for more detailed storytelling. However, short video clips can create a sense of energy and keep the viewer’s attention.
7. Use Transitions Wisely
Choose appropriate transitions to connect different clips smoothly. Transitions like cuts, fades, dissolves, or wipes can help create continuity. Furthermore, such transitions indicate time or location changes or add a stylistic touch. However, avoid overusing flashy transitions that may distract from the content.
8. Sync Video with Audio
Some videos include audio, so ensure the video clips are synchronized properly. Moreover, align dialogue, music, or sound effects with the corresponding video. This will enhance the overall impact and coherence of your video project.
9. Enhance with Visual Effects or Graphics
Consider using effects, graphics, or text overlays to improve your video. It will even improve the storytelling or provide additional information. Additionally, you can use these elements purposefully to complement the narrative.
10. End Strong
The ending of a video with a memorable and impactful closing shot or sequence also matters. By doing so, your video will surely leave a lasting impression. It can summarize the main message, provide a call to action, or create an emotional impact.
11. Smooth Transitions Between Scenes
Another way is to add smooth transitions if your video includes multiple scenes or locations. Use techniques like matching action or complementary visuals to create seamless transitions. It will surely enhance the viewer’s experience.
12. Test and Refine
Lastly, preview your edited video and gather feedback from others to ensure its effectiveness. Adjust the sequence, pacing, or elements as necessary to improve the overall flow and impact. It will help you to finalize your video with a little touch-up using the feedback.
Part 2: Wondershare Filmora and Video Editing: A Heaven For Video Editors
Wondershare Filmora is a video editing solution for all of your boring videos. If you’re a content creator and want to up your game, use a good editing tool like Filmora. This platform provides you with different templates and presets that you can apply to your content. Furthermore, you don’t need extensive training to learn this tool, as it is pretty straightforward.
However, this tool has a lot to offer, including its new AI-powered features and options. You can automatically audio duct using this tool and much more. If you can’t find any suitable music for your video, simply search, listen, and use audio files in the tool. Wondershare Filmora is indeed heaven for video editors and enthusiasts, as it offers so much. Be it long or short video clips; this tool will help you easily edit them.
Free Download For Win 7 or later(64-bit)
Free Download For macOS 10.14 or later
Part 3: Learning Different Ways of Importing Video Clips in Filmora
If you’re searching for ways to import videos in Wondershare Filmora, you’re in luck. This portion is going to discuss different ways to import long and short video clips in the tool.
Filmora Tutorial - Import And Organize Media Files
Step 1Launch Wondershare Filmora and Create a New Project
Access Wondershare Filmora on your system. Start a new project by selecting “New Project.”

Step 2Select the Import Option
In the new window, select “Click here to import media” and choose the files you want to import into the tool.

Step 3Import Files by Drag and Down
Alternatively, drag and drop your media files into the Media Import section. In this way, you can choose your media using dragging and dropping.

Step 4Import Your Media Files from Drop-Down Menu
Another way to import files is by locating the Media Import section and clicking the “Import” drop-down menu. Then select “Import Media Files” and browse to choose your media file.

Step 5Import Using Shortcut Keys
You can use shortcut keys by launching the tool and pressing “Ctrl + I.” A new window will appear where you can add media files.

Step 6Import Your Media Folder
To import a media folder, go to the Media Import section and click the “Import” drop-down menu. Then, select “Import a Media Folder” and choose the media you want to import.

Step 7Import from a Device
Wondershare Filmora also allows you to import media directly from an external camera or phone. Attach the device, go to the “Import” drop-down menu, and select “Import from a Camera or a Phone.” Next, choose the media from your device folder and click “OK.”

Step 8Import from Your Cloud Storage
You can also import media files from your cloud storage. In the “Import” drop-down menu, find “Import from other Apps” and select it. Further, select the storage app from where you want to import your media files. Once your storage account is linked to your computer, you can easily import media files from there as well.

Part 4: Adjustment Layers: A New Thing in Filmora?
Wondershare Filmora is the ultimate editing tool that even lets you add layers to your video. The Filmora adjustment layer will allow you to make changes without changing the original footage.
Filmroa Tutorial - Adjustment Layers in Filmora Files
Free Download For Win 7 or later(64-bit)
Free Download For macOS 10.14 or later
Step 1Add an Adjustment Layer
To create a video slideshow using a Filmora adjustment layer, open the tool and create a new project. Once you’ve imported all the video clips in the timeline then, select the “Media” button. Proceed next by choosing the “Adjustment Layer” tab in the bottom panel. Then, click on the layer and drop it in the timeline above your video.

Step 2Apply Effects to the Adjustment Layer
If you want to add effects, select the adjustment layer and locate the “Effects” button. Next, drag and drop the effect onto the adjustment layer.

Step 3Color Correct Your Adjustment Layer
Adjust the color toning of your video by finding the “Histogram” icon in the “Preview” section. Modify the curves according to your preference while turning on this function. Continue to select the “Adjustment Layer” and lead to the “Color” tab to look for the “Curves” option.

Step 4Add Multiple Adjustment Layers
Additionally, you can apply different effects at different durations and drag the adjustment layer to the end of the layer. Further, split the adjustment layer using the “Playhead” slider at the desired duration to add a new effect. To make your slideshow better, you can also add transition effects by dragging and dropping them between two clips.

Step 5Save as a Preset
You can also save your adjustment layer as a preset. Select your adjustment layer, locate the “Save as Custom” option in the right panel, and click on it. This will save the adjustment layer as a preset. Your preset will be in the “Adjustment Layer” section of the “Media” tab.

Conclusion
Video editing might not be as easy as you think. It is a skill that requires time, effort, and even knowledge. There are many people who took video editing and post-production as a professional career. You can also learn to edit videos like a professional by taking baby steps. Firstly you can learn how to adjust clips and import them in Wondershare Filmora, a great tool.
How to Slow Down a Video on iPhone and Android The Easy Way
How to edit a video to slow motion on iPhone and Android? Slow motion is an important part of video editing. You would be enhancing your feature-length films or simply preparing cool stuff for posting on social media. By slowing down some or all the scenes of your video, you make it appear cool and more interesting. The slo mo allows viewers to notice specific details of your videos or focus on what you want them to. To show you how to make slow motion video in Android and iPhone, we are going to introduce a versatile video editing app that works well on both platforms. This article will provide the step-by-step process on how to edit video to slow motion on iPhone and Android using Wondershare Filmora.
Slow Motion Maker Slow your video’s speed with better control of your keyframes to create unique cinematic effects!
Free Download Free Download Learn More

Part 1. How to Make Slow Motion Videos on iPhone With Filmora : 2 Ways
Creating slo mo videos is a staple in video editing, which helps make videos more cinematic and engaging. Understanding how to edit iPhone slow motion video will help you to create quality videos on the go. It also gives you more freedom in how you tell your visual story or keeping the attention of your viewers throughout the video.
Free Download For Win 7 or later(64-bit)
Free Download For macOS 10.14 or later
When you slow motion a video, you make it easier for your viewers to observe details in every minute. This is also an effective way to add emotional weight or a dramatic flair to your videos. Let’s explore how to edit a video slow motion on iPhone with Wondershare Filmora.
Step 1: Download Wondershare Filmora
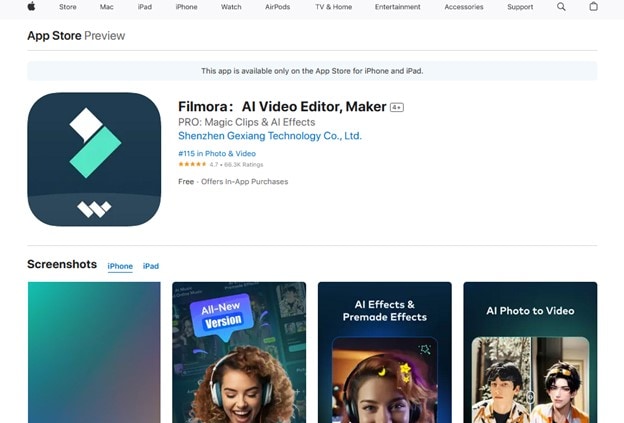
Open the App Store on your phone. Search for Wondershare Filmora, download and launch the app on your phone. Follow the instructions on the screen to create a Filmora account or log in to an existing one to start using the app.
Step 2: Import Video to Filmora
Once you open the Filmora app, tap the + button and import the video you want to edit from your photo library.

Step 3: Slow Down the Video
Once you have imported the video, slow it down to your desired speed. You have two ways to achieve this with Filmora for iPhone:
Method 1Use the Uniform Speed Slider
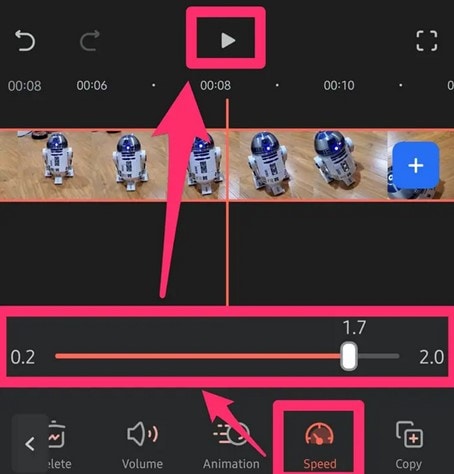
Tap on the video clip, and at the bottom of the screen, select the speed slider. Adjust the slider to the right or left to adjust the speed of your video. Then tap Done, and save your video.
Method 2Use the Speed Ramping Feature
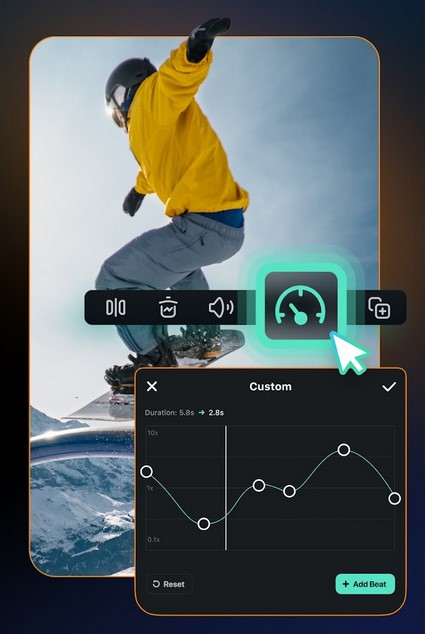
The speed ramping feature will gradually change the speed of your video. When done right, speed ramps in a video add a cinematic feel and look. Tap on the video clip. Then tap on the Speed Ramping feature at the bottom of the screen. Use the graph that appears to set the speed ramp for your video. You may choose the presets already available or customize the speed based on your own desired setting. Tap Done when you are satisfied and save the video.
Part 2. How to Make Slow Motion Videos on Android with Filmora : 2 Ways
The Android operating systems does allow you to slow down or speed up video. However, third-party apps like Wondershare Filmors provide more versatile and better outcomes. The app helps you quickly change the playback speed of a video. It is a great choice for anyone wondering how to make slow motion video in Android.
You can opt for speeding up or slowing down the video based on what you specifically want to achieve. There is also the option to use the Speed Ramp feature which allows you to customize different speed rates for the same clip. In some circumstances, combining the two features can produce exceptional results in your video editing projects. Let’s have a look at how you can use this app on your Android phone.
Free Download For Win 7 or later(64-bit)
Free Download For macOS 10.14 or later
Step 1: Download and Install Filmora
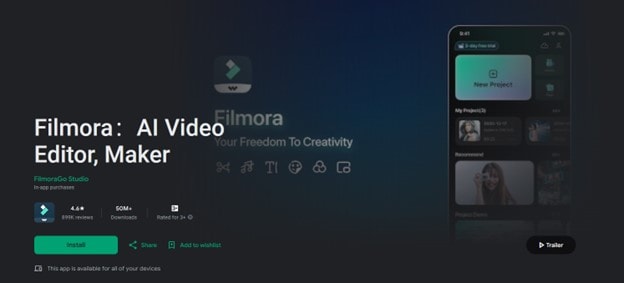
Search for Wondershare Filmora in the Google Play Store. The app is available for Android devices running Android 7.0 or higher, making it compatible with a wide range of devices. Download and install the Filmora: AI Video Editor and Maker app on your Android phone. Start the app and follow the instructions to create a new or sign into an existing account.
Step 2: Import Your Video into Filmora
Once you start the Filmora app on your Android device, tap the + button and select the video you want to import. This will add the video files in Filmora to start editing its specific components, including speed.

Step 3: Adjust the Speed with Filmora
Filmora for Android offers two methods to edit the speed of your video. You can use the speed slider for direct editing or the Speed Ramping feature for a more creative approach.
Method 1Use the Uniform Speed Slider
Tap the video that you have imported. Then, select the speed slider at the bottom of the screen. Adjust the speed of the video by dragging the speed slider to the left or right. Once satisfied, tap the Check button and save your video.

Method 2Use the Speed Ramping Feature
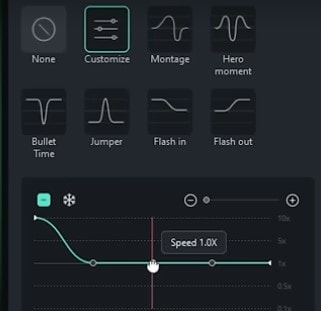
With the Speed Ramping feature, adjust the speed of your Android video gradually in a more creative manner. You may slow it down at the beginning or the end while accelerating the middle. This makes the video fun and more engaging to your audience.
To use this feature on Filmora for Android, tap on the video clip and select the Speed Ramping icon at the bottom of the screen. Use the graph that appears to adjust how you want the video to slow down or speed up when playing it back. Tap on the Check button once done and save your video.
Conclusion
Creating slow-motion videos is a vital skill in video editing. It improves visual storytelling and keeps your audience more engaging by focusing on the most important aspects of your videos. Wondering how to edit slo mo video on iPhone and Android devices, Wondershare Filmora offers an intuitive feature to do this. The user-friendly tool is effective in slowing down videos on both iPhone and Android phones. Download the app App Store for iPhone and Play Store for Android to enhance your slow-motion videos and unleash the creativity of mobile phone video editing.
Free Download Free Download Learn More

Part 1. How to Make Slow Motion Videos on iPhone With Filmora : 2 Ways
Creating slo mo videos is a staple in video editing, which helps make videos more cinematic and engaging. Understanding how to edit iPhone slow motion video will help you to create quality videos on the go. It also gives you more freedom in how you tell your visual story or keeping the attention of your viewers throughout the video.
Free Download For Win 7 or later(64-bit)
Free Download For macOS 10.14 or later
When you slow motion a video, you make it easier for your viewers to observe details in every minute. This is also an effective way to add emotional weight or a dramatic flair to your videos. Let’s explore how to edit a video slow motion on iPhone with Wondershare Filmora.
Step 1: Download Wondershare Filmora
Open the App Store on your phone. Search for Wondershare Filmora, download and launch the app on your phone. Follow the instructions on the screen to create a Filmora account or log in to an existing one to start using the app.

Step 2: Import Video to Filmora
Once you open the Filmora app, tap the + button and import the video you want to edit from your photo library.

Step 3: Slow Down the Video
Once you have imported the video, slow it down to your desired speed. You have two ways to achieve this with Filmora for iPhone:
Method 1Use the Uniform Speed Slider
Tap on the video clip, and at the bottom of the screen, select the speed slider. Adjust the slider to the right or left to adjust the speed of your video. Then tap Done, and save your video.

Method 2Use the Speed Ramping Feature
The speed ramping feature will gradually change the speed of your video. When done right, speed ramps in a video add a cinematic feel and look. Tap on the video clip. Then tap on the Speed Ramping feature at the bottom of the screen. Use the graph that appears to set the speed ramp for your video. You may choose the presets already available or customize the speed based on your own desired setting. Tap Done when you are satisfied and save the video.

Part 2. How to Make Slow Motion Videos on Android with Filmora : 2 Ways
The Android operating systems does allow you to slow down or speed up video. However, third-party apps like Wondershare Filmors provide more versatile and better outcomes. The app helps you quickly change the playback speed of a video. It is a great choice for anyone wondering how to make slow motion video in Android.
You can opt for speeding up or slowing down the video based on what you specifically want to achieve. There is also the option to use the Speed Ramp feature which allows you to customize different speed rates for the same clip. In some circumstances, combining the two features can produce exceptional results in your video editing projects. Let’s have a look at how you can use this app on your Android phone.
Free Download For Win 7 or later(64-bit)
Free Download For macOS 10.14 or later
Step 1: Download and Install Filmora
Search for Wondershare Filmora in the Google Play Store. The app is available for Android devices running Android 7.0 or higher, making it compatible with a wide range of devices. Download and install the Filmora: AI Video Editor and Maker app on your Android phone. Start the app and follow the instructions to create a new or sign into an existing account.

Step 2: Import Your Video into Filmora
Once you start the Filmora app on your Android device, tap the + button and select the video you want to import. This will add the video files in Filmora to start editing its specific components, including speed.

Step 3: Adjust the Speed with Filmora
Filmora for Android offers two methods to edit the speed of your video. You can use the speed slider for direct editing or the Speed Ramping feature for a more creative approach.
Method 1Use the Uniform Speed Slider
Tap the video that you have imported. Then, select the speed slider at the bottom of the screen. Adjust the speed of the video by dragging the speed slider to the left or right. Once satisfied, tap the Check button and save your video.

Method 2Use the Speed Ramping Feature
With the Speed Ramping feature, adjust the speed of your Android video gradually in a more creative manner. You may slow it down at the beginning or the end while accelerating the middle. This makes the video fun and more engaging to your audience.
To use this feature on Filmora for Android, tap on the video clip and select the Speed Ramping icon at the bottom of the screen. Use the graph that appears to adjust how you want the video to slow down or speed up when playing it back. Tap on the Check button once done and save your video.

Conclusion
Creating slow-motion videos is a vital skill in video editing. It improves visual storytelling and keeps your audience more engaging by focusing on the most important aspects of your videos. Wondering how to edit slo mo video on iPhone and Android devices, Wondershare Filmora offers an intuitive feature to do this. The user-friendly tool is effective in slowing down videos on both iPhone and Android phones. Download the app App Store for iPhone and Play Store for Android to enhance your slow-motion videos and unleash the creativity of mobile phone video editing.
Also read:
- In 2024, Easy Way to Add Transitions to Videos
- Updated In 2024, Best 8 Animated Video Makers
- In 2024, Overview of Perfect Moody LUTs for VN Editor
- Updated Easy Guide to Overlay Videos in Premiere Pro for 2024
- Updated In 2024, 10 Catchy Pixel Art Wallpapers and How to Custom Your Own
- Best Free Video Editing Software for Reddit for 2024
- How to Add Font Effects to Videos
- Updated 2024 Approved Best 8 Online GIF to APNG Converters
- Updated How to Slow Down Time-Lapse Videos on iPhone for 2024
- In 2024, What Is the Selective Color Effect, and How Can You Add This Effect to Your Videos Using Wondershare Filmora? A Complete Guide for Beginners
- Updated For Artists Who Are Making Videos for Show Their Knowledge or Projects, Add some Effects for the Video Can Always Provoke Interests and Attention. This Article Will Show You How to Do that Easily
- New Something About Skin Care Vlog Ideas
- Best Method to Split Video Into Parts Online
- In 2024, Read and Learn How to Convert a Slow-Motion Video to Normal in This Guide. Besides, Find the Best Desktop Solution to Adjust Video Speed Quickly and Easily
- What Is the Best MP4 Cutters for YouTubers on Mac?
- New How to Overlay Video in Premiere Pro
- New Complete Tutorial on After Effects Countdown Timer Adding
- New Video Editors Use the Loading Text Effect to Create Impressive and Descriptive Videos. Let Us Understand the Detailed Steps to Customize the Loading Text Effect in Wondershare Filmora
- Updated 2024 Approved Make Super Easy Coin Magic With Filmora
- New 2024 Approved Top List Best VHS Sound Effect That You Can Use in Video Making
- Discover 30+ Amazing Templates for VN Video Editor to Elevate Your Videos. Create Professional-Looking Videos with Ease
- 2024 Approved 4 Methods to Crop a Video on Android Easily
- How to Make Text Reveal Effect for Your Video for 2024
- New Making Slow Motion Videos in Premiere Pro A Review on The Best Methods for 2024
- Updated Detailed Guide to Merge Videos in VLC Media Player
- Updated The Only Guide Youll Ever Need to Learn GIF Design
- Windows Movie Maker Review for 2024
- New In 2024, 5 Methods to Denoise a Video
- New 2024 Approved A Guide To Motion Tracking Using The Best Video Editors
- Updated 2024 Approved Ll About GIF Keyboard That You Want to Know
- Updated 2024 Approved 6 Websites to Free Download Motivational Video Footage
- How to Make Subtitle Videos for 2024
- In 2024, Do You Want to Add a Slow-Mo Effect in Your Videos? In This Guide, We Will Discuss How to Add Slow-Motion Effects in the Videos with After Effects in an Efficient Way
- In 2024, Best Tools To Create Blend Image Collage
- 2024 Approved How to Animate Designs With Canva GIF
- Updated How to Make an Adobe Slideshow the Easy Way for 2024
- Updated 2024 Approved Best Jump Cut Editing Tricks
- New Why You Should Master Slideshows In Lightroom?
- New In 2024, The Best Way To Color Grading & Color Correction in Filmora
- New In 2024, Backup and Organize Your Tons of Footage in Minutes
- New In 2024, | Best WMV to GIF Converters
- New How to Add Echo Effect to Video
- Updated What Is the Best FPS for YouTube Videos?
- New 6 Best Methods to Make a Video Longer for 2024
- How To Change Sky Background With Adobe Photoshop Best Ways
- Updated HOW to Add Fade to Black on Premiere Pro
- 2024 Approved How to Use Renderforest Intro Video Maker
- Updated Discover the Essential Steps for Editing a Music Video in This Guide. Learn About Aspect Ratio and the First Cut Process to Create a Visually Captivating Video
- Updated In 2024, Top 10 Sony LUT for Different Purposes
- In 2024, Top Apps and Online Tools To Track Xiaomi Civi 3 Phone With/Without IMEI Number
- How to Stop My Spouse from Spying on My Oppo A1x 5G | Dr.fone
- In 2024, How To Unlock a Xiaomi Redmi Note 12 4G Easily?
- Unlocking Apple iPhone 13 mini Passcode without a Computer
- Full Tutorial to Bypass Your Xiaomi Redmi Note 12 4G Face Lock?
- In 2024, What Legendaries Are In Pokemon Platinum On Apple iPhone 14? | Dr.fone
- In 2024, A Step-by-Step Guide on Using ADB and Fastboot to Remove FRP Lock on your Samsung Galaxy Z Flip 5
- Top 10 Best Spy Watches For your Xiaomi Redmi 12 5G | Dr.fone
- In 2024, How to Transfer Contacts from Tecno Camon 20 Pro 5G to iPhone XS/11 | Dr.fone
- In 2024, Android to Apple How To Transfer Photos From Oppo A56s 5G to iPad Easily | Dr.fone
- In 2024, How To Remove or Bypass Knox Enrollment Service On Realme GT Neo 5 SE
- How to Update iPhone 7 Plus without Losing Data? | Dr.fone
- In 2024, Latest way to get Shiny Meltan Box in Pokémon Go Mystery Box On Poco C65 | Dr.fone
- How to share/fake gps on Uber for Nokia G310 | Dr.fone
- Title: 6 Ways to Mimic Professional Filming Gears for 2024
- Author: Chloe
- Created at : 2024-05-20 03:37:44
- Updated at : 2024-05-21 03:37:44
- Link: https://ai-editing-video.techidaily.com/6-ways-to-mimic-professional-filming-gears-for-2024/
- License: This work is licensed under CC BY-NC-SA 4.0.

