:max_bytes(150000):strip_icc():format(webp)/001_2654847-5b99b903c9e77c005077d0d8.jpg)
A Complete Guide to Use Distortion Effect in Premiere Pro for 2024

A Complete Guide to Use Distortion Effect in Premiere Pro
Create High-Quality Video - Wondershare Filmora
An easy and powerful YouTube video editor
Numerous video and audio effects to choose from
Detailed tutorials are provided by the official channel
Premiere Pro is one of the most popular timeline-based video editing software, with over 9 million users. It’s the successor to Adobe Premiere, and it comes with cool distortion effects. We’ll look at Premiere Pro distortion effects and how to use them.
In this article
01 How to Use Distortion Effect in Premiere Pro?
02 Bonus! Free Distortion Effects for Premiere Pro
Adobe Premiere Pro offers a wide variety of beneficial editing tools and effects. Below are some of the impressive distortion effects you’ll find in Premiere Pro and how to use them in your project.
1. Corner Pin Effect
This effect distorts your image by simply changing the position of its corners. You can use the Corner pin effect to twist, skew, shrink, or stretch an image. Additionally, you can use it to simulate movement or perspective pivoting from the edge of your clip like a door opening.
You can directly manipulate the properties of the Corner Pin effect in the Program monitor by clicking the Transform right next to Corner Pin. To adjust the properties, drag one of the corner handles.
- To use this effect, open Premiere Pro and click File. Choose Import from the drop-down menu. The File Explorer window will open and allow you to find your footage. Select the video file you want to import, then click Open.
- Go to Effects Control and click Distortion. Choose Corner Pin Effect from the drop-down menu.

- You can now pin each corner from its original point to another specific point by adjusting the slider on the Upper Left, Upper Right, Lower Left, and Lower Right. You can also highlight your selection tool when working with the Corner Pin effect.

2. Lens Distortion Effect
This distortion effect Premiere Pro simulates the distorted lens through which people view the clip.
1. Go to Effects Control>Distortion>Lens Distortion Effect.
2. Choose the settings you want to use from the available options and adjust the slider.
- The Vertical and Horizontal Decentering control displaces the lens’ focal and makes the image bend and smear. The image will wrap in on itself at extreme settings.
- The Curvature setting alters the curvature of the lens. You can specify a positive value to make the image convex, while the negative value makes the image concave.
- The Vertical and Horizontal Prism FX setting created results similar to horizontal decentering and vertical, but the image does not wrap in on itself at extreme values.
- Use the Fill Color option to specify the background color, and Fill Alpha to make your background transparent.

3. Magnify Effect
This effect allows you to enlarge a selected area of your clip. The Magnify effect acts as a magnifying glass set over an area of an image. You can also use this effect to scale the whole image far beyond 100 percent and still maintain resolution.
1. To use this effect, go to Effect Control>Distortion>Magnify.
2. Next, go to the left side of the Effects Control panel and make the necessary adjustments to suit your preferences.
- Shape: This control specifies the magnified area shape.
- Center: The Center control allows you to specify the center of the magnified section.
- Magnification: This setting lets users specify the percentage of the magnification of the area they have selected, while the values represent the scale percentage.
- Link: The Link control allows you to specify how the effect will link the Size, Feather, and Magnification amount, to enable them to decrease or increase proportionally. You will disable the Resize Layer option if you set the Link control to any of the available settings except None. Setting the Link control to any setting except None disables Resize Layer. Size & Feather To Magnification allows you to specify that the edge feather and size of the magnified section decrease or increase proportionally regarding the magnification adjustment.
- Size: This control allows you to specify the magnified area size in pixels.
- Feather: With the Feather option, you can specify the amount of feather the effect applies to the magnified area edge. Lower values will sharpen the edge. Higher values will soften the edge while blending the edge with the layer that’s behind it.
- Opacity: This control allows you to specify the transparency of the magnified region.
- Scaling: Use this option to specify the kind of scaling the effect is using to magnify an image.
- Blending Mode: Use this control to specify the blend mode the effect will use to combine the original clip with the magnified area. The None option shows transparent pixels around the magnified section.
- Resize Layer: Selecting this option means the effect will only use the boundaries as the clip’s edge when the magnified region extends beyond the original boundaries of the clip. Deselecting the Resize Layer means that the boundaries of the clip will crop any area of your image outside the bounding box of the original clip.

4. Mirror Effect
This distortion Premiere Pro effect splits an image along a line while reflecting one side onto the other. Where the reflection appears and which side will be reflected is determined by the reflection angles.
1. Head over to Effect Control>Distortion>Mirror to use this effect.
2. Adjust the controls until you get the results you desire.
- Reflection Angle: With the Reflection Angle control, you can specify the angle of reflection and where it appears on the clip. A zero-degree angle reflects the left-hand side on the right.
- Reflection Center: This control allows you to specify the position of the line. You need to click the box, then drag the resulting crosshair up to the area in the image where you would like to place the line.

5. Offset Effect
This effect pans your image within a clip, and visual details pushed off one side of this image will appear on the opposite side. You have to perform the offset with subpixel precision at the best quality.
Also, you can use Offset with a combination of other effects. Head over to Effect Control>Distortion>Offset to use this effect.

6. Spherize Effect
The Spherize effect allows users to wrap a video clip around a spherical shape. You can use it to give texts and objects a three-dimensional effect. Go to Effect Control>Distortion>Spherize and adjust the radius and center of the sphere.

7. Transform Effect
This effect applies 2-dimensional geometric transformations to your clip. You can use this effect to skew clips along any axis.
1. Go to Effect Control>Distortion>Transform to apply this effect to your clip.
2. Use Transform settings to adjust Opacity, Skew, Rotation, Scale, Anchor Point, and more.

8. Turbulent Displace Effect
This fun effect utilizes fractal noise to create turbulent Premiere Pro distortion effects in your image. You can use the Turbulent Displace effect to add movement to your clip.
1. Head to Effect Control>Distortion>Turbulent Displace.
2. Adjust the following controls:
- Displacement
- Amount
- Size
- Offset (Turbulence)
- Complexity
- Evolution
- Pinning
- Resize Layer
- Antialiasing For Best Quality

9. Twirl Effect
The Twirl effect allows you to rotate your clip around its center. It rotates the image more sharply in the middle than at the edge. You can use it on faces to make a funny clip. Navigate to Effect Control>Distortion>Twirl to start using this effect. Next, use the settings to adjust how much angle it twirls and the radius.

10. Wave Warp Effect
This effect is one of the most popular Premiere Pro distortion effects. It generates the appearance of a wave as it’s traveling across an image. The Wave Warp effect allows you to produce various wave shapes, including sine, circular, and square waves.
It’s automatically animated at a steady speed across the time range, and that’s without frames. You need to set keyframes to vary speeds.
1. Head to Effect Control>Distortion>Wave Warp to apply this effect in your video clip.
2. Now, change the wave speed, direction, height, width, and type to suit your preference.

Bonus! Free Distortion Effects for Premiere Pro
1. Liquid Distortion Effect
This effect can distort the content in a clip and can be used to shift into the next clip. It could be utilized in editing or used as a transition.

2. Earthquake Effect
This effect adds a shaking motion to the video clip you add it to; it works as a transition but could also be a useful editing tool.

3. Glass Effect
This effect can add various blurs to the video clip and be used to transition from one clip to the next.

4. TV Effect
This effect imitates the view of a television being turned on or off. You can use it to introduce a new video clip. It would also be a great start or end to the entire video.

5. Glitch Effect
This effect adds a glitch to the video clip. You can use it in editing or as a transition from one clip to the next.

Conclusion
● You can add any of these Premiere Pro distortion effects to make your videos more catchy. In turn, they will get more attention and views. Premiere Pro comes with tons of distortion effects and a responsive interface.
Premiere Pro is one of the most popular timeline-based video editing software, with over 9 million users. It’s the successor to Adobe Premiere, and it comes with cool distortion effects. We’ll look at Premiere Pro distortion effects and how to use them.
In this article
01 How to Use Distortion Effect in Premiere Pro?
02 Bonus! Free Distortion Effects for Premiere Pro
Adobe Premiere Pro offers a wide variety of beneficial editing tools and effects. Below are some of the impressive distortion effects you’ll find in Premiere Pro and how to use them in your project.
1. Corner Pin Effect
This effect distorts your image by simply changing the position of its corners. You can use the Corner pin effect to twist, skew, shrink, or stretch an image. Additionally, you can use it to simulate movement or perspective pivoting from the edge of your clip like a door opening.
You can directly manipulate the properties of the Corner Pin effect in the Program monitor by clicking the Transform right next to Corner Pin. To adjust the properties, drag one of the corner handles.
- To use this effect, open Premiere Pro and click File. Choose Import from the drop-down menu. The File Explorer window will open and allow you to find your footage. Select the video file you want to import, then click Open.
- Go to Effects Control and click Distortion. Choose Corner Pin Effect from the drop-down menu.

- You can now pin each corner from its original point to another specific point by adjusting the slider on the Upper Left, Upper Right, Lower Left, and Lower Right. You can also highlight your selection tool when working with the Corner Pin effect.

2. Lens Distortion Effect
This distortion effect Premiere Pro simulates the distorted lens through which people view the clip.
1. Go to Effects Control>Distortion>Lens Distortion Effect.
2. Choose the settings you want to use from the available options and adjust the slider.
- The Vertical and Horizontal Decentering control displaces the lens’ focal and makes the image bend and smear. The image will wrap in on itself at extreme settings.
- The Curvature setting alters the curvature of the lens. You can specify a positive value to make the image convex, while the negative value makes the image concave.
- The Vertical and Horizontal Prism FX setting created results similar to horizontal decentering and vertical, but the image does not wrap in on itself at extreme values.
- Use the Fill Color option to specify the background color, and Fill Alpha to make your background transparent.

3. Magnify Effect
This effect allows you to enlarge a selected area of your clip. The Magnify effect acts as a magnifying glass set over an area of an image. You can also use this effect to scale the whole image far beyond 100 percent and still maintain resolution.
1. To use this effect, go to Effect Control>Distortion>Magnify.
2. Next, go to the left side of the Effects Control panel and make the necessary adjustments to suit your preferences.
- Shape: This control specifies the magnified area shape.
- Center: The Center control allows you to specify the center of the magnified section.
- Magnification: This setting lets users specify the percentage of the magnification of the area they have selected, while the values represent the scale percentage.
- Link: The Link control allows you to specify how the effect will link the Size, Feather, and Magnification amount, to enable them to decrease or increase proportionally. You will disable the Resize Layer option if you set the Link control to any of the available settings except None. Setting the Link control to any setting except None disables Resize Layer. Size & Feather To Magnification allows you to specify that the edge feather and size of the magnified section decrease or increase proportionally regarding the magnification adjustment.
- Size: This control allows you to specify the magnified area size in pixels.
- Feather: With the Feather option, you can specify the amount of feather the effect applies to the magnified area edge. Lower values will sharpen the edge. Higher values will soften the edge while blending the edge with the layer that’s behind it.
- Opacity: This control allows you to specify the transparency of the magnified region.
- Scaling: Use this option to specify the kind of scaling the effect is using to magnify an image.
- Blending Mode: Use this control to specify the blend mode the effect will use to combine the original clip with the magnified area. The None option shows transparent pixels around the magnified section.
- Resize Layer: Selecting this option means the effect will only use the boundaries as the clip’s edge when the magnified region extends beyond the original boundaries of the clip. Deselecting the Resize Layer means that the boundaries of the clip will crop any area of your image outside the bounding box of the original clip.

4. Mirror Effect
This distortion Premiere Pro effect splits an image along a line while reflecting one side onto the other. Where the reflection appears and which side will be reflected is determined by the reflection angles.
1. Head over to Effect Control>Distortion>Mirror to use this effect.
2. Adjust the controls until you get the results you desire.
- Reflection Angle: With the Reflection Angle control, you can specify the angle of reflection and where it appears on the clip. A zero-degree angle reflects the left-hand side on the right.
- Reflection Center: This control allows you to specify the position of the line. You need to click the box, then drag the resulting crosshair up to the area in the image where you would like to place the line.

5. Offset Effect
This effect pans your image within a clip, and visual details pushed off one side of this image will appear on the opposite side. You have to perform the offset with subpixel precision at the best quality.
Also, you can use Offset with a combination of other effects. Head over to Effect Control>Distortion>Offset to use this effect.

6. Spherize Effect
The Spherize effect allows users to wrap a video clip around a spherical shape. You can use it to give texts and objects a three-dimensional effect. Go to Effect Control>Distortion>Spherize and adjust the radius and center of the sphere.

7. Transform Effect
This effect applies 2-dimensional geometric transformations to your clip. You can use this effect to skew clips along any axis.
1. Go to Effect Control>Distortion>Transform to apply this effect to your clip.
2. Use Transform settings to adjust Opacity, Skew, Rotation, Scale, Anchor Point, and more.

8. Turbulent Displace Effect
This fun effect utilizes fractal noise to create turbulent Premiere Pro distortion effects in your image. You can use the Turbulent Displace effect to add movement to your clip.
1. Head to Effect Control>Distortion>Turbulent Displace.
2. Adjust the following controls:
- Displacement
- Amount
- Size
- Offset (Turbulence)
- Complexity
- Evolution
- Pinning
- Resize Layer
- Antialiasing For Best Quality

9. Twirl Effect
The Twirl effect allows you to rotate your clip around its center. It rotates the image more sharply in the middle than at the edge. You can use it on faces to make a funny clip. Navigate to Effect Control>Distortion>Twirl to start using this effect. Next, use the settings to adjust how much angle it twirls and the radius.

10. Wave Warp Effect
This effect is one of the most popular Premiere Pro distortion effects. It generates the appearance of a wave as it’s traveling across an image. The Wave Warp effect allows you to produce various wave shapes, including sine, circular, and square waves.
It’s automatically animated at a steady speed across the time range, and that’s without frames. You need to set keyframes to vary speeds.
1. Head to Effect Control>Distortion>Wave Warp to apply this effect in your video clip.
2. Now, change the wave speed, direction, height, width, and type to suit your preference.

Bonus! Free Distortion Effects for Premiere Pro
1. Liquid Distortion Effect
This effect can distort the content in a clip and can be used to shift into the next clip. It could be utilized in editing or used as a transition.

2. Earthquake Effect
This effect adds a shaking motion to the video clip you add it to; it works as a transition but could also be a useful editing tool.

3. Glass Effect
This effect can add various blurs to the video clip and be used to transition from one clip to the next.

4. TV Effect
This effect imitates the view of a television being turned on or off. You can use it to introduce a new video clip. It would also be a great start or end to the entire video.

5. Glitch Effect
This effect adds a glitch to the video clip. You can use it in editing or as a transition from one clip to the next.

Conclusion
● You can add any of these Premiere Pro distortion effects to make your videos more catchy. In turn, they will get more attention and views. Premiere Pro comes with tons of distortion effects and a responsive interface.
Premiere Pro is one of the most popular timeline-based video editing software, with over 9 million users. It’s the successor to Adobe Premiere, and it comes with cool distortion effects. We’ll look at Premiere Pro distortion effects and how to use them.
In this article
01 How to Use Distortion Effect in Premiere Pro?
02 Bonus! Free Distortion Effects for Premiere Pro
Adobe Premiere Pro offers a wide variety of beneficial editing tools and effects. Below are some of the impressive distortion effects you’ll find in Premiere Pro and how to use them in your project.
1. Corner Pin Effect
This effect distorts your image by simply changing the position of its corners. You can use the Corner pin effect to twist, skew, shrink, or stretch an image. Additionally, you can use it to simulate movement or perspective pivoting from the edge of your clip like a door opening.
You can directly manipulate the properties of the Corner Pin effect in the Program monitor by clicking the Transform right next to Corner Pin. To adjust the properties, drag one of the corner handles.
- To use this effect, open Premiere Pro and click File. Choose Import from the drop-down menu. The File Explorer window will open and allow you to find your footage. Select the video file you want to import, then click Open.
- Go to Effects Control and click Distortion. Choose Corner Pin Effect from the drop-down menu.

- You can now pin each corner from its original point to another specific point by adjusting the slider on the Upper Left, Upper Right, Lower Left, and Lower Right. You can also highlight your selection tool when working with the Corner Pin effect.

2. Lens Distortion Effect
This distortion effect Premiere Pro simulates the distorted lens through which people view the clip.
1. Go to Effects Control>Distortion>Lens Distortion Effect.
2. Choose the settings you want to use from the available options and adjust the slider.
- The Vertical and Horizontal Decentering control displaces the lens’ focal and makes the image bend and smear. The image will wrap in on itself at extreme settings.
- The Curvature setting alters the curvature of the lens. You can specify a positive value to make the image convex, while the negative value makes the image concave.
- The Vertical and Horizontal Prism FX setting created results similar to horizontal decentering and vertical, but the image does not wrap in on itself at extreme values.
- Use the Fill Color option to specify the background color, and Fill Alpha to make your background transparent.

3. Magnify Effect
This effect allows you to enlarge a selected area of your clip. The Magnify effect acts as a magnifying glass set over an area of an image. You can also use this effect to scale the whole image far beyond 100 percent and still maintain resolution.
1. To use this effect, go to Effect Control>Distortion>Magnify.
2. Next, go to the left side of the Effects Control panel and make the necessary adjustments to suit your preferences.
- Shape: This control specifies the magnified area shape.
- Center: The Center control allows you to specify the center of the magnified section.
- Magnification: This setting lets users specify the percentage of the magnification of the area they have selected, while the values represent the scale percentage.
- Link: The Link control allows you to specify how the effect will link the Size, Feather, and Magnification amount, to enable them to decrease or increase proportionally. You will disable the Resize Layer option if you set the Link control to any of the available settings except None. Setting the Link control to any setting except None disables Resize Layer. Size & Feather To Magnification allows you to specify that the edge feather and size of the magnified section decrease or increase proportionally regarding the magnification adjustment.
- Size: This control allows you to specify the magnified area size in pixels.
- Feather: With the Feather option, you can specify the amount of feather the effect applies to the magnified area edge. Lower values will sharpen the edge. Higher values will soften the edge while blending the edge with the layer that’s behind it.
- Opacity: This control allows you to specify the transparency of the magnified region.
- Scaling: Use this option to specify the kind of scaling the effect is using to magnify an image.
- Blending Mode: Use this control to specify the blend mode the effect will use to combine the original clip with the magnified area. The None option shows transparent pixels around the magnified section.
- Resize Layer: Selecting this option means the effect will only use the boundaries as the clip’s edge when the magnified region extends beyond the original boundaries of the clip. Deselecting the Resize Layer means that the boundaries of the clip will crop any area of your image outside the bounding box of the original clip.

4. Mirror Effect
This distortion Premiere Pro effect splits an image along a line while reflecting one side onto the other. Where the reflection appears and which side will be reflected is determined by the reflection angles.
1. Head over to Effect Control>Distortion>Mirror to use this effect.
2. Adjust the controls until you get the results you desire.
- Reflection Angle: With the Reflection Angle control, you can specify the angle of reflection and where it appears on the clip. A zero-degree angle reflects the left-hand side on the right.
- Reflection Center: This control allows you to specify the position of the line. You need to click the box, then drag the resulting crosshair up to the area in the image where you would like to place the line.

5. Offset Effect
This effect pans your image within a clip, and visual details pushed off one side of this image will appear on the opposite side. You have to perform the offset with subpixel precision at the best quality.
Also, you can use Offset with a combination of other effects. Head over to Effect Control>Distortion>Offset to use this effect.

6. Spherize Effect
The Spherize effect allows users to wrap a video clip around a spherical shape. You can use it to give texts and objects a three-dimensional effect. Go to Effect Control>Distortion>Spherize and adjust the radius and center of the sphere.

7. Transform Effect
This effect applies 2-dimensional geometric transformations to your clip. You can use this effect to skew clips along any axis.
1. Go to Effect Control>Distortion>Transform to apply this effect to your clip.
2. Use Transform settings to adjust Opacity, Skew, Rotation, Scale, Anchor Point, and more.

8. Turbulent Displace Effect
This fun effect utilizes fractal noise to create turbulent Premiere Pro distortion effects in your image. You can use the Turbulent Displace effect to add movement to your clip.
1. Head to Effect Control>Distortion>Turbulent Displace.
2. Adjust the following controls:
- Displacement
- Amount
- Size
- Offset (Turbulence)
- Complexity
- Evolution
- Pinning
- Resize Layer
- Antialiasing For Best Quality

9. Twirl Effect
The Twirl effect allows you to rotate your clip around its center. It rotates the image more sharply in the middle than at the edge. You can use it on faces to make a funny clip. Navigate to Effect Control>Distortion>Twirl to start using this effect. Next, use the settings to adjust how much angle it twirls and the radius.

10. Wave Warp Effect
This effect is one of the most popular Premiere Pro distortion effects. It generates the appearance of a wave as it’s traveling across an image. The Wave Warp effect allows you to produce various wave shapes, including sine, circular, and square waves.
It’s automatically animated at a steady speed across the time range, and that’s without frames. You need to set keyframes to vary speeds.
1. Head to Effect Control>Distortion>Wave Warp to apply this effect in your video clip.
2. Now, change the wave speed, direction, height, width, and type to suit your preference.

Bonus! Free Distortion Effects for Premiere Pro
1. Liquid Distortion Effect
This effect can distort the content in a clip and can be used to shift into the next clip. It could be utilized in editing or used as a transition.

2. Earthquake Effect
This effect adds a shaking motion to the video clip you add it to; it works as a transition but could also be a useful editing tool.

3. Glass Effect
This effect can add various blurs to the video clip and be used to transition from one clip to the next.

4. TV Effect
This effect imitates the view of a television being turned on or off. You can use it to introduce a new video clip. It would also be a great start or end to the entire video.

5. Glitch Effect
This effect adds a glitch to the video clip. You can use it in editing or as a transition from one clip to the next.

Conclusion
● You can add any of these Premiere Pro distortion effects to make your videos more catchy. In turn, they will get more attention and views. Premiere Pro comes with tons of distortion effects and a responsive interface.
Premiere Pro is one of the most popular timeline-based video editing software, with over 9 million users. It’s the successor to Adobe Premiere, and it comes with cool distortion effects. We’ll look at Premiere Pro distortion effects and how to use them.
In this article
01 How to Use Distortion Effect in Premiere Pro?
02 Bonus! Free Distortion Effects for Premiere Pro
Adobe Premiere Pro offers a wide variety of beneficial editing tools and effects. Below are some of the impressive distortion effects you’ll find in Premiere Pro and how to use them in your project.
1. Corner Pin Effect
This effect distorts your image by simply changing the position of its corners. You can use the Corner pin effect to twist, skew, shrink, or stretch an image. Additionally, you can use it to simulate movement or perspective pivoting from the edge of your clip like a door opening.
You can directly manipulate the properties of the Corner Pin effect in the Program monitor by clicking the Transform right next to Corner Pin. To adjust the properties, drag one of the corner handles.
- To use this effect, open Premiere Pro and click File. Choose Import from the drop-down menu. The File Explorer window will open and allow you to find your footage. Select the video file you want to import, then click Open.
- Go to Effects Control and click Distortion. Choose Corner Pin Effect from the drop-down menu.

- You can now pin each corner from its original point to another specific point by adjusting the slider on the Upper Left, Upper Right, Lower Left, and Lower Right. You can also highlight your selection tool when working with the Corner Pin effect.

2. Lens Distortion Effect
This distortion effect Premiere Pro simulates the distorted lens through which people view the clip.
1. Go to Effects Control>Distortion>Lens Distortion Effect.
2. Choose the settings you want to use from the available options and adjust the slider.
- The Vertical and Horizontal Decentering control displaces the lens’ focal and makes the image bend and smear. The image will wrap in on itself at extreme settings.
- The Curvature setting alters the curvature of the lens. You can specify a positive value to make the image convex, while the negative value makes the image concave.
- The Vertical and Horizontal Prism FX setting created results similar to horizontal decentering and vertical, but the image does not wrap in on itself at extreme values.
- Use the Fill Color option to specify the background color, and Fill Alpha to make your background transparent.

3. Magnify Effect
This effect allows you to enlarge a selected area of your clip. The Magnify effect acts as a magnifying glass set over an area of an image. You can also use this effect to scale the whole image far beyond 100 percent and still maintain resolution.
1. To use this effect, go to Effect Control>Distortion>Magnify.
2. Next, go to the left side of the Effects Control panel and make the necessary adjustments to suit your preferences.
- Shape: This control specifies the magnified area shape.
- Center: The Center control allows you to specify the center of the magnified section.
- Magnification: This setting lets users specify the percentage of the magnification of the area they have selected, while the values represent the scale percentage.
- Link: The Link control allows you to specify how the effect will link the Size, Feather, and Magnification amount, to enable them to decrease or increase proportionally. You will disable the Resize Layer option if you set the Link control to any of the available settings except None. Setting the Link control to any setting except None disables Resize Layer. Size & Feather To Magnification allows you to specify that the edge feather and size of the magnified section decrease or increase proportionally regarding the magnification adjustment.
- Size: This control allows you to specify the magnified area size in pixels.
- Feather: With the Feather option, you can specify the amount of feather the effect applies to the magnified area edge. Lower values will sharpen the edge. Higher values will soften the edge while blending the edge with the layer that’s behind it.
- Opacity: This control allows you to specify the transparency of the magnified region.
- Scaling: Use this option to specify the kind of scaling the effect is using to magnify an image.
- Blending Mode: Use this control to specify the blend mode the effect will use to combine the original clip with the magnified area. The None option shows transparent pixels around the magnified section.
- Resize Layer: Selecting this option means the effect will only use the boundaries as the clip’s edge when the magnified region extends beyond the original boundaries of the clip. Deselecting the Resize Layer means that the boundaries of the clip will crop any area of your image outside the bounding box of the original clip.

4. Mirror Effect
This distortion Premiere Pro effect splits an image along a line while reflecting one side onto the other. Where the reflection appears and which side will be reflected is determined by the reflection angles.
1. Head over to Effect Control>Distortion>Mirror to use this effect.
2. Adjust the controls until you get the results you desire.
- Reflection Angle: With the Reflection Angle control, you can specify the angle of reflection and where it appears on the clip. A zero-degree angle reflects the left-hand side on the right.
- Reflection Center: This control allows you to specify the position of the line. You need to click the box, then drag the resulting crosshair up to the area in the image where you would like to place the line.

5. Offset Effect
This effect pans your image within a clip, and visual details pushed off one side of this image will appear on the opposite side. You have to perform the offset with subpixel precision at the best quality.
Also, you can use Offset with a combination of other effects. Head over to Effect Control>Distortion>Offset to use this effect.

6. Spherize Effect
The Spherize effect allows users to wrap a video clip around a spherical shape. You can use it to give texts and objects a three-dimensional effect. Go to Effect Control>Distortion>Spherize and adjust the radius and center of the sphere.

7. Transform Effect
This effect applies 2-dimensional geometric transformations to your clip. You can use this effect to skew clips along any axis.
1. Go to Effect Control>Distortion>Transform to apply this effect to your clip.
2. Use Transform settings to adjust Opacity, Skew, Rotation, Scale, Anchor Point, and more.

8. Turbulent Displace Effect
This fun effect utilizes fractal noise to create turbulent Premiere Pro distortion effects in your image. You can use the Turbulent Displace effect to add movement to your clip.
1. Head to Effect Control>Distortion>Turbulent Displace.
2. Adjust the following controls:
- Displacement
- Amount
- Size
- Offset (Turbulence)
- Complexity
- Evolution
- Pinning
- Resize Layer
- Antialiasing For Best Quality

9. Twirl Effect
The Twirl effect allows you to rotate your clip around its center. It rotates the image more sharply in the middle than at the edge. You can use it on faces to make a funny clip. Navigate to Effect Control>Distortion>Twirl to start using this effect. Next, use the settings to adjust how much angle it twirls and the radius.

10. Wave Warp Effect
This effect is one of the most popular Premiere Pro distortion effects. It generates the appearance of a wave as it’s traveling across an image. The Wave Warp effect allows you to produce various wave shapes, including sine, circular, and square waves.
It’s automatically animated at a steady speed across the time range, and that’s without frames. You need to set keyframes to vary speeds.
1. Head to Effect Control>Distortion>Wave Warp to apply this effect in your video clip.
2. Now, change the wave speed, direction, height, width, and type to suit your preference.

Bonus! Free Distortion Effects for Premiere Pro
1. Liquid Distortion Effect
This effect can distort the content in a clip and can be used to shift into the next clip. It could be utilized in editing or used as a transition.

2. Earthquake Effect
This effect adds a shaking motion to the video clip you add it to; it works as a transition but could also be a useful editing tool.

3. Glass Effect
This effect can add various blurs to the video clip and be used to transition from one clip to the next.

4. TV Effect
This effect imitates the view of a television being turned on or off. You can use it to introduce a new video clip. It would also be a great start or end to the entire video.

5. Glitch Effect
This effect adds a glitch to the video clip. You can use it in editing or as a transition from one clip to the next.

Conclusion
● You can add any of these Premiere Pro distortion effects to make your videos more catchy. In turn, they will get more attention and views. Premiere Pro comes with tons of distortion effects and a responsive interface.
How to Create Chroma Key Written Text Effects in Filmora
Did you know it only takes a few clicks to key out the color in Filmora? It means that you can add green screen effects to many other objects. This article will show a cool chroma key effect you can try using written text.
Part 1. What Is Chroma Key Text Effect?
Composing of the chroma key effect is widely used in the gaming and newscasting industries. In this technique, you can make layering images and videos for the text together based on color hues.
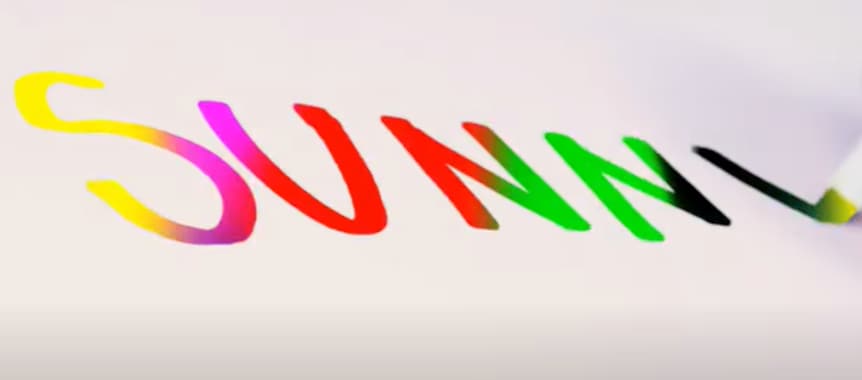
Video editors can eliminate the basis from a picture by automatically choosing a certain hue in post-production. An interactive animation results by adding different color schemes; it’s an easy way to make 3D motion videos.
To make the effects on text, we have to film the subject writing on white paper. For this, follow the below instructions:
Part 2. Filming Tips for Written Texts
To write a key text before adding the chroma effect, we have to film the writing process to understand your next project better. You can create your own by following these tips. We are just concluding a single example here.
Tip 1. A Pen and a White Paper
We need blank white paper with no boundaries and lines for writing a text. Because the chroma effect will embellish the other lines if present on paper. Make sure to choose a prominent color for writing a text.
We are using a purple color pen here for writing an essential text to make it more prominent, as shown below:
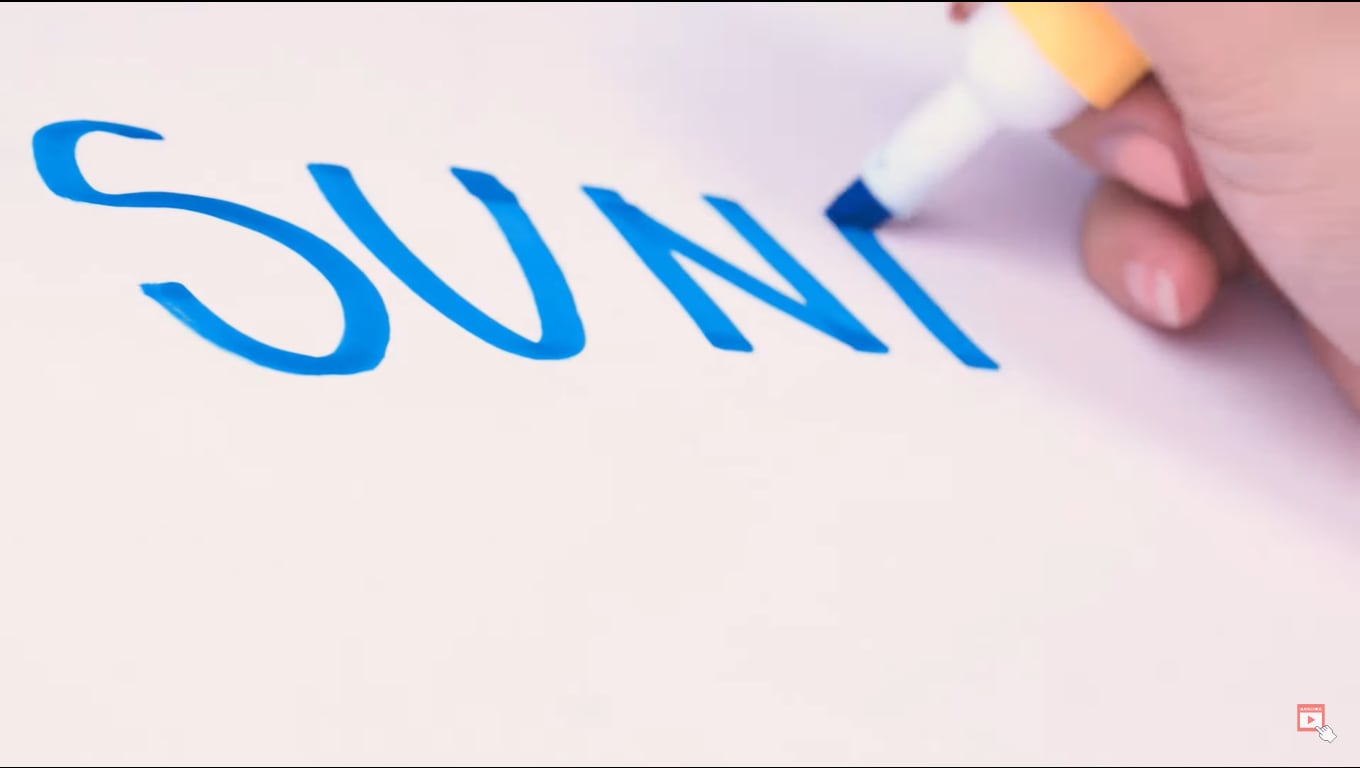
It all depends upon the contrast, and you can choose another color too but ensure that it’s more apparent during filming.
Tip 2. Different Color Paper
There are many chances that you don’t have only white paper in your studio, or your requirement is not going with a blank white sheet. Then you don’t need to worry because you can use different color papers too.
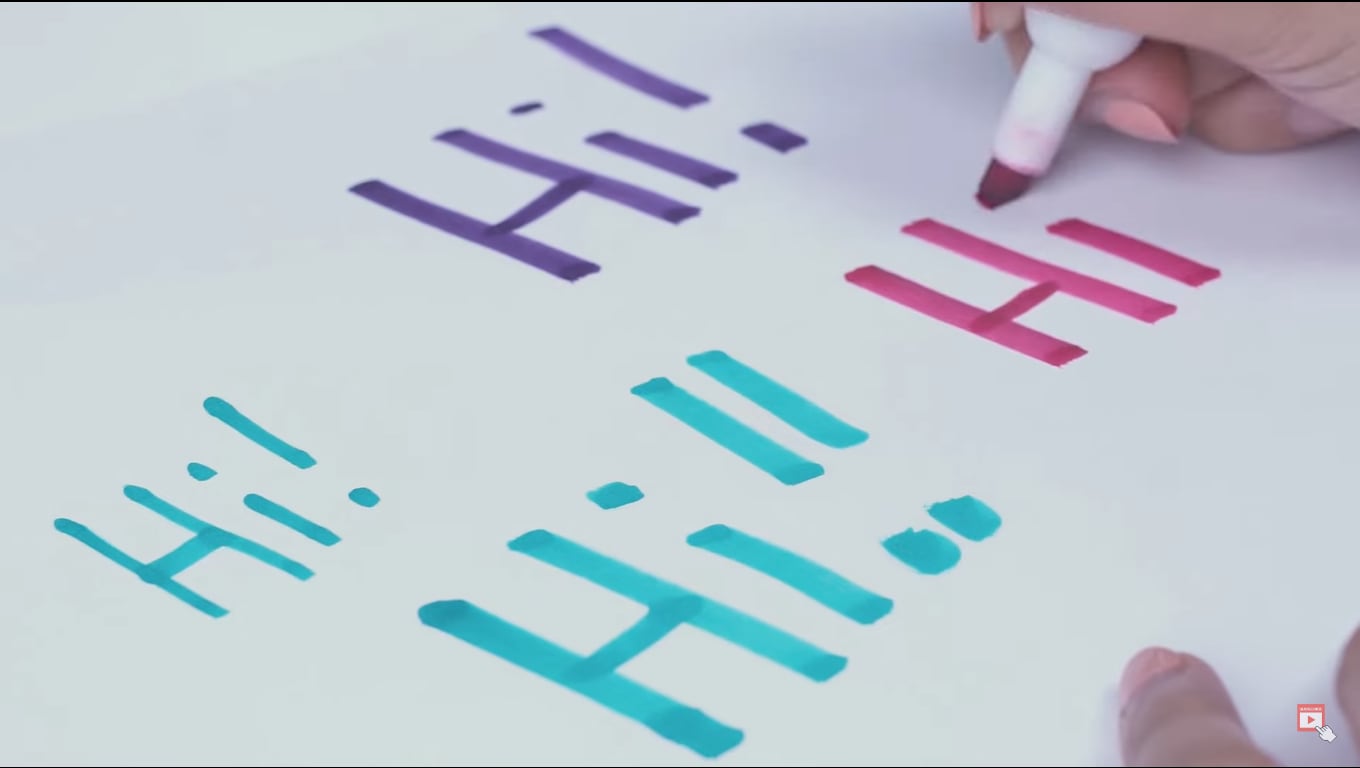
But always try to use clearer paper and a prominent pen or highlighter. See the below example of a different color paper with a different highlighter.
![]()
Note: Ensure that the colored pens have good contrast with colored paper. Don’t use dull color pens with bright color paper.
Tip 3. Camera Angles
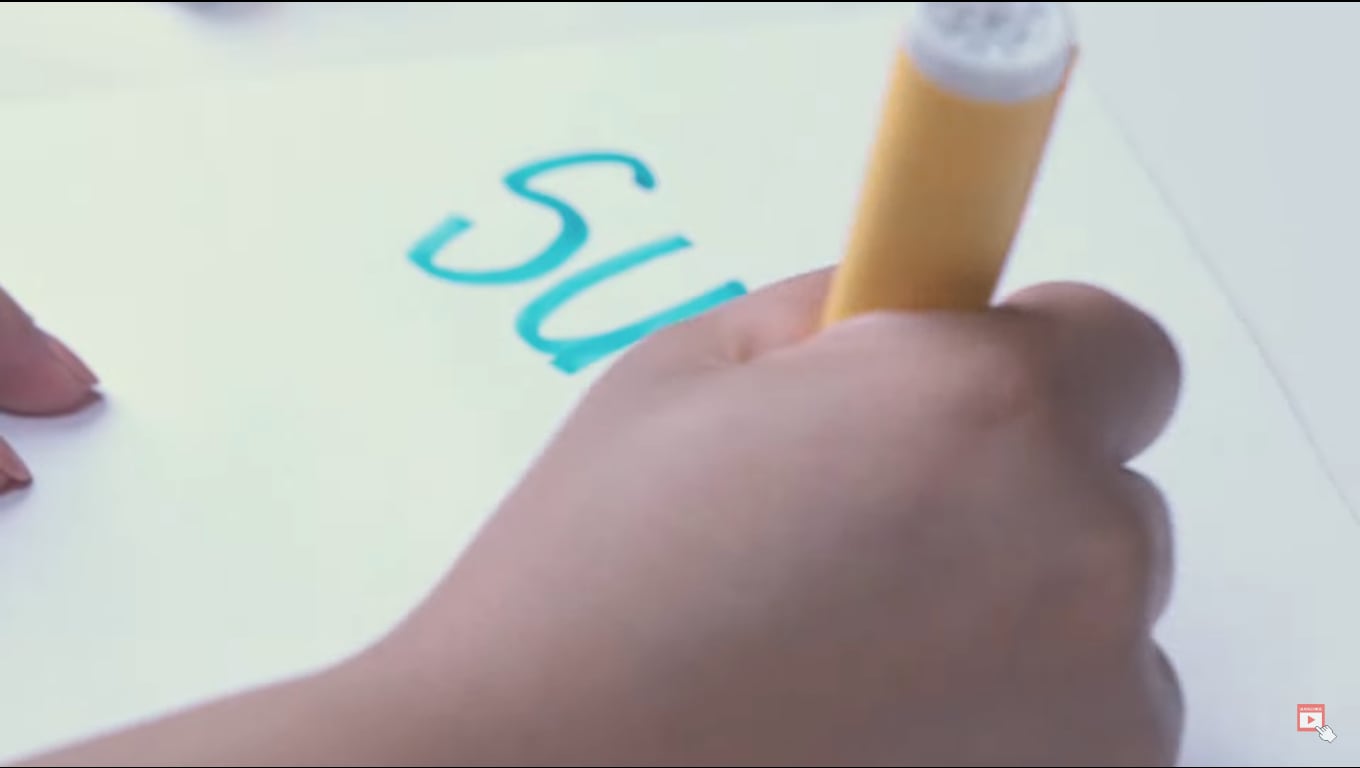
While filming a writing process for a video, you have to take care of the alignment of the camera. First, ensure the camera is at a suitable angle so it will not block the writing letters from the left side.
Sometimes, the writer’s hand blocks the letters on the left side during writing. Take note of this tip during filming a professional video, as shown below.
After checking the alignment of the camera, it’s time to look at what size we have to use for writing!
Tip 4. Larger Size of Letters
As we already said about the prominence of written text, we have to follow one more instruction related to the structure of the letters. Use the larger size and bold words when writing from a highlighter.
It is because the effect we insert during editing will be more standing and give a professional look to the video.
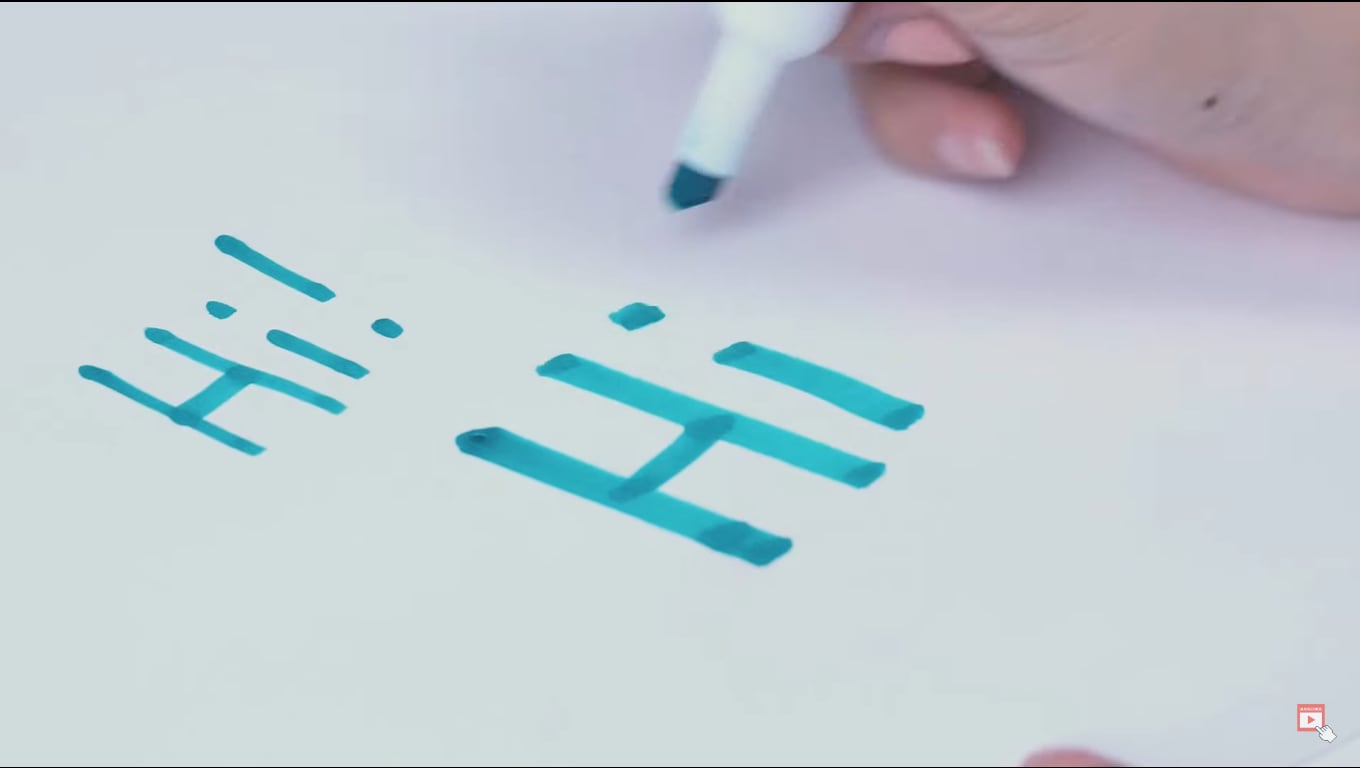
![]()
Note: You can create more shots till you get the right angle for a final video. Just focus on the camera alignment and highlighted words, then it will be all set.
After filming all the clips, you must edit those shots on the Filmora to get the chroma effect. Scroll more to get the step-by-step process!
Part 3. Editing the Chroma Key Text With Filmora
We need software that will give great setting choices and stock videos for a more professional look. For this, Wondershare Filmora will work more than a robot and give high-resolution results. To do the editing process on Filmora, follow the steps below and enjoy yourself with your followers.
Free Download For Win 7 or later(64-bit)
Free Download For macOS 10.14 or later
Step1 Download and install Wondershare Filmora
Launch Wondershare Filmora on your PC or Mac after downloading.
![]()
Note: If you want to enjoy its unlimited effect, you get its premium version quickly.

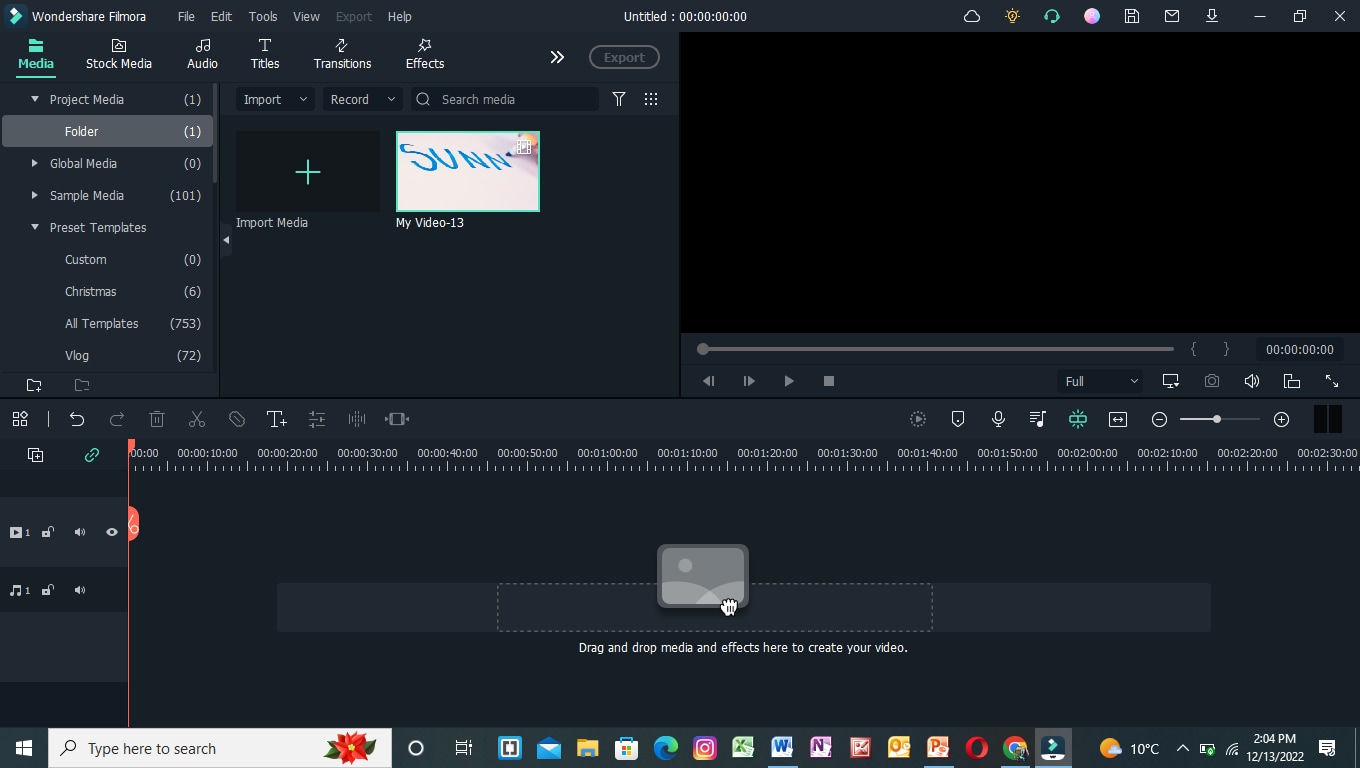
Step2 Import the clips to the Filmora
First, import the best footage into the filmora which you have shot. Ensure that the clip should have the best recording angle and that every word will be prominent on the page.
For this, click on Import Media and choose from the PC library what you want to edit.
Step3 Drag the clip to the timeline
Drag and drop the clip into the timeline from the import section. If you have more clips, choose first according to your script.
Add the text-written clip into the second video track because we have to insert the background into the first video track later.
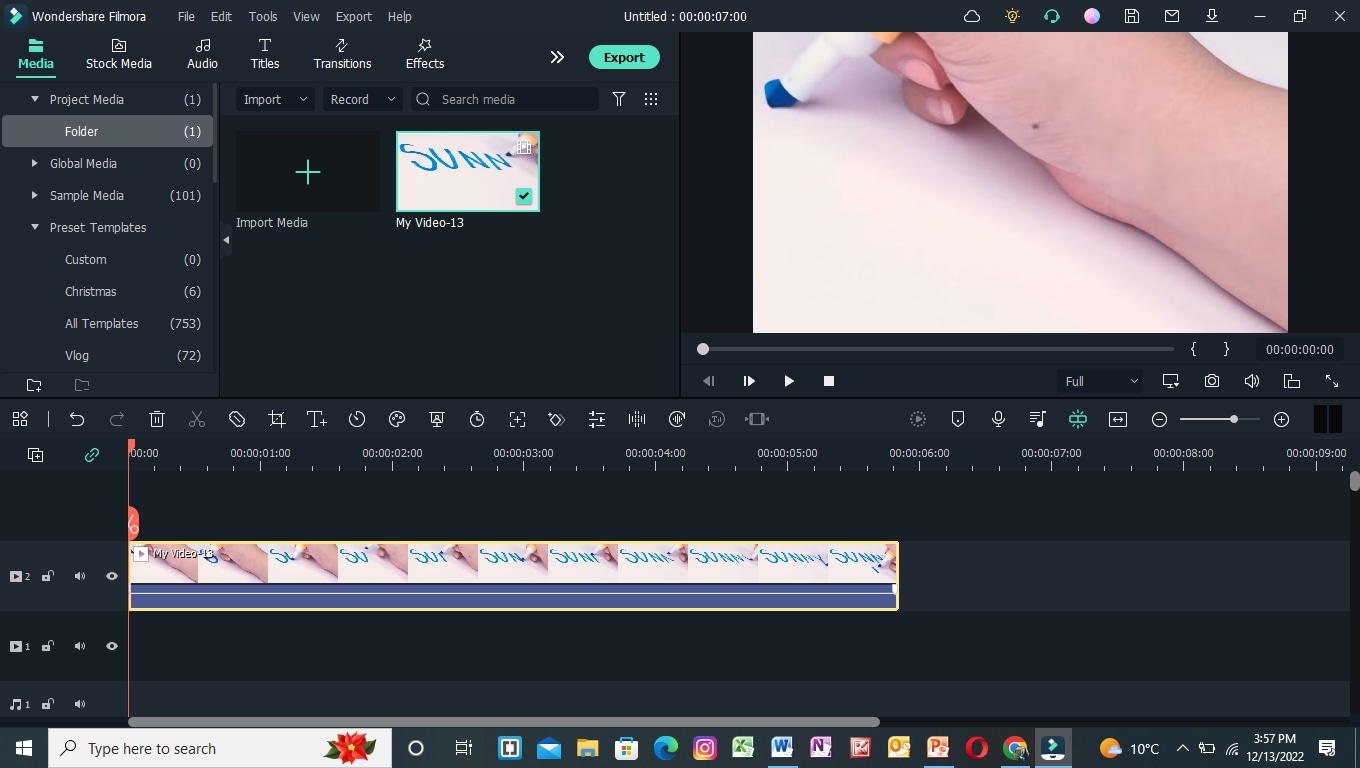
After inserting the clip into the timeline, it’s time to edit it. For this, keep following the below-mentioned steps!
Step4 Chroma key settings
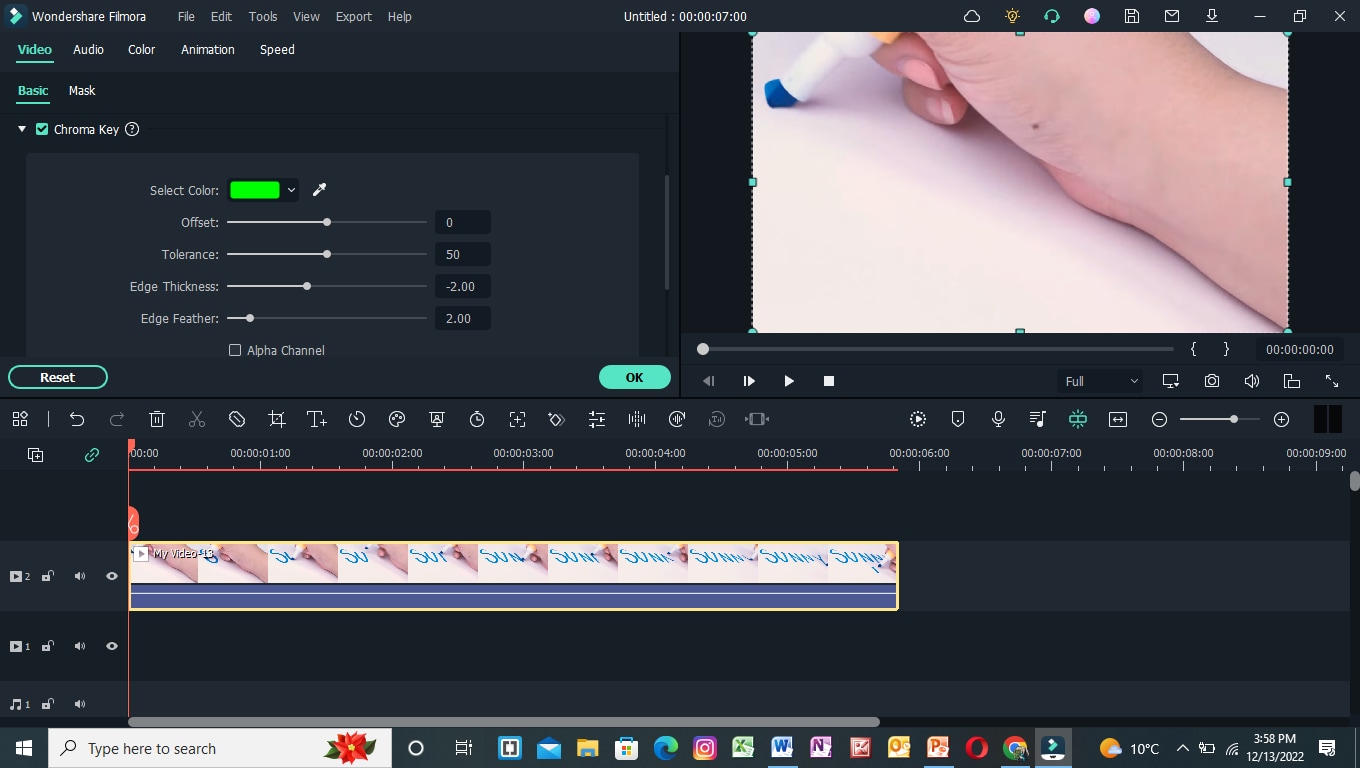
To edit the chroma key, you need to open the settings. For this, follow the below instructions:
- First, double-click on the clip in the timeline of the Filmora.
- Then, the setting section of the video will pop up at the top left side.
- Mark the tick in front of the Chroma Key section, and it will show the list of different features as shown below.
Step5 Color key out
To key out the specific color for changing its background, you have to perform the following actions:
- First, find the Select color option in the settings of the clip.
- Then click on the color dropper in front of the color tab.
- After that, pick the color dropper and move it on the video to select the color from the text.
![]()
Note: Ensure to select the color from the middle of the text for better key-out accuracy.
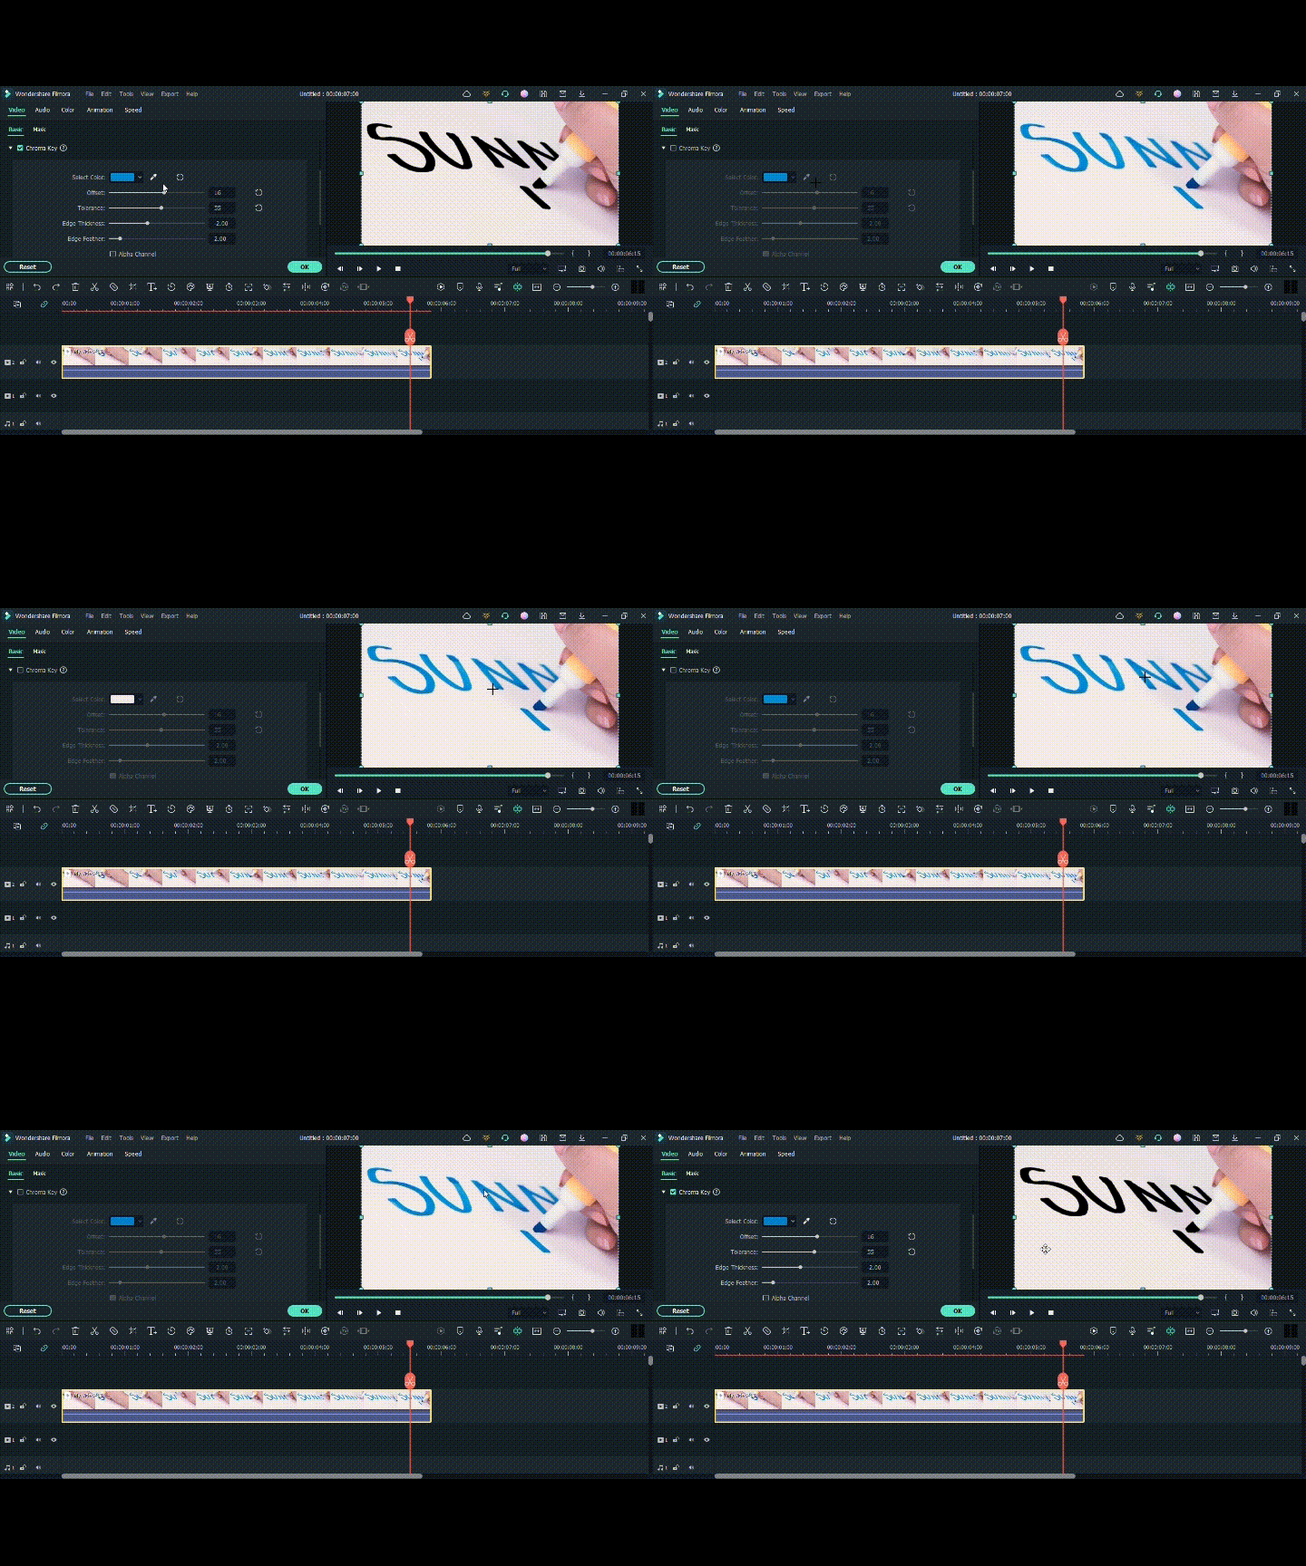
You have to adjust the size and thickness after selecting the key-out. For this, follow the next step!
Step6 Adjust the settings
To adjust the Chroma Key’s settings, set the offset, tolerance, edge thickness, and edge feather. Increase or decrease according to your range and that suits you the best.
Then click on Alpha Channel to mark the tick in front of the option. It is due to that chroma key effects will be more clearly shown.
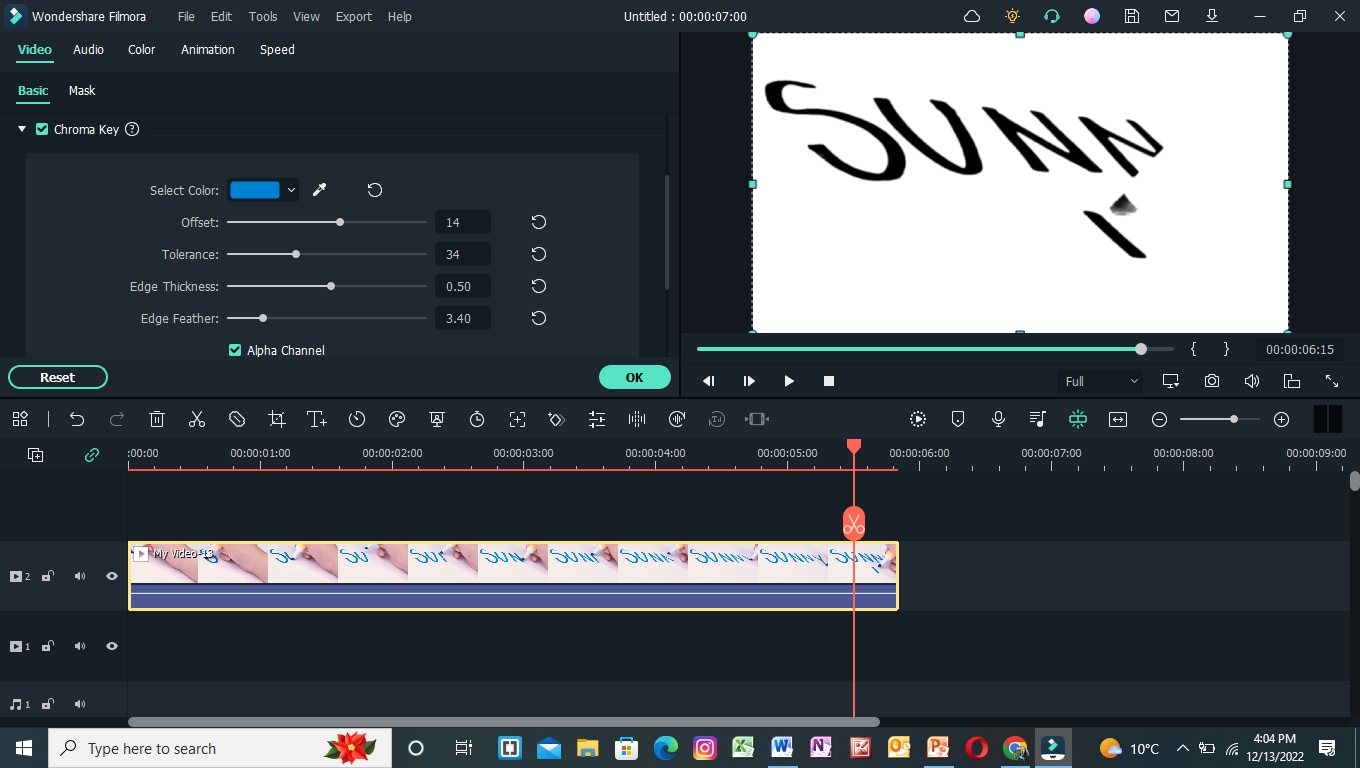
Now, it’s time to set the background after fixing all the settings of the chroma key effect. To perform this, scroll more to get to the next step.
Step7 Import background clips
You have to add an excellent motion background in the handwritten text video. For this, you must first import the background clip into the filmora. Then, click on Import Media and choose what you want from your PC.
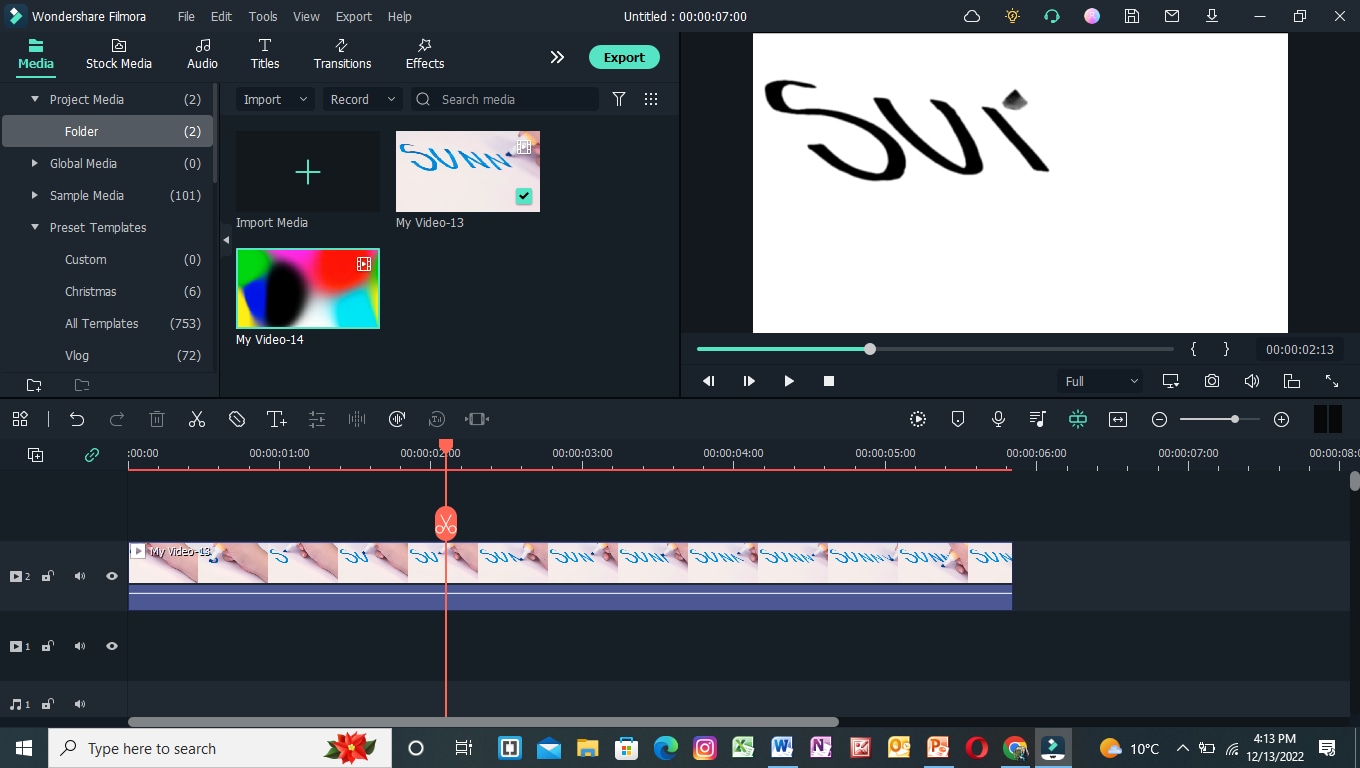
Step8 Add a background clip to the timeline
After importing the background clip, now drag and drop the clip into the timeline. Finally, add the background clip to the first video track at the bottom.
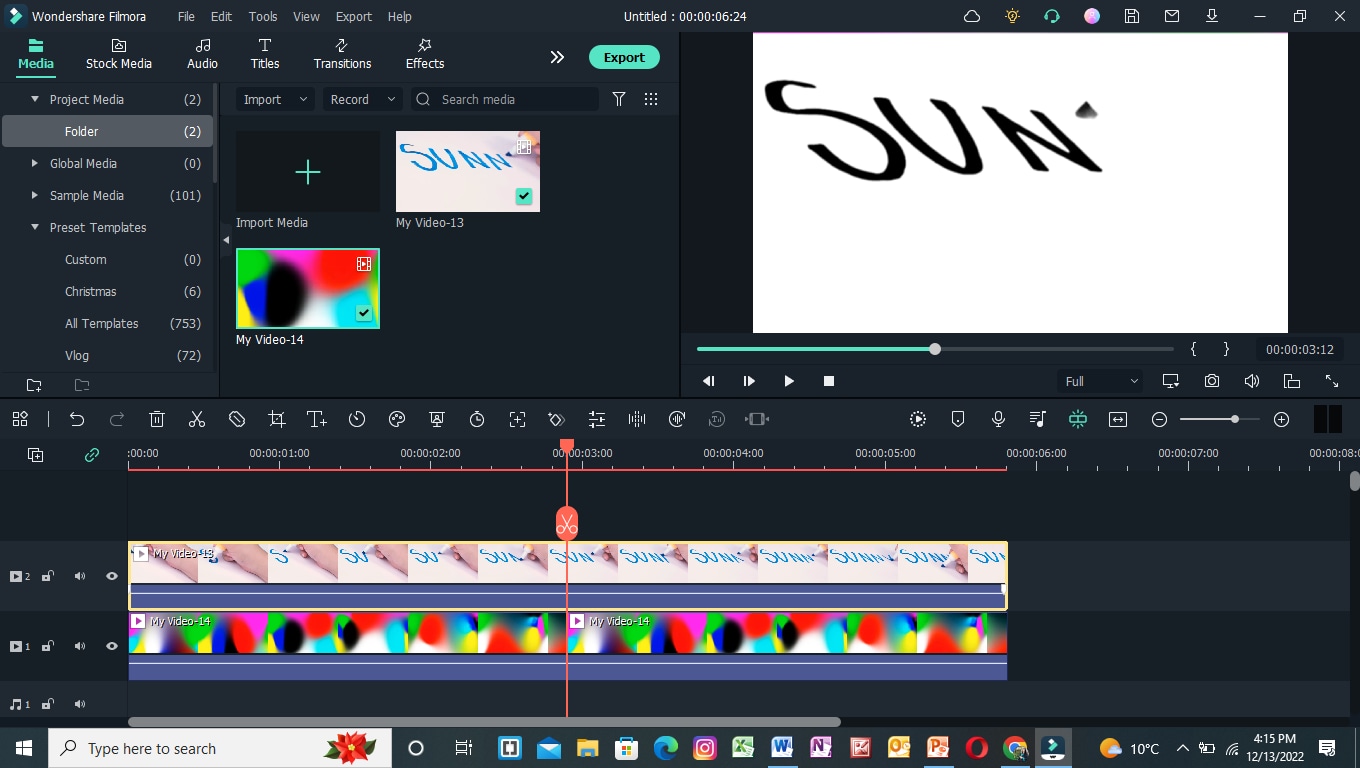
Step9 Turn off the alpha channel
The last step is merging the background clip with the first clip. For this, follow the below guidelines:
- First, double-click on the handwritten text video.
- It will show the settings section at the top left corner.
- Find the chroma key section and turn Alpha Channel
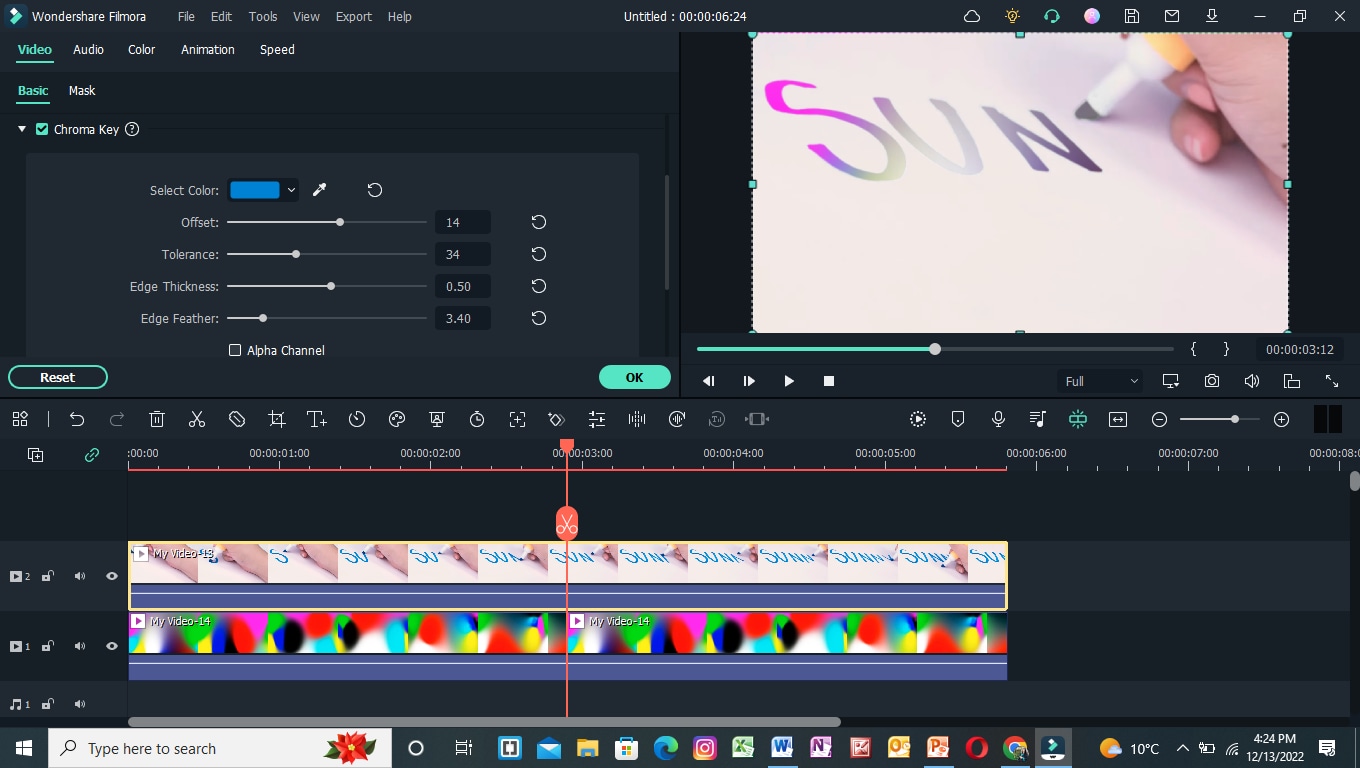
Final Results
You have all done with the steps and got such a fascinating result. Following the above tricks, you can easily make your vlogs and daily videos more professional and creative. Make sure to add a great and colorful background clip.
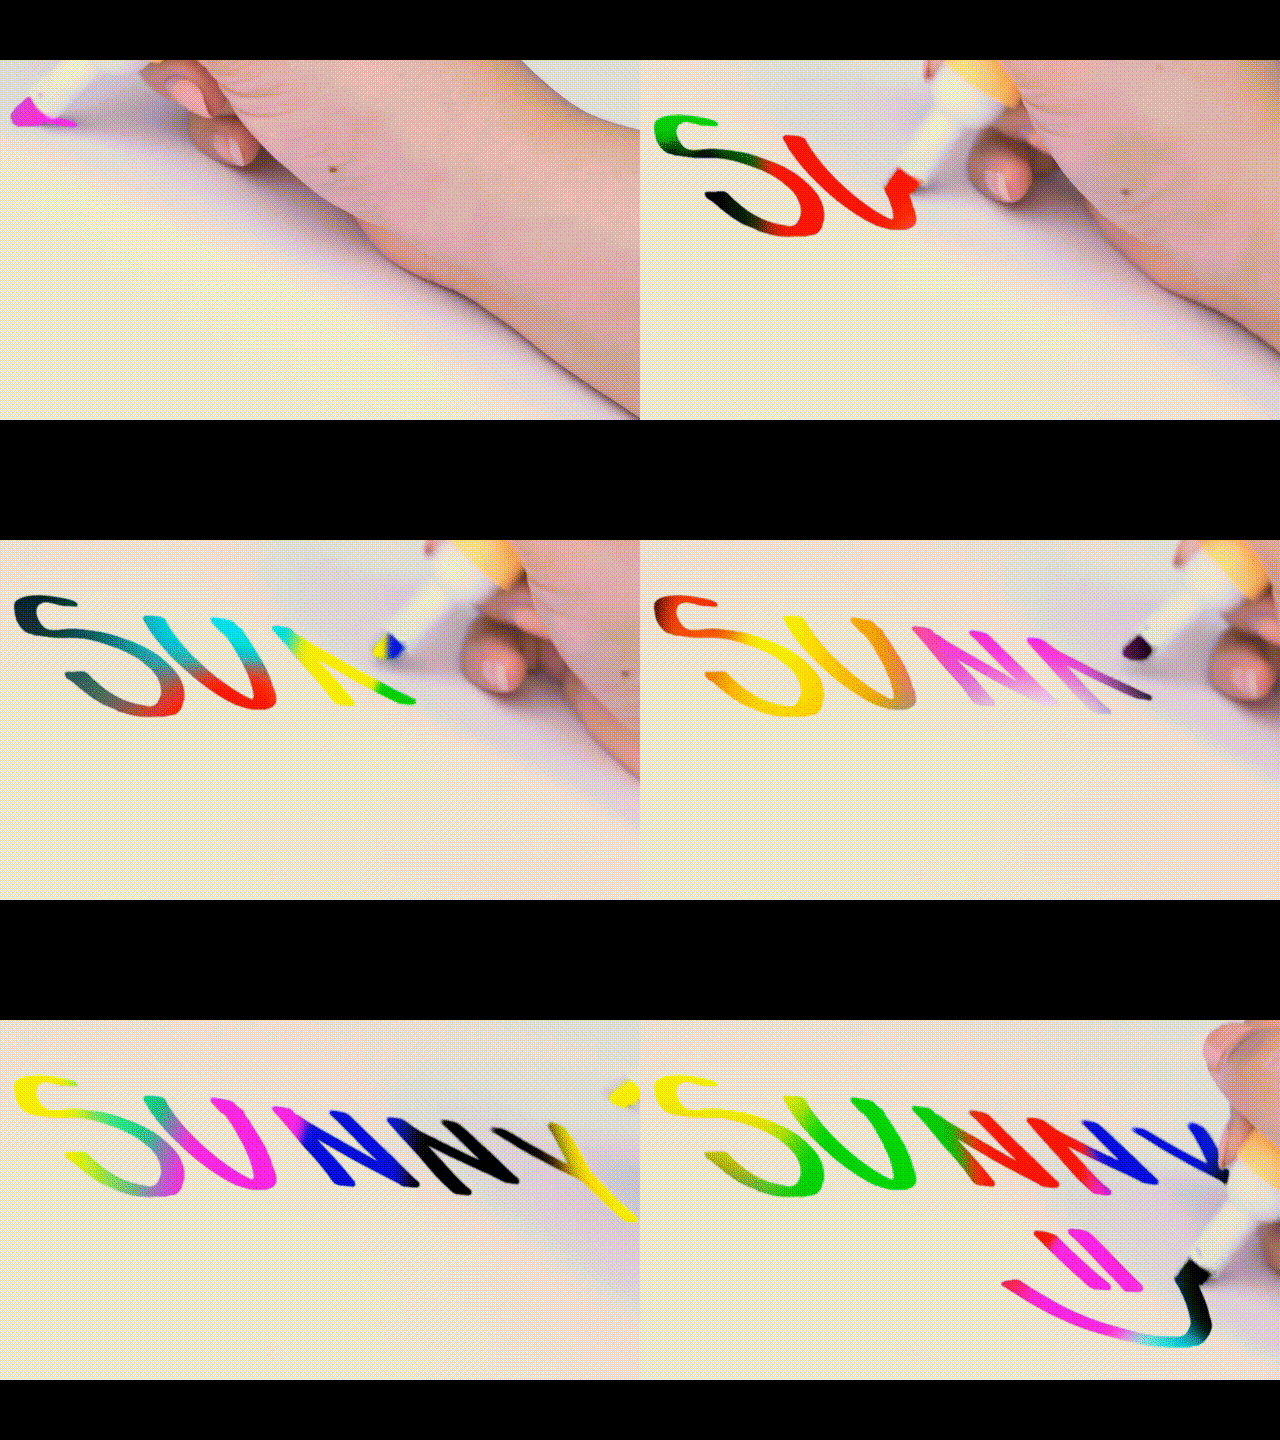
You can also use any other motion video of scenes rather than colorful videos to give a striking look.
Conclusion
Create more attractive looks and share them with your subscribers. Mainly, vloggers can attract many viewers by making the introductory part with this effect. Then, choose hundreds of other videos from the stock media and create different looks daily.
See how you can get editing tricks on Wondershare Filmora and use them in a few clicks to get an attractive look!
Tip 3. Camera Angles
While filming a writing process for a video, you have to take care of the alignment of the camera. First, ensure the camera is at a suitable angle so it will not block the writing letters from the left side.
Sometimes, the writer’s hand blocks the letters on the left side during writing. Take note of this tip during filming a professional video, as shown below.

After checking the alignment of the camera, it’s time to look at what size we have to use for writing!
Tip 4. Larger Size of Letters
As we already said about the prominence of written text, we have to follow one more instruction related to the structure of the letters. Use the larger size and bold words when writing from a highlighter.
It is because the effect we insert during editing will be more standing and give a professional look to the video.

![]()
Note: You can create more shots till you get the right angle for a final video. Just focus on the camera alignment and highlighted words, then it will be all set.
After filming all the clips, you must edit those shots on the Filmora to get the chroma effect. Scroll more to get the step-by-step process!
Part 3. Editing the Chroma Key Text With Filmora
We need software that will give great setting choices and stock videos for a more professional look. For this, Wondershare Filmora will work more than a robot and give high-resolution results. To do the editing process on Filmora, follow the steps below and enjoy yourself with your followers.
Free Download For Win 7 or later(64-bit)
Free Download For macOS 10.14 or later
Step1 Download and install Wondershare Filmora
Launch Wondershare Filmora on your PC or Mac after downloading.
![]()
Note: If you want to enjoy its unlimited effect, you get its premium version quickly.

Step2 Import the clips to the Filmora
First, import the best footage into the filmora which you have shot. Ensure that the clip should have the best recording angle and that every word will be prominent on the page.
For this, click on Import Media and choose from the PC library what you want to edit.

Step3 Drag the clip to the timeline
Drag and drop the clip into the timeline from the import section. If you have more clips, choose first according to your script.
Add the text-written clip into the second video track because we have to insert the background into the first video track later.

After inserting the clip into the timeline, it’s time to edit it. For this, keep following the below-mentioned steps!
Step4 Chroma key settings
To edit the chroma key, you need to open the settings. For this, follow the below instructions:
- First, double-click on the clip in the timeline of the Filmora.
- Then, the setting section of the video will pop up at the top left side.
- Mark the tick in front of the Chroma Key section, and it will show the list of different features as shown below.

Step5 Color key out
To key out the specific color for changing its background, you have to perform the following actions:
- First, find the Select color option in the settings of the clip.
- Then click on the color dropper in front of the color tab.
- After that, pick the color dropper and move it on the video to select the color from the text.
![]()
Note: Ensure to select the color from the middle of the text for better key-out accuracy.

You have to adjust the size and thickness after selecting the key-out. For this, follow the next step!
Step6 Adjust the settings
To adjust the Chroma Key’s settings, set the offset, tolerance, edge thickness, and edge feather. Increase or decrease according to your range and that suits you the best.
Then click on Alpha Channel to mark the tick in front of the option. It is due to that chroma key effects will be more clearly shown.

Now, it’s time to set the background after fixing all the settings of the chroma key effect. To perform this, scroll more to get to the next step.
Step7 Import background clips
You have to add an excellent motion background in the handwritten text video. For this, you must first import the background clip into the filmora. Then, click on Import Media and choose what you want from your PC.

Step8 Add a background clip to the timeline
After importing the background clip, now drag and drop the clip into the timeline. Finally, add the background clip to the first video track at the bottom.

Step9 Turn off the alpha channel
The last step is merging the background clip with the first clip. For this, follow the below guidelines:
- First, double-click on the handwritten text video.
- It will show the settings section at the top left corner.
- Find the chroma key section and turn Alpha Channel

Final Results
You have all done with the steps and got such a fascinating result. Following the above tricks, you can easily make your vlogs and daily videos more professional and creative. Make sure to add a great and colorful background clip.

You can also use any other motion video of scenes rather than colorful videos to give a striking look.
Conclusion
Create more attractive looks and share them with your subscribers. Mainly, vloggers can attract many viewers by making the introductory part with this effect. Then, choose hundreds of other videos from the stock media and create different looks daily.
See how you can get editing tricks on Wondershare Filmora and use them in a few clicks to get an attractive look!
How to Make Text Reveal Effect Easily
Have you ever seen the text reveal led by a subject when moving across the frame? It’s one of the most common text-revealing effects in video editing. This technique is often used to add titles or credits to a scene for cinematic vibes and creative effects.
While it may look complicated, it’s actually quite easy to create with a video editing program like Filmora. Filmora’s masking feature allows users to create impressive and eye-catching text reveals in their videos. For those looking for a tutorial on how to make text reveal, here’s a step-by-step guide to help you out.
How to add text reveal effect using Filmora’s masking tool
Free Download For Win 7 or later(64-bit)
Free Download For macOS 10.14 or later
First, make sure the video clips you are using are clear, with the subject moving across the frame. It will help the text to stand out and be more easily seen. Now, follow the step-by-step guides below:
Step 1 Add video tracks
You will need three video tracks in order to create this effect, so click the (+) icon above the timeline > Add Video Track and add two more video tracks.
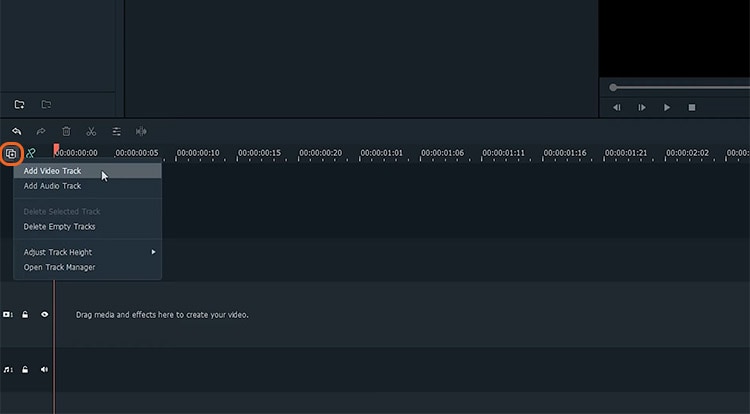
Step 2 Import the clip to the timeline
Drag and drop your clip onto the first and third video tracks of the timeline. Then, align them with each other.
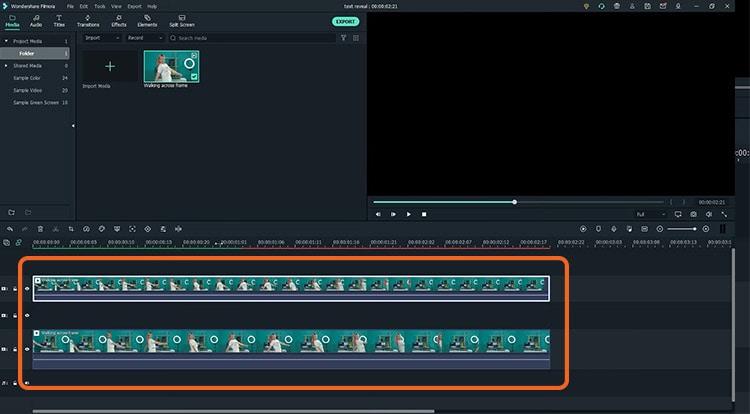
Step 3 Make a cut at the beginning of the text
Find the spot where you want the text reveals to start, then click the scissor icon to make a cut on the clip from the first video track.
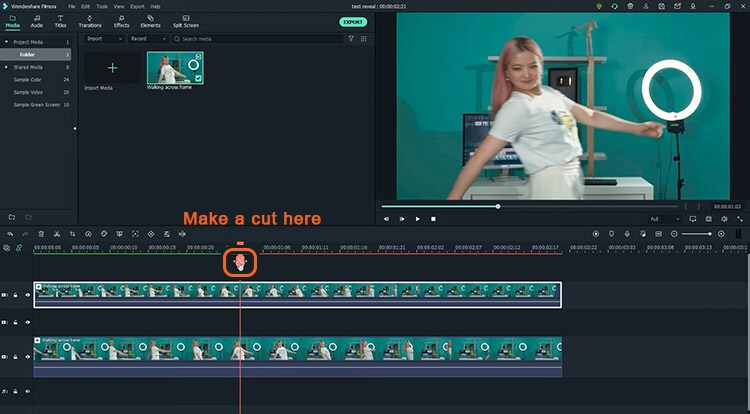
Step 4 Add and adjust the text
Go to Title > Plain Text > select which text styles suit you best. Then, drag the title to the second video track.
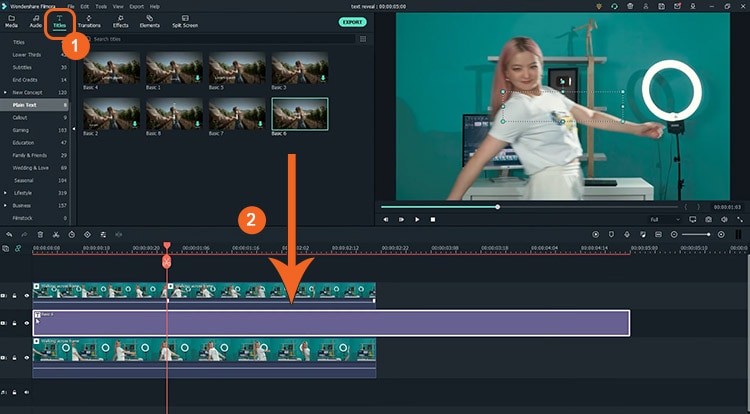
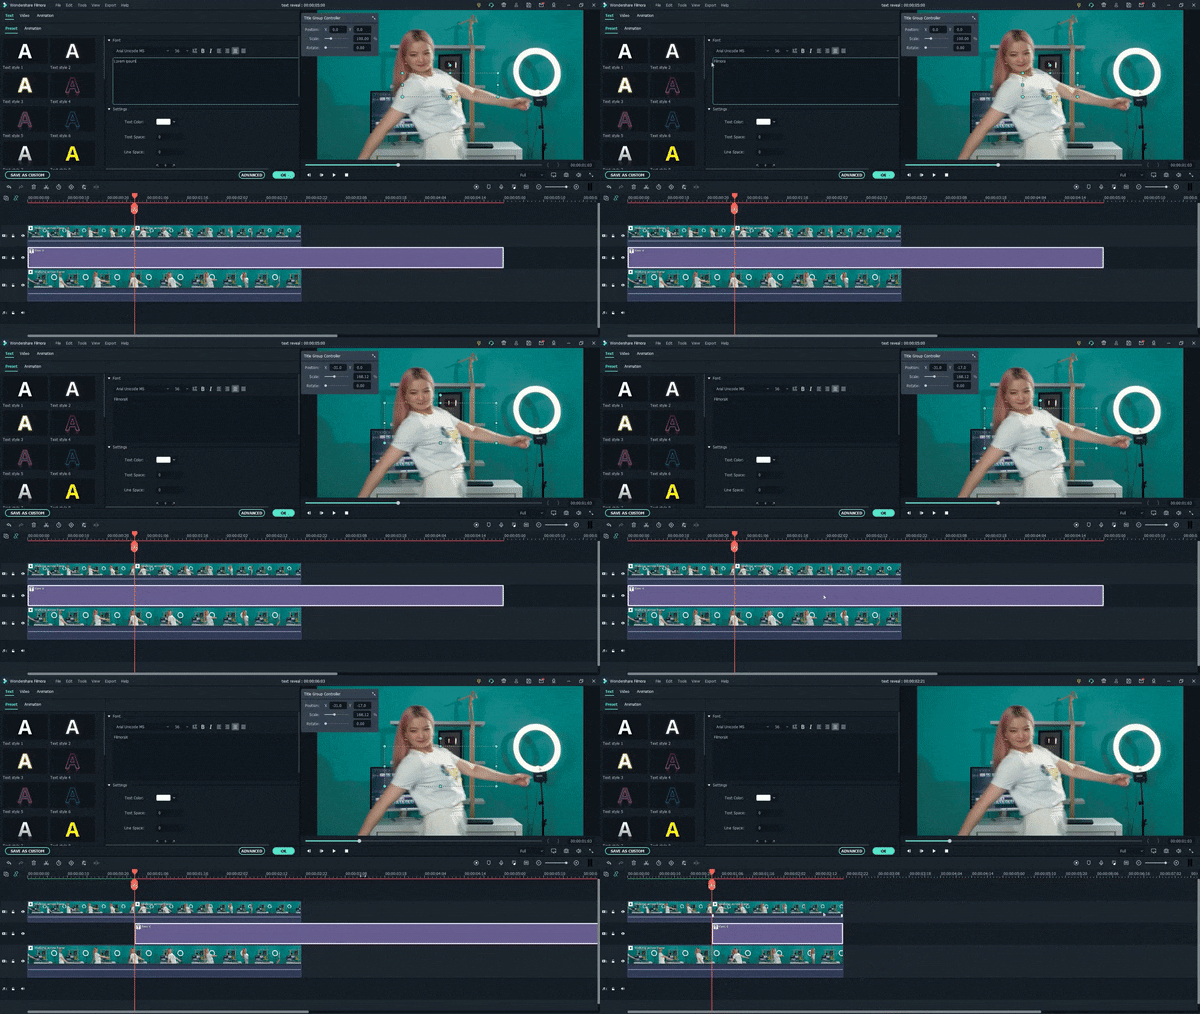
Double-click on the title clip and type out your text. Then, adjust the text position and align it to the cut you have made.
Step 5 Use the masking tool
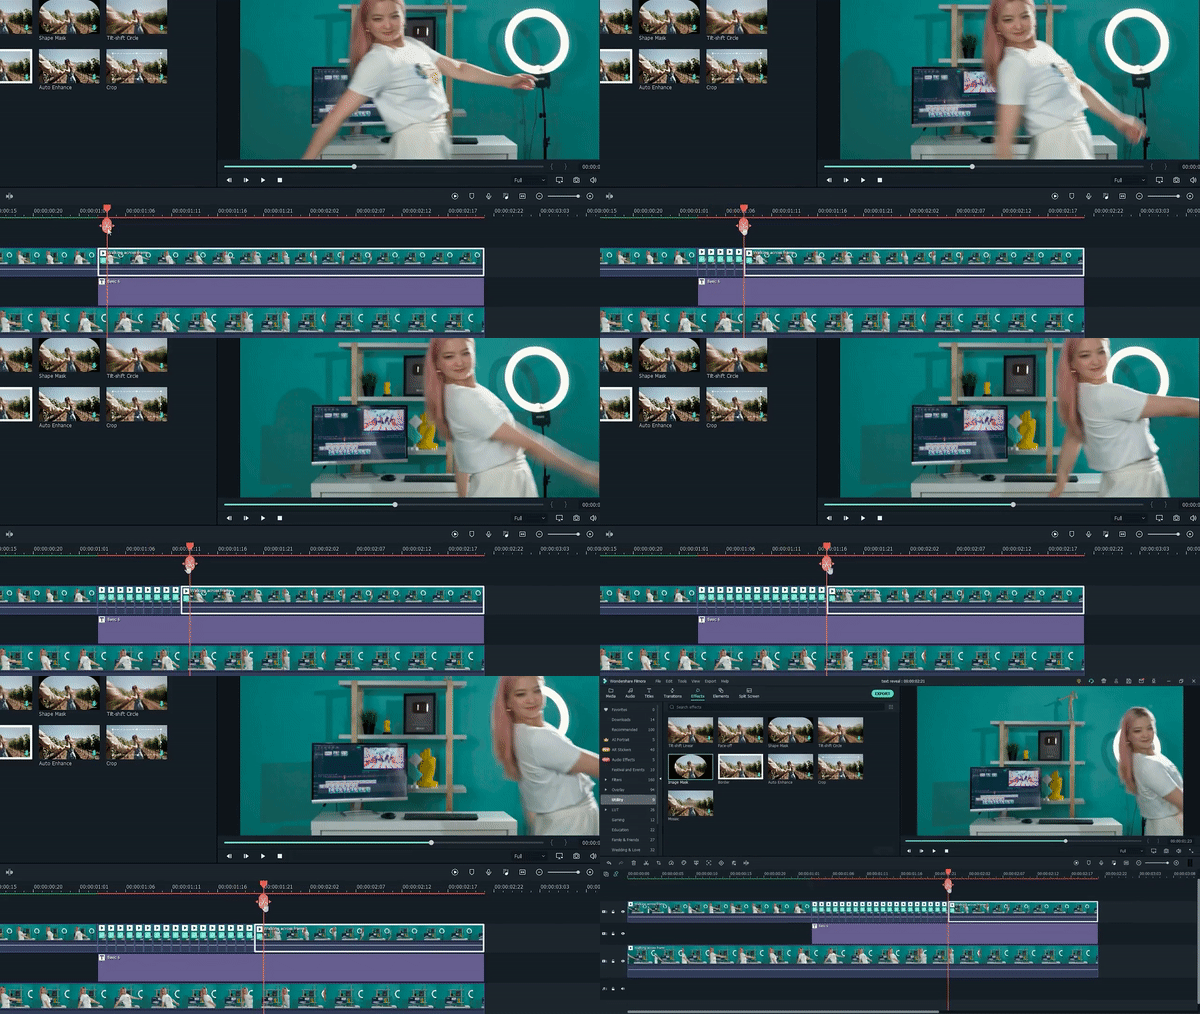
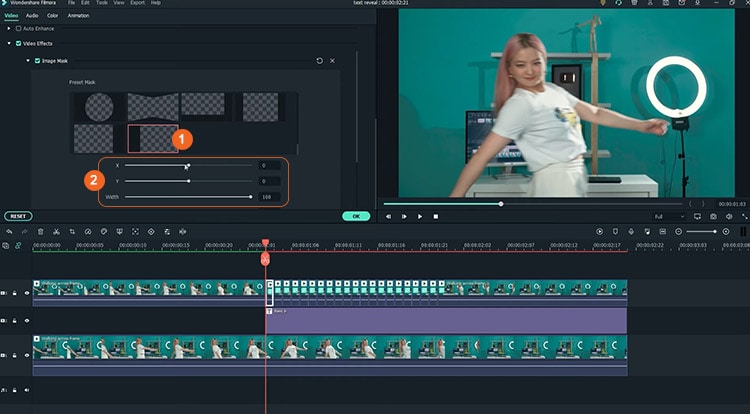
Go to Effects > Utility > Image Mask, then drag and drop it onto the latter half of the top video clip.
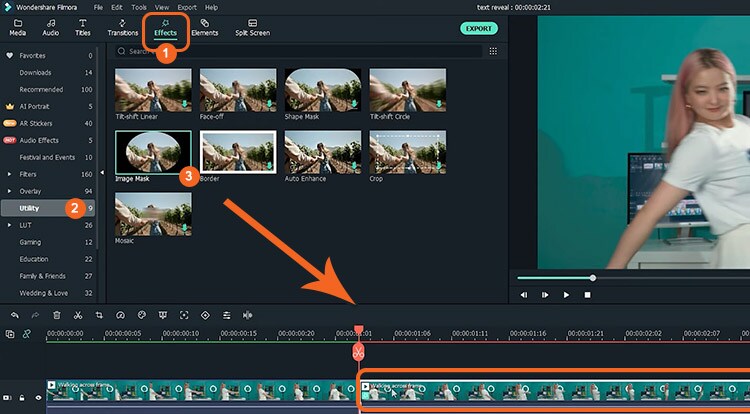
Make more cuts on the top latter clip, frame by frame, starting from the first cut you have made.
Double-click on each of the smaller clips and find the mask settings.
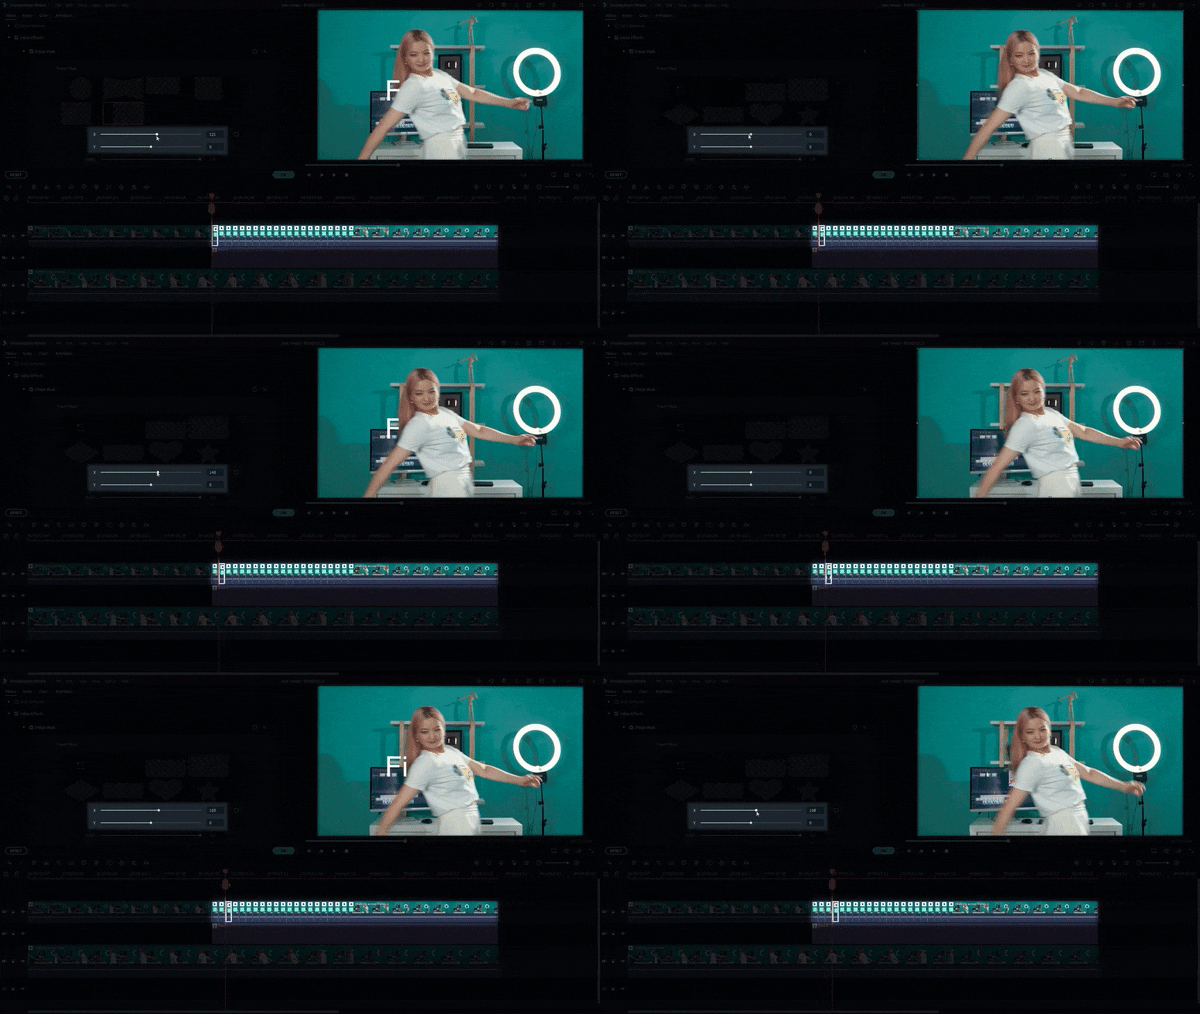
Since the subject in this tutorial is moving from side to side, we are going to match the mask’s y-axis setting, which is also the revealed text portion, with the subject’s movement. Starting from the first clip, adjust the y-axis number to a smaller/bigger number.
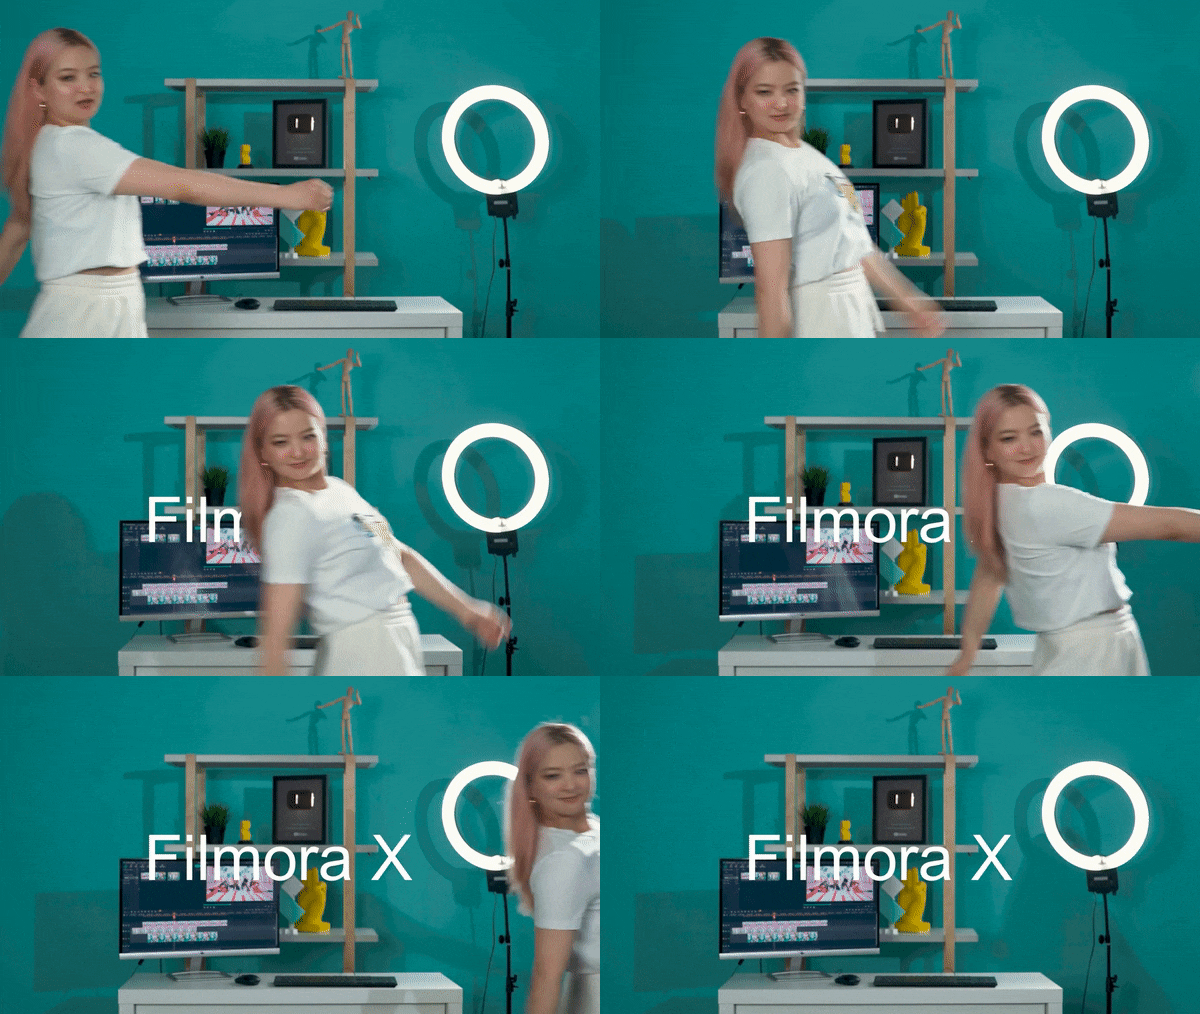
There we go! The final look should look like this:
Summary
That is how we can create the text reveal effect using Wondershare Filmora. Using Filmora’s masking tool, it’s easy to create a text reveal the effect that can add flair and interest to your videos. Just follow the simple steps, and you’ll be able to get the desired result with a few clicks of your mouse. Give it a try, and share your thoughts with us.
Free Download For macOS 10.14 or later
First, make sure the video clips you are using are clear, with the subject moving across the frame. It will help the text to stand out and be more easily seen. Now, follow the step-by-step guides below:
Step 1 Add video tracks
You will need three video tracks in order to create this effect, so click the (+) icon above the timeline > Add Video Track and add two more video tracks.

Step 2 Import the clip to the timeline
Drag and drop your clip onto the first and third video tracks of the timeline. Then, align them with each other.

Step 3 Make a cut at the beginning of the text
Find the spot where you want the text reveals to start, then click the scissor icon to make a cut on the clip from the first video track.

Step 4 Add and adjust the text
Go to Title > Plain Text > select which text styles suit you best. Then, drag the title to the second video track.

Double-click on the title clip and type out your text. Then, adjust the text position and align it to the cut you have made.

Step 5 Use the masking tool
Go to Effects > Utility > Image Mask, then drag and drop it onto the latter half of the top video clip.

Make more cuts on the top latter clip, frame by frame, starting from the first cut you have made.

Double-click on each of the smaller clips and find the mask settings.

Since the subject in this tutorial is moving from side to side, we are going to match the mask’s y-axis setting, which is also the revealed text portion, with the subject’s movement. Starting from the first clip, adjust the y-axis number to a smaller/bigger number.

There we go! The final look should look like this:

Summary
That is how we can create the text reveal effect using Wondershare Filmora. Using Filmora’s masking tool, it’s easy to create a text reveal the effect that can add flair and interest to your videos. Just follow the simple steps, and you’ll be able to get the desired result with a few clicks of your mouse. Give it a try, and share your thoughts with us.
Free Download For macOS 10.14 or later
First, make sure the video clips you are using are clear, with the subject moving across the frame. It will help the text to stand out and be more easily seen. Now, follow the step-by-step guides below:
Step 1 Add video tracks
You will need three video tracks in order to create this effect, so click the (+) icon above the timeline > Add Video Track and add two more video tracks.

Step 2 Import the clip to the timeline
Drag and drop your clip onto the first and third video tracks of the timeline. Then, align them with each other.

Step 3 Make a cut at the beginning of the text
Find the spot where you want the text reveals to start, then click the scissor icon to make a cut on the clip from the first video track.

Step 4 Add and adjust the text
Go to Title > Plain Text > select which text styles suit you best. Then, drag the title to the second video track.

Double-click on the title clip and type out your text. Then, adjust the text position and align it to the cut you have made.

Step 5 Use the masking tool
Go to Effects > Utility > Image Mask, then drag and drop it onto the latter half of the top video clip.

Make more cuts on the top latter clip, frame by frame, starting from the first cut you have made.

Double-click on each of the smaller clips and find the mask settings.

Since the subject in this tutorial is moving from side to side, we are going to match the mask’s y-axis setting, which is also the revealed text portion, with the subject’s movement. Starting from the first clip, adjust the y-axis number to a smaller/bigger number.

There we go! The final look should look like this:

Summary
That is how we can create the text reveal effect using Wondershare Filmora. Using Filmora’s masking tool, it’s easy to create a text reveal the effect that can add flair and interest to your videos. Just follow the simple steps, and you’ll be able to get the desired result with a few clicks of your mouse. Give it a try, and share your thoughts with us.
Free Download For macOS 10.14 or later
First, make sure the video clips you are using are clear, with the subject moving across the frame. It will help the text to stand out and be more easily seen. Now, follow the step-by-step guides below:
Step 1 Add video tracks
You will need three video tracks in order to create this effect, so click the (+) icon above the timeline > Add Video Track and add two more video tracks.

Step 2 Import the clip to the timeline
Drag and drop your clip onto the first and third video tracks of the timeline. Then, align them with each other.

Step 3 Make a cut at the beginning of the text
Find the spot where you want the text reveals to start, then click the scissor icon to make a cut on the clip from the first video track.

Step 4 Add and adjust the text
Go to Title > Plain Text > select which text styles suit you best. Then, drag the title to the second video track.

Double-click on the title clip and type out your text. Then, adjust the text position and align it to the cut you have made.

Step 5 Use the masking tool
Go to Effects > Utility > Image Mask, then drag and drop it onto the latter half of the top video clip.

Make more cuts on the top latter clip, frame by frame, starting from the first cut you have made.

Double-click on each of the smaller clips and find the mask settings.

Since the subject in this tutorial is moving from side to side, we are going to match the mask’s y-axis setting, which is also the revealed text portion, with the subject’s movement. Starting from the first clip, adjust the y-axis number to a smaller/bigger number.

There we go! The final look should look like this:

Summary
That is how we can create the text reveal effect using Wondershare Filmora. Using Filmora’s masking tool, it’s easy to create a text reveal the effect that can add flair and interest to your videos. Just follow the simple steps, and you’ll be able to get the desired result with a few clicks of your mouse. Give it a try, and share your thoughts with us.
How to Take Slow Motion Videos
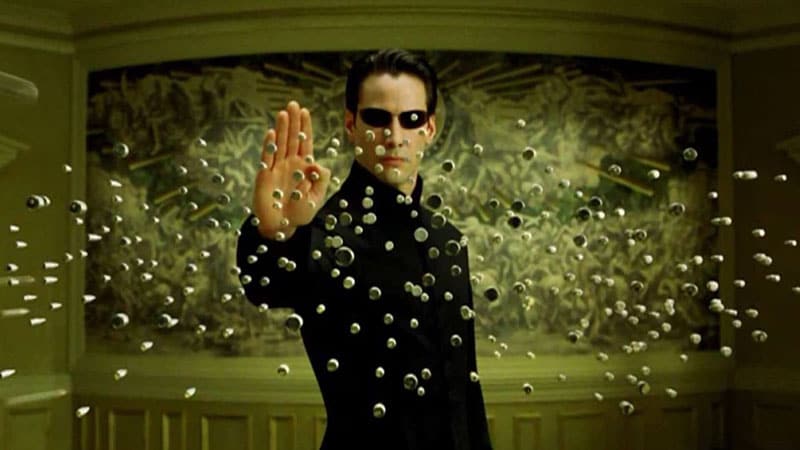
Scenes that might otherwise be monotonous can be made more interesting by the use of slow-motion photography in movies and television shows. For instance, a battle sequence between two characters can be portrayed in its entirety, but if it is later replayed in slow motion, the intensity of the action is amplified significantly.
Let’s dive in!
1. What is slow motion?
Filmmakers use the slow-motion effect to create the illusion that the passage of time has been slowed down on the screen. In the early 20th century, an Austrian priest named August Musger was the one who came up with the idea. Playing normally recorded material at a slower pace is another method for creating the illusion of slow motion.
When a film is recorded at 25 frames per second, but played back at 24 frames per second, it will seem as if it is being shown in slow motion because all of the movements will be slightly slower than when they were actually performed. This is because the film was recorded at 25 frames per second, but the playback was done at 24 frames per second.
Because there are not enough frames to show all of the details of each frame when a 24-frame animation is played at a 25-frame rate (or a 30-frame animation at a 32-frame rate), certain frames have to be repeated (every 5th one in this case). When there is a dramatic event taking place, this manipulation of the film speed makes the action on screen appear even more dramatic or “tensioned.”
2. Understanding frame rates
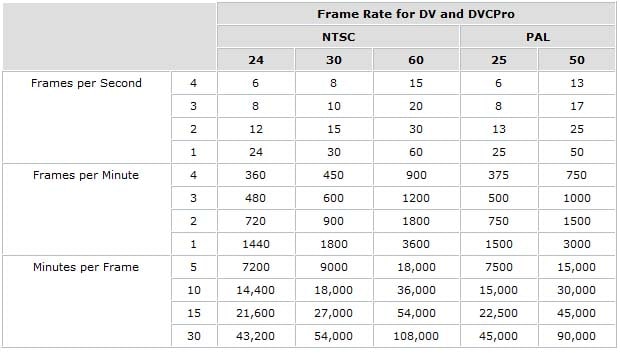
When filming video, there are a set number of frames per second that you can choose from. One picture is all you get when you take a still photograph. Click. That is only one example. A frame is the name of that picture. With video, however, you take 30 or 24 images per second, which you then combine. You now have footage.
The video is a combination of tens of thousands of frames or images that are flashing before your eyes. With a normal frame rate of 24 frames per second, you are essentially taking 24 pictures per second and stitching them together to create video. When you stretch it out in post for slow motion, you double or triple the frame rate, which results in more images per second and eliminates empty gaps and jarring actions.
This is how video that has been sped up for slow motion may still preserve its quality. But you can’t just choose a frame rate based on taste. Frame rates vary depending on the different types of emotions. 60 fps will do if the video is a slo-mo of a person’s emotion. However, if your shot contains a lot of movement and you want to show it, such as when automobiles collide or explode, you may require a higher frame rate, such as 120 fps.
3. Post processing
This is when it gets a bit complicated. Some cameras come equipped with a slow-motion feature. To capture the video in slow motion at a higher frame rate, go to your settings. You might not have this built-in slow-motion feature in other models.
Therefore, even though the footage was taken at a higher frame rate, the camera is playing the movie back at the same pace it was shot at, so when you shoot at a higher frame rate, you end up with footage of a normal speed. There is a solution to that. The footage’s speed can be adjusted during post-production.
The 24/30 fps editing timelines are pre-set. The majority of the video you capture at this frame rate plays back just nicely on this timeline. You must stretch out video that was shot at a higher frame rate to match this timeline, though. That effectively doubles or triples the length of a video, depending on the multiple of the timeline’s typical frame rate.

4. Lighting
While watching TV or movies, you might have observed anything. The majority of the extremely slow photos happen in broad daylight. Not after dark or in dimly lit areas. The reason for this is that sufficient lighting is required in order to capture motion. Lighting becomes crucial as your frame rate exceeds 300 frames per second. Therefore, if you must take these pictures, you must do so in a studio environment with lots of artificial lighting.
To create that cinematic magic, you can use high CRI lighting. On the screen, a flickering light may spell doom. Flickering lights have the potential to damage slow-motion film even though they would be OK for any other scene. Because there is no risk of voltage fluctuation, LED lights are a safe bet. The reason for this is that some models do not require an electrical outlet to function. Prior to departure, make sure you have checked each and every light.
If you are filming during the day and you point your camera toward the sun, you may end up with a significant amount of glare that cannot be hidden up in the post-production stage nor can it be ignored. This is not merely a problem that occurs throughout the daytime. Flares can also be obtained from moving vehicles and various other sources of light. If you use a flat lens when you’re out at night, you can eliminate the risk of something like that happening.

5. Why use slow motion?
When you first begin working with slow-motion video, you need to ask yourself, “What exactly is the purpose behind me choosing this effect?” Once you have an answer to that question, you may move on to the next step.
In most cases, there are often two primary causes for it.
1. It makes sense to present emotions on the screen for a longer period of time in order for the audience to be able to absorb and comprehend it in its whole if they are shown for a longer period of time since moments that are packed with emotions seem to endure longer than ordinary ones.
2. The second strategy is to draw attention to striking visuals that you might have overlooked in other circumstances and that contribute significantly to the aesthetic value of your setting. A flutter of the eyelid, a butterfly stretching its wings, rains falling on a flower petal, shards of fire breaking free, etc. are all examples of how quickly things may happen. You need to have a good reason for using slow motion, and you shouldn’t abuse the effect too much too. You should only do so at those moments where it makes logical sense to do so.

Subconscious slow-motion. Overusing or misusing a function ruins its appeal. Filming isn’t an exact science, but it does nothing unnecessary. For a cinematic effect, slow-motion should be introduced carefully.
Free Download For Win 7 or later(64-bit)
Free Download For macOS 10.14 or later
Free Download For macOS 10.14 or later
Also read:
- 2024 Approved Do You Want to Know Where You Can Find Online Video Editing Courses? In This Article, We Have Provided 15 Options for Your Various Demand. We Also Recommend a Great Video Editor to Help You Start Your Video Editing Journey with Ease
- 2024 Approved How to Remove Background Noise From Video Sony Vegas
- In 2024, Do You Like Clouds or Sky and Want to Use Them as a Video Background? Explore This Article to Learn About the Sky Change Video in Filmora
- Wondershare Filmora Has Introduced a New Feature - AI Portrait Effect that You Can Use to Remove Background From Various Videos and Images. Explore the Uses, Benefits, and Real-Life Scenarios of This Feature in a Comprehensive Guide for 2024
- New In 2024, 15 Amazing GIF Splitter Examples You Need to Bookmark
- In 2024, Exploring the Top Professional Tools to Perform Mask Tracking
- 2024 Approved Wondering How to Rotate a Video in Windows at Any Desired Angle and Save It Permanently? Find Out All the Different Ways to Rotate Videos Temporarily as Well as Permanently
- Unlock Your Video Editing Potential With Filmora From Wondershare for 2024
- Top 10 Audio Visualizers Windows, Mac, Android, iPhone & Online for 2024
- New 5 Tried-And-True Methods to GIF Making
- In 2024, Top 18 Video Editors for PC and Mac
- Updated Best Cloud Storage Service for Videos
- Is Augmented Reality Conferencing the Future of Workplace Collaboratio
- Updated Learn How to Convert MP4 Videos to 60 FPS GIFs with This Easy-to-Follow Tutorial. Get Smooth and Crisp Motion in Your GIFs in Just a Few Simple Steps
- Do You Want to Print Designs Onto Your Garments or Other Fashion Accessories? Find Out How to Create a Screen Print Effect in Photoshop to Give Your Text or Graphics a Vintage or Retro Look
- Updated How To Make a Photo Collage in Microsoft Word — Step by Step Guide
- In 2024, How to Make Video Slow Motion?
- Updated Learn About some of the Best Apps for Photo Collage for PC
- In 2024, How to Intercept Text Messages on OnePlus Nord 3 5G | Dr.fone
- 2024 Approved Animate Graphics in Canva
- Unlocking the Power of Smart Lock A Beginners Guide for Itel A60 Users
- In 2024, Unlock Your iPhone 8 Plus in Minutes with ICCID Code Everything You Need to Know
- The Most Useful Tips for Pokemon Go Ultra League On Vivo Y78+ (T1) Edition | Dr.fone
- In 2024, 8 Best Apps for Screen Mirroring Sony Xperia 1 V PC | Dr.fone
- In 2024, How To Bypass iCloud By Checkra1n Even From iPhone 15 Pro Max If Youve Tried Everything
- 7 Fixes for Unfortunately, Phone Has Stopped on ZTE Axon 40 Lite | Dr.fone
- Easy steps to recover deleted call history from A2
- In 2024, Different Methods To Unlock Your Apple iPhone 6
- 5 Ways to Track Oppo Find N3 Flip without App | Dr.fone
- Updated 2024 Approved Detailed Review & Alternatives of VOCALOID6 Voice Generator
- How do I reset my OnePlus Ace 2 Pro Phone without technical knowledge? | Dr.fone
- In 2024, Unlock Your Disabled iPhone 12 Without iTunes in 5 Ways | Dr.fone
- In 2024, How To Remove or Bypass Knox Enrollment Service On Motorola Edge 40 Neo
- Prevent Cross-Site Tracking on Gionee F3 Pro and Browser | Dr.fone
- In 2024, How Can I Catch the Regional Pokémon without Traveling On Realme 11 5G | Dr.fone
- Title: A Complete Guide to Use Distortion Effect in Premiere Pro for 2024
- Author: Chloe
- Created at : 2024-05-20 03:37:45
- Updated at : 2024-05-21 03:37:45
- Link: https://ai-editing-video.techidaily.com/a-complete-guide-to-use-distortion-effect-in-premiere-pro-for-2024/
- License: This work is licensed under CC BY-NC-SA 4.0.

