
A Guide to Adding Audio in Wondershare Filmora
A Guide to Adding Audio in Wondershare Filmora
Audios are the most important part of videos in today’s world. Even if your video quality is not cinematic, audio lets you engage multiple users, even on low-quality video. To ensure the maximum number of customers on your videos, you need to add optimized quality audio to them. And it’s okay if you don’t know how to add audio to videos because you are about to.
Wondershare Filmora will let you accomplish your task in a matter of seconds. Along with providing details on adding and adjusting audio, we will also introduce the premium quality features of Filmora to present it as a powerful tool. By the end of this discussion, you will get familiar with the procedure of how to adjust TikTok audio through this video editing tool.
Part 1: Discussing The Audio Features of Wondershare Filmora in Detail
The key features of Wondershare Filmora are itself a full fledge example of innovation and modernization. You can maximize the productivity of your videos by adding soothing and studio-quality audio. Not only does it serve as a good audio adjustor, but it also makes processing easier.
Filmora is not only used for adding audio to videos, but also for modifications of audio. The AI audio-related key features of Wondershare Filmora through which you can boost your audio quality and overall video quality are presented here:
1. Audio Ducking
Integrating two soundtracks into the videos means you have to dominate one of them. With the Audio Ducking feature of Filmora, you can lower the sound of one of the two tracks presented in the videos. This is very helpful when working on YouTube videos, podcasts, and Vlogs. This tool also automatically detects soundtracks, so you don’t have to face hassles.
2. Text-to-Speech (TTS)
In this busy world, everyone looks for reliable shortcuts and ways to accomplish their task in a limited time. Filmora offers you the ability to convert text files into realistic and outclass voiceovers. You can also write lengthy blogs, share them with the site and make voiceover videos with state of art accuracy
3. Silence Detection
Do you wish to detect the silent moments in the videos and remove them without impacting the video quality? No need to worry because the Silence Detection feature of Filmora will assist you with this problem. You can also customize the Volume Threshold, Minimum Duration, and Softening Butter. Moreover, you can remove the silenced parts with a few taps.
4. Audio Visualizer
The Audio Visualizer of Filmora can add new life to your lifeless videos and match them with your videos. In addition to this, it can also add dynamic effects to videos. Not only simple, but you also have the option to add podcasts and cinematic music videos. Filmora comprises more than 25 visualizer effects for the ease of the users.
5. Audio Synchronization
Matching audio with the length of the videos without any complication is like a dream to some users. However, it can be true if you are utilizing assistive tools such as Filmora. It supports the feature of Auto Sync, through which you can synchronize the audio with video irrespective of length and format. You can also select royalty-free music from Filmora, add it to the video and sync it automatically .
6. AI Audio Stretch
To fit the duration of your audio with audio, you can retime the audio in real-time with Filmora. This feature encompasses AI powers, so you don’t have to adjust everything manually. There is no need to add fading effects or cut unnecessary parts. Along with this, you can also preview the music track to match it with the length of the videos.
7. AI Audio Denoise
Background noises in videos cause a distraction for the users and impact the engagement of users in a bad way. From removing electrical noises to the removal of pet noises, this tool can help you with everything. As it supports a wide array of audio file formats, you will not face restrictions in this part.
8. Speech-to-Text (STT)
Transcribing long videos without errors and mistakes is one of the specialties in Filmora. It also integrates several plug-ins through which you can optimize the speech-to-text in a limited time. One of the best things is it can also work on SRT files.
Part 2: How to Add and Detach Audio in Wondershare Filmora?
Integrating audio in the video somehow depends upon the user’s preferences. Yet, a reliable video editor will let you add or detach the audio from videos without any issue. The best tool through which you can accomplish this task is Wondershare Filmora. You can also discover the procedure of addition and detaching videos in the below-given information:
How to Add Audio to Video with Wondershare Filmora?
As stated above, Filmora is an industry-standard tool that offers a straightforward procedure for modifying multimedia content. The procedure for adding audio in videos with Wondershare Filmora free audio editor is listed here:
Add Audio to Video For Win 7 or later(64-bit)
Add Audio to Video For macOS 10.14 or later


Step 1Import Video and Select Audio
Initially, import the video in Filmora and drag it to “Timeline.” Next, go to the “Audio” section and select the audio of your choice. You can also click the “Learn More” icon to get more information about the audio. You can also import the customized audio from your device.

Step 2Add Audio to Video
Following this, drag your selected audio in the video in “Timeline” and “Double Click” on the audio. Next, manage the “Volume,” “Sound Balance,” “Pitch,” “Audio Ducking,” and other parameters of audio from the right panel. After this, click the “Export” button, change settings, and again hit the “Export” button to save the video on the device.

How to Detach Audio From Video with Wondershare Filmora
The procedure of audio detaching is also very smooth. Feel free to follow the steps instructed here to accomplish this task:
Detach Audio From Video For Win 7 or later(64-bit)
Detach Audio From Video For macOS 10.14 or later
Step 1Drag Video to Timeline
To get started, launch Filmora and import the video by clicking on the “Click here to import media” button. To continue, drag the imported video to the “Timeline.”


Step 2Detach Audio from Video
Once done, right-click on the video in the timeline and locate the “Detach Audio” button. Following this, hit “Detach Audio” to separate the audio from the video and continue to save it on the device.

Part 3: How to Adjust the Parameters of Audios in Filmora?
Every person wishes to customize the audio in the video so they can share their creativity with the world without any complications. To adjust the audio parameters, you need to use a reliable tool that offers versatile audio editing features.
Adjust Audio Now For Win 7 or later(64-bit)
Adjust Audio Now For macOS 10.14 or later
Luckily, Wondershare Filmora can help you a lot in modifying and customizing the audio parameters. To change the audio parameters in this audio adjuster, follow the instructions listed here:
Step 1Access Filmora and Import Video
To change the audio parameters, access Wondershare Filmora on your device and click “New Project.” Following this, hit the “Click here to import media” button to import a video and drag it to the “Timeline.”
Step 2 Change Audio Parameters in the Video
Once the video is in the timeline, double-click on the audio in the timeline. After this, the audio parameter window will be opened in the right section. From here, you can change “Sound Balance,” “Fade In,” and “Fade Out” in a customized way. Moreover, you can also toggle the “Auto-Normalization” option and optimize “Volume.”

Step 3Saving the Adjusted Video to the Device
Saving the Adjusted Video to the Device

Conclusion
In a nutshell, this discussion has guided you about the addition and adjustment of Wondershare Filmora. With Filmora, you can optimize the quality of audio in videos in no time. Moreover, it also integrates several useful features such as Audio Ducking, AI Audio Denoise, Audio Visualizer, and more.
You can discover more information about its features from the above-given discussion. This article also discusses the steps to add and detach audio from video. In addition to this, you can also adjust multiple audio parameters with Filmora’s explicit toolkit.
How to Add Audio to Video with Wondershare Filmora?
As stated above, Filmora is an industry-standard tool that offers a straightforward procedure for modifying multimedia content. The procedure for adding audio in videos with Wondershare Filmora free audio editor is listed here:
Add Audio to Video For Win 7 or later(64-bit)
Add Audio to Video For macOS 10.14 or later
Step 1Import Video and Select Audio
Initially, import the video in Filmora and drag it to “Timeline.” Next, go to the “Audio” section and select the audio of your choice. You can also click the “Learn More” icon to get more information about the audio. You can also import the customized audio from your device.
Step 2Add Audio to Video
Following this, drag your selected audio in the video in “Timeline” and “Double Click” on the audio. Next, manage the “Volume,” “Sound Balance,” “Pitch,” “Audio Ducking,” and other parameters of audio from the right panel. After this, click the “Export” button, change settings, and again hit the “Export” button to save the video on the device.
How to Detach Audio From Video with Wondershare Filmora
The procedure of audio detaching is also very smooth. Feel free to follow the steps instructed here to accomplish this task:
Detach Audio From Video For Win 7 or later(64-bit)
Detach Audio From Video For macOS 10.14 or later
Step 1Drag Video to Timeline
To get started, launch Filmora and import the video by clicking on the “Click here to import media” button. To continue, drag the imported video to the “Timeline.”
Step 2Detach Audio from Video
Once done, right-click on the video in the timeline and locate the “Detach Audio” button. Following this, hit “Detach Audio” to separate the audio from the video and continue to save it on the device.
Part 3: How to Adjust the Parameters of Audios in Filmora?
Every person wishes to customize the audio in the video so they can share their creativity with the world without any complications. To adjust the audio parameters, you need to use a reliable tool that offers versatile audio editing features.
Adjust Audio Now For Win 7 or later(64-bit)
Adjust Audio Now For macOS 10.14 or later
Luckily, Wondershare Filmora can help you a lot in modifying and customizing the audio parameters. To change the audio parameters in this audio adjuster, follow the instructions listed here:
Step 1Access Filmora and Import Video
To change the audio parameters, access Wondershare Filmora on your device and click “New Project.” Following this, hit the “Click here to import media” button to import a video and drag it to the “Timeline.”
Step 2 Change Audio Parameters in the Video
Once the video is in the timeline, double-click on the audio in the timeline. After this, the audio parameter window will be opened in the right section. From here, you can change “Sound Balance,” “Fade In,” and “Fade Out” in a customized way. Moreover, you can also toggle the “Auto-Normalization” option and optimize “Volume.”
Step 3Saving the Adjusted Video to the Device
Saving the Adjusted Video to the Device
Conclusion
In a nutshell, this discussion has guided you about the addition and adjustment of Wondershare Filmora. With Filmora, you can optimize the quality of audio in videos in no time. Moreover, it also integrates several useful features such as Audio Ducking, AI Audio Denoise, Audio Visualizer, and more.
You can discover more information about its features from the above-given discussion. This article also discusses the steps to add and detach audio from video. In addition to this, you can also adjust multiple audio parameters with Filmora’s explicit toolkit.
Windows Movie Maker Review
Are you considering creating impressive movies from your video clips? Then you need to install this famous Windows movie maker tool to fulfill your job. This is expert video editing Microsoft software that you may use for free. This video editing tool by Windows has received massive recognition due to its simplicity. Also, it makes every task easy and quick, like combining video clips to form digital movies, including various effects, background music, transitions, and titles.
So, Windows Movie Maker is undoubtedly the ideal software for this job. Moreover, video editors using this app experience several attributes in their organization to finally emerge with the perfect videos, like audio options, animations, transitions overlays, and timeline narration. It has user-friendly features, which you’ll enjoy experimenting with. This software also has XML code allowing its end users to modify live effects and transitions or even prepare very new ones.
This brilliant tool can even do primary track editing, including fade-out and fade-in effects in your final audio tracks. Windows movie maker even allows you to post your final project effortlessly on various video sites and social media platforms. Here’s a complete guide:
1. Download and Install Windows Movie Maker
Windows movie maker was previously recognized in Windows 7 as Windows Live Movie Maker. So to experience the features of this software, first, you need to download and install this app which is available free of charge. The steps are as follows.
- Firstly, download the setup file of Windows Live Essentials.
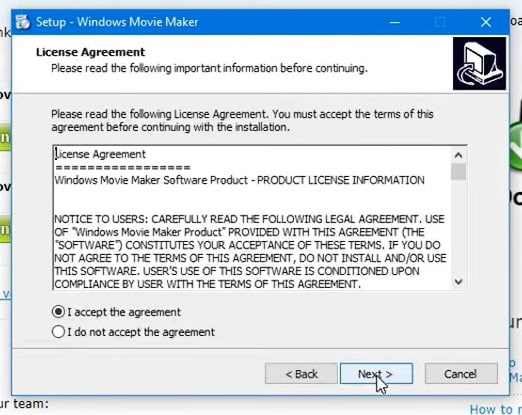
- You’ve to double-click on this setup file called windows-movie-maker.exe. Then tap on ‘Yes’ to permit the setup package to function.
- You’ll now be redirected to the installation window of Windows Essential. Next, you’ll see two options towards the web page’s top, and you’ll have to select the option ‘Install all of Windows Essentials (recommended)’ to continue with the installation process.
Windows Essentials comprise Microsoft OneDrive, Outlook Connector Pack, Movie Maker, Writer, Mail, Photo Gallery, and Messenger.
- Locate ‘View Details’ towards the left end of the page and tap on it. A progress and percentage bar will pop out along with the details regarding the program you’re installing.
- You need to wait a while to install Windows Movie Maker Software. Pause until the program completes its installation. After you find that the program title changes to another program such as Mail, you may proceed again.
- Now click on the Windows icon and then the ‘Start’ menu on the bottom left of your computer screen.
- Type and Search for ‘Windows Movie Maker, and you’ll find the newly downloaded app on the screen.
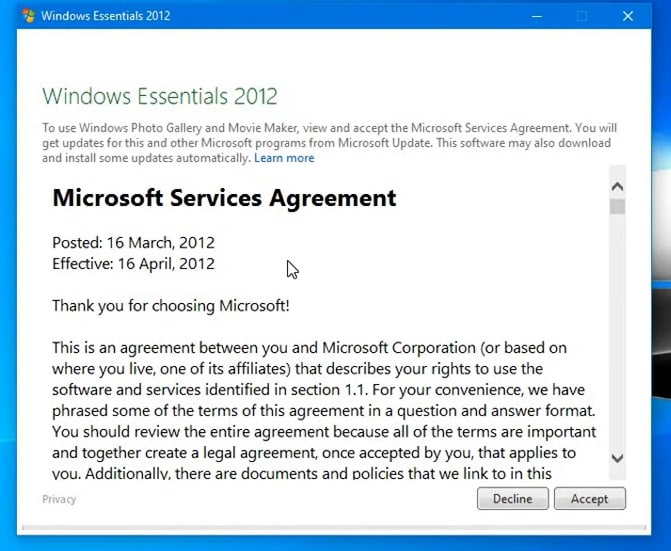
- Click on the icon with film reel, which is the Movie Maker app, and you’ll locate it above the Start menu. Next, you’ll be redirected to the terms of use of Windows Essentials for this Window to begin.
- Find the ‘Accept ‘ button towards the screen’s right-end corner and tap on it. Windows Movie Maker will now open.
- Next, tap on ‘Close’ when prompted with an error message from the installation windows.
You may now Enjoy Windows Movie Maker Live and begin making movies and videos using this software.
2. Interface
The user interface of Winona Movie Maker has three essential areas: the timeline and the storyboard, the panes and the toolbar, and the menu bar. This area covers…
- Timeline and storyboard: It offers a timeline and storyboard usage details for working with the current project clips.
- Panes: It offers details regarding Collections pane usage for viewing all your collections. Furthermore, it offers information regarding the Movie Task pane for all general tasks during movie making or project editing.
- Toolbar and Menubar: Here, you’ll get details regarding toolbar and menu commands usage for different tasks in this software.
3. Basic Editing
Adding clips to your timeline is the most straightforward method for creating digital movies using Movie Maker. Thereby, picking any one AutoMovie Themes out of those seven choices from default, sepia, black and white, pan and zoom, fade, cinematic, and contemporary.
You can enjoy the following choices for editing all your video clips:
- Creating clips: You may create new clips from different video clips after you’re done with capturing and importing in the Windows Movie Maker. You may create clips in the software anytime, according to your convenience.
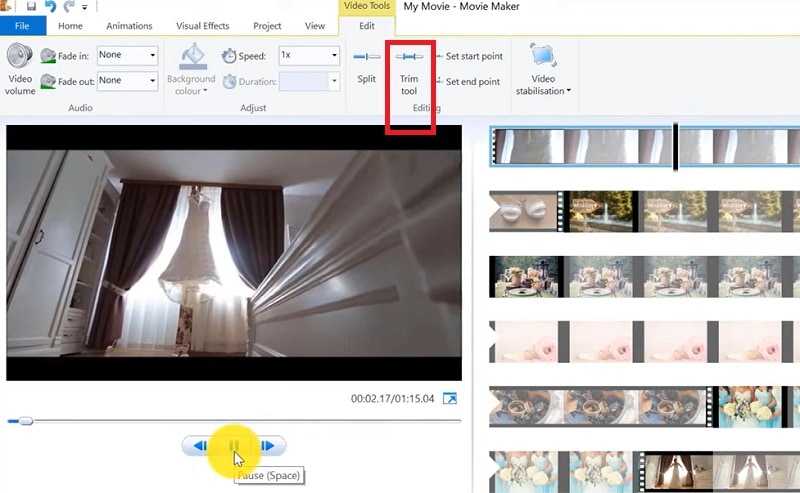
- Trimming any clip: You may hide any clip part you don’t wish to keep in the project. For instance, you may trim the clip’s end or beginning. Also, trimming doesn’t erase the details provided in their source material.
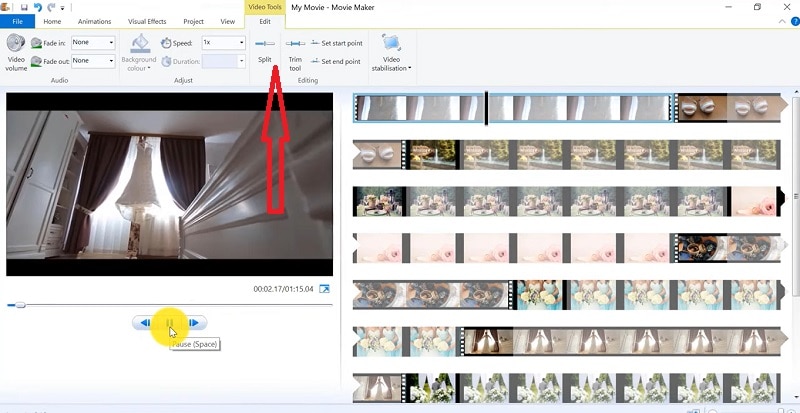
- Splitting Clips: Movie Maker allows you to split any video into two parts which can be helpful when you wish to add a video transition picture between the clips.
- Combining clips: Movie Maker allows you to merge two or multiple contiguous clips. Contiguous indicates that you need to record these clips together so that the beginning and end times are the same as the following video clip.
4. Add Video Effects
Video effects’ ascertain how any title, picture, or video clip displays in the final movie or project. Video effects permit you to include various effects in the movie and are added for the total time that the title, picture, or video clip displays.
Furthermore, you may add various other effects, which you’ll find in the folder of video effects in their Collections pane. You may maintain video effects when moving, copying, cutting, or splitting a picture or video clip.
5. Audio Editing
Windows Movie Maker permits you to operate various audios in several ways. A few specific audio-related jobs you may execute in Windows Movie Live Maker comprise the following:
- Audio levels adjustment: You can adjust your audio level so that you can easily control the audio playback and balance after you have the audio that comes up on Music/ Audio and Audio tracks in your timeline.
- Timeline narration: You may include a voice narration for the picture or video clips, which will appear on the timeline’s video track. There’ll be an automated synchronization of the audio narration with your video, where the narration shall elaborate on the movie event or action when you play it.
- Audio Clips Volume adjustment: You may adjust the audio volume for the video clip’s audio portion or the clips containing only audio. This permits you to control the audio clip’s volume such that you can hear it based on the sound level you’ve set for your audio clip.
- Adding audio effects: You may add various audio effects like mute, fade out and fade in.
6. Share Files
Are you done with video project editing, and now you wish to share it? Windows Movie Maker offers you various choices for sharing straight away from their app, comprising:
- YouTube
- Vimeo
So with this power, you may guarantee to share the video’s correct aspect ratio and size version to any planned platform. Nevertheless, you don’t require signing in to your Microsoft account for sharing to the preferred platform, which may act as a hurdle for all its users who do not have Microsoft Office accounts.
7. Pros and Cons
The software’s advantages are its automated preview, simple controls, and user-friendliness. Additionally, the following are some clear advantages and disadvantages of using Windows Movie Maker:
Pros
- This app is perfect for all novices and is an ideal introduction as it utilizes several pro editing systems’ general workflow components like assembling timelines and importing. Its interface has easy navigation and is exceptionally intuitive for most new beginners as well.
- Windows Live MovieMaker is a video editing Microsoft application that arrives standard with all Windows computers. It is amongst the most favorite editing apps obtainable and exact, as other programs are user-friendly and fun. This software comes free with Vista, XP, and Windows Me and has effortless usage. Moreover, you may download additional video plugins, plus it won’t give you any chance to complain regarding its free software.
- This app is straightforward to learn, and you won’t require any experience in film editing for using Windows Media Player. You’ll explore more than 130 effects with accessible Fantastic credits, titles, and transitions. Next to this, you may drag and then drop the clip at any place in the timeline.
- Windows Movie Maker is an ideal app for image slide shows and was developed to create photo and home movie slide shows. It presents excellent fun transitions and themes; you may add music easily. This app provides excellent variety, being a free editing application. Furthermore, it offers transitions and striking effects to function with.
- Windows Live Movie Maker is free of cost for all Microsoft Windows users and is basically for clients having zero to minimum experience editing audio and videos. Moreover, it has many special effects you may use while creating videos. Also, you may frag and then place any picture or video anywhere you wish to see it.
- You can choose from several themes, enhancing your film with tools like contemporary themes, fade effects, and sepia toning choices. You have to click once, and then the users can choose and apply from the multiple effects collection.
Cons
- Windows Movie Maker contains unlimited audio and video tracks, yet it provides just one accessible one at a time. Hence, if you wish to include some other audio or music track, you may prepare the video, thereby sending it to the ultimate file.
- It isn’t uninstallable using any remove or add control panel. Also, it is impossible to do video overlaying.
- This app requires much patience because it is prone to crashes. Moreover, you’ll require enough time and effort to do video reversing. It often becomes frustrating for all advanced editors to cut clips into small parts and then add them back. Hence, Windows Movie maker isn’t good for professional video editors.
- Windows Live MovieMaker can crash and freeze and is known to suffer frequent crashes. Hence, ensure saving often and avoid creating complex videos. Also, you cannot perform complex editing and can now prepare single audio and video track.
8. Windows Movie Maker Alternative Software
Wondershare Filmora Video Editor is the best alternative for Windows Movie Live Maker and is a highly favored and most effective software program. You can download it for free, and it is adaptable with Windows 7 OS or above. This app is user-friendly but powerful and allows you to split, merge, crop, and trip various video clips with essential built-in video editing attributes.
Free Download For Win 7 or later(64-bit)
Free Download For macOS 10.14 or later
Additionally, you may get a few advanced properties like video stabilization, color correction, and green screen in Filmora effortlessly. You may even explore several fashionable and modern video effects such as music, text, and intros for topics like games, Education, Travel, Vlogger, Beauty, etc. Here is the comparison between the two software:
Filmora and Windows Movie Maker comparison
| Basis | Windows Movie Maker | Wondershare Filmora |
|---|---|---|
| Pricing | Free/ inexpensive | Quote basedAnnual SubscriptionOne-time paymentMonthly Payment |
| Interface | Pleasing interface | Auto movie options |
| Effects | Several overlays and effects | Special effects choices and transition overlays |
| Integration | YouTubeFacebookVimeoEmail | TwitterInstagramFacebookVimeoYouTube |
Conclusion
You may use Windows Movie Maker Live for capturing videos and audio to the computer using various video sources, including Web Cameras and Video Cameras, thereby using the recorded data in your new movies. You may import still pictures, video, and audio into this application to use in the movies you’re making. Moreover, after you’ve finished with video and audio content editing in this app, which may involve adding effects, video transitions, and titles, you may finally save the ultimate movie and then share and watch it with your family and friends.
Ultimate Guide to Making Cinematography for Music Video
To visually represent the story in the music video, cinematography shots are helpful. It’ll obviously and pleasing and eye-catchy effect in your video. These major requirements for making that cinematography can be covered as the following:
- Light a subject
- Create atmosphere
- Light a set
- Camera techniques
- Aspect ratio
- Framing
- Camera movement
Before, we go deeper to the details on how to make a cinematography for music, let us know first about the cinematography for music video. Everything is represented in this article, from the camera movement to the setting of the lights in the studio. You will also learn about aspect ratio and framing while making shots from the DSLR.
What Is Cinematography?
Cinematography covers all aspects of how a movie or music video is made, including choosing the lighting for the scene. The type of camera equipment to use, how to frame your photographs, and how to decide on camera movement are also included in this. Let’s move toward the next lines to get the cool cinematography on display.
Light a subject
Although you may assume that cinematography is just concerned with the usage of the camera, lighting plays an equally important role. While planning your photographs, you should think about how the scene is lit and how your subject is illuminated.

The cinematographer should consider the hard and soft lights for perfect illustrations during shooting. These are depicted with the following requirements!
Hard light and soft light
The cinematographers mainly focus on the hard and soft lights during filmmaking. The hard lights give a softer look to the subject. They are pointing to the light sources which are closer to the subject in the video. It makes the photographs and shots harsher and more dramatic.

The soft light is trying to wrap around the subject. It gives diffused shadows and soft edges to the character of the music video.

![]()
Note: To get better results of the soft look, you need to add diffusion to lower the intensity.
Create Atmosphere
You need a haze machine to create the atmosphere and give the environment true vibes. The haze machine gives a foggy appearance in every shoot and scene.

Filmora Video Editor Easily create video with plenty of video effects and filters.
Free Download Free Download Learn More

![]()
Light a Set
To give proper lights in the set is illustrated with the help of an example as shown below!
Examples
In this music video of the 3lau’s, the main prop used is a bus, which is presented in the middle of the set and lit very well. The bus is rounded by many tungsten lights, which give a resemblance to those street lights. They are set up automatically in such a way that this stimulates the real movement of the bus on the road.

The three projectors are set to give the street footage at the back scene to add more realism.
The three lights are set in the queue by the production team to get the memory of the protagonist. In the setup, soft lights are also added on top of all the upper windows of the bus to give blue interior light to the bus.
Camera Techniques
The cameras used during filming play a major role in giving the cinematographic shots. All the techniques shown below are applied to the DSLRs and even the smartphones you use for filming.
Prime lenses
The foremost and most helpful lenses in filming are called prime lenses, which have fixed focal lengths. There is no Johns to zoom out and zoom-in in prime lenses.
For filming, we need to choose the right level of zoom, which the DP does by picking the right lens for the footage.

In the close-up scenes, there is a requirement for a wider field of view which also depends on the aspect ratio of shooting.
Aspect Ratio
In filmy view, the most appropriate aspect ratio is 2.35, which is also a cinematic ratio. There is also another ratio of 16:9, which is a wider ratio. While 2.35 gives a more narrow perspective as compared to the prior one.
![]()
Note: The narrow ratio is helpful in showing the relationships between the subjects.

Whenever we use a microscope, we are dealing with the aspect ratio and narrowing down to the required point where we want to look, and this is all about framing, which is discussed as shown below!
Framing
Framing is a way used to illustrate the concepts such as the rule of thirds and leading lines. To give customized headroom to the subject, the framing is used from the top of the head and the top of the frame.
Camera Movement
The camera movement actually shows the real story presented in the music video. The camera movements used for filming are mainly the pedestal, truck, pan, tilt, and roll.

Whenever the protagonist looks out the bus’s window, the camera operator will use the “Dolly” and “Trucking” movements.
Trucking Movement
The trucking movement of the camera is done in left-to-right motion in the filming. This is used for emotional purposes and whenever the subject is in a pull-out shot.
Dolly Movement
The dolly movement of the camera is done by moving towards or away from the subject. This often gives a sense of importance to the character.
Final Words
The above article gives the exact preferences of the “Tokyo” song by which you learned a lot of techniques for your future use. By following the above rules and tips, you’ll obviously come up with a viral music video.
Create Atmosphere
You need a haze machine to create the atmosphere and give the environment true vibes. The haze machine gives a foggy appearance in every shoot and scene.
Filmora Video Editor Easily create video with plenty of video effects and filters.
Free Download Free Download Learn More
![]()
Light a Set
To give proper lights in the set is illustrated with the help of an example as shown below!
Examples
In this music video of the 3lau’s, the main prop used is a bus, which is presented in the middle of the set and lit very well. The bus is rounded by many tungsten lights, which give a resemblance to those street lights. They are set up automatically in such a way that this stimulates the real movement of the bus on the road.
The three projectors are set to give the street footage at the back scene to add more realism.
The three lights are set in the queue by the production team to get the memory of the protagonist. In the setup, soft lights are also added on top of all the upper windows of the bus to give blue interior light to the bus.
Camera Techniques
The cameras used during filming play a major role in giving the cinematographic shots. All the techniques shown below are applied to the DSLRs and even the smartphones you use for filming.
Prime lenses
The foremost and most helpful lenses in filming are called prime lenses, which have fixed focal lengths. There is no Johns to zoom out and zoom-in in prime lenses.
For filming, we need to choose the right level of zoom, which the DP does by picking the right lens for the footage.
In the close-up scenes, there is a requirement for a wider field of view which also depends on the aspect ratio of shooting.
Aspect Ratio
In filmy view, the most appropriate aspect ratio is 2.35, which is also a cinematic ratio. There is also another ratio of 16:9, which is a wider ratio. While 2.35 gives a more narrow perspective as compared to the prior one.
![]()
Note: The narrow ratio is helpful in showing the relationships between the subjects.
Whenever we use a microscope, we are dealing with the aspect ratio and narrowing down to the required point where we want to look, and this is all about framing, which is discussed as shown below!
Framing
Framing is a way used to illustrate the concepts such as the rule of thirds and leading lines. To give customized headroom to the subject, the framing is used from the top of the head and the top of the frame.
Camera Movement
The camera movement actually shows the real story presented in the music video. The camera movements used for filming are mainly the pedestal, truck, pan, tilt, and roll.
Whenever the protagonist looks out the bus’s window, the camera operator will use the “Dolly” and “Trucking” movements.
Trucking Movement
The trucking movement of the camera is done in left-to-right motion in the filming. This is used for emotional purposes and whenever the subject is in a pull-out shot.
Dolly Movement
The dolly movement of the camera is done by moving towards or away from the subject. This often gives a sense of importance to the character.
Final Words
The above article gives the exact preferences of the “Tokyo” song by which you learned a lot of techniques for your future use. By following the above rules and tips, you’ll obviously come up with a viral music video.
Easy Guide to Apply Slow Zoom Effects to Videos
A raw video without any effect will fall flat on its face when it comes to engagement and watch time. Nobody likes watching videos without effects as there is no entertainment value, and the video is not soothing and pleasing to the eyes. That is why effects in videos are extremely important especially when it is a video you are posting on social media to get everyone’s attention. You should definitely consider adding slow zoom effect in your video to make it stand out.
The slow zoom effect is one of the most common but widely loved video effects that work for any video. Human eyes love when there is slow motion effect of panning and zooming into the central or specific portion of a video. The slow zoom in effect is extremely popular among TikTok videos. We will illustrate how to apply slow zoom effect to your video on your smartphone as well as on your computer.
Part 1. How to create slow zoom-in effect in Filmora
If you want to add slow zoom to any recorded video on your computer, you will need a dedicated video editor. There are many popular video editors available where slow zoom effect is not available. We recommend Wondershare Filmora which is a professional video editor that is available for Windows and Mac users. You will need to combine slow motion and keyframe to achieve the desired slow zoom effect. Here are the steps on how to create slow zoom in effect for your videos.
Free Download For Win 7 or later(64-bit)
Free Download For macOS 10.14 or later
Step1 Download and install Wondershare Filmora . Launch the application and click on New Project option from the welcome screen.

Step2 Drag and drop your video in Project Media folder. Thereafter, drag and drop the video into the Timeline.

Step3 Put the red header on the beginning part of the clip that you want to cut off and click on Cut(Scissor) icon. Then put the red header on the end part of the clip and click on Cut icon again. You should now have the separated clip for applying slow zoom effect.

Step4 Select the separated clip and click on Speed icon. Go to Slow option and select the speed according to the slowness of zooming you want.

Step5 Now you have to add multiple keyframes so that the slow zoom effect is smooth and soothing. Right-click on the clip, go to Animation and click on Add Animation. Go to Animation tab and then to Customization section.

Move the red header to the point where you want a keyframe and click on Add option. Similarly, move the red header slightly farther and add another keyframe. Keep adding like that till you reach the end point.

Step6 Double-click on the clip and go to Video> Basic> Transform. Select keyframes and slowly increase the scale slider for each keyframe to apply the zoom effect. Therefore, for every keyframe, zooming will increase gradually and you have already applied slow speed for complete slow zoom effect.

Part 2. How to do the slow zoom in effect on TikTok?
TikTok is one of the most popular short-video sharing platforms among teenagers and young adults. The slow zoom effect has been popularized by TikTokers as they use the effect quite regularly. Naturally, adding slow zoom in effect on your video on TikTok is the easiest. Here are the steps to follow one by one.
Step1 Launch TikTok app and you can shoot your video directly from TikTok. If you have already recorded the video, tap on “+” icon located at the bottom of the app screen and select the video.
Step2 After adding the video, go to Effects> Time. Under Time section, tap on “Slo-Mo” option to add slow-motion effect on your video.

Step3 Go to Visuals and you will find Zoom option. Place the header on the part of the video where you want to place the slow zoom effect. Thereafter, tap and hold Zoom effect so that the effect applies on the video clip. Release the effect where the desired section is covered.

Step4 Tap on Save option and play the video to see slow zoom effect. Tap on Next button and you can share the video on social media platforms as well.

There is another way you can apply slow zoom effect on TikTok. Here are the steps to find and apply slow zoom effect.
Step1 Launch TikTok app and tap on Discover option located at the bottom.

Step2 On the next screen, type “Slow Zoom” on the search bar and tap on Search option.

Step3 Now you will see the videos where different TikTok users have already applied slow zoom effect. Tap on Effects Slow Motion to apply the same effect to your video.

Step4 On the next screen, tap on Try This Effect button. You can select the duration of the zooming of the video you are about to shoot as well the zooming magnification.

Step5 Finally, tap on Record button to capture your video and apply slow zoom effect on the video automatically.

Conclusion
The slow zoom effect is one of the most viral and trending video effects on social media platforms. If you want to add slow zoom effect to your video for a certain portion, you can do the same from your smartphone as well as computer. For Windows and Mac users, we recommend you use Wondershare Filmora .
Free Download For macOS 10.14 or later
Step1 Download and install Wondershare Filmora . Launch the application and click on New Project option from the welcome screen.
Step2 Drag and drop your video in Project Media folder. Thereafter, drag and drop the video into the Timeline.
Step3 Put the red header on the beginning part of the clip that you want to cut off and click on Cut(Scissor) icon. Then put the red header on the end part of the clip and click on Cut icon again. You should now have the separated clip for applying slow zoom effect.
Step4 Select the separated clip and click on Speed icon. Go to Slow option and select the speed according to the slowness of zooming you want.
Step5 Now you have to add multiple keyframes so that the slow zoom effect is smooth and soothing. Right-click on the clip, go to Animation and click on Add Animation. Go to Animation tab and then to Customization section.
Move the red header to the point where you want a keyframe and click on Add option. Similarly, move the red header slightly farther and add another keyframe. Keep adding like that till you reach the end point.
Step6 Double-click on the clip and go to Video> Basic> Transform. Select keyframes and slowly increase the scale slider for each keyframe to apply the zoom effect. Therefore, for every keyframe, zooming will increase gradually and you have already applied slow speed for complete slow zoom effect.
Part 2. How to do the slow zoom in effect on TikTok?
TikTok is one of the most popular short-video sharing platforms among teenagers and young adults. The slow zoom effect has been popularized by TikTokers as they use the effect quite regularly. Naturally, adding slow zoom in effect on your video on TikTok is the easiest. Here are the steps to follow one by one.
Step1 Launch TikTok app and you can shoot your video directly from TikTok. If you have already recorded the video, tap on “+” icon located at the bottom of the app screen and select the video.
Step2 After adding the video, go to Effects> Time. Under Time section, tap on “Slo-Mo” option to add slow-motion effect on your video.
Step3 Go to Visuals and you will find Zoom option. Place the header on the part of the video where you want to place the slow zoom effect. Thereafter, tap and hold Zoom effect so that the effect applies on the video clip. Release the effect where the desired section is covered.
Step4 Tap on Save option and play the video to see slow zoom effect. Tap on Next button and you can share the video on social media platforms as well.
There is another way you can apply slow zoom effect on TikTok. Here are the steps to find and apply slow zoom effect.
Step1 Launch TikTok app and tap on Discover option located at the bottom.
Step2 On the next screen, type “Slow Zoom” on the search bar and tap on Search option.
Step3 Now you will see the videos where different TikTok users have already applied slow zoom effect. Tap on Effects Slow Motion to apply the same effect to your video.
Step4 On the next screen, tap on Try This Effect button. You can select the duration of the zooming of the video you are about to shoot as well the zooming magnification.
Step5 Finally, tap on Record button to capture your video and apply slow zoom effect on the video automatically.
Conclusion
The slow zoom effect is one of the most viral and trending video effects on social media platforms. If you want to add slow zoom effect to your video for a certain portion, you can do the same from your smartphone as well as computer. For Windows and Mac users, we recommend you use Wondershare Filmora .
Also read:
- [New] Pioneering Pedagogy Choosing From the Premier 10 Lecture Recorders for 2024
- 2024 Approved Slow It Down A Comprehen
- ChatGPT Is Listening – Start a Dialogue
- In 2024, Expert Review of PowerDirector - Features & Tips
- In 2024, Learn How to Convert MP4 Videos to 60 FPS GIFs with This Easy-to-Follow Tutorial. Get Smooth and Crisp Motion in Your GIFs in Just a Few Simple Steps
- In 2024, Top 11 Free Apps to Check IMEI on Itel A05s Phones
- Locked Out of iPhone 6 Plus? 5 Ways to get into a Locked iPhone 6 Plus | Dr.fone
- New A Countdown Effect Is Widely Used in Gaming and Report Videos. So How to Create Your Own Countdown Video? This Article Will Tell You some Ideas About Contdown Video Editing for 2024
- New How Do You Create In-Camera Transitions in Your Videos? A Complete Guide for Beginners to Create These Transitions Using Their Camera at Home
- New In 2024, Adobe Lightroom Color Grading Tutorial
- New In This Article Let Me Share with You How to Start a Vlog? Ideas and Any Tips for You to Start Your Own Vlogging Channel
- Troubleshooting Steps for Persistent Palworld Crashes on Personal Computers
- Title: A Guide to Adding Audio in Wondershare Filmora
- Author: Chloe
- Created at : 2024-09-28 19:15:15
- Updated at : 2024-10-03 12:56:07
- Link: https://ai-editing-video.techidaily.com/a-guide-to-adding-audio-in-wondershare-filmora/
- License: This work is licensed under CC BY-NC-SA 4.0.