A Guide to Color Grade Your Picture in LightRoom

A Guide to Color Grade Your Picture in LightRoom
Create High-Quality Video - Wondershare Filmora
An easy and powerful YouTube video editor
Numerous video and audio effects to choose from
Detailed tutorials are provided by the official channel
Every budding photographer knows what Photoshop is Adobe Lightroom (officially Adobe Photoshop Lightroom) is the newer and more advanced version of Photoshop. Compared with other alternatives of Lightroom , Lightroom helps photographers import, modify, manipulate, find, organize, and manage their images as an image editing software. Lightroom combines photo management and photo editing in one.
One of the most amazing things about Lightroom is its autosave or nondestructive feature. Once you edit your photos, Lightroom instantly saves and stores them in your Lightroom catalog. With its inbuilt-presets, Lightroom makes working on your project so much easy and fun.
You can leverage Lightroom’s unique features to perform different types of tasks. However, in this article, you’ll learn color grading in Lightroom and how to make it work.
In this article
03 How To Color Grade Your Picture in LightRoom
What Is Color Grading?
Color grading is one of the essential processes for creating the perfect video and image content. Like with color correction, color grading helps enhance the appearance of your image or video and makes it appealing to viewers. However, unlike color correction, it focuses on creating stylistic or cinematic effects rather than rectifying mistakes in the image.
Color grading enhances an already edited or otherwise perfect image or video. So, in color grading, you are not trying to balance out colors or make your pictures look natural to the human eyes. Color correction does all that. Instead, with color grading, you aim to “paint over” a color-corrected content to evoke specific emotions or moods in the viewers.
Colors carry different emotions or visual tones. So, they’re essential in the post-production process to manipulate viewers into specific moods that tell your story best. In other words, color grading aligns your viewer’s emotions to the central theme in your story.

For example, if your image or video’s theme is passion, power, violence, or danger, red portrays them perfectly. Meanwhile, blue does it when you wish to evoke calmness and melancholy in your viewers.
Other examples include:
- pink for beauty, innocence, and femininity,
- Green for nature, darkness, and corruption
- Purple for fantasies, and the mystical
- Yellow for obsession, sickness, and naivety
- Orange for warmth, friendliness, youth, and happiness
Have you noticed that turning your pictures black and white makes them look timeless? That’s color grading in action.
Color Grading in LightRoom
Are you amazed by the thrilling power of color grading to manipulate viewers’ emotions? Are you wondering how you can achieve that effect seamlessly? Then, you don’t need to worry about it. With Adobe Photoshop Lightroom, you too can make magic.
Since Lightroom is an advanced photo editor, it has a lot to offer in features. Unfortunately, this may also mean that it can be complex to understand, especially if you’re new to photo editing. So, first things first, you must understand the color grading panel in Lightroom to appreciate it better.
Lightroom’s color grading panel is right beneath the HSL panel in the Develop Panel. It serves as a replacement for the Split Toning Panel from earlier versions, so it’s pretty easy to find.
The color grading panel comprises five small icons, three color wheels, and a blending/balance slider:
● The Five Small Icons
Lightroom’s small icons are a 3-way default layout, shadows, mid-tones, highlights, and global. With 3-way, you can manipulate the highlights, shadows, and mid-tones. Mid-tones, highlights, and shadows hide all color wheels, excluding the necessary ones that adjust them.
Meanwhile, Global combines and blends the highlights, mid-tones, and shadow adjustments no matter the luminosity. Global ensures that the color wheels work harmoniously.
When adjusting icons, it’s best to use each color wheel one after another one. You’ll get better and more precise outcomes that way compared to using them together.
● Lightroom’s Color Wheels
You can view Lightroom’s three-color wheels through the 3-way default layout. The color wheels help to enhance distinct image parts by providing various color hues. It also allows you to introduce saturation through an adjustable knob.
Each lightroom’s color wheels feature a luminance slide beneath them that adjusts color brightness. Between the luminance slide and the wheel is a visible eye icon that you can use to turn the effects on or off.
● The Blending and Balance Slider
The blending and balance sliders offer you advanced control over how your colors look after introducing them. With the blending slider, you can control the color distinctiveness between highlights and shadows. In other words, this feature helps to merge colors to produce a much more balanced and beautiful result.
The balance slider adjusts altered mid-tones, highlights, and shadows to balance the effects. By default, the slider is set at 0 in the middle and allows you to move it in opposite directions for distinct effects. For example, you can use this tool to balance shadows with over-concentrated colors.
While the above features are visible to everyone in the 3-way view, there are two more hidden sliders. You may only view them when editing highlights, shadows, mid-tones, or the global color wheels. They’re the hue and saturation sliders that you can only uncover by clicking on the arrow below the eye icon.
There’s no idea why the hue and saturation sliders aren’t visible in the 3-way view. That’s especially when you discover that they do the all-important job of making minor but precise changes to final adjustments. This produces an excellent fine-tuned outcome and gives your image a professional finish.

How To Color Grade Your Picture in LightRoom
If you wish to use the color grading Lightroom tool to enhance photos, here’s a comprehensive guide for you. You’ll learn the best practices to apply when using the specific Lightroom features to produce your desired effects:
● Pick Your Color Scheme
What’s color grading without the right colors? Choosing an appropriate color scheme is one of the essential steps in Lightroom color grading. That’s because it sets the tone for the next steps. If you choose the wrong colors, you won’t get the excellent result you desire no matter how hard you try.
First, take a good look at your picture and its visible colors. Then think of the colors that compliment or contrast with them. For example, you should base images with red highlights around red. You can also try colors close to red in the color wheel, like orange.
Once you’ve found the colors that suit your image, you’re ready for the next steps in your color grading process. However, more than just adding colors, you must also pay attention to contrasting colors during processing. If you find such unwanted colors, use the HSL panel to pale them out.
● Prioritize Precision
In earlier paragraphs, you learned that working with the highlights, shadows, and mid-tones individually is best. That’s because individual adjustments are a painstaking process that guarantees the most accurate results. This makes a lot of difference in the final product compared to when you work with the wheel.
Working on the shadows, highlights, and mid-tones individually also connects to the hue and saturation sliders. So you remember how vital these hidden sliders are? You wouldn’t be able to access them by working on the tools one after another. Take that as your reward for being detail-oriented.
● Increase Saturation Values
Sometimes, the effect of one tool tells on another. For example, leaving your saturation values below may render your hue slider ineffective. To avoid that confusion, it’s best to increase your saturation levels to some values higher than your preferred one.
Yes, it wouldn’t look nice initially as you adjust the hue. However, it will ensure that you get the perfect color for your image. You can always go back to adjust the saturation to your choice values later on.
● Use Color Wheels To Find Color, Use Shadows to Refine
When discussing how to choose your color scheme, you must have understood how vital the color wheel is in finding harmonious hues. However, picking your preferred color isn’t the complete process. You must learn to fine-tune your chosen color by using the hue slider. Do this after adjusting the saturation to your preferred level as in the previous step. The result is always mind-blowing.

● Learn the Short Cuts
There are some shortcuts to learn when color grading in Lightroom to enhance accuracy and convenience. For example, option (Mac)/Alt (Windows) gives you better control over your image’s outcomes. Option/Alt + Up will increase saturation by one while the shift key adjusts it. You can use Command (Mac)/Ctrl (Windows) to adjust the hue. Also, the reset button on the right side of your panel takes you back to your initial image.
● Extra Tips
These best practices will help you to achieve excellent results:
- Don’t color grade without understanding the psychology of colors. Know what colors convey different moods or emotions.
- Be sure to work with high-quality pictures. Color grading isn’t magic; it wouldn’t correct an already lousy image.
- Shooting your pictures in RAW gives you more color control.
Conclusion
● Now that you’ve learned how to color grade using Lightroom, there’s no limit to what you can achieve. You can now explore your creative side with so much fun. However, know that you will likely not get it right the first time. Perfection comes with consistent practice or trial and error.
Every budding photographer knows what Photoshop is Adobe Lightroom (officially Adobe Photoshop Lightroom) is the newer and more advanced version of Photoshop. Compared with other alternatives of Lightroom , Lightroom helps photographers import, modify, manipulate, find, organize, and manage their images as an image editing software. Lightroom combines photo management and photo editing in one.
One of the most amazing things about Lightroom is its autosave or nondestructive feature. Once you edit your photos, Lightroom instantly saves and stores them in your Lightroom catalog. With its inbuilt-presets, Lightroom makes working on your project so much easy and fun.
You can leverage Lightroom’s unique features to perform different types of tasks. However, in this article, you’ll learn color grading in Lightroom and how to make it work.
In this article
03 How To Color Grade Your Picture in LightRoom
What Is Color Grading?
Color grading is one of the essential processes for creating the perfect video and image content. Like with color correction, color grading helps enhance the appearance of your image or video and makes it appealing to viewers. However, unlike color correction, it focuses on creating stylistic or cinematic effects rather than rectifying mistakes in the image.
Color grading enhances an already edited or otherwise perfect image or video. So, in color grading, you are not trying to balance out colors or make your pictures look natural to the human eyes. Color correction does all that. Instead, with color grading, you aim to “paint over” a color-corrected content to evoke specific emotions or moods in the viewers.
Colors carry different emotions or visual tones. So, they’re essential in the post-production process to manipulate viewers into specific moods that tell your story best. In other words, color grading aligns your viewer’s emotions to the central theme in your story.

For example, if your image or video’s theme is passion, power, violence, or danger, red portrays them perfectly. Meanwhile, blue does it when you wish to evoke calmness and melancholy in your viewers.
Other examples include:
- pink for beauty, innocence, and femininity,
- Green for nature, darkness, and corruption
- Purple for fantasies, and the mystical
- Yellow for obsession, sickness, and naivety
- Orange for warmth, friendliness, youth, and happiness
Have you noticed that turning your pictures black and white makes them look timeless? That’s color grading in action.
Color Grading in LightRoom
Are you amazed by the thrilling power of color grading to manipulate viewers’ emotions? Are you wondering how you can achieve that effect seamlessly? Then, you don’t need to worry about it. With Adobe Photoshop Lightroom, you too can make magic.
Since Lightroom is an advanced photo editor, it has a lot to offer in features. Unfortunately, this may also mean that it can be complex to understand, especially if you’re new to photo editing. So, first things first, you must understand the color grading panel in Lightroom to appreciate it better.
Lightroom’s color grading panel is right beneath the HSL panel in the Develop Panel. It serves as a replacement for the Split Toning Panel from earlier versions, so it’s pretty easy to find.
The color grading panel comprises five small icons, three color wheels, and a blending/balance slider:
● The Five Small Icons
Lightroom’s small icons are a 3-way default layout, shadows, mid-tones, highlights, and global. With 3-way, you can manipulate the highlights, shadows, and mid-tones. Mid-tones, highlights, and shadows hide all color wheels, excluding the necessary ones that adjust them.
Meanwhile, Global combines and blends the highlights, mid-tones, and shadow adjustments no matter the luminosity. Global ensures that the color wheels work harmoniously.
When adjusting icons, it’s best to use each color wheel one after another one. You’ll get better and more precise outcomes that way compared to using them together.
● Lightroom’s Color Wheels
You can view Lightroom’s three-color wheels through the 3-way default layout. The color wheels help to enhance distinct image parts by providing various color hues. It also allows you to introduce saturation through an adjustable knob.
Each lightroom’s color wheels feature a luminance slide beneath them that adjusts color brightness. Between the luminance slide and the wheel is a visible eye icon that you can use to turn the effects on or off.
● The Blending and Balance Slider
The blending and balance sliders offer you advanced control over how your colors look after introducing them. With the blending slider, you can control the color distinctiveness between highlights and shadows. In other words, this feature helps to merge colors to produce a much more balanced and beautiful result.
The balance slider adjusts altered mid-tones, highlights, and shadows to balance the effects. By default, the slider is set at 0 in the middle and allows you to move it in opposite directions for distinct effects. For example, you can use this tool to balance shadows with over-concentrated colors.
While the above features are visible to everyone in the 3-way view, there are two more hidden sliders. You may only view them when editing highlights, shadows, mid-tones, or the global color wheels. They’re the hue and saturation sliders that you can only uncover by clicking on the arrow below the eye icon.
There’s no idea why the hue and saturation sliders aren’t visible in the 3-way view. That’s especially when you discover that they do the all-important job of making minor but precise changes to final adjustments. This produces an excellent fine-tuned outcome and gives your image a professional finish.

How To Color Grade Your Picture in LightRoom
If you wish to use the color grading Lightroom tool to enhance photos, here’s a comprehensive guide for you. You’ll learn the best practices to apply when using the specific Lightroom features to produce your desired effects:
● Pick Your Color Scheme
What’s color grading without the right colors? Choosing an appropriate color scheme is one of the essential steps in Lightroom color grading. That’s because it sets the tone for the next steps. If you choose the wrong colors, you won’t get the excellent result you desire no matter how hard you try.
First, take a good look at your picture and its visible colors. Then think of the colors that compliment or contrast with them. For example, you should base images with red highlights around red. You can also try colors close to red in the color wheel, like orange.
Once you’ve found the colors that suit your image, you’re ready for the next steps in your color grading process. However, more than just adding colors, you must also pay attention to contrasting colors during processing. If you find such unwanted colors, use the HSL panel to pale them out.
● Prioritize Precision
In earlier paragraphs, you learned that working with the highlights, shadows, and mid-tones individually is best. That’s because individual adjustments are a painstaking process that guarantees the most accurate results. This makes a lot of difference in the final product compared to when you work with the wheel.
Working on the shadows, highlights, and mid-tones individually also connects to the hue and saturation sliders. So you remember how vital these hidden sliders are? You wouldn’t be able to access them by working on the tools one after another. Take that as your reward for being detail-oriented.
● Increase Saturation Values
Sometimes, the effect of one tool tells on another. For example, leaving your saturation values below may render your hue slider ineffective. To avoid that confusion, it’s best to increase your saturation levels to some values higher than your preferred one.
Yes, it wouldn’t look nice initially as you adjust the hue. However, it will ensure that you get the perfect color for your image. You can always go back to adjust the saturation to your choice values later on.
● Use Color Wheels To Find Color, Use Shadows to Refine
When discussing how to choose your color scheme, you must have understood how vital the color wheel is in finding harmonious hues. However, picking your preferred color isn’t the complete process. You must learn to fine-tune your chosen color by using the hue slider. Do this after adjusting the saturation to your preferred level as in the previous step. The result is always mind-blowing.

● Learn the Short Cuts
There are some shortcuts to learn when color grading in Lightroom to enhance accuracy and convenience. For example, option (Mac)/Alt (Windows) gives you better control over your image’s outcomes. Option/Alt + Up will increase saturation by one while the shift key adjusts it. You can use Command (Mac)/Ctrl (Windows) to adjust the hue. Also, the reset button on the right side of your panel takes you back to your initial image.
● Extra Tips
These best practices will help you to achieve excellent results:
- Don’t color grade without understanding the psychology of colors. Know what colors convey different moods or emotions.
- Be sure to work with high-quality pictures. Color grading isn’t magic; it wouldn’t correct an already lousy image.
- Shooting your pictures in RAW gives you more color control.
Conclusion
● Now that you’ve learned how to color grade using Lightroom, there’s no limit to what you can achieve. You can now explore your creative side with so much fun. However, know that you will likely not get it right the first time. Perfection comes with consistent practice or trial and error.
Every budding photographer knows what Photoshop is Adobe Lightroom (officially Adobe Photoshop Lightroom) is the newer and more advanced version of Photoshop. Compared with other alternatives of Lightroom , Lightroom helps photographers import, modify, manipulate, find, organize, and manage their images as an image editing software. Lightroom combines photo management and photo editing in one.
One of the most amazing things about Lightroom is its autosave or nondestructive feature. Once you edit your photos, Lightroom instantly saves and stores them in your Lightroom catalog. With its inbuilt-presets, Lightroom makes working on your project so much easy and fun.
You can leverage Lightroom’s unique features to perform different types of tasks. However, in this article, you’ll learn color grading in Lightroom and how to make it work.
In this article
03 How To Color Grade Your Picture in LightRoom
What Is Color Grading?
Color grading is one of the essential processes for creating the perfect video and image content. Like with color correction, color grading helps enhance the appearance of your image or video and makes it appealing to viewers. However, unlike color correction, it focuses on creating stylistic or cinematic effects rather than rectifying mistakes in the image.
Color grading enhances an already edited or otherwise perfect image or video. So, in color grading, you are not trying to balance out colors or make your pictures look natural to the human eyes. Color correction does all that. Instead, with color grading, you aim to “paint over” a color-corrected content to evoke specific emotions or moods in the viewers.
Colors carry different emotions or visual tones. So, they’re essential in the post-production process to manipulate viewers into specific moods that tell your story best. In other words, color grading aligns your viewer’s emotions to the central theme in your story.

For example, if your image or video’s theme is passion, power, violence, or danger, red portrays them perfectly. Meanwhile, blue does it when you wish to evoke calmness and melancholy in your viewers.
Other examples include:
- pink for beauty, innocence, and femininity,
- Green for nature, darkness, and corruption
- Purple for fantasies, and the mystical
- Yellow for obsession, sickness, and naivety
- Orange for warmth, friendliness, youth, and happiness
Have you noticed that turning your pictures black and white makes them look timeless? That’s color grading in action.
Color Grading in LightRoom
Are you amazed by the thrilling power of color grading to manipulate viewers’ emotions? Are you wondering how you can achieve that effect seamlessly? Then, you don’t need to worry about it. With Adobe Photoshop Lightroom, you too can make magic.
Since Lightroom is an advanced photo editor, it has a lot to offer in features. Unfortunately, this may also mean that it can be complex to understand, especially if you’re new to photo editing. So, first things first, you must understand the color grading panel in Lightroom to appreciate it better.
Lightroom’s color grading panel is right beneath the HSL panel in the Develop Panel. It serves as a replacement for the Split Toning Panel from earlier versions, so it’s pretty easy to find.
The color grading panel comprises five small icons, three color wheels, and a blending/balance slider:
● The Five Small Icons
Lightroom’s small icons are a 3-way default layout, shadows, mid-tones, highlights, and global. With 3-way, you can manipulate the highlights, shadows, and mid-tones. Mid-tones, highlights, and shadows hide all color wheels, excluding the necessary ones that adjust them.
Meanwhile, Global combines and blends the highlights, mid-tones, and shadow adjustments no matter the luminosity. Global ensures that the color wheels work harmoniously.
When adjusting icons, it’s best to use each color wheel one after another one. You’ll get better and more precise outcomes that way compared to using them together.
● Lightroom’s Color Wheels
You can view Lightroom’s three-color wheels through the 3-way default layout. The color wheels help to enhance distinct image parts by providing various color hues. It also allows you to introduce saturation through an adjustable knob.
Each lightroom’s color wheels feature a luminance slide beneath them that adjusts color brightness. Between the luminance slide and the wheel is a visible eye icon that you can use to turn the effects on or off.
● The Blending and Balance Slider
The blending and balance sliders offer you advanced control over how your colors look after introducing them. With the blending slider, you can control the color distinctiveness between highlights and shadows. In other words, this feature helps to merge colors to produce a much more balanced and beautiful result.
The balance slider adjusts altered mid-tones, highlights, and shadows to balance the effects. By default, the slider is set at 0 in the middle and allows you to move it in opposite directions for distinct effects. For example, you can use this tool to balance shadows with over-concentrated colors.
While the above features are visible to everyone in the 3-way view, there are two more hidden sliders. You may only view them when editing highlights, shadows, mid-tones, or the global color wheels. They’re the hue and saturation sliders that you can only uncover by clicking on the arrow below the eye icon.
There’s no idea why the hue and saturation sliders aren’t visible in the 3-way view. That’s especially when you discover that they do the all-important job of making minor but precise changes to final adjustments. This produces an excellent fine-tuned outcome and gives your image a professional finish.

How To Color Grade Your Picture in LightRoom
If you wish to use the color grading Lightroom tool to enhance photos, here’s a comprehensive guide for you. You’ll learn the best practices to apply when using the specific Lightroom features to produce your desired effects:
● Pick Your Color Scheme
What’s color grading without the right colors? Choosing an appropriate color scheme is one of the essential steps in Lightroom color grading. That’s because it sets the tone for the next steps. If you choose the wrong colors, you won’t get the excellent result you desire no matter how hard you try.
First, take a good look at your picture and its visible colors. Then think of the colors that compliment or contrast with them. For example, you should base images with red highlights around red. You can also try colors close to red in the color wheel, like orange.
Once you’ve found the colors that suit your image, you’re ready for the next steps in your color grading process. However, more than just adding colors, you must also pay attention to contrasting colors during processing. If you find such unwanted colors, use the HSL panel to pale them out.
● Prioritize Precision
In earlier paragraphs, you learned that working with the highlights, shadows, and mid-tones individually is best. That’s because individual adjustments are a painstaking process that guarantees the most accurate results. This makes a lot of difference in the final product compared to when you work with the wheel.
Working on the shadows, highlights, and mid-tones individually also connects to the hue and saturation sliders. So you remember how vital these hidden sliders are? You wouldn’t be able to access them by working on the tools one after another. Take that as your reward for being detail-oriented.
● Increase Saturation Values
Sometimes, the effect of one tool tells on another. For example, leaving your saturation values below may render your hue slider ineffective. To avoid that confusion, it’s best to increase your saturation levels to some values higher than your preferred one.
Yes, it wouldn’t look nice initially as you adjust the hue. However, it will ensure that you get the perfect color for your image. You can always go back to adjust the saturation to your choice values later on.
● Use Color Wheels To Find Color, Use Shadows to Refine
When discussing how to choose your color scheme, you must have understood how vital the color wheel is in finding harmonious hues. However, picking your preferred color isn’t the complete process. You must learn to fine-tune your chosen color by using the hue slider. Do this after adjusting the saturation to your preferred level as in the previous step. The result is always mind-blowing.

● Learn the Short Cuts
There are some shortcuts to learn when color grading in Lightroom to enhance accuracy and convenience. For example, option (Mac)/Alt (Windows) gives you better control over your image’s outcomes. Option/Alt + Up will increase saturation by one while the shift key adjusts it. You can use Command (Mac)/Ctrl (Windows) to adjust the hue. Also, the reset button on the right side of your panel takes you back to your initial image.
● Extra Tips
These best practices will help you to achieve excellent results:
- Don’t color grade without understanding the psychology of colors. Know what colors convey different moods or emotions.
- Be sure to work with high-quality pictures. Color grading isn’t magic; it wouldn’t correct an already lousy image.
- Shooting your pictures in RAW gives you more color control.
Conclusion
● Now that you’ve learned how to color grade using Lightroom, there’s no limit to what you can achieve. You can now explore your creative side with so much fun. However, know that you will likely not get it right the first time. Perfection comes with consistent practice or trial and error.
Every budding photographer knows what Photoshop is Adobe Lightroom (officially Adobe Photoshop Lightroom) is the newer and more advanced version of Photoshop. Compared with other alternatives of Lightroom , Lightroom helps photographers import, modify, manipulate, find, organize, and manage their images as an image editing software. Lightroom combines photo management and photo editing in one.
One of the most amazing things about Lightroom is its autosave or nondestructive feature. Once you edit your photos, Lightroom instantly saves and stores them in your Lightroom catalog. With its inbuilt-presets, Lightroom makes working on your project so much easy and fun.
You can leverage Lightroom’s unique features to perform different types of tasks. However, in this article, you’ll learn color grading in Lightroom and how to make it work.
In this article
03 How To Color Grade Your Picture in LightRoom
What Is Color Grading?
Color grading is one of the essential processes for creating the perfect video and image content. Like with color correction, color grading helps enhance the appearance of your image or video and makes it appealing to viewers. However, unlike color correction, it focuses on creating stylistic or cinematic effects rather than rectifying mistakes in the image.
Color grading enhances an already edited or otherwise perfect image or video. So, in color grading, you are not trying to balance out colors or make your pictures look natural to the human eyes. Color correction does all that. Instead, with color grading, you aim to “paint over” a color-corrected content to evoke specific emotions or moods in the viewers.
Colors carry different emotions or visual tones. So, they’re essential in the post-production process to manipulate viewers into specific moods that tell your story best. In other words, color grading aligns your viewer’s emotions to the central theme in your story.

For example, if your image or video’s theme is passion, power, violence, or danger, red portrays them perfectly. Meanwhile, blue does it when you wish to evoke calmness and melancholy in your viewers.
Other examples include:
- pink for beauty, innocence, and femininity,
- Green for nature, darkness, and corruption
- Purple for fantasies, and the mystical
- Yellow for obsession, sickness, and naivety
- Orange for warmth, friendliness, youth, and happiness
Have you noticed that turning your pictures black and white makes them look timeless? That’s color grading in action.
Color Grading in LightRoom
Are you amazed by the thrilling power of color grading to manipulate viewers’ emotions? Are you wondering how you can achieve that effect seamlessly? Then, you don’t need to worry about it. With Adobe Photoshop Lightroom, you too can make magic.
Since Lightroom is an advanced photo editor, it has a lot to offer in features. Unfortunately, this may also mean that it can be complex to understand, especially if you’re new to photo editing. So, first things first, you must understand the color grading panel in Lightroom to appreciate it better.
Lightroom’s color grading panel is right beneath the HSL panel in the Develop Panel. It serves as a replacement for the Split Toning Panel from earlier versions, so it’s pretty easy to find.
The color grading panel comprises five small icons, three color wheels, and a blending/balance slider:
● The Five Small Icons
Lightroom’s small icons are a 3-way default layout, shadows, mid-tones, highlights, and global. With 3-way, you can manipulate the highlights, shadows, and mid-tones. Mid-tones, highlights, and shadows hide all color wheels, excluding the necessary ones that adjust them.
Meanwhile, Global combines and blends the highlights, mid-tones, and shadow adjustments no matter the luminosity. Global ensures that the color wheels work harmoniously.
When adjusting icons, it’s best to use each color wheel one after another one. You’ll get better and more precise outcomes that way compared to using them together.
● Lightroom’s Color Wheels
You can view Lightroom’s three-color wheels through the 3-way default layout. The color wheels help to enhance distinct image parts by providing various color hues. It also allows you to introduce saturation through an adjustable knob.
Each lightroom’s color wheels feature a luminance slide beneath them that adjusts color brightness. Between the luminance slide and the wheel is a visible eye icon that you can use to turn the effects on or off.
● The Blending and Balance Slider
The blending and balance sliders offer you advanced control over how your colors look after introducing them. With the blending slider, you can control the color distinctiveness between highlights and shadows. In other words, this feature helps to merge colors to produce a much more balanced and beautiful result.
The balance slider adjusts altered mid-tones, highlights, and shadows to balance the effects. By default, the slider is set at 0 in the middle and allows you to move it in opposite directions for distinct effects. For example, you can use this tool to balance shadows with over-concentrated colors.
While the above features are visible to everyone in the 3-way view, there are two more hidden sliders. You may only view them when editing highlights, shadows, mid-tones, or the global color wheels. They’re the hue and saturation sliders that you can only uncover by clicking on the arrow below the eye icon.
There’s no idea why the hue and saturation sliders aren’t visible in the 3-way view. That’s especially when you discover that they do the all-important job of making minor but precise changes to final adjustments. This produces an excellent fine-tuned outcome and gives your image a professional finish.

How To Color Grade Your Picture in LightRoom
If you wish to use the color grading Lightroom tool to enhance photos, here’s a comprehensive guide for you. You’ll learn the best practices to apply when using the specific Lightroom features to produce your desired effects:
● Pick Your Color Scheme
What’s color grading without the right colors? Choosing an appropriate color scheme is one of the essential steps in Lightroom color grading. That’s because it sets the tone for the next steps. If you choose the wrong colors, you won’t get the excellent result you desire no matter how hard you try.
First, take a good look at your picture and its visible colors. Then think of the colors that compliment or contrast with them. For example, you should base images with red highlights around red. You can also try colors close to red in the color wheel, like orange.
Once you’ve found the colors that suit your image, you’re ready for the next steps in your color grading process. However, more than just adding colors, you must also pay attention to contrasting colors during processing. If you find such unwanted colors, use the HSL panel to pale them out.
● Prioritize Precision
In earlier paragraphs, you learned that working with the highlights, shadows, and mid-tones individually is best. That’s because individual adjustments are a painstaking process that guarantees the most accurate results. This makes a lot of difference in the final product compared to when you work with the wheel.
Working on the shadows, highlights, and mid-tones individually also connects to the hue and saturation sliders. So you remember how vital these hidden sliders are? You wouldn’t be able to access them by working on the tools one after another. Take that as your reward for being detail-oriented.
● Increase Saturation Values
Sometimes, the effect of one tool tells on another. For example, leaving your saturation values below may render your hue slider ineffective. To avoid that confusion, it’s best to increase your saturation levels to some values higher than your preferred one.
Yes, it wouldn’t look nice initially as you adjust the hue. However, it will ensure that you get the perfect color for your image. You can always go back to adjust the saturation to your choice values later on.
● Use Color Wheels To Find Color, Use Shadows to Refine
When discussing how to choose your color scheme, you must have understood how vital the color wheel is in finding harmonious hues. However, picking your preferred color isn’t the complete process. You must learn to fine-tune your chosen color by using the hue slider. Do this after adjusting the saturation to your preferred level as in the previous step. The result is always mind-blowing.

● Learn the Short Cuts
There are some shortcuts to learn when color grading in Lightroom to enhance accuracy and convenience. For example, option (Mac)/Alt (Windows) gives you better control over your image’s outcomes. Option/Alt + Up will increase saturation by one while the shift key adjusts it. You can use Command (Mac)/Ctrl (Windows) to adjust the hue. Also, the reset button on the right side of your panel takes you back to your initial image.
● Extra Tips
These best practices will help you to achieve excellent results:
- Don’t color grade without understanding the psychology of colors. Know what colors convey different moods or emotions.
- Be sure to work with high-quality pictures. Color grading isn’t magic; it wouldn’t correct an already lousy image.
- Shooting your pictures in RAW gives you more color control.
Conclusion
● Now that you’ve learned how to color grade using Lightroom, there’s no limit to what you can achieve. You can now explore your creative side with so much fun. However, know that you will likely not get it right the first time. Perfection comes with consistent practice or trial and error.
Want to Speed up or Slow Down a Video to Make It Look Different? Here Are the Simple Steps to Change Video Speed in Lightworks Video Editor
You must have watched videos where certain parts have different speeds. Have you ever wondered why video creators change the speed of the video? The slow-motion video has some eye-pleasing effects. But the video creator’s intention could be to draw attention to the detail. Similarly, they speed up the video to go through boring parts faster than usual.
Apart from that, the speeding up of a video clip may make it look funny. Sometimes, speeding up a video is necessary to limit its duration. You will need a feature-rich video editor to speed up your video. Lightworks is a powerful video editor that can speed up or slow down your video. We will illustrate how to change video speed in Lightworks.
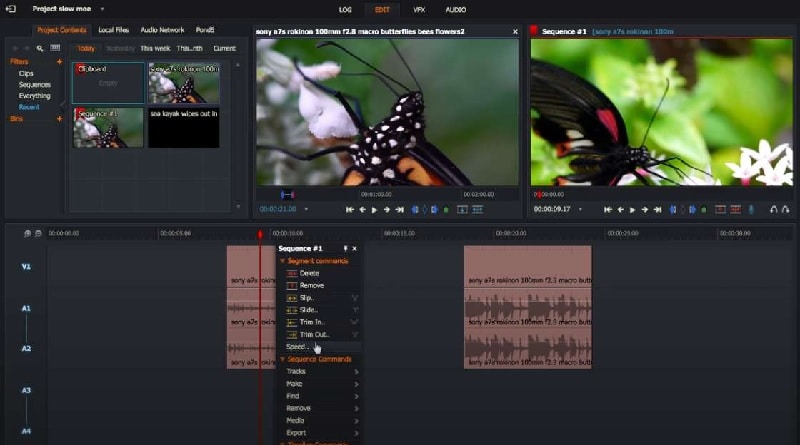
Part I. How to Speed Up Video in Lightworks
If you are making short-duration videos, you may need to speed up your video. You will come across many shorts and reels where sped-up videos look so funny. You can also speed up certain parts in your video where detail to attention is not required. Here are the steps for Lightworks to speed up a video.
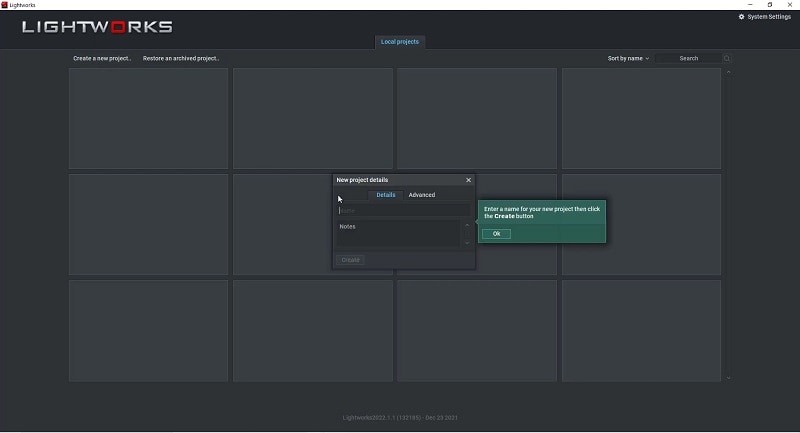
Step1 Launch Lightworks and click the New A New Project option. Enter a name for your video project and click Create button.
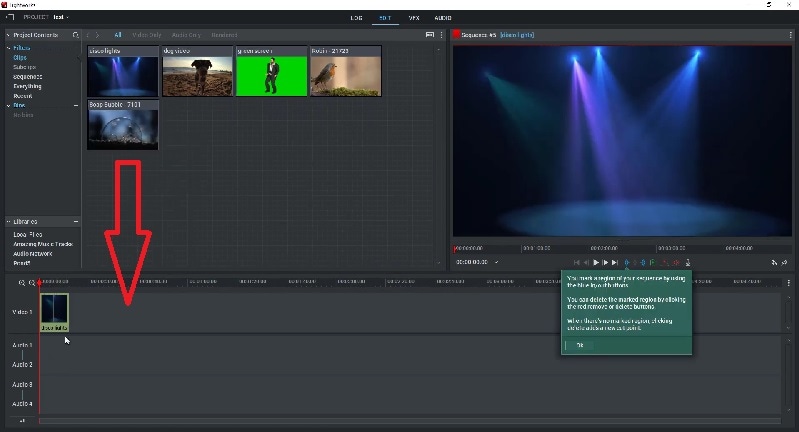
Step2 Drag and drop your video clip to the video editor under the Edit tab. Drag and drop the video clip from the Edit tab to the timeline.
Step3 Right-click the video clip on the timeline. Click the Speed option from the menu.
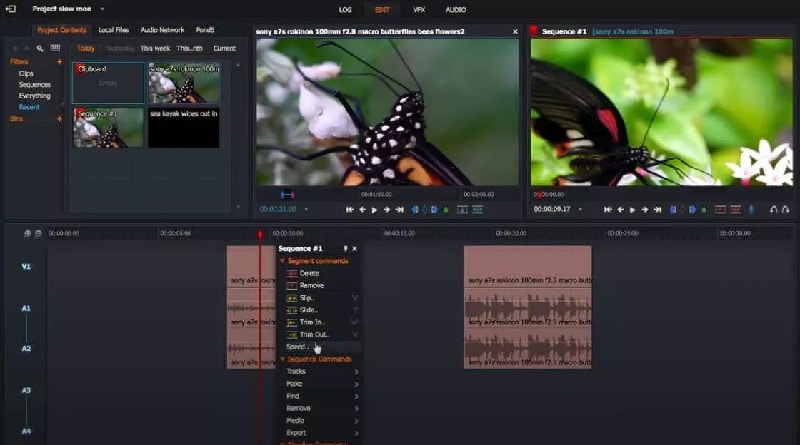
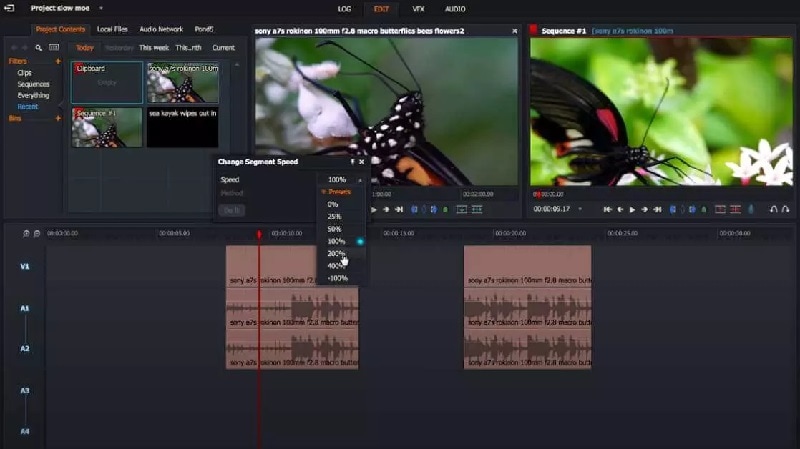
Step4 You can select from any preset. To speed up, you need to select options above 100%. Click the Do It button to save the changes you have made.
Part II. How to Slow Down Video in Lightworks
More often than not, you will want to slow down your video speed. This is because slow-motion video is in trend. You may want to slow down your video so that the viewers pay attention to the detail. Besides, slowing down certain motions looks extremely eye-catching. Here are the steps to slow down video in Lightworks.
Step1 If you have dragged and dropped your video clip onto the timeline, right-click on the video clip.
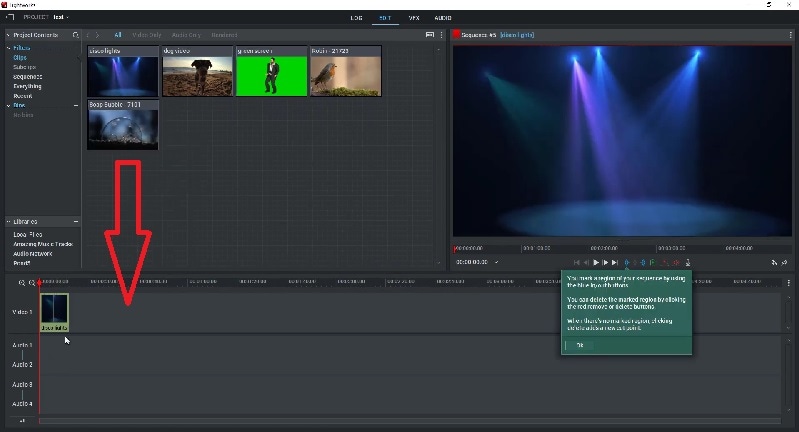
Step2 Select the Speed option from the menu. You need to select a speed preset, but it has to be below 100% so that your video slows down.
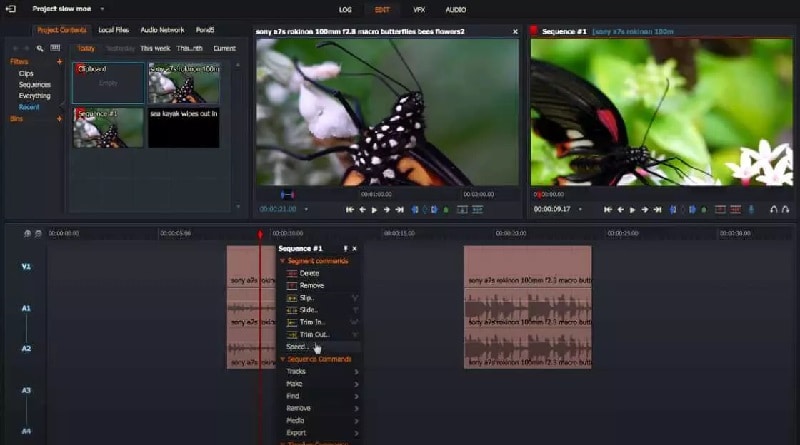
Step3 Finally, click the Do It button and play the video to check out the outcome.
Part III. Bonus Tips for Changing Video Speed in Lightworks
Now that you know how to speed up video Lightworks, here are some important tips to pay attention to. These tips will help you edit your video better, especially when you are tweaking the speed factor.
Lightworks speed up part of a video - If you want to speed up only a certain part of your video, you need to split the video. All you need to do is reposition the playhead and click the “C” icon to split the video. Thereafter, you can select any split portion of the video and follow the steps to change the speed.
Audio Video Syncing - You can alter the speed of the video as well as the audio on Lightworks. When you are performing speed-up video in Lightworks, you should ideally change the speed of the audio. This will make the video and the audio stay in sync so that it does not sound awkward.
Work with Frame Rate - If you know beforehand that you will change the speed of a certain scene, you should set the frame rate accordingly. If you want to slow down a video, you should shoot it at a higher frame rate. Similarly, if you want to speed up your video, you should shoot it at a lower frame rate. This is because, after the change of speed in Lightworks, the frame rate will be usual rather than abnormal. The video will be soothing to the eyes of the viewers.
Part IV. Is There an Easier Way to Change Video Speed?
There is no doubt that most users find Lightworks difficult to operate. This is because the user interface is not tailor-made for beginners. It is more for advanced video creators who have experience in video editing. If you are looking for an easier way to change video speed, we recommend Wondershare Filmora.
Filmora is a professional video editor like Lightworks. However, Filmora has wider popularity because of its intuitive user interface. Anyone can use the video editor without prior experience, and they can easily locate the required options. In fact, Filmora has a better collection of stock media files, video effects, and graphical elements. You can also save the edited video file in different file formats as per your requirements.
As a matter of fact, Filmora offers more options than Lightworks on how to speed up the video. You can choose from presets, customize speed uniformly as well as vary the speed through the video through curvy graphs. We will illustrate all the different ways to change the speed of your video on Wondershare Filmora .
Methods to Change Video Speed in Filmora in Simple Steps
We have already stated that there are different ways to change video speed in Filmora. Now, we will illustrate the steps for every method. You can choose any of them to change the speed of the video as per your requirements.
You can watch the video to understand these methods in detail.
Method 1. Change The Speed of Video From Presets
We have stated how to speed up a video in Lightworks from presets. The same method is available on Filmora as well. You can choose from the different preset speed options. This is the easiest way to speed up or slow down your video. In comparison to Lightworks, Filmora has more preset options. Here are the steps to speed up video by choosing a preset in Filmora.
Free Download For Win 7 or later(64-bit)
Free Download For macOS 10.14 or later
Step1 Install Filmora on your computer. It is available for Windows and macOS. Launch Filmora and select Create New Project option.

Step2 You need to import the desired video file in Filmora. Go to File> Import Media and select the Import Media Files option. You can browse your computer to select the video file whose speed you want to change. The chosen video file will be included in the Project Media folder. You can even drag and drop the target video file from your computer to the Project Media folder.

Step3 Drop the video file onto the timeline. Click on the video clip on the timeline to select it. Click on the Speed icon located at the top of the timeline.

Step4 Go to Fast or Slow and select a speed preset as per your requirements. If you are satisfied with the video, click on the Export button.

Method 2. Customize The Change of Speed in Wondershare Filmora
You may want to set a speed that is not available on the preset list. Filmora has come up with the Uniform Speed option to let you customize the speed of the video as per your requirements. You can choose from 0.01X to 100X speed, and the chosen speed will be applied to the video uniformly. Here are the steps to follow.
Step1 Drag and drop the video file from the Project Media folder onto the timeline. Click on the Speed icon located at the top of the timeline.
Step2 From the menu, select the Uniform Speed option. You will see the Uniform Speed tab above the timeline.

Step3 You need to move the speed slider to set the desired speed for your video. You can play the video to see how the video speed changes.

Step4 If satisfied with the result, click on the Ok button. Thereafter, you can export the video file in any file format.
Method 3. Use Speed Ramping to Customize Your Video
Speed ramping is a unique way to change video speed. It is useful for advanced video editors that want to vary the speed differently for different sections of the video. You can set the graph with nodes as per your requirements. According to the graph you have designed, your video speed will vary. Here is how to use speed ramping to change the speed of your video.
Step1 Drag and drop the video file onto the timeline and click the Speed icon.
Step2 Click Speed Ramping option from the menu. You will see Speed Ramping tab above the timeline.

Step3 You can choose any preset available. If you want to customize the graph, select the Customize option and edit the nodes.
Step4 Play the video as you make the changes. Click the Ok button if the output is as per your expectation. Finally, click the Export button to save the video file.
Conclusion
We have illustrated how to speed up a video in Lightworks. However, you can only choose from the fixed presets available in Lightworks. If you want to customize the speed of your video, Wondershare Filmora is a better alternative to Lightworks. Several methods are available to change your video’s speed in Filmora. Therefore, you can get the desired video output in simpler steps.
Method 1. Change The Speed of Video From Presets
We have stated how to speed up a video in Lightworks from presets. The same method is available on Filmora as well. You can choose from the different preset speed options. This is the easiest way to speed up or slow down your video. In comparison to Lightworks, Filmora has more preset options. Here are the steps to speed up video by choosing a preset in Filmora.
Free Download For Win 7 or later(64-bit)
Free Download For macOS 10.14 or later
Step1 Install Filmora on your computer. It is available for Windows and macOS. Launch Filmora and select Create New Project option.

Step2 You need to import the desired video file in Filmora. Go to File> Import Media and select the Import Media Files option. You can browse your computer to select the video file whose speed you want to change. The chosen video file will be included in the Project Media folder. You can even drag and drop the target video file from your computer to the Project Media folder.

Step3 Drop the video file onto the timeline. Click on the video clip on the timeline to select it. Click on the Speed icon located at the top of the timeline.

Step4 Go to Fast or Slow and select a speed preset as per your requirements. If you are satisfied with the video, click on the Export button.

Method 2. Customize The Change of Speed in Wondershare Filmora
You may want to set a speed that is not available on the preset list. Filmora has come up with the Uniform Speed option to let you customize the speed of the video as per your requirements. You can choose from 0.01X to 100X speed, and the chosen speed will be applied to the video uniformly. Here are the steps to follow.
Step1 Drag and drop the video file from the Project Media folder onto the timeline. Click on the Speed icon located at the top of the timeline.
Step2 From the menu, select the Uniform Speed option. You will see the Uniform Speed tab above the timeline.

Step3 You need to move the speed slider to set the desired speed for your video. You can play the video to see how the video speed changes.

Step4 If satisfied with the result, click on the Ok button. Thereafter, you can export the video file in any file format.
Method 3. Use Speed Ramping to Customize Your Video
Speed ramping is a unique way to change video speed. It is useful for advanced video editors that want to vary the speed differently for different sections of the video. You can set the graph with nodes as per your requirements. According to the graph you have designed, your video speed will vary. Here is how to use speed ramping to change the speed of your video.
Step1 Drag and drop the video file onto the timeline and click the Speed icon.
Step2 Click Speed Ramping option from the menu. You will see Speed Ramping tab above the timeline.

Step3 You can choose any preset available. If you want to customize the graph, select the Customize option and edit the nodes.
Step4 Play the video as you make the changes. Click the Ok button if the output is as per your expectation. Finally, click the Export button to save the video file.
Conclusion
We have illustrated how to speed up a video in Lightworks. However, you can only choose from the fixed presets available in Lightworks. If you want to customize the speed of your video, Wondershare Filmora is a better alternative to Lightworks. Several methods are available to change your video’s speed in Filmora. Therefore, you can get the desired video output in simpler steps.
How to Make Animated Text Video on Computer/iPhone/Android/Online
In the recent times, there are many animated text video generators available; which ones are worthwhile of your time and effort? The days when only experienced video editors and designers could create animated text video are long gone. Anyone with a computer or smartphone can easily make text to animate, shimmer, and change colors thanks to the development of animated text generators. Here, we’ve put up a list of the top ways to add animated text to image so you can narrow down your search.
Animated text videos maintain audience interest, and costs nothing to produce high-quality content. Use word animation to make your next presentation, creative video, or demo video engaging and simple to follow. You may choose from a variety of distinctive font and text styles in a matter of minutes to make your films stand out. Contrary to common opinion, you can also convert text to animated video. You may create these films at no cost. The most effective methods for doing it on all devices are mentioned below.
Part 1. How to make animated text video on computer?
The first on the list is Filmora, which has a clear user interface and simple drag-and-drop features. The greatest video animation software for professional editors and artists can be found at Filmora . You can quickly make entertaining animated films with full HD support, horizontal and vertical video layouts, and predefined visuals. Text-to-speech, the possibility to add background music and sound effects, and voiceover are examples of audio functionality. You may upload your own songs or choose from Filmora’s stock music collection.
Steps to create animated text video with Filmora:
Step1Download and launch Filmora Video Editor
You probably still consider yourself a novice in the field of video editing if you don’t yet know how to include animated words in your films. With Filmora for Windows and Mac, you can achieve a powerful, user-friendly piece of software so you can get started producing excellent material right immediately. Visit the official links to download and install the tool hand in hand:
Step2Create a New Project and Add Files
The New Project button should appear when you start the program. To enter the project window, click the button. You will then be directed to your storage space. Go to the location where you have the video files saved. Hold down the control button while clicking on each file to select it all at once. Hit the Import button afterwards to add them to the Project media.
Step3Add Text Animation to Your Video
Refer to the Annotations tab to initiate the text animation. This enables you to keep the text size and length consistent throughout the whole video. To fit your tastes and the way your video flows best, you may edit the layers you’ve created. Then, by selecting Effects menu, beneath your preferred motion effect, you may change the animation of your text motion intro and outro.
Step4Save your Video
Click Export to save your video. Options for Resolution and Bitrate should be available on the new window. Up to 4K video resolutions are supported by Filmora . However, you may continue and save your film at this point since Filmora automatically selects the ideal size and quality ratio so you can export more quickly without sacrificing quality. Finally, click Export, and everything will be yours. By selecting the Upload to YouTube option, you may also upload your video to YouTube immediately.
Part 2. How to Create Animated Text Video on iPhone (Video Maker App)
The Video Maker App does an excellent job of spicing up text. You may apply basic animations to your text and alter modifications to change the outcome. It offers a very flexible editor along with a huge selection of fonts, colors, text effects, and—most importantly—animations. Additionally, a variety of fashionable text effects, ranging from neon to 3D, are available with this application.
Link to Download: Text Animation on Video Maker
Steps to Create Animated Text Video on iPhone:
Step1Download Text Animation on Video Maker. This unique iOS software enables you to quickly apply vibrant text overlays to any footage. Download this on your iPhone by clicking the associated link to the App store.

Step2Choose a movie or image from your media roll, and then add custom text to the video to make it animated. Click the Next button in the upper right corner to continue.
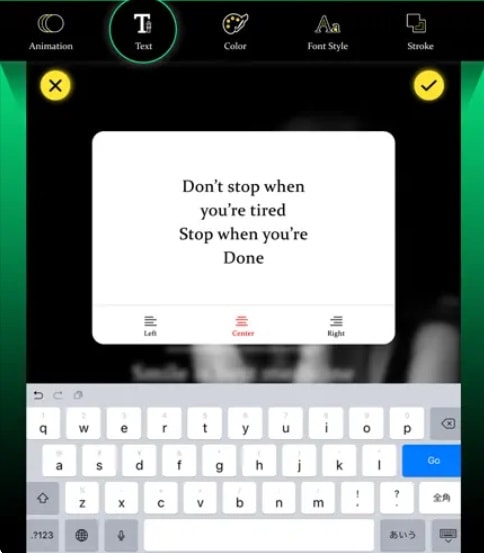
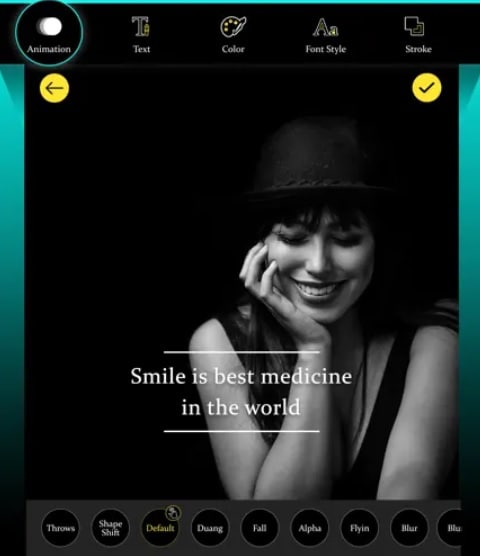
Step3Select a design from the vast array that is offered. Once you’ve chosen the animation you like most, you may further alter it by choosing a filter and text color.
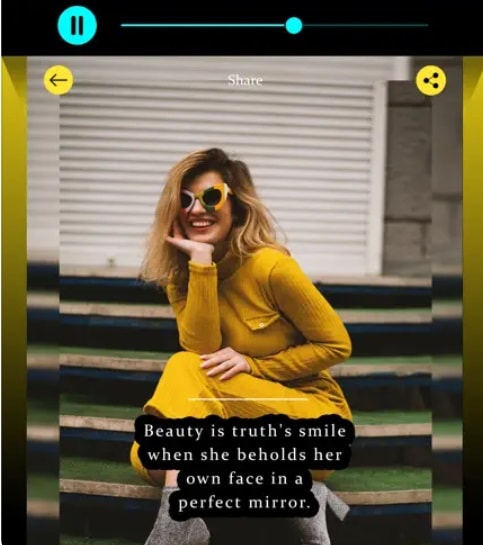
Step4Click the three dots symbol at the bottom right of your screen to save the animated text movie to your camera roll. Additionally, you have the option of saving your movie in GIF format.
Part 3. How to Create Animated Text Video on Android
Users may experiment with various degrees of editing capabilities with Textor. The program offers powerful features that are simple to use and provide rapid sharing choices across numerous digital channels, making it a suitable match for experienced and inexperienced users alike. Textro is a simple, elegant tool that lets you make stunning text movies or video intros for your videos. This software is a fantastic choice for marketers trying to sell their brand on social media because of its variety of features that assist generate a premium quality output.
Link to Download: Textor
Steps to Create Animated Text Video on Android:
- Simply download the app to begin going. When you first launch the program, it will prompt you to add text.

- You may embellish your post with text, images, icons, and logos. By pressing the random button, you may make a completely new combination of colors or modify the post’s color scheme using the already-existing possibilities.
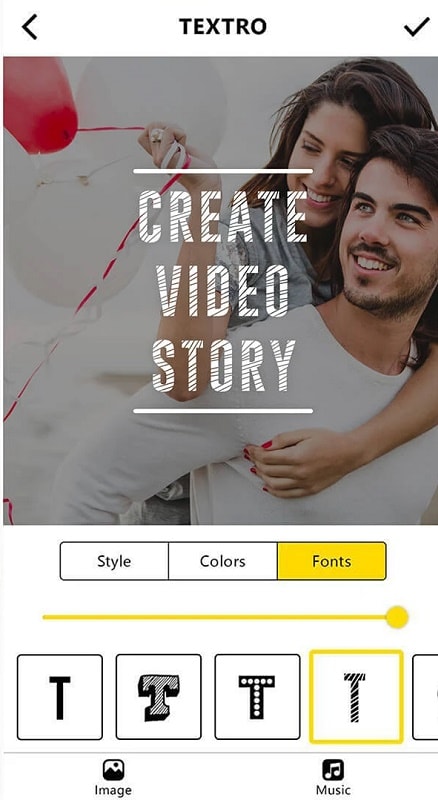
- Text may be animated using the fade, slide, grow, pan, zoom, focus, and fill effects. These effects may all be manually applied and help your project stand out from the competition.
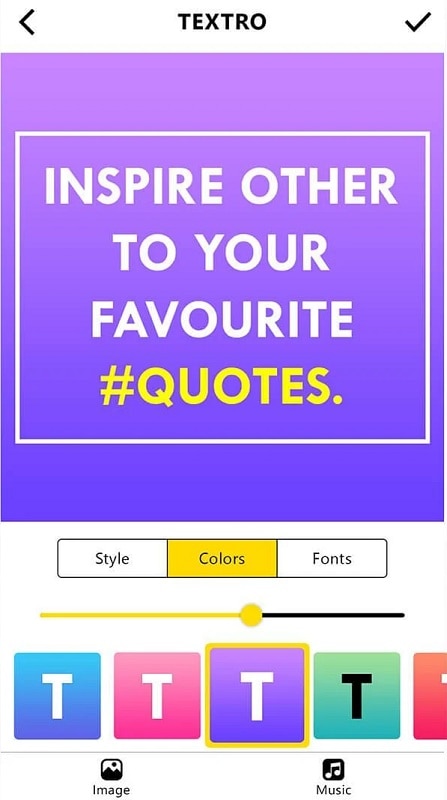
- The post may be instantly shared on Instagram or saved to your phone. Additionally, you may share the project directly on other social platforms or download it to your phone.
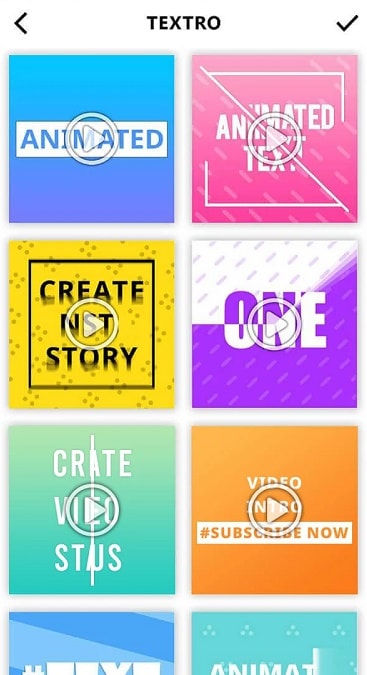
Part 4. How to Create Animated Text Video Online
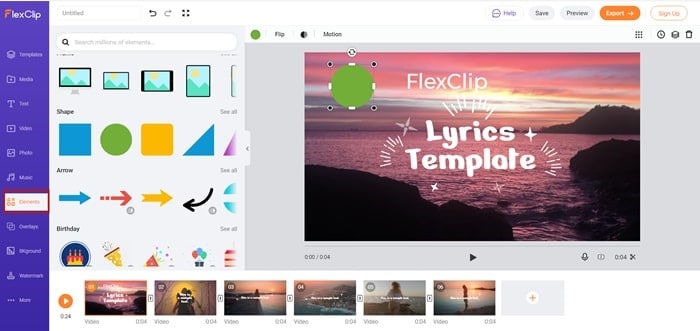
A DIY intro and slideshow-style animated video creator in the cloud, FlexClip. There is a selection of well created, editable templates to which you may add dynamic text. You may choose a template that best suits your requirements and edit the text inside it. There are a variety of ready-to-use animations available. The fonts, colors, text size, alignment, and other elements of these animations are all readily editable.
Link: FlexClip Online
Steps to Create Animated Text Video Online:
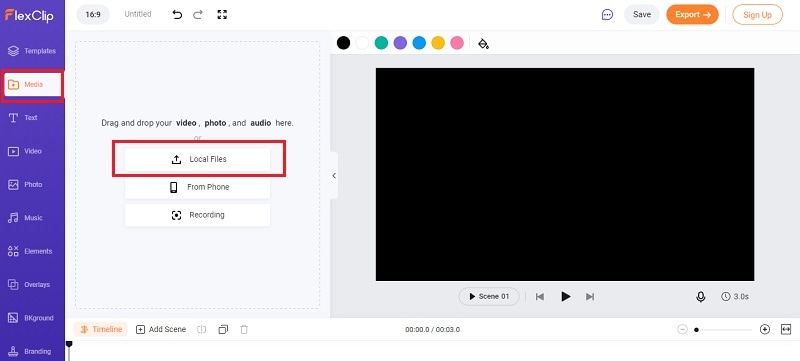
Step1Upload Your Video
To add the video to the FlexClip media library, launch the FlexClip video editor and choose “Local Files.” To move it to the storyboard where it will be modified, click the “Plus” button. The video may also be dropped directly into the editor by dragging it from the folder.
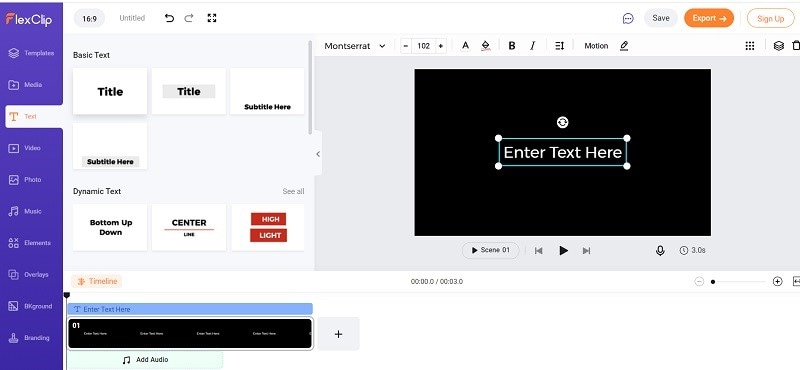
Step2Add and Customize Text
Enter the term you want to appear in the movie while choosing your chosen text (either Dynamic Texts or Basic Texts), then edit the text by changing the size, font, placement, color, and backdrop color. On the toolbar’s left side, choose the text by clicking there. To add dynamic or basic text to your movie, right-click on the text you want to use. To establish your brand, add some other items next to the text or utilize the existing textual overlay before adjusting the time.
Step3Export your Video
You should export your final video at this point. To accomplish this, just click “Export,” and your video will be instantly stored in your choice storage area as an MP4 file.
Conclusion
These were a few simple techniques for producing lovely text animations. The animation has a sharp, material design aesthetic. Though it seems that the most of the animations are standard. With the help of these tools, you may overlay text animations over photos and videos, making it appealing to a larger audience. No matter what sector you work in, word animation can give your films a polished appearance. Text animations may keep viewers on your page longer and prevent them from scrolling down. Use the above suggestions for any device to kickstart your own animated text video journey regardless of the device you’re on.
Free Download For Win 7 or later(64-bit)
Free Download For macOS 10.14 or later
How to Make OBS Slideshow
How to Create OBS Slideshow
An easy yet powerful editor
Numerous effects to choose from
Detailed tutorials provided by the official channel
Slideshow can be created easily with OBS with online application. The steps to create OBS Slideshow with application. How to create OBS slideshow easily?

Presentation and slide show are the most widely used methods of presenting and expressing the data, figures and information by any company or individual. It is most attractive and easy way to showcase the details of any business concern. Slideshow is also used in presenting the images in an artistic way. They are also very useful in creating content now-a-days. Therefore slideshow presentations are gaining importance. There are various applications and software used for making presentation and slideshow. The use of the application is based on the various features and ease to usage to the various categories of users. One of the software used for creating slideshow and making content is OBS. This software is used widely by the content creators and YouTubers. It is used for recording the screen, videos and editing in video. This program can also be used for creating slideshow. Let’s see some details about it and how you can create slideshow with OBS.
In this article
01 [What Are the Advantages of Creating Slideshow with OBS](#Part 1)
02 [How to Create an Image Slideshow in OBS](#Part 2)
03 [Five OBS Slideshow Maker Alternatives](#Part 3)
Part 1 What Are the Advantages of Creating Slideshow with OBS
OBS is an incredible tool for advanced level user for creating some fine presentation, slideshow, videos and content. It is the most widely used software for numerous applications. The reason for its wide application and usage is its various advantages which it offers to the various categories of users. Let’s see some of the advantages of creating Slideshow with OBS.
● The layout of OBS is attractive as compared to any other software. You can find effortless and intuitive navigation.
● It has great customization features, which give another plus point to the software. One can give some effects and make the slides as per the need or for any special purpose.
● You can use various elements in the slideshow using OBS like overlays and on-screen elements.
● You can make good quality videos and live uploads with the use of OBS slideshows
● Even a beginner can easily use the software of OBS in creating slideshow as it is easy to use even without going through the instruction manuals and guides.
● One can easily organize and even hide the details made through OBS slideshow.
● It is within the reach of every user as it is free, virus free and open software. One can use it for making live telecast and for video recording.
● It has a good association with various social media platforms like facebook and YouTube.
● It has option for screen recording also.
● One has the feature of changing scene along with resolution setting.
● Connecting with streaming service provider is easy.
● Designing and editing in the OBS slideshow is easy and can be done based on what the viewers want to look.
● Background customization facility.
● Facility for scrolling and moving the details included in the slides.
● Duplicate slides can be effectively and easily created in OBS slideshow.
Part 2 How to Create an Image Slideshow in OBS
When you look upon so many advantages of making slideshow through OBS, you may be eager to know how you can create an images, videos and image slideshow in OBS. Let’s see the process of OBS image slideshow:
● It can be created in two parts. The first is setting up the slideshow and the second one is setting up hotkeys.
● Open OBS and create a new scene.
● At the lower left corner of the screen, click on addition symbol.
● Name it and click on o.k.
● Go to addition symbol at source box and choose select image slideshow.
● Click O.K after naming the source.
● Next step is setting up slideshow properties. You can choose slide mode to automatic or manual. Based on your choice, you can select the transition. Also set the time and transition speed as you like. At next step you can take up loop, hide and randomize playback.
● At last add images.
● You can rearrange the images with the use of up and down arrow.
● When you finished adding and arranging the images, click on O.K
● Now the next stage is setting up of hotkeys.
● Open the setting over the File menu.
● Hotkeys are there in the left menu, select it and place where you see image slideshow
● Through keys go to next and previous slide.
● After hotkeys setting are done, click apply.
This is an easy way to create an image in OBS slideshow. You can also learn creating videos and doing live telecast.
Part 3 Five OBS Slideshow Maker Alternatives
Although OBS is one of the popular slideshow maker, but due to its advanced features and usage, it may not be fit for everyone. So, here are some of OBS Slideshow maker alternatives you can try:
01Camtasia

For those who are new to making videos and slides using software, Camtasia is a good option. One can easily record the specific areas of the screen on the computer screen. Drag and drop, remove, trim, selecting and movement, effects, adding music and effects are easily possible through Camtasia.
02ShareX

It is a free and open source tool with a lot of features and addition. It some unique features like one can record the screen as it is scrolled down and time can also be set. It is also useful for text files also. One can take the screen shot of text which make easier for the users as it saves time. It supports many destinations like image, file and text uploaders. It is good for window users who are looking for easy and free alternatives for OBS.
03XSplit Broadcaster

When you are looking for a good alternative for OBS to make live streaming and recording go easier, then XSplit Broadcaster is the best option. Its application is seen in both gamming and esports. You have so many features like drag, drop, customization, image resizing and including videos and gif. This is good for the people who love to do customization and create media slideshows by including multiple of images.
04Streamlabs OBS

This is open source and free software good for recording and live streaming purpose. This is good for gamers and live event organizers. Layout editor, drag and drop and control over recording make this software an exceptional one. One can easily watch the recent events, save the replays and chat on chat box over the screen.
05Lightstream Studio

If you desire to go live in few minutes having a computer and good internet connection, the best alternative software other than OBS is Lightstream Studio. It is good for gamers and creators who just cannot wait to go live along with some great customization features. Layout making, creation of unlimited projects and scenes, motion graphics and social media messaging can be done effectively with the use of this software.
Although there are some few more options, but one of the most growing software for making slideshow is Filmora.

Wondershare Filmora Video Editor is an application/software for making any picture or video more effective. With great editing and personalizing video features and effects, it becomes the most popular software. This software is regularly updated to enhance its features and offer best tools to every category of users whether they are beginners or the intermediates. This software is developed by wondershare. It comes in various versions like Filmora, Filmora, FilmoraScrn. Each of the versions is designed looking into the need of the users with some different and advanced features.
For Win 7 or later (64-bit)
For macOS 10.12 or later
Filmora is a video editor application for every content creator. Those who are frequent in touch with slideshow, presentation and editing thereof, Filmora has all for them. One can easily create slideshow with multiple pictures and videos. The process is easy as one need to download the software, import photos and music, add transitions and background music, and finally export and save it. The reason for choosing filmora is that it supports various file formats with crop, pan and zoom feature.
● Ending Thoughts →
● With the advancement of technology, people are using such software that makes presenting images, videos and live events more attractive and effective. Slideshow OBS is one of the popular software for creating slideshow using images and videos. There is various advantage of using this software like it has powerful video recording feature and live streaming facility.
● Image slideshow can be created in easy and simple steps using OBS powerpoint slideshow. It is done through setting up the slideshow and the second one is setting up hotkeys.
● There are various alternative in place of OBS slideshow that can be used by different users based on their level of learning. Those who are looking for easy yet effective software for making or editing slideshow, Filmora is the best option for them.
Slideshow can be created easily with OBS with online application. The steps to create OBS Slideshow with application. How to create OBS slideshow easily?

Presentation and slide show are the most widely used methods of presenting and expressing the data, figures and information by any company or individual. It is most attractive and easy way to showcase the details of any business concern. Slideshow is also used in presenting the images in an artistic way. They are also very useful in creating content now-a-days. Therefore slideshow presentations are gaining importance. There are various applications and software used for making presentation and slideshow. The use of the application is based on the various features and ease to usage to the various categories of users. One of the software used for creating slideshow and making content is OBS. This software is used widely by the content creators and YouTubers. It is used for recording the screen, videos and editing in video. This program can also be used for creating slideshow. Let’s see some details about it and how you can create slideshow with OBS.
In this article
01 [What Are the Advantages of Creating Slideshow with OBS](#Part 1)
02 [How to Create an Image Slideshow in OBS](#Part 2)
03 [Five OBS Slideshow Maker Alternatives](#Part 3)
Part 1 What Are the Advantages of Creating Slideshow with OBS

OBS is an incredible tool for advanced level user for creating some fine presentation, slideshow, videos and content. It is the most widely used software for numerous applications. The reason for its wide application and usage is its various advantages which it offers to the various categories of users. Let’s see some of the advantages of creating Slideshow with OBS.
● The layout of OBS is attractive as compared to any other software. You can find effortless and intuitive navigation.
● It has great customization features, which give another plus point to the software. One can give some effects and make the slides as per the need or for any special purpose.
● You can use various elements in the slideshow using OBS like overlays and on-screen elements.
● You can make good quality videos and live uploads with the use of OBS slideshows
● Even a beginner can easily use the software of OBS in creating slideshow as it is easy to use even without going through the instruction manuals and guides.
● One can easily organize and even hide the details made through OBS slideshow.
● It is within the reach of every user as it is free, virus free and open software. One can use it for making live telecast and for video recording.
● It has a good association with various social media platforms like facebook and YouTube.
● It has option for screen recording also.
● One has the feature of changing scene along with resolution setting.
● Connecting with streaming service provider is easy.
● Designing and editing in the OBS slideshow is easy and can be done based on what the viewers want to look.
● Background customization facility.
● Facility for scrolling and moving the details included in the slides.
● Duplicate slides can be effectively and easily created in OBS slideshow.
Part 2 How to Create an Image Slideshow in OBS

When you look upon so many advantages of making slideshow through OBS, you may be eager to know how you can create an images, videos and image slideshow in OBS. Let’s see the process of OBS image slideshow:
● It can be created in two parts. The first is setting up the slideshow and the second one is setting up hotkeys.
● Open OBS and create a new scene.
● At the lower left corner of the screen, click on addition symbol.
● Name it and click on o.k.
● Go to addition symbol at source box and choose select image slideshow.
● Click O.K after naming the source.
● Next step is setting up slideshow properties. You can choose slide mode to automatic or manual. Based on your choice, you can select the transition. Also set the time and transition speed as you like. At next step you can take up loop, hide and randomize playback.
● At last add images.
● You can rearrange the images with the use of up and down arrow.
● When you finished adding and arranging the images, click on O.K
● Now the next stage is setting up of hotkeys.
● Open the setting over the File menu.
● Hotkeys are there in the left menu, select it and place where you see image slideshow
● Through keys go to next and previous slide.
● After hotkeys setting are done, click apply.
This is an easy way to create an image in OBS slideshow. You can also learn creating videos and doing live telecast.
Part 3 Five OBS Slideshow Maker Alternatives
Although OBS is one of the popular slideshow maker, but due to its advanced features and usage, it may not be fit for everyone. So, here are some of OBS Slideshow maker alternatives you can try:
01Camtasia

For those who are new to making videos and slides using software, Camtasia is a good option. One can easily record the specific areas of the screen on the computer screen. Drag and drop, remove, trim, selecting and movement, effects, adding music and effects are easily possible through Camtasia.
02ShareX

It is a free and open source tool with a lot of features and addition. It some unique features like one can record the screen as it is scrolled down and time can also be set. It is also useful for text files also. One can take the screen shot of text which make easier for the users as it saves time. It supports many destinations like image, file and text uploaders. It is good for window users who are looking for easy and free alternatives for OBS.
03XSplit Broadcaster

When you are looking for a good alternative for OBS to make live streaming and recording go easier, then XSplit Broadcaster is the best option. Its application is seen in both gamming and esports. You have so many features like drag, drop, customization, image resizing and including videos and gif. This is good for the people who love to do customization and create media slideshows by including multiple of images.
04Streamlabs OBS

This is open source and free software good for recording and live streaming purpose. This is good for gamers and live event organizers. Layout editor, drag and drop and control over recording make this software an exceptional one. One can easily watch the recent events, save the replays and chat on chat box over the screen.
05Lightstream Studio

If you desire to go live in few minutes having a computer and good internet connection, the best alternative software other than OBS is Lightstream Studio. It is good for gamers and creators who just cannot wait to go live along with some great customization features. Layout making, creation of unlimited projects and scenes, motion graphics and social media messaging can be done effectively with the use of this software.
Although there are some few more options, but one of the most growing software for making slideshow is Filmora.

Wondershare Filmora Video Editor is an application/software for making any picture or video more effective. With great editing and personalizing video features and effects, it becomes the most popular software. This software is regularly updated to enhance its features and offer best tools to every category of users whether they are beginners or the intermediates. This software is developed by wondershare. It comes in various versions like Filmora, Filmora, FilmoraScrn. Each of the versions is designed looking into the need of the users with some different and advanced features.
For Win 7 or later (64-bit)
For macOS 10.12 or later
Filmora is a video editor application for every content creator. Those who are frequent in touch with slideshow, presentation and editing thereof, Filmora has all for them. One can easily create slideshow with multiple pictures and videos. The process is easy as one need to download the software, import photos and music, add transitions and background music, and finally export and save it. The reason for choosing filmora is that it supports various file formats with crop, pan and zoom feature.
● Ending Thoughts →
● With the advancement of technology, people are using such software that makes presenting images, videos and live events more attractive and effective. Slideshow OBS is one of the popular software for creating slideshow using images and videos. There is various advantage of using this software like it has powerful video recording feature and live streaming facility.
● Image slideshow can be created in easy and simple steps using OBS powerpoint slideshow. It is done through setting up the slideshow and the second one is setting up hotkeys.
● There are various alternative in place of OBS slideshow that can be used by different users based on their level of learning. Those who are looking for easy yet effective software for making or editing slideshow, Filmora is the best option for them.
Slideshow can be created easily with OBS with online application. The steps to create OBS Slideshow with application. How to create OBS slideshow easily?

Presentation and slide show are the most widely used methods of presenting and expressing the data, figures and information by any company or individual. It is most attractive and easy way to showcase the details of any business concern. Slideshow is also used in presenting the images in an artistic way. They are also very useful in creating content now-a-days. Therefore slideshow presentations are gaining importance. There are various applications and software used for making presentation and slideshow. The use of the application is based on the various features and ease to usage to the various categories of users. One of the software used for creating slideshow and making content is OBS. This software is used widely by the content creators and YouTubers. It is used for recording the screen, videos and editing in video. This program can also be used for creating slideshow. Let’s see some details about it and how you can create slideshow with OBS.
In this article
01 [What Are the Advantages of Creating Slideshow with OBS](#Part 1)
02 [How to Create an Image Slideshow in OBS](#Part 2)
03 [Five OBS Slideshow Maker Alternatives](#Part 3)
Part 1 What Are the Advantages of Creating Slideshow with OBS

OBS is an incredible tool for advanced level user for creating some fine presentation, slideshow, videos and content. It is the most widely used software for numerous applications. The reason for its wide application and usage is its various advantages which it offers to the various categories of users. Let’s see some of the advantages of creating Slideshow with OBS.
● The layout of OBS is attractive as compared to any other software. You can find effortless and intuitive navigation.
● It has great customization features, which give another plus point to the software. One can give some effects and make the slides as per the need or for any special purpose.
● You can use various elements in the slideshow using OBS like overlays and on-screen elements.
● You can make good quality videos and live uploads with the use of OBS slideshows
● Even a beginner can easily use the software of OBS in creating slideshow as it is easy to use even without going through the instruction manuals and guides.
● One can easily organize and even hide the details made through OBS slideshow.
● It is within the reach of every user as it is free, virus free and open software. One can use it for making live telecast and for video recording.
● It has a good association with various social media platforms like facebook and YouTube.
● It has option for screen recording also.
● One has the feature of changing scene along with resolution setting.
● Connecting with streaming service provider is easy.
● Designing and editing in the OBS slideshow is easy and can be done based on what the viewers want to look.
● Background customization facility.
● Facility for scrolling and moving the details included in the slides.
● Duplicate slides can be effectively and easily created in OBS slideshow.
Part 2 How to Create an Image Slideshow in OBS

When you look upon so many advantages of making slideshow through OBS, you may be eager to know how you can create an images, videos and image slideshow in OBS. Let’s see the process of OBS image slideshow:
● It can be created in two parts. The first is setting up the slideshow and the second one is setting up hotkeys.
● Open OBS and create a new scene.
● At the lower left corner of the screen, click on addition symbol.
● Name it and click on o.k.
● Go to addition symbol at source box and choose select image slideshow.
● Click O.K after naming the source.
● Next step is setting up slideshow properties. You can choose slide mode to automatic or manual. Based on your choice, you can select the transition. Also set the time and transition speed as you like. At next step you can take up loop, hide and randomize playback.
● At last add images.
● You can rearrange the images with the use of up and down arrow.
● When you finished adding and arranging the images, click on O.K
● Now the next stage is setting up of hotkeys.
● Open the setting over the File menu.
● Hotkeys are there in the left menu, select it and place where you see image slideshow
● Through keys go to next and previous slide.
● After hotkeys setting are done, click apply.
This is an easy way to create an image in OBS slideshow. You can also learn creating videos and doing live telecast.
Part 3 Five OBS Slideshow Maker Alternatives
Although OBS is one of the popular slideshow maker, but due to its advanced features and usage, it may not be fit for everyone. So, here are some of OBS Slideshow maker alternatives you can try:
01Camtasia

For those who are new to making videos and slides using software, Camtasia is a good option. One can easily record the specific areas of the screen on the computer screen. Drag and drop, remove, trim, selecting and movement, effects, adding music and effects are easily possible through Camtasia.
02ShareX

It is a free and open source tool with a lot of features and addition. It some unique features like one can record the screen as it is scrolled down and time can also be set. It is also useful for text files also. One can take the screen shot of text which make easier for the users as it saves time. It supports many destinations like image, file and text uploaders. It is good for window users who are looking for easy and free alternatives for OBS.
03XSplit Broadcaster

When you are looking for a good alternative for OBS to make live streaming and recording go easier, then XSplit Broadcaster is the best option. Its application is seen in both gamming and esports. You have so many features like drag, drop, customization, image resizing and including videos and gif. This is good for the people who love to do customization and create media slideshows by including multiple of images.
04Streamlabs OBS

This is open source and free software good for recording and live streaming purpose. This is good for gamers and live event organizers. Layout editor, drag and drop and control over recording make this software an exceptional one. One can easily watch the recent events, save the replays and chat on chat box over the screen.
05Lightstream Studio

If you desire to go live in few minutes having a computer and good internet connection, the best alternative software other than OBS is Lightstream Studio. It is good for gamers and creators who just cannot wait to go live along with some great customization features. Layout making, creation of unlimited projects and scenes, motion graphics and social media messaging can be done effectively with the use of this software.
Although there are some few more options, but one of the most growing software for making slideshow is Filmora.

Wondershare Filmora Video Editor is an application/software for making any picture or video more effective. With great editing and personalizing video features and effects, it becomes the most popular software. This software is regularly updated to enhance its features and offer best tools to every category of users whether they are beginners or the intermediates. This software is developed by wondershare. It comes in various versions like Filmora, Filmora, FilmoraScrn. Each of the versions is designed looking into the need of the users with some different and advanced features.
For Win 7 or later (64-bit)
For macOS 10.12 or later
Filmora is a video editor application for every content creator. Those who are frequent in touch with slideshow, presentation and editing thereof, Filmora has all for them. One can easily create slideshow with multiple pictures and videos. The process is easy as one need to download the software, import photos and music, add transitions and background music, and finally export and save it. The reason for choosing filmora is that it supports various file formats with crop, pan and zoom feature.
● Ending Thoughts →
● With the advancement of technology, people are using such software that makes presenting images, videos and live events more attractive and effective. Slideshow OBS is one of the popular software for creating slideshow using images and videos. There is various advantage of using this software like it has powerful video recording feature and live streaming facility.
● Image slideshow can be created in easy and simple steps using OBS powerpoint slideshow. It is done through setting up the slideshow and the second one is setting up hotkeys.
● There are various alternative in place of OBS slideshow that can be used by different users based on their level of learning. Those who are looking for easy yet effective software for making or editing slideshow, Filmora is the best option for them.
Slideshow can be created easily with OBS with online application. The steps to create OBS Slideshow with application. How to create OBS slideshow easily?

Presentation and slide show are the most widely used methods of presenting and expressing the data, figures and information by any company or individual. It is most attractive and easy way to showcase the details of any business concern. Slideshow is also used in presenting the images in an artistic way. They are also very useful in creating content now-a-days. Therefore slideshow presentations are gaining importance. There are various applications and software used for making presentation and slideshow. The use of the application is based on the various features and ease to usage to the various categories of users. One of the software used for creating slideshow and making content is OBS. This software is used widely by the content creators and YouTubers. It is used for recording the screen, videos and editing in video. This program can also be used for creating slideshow. Let’s see some details about it and how you can create slideshow with OBS.
In this article
01 [What Are the Advantages of Creating Slideshow with OBS](#Part 1)
02 [How to Create an Image Slideshow in OBS](#Part 2)
03 [Five OBS Slideshow Maker Alternatives](#Part 3)
Part 1 What Are the Advantages of Creating Slideshow with OBS

OBS is an incredible tool for advanced level user for creating some fine presentation, slideshow, videos and content. It is the most widely used software for numerous applications. The reason for its wide application and usage is its various advantages which it offers to the various categories of users. Let’s see some of the advantages of creating Slideshow with OBS.
● The layout of OBS is attractive as compared to any other software. You can find effortless and intuitive navigation.
● It has great customization features, which give another plus point to the software. One can give some effects and make the slides as per the need or for any special purpose.
● You can use various elements in the slideshow using OBS like overlays and on-screen elements.
● You can make good quality videos and live uploads with the use of OBS slideshows
● Even a beginner can easily use the software of OBS in creating slideshow as it is easy to use even without going through the instruction manuals and guides.
● One can easily organize and even hide the details made through OBS slideshow.
● It is within the reach of every user as it is free, virus free and open software. One can use it for making live telecast and for video recording.
● It has a good association with various social media platforms like facebook and YouTube.
● It has option for screen recording also.
● One has the feature of changing scene along with resolution setting.
● Connecting with streaming service provider is easy.
● Designing and editing in the OBS slideshow is easy and can be done based on what the viewers want to look.
● Background customization facility.
● Facility for scrolling and moving the details included in the slides.
● Duplicate slides can be effectively and easily created in OBS slideshow.
Part 2 How to Create an Image Slideshow in OBS

When you look upon so many advantages of making slideshow through OBS, you may be eager to know how you can create an images, videos and image slideshow in OBS. Let’s see the process of OBS image slideshow:
● It can be created in two parts. The first is setting up the slideshow and the second one is setting up hotkeys.
● Open OBS and create a new scene.
● At the lower left corner of the screen, click on addition symbol.
● Name it and click on o.k.
● Go to addition symbol at source box and choose select image slideshow.
● Click O.K after naming the source.
● Next step is setting up slideshow properties. You can choose slide mode to automatic or manual. Based on your choice, you can select the transition. Also set the time and transition speed as you like. At next step you can take up loop, hide and randomize playback.
● At last add images.
● You can rearrange the images with the use of up and down arrow.
● When you finished adding and arranging the images, click on O.K
● Now the next stage is setting up of hotkeys.
● Open the setting over the File menu.
● Hotkeys are there in the left menu, select it and place where you see image slideshow
● Through keys go to next and previous slide.
● After hotkeys setting are done, click apply.
This is an easy way to create an image in OBS slideshow. You can also learn creating videos and doing live telecast.
Part 3 Five OBS Slideshow Maker Alternatives
Although OBS is one of the popular slideshow maker, but due to its advanced features and usage, it may not be fit for everyone. So, here are some of OBS Slideshow maker alternatives you can try:
01Camtasia

For those who are new to making videos and slides using software, Camtasia is a good option. One can easily record the specific areas of the screen on the computer screen. Drag and drop, remove, trim, selecting and movement, effects, adding music and effects are easily possible through Camtasia.
02ShareX

It is a free and open source tool with a lot of features and addition. It some unique features like one can record the screen as it is scrolled down and time can also be set. It is also useful for text files also. One can take the screen shot of text which make easier for the users as it saves time. It supports many destinations like image, file and text uploaders. It is good for window users who are looking for easy and free alternatives for OBS.
03XSplit Broadcaster

When you are looking for a good alternative for OBS to make live streaming and recording go easier, then XSplit Broadcaster is the best option. Its application is seen in both gamming and esports. You have so many features like drag, drop, customization, image resizing and including videos and gif. This is good for the people who love to do customization and create media slideshows by including multiple of images.
04Streamlabs OBS

This is open source and free software good for recording and live streaming purpose. This is good for gamers and live event organizers. Layout editor, drag and drop and control over recording make this software an exceptional one. One can easily watch the recent events, save the replays and chat on chat box over the screen.
05Lightstream Studio

If you desire to go live in few minutes having a computer and good internet connection, the best alternative software other than OBS is Lightstream Studio. It is good for gamers and creators who just cannot wait to go live along with some great customization features. Layout making, creation of unlimited projects and scenes, motion graphics and social media messaging can be done effectively with the use of this software.
Although there are some few more options, but one of the most growing software for making slideshow is Filmora.

Wondershare Filmora Video Editor is an application/software for making any picture or video more effective. With great editing and personalizing video features and effects, it becomes the most popular software. This software is regularly updated to enhance its features and offer best tools to every category of users whether they are beginners or the intermediates. This software is developed by wondershare. It comes in various versions like Filmora, Filmora, FilmoraScrn. Each of the versions is designed looking into the need of the users with some different and advanced features.
For Win 7 or later (64-bit)
For macOS 10.12 or later
Filmora is a video editor application for every content creator. Those who are frequent in touch with slideshow, presentation and editing thereof, Filmora has all for them. One can easily create slideshow with multiple pictures and videos. The process is easy as one need to download the software, import photos and music, add transitions and background music, and finally export and save it. The reason for choosing filmora is that it supports various file formats with crop, pan and zoom feature.
● Ending Thoughts →
● With the advancement of technology, people are using such software that makes presenting images, videos and live events more attractive and effective. Slideshow OBS is one of the popular software for creating slideshow using images and videos. There is various advantage of using this software like it has powerful video recording feature and live streaming facility.
● Image slideshow can be created in easy and simple steps using OBS powerpoint slideshow. It is done through setting up the slideshow and the second one is setting up hotkeys.
● There are various alternative in place of OBS slideshow that can be used by different users based on their level of learning. Those who are looking for easy yet effective software for making or editing slideshow, Filmora is the best option for them.
Also read:
- New How Did AI Video Games Act More Human Than Human for 2024
- Updated 2024 Approved Useful Guide to Speed Up/Down Videos in VLC
- 30+ Amazing Templates for VN Video Editor for 2024
- Updated In 2024, Discovering The Best Wedding LUTs for Premiere Pro | An Overview
- The Way to Make Dynamic Video Collages?
- How to Make Foggy Text Reflection Effect
- Updated In 2024, How to Comment on YouTube Live Chat
- Updated 2024 Approved A Review of Efectum App Making Slow Motion Video
- Updated In 2024, What Is Animated GIF | GIF Example & Advantages of GIF
- New Detailed Steps to Rotate Videos in Windows Media Player
- How to Create a Video Slideshow in iMovie
- In 2024, Converting an SRT File to VTT Is Extremely Easy. The Article Enlists Various Methods You Can Use to Convert an SRT File to VTT, Introducing You to Filmora, Which Allows You to Edit Your SRT Files
- Create Promotional Video
- How To Make a Timelapse in After Effects for 2024
- 2024 Approved Add Emoji to Linkedin Post – 5 Tips You Would Like to Know
- In 2024, Easy Step by Step Tutorial on Creating a Lightroom Collage
- New Replacing Sky Background Using Adobe Photoshop A Comprehensive Guide for 2024
- Updated How To Make a Video by Mouse in Filmora for 2024
- 2024 Approved Learn to Splice Videos Together on iPhone
- Top Ways to Make Fast Motion Video on iPhone Solved
- New Best 8 Top Premiere Pro Slideshow Templates
- Updated What Is Color Finale
- In 2024, Forgotten The Voicemail Password Of Vivo Y02T? Try These Fixes
- How to Use Emojis on Windows 10 and Windows 11, In 2024
- 10 Free Location Spoofers to Fake GPS Location on your Vivo Y17s | Dr.fone
- Hassle-Free Ways to Remove FRP Lock on Nokia C02 Phones with/without a PC
- New 2024 Approved Best 10 Free AI Voice Generators to Use in Daily Life
- How to retrieve erased call logs from Honor ?
- Can you play MP4 on Samsung Galaxy M34 5G?
- In 2024, Where Is the Best Place to Catch Dratini On Tecno Spark 10 Pro | Dr.fone
- 4 Methods to Turn off Life 360 On Tecno Spark 10 5G without Anyone Knowing | Dr.fone
- Best Pokemons for PVP Matches in Pokemon Go For Vivo V30 | Dr.fone
- A Working Guide For Pachirisu Pokemon Go Map On Apple iPhone 12 Pro | Dr.fone
- Updated Secret Source to Make a Stop Motion Puppet
- How to Bypass Activation Lock from iPhone XS Max or iPad?
- In 2024, How Realme C67 5G Mirror Screen to PC? | Dr.fone
- How to Factory Reset Infinix Smart 7 If I Forgot Security Code or Password? | Dr.fone
- In 2024, How to Transfer Contacts from Itel A60 to Outlook | Dr.fone
- In 2024, Here Are Some Reliable Ways to Get Pokemon Go Friend Codes For Lava Blaze Pro 5G | Dr.fone
- How to Stop My Spouse from Spying on My Honor Magic 6 Pro | Dr.fone
- In 2024, Is pgsharp legal when you are playing pokemon On Motorola Edge 40 Pro? | Dr.fone
- 5 Ways to Track Realme C67 5G without App | Dr.fone
- Best Android Data Recovery - Undelete Lost Messages from Motorola Edge 40 Pro
- Title: A Guide to Color Grade Your Picture in LightRoom
- Author: Chloe
- Created at : 2024-06-18 14:31:02
- Updated at : 2024-06-19 14:31:02
- Link: https://ai-editing-video.techidaily.com/a-guide-to-color-grade-your-picture-in-lightroom/
- License: This work is licensed under CC BY-NC-SA 4.0.

