
:max_bytes(150000):strip_icc():format(webp)/GettyImages-81522363-5683a5573df78ccc15cabf56.jpg)
A Review of 3D LUT Mobile App - A Composite Application for Editing Media
A Review of 3D LUT Mobile App - A Composite Application for Editing Media
Have you ever wondered how movies, TV shows, and social media posts look so good? It’s not the video editing that makes them look good but also the color grading. The correct color grading adds a perspective to your storytelling and a feel to your media. As a matter of fact, there are many different tools for this purpose, and LUT is the most popular one.
Many people think that LUTs can only be applied using a PC or Mac. However, it’s not true because there are different mobile apps that you can use to apply LUTs. One such excellent tool is 3DLUT mobile app which is available for multiple mobile platforms.
- Part 2: How to Use LUTs on 3DLUT Mobile App for Video Editing?
- Part 3: 6 Best LUTs That Can Be Used on 3DLUT Mobile App
Part 1: Overviewing The Features of the 3DLUT Mobile App
If you’re looking for a simple and basic mobile application for color grading, 3DLUT mobile app is a good choice. It is an easy-to-use application that does not overcomplicate your color grading process. You can adjust the brightness and contrast of your media files with its basic tools option. Moreover, you can add white balance and saturation, brighten shadows, and sharpen your photos and videos.
Additionally, this app offers over 70 LUT presets that you can use. These LUTs can be applied directly to your media files by changing their tone and mood. In addition to this, it gives you access to the 3DLUT Creator’s library, where you can download and purchase different LUTs packs. You can download this color grading application on your iOS and Android devices.
Free Download For Win 7 or later(64-bit)
Free Download For macOS 10.14 or later
Part 2: How to Use LUTs on 3DLUT Mobile App for Video Editing?
Color grading and color correction are not only for professional pictures and portraits. You can color-correct your videos as well with your smartphones. This section will give you step-by-step guidance on how to use LUTs using the 3D LUT mobile app for your videos.
Step1Install the Application and Import Media
To install the application, go to the App Store/Play Store and search for the 3DLUT app. Install the application to apply LUTs to your videos. After installing the app, open the application and tap on the “Open Gallery” button to import your media files. You can choose any photo or media from your gallery.

Step2Apply LUTs On Your File
Once you’ve imported your video file, it’s time to apply the LUT to your video. To do so, choose the “LUT” tab from the bottom tray and select the desired LUT.

Step3 Apply the Changes and Save Your File
When you have selected the desired LUT, tap on the “Tick” sign in the right corner of the screen. You can save your file in the gallery by tapping the same sign. Moreover, you can further adjust your file by selecting the Basic option from the bottom tray.

Part 3: 6 Best LUTs That Can Be Used on 3DLUT Mobile App
With the 3DLUT app, you can even access the LUT’s library of 3DLUT Creator. You can choose from different LUTs available according to your choice. You can always select the option for 3DLUT mobile app free download on your app’s store.
1. Speedy Grade Pack
It is a great LUT pack that you can use for your photos and videos. Speedy Grade Pack is a LUT pack that includes 10 LUTs. This color grading pack has different LUTs, each with a new style and color composition. Moreover, it is a pack that enhances color to make your videos more vibrant and livelier. It creates a more refreshing and colorful atmosphere for your viewers.

2. GoPro LUTs Color Grading Pack
Yet another fantastic LUT pack, especially for outdoor vlogging and videography, is GoPro LUTs Color Grading Pack. This pack comes with over 50 different LUTs, each suitable for GoPro videos. You can use these LUTs to give your vlogs and videos a more cinematic and professional touch. It enhances the brown and muddiness in your videos and balances the exposure to provide the perfect outdoor look.

3. Skin Tones Pack
This pack is the right choice if you want to color-grade your portraits. Skin Tones Pack has over 5 LUTs, and each one is used to fine-tune your skin complexation. With this LUT pack, you can add tan and more brightness to your photos and videos. This pack enhances your skin tone by highlighting your skin color composition. It increases brownness and saturation in your media files to give them a more natural look.

4. Zoan Cinematic Pack
Zoan Cinematic Pack is the perfect color-grading preset that gives your videos a professional-looking cinematic look. This pack has eight cinematic-rich presets you can apply to your videos and vlogs. These LUTs give the modern Hollywood-style impression. It adds richness to your videos, and it underexposes bright colors in your videos to create a modern cinematic ambiance.

5. Winter Pack
It is an exceptional and diversely influencing pack of 3DLUT Mobile. It changes your color composition to bluish to give a colder look. This pack has one LUT that comes with rich colors and deep blue color grading. These colors create an atmosphere that resembles winter and coldness. The blue tone and damping of other colors make your videos look more profound and meaningful.

6. RakhmonovFilmsLUT Pack
The last one on this list is RakhmonovFilmsLUT Pack which has over 100 LUTs. Each LUT is different from the others in style and tone. This pack gives your videos a more meaningful natural-looking color tone. These LUTs create a movie-like feel to your content by correcting colors that look more professional. It adds depth and dramatic touch to your media files with the correct exposure and white balance.

Conclusion
With new tools and applications, video editing becomes more accessible with a professional touch. Social media influencers create videos that give the feel of an expensive movie. This is how much these tools have made creating an excellent cinematic video easier. You can apply LUTs and other color grading options with your smartphone applications, such as 3DLUT mobile app.
Empower your videos with a new mood using different LUTs. Filmora now offers 100+ top-quality 3D LUTs cover a broad range of scenarios. Transform your videos with Filmora’s powerful 3D LUTs.
Apply LUT on Videos Apply LUT on Videos Learn More


Part 1: Overviewing The Features of the 3DLUT Mobile App
If you’re looking for a simple and basic mobile application for color grading, 3DLUT mobile app is a good choice. It is an easy-to-use application that does not overcomplicate your color grading process. You can adjust the brightness and contrast of your media files with its basic tools option. Moreover, you can add white balance and saturation, brighten shadows, and sharpen your photos and videos.
Additionally, this app offers over 70 LUT presets that you can use. These LUTs can be applied directly to your media files by changing their tone and mood. In addition to this, it gives you access to the 3DLUT Creator’s library, where you can download and purchase different LUTs packs. You can download this color grading application on your iOS and Android devices.
Free Download For Win 7 or later(64-bit)
Free Download For macOS 10.14 or later
Part 2: How to Use LUTs on 3DLUT Mobile App for Video Editing?
Color grading and color correction are not only for professional pictures and portraits. You can color-correct your videos as well with your smartphones. This section will give you step-by-step guidance on how to use LUTs using the 3D LUT mobile app for your videos.
Step1Install the Application and Import Media
To install the application, go to the App Store/Play Store and search for the 3DLUT app. Install the application to apply LUTs to your videos. After installing the app, open the application and tap on the “Open Gallery” button to import your media files. You can choose any photo or media from your gallery.
Step2Apply LUTs On Your File
Once you’ve imported your video file, it’s time to apply the LUT to your video. To do so, choose the “LUT” tab from the bottom tray and select the desired LUT.
Step3 Apply the Changes and Save Your File
When you have selected the desired LUT, tap on the “Tick” sign in the right corner of the screen. You can save your file in the gallery by tapping the same sign. Moreover, you can further adjust your file by selecting the Basic option from the bottom tray.
Part 3: 6 Best LUTs That Can Be Used on 3DLUT Mobile App
With the 3DLUT app, you can even access the LUT’s library of 3DLUT Creator. You can choose from different LUTs available according to your choice. You can always select the option for 3DLUT mobile app free download on your app’s store.
1. Speedy Grade Pack
It is a great LUT pack that you can use for your photos and videos. Speedy Grade Pack is a LUT pack that includes 10 LUTs. This color grading pack has different LUTs, each with a new style and color composition. Moreover, it is a pack that enhances color to make your videos more vibrant and livelier. It creates a more refreshing and colorful atmosphere for your viewers.
2. GoPro LUTs Color Grading Pack
Yet another fantastic LUT pack, especially for outdoor vlogging and videography, is GoPro LUTs Color Grading Pack. This pack comes with over 50 different LUTs, each suitable for GoPro videos. You can use these LUTs to give your vlogs and videos a more cinematic and professional touch. It enhances the brown and muddiness in your videos and balances the exposure to provide the perfect outdoor look.
3. Skin Tones Pack
This pack is the right choice if you want to color-grade your portraits. Skin Tones Pack has over 5 LUTs, and each one is used to fine-tune your skin complexation. With this LUT pack, you can add tan and more brightness to your photos and videos. This pack enhances your skin tone by highlighting your skin color composition. It increases brownness and saturation in your media files to give them a more natural look.
4. Zoan Cinematic Pack
Zoan Cinematic Pack is the perfect color-grading preset that gives your videos a professional-looking cinematic look. This pack has eight cinematic-rich presets you can apply to your videos and vlogs. These LUTs give the modern Hollywood-style impression. It adds richness to your videos, and it underexposes bright colors in your videos to create a modern cinematic ambiance.
5. Winter Pack
It is an exceptional and diversely influencing pack of 3DLUT Mobile. It changes your color composition to bluish to give a colder look. This pack has one LUT that comes with rich colors and deep blue color grading. These colors create an atmosphere that resembles winter and coldness. The blue tone and damping of other colors make your videos look more profound and meaningful.
6. RakhmonovFilmsLUT Pack
The last one on this list is RakhmonovFilmsLUT Pack which has over 100 LUTs. Each LUT is different from the others in style and tone. This pack gives your videos a more meaningful natural-looking color tone. These LUTs create a movie-like feel to your content by correcting colors that look more professional. It adds depth and dramatic touch to your media files with the correct exposure and white balance.
Conclusion
With new tools and applications, video editing becomes more accessible with a professional touch. Social media influencers create videos that give the feel of an expensive movie. This is how much these tools have made creating an excellent cinematic video easier. You can apply LUTs and other color grading options with your smartphone applications, such as 3DLUT mobile app.
Empower your videos with a new mood using different LUTs. Filmora now offers 100+ top-quality 3D LUTs cover a broad range of scenarios. Transform your videos with Filmora’s powerful 3D LUTs.
Apply LUT on Videos Apply LUT on Videos Learn More
Windows Movie Maker Review
Are you considering creating impressive movies from your video clips? Then you need to install this famous Windows movie maker tool to fulfill your job. This is expert video editing Microsoft software that you may use for free. This video editing tool by Windows has received massive recognition due to its simplicity. Also, it makes every task easy and quick, like combining video clips to form digital movies, including various effects, background music, transitions, and titles.
So, Windows Movie Maker is undoubtedly the ideal software for this job. Moreover, video editors using this app experience several attributes in their organization to finally emerge with the perfect videos, like audio options, animations, transitions overlays, and timeline narration. It has user-friendly features, which you’ll enjoy experimenting with. This software also has XML code allowing its end users to modify live effects and transitions or even prepare very new ones.
This brilliant tool can even do primary track editing, including fade-out and fade-in effects in your final audio tracks. Windows movie maker even allows you to post your final project effortlessly on various video sites and social media platforms. Here’s a complete guide:
1. Download and Install Windows Movie Maker
Windows movie maker was previously recognized in Windows 7 as Windows Live Movie Maker. So to experience the features of this software, first, you need to download and install this app which is available free of charge. The steps are as follows.
- Firstly, download the setup file of Windows Live Essentials.
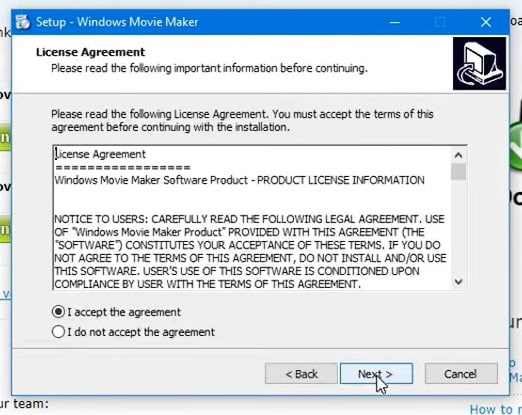
- You’ve to double-click on this setup file called windows-movie-maker.exe. Then tap on ‘Yes’ to permit the setup package to function.
- You’ll now be redirected to the installation window of Windows Essential. Next, you’ll see two options towards the web page’s top, and you’ll have to select the option ‘Install all of Windows Essentials (recommended)’ to continue with the installation process.
Windows Essentials comprise Microsoft OneDrive, Outlook Connector Pack, Movie Maker, Writer, Mail, Photo Gallery, and Messenger.
- Locate ‘View Details’ towards the left end of the page and tap on it. A progress and percentage bar will pop out along with the details regarding the program you’re installing.
- You need to wait a while to install Windows Movie Maker Software. Pause until the program completes its installation. After you find that the program title changes to another program such as Mail, you may proceed again.
- Now click on the Windows icon and then the ‘Start’ menu on the bottom left of your computer screen.
- Type and Search for ‘Windows Movie Maker, and you’ll find the newly downloaded app on the screen.
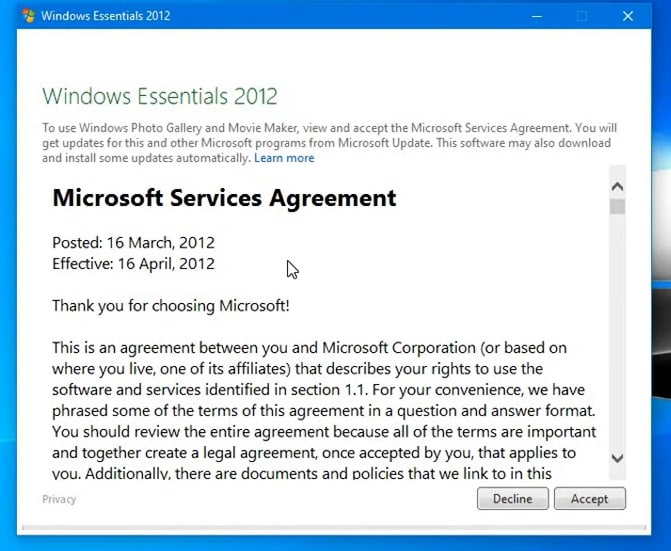
- Click on the icon with film reel, which is the Movie Maker app, and you’ll locate it above the Start menu. Next, you’ll be redirected to the terms of use of Windows Essentials for this Window to begin.
- Find the ‘Accept ‘ button towards the screen’s right-end corner and tap on it. Windows Movie Maker will now open.
- Next, tap on ‘Close’ when prompted with an error message from the installation windows.
You may now Enjoy Windows Movie Maker Live and begin making movies and videos using this software.
2. Interface
The user interface of Winona Movie Maker has three essential areas: the timeline and the storyboard, the panes and the toolbar, and the menu bar. This area covers…
- Timeline and storyboard: It offers a timeline and storyboard usage details for working with the current project clips.
- Panes: It offers details regarding Collections pane usage for viewing all your collections. Furthermore, it offers information regarding the Movie Task pane for all general tasks during movie making or project editing.
- Toolbar and Menubar: Here, you’ll get details regarding toolbar and menu commands usage for different tasks in this software.
3. Basic Editing
Adding clips to your timeline is the most straightforward method for creating digital movies using Movie Maker. Thereby, picking any one AutoMovie Themes out of those seven choices from default, sepia, black and white, pan and zoom, fade, cinematic, and contemporary.
You can enjoy the following choices for editing all your video clips:
- Creating clips: You may create new clips from different video clips after you’re done with capturing and importing in the Windows Movie Maker. You may create clips in the software anytime, according to your convenience.
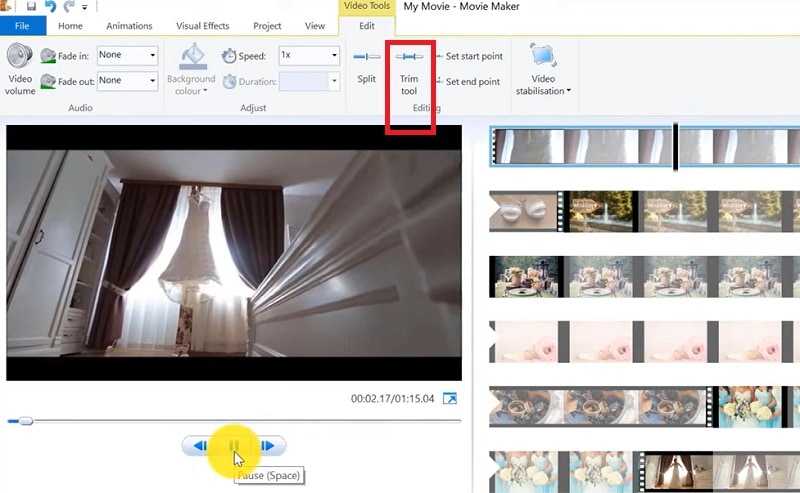
- Trimming any clip: You may hide any clip part you don’t wish to keep in the project. For instance, you may trim the clip’s end or beginning. Also, trimming doesn’t erase the details provided in their source material.
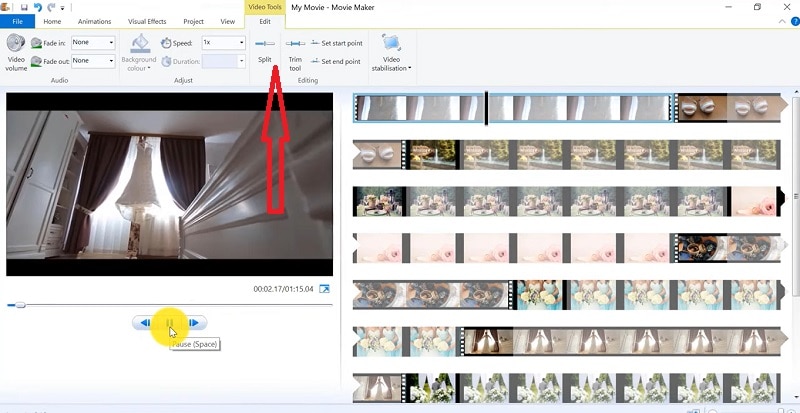
- Splitting Clips: Movie Maker allows you to split any video into two parts which can be helpful when you wish to add a video transition picture between the clips.
- Combining clips: Movie Maker allows you to merge two or multiple contiguous clips. Contiguous indicates that you need to record these clips together so that the beginning and end times are the same as the following video clip.
4. Add Video Effects
Video effects’ ascertain how any title, picture, or video clip displays in the final movie or project. Video effects permit you to include various effects in the movie and are added for the total time that the title, picture, or video clip displays.
Furthermore, you may add various other effects, which you’ll find in the folder of video effects in their Collections pane. You may maintain video effects when moving, copying, cutting, or splitting a picture or video clip.
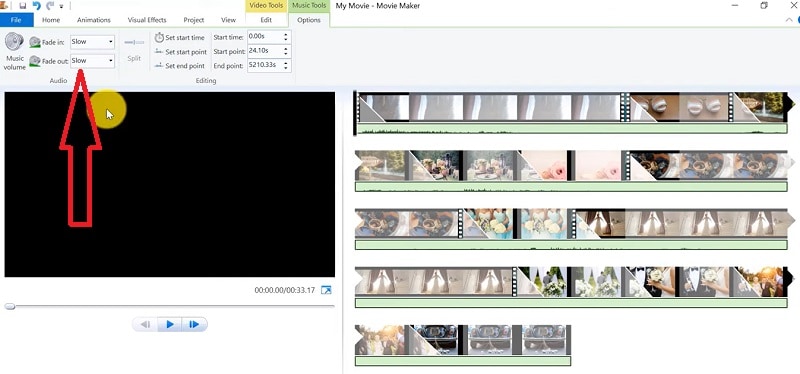
5. Audio Editing
Windows Movie Maker permits you to operate various audios in several ways. A few specific audio-related jobs you may execute in Windows Movie Live Maker comprise the following:
- Audio levels adjustment: You can adjust your audio level so that you can easily control the audio playback and balance after you have the audio that comes up on Music/ Audio and Audio tracks in your timeline.
- Timeline narration: You may include a voice narration for the picture or video clips, which will appear on the timeline’s video track. There’ll be an automated synchronization of the audio narration with your video, where the narration shall elaborate on the movie event or action when you play it.
- Audio Clips Volume adjustment: You may adjust the audio volume for the video clip’s audio portion or the clips containing only audio. This permits you to control the audio clip’s volume such that you can hear it based on the sound level you’ve set for your audio clip.
- Adding audio effects: You may add various audio effects like mute, fade out and fade in.
6. Share Files
Are you done with video project editing, and now you wish to share it? Windows Movie Maker offers you various choices for sharing straight away from their app, comprising:
- YouTube
- Vimeo
So with this power, you may guarantee to share the video’s correct aspect ratio and size version to any planned platform. Nevertheless, you don’t require signing in to your Microsoft account for sharing to the preferred platform, which may act as a hurdle for all its users who do not have Microsoft Office accounts.
7. Pros and Cons
The software’s advantages are its automated preview, simple controls, and user-friendliness. Additionally, the following are some clear advantages and disadvantages of using Windows Movie Maker:
Pros
- This app is perfect for all novices and is an ideal introduction as it utilizes several pro editing systems’ general workflow components like assembling timelines and importing. Its interface has easy navigation and is exceptionally intuitive for most new beginners as well.
- Windows Live MovieMaker is a video editing Microsoft application that arrives standard with all Windows computers. It is amongst the most favorite editing apps obtainable and exact, as other programs are user-friendly and fun. This software comes free with Vista, XP, and Windows Me and has effortless usage. Moreover, you may download additional video plugins, plus it won’t give you any chance to complain regarding its free software.
- This app is straightforward to learn, and you won’t require any experience in film editing for using Windows Media Player. You’ll explore more than 130 effects with accessible Fantastic credits, titles, and transitions. Next to this, you may drag and then drop the clip at any place in the timeline.
- Windows Movie Maker is an ideal app for image slide shows and was developed to create photo and home movie slide shows. It presents excellent fun transitions and themes; you may add music easily. This app provides excellent variety, being a free editing application. Furthermore, it offers transitions and striking effects to function with.
- Windows Live Movie Maker is free of cost for all Microsoft Windows users and is basically for clients having zero to minimum experience editing audio and videos. Moreover, it has many special effects you may use while creating videos. Also, you may frag and then place any picture or video anywhere you wish to see it.
- You can choose from several themes, enhancing your film with tools like contemporary themes, fade effects, and sepia toning choices. You have to click once, and then the users can choose and apply from the multiple effects collection.
Cons
- Windows Movie Maker contains unlimited audio and video tracks, yet it provides just one accessible one at a time. Hence, if you wish to include some other audio or music track, you may prepare the video, thereby sending it to the ultimate file.
- It isn’t uninstallable using any remove or add control panel. Also, it is impossible to do video overlaying.
- This app requires much patience because it is prone to crashes. Moreover, you’ll require enough time and effort to do video reversing. It often becomes frustrating for all advanced editors to cut clips into small parts and then add them back. Hence, Windows Movie maker isn’t good for professional video editors.
- Windows Live MovieMaker can crash and freeze and is known to suffer frequent crashes. Hence, ensure saving often and avoid creating complex videos. Also, you cannot perform complex editing and can now prepare single audio and video track.
8. Windows Movie Maker Alternative Software
Wondershare Filmora Video Editor is the best alternative for Windows Movie Live Maker and is a highly favored and most effective software program. You can download it for free, and it is adaptable with Windows 7 OS or above. This app is user-friendly but powerful and allows you to split, merge, crop, and trip various video clips with essential built-in video editing attributes.
Free Download For Win 7 or later(64-bit)
Free Download For macOS 10.14 or later
Additionally, you may get a few advanced properties like video stabilization, color correction, and green screen in Filmora effortlessly. You may even explore several fashionable and modern video effects such as music, text, and intros for topics like games, Education, Travel, Vlogger, Beauty, etc. Here is the comparison between the two software:
Filmora and Windows Movie Maker comparison
| Basis | Windows Movie Maker | Wondershare Filmora |
|---|---|---|
| Pricing | Free/ inexpensive | Quote basedAnnual SubscriptionOne-time paymentMonthly Payment |
| Interface | Pleasing interface | Auto movie options |
| Effects | Several overlays and effects | Special effects choices and transition overlays |
| Integration | YouTubeFacebookVimeoEmail | TwitterInstagramFacebookVimeoYouTube |
Conclusion
You may use Windows Movie Maker Live for capturing videos and audio to the computer using various video sources, including Web Cameras and Video Cameras, thereby using the recorded data in your new movies. You may import still pictures, video, and audio into this application to use in the movies you’re making. Moreover, after you’ve finished with video and audio content editing in this app, which may involve adding effects, video transitions, and titles, you may finally save the ultimate movie and then share and watch it with your family and friends.
How to Split a Clip in After Effects
You’ve probably heard of splitting clips in Adobe After Effects, and maybe you’ve even tried it out. But if you’re like many people, you’re not quite sure how to use it. This post will explain everything you need to know about trimming videos in After Effects. We’ll give you step-by-step instructions for splitting clips in the Windows and Mac versions of After Effects—and even show you some tricks that make it easier for beginners.
- What is Filmora
- How to split video clips in Filmora manually
- How to split video clips in Filmora automatically using a scene detector
- How to trim videos online with Filmora Online Video Trimmer
What is After Effects?
Adobe After Effects is an application that can be used to create videos and animation. It is a powerful tool that allows you to create custom animations, including motion graphics, visual effects, and titles. Many professionals in the industry today use it to create visual effects and animations. This program can be used to create professional videos or advertisements for your business.
After Effects allows users to quickly create animations that have been created in other programs like Photoshop or Illustrator. It also allows users to edit videos to look better than they initially did. The program has many features, such as prebuilt templates, text tools, support for different file formats, and more. This program also has a lot of customization options and will allow you to create stunning visuals quickly and easily.
How to split video clips in After Effects manually
Import your video into the After Effects timeline
To split your video clip using after effects, the first step is to get the clip into the program. To do this, open the file menu in the top left corner of the After Effects workspace. Select “ Import” from the options on the drop-down menu displayed. This will open up the file explorer for you to select the clip you would like to import into your project. Once you find your video file, click “OK” to add it to the project files. Alternatively, you can simply drag your clip from the file explorer and drop it into the Adobe After Effects workspace.

Create a new composition
To go ahead with splitting your video clip, you will need to create a new composition. This can be done in two ways. The first is to drag the clip from the project browser to the new composition icon on the layer panel. This automatically creates a new composition. An alternate method is to right-click the video and select “New Comp” on the menu.


Split the clip
Once you have your clip loaded into your timeline, you can go ahead to split it. You just have to move the timeline indicator to the exact position where you would like to split the video. Press the keyboard combination [CTRL + SHIFT + D] to split the video on a windows computer. For macOS users, you will have to use the combination [CMD + SHIFT + D]. Once this is done, the video clip is split right where the timeline marker is placed.

Keyboard shortcuts for splitting videos in After Effects
| Shortcut | Windows | Mac |
|---|---|---|
| Split a layer | Control + Shift + D | CMD + Shift + D |
| New project | Control + Alt + N | Command + Option + N |
| New composition | Control + N | Command + N |
| Set beginning or end of work area to current time | B or N | B or N |
| Trim Composition to work area | Control + Shift + X | Command + Shift + X |
| Go to specific time | Alt + Shift + J | Option + Shift + J |
| Go to the beginning of a composition, layer, or footage item | Home or Ctrl + Alt + Left Arrow | Home or Command + Option + Left Arrow |
| Import one file or image sequence | Control + I | Command + I |
| Import multiple files or image sequences | Control + Alt + I | Command + Option + I |
How to split video clips in Filmora
What is Filmora?
Filmora video editor is a free and easy-to-use video editor for PC. The program boasts a wide range of features that allow users to easily create, edit and share their videos.
The interface is clean and straightforward, allowing you to focus on what you want to do without spending too much time figuring out how the program works. It also comes with an integrated video editor, which allows users to add text, images, and other elements.
Free Download For Win 7 or later(64-bit)
Free Download For macOS 10.14 or later
How to split video clips in Filmora manually
- Import your video clip into Filmora media using the “ Import” button or just drop your videos.
- Locate the video in your storage and then click “OK”.
- Once you have the video in, drag and drop it into the timeline to begin editing it.

- Drag the playhead to the position where you would like to split the video and then click on the Split button (it is in the shape of scissors).
- To split the video into multiple parts, repeat the above processes as many times as you want.
- Once you have the video split up into multiple parts, you can go ahead to delete any unwanted parts. To do this, all you have to do is to select the section and then click on the Delete
- Click on Export to save your video in any of the supported file formats. Filmora has support for 3GP, AVI, MP4, MKV, WMV, MOV, FLV, TS, GIF and so on.

How to split video clips in Filmora automatically using a scene detector
Wondershare Filmora has a nifty feature called scene detection that allows you to split a video automatically when a change in the scene is detected. The following are the steps you need to follow to use this feature.
- Import your video into the project media library using the same steps above.
- Once you have your video in the media library, right-click on it and select the Scene Detection This opens the scene detection interface.

- Click on the Detect button to allow Filmora to automatically detect the scenes and split the video up. You have the option of previewing each of the individual clips before they are added to the timeline.

- You can also delete any section you will not need by clicking the Delete icon next to the clip. Alternatively, select Add to Timeline to add any clips you want to use to the timeline.
- Save your split video by using the Export button.
How to trim videos online with Filmora Online Video Trimmer
Filmora offers an online video trimmer for those that would like to trim videos without installing any additional software on their computers. Filmora’s online video editor is free to use and doesn’t leave a watermark on your videos. Read on to learn how to use this free tool.
- Click on this link to go to the video trimmer website.
- Upload your video from your computer. Note that you can only upload files less than 100MB.
- You can trim your video using either the slider or by inputting your desired start and stop time.

- Export and download your trimmed video.
Conclusion
It’s quite simple once you get the hang of it. Now that you know how to split a clip in After Effects, it will be much easier for you to adjust your frame, include a rapid cut, or simply steady a section of your movie.
- What is Filmora
- How to split video clips in Filmora manually
- How to split video clips in Filmora automatically using a scene detector
- How to trim videos online with Filmora Online Video Trimmer
What is After Effects?
Adobe After Effects is an application that can be used to create videos and animation. It is a powerful tool that allows you to create custom animations, including motion graphics, visual effects, and titles. Many professionals in the industry today use it to create visual effects and animations. This program can be used to create professional videos or advertisements for your business.
After Effects allows users to quickly create animations that have been created in other programs like Photoshop or Illustrator. It also allows users to edit videos to look better than they initially did. The program has many features, such as prebuilt templates, text tools, support for different file formats, and more. This program also has a lot of customization options and will allow you to create stunning visuals quickly and easily.
How to split video clips in After Effects manually
Import your video into the After Effects timeline
To split your video clip using after effects, the first step is to get the clip into the program. To do this, open the file menu in the top left corner of the After Effects workspace. Select “ Import” from the options on the drop-down menu displayed. This will open up the file explorer for you to select the clip you would like to import into your project. Once you find your video file, click “OK” to add it to the project files. Alternatively, you can simply drag your clip from the file explorer and drop it into the Adobe After Effects workspace.
Create a new composition
To go ahead with splitting your video clip, you will need to create a new composition. This can be done in two ways. The first is to drag the clip from the project browser to the new composition icon on the layer panel. This automatically creates a new composition. An alternate method is to right-click the video and select “New Comp” on the menu.
Split the clip
Once you have your clip loaded into your timeline, you can go ahead to split it. You just have to move the timeline indicator to the exact position where you would like to split the video. Press the keyboard combination [CTRL + SHIFT + D] to split the video on a windows computer. For macOS users, you will have to use the combination [CMD + SHIFT + D]. Once this is done, the video clip is split right where the timeline marker is placed.
Keyboard shortcuts for splitting videos in After Effects
| Shortcut | Windows | Mac |
|---|---|---|
| Split a layer | Control + Shift + D | CMD + Shift + D |
| New project | Control + Alt + N | Command + Option + N |
| New composition | Control + N | Command + N |
| Set beginning or end of work area to current time | B or N | B or N |
| Trim Composition to work area | Control + Shift + X | Command + Shift + X |
| Go to specific time | Alt + Shift + J | Option + Shift + J |
| Go to the beginning of a composition, layer, or footage item | Home or Ctrl + Alt + Left Arrow | Home or Command + Option + Left Arrow |
| Import one file or image sequence | Control + I | Command + I |
| Import multiple files or image sequences | Control + Alt + I | Command + Option + I |
How to split video clips in Filmora
What is Filmora?
Filmora video editor is a free and easy-to-use video editor for PC. The program boasts a wide range of features that allow users to easily create, edit and share their videos.
The interface is clean and straightforward, allowing you to focus on what you want to do without spending too much time figuring out how the program works. It also comes with an integrated video editor, which allows users to add text, images, and other elements.
Free Download For Win 7 or later(64-bit)
Free Download For macOS 10.14 or later
How to split video clips in Filmora manually
- Import your video clip into Filmora media using the “ Import” button or just drop your videos.
- Locate the video in your storage and then click “OK”.
- Once you have the video in, drag and drop it into the timeline to begin editing it.
- Drag the playhead to the position where you would like to split the video and then click on the Split button (it is in the shape of scissors).
- To split the video into multiple parts, repeat the above processes as many times as you want.
- Once you have the video split up into multiple parts, you can go ahead to delete any unwanted parts. To do this, all you have to do is to select the section and then click on the Delete
- Click on Export to save your video in any of the supported file formats. Filmora has support for 3GP, AVI, MP4, MKV, WMV, MOV, FLV, TS, GIF and so on.
How to split video clips in Filmora automatically using a scene detector
Wondershare Filmora has a nifty feature called scene detection that allows you to split a video automatically when a change in the scene is detected. The following are the steps you need to follow to use this feature.
- Import your video into the project media library using the same steps above.
- Once you have your video in the media library, right-click on it and select the Scene Detection This opens the scene detection interface.
- Click on the Detect button to allow Filmora to automatically detect the scenes and split the video up. You have the option of previewing each of the individual clips before they are added to the timeline.
- You can also delete any section you will not need by clicking the Delete icon next to the clip. Alternatively, select Add to Timeline to add any clips you want to use to the timeline.
- Save your split video by using the Export button.
How to trim videos online with Filmora Online Video Trimmer
Filmora offers an online video trimmer for those that would like to trim videos without installing any additional software on their computers. Filmora’s online video editor is free to use and doesn’t leave a watermark on your videos. Read on to learn how to use this free tool.
- Click on this link to go to the video trimmer website.
- Upload your video from your computer. Note that you can only upload files less than 100MB.
- You can trim your video using either the slider or by inputting your desired start and stop time.
- Export and download your trimmed video.
Conclusion
It’s quite simple once you get the hang of it. Now that you know how to split a clip in After Effects, it will be much easier for you to adjust your frame, include a rapid cut, or simply steady a section of your movie.
6 Tips for Your First Facebook Ads
Facebook ads can be an effective channel for reaching the right customers, but only if you have a strong strategy in place. If you are new to Facebook ads, don’t rush into creating your first campaign without fully understanding the risks and rewards of advertising on Facebook.

Before you launch your first Facebook ad campaign, here are six tips to keep in mind:
Part1. Define the purpose of your ad
This can be a long-form or short-form question. If a user is browsing Facebook and sees your ad, you want them to know why they should click on it. Is it an offer? If so, what are they getting in return? Is the ad simply a call to action? You may want to include a “Learn more” button that links back to your website so that users can learn more about whatever they need to know before taking the next steps.
There are 11 Facebook Ads campaign objectives to choose from, and you should choose the one that best aligns with your goals.

Awareness:
- Brand awareness - Show your advertisements to individuals who are most likely to recall them.
- Reach - Show your ad to as many people as possible
Consideration:
- Traffic - Send people to your website or app
- Engagement - Increase the number of times people see and interact with your ad.
- App installs - Advertise to individuals who are more likely than others to download and use your app.
- Video views - Increase the number of times people see and interact with your video
- Lead generation - Use forms, calls, or chats to obtain information from people eager in your business.
- Messages - Get more people to message you on Facebook Messenger
Conversion:
- Conversions - Advertise to people who have a higher likelihood of taking action, such as buying something or calling you from your website.
- Catalog sales -Show your potential customers ads for items in your catalog that match their interests, so they are more likely to buy from you.
- Store traffic - This allows you to use your Facebook page as a marketing platform. If you want to run store traffic ads on Facebook, include your shop information there.
Whatever the case, make sure you have a clear goal from start to finish to understand what exactly it is you are trying to accomplish for any given campaign.
Part2. Know your target audience
Before you create any ads, it’s important to define who will see them. You’ll want to think carefully about the type of person who would be interested in what you’re offering and how they would respond when they see the ad. If you can’t answer these questions, it’s time to start considering different audiences.

But how do we begin defining a target audience? To start, let’s look at the different terms used by advertisers:
Customer: The person who has already bought from your company. For example, if you sell coffee makers on Amazon and have an existing customer base from those sales (customers), then this would be the most relevant term for you when deciding who should see specific ads for new products or services that may interest them based on past purchases or interests shown through other online activity such as browsing history or social media engagement with similar content/products/services.
Prospect: A lead that has expressed interest in buying something, but has not yet purchased anything from your company. A prospect does not necessarily mean someone has signed up for an email list or asked for more info; keeping leads fresh is just as important as nurturing prospects into customers later down the road so don’t forget that part!
Now that you know who you are targeting, it’s time to create an avatar for your target customer. An avatar is a fictional character that represents your target customer. This will help you to better understand their needs and wants, and it will also make it easier to create targeted ads.
![]()
There are a few different ways to create an avatar:
1.) Customer profile: This is a simple way to gather information about your target customer. Start by creating a list of demographic information such as age, location, gender, education level, and income level. You can also include interests and behaviors, such as what they like to do for fun, what type of music they listen to, and what type of products they buy.
2.) Persona: A persona is very similar to a customer profile, but it takes things a step further by giving each target customer a name and backstory. This can be helpful if you are targeting a specific niche audience.
3.) Mind-map: If you want to get creative, you can create a mind-map of your target customer. This will allow you to brainstorm everything that you know about them and come up with new ideas.
Once you have created your avatar, make sure that you keep it in mind when creating your Facebook ad campaign. This will help to ensure that your ads are relevant and interesting to your target customer.
Part3. Prepare a decent image for your audience to click on
Images are the most important part of any ad. A good image will help your customers understand what it is that they’re clicking on, and they may even want to share it with their friends. However, if your image is poor quality or irrelevant then, it won’t do as well as it could have done.
You should start by picking a relevant image that shows off your product in the best light possible. If possible, try and get some type of testimonial from customers using your product so that other people can see how great your product really is!

If you don’t have good images available yet, don’t worry! You can always hire a professional photographer who knows what kind of shots work best for advertising purposes but even if this isn’t something that suits every business, there are still plenty of free resources out there too like Unsplash which offers high-quality stock photography under Creative Commons licenses under various conditions such as attribution when used commercially, so make sure whatever method you choose fits within these guidelines!
Part4. Practice Your copywriting skills
You can have the best-developed ad in the world, but if it doesn’t have strong copywriting, your ads won’t work as well. It’s important to know what you’re getting into before spending time and money on Facebook ads.

The following are just some of the ways you can improve your copywriting skills:
- Read other people’s ads and see how they write their copy
- Read books about writing persuasive copy.
Try writing your own copy. Then have someone read it and give feedback on what they like and what they don’t like about it. Try to learn from their suggestions.
There are also many different ways to write copy for a Facebook ad. Some people like to use specific formulas for their ads, such as: AIDA (attention, interest, desire, action). This formula was developed by an American businessman named Claude C. Hopkins in 1898 and is still widely used today. If you’re not sure which method is best for you, it might be worth trying a few different ones. Have someone read your ad and give their opinion on which method was the most effective at convincing them that they should click on your ad.
You can also hire a copywriter to help you with your ad. However, if you don’t have the budget for it at this point in time or just want to try writing your own first before hiring someone else, there are many different apps and websites that will help you to create an ad copy.
Part5. Decide what type of ad format will you use
It is a carousel ad, or single image/video ad, or a combination of both?

If you are going to use a carousel ad, you need at least three images. If you’re using a single image or video ads, then you only need one image or video.
As always, if your budget allows it, try to increase the number of ad sets that are running at once so as not to cannibalize each other’s reach—it’s better to have multiple ads winning than just one.
If you’re running a single video ad for example and your budget is $100 per day, it’s best practice to have to create multiple versions of this single video ad so that they don’t cannibalize each other.
Part6. Plan your ad budget
You need to determine how much you’re willing to spend on your Facebook ads. This will help you to create a budget and also to decide how often you want your ad to be shown.

The average Facebook ad spends between $5 and $10 per day. However, this can vary depending on the type of product or service that you’re promoting, as well as the size of your target audience.
If you have a large target audience, it might be worth increasing your ad budget so that your ad is seen by more people. On the other hand, if you have a smaller target audience, you might want to decrease your ad budget so that you don’t spend too much money on ads that aren’t being seen by as many people.
It’s also important to consider how often you want your ad to be shown. If you want your ad to be seen by as many people as possible, it’s best to have it shown more than once. However, if you only want your ad to be shown to a select group of people, it’s best to have it shown less often.
Both of these factors will help you to determine your Facebook ad spend.
The Bottom Line
If you’re ready to get started with Facebook ads, we encourage you to put these tips into practice. I believe that they will help you make the most of your budget and achieve your goals, whether they be brand awareness, lead generation or sales.
Free Download For Win 7 or later(64-bit)
Free Download For macOS 10.14 or later
Free Download For macOS 10.14 or later
Also read:
- Best Movie Title Maker for 2024
- New In 2024, Create Glitch Text Effect
- Updated The Article Shall Offer an Overview to Create a Promising Sports Intro and Edit a YouTube Outro for a Sports Channel. There Will Also Be Three Recommended Apps to Download Background Music for Exercise
- New Have You Ever Watched a Movie Where You Felt the Filmmakers Left You Hanging? Yea, Thats What Freeze Frame Does. Here We Will Enlighten You on What It Is, Freeze Frame Examples Where It Has Been Helpful to Drive Our Point Home
- 4 Methods How To Make a Recap Video for 2024
- 2024 Approved This Article Is Actually the Guide Regarding Editing the Videos Through VEED. As a Substitute, Wondershare Filmora Is Also Under Discussion that Is Also Available for the Same Purpose
- In 2024, To Know How to Add Effects in Premiere Pro, You Need to Follow This Guide as It Has All You Need to Know to Add Effects in Premiere Pro. Learn More Here
- How Can Filmora Create an Audio Visualizer Project for a Song? All Steps, From Launching the App to Editing the Text, Are Detailed Here for 2024
- Updated Add Stylish Text to Videos for 2024
- How to Make Your CSGO Montage Impressive for 2024
- Best Video Grabbers for Chrome for 2024
- New 2024 Approved Replacing Sky in Your Pictures Using Online and Offline Tools
- 2024 Approved You May Want to Create Your Video Tutorial and Share Your Knowledge with Others. Fortunately, You Can Easily Create a Professionally Edited Tutorial Video with Filmora. Keep Reading This Article Since We Will Show You How to Do It
- Updated Splitting Video in VSDC Step by Step for 2024
- 2024 Approved How To Create A Green Screen Video In After Effects
- In 2024, Create Stunning Videos Like a Pro with Filmora. Learn About Its Benefits and some Amazing Video and Audio Editing Features Such as Split Screens, Keyframing, Etc
- Want to Speed up Your Video to Shorten Its Duration and Make It More Entertaining? Here Is How to Speed up Videos in Final Cut Pro. Get a Better Alternative to FCP to Speed up Videos for 2024
- New 8 Apps to Custom Your GIF Stickers for 2024
- Updated In 2024, How to Add a Lower Third to Your Video
- Updated In 2024, Best Dark Moody LUTs During Editing
- New In 2024, The Ultimate Guide to Slideshow Maker with Music
- 2024 Approved Competitive Guide To Use Slow Motion in After Effects
- New 2024 Approved Thousands Already Know Ezgif and So Can You
- New 2024 Approved How Long Does It Take To Edit A Video
- In 2024, How to Add a Lower Third to Your Video
- Updated How to Make a Video Slideshow in iMovie
- In 2024, How to Start a Vlog
- In 2024, How to Split a Video Into Parts on All Platforms
- New Steps to Remove Background Noise From Video Sony Vegas
- Updated 2024 Approved Create Dynamic Text Animation in Filmora
- Updated Best Dark Moody LUTs During Editing for 2024
- Ways to Learn Discord Game Bots – Even if Youre Just Starting Out for 2024
- Updated Methods on How to Speed Up Video on Splice
- Updated Top 18 Video Editors for PC and Mac
- In 2024, Top LUTs for Sony HLG to Download
- Updated Want Make a Slide Show Video? Heres How for 2024
- New Want to Make a Slide Show Video? Heres How
- New GIF to JPG Is as Simple as a Blink of an Eye for 2024
- How to Create and Add an Adjustment Layer in Final Cut Pro for 2024
- New In 2024, Guaranteed 10 Storyboard Creators To Make Animation Easier For You
- New Split a Clip in DaVinci Resolve Step by Step
- Updated Splitting a Video in VSDC Step by Step
- 2024 Approved If You Are Wondering How to Play a Slideshow in PowerPoint Automatically, This Article Is for You. Here We Will Be Looking at How to Add a Slideshow in PowerPoint and Other Relevant Headings that Would Help You Quickly Work on a PowerPoint
- Updated How to Make A Jaw-Dropping Time Lapse Video, In 2024
- New In 2024, Guide To Slowing Down Videos in Snapchat Discussing the Details
- Updated 2024 Approved How to Do Velocity Edits on PC
- 2024 Approved How to Make a TikTok Loop Video
- Updated Attaining Slow Motion Video Trend Finding The Best CapCut Templates
- Top 7 Phone Number Locators To Track Asus ROG Phone 8 Location | Dr.fone
- 5 Hassle-Free Solutions to Fake Location on Find My Friends Of Samsung Galaxy S23 Tactical Edition | Dr.fone
- How to Lock Apps on Samsung Galaxy F54 5G to Protect Your Individual Information
- Ways to trade pokemon go from far away On Honor 100? | Dr.fone
- Can I use iTools gpx file to catch the rare Pokemon On Samsung Galaxy S24 Ultra | Dr.fone
- In 2024, How To Create an Apple Developer Account On iPhone 11 Pro
- How to Bypass Google FRP Lock from Honor Magic 5 Lite Devices
- In 2024, Set Your Preferred Job Location on LinkedIn App of your Honor X8b | Dr.fone
- In 2024, How to Transfer Contacts from Huawei Nova Y71 to Other Android Devices Using Bluetooth? | Dr.fone
- In 2024, Best Pokemons for PVP Matches in Pokemon Go For Apple iPhone 6s | Dr.fone
- Top 15 Augmented Reality Games Like Pokémon GO To Play On Realme Narzo N53 | Dr.fone
- In 2024, A Complete Guide To OEM Unlocking on ZTE Blade A73 5G
- Does Life360 Notify When You Log Out On Gionee F3 Pro? | Dr.fone
- In 2024, 10 Easy-to-Use FRP Bypass Tools for Unlocking Google Accounts On Vivo Y36
- Fix Unfortunately Settings Has Stopped on Vivo Y77t Quickly | Dr.fone
- How Can We Unlock Our Xiaomi Redmi Note 12R Phone Screen?
- Title: A Review of 3D LUT Mobile App - A Composite Application for Editing Media
- Author: Chloe
- Created at : 2024-05-20 03:37:18
- Updated at : 2024-05-21 03:37:18
- Link: https://ai-editing-video.techidaily.com/a-review-of-3d-lut-mobile-app-a-composite-application-for-editing-media/
- License: This work is licensed under CC BY-NC-SA 4.0.
