
:max_bytes(150000):strip_icc():format(webp)/GettyImages-1345967858-4e7ba42433504ee899e05ceb500f3b68.jpg)
Achieving GoPro Slow Motion with Quality An In-Depth Overview
Achieving GoPro Slow Motion with Quality: An In-Depth Overview
Slow-motion videos are a new phenomenon in engaging audiences. In this decade, such effects add a dramatic feel to empathize movie clips. Slow motion is an effective way to keep viewers hooked to the content. Now, the question arises of which could be the best way to make a perfect GoPro slow-mo. To find an answer, read this guide and achieve high-quality slow-mo videos with GoPro.
Let us tell you first that GoPro is primarily a company for camera accessories. Besides, there is GoPro Quik, which is responsible for dedicated video editing. Many professionals rely on GoPro slow-motion to change video speed with a single tap. Thus, without wasting time, delve into the details given and learn to make GoPro 11 slow motion with the best available accessories.
Slow Motion Video Maker Slow your video’s speed with better control of your keyframes to create unique cinematic effects!
Make A Slow Motion Video Make A Slow Motion Video More Features

Part 1: Slowing Down Videos on Your GoPro: A Guide
GoPro offers Sony Vegas Pro Slow Motion to record videos in slow motion. Does using such technical equipment seem challenging for you as a new user? Follow this step-by-step guide and set the camera before recording to make a perfect slow-mo shot.
Step 1
Set the resolution to 2.7k for a slow-motion video and a frame rate of 240fps. Afterward, keep the “Color” natural if you don’t want to color grade it. Moreover, adjust the “Sharping” low by using its respective options.

Step 2
Reset the “Hyper Smooth” to high and later turn ISO to a minimum of 100 and a maximum of 800. Then, head to set the “Shutter Speed” and “White Balance” to auto.

Step 3
Moving ahead, choose Lens to “Linear” and keep the “Bitrate” high. Finally, select the “Exposure Value Compensation” to -0.5 using its slider. Your camera is ready to capture your desired and captivating slow-motion shots.

Part 2: Slow Down Videos on GoPro Quik After Recording
After recording the required clip, post-editing is important to polish the digital content. GoPro also offers GoPro Quik to edit slow-motion videos to your desired extent. Unfortunately, not everyone can quickly discover Go Pro slow motion in their first use. That’s why it’s necessary to follow the given steps so you can easily discover and edit slow motion.
Step 1
Access the GoPro Quick on your device and launch it. Choose the “Media” icon in the bottom bar and select the video you want to edit. After importing the required media files, start working on a project.

Step 2
Select the “Pen” icon in the bottom bar and scroll the menu to the left side. Here, choose the “Speed” option and tap the “+” icon to drag the slider to the point where you want to apply the slow motion. Hit the end mark and get a preview of smooth speed ramping in slow motion.

Part 3: Make Better Slow-Motion Videos with Wondershare Filmora
Making a slow motion means spending cognitive effort and time on a project. Thus, video editors seek a reliable platform like GoPro Hero 11, which is slow motion. Unfortunately, this editing app is outdated, and other better platforms are being developed. In search of the latest and easy-to-use video editor, use Wondershare Filmora .
It is a video editing software with various powerful editing features compared with GoPro Quik. This platform can perform more tasks than trimming, merging, and splitting clips. Filmora is equipped with AI technology to provide maximum ease to users. You can use this tool to ensure a smooth workflow and boost your productivity.
Why Filmora is Better Than GoPro Quik?
Filmora provides many features that GoPro Quik does not offer. Everyone needs solid arguments and valid reasons to reconsider their choices. Thus, here we have highlighted some proven and logical reasons to use Filmora instead of GoPro:
- The first and foremost thing you can see is Filmora’s intuitive interface. Anyone without any video editing background can use this tool effectively for their projects.
- Video editors need assistance while editing perfect shots. Filmora offers an AI Copilot Editing system as your editing assistant, which GoPro does not provide. It directs users to create high-quality videos.
Free Download For Win 7 or later(64-bit)
Free Download For macOS 10.14 or later
- GoPro Quik allows you to edit up to 1-minute videos. In contrast, Filmora doesn’t restrict you from editing videos of a certain length.
- With Filmora AI, you can generate a customized script and turn it into a video. AI integration for unique content makes this tool better than GoPro Quik.
- Unlike GoPro Quik, getting personalized music tracks is possible with Filmora. It can create soundtracks that align with your project’s needs.
- Slow-motion GoPro can assist in speed-ramping videos for a smooth transition. Conversely, Filmora also offers an optical flow option to automate the speed ramping .
- Even GoPro Quik cannot remove vocals from the audio files. Using Filmora, this option is just a click away. It can automatically separate vocals from music tracks so you can dub high-quality videos.
- Using GoPro, users can share their videos on social media or export them anywhere. In comparison, Filmora allows you to adjust resolution, quality, project name, and destination.
- AI in Filmora can generate images with your prompts that will not claim legal rights. This service is unavailable in GoPro; it is just limited to video editing.
- Last but not least, Filmora can transform your text into engaging videos. By doing so, you can save the budget for actors, video editors, and other crew.
Step-by-Step Guide to Slow Down Video With Filmora
After learning the exceptional functionalities of Filmora, you might be considering using it. To put you at ease, we have explained stepwise usage of achieving slow motion with Filmora. It’s quite easier and more automatic than GoPro slow motion:
Free Download For Win 7 or later(64-bit)
Free Download For macOS 10.14 or later
Step 1: Install Filmora V13 and Import Your Media
Go to the official site of Wondershare Filmora and download its latest version, V13. Launch it in your system and access its intuitive main interface. Choose “New Project” from its home screen and enter in the editing screen. Press your keyboard’s “Ctrl + I” keys and import your desired file in Filmora.

Step 2: Use the Optical Flow Option and Slow Down the Video Speed
Drag and drop the imported video in the timeline section. Place your cursor on that video and right-click on it. Hit the “Uniform Speed” option from the displayed list and direct toward the right-side editing panel. There, use the “Speed” slider and slow down the video as required. Move downward and extend the “AI Frame Interpolation” menu to pick the “Optical Flow.”

Step 3: Preview the Results to Export or Continue to Edit
Finally, get a preview of a slower but high-quality video by pressing the “Space” key. Afterward, if you are satisfied with the results, move to the “Export” option at the top right. Now, set the output settings based on how you want to save the video. Finally, press the “Export” button to save the results on your system.

Conclusion
To summarize, the GoPro camera is available in the market to capture slow-motion shots. On the other hand, GoPro Quik is an editing tool that has been popular for a decade. Many users are unaware of the latest video editing software, Wondershare Filmora. It is an AI-powered platform that has proven to be better than GoPro slow-motion, as discussed above.
Make A Slow Motion Video Make A Slow Motion Video More Features
Part 1: Slowing Down Videos on Your GoPro: A Guide
GoPro offers Sony Vegas Pro Slow Motion to record videos in slow motion. Does using such technical equipment seem challenging for you as a new user? Follow this step-by-step guide and set the camera before recording to make a perfect slow-mo shot.
Step 1
Set the resolution to 2.7k for a slow-motion video and a frame rate of 240fps. Afterward, keep the “Color” natural if you don’t want to color grade it. Moreover, adjust the “Sharping” low by using its respective options.
Step 2
Reset the “Hyper Smooth” to high and later turn ISO to a minimum of 100 and a maximum of 800. Then, head to set the “Shutter Speed” and “White Balance” to auto.
Step 3
Moving ahead, choose Lens to “Linear” and keep the “Bitrate” high. Finally, select the “Exposure Value Compensation” to -0.5 using its slider. Your camera is ready to capture your desired and captivating slow-motion shots.
Part 2: Slow Down Videos on GoPro Quik After Recording
After recording the required clip, post-editing is important to polish the digital content. GoPro also offers GoPro Quik to edit slow-motion videos to your desired extent. Unfortunately, not everyone can quickly discover Go Pro slow motion in their first use. That’s why it’s necessary to follow the given steps so you can easily discover and edit slow motion.
Step 1
Access the GoPro Quick on your device and launch it. Choose the “Media” icon in the bottom bar and select the video you want to edit. After importing the required media files, start working on a project.
Step 2
Select the “Pen” icon in the bottom bar and scroll the menu to the left side. Here, choose the “Speed” option and tap the “+” icon to drag the slider to the point where you want to apply the slow motion. Hit the end mark and get a preview of smooth speed ramping in slow motion.
Part 3: Make Better Slow-Motion Videos with Wondershare Filmora
Making a slow motion means spending cognitive effort and time on a project. Thus, video editors seek a reliable platform like GoPro Hero 11, which is slow motion. Unfortunately, this editing app is outdated, and other better platforms are being developed. In search of the latest and easy-to-use video editor, use Wondershare Filmora .
It is a video editing software with various powerful editing features compared with GoPro Quik. This platform can perform more tasks than trimming, merging, and splitting clips. Filmora is equipped with AI technology to provide maximum ease to users. You can use this tool to ensure a smooth workflow and boost your productivity.
Why Filmora is Better Than GoPro Quik?
Filmora provides many features that GoPro Quik does not offer. Everyone needs solid arguments and valid reasons to reconsider their choices. Thus, here we have highlighted some proven and logical reasons to use Filmora instead of GoPro:
- The first and foremost thing you can see is Filmora’s intuitive interface. Anyone without any video editing background can use this tool effectively for their projects.
- Video editors need assistance while editing perfect shots. Filmora offers an AI Copilot Editing system as your editing assistant, which GoPro does not provide. It directs users to create high-quality videos.
Free Download For Win 7 or later(64-bit)
Free Download For macOS 10.14 or later
- GoPro Quik allows you to edit up to 1-minute videos. In contrast, Filmora doesn’t restrict you from editing videos of a certain length.
- With Filmora AI, you can generate a customized script and turn it into a video. AI integration for unique content makes this tool better than GoPro Quik.
- Unlike GoPro Quik, getting personalized music tracks is possible with Filmora. It can create soundtracks that align with your project’s needs.
- Slow-motion GoPro can assist in speed-ramping videos for a smooth transition. Conversely, Filmora also offers an optical flow option to automate the speed ramping .
- Even GoPro Quik cannot remove vocals from the audio files. Using Filmora, this option is just a click away. It can automatically separate vocals from music tracks so you can dub high-quality videos.
- Using GoPro, users can share their videos on social media or export them anywhere. In comparison, Filmora allows you to adjust resolution, quality, project name, and destination.
- AI in Filmora can generate images with your prompts that will not claim legal rights. This service is unavailable in GoPro; it is just limited to video editing.
- Last but not least, Filmora can transform your text into engaging videos. By doing so, you can save the budget for actors, video editors, and other crew.
Step-by-Step Guide to Slow Down Video With Filmora
After learning the exceptional functionalities of Filmora, you might be considering using it. To put you at ease, we have explained stepwise usage of achieving slow motion with Filmora. It’s quite easier and more automatic than GoPro slow motion:
Free Download For Win 7 or later(64-bit)
Free Download For macOS 10.14 or later
Step 1: Install Filmora V13 and Import Your Media
Go to the official site of Wondershare Filmora and download its latest version, V13. Launch it in your system and access its intuitive main interface. Choose “New Project” from its home screen and enter in the editing screen. Press your keyboard’s “Ctrl + I” keys and import your desired file in Filmora.
Step 2: Use the Optical Flow Option and Slow Down the Video Speed
Drag and drop the imported video in the timeline section. Place your cursor on that video and right-click on it. Hit the “Uniform Speed” option from the displayed list and direct toward the right-side editing panel. There, use the “Speed” slider and slow down the video as required. Move downward and extend the “AI Frame Interpolation” menu to pick the “Optical Flow.”
Step 3: Preview the Results to Export or Continue to Edit
Finally, get a preview of a slower but high-quality video by pressing the “Space” key. Afterward, if you are satisfied with the results, move to the “Export” option at the top right. Now, set the output settings based on how you want to save the video. Finally, press the “Export” button to save the results on your system.
Conclusion
To summarize, the GoPro camera is available in the market to capture slow-motion shots. On the other hand, GoPro Quik is an editing tool that has been popular for a decade. Many users are unaware of the latest video editing software, Wondershare Filmora. It is an AI-powered platform that has proven to be better than GoPro slow-motion, as discussed above.
Add Green Screen Video on TikTok
TikTok is the most popular platform for making short videos. You can create creative short videos and upload to TikTok so that they can entertain your followers and make your videos go viral. To add variety to your video content, the use of green screen in short videos is a great idea. You can replace the green screen with any background in your TikTok video. You need to know how to add green screen video on TikTok.
Adding green screen on TikTok videos has become a trend now as there are several green screen TikTok videos that have gone viral. In fact, creative green screen videos are extremely popular on social media platforms. Instead of replacing the green screen in your video with a single photo, you can replace it with multiple pictures on TikTok. We will illustrate how to add multiple pictures on TikTok green screen.
Part 1. How to Add Green Screen on TikTok?
To add green screen on TikTok video, you need to have a background of uniform color. It does not necessarily have to be a green screen. For example, if you are shooting a video of your legs and the floor tiles have uniform color, you can use green screen on TikTok to replace the tiles with any picture. Instead of using one picture on TikTok short video, you can use multiple pictures in the background to create stunning TikTok videos. Here are the steps on how to add multiple pictures to TikTok green screen.
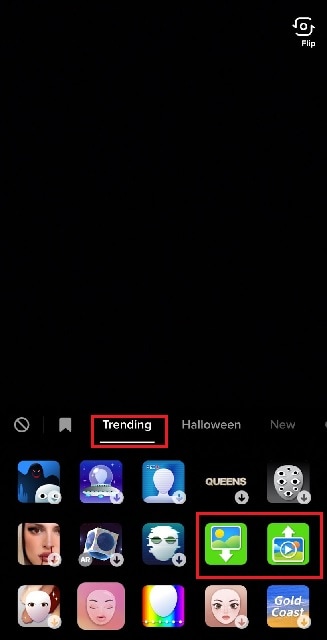
Step1 Open TikTok app on your phone. Tap on Plus icon located at the bottom of the app screen to make a new video.
Step2 Choose the duration of the video as per your preference. Thereafter, tap on Effects option located at the bottom-left corner to see the different effects available on TikTok.
![]()
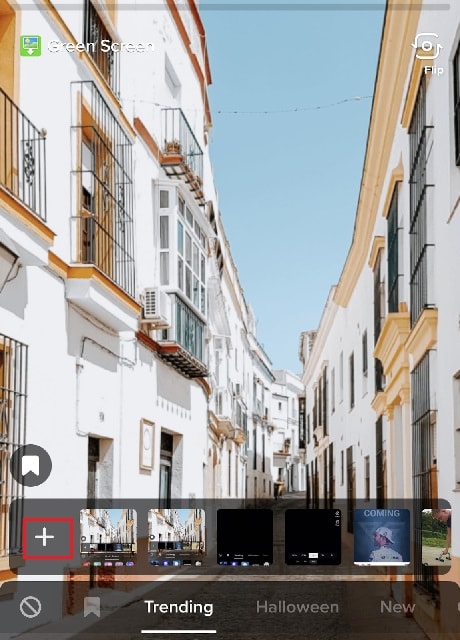
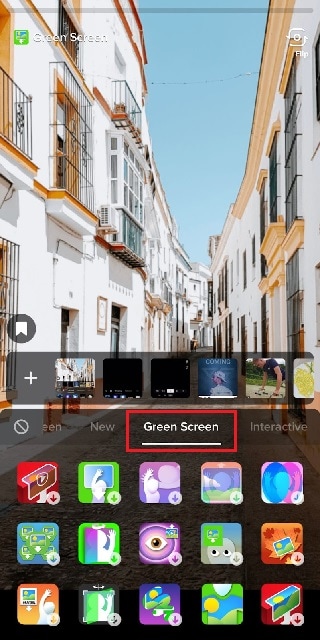
Step3 Go to Trending tab and you will see Green Screen and Green Screen Video icons. If you want your video to have green screen photo, tap on Green Screen icon. If you want your video to have green screen video, tap on Green Screen Video icon.
Step4 You will get a generic background and you can choose any preset background or select photo or video from your phone gallery by tapping on Plus icon. Once you are done, tap on Record button.
Step5 In order to use multiple pictures, you should stop recording in between and change your green screen image to anything you desire. Then tap on Record button again. TikTok will string your clips and it would appear that you have been changing multiple pictures of your background for your video.
If you want to experiment with green scree effects, you can scroll down after tapping on Green Screen icon under Effects. You will see different types of green screen videos possible on TikTok to choose from.
Part 2. Creative Ideas to Make TikTok Green Screen Video
Now that you know how to add a video on TikTok green screen, you have to make the most out of it. If you are wondering how you can use green screen in your TikTok videos, here are some creative ideas for you.
Walking Out Videos – You can use green screen effect to show that you are walking out of plane, walking vertically on the wall like inception, walking on the roof of a building. In fact, you can show that you are walking out of popular monuments and palaces and trick your viewers into thinking that you were actually there.
Photoshoot Location – Create a TikTok video showing your favorite locations across the world where you dream of doing photoshoot. You can pose differently and place the location in your background through green screen effect.
How-To Video – If your TikTok channel is about tutorial and learning videos, you can explain things better by putting screenshots and multiple relevant pictures in the background so that viewers can get a pictorial representation of what you are speaking to them.
Mystery Story – You can a create short video describing unknowing facts and mysteries around certain places in the world. You can put photos or video clips of those mysterious places in your background to keep your viewers hooked and related to your narration.
Rate Them Video – You can use green screen effect to showcase your old Instagram photos or videos and rate them. This is an extremely popular trend in TikTok where people show their old photos, display work from the past, and rate them today.
Reveal Your Creation – Share your secrets or interesting stories behind some of the photos or videos you took in the past. You can talk about how creatively you took certain photos and put those photos in the background while discussing them.
Part 3. How to Make Green Screen Video on Computer?
If you have a computer and a webcam, you can record a green screen video on your computer. You can place the green screen in the background perfectly and place the webcam so that the background stays within the green screen. You will need a video recorder and a video editor to make green screen video as well as replace the green screen with any photo or video. We recommend Wondershare Filmora where you can record as well as edit green screen video.
Filmora is a professional video editor where you can record your computer screen as well as your webcam video with green screen background in Picture-in-Picture mode. After recording the video, you can replace the green screen with any video clip or photo instantly in a few steps. You can also fine-tune green screen effect for perfection. Therefore, you can save the video in any resolution and file format as per your preference.

Free Download For Win 7 or later(64-bit)
Free Download For macOS 10.14 or later
Conclusion
Adding green screen effect on TikTok videos can make your videos stand out. We have illustrated how to add multiple green screen videos on TikTok and your videos will have a better chance of getting viral. Keep the green screen ideas in mind while making TikTok green screen videos. If you want to make and edit green screen videos on computer, Wondershare Filmora is the best application available for Windows and Mac users.
How to Livestream Zoom on Facebook?
Abundant Video Effects - Wondershare Filmora
Provide abundant video effects - A creative video editor
Powerful color correction and grading
Detailed tutorials provided by the official channel
There are numerous ways to connect with viewers across the globe through online platforms. One such platform is Facebook live stream videos through which a single person can connect with the whole world and can talk to the people live. Through live stream videos on Facebook, people can show cooking or makeup tutorials that millions of people can join to watch easily.
Also, through such videos, many teachers prefer to demonstrate a particular concept so that students can respond instantly. However, if you want a clearer vision for better understanding, you can zoom on Facebook live stream videos by reading instructions from this article.
In this article
Part 1: Zoom in Facebook Livestream from Browser
Part 2: How to Zoom in Facebook Livestream on Android
Part 3: How to Zoom in Facebook Livestream on iPhone
Part 1: Zoom in Facebook Livestream from Browser
The easiest way to zoom in on Facebook Livestream videos is via browser. In this part, we will describe two methods for zooming in on Facebook Livestream videos that are manual and through a browser extension.
Method 1: Manual Method
In this first method, you can zoom on Facebook videos through your desktop manually. Read the following steps to perform this method:
Step 1: Open your Facebook account by entering your username and password. Now play the livestream video on which you want to zoom in.
Step 2: For Windows users, press the “CTRL” and “+” buttons simultaneously to zoom on the Facebook video. Whereas, for Mac users, press the “COMMAND” and “+” buttons at the same time to zoom in. A small pop-up window will display at the top right corner from where you can control the zoom value.

Method 2: Browser Extension
In this particular method, we will use a browser extension called “Zoom,” through which you can quickly enjoy the zoom experience on the Facebook live stream videos. This special browser extension is a lightweight extension that can assist you in browsing the web pages by zooming in and out conveniently. By using this extension, you can change the zoom value through its slider up to 400 easily.
Step 1: First, you need to install the browser extension of Zoom on your PC. Click on the “Add to Chrome” option to download and install this extension on your Chrome browser.

Step 2: Open your Facebook account and play your live stream video. On the top right corner, you can see the “Extension” icon where all your added extensions are pinned. Select Zoom extension, and through its displayed slider, you can increase the zoom value easily. You can also press the “+” button from your keyboard to zoom in on the Facebook video through this extension.

Part 2: How to Zoom in Facebook Livestream on Android
If you are watching live stream videos of Facebook on an Android device, you can also zoom in by modifying your phone’s settings. To do so, here are basic steps:
Step 1: From your Android phone, reach out to the “Settings” to open its menu. From this menu, find the option of “Accessibility” from “Additional Settings” and click on it.

Step 2: On the accessibility screen, tap on the option of “Vision” and then locate the section called “Display.”

Step 3: Now, find the option of “Magnification” and tap on it. Afterward, select the “Magnification Shortcut” and turn on the toggle of magnification.

Step 4: Now, go back to your Facebook account to use your accessibility feature. You have to first tap on the icon of the small person at the bottom right corner of your screen. Now you can tap anywhere on your screen to zoom in.

Step 5: To zoom in on a live stream video of Facebook, expand your two fingers by placing them on the screen. Thus you can easily zoom in on any specific part of the Facebook video easily. For zooming out, move your fingers in an inward direction to pinch the screen. Also, to zoom back into a default mode, click on the accessibility feature.

Part 3: How to Zoom in Facebook Livestream on iPhone
As Android devices give options to zoom in and out easily, iPhone users can also change their settings to use the accessibility feature quickly. To use the accessibility button on iPhone devices, use the following steps:
Step 1: On your iPhone, go to the “Settings” and scroll down its menu. Here you can find the option of “Accessibility,” so tap on it to open its menu.

Step 2: From the accessibility menu, locate the option of “Zoom” and click on it. Now tap on its toggle to turn it on.

Step 3: Afterward, click on “Zoom Region” and then tap the option of “Full Screen Zoom.” Now leave your settings and go back to your Facebook account.

Step 4: To zoom on Facebook portal, double-tap from your three fingers on any specific part of your screen that will activate the accessibility feature.
Step 5: To change the zoom value, you have to triple-tap the screen with your three fingers. Options will pop up from where you can use the magnifying slider to change the zoom level by either moving it to the right or left.

Step 6: If you want to navigate to any part of the screen while zoomed in, use your three fingers and move them around. Also, to return to the default value of the zoom, double-tap on any part of your screen using three fingers.
Conclusion
Facebook is the most popular app across the globe that offers a single and enhanced platform for sharing and posting various kinds of information. Through Facebook live stream videos, users can get details and related information instantly through a live video.
However, if you are struggling to catch a clear vision in live stream videos, you can zoom on Facebook app by using our provided guidelines in this article. Thus, you can have a clear and focused vision by zooming in on live stream videos on Facebook.
There are numerous ways to connect with viewers across the globe through online platforms. One such platform is Facebook live stream videos through which a single person can connect with the whole world and can talk to the people live. Through live stream videos on Facebook, people can show cooking or makeup tutorials that millions of people can join to watch easily.
Also, through such videos, many teachers prefer to demonstrate a particular concept so that students can respond instantly. However, if you want a clearer vision for better understanding, you can zoom on Facebook live stream videos by reading instructions from this article.
In this article
Part 1: Zoom in Facebook Livestream from Browser
Part 2: How to Zoom in Facebook Livestream on Android
Part 3: How to Zoom in Facebook Livestream on iPhone
Part 1: Zoom in Facebook Livestream from Browser
The easiest way to zoom in on Facebook Livestream videos is via browser. In this part, we will describe two methods for zooming in on Facebook Livestream videos that are manual and through a browser extension.
Method 1: Manual Method
In this first method, you can zoom on Facebook videos through your desktop manually. Read the following steps to perform this method:
Step 1: Open your Facebook account by entering your username and password. Now play the livestream video on which you want to zoom in.
Step 2: For Windows users, press the “CTRL” and “+” buttons simultaneously to zoom on the Facebook video. Whereas, for Mac users, press the “COMMAND” and “+” buttons at the same time to zoom in. A small pop-up window will display at the top right corner from where you can control the zoom value.
Method 2: Browser Extension
In this particular method, we will use a browser extension called “Zoom,” through which you can quickly enjoy the zoom experience on the Facebook live stream videos. This special browser extension is a lightweight extension that can assist you in browsing the web pages by zooming in and out conveniently. By using this extension, you can change the zoom value through its slider up to 400 easily.
Step 1: First, you need to install the browser extension of Zoom on your PC. Click on the “Add to Chrome” option to download and install this extension on your Chrome browser.
Step 2: Open your Facebook account and play your live stream video. On the top right corner, you can see the “Extension” icon where all your added extensions are pinned. Select Zoom extension, and through its displayed slider, you can increase the zoom value easily. You can also press the “+” button from your keyboard to zoom in on the Facebook video through this extension.
Part 2: How to Zoom in Facebook Livestream on Android
If you are watching live stream videos of Facebook on an Android device, you can also zoom in by modifying your phone’s settings. To do so, here are basic steps:
Step 1: From your Android phone, reach out to the “Settings” to open its menu. From this menu, find the option of “Accessibility” from “Additional Settings” and click on it.
Step 2: On the accessibility screen, tap on the option of “Vision” and then locate the section called “Display.”
Step 3: Now, find the option of “Magnification” and tap on it. Afterward, select the “Magnification Shortcut” and turn on the toggle of magnification.
Step 4: Now, go back to your Facebook account to use your accessibility feature. You have to first tap on the icon of the small person at the bottom right corner of your screen. Now you can tap anywhere on your screen to zoom in.
Step 5: To zoom in on a live stream video of Facebook, expand your two fingers by placing them on the screen. Thus you can easily zoom in on any specific part of the Facebook video easily. For zooming out, move your fingers in an inward direction to pinch the screen. Also, to zoom back into a default mode, click on the accessibility feature.
Part 3: How to Zoom in Facebook Livestream on iPhone
As Android devices give options to zoom in and out easily, iPhone users can also change their settings to use the accessibility feature quickly. To use the accessibility button on iPhone devices, use the following steps:
Step 1: On your iPhone, go to the “Settings” and scroll down its menu. Here you can find the option of “Accessibility,” so tap on it to open its menu.
Step 2: From the accessibility menu, locate the option of “Zoom” and click on it. Now tap on its toggle to turn it on.
Step 3: Afterward, click on “Zoom Region” and then tap the option of “Full Screen Zoom.” Now leave your settings and go back to your Facebook account.
Step 4: To zoom on Facebook portal, double-tap from your three fingers on any specific part of your screen that will activate the accessibility feature.
Step 5: To change the zoom value, you have to triple-tap the screen with your three fingers. Options will pop up from where you can use the magnifying slider to change the zoom level by either moving it to the right or left.
Step 6: If you want to navigate to any part of the screen while zoomed in, use your three fingers and move them around. Also, to return to the default value of the zoom, double-tap on any part of your screen using three fingers.
Conclusion
Facebook is the most popular app across the globe that offers a single and enhanced platform for sharing and posting various kinds of information. Through Facebook live stream videos, users can get details and related information instantly through a live video.
However, if you are struggling to catch a clear vision in live stream videos, you can zoom on Facebook app by using our provided guidelines in this article. Thus, you can have a clear and focused vision by zooming in on live stream videos on Facebook.
Vintage Film Effect 1990S - How to Make
In the 90s, movie production technology improved a lot. This decade saw horror movies become much more fun and immersive than in the 80s and 50s because they were more psychological. In fact, we can say that the horror movies of the 90s laid the foundation for current horror movies. So, without wasting time, let’s create a 1990s horror movie similar to The Blair Witch Project.
Preparation

The preparation for this horror film production is relatively self-explanatory if you’ve watched The Blair Witch Project. Simply shoot footage inside a dark room and apply some light to your face. It’s even better if you can shoot the video inside the woods. Just add some drama and a few screaming scenes to evoke emotions.
How to create a 1990s horror film with Filmora :
Free Download For Win 7 or later(64-bit)
Free Download For macOS 10.14 or later
Step1 Add the horror video to the timeline

Open Wondershare Filmora on your computer, then load the video you want to edit. After adding the video, drag it to the editing timeline, then move it a few keyframes to the right. The idea is to apply some black screen to add drama and fear before the film starts playing.
Step2 Apply color grading

Next, double-click the horror clip and go to the Color menu. Then, click the Tone arrow before lowering the Saturation to -50%. This will give us a less saturated look popularly used in horror films.

Now click the 3D LUT option and choose a LUT that works for your film. For this horror film project, we’ll select the Dark Film option.
Step3 Add creepiness to the video

Obviously, you’ll want your horror film to look as creepy as possible. To achieve that, click the Elements tab, then search for the Smokescreen 1 effect. Move the effect to the timeline above the video track before trimming the effect clip to fit with the original horror video.

We’ll now change the size and positioning of the smokescreen effect to match the feature video. To do that, double-click the effect track. You can also reduce the opacity to around 30% to make the smoke more visible.
Step4 Add a retro filming effect

Now we’ll make the film more believable by adding a retro overlay. Click the Effects tab, then search for Retro Film Overlay 15 before dragging and dropping the effect above all the tracks in the editing timeline.

Summary
That’s it! With these tips and tricks, you can effortlessly create a retro-style 1990s horror film. Follow this tutorial and play around with the movie effects to find what works best for you. Remember, Filmstock is the ultimate resource for video and movie effects. Give it a try!
Free Download For macOS 10.14 or later
Step1 Add the horror video to the timeline
Open Wondershare Filmora on your computer, then load the video you want to edit. After adding the video, drag it to the editing timeline, then move it a few keyframes to the right. The idea is to apply some black screen to add drama and fear before the film starts playing.
Step2 Apply color grading
Next, double-click the horror clip and go to the Color menu. Then, click the Tone arrow before lowering the Saturation to -50%. This will give us a less saturated look popularly used in horror films.
Now click the 3D LUT option and choose a LUT that works for your film. For this horror film project, we’ll select the Dark Film option.
Step3 Add creepiness to the video
Obviously, you’ll want your horror film to look as creepy as possible. To achieve that, click the Elements tab, then search for the Smokescreen 1 effect. Move the effect to the timeline above the video track before trimming the effect clip to fit with the original horror video.
We’ll now change the size and positioning of the smokescreen effect to match the feature video. To do that, double-click the effect track. You can also reduce the opacity to around 30% to make the smoke more visible.
Step4 Add a retro filming effect
Now we’ll make the film more believable by adding a retro overlay. Click the Effects tab, then search for Retro Film Overlay 15 before dragging and dropping the effect above all the tracks in the editing timeline.
Summary
That’s it! With these tips and tricks, you can effortlessly create a retro-style 1990s horror film. Follow this tutorial and play around with the movie effects to find what works best for you. Remember, Filmstock is the ultimate resource for video and movie effects. Give it a try!
Also read:
- Updated Top 10 Mp3 Visualizers Windows, Mac, Android, iPhone & Online
- Updated 8 Ways To Live Stream Pre-Recorded Video
- In 2024, End This Problem! Make Transparent Background Video Today
- Guide to Add Transition Effects in Premiere Pro
- In 2024, Free Ways to Download Mobile Phone Green Screen Videos and Pictures No Copyright
- In 2024, How to Make a Video by Mouse with Filmora
- Updated 2024 Approved Learn Top Best Free LUTs For Premiere Pro
- Wish to Rock on YouTube, but Lacking Tricks? Here, We Will Tell You Everything About How the YouTube Algorithm AI Works and How You Can Perform Well According to AI
- 2024 Approved Looking for a Way to Learn How to Merge Videos in HandBrake? Theres a Better Solution Waiting for You Inside
- New In 2024, Add Stylish Text to Videos
- New 2024 Approved Best Online GIF to Image (PNG/JPG) Converters
- Updated Filmora Is a Great Video Editor that Many Users Are Making Intro Video with It. This Article Will Guide You How to Create an Intro Video with Filmora
- 2024 Approved How to Create Discord GIF Avatar in Depth Guide
- Updated In 2024, How to Change Video Resolution in Filmora
- New 2024 Approved 15 Stunning GIF Splitter Examples You Need to Bookmark
- New How to Create Cooking Video Intro and End Screen for YouTube Channel for 2024
- How to Make a Smooth Speed Ramping in Premiere Pro, In 2024
- New How to Get Zoom on TV Easy Solutions
- How to Use 3D Camera Tracking Effects in After Effects
- New In 2024, Zoom In and Out on Discord
- New How to Create Video Contents That Convert Sales
- Updated In 2024, Best Animated Video Makers
- New Want to Add Motion Effects to Your Texts in Your Video? Learn the Simple Steps to Create Motion Text Effects in Popular Video Editors
- 2024 Approved Learn to Create Custom Sequence Presets in Premiere Pro for Efficient Video Editing. Ensure Consistency and Speed up Your Workflow with Personalized Settings
- Updated Guide to Create Freeze Frame Clone Effect Video
- Top IMEI Unlokers for Your Samsung Galaxy A34 5G Phone
- How to recover deleted pictures from Mix Fold 3.
- In 2024, Pokemon Go No GPS Signal? Heres Every Possible Solution On Oppo Reno 10 Pro+ 5G | Dr.fone
- In 2024, Sim Unlock OnePlus Nord CE 3 Lite 5G Phones without Code 2 Ways to Remove Android Sim Lock
- 3 Ways to Fake GPS Without Root On Realme C51 | Dr.fone
- In 2024, iPhone Is Disabled? Here Is The Way To Unlock Disabled iPhone 15
- Step-by-Step Tutorial How To Bypass Vivo Y36 FRP
- Ultimate Guide from Apple iPhone 14 iCloud Activation Lock Bypass
- In 2024, How to Delete iCloud Account From Apple iPhone XS without Password?
- Which is the Best Fake GPS Joystick App On Xiaomi 13T? | Dr.fone
- 10 Easy-to-Use FRP Bypass Tools for Unlocking Google Accounts On Oppo Reno 11 5G
- Additional Tips About Sinnoh Stone For Samsung Galaxy A25 5G | Dr.fone
- How To Recover Whatsapp Chat History From iPhone SE | Stellar
- In 2024, Preparation to Beat Giovani in Pokemon Go For Xiaomi Redmi Note 12T Pro | Dr.fone
- In 2024, 5 Ways To Teach You To Transfer Files from Vivo Y77t to Other Android Devices Easily | Dr.fone
- In 2024, Unlock Your Vivo S17 Pro Phone with Ease The 3 Best Lock Screen Removal Tools
- 9 Solutions to Fix Process System Isnt Responding Error on Oppo A1x 5G | Dr.fone
- Title: Achieving GoPro Slow Motion with Quality An In-Depth Overview
- Author: Chloe
- Created at : 2024-05-20 03:37:18
- Updated at : 2024-05-21 03:37:18
- Link: https://ai-editing-video.techidaily.com/achieving-gopro-slow-motion-with-quality-an-in-depth-overview/
- License: This work is licensed under CC BY-NC-SA 4.0.
