
Add Selective Color Effect to Your Videos Using Filmora

Add Selective Color Effect to Your Videos Using Filmora
Selective color is an effect that lets you desaturate all the colors in a photo or video while preserving one or more colors of your choice. It is done by isolating a specific color of your choice in the frame while all other colors turn into black and white, just like this.

By using this effect, we can draw viewers’ attention to a specific point in the clip. If you want your video do the same, Filmora can be a good helper. Alright, we’ll be creating selective color effects in two examples. Let’s get started.
Tutorial 1 on making color isolation by selective color effect
In this first example, we are going to use stock footage showing a subject on a bike.
To add a selective color effect, download Wondershare Filmora on your PC or Mac. Now follow the steps as explained below to add this effect and isolate the color of your choice.
Free Download For Win 7 or later(64-bit)
Free Download For macOS 10.14 or later
Step1 Launch Wondershare Filmora and drag and drop your clip to the timeline.
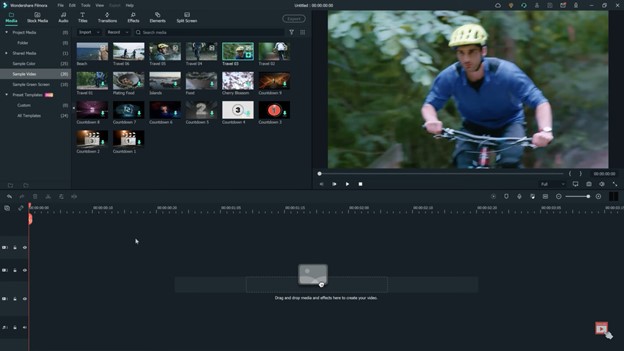
Step2 Go to effects and then click “NewBlue FX” option and select Newblue filters.
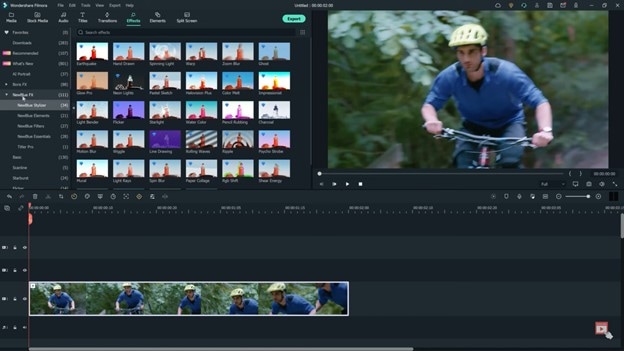
Step3 Find the Selective Color Effect and drag it onto the clip. The effect will be instantly applied.
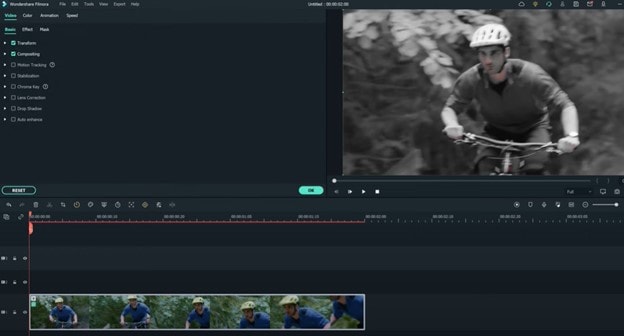
Step4 Next, double-click on the clip and check out the effects menu at the top of the screen.
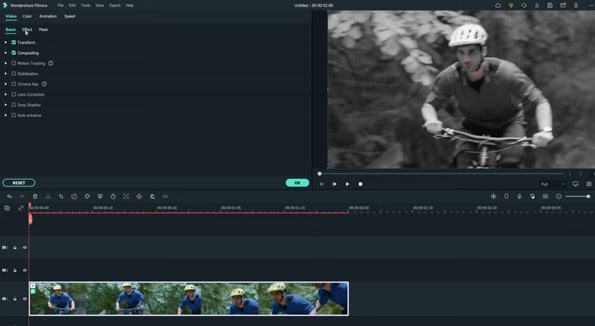
Step5 Open the preset drop-down menu. There will be a lot of presets with different colors. Select the preset you want to use. In this scenario, let us select Just Blue.
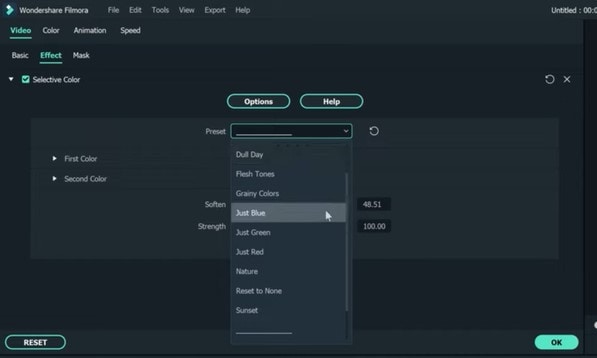
Step6 If you see a blue tint at a place or object which you want to be white and black, click on the first color.
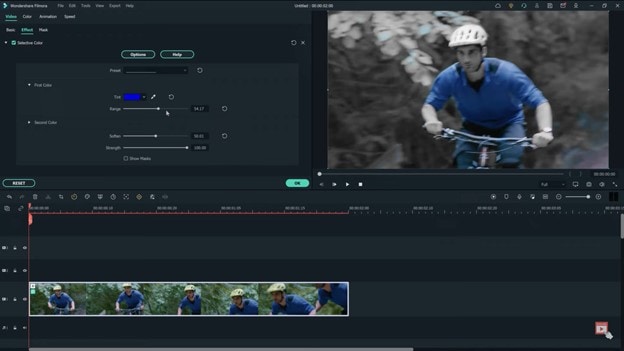
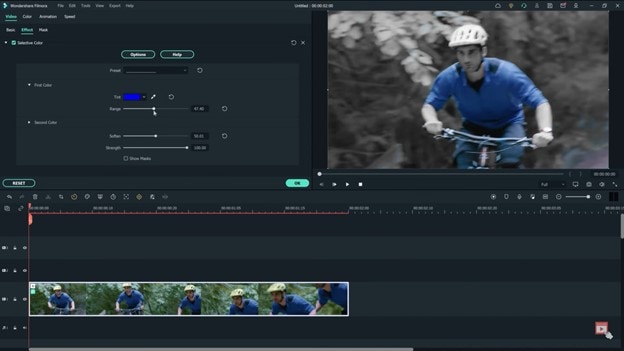
Step7 Now adjust the range slider to decrease the number of unwanted tints.
Step8 To blur the edges of the effects, turn up the softened slider and remove any unwanted tint previously remaining.
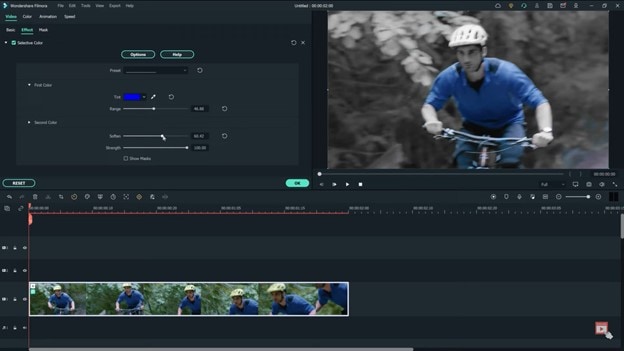
In this way, you can add a selective color effect to your video clips and isolate the color of your choice.
Tutorial 2 on make color isolation using eyedropper tool
You might ask how do we use the eyedropper tool here. It can sample colors from anywhere in a video or an image and add them to your swatch panel. The steps to use the eyedropper tool to add a selective color to your video are below.
Step1 As same as the first one, launching Wondershare Filmora is the first priority. And drag your clip to the timeline.
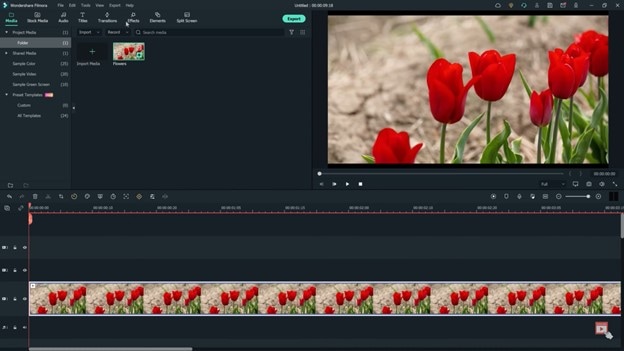
Step2 Go to effects at the top, and find Newblue effects, and click on the Newblue filters.
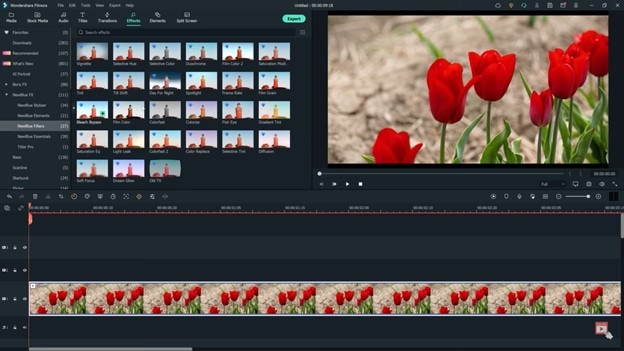
Step3 Find the selective color effect and drag it to the clip.

Step4 Double-click on the clip and visit the effects menu at the top of the screen.

Step5 Click on the ‘first color’ and select the eye dropper tool. This will allow us to select the red flower in the preview window. You can also click different parts of the image to get the color that we want.
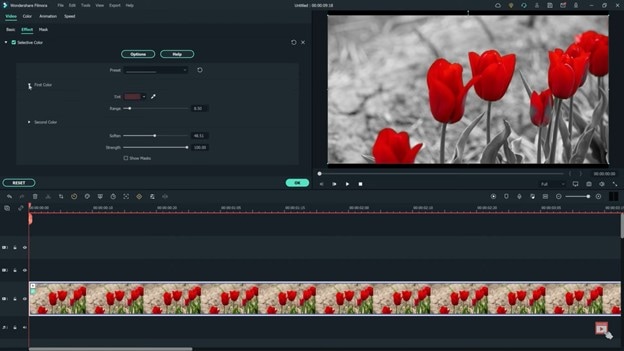
Step6 Next, try selecting a second color to isolate within our shot. In this example, we are going to make the stems on the flowers stand out as well. Select second color and go to the tint section. And find a color that is close to the second color, which will be green in this case.
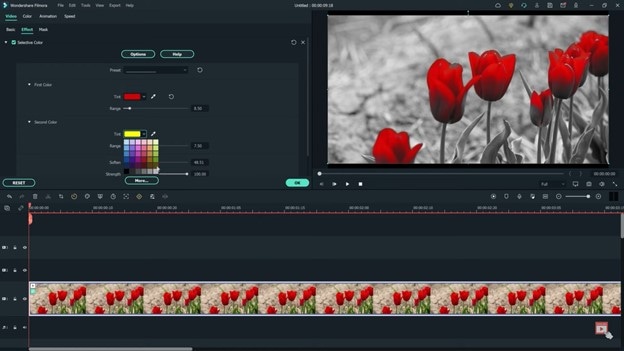
Step7 Pick the eyedropper tool and click it on the green part of the clip. Then adjust the range slider as needed.
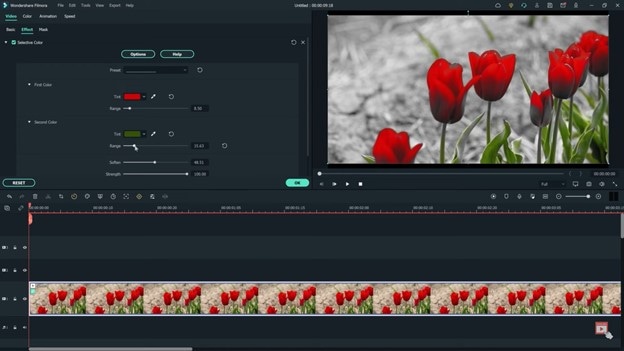
Alright, let’s watch back the video to see how both colors are now isolated.

Follow all the steps in the correct order. This is how you can use NewBlue effects for color isolation using Wondershare Filmora. The color isolation using the selective color effect defines the point of interest in the clip for the viewers.
Free Download For macOS 10.14 or later
Step1 Launch Wondershare Filmora and drag and drop your clip to the timeline.

Step2 Go to effects and then click “NewBlue FX” option and select Newblue filters.

Step3 Find the Selective Color Effect and drag it onto the clip. The effect will be instantly applied.

Step4 Next, double-click on the clip and check out the effects menu at the top of the screen.

Step5 Open the preset drop-down menu. There will be a lot of presets with different colors. Select the preset you want to use. In this scenario, let us select Just Blue.

Step6 If you see a blue tint at a place or object which you want to be white and black, click on the first color.

Step7 Now adjust the range slider to decrease the number of unwanted tints.

Step8 To blur the edges of the effects, turn up the softened slider and remove any unwanted tint previously remaining.

In this way, you can add a selective color effect to your video clips and isolate the color of your choice.
Tutorial 2 on make color isolation using eyedropper tool
You might ask how do we use the eyedropper tool here. It can sample colors from anywhere in a video or an image and add them to your swatch panel. The steps to use the eyedropper tool to add a selective color to your video are below.
Step1 As same as the first one, launching Wondershare Filmora is the first priority. And drag your clip to the timeline.

Step2 Go to effects at the top, and find Newblue effects, and click on the Newblue filters.

Step3 Find the selective color effect and drag it to the clip.

Step4 Double-click on the clip and visit the effects menu at the top of the screen.

Step5 Click on the ‘first color’ and select the eye dropper tool. This will allow us to select the red flower in the preview window. You can also click different parts of the image to get the color that we want.

Step6 Next, try selecting a second color to isolate within our shot. In this example, we are going to make the stems on the flowers stand out as well. Select second color and go to the tint section. And find a color that is close to the second color, which will be green in this case.

Step7 Pick the eyedropper tool and click it on the green part of the clip. Then adjust the range slider as needed.

Alright, let’s watch back the video to see how both colors are now isolated.

Follow all the steps in the correct order. This is how you can use NewBlue effects for color isolation using Wondershare Filmora. The color isolation using the selective color effect defines the point of interest in the clip for the viewers.
Find Out the Best Animated Text Video Tools and Learn How to Animate Text in a Video in Simple Steps. Discover the Best Fonts to Animate Text Along with the Text Animation Templates
If you need to add text to video, you should animate the text part so that it looks attractive and enhance the video content. When you want to animate the texts and titles in your video, you should have the best animated text video tools where there is a wide range of text effects and animations templates and presets.
We have listed the best platforms for animating texts and titles in your video. You can check out their pros and cons and select the perfect one to get started. We have illustrated the simple steps for stunning text animation using Wondershare Filmora.
Part 1. Best Animated Text Video Tools
Here is the list of the best tools that you can use to animate the text in your video. Starting from desktop applications to online platforms, we have reviewed them for your easy selection.
1. Premiere Pro
Best for: Professional video editors
Price: $20.99 per month(subscription)
Compatible OS: Windows and macOS
Adobe Premiere Pro is one of the most preferred video editors in the professional video editing world. Premiere Pro is designed for experienced video editors and amateur video editors can find its user interface difficult to get used to without thorough tutorials. In fact, it is a great platform to work as a team for editing a large video project.

There are advanced video editing options available that you generally do not get in a regular video editor. Starting from video effects, color correction to audio editing and text effects, all the different features are available. As a matter of fact, you can edit VR as well as multi-cam videos as well. The software also supports importing and exporting different types of video file formats.
Pros
- Huge library of video and text effects and presets.
- Multi-cam editing and VR support.
- Dedicated options for audio editing and mixing.
- Stunning stabilization and color grading options.
- Supports a wide range of video file formats.
- Easy workflow for a team of video editors.
Cons
- Required high-end systems for smooth operation.
- Learning curve is steep for amateurs and beginners.
2. Filmora
Best for: beginners as well as professionals who are looking for a wide range of text effects.
Price: $49.99 annually
Compatible OS: Windows and macOS
Wondershare Filmora is the best animated text maker. In comparison to popular video editors, Filmora has the widest range of text effects and animations that you can apply to the text in your video instantly. Most importantly, you can customize and personalize the effects and animations as per your requirements.

The user interface is super intuitive and hence, both beginners as well as professionals prefer it. There are tons of stock photos, videos, and backgrounds that you can use in your video without any copyright claim. This is why Filmora is one of the most preferred video editors among video creators for social media and video streaming platforms.
Pros
- Vast stock media library of photos, videos, and GIFs.
- Various graphical elements, transitions, and audio.
- Motion tracking, audio ducking, and color matching.
- Wide collection of text effects and animation.
- User-friendly interface and faster rendering.
- Supports different types of video file formats.
- Highly affordable pricing and responsive support team.
Cons
- There is scope for improvement in advanced video editing features.
3. iMovie
Best for: beginners who use Apple computers and mobile devices.
Price: Free
Compatible OS: macOS and iOS 
iMovie by Apple comes pre-installed on MacBook and Mac. It is the most preferred video editor for beginners who do not want to invest in purchasing a premium video editor. iMovie is a standard video editor where you can get all the basic tools for effects and animations. There are themes and templates available with easy customization options. Most importantly, iMovie has cross-device support as iMovie is available for all Apple devices.
Pros
- Cinematic effects, beautiful styles, and chrome key.
- Decent range of text effect, video effects, and enhancements.
- User-friendly interface for easy operation.
- Easy sharing on cloud, video streaming, and social media platforms.
- Work on any Apple device starting from MacBook to iPad.
Cons
- The output file size is huge.
- Importing MP4 file format is complicated.
- You can work with two video tracks only.
4. Veed.io
Best for: those who prefer online text animation maker.
Price: $12 per month
Compatible OS: Windows, Linux, macOS, Android, and iOS.

Veed.io is a popular online video editor and it is perfect for you if you do not want to install a dedicated video editor on your computer. In fact, it is suitable for low-end computers without low storage space. You can add text effects and animations on the go from your web browser. The platform also supports collaborative video project editing. There are loads of text effects and animation templates available to pick from.
Pros
- Powerful video editor and comparable to premium ones.
- Wide range of video effects, text animation templates available.
- The user interface is intuitive and suitable for everyone.
- Option to add subtitle and supports various video file formats.
- The support team is highly responsive.
Cons
- Users have complained about bugs and hangs.
- Advanced text animation editing options not available.
- Does not have a dedicated app for mobile users.
5. Kapwing
Best for: social media video creators who need videos in different aspect ratios.
Price: $16 per month
Compatible OS: Windows, Linux, and macOS.

Kapwing is a great online editor where you can get to animate the texts and titles in your videos pretty easily. Starting from editing your photos to videos and even creating GIFs, the platform serves all the needs of the users completely. It is particularly popular among social media video creators as there are several aspect ratios and templates available for creating shorts, stories, and regular videos. There is a dedicated app available for mobile users.
Pros
- Different types of text and video templates available.
- Wide range of elements, transitions, and stock media files.
- Quick transformation into different aspect ratio.
- Multi-lingual subtitle support and direct recording option.
- User-friendly and intuitive interface and support for plugins.
Cons
- It gets slower on a low-end computer.
- Does not support a wide range of file formats.
- The support team is not that responsive.
6. Flixier
Best for: those looking for faster and cheaper online text animation maker
Price: $8 per month
Compatible OS: Windows, Linux, macOS and mobile OS.

Flixier is a powerful video editor that you can access from any popular web browser from any device. It is one of the fastest text animation makers and the pricing is highly affordable. The platform is quite popular among social media video creators. There are dedicated formats available for Facebook, Instagram, and YouTube. The user interface feels like a premium video editor with timeline and you can even record video through Flixier.
Pros
- Different text motion presets for animations and effects.
- Allows working with multiple tracks.
- Stock media files such as photos, videos, and audio files.
- Simple but powerful user interface for smooth operation.
- Speeds up collaborative work and cloud integration.
Cons
- Lacks certain advanced editing features.
- Limited file format support and compatibility.
Part 2. Creative Fonts Resource for The Animated Text
Fonts play an important role in text animations. If the typography of the text is not up to the mark, the animation won’t come out as intended. Therefore, you should have trendy and dynamic fonts in your possession to type in your texts and titles.
Trendy Fonts to Use
You have to follow the trend in the animation so that your text animation gets instant traction and stays relevant. You will need to have trendy fonts so that your creative text animations look eye-catching and engaging. Here is the list of the best trendy fonts to use in the animated text.
- Redwing font
If you want to display titles in uppercase as well as in large-sized letters, Redwing should match your requirements perfectly. The font can be considered an upgrade over the popular Impact font that most people use for showing one-word texts and titles in bold style and large sizes.

- Takota font
If you are looking for something cool and funky, Takota font should be at the top of your list. You will find people using similar fonts for showing cool text animations over beautiful landscapes in the background. Every character in this font has its individuality and uniqueness in design.

- Basement grotesque font
This font is inspired by 19th-century typeface where boldness gets the upper hand. It is one of the best display typefaces to showcase titles in brutal fashion. The font strikes a mark in the mind of the viewers instantly. You might see this font in newspapers especially in the titles and headlines.

- Meraki
If you are looking for a compact and modern font to animate the text, Meraki is perfect. You can fit more words in a sentence within a video frame. You must have seen this font in games, t-shirts, logos, and much more. You can consider an upgrade to Sans Serif font.

- Ashfiana
Ashfiana is another upgrade to the regular Sans Serif font but this one has high contrast and it looks more elegant. It is quite slim and you can use the font for titles and text blocks and you can use it more elegantly in oblique style.

- Clap hand
If you are looking for a fun and cute typeface, clap hand font can be great. It is particularly popular among video creators who make videos for kids. You must have seen similar font among brands selling kids’ products. The font is impactful for titles, banners, logos, and short paragraphs.

- Made mellow
You can consider this a serious typeface of Clap Hand font. You get different variations in weights from light to black and it is particularly popular for showing full screen texts and titles. You can apply several stunning text effects on it so that the effects become prominently visible and the animation comes out superb.

- Wonder type
This font has unique design for each character and it gives out cuteness as well as positivity. The font is bold and it has a rustic look. There are several numeral text styles and there are different textures for uppercase and lowercase. The font is modern as well as elegant for all types of text effects and animations.

Dynamic Fonts to Choose
A dynamic font is highly useful in text animation as the characters are not static and they have their own individuality. The characters could have their own texture even though the overall theme of the font stays the same. Besides, the characters have their own animations and effects. Here are some of the popular dynamic fonts to choose from.
- Wicked Mouse Font
If you want to have a cartoon-based text effect and animation, Wicked mouse font is the best option. The font style is large and bold and the characters come in uppercase. When you type in lowercase and uppercase characters, you can notice certain variations and there is 3D text version available.

- Animated Alphabet
It is needless to say that the animated alphabet font is the go-to font when there are texts in a video that needs to be animated. There are so many different variations of animated alphabet fonts that you will find on popular font resource websites and you should download as per your preference.

- Halloween Titles
When you add mysterious or suspenseful typography to your texts and titles, it gets more traction than usual. In this pack, you will get different types of dynamic fonts and text animations that are simple yet impactful. You can use them to create unique and engaging text animations for your video.

- Instagram Title Pack
If you are making videos for Instagram or social media platforms, this is a pack that you should definitely have. In this pack, you will get text fonts for stories and posts, animated titles, dynamic texts for transitions and swipe up activities. For each category, there are several variations to post creative text animations.

- Chalkboard Animated Handwriting
The chalkboard animated handwriting pack has the classic text animation with customization options. There are different variations available along with rubbing the displayed text off with duster animation. It is great for titles as well as showing lengthy text and you can change the texture, border, color, and much more.

- Glitch Titles
The glitch text animation is one of the trending text effects in the modern videos. The glitch animation is often accompanied by heavy bass sound effect for opening and closing titles. The glitch titles preset comes with several variations so that your videos do not look the same to the viewers and get appreciation of the text animations.

- Glow Text Animations
The glow text animations font is suitable for titles, transitions, as well as low thirds. The font has 3D effect along with the glow effect and both of them make the text instantly engaging. There are different variations available such as cool glow, fiery glow, sober glow, and icy glow effect.

- Neon Short Circuit Titles
For text animations, dynamic fonts based on neon effects are always in high demand. Neon short circuit titles combine the neon as well as the short circuit animation together. That is why it is more refreshing and eye-catching than regular neon fonts and you must use it for text animations especially when you have a darker background.

Part 3. How to Animate Text in A Video
Out of the top video tools to animate text in a video, we have picked Wondershare Filmora as the best animated text maker. Filmora Video Editor has all the different categories of text animations to cater to all the different video niches. Therefore, you can have appropriate and creative text animations based on your video content to make it eye-catching and engaging. Here are the detailed steps to animate the text in video.
Free Download For Win 7 or later(64-bit)
Free Download For macOS 10.14 or later
- How to add text in Filmora?
First of all, you need to add text to your video project to get started. Launch Filmora and import any video that you want to place in the background. You can also go to Stock Media and select any background photo or video as per your preference. Click on Quick Text option from the toolbar above the timeline.
This will add a text layer on the timeline with a default text. Double-click on the text layer and edit the default text. The text layer should be over the background layer and you can reposition the text layer depending on where you want the text to appear on the video. You can adjust the position of the text on the video from Viewer.

- How to edit font in Filmora?
Now that you have placed and positioned the text in your video properly, it is time to edit the text style. Double-click on the text layer and go to Title>Preset> Font section. Select the font, size, and alignment. If there are multiple texts in the template, select them one by one from Viewer and edit them. Go to Settings section and change text color and spacing as appropriate. There are also several text style templates available to choose from if you want to.

- How to use animation in text in Filmora?
Double-click on the text layer again and this time, you need to go to Animation tab. You will see all the popular text animation templates on the left panel. Place your mouse pointer over them to get a preview. Select any one of these animations by double-clicking on the animation and click on Ok button. Play the video to watch the applied animation.

- How to use text preset in Filmora?
If you want to make the text animation eye-catching and attention-grabbing, you need to select a text animation preset in Filmora. Go to Titles and check out the left panel where you will find all the different categories of text effects and animations. Go to the category that matches your video content and select any template and drop it on the timeline. Double-click on the text layer to edit the default text and text style as per your preference.

Part 4. How to Make Creative Text Animation?
Depending on the video content, you have to select the text effect and create text animation accordingly. We have already stated that Filmora has different categories of text animation templates to satisfy all your video requirements perfectly. You can choose appropriate text animation templates that go well with your video category and use them to come up with creative text animations.
- Social media
If you are making videos for social media platforms such as Facebook or for video streaming platforms like YouTube, you should select text animations from Social Media category in Filmora. There are over 200+ text animation templates available that have all the common text animations you usually see as well as creative text animations that will make your video stand out.

All you need to do is import your video and place it in the background. Go to Titles and select Social Media category and drop any desired text animation on the timeline. Thereafter, edit and customize the text layer and style along with the animation as per your preference.
- Education
If your video belongs to education nice such as you are explaining a concept or demonstrating a tutorial, you need to use text animations that are graceful for your video content. Filmora has a dedicated section for text animations related to education. Go to Titles> Tutorials and you will see around 400 text effects and animations that you can use in your educational video effectively.

- Business
If you are creating videos for brands and businesses, there are certain creative text animations you have to use in order to get traction from the target audiences. Filmora comes with over 150 text effects and animations specifically for business videos so that the branding gets strong and leaves a good impression in the mind of the viewers. Go to Titles> Business and choose the desired text animations and customize them to fit into your brand image.

- Travel
If you are into making traveling vlogs or informational travel videos, Filmora has a specific set of text effects and creative animations. You get to choose from over 250 templates to represent any text and title you want to display in your video. The beautiful and eye-catching animated text will definitely get your message across to the viewers pleasantly. Go to Titles> Travel section and check out all the text animations to choose from.

- Gaming
There are so many gamers who put up their gameplay videos on social media and video streaming platforms. While editing the video, they need to put up animated text so that the video content looks interesting and engaging. If you have a gaming video, Filmora has around 500 text effects and animations to use in your video. Go to Titles> Gaming and select from any creative text animations as per your preference.

2. Filmora
Best for: beginners as well as professionals who are looking for a wide range of text effects.
Price: $49.99 annually
Compatible OS: Windows and macOS
Wondershare Filmora is the best animated text maker. In comparison to popular video editors, Filmora has the widest range of text effects and animations that you can apply to the text in your video instantly. Most importantly, you can customize and personalize the effects and animations as per your requirements.

The user interface is super intuitive and hence, both beginners as well as professionals prefer it. There are tons of stock photos, videos, and backgrounds that you can use in your video without any copyright claim. This is why Filmora is one of the most preferred video editors among video creators for social media and video streaming platforms.
Pros
- Vast stock media library of photos, videos, and GIFs.
- Various graphical elements, transitions, and audio.
- Motion tracking, audio ducking, and color matching.
- Wide collection of text effects and animation.
- User-friendly interface and faster rendering.
- Supports different types of video file formats.
- Highly affordable pricing and responsive support team.
Cons
- There is scope for improvement in advanced video editing features.
3. iMovie
Best for: beginners who use Apple computers and mobile devices.
Price: Free
Compatible OS: macOS and iOS 
iMovie by Apple comes pre-installed on MacBook and Mac. It is the most preferred video editor for beginners who do not want to invest in purchasing a premium video editor. iMovie is a standard video editor where you can get all the basic tools for effects and animations. There are themes and templates available with easy customization options. Most importantly, iMovie has cross-device support as iMovie is available for all Apple devices.
Pros
- Cinematic effects, beautiful styles, and chrome key.
- Decent range of text effect, video effects, and enhancements.
- User-friendly interface for easy operation.
- Easy sharing on cloud, video streaming, and social media platforms.
- Work on any Apple device starting from MacBook to iPad.
Cons
- The output file size is huge.
- Importing MP4 file format is complicated.
- You can work with two video tracks only.
4. Veed.io
Best for: those who prefer online text animation maker.
Price: $12 per month
Compatible OS: Windows, Linux, macOS, Android, and iOS.

Veed.io is a popular online video editor and it is perfect for you if you do not want to install a dedicated video editor on your computer. In fact, it is suitable for low-end computers without low storage space. You can add text effects and animations on the go from your web browser. The platform also supports collaborative video project editing. There are loads of text effects and animation templates available to pick from.
Pros
- Powerful video editor and comparable to premium ones.
- Wide range of video effects, text animation templates available.
- The user interface is intuitive and suitable for everyone.
- Option to add subtitle and supports various video file formats.
- The support team is highly responsive.
Cons
- Users have complained about bugs and hangs.
- Advanced text animation editing options not available.
- Does not have a dedicated app for mobile users.
5. Kapwing
Best for: social media video creators who need videos in different aspect ratios.
Price: $16 per month
Compatible OS: Windows, Linux, and macOS.

Kapwing is a great online editor where you can get to animate the texts and titles in your videos pretty easily. Starting from editing your photos to videos and even creating GIFs, the platform serves all the needs of the users completely. It is particularly popular among social media video creators as there are several aspect ratios and templates available for creating shorts, stories, and regular videos. There is a dedicated app available for mobile users.
Pros
- Different types of text and video templates available.
- Wide range of elements, transitions, and stock media files.
- Quick transformation into different aspect ratio.
- Multi-lingual subtitle support and direct recording option.
- User-friendly and intuitive interface and support for plugins.
Cons
- It gets slower on a low-end computer.
- Does not support a wide range of file formats.
- The support team is not that responsive.
6. Flixier
Best for: those looking for faster and cheaper online text animation maker
Price: $8 per month
Compatible OS: Windows, Linux, macOS and mobile OS.

Flixier is a powerful video editor that you can access from any popular web browser from any device. It is one of the fastest text animation makers and the pricing is highly affordable. The platform is quite popular among social media video creators. There are dedicated formats available for Facebook, Instagram, and YouTube. The user interface feels like a premium video editor with timeline and you can even record video through Flixier.
Pros
- Different text motion presets for animations and effects.
- Allows working with multiple tracks.
- Stock media files such as photos, videos, and audio files.
- Simple but powerful user interface for smooth operation.
- Speeds up collaborative work and cloud integration.
Cons
- Lacks certain advanced editing features.
- Limited file format support and compatibility.
Part 2. Creative Fonts Resource for The Animated Text
Fonts play an important role in text animations. If the typography of the text is not up to the mark, the animation won’t come out as intended. Therefore, you should have trendy and dynamic fonts in your possession to type in your texts and titles.
Trendy Fonts to Use
You have to follow the trend in the animation so that your text animation gets instant traction and stays relevant. You will need to have trendy fonts so that your creative text animations look eye-catching and engaging. Here is the list of the best trendy fonts to use in the animated text.
- Redwing font
If you want to display titles in uppercase as well as in large-sized letters, Redwing should match your requirements perfectly. The font can be considered an upgrade over the popular Impact font that most people use for showing one-word texts and titles in bold style and large sizes.

- Takota font
If you are looking for something cool and funky, Takota font should be at the top of your list. You will find people using similar fonts for showing cool text animations over beautiful landscapes in the background. Every character in this font has its individuality and uniqueness in design.

- Basement grotesque font
This font is inspired by 19th-century typeface where boldness gets the upper hand. It is one of the best display typefaces to showcase titles in brutal fashion. The font strikes a mark in the mind of the viewers instantly. You might see this font in newspapers especially in the titles and headlines.

- Meraki
If you are looking for a compact and modern font to animate the text, Meraki is perfect. You can fit more words in a sentence within a video frame. You must have seen this font in games, t-shirts, logos, and much more. You can consider an upgrade to Sans Serif font.

- Ashfiana
Ashfiana is another upgrade to the regular Sans Serif font but this one has high contrast and it looks more elegant. It is quite slim and you can use the font for titles and text blocks and you can use it more elegantly in oblique style.

- Clap hand
If you are looking for a fun and cute typeface, clap hand font can be great. It is particularly popular among video creators who make videos for kids. You must have seen similar font among brands selling kids’ products. The font is impactful for titles, banners, logos, and short paragraphs.

- Made mellow
You can consider this a serious typeface of Clap Hand font. You get different variations in weights from light to black and it is particularly popular for showing full screen texts and titles. You can apply several stunning text effects on it so that the effects become prominently visible and the animation comes out superb.

- Wonder type
This font has unique design for each character and it gives out cuteness as well as positivity. The font is bold and it has a rustic look. There are several numeral text styles and there are different textures for uppercase and lowercase. The font is modern as well as elegant for all types of text effects and animations.

Dynamic Fonts to Choose
A dynamic font is highly useful in text animation as the characters are not static and they have their own individuality. The characters could have their own texture even though the overall theme of the font stays the same. Besides, the characters have their own animations and effects. Here are some of the popular dynamic fonts to choose from.
- Wicked Mouse Font
If you want to have a cartoon-based text effect and animation, Wicked mouse font is the best option. The font style is large and bold and the characters come in uppercase. When you type in lowercase and uppercase characters, you can notice certain variations and there is 3D text version available.

- Animated Alphabet
It is needless to say that the animated alphabet font is the go-to font when there are texts in a video that needs to be animated. There are so many different variations of animated alphabet fonts that you will find on popular font resource websites and you should download as per your preference.

- Halloween Titles
When you add mysterious or suspenseful typography to your texts and titles, it gets more traction than usual. In this pack, you will get different types of dynamic fonts and text animations that are simple yet impactful. You can use them to create unique and engaging text animations for your video.

- Instagram Title Pack
If you are making videos for Instagram or social media platforms, this is a pack that you should definitely have. In this pack, you will get text fonts for stories and posts, animated titles, dynamic texts for transitions and swipe up activities. For each category, there are several variations to post creative text animations.

- Chalkboard Animated Handwriting
The chalkboard animated handwriting pack has the classic text animation with customization options. There are different variations available along with rubbing the displayed text off with duster animation. It is great for titles as well as showing lengthy text and you can change the texture, border, color, and much more.

- Glitch Titles
The glitch text animation is one of the trending text effects in the modern videos. The glitch animation is often accompanied by heavy bass sound effect for opening and closing titles. The glitch titles preset comes with several variations so that your videos do not look the same to the viewers and get appreciation of the text animations.

- Glow Text Animations
The glow text animations font is suitable for titles, transitions, as well as low thirds. The font has 3D effect along with the glow effect and both of them make the text instantly engaging. There are different variations available such as cool glow, fiery glow, sober glow, and icy glow effect.

- Neon Short Circuit Titles
For text animations, dynamic fonts based on neon effects are always in high demand. Neon short circuit titles combine the neon as well as the short circuit animation together. That is why it is more refreshing and eye-catching than regular neon fonts and you must use it for text animations especially when you have a darker background.

Part 3. How to Animate Text in A Video
Out of the top video tools to animate text in a video, we have picked Wondershare Filmora as the best animated text maker. Filmora Video Editor has all the different categories of text animations to cater to all the different video niches. Therefore, you can have appropriate and creative text animations based on your video content to make it eye-catching and engaging. Here are the detailed steps to animate the text in video.
Free Download For Win 7 or later(64-bit)
Free Download For macOS 10.14 or later
- How to add text in Filmora?
First of all, you need to add text to your video project to get started. Launch Filmora and import any video that you want to place in the background. You can also go to Stock Media and select any background photo or video as per your preference. Click on Quick Text option from the toolbar above the timeline.
This will add a text layer on the timeline with a default text. Double-click on the text layer and edit the default text. The text layer should be over the background layer and you can reposition the text layer depending on where you want the text to appear on the video. You can adjust the position of the text on the video from Viewer.

- How to edit font in Filmora?
Now that you have placed and positioned the text in your video properly, it is time to edit the text style. Double-click on the text layer and go to Title>Preset> Font section. Select the font, size, and alignment. If there are multiple texts in the template, select them one by one from Viewer and edit them. Go to Settings section and change text color and spacing as appropriate. There are also several text style templates available to choose from if you want to.

- How to use animation in text in Filmora?
Double-click on the text layer again and this time, you need to go to Animation tab. You will see all the popular text animation templates on the left panel. Place your mouse pointer over them to get a preview. Select any one of these animations by double-clicking on the animation and click on Ok button. Play the video to watch the applied animation.

- How to use text preset in Filmora?
If you want to make the text animation eye-catching and attention-grabbing, you need to select a text animation preset in Filmora. Go to Titles and check out the left panel where you will find all the different categories of text effects and animations. Go to the category that matches your video content and select any template and drop it on the timeline. Double-click on the text layer to edit the default text and text style as per your preference.

Part 4. How to Make Creative Text Animation?
Depending on the video content, you have to select the text effect and create text animation accordingly. We have already stated that Filmora has different categories of text animation templates to satisfy all your video requirements perfectly. You can choose appropriate text animation templates that go well with your video category and use them to come up with creative text animations.
- Social media
If you are making videos for social media platforms such as Facebook or for video streaming platforms like YouTube, you should select text animations from Social Media category in Filmora. There are over 200+ text animation templates available that have all the common text animations you usually see as well as creative text animations that will make your video stand out.

All you need to do is import your video and place it in the background. Go to Titles and select Social Media category and drop any desired text animation on the timeline. Thereafter, edit and customize the text layer and style along with the animation as per your preference.
- Education
If your video belongs to education nice such as you are explaining a concept or demonstrating a tutorial, you need to use text animations that are graceful for your video content. Filmora has a dedicated section for text animations related to education. Go to Titles> Tutorials and you will see around 400 text effects and animations that you can use in your educational video effectively.

- Business
If you are creating videos for brands and businesses, there are certain creative text animations you have to use in order to get traction from the target audiences. Filmora comes with over 150 text effects and animations specifically for business videos so that the branding gets strong and leaves a good impression in the mind of the viewers. Go to Titles> Business and choose the desired text animations and customize them to fit into your brand image.

- Travel
If you are into making traveling vlogs or informational travel videos, Filmora has a specific set of text effects and creative animations. You get to choose from over 250 templates to represent any text and title you want to display in your video. The beautiful and eye-catching animated text will definitely get your message across to the viewers pleasantly. Go to Titles> Travel section and check out all the text animations to choose from.

- Gaming
There are so many gamers who put up their gameplay videos on social media and video streaming platforms. While editing the video, they need to put up animated text so that the video content looks interesting and engaging. If you have a gaming video, Filmora has around 500 text effects and animations to use in your video. Go to Titles> Gaming and select from any creative text animations as per your preference.

2. Filmora
Best for: beginners as well as professionals who are looking for a wide range of text effects.
Price: $49.99 annually
Compatible OS: Windows and macOS
Wondershare Filmora is the best animated text maker. In comparison to popular video editors, Filmora has the widest range of text effects and animations that you can apply to the text in your video instantly. Most importantly, you can customize and personalize the effects and animations as per your requirements.

The user interface is super intuitive and hence, both beginners as well as professionals prefer it. There are tons of stock photos, videos, and backgrounds that you can use in your video without any copyright claim. This is why Filmora is one of the most preferred video editors among video creators for social media and video streaming platforms.
Pros
- Vast stock media library of photos, videos, and GIFs.
- Various graphical elements, transitions, and audio.
- Motion tracking, audio ducking, and color matching.
- Wide collection of text effects and animation.
- User-friendly interface and faster rendering.
- Supports different types of video file formats.
- Highly affordable pricing and responsive support team.
Cons
- There is scope for improvement in advanced video editing features.
3. iMovie
Best for: beginners who use Apple computers and mobile devices.
Price: Free
Compatible OS: macOS and iOS 
iMovie by Apple comes pre-installed on MacBook and Mac. It is the most preferred video editor for beginners who do not want to invest in purchasing a premium video editor. iMovie is a standard video editor where you can get all the basic tools for effects and animations. There are themes and templates available with easy customization options. Most importantly, iMovie has cross-device support as iMovie is available for all Apple devices.
Pros
- Cinematic effects, beautiful styles, and chrome key.
- Decent range of text effect, video effects, and enhancements.
- User-friendly interface for easy operation.
- Easy sharing on cloud, video streaming, and social media platforms.
- Work on any Apple device starting from MacBook to iPad.
Cons
- The output file size is huge.
- Importing MP4 file format is complicated.
- You can work with two video tracks only.
4. Veed.io
Best for: those who prefer online text animation maker.
Price: $12 per month
Compatible OS: Windows, Linux, macOS, Android, and iOS.

Veed.io is a popular online video editor and it is perfect for you if you do not want to install a dedicated video editor on your computer. In fact, it is suitable for low-end computers without low storage space. You can add text effects and animations on the go from your web browser. The platform also supports collaborative video project editing. There are loads of text effects and animation templates available to pick from.
Pros
- Powerful video editor and comparable to premium ones.
- Wide range of video effects, text animation templates available.
- The user interface is intuitive and suitable for everyone.
- Option to add subtitle and supports various video file formats.
- The support team is highly responsive.
Cons
- Users have complained about bugs and hangs.
- Advanced text animation editing options not available.
- Does not have a dedicated app for mobile users.
5. Kapwing
Best for: social media video creators who need videos in different aspect ratios.
Price: $16 per month
Compatible OS: Windows, Linux, and macOS.

Kapwing is a great online editor where you can get to animate the texts and titles in your videos pretty easily. Starting from editing your photos to videos and even creating GIFs, the platform serves all the needs of the users completely. It is particularly popular among social media video creators as there are several aspect ratios and templates available for creating shorts, stories, and regular videos. There is a dedicated app available for mobile users.
Pros
- Different types of text and video templates available.
- Wide range of elements, transitions, and stock media files.
- Quick transformation into different aspect ratio.
- Multi-lingual subtitle support and direct recording option.
- User-friendly and intuitive interface and support for plugins.
Cons
- It gets slower on a low-end computer.
- Does not support a wide range of file formats.
- The support team is not that responsive.
6. Flixier
Best for: those looking for faster and cheaper online text animation maker
Price: $8 per month
Compatible OS: Windows, Linux, macOS and mobile OS.

Flixier is a powerful video editor that you can access from any popular web browser from any device. It is one of the fastest text animation makers and the pricing is highly affordable. The platform is quite popular among social media video creators. There are dedicated formats available for Facebook, Instagram, and YouTube. The user interface feels like a premium video editor with timeline and you can even record video through Flixier.
Pros
- Different text motion presets for animations and effects.
- Allows working with multiple tracks.
- Stock media files such as photos, videos, and audio files.
- Simple but powerful user interface for smooth operation.
- Speeds up collaborative work and cloud integration.
Cons
- Lacks certain advanced editing features.
- Limited file format support and compatibility.
Part 2. Creative Fonts Resource for The Animated Text
Fonts play an important role in text animations. If the typography of the text is not up to the mark, the animation won’t come out as intended. Therefore, you should have trendy and dynamic fonts in your possession to type in your texts and titles.
Trendy Fonts to Use
You have to follow the trend in the animation so that your text animation gets instant traction and stays relevant. You will need to have trendy fonts so that your creative text animations look eye-catching and engaging. Here is the list of the best trendy fonts to use in the animated text.
- Redwing font
If you want to display titles in uppercase as well as in large-sized letters, Redwing should match your requirements perfectly. The font can be considered an upgrade over the popular Impact font that most people use for showing one-word texts and titles in bold style and large sizes.

- Takota font
If you are looking for something cool and funky, Takota font should be at the top of your list. You will find people using similar fonts for showing cool text animations over beautiful landscapes in the background. Every character in this font has its individuality and uniqueness in design.

- Basement grotesque font
This font is inspired by 19th-century typeface where boldness gets the upper hand. It is one of the best display typefaces to showcase titles in brutal fashion. The font strikes a mark in the mind of the viewers instantly. You might see this font in newspapers especially in the titles and headlines.

- Meraki
If you are looking for a compact and modern font to animate the text, Meraki is perfect. You can fit more words in a sentence within a video frame. You must have seen this font in games, t-shirts, logos, and much more. You can consider an upgrade to Sans Serif font.

- Ashfiana
Ashfiana is another upgrade to the regular Sans Serif font but this one has high contrast and it looks more elegant. It is quite slim and you can use the font for titles and text blocks and you can use it more elegantly in oblique style.

- Clap hand
If you are looking for a fun and cute typeface, clap hand font can be great. It is particularly popular among video creators who make videos for kids. You must have seen similar font among brands selling kids’ products. The font is impactful for titles, banners, logos, and short paragraphs.

- Made mellow
You can consider this a serious typeface of Clap Hand font. You get different variations in weights from light to black and it is particularly popular for showing full screen texts and titles. You can apply several stunning text effects on it so that the effects become prominently visible and the animation comes out superb.

- Wonder type
This font has unique design for each character and it gives out cuteness as well as positivity. The font is bold and it has a rustic look. There are several numeral text styles and there are different textures for uppercase and lowercase. The font is modern as well as elegant for all types of text effects and animations.

Dynamic Fonts to Choose
A dynamic font is highly useful in text animation as the characters are not static and they have their own individuality. The characters could have their own texture even though the overall theme of the font stays the same. Besides, the characters have their own animations and effects. Here are some of the popular dynamic fonts to choose from.
- Wicked Mouse Font
If you want to have a cartoon-based text effect and animation, Wicked mouse font is the best option. The font style is large and bold and the characters come in uppercase. When you type in lowercase and uppercase characters, you can notice certain variations and there is 3D text version available.

- Animated Alphabet
It is needless to say that the animated alphabet font is the go-to font when there are texts in a video that needs to be animated. There are so many different variations of animated alphabet fonts that you will find on popular font resource websites and you should download as per your preference.

- Halloween Titles
When you add mysterious or suspenseful typography to your texts and titles, it gets more traction than usual. In this pack, you will get different types of dynamic fonts and text animations that are simple yet impactful. You can use them to create unique and engaging text animations for your video.

- Instagram Title Pack
If you are making videos for Instagram or social media platforms, this is a pack that you should definitely have. In this pack, you will get text fonts for stories and posts, animated titles, dynamic texts for transitions and swipe up activities. For each category, there are several variations to post creative text animations.

- Chalkboard Animated Handwriting
The chalkboard animated handwriting pack has the classic text animation with customization options. There are different variations available along with rubbing the displayed text off with duster animation. It is great for titles as well as showing lengthy text and you can change the texture, border, color, and much more.

- Glitch Titles
The glitch text animation is one of the trending text effects in the modern videos. The glitch animation is often accompanied by heavy bass sound effect for opening and closing titles. The glitch titles preset comes with several variations so that your videos do not look the same to the viewers and get appreciation of the text animations.

- Glow Text Animations
The glow text animations font is suitable for titles, transitions, as well as low thirds. The font has 3D effect along with the glow effect and both of them make the text instantly engaging. There are different variations available such as cool glow, fiery glow, sober glow, and icy glow effect.

- Neon Short Circuit Titles
For text animations, dynamic fonts based on neon effects are always in high demand. Neon short circuit titles combine the neon as well as the short circuit animation together. That is why it is more refreshing and eye-catching than regular neon fonts and you must use it for text animations especially when you have a darker background.

Part 3. How to Animate Text in A Video
Out of the top video tools to animate text in a video, we have picked Wondershare Filmora as the best animated text maker. Filmora Video Editor has all the different categories of text animations to cater to all the different video niches. Therefore, you can have appropriate and creative text animations based on your video content to make it eye-catching and engaging. Here are the detailed steps to animate the text in video.
Free Download For Win 7 or later(64-bit)
Free Download For macOS 10.14 or later
- How to add text in Filmora?
First of all, you need to add text to your video project to get started. Launch Filmora and import any video that you want to place in the background. You can also go to Stock Media and select any background photo or video as per your preference. Click on Quick Text option from the toolbar above the timeline.
This will add a text layer on the timeline with a default text. Double-click on the text layer and edit the default text. The text layer should be over the background layer and you can reposition the text layer depending on where you want the text to appear on the video. You can adjust the position of the text on the video from Viewer.

- How to edit font in Filmora?
Now that you have placed and positioned the text in your video properly, it is time to edit the text style. Double-click on the text layer and go to Title>Preset> Font section. Select the font, size, and alignment. If there are multiple texts in the template, select them one by one from Viewer and edit them. Go to Settings section and change text color and spacing as appropriate. There are also several text style templates available to choose from if you want to.

- How to use animation in text in Filmora?
Double-click on the text layer again and this time, you need to go to Animation tab. You will see all the popular text animation templates on the left panel. Place your mouse pointer over them to get a preview. Select any one of these animations by double-clicking on the animation and click on Ok button. Play the video to watch the applied animation.

- How to use text preset in Filmora?
If you want to make the text animation eye-catching and attention-grabbing, you need to select a text animation preset in Filmora. Go to Titles and check out the left panel where you will find all the different categories of text effects and animations. Go to the category that matches your video content and select any template and drop it on the timeline. Double-click on the text layer to edit the default text and text style as per your preference.

Part 4. How to Make Creative Text Animation?
Depending on the video content, you have to select the text effect and create text animation accordingly. We have already stated that Filmora has different categories of text animation templates to satisfy all your video requirements perfectly. You can choose appropriate text animation templates that go well with your video category and use them to come up with creative text animations.
- Social media
If you are making videos for social media platforms such as Facebook or for video streaming platforms like YouTube, you should select text animations from Social Media category in Filmora. There are over 200+ text animation templates available that have all the common text animations you usually see as well as creative text animations that will make your video stand out.

All you need to do is import your video and place it in the background. Go to Titles and select Social Media category and drop any desired text animation on the timeline. Thereafter, edit and customize the text layer and style along with the animation as per your preference.
- Education
If your video belongs to education nice such as you are explaining a concept or demonstrating a tutorial, you need to use text animations that are graceful for your video content. Filmora has a dedicated section for text animations related to education. Go to Titles> Tutorials and you will see around 400 text effects and animations that you can use in your educational video effectively.

- Business
If you are creating videos for brands and businesses, there are certain creative text animations you have to use in order to get traction from the target audiences. Filmora comes with over 150 text effects and animations specifically for business videos so that the branding gets strong and leaves a good impression in the mind of the viewers. Go to Titles> Business and choose the desired text animations and customize them to fit into your brand image.

- Travel
If you are into making traveling vlogs or informational travel videos, Filmora has a specific set of text effects and creative animations. You get to choose from over 250 templates to represent any text and title you want to display in your video. The beautiful and eye-catching animated text will definitely get your message across to the viewers pleasantly. Go to Titles> Travel section and check out all the text animations to choose from.

- Gaming
There are so many gamers who put up their gameplay videos on social media and video streaming platforms. While editing the video, they need to put up animated text so that the video content looks interesting and engaging. If you have a gaming video, Filmora has around 500 text effects and animations to use in your video. Go to Titles> Gaming and select from any creative text animations as per your preference.

2. Filmora
Best for: beginners as well as professionals who are looking for a wide range of text effects.
Price: $49.99 annually
Compatible OS: Windows and macOS
Wondershare Filmora is the best animated text maker. In comparison to popular video editors, Filmora has the widest range of text effects and animations that you can apply to the text in your video instantly. Most importantly, you can customize and personalize the effects and animations as per your requirements.

The user interface is super intuitive and hence, both beginners as well as professionals prefer it. There are tons of stock photos, videos, and backgrounds that you can use in your video without any copyright claim. This is why Filmora is one of the most preferred video editors among video creators for social media and video streaming platforms.
Pros
- Vast stock media library of photos, videos, and GIFs.
- Various graphical elements, transitions, and audio.
- Motion tracking, audio ducking, and color matching.
- Wide collection of text effects and animation.
- User-friendly interface and faster rendering.
- Supports different types of video file formats.
- Highly affordable pricing and responsive support team.
Cons
- There is scope for improvement in advanced video editing features.
3. iMovie
Best for: beginners who use Apple computers and mobile devices.
Price: Free
Compatible OS: macOS and iOS 
iMovie by Apple comes pre-installed on MacBook and Mac. It is the most preferred video editor for beginners who do not want to invest in purchasing a premium video editor. iMovie is a standard video editor where you can get all the basic tools for effects and animations. There are themes and templates available with easy customization options. Most importantly, iMovie has cross-device support as iMovie is available for all Apple devices.
Pros
- Cinematic effects, beautiful styles, and chrome key.
- Decent range of text effect, video effects, and enhancements.
- User-friendly interface for easy operation.
- Easy sharing on cloud, video streaming, and social media platforms.
- Work on any Apple device starting from MacBook to iPad.
Cons
- The output file size is huge.
- Importing MP4 file format is complicated.
- You can work with two video tracks only.
4. Veed.io
Best for: those who prefer online text animation maker.
Price: $12 per month
Compatible OS: Windows, Linux, macOS, Android, and iOS.

Veed.io is a popular online video editor and it is perfect for you if you do not want to install a dedicated video editor on your computer. In fact, it is suitable for low-end computers without low storage space. You can add text effects and animations on the go from your web browser. The platform also supports collaborative video project editing. There are loads of text effects and animation templates available to pick from.
Pros
- Powerful video editor and comparable to premium ones.
- Wide range of video effects, text animation templates available.
- The user interface is intuitive and suitable for everyone.
- Option to add subtitle and supports various video file formats.
- The support team is highly responsive.
Cons
- Users have complained about bugs and hangs.
- Advanced text animation editing options not available.
- Does not have a dedicated app for mobile users.
5. Kapwing
Best for: social media video creators who need videos in different aspect ratios.
Price: $16 per month
Compatible OS: Windows, Linux, and macOS.

Kapwing is a great online editor where you can get to animate the texts and titles in your videos pretty easily. Starting from editing your photos to videos and even creating GIFs, the platform serves all the needs of the users completely. It is particularly popular among social media video creators as there are several aspect ratios and templates available for creating shorts, stories, and regular videos. There is a dedicated app available for mobile users.
Pros
- Different types of text and video templates available.
- Wide range of elements, transitions, and stock media files.
- Quick transformation into different aspect ratio.
- Multi-lingual subtitle support and direct recording option.
- User-friendly and intuitive interface and support for plugins.
Cons
- It gets slower on a low-end computer.
- Does not support a wide range of file formats.
- The support team is not that responsive.
6. Flixier
Best for: those looking for faster and cheaper online text animation maker
Price: $8 per month
Compatible OS: Windows, Linux, macOS and mobile OS.

Flixier is a powerful video editor that you can access from any popular web browser from any device. It is one of the fastest text animation makers and the pricing is highly affordable. The platform is quite popular among social media video creators. There are dedicated formats available for Facebook, Instagram, and YouTube. The user interface feels like a premium video editor with timeline and you can even record video through Flixier.
Pros
- Different text motion presets for animations and effects.
- Allows working with multiple tracks.
- Stock media files such as photos, videos, and audio files.
- Simple but powerful user interface for smooth operation.
- Speeds up collaborative work and cloud integration.
Cons
- Lacks certain advanced editing features.
- Limited file format support and compatibility.
Part 2. Creative Fonts Resource for The Animated Text
Fonts play an important role in text animations. If the typography of the text is not up to the mark, the animation won’t come out as intended. Therefore, you should have trendy and dynamic fonts in your possession to type in your texts and titles.
Trendy Fonts to Use
You have to follow the trend in the animation so that your text animation gets instant traction and stays relevant. You will need to have trendy fonts so that your creative text animations look eye-catching and engaging. Here is the list of the best trendy fonts to use in the animated text.
- Redwing font
If you want to display titles in uppercase as well as in large-sized letters, Redwing should match your requirements perfectly. The font can be considered an upgrade over the popular Impact font that most people use for showing one-word texts and titles in bold style and large sizes.

- Takota font
If you are looking for something cool and funky, Takota font should be at the top of your list. You will find people using similar fonts for showing cool text animations over beautiful landscapes in the background. Every character in this font has its individuality and uniqueness in design.

- Basement grotesque font
This font is inspired by 19th-century typeface where boldness gets the upper hand. It is one of the best display typefaces to showcase titles in brutal fashion. The font strikes a mark in the mind of the viewers instantly. You might see this font in newspapers especially in the titles and headlines.

- Meraki
If you are looking for a compact and modern font to animate the text, Meraki is perfect. You can fit more words in a sentence within a video frame. You must have seen this font in games, t-shirts, logos, and much more. You can consider an upgrade to Sans Serif font.

- Ashfiana
Ashfiana is another upgrade to the regular Sans Serif font but this one has high contrast and it looks more elegant. It is quite slim and you can use the font for titles and text blocks and you can use it more elegantly in oblique style.

- Clap hand
If you are looking for a fun and cute typeface, clap hand font can be great. It is particularly popular among video creators who make videos for kids. You must have seen similar font among brands selling kids’ products. The font is impactful for titles, banners, logos, and short paragraphs.

- Made mellow
You can consider this a serious typeface of Clap Hand font. You get different variations in weights from light to black and it is particularly popular for showing full screen texts and titles. You can apply several stunning text effects on it so that the effects become prominently visible and the animation comes out superb.

- Wonder type
This font has unique design for each character and it gives out cuteness as well as positivity. The font is bold and it has a rustic look. There are several numeral text styles and there are different textures for uppercase and lowercase. The font is modern as well as elegant for all types of text effects and animations.

Dynamic Fonts to Choose
A dynamic font is highly useful in text animation as the characters are not static and they have their own individuality. The characters could have their own texture even though the overall theme of the font stays the same. Besides, the characters have their own animations and effects. Here are some of the popular dynamic fonts to choose from.
- Wicked Mouse Font
If you want to have a cartoon-based text effect and animation, Wicked mouse font is the best option. The font style is large and bold and the characters come in uppercase. When you type in lowercase and uppercase characters, you can notice certain variations and there is 3D text version available.

- Animated Alphabet
It is needless to say that the animated alphabet font is the go-to font when there are texts in a video that needs to be animated. There are so many different variations of animated alphabet fonts that you will find on popular font resource websites and you should download as per your preference.

- Halloween Titles
When you add mysterious or suspenseful typography to your texts and titles, it gets more traction than usual. In this pack, you will get different types of dynamic fonts and text animations that are simple yet impactful. You can use them to create unique and engaging text animations for your video.

- Instagram Title Pack
If you are making videos for Instagram or social media platforms, this is a pack that you should definitely have. In this pack, you will get text fonts for stories and posts, animated titles, dynamic texts for transitions and swipe up activities. For each category, there are several variations to post creative text animations.

- Chalkboard Animated Handwriting
The chalkboard animated handwriting pack has the classic text animation with customization options. There are different variations available along with rubbing the displayed text off with duster animation. It is great for titles as well as showing lengthy text and you can change the texture, border, color, and much more.

- Glitch Titles
The glitch text animation is one of the trending text effects in the modern videos. The glitch animation is often accompanied by heavy bass sound effect for opening and closing titles. The glitch titles preset comes with several variations so that your videos do not look the same to the viewers and get appreciation of the text animations.

- Glow Text Animations
The glow text animations font is suitable for titles, transitions, as well as low thirds. The font has 3D effect along with the glow effect and both of them make the text instantly engaging. There are different variations available such as cool glow, fiery glow, sober glow, and icy glow effect.

- Neon Short Circuit Titles
For text animations, dynamic fonts based on neon effects are always in high demand. Neon short circuit titles combine the neon as well as the short circuit animation together. That is why it is more refreshing and eye-catching than regular neon fonts and you must use it for text animations especially when you have a darker background.

Part 3. How to Animate Text in A Video
Out of the top video tools to animate text in a video, we have picked Wondershare Filmora as the best animated text maker. Filmora Video Editor has all the different categories of text animations to cater to all the different video niches. Therefore, you can have appropriate and creative text animations based on your video content to make it eye-catching and engaging. Here are the detailed steps to animate the text in video.
Free Download For Win 7 or later(64-bit)
Free Download For macOS 10.14 or later
- How to add text in Filmora?
First of all, you need to add text to your video project to get started. Launch Filmora and import any video that you want to place in the background. You can also go to Stock Media and select any background photo or video as per your preference. Click on Quick Text option from the toolbar above the timeline.
This will add a text layer on the timeline with a default text. Double-click on the text layer and edit the default text. The text layer should be over the background layer and you can reposition the text layer depending on where you want the text to appear on the video. You can adjust the position of the text on the video from Viewer.

- How to edit font in Filmora?
Now that you have placed and positioned the text in your video properly, it is time to edit the text style. Double-click on the text layer and go to Title>Preset> Font section. Select the font, size, and alignment. If there are multiple texts in the template, select them one by one from Viewer and edit them. Go to Settings section and change text color and spacing as appropriate. There are also several text style templates available to choose from if you want to.

- How to use animation in text in Filmora?
Double-click on the text layer again and this time, you need to go to Animation tab. You will see all the popular text animation templates on the left panel. Place your mouse pointer over them to get a preview. Select any one of these animations by double-clicking on the animation and click on Ok button. Play the video to watch the applied animation.

- How to use text preset in Filmora?
If you want to make the text animation eye-catching and attention-grabbing, you need to select a text animation preset in Filmora. Go to Titles and check out the left panel where you will find all the different categories of text effects and animations. Go to the category that matches your video content and select any template and drop it on the timeline. Double-click on the text layer to edit the default text and text style as per your preference.

Part 4. How to Make Creative Text Animation?
Depending on the video content, you have to select the text effect and create text animation accordingly. We have already stated that Filmora has different categories of text animation templates to satisfy all your video requirements perfectly. You can choose appropriate text animation templates that go well with your video category and use them to come up with creative text animations.
- Social media
If you are making videos for social media platforms such as Facebook or for video streaming platforms like YouTube, you should select text animations from Social Media category in Filmora. There are over 200+ text animation templates available that have all the common text animations you usually see as well as creative text animations that will make your video stand out.

All you need to do is import your video and place it in the background. Go to Titles and select Social Media category and drop any desired text animation on the timeline. Thereafter, edit and customize the text layer and style along with the animation as per your preference.
- Education
If your video belongs to education nice such as you are explaining a concept or demonstrating a tutorial, you need to use text animations that are graceful for your video content. Filmora has a dedicated section for text animations related to education. Go to Titles> Tutorials and you will see around 400 text effects and animations that you can use in your educational video effectively.

- Business
If you are creating videos for brands and businesses, there are certain creative text animations you have to use in order to get traction from the target audiences. Filmora comes with over 150 text effects and animations specifically for business videos so that the branding gets strong and leaves a good impression in the mind of the viewers. Go to Titles> Business and choose the desired text animations and customize them to fit into your brand image.

- Travel
If you are into making traveling vlogs or informational travel videos, Filmora has a specific set of text effects and creative animations. You get to choose from over 250 templates to represent any text and title you want to display in your video. The beautiful and eye-catching animated text will definitely get your message across to the viewers pleasantly. Go to Titles> Travel section and check out all the text animations to choose from.

- Gaming
There are so many gamers who put up their gameplay videos on social media and video streaming platforms. While editing the video, they need to put up animated text so that the video content looks interesting and engaging. If you have a gaming video, Filmora has around 500 text effects and animations to use in your video. Go to Titles> Gaming and select from any creative text animations as per your preference.

Art of Time Manipulation: A Guide to After Effects Slow Motion Mastery
The discovery of manipulating various aspects of video is advancing in every era. One such advancement is manipulating time duration to create slow-mo. Slowing down a video has advantages in many industries and multiple contexts. For instance, it focuses the audience’s attention on a video shot or during a sports match. They also help in comprehending scientific processes during research.
If you also want to experiment with this video aspect, then you’re at the right place. This article will provide you with a detailed guide on how to slow down video in After Effects. Along with slow down footage After Effects, you can learn about an alternative. Both video editors are professional when it comes to making a slow-mo. Keep reading the article to learn more about the slow-down clip After Effects.
Slow Motion Video Maker Slow your video’s speed with better control of your keyframes to create unique cinematic effects 

Part 1: A Complete Overview of Adobe After Effects
Before learning how to slow mo in After Effects, we want to introduce you to the software. Adobe After Effects is a professional software designed to assist in post-production. Those unrealistic scenes you see in a sci-fi movie are its creation. Users can work with multiple effects categories to create animated scenes and titles.
The software has undergone multiple updates since its creation. With each version more advanced than the previous, users can perform multiple tasks with it. They can add and customize visual effects, 2D vectors, and 3D animations. Following are some of the functions to find along with slow-down footage After Effects:
- Text Animations: Adding text and titles is important for emphasizing a video’s key parts. In After Effects, you can personalize titles and introduce animations. You can also create animated logos in this editor for personal branding.
- VFX/Visual Effects: You can add multiple visual effects and presets from its asset’s library. The tool also allows users to customize and add an effect to preset. This helps with increasing productivity during video editing tasks.
- Motion Tracking: Do you want to blur out or remove a person or scene throughout a video? With this feature, doing that is a piece of cake. Select the object-to-motion track and play the video from start to end. The tracker will detect the object’s motion and add a specific effect throughout.
- Masking: Many video editors offer masking options, but a few offer precision. Precision is very important during masking, and After Effects is a master of that. Along with different masking options, it offers custom settings to bring accuracy.
- Timeline Editing: To see how professional software is, see if it has a timeline panel. Timeline editing is one of the functions that bring accuracy and professionalism. You can cut, align, apply effects, transitions, and much more on it.
Part 2: A Guide to Slow Down Video in Adobe After Effects During Editing
Upon learning about After Effects and its functionalities, let’s move forward. This section highlights the step-by-step procedure of creating a video slow mo. This is a quick and simple method to slow down a video using After Effects. Keep reading the below section for a seamless slow-down clip After Effects:
Step 1: After importing a video, navigate towards the timeline video layer and right-click on it. From the dropdown menu, select “Time” and then select the “Time Stretch” option.

Step 2: In the Time Stretch window, increase the default value of “Stretch Factor.” Then click “OK,” and this will slow down your clip.

Step 3: To bring precision to your slow-mo, you need to adjust the frame rate of the video. For this, right-click on the timeline and go to “Frame Blending > Pixel Motion” option. Afterward, play your video from start to end and observe the changes.

Part 3: Alternative: Slowing Down Video in Wondershare Filmora with Clarity
Even though slow-down footage After Effects retains video quality, there are certain drawbacks. It is a professional video editing platform used by filmmakers. This means the software must have some technicalities and costs a fortune. Hence, we provide you with a simpler yet professional alternative called Wondershare Filmora . It is a video editing software that offers multiple editing functions and effects.
Wondershare Filmora is an AI-driven software that makes task achievement accessible. Along with multiple features, there are different methods for slowing down a video in it. You can use its Super Slow-Motion feature, Speed Ramping, or a Preset for it. In this guide, we will discuss all these methods with their step-by-step guides.
Free Download For Win 7 or later(64-bit)
Free Download For macOS 10.14 or later
Methods to Slow Down Video in Filmora
In this section, we will discuss alternative methods of slowing video in After Effects. All the mentioned methods are carried out in Wondershare Filmora. Here is the step-by-step guide to creating a slow-motion video using Filmora:
- Method 1. Step-by-Step Guide to Slow Down a Video Manually
- Method 2. Step-by-Step Guide to Slow a Video Using Optical Flow Option
Method 1. Step-by-Step Guide to Slow Down a Video Manually
Users can employ the manual speed adjustment option along with the automated slow-motion option. The method of accessing this option is straightforward, and here is its guide:
Step 1Initiate Filmora and Import Media
Once you have downloaded Filmora, start it and click the “New Project” tab. After accessing the editing interface, click the “Import” button to download media. From the Project Media panel, drag and drop media to the timeline.

Step 2Access Uniform Speed Option
Once the media is in the timeline, select it and right-click on it. From the options panel, locate and click the “Uniform Speed” option. From 
Step 3Adjust the Speed and Preview
A settings panel will appear on the right side of the screen; navigate towards it. Under the “Uniform Speed” tab, adjust the “Speed” slider to slow down your video. If its value decreases, your video will become slow motion. Further, hit the play button to preview and export your slow-mo video.

Method 2. Step-by-Step Guide to Slow a Video Using Optical Flow Option
If you prefer the automated creation of slow-mo, then Filmora offers an AI Frame Interpolation feature. Find the detailed instruction manual for accessing this feature below:
Step 1Look For Speed Ramping Option
After importing media and bringing it to the timeline panel, select it. Then, navigate towards the top toolbar and select the “Tools” tab. From the expansion menu, click on the “Speed Ramping” option.

Step 2Access the AI Frame Interpolation
Continue to select a specific preset for speed ramping. As you select one, locate and expand the “AI Frame Interpolation” section. From the appearing option, select the “Optical Flow” option.

Step 3Render Preview for Results
Once you have enabled this option, navigate towards the timeline toolbar. Search and select the “Render Preview” option from the given icons. Play the video to see the results, adjust, and click the “Export” button to download.

Edit Beyond Basic with AI Video Editing Features of Filmora
This part of the article will highlight some of the prominent video editing features of Filmora. The uniqueness of these features lies in their AI-backed algorithms. You can give directions according to your video, and AI will operate accordingly. Here are some of its video editing features that you’ll come across upon entering:
1. Remove Background
With this feature of Filmora, you can remove the background of your videos and images. The AI-integrated technology preserves the object while removing the background. In addition, you can add a solid color, gradient, or custom background for it.
2. Auto Reframe
Creating reels for Instagram or crafting YouTube shorts has some requirements. To preserve the integrity and visuals of content, it is important to fit a video. With this AI, you can set the required frame resolution. Along with that, it preserves the pixel quality of the video while resizing the frame.
3. AI Smart Masking
Filmora offers multiple mask options to infuse effects and filters to specific parts. However, the V13 upgrade introduced an AI masking feature for improved results. By enabling this feature, you can choose to mask objects or backgrounds.
4. AI Thumbnail Creator
Thumbnails increase video views by evoking the audience’s interest in seeing a video. In Filmora, you can employ the AI Thumbnail creator to auto-create thumbnails. It analyzes the best frame out of your video and chooses it as a thumbnail. You can further apply many templates to this thumbnail according to context.
Conclusion
This article has expanded your knowledge and expertise about two powerful video editors. With how to slow down video in After Effects, we introduced you to the software. There is no limitation of features in either software as both bring out the best in videos.
However, we recommend Wondershare Filmora as it is a more accessible alternative. Creating a slow-mo in this software is easier and requires no effort. In addition, you can also access its built-in effects and presets for task productivity.
Make A Slow Motion Video Make A Slow Motion Video More Features

Part 1: A Complete Overview of Adobe After Effects
Before learning how to slow mo in After Effects, we want to introduce you to the software. Adobe After Effects is a professional software designed to assist in post-production. Those unrealistic scenes you see in a sci-fi movie are its creation. Users can work with multiple effects categories to create animated scenes and titles.
The software has undergone multiple updates since its creation. With each version more advanced than the previous, users can perform multiple tasks with it. They can add and customize visual effects, 2D vectors, and 3D animations. Following are some of the functions to find along with slow-down footage After Effects:
- Text Animations: Adding text and titles is important for emphasizing a video’s key parts. In After Effects, you can personalize titles and introduce animations. You can also create animated logos in this editor for personal branding.
- VFX/Visual Effects: You can add multiple visual effects and presets from its asset’s library. The tool also allows users to customize and add an effect to preset. This helps with increasing productivity during video editing tasks.
- Motion Tracking: Do you want to blur out or remove a person or scene throughout a video? With this feature, doing that is a piece of cake. Select the object-to-motion track and play the video from start to end. The tracker will detect the object’s motion and add a specific effect throughout.
- Masking: Many video editors offer masking options, but a few offer precision. Precision is very important during masking, and After Effects is a master of that. Along with different masking options, it offers custom settings to bring accuracy.
- Timeline Editing: To see how professional software is, see if it has a timeline panel. Timeline editing is one of the functions that bring accuracy and professionalism. You can cut, align, apply effects, transitions, and much more on it.
Part 2: A Guide to Slow Down Video in Adobe After Effects During Editing
Upon learning about After Effects and its functionalities, let’s move forward. This section highlights the step-by-step procedure of creating a video slow mo. This is a quick and simple method to slow down a video using After Effects. Keep reading the below section for a seamless slow-down clip After Effects:
Step 1: After importing a video, navigate towards the timeline video layer and right-click on it. From the dropdown menu, select “Time” and then select the “Time Stretch” option.

Step 2: In the Time Stretch window, increase the default value of “Stretch Factor.” Then click “OK,” and this will slow down your clip.

Step 3: To bring precision to your slow-mo, you need to adjust the frame rate of the video. For this, right-click on the timeline and go to “Frame Blending > Pixel Motion” option. Afterward, play your video from start to end and observe the changes.

Part 3: Alternative: Slowing Down Video in Wondershare Filmora with Clarity
Even though slow-down footage After Effects retains video quality, there are certain drawbacks. It is a professional video editing platform used by filmmakers. This means the software must have some technicalities and costs a fortune. Hence, we provide you with a simpler yet professional alternative called Wondershare Filmora . It is a video editing software that offers multiple editing functions and effects.
Wondershare Filmora is an AI-driven software that makes task achievement accessible. Along with multiple features, there are different methods for slowing down a video in it. You can use its Super Slow-Motion feature, Speed Ramping, or a Preset for it. In this guide, we will discuss all these methods with their step-by-step guides.
Free Download For Win 7 or later(64-bit)
Free Download For macOS 10.14 or later
Methods to Slow Down Video in Filmora
In this section, we will discuss alternative methods of slowing video in After Effects. All the mentioned methods are carried out in Wondershare Filmora. Here is the step-by-step guide to creating a slow-motion video using Filmora:
- Method 1. Step-by-Step Guide to Slow Down a Video Manually
- Method 2. Step-by-Step Guide to Slow a Video Using Optical Flow Option
Method 1. Step-by-Step Guide to Slow Down a Video Manually
Users can employ the manual speed adjustment option along with the automated slow-motion option. The method of accessing this option is straightforward, and here is its guide:
Step 1Initiate Filmora and Import Media
Once you have downloaded Filmora, start it and click the “New Project” tab. After accessing the editing interface, click the “Import” button to download media. From the Project Media panel, drag and drop media to the timeline.

Step 2Access Uniform Speed Option
Once the media is in the timeline, select it and right-click on it. From the options panel, locate and click the “Uniform Speed” option. From 
Step 3Adjust the Speed and Preview
A settings panel will appear on the right side of the screen; navigate towards it. Under the “Uniform Speed” tab, adjust the “Speed” slider to slow down your video. If its value decreases, your video will become slow motion. Further, hit the play button to preview and export your slow-mo video.

Method 2. Step-by-Step Guide to Slow a Video Using Optical Flow Option
If you prefer the automated creation of slow-mo, then Filmora offers an AI Frame Interpolation feature. Find the detailed instruction manual for accessing this feature below:
Step 1Look For Speed Ramping Option
After importing media and bringing it to the timeline panel, select it. Then, navigate towards the top toolbar and select the “Tools” tab. From the expansion menu, click on the “Speed Ramping” option.

Step 2Access the AI Frame Interpolation
Continue to select a specific preset for speed ramping. As you select one, locate and expand the “AI Frame Interpolation” section. From the appearing option, select the “Optical Flow” option.

Step 3Render Preview for Results
Once you have enabled this option, navigate towards the timeline toolbar. Search and select the “Render Preview” option from the given icons. Play the video to see the results, adjust, and click the “Export” button to download.

Edit Beyond Basic with AI Video Editing Features of Filmora
This part of the article will highlight some of the prominent video editing features of Filmora. The uniqueness of these features lies in their AI-backed algorithms. You can give directions according to your video, and AI will operate accordingly. Here are some of its video editing features that you’ll come across upon entering:
1. Remove Background
With this feature of Filmora, you can remove the background of your videos and images. The AI-integrated technology preserves the object while removing the background. In addition, you can add a solid color, gradient, or custom background for it.
2. Auto Reframe
Creating reels for Instagram or crafting YouTube shorts has some requirements. To preserve the integrity and visuals of content, it is important to fit a video. With this AI, you can set the required frame resolution. Along with that, it preserves the pixel quality of the video while resizing the frame.
3. AI Smart Masking
Filmora offers multiple mask options to infuse effects and filters to specific parts. However, the V13 upgrade introduced an AI masking feature for improved results. By enabling this feature, you can choose to mask objects or backgrounds.
4. AI Thumbnail Creator
Thumbnails increase video views by evoking the audience’s interest in seeing a video. In Filmora, you can employ the AI Thumbnail creator to auto-create thumbnails. It analyzes the best frame out of your video and chooses it as a thumbnail. You can further apply many templates to this thumbnail according to context.
Conclusion
This article has expanded your knowledge and expertise about two powerful video editors. With how to slow down video in After Effects, we introduced you to the software. There is no limitation of features in either software as both bring out the best in videos.
However, we recommend Wondershare Filmora as it is a more accessible alternative. Creating a slow-mo in this software is easier and requires no effort. In addition, you can also access its built-in effects and presets for task productivity.
Easy Steps to Make Glitch Effect with Filmora
You don’t need outdated VCRs or any other broken technology to produce glitch effects. Instead, you can use a video editing program for Mac and PCs, such as Filmora , to transform your videos into glitch-effect masterpieces. You can also use the glitch effects to provide striking shot transitions or opening titles. Keep reading this article on how to apply various glitch video effects in Filmora 11:
Part 1: What is a Glitch Effect?
A glitch effect occurs when a section of your video temporarily changes look or “glitches” for a short while. Although transient glitches are typical, they can occasionally linger for a few seconds or more.

You can use a glitch effect to temporarily change the appearance of the image in the video to give the impression that a machine is processing it. Additionally, it gives your finished piece a fantastic, dreamlike aspect.
Part 2: When Should you Apply a Glitch Effect?
A few years back, we had no choice but to watch glitchy movies on rusty VCR devices. Nowadays, retro video effects are very popular in TV movies and even games. You can use these effects in many ways, like making fake vintage footage or emulating a glitching computer.
Filmmakers frequently employ glitching in their videos to give the impression that a character has been affected by a technical abnormality, is having a flashback, or is being watched by someone else via a digital camera system. Something happens when the person or image flashes, often without their knowledge. In addition, you can apply the glitch effect to a composition to evoke a feeling of dramatic irony.
Part 3: Tutorial to Chromatic Aberration Effect
Chromatic aberration refers to how old lenses tend to split colors. This effect is very common in Old media like VHS or LaserDisc.

Here is a complete breakdown of each component of the Retro look and how you can make your glitch effects in Filmora 11:
Step1 Download Wondersshare Filmora 11 on your Pc by visiting filmora.wondershare.com.

Step2 Open Filmora and click on the Effects tab.
Step3 Search Chromatic aberration and drag the effect right onto your clip. It will give you a fantastic pre-made version of the effect.
Part 4: How to Customize Glitch Effect with Filmora
You can add final touches to your video clips by customizing Filmora’s effects to take your glitch effect to the next level. You can mix and match different effects in your video to create your custom glitch effect in Filmora 11.
Free Download For Win 7 or later(64-bit)
Free Download For macOS 10.14 or later
Step1 Once you have your clip on the timeline, select your clip and click on Edit. Now choose Duplicate to create two more copies.

Step2 Put the new copies on the layer above the others and make sure everything is lined up exactly. To create the glitch effect, separate the color channels on your Clips into the primary colors red, green, and blue.

Step3 Double-click on the top clip.

Go to Color and open the White Balance option to make this layer completely red. Next, drag both Temperature and Tint sliders to a hundred.

Step4 Now click the little eye icon on the timeline to hide the top layer and move on to the middle layer.
Step5 Double-click on your middle clip and go to Color, then select White Balance and set your Temperature to -100 and your Tint to 100.

Step6 Finally, hide this layer just like before. Repeat the same steps for the last clip but make this clip the blue layer by leaving the Temperature at zero and setting the Tint to -100.

Step7 Double-click the clip in the top layer, click the Video Tab, and open the Compositing options. Set the Blending Mode of this top layer to Soft Light.

Now click on the clip in your preview window and move the image over by pressing the left Arrow key on your keyboard a few times. Once you’re happy with the top clip, hide that layer by clicking the eye icon.

Step8 To make the middle layer visible, double-click the clip in your mid layer and set the Blending Mode of this layer to Screen.

Now click on your clip in the preview window and press the Right key as many times as you did before. Finally, make all the layers visible by clicking the eye icon.

Vignette
A vignette is a dark border that fades around the frame’s edges in Filmora. You can easily add a vignette effect to your video by using these steps:
Step1 First, click the Effects Tab and type in Vignette.
Step2 Next, drag the Vignette Radius effect to a layer above your previous three layers.
Step3 Now adjust the length to match the other clips.
VHS static effects
A VHS effect is a grainy distortion that resembles an old analog video cassette recording. To apply the VHS static effects:
Step1 Click the Effects tab.
Step2 Search for the VHS static and drag it to a new layer above everything else.
Step3 Extend one of the effects to match the length of your previous clips.
VCR Distortion
VCR Distortion effect will make your video look highly glitched. To apply this effect:
Step1 Click on the Effects tab.
Step2 Search for VCR Distortion, then drag and drop this effect over your previous layer.
Part 5: Tips to Create Awesome Glitch Effects
- One of the best ways to use the VCR Distortion effect is to cut it short and intersperse it around your video in random parts.
- The glitch Distortion effect is very intense, so we recommend cutting this effect very short and dropping it at random parts of your video.
- You can also use these effects as a sneaky way to hide Cuts in your video.
Summary
You can use glitch effects created or inspired by faulty video equipment as a powerful storytelling tool. These effects can help you change the tone of the entire video by adding a specific visual aesthetic and making the narrative simpler to convey and more approachable for the audience.
We recommend using Filmora 11 for adding built-in glitch effects. You can also use this app to create custom glitch effects within a few minutes.
Free Download For macOS 10.14 or later
Step1 Once you have your clip on the timeline, select your clip and click on Edit. Now choose Duplicate to create two more copies.

Step2 Put the new copies on the layer above the others and make sure everything is lined up exactly. To create the glitch effect, separate the color channels on your Clips into the primary colors red, green, and blue.

Step3 Double-click on the top clip.

Go to Color and open the White Balance option to make this layer completely red. Next, drag both Temperature and Tint sliders to a hundred.

Step4 Now click the little eye icon on the timeline to hide the top layer and move on to the middle layer.
Step5 Double-click on your middle clip and go to Color, then select White Balance and set your Temperature to -100 and your Tint to 100.

Step6 Finally, hide this layer just like before. Repeat the same steps for the last clip but make this clip the blue layer by leaving the Temperature at zero and setting the Tint to -100.

Step7 Double-click the clip in the top layer, click the Video Tab, and open the Compositing options. Set the Blending Mode of this top layer to Soft Light.

Now click on the clip in your preview window and move the image over by pressing the left Arrow key on your keyboard a few times. Once you’re happy with the top clip, hide that layer by clicking the eye icon.

Step8 To make the middle layer visible, double-click the clip in your mid layer and set the Blending Mode of this layer to Screen.

Now click on your clip in the preview window and press the Right key as many times as you did before. Finally, make all the layers visible by clicking the eye icon.

Vignette
A vignette is a dark border that fades around the frame’s edges in Filmora. You can easily add a vignette effect to your video by using these steps:
Step1 First, click the Effects Tab and type in Vignette.
Step2 Next, drag the Vignette Radius effect to a layer above your previous three layers.
Step3 Now adjust the length to match the other clips.
VHS static effects
A VHS effect is a grainy distortion that resembles an old analog video cassette recording. To apply the VHS static effects:
Step1 Click the Effects tab.
Step2 Search for the VHS static and drag it to a new layer above everything else.
Step3 Extend one of the effects to match the length of your previous clips.
VCR Distortion
VCR Distortion effect will make your video look highly glitched. To apply this effect:
Step1 Click on the Effects tab.
Step2 Search for VCR Distortion, then drag and drop this effect over your previous layer.
Part 5: Tips to Create Awesome Glitch Effects
- One of the best ways to use the VCR Distortion effect is to cut it short and intersperse it around your video in random parts.
- The glitch Distortion effect is very intense, so we recommend cutting this effect very short and dropping it at random parts of your video.
- You can also use these effects as a sneaky way to hide Cuts in your video.
Summary
You can use glitch effects created or inspired by faulty video equipment as a powerful storytelling tool. These effects can help you change the tone of the entire video by adding a specific visual aesthetic and making the narrative simpler to convey and more approachable for the audience.
We recommend using Filmora 11 for adding built-in glitch effects. You can also use this app to create custom glitch effects within a few minutes.
Also read:
- New How To Create a Polaroid Collage for 2024
- 2024 Approved With Looping Videos, People Stay on Your Site Longer, Boosting Engagement. With Video Being Watched on Mobile over 3X More than Any Other Content, Its an Essential Part of Mobile Advertising
- New Want to Add the Radial Blur Image Effect to Your Photos to Make Them Stand Out? Read on to Find the 11 Best Tools for Creating Stunning Image Editing Projects
- Easy Guide to Use a Stabilization Tool in Filmora
- Updated 2024 Approved 10 Best Music Video Templates to Make Your Video Popular
- Updated 2024 Approved Mastering DaVinci Resolve Scopes A Comprehensive Guide
- 2024 Approved Do You Want to Know About the Photo Video Maker with Song? Are You Ready to Discover It in Detail? This Article Will Give You Valuable Insights on This Topic
- Updated Learn Top Best Free LUTs For Premiere Pro for 2024
- Quick Solved How to Add Subtitles to a Video on iPhones for 2024
- New 10 Best Innovative AR Video Effects to Check Out for 2024
- 2024 Approved How to Crop a Video in Windows Media Player
- Top 20 Best Text To Speech Software Windows, Mac, Android, iPhone & Online
- Updated Best Voice Changers for WhatsApp Free Included for 2024
- Updated Guide To Creating The Perfect VHS Effect Look in Premiere Pro
- Updated WebM to GIF Converters (Online and Offline Solutions)
- 2024 Approved How to Create Your Own LUTs for Your Video
- Updated This Article Is a Guide on How to Download and Install Final Cut Pro, Its Key Features, and More. It Also Discusses an Alternative Option to It so the Creators or Editors Can Opt for Editing Videos Accordingly
- New 2024 Approved Tips for Choosing Location and Scheduling Music Video
- New Does the Customary Speed of Your TikTok Slideshow Appear to Be Slow Enough of Late? If Yes, Drop Your Worries Here with the Know-How of Increasing the TikTok Slideshow Speed
- Updated How to Create Glowing Edge Effect in TikTok Dancing Video
- 2024 Approved Ultimate Guide on Magic Effects Video Making
- New Easily Cut Large Video Faster on Mac
- How To Speed Up Video With Lightworks Video Editor for 2024
- Top 5 AI Music Video Examples and Makers to Make Them for 2024
- Updated Guide Adding Audio in Wondershare Filmora
- Updated WMV File Format Has Many Benefits over the Video Industry. If You Are Excited to Know More About the Format and Its Pros and Cons, Then Lets Start the Discussion
- Updated Have a Desire to Uplift Your Editing Creativity with Trying Hands at Working with Storyboards? Keep Reading to Have a Comprehensive Understating of the Workflow Through Stepwise User Guides
- 2024 Approved Lets Learn How to Convert a Normal Video Into a Film Shot in the 1920S with Wondershare Filmora
- New Hard to Remove Black Background in After Effects? Heres the Best Way to Deal With It
- 2024 Approved Create Eye-Catching Slow-Motion Videos to Set Your Own Trend. For This Purpose, Read This Article to Find and Learn to Use CapCuts New Slow-Motion Templates
- Updated In 2024, The Most Complete Guide to Make Fortnite Montage
- New 2024 Approved Step by Step to Rotate Videos Using Handbrake
- New How to Create Glowing Edge Effect in TikTok Dancing Video
- Updated 2024 Approved Split a Video in the Lightworks Step by Step
- In 2024, ReVisionFX ReelSmart Motion Blur Plugin For Premiere Pro
- How To Change Country on App Store for iPhone SE (2020) With 7 Methods | Dr.fone
- Ways to stop parent tracking your Vivo Y56 5G | Dr.fone
- In 2024, How to Track WhatsApp Messages on Lenovo ThinkPhone Without Them Knowing? | Dr.fone
- In 2024, How Can We Bypass Nokia G42 5G FRP?
- In 2024, 5 Ways To Teach You To Transfer Files from Samsung Galaxy A54 5G to Other Android Devices Easily | Dr.fone
- In 2024, All About Apple iPhone 12 Pro Unlock Chip You Need to Know
- Updated Top 10 Best Photo to Animation Converters for 2024
- How Do I Stop Someone From Tracking My Nokia C210? | Dr.fone
- How To Fix Unresponsive Phone Touchscreen Of Vivo Y100i | Dr.fone
- Process of Screen Sharing Oppo A2 to PC- Detailed Steps | Dr.fone
- In 2024, Unova Stone Pokémon Go Evolution List and How Catch Them For Honor Magic5 Ultimate | Dr.fone
- In 2024, How To Unlock a Samsung Galaxy F04 Easily?
- How to unlock a disable iPhone 7 using find my iphone
- 5 Easy Ways to Change Location on YouTube TV On Oppo Find X7 Ultra | Dr.fone
- In 2024, Did Your iPhone 12 Pro Max Passcode Change Itself? Unlock It Now
- Top 10 Telegram Spy Tools On Motorola Moto G14 for Parents | Dr.fone
- In 2024, How To Change Your SIM PIN Code on Your Samsung Galaxy Z Flip 5 Phone
- In 2024, Top 5 Car Locator Apps for Vivo Y27 5G | Dr.fone
- New OBS Animated Lower Thirds Alternatives
- In 2024, Hacks to do pokemon go trainer battles For Realme C55 | Dr.fone
- In 2024, Ultimate Guide on iPhone 11 Pro iCloud Activation Lock Bypass
- In 2024, 6 Methods to Share Apple iPhone 13 mini Screen with PC | Dr.fone
- In 2024, Top 15 Apps To Hack WiFi Password On ZTE Axon 40 Lite
- Reinstall hardware drivers with Device Manager on Windows 10
- Remove FRP Lock on Poco
- Easy steps to recover deleted videos from Nokia G310
- Fix Tecno Camon 20 Pro 5G Android System Webview Crash 2024 Issue | Dr.fone
- How to Fix the Soft Bricked Infinix Note 30 VIP Racing Edition? | Dr.fone
- Title: Add Selective Color Effect to Your Videos Using Filmora
- Author: Chloe
- Created at : 2024-06-26 06:23:53
- Updated at : 2024-06-27 06:23:53
- Link: https://ai-editing-video.techidaily.com/add-selective-color-effect-to-your-videos-using-filmora/
- License: This work is licensed under CC BY-NC-SA 4.0.

