:max_bytes(150000):strip_icc():format(webp)/iPad-Pro_creative-sketch_10302018-5be0773ac9e77c0051d5d51c.jpg)
Add Some Shake to Videos with Alight Motion

Add Some Shake to Videos with Alight Motion
Are you looking to add some dynamic effects to your videos? Have you ever wanted to create footage that feels like shaking but didn’t know how to do it? Well, you’re in luck! This guide will show you how to use Alight Motion, a video editing app, to add shake effects to your videos.
Whether you’re a professional videographer or a hobbyist, this guide will take you step-by-step through adding shake effects with Alight Motion. With its easy-to-use interface and powerful features, Alight Motion makes it simple to take your videos to the next level. So, let’s get started and shake things up!

Overview of Alight Motion
Alight Motion is a powerful video editing app that allows users to create dynamic and engaging videos. It offers many features, including motion graphics, visual effects, and animation tools. With Alight Motion, you can easily add shake effects to your videos and other dynamic effects such as panning, zooming, and rotation.
One of the great things about Alight Motion is its user-friendly interface. The app is designed to be intuitive and easy to use, making it accessible to users of all skill levels.
Alight Motion has everything you need to create high-quality, cinematic footage, whether you’re a professional videographer or just getting started with video editing. So, if you want to take your videos to the next level, give Alight Motion a try!
How To Add Shake Effects to Your Video in Alight Motion?
By following these simple steps, you’ll be able to create footage that feels like shaking, adding a sense of dynamic movement to your videos. Shake effects can be a great addition to any video if you want to create a dramatic effect or add visual interest to your footage. So, let’s learn how to add shake effects to your videos in Alight Motion.
Step1 Open the Alight Motion app and tap “New Project.”
Step2 Import your video clip.
Step3 Adjust the length of your clip, then tap “Add Effect.”

Step4 Search for the video effect. In this case, search “Tiles.”
Step5 Adjust the video using the effect settings.
Step6 Search for the blur effect. In this case, search “Motion Blur.”
Step7 Search for the shake effect. In this case, search “Auto-Shake.”
Step8 Adjust the speed, magnitude, and other elements and effects of the video clip.
Step9 Preview the video and tap “Save.”
[Bonus] Filmora for Mobile – Best Alternative to Alight Motion
Filmora for mobile is a powerful video editing app that can be an alternative to Alight Motion. It has a user-friendly interface and offers a wide range of features that allow users to create professional-looking videos easily. Some of the key features of Filmora for mobile include:
Free Download For Win 7 or later(64-bit)
Free Download For macOS 10.14 or later
- Motion graphics and visual effects: Filmora for mobile has a wide range of motion graphics and visual effects that you can use to enhance your videos, including shake effects.
- Video trimming, merging, and splitting: The app allows you to trim, merge and split your videos to create the perfect footage.
- Music and audio editing: Filmora for mobile has a built-in music library and audio editing tools that you can use to add music and sound effects to your videos.
- Text and title overlays: You can add text and title overlays to your videos to create captions, subtitles, and more.
- Speed control: Adjust the speed of your videos to create fast-paced or slow-motion footage.
With Filmora for mobile, you can easily create high-quality, professional-looking videos with shake effects and all the other features that Alight Motion offers. The app has a simple and intuitive interface that makes it easy for users of all skill levels to create stunning videos.
Effects in Filmora for Mobile
Filmora for mobile offers a wide variety of effects that you can use to enhance your videos and make them stand out. The shaking effect is one popular effect that adds a sense of movement and drama to your footage. With Filmora, you can easily adjust the intensity of the shake effect to create a subtle or more pronounced effect.
Another great effect that Filmora for mobile offers is the split-screen effect. This allows you to split your screen into multiple sections and play different videos or images in each section. This can be useful for creating a sense of simultaneity and storytelling.
Additionally, Filmora for mobile offers a wide variety of transition effects that you can use to transition between different clips in your video smoothly. These effects include wipes, fades, and more. With these effects, you can take your videos to the next level.
How To Add Shake Effects in Filmora for Mobile
Shake effects can be a great addition to any video if you want to create a dramatic effect or add visual interest to your footage. By following the simple steps outlined in this guide, you’ll be able to add shake effects to your videos in Filmora for mobile and take your videos to the next level. So, let’s get started and learn how to add shake effects in Filmora for mobile.
Step1 Open the Filmora mobile app and tap “More.”
Step2 Select the effect in the list of effects loaded.
Step3 Click the “Use“ button to make the effect present in your clip.
Step4 Select the video clip from your device that you want to edit.
Step5 Select the shake effect you want to use and tap the check icon.
Step6 Adjust the duration of the effect to your desired length.
Step7 Tap the “Export“ button to save your video.
After following the steps outlined in this guide, you can easily add shake effects to your videos in Filmora for mobile. However, if you’re still having trouble, we recommend watching the following video for more detailed instructions:
Which Is Better? Alight Motion or Filmora for Mobile?
It ultimately depends on your specific needs and preferences when deciding between Alight Motion and Filmora for mobile. Both apps are powerful video editing tools that offer many features and effects but have their strengths and weaknesses.
| | Alight Motion | Filmora | |
| —————————- | ————————————————————————————————— | ——————————————————– |
| Operating System | Android and iOS | Android and iOS |
| App Store Rating | 4.4 out of 5 | 4.7 out of 5 |
| Google Play Store Rating | 3.6 out of 5 | 4.7 out of 5 |
| Pricing | Free with In-app Purchases | Free with In-app Purchases |
| Number of Shake Effects | 100+ shake effects | 8 different camera shake |
Alight Motion is a powerful video editing app that offers many features and effects, including 100+ shake effects. The app is available for Android and iOS and has received a 4.4 out of 5 rating on the App Store and a 3.6 out of 5 rating on the Google Play Store. Alight Motion is free to download and use, but some features and effects may require in-app purchases.
One of the standout features of Alight Motion is its motion graphics and visual effects capabilities. The app has a wide range of shake effects that you can use to add a sense of movement and drama to your footage.
Alight Motion is suitable for professional videographers who want to create high-quality and professional-looking videos. The app is also great for those who want to create videos for social media platforms, especially those who want to create dynamic and visually engaging videos.
On the other hand, Filmora for mobile is also a powerful video editing app that offers a wide range of features and effects, including 8 different camera shake effects.
The app is available for Android and iOS and has received a 4.7 out of 5 rating on the App Store and a 4.7 out of 5 rating on the Google Play Store. Filmora is free to download and use, but some features and effects may require in-app purchases.
The shake effect feature in Filmora for mobile is simple and allows you to add a subtle or more pronounced shake effect to your footage. Additionally, Filmora for mobile offers a wide range of other effects, including visual effects, transition effects, and color correction tools, that you can use to enhance your videos.
Filmora for mobile is suitable as a user-friendly and easy-to-use video editing app. The app is perfect for hobbyists, YouTubers, or social media content creators who want to create high-quality videos with various effects. It’s also great for those seeking a mobile-based alternative to desktop video editing software.
People Also Ask
Here are some questions that people commonly ask concerning the topic of adding shake effects to videos using Alight Motion.
Q1. How Do You Add Effects to Alight Motion?
To add effects to Alight Motion, you can follow these steps:
Step1 Open the Alight Motion app and create a new project or open an existing one.
Step2 Select the layer to which you want to add the effect, then tap on the “Effects“ button.
Step3 Browse the available effects and tap on the desired effect to apply it to the selected layer.
Step4 You can add multiple layers to your video.
Q2. How Many Effects Are in Alight Motion?
As of now, Alight Motion offers 100+ effects that you can use to enhance your videos and make them stand out. These effects include a wide range of motion graphics, visual effects, and animation tools. Some of the effects available in Alight Motion include shaking effects, panning, zooming, rotation, color correction, and many more.
The app is regularly updated, so the number of effects available may increase over time. The wide range of effects gives you the power to create dynamic and visually engaging videos. With Alight Motion, the possibilities are endless.
Q3. Is 8GB RAM Enough for Alight Motion?
8GB of RAM is generally enough for running Alight Motion, although the app’s recommended minimum is 2GB of RAM. Having more RAM would allow for smoother performance and the ability to handle larger and more complex projects. However, with 8GB of RAM, you should still be able to run Alight Motion without any major issues.
Conclusion
Alight Motion and Filmora for mobile are powerful video editing apps that offer a wide range of features and effects. Each app has its strengths and weaknesses, and it ultimately depends on your specific needs and preferences.
Alight Motion offers more shake effects, while Filmora for mobile offers more simplicity. Both apps can be used to create high-quality and professional-looking videos. It’s recommended to try both apps and see which one works best for you.
How to Loop YouTube Videos on iPhone
YouTube videos are a great way to get information fast. But there are times when you want to watch a video over and over again without having to go back to the YouTube app. Here is how you can loop YouTube videos on your iPhone. There are 2 ways to loop YouTube videos on iPhone. One is through the YouTube app and using third-party apps.
There are many reasons why you might want to loop a video on your iPhone. Maybe you’re trying to learn a dance routine, or you want to listen to a song on repeat. You’ve probably seen those cool looping videos on Instagram and Facebook and wondered how people make them. YouTube is a great place to find videos on any topic.
The YouTube app on the iPhone is a great way to watch videos, but it doesn’t have a repeat or loop feature. This means that if you are watching a long video, you will have to keep your phone on and continue watching the video. YouTube is the world’s most popular video-sharing platform with approx. 1.9 billion monthly active users.
Part 1: How to loop YouTube videos on iPhone
Step 1: Open the YouTube app on your iPhone
Install YouTube on your iPhone after that open it. Search your desired video on the YouTube search bar.
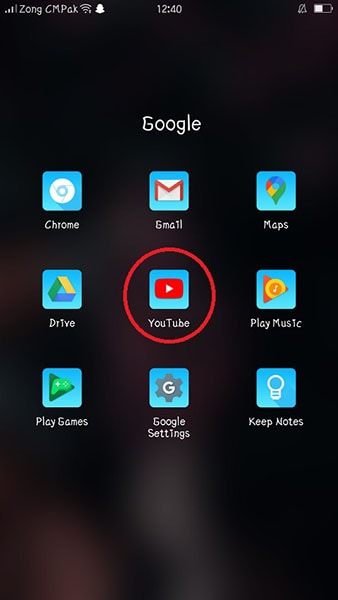
Step 2: Tap the video you want to repeat
Click on the three dots or click on the save button to create a new playlist for your video. If you want to listen to or see the existing videos you can also add your videos to your old playlist.
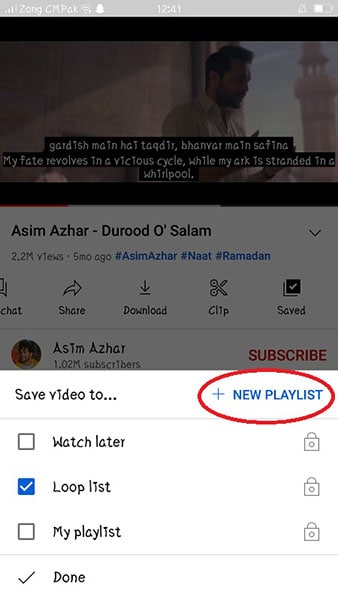
Step 3: Create a playlist and start playing it
Click on New Playlist then give any name to your playlist. Give any name to your playlist and select whether you want to make it private or public.
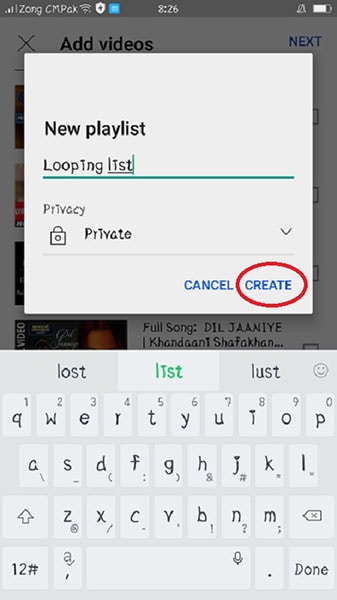
Step 4: Click on the library
After creating a playlist click on the library which is placed at the bottom. After clicking on it you can see your all playlists.

Step 5: Play the playlist on the loop
Click on your desired playlist which you want to play after that you’ll see two options on the screen Play and Shuffle. Select the Play option, your playlist will start.
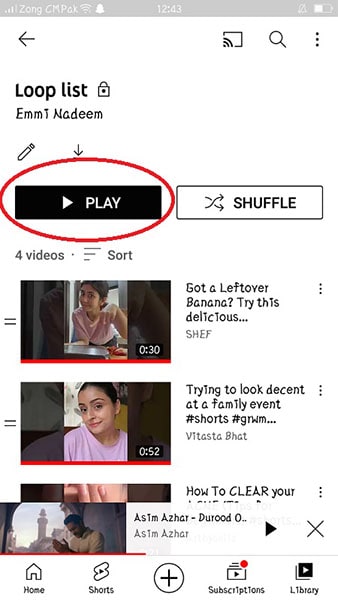
Step 6: Play your favorite video first and put the playlist on the loop
When you start playing your playlist, you can start it with your favorite video or you can also put your playlist on a loop. So that you can watch your videos on a loop.
Benefits of looping YouTube videos on iPhone
If you are a YouTube addict, then you might be pleased to know that your iPhone has a built-in feature that allows for the video to loop back to the beginning. This feature is an excellent way of saving time and maximizing your viewing pleasure. Looping videos on iPhone is a great way of saving time and maximizing your viewing pleasure.
Looping videos on your phone can be a great way to kill time. Watching the same video over and over again can be tiring, but if you do it on your phone, you don’t have to worry about that. You can change the video at any point in time, so if you find that you are getting bored with it, then just find another one.
Over a billion hours of video are watched every day. The app is available for both iOS and Android devices, which means that you can watch YouTube videos on your phone no matter where you are. This can be useful if you want to listen to music or watch a tutorial while doing something else on your phone, like checking Facebook or browsing the web.
Part 2: How to Edit Time-lapse Video on Computer
Time-lapse videos are becoming more and more popular nowadays. They are a great way to show the passage of time, but editing them on a computer is not an easy task. Editing time-lapse videos on a computer is not an easy task because it requires you to have the right software and know how to use it.
It can be quite time-consuming and tedious work, which is why we need a proper editing program that can help us through this process. It’s just about learning the basics of editing and then adding a few effects to make your video more interesting. Here are some tips on how you can edit time-lapse videos on your computer:
- The first thing you need to do is download and install a video editor for your computer.
- Import the timelapse footage into the video editing program that you have downloaded and installed, such as Adobe Premiere Pro or Sony Vegas Pro, etc.
- Now you need to trim out any unwanted footage at the beginning or end of the clip so that what remains is just what you want to show in your final video.
- The next step is to add transitions between scenes, such as fades, wipes, dissolves, or cuts between shots - this will help transition between scenes smoothly and seamlessly without any abrupt jumps in time or space between them while also adding an extra level of polish.
Time-lapse videos can help you produce stunning results, no matter what your creative goals may be. If you want to create a time-lapse video, there are many things you need to consider. Time-lapse videos are not just a series of photos strung together. And the most important thing you need to consider is the format of the video you’ll need to take.
Choosing the right editing software is also important if you’re using a camera that shoots time-lapse videos. And if you’re using a DSLR camera, there is a chance that your time-lapse videos are in MOV format. If that’s the case, then you’re in luck. Filmora can help you edit your time-lapse video with ease.
Edit Time-lapse video on Filmora software
Filmora is a video editor that lets you easily create and edit time-lapse videos. With Filmora, you can add music, filters, and effects to your videos to give them a unique look and feel. You can also trim and cut your videos, and merge them to create longer videos. Filmora is perfect for creating professional-looking time-lapse videos.
Filmora has an easy-to-use timeline that makes it easy to sequence your videos and create smooth transitions. This makes it easy to create high-quality time-lapse videos that look like they were filmed in a single take. Filmora has a built-in editor that lets you easily add music and sound effects to your videos. This means that you can create videos that look and sound like professional movies.
How to edit a video in Filmora:
Filmora’s time-lapse feature is free, which is a great start. However, you do need to do a few things to make it work. First, you need to make sure that your phone is compatible with Filmora. You’ll also need a connection to the Internet and a working camera on your phone. There are a few things that you’ll need to know to start editing videos on Filmora.
Step 1: Download Filmora and create a new project
Download Filmora on your desktop and click on the “New Project” button. This will open up a new window where you can name your project and choose a video file to start working with.

Free Download For Win 7 or later(64-bit)
Free Download For macOS 10.14 or later
Step 2: Select media and place it on the timeline
Click on the “Media” tab and select your video file. You’ll now see the video timeline on the left side of the window. Use the video timeline to drag and drop video clips into the timeline. You can also use the buttons on the timeline to change the speed, direction, and audio volume of the video clips.

Step 3: Select the speed you want the video to play at and click on the “OK” button.
You set the duration and speed of your video according to your requirements. You can edit the speed of your video individually. If you put your first video on high speed then you can slow down your second video.

Step 4: Click on the “Effects” button and select the “Special Effects” tab
You have undoubtedly seen those videos, full of special effects and transitions. These effects are the result of good video editing software, like Filmora. This software is designed to be used by anyone, from beginners to expert editors. You can add effects to your time-lapse video. Click on the Effects on the top bar of Filmora. You can also add various transitions in your time-lapse video.

Step 5: Export your time-lapse video
As a user of Filmora, you can export a time-lapse video onto your computer. This feature is one of the best features Filmora has to offer. You can export your edited time-lapse video on Filmora. When you are done with your time-lapse editing export the video on your desktop, drive, or anywhere you want

The Bottom Line
Since most people own an iPhone, it’s very useful to know some tricks to be more productive. As you have seen, the utility of looping a video is not something to be scoffed at. If you need to keep watching a video over and over again, on iPhone looping a video is one of the best ways to do so.
We hope the content above has been useful to you, and that you can see how looping YouTube videos on your iPhone could improve your iPhone experience. On the other hand, you can use Filmora software for your video or photo editing. Filmora is user-friendly software and you can easily install it from a browser. You just need a piece of basic knowledge to use Filmora.
Free Download For macOS 10.14 or later
Step 2: Select media and place it on the timeline
Click on the “Media” tab and select your video file. You’ll now see the video timeline on the left side of the window. Use the video timeline to drag and drop video clips into the timeline. You can also use the buttons on the timeline to change the speed, direction, and audio volume of the video clips.

Step 3: Select the speed you want the video to play at and click on the “OK” button.
You set the duration and speed of your video according to your requirements. You can edit the speed of your video individually. If you put your first video on high speed then you can slow down your second video.

Step 4: Click on the “Effects” button and select the “Special Effects” tab
You have undoubtedly seen those videos, full of special effects and transitions. These effects are the result of good video editing software, like Filmora. This software is designed to be used by anyone, from beginners to expert editors. You can add effects to your time-lapse video. Click on the Effects on the top bar of Filmora. You can also add various transitions in your time-lapse video.

Step 5: Export your time-lapse video
As a user of Filmora, you can export a time-lapse video onto your computer. This feature is one of the best features Filmora has to offer. You can export your edited time-lapse video on Filmora. When you are done with your time-lapse editing export the video on your desktop, drive, or anywhere you want

The Bottom Line
Since most people own an iPhone, it’s very useful to know some tricks to be more productive. As you have seen, the utility of looping a video is not something to be scoffed at. If you need to keep watching a video over and over again, on iPhone looping a video is one of the best ways to do so.
We hope the content above has been useful to you, and that you can see how looping YouTube videos on your iPhone could improve your iPhone experience. On the other hand, you can use Filmora software for your video or photo editing. Filmora is user-friendly software and you can easily install it from a browser. You just need a piece of basic knowledge to use Filmora.
Free Download For macOS 10.14 or later
Step 2: Select media and place it on the timeline
Click on the “Media” tab and select your video file. You’ll now see the video timeline on the left side of the window. Use the video timeline to drag and drop video clips into the timeline. You can also use the buttons on the timeline to change the speed, direction, and audio volume of the video clips.

Step 3: Select the speed you want the video to play at and click on the “OK” button.
You set the duration and speed of your video according to your requirements. You can edit the speed of your video individually. If you put your first video on high speed then you can slow down your second video.

Step 4: Click on the “Effects” button and select the “Special Effects” tab
You have undoubtedly seen those videos, full of special effects and transitions. These effects are the result of good video editing software, like Filmora. This software is designed to be used by anyone, from beginners to expert editors. You can add effects to your time-lapse video. Click on the Effects on the top bar of Filmora. You can also add various transitions in your time-lapse video.

Step 5: Export your time-lapse video
As a user of Filmora, you can export a time-lapse video onto your computer. This feature is one of the best features Filmora has to offer. You can export your edited time-lapse video on Filmora. When you are done with your time-lapse editing export the video on your desktop, drive, or anywhere you want

The Bottom Line
Since most people own an iPhone, it’s very useful to know some tricks to be more productive. As you have seen, the utility of looping a video is not something to be scoffed at. If you need to keep watching a video over and over again, on iPhone looping a video is one of the best ways to do so.
We hope the content above has been useful to you, and that you can see how looping YouTube videos on your iPhone could improve your iPhone experience. On the other hand, you can use Filmora software for your video or photo editing. Filmora is user-friendly software and you can easily install it from a browser. You just need a piece of basic knowledge to use Filmora.
Free Download For macOS 10.14 or later
Step 2: Select media and place it on the timeline
Click on the “Media” tab and select your video file. You’ll now see the video timeline on the left side of the window. Use the video timeline to drag and drop video clips into the timeline. You can also use the buttons on the timeline to change the speed, direction, and audio volume of the video clips.

Step 3: Select the speed you want the video to play at and click on the “OK” button.
You set the duration and speed of your video according to your requirements. You can edit the speed of your video individually. If you put your first video on high speed then you can slow down your second video.

Step 4: Click on the “Effects” button and select the “Special Effects” tab
You have undoubtedly seen those videos, full of special effects and transitions. These effects are the result of good video editing software, like Filmora. This software is designed to be used by anyone, from beginners to expert editors. You can add effects to your time-lapse video. Click on the Effects on the top bar of Filmora. You can also add various transitions in your time-lapse video.

Step 5: Export your time-lapse video
As a user of Filmora, you can export a time-lapse video onto your computer. This feature is one of the best features Filmora has to offer. You can export your edited time-lapse video on Filmora. When you are done with your time-lapse editing export the video on your desktop, drive, or anywhere you want

The Bottom Line
Since most people own an iPhone, it’s very useful to know some tricks to be more productive. As you have seen, the utility of looping a video is not something to be scoffed at. If you need to keep watching a video over and over again, on iPhone looping a video is one of the best ways to do so.
We hope the content above has been useful to you, and that you can see how looping YouTube videos on your iPhone could improve your iPhone experience. On the other hand, you can use Filmora software for your video or photo editing. Filmora is user-friendly software and you can easily install it from a browser. You just need a piece of basic knowledge to use Filmora.
2 Effective Ways to Make SRT File Translation Like a Pro
Whether you download YouTube SRT in Spanish or want to add translated subtitles to your favorite cartoon video, having an SRT translator will come in handy. The SRT subtitle file is based on texts divided into multiple sections. When you add it to a video, the texts will be displayed as you wrote in the file.
As most people find the translation work tedious, we have presented the two easiest ways of SRT file translation so without anyone’s assistance or prior training.
- Method 2 Translate subtitle .srt file without Downloading Any Software
- [Optional] If you hope to Edit SRT file for Video, here is the Best Way
Method 1 Translate SRT subtitles with third-party translator software
As there are so many different translator software platforms you can try to convert the SRT file to another language, you may be unable to choose the right one. That’s why we have explained the proper process for better clarification.
1. Redokun
One of the best software platforms you can use to translate the SRT file into another language is Redokun. It comes with a machine-automated translation that will automatically translate one language to another within minutes, increasing the overall productivity by 60%. It accurately processes the translation and ensures the texts don’t change during translation. Besides, this SRT file translator comes with a Translator Memory to help you quickly check past files.

Pros
- Easy to use software
- Supports smart revisions for last-minute alterations
- Precise and accurate translator
Cons
- Supports only 14 days of trial
How to translate SRT files?
- Visit Redokun and open the translator.
- Upload the SRT file from local or cloud storage and wait for the document to get uploaded.
- Set the input and output languages and click on the Translate button.
- The new SRT file will get generated with translated text.
Supported OS: Mac and Windows
Supported language translation: English, German, Chinese, and so on.
2. Smartcat
Another outstanding online tool you can use is Smartcat. It supports eight different translator engines, including Amazon and Google. It also accepts multiple file formats and supports over 240 languages, ensuring the SRT file can be translated within minutes.

Pros
- Does not require any expert knowledge
- Translates through AI program for more accuracy
- Support extracting the text from .xml
Cons
- Might not be suitable for beginners
How to translate SRT files?
- Log in to Smartcat and click on Upload. Choose the SRT file and click on Open.
- As the document downloads on the translator, set its language if the default language is not the same. Also, set the new language in which you want the translation.
- Click on Translate and wait for a couple of minutes.
- After a certain time, the new file will be generated with texts written in the language you have set.
Supported OS: Windows and Mac
Supported language translation: English, Mexican, Spanish, Brazilian, and more
3. SDL Trados Studio
SDL Trados Studio is a perfect tool for SRT file translation into another language in no time. It features an AI-powered algorithm that ensures the maximum accuracy in the translated file.

Pros
- Supports multiple languages for translation
- Has free plans
- Accurate translation with no error
Cons
- Not suitable for pros
How to translate SRT files?
- Upload the SRT file on SDL Trados Studio and select the original language from the dropdown.
- Open the language dropdown from the output window and choose the desired language.
- Click on Translate and wait for the new file to be generated.
Supported OS: Mac and Windows
Supported language translation: English, Japanese, Spanish, French, and Italian
4. MemoQ Translator Pro
Based on a computer-based program, this translator software makes the work easier, ensuring easy usage without any hurdles. You won’t have to worry about the texts changing their meaning or getting corrupted during translation.

Pros
- Remembers the past translations
- Increases productivity with faster translation
- Open-source platform
Cons
- Not ideal for beginners
How to translate SRT files?
- Once you upload the file to the software, the texts will be displayed on one side. Choose the language in which you want the final file and click on Translate.
- Each text block will be translated at a time. Once it is over, a green mark will be shown on the side.
Supported OS: Windows
Supported language translation: English, French, Italian, Greek, and Hindi
5. Lokalise
Used even by professional companies, this excellent online tool SRT translator is perfect for Windows and Mac and allows hassle-free translation. It comes with an intuitive UI, ensuring beginners can also efficiently work on the SRT file translation.

Pros
- Easy user interface
- Supports multiple languages
- Allows export of the translated file
Cons
- Does not allow editing of the SRT file
How to translate SRT files?
- Choose the languages for both sides from the dropdown and then upload the concerned SRT file.
- Click on the Translate button and wait for the new file to be generated.
- Once the translation is completed, it will generate the file, and you can download it.
Supported OS: Windows and Mac
Supported language translation: French, Italian, Korean, Spanish, Chinese, etc.
6. Text United
This online platform allows you to translate and upload SRT files easily. It ensures maximum accuracy and does not introduce any error in the translated file.

Pros
- Interface is easy-to-use with clear translating process
- Faster translation for more productivity
- Free software
Cons
- Not an open-source platform
How to translate SRT files?
- Upload the original SRT file and select the input language.
- Once done, select the output language and click on Translate.
- The new subtitles will be generated in the new language after a couple of minutes.
Supported OS: Mac and Windows
Supported language translation: English, German, French
Method 2 Translate subtitle .srt file without Downloading Any Software
The other method for translating the SRT files from one language to another is Notepad (for Windows) or TextEdit (for Mac). As these are simple text editor applications built into the OS, you don’t require any downloading or another person’s help to complete the job.
Note: TextEdit and Notebook are best suited for translating short SRT files from one language to another, especially if the subtitles present are not that much complicated.
Step-by-step guide for SRT translation on Notepad
- Go to the drive where you have stored the file and right-click on the same. Click on “Open with” and choose Notepad from the list of options displayed.

- The file will open in Notepad. Now, edit the SRT file according to the subtitle positions and the text you want to add to the video. Check the time codes because they need to be in sync with the video file.

- Once done, save the file and open Google Translate. Copy each text line and paste the same into the translator’s input box. If the language of the original text is not English, change the language from the dropdown in the translator for easier and more accurate interpretation.

- Click on Translate and wait till the translated text is generated. You need to select the language of the output section according to the required language of the translated SRT file.

- Once the translated text is generated, copy the new text and paste it in place of the original text you copied.
Pros
- Does not need to know about the usage of any software
- Best for small SRT files
- Better for beginners
Cons
- Can change the text during translation
- Time consuming process
Step-by-step guide for SRT translation on TextEdit
- Go to the stored location of the SRT file and right-click on the selected file. Once the menu expands, click on “Open With” and then choose TextEdit as the option. You can also change the default file type to TextEdit. Right-click on the file and select Properties. Once the dialog box opens, click on the “Open With” option and select TextEdit from there. Click on Apply and then Save to change the default file type.

- Once you complete all the edits, open Google Translator and select the input and output languages. The input language will be the one in which your original text is written, and the output is the language you need to transfer the SRT file into.
- Copy and paste the text line from the beginning and click on Translate. Wait for the tool to evaluate and display the translated text.
- Copy it and paste the text into the SRT file. Ensure all the texts are adequately translated before saving and uploading the file to the video.
Pros
- No need to know about the technical use of a software
- Can convert the languages of a small file
- Best for immediate translation
Cons
- Errors can occur during translation
- Needs a lot of time
[Optional] If you hope to Edit SRT file for Video, here is the Best Way
Now that you know the best tools for high-quality video-based subtitle translation, you can choose. However, not all of them support the ability to edit SRT files; for that, you can rely on Wondershare Filmora .
The software is a desktop-based program that users can try out for varying levels of video editing work. You can optimize the videos with features like speed ramping, audio visualization, and speech-to-text. You can add subtitles to videos with the last feature or add external SRT files. Editing is possible as well.
How to Use Filmora to Edit SRT Subtitles for Videos?
Free Download For Win 7 or later(64-bit)
Free Download For macOS 10.14 or later
Step1 Open the Filmora software and add the video file.
Step2 Click on Media to upload SRT file.
Step3 Right-click your subtitle file on the editor timeline> Choose “Advanced Edit”.

Step4 Make changes to the time code, add/merge/remove the strips of subtitle, modify the SRT file, or change the font style similar to Filmora’s Advanced Edit-based text format.

Step5 Right-click on the SRT file in the timeline and press the “Export Subtitle File” option.

Step6 Make other video edits, like merging, equalization, etc.
Step7 Click on Export > Local > YouTube. Make changes in the settings and click the Export button.
Conclusion
We have given you the top six options if you are looking for the best online tool for SRT translation. You need to weigh the options according to your requirements and start translating your subtitle file to a language you want for the video.

Method 1 Translate SRT subtitles with third-party translator software
As there are so many different translator software platforms you can try to convert the SRT file to another language, you may be unable to choose the right one. That’s why we have explained the proper process for better clarification.
1. Redokun
One of the best software platforms you can use to translate the SRT file into another language is Redokun. It comes with a machine-automated translation that will automatically translate one language to another within minutes, increasing the overall productivity by 60%. It accurately processes the translation and ensures the texts don’t change during translation. Besides, this SRT file translator comes with a Translator Memory to help you quickly check past files.

Pros
- Easy to use software
- Supports smart revisions for last-minute alterations
- Precise and accurate translator
Cons
- Supports only 14 days of trial
How to translate SRT files?
- Visit Redokun and open the translator.
- Upload the SRT file from local or cloud storage and wait for the document to get uploaded.
- Set the input and output languages and click on the Translate button.
- The new SRT file will get generated with translated text.
Supported OS: Mac and Windows
Supported language translation: English, German, Chinese, and so on.
2. Smartcat
Another outstanding online tool you can use is Smartcat. It supports eight different translator engines, including Amazon and Google. It also accepts multiple file formats and supports over 240 languages, ensuring the SRT file can be translated within minutes.

Pros
- Does not require any expert knowledge
- Translates through AI program for more accuracy
- Support extracting the text from .xml
Cons
- Might not be suitable for beginners
How to translate SRT files?
- Log in to Smartcat and click on Upload. Choose the SRT file and click on Open.
- As the document downloads on the translator, set its language if the default language is not the same. Also, set the new language in which you want the translation.
- Click on Translate and wait for a couple of minutes.
- After a certain time, the new file will be generated with texts written in the language you have set.
Supported OS: Windows and Mac
Supported language translation: English, Mexican, Spanish, Brazilian, and more
3. SDL Trados Studio
SDL Trados Studio is a perfect tool for SRT file translation into another language in no time. It features an AI-powered algorithm that ensures the maximum accuracy in the translated file.

Pros
- Supports multiple languages for translation
- Has free plans
- Accurate translation with no error
Cons
- Not suitable for pros
How to translate SRT files?
- Upload the SRT file on SDL Trados Studio and select the original language from the dropdown.
- Open the language dropdown from the output window and choose the desired language.
- Click on Translate and wait for the new file to be generated.
Supported OS: Mac and Windows
Supported language translation: English, Japanese, Spanish, French, and Italian
4. MemoQ Translator Pro
Based on a computer-based program, this translator software makes the work easier, ensuring easy usage without any hurdles. You won’t have to worry about the texts changing their meaning or getting corrupted during translation.

Pros
- Remembers the past translations
- Increases productivity with faster translation
- Open-source platform
Cons
- Not ideal for beginners
How to translate SRT files?
- Once you upload the file to the software, the texts will be displayed on one side. Choose the language in which you want the final file and click on Translate.
- Each text block will be translated at a time. Once it is over, a green mark will be shown on the side.
Supported OS: Windows
Supported language translation: English, French, Italian, Greek, and Hindi
5. Lokalise
Used even by professional companies, this excellent online tool SRT translator is perfect for Windows and Mac and allows hassle-free translation. It comes with an intuitive UI, ensuring beginners can also efficiently work on the SRT file translation.

Pros
- Easy user interface
- Supports multiple languages
- Allows export of the translated file
Cons
- Does not allow editing of the SRT file
How to translate SRT files?
- Choose the languages for both sides from the dropdown and then upload the concerned SRT file.
- Click on the Translate button and wait for the new file to be generated.
- Once the translation is completed, it will generate the file, and you can download it.
Supported OS: Windows and Mac
Supported language translation: French, Italian, Korean, Spanish, Chinese, etc.
6. Text United
This online platform allows you to translate and upload SRT files easily. It ensures maximum accuracy and does not introduce any error in the translated file.

Pros
- Interface is easy-to-use with clear translating process
- Faster translation for more productivity
- Free software
Cons
- Not an open-source platform
How to translate SRT files?
- Upload the original SRT file and select the input language.
- Once done, select the output language and click on Translate.
- The new subtitles will be generated in the new language after a couple of minutes.
Supported OS: Mac and Windows
Supported language translation: English, German, French
Method 2 Translate subtitle .srt file without Downloading Any Software
The other method for translating the SRT files from one language to another is Notepad (for Windows) or TextEdit (for Mac). As these are simple text editor applications built into the OS, you don’t require any downloading or another person’s help to complete the job.
Note: TextEdit and Notebook are best suited for translating short SRT files from one language to another, especially if the subtitles present are not that much complicated.
Step-by-step guide for SRT translation on Notepad
- Go to the drive where you have stored the file and right-click on the same. Click on “Open with” and choose Notepad from the list of options displayed.

- The file will open in Notepad. Now, edit the SRT file according to the subtitle positions and the text you want to add to the video. Check the time codes because they need to be in sync with the video file.

- Once done, save the file and open Google Translate. Copy each text line and paste the same into the translator’s input box. If the language of the original text is not English, change the language from the dropdown in the translator for easier and more accurate interpretation.

- Click on Translate and wait till the translated text is generated. You need to select the language of the output section according to the required language of the translated SRT file.

- Once the translated text is generated, copy the new text and paste it in place of the original text you copied.
Pros
- Does not need to know about the usage of any software
- Best for small SRT files
- Better for beginners
Cons
- Can change the text during translation
- Time consuming process
Step-by-step guide for SRT translation on TextEdit
- Go to the stored location of the SRT file and right-click on the selected file. Once the menu expands, click on “Open With” and then choose TextEdit as the option. You can also change the default file type to TextEdit. Right-click on the file and select Properties. Once the dialog box opens, click on the “Open With” option and select TextEdit from there. Click on Apply and then Save to change the default file type.

- Once you complete all the edits, open Google Translator and select the input and output languages. The input language will be the one in which your original text is written, and the output is the language you need to transfer the SRT file into.
- Copy and paste the text line from the beginning and click on Translate. Wait for the tool to evaluate and display the translated text.
- Copy it and paste the text into the SRT file. Ensure all the texts are adequately translated before saving and uploading the file to the video.
Pros
- No need to know about the technical use of a software
- Can convert the languages of a small file
- Best for immediate translation
Cons
- Errors can occur during translation
- Needs a lot of time
[Optional] If you hope to Edit SRT file for Video, here is the Best Way
Now that you know the best tools for high-quality video-based subtitle translation, you can choose. However, not all of them support the ability to edit SRT files; for that, you can rely on Wondershare Filmora .
The software is a desktop-based program that users can try out for varying levels of video editing work. You can optimize the videos with features like speed ramping, audio visualization, and speech-to-text. You can add subtitles to videos with the last feature or add external SRT files. Editing is possible as well.
How to Use Filmora to Edit SRT Subtitles for Videos?
Free Download For Win 7 or later(64-bit)
Free Download For macOS 10.14 or later
Step1 Open the Filmora software and add the video file.
Step2 Click on Media to upload SRT file.
Step3 Right-click your subtitle file on the editor timeline> Choose “Advanced Edit”.

Step4 Make changes to the time code, add/merge/remove the strips of subtitle, modify the SRT file, or change the font style similar to Filmora’s Advanced Edit-based text format.

Step5 Right-click on the SRT file in the timeline and press the “Export Subtitle File” option.

Step6 Make other video edits, like merging, equalization, etc.
Step7 Click on Export > Local > YouTube. Make changes in the settings and click the Export button.
Conclusion
We have given you the top six options if you are looking for the best online tool for SRT translation. You need to weigh the options according to your requirements and start translating your subtitle file to a language you want for the video.

Have You Ever Wondered How Those PowerPoint, Looping Slideshows You See in Conferences and Reception Areas Display and Move to the Next Slide Automatically without Clicking a Mouse? You Don’t Have to Be Amazed at This
How to make a PowerPoint looping slideshow
An easy yet powerful editor
Numerous effects to choose from
Detailed tutorials provided by the official channel
A PowerPoint Looping slideshow automatically starts over from the beginning after displaying the last slide. A particular slide is displayed for a certain amount of time interval. Once the time has elapsed, the slide automatically moves to the next one. It is sometimes used in seminars to keep the audience busy before the main presentation commences. In most tradeshows, the videos or information you notice repeatedly playing on its own are in a loop. The transition and slide sets get tweaked to work that way. In Nigeria, most banks use looped slides to display their welcome message. Looping slides make display work more accessible and give time to face other activities while your slide runs automatically.
In this article
01 [Advantages of PowerPoint looping slide](#Part 1)
02 [How to loop a PowerPoint in simple steps.](#Part 2)
Part 1 Advantages of PowerPoint Looping Slide.
PowerPoint slideshows aid and develop visual resources. Looping a PowerPoint slideshowmakes a presentation more accessible and more attractive. Studies show that humans tend to remember more of what they see than what they hear. You should use a PowerPoint-loop slideshow if you want to make a lasting impression while holding that conference, pitch to your boss at work, or even bid for that project**.** Here are some other reasons you should consider looping in your nextPowerPoint slide show.
A looping PowerPoint slideshow runs automatically. A typical PowerPoint presentation moves to the next slide when the presenter clicks the mouse, but a looping slideshow does not need human participation. It displays the next slide automatically after the time interval has elapsed.
It can be helpful to welcome guests to a meeting or Newcomers to an office reception area.
It ensures that latecomers do not miss any significant part of the presentation because a PowerPoint automatic slideshow loop starts all over again after displaying the last slide.
Setting up a looping slideshow is easy and does not require much equipment. You’re all set to go if you have a computer and projector.
It gives the speaker more time to focus on the audience and interact with them rather than concentrating on getting the next slide correctly.
With or without the presence of an operator, the PowerPoint presentation can display the slides configured to display.
It saves you the stress of arranging and rearranging slides during a meeting or an event.
It makes presentation easy and allows the large audience to flow with the speaker as they do not have to read from documents while trying to keep up with the speaker.
A PowerPoint configured to loop continuously can be used to pass general information.
Not everyone likes speaking in public or making a presentation in front of a large crowd. Someone like me immediately starts sweating profusely and has heart palpitations when many eyes are on me. In this kind of situation, a looped PowerPoint slideshow helps take the tension off a nervous speaker as the audience will most likely be concentrating on the slideshows instead of you.
Part 2 How to Loop a PowerPoint in Simple Steps.
Have you been wondering how to make PowerPoint looping slideshows? It seems like a challenging feat, but I’ll show you how to go about it. A looping PowerPoint presentation can create Visual presentations at various events like trade shows, kiosks, conferences, seminars, and many more gatherings. It can display automatically without the intervention of the presenter. With the correct procedure, you’ll be able to create a looping PowerPoint slideshow that will run without hitches. Setting up a looping PowerPoint presentation is relatively easy and doesn’t require rocket science as most people think. Below are simple steps on how to loop a slideshow on PowerPoint;
An easy way to set up looping slideshows is to apply automatic transitions and then set up your desired slideshow settings.
Step 1: Open your PowerPoint presentation
First, open and select the particular PowerPoint presentation you would like to loop.
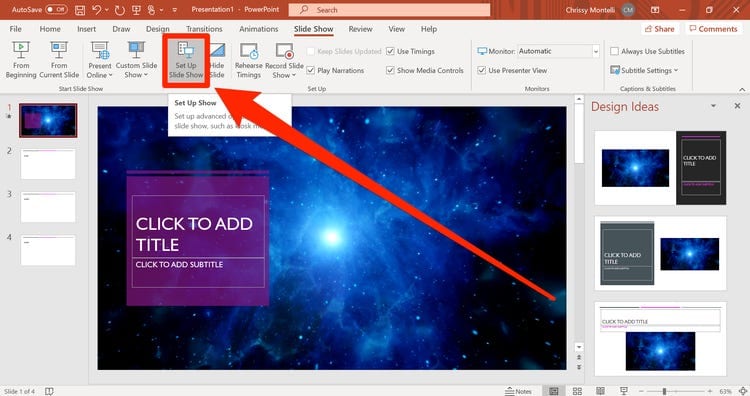
Step 2: Set up the slideshow
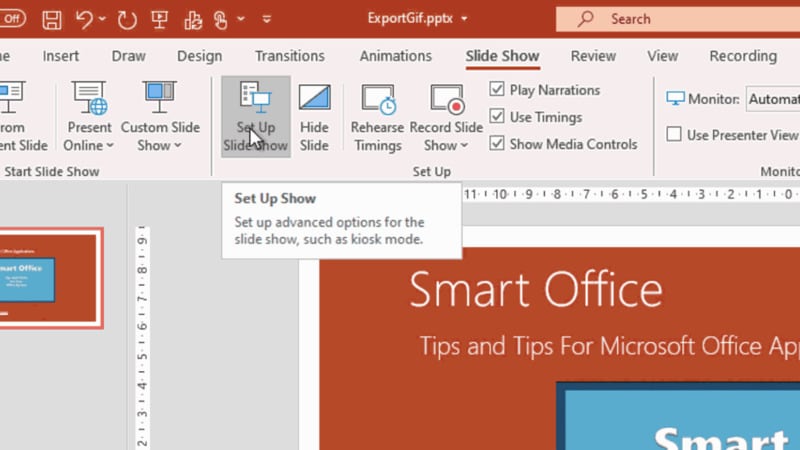
Once your desired presentation is open, go to the “Set Up” group on the “Slide Show” tab and then click on the “Set Up Slide Show” button. Once your desired presentation is open, go to the “Set Up” group on the “Slide Show” tab and then click on the “Set Up Slide Show” button.
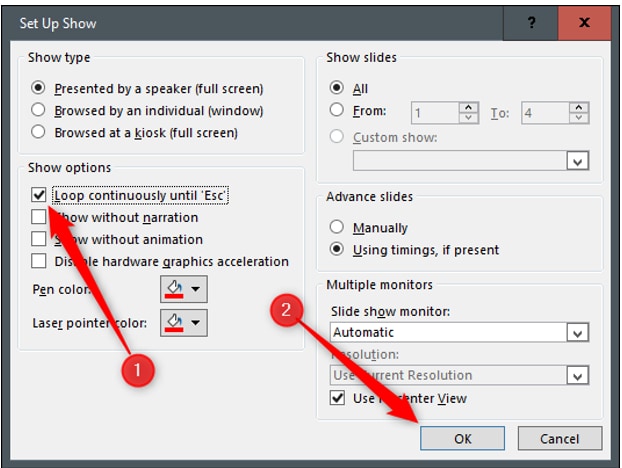
Step 3: Choose your mode of control over the slides.
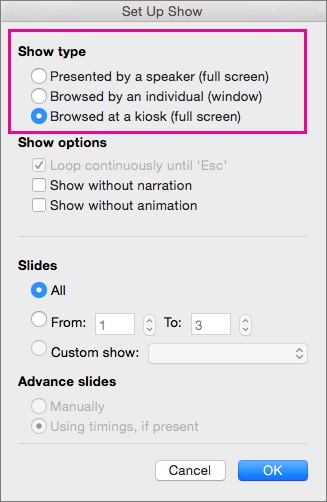
Adialogue box will come up. In the” show options, “select if you want it to get presented by a speaker, which is the default setting of PowerPoint. This option gives the speaker or presenter control over when to advance the slide. The second option, which an individual browses, restricts the control of the speaker over the advancement of the slide, likewise the third option. Checkbox next to “Loop continuously until ‘Esc.’ Then click [OK]. The slide keeps looping automatically until the speaker or presenter presses ok.
Step 4: Select the number of slides you want to be displayed.
From the “Slides” preview side panel, tap your first slide, press and hold [Shift] and click your last slide or input the number of slides you want to display. This option will select all of the slides you want to display.
Step 5: Set up Transitions mode
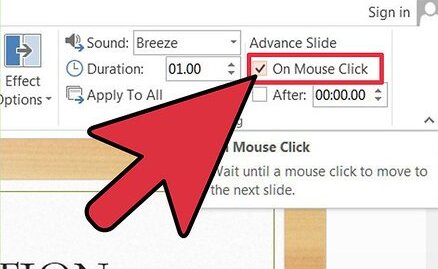
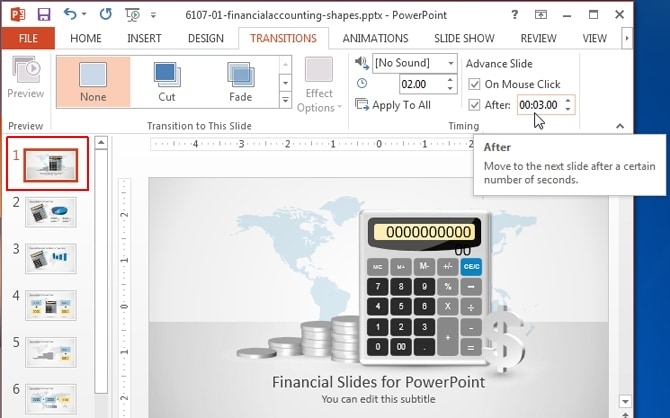
Click the [Transitions] tab. The transition appears between slides when a slideshow is displayed. In the Transitions tab in PowerPoint, you can choose the type of transition (such as Fade). From the “Timing” group, uncheck the box next to “On Mouse Click” and check “After .”This setting enables the transition to occur after your preferred time and not when you click the mouse.
Step 6: Adjust the time interval
To adjust the duration you would like each slide to display, click the up and down arrows in the “After:” field within the “Timing” group. When your slideshow reaches the last slide, it will automatically loop back to the beginning.
****Wondershare Filmora Video Editor Software**
There are many video editing software, but one that stands out amongst them is filmora because of its unique video editing features. The Filmora software is undoubtedly one of the best beginner and professional-level video editing tools.
For Win 7 or later (64-bit)
For macOS 10.12 or later
Making loop videos is relatively easy with its timeline features. Video loops are short clips that replay for a particular duration or unlimited times without the user having to click the play button repeatedly. This kind of video is quite trendy on social media platforms. Filmora software also creates photo and video slideshows and can add music, texts, filters, different transition effects, and even animation to your slideshow. Many tools can help you create these kinds of videos, and Filmora is one of them.
● Ending Thoughts →
● I’m sure that post reading this guide, you will be able to create a PowerPoint looping slideshow and know what software to use in creating loop videos.
● Learning how to loop a PowerPoint slideshow is a game-changer for organizations and meetings that require a large audience or attendees. The major shortcoming of using a PowerPoint presentation slideshow is that a display cannot hold without a laptop and projector.
A PowerPoint Looping slideshow automatically starts over from the beginning after displaying the last slide. A particular slide is displayed for a certain amount of time interval. Once the time has elapsed, the slide automatically moves to the next one. It is sometimes used in seminars to keep the audience busy before the main presentation commences. In most tradeshows, the videos or information you notice repeatedly playing on its own are in a loop. The transition and slide sets get tweaked to work that way. In Nigeria, most banks use looped slides to display their welcome message. Looping slides make display work more accessible and give time to face other activities while your slide runs automatically.
In this article
01 [Advantages of PowerPoint looping slide](#Part 1)
02 [How to loop a PowerPoint in simple steps.](#Part 2)
Part 1 Advantages of PowerPoint Looping Slide.
PowerPoint slideshows aid and develop visual resources. Looping a PowerPoint slideshowmakes a presentation more accessible and more attractive. Studies show that humans tend to remember more of what they see than what they hear. You should use a PowerPoint-loop slideshow if you want to make a lasting impression while holding that conference, pitch to your boss at work, or even bid for that project**.** Here are some other reasons you should consider looping in your nextPowerPoint slide show.
A looping PowerPoint slideshow runs automatically. A typical PowerPoint presentation moves to the next slide when the presenter clicks the mouse, but a looping slideshow does not need human participation. It displays the next slide automatically after the time interval has elapsed.
It can be helpful to welcome guests to a meeting or Newcomers to an office reception area.
It ensures that latecomers do not miss any significant part of the presentation because a PowerPoint automatic slideshow loop starts all over again after displaying the last slide.
Setting up a looping slideshow is easy and does not require much equipment. You’re all set to go if you have a computer and projector.
It gives the speaker more time to focus on the audience and interact with them rather than concentrating on getting the next slide correctly.
With or without the presence of an operator, the PowerPoint presentation can display the slides configured to display.
It saves you the stress of arranging and rearranging slides during a meeting or an event.
It makes presentation easy and allows the large audience to flow with the speaker as they do not have to read from documents while trying to keep up with the speaker.
A PowerPoint configured to loop continuously can be used to pass general information.
Not everyone likes speaking in public or making a presentation in front of a large crowd. Someone like me immediately starts sweating profusely and has heart palpitations when many eyes are on me. In this kind of situation, a looped PowerPoint slideshow helps take the tension off a nervous speaker as the audience will most likely be concentrating on the slideshows instead of you.
Part 2 How to Loop a PowerPoint in Simple Steps.
Have you been wondering how to make PowerPoint looping slideshows? It seems like a challenging feat, but I’ll show you how to go about it. A looping PowerPoint presentation can create Visual presentations at various events like trade shows, kiosks, conferences, seminars, and many more gatherings. It can display automatically without the intervention of the presenter. With the correct procedure, you’ll be able to create a looping PowerPoint slideshow that will run without hitches. Setting up a looping PowerPoint presentation is relatively easy and doesn’t require rocket science as most people think. Below are simple steps on how to loop a slideshow on PowerPoint;
An easy way to set up looping slideshows is to apply automatic transitions and then set up your desired slideshow settings.
Step 1: Open your PowerPoint presentation
First, open and select the particular PowerPoint presentation you would like to loop.

Step 2: Set up the slideshow
Once your desired presentation is open, go to the “Set Up” group on the “Slide Show” tab and then click on the “Set Up Slide Show” button. Once your desired presentation is open, go to the “Set Up” group on the “Slide Show” tab and then click on the “Set Up Slide Show” button.

Step 3: Choose your mode of control over the slides.
Adialogue box will come up. In the” show options, “select if you want it to get presented by a speaker, which is the default setting of PowerPoint. This option gives the speaker or presenter control over when to advance the slide. The second option, which an individual browses, restricts the control of the speaker over the advancement of the slide, likewise the third option. Checkbox next to “Loop continuously until ‘Esc.’ Then click [OK]. The slide keeps looping automatically until the speaker or presenter presses ok.

Step 4: Select the number of slides you want to be displayed.
From the “Slides” preview side panel, tap your first slide, press and hold [Shift] and click your last slide or input the number of slides you want to display. This option will select all of the slides you want to display.

Step 5: Set up Transitions mode
Click the [Transitions] tab. The transition appears between slides when a slideshow is displayed. In the Transitions tab in PowerPoint, you can choose the type of transition (such as Fade). From the “Timing” group, uncheck the box next to “On Mouse Click” and check “After .”This setting enables the transition to occur after your preferred time and not when you click the mouse.

Step 6: Adjust the time interval
To adjust the duration you would like each slide to display, click the up and down arrows in the “After:” field within the “Timing” group. When your slideshow reaches the last slide, it will automatically loop back to the beginning.

****Wondershare Filmora Video Editor Software**
There are many video editing software, but one that stands out amongst them is filmora because of its unique video editing features. The Filmora software is undoubtedly one of the best beginner and professional-level video editing tools.
For Win 7 or later (64-bit)
For macOS 10.12 or later
Making loop videos is relatively easy with its timeline features. Video loops are short clips that replay for a particular duration or unlimited times without the user having to click the play button repeatedly. This kind of video is quite trendy on social media platforms. Filmora software also creates photo and video slideshows and can add music, texts, filters, different transition effects, and even animation to your slideshow. Many tools can help you create these kinds of videos, and Filmora is one of them.
● Ending Thoughts →
● I’m sure that post reading this guide, you will be able to create a PowerPoint looping slideshow and know what software to use in creating loop videos.
● Learning how to loop a PowerPoint slideshow is a game-changer for organizations and meetings that require a large audience or attendees. The major shortcoming of using a PowerPoint presentation slideshow is that a display cannot hold without a laptop and projector.
A PowerPoint Looping slideshow automatically starts over from the beginning after displaying the last slide. A particular slide is displayed for a certain amount of time interval. Once the time has elapsed, the slide automatically moves to the next one. It is sometimes used in seminars to keep the audience busy before the main presentation commences. In most tradeshows, the videos or information you notice repeatedly playing on its own are in a loop. The transition and slide sets get tweaked to work that way. In Nigeria, most banks use looped slides to display their welcome message. Looping slides make display work more accessible and give time to face other activities while your slide runs automatically.
In this article
01 [Advantages of PowerPoint looping slide](#Part 1)
02 [How to loop a PowerPoint in simple steps.](#Part 2)
Part 1 Advantages of PowerPoint Looping Slide.
PowerPoint slideshows aid and develop visual resources. Looping a PowerPoint slideshowmakes a presentation more accessible and more attractive. Studies show that humans tend to remember more of what they see than what they hear. You should use a PowerPoint-loop slideshow if you want to make a lasting impression while holding that conference, pitch to your boss at work, or even bid for that project**.** Here are some other reasons you should consider looping in your nextPowerPoint slide show.
A looping PowerPoint slideshow runs automatically. A typical PowerPoint presentation moves to the next slide when the presenter clicks the mouse, but a looping slideshow does not need human participation. It displays the next slide automatically after the time interval has elapsed.
It can be helpful to welcome guests to a meeting or Newcomers to an office reception area.
It ensures that latecomers do not miss any significant part of the presentation because a PowerPoint automatic slideshow loop starts all over again after displaying the last slide.
Setting up a looping slideshow is easy and does not require much equipment. You’re all set to go if you have a computer and projector.
It gives the speaker more time to focus on the audience and interact with them rather than concentrating on getting the next slide correctly.
With or without the presence of an operator, the PowerPoint presentation can display the slides configured to display.
It saves you the stress of arranging and rearranging slides during a meeting or an event.
It makes presentation easy and allows the large audience to flow with the speaker as they do not have to read from documents while trying to keep up with the speaker.
A PowerPoint configured to loop continuously can be used to pass general information.
Not everyone likes speaking in public or making a presentation in front of a large crowd. Someone like me immediately starts sweating profusely and has heart palpitations when many eyes are on me. In this kind of situation, a looped PowerPoint slideshow helps take the tension off a nervous speaker as the audience will most likely be concentrating on the slideshows instead of you.
Part 2 How to Loop a PowerPoint in Simple Steps.
Have you been wondering how to make PowerPoint looping slideshows? It seems like a challenging feat, but I’ll show you how to go about it. A looping PowerPoint presentation can create Visual presentations at various events like trade shows, kiosks, conferences, seminars, and many more gatherings. It can display automatically without the intervention of the presenter. With the correct procedure, you’ll be able to create a looping PowerPoint slideshow that will run without hitches. Setting up a looping PowerPoint presentation is relatively easy and doesn’t require rocket science as most people think. Below are simple steps on how to loop a slideshow on PowerPoint;
An easy way to set up looping slideshows is to apply automatic transitions and then set up your desired slideshow settings.
Step 1: Open your PowerPoint presentation
First, open and select the particular PowerPoint presentation you would like to loop.

Step 2: Set up the slideshow
Once your desired presentation is open, go to the “Set Up” group on the “Slide Show” tab and then click on the “Set Up Slide Show” button. Once your desired presentation is open, go to the “Set Up” group on the “Slide Show” tab and then click on the “Set Up Slide Show” button.

Step 3: Choose your mode of control over the slides.
Adialogue box will come up. In the” show options, “select if you want it to get presented by a speaker, which is the default setting of PowerPoint. This option gives the speaker or presenter control over when to advance the slide. The second option, which an individual browses, restricts the control of the speaker over the advancement of the slide, likewise the third option. Checkbox next to “Loop continuously until ‘Esc.’ Then click [OK]. The slide keeps looping automatically until the speaker or presenter presses ok.

Step 4: Select the number of slides you want to be displayed.
From the “Slides” preview side panel, tap your first slide, press and hold [Shift] and click your last slide or input the number of slides you want to display. This option will select all of the slides you want to display.

Step 5: Set up Transitions mode
Click the [Transitions] tab. The transition appears between slides when a slideshow is displayed. In the Transitions tab in PowerPoint, you can choose the type of transition (such as Fade). From the “Timing” group, uncheck the box next to “On Mouse Click” and check “After .”This setting enables the transition to occur after your preferred time and not when you click the mouse.

Step 6: Adjust the time interval
To adjust the duration you would like each slide to display, click the up and down arrows in the “After:” field within the “Timing” group. When your slideshow reaches the last slide, it will automatically loop back to the beginning.

****Wondershare Filmora Video Editor Software**
There are many video editing software, but one that stands out amongst them is filmora because of its unique video editing features. The Filmora software is undoubtedly one of the best beginner and professional-level video editing tools.
For Win 7 or later (64-bit)
For macOS 10.12 or later
Making loop videos is relatively easy with its timeline features. Video loops are short clips that replay for a particular duration or unlimited times without the user having to click the play button repeatedly. This kind of video is quite trendy on social media platforms. Filmora software also creates photo and video slideshows and can add music, texts, filters, different transition effects, and even animation to your slideshow. Many tools can help you create these kinds of videos, and Filmora is one of them.
● Ending Thoughts →
● I’m sure that post reading this guide, you will be able to create a PowerPoint looping slideshow and know what software to use in creating loop videos.
● Learning how to loop a PowerPoint slideshow is a game-changer for organizations and meetings that require a large audience or attendees. The major shortcoming of using a PowerPoint presentation slideshow is that a display cannot hold without a laptop and projector.
A PowerPoint Looping slideshow automatically starts over from the beginning after displaying the last slide. A particular slide is displayed for a certain amount of time interval. Once the time has elapsed, the slide automatically moves to the next one. It is sometimes used in seminars to keep the audience busy before the main presentation commences. In most tradeshows, the videos or information you notice repeatedly playing on its own are in a loop. The transition and slide sets get tweaked to work that way. In Nigeria, most banks use looped slides to display their welcome message. Looping slides make display work more accessible and give time to face other activities while your slide runs automatically.
In this article
01 [Advantages of PowerPoint looping slide](#Part 1)
02 [How to loop a PowerPoint in simple steps.](#Part 2)
Part 1 Advantages of PowerPoint Looping Slide.
PowerPoint slideshows aid and develop visual resources. Looping a PowerPoint slideshowmakes a presentation more accessible and more attractive. Studies show that humans tend to remember more of what they see than what they hear. You should use a PowerPoint-loop slideshow if you want to make a lasting impression while holding that conference, pitch to your boss at work, or even bid for that project**.** Here are some other reasons you should consider looping in your nextPowerPoint slide show.
A looping PowerPoint slideshow runs automatically. A typical PowerPoint presentation moves to the next slide when the presenter clicks the mouse, but a looping slideshow does not need human participation. It displays the next slide automatically after the time interval has elapsed.
It can be helpful to welcome guests to a meeting or Newcomers to an office reception area.
It ensures that latecomers do not miss any significant part of the presentation because a PowerPoint automatic slideshow loop starts all over again after displaying the last slide.
Setting up a looping slideshow is easy and does not require much equipment. You’re all set to go if you have a computer and projector.
It gives the speaker more time to focus on the audience and interact with them rather than concentrating on getting the next slide correctly.
With or without the presence of an operator, the PowerPoint presentation can display the slides configured to display.
It saves you the stress of arranging and rearranging slides during a meeting or an event.
It makes presentation easy and allows the large audience to flow with the speaker as they do not have to read from documents while trying to keep up with the speaker.
A PowerPoint configured to loop continuously can be used to pass general information.
Not everyone likes speaking in public or making a presentation in front of a large crowd. Someone like me immediately starts sweating profusely and has heart palpitations when many eyes are on me. In this kind of situation, a looped PowerPoint slideshow helps take the tension off a nervous speaker as the audience will most likely be concentrating on the slideshows instead of you.
Part 2 How to Loop a PowerPoint in Simple Steps.
Have you been wondering how to make PowerPoint looping slideshows? It seems like a challenging feat, but I’ll show you how to go about it. A looping PowerPoint presentation can create Visual presentations at various events like trade shows, kiosks, conferences, seminars, and many more gatherings. It can display automatically without the intervention of the presenter. With the correct procedure, you’ll be able to create a looping PowerPoint slideshow that will run without hitches. Setting up a looping PowerPoint presentation is relatively easy and doesn’t require rocket science as most people think. Below are simple steps on how to loop a slideshow on PowerPoint;
An easy way to set up looping slideshows is to apply automatic transitions and then set up your desired slideshow settings.
Step 1: Open your PowerPoint presentation
First, open and select the particular PowerPoint presentation you would like to loop.

Step 2: Set up the slideshow
Once your desired presentation is open, go to the “Set Up” group on the “Slide Show” tab and then click on the “Set Up Slide Show” button. Once your desired presentation is open, go to the “Set Up” group on the “Slide Show” tab and then click on the “Set Up Slide Show” button.

Step 3: Choose your mode of control over the slides.
Adialogue box will come up. In the” show options, “select if you want it to get presented by a speaker, which is the default setting of PowerPoint. This option gives the speaker or presenter control over when to advance the slide. The second option, which an individual browses, restricts the control of the speaker over the advancement of the slide, likewise the third option. Checkbox next to “Loop continuously until ‘Esc.’ Then click [OK]. The slide keeps looping automatically until the speaker or presenter presses ok.

Step 4: Select the number of slides you want to be displayed.
From the “Slides” preview side panel, tap your first slide, press and hold [Shift] and click your last slide or input the number of slides you want to display. This option will select all of the slides you want to display.

Step 5: Set up Transitions mode
Click the [Transitions] tab. The transition appears between slides when a slideshow is displayed. In the Transitions tab in PowerPoint, you can choose the type of transition (such as Fade). From the “Timing” group, uncheck the box next to “On Mouse Click” and check “After .”This setting enables the transition to occur after your preferred time and not when you click the mouse.

Step 6: Adjust the time interval
To adjust the duration you would like each slide to display, click the up and down arrows in the “After:” field within the “Timing” group. When your slideshow reaches the last slide, it will automatically loop back to the beginning.

****Wondershare Filmora Video Editor Software**
There are many video editing software, but one that stands out amongst them is filmora because of its unique video editing features. The Filmora software is undoubtedly one of the best beginner and professional-level video editing tools.
For Win 7 or later (64-bit)
For macOS 10.12 or later
Making loop videos is relatively easy with its timeline features. Video loops are short clips that replay for a particular duration or unlimited times without the user having to click the play button repeatedly. This kind of video is quite trendy on social media platforms. Filmora software also creates photo and video slideshows and can add music, texts, filters, different transition effects, and even animation to your slideshow. Many tools can help you create these kinds of videos, and Filmora is one of them.
● Ending Thoughts →
● I’m sure that post reading this guide, you will be able to create a PowerPoint looping slideshow and know what software to use in creating loop videos.
● Learning how to loop a PowerPoint slideshow is a game-changer for organizations and meetings that require a large audience or attendees. The major shortcoming of using a PowerPoint presentation slideshow is that a display cannot hold without a laptop and projector.
Also read:
- Updated How to Start a Vlog for 2024
- New In 2024, Guide To Creating The Perfect VHS Effect Look in Premiere Pro
- 2024 Approved Unravel the Creative Potential of Adobe After Effects for Precise Motion Synchronization. Learn How to Use Track Matte and Tracking with a Simple Alternative
- New In 2024, Best 8 Free Video Editing Software Reddit
- Guide Create The Perfect VHS Effect Look in Premiere Pro for 2024
- 2024 Approved Here Is a Complete Overview of VSCO Video Editor; the Best Photo-Editing App that Helps You Adjust Your Pictures Right After You Capture Them
- Updated 2024 Approved How to Add Font Effects to Videos
- New Best 6 WMV to GIF Converters for 2024
- In 2024, What Are the Top 15 Slideshow Presentation Examples Your Audience Will
- Updated Steps To Fade Audio In Premier Pro
- New In This Article, We Will Review Movavi Video Editor and List Out Movavi Video Suites Features
- Updated Have You Been Looking for Online YouTube Video Trimmer? You Will Be Introduced to Different Ways to Trim YouTube Videos as Introduced by YouTube Itself and some Online and Desktop Software to Help You Learn Video Trimming in This Article
- In 2024, Exploring Tools to Integrate Special Mask Effects Into Your Content. Read the Following Article to Master some Tools Experts in Mask Tracking
- Best 6 Online MP4 Croppers for 2024
- How to Make Stunning Glitch Effect in Photoshop? Ultimate Guide for 2024
- How to Loop QuickTime Video for 2024
- New 2024 Approved Adobe Premiere Pro Rec 709 LUTs Finding The Best Options
- This Article Discusses What Is Blender Video Editor, How to Download, Install and Use It, and Its Key Features. It Further Discusses Its Alternative for Editing Your Videos and More. Check Out Now
- KineMaster Templates 101 How to Get the Most Out of Video Templates for 2024
- New How to Record Video Streams With FFmpeg on Windows and Mac?
- Video in Text Cinematic Intro【Filmora Tutorial】 for 2024
- 2024 Approved How to Add Camera Shake to Video in Adobe After Effects
- New 2024 Approved How to Add VHS Green Screen to Your Video
- New How to Remove Audio From Video on Mac? Free and Official Solutions
- How to Make Eye Zoom Transition Effect with Filmora
- Step by Step to Cut Videos in Adobe Premiere Pro for 2024
- Updated In 2024, Phone Aspect Ratio Vertical Definition, Types and Tips
- Updated 2024 Approved Ultimate Guide on How to Plan and Storyboard a Music Video
- Reviewing Efectum App and The Best Alternatives for Smartphone Users for 2024
- New Easy Steps to Slow Down a Video on iPhone and Android
- ReVisionFX ReelSmart Motion Blur Plugin For Premiere Pro
- Updated In This Article, We Will Discuss What Lens Distortion Is, How It May Be Fixed, and the Factors You Need to Pay Attention to Avoid Lens Distortion when Taking or Recording Videos
- In 2024, Want to Learn How to Add VHS Green Screen to Your Videos? This Guide Will Cover All the Details You Need to Know to Add This Effect to Your Videos and Make Them Stand Out
- Merge MP4 Online? Its Easy With These 5 Tools
- Are You Looking for Dark LUTs Premiere Pro Free? This Article Discusses the Dark Moody LUTs with Top Recommendations for Beginning Visual Editing for 2024
- 2024 Approved What Are the Best Video Background Changers Online?
- Updated 2024 Approved Tips for Choosing Location and Scheduling Music Video
- 2024 Approved How Can I Control Speed of a Video
- Zoom In and Out on Discord
- 2024 Approved How to Use Deep Fried Meme Maker
- Updated Best 6 Online MP4 Croppers
- New 2024 Approved | Live Stream on YouTube Using Zoom
- New How to Make a Smooth Speed Ramping in Premiere Pro?
- Top 10 Online And PC Cartoon Video Maker 2022 For Beginner
- New 2024 Approved How to Loop Videos with iMovie
- In 2024, Tutorial to Change Lava Yuva 2 Pro IMEI without Root A Comprehensive Guide
- In 2024, 4 solution to get rid of pokemon fail to detect location On Realme GT 3 | Dr.fone
- In 2024, How PGSharp Save You from Ban While Spoofing Pokemon Go On Nokia C02? | Dr.fone
- 5 Hassle-Free Solutions to Fake Location on Find My Friends Of Huawei Nova Y71 | Dr.fone
- How To Enable USB Debugging on a Locked Realme 12 Pro 5G Phone
- What To Do if Your Vivo T2 Pro 5G Auto Does Not Work | Dr.fone
- 4 Ways to Transfer Music from Itel A60s to iPhone | Dr.fone
- Easy steps to recover deleted messages from Nubia Z50 Ultra
- In 2024, Full Guide to Bypass Oppo Reno 9A FRP
- Will Huawei play AVCHD mts files?
- In 2024, Top 11 Free Apps to Check IMEI on OnePlus Open Phones
- Ultimate Guide from Nokia G22 FRP Bypass
- In 2024, The Best iSpoofer Alternative to Try On Meizu 21 Pro | Dr.fone
- Top 7 Skype Hacker to Hack Any Skype Account On your OnePlus Open | Dr.fone
- Fix App Not Available in Your Country Play Store Problem on Oppo A2 | Dr.fone
- How To Transfer WhatsApp From Apple iPhone 15 Pro to other iPhone 14 Pro Max devices? | Dr.fone
- Unova Stone Pokémon Go Evolution List and How Catch Them For Realme GT 5 Pro | Dr.fone
- How Do You Remove Restricted Mode on Apple iPhone XR
- What to Do if Google Play Services Keeps Stopping on Poco C51 | Dr.fone
- Getting the Pokemon Go GPS Signal Not Found 11 Error in Xiaomi Redmi K70 Pro | Dr.fone
- How to Reset iPhone 12 mini without Losing Data? | Stellar
- In 2024, Top 15 Augmented Reality Games Like Pokémon GO To Play On Honor Play 8T | Dr.fone
- In 2024, How To Remove the Two Factor Authentication On iPhone 12 Pro Max
- How To Fix Auto Lock Greyed Out on Apple iPhone 12 Pro
- A Working Guide For Pachirisu Pokemon Go Map On Apple iPhone 12 mini | Dr.fone
- In 2024, How to Mirror Your Vivo Y200 Screen to PC with Chromecast | Dr.fone
- In 2024, How to Cast OnePlus 11R to Computer for iPhone and Android? | Dr.fone
- How Do You Get Sun Stone Evolutions in Pokémon For Vivo V29? | Dr.fone
- In 2024, Complete Tutorial to Use VPNa to Fake GPS Location On Motorola Moto G73 5G | Dr.fone
- Bypass iCloud Activation Lock with IMEI Code On your Apple iPhone 6s
- Read This Guide to Find a Reliable Alternative to Fake GPS On Infinix Smart 7 HD | Dr.fone
- In 2024, 5 Techniques to Transfer Data from Itel P55 5G to iPhone 15/14/13/12 | Dr.fone
- In 2024, Top-Notch Solutions for Disabled Apple ID On Apple iPhone 15 Pro Making It Possible
- In 2024, How to Come up With the Best Pokemon Team On Tecno Spark 20C? | Dr.fone
- In 2024, Simple and Effective Ways to Change Your Country on YouTube App Of your Vivo X Fold 2 | Dr.fone
- In 2024, How to Intercept Text Messages on Nokia 105 Classic | Dr.fone
- How to Perform Hard Reset on Oppo F23 5G? | Dr.fone
- Title: Add Some Shake to Videos with Alight Motion
- Author: Chloe
- Created at : 2024-05-20 03:37:19
- Updated at : 2024-05-21 03:37:19
- Link: https://ai-editing-video.techidaily.com/add-some-shake-to-videos-with-alight-motion/
- License: This work is licensed under CC BY-NC-SA 4.0.


