:max_bytes(150000):strip_icc():format(webp)/cq5dam.web.1280.1280-3-5c2a5dc746e0fb0001d115f0.jpeg)
Add VHS Effects to Videos for Free A 2024 Guide

Add VHS Effects to Videos for Free: A 2024 Guide
2023 has ushered in a wave of nostalgia, sweeping across various domains, from fashion to technology. Amidst this, videos have become a powerful medium to relive the past. If you’re aiming to infuse your videos with a touch of the ‘90s, look no further than the VHS effect.
For those who need a quick trip down memory lane, VHS tapes were once the cornerstone of home entertainment. These clunky plastic cassettes captured countless memories, from family gatherings to favorite films and TV shows. While they might be alien to newer generations, they hold a special place in the chronicles of video evolution.
The VHS effect isn’t just about mimicking the look of these tapes. It’s about encapsulating their essence—grainy visuals, occasional jitters, and that characteristic static. Incorporating these imperfections into today’s high-definition videos imparts a distinctive vintage flair. It’s akin to applying an Instagram filter to a photo, where a simple touch can transport a viewer back in time. Dive in as we guide you on adding this retro charm to your free videos.
Part 1: Free VHS overlay video resource download website
In today’s digital age, with so many resources out there, finding the right ones for our specific needs can be quite challenging, like searching for a needle in a haystack.
To achieve that authentic VHS look for your videos, starting with the right VHS overlays is crucial. Here are some websites that offer free VHS overlay video resources:
01Freepik
Renowned for its seemingly endless library of graphic resources, Freepik is not just about captivating images and vectors. Dive deeper into their platform and uncover a treasure trove of VHS video overlays. For those unfamiliar with the platform, the search functionality is intuitive.
Enter “VHS overlay video,” and you’re instantly presented with nostalgic results, each ready to seamlessly integrate into your project. Freepik’s resources are often high-quality, ensuring that your video doesn’t just look retro but feels authentic.
02Color grading central
Primarily catered to the more seasoned video editors, Color Grading Central is not your average overlay repository.
It’s an immersive platform that delves deep into the art of video editing. Beyond their remarkable VHS overlays, which promise a genuine vintage touch, the website is a haven for tips and tutorials on color grading.
This is your go-to platform for those keen on mastering the art of video editing while achieving the VHS look. The overlays here, particularly the VHS ones, have been meticulously crafted, ensuring every pixel exudes the 90s charm.
03Vecteezy
If you’ve spent some time in the video editing, you’ve likely stumbled upon or actively sought out Vecteezy. Lauded as a video editor’s dream, Vecteezy doesn’t disappoint regarding VHS effects.
Their vast collection ensures that you’re not limited to one generic VHS look but have the luxury to pick and choose, ensuring your video remains unique. Input “VHS filter video” in their search bar, and you’re met with a smorgasbord of overlays, each bringing its flavor of the past. From subtle grains to pronounced static lines, the choice is all yours.
04Brusheezy
A designer’s paradise for its exquisite collection of Photoshop brushes, Brusheezy has recently expanded its offerings. Recognizing the growing trend of video content, they’ve ventured into video overlays, and it’s no surprise they’ve added VHS effects to their roster.
Their overlays capture the essence of VHS, ensuring videos are tinged with a touch of the past. For those who trust Brusheezy for design resources, this is a familiar and reliable platform to source your VHS video overlays.
Part 2: Use Filmora’s built-in VHS effects presets
For those unfamiliar, Filmora is more than just another video editing tool. It’s a platform that has been applauded by beginners and professionals alike for its intuitive interface and powerful editing capabilities.
Among its vast array of features is a collection of built-in VHS effects presets, ensuring that users can achieve that much-coveted retro look without relying on external resources.
Here’s a comprehensive guide:
VHS Effects Editor
VHS Effects Editor For Win 7 or later(64-bit)
VHS Effects Editor For macOS 10.14 or later
Step 1: Navigate to the Filters Feature
Kickstart your editing journey by launching your desired project within Filmora. As you familiarize yourself with the interface, direct your attention to the left sidebar. You’ll spot the ‘Filters’ option among the various icons, symbolized by an artistic palette. This section houses a myriad of filters ready to elevate your video content. Give it a click to delve deeper into the world of Filmora filters.
Step 2: Dive into the Retro Realm with VHS and Glitch Effects
Now that you’re in the Filters section, the search bar at the top beckons. This feature ensures you can quickly access desired effects without sifting through the extensive collection. Begin by typing “VHS” or “Glitch.”
As you type, the list below starts to populate with related effects. These aren’t just your run-of-the-mill effects. Each has been crafted to bring a distinct vintage vibe, ensuring that every video has its unique touch of the past.
Step 3: Instantly Apply the Chosen Effect with a Double Click
With the list of VHS effects now at your disposal, take a moment to preview each one by hovering over them. Found one that captures the essence of your vision?
It’s time to apply the magic. Simply double-click on your chosen effect. Like that, your video segment, currently active on the timeline, gets transported back in time, imbued with all the charm of the VHS era.
For those who wish to refine the effect further, Filmora offers adjustment tools, allowing you to tweak the intensity, hue, and other parameters of the filter, ensuring your video looks just the way you envisioned.
Part 3: Summary
Giving your videos a vintage VHS look has never been easier. With the availability of free resources online and built-in presets in editing software like Filmora, you’re only a few clicks away from transporting your audience back to the 90s.
Whether for aesthetic or nostalgic reasons, the VHS effect is a fun way to spice up your videos. So, grab your camcorder (or smartphone) and start filming!
Learn Topaz Video Enhance AI Review
Learn Topaz Video Enhance AI Review and Achieve Powerful Video Conversion
An easy yet powerful editor
Numerous effects to choose from
Detailed tutorials provided by the official channel
Earlier, you might need a professional to help you with the AI video enhancing process, but now you can do it yourself using Topaz. This app has fascinating features to make your editing experience smooth and unique. This app was used only for photo enhancement earlier. Now with time, it has been updated, and now it can be used to do AI Enhancing of your video. This article is a Topaz Video Enhance AI review. Here in this article, we focus on the usage of Topaz and its effectiveness compared to other AI software.
In this article
01 [What Does Topaz Video Enhance AI Do?](#Part 1)
02 [How Do You Use Topaz Video Enhance AI?](#Part 2)
03 [Deep Learning: Topaz Video Enhance AI Review](#Part 3)
Part 1 What Does Topaz Video Enhance AI Do?
Topaz Video Enhance IA is an all-rounder in its field. This app is used to do AI upscaling in general and is used to improve the display quality of the footage. The AI technology used in this software is so advanced that it does not need any help and edits every frame with accuracy resulting in a natural and smooth visual. Topaz Video Enhance IA can be used to restore old or low-resolution footage. This video enhance AI app allows outstanding slow-motion editing of videos. This software can give your video upscaling experience a new turn.
Part 2 How Do You Use Topaz Video Enhance AI?
When we are talking about topaz labs video enhance AI review, it’s incomplete if we do not talk about the process of using it**.** The whole process of video enhance AI topaz labs can be divided into these parts:
01Importing of videos
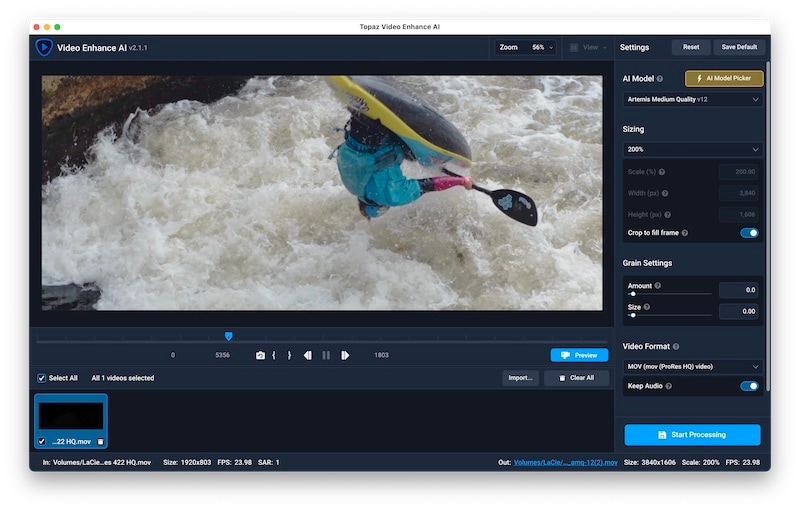
To open a dialogue box showing your videos, click on the center of the screen. You can select more than one video or even drag those videos directly into the app from the dialogue box that has been shown.
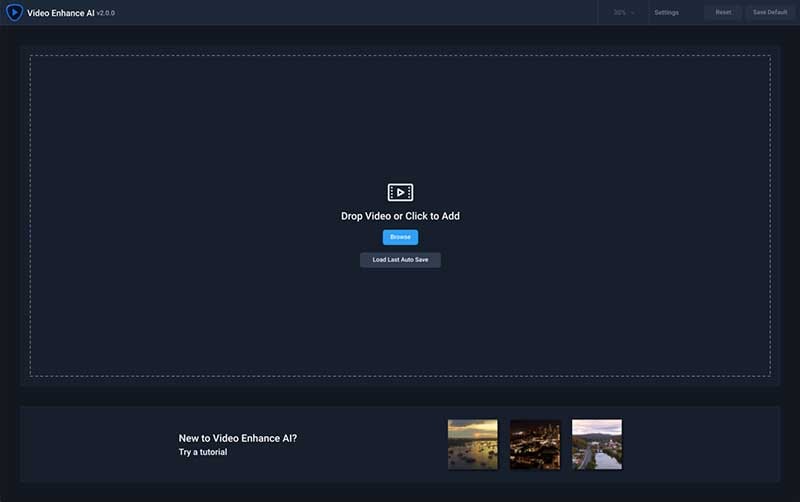
The videos you have selected will be shown at the bottom of the screen. You can pick each video individually to edit, or you can do a batch edit of all the videos.
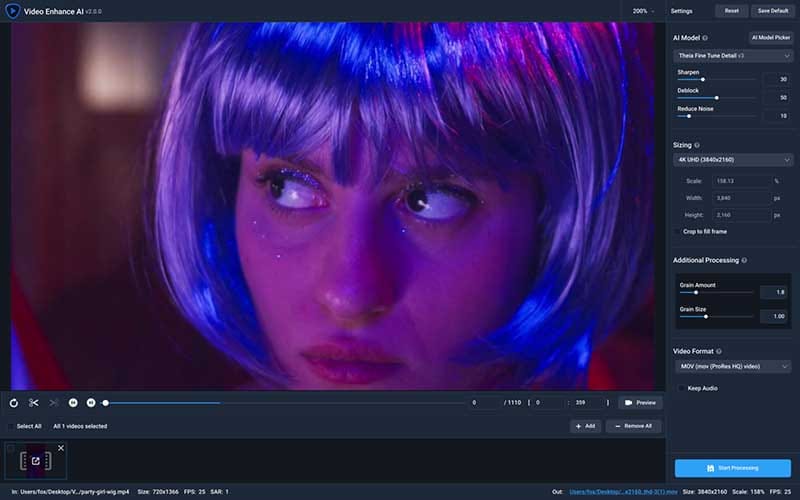
To remove a video or a video queue, you can click on the delete icon above the video list.
02Choosing AI Processing Models
You need to choose the suitable models to edit or enhance your video. Different AI Processing models will be available in the app itself; you can choose if you want to choose from those models.
03Settings of the output of the video
The app offers in-built standards to set your output, or you can create your custom settings.
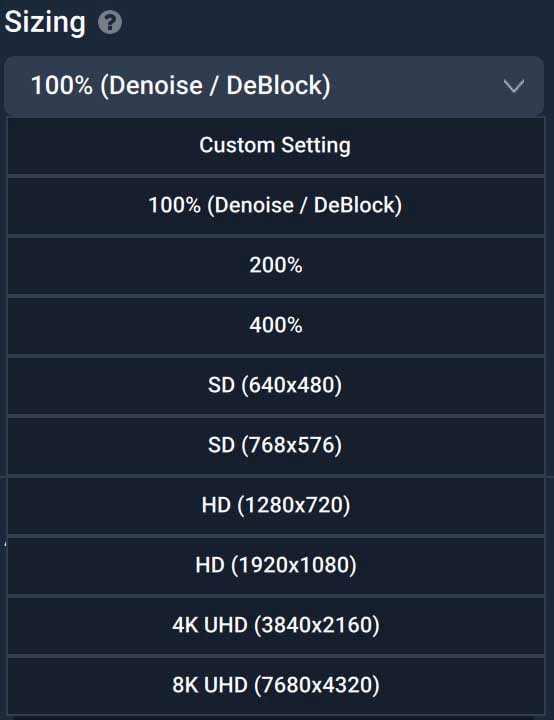
For the output of the video, the app allows both picture and video sequence output.
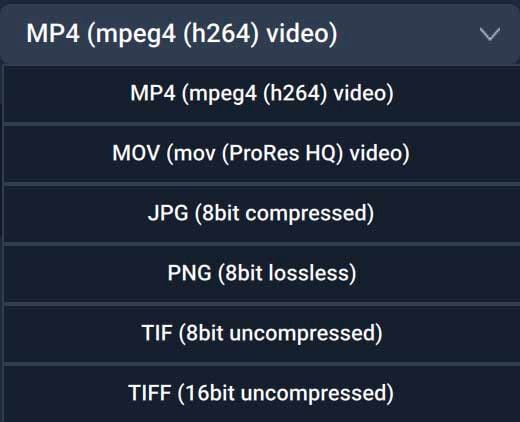
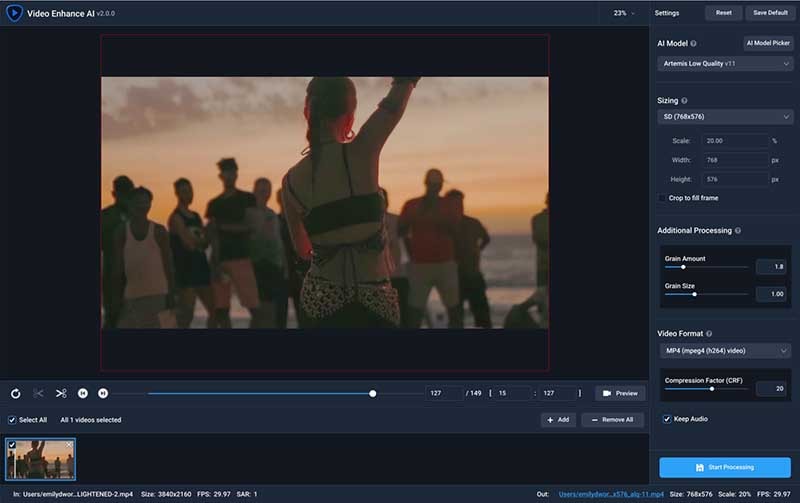
Sometimes a black bar appears on the output video when non-standard-sized videos are converted to standard preset.
But there is a solution to this, you fill the frame by clicking on the “Crop to fill frame” option.
04Setting a name for your output
With the height, width, and scale of the output video, the current name will be shown by default. You can change this by unchecking the box and selecting the “Use default output name,” Then, there will be a dialogue box on your screen.
In that dialogue box, type the name of your output video, select the format or type of your output file, select the location where you want to save your output and then click on the “Save” option.
05Preview of the output video
You can see a short clip of 30 rendered framed of your output as a preview.
To preview the render, you need to select and drag the slider on your video’s timeline. Position the slider where you want to see the preview of your render or output.
You need to wait for a while so that the clips get processed. After the processing is complete, there will be a split-screen.
One part of the split shows the original video clip, and the other split shows the edited or rendered previews on loop.
06Trimming of the output video
To understand simply, the more your output size, the more time it takes to process.
To save the processing time, you can trim only that part of the rendered video you need.
To start with the trimming process, you need to drag the slider along the video’s timeline to select the starting timestamp of the video.
After you have positioned your slider, click on the “scissor” icon on your screen to trim the beginning of your rendered video.
To trim from the end of the rendered video, you have to drag the slider to the ending position of your video.
After your slider is perfectly positioned, click on the “scissor” icon on your screen to trim the end part of your rendered video.
A part of your timeline will be highlighted; this highlighted portion will be processed as you edit, enhanced output.
07Processing of the final output
To get the final output, you need to process the video.
To start with the processing, click on the “Start Processing” option at the bottom. Your video will be shown frame by frame until the processing of the video is complete.
Part 3 Deep Learning: Topaz Video Enhance AI Review
To make the topaz video enhance review, we need to throw light on these features.
01Cost
All the users are given a one-month free trial. However, the complete version of Topaz Video Enhance AI costs $199.9 (includes an update of one year), and the yearly upgrades run at $99. If you do not want to pay for yearly upgrades, you continue using your previous version or the version you bought previously. You can use coupons to have a discount on your payment.
02Design and Performance
The main designs and performance highlights of this software are:
● Default footage set to 4K resolution.
● This software cleans up old progressive footage
● The app interlaces footage to 4K
● This app cleans up old interlaced footage
● This app supports 400% slow motion and 60fps.
03Features
Topaz Video Enhance AI has several exciting features. The most iconic among those features were:
● Upscaling of video to 4Kor 8K resolution. This application can upgrade your video from SD to HD, from HD to 4K, and from 4K to 8K.
● Topaz Video Enhance AI works as a wonder to remove noise. This app has an excellent performance in removing high ISO noise. Topaz AI uses outstanding photo editing software, which results in wonderful outputs.
● The AI automatically converts your video frame rate from 25fps to 3fps. So, if you need your custom frame rate settings, you can set them in the app.
● Topaz Video Enhance AI acts as amind-blowing editing software when it is about deinterlacing video. Deinterlacing your video gives a smooth and natural finish to your video because there are almost no or very few artifacts in the final output.
04System Requirements
Video Enhance AI has certain system requirements. The features required are:
Windows: This software is not supported by Windows 7 or Windows 8. Appropriate for Windows 10 (build 19041 v2004 and above) and Windows 11.
Mac: 10.14 Mojave and above for CPU support 10.15 Catalina and above GPU support.
The hardware requirements are:
● Processor: Intel HD 5000 iGPU or above AMD CPUs from 2016
● System Memory: 8GB (16GB recommended for better performance)
● Graphics Card: Intel HD 5000 (on CPU DirectX 12, compatible in all Windows) and Mac 10.15 and above.
● Dedicated Graphics Memory: 2GB (8GB recommended for better performance)
05Interface
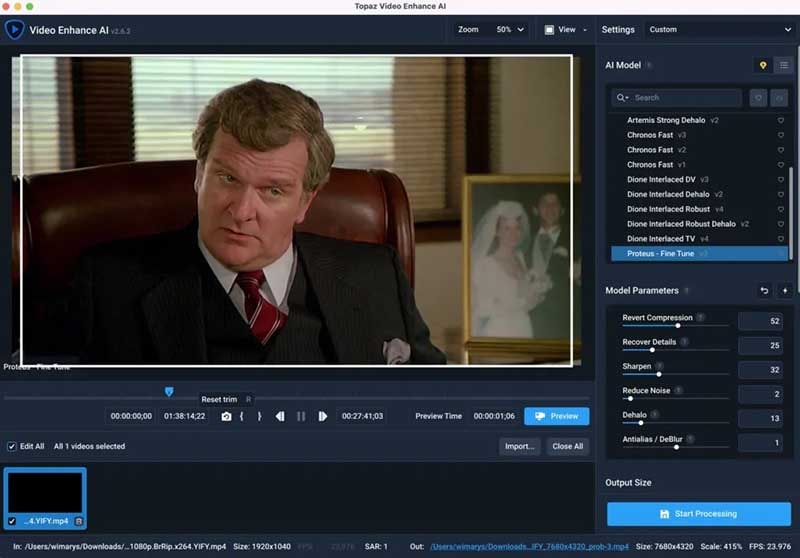
When Topaz Video Enhance AI is working, the screen is divided into different parts, that is:
● Clip selection or the clip selection bar can be used to select the exact portions that you want to render and export as the final footage.
● Video Processing Window can be used to select the AI model from the preset AI models on the app itself.
● A batch processing window is used to edit the batch by adding footage to the batch for batch editing.
● In this video output section, you can select one of the presets for your footage from an upscale percentage of 1.
06A Comparison to Other Video Enhance AI Software
| Topaz Video Enhance AI | Other Video Enhance AI |
|---|---|
| Preset video resolution is 4K | Most of the video enhance AI has a maximum resolution of 4K. |
| The preset fps rate is 30, and you can change it accordingly. | Other Video Enhance AI software has one preset fps rate and does not allow users to change it. |
| Supports any output format. | Supports only particular formats of output. |
Wondershare Filmora Video Editor is another app you can use to edit your footage and retain its quality. Most of the editing app ruins the quality. You can use this app to edit your own footage or photos. This application is one of the best editing apps because of its cool and user-friendly features. The most amazing part is this app is free and available on both Windows and Mac.
For Win 7 or later (64-bit)
For macOS 10.12 or later
● Ending Thoughts →
● Now you know what usages of Topaz Video Enhance IA are through the topaz video enhance review focused on in this article.
● The main features, minimum system requirements, and, most importantly, the procedure to use this app have been elaborated on in this article.
● Please let us know your views on this post and if you liked it, do share it with your friends and comment below.
Earlier, you might need a professional to help you with the AI video enhancing process, but now you can do it yourself using Topaz. This app has fascinating features to make your editing experience smooth and unique. This app was used only for photo enhancement earlier. Now with time, it has been updated, and now it can be used to do AI Enhancing of your video. This article is a Topaz Video Enhance AI review. Here in this article, we focus on the usage of Topaz and its effectiveness compared to other AI software.
In this article
01 [What Does Topaz Video Enhance AI Do?](#Part 1)
02 [How Do You Use Topaz Video Enhance AI?](#Part 2)
03 [Deep Learning: Topaz Video Enhance AI Review](#Part 3)
Part 1 What Does Topaz Video Enhance AI Do?
Topaz Video Enhance IA is an all-rounder in its field. This app is used to do AI upscaling in general and is used to improve the display quality of the footage. The AI technology used in this software is so advanced that it does not need any help and edits every frame with accuracy resulting in a natural and smooth visual. Topaz Video Enhance IA can be used to restore old or low-resolution footage. This video enhance AI app allows outstanding slow-motion editing of videos. This software can give your video upscaling experience a new turn.

Part 2 How Do You Use Topaz Video Enhance AI?
When we are talking about topaz labs video enhance AI review, it’s incomplete if we do not talk about the process of using it**.** The whole process of video enhance AI topaz labs can be divided into these parts:
01Importing of videos
To open a dialogue box showing your videos, click on the center of the screen. You can select more than one video or even drag those videos directly into the app from the dialogue box that has been shown.

The videos you have selected will be shown at the bottom of the screen. You can pick each video individually to edit, or you can do a batch edit of all the videos.

To remove a video or a video queue, you can click on the delete icon above the video list.
02Choosing AI Processing Models
You need to choose the suitable models to edit or enhance your video. Different AI Processing models will be available in the app itself; you can choose if you want to choose from those models.
03Settings of the output of the video
The app offers in-built standards to set your output, or you can create your custom settings.

For the output of the video, the app allows both picture and video sequence output.

Sometimes a black bar appears on the output video when non-standard-sized videos are converted to standard preset.
But there is a solution to this, you fill the frame by clicking on the “Crop to fill frame” option.
04Setting a name for your output
With the height, width, and scale of the output video, the current name will be shown by default. You can change this by unchecking the box and selecting the “Use default output name,” Then, there will be a dialogue box on your screen.
In that dialogue box, type the name of your output video, select the format or type of your output file, select the location where you want to save your output and then click on the “Save” option.
05Preview of the output video
You can see a short clip of 30 rendered framed of your output as a preview.
To preview the render, you need to select and drag the slider on your video’s timeline. Position the slider where you want to see the preview of your render or output.
You need to wait for a while so that the clips get processed. After the processing is complete, there will be a split-screen.
One part of the split shows the original video clip, and the other split shows the edited or rendered previews on loop.
06Trimming of the output video
To understand simply, the more your output size, the more time it takes to process.
To save the processing time, you can trim only that part of the rendered video you need.
To start with the trimming process, you need to drag the slider along the video’s timeline to select the starting timestamp of the video.
After you have positioned your slider, click on the “scissor” icon on your screen to trim the beginning of your rendered video.
To trim from the end of the rendered video, you have to drag the slider to the ending position of your video.
After your slider is perfectly positioned, click on the “scissor” icon on your screen to trim the end part of your rendered video.
A part of your timeline will be highlighted; this highlighted portion will be processed as you edit, enhanced output.

07Processing of the final output
To get the final output, you need to process the video.
To start with the processing, click on the “Start Processing” option at the bottom. Your video will be shown frame by frame until the processing of the video is complete.
Part 3 Deep Learning: Topaz Video Enhance AI Review
To make the topaz video enhance review, we need to throw light on these features.
01Cost
All the users are given a one-month free trial. However, the complete version of Topaz Video Enhance AI costs $199.9 (includes an update of one year), and the yearly upgrades run at $99. If you do not want to pay for yearly upgrades, you continue using your previous version or the version you bought previously. You can use coupons to have a discount on your payment.
02Design and Performance
The main designs and performance highlights of this software are:
● Default footage set to 4K resolution.
● This software cleans up old progressive footage
● The app interlaces footage to 4K
● This app cleans up old interlaced footage
● This app supports 400% slow motion and 60fps.
03Features
Topaz Video Enhance AI has several exciting features. The most iconic among those features were:
● Upscaling of video to 4Kor 8K resolution. This application can upgrade your video from SD to HD, from HD to 4K, and from 4K to 8K.
● Topaz Video Enhance AI works as a wonder to remove noise. This app has an excellent performance in removing high ISO noise. Topaz AI uses outstanding photo editing software, which results in wonderful outputs.
● The AI automatically converts your video frame rate from 25fps to 3fps. So, if you need your custom frame rate settings, you can set them in the app.
● Topaz Video Enhance AI acts as amind-blowing editing software when it is about deinterlacing video. Deinterlacing your video gives a smooth and natural finish to your video because there are almost no or very few artifacts in the final output.
04System Requirements
Video Enhance AI has certain system requirements. The features required are:
Windows: This software is not supported by Windows 7 or Windows 8. Appropriate for Windows 10 (build 19041 v2004 and above) and Windows 11.
Mac: 10.14 Mojave and above for CPU support 10.15 Catalina and above GPU support.
The hardware requirements are:
● Processor: Intel HD 5000 iGPU or above AMD CPUs from 2016
● System Memory: 8GB (16GB recommended for better performance)
● Graphics Card: Intel HD 5000 (on CPU DirectX 12, compatible in all Windows) and Mac 10.15 and above.
● Dedicated Graphics Memory: 2GB (8GB recommended for better performance)
05Interface
When Topaz Video Enhance AI is working, the screen is divided into different parts, that is:
● Clip selection or the clip selection bar can be used to select the exact portions that you want to render and export as the final footage.
● Video Processing Window can be used to select the AI model from the preset AI models on the app itself.
● A batch processing window is used to edit the batch by adding footage to the batch for batch editing.
● In this video output section, you can select one of the presets for your footage from an upscale percentage of 1.

06A Comparison to Other Video Enhance AI Software
| Topaz Video Enhance AI | Other Video Enhance AI |
|---|---|
| Preset video resolution is 4K | Most of the video enhance AI has a maximum resolution of 4K. |
| The preset fps rate is 30, and you can change it accordingly. | Other Video Enhance AI software has one preset fps rate and does not allow users to change it. |
| Supports any output format. | Supports only particular formats of output. |
Wondershare Filmora Video Editor is another app you can use to edit your footage and retain its quality. Most of the editing app ruins the quality. You can use this app to edit your own footage or photos. This application is one of the best editing apps because of its cool and user-friendly features. The most amazing part is this app is free and available on both Windows and Mac.
For Win 7 or later (64-bit)
For macOS 10.12 or later
● Ending Thoughts →
● Now you know what usages of Topaz Video Enhance IA are through the topaz video enhance review focused on in this article.
● The main features, minimum system requirements, and, most importantly, the procedure to use this app have been elaborated on in this article.
● Please let us know your views on this post and if you liked it, do share it with your friends and comment below.
Earlier, you might need a professional to help you with the AI video enhancing process, but now you can do it yourself using Topaz. This app has fascinating features to make your editing experience smooth and unique. This app was used only for photo enhancement earlier. Now with time, it has been updated, and now it can be used to do AI Enhancing of your video. This article is a Topaz Video Enhance AI review. Here in this article, we focus on the usage of Topaz and its effectiveness compared to other AI software.
In this article
01 [What Does Topaz Video Enhance AI Do?](#Part 1)
02 [How Do You Use Topaz Video Enhance AI?](#Part 2)
03 [Deep Learning: Topaz Video Enhance AI Review](#Part 3)
Part 1 What Does Topaz Video Enhance AI Do?
Topaz Video Enhance IA is an all-rounder in its field. This app is used to do AI upscaling in general and is used to improve the display quality of the footage. The AI technology used in this software is so advanced that it does not need any help and edits every frame with accuracy resulting in a natural and smooth visual. Topaz Video Enhance IA can be used to restore old or low-resolution footage. This video enhance AI app allows outstanding slow-motion editing of videos. This software can give your video upscaling experience a new turn.

Part 2 How Do You Use Topaz Video Enhance AI?
When we are talking about topaz labs video enhance AI review, it’s incomplete if we do not talk about the process of using it**.** The whole process of video enhance AI topaz labs can be divided into these parts:
01Importing of videos
To open a dialogue box showing your videos, click on the center of the screen. You can select more than one video or even drag those videos directly into the app from the dialogue box that has been shown.

The videos you have selected will be shown at the bottom of the screen. You can pick each video individually to edit, or you can do a batch edit of all the videos.

To remove a video or a video queue, you can click on the delete icon above the video list.
02Choosing AI Processing Models
You need to choose the suitable models to edit or enhance your video. Different AI Processing models will be available in the app itself; you can choose if you want to choose from those models.
03Settings of the output of the video
The app offers in-built standards to set your output, or you can create your custom settings.

For the output of the video, the app allows both picture and video sequence output.

Sometimes a black bar appears on the output video when non-standard-sized videos are converted to standard preset.
But there is a solution to this, you fill the frame by clicking on the “Crop to fill frame” option.
04Setting a name for your output
With the height, width, and scale of the output video, the current name will be shown by default. You can change this by unchecking the box and selecting the “Use default output name,” Then, there will be a dialogue box on your screen.
In that dialogue box, type the name of your output video, select the format or type of your output file, select the location where you want to save your output and then click on the “Save” option.
05Preview of the output video
You can see a short clip of 30 rendered framed of your output as a preview.
To preview the render, you need to select and drag the slider on your video’s timeline. Position the slider where you want to see the preview of your render or output.
You need to wait for a while so that the clips get processed. After the processing is complete, there will be a split-screen.
One part of the split shows the original video clip, and the other split shows the edited or rendered previews on loop.
06Trimming of the output video
To understand simply, the more your output size, the more time it takes to process.
To save the processing time, you can trim only that part of the rendered video you need.
To start with the trimming process, you need to drag the slider along the video’s timeline to select the starting timestamp of the video.
After you have positioned your slider, click on the “scissor” icon on your screen to trim the beginning of your rendered video.
To trim from the end of the rendered video, you have to drag the slider to the ending position of your video.
After your slider is perfectly positioned, click on the “scissor” icon on your screen to trim the end part of your rendered video.
A part of your timeline will be highlighted; this highlighted portion will be processed as you edit, enhanced output.

07Processing of the final output
To get the final output, you need to process the video.
To start with the processing, click on the “Start Processing” option at the bottom. Your video will be shown frame by frame until the processing of the video is complete.
Part 3 Deep Learning: Topaz Video Enhance AI Review
To make the topaz video enhance review, we need to throw light on these features.
01Cost
All the users are given a one-month free trial. However, the complete version of Topaz Video Enhance AI costs $199.9 (includes an update of one year), and the yearly upgrades run at $99. If you do not want to pay for yearly upgrades, you continue using your previous version or the version you bought previously. You can use coupons to have a discount on your payment.
02Design and Performance
The main designs and performance highlights of this software are:
● Default footage set to 4K resolution.
● This software cleans up old progressive footage
● The app interlaces footage to 4K
● This app cleans up old interlaced footage
● This app supports 400% slow motion and 60fps.
03Features
Topaz Video Enhance AI has several exciting features. The most iconic among those features were:
● Upscaling of video to 4Kor 8K resolution. This application can upgrade your video from SD to HD, from HD to 4K, and from 4K to 8K.
● Topaz Video Enhance AI works as a wonder to remove noise. This app has an excellent performance in removing high ISO noise. Topaz AI uses outstanding photo editing software, which results in wonderful outputs.
● The AI automatically converts your video frame rate from 25fps to 3fps. So, if you need your custom frame rate settings, you can set them in the app.
● Topaz Video Enhance AI acts as amind-blowing editing software when it is about deinterlacing video. Deinterlacing your video gives a smooth and natural finish to your video because there are almost no or very few artifacts in the final output.
04System Requirements
Video Enhance AI has certain system requirements. The features required are:
Windows: This software is not supported by Windows 7 or Windows 8. Appropriate for Windows 10 (build 19041 v2004 and above) and Windows 11.
Mac: 10.14 Mojave and above for CPU support 10.15 Catalina and above GPU support.
The hardware requirements are:
● Processor: Intel HD 5000 iGPU or above AMD CPUs from 2016
● System Memory: 8GB (16GB recommended for better performance)
● Graphics Card: Intel HD 5000 (on CPU DirectX 12, compatible in all Windows) and Mac 10.15 and above.
● Dedicated Graphics Memory: 2GB (8GB recommended for better performance)
05Interface
When Topaz Video Enhance AI is working, the screen is divided into different parts, that is:
● Clip selection or the clip selection bar can be used to select the exact portions that you want to render and export as the final footage.
● Video Processing Window can be used to select the AI model from the preset AI models on the app itself.
● A batch processing window is used to edit the batch by adding footage to the batch for batch editing.
● In this video output section, you can select one of the presets for your footage from an upscale percentage of 1.

06A Comparison to Other Video Enhance AI Software
| Topaz Video Enhance AI | Other Video Enhance AI |
|---|---|
| Preset video resolution is 4K | Most of the video enhance AI has a maximum resolution of 4K. |
| The preset fps rate is 30, and you can change it accordingly. | Other Video Enhance AI software has one preset fps rate and does not allow users to change it. |
| Supports any output format. | Supports only particular formats of output. |
Wondershare Filmora Video Editor is another app you can use to edit your footage and retain its quality. Most of the editing app ruins the quality. You can use this app to edit your own footage or photos. This application is one of the best editing apps because of its cool and user-friendly features. The most amazing part is this app is free and available on both Windows and Mac.
For Win 7 or later (64-bit)
For macOS 10.12 or later
● Ending Thoughts →
● Now you know what usages of Topaz Video Enhance IA are through the topaz video enhance review focused on in this article.
● The main features, minimum system requirements, and, most importantly, the procedure to use this app have been elaborated on in this article.
● Please let us know your views on this post and if you liked it, do share it with your friends and comment below.
Earlier, you might need a professional to help you with the AI video enhancing process, but now you can do it yourself using Topaz. This app has fascinating features to make your editing experience smooth and unique. This app was used only for photo enhancement earlier. Now with time, it has been updated, and now it can be used to do AI Enhancing of your video. This article is a Topaz Video Enhance AI review. Here in this article, we focus on the usage of Topaz and its effectiveness compared to other AI software.
In this article
01 [What Does Topaz Video Enhance AI Do?](#Part 1)
02 [How Do You Use Topaz Video Enhance AI?](#Part 2)
03 [Deep Learning: Topaz Video Enhance AI Review](#Part 3)
Part 1 What Does Topaz Video Enhance AI Do?
Topaz Video Enhance IA is an all-rounder in its field. This app is used to do AI upscaling in general and is used to improve the display quality of the footage. The AI technology used in this software is so advanced that it does not need any help and edits every frame with accuracy resulting in a natural and smooth visual. Topaz Video Enhance IA can be used to restore old or low-resolution footage. This video enhance AI app allows outstanding slow-motion editing of videos. This software can give your video upscaling experience a new turn.

Part 2 How Do You Use Topaz Video Enhance AI?
When we are talking about topaz labs video enhance AI review, it’s incomplete if we do not talk about the process of using it**.** The whole process of video enhance AI topaz labs can be divided into these parts:
01Importing of videos
To open a dialogue box showing your videos, click on the center of the screen. You can select more than one video or even drag those videos directly into the app from the dialogue box that has been shown.

The videos you have selected will be shown at the bottom of the screen. You can pick each video individually to edit, or you can do a batch edit of all the videos.

To remove a video or a video queue, you can click on the delete icon above the video list.
02Choosing AI Processing Models
You need to choose the suitable models to edit or enhance your video. Different AI Processing models will be available in the app itself; you can choose if you want to choose from those models.
03Settings of the output of the video
The app offers in-built standards to set your output, or you can create your custom settings.

For the output of the video, the app allows both picture and video sequence output.

Sometimes a black bar appears on the output video when non-standard-sized videos are converted to standard preset.
But there is a solution to this, you fill the frame by clicking on the “Crop to fill frame” option.
04Setting a name for your output
With the height, width, and scale of the output video, the current name will be shown by default. You can change this by unchecking the box and selecting the “Use default output name,” Then, there will be a dialogue box on your screen.
In that dialogue box, type the name of your output video, select the format or type of your output file, select the location where you want to save your output and then click on the “Save” option.
05Preview of the output video
You can see a short clip of 30 rendered framed of your output as a preview.
To preview the render, you need to select and drag the slider on your video’s timeline. Position the slider where you want to see the preview of your render or output.
You need to wait for a while so that the clips get processed. After the processing is complete, there will be a split-screen.
One part of the split shows the original video clip, and the other split shows the edited or rendered previews on loop.
06Trimming of the output video
To understand simply, the more your output size, the more time it takes to process.
To save the processing time, you can trim only that part of the rendered video you need.
To start with the trimming process, you need to drag the slider along the video’s timeline to select the starting timestamp of the video.
After you have positioned your slider, click on the “scissor” icon on your screen to trim the beginning of your rendered video.
To trim from the end of the rendered video, you have to drag the slider to the ending position of your video.
After your slider is perfectly positioned, click on the “scissor” icon on your screen to trim the end part of your rendered video.
A part of your timeline will be highlighted; this highlighted portion will be processed as you edit, enhanced output.

07Processing of the final output
To get the final output, you need to process the video.
To start with the processing, click on the “Start Processing” option at the bottom. Your video will be shown frame by frame until the processing of the video is complete.
Part 3 Deep Learning: Topaz Video Enhance AI Review
To make the topaz video enhance review, we need to throw light on these features.
01Cost
All the users are given a one-month free trial. However, the complete version of Topaz Video Enhance AI costs $199.9 (includes an update of one year), and the yearly upgrades run at $99. If you do not want to pay for yearly upgrades, you continue using your previous version or the version you bought previously. You can use coupons to have a discount on your payment.
02Design and Performance
The main designs and performance highlights of this software are:
● Default footage set to 4K resolution.
● This software cleans up old progressive footage
● The app interlaces footage to 4K
● This app cleans up old interlaced footage
● This app supports 400% slow motion and 60fps.
03Features
Topaz Video Enhance AI has several exciting features. The most iconic among those features were:
● Upscaling of video to 4Kor 8K resolution. This application can upgrade your video from SD to HD, from HD to 4K, and from 4K to 8K.
● Topaz Video Enhance AI works as a wonder to remove noise. This app has an excellent performance in removing high ISO noise. Topaz AI uses outstanding photo editing software, which results in wonderful outputs.
● The AI automatically converts your video frame rate from 25fps to 3fps. So, if you need your custom frame rate settings, you can set them in the app.
● Topaz Video Enhance AI acts as amind-blowing editing software when it is about deinterlacing video. Deinterlacing your video gives a smooth and natural finish to your video because there are almost no or very few artifacts in the final output.
04System Requirements
Video Enhance AI has certain system requirements. The features required are:
Windows: This software is not supported by Windows 7 or Windows 8. Appropriate for Windows 10 (build 19041 v2004 and above) and Windows 11.
Mac: 10.14 Mojave and above for CPU support 10.15 Catalina and above GPU support.
The hardware requirements are:
● Processor: Intel HD 5000 iGPU or above AMD CPUs from 2016
● System Memory: 8GB (16GB recommended for better performance)
● Graphics Card: Intel HD 5000 (on CPU DirectX 12, compatible in all Windows) and Mac 10.15 and above.
● Dedicated Graphics Memory: 2GB (8GB recommended for better performance)
05Interface
When Topaz Video Enhance AI is working, the screen is divided into different parts, that is:
● Clip selection or the clip selection bar can be used to select the exact portions that you want to render and export as the final footage.
● Video Processing Window can be used to select the AI model from the preset AI models on the app itself.
● A batch processing window is used to edit the batch by adding footage to the batch for batch editing.
● In this video output section, you can select one of the presets for your footage from an upscale percentage of 1.

06A Comparison to Other Video Enhance AI Software
| Topaz Video Enhance AI | Other Video Enhance AI |
|---|---|
| Preset video resolution is 4K | Most of the video enhance AI has a maximum resolution of 4K. |
| The preset fps rate is 30, and you can change it accordingly. | Other Video Enhance AI software has one preset fps rate and does not allow users to change it. |
| Supports any output format. | Supports only particular formats of output. |
Wondershare Filmora Video Editor is another app you can use to edit your footage and retain its quality. Most of the editing app ruins the quality. You can use this app to edit your own footage or photos. This application is one of the best editing apps because of its cool and user-friendly features. The most amazing part is this app is free and available on both Windows and Mac.
For Win 7 or later (64-bit)
For macOS 10.12 or later
● Ending Thoughts →
● Now you know what usages of Topaz Video Enhance IA are through the topaz video enhance review focused on in this article.
● The main features, minimum system requirements, and, most importantly, the procedure to use this app have been elaborated on in this article.
● Please let us know your views on this post and if you liked it, do share it with your friends and comment below.
Find Out How to Add Subtitles in the VLC Media Player on Your Windows and Mac System with Quick and Simple Instructions
VLC is a free, open-source, and easy-to-use cross-platform multimedia player that supports numerous audio and video file formats. You can use the program on different devices, including smartphones, TVs, and PCs.
With the VLC media player, you can not only watch your favorite movie or video clip but can also add subtitles to them. This can be useful to improve your video-watching experience, especially if you are playing a foreign film or one with poor audio quality. Moreover, subtitles can also help people with hearing impairments to follow along.
Want to learn how to add subtitles in the VLC media player? Keep reading to find out!
How To Add Subtitle Files In VLC Media Player?
You can download subtitles for the language you want from a subtitle site and enjoy them while watching the movie or video clip in VLC Media Player. However, this method won’t add the SRT file permanently to your videos.
Here’s how you can add subtitles in the VLC media player on your video clip:
Step1 Visit the subtitles website of your choice and download the file for the video you are watching.
Step2 Save the SRT file along with your video in the same folder.
Step3 Right-click the video, click “Open With,” and choose VLC media player. Alternatively, launch the player, click “Media,” and select “Open file…” to import the video.

Step4 VLC Media Player will automatically detect and add the subtitles file. If not, click the “Subtitles” option in the toolbar, select “Sub Track,” and choose the relevant file within the listing.
Step5 The VLC player will now display the subtitles along with your video. However, if it is still unable to find the subtitles file, click “Subtitles” > “Add Subtitles” and manually add the file you’ve downloaded.

![]()
Note: If the subtitles are not playing correctly along the video, you can adjust the playback delay using the G and H keys on your keyboard. This will toggle between 50ms delays.
How To Add Subtitles To Video In VLC Media Player Permanently?
Since the above method only adds subtitles temporarily, you might be looking for a solution to permanently attach the SRT file to your clip to provide a better viewing experience to your viewers or add extra information for those who have difficulty understanding the audio.
Below we’ve provided step-by-step methods to add subtitles to video in the VLC media player on your Windows and Mac.
On Windows
You can permanently embed the subtitles to your video in the VLC media player on your Windows in the following way:
Step1 Launch the VLC media player on your Windows PC/laptop and click “Media.” Scroll down and click the “Stream” option.

Step2 Now, click “Add” in the pop-up menu and choose the video you want to play. To add a subtitles file, check the “Use a Subtitles File” option and click “Browse.” Now, add the relevant SRT file you’ve downloaded.

Step3 Next, click the “Stream” option and choose “Next.” To set the destination for your video, select “File” and click “Add.” A new window will open, click the “Browse” option and enter your footage/video name.
Make sure to set the format as .mp4 or any other video format. Choose the folder for your video and click “Save.” Click the “Next” option to proceed further.
Step4 Check the box next to “Active Transcoding,” click the Wrench icon, and head to the “Subtitles” tab. Check the boxes next to “Subtitles” and “Overlay Subtitles on the Video.
Finally, click the “Save” option, select “Next,” and click “Stream” in the new window. Wait for the processing to complete, and your video with subtitles will be saved to the folder you’ve selected.

On Mac
Here’s how you can permanently add subtitles to your video clip in the VLC media player on your Mac:
Step1 Launch the VLC media player on your Mac and click the “File” option from the top toolbar. Click “Advanced Open File.”

Step2 Now, click “Browse” on the next page and add the video to which you want to attach the subtitles. Checkmark the “Add Subtitles File” option and click “Choose.” Browse and add the SRT file. Click “OK” to confirm.
Step3 Checkmark the “Stream Outputs” option and click “Settings.” Next, click “Browse” in the next window to configure the output file name and folder. Afterward, click “Save” and set the Encapsulation method as “MPEG 4.”
Under the Transcoding tab, checkmark the boxes next to Video and Audio. Next, click “OK” and select “Open.” You can now turn on the subtitles by navigating to “Subtitles” > “Subtitles Track.”

How To Create Subtitles In VLC Media Player?
It is possible to create subtitles in the VLC media player if you’re unable to find an appropriate SRT file online or want to add some extra details by editing the existing one. For this method to work, you will first need to format your file in the SRT format.
Furthermore, you have to rank the text in order with a number and add timestamps in minutes, seconds, and milliseconds to determine the duration. To avoid plain text, you can also add effects to the subtitles by using HTML.
Step1 Launch a text editoron your PC, import your video to the editor, and save it in .srt format.

Step2 Open the VLC media player and play the video. Now, edit the subtitles while matching them with the timestamps.
Step3 Next, add a new line, timestamp, and subtitle for each caption.
Step4 Repeat the process to create and add all the required subtitles.
Bonus Tips: How To Add And Edit Subtitles In The Best VLC Alternative
If you find the above method difficult to understand, we recommend using Filmora . With this software program, you can not only edit your videos to make them engaging and appealing to watch but can also add and edit subtitles to them using the ten pre-build subtitles templates.
Free Download For Win 7 or later(64-bit)
Free Download For macOS 10.14 or later
Filmora can help you to format the subtitles to match your video and add various font styles, such as WordArt, Basic, Titles, and more. In addition, you can create text with different parameters, including color fills, gradient fills, and 12 shadow effects. You can also make your captions alive with the animation effects.
Here’s how you can add and edit subtitles on your videos using Filmora:
Step1 Launch the Filmora software on your PC and click “Create New Project.” Drag and drop your video or select “Click here to import media” to add your video.

Step2 Add the video to the timeline and play it. Listen to the voiceover and press the “M” key to add a marker.
Now, click the “Titles” option and head to the “Subtitles” tab from the left menu. Double-click a subtitle to download and preview it.

Step3 Drag and drop the subtitle you want to use in the timeline and adjust it along the marker point.
Next, double-click the subtitle box in the timeline and type the text from the voiceover. Add color, text template, and adjust the text space.

Step4 Head to the “Advanced” tab, delete the preset text and adjust the one you’ve just typed. You can also add animation effects from the “Animation” tab and click “OK.”

Repeat the process to add and edit the subtitles on your video till the end. Once you are satisfied, click “Export” and save the file on your PC.
Conclusion
In this article, we’ve explored different methods to show you how to add subtitles in the VLC media player to make your videos more engaging and easy to understand, even for those with hearing impairment.
We’ve also provided step-by-step instructions to use Filmora as an alternative to add and edit the subtitles on your video real quickly.
Hopefully, you’ve enjoyed reading this article and can now enjoy watching a video in any language with ease.
How To Add Subtitles To Video In VLC Media Player Permanently?
Since the above method only adds subtitles temporarily, you might be looking for a solution to permanently attach the SRT file to your clip to provide a better viewing experience to your viewers or add extra information for those who have difficulty understanding the audio.
Below we’ve provided step-by-step methods to add subtitles to video in the VLC media player on your Windows and Mac.
On Windows
You can permanently embed the subtitles to your video in the VLC media player on your Windows in the following way:
Step1 Launch the VLC media player on your Windows PC/laptop and click “Media.” Scroll down and click the “Stream” option.

Step2 Now, click “Add” in the pop-up menu and choose the video you want to play. To add a subtitles file, check the “Use a Subtitles File” option and click “Browse.” Now, add the relevant SRT file you’ve downloaded.

Step3 Next, click the “Stream” option and choose “Next.” To set the destination for your video, select “File” and click “Add.” A new window will open, click the “Browse” option and enter your footage/video name.
Make sure to set the format as .mp4 or any other video format. Choose the folder for your video and click “Save.” Click the “Next” option to proceed further.
Step4 Check the box next to “Active Transcoding,” click the Wrench icon, and head to the “Subtitles” tab. Check the boxes next to “Subtitles” and “Overlay Subtitles on the Video.
Finally, click the “Save” option, select “Next,” and click “Stream” in the new window. Wait for the processing to complete, and your video with subtitles will be saved to the folder you’ve selected.

On Mac
Here’s how you can permanently add subtitles to your video clip in the VLC media player on your Mac:
Step1 Launch the VLC media player on your Mac and click the “File” option from the top toolbar. Click “Advanced Open File.”

Step2 Now, click “Browse” on the next page and add the video to which you want to attach the subtitles. Checkmark the “Add Subtitles File” option and click “Choose.” Browse and add the SRT file. Click “OK” to confirm.
Step3 Checkmark the “Stream Outputs” option and click “Settings.” Next, click “Browse” in the next window to configure the output file name and folder. Afterward, click “Save” and set the Encapsulation method as “MPEG 4.”
Under the Transcoding tab, checkmark the boxes next to Video and Audio. Next, click “OK” and select “Open.” You can now turn on the subtitles by navigating to “Subtitles” > “Subtitles Track.”

How To Create Subtitles In VLC Media Player?
It is possible to create subtitles in the VLC media player if you’re unable to find an appropriate SRT file online or want to add some extra details by editing the existing one. For this method to work, you will first need to format your file in the SRT format.
Furthermore, you have to rank the text in order with a number and add timestamps in minutes, seconds, and milliseconds to determine the duration. To avoid plain text, you can also add effects to the subtitles by using HTML.
Step1 Launch a text editoron your PC, import your video to the editor, and save it in .srt format.

Step2 Open the VLC media player and play the video. Now, edit the subtitles while matching them with the timestamps.
Step3 Next, add a new line, timestamp, and subtitle for each caption.
Step4 Repeat the process to create and add all the required subtitles.
Bonus Tips: How To Add And Edit Subtitles In The Best VLC Alternative
If you find the above method difficult to understand, we recommend using Filmora . With this software program, you can not only edit your videos to make them engaging and appealing to watch but can also add and edit subtitles to them using the ten pre-build subtitles templates.
Free Download For Win 7 or later(64-bit)
Free Download For macOS 10.14 or later
Filmora can help you to format the subtitles to match your video and add various font styles, such as WordArt, Basic, Titles, and more. In addition, you can create text with different parameters, including color fills, gradient fills, and 12 shadow effects. You can also make your captions alive with the animation effects.
Here’s how you can add and edit subtitles on your videos using Filmora:
Step1 Launch the Filmora software on your PC and click “Create New Project.” Drag and drop your video or select “Click here to import media” to add your video.

Step2 Add the video to the timeline and play it. Listen to the voiceover and press the “M” key to add a marker.
Now, click the “Titles” option and head to the “Subtitles” tab from the left menu. Double-click a subtitle to download and preview it.

Step3 Drag and drop the subtitle you want to use in the timeline and adjust it along the marker point.
Next, double-click the subtitle box in the timeline and type the text from the voiceover. Add color, text template, and adjust the text space.

Step4 Head to the “Advanced” tab, delete the preset text and adjust the one you’ve just typed. You can also add animation effects from the “Animation” tab and click “OK.”

Repeat the process to add and edit the subtitles on your video till the end. Once you are satisfied, click “Export” and save the file on your PC.
Conclusion
In this article, we’ve explored different methods to show you how to add subtitles in the VLC media player to make your videos more engaging and easy to understand, even for those with hearing impairment.
We’ve also provided step-by-step instructions to use Filmora as an alternative to add and edit the subtitles on your video real quickly.
Hopefully, you’ve enjoyed reading this article and can now enjoy watching a video in any language with ease.
How to Add Filter to Video Online
When you record a video with your phone camera, digital camera, or even webcam, the color scheme in the video can differ depending on the surrounding light. If it differs a lot from the natural color scheme, it can affect the viewing experience of the audience negatively. That is why color correction is an essential part of video editing, and that is where video filters can be handy. You do not need a dedicated video editor application to add video filters as you can you can put filter on video online.
Video filters can correct color imbalances and make the video have consistent colors. For example, if you had recorded a video when the sun was setting, you can use a high saturation video filter to make the video color more vivid. You can even set the mood of a video with video filters so that the audience can get the exact emotion you want to portray through your video. We will illustrate the different ways on how to add filter to video online instantly.
Way 1. Use Clideo Filter Editor
Clideo Filter Editor is one of the fastest video editors that you can apply filters to your videos instantly. There is a wide range of different presets to apply temporarily and compare. Therefore, you can choose the best video filter and save your modified video. The user interface is super intuitive for everyone.
The platform is completely secure for uploading and editing videos, and you can upload videos in different file formats. You can use Clideo Filter Editor on your web browser from your Mac, Windows PC as well as smartphone. Here are the steps to add video filters online using Clideo Filter Editor.
Step1Open your web browser and visit “clideo.com/filter-video”.
Step2Click on Choose File button to upload your video from your hard drive. You can also upload video from Google Drive and Dropbox.
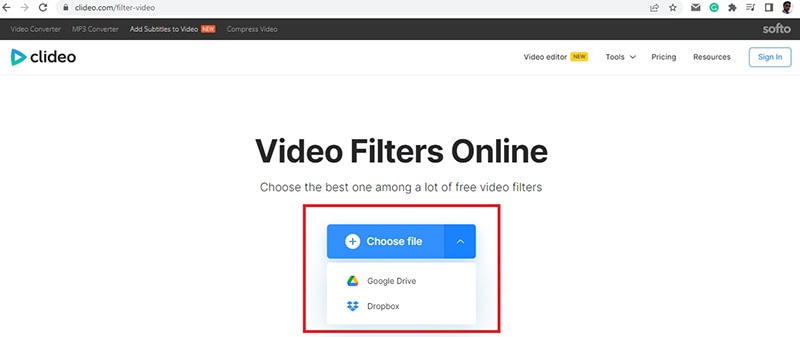
Step3After successful uploading, you will see the video filters on the right side of your video. Apply them one and one while playing your video so that you can see the changes in video color scheme instantly.
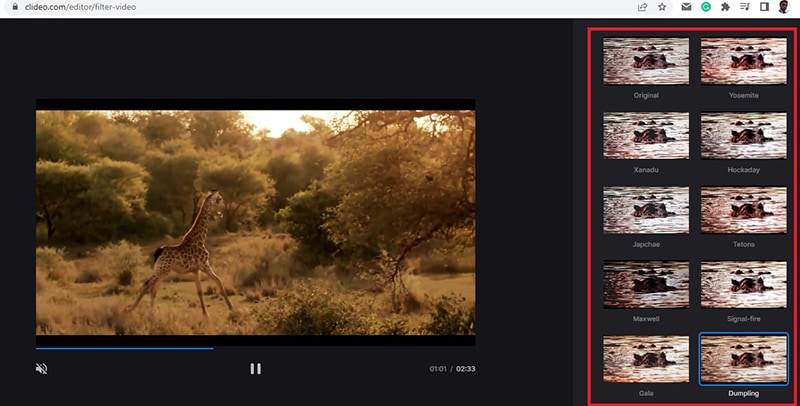
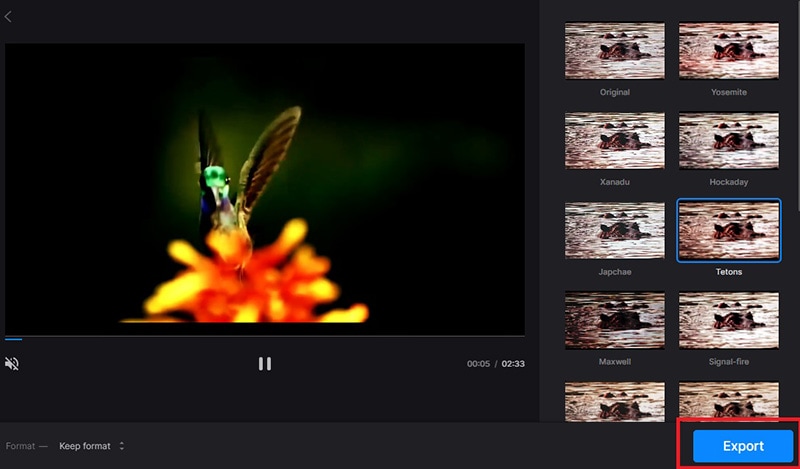
Step4Finalize a video filter to apply to your video and click on Export to save the modified video on your hard drive on any desired file format.
Way 2. Veed.io Video Filters
If you are looking for some stunning video filters to use on your video, Veed.io Video Filters is the best online platform. You can add filter to video online free, and the platform supports several video file formats. You will find color grading filters as well as effects to apply to your video and get the desired outcome. If you are going to upload videos to social media, you should definitely use Veed.io Video Filters to make your videos feel unique. Here are the steps on how to add filter video online using Veed.io Video Filters.
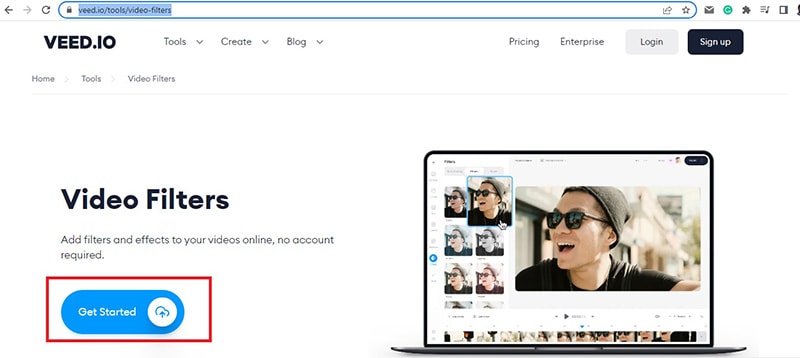
Step1Open your web browser and visit “veed.io/tools/video-filters”. Click on Get Started button.
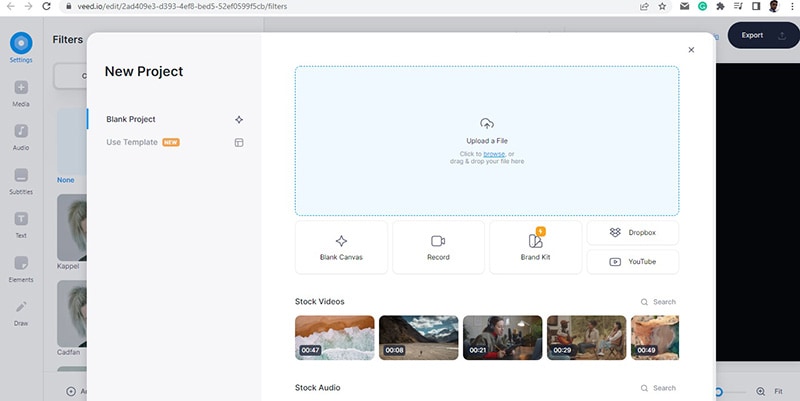
Step2On the next screen, click on Browser or drag and drop your video file for adding video filters.
Step3After the video file gets uploaded, you will see Filters on the left side of the video. There are two different tabs – Color Grading and Effects available where there are different video filters available to apply to your video.
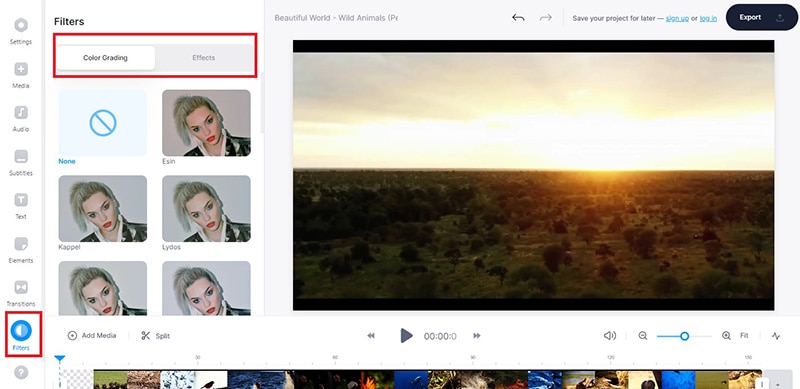
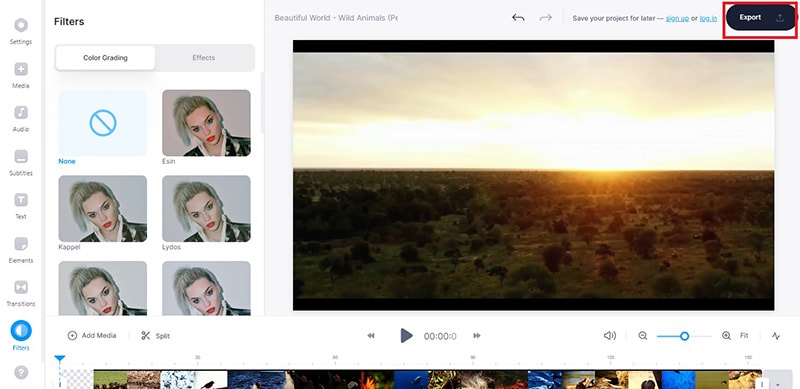
Step4Click on the filters to see how they look on your video instantly. Once you have selected a filter for the video, click on Export button to save the edited video in desired file format.
Way 3. Clipchamp Video Filter Editor
Clipchamp video filter editor has a wide range of beautiful video filters to enhance your video instantly. You can correct any color imbalance as well as set any required tone to your video. Starting from Outdoor and Portrait to Indoors and Muted, all the popular professional video filters can do the magic to your video. You can also save the edited video in different video resolution and file format as per your requirements. Here are the steps on how to add filter video online using Clipchamp video filter editor.
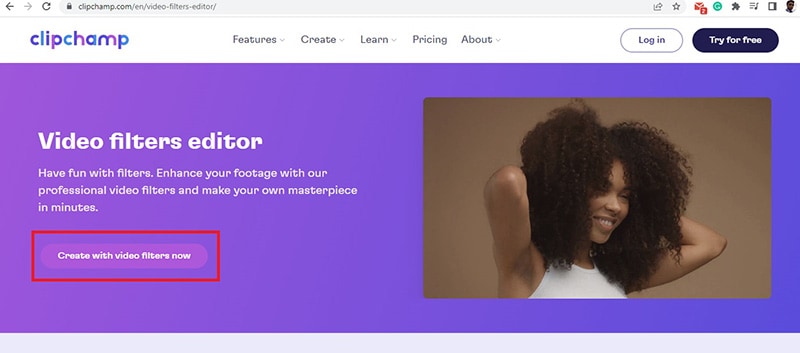
Step1Open your web browser and visit “clipchamp.com/en/video-filters-editor”. Click on Create with video filters now button.
Step2You have to sign up on the next screen so that you can apply the video filters.
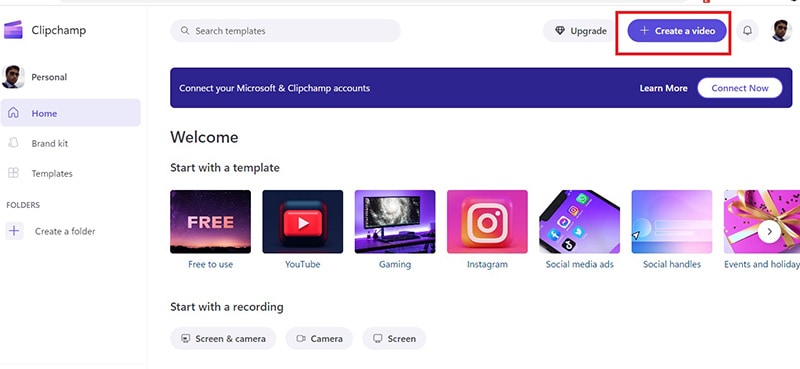
Step3Once the video editor opens, click on Create a Video button.
Step4Drag and drop your video on the video editor and thereafter on Timeline.
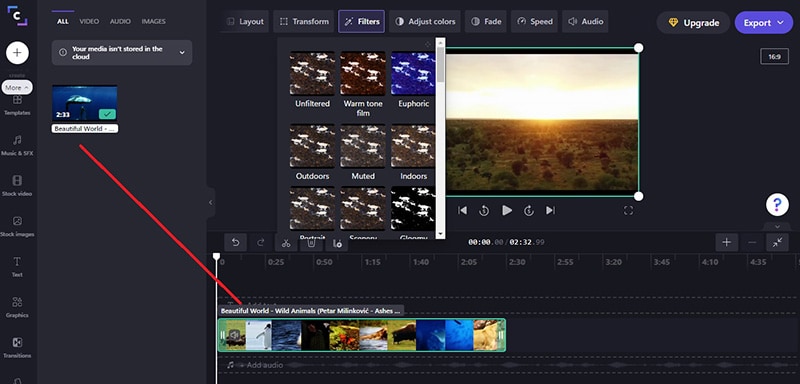
Step5Click on Filters option located at the top and you will see a drop-down containing all the filters. Place your mouse pointer on the filters one by one to see how they look on your video instantly.
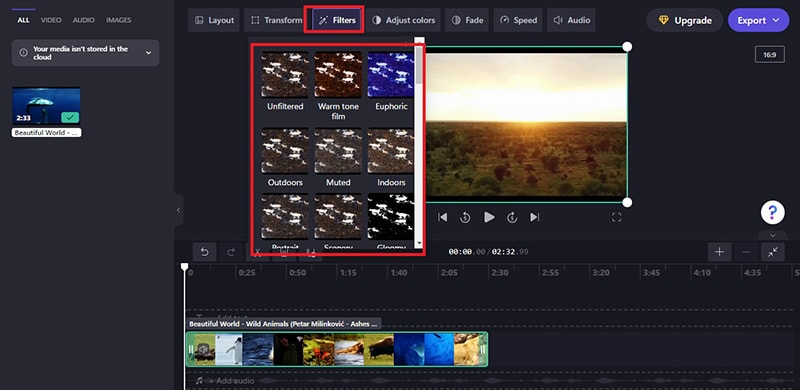
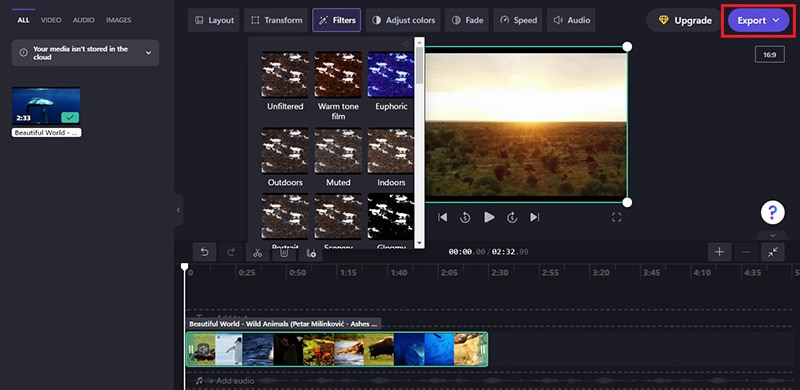
Step6Finally, click on the selected filter and click on Export button to save the edited video.
Way 4. FlexClip Video Filter Editor
FlexClip has a collection of online tools to edit your video instantly without installing any video editor application. FlexClip Video Filter Editor has over 20 popular video filters to apply to your video on the go. You can change the video outlook, and the platform supports different types of video file formats. You can add filter to video online free, and there is not going to be any watermark on your edited video. Here are the steps on how you can add filter to your video using FlexClip video filter editor.
Step1Open your web browser and visit “flexclip.com/tools/filter-video”.
Step2Drag and drop your video to the free video filter editor online.
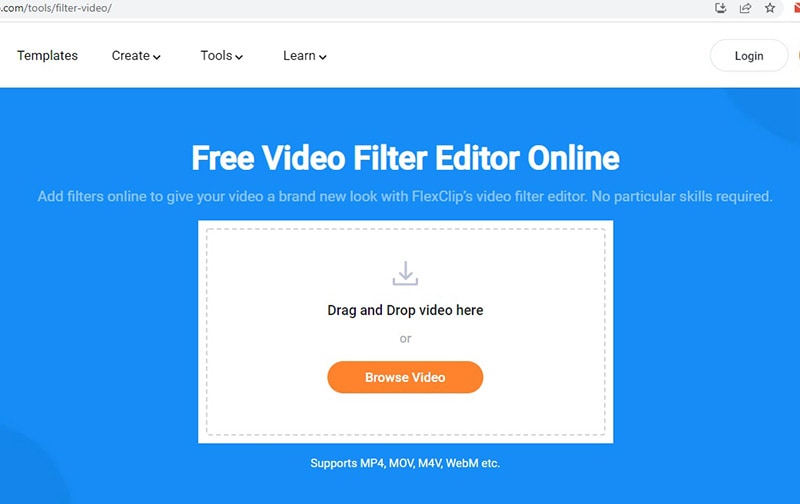
Step3After successful uploading, you will see all the video filters on the left side.
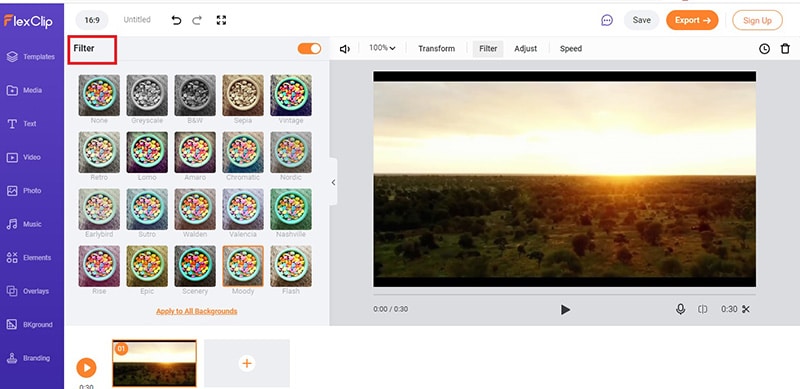
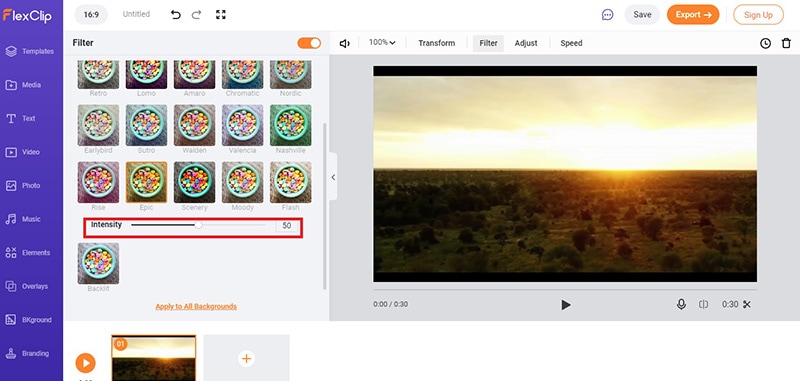
Step4Click on the video filters one to one to apply them to the video and see which one suits the best. You can adjust the intensity of the filters as per your preference.
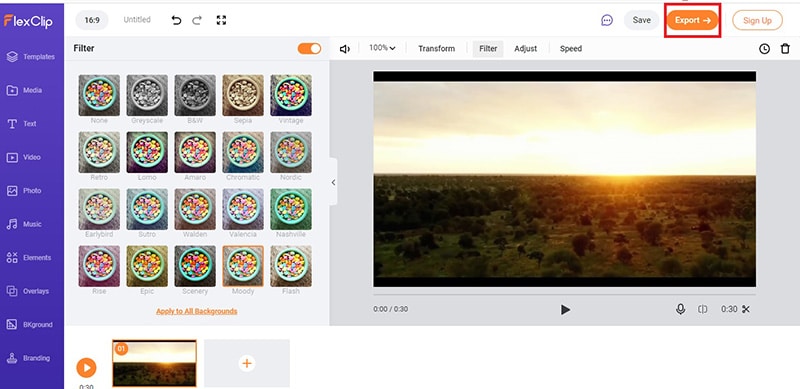
Step5Once you have applied a filter and you can satisfy with it, click on Export button to save the edited video.
Way 5. Kapwing Filter Video Editor
Kapwing is a popular online video editor, and you can add video filters to your recorded video for free. Kapwing Filter Video Editor works on all devices, and you can access it from any popular web browser. You can upload recorded video as well as paste URL of an online video stored in Google cloud platform to apply video filters. The preset filters enhance video quality starting from colors and saturation to brightness and contrast. You can also share them on social media platforms directly from Kapwing video editor. Here are the steps how to put filter on video online using Kapwing filter video editor.
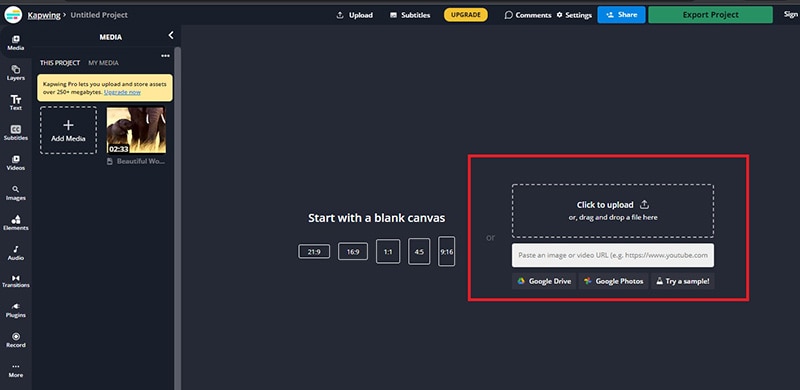
Step1Open your web browser and visit “kapwing.com/tools/filter-video”. Click on Choose a video button to get started.
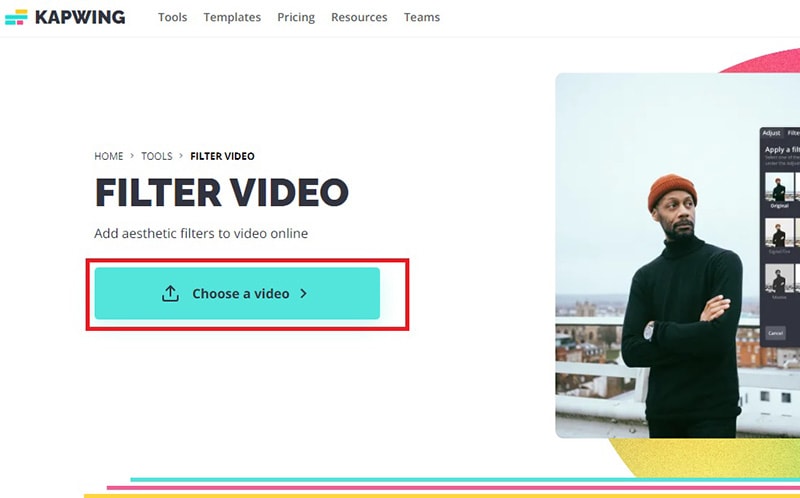
Step2Once Kapwing video editor opens, drag and drop your video to upload on the platform. You can also paste video URL from Google Drive or Google Photos.
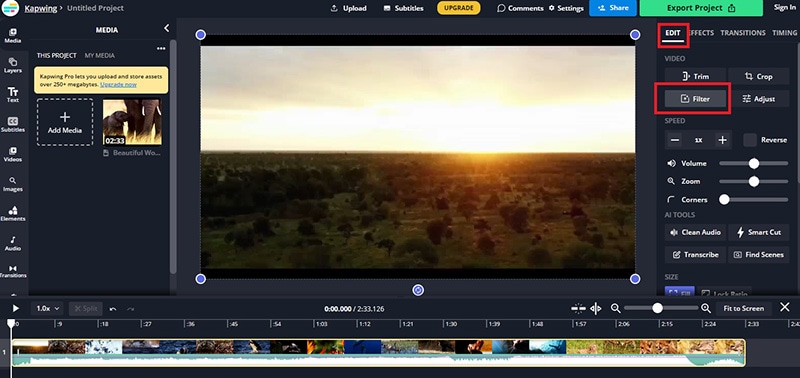
Step3Click on the video and on the right side, go to Edit tab and click on Filters under Video section.
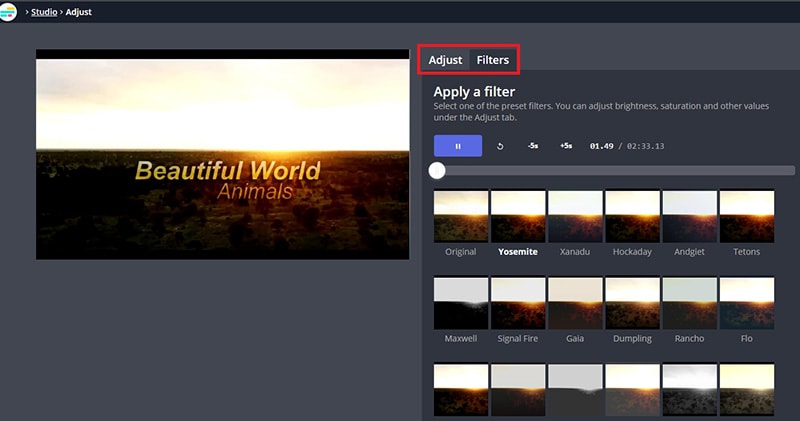
Step4You will see a host of video filters that you can apply to your video. Click on them to check them out. You can also customize the video filter by going to Adjust tab.
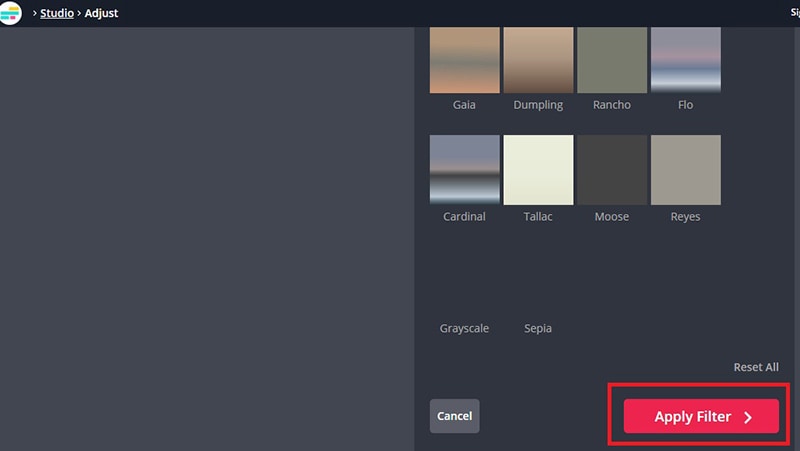
Step5Select the best one and click on Apply Filters button. Finally, click on Export Project button to save the edited video.
Conclusion
If you want to apply video filters to your recorded video in order to enhance the video outlook and adjust the color balance, you can use video filter editors online. We have illustrated five different ways on how to add video filters online for free. Each one of them has different sets of video filters. If you are looking for a dedicated video editor desktop application, we recommend Wondershare Filmora .
Free Download For Win 7 or later(64-bit)
Free Download For macOS 10.14 or later
Free Download For macOS 10.14 or later
Also read:
- Updated 2024 Approved Best 6 WebM to GIF Converters
- Updated How to Make a Slideshow on iPhone for 2024
- 4 Methods to Merge MP4 and MP3
- Updated Online Video Makers for 2024
- New 2024 Approved 2 Methods to Crop a Video in VLC
- Finding LUTs Made by Danny Gevirtz for 2024
- In 2024, 10 Best Meme Text to Speech Tools Windows, Mac, Android, iPhone&Online
- Here Are a Number of Tools Used in the Market to Resize the Videos. We Are Going to Teach How to Resize the Video in Davinci Resolve and Fimora Wondershare. Once You Have Mastered How to Resize a Video, It Would Be as Simple as the Click
- In 2024, New Video Inspiration for Birthday Slideshow
- New In 2024, Replacing Sky in Your Pictures Using Online and Offline Tools
- Updated 2024 Approved Guide to Synchronizing Your Audio And Videos Properly?
- 9 Best Sparkle Effects Photo and Video Editors You Should Know for 2024
- How to Create a DIY Green Screen Video Effect for 2024
- Updated In 2024, How Can You DIY VHS Overlay in After Effects?
- In 2024, Looking for the Simple Steps to Add Transition Effects in Your Video? We Will Illustrate How to Add Transition in Filmora and Mention Tips and Tricks for Video Transition Effects
- Updated 2024 Approved Best Online MPEG to GIF Converters
- New In 2024, Top 10 3D Slideshow Software Review
- 2024 Approved Have You Ever Wanted to Stop Your Video and Hold on to a Single Frame to Draw Attention to a Point or for Dramatic Flair? Good News! VEGAS Pro Makes It Easy to Do Just That. In This Tutorial, Well Look at How to Make Sony Vegas Freeze Frame
- New The Way to Make Dynamic Video Collages for 2024
- New How to Remove Audio From Videos with FFmpeg, In 2024
- Updated Guide to Add Transition Effects in Premiere Pro
- Confused as to How to Add Subtitles to a Video on iPhone? No Worries as We Bring You the Best Solution to Get the Task Done for 2024
- Updated 10 Top Suggestions for AI Video Interviews
- In 2024, How to Convert Videos to Slow Motion?
- Updated This Article Is Regarding the Guideline for Splitting the Video Clips in Adobe After Effects. Here, You Will Also Know About the Most Appropriate Substitute, Wondershare Filmora. Being Economical, You Can Also Use It Practically
- Updated A Full Review of Leeming LUT Pro
- New Backup and Organize Your Tons of Footage in Minutes for 2024
- M31 LUT (Teal and Orange LUT) Free Download for 2024
- Looking Forward to Complement Your Weekend Evenings with a Fantasy Tour to the Anime World? Stay Here to Pick the Most Appealing Alternative From the Best and Timeless Anime Creations for 2024
- 2024 Approved Having GoPro Accessories Is Easy, but Editing on GoPro Quik Is Challenging. Read This Guide and, Stepwise, Learn to Use GoPro Slow-Motion for Perfect Shots
- New In 2024, How to Customize Your Loading Text Effect?
- Updated You Are at the Right Post if You Are Surfing for a GIF to MP4 Conversion Tool. This Article Will Provide You with the Top Best Converters that Can Help You Convert GIF to MP4 Videos Quickly and Easily
- New How To Make Ninja Jump Effect for 2024
- 2024 Approved 4 Solutions to Resize a WebM File
- New Add Effects to Video Online for 2024
- Updated How to Create Custom Lower Thirds in Filmora
- How to Make a Slideshow on iPhone for 2024
- Updated In 2024, Create Your Slow Zoom TikTok in Minutes
- In 2024, How To Add Scrolling Text Effect
- 2024 Approved Enhance Your Film Production with These 5 Silence Detection Tools
- In 2024, Pokemon Go Error 12 Failed to Detect Location On Vivo X Flip? | Dr.fone
- How To Fix iPhone 15 Pro Could Not Be Activated/Reached Issue
- iPhone Transfer Transfer Contact from Apple iPhone 15 Pro Max to iPhone without iCloud | Dr.fone
- How To Fix Unresponsive Phone Touchscreen Of Vivo X90S | Dr.fone
- In 2024, How Do You Get Sun Stone Evolutions in Pokémon For Nokia G310? | Dr.fone
- 3 Things You Must Know about Fake Snapchat Location On Poco C50 | Dr.fone
- In 2024, 2 Ways to Transfer Text Messages from Xiaomi Redmi Note 13 Pro+ 5G to iPhone 15/14/13/12/11/X/8/ | Dr.fone
- How to Transfer from Apple iPhone 15 to iPhone 8/11/11 Pro | Dr.fone
- The Complete Guide to Vivo G2 FRP Bypass Everything You Need to Know
- In 2024, What Does Enter PUK Code Mean And Why Did The Sim Get PUK Blocked On Samsung Galaxy A24 Device
- How to Manually Install a Driver on Windows 11 & 10
- Turn Off Screen Lock - Poco
- Forgot iPhone Passcode Again? Unlock Apple iPhone 12 mini Without Passcode Now
- In 2024, CatchEmAll Celebrate National Pokémon Day with Virtual Location On Huawei Nova Y71 | Dr.fone
- In 2024, The Magnificent Art of Pokemon Go Streaming On Motorola Moto E13? | Dr.fone
- In 2024, How to Fake GPS on Android without Mock Location For your Tecno Camon 30 Pro 5G | Dr.fone
- How PGSharp Save You from Ban While Spoofing Pokemon Go On Xiaomi Civi 3? | Dr.fone
- Remove FRP Lock on Honor Magic 5
- In 2024, Delete Gmail Account With/Without Password On Samsung Galaxy M14 5G
- In 2024, Unlock Your iPhone XS in Minutes with ICCID Code Everything You Need to Know
- In 2024, How to Mirror Your Tecno Spark 10C Screen to PC with Chromecast | Dr.fone
- In 2024, List of Pokémon Go Joysticks On Vivo Y27 4G | Dr.fone
- In 2024, What to do if your Apple iPhone 11 Pro has bad ESN or blacklisted IMEI?
- How to Change Honor Play 7T Location on Skout | Dr.fone
- How to Remove Activation Lock From the Apple iPhone SE Without Previous Owner?
- In 2024, Bypass iCloud Activation Lock with IMEI Code On iPhone 12 Pro Max
- 9 Quick Fixes to Unfortunately TouchWiz has stopped Of Realme Narzo 60 5G | Dr.fone
- Updated In 2024, Video Translator | Wondershare Virbo Online
- In 2024, Unova Stone Pokémon Go Evolution List and How Catch Them For Poco M6 5G | Dr.fone
- How To Transfer Data From Apple iPhone 7 To Others Android Devices? | Dr.fone
- Does PokeGo++ still work on Apple iPhone 14/iPad? | Dr.fone
- A Step-by-Step Guide on Using ADB and Fastboot to Remove FRP Lock on your Samsung Galaxy A23 5G
- 3 Effective Ways to Bypass Activation Lock from Apple iPhone 7 Plus
- 9 Best Free Android Monitoring Apps to Monitor Phone Remotely For your Vivo G2 | Dr.fone
- Can I Bypass a Forgotten Phone Password Of Google Pixel 8 Pro?
- 6 Proven Ways to Unlock Oppo A78 Phone When You Forget the Password
- In 2024, Process of Screen Sharing Realme V30T to PC- Detailed Steps | Dr.fone
- A Comprehensive Guide to Video and Subtitle Translation with Veed.io for 2024
- Title: Add VHS Effects to Videos for Free A 2024 Guide
- Author: Chloe
- Created at : 2024-05-20 03:37:19
- Updated at : 2024-05-21 03:37:19
- Link: https://ai-editing-video.techidaily.com/add-vhs-effects-to-videos-for-free-a-2024-guide/
- License: This work is licensed under CC BY-NC-SA 4.0.

