:max_bytes(150000):strip_icc():format(webp)/F8conferencelogo-7ec4475dc6624114aea076c2611df199.jpg)
Adding a Spooky Shadow Effect with Filmora

Adding a Spooky Shadow Effect with Filmora
Wondershare Filmora’s main purpose is the empowerment of content creators. The latest updates to the program are one of the pieces of evidence.
Whether you’re a horror content creator or simply living the Halloween vibe 24/7, continue reading to know how to use its latest masking feature to create a cool shadow effect for your next mind-blowing social media video.
How to Use The Masking Effect
Wondershare Filmora’s latest Masking feature allows its users to select a specific clip that they can overlay on other parts of the video or other clips.
Free Download For Win 7 or later(64-bit)
Free Download For macOS 10.14 or later
The feature allows you to insert the mask in any shape, such as a rectangle, circle, or triangle. You can also import any shapes you like if you can’t find them in the presets library. You can also adjust the mask placement, width, height, and feather effect.
Without further ado, let’s see the detailed step-by-step guide for this effect.
a. Preparation
You will need at least three shots of the same frame to get the shadow effect to work. The first is the main video, the second is the shadow clip, and the last would be a clip portraying just a plain background.
Make sure that your camera stays at the same point and angle. You can use a tripod for assurance.
Take the first main video and don’t forget to mark the positioning of the object for the next take. Then, you can shoot the shadow clip following the marking of the object to match its position in the main clip.
Finally, shoot the final clip without the object on the frame.

b. Steps to add the shadow effect to your videos using Masking
Step 1: Place the main clip on the timeline and find the start of the segment that you want to use. Press M on the keyboard to set a marker.

Step 2: Place the shadow clip on top of the main clip on the timeline. Trim and adjust until the shadow clip ends right at the marker of the main clip.

Step 3: Move the play head to the start of the shadow clip. Trim the main clip right on that mark so both clips have the same start by clicking the scissor icon and deleting the unused part.

Step 4: Double-click the shadow clip. OpenSettings > Mask Section > Rectangle to apply the mask. Adjust the blur strength to smooth out the edge.

Step 5: Play the result to see if there’s any part you need to block out. When you find them, repeat steps 1 to 4 but with the background clip. Try to conceal all things you need to hide using the masks. Make sure that you get the timings right.

Step6 Trim the length of the masking clips to match the main clip by sliding the play head and clicking the Split button.
Adjust the audio and preview the effect before you save the result. You can also add extra features like slow motion for maximum effect.

Summary
It is so easy to use this shadow effect on your video using Wondershare Filmora. The handy masking feature also comes with additional keyframe control and easy composite adjustment.
Wondershare Filmora is also packed with other powerful new features. This includes Auto Beat Sync, Speed Ramping, Quick Split Mode, and the upgraded Denoise feature. Update today to add more quirk to your content.
Free Download For macOS 10.14 or later
The feature allows you to insert the mask in any shape, such as a rectangle, circle, or triangle. You can also import any shapes you like if you can’t find them in the presets library. You can also adjust the mask placement, width, height, and feather effect.
Without further ado, let’s see the detailed step-by-step guide for this effect.
a. Preparation
You will need at least three shots of the same frame to get the shadow effect to work. The first is the main video, the second is the shadow clip, and the last would be a clip portraying just a plain background.
Make sure that your camera stays at the same point and angle. You can use a tripod for assurance.
Take the first main video and don’t forget to mark the positioning of the object for the next take. Then, you can shoot the shadow clip following the marking of the object to match its position in the main clip.
Finally, shoot the final clip without the object on the frame.

b. Steps to add the shadow effect to your videos using Masking
Step 1: Place the main clip on the timeline and find the start of the segment that you want to use. Press M on the keyboard to set a marker.

Step 2: Place the shadow clip on top of the main clip on the timeline. Trim and adjust until the shadow clip ends right at the marker of the main clip.

Step 3: Move the play head to the start of the shadow clip. Trim the main clip right on that mark so both clips have the same start by clicking the scissor icon and deleting the unused part.

Step 4: Double-click the shadow clip. OpenSettings > Mask Section > Rectangle to apply the mask. Adjust the blur strength to smooth out the edge.

Step 5: Play the result to see if there’s any part you need to block out. When you find them, repeat steps 1 to 4 but with the background clip. Try to conceal all things you need to hide using the masks. Make sure that you get the timings right.

Step6 Trim the length of the masking clips to match the main clip by sliding the play head and clicking the Split button.
Adjust the audio and preview the effect before you save the result. You can also add extra features like slow motion for maximum effect.

Summary
It is so easy to use this shadow effect on your video using Wondershare Filmora. The handy masking feature also comes with additional keyframe control and easy composite adjustment.
Wondershare Filmora is also packed with other powerful new features. This includes Auto Beat Sync, Speed Ramping, Quick Split Mode, and the upgraded Denoise feature. Update today to add more quirk to your content.
Free Download For macOS 10.14 or later
The feature allows you to insert the mask in any shape, such as a rectangle, circle, or triangle. You can also import any shapes you like if you can’t find them in the presets library. You can also adjust the mask placement, width, height, and feather effect.
Without further ado, let’s see the detailed step-by-step guide for this effect.
a. Preparation
You will need at least three shots of the same frame to get the shadow effect to work. The first is the main video, the second is the shadow clip, and the last would be a clip portraying just a plain background.
Make sure that your camera stays at the same point and angle. You can use a tripod for assurance.
Take the first main video and don’t forget to mark the positioning of the object for the next take. Then, you can shoot the shadow clip following the marking of the object to match its position in the main clip.
Finally, shoot the final clip without the object on the frame.

b. Steps to add the shadow effect to your videos using Masking
Step 1: Place the main clip on the timeline and find the start of the segment that you want to use. Press M on the keyboard to set a marker.

Step 2: Place the shadow clip on top of the main clip on the timeline. Trim and adjust until the shadow clip ends right at the marker of the main clip.

Step 3: Move the play head to the start of the shadow clip. Trim the main clip right on that mark so both clips have the same start by clicking the scissor icon and deleting the unused part.

Step 4: Double-click the shadow clip. OpenSettings > Mask Section > Rectangle to apply the mask. Adjust the blur strength to smooth out the edge.

Step 5: Play the result to see if there’s any part you need to block out. When you find them, repeat steps 1 to 4 but with the background clip. Try to conceal all things you need to hide using the masks. Make sure that you get the timings right.

Step6 Trim the length of the masking clips to match the main clip by sliding the play head and clicking the Split button.
Adjust the audio and preview the effect before you save the result. You can also add extra features like slow motion for maximum effect.

Summary
It is so easy to use this shadow effect on your video using Wondershare Filmora. The handy masking feature also comes with additional keyframe control and easy composite adjustment.
Wondershare Filmora is also packed with other powerful new features. This includes Auto Beat Sync, Speed Ramping, Quick Split Mode, and the upgraded Denoise feature. Update today to add more quirk to your content.
Free Download For macOS 10.14 or later
The feature allows you to insert the mask in any shape, such as a rectangle, circle, or triangle. You can also import any shapes you like if you can’t find them in the presets library. You can also adjust the mask placement, width, height, and feather effect.
Without further ado, let’s see the detailed step-by-step guide for this effect.
a. Preparation
You will need at least three shots of the same frame to get the shadow effect to work. The first is the main video, the second is the shadow clip, and the last would be a clip portraying just a plain background.
Make sure that your camera stays at the same point and angle. You can use a tripod for assurance.
Take the first main video and don’t forget to mark the positioning of the object for the next take. Then, you can shoot the shadow clip following the marking of the object to match its position in the main clip.
Finally, shoot the final clip without the object on the frame.

b. Steps to add the shadow effect to your videos using Masking
Step 1: Place the main clip on the timeline and find the start of the segment that you want to use. Press M on the keyboard to set a marker.

Step 2: Place the shadow clip on top of the main clip on the timeline. Trim and adjust until the shadow clip ends right at the marker of the main clip.

Step 3: Move the play head to the start of the shadow clip. Trim the main clip right on that mark so both clips have the same start by clicking the scissor icon and deleting the unused part.

Step 4: Double-click the shadow clip. OpenSettings > Mask Section > Rectangle to apply the mask. Adjust the blur strength to smooth out the edge.

Step 5: Play the result to see if there’s any part you need to block out. When you find them, repeat steps 1 to 4 but with the background clip. Try to conceal all things you need to hide using the masks. Make sure that you get the timings right.

Step6 Trim the length of the masking clips to match the main clip by sliding the play head and clicking the Split button.
Adjust the audio and preview the effect before you save the result. You can also add extra features like slow motion for maximum effect.

Summary
It is so easy to use this shadow effect on your video using Wondershare Filmora. The handy masking feature also comes with additional keyframe control and easy composite adjustment.
Wondershare Filmora is also packed with other powerful new features. This includes Auto Beat Sync, Speed Ramping, Quick Split Mode, and the upgraded Denoise feature. Update today to add more quirk to your content.
How to Remove or Mute Audio in Video with Android Phones?
There are many situations where you need to remove or mute audio in the video. For example, you don’t want the audio in your video to be included, or you want to change it to another sound.
Whatever the reasons, you don’t always have to edit to remove them on PC. There are many adequate android apps that can remove audio from your video. Read on, and this article will show you how!
Method 1: Use Google Photos to mute a video
If you’re looking for a free way to edit a video, you can use the editing tools in Google Photos. Google Photos is the best free app that you can use to store, manage, and edit your photos and videos. It’s also compatible with many android devices.
The basic editing features that Google Photos offers include removing audio from videos on android devices, making videos shorter, or adding text to videos. You can also use it to improve the quality of your videos by editing the contrast, brightness, and saturation.

So, if you want to know how to mute audio in a video android using Google Photos, follow the steps below:
Step1 Launch Google Photos and select the video you want to edit
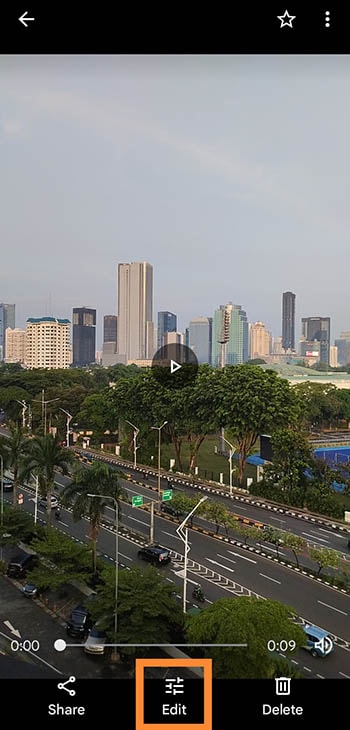
Step2 Open the video editing setting
After the video is shown, pause the video and tap the Edit button to see the setting.
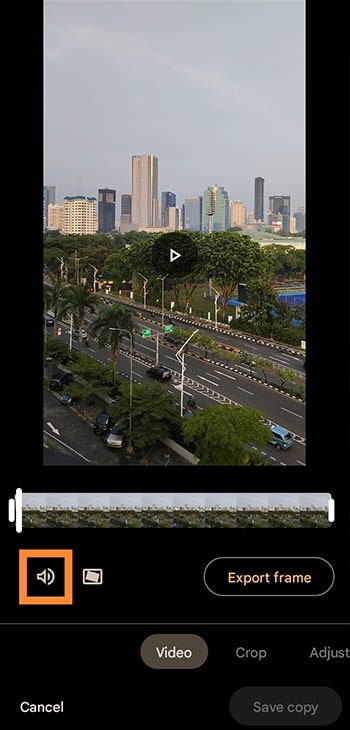
Step3 Mute the audio
Now, you can click the speaker icon to mute the video audio, as seen in the picture.
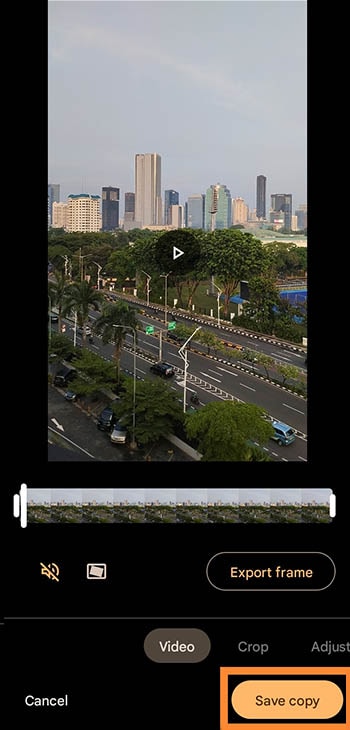
Step4 Save the edited video
Once you’re finished making changes, tap the “Save copy” button to save your changes.
Method 2: Use Filmora to remove audio from a video
Although Google Photos is excellent enough for basic video editing, there are a variety of phones that have no access to Google Services. But worry not. There are still plenty of other tool options that can remove sound from video in android.
The Filmora video editor is another fantastic tool for mobile videographers. It’s very convenient and has a wide range of features, making it a superb choice for anyone looking to edit videos on their mobile device.
Free Download For Win 7 or later(64-bit)
Free Download For macOS 10.14 or later
App size: 67 MB
Rating: 4.8/5 (Google Playstore)

If you’re new to video editing, Filmora is a great place to start. The interface is easy to understand, with a reasonable learning curve and a built-in tutorial that will help you get up to speed quickly.
Once you’re familiar with the basics, you can start exploring more app features, like adding effects and transitions, trimming and splitting clips, and more.
Take a look at some of Filmora’s best features:
- Equipped with over 1000 templates and featured music
- Allows you to do keyframe on a phone
- Professional adjustments, such as voice enhancement and audio speed, or setting video brightness and contrast
- Export quickly in HD quality and custom resolution
Moreover, Filmora is in the top 10 ranking for video players and editors at Google Playstore. Whether you’re a seasoned pro or just getting started, Filmora is an excellent option for mobile video editing. You can edit your videos whenever and wherever you can.
Let’s start removing the audio from your videos by following the steps below:
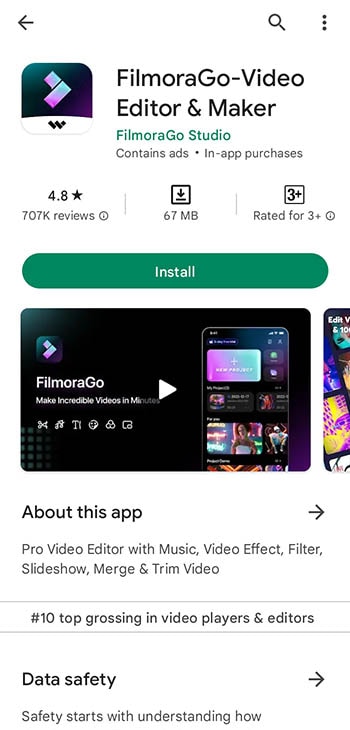
Step1 Install Filmora on your device
You can find and download Filmora Go through Google Playstore. Just search for “Filmora-Video Editor & Maker) and click the Install button.
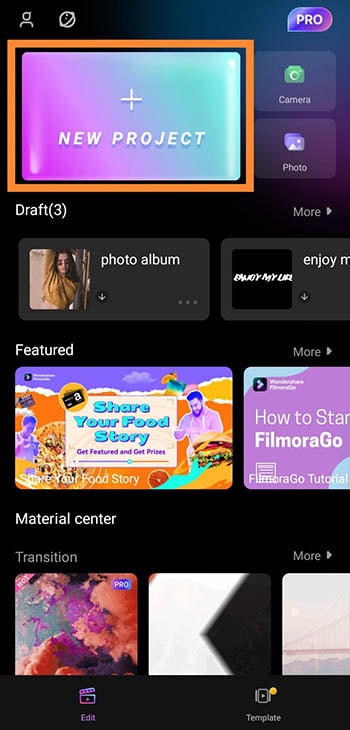
Step2 Open Filmora Go and click New Project
After running Filmora Go, you can click the New Project button and upload the video you want to edit from your gallery.
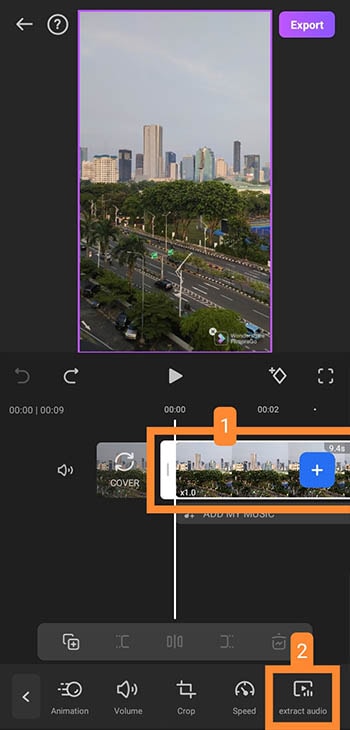
Step3 Extract audio from the video
Once the video has been uploaded, click the clip in the timeline and choose “extract audio.”
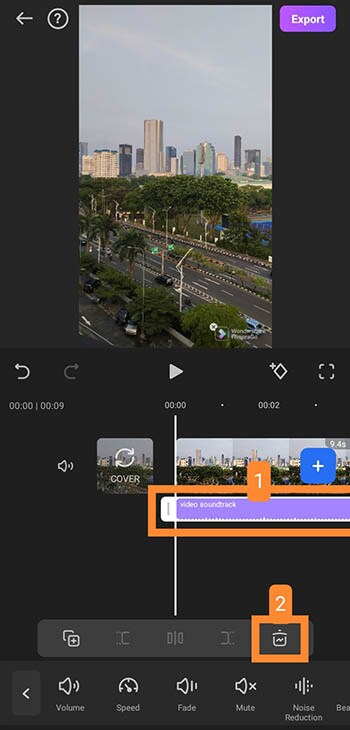
Step4 Remove audio from the video
Now that you have extracted the audio from your video, you can click the video soundtrack on the timeline, then click the delete button as seen in the picture below. By then, your audio will be removed.
Step5 Export the edited file
After you have deleted the audio and felt satisfied, it’s time to export the edited video. Click “Export” at the top right to see the export setting. Choose the resolution and frame rates output you want, then click the Export button.
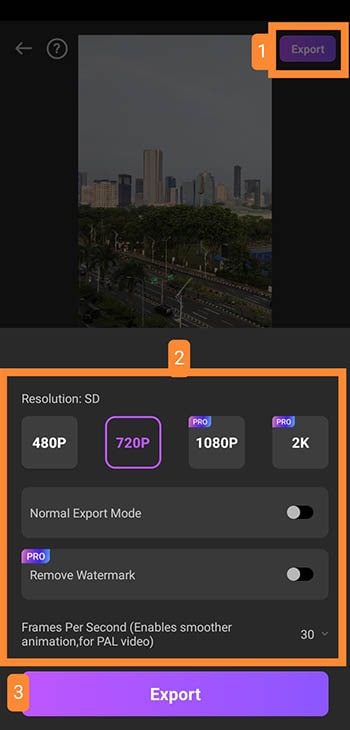
Voila! The edited video without sound will be saved to your phone, and you can also share it immediately on your social media.
Method 3: Use InShot to remove sound from video android
There are many ways to remove sound from a video on android. In this part, we’ll show you another alternative tool that you can use to mute your videos, namely InShot Video Editor.
InShot is a video editing app for mobile phones with professional features. This app is a great tool for creating short and fancy video clips to share on social media or with friends and family. But to be aware, although you can use Inshot for free, but the app will display some ads.
App size: 168 MB
Rating: 4.9/5 (Google Playstore)

InShot is widely used by android users with more than 500M downloads on Google Playstore, making it one of the most popular video editors for mobile.
InShot offers a variety of features for its users, such as:
- Adding transition effects for videos
- Making a smooth slow motion
- Adding music and voice-overs
The method is a bit more tricky than the other tools mentioned above, but it should work for most people. Now, follow these steps carefully to remove the audio from your video:
Step1 Install InShot Video Editor on your phone
The app can take up your phone’s storage, so ensure you have enough space before downloading it. You can find and install the app from Google Playstore by searching “Video Editor & Maker - InShot.”
Step2 Open the InShot app and create a new video project

Step3 Extract audio from the video
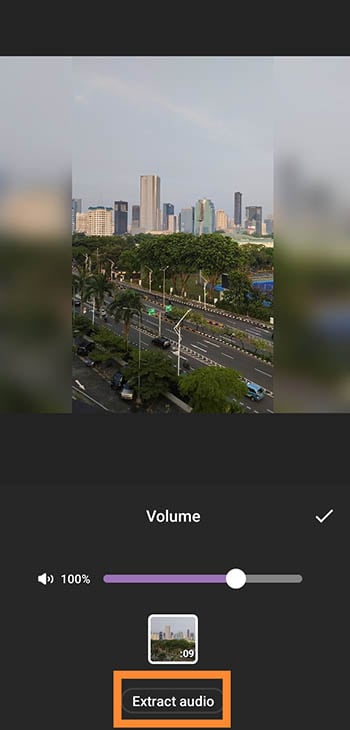
After the video has been added, you should find and click the Volume setting.

Then, click the “Extract audio” button to separate the audio from the video. Tip: if you only want to mute it, you can slide the volume to zero for this step.
Step4 Remove the audio
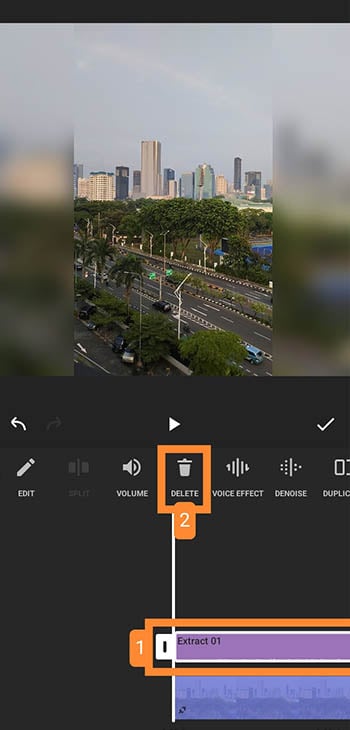
Once you have extracted the audio, select the audio bar and click the delete button to remove it.
Step5 Save the changes
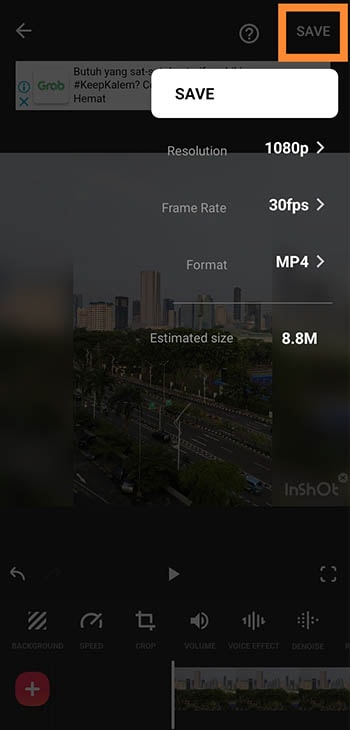
Now, you can save the edited video and choose the resolution you need, as well as the frame rate and output format. InShot will also show you the estimated size of the edited file before saving it.
Once done, click “Save,” and the video will be downloaded to your phone.
Conclusion
For video editing or audio removal, you don’t always have to do it on a PC. You can use android apps to remove sound from your video in any case. Among android video editors, some apps let you simply mute the audio, while others remove the audio track entirely.
The above-recommended apps are the best-chosen ones, including Google Photos, Filmora, and InShot. While not every android device supports Google service, you might want to consider Filmora, as it’s a sufficient alternative with a rather smaller size. Hence, it helps you edit your video with ease and smoothly.
Free Download For macOS 10.14 or later
App size: 67 MB
Rating: 4.8/5 (Google Playstore)

If you’re new to video editing, Filmora is a great place to start. The interface is easy to understand, with a reasonable learning curve and a built-in tutorial that will help you get up to speed quickly.
Once you’re familiar with the basics, you can start exploring more app features, like adding effects and transitions, trimming and splitting clips, and more.
Take a look at some of Filmora’s best features:
- Equipped with over 1000 templates and featured music
- Allows you to do keyframe on a phone
- Professional adjustments, such as voice enhancement and audio speed, or setting video brightness and contrast
- Export quickly in HD quality and custom resolution
Moreover, Filmora is in the top 10 ranking for video players and editors at Google Playstore. Whether you’re a seasoned pro or just getting started, Filmora is an excellent option for mobile video editing. You can edit your videos whenever and wherever you can.
Let’s start removing the audio from your videos by following the steps below:
Step1 Install Filmora on your device
You can find and download Filmora Go through Google Playstore. Just search for “Filmora-Video Editor & Maker) and click the Install button.

Step2 Open Filmora Go and click New Project
After running Filmora Go, you can click the New Project button and upload the video you want to edit from your gallery.

Step3 Extract audio from the video
Once the video has been uploaded, click the clip in the timeline and choose “extract audio.”

Step4 Remove audio from the video
Now that you have extracted the audio from your video, you can click the video soundtrack on the timeline, then click the delete button as seen in the picture below. By then, your audio will be removed.

Step5 Export the edited file
After you have deleted the audio and felt satisfied, it’s time to export the edited video. Click “Export” at the top right to see the export setting. Choose the resolution and frame rates output you want, then click the Export button.

Voila! The edited video without sound will be saved to your phone, and you can also share it immediately on your social media.
Method 3: Use InShot to remove sound from video android
There are many ways to remove sound from a video on android. In this part, we’ll show you another alternative tool that you can use to mute your videos, namely InShot Video Editor.
InShot is a video editing app for mobile phones with professional features. This app is a great tool for creating short and fancy video clips to share on social media or with friends and family. But to be aware, although you can use Inshot for free, but the app will display some ads.
App size: 168 MB
Rating: 4.9/5 (Google Playstore)

InShot is widely used by android users with more than 500M downloads on Google Playstore, making it one of the most popular video editors for mobile.
InShot offers a variety of features for its users, such as:
- Adding transition effects for videos
- Making a smooth slow motion
- Adding music and voice-overs
The method is a bit more tricky than the other tools mentioned above, but it should work for most people. Now, follow these steps carefully to remove the audio from your video:
Step1 Install InShot Video Editor on your phone
The app can take up your phone’s storage, so ensure you have enough space before downloading it. You can find and install the app from Google Playstore by searching “Video Editor & Maker - InShot.”
Step2 Open the InShot app and create a new video project

Step3 Extract audio from the video
After the video has been added, you should find and click the Volume setting.

Then, click the “Extract audio” button to separate the audio from the video. Tip: if you only want to mute it, you can slide the volume to zero for this step.

Step4 Remove the audio
Once you have extracted the audio, select the audio bar and click the delete button to remove it.

Step5 Save the changes
Now, you can save the edited video and choose the resolution you need, as well as the frame rate and output format. InShot will also show you the estimated size of the edited file before saving it.
Once done, click “Save,” and the video will be downloaded to your phone.

Conclusion
For video editing or audio removal, you don’t always have to do it on a PC. You can use android apps to remove sound from your video in any case. Among android video editors, some apps let you simply mute the audio, while others remove the audio track entirely.
The above-recommended apps are the best-chosen ones, including Google Photos, Filmora, and InShot. While not every android device supports Google service, you might want to consider Filmora, as it’s a sufficient alternative with a rather smaller size. Hence, it helps you edit your video with ease and smoothly.
Level Up Videos By Applying Keyframe with Filmora
Everyone is fascinated by a video portraying creativity and effort in each frame. Your films can easily have this captivity through the keyframe feature. It provides you the accessibility to make even a simple, plain shot pace up, slow down, or pan across the screen.
Wondershare Filmora offers you a simple yet great experience of Keyframing. It has been the editors’ favorite feature for years. Under its Grow and Win Program, Filmora presents the Keyframe creativity contest. It is the ultimate solution for bringing captivity and precision to your shots.
Part 1. What is the Keyframe Feature?
A keyframe, also spelled “key frame,” defines any smooth transition’s beginning and conclusion. In the case of animation or film, or video, that something may be a drawing or a specific frame of a shot.
The keyframe feature creates room for boundless creativity. The Keyframe feature could imitate any illusive or fascinating impact, from object enlargement to magical power effects. A key frame is a frame that serves as a marker for the start or stop of a parameter change.
You could use a keyframe to mark the spot where the audio will have faded up or down to a specific volume.
Part 2. Where to Use The Keyframe Feature?
Editors and creators use keyframing for all kinds of stuff. These uses include:
Animated Logo Intros
You can use the keyframe feature to create indigenous intros with animated logos. It helps the editors go for vlogging or tutorial videos.

Special Transparency Effects
Keyframing is famous for creating blended visuals through experimentation with the transparency of the clip.

Custom Picture-in-Picture Paths
We use the picture-in-picture effect in many editing formats, from tutorial videos to gaming streams and vlogs. Keyframing allows editors to execute the movement of the PIP as they wish. For instance, this video call was shot from a video.

The picture will move across the screen between the 30-second and 1-minute marks if you indicate that it will be in the upper left corner of the screen at the 30-second timestamp of your video and the bottom right corner at the 1-minute timestamp.
Part 3. What Would You Need to Make a Keyframe Video
Let us share the procedure for making a video using the keyframe feature.
1. A Video Clip or Photos
For experimenting and creating with the keyframe feature, first, you would need high-quality video clips or images.
The high-resolution requirement is a prerequisite for the complete experience of all parameters of the keyframe feature. For example, the zooming and varying opacity effects you add might look bland and dull if the clip or image appears pixelated upon zooming and scaling.
2. Motion Elements
Keyframing allows for a vast area of creativity with motion elements that you can download online. The keyframe feature adds charm to these elements by playing with their orientation and scale.
3. An Advanced Editing Software
To utilize the keyframe feature, you need high-end video and animation editing software with an interactive and easy-to-use user interface and good accessibility options. So, what better choice than Filmora to use for this feature? To do the editing process on Filmora , follow the steps below and enjoy!
Free Download For Win 7 or later(64-bit)
Free Download For macOS 10.14 or later
Part 4. How to Make a Keyframe Video With Filmora
Filmora can be one of the best video editors to achieve the effect. It can personalize anything in detail. There is plenty of footage from its built-in stock media with unlimited resources. By using this platform for editing, your editing time hugely can be greatly reduced.
- The keyframe tool is efficient for adding beautiful animations to podcast videos.
- More than 2,000 audio resources, including music, audio effects, and more.
- Multiple clips can be edited more quickly with the shortcut key.
- Choose from over 1,000 video effects, including transitions, filters, titles, and many others, to spice up your keyframe videos.
There are many different ways you can use keyframes on Filmora. To learn the complete step-by-step instructions, continue reading. Here we explain three examples of how to use keyframing and how to use the tool in Filmora.
Step1 Install the Wondershare Filmora
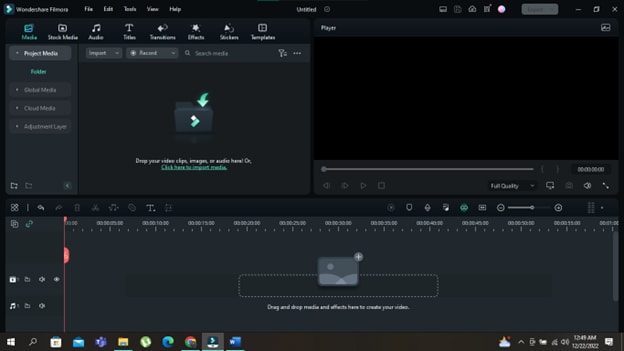
Launch the most recent version of the software on your computer to produce an outstanding film. To do this, take the following actions.
- You must first download and open Wondershare Filmora on your PC or Mac.
Step2 Import your Photos and Videos
- When you open Wondershare Filmora, you will notice the main import window in the top left corner.
- Click in the center of the import window upon the import icon.
- After clicking, Wondershare Filmora will automatically direct you to your PC library.
- Browse to where your target Clips or Images are stored.
- Select all the objects you want to import.
- Click on Open, and you will have imported files.
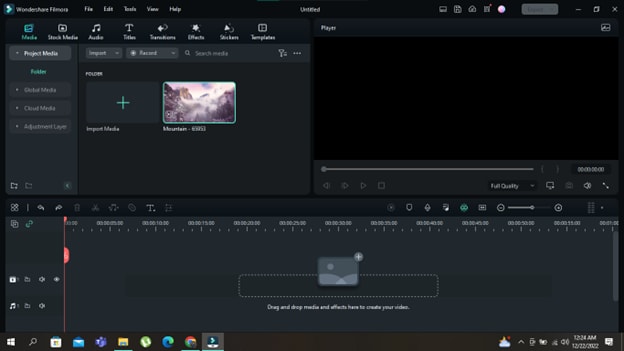
Step3 Add your Photos and Videos to the Timeline
Your next step will be to add the imported videos and images to the timeline. When you have many videos and photos imported into the timeline, you can add them simultaneously.
Or you can also add them one by one wherever you need. To add an item to your timeline, follow the steps mentioned.
- Right-click on the photo or video you want to add to the timeline.
- Keep holding the right-click and drag it down to the timeline.
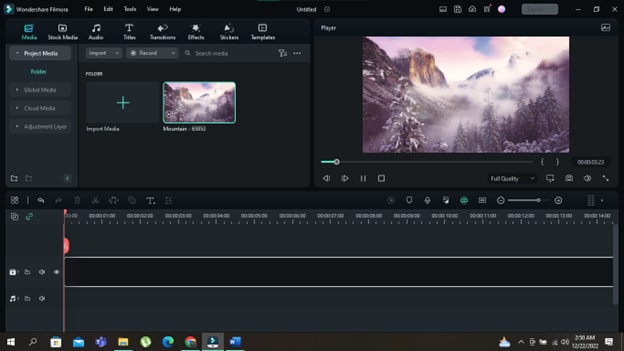
Step4 Adding Movement to your Shots
The next step would be to use the movement option in Keyframing, where you can pan and zoom a shot over a specified time. To do this, follow the bullet points below.
- After importing your clips to the timeline, double-click the clip to open the Editing Menu.
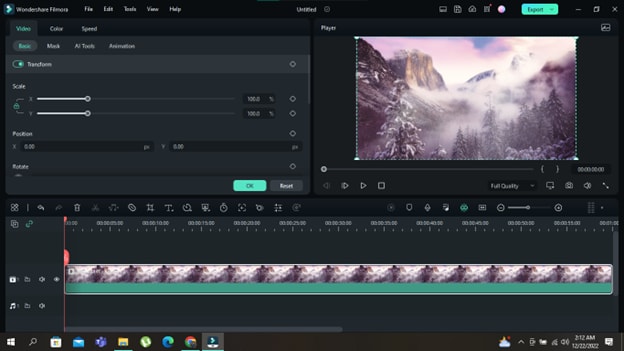
- Once opened, the editing menu will have a Basic tab; click it.
- Check the key-shaped button in front of the Transform button. It will create a Keyframe in the default form of your clip.
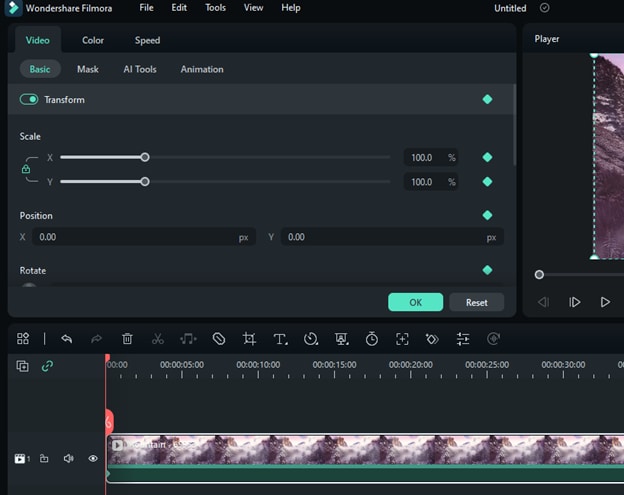
- You need to add a second keyframe at the end of the clip to create movement. First, move the timeline cursor to the end of the clip. Then, check the key-shaped button in front of the Transform button again for a second Keyframe.
- Now change the scale of the clip from the slider options in the Custom Animation
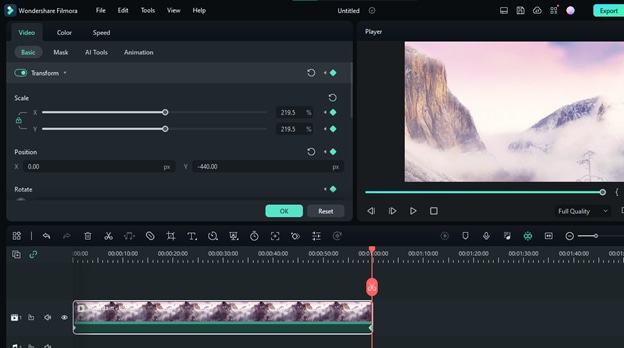
- Now play your clip, and you’ll see it zooms in and pans automatically to the state of the second keyframe over that timeline.

Step5 Adding Motion to your Shots
Keyframing can add motion to your project’s objects, clips, or images. To perform this in Filmora, follow these instructions:
- Go to the Stock Media tab on the top left ribbon in Filmora and download some motion elements (videos/GIFs) from accessible outlets like the Flora GIF used here.
- After importing elements to the timeline, double-click the element to open the Editing Menu.
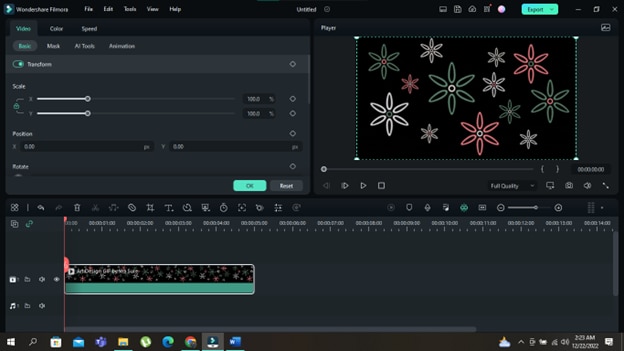
- Once opened, the editing menu will have a Basic tab; click
- Check the key-shaped button in the Basic Tab. It will create a Keyframe in the default form of your motion element.
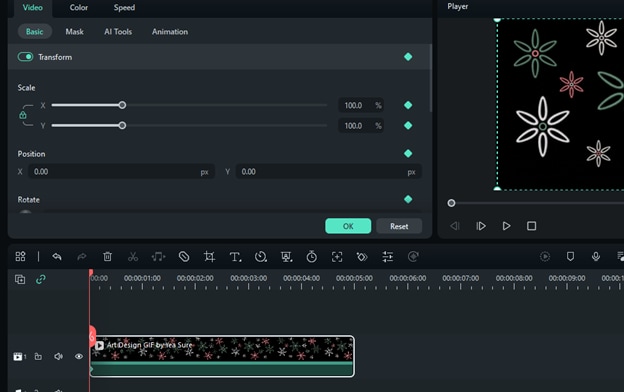
- Next, move it to the end of the clip, check the key-shaped button in front of the Transform button, and add another keyframe there, but this time, change its scale and rotation attributes as you like.
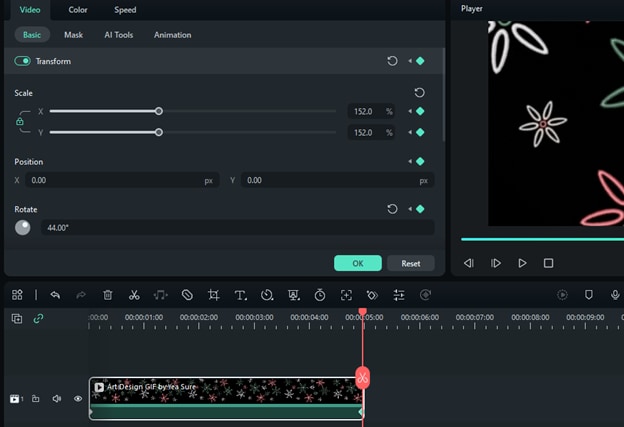
- Enter OK and play your clip to see the fantastic effect.

Step6 Keyframing Opacity
Keyframing allows creators to integrate variable opacity in their shots to instill a dramatic feel. This technique also helps create perfect fade-in and fade-out shots for your videos. Additionally, it is for theatrically dissolving shots too.
For an illustrated guide to keyframing opacity, keep on reading the following instructions:
- Add a Keyframe to a clip on your timeline. For it, double-click the clip to open the Editing Menu, Then go to Basic Tab.
- Check the key-shaped button in front of the Transform button. It will create a Keyframe in the default form of your motion element.
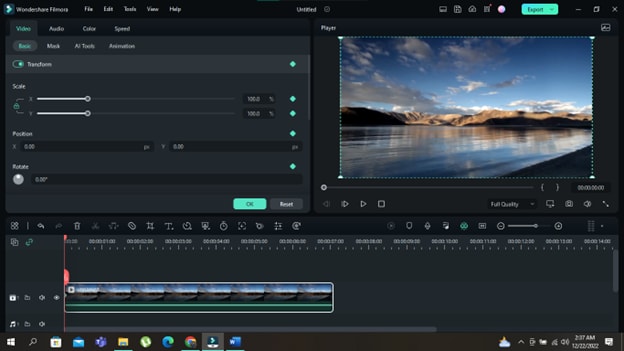
- Move the red cursor to the end of the clip.
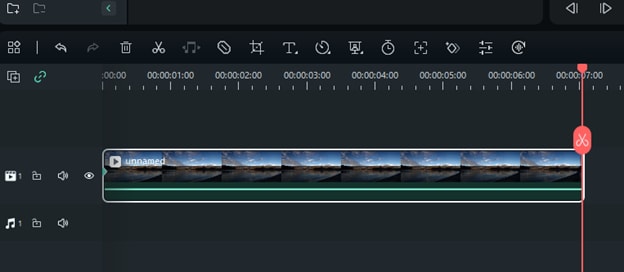
- Next, add another keyframe, scroll down in the editing menu, and remove the opacity from the slider below the Bend Mode option.
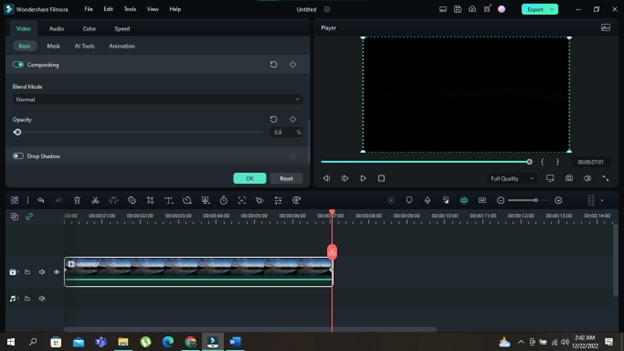
- That’s it; you have a theatrical variation of the clip’s visible opacity throughout the timeline.

Conclusion
On the whole, keyframing is all about creativity at your fingertips. When detailed effort becomes necessary, the keyframe feature is always there to save the day. This tool is a delight, from adding movement and motion to your playful and immersive shots to crafting a cinematic scene out of your films. This contest is your chance to show us how creative you can get with this beautiful feature. Good luck creating!
Free Download For macOS 10.14 or later
Part 4. How to Make a Keyframe Video With Filmora
Filmora can be one of the best video editors to achieve the effect. It can personalize anything in detail. There is plenty of footage from its built-in stock media with unlimited resources. By using this platform for editing, your editing time hugely can be greatly reduced.
- The keyframe tool is efficient for adding beautiful animations to podcast videos.
- More than 2,000 audio resources, including music, audio effects, and more.
- Multiple clips can be edited more quickly with the shortcut key.
- Choose from over 1,000 video effects, including transitions, filters, titles, and many others, to spice up your keyframe videos.
There are many different ways you can use keyframes on Filmora. To learn the complete step-by-step instructions, continue reading. Here we explain three examples of how to use keyframing and how to use the tool in Filmora.
Step1 Install the Wondershare Filmora
Launch the most recent version of the software on your computer to produce an outstanding film. To do this, take the following actions.
- You must first download and open Wondershare Filmora on your PC or Mac.

Step2 Import your Photos and Videos
- When you open Wondershare Filmora, you will notice the main import window in the top left corner.
- Click in the center of the import window upon the import icon.
- After clicking, Wondershare Filmora will automatically direct you to your PC library.
- Browse to where your target Clips or Images are stored.
- Select all the objects you want to import.
- Click on Open, and you will have imported files.

Step3 Add your Photos and Videos to the Timeline
Your next step will be to add the imported videos and images to the timeline. When you have many videos and photos imported into the timeline, you can add them simultaneously.
Or you can also add them one by one wherever you need. To add an item to your timeline, follow the steps mentioned.
- Right-click on the photo or video you want to add to the timeline.
- Keep holding the right-click and drag it down to the timeline.

Step4 Adding Movement to your Shots
The next step would be to use the movement option in Keyframing, where you can pan and zoom a shot over a specified time. To do this, follow the bullet points below.
- After importing your clips to the timeline, double-click the clip to open the Editing Menu.

- Once opened, the editing menu will have a Basic tab; click it.
- Check the key-shaped button in front of the Transform button. It will create a Keyframe in the default form of your clip.

- You need to add a second keyframe at the end of the clip to create movement. First, move the timeline cursor to the end of the clip. Then, check the key-shaped button in front of the Transform button again for a second Keyframe.
- Now change the scale of the clip from the slider options in the Custom Animation

- Now play your clip, and you’ll see it zooms in and pans automatically to the state of the second keyframe over that timeline.

Step5 Adding Motion to your Shots
Keyframing can add motion to your project’s objects, clips, or images. To perform this in Filmora, follow these instructions:
- Go to the Stock Media tab on the top left ribbon in Filmora and download some motion elements (videos/GIFs) from accessible outlets like the Flora GIF used here.
- After importing elements to the timeline, double-click the element to open the Editing Menu.

- Once opened, the editing menu will have a Basic tab; click
- Check the key-shaped button in the Basic Tab. It will create a Keyframe in the default form of your motion element.

- Next, move it to the end of the clip, check the key-shaped button in front of the Transform button, and add another keyframe there, but this time, change its scale and rotation attributes as you like.

- Enter OK and play your clip to see the fantastic effect.

Step6 Keyframing Opacity
Keyframing allows creators to integrate variable opacity in their shots to instill a dramatic feel. This technique also helps create perfect fade-in and fade-out shots for your videos. Additionally, it is for theatrically dissolving shots too.
For an illustrated guide to keyframing opacity, keep on reading the following instructions:
- Add a Keyframe to a clip on your timeline. For it, double-click the clip to open the Editing Menu, Then go to Basic Tab.
- Check the key-shaped button in front of the Transform button. It will create a Keyframe in the default form of your motion element.

- Move the red cursor to the end of the clip.

- Next, add another keyframe, scroll down in the editing menu, and remove the opacity from the slider below the Bend Mode option.

- That’s it; you have a theatrical variation of the clip’s visible opacity throughout the timeline.

Conclusion
On the whole, keyframing is all about creativity at your fingertips. When detailed effort becomes necessary, the keyframe feature is always there to save the day. This tool is a delight, from adding movement and motion to your playful and immersive shots to crafting a cinematic scene out of your films. This contest is your chance to show us how creative you can get with this beautiful feature. Good luck creating!
Top List of Best VHS Video Effect Makers
VHS effects are the trendiest and most highly usable effects for videos through which you can add retro qualities in simple videos. You must have noticed the classical yet smooth distortion in the famous music videos. This smoother distortion that gives a retro vibe in the video is possible with the VHS effects. You don’t have to spend millions on this as many VHS effect online tools are at your disposal.
This discussion aims to familiarize you with the most known and reliable VHS filter online tools. You will also discover much-needed and significant knowledge of VHS effects. The offline tool through which you can add VHS effects in videos like never before will also be discussed here.
Part 1: What Do You Know About VHS Effects?
The VHS effects are the visual and auditory artifacts, along with smoother playback video distortion. The term VHS indicates the technology “Video Home System tapes.” From the 1980s-1990s, these effects were well-known and readily used in digital content. Moreover, in recent years, the vintage appeal of the videos has been achieved with these VHS effects. You can learn more about this from the provided information:
- Lines of VHS: The lines in VHS are tracking lines, and it is used to implement distortion effects in the videos. You can notice that these lines often run vertically in the video effects.
- Vintage Frames: You may have seen the darkening and faded effects on the edges in the VHS-integrated videos. The playback equipment limitation initially caused it; however, many videographers apply these effects in videos to give them a vintage look.
- Glitching Effects: VHS effects are not completed without comprehension of glitching effects. This includes rolling bars and sudden statics. This also gives the look of tape damage and signal interface and is perfect for flashbacks.
- Nostalgic Provocation: With this effect, you can add nostalgic feelings. If you are going to make movies regarding history, it can also help you by adding retro effects. It also replicates imperfections to give a unique look to videos.
Add VHS Effect to Video
Simply add video effects on Video with Filmora Video Effect Editor ! Experience the magic of cool yet outstanding video effects, where your videos come to life in beautiful visuals.
Apply VHS Effect Apply VHS Effect Learn More >

Part 2: Top VHS Video Effect Online Tools to Use in 2024
A substantial inventory of tools can confuse you and make it harder to select the best tool. We wish to bring peace and harmony to your videography career and wish you to get familiar with the VHS effect online video tools without getting confused. You can find the industry-grade tool for making videos visually appealing here:
| 1. Veed.io | 2. Kapwing |
|---|---|
| 3. Clideo | 4. FlexClip |
| 5. Fastreel | 6. CreatorKit |
1. Veed.io
Veed.io lets you transform simple-looking videos into a masterpiece of aesthetics and retros with its VHS overlays. With this online VHS effect tool, you can also add perfect flashbacks along with VHS to engage users. Creating the loops of videos and adding VHS overlays is also possible with this. It also helps to add customized subtitles to the videos to make it more understandable.
Some Prominent Characteristics of Veed.io
- It is an all-in-one video editor through which you can add modern modifications to create stunning and powerful videos. This tool can help in creating marketing, training, TikTok, and demos.
- You can also optimize the videos by trimming, cropping, rotating, and splitting them. Other than this, you can add customized audio in simple videos.
- Removing unnecessary background noises and awkward pauses is also possible with Veed.io. You can also upgrade your productivity by using its pre-built templates.

2. Kapwing
To add VHS effects to video online for free, you can get assistance from this premium grade tool - Kapwing . It also supports timeline-based nondestructive editing, which gives you a free hand in customization. Other than this, you can also create the layers in the videos and add VHS effects where needed. If you have some unique idea in mind, don’t hesitate to choose a blank canvas.
Some Prominent Characteristics of Kapwing
- Kapwing lets you import videos from different sources. You can use Google Drive, Google Photos, or your device’s gallery to add a video.
- Using its preset templates, you can create high-quality videos without investing extra time. It also supports diversified plugins to boost your productivity.
- There are versatile shapes, emojis, and elements in it that you can use as per your need. This also lets you add customized text and subtitles to videos.

3. Clideo
This fast and secure VHS effect online video tool helps you add realistic VHS effects to videos. You can not only add the effects but can also change the format of videos without any issues. Other than this, you also apply several intuitive filters to make videos more studio friendly. Clideo can edit diversified metrics of the videos and work as a reputable video editor.
Some Prominent Characteristics of Clideo
- With this tool, you can add text to a video, change its fonts and colors, or make a picture in a picture split screen.
- It also assists you in merging lengthy videos into smaller ones. You can also compress the large-sized videos to make them more shareable.
- Creating memes, managing the speed of videos, resizing their dimensions, or cropping unrequired parts is also possible with this.

4. FlexClip
Distorted video quality is much adored in today’s world, and you can also add these effects to your videos. You can deploy this effect to represent something in the past, and it can boost your engagement in the entertainment industry. If you are worried that the quality of the video will be compromised with FlexClip , you can use its duplicating feature so the original video is preserved.
Some Prominent Characteristics of FlexClip
- It supports the text-to-speech feature through which you can not only add voiceover but can also customize the voice style.
- If you want to make videos more engaging, you can use the previously existing soundtracks of FlexClip. You can also search for the required soundtrack through specific genres.
- There are versatile effects, logos, shapes, cooperative, decorative, and title overlays, so you can make videos more illustrative.

5. Fastreel
This online-based platform can escalate your user experience by adding VHS effects to the videos. You can add high-quality VHS effects in videos and create perfect slideshows. Not only personally, but you can also use the capabilities of this tool to expand your professional life. Fastreel also lets you merge multiple videos and then apply the VHS effects.
Some Prominent Characteristics of Fastreel
- This tool works like an all-in-one video editor, as you can reverse, crop, resize, flip, and loop videos.
- If you are a slow-motion video lover, you can also make slow and stop-motion videos with built-in features.
- Fastreel can also convert images into videos or make video collages for you. Other than this, you are also free to add music to videos.

6. CreatorKit
Along with hundreds of promotional templates for high-quality VHS effects, this VHS filter online tool never fails to amaze users with its higher functionality. CreatorKit can create engaging product videos with intuitive text styles. You can use its background removal if you want to create transparent-grade videos.
Some Prominent Characteristics of CreatorKit
- To create optimized videos, you can use its Shopify integrations to access more elements and other things.
- It can add animated price tags along with showcasing product features. You can also create intros and outros with this.
- There are several colors generated and gradient-generating bases that can assist you in showcasing the brand colors without any issues.

Part 3: Software Alternative: Insert Best VHS Effects Using Wondershare Filmora
It will not be inappropriate to say that Wondershare Filmora is the top-ranked video editor in the market. With Filmora, you can add several types of VHS effects in videos, such as horror filters, distortion bad, static, lines, vintage, and more. You can also search for customized effects by adding keywords and their subscription status.
Add VHS Video Effect For Win 7 or later(64-bit)
Add VHS Video Effect For macOS 10.14 or later
Wondershare Filmora is also a better option than other VHS effect online tools because you can also access versatile stock media files in it. There are tons of pre-built templates in Filmora, and you can also access all your previous projects from Filmora Cloud. Adding high-quality audio to videos is also possible with this tool.
Instructions to Add VHS Effects in Videos with Filmora
The instructions through which you can add the VHS effects in videos with any complications are given here:
Step 1Launch Filmora and Add a Video
To get started, install and launch Wondershare Filmora on your device. Make sure you use the updated version of Filmora. Next, click the “New Project” button and select “Click here to import media.” Next, add the video of your choice on which you wish to apply the VHS effect.

Step 2Add Video to Timeline and Apply Effect
Following this, drag the video to the “Timeline,” click on “Effects” from the above panel and go to “Search Bar.” From there, search for “VHS Effects” and select the effect from the available options. After selecting it, drag it on the video present in the timeline.

Step 3Download the VHS Effect Integrated Video
To continue, you can also modify it to a further extent by clicking on the added effect. There are several features that can help you with modification, such as Transitions, Stickers, and more. Afterward, click the “Export” button, customize the “Name,” “Save To,” “Format,” Quality,” and other metrics of videos. Finally, hit the “Export” button and save the video on your device.

Conclusion
To summarize, it can be said that you can use the VHS effect online video tools to create cinematic-level videos. VHS effects are smooth distortion effects that are used in several videos. You can learn more about this from the above information. Besides this, several online tools such as Veed.io, Clideo, FlexClip, and more can help you add VHS effects to videos.
To learn more about these tools, look at the information provided above. In case you wish to add the VHS effects to videos without facing any complications, don’t refrain from using the top-class tool named Wondershare Filmora. The steps to accomplish this task in a flawless manner are also discussed above for you.
Apply VHS Effect Apply VHS Effect Learn More >

Part 2: Top VHS Video Effect Online Tools to Use in 2024
A substantial inventory of tools can confuse you and make it harder to select the best tool. We wish to bring peace and harmony to your videography career and wish you to get familiar with the VHS effect online video tools without getting confused. You can find the industry-grade tool for making videos visually appealing here:
| 1. Veed.io | 2. Kapwing |
|---|---|
| 3. Clideo | 4. FlexClip |
| 5. Fastreel | 6. CreatorKit |
1. Veed.io
Veed.io lets you transform simple-looking videos into a masterpiece of aesthetics and retros with its VHS overlays. With this online VHS effect tool, you can also add perfect flashbacks along with VHS to engage users. Creating the loops of videos and adding VHS overlays is also possible with this. It also helps to add customized subtitles to the videos to make it more understandable.
Some Prominent Characteristics of Veed.io
- It is an all-in-one video editor through which you can add modern modifications to create stunning and powerful videos. This tool can help in creating marketing, training, TikTok, and demos.
- You can also optimize the videos by trimming, cropping, rotating, and splitting them. Other than this, you can add customized audio in simple videos.
- Removing unnecessary background noises and awkward pauses is also possible with Veed.io. You can also upgrade your productivity by using its pre-built templates.

2. Kapwing
To add VHS effects to video online for free, you can get assistance from this premium grade tool - Kapwing . It also supports timeline-based nondestructive editing, which gives you a free hand in customization. Other than this, you can also create the layers in the videos and add VHS effects where needed. If you have some unique idea in mind, don’t hesitate to choose a blank canvas.
Some Prominent Characteristics of Kapwing
- Kapwing lets you import videos from different sources. You can use Google Drive, Google Photos, or your device’s gallery to add a video.
- Using its preset templates, you can create high-quality videos without investing extra time. It also supports diversified plugins to boost your productivity.
- There are versatile shapes, emojis, and elements in it that you can use as per your need. This also lets you add customized text and subtitles to videos.

3. Clideo
This fast and secure VHS effect online video tool helps you add realistic VHS effects to videos. You can not only add the effects but can also change the format of videos without any issues. Other than this, you also apply several intuitive filters to make videos more studio friendly. Clideo can edit diversified metrics of the videos and work as a reputable video editor.
Some Prominent Characteristics of Clideo
- With this tool, you can add text to a video, change its fonts and colors, or make a picture in a picture split screen.
- It also assists you in merging lengthy videos into smaller ones. You can also compress the large-sized videos to make them more shareable.
- Creating memes, managing the speed of videos, resizing their dimensions, or cropping unrequired parts is also possible with this.

4. FlexClip
Distorted video quality is much adored in today’s world, and you can also add these effects to your videos. You can deploy this effect to represent something in the past, and it can boost your engagement in the entertainment industry. If you are worried that the quality of the video will be compromised with FlexClip , you can use its duplicating feature so the original video is preserved.
Some Prominent Characteristics of FlexClip
- It supports the text-to-speech feature through which you can not only add voiceover but can also customize the voice style.
- If you want to make videos more engaging, you can use the previously existing soundtracks of FlexClip. You can also search for the required soundtrack through specific genres.
- There are versatile effects, logos, shapes, cooperative, decorative, and title overlays, so you can make videos more illustrative.

5. Fastreel
This online-based platform can escalate your user experience by adding VHS effects to the videos. You can add high-quality VHS effects in videos and create perfect slideshows. Not only personally, but you can also use the capabilities of this tool to expand your professional life. Fastreel also lets you merge multiple videos and then apply the VHS effects.
Some Prominent Characteristics of Fastreel
- This tool works like an all-in-one video editor, as you can reverse, crop, resize, flip, and loop videos.
- If you are a slow-motion video lover, you can also make slow and stop-motion videos with built-in features.
- Fastreel can also convert images into videos or make video collages for you. Other than this, you are also free to add music to videos.

6. CreatorKit
Along with hundreds of promotional templates for high-quality VHS effects, this VHS filter online tool never fails to amaze users with its higher functionality. CreatorKit can create engaging product videos with intuitive text styles. You can use its background removal if you want to create transparent-grade videos.
Some Prominent Characteristics of CreatorKit
- To create optimized videos, you can use its Shopify integrations to access more elements and other things.
- It can add animated price tags along with showcasing product features. You can also create intros and outros with this.
- There are several colors generated and gradient-generating bases that can assist you in showcasing the brand colors without any issues.

Part 3: Software Alternative: Insert Best VHS Effects Using Wondershare Filmora
It will not be inappropriate to say that Wondershare Filmora is the top-ranked video editor in the market. With Filmora, you can add several types of VHS effects in videos, such as horror filters, distortion bad, static, lines, vintage, and more. You can also search for customized effects by adding keywords and their subscription status.
Add VHS Video Effect For Win 7 or later(64-bit)
Add VHS Video Effect For macOS 10.14 or later
Wondershare Filmora is also a better option than other VHS effect online tools because you can also access versatile stock media files in it. There are tons of pre-built templates in Filmora, and you can also access all your previous projects from Filmora Cloud. Adding high-quality audio to videos is also possible with this tool.
Instructions to Add VHS Effects in Videos with Filmora
The instructions through which you can add the VHS effects in videos with any complications are given here:
Step 1Launch Filmora and Add a Video
To get started, install and launch Wondershare Filmora on your device. Make sure you use the updated version of Filmora. Next, click the “New Project” button and select “Click here to import media.” Next, add the video of your choice on which you wish to apply the VHS effect.

Step 2Add Video to Timeline and Apply Effect
Following this, drag the video to the “Timeline,” click on “Effects” from the above panel and go to “Search Bar.” From there, search for “VHS Effects” and select the effect from the available options. After selecting it, drag it on the video present in the timeline.

Step 3Download the VHS Effect Integrated Video
To continue, you can also modify it to a further extent by clicking on the added effect. There are several features that can help you with modification, such as Transitions, Stickers, and more. Afterward, click the “Export” button, customize the “Name,” “Save To,” “Format,” Quality,” and other metrics of videos. Finally, hit the “Export” button and save the video on your device.

Conclusion
To summarize, it can be said that you can use the VHS effect online video tools to create cinematic-level videos. VHS effects are smooth distortion effects that are used in several videos. You can learn more about this from the above information. Besides this, several online tools such as Veed.io, Clideo, FlexClip, and more can help you add VHS effects to videos.
To learn more about these tools, look at the information provided above. In case you wish to add the VHS effects to videos without facing any complications, don’t refrain from using the top-class tool named Wondershare Filmora. The steps to accomplish this task in a flawless manner are also discussed above for you.
Also read:
- Fast and Easy Method to Match Color in Photoshop
- New Effective 10 Ways to Convert YouTube to MOV at Ease PC & Online
- Updated Color Match Game Top Tips for You for 2024
- 2024 Approved Do You Know How to Create AI Thumbnails for Videos? This Article Will Mention some of the Best Tools to Generate Attractive Thumbnails for Videos with AI
- New Want to Create a Stunning Intro Video on Your Smartphone? Legend Intro Maker Is a Popular Choice. Learn the Steps to Design Intro Video Legend Intro Maker
- Learn How to Blur the Background in Adobe Premiere Pro with Our Quick and Simple Step-by-Step Instructions to Make Your Subject More Attention-Grabbing
- New Converting an SRT (SRT/Sorted Reader) Into a DOCX File Is a Process. Here We Will Discuss Converting a Set File to a Docx File and More Details About This
- New How to Add Text Effects in Adobe Premiere Pro?
- New How to Remove Background From a Video in Premier Pro for 2024
- New 3 Different Methods to Correct Color Distortion in Videos
- New 2024 Approved How to Create a Freeze Frame Sequence Effect
- Updated VN Editor A Prominent Option for Adding Luts for Video Editing
- 2024 Approved How to Fade to Black Premiere Pro
- Updated 3D Ray Traced Settings In After Effects A Comprehensive Guide for 2024
- In 2024, How to Make a PowerPoint Looping Slideshow
- 2024 Approved Ideas That Will Help You Out in Converting AVI to GIF
- Updated Top 5 Video Filter Software Enhance Your Videos
- Updated What Are the Best Video Background Changers Online?
- New Rules of Three or Thirds Is a Classic Trick in Photography, and the Result of Video and Photo Is Really Great. This Article Will Show You How to Use Rule of Thirds to Make a Better Video
- Updated 2024 Approved How to Add Motion Blur in After Effects
- 2024 Approved How To Make a Photo Collage in Microsoft Word
- Updated This Article Talks About if the Windows Movie Maker Available and if Yes, Then How You Can Download It and so On. It Further Comprises an Alternative to the Same to Create Videos
- Updated In 2024, Best 31 Video Trimmers for Computer, Phone and Online
- With the HDR Feature, You Can Make Your Images Look More Realistic and Add More Depth to Them. But if You Are Clueless as to How This Can Be Done Using Your Android Devices and the Best Situations for the Same, Then This Article Will Just Be an Apt Read
- Updated How to Use Frame Blending in Adobe Premiere Pro
- How to Use Renderforest Intro Video Maker for 2024
- New How to Add Filters on iMovie
- 3 Ways for Android Pokemon Go Spoofing On Tecno Spark Go (2024) | Dr.fone
- In 2024, How to Share/Fake Location on WhatsApp for Samsung Galaxy A15 4G | Dr.fone
- In 2024, How and Where to Find a Shiny Stone Pokémon For Apple iPhone 11? | Dr.fone
- Bricked Your Infinix Zero 30 5G? Heres A Full Solution | Dr.fone
- Home Button Not Working on Samsung Galaxy A15 4G? Here Are Real Fixes | Dr.fone
- Updated Diverse Template
- In 2024, Still Using Pattern Locks with Oppo A38? Tips, Tricks and Helpful Advice
- Easy steps to recover deleted pictures from Honor 70 Lite 5G.
- In 2024, 6 Methods to Share Apple iPhone 15 Screen with PC | Dr.fone
- In 2024, A Complete Guide To OEM Unlocking on Xiaomi 14 Pro
- Title: Adding a Spooky Shadow Effect with Filmora
- Author: Chloe
- Created at : 2024-05-20 03:37:19
- Updated at : 2024-05-21 03:37:19
- Link: https://ai-editing-video.techidaily.com/adding-a-spooky-shadow-effect-with-filmora/
- License: This work is licensed under CC BY-NC-SA 4.0.


