:max_bytes(150000):strip_icc():format(webp)/Robothandholdinganapple-fbe6ff482ed641e188dd6650b9ac132e.jpg)
Adjust Background to Black for Your Product Review Video

Adjust Background to Black for Your Product Review Video
Are you planning to make a product review video but wondering how to set up your background? If so, then you’re in the right place. This post will show you how to adjust the background to black for your product review video.
It’s essential to have a smooth black background without texture for your product review videos. Having a clean background is visually appealing and enhances the video. It will make sure that your viewers can see the product clearly without any distractions.
Do the following steps to change the background to black for your product review video:
Part 1. How to change the parameters in Filmora
For this tutorial, we will do it using Wondershare Filmora . So, if you haven’t installed it yet, you can download it here:
Free Download For Win 7 or later(64-bit)
Free Download For macOS 10.14 or later
Step1 Right-click the clip in the editing timeline > Edit Properties.
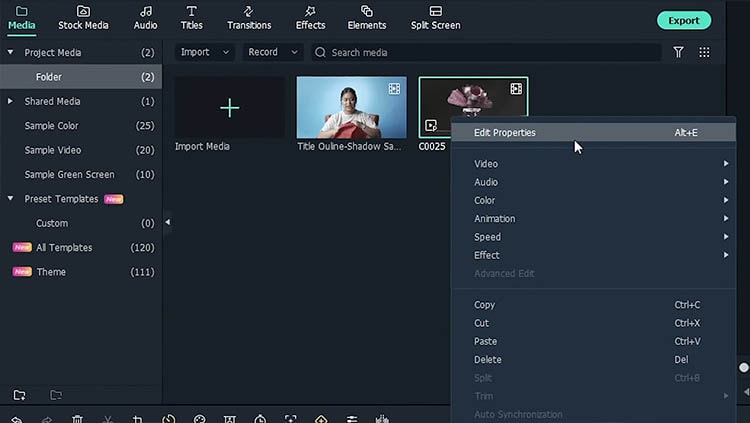
Step2 Select the Color menu > Advanced.

Step3 Setting the color parameters.
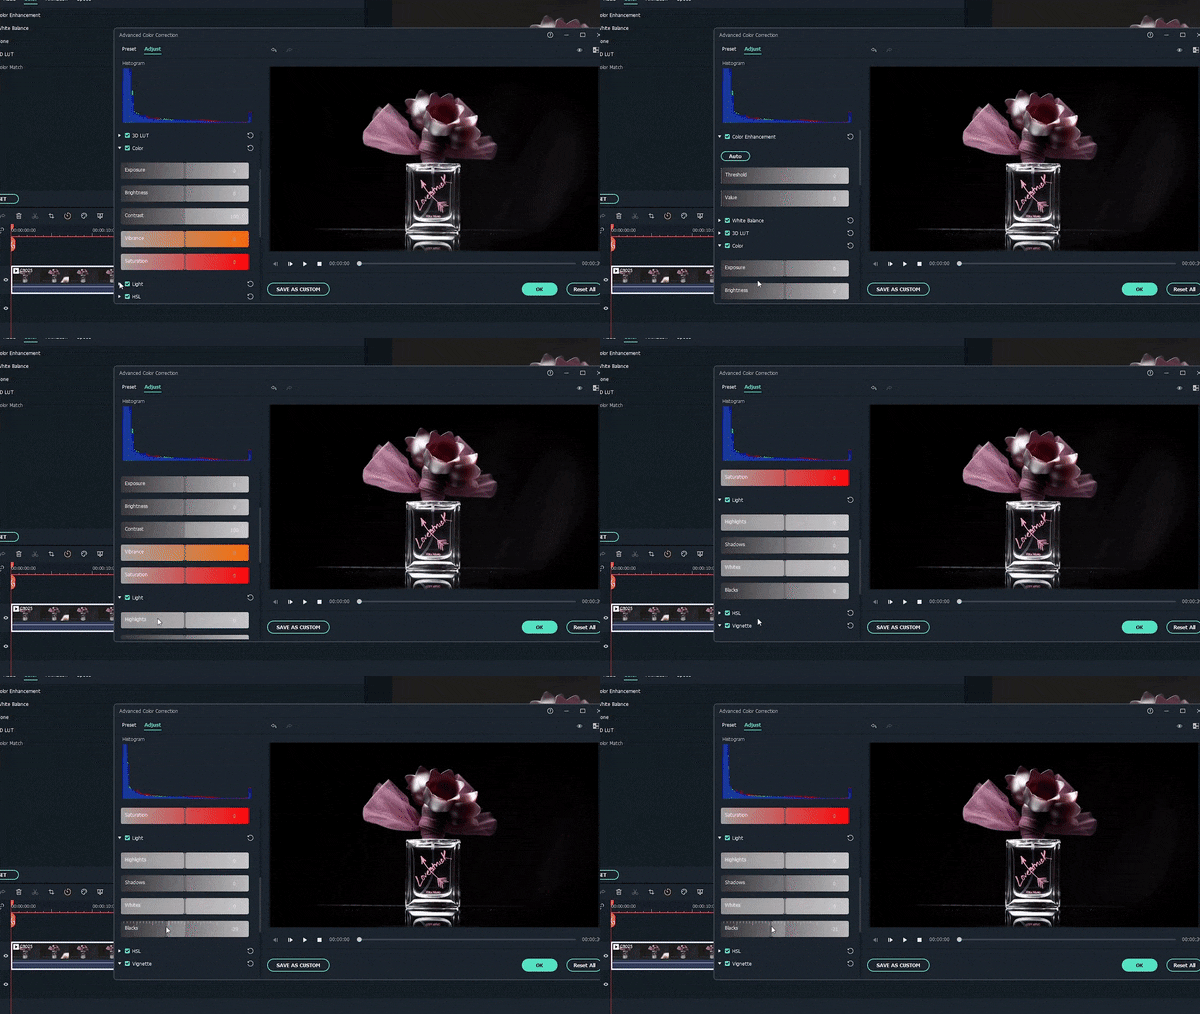
Click the adjust button in the upper left, scroll down to the vignette, and then decrease the amount and size value until the oval surrounds the subject.

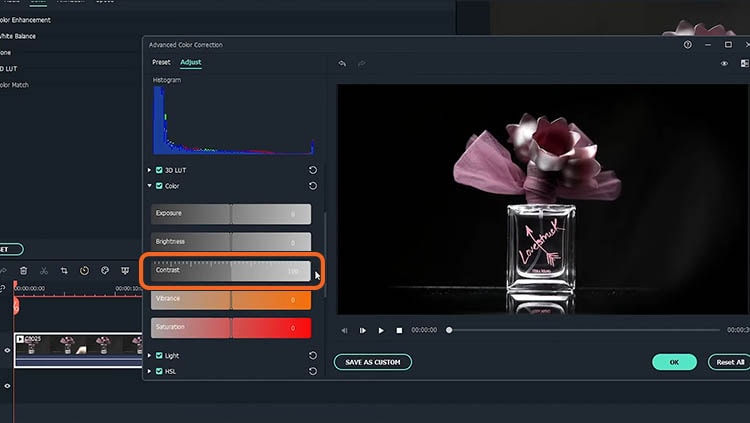
Scroll up to the color options and increase the contrast to 100.
Go to the light menu, then decrease the shadows to cover any remaining light spots.
Part 2. Tips: How to improve product review video
Following these tips will help you improve the quality of your product review videos and make them more enjoyable for your audience.
1) Make sure your video has the correct resolution and scale
Having the correct resolution and scale for your video will make sure that it has a high-definition (HD) or high-quality resolution. Also, it will ensure that your video is the correct size when exporting.
If the scale is different from the resolution, then the empty space will be filled with black, and you will get black bars border that makes your video smaller.
2) Use proper lighting to ensure your video looks clear and bright
To get proper lighting, you should use natural lighting whenever possible, such as sunlight. However, if you can’t shoot during the day or it’s difficult to get natural light, you will need to use artificial lighting.
Next, adjust the white balance on your camera. You can also edit the color grading to finalize the look and improve the overall color of your video.
3) Make sure the audio quality of your video is good
Poor audio can make your video harder to listen to and turn off viewers.
Summary
It is essential to know how to adjust the background to black in your product review video. This is because it can help to make your video content more professional and stand out. By the end of this tutorial, you can now try and create a professional-looking video with a black background to improve your product review video.
Free Download For macOS 10.14 or later
Step1 Right-click the clip in the editing timeline > Edit Properties.

Step2 Select the Color menu > Advanced.

Step3 Setting the color parameters.
Click the adjust button in the upper left, scroll down to the vignette, and then decrease the amount and size value until the oval surrounds the subject.

Scroll up to the color options and increase the contrast to 100.

Go to the light menu, then decrease the shadows to cover any remaining light spots.

Part 2. Tips: How to improve product review video
Following these tips will help you improve the quality of your product review videos and make them more enjoyable for your audience.
1) Make sure your video has the correct resolution and scale
Having the correct resolution and scale for your video will make sure that it has a high-definition (HD) or high-quality resolution. Also, it will ensure that your video is the correct size when exporting.
If the scale is different from the resolution, then the empty space will be filled with black, and you will get black bars border that makes your video smaller.
2) Use proper lighting to ensure your video looks clear and bright
To get proper lighting, you should use natural lighting whenever possible, such as sunlight. However, if you can’t shoot during the day or it’s difficult to get natural light, you will need to use artificial lighting.
Next, adjust the white balance on your camera. You can also edit the color grading to finalize the look and improve the overall color of your video.
3) Make sure the audio quality of your video is good
Poor audio can make your video harder to listen to and turn off viewers.
Summary
It is essential to know how to adjust the background to black in your product review video. This is because it can help to make your video content more professional and stand out. By the end of this tutorial, you can now try and create a professional-looking video with a black background to improve your product review video.
Voice Changer for Discord | Use Voicemod on Discord
Powerful Video Editor - Wondershare Filmora
Provide abundant video effects - A creative video editor
Powerful color correction and grading
Detailed tutorials are provided by the official channel
Introduction
In today’s world, these voice-changing tools are in use by a lot of online gamers for them to remain anonymous on popular game streaming platforms like Twitch. However, we are more focused on Discord in this article. With everything that’s happening in the world today, voice changers can be used for good or can be misused, depending on who is using them. However, we promote such tools for the immerse benefits they offer users as we do not condone the suggestive use of such devices.
Therefore, in a bid to rave about this phenomenal voice-changing tool, we will talk about the best voice changer for Discord which is Voicemod.
Voicemod is an excellent tool with an impressive list of voice filters at its disposal. With this tool, users can choose from a wide range of voice effects that can have both fun and practical uses. Also, if you are looking to use the tool like a robot, Voicemod can help you do that. The tool is spectacularly easy to use, free across all Windows platforms, and operates in real-time. Additionally, the software can work on Skype, Twitch, and other online chat or streaming platforms.
In this article
01 How to Use Voicemod Voice Changer for Discord on Desktop (Win+Mac)?
02 How to Use Voicemod Voice Changer for Discord on Mobile (Android+iPhone)?
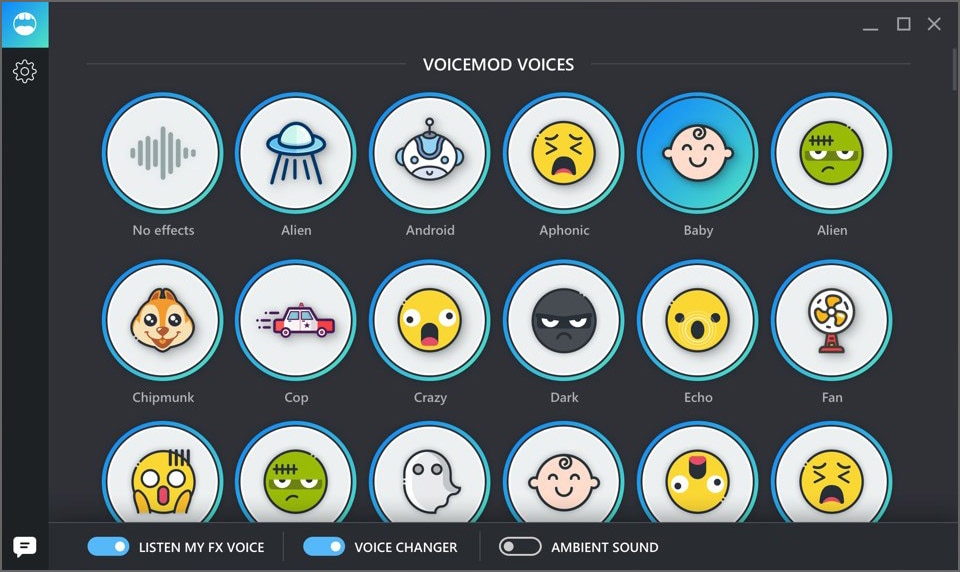
Part 1: How to Use Voicemod Voice Changer for Discord on Desktop (Win+Mac)?
Voicemod Discord works for Windows and Mac operating systems smoothly. Its new Mac OS version is on its way, and you can choose to get notified once it launches.
With a voice changer for Discord, you can add sound effects and change your voice in your communication. You can download this free application on your Windows 10/11 (64-bit) desktop. Its 90 different voices and effects integrate perfectly with Discord to give you strict and most efficient performance.
Now that you know about Voicemod, explore how to use Voicemod on Discord for Desktop.
Step 1: Install Voicemod
Before jumping straight to how we can use Discord for Desktop, we must first know how to install it on our Windows and Mac PC. Here is how to install Voicemod:
- First of all, visit the Voicemod website to start the download process.
- Next, you will see the “Get Voicemod Free” screen. Click it!
- After clicking, you will need to sign in to your account from Discord, Twitch, to Google. Make sure you use your Discord login details to sign in.
- After signing in, the “.exe” file will download to your Windows and Mac download folder. Open it.
- Then an install wizard opens. Navigate through it to install the program on your Windows and Mac computer.
- After complete installation, the installation wizard will ask you to restart your Windows’ or Mac computer.
- However, you can skip the restart process, but it’s best to restart it for smooth operations. Once your Mac or Windows computer restarts, you will see the Voicemod application icon on your desktop screen.
Step 2. Go to Settings>Voice and Video
To configure Voicemod with Discord, open your discord account and go to the settings option located in the screen’s bottom-left corner. Then tap on the “Voice and Video” option right under the app settings.
Step 3. In the “Input Device” section, Choose “Microphone Voicemod Virtual Audio.”
To make Voicemod usable, you are required to change the Voice settings. So, navigate within the “Input Device” option and select the option that says “Microphone Voicemod Virtual Audio.” Once the audio setting changes, it makes it easy for you to change the voice within the program. Also, other users can hear your audio alteration.
Step 4. Choose Your Favorite Voice
In the “basic version,” you have the authorization to change seven free voice choices each day. In addition, with the “pro-version,” you have access to more than 80 different voice options.
Therefore, if you are looking for a simple and easy Windows and Mac application, do not look further than Voicemod!
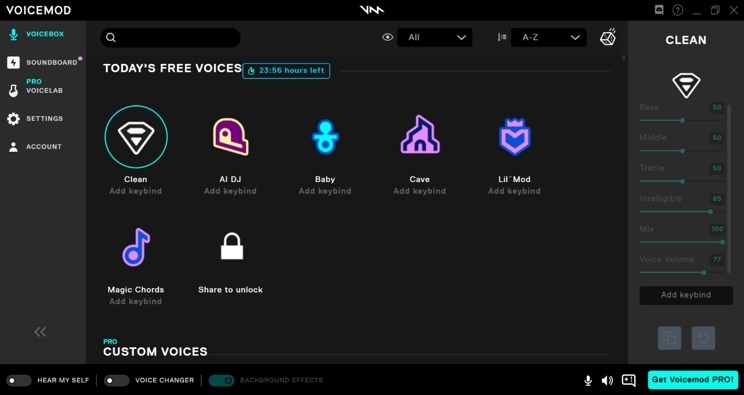
Part 2: How to Use Voicemod Voice Changer for Discord on Mobile (Android+iPhone)?
“Voicemod clips” is the version that is available for both Apple and Android devices. The application help users to make very high-quality content using its wide selection of one-of-a-kind effects that will change your voice so that you won’t even recognize yourself. Additionally, you can add filters connected to your cell phone’s camera to create hilarious, exciting videos. Also, you get the option to select from 10 different voices, and you can also make infinite videos and audio from the humorous to the terrifying.
Some of the Voicemod for Discord voices that are available on mobile devices include;
- Male-to-female
- Different robot effects
- Celebrities
- Scary voices, etc.
Also, the changes are on how you would like to modify your voice. It can also be cross-share to popular social networking platforms such as Facebook, Twitter, Instagram, TikTok, and Snapchat using your smartphone.
Here are step-by-step instructions:
Step 1: Download Voicemod for Mobile
Ensure you have downloaded the Voicemod application on your Android and iPhone and appropriately configured it. To configure, follow the step below;
- Open it to set your profile using Discord. Additionally, you can view all the different filters for videos and available voices.
- Also, you can decide the type of content you want to create, whether it is a video clip or audio.
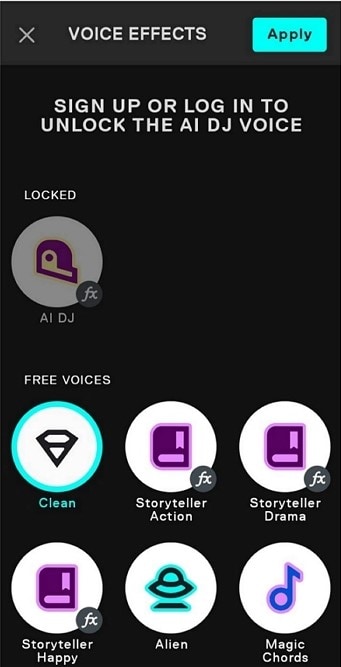
Step 2: Access Sound Effects
Open Discord and tap the “cogwheel icon” near your name and avatar. You will see a “settings” page located within it. Tap the “Voice & Video” option. Then under the “Input Device” option, select Voicemod and the headset under the “Output Device” option and tap escape. Then you will have access to numerous exciting sounds.
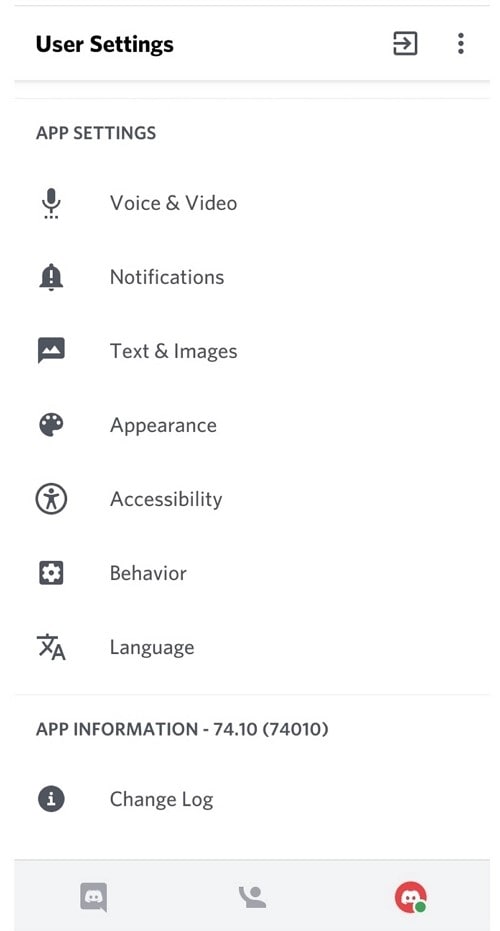
Finally, add your favorite effect, save and start using your new enhanced voice from Voicemod Discord.
Part 3: People Also Want to Know
This section will look at some basic questions about Voicemod Discord that appeared in Q&A forums.
Is Voicemod safe for Discord?
Yes, Voicemod is safe, but you must download it from its official website or the Google Playstore and Apple’s App Store, as there are many cracked versions of Voicemod online.
Is there a voice changer for Discord?
Yes, a voice changer for Discord and Voicemod is known to be the best. It is an advanced and easy-to-use voice changer that allows you to sound like a man, woman, robot, or anything else you can ever imagine.
Key Takeaways from This Episode
Thus, as you saw, in this report, we have summarised a few essential points that you should know regarding Voicemod Discord. You learned:
- The best voice changer for Discordis Voicemod
- How to use Voicemod for Windows and Mac computers
- How to use Voicemod for mobile (iPhone and Android)
- Finally, a few FAQs for users to better understand the discord voice changer (Voicemod).
So, use the new knowledge about how to use Voicemod on Discord you acquired above and spin some voice changes.
Introduction
In today’s world, these voice-changing tools are in use by a lot of online gamers for them to remain anonymous on popular game streaming platforms like Twitch. However, we are more focused on Discord in this article. With everything that’s happening in the world today, voice changers can be used for good or can be misused, depending on who is using them. However, we promote such tools for the immerse benefits they offer users as we do not condone the suggestive use of such devices.
Therefore, in a bid to rave about this phenomenal voice-changing tool, we will talk about the best voice changer for Discord which is Voicemod.
Voicemod is an excellent tool with an impressive list of voice filters at its disposal. With this tool, users can choose from a wide range of voice effects that can have both fun and practical uses. Also, if you are looking to use the tool like a robot, Voicemod can help you do that. The tool is spectacularly easy to use, free across all Windows platforms, and operates in real-time. Additionally, the software can work on Skype, Twitch, and other online chat or streaming platforms.
In this article
01 How to Use Voicemod Voice Changer for Discord on Desktop (Win+Mac)?
02 How to Use Voicemod Voice Changer for Discord on Mobile (Android+iPhone)?

Part 1: How to Use Voicemod Voice Changer for Discord on Desktop (Win+Mac)?
Voicemod Discord works for Windows and Mac operating systems smoothly. Its new Mac OS version is on its way, and you can choose to get notified once it launches.
With a voice changer for Discord, you can add sound effects and change your voice in your communication. You can download this free application on your Windows 10/11 (64-bit) desktop. Its 90 different voices and effects integrate perfectly with Discord to give you strict and most efficient performance.
Now that you know about Voicemod, explore how to use Voicemod on Discord for Desktop.
Step 1: Install Voicemod
Before jumping straight to how we can use Discord for Desktop, we must first know how to install it on our Windows and Mac PC. Here is how to install Voicemod:
- First of all, visit the Voicemod website to start the download process.
- Next, you will see the “Get Voicemod Free” screen. Click it!
- After clicking, you will need to sign in to your account from Discord, Twitch, to Google. Make sure you use your Discord login details to sign in.
- After signing in, the “.exe” file will download to your Windows and Mac download folder. Open it.
- Then an install wizard opens. Navigate through it to install the program on your Windows and Mac computer.
- After complete installation, the installation wizard will ask you to restart your Windows’ or Mac computer.
- However, you can skip the restart process, but it’s best to restart it for smooth operations. Once your Mac or Windows computer restarts, you will see the Voicemod application icon on your desktop screen.
Step 2. Go to Settings>Voice and Video
To configure Voicemod with Discord, open your discord account and go to the settings option located in the screen’s bottom-left corner. Then tap on the “Voice and Video” option right under the app settings.
Step 3. In the “Input Device” section, Choose “Microphone Voicemod Virtual Audio.”
To make Voicemod usable, you are required to change the Voice settings. So, navigate within the “Input Device” option and select the option that says “Microphone Voicemod Virtual Audio.” Once the audio setting changes, it makes it easy for you to change the voice within the program. Also, other users can hear your audio alteration.
Step 4. Choose Your Favorite Voice
In the “basic version,” you have the authorization to change seven free voice choices each day. In addition, with the “pro-version,” you have access to more than 80 different voice options.
Therefore, if you are looking for a simple and easy Windows and Mac application, do not look further than Voicemod!

Part 2: How to Use Voicemod Voice Changer for Discord on Mobile (Android+iPhone)?
“Voicemod clips” is the version that is available for both Apple and Android devices. The application help users to make very high-quality content using its wide selection of one-of-a-kind effects that will change your voice so that you won’t even recognize yourself. Additionally, you can add filters connected to your cell phone’s camera to create hilarious, exciting videos. Also, you get the option to select from 10 different voices, and you can also make infinite videos and audio from the humorous to the terrifying.
Some of the Voicemod for Discord voices that are available on mobile devices include;
- Male-to-female
- Different robot effects
- Celebrities
- Scary voices, etc.
Also, the changes are on how you would like to modify your voice. It can also be cross-share to popular social networking platforms such as Facebook, Twitter, Instagram, TikTok, and Snapchat using your smartphone.
Here are step-by-step instructions:
Step 1: Download Voicemod for Mobile
Ensure you have downloaded the Voicemod application on your Android and iPhone and appropriately configured it. To configure, follow the step below;
- Open it to set your profile using Discord. Additionally, you can view all the different filters for videos and available voices.
- Also, you can decide the type of content you want to create, whether it is a video clip or audio.

Step 2: Access Sound Effects
Open Discord and tap the “cogwheel icon” near your name and avatar. You will see a “settings” page located within it. Tap the “Voice & Video” option. Then under the “Input Device” option, select Voicemod and the headset under the “Output Device” option and tap escape. Then you will have access to numerous exciting sounds.

Finally, add your favorite effect, save and start using your new enhanced voice from Voicemod Discord.
Part 3: People Also Want to Know
This section will look at some basic questions about Voicemod Discord that appeared in Q&A forums.
Is Voicemod safe for Discord?
Yes, Voicemod is safe, but you must download it from its official website or the Google Playstore and Apple’s App Store, as there are many cracked versions of Voicemod online.
Is there a voice changer for Discord?
Yes, a voice changer for Discord and Voicemod is known to be the best. It is an advanced and easy-to-use voice changer that allows you to sound like a man, woman, robot, or anything else you can ever imagine.
Key Takeaways from This Episode
Thus, as you saw, in this report, we have summarised a few essential points that you should know regarding Voicemod Discord. You learned:
- The best voice changer for Discordis Voicemod
- How to use Voicemod for Windows and Mac computers
- How to use Voicemod for mobile (iPhone and Android)
- Finally, a few FAQs for users to better understand the discord voice changer (Voicemod).
So, use the new knowledge about how to use Voicemod on Discord you acquired above and spin some voice changes.
Introduction
In today’s world, these voice-changing tools are in use by a lot of online gamers for them to remain anonymous on popular game streaming platforms like Twitch. However, we are more focused on Discord in this article. With everything that’s happening in the world today, voice changers can be used for good or can be misused, depending on who is using them. However, we promote such tools for the immerse benefits they offer users as we do not condone the suggestive use of such devices.
Therefore, in a bid to rave about this phenomenal voice-changing tool, we will talk about the best voice changer for Discord which is Voicemod.
Voicemod is an excellent tool with an impressive list of voice filters at its disposal. With this tool, users can choose from a wide range of voice effects that can have both fun and practical uses. Also, if you are looking to use the tool like a robot, Voicemod can help you do that. The tool is spectacularly easy to use, free across all Windows platforms, and operates in real-time. Additionally, the software can work on Skype, Twitch, and other online chat or streaming platforms.
In this article
01 How to Use Voicemod Voice Changer for Discord on Desktop (Win+Mac)?
02 How to Use Voicemod Voice Changer for Discord on Mobile (Android+iPhone)?

Part 1: How to Use Voicemod Voice Changer for Discord on Desktop (Win+Mac)?
Voicemod Discord works for Windows and Mac operating systems smoothly. Its new Mac OS version is on its way, and you can choose to get notified once it launches.
With a voice changer for Discord, you can add sound effects and change your voice in your communication. You can download this free application on your Windows 10/11 (64-bit) desktop. Its 90 different voices and effects integrate perfectly with Discord to give you strict and most efficient performance.
Now that you know about Voicemod, explore how to use Voicemod on Discord for Desktop.
Step 1: Install Voicemod
Before jumping straight to how we can use Discord for Desktop, we must first know how to install it on our Windows and Mac PC. Here is how to install Voicemod:
- First of all, visit the Voicemod website to start the download process.
- Next, you will see the “Get Voicemod Free” screen. Click it!
- After clicking, you will need to sign in to your account from Discord, Twitch, to Google. Make sure you use your Discord login details to sign in.
- After signing in, the “.exe” file will download to your Windows and Mac download folder. Open it.
- Then an install wizard opens. Navigate through it to install the program on your Windows and Mac computer.
- After complete installation, the installation wizard will ask you to restart your Windows’ or Mac computer.
- However, you can skip the restart process, but it’s best to restart it for smooth operations. Once your Mac or Windows computer restarts, you will see the Voicemod application icon on your desktop screen.
Step 2. Go to Settings>Voice and Video
To configure Voicemod with Discord, open your discord account and go to the settings option located in the screen’s bottom-left corner. Then tap on the “Voice and Video” option right under the app settings.
Step 3. In the “Input Device” section, Choose “Microphone Voicemod Virtual Audio.”
To make Voicemod usable, you are required to change the Voice settings. So, navigate within the “Input Device” option and select the option that says “Microphone Voicemod Virtual Audio.” Once the audio setting changes, it makes it easy for you to change the voice within the program. Also, other users can hear your audio alteration.
Step 4. Choose Your Favorite Voice
In the “basic version,” you have the authorization to change seven free voice choices each day. In addition, with the “pro-version,” you have access to more than 80 different voice options.
Therefore, if you are looking for a simple and easy Windows and Mac application, do not look further than Voicemod!

Part 2: How to Use Voicemod Voice Changer for Discord on Mobile (Android+iPhone)?
“Voicemod clips” is the version that is available for both Apple and Android devices. The application help users to make very high-quality content using its wide selection of one-of-a-kind effects that will change your voice so that you won’t even recognize yourself. Additionally, you can add filters connected to your cell phone’s camera to create hilarious, exciting videos. Also, you get the option to select from 10 different voices, and you can also make infinite videos and audio from the humorous to the terrifying.
Some of the Voicemod for Discord voices that are available on mobile devices include;
- Male-to-female
- Different robot effects
- Celebrities
- Scary voices, etc.
Also, the changes are on how you would like to modify your voice. It can also be cross-share to popular social networking platforms such as Facebook, Twitter, Instagram, TikTok, and Snapchat using your smartphone.
Here are step-by-step instructions:
Step 1: Download Voicemod for Mobile
Ensure you have downloaded the Voicemod application on your Android and iPhone and appropriately configured it. To configure, follow the step below;
- Open it to set your profile using Discord. Additionally, you can view all the different filters for videos and available voices.
- Also, you can decide the type of content you want to create, whether it is a video clip or audio.

Step 2: Access Sound Effects
Open Discord and tap the “cogwheel icon” near your name and avatar. You will see a “settings” page located within it. Tap the “Voice & Video” option. Then under the “Input Device” option, select Voicemod and the headset under the “Output Device” option and tap escape. Then you will have access to numerous exciting sounds.

Finally, add your favorite effect, save and start using your new enhanced voice from Voicemod Discord.
Part 3: People Also Want to Know
This section will look at some basic questions about Voicemod Discord that appeared in Q&A forums.
Is Voicemod safe for Discord?
Yes, Voicemod is safe, but you must download it from its official website or the Google Playstore and Apple’s App Store, as there are many cracked versions of Voicemod online.
Is there a voice changer for Discord?
Yes, a voice changer for Discord and Voicemod is known to be the best. It is an advanced and easy-to-use voice changer that allows you to sound like a man, woman, robot, or anything else you can ever imagine.
Key Takeaways from This Episode
Thus, as you saw, in this report, we have summarised a few essential points that you should know regarding Voicemod Discord. You learned:
- The best voice changer for Discordis Voicemod
- How to use Voicemod for Windows and Mac computers
- How to use Voicemod for mobile (iPhone and Android)
- Finally, a few FAQs for users to better understand the discord voice changer (Voicemod).
So, use the new knowledge about how to use Voicemod on Discord you acquired above and spin some voice changes.
Introduction
In today’s world, these voice-changing tools are in use by a lot of online gamers for them to remain anonymous on popular game streaming platforms like Twitch. However, we are more focused on Discord in this article. With everything that’s happening in the world today, voice changers can be used for good or can be misused, depending on who is using them. However, we promote such tools for the immerse benefits they offer users as we do not condone the suggestive use of such devices.
Therefore, in a bid to rave about this phenomenal voice-changing tool, we will talk about the best voice changer for Discord which is Voicemod.
Voicemod is an excellent tool with an impressive list of voice filters at its disposal. With this tool, users can choose from a wide range of voice effects that can have both fun and practical uses. Also, if you are looking to use the tool like a robot, Voicemod can help you do that. The tool is spectacularly easy to use, free across all Windows platforms, and operates in real-time. Additionally, the software can work on Skype, Twitch, and other online chat or streaming platforms.
In this article
01 How to Use Voicemod Voice Changer for Discord on Desktop (Win+Mac)?
02 How to Use Voicemod Voice Changer for Discord on Mobile (Android+iPhone)?

Part 1: How to Use Voicemod Voice Changer for Discord on Desktop (Win+Mac)?
Voicemod Discord works for Windows and Mac operating systems smoothly. Its new Mac OS version is on its way, and you can choose to get notified once it launches.
With a voice changer for Discord, you can add sound effects and change your voice in your communication. You can download this free application on your Windows 10/11 (64-bit) desktop. Its 90 different voices and effects integrate perfectly with Discord to give you strict and most efficient performance.
Now that you know about Voicemod, explore how to use Voicemod on Discord for Desktop.
Step 1: Install Voicemod
Before jumping straight to how we can use Discord for Desktop, we must first know how to install it on our Windows and Mac PC. Here is how to install Voicemod:
- First of all, visit the Voicemod website to start the download process.
- Next, you will see the “Get Voicemod Free” screen. Click it!
- After clicking, you will need to sign in to your account from Discord, Twitch, to Google. Make sure you use your Discord login details to sign in.
- After signing in, the “.exe” file will download to your Windows and Mac download folder. Open it.
- Then an install wizard opens. Navigate through it to install the program on your Windows and Mac computer.
- After complete installation, the installation wizard will ask you to restart your Windows’ or Mac computer.
- However, you can skip the restart process, but it’s best to restart it for smooth operations. Once your Mac or Windows computer restarts, you will see the Voicemod application icon on your desktop screen.
Step 2. Go to Settings>Voice and Video
To configure Voicemod with Discord, open your discord account and go to the settings option located in the screen’s bottom-left corner. Then tap on the “Voice and Video” option right under the app settings.
Step 3. In the “Input Device” section, Choose “Microphone Voicemod Virtual Audio.”
To make Voicemod usable, you are required to change the Voice settings. So, navigate within the “Input Device” option and select the option that says “Microphone Voicemod Virtual Audio.” Once the audio setting changes, it makes it easy for you to change the voice within the program. Also, other users can hear your audio alteration.
Step 4. Choose Your Favorite Voice
In the “basic version,” you have the authorization to change seven free voice choices each day. In addition, with the “pro-version,” you have access to more than 80 different voice options.
Therefore, if you are looking for a simple and easy Windows and Mac application, do not look further than Voicemod!

Part 2: How to Use Voicemod Voice Changer for Discord on Mobile (Android+iPhone)?
“Voicemod clips” is the version that is available for both Apple and Android devices. The application help users to make very high-quality content using its wide selection of one-of-a-kind effects that will change your voice so that you won’t even recognize yourself. Additionally, you can add filters connected to your cell phone’s camera to create hilarious, exciting videos. Also, you get the option to select from 10 different voices, and you can also make infinite videos and audio from the humorous to the terrifying.
Some of the Voicemod for Discord voices that are available on mobile devices include;
- Male-to-female
- Different robot effects
- Celebrities
- Scary voices, etc.
Also, the changes are on how you would like to modify your voice. It can also be cross-share to popular social networking platforms such as Facebook, Twitter, Instagram, TikTok, and Snapchat using your smartphone.
Here are step-by-step instructions:
Step 1: Download Voicemod for Mobile
Ensure you have downloaded the Voicemod application on your Android and iPhone and appropriately configured it. To configure, follow the step below;
- Open it to set your profile using Discord. Additionally, you can view all the different filters for videos and available voices.
- Also, you can decide the type of content you want to create, whether it is a video clip or audio.

Step 2: Access Sound Effects
Open Discord and tap the “cogwheel icon” near your name and avatar. You will see a “settings” page located within it. Tap the “Voice & Video” option. Then under the “Input Device” option, select Voicemod and the headset under the “Output Device” option and tap escape. Then you will have access to numerous exciting sounds.

Finally, add your favorite effect, save and start using your new enhanced voice from Voicemod Discord.
Part 3: People Also Want to Know
This section will look at some basic questions about Voicemod Discord that appeared in Q&A forums.
Is Voicemod safe for Discord?
Yes, Voicemod is safe, but you must download it from its official website or the Google Playstore and Apple’s App Store, as there are many cracked versions of Voicemod online.
Is there a voice changer for Discord?
Yes, a voice changer for Discord and Voicemod is known to be the best. It is an advanced and easy-to-use voice changer that allows you to sound like a man, woman, robot, or anything else you can ever imagine.
Key Takeaways from This Episode
Thus, as you saw, in this report, we have summarised a few essential points that you should know regarding Voicemod Discord. You learned:
- The best voice changer for Discordis Voicemod
- How to use Voicemod for Windows and Mac computers
- How to use Voicemod for mobile (iPhone and Android)
- Finally, a few FAQs for users to better understand the discord voice changer (Voicemod).
So, use the new knowledge about how to use Voicemod on Discord you acquired above and spin some voice changes.
Vlogs and Travel Content Are Incomplete without a Fast-Motion Effect. Learn Step-by-Step How to Make Fast Motion Video on an iPhone in This Article
Fast motion has always been a time saver since it covers the unnecessary details in seconds. Acquiring this skill is important if you are a content creator or videographer. You might already be aware of how to make fast-motion videos on iPhone.
However, if this is unheard of or you are new to video editing, we’ve got you covered. This article covers the ins and outs of how to make a video fast-motion iPhone. In addition, users can gain insights into some applications and their guides. Moreover, we’ll discuss an AI alternative to those applications.
Slow Motion Video Maker Slow your video’s speed with better control of your keyframes to create unique cinematic effects!
Make A Slow Motion Video Make A Slow Motion Video More Features

Part 1: What are the Different Use Cases of Fast-Motion Videos?
The fast motion effect covers multiple creative ways of speed increase that you can incorporate. All these ways apply to different genres of videos. This section diverts your focus on different use cases of fast-motion videos. Here is how to make video fast motion on iPhone for different purposes:
1. Construction and Development Videos
Fast-motion videos help in video creation where development is happening. Such videos show the before and after results of an area, location, or building. The construction or manufacturing process is shown in fast motion in engineering videos. It also helps in showing the transformation of a non-populated or undeveloped city.
2. Nature Photography or Documentaries
Natural phenomenon like the blooming of a flower usually occurs at a slower rate. Capturing them takes a long time, but the audience may not like such a long duration. Hence, editors can increase the speed of such videos to speed up the phenomenon. In addition, if you watch wildlife or nature documentaries, they also use this effect.
3. Aesthetic Expression
Fast-paced videos bring a sense of creativity to your videos as they are an artistic expression of time. To indicate the passing of time in movies or to show a scene at a railway station or airport. It also indicates that the filmmakers and editors have put in an effort.
Part 2: Different Tools to Help You Make Fast Motion Video on iPhone
Fast-motion tools are important in video editing since they offer a chance at creativity. They have a wide range of applications in the filmmaking and media industry. Do you know how to make a video fast-motion iPhone using a third-party application? If not, here is a detailed guide on some of them:
1. iMovie
If you are looking for an accessible application with an easy-to-use interface, this is for you. The process of speed manipulation consists of a slider for control. After editing, you can integrate multiple soundtracks from 130 pre-assembled tracks. The application is compatible with iPhone X and newer versions.
Steps to Create a Fast Motion Video Using iMovie
Do you want to learn how to make fast-motion videos on your iPhone with this application? Given Below is your perfect guide to crafting a fast-paced video:
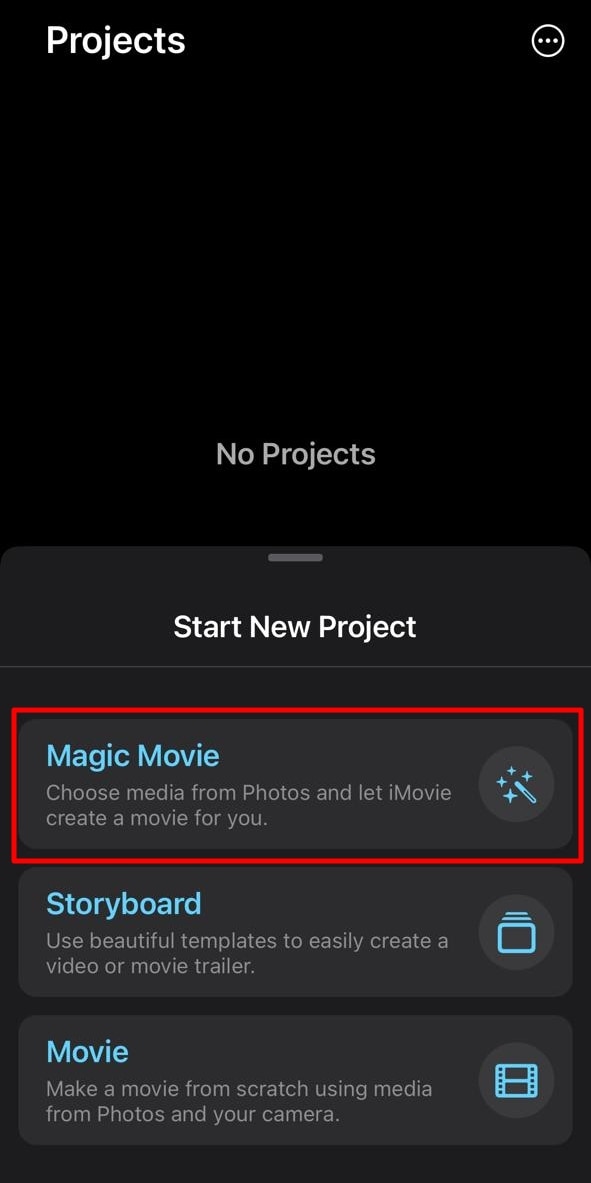
Step 1: After downloading the application on your iPhone, access it and “Start New Project.” Then, select a video from your media library to edit.
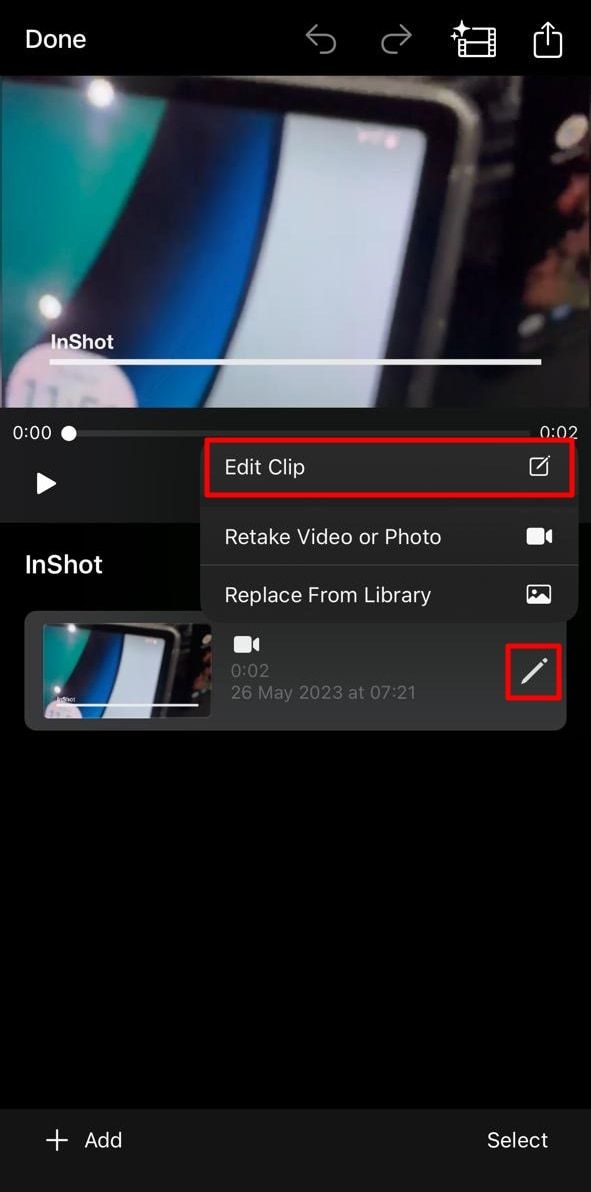
Step 2: After importing the video, click the “Pen” icon to access editing options. Then, click the “Edit Clip” option to do so.
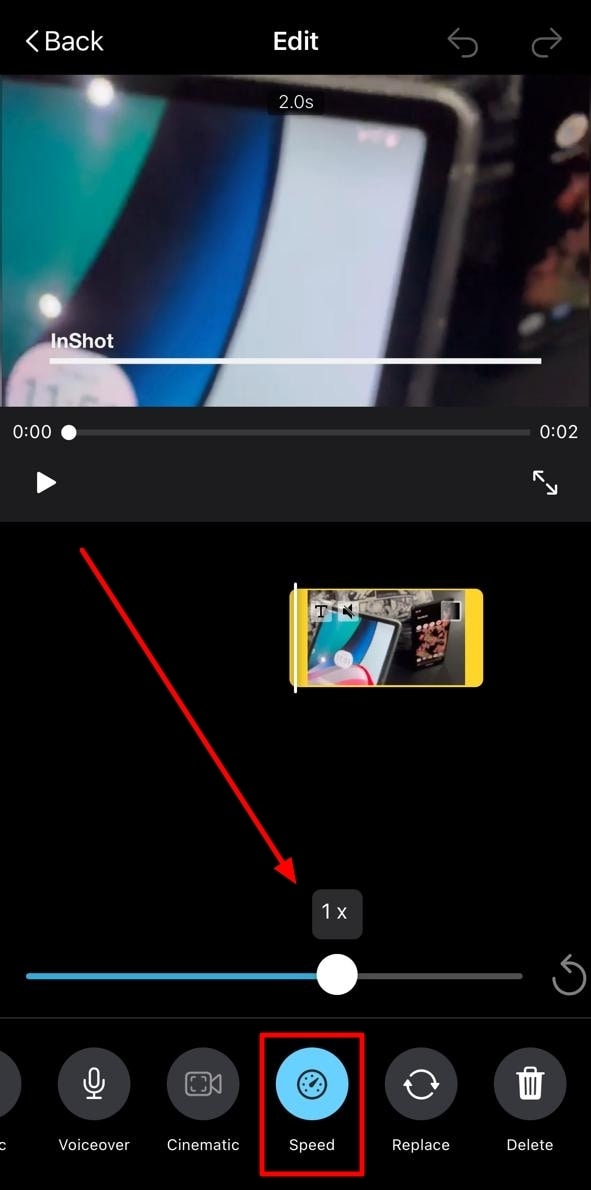
Step 3: Move to the bottom of the screen and slide the given option to access “Speed.” Click it and drag the speed slider towards the right side to increase the speed of the video.
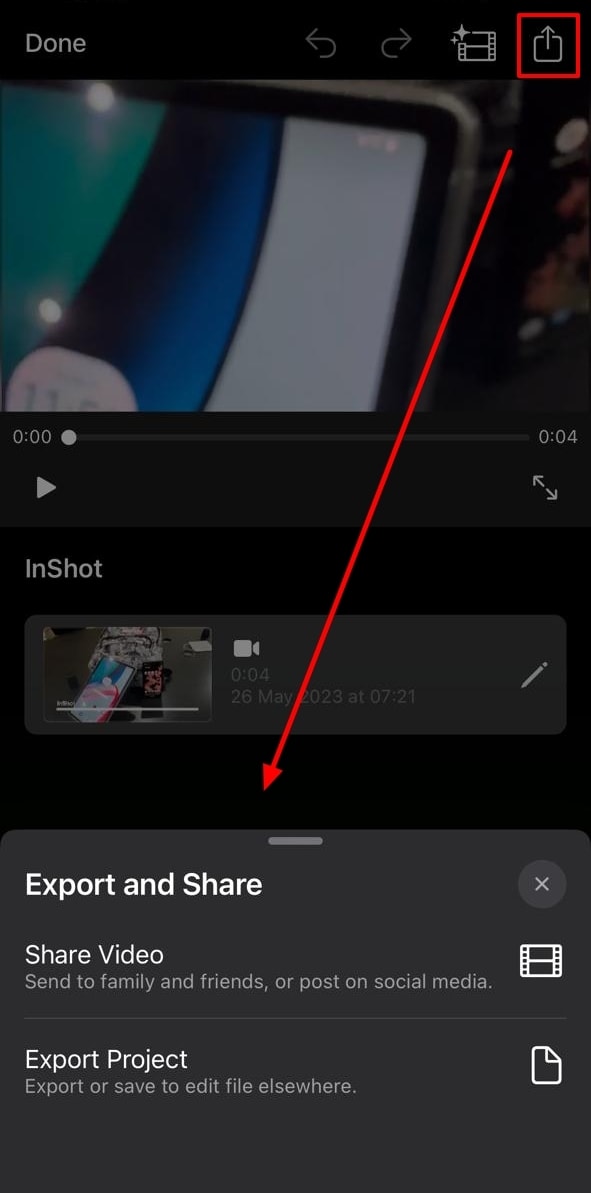
Step 4: Hit the “Play” button to see the speed of the video and re-adjust if required. Go to the top right corner of the screen, locate the “Export” icon, and click it.
2. Video Speed Changer – Editor
Want to learn how to make video fast motion on iPhone without additional technicalities? This application ensures a comprehensive narrative just for speed change. Users can formulate 3 fast motion effects with it at specific frames. For pre-recorded or new videos, it offers Time Wrap, Time Lapse, and Hyper-lapse. The application has been found to support iOS 12.3 and later versions.
Steps to Create a Fast Motion Video Using Video Speed Changer
Multiple applications provide similar services, but none can compare to its UI. Here is how to make a video fast motion iPhone using this
Step 1: Access this application from the App Store and launch it after installation. Click on the “Select Video” button and import a clip.

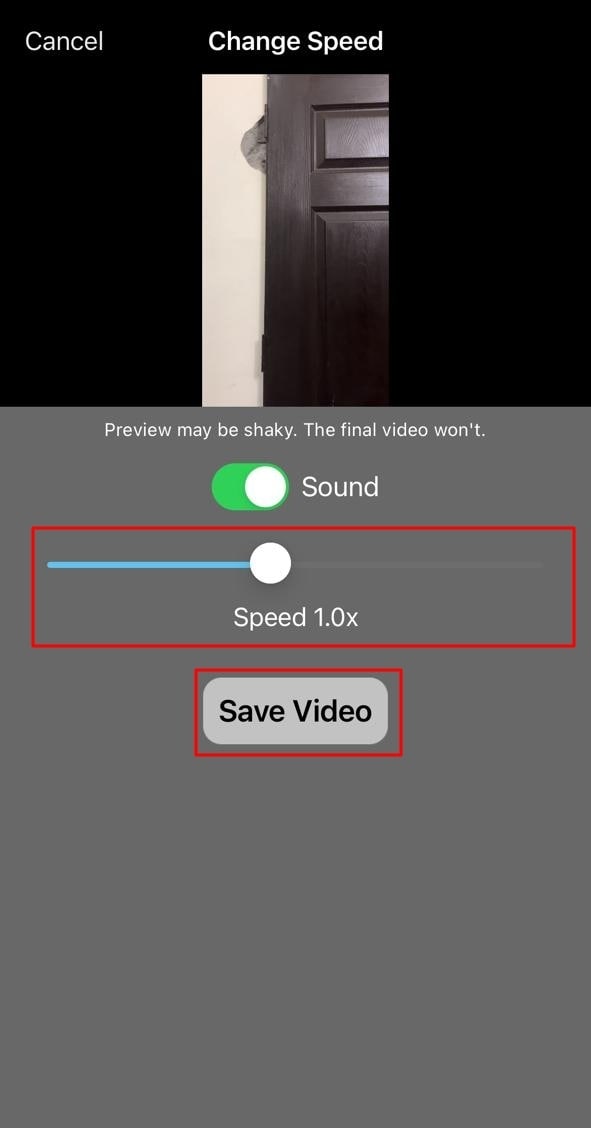
Step 2: Once you have selected a video, it will take you straight to the speed change option. Change the position of the given slider. Finally, preview the video and click the “Save Video” button to save it on your device.
3. Slow Motion Video FX Edit
Although the name indicates otherwise, this video editor is capable of high-speed change. It comes with an intuitive user interface and is easy for anyone to employ. In addition to speed alteration, you can insert 40 different filters into your video. You can also commence its freeze frame action to add an extra layer of creativity. The tool is compatible with iOS 13.0 and higher versions.
Steps to Create Fast Motion Using Slow Motion Video FX
This is another editor to gain insights on how to make fast-motion videos on an iPhone. We have given the verified step-by-step guide to using this app:
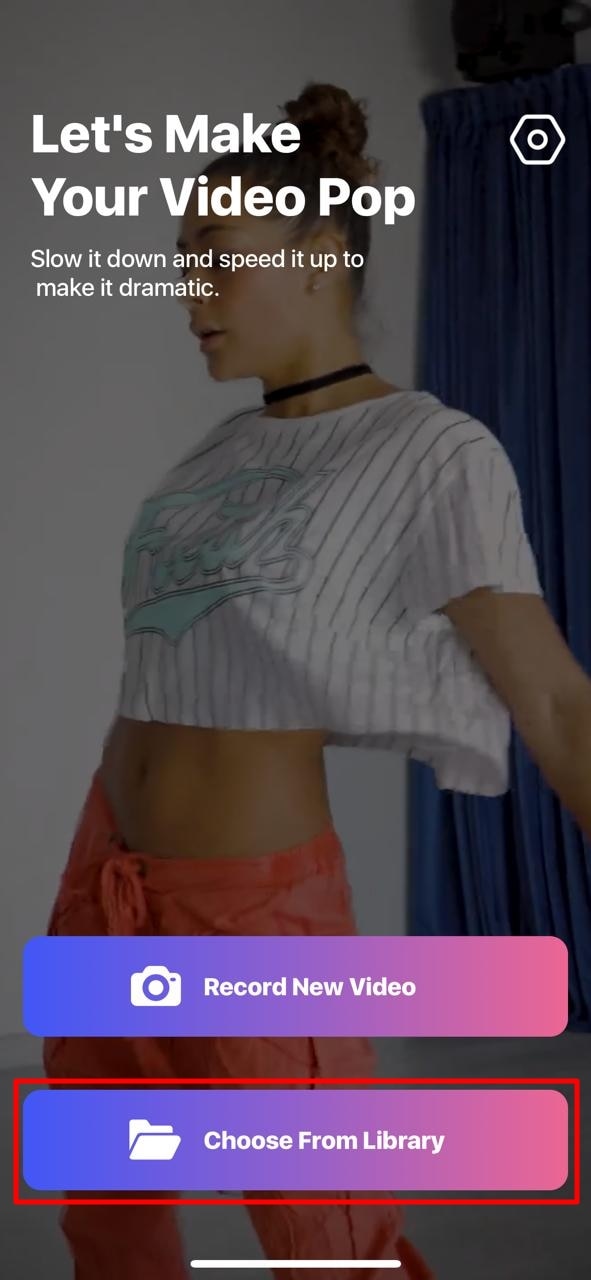
Step 1: After launching this application, click the “Choose From Library” option. Then, select a clip from your device’s gallery.
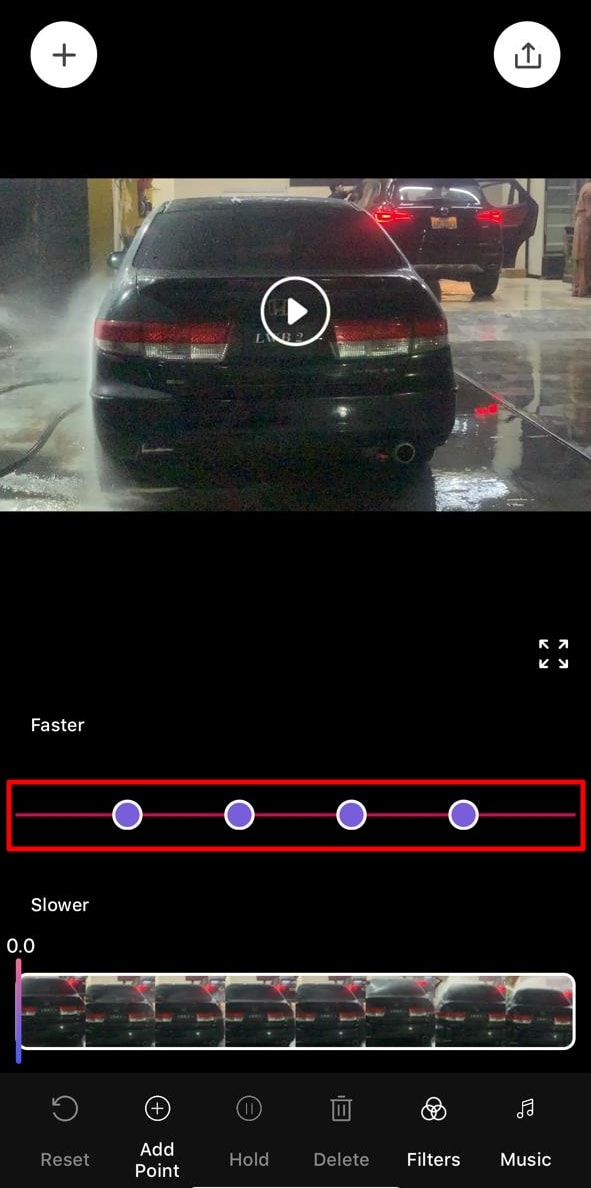
Step 2: Once the video is compressed, you’ll be taken to the speed change screen. From there, you can alter the speed of different clip sections. Move the slider of the relevant section upward to increase the speed.
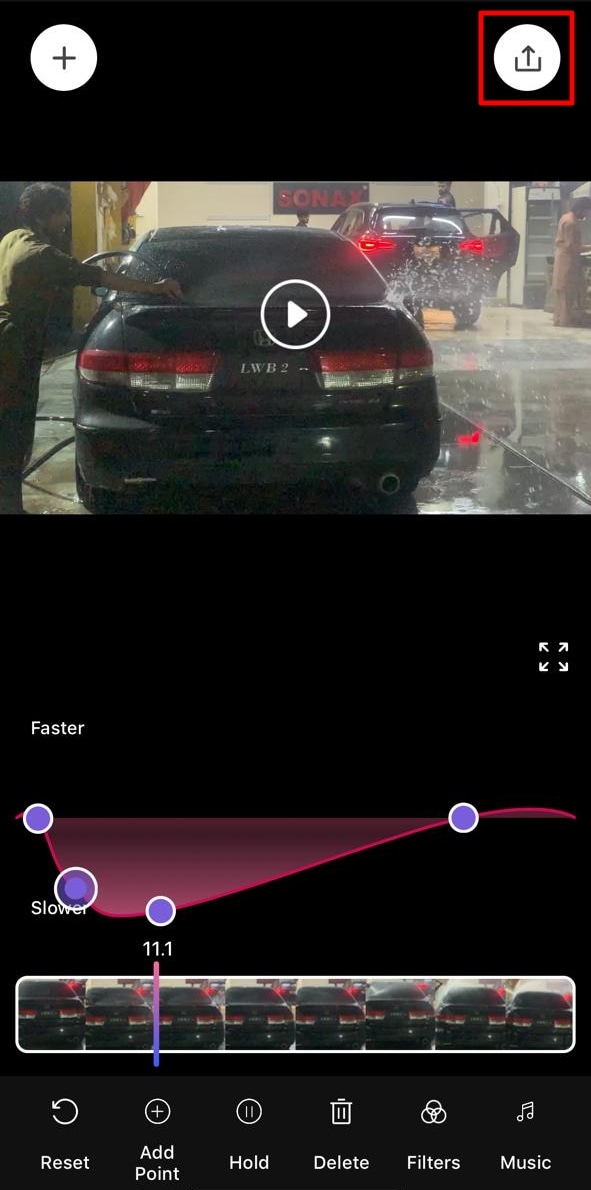
Step 3: Once you have altered the speed, navigate towards the top right corner and click the “Export” icon.
Part 3: Desktop Solution: Remedy for Those Who Want to Speed Up Video on Their Computer
If you have gone through the above applications, you know the fast-motion effect. Do you want to know how to make a video fast motion on an iPhone using a computer? Wondershare Filmora is the best alternative to the above applications for creating this effect. The software is compatible with all the macOS and iOS devices and allows seamless editing.
With this editor, you get multiple options to create a fast-motion video. In this article, we will use the Uniform Speed feature. The operating process is very accessible and designed to assist both professionals and beginners. You can also apply the AI Frame Interpolation option to apply “Frame Bending.”
Free Download For Win 7 or later(64-bit)
Free Download For macOS 10.14 or later
Step-by-Step Guide to Speed Up Video with Filmora
After reading the article till now, you have gained knowledge of Filmora’s speeding options. How to make fast motion video on iPhone now seems like an easy option. Even though the process is easy, we want you to stay ahead. Hence, here is a step-by-step procedure for creating fast motion in Filmora:
Step 1Create a New Project and Import Media
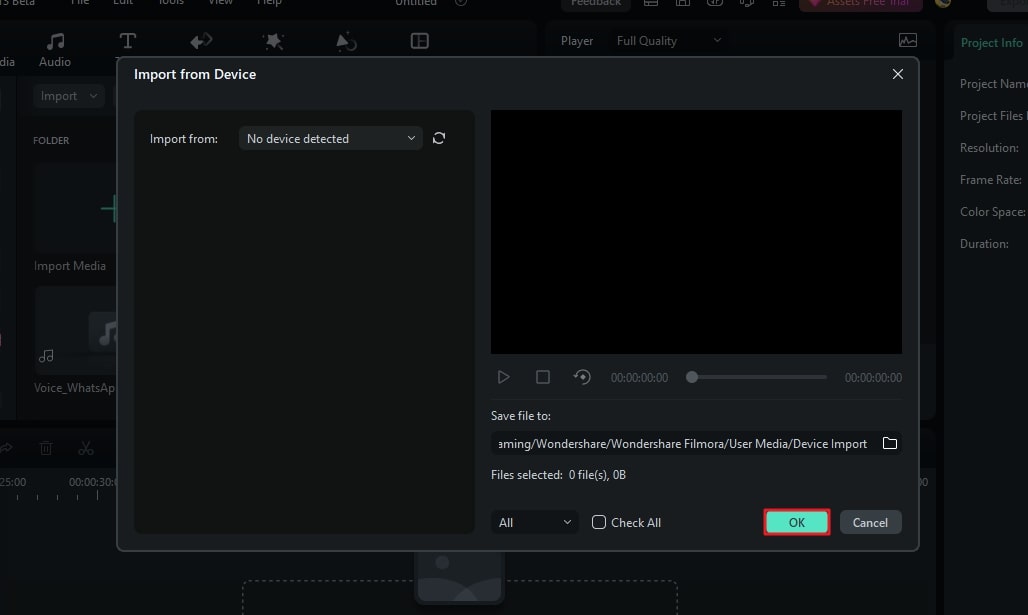
First, connect your iOS device to your Wondershare Filmora device. After that, launch Filmora to access the main menu. From there, click on the “New Project” tab fashioned in the center. Expand the “Import” option in the Project Media section and select the suitable option. In this case, choose the “Import from Phone or Camera” option.
Step 2Access the Uniform Speed Section
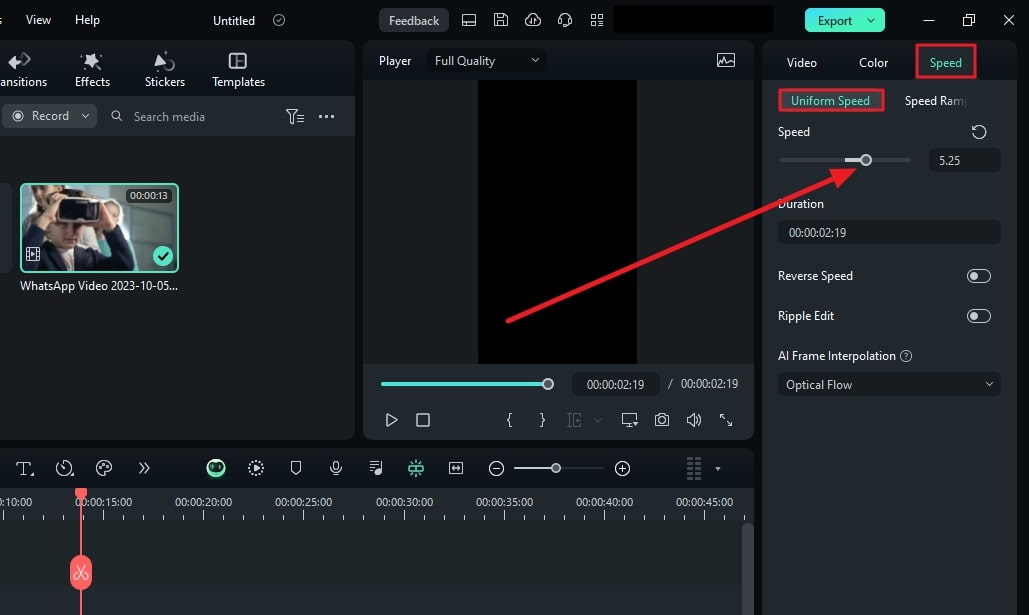
After bringing the imported media to the timeline, select it to access the settings panel. Select the “Speed > Uniform Speed” tab from the appeared panel. Then, drag the Speed slider on the right side to increase speed. Afterward, click the “Play” button on the preview screen to see the results.
Step 3Apply Frame Bending and Export
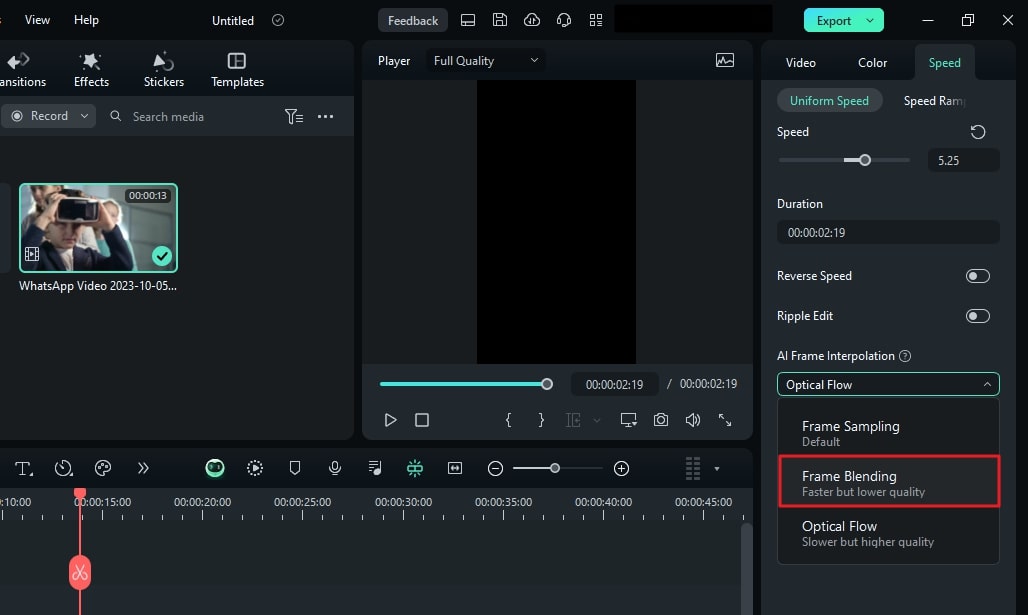
This part is optional, but if you find an irregularity or roughness to the video, apply this. Go to the “AI Frame Interpolation” section at the bottom and expand the options. From the dropdown menu, select the “Frame Bending” option and do the rendering from the timeline. After everything is set, select the “Export” button at the top right corner.
Trending Video Editing Features of Wondershare Filmora
Filmora is a versatile tool that is not confined to speed manipulation or fast motion only. This editor offers audio, text, AI editing options, and video. Here are some prominent key features of Wondershare Filmora to help you in editing:
1. Speed Ramping
The other option for speed modification mentioned previously is speed ramping. This option comes with 6 editable speed change presets for automated editing. However, you can also employ the custom preset to create your own way. Moreover, it allows the audio pitch option to enable automated maintenance of audio.
2. AI Smart Cutout
There is more than one way of removing and replacing a background in Filmora. Smart Cutout offers an AI-integrated masking option to cut out the selected parts. You can also set preferences for Edge Thickness or Edge Feather for accuracy. Afterward, you can introduce three background options: color, grid, or more.
3. AI Text-to-Video
Bring your imagination to visuals with this amazing generative AI video creator. It creates videos from text and covers the voice and graphical elements. Users can customize the AI voice and ratio before generating a video. The prompt section offers up to 1000 characters for adding a script or giving directions.
4. AI Smart Masking
Are there any effects or filters you want to introduce to only a specific part of the video? Use Filmora’s AI mask for automated masking of an object or background. The mask brush selects the relevant area on its own. Besides AI masks, there is a manual masking option or mask shapes to apply. You can also customize the Brush size according to the video.
Conclusion
The article highlighted the importance of increasing video speed in many industries. In addition, we discussed some tools that make fast motion with ease. We also provided step-by-step guides on how to make fast motion video on iPhone. Wondershare Filmora stands amongst all those applications to create fast motion. We recommend this software due to its multiple functionalities and detailed editing abilities.
Make A Slow Motion Video Make A Slow Motion Video More Features

Part 1: What are the Different Use Cases of Fast-Motion Videos?
The fast motion effect covers multiple creative ways of speed increase that you can incorporate. All these ways apply to different genres of videos. This section diverts your focus on different use cases of fast-motion videos. Here is how to make video fast motion on iPhone for different purposes:
1. Construction and Development Videos
Fast-motion videos help in video creation where development is happening. Such videos show the before and after results of an area, location, or building. The construction or manufacturing process is shown in fast motion in engineering videos. It also helps in showing the transformation of a non-populated or undeveloped city.
2. Nature Photography or Documentaries
Natural phenomenon like the blooming of a flower usually occurs at a slower rate. Capturing them takes a long time, but the audience may not like such a long duration. Hence, editors can increase the speed of such videos to speed up the phenomenon. In addition, if you watch wildlife or nature documentaries, they also use this effect.
3. Aesthetic Expression
Fast-paced videos bring a sense of creativity to your videos as they are an artistic expression of time. To indicate the passing of time in movies or to show a scene at a railway station or airport. It also indicates that the filmmakers and editors have put in an effort.
Part 2: Different Tools to Help You Make Fast Motion Video on iPhone
Fast-motion tools are important in video editing since they offer a chance at creativity. They have a wide range of applications in the filmmaking and media industry. Do you know how to make a video fast-motion iPhone using a third-party application? If not, here is a detailed guide on some of them:
1. iMovie
If you are looking for an accessible application with an easy-to-use interface, this is for you. The process of speed manipulation consists of a slider for control. After editing, you can integrate multiple soundtracks from 130 pre-assembled tracks. The application is compatible with iPhone X and newer versions.
Steps to Create a Fast Motion Video Using iMovie
Do you want to learn how to make fast-motion videos on your iPhone with this application? Given Below is your perfect guide to crafting a fast-paced video:
Step 1: After downloading the application on your iPhone, access it and “Start New Project.” Then, select a video from your media library to edit.

Step 2: After importing the video, click the “Pen” icon to access editing options. Then, click the “Edit Clip” option to do so.

Step 3: Move to the bottom of the screen and slide the given option to access “Speed.” Click it and drag the speed slider towards the right side to increase the speed of the video.

Step 4: Hit the “Play” button to see the speed of the video and re-adjust if required. Go to the top right corner of the screen, locate the “Export” icon, and click it.

2. Video Speed Changer – Editor
Want to learn how to make video fast motion on iPhone without additional technicalities? This application ensures a comprehensive narrative just for speed change. Users can formulate 3 fast motion effects with it at specific frames. For pre-recorded or new videos, it offers Time Wrap, Time Lapse, and Hyper-lapse. The application has been found to support iOS 12.3 and later versions.
Steps to Create a Fast Motion Video Using Video Speed Changer
Multiple applications provide similar services, but none can compare to its UI. Here is how to make a video fast motion iPhone using this
Step 1: Access this application from the App Store and launch it after installation. Click on the “Select Video” button and import a clip.

Step 2: Once you have selected a video, it will take you straight to the speed change option. Change the position of the given slider. Finally, preview the video and click the “Save Video” button to save it on your device.

3. Slow Motion Video FX Edit
Although the name indicates otherwise, this video editor is capable of high-speed change. It comes with an intuitive user interface and is easy for anyone to employ. In addition to speed alteration, you can insert 40 different filters into your video. You can also commence its freeze frame action to add an extra layer of creativity. The tool is compatible with iOS 13.0 and higher versions.
Steps to Create Fast Motion Using Slow Motion Video FX
This is another editor to gain insights on how to make fast-motion videos on an iPhone. We have given the verified step-by-step guide to using this app:
Step 1: After launching this application, click the “Choose From Library” option. Then, select a clip from your device’s gallery.

Step 2: Once the video is compressed, you’ll be taken to the speed change screen. From there, you can alter the speed of different clip sections. Move the slider of the relevant section upward to increase the speed.

Step 3: Once you have altered the speed, navigate towards the top right corner and click the “Export” icon.

Part 3: Desktop Solution: Remedy for Those Who Want to Speed Up Video on Their Computer
If you have gone through the above applications, you know the fast-motion effect. Do you want to know how to make a video fast motion on an iPhone using a computer? Wondershare Filmora is the best alternative to the above applications for creating this effect. The software is compatible with all the macOS and iOS devices and allows seamless editing.
With this editor, you get multiple options to create a fast-motion video. In this article, we will use the Uniform Speed feature. The operating process is very accessible and designed to assist both professionals and beginners. You can also apply the AI Frame Interpolation option to apply “Frame Bending.”
Free Download For Win 7 or later(64-bit)
Free Download For macOS 10.14 or later
Step-by-Step Guide to Speed Up Video with Filmora
After reading the article till now, you have gained knowledge of Filmora’s speeding options. How to make fast motion video on iPhone now seems like an easy option. Even though the process is easy, we want you to stay ahead. Hence, here is a step-by-step procedure for creating fast motion in Filmora:
Step 1Create a New Project and Import Media
First, connect your iOS device to your Wondershare Filmora device. After that, launch Filmora to access the main menu. From there, click on the “New Project” tab fashioned in the center. Expand the “Import” option in the Project Media section and select the suitable option. In this case, choose the “Import from Phone or Camera” option.

Step 2Access the Uniform Speed Section
After bringing the imported media to the timeline, select it to access the settings panel. Select the “Speed > Uniform Speed” tab from the appeared panel. Then, drag the Speed slider on the right side to increase speed. Afterward, click the “Play” button on the preview screen to see the results.

Step 3Apply Frame Bending and Export
This part is optional, but if you find an irregularity or roughness to the video, apply this. Go to the “AI Frame Interpolation” section at the bottom and expand the options. From the dropdown menu, select the “Frame Bending” option and do the rendering from the timeline. After everything is set, select the “Export” button at the top right corner.

Trending Video Editing Features of Wondershare Filmora
Filmora is a versatile tool that is not confined to speed manipulation or fast motion only. This editor offers audio, text, AI editing options, and video. Here are some prominent key features of Wondershare Filmora to help you in editing:
1. Speed Ramping
The other option for speed modification mentioned previously is speed ramping. This option comes with 6 editable speed change presets for automated editing. However, you can also employ the custom preset to create your own way. Moreover, it allows the audio pitch option to enable automated maintenance of audio.
2. AI Smart Cutout
There is more than one way of removing and replacing a background in Filmora. Smart Cutout offers an AI-integrated masking option to cut out the selected parts. You can also set preferences for Edge Thickness or Edge Feather for accuracy. Afterward, you can introduce three background options: color, grid, or more.
3. AI Text-to-Video
Bring your imagination to visuals with this amazing generative AI video creator. It creates videos from text and covers the voice and graphical elements. Users can customize the AI voice and ratio before generating a video. The prompt section offers up to 1000 characters for adding a script or giving directions.
4. AI Smart Masking
Are there any effects or filters you want to introduce to only a specific part of the video? Use Filmora’s AI mask for automated masking of an object or background. The mask brush selects the relevant area on its own. Besides AI masks, there is a manual masking option or mask shapes to apply. You can also customize the Brush size according to the video.
Conclusion
The article highlighted the importance of increasing video speed in many industries. In addition, we discussed some tools that make fast motion with ease. We also provided step-by-step guides on how to make fast motion video on iPhone. Wondershare Filmora stands amongst all those applications to create fast motion. We recommend this software due to its multiple functionalities and detailed editing abilities.
How to Create a Makeup Video
This topic is one of the videos you can easily find on YouTube, apart from the fact that it’s easy to make a video like this, there are many people who want to learn how to do their own makeup, that is why this is the most search content on YouTube. Makeup tutorial is effective through video, since viewers can see exactly how makeup are executed, what products they are using and where to buy.
This kind of video is about sharing makeup techniques, makeup inspiration and beauty product reviews. So, whether you are a makeup artist or a makeup enthusiast you can surely record yourself, make a video and share to your YouTube channel to inspire everyone to be beautiful on their own.
In this article I will sharing may setup and tips on how you can create a makeup video on your YouTube channel.
How to Setup for Making a Makeup Video
You don’t need to have expensive gear to start making this kind of content, also having a small space in your room, a smart phone and a natural lighting from your window is good enough to start your video. But if you are willing to invest there are a lot of online shop selling affordable gear for your great setup.
So, let’s take a look at some of the basic gears recommended:
Smart Phone / Camera
Right now, if you don’t have a digital camera yet, cellphone or mobile phone is good enough to start making your makeup video. This is the most convenient and affordable option for filming a makeup video. I’m sure now a days most of the camera built in mobile phone are quality for making a good video.
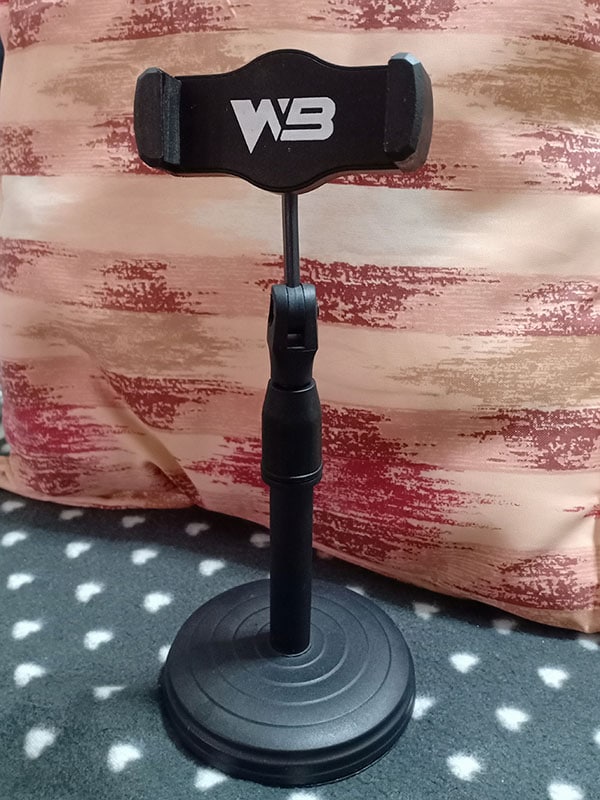
Cell Phone Stand
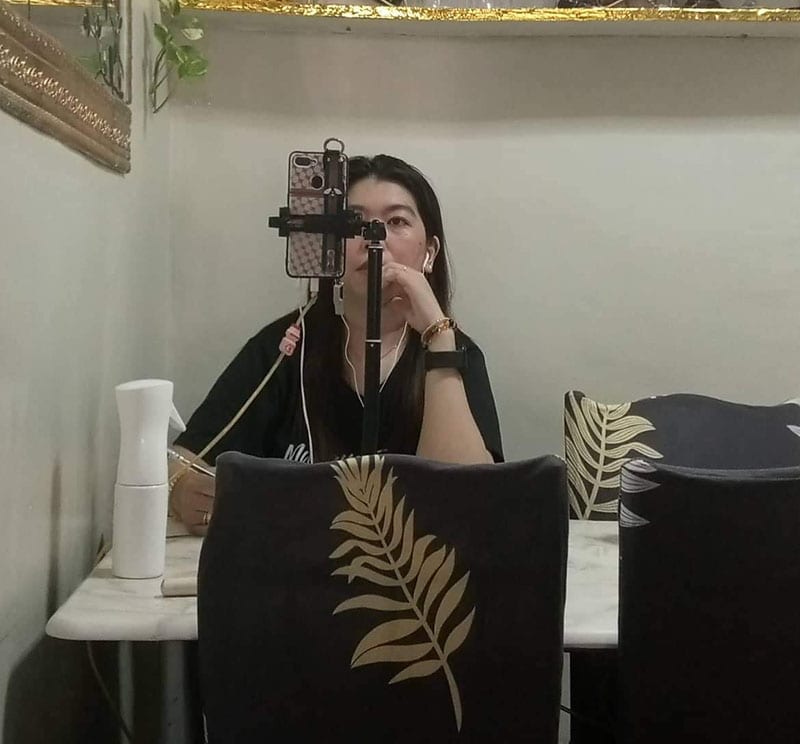
you must have a sturdy stand that allows to adjust height and rotation based on your needs.
If you don’t have a cell phone stand you can get anything that where you can put your camera on, but make sure that is just high enough that you can see your face for the tutorial.
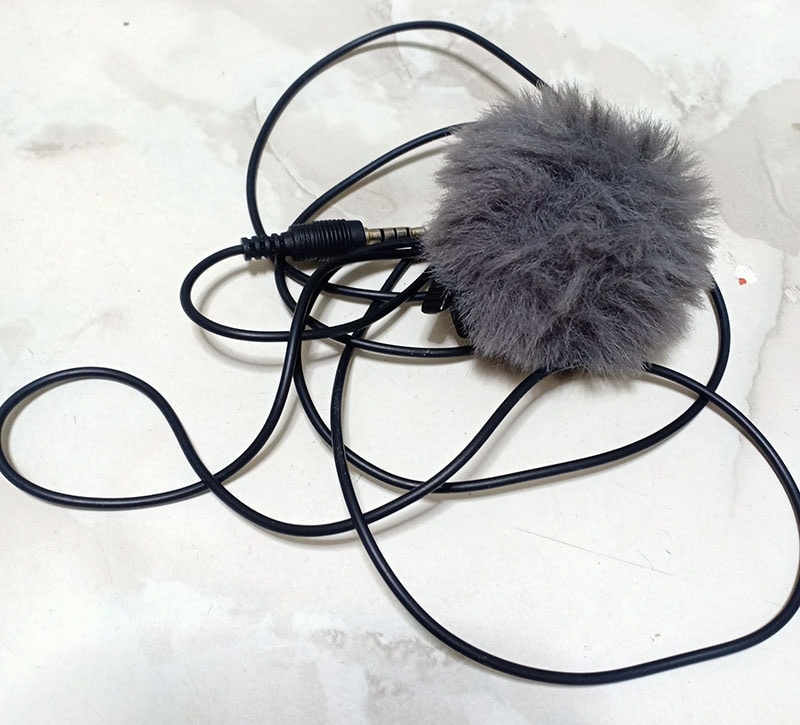
External Mic / Lapel Mic
To ensure you have both video and audio quality, it’s advisable to use an external microphone to record the audio separately, but there is lapel microphone that you can connect directly to your mobile phone make sure to use lapel mic that is compatible to your phone.
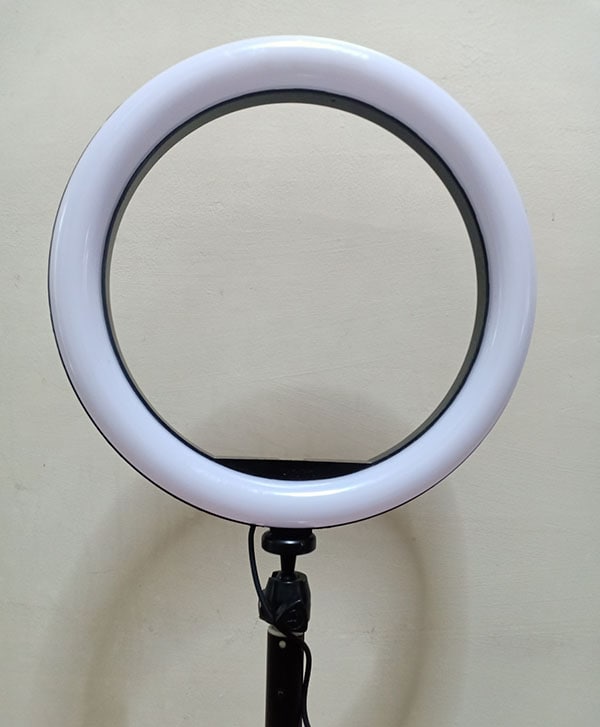
Ring Light
As I said natural lighting that comes from your window is your best friend when it comes to your lighting set up. Just find a window that the sun is shining through and use that light to your advantage.
but if you are willing to invest to have a quality video, just go with Ring Light. This light provides a soft, radial glow and its even capable as natural daylight. So, you don’t have to worry about flickers or distorts when filming, as the ring provides a continuous stream of light. Because you know lighting is one of the crucial setups for making all videos, especially to a makeup tutorial videos. You can always buy an affordable ring light online.
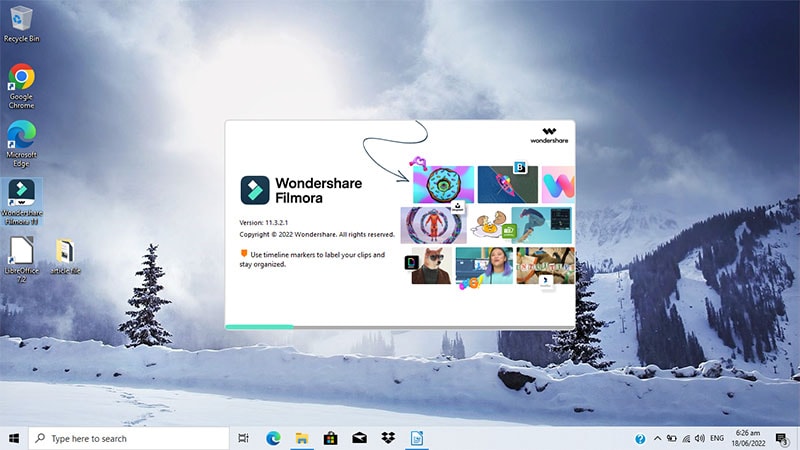
Editing Software
Other than the camera and the video footage itself, the video editing software is the mores essential steps as a content creator. There are usually awkward moments during filming that you may want to edit out, and you may also need to add effects and interesting transition. You can use a video editor that you can download from google.
Wondershare Filmora is a free, one of the easy-to-use software that most content creator used as their editing software. Filmora has editing tools like animation, effects, color change, transition, and overlays to make your video attractive and stands out to others.
Free Download For Win 7 or later(64-bit)
Free Download For macOS 10.14 or later
Step1Ready or set up your studio
A studio can be a corner of a room or if you have an extra space, you can dedicate an entire room to be your filming studio. Then get your camera or smart phone set up on a stable table with your cellphone stand to make it sturdy and make sure you have a suitable lighting. Dark video is not useful to anyone specially for something as detailed as applying a makeup.
Step2Create an outline
It may be helpful to create an outline or a script of your video beforehand so that you remember to do all the things your intent to do in your tutorial. This can also help you stay on track during filming so that you are remembering to demonstrate every part of your tutorial. Making a makeup tutorial video need also a step-by-step process so that you don’t forget anything that you will put or show in the video, you need to make a note or an outline for you to remember all because it so hustles to go back and record what you missed.
Step3Prepare Your Makeup
Before recording, prepare your makeup and make sure you use clean brushes. Set up the makeup you intent to use on the table or on you vanity near your filming setup. Lay out all you makeup and products that you want to use in this video. Have your makeup in front of you so that they are easily accessible during filming.
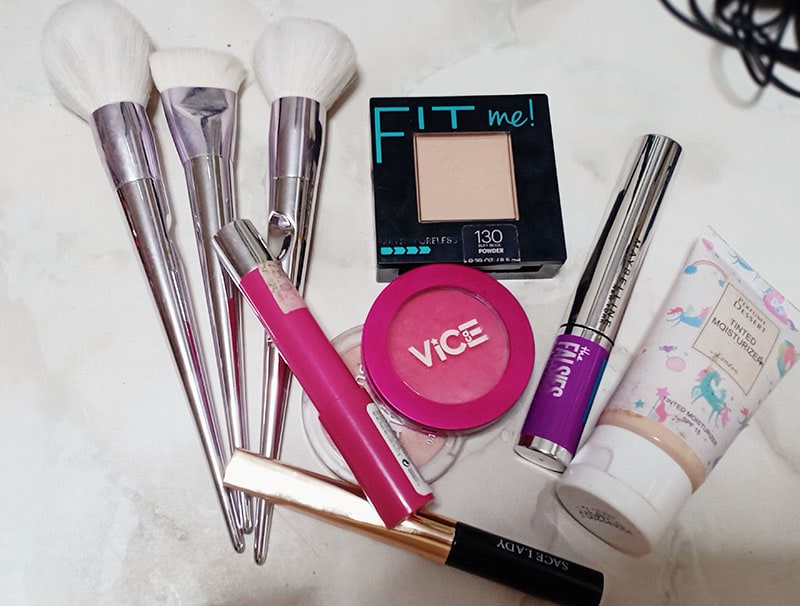
Make sure to have this thing in front of you before filming
- Makeup Brushes
- Skin and Eye Primer
- Moisturizer
- Foundation and Concealer
- Loose or Setting Powder
- Eyebrows Pencil or powder
- Contouring Palette
- Eyeshadow Palette
- Highlight powder
- Lipstick
- Setting Spray
Step4Concentrate and Film
Usually before filming I pray for guidance and knowledge. This is essential to me I do it before filming so that I can be guided and finish what I’m doing properly and less struggle.
If you are done the you can now start filming. Used your script to start talking to the camera, remember to be happy mood while doing this tutorial. Make your viewers feel good while watching you and don’t forget to tell them what product you are using. Also leave some comment to where they can buy the product you are using on your video.

Step5Edit and Upload
This is the last step for making a makeup video. Edit your video properly and make your video creative to attract more viewers. Cut the unwanted clips especially the part where you’re just talking. Because sometime viewers get bored if they only see you talking. Create a nice animation or transition to make your video stands out.
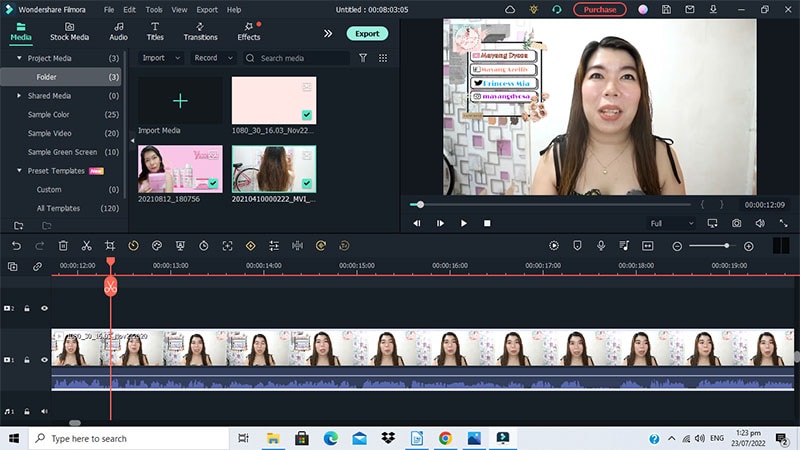
Then upload your finish video to your Youtube channel, make sure to public and promote your video so that more viewers will see how great you are in making this kind of videos. Remember to share your video to all your social media account to have more viewers and subscribers, don’t be shy to tell also your family and friends that you made a video so they can see the finished product of your hard work video tutorial and ask them to leave comment and suggestion if you have anything else to change or fix in making video, because for us content creator people’s feedback is very important so we can do better next time.
The Bottom Line
Now that you already knew the gear that you need to start setting up your studio for your makeup video and you also knew the step-by-step process, you are now ready to film a makeup video. But remember this you can’t just put makeup on your face style your hair and end the video. As a beauty vlogger, you’re an entertainer, so open dialogue is essential when filming. Ask your audience what they want to see, more importantly always remember to ask for feedback because for us content creator viewers feedback is very important so we can do better next time.If you’ve just started this inspiring journey of becoming a beauty Youtuber then hopefully these tips on how to create a makeup video will helped.
Free Download For Win 7 or later(64-bit)
Free Download For macOS 10.14 or later
Free Download For macOS 10.14 or later
Step1Ready or set up your studio
A studio can be a corner of a room or if you have an extra space, you can dedicate an entire room to be your filming studio. Then get your camera or smart phone set up on a stable table with your cellphone stand to make it sturdy and make sure you have a suitable lighting. Dark video is not useful to anyone specially for something as detailed as applying a makeup.

Step2Create an outline
It may be helpful to create an outline or a script of your video beforehand so that you remember to do all the things your intent to do in your tutorial. This can also help you stay on track during filming so that you are remembering to demonstrate every part of your tutorial. Making a makeup tutorial video need also a step-by-step process so that you don’t forget anything that you will put or show in the video, you need to make a note or an outline for you to remember all because it so hustles to go back and record what you missed.
Step3Prepare Your Makeup
Before recording, prepare your makeup and make sure you use clean brushes. Set up the makeup you intent to use on the table or on you vanity near your filming setup. Lay out all you makeup and products that you want to use in this video. Have your makeup in front of you so that they are easily accessible during filming.

Make sure to have this thing in front of you before filming
- Makeup Brushes
- Skin and Eye Primer
- Moisturizer
- Foundation and Concealer
- Loose or Setting Powder
- Eyebrows Pencil or powder
- Contouring Palette
- Eyeshadow Palette
- Highlight powder
- Lipstick
- Setting Spray
Step4Concentrate and Film
Usually before filming I pray for guidance and knowledge. This is essential to me I do it before filming so that I can be guided and finish what I’m doing properly and less struggle.
If you are done the you can now start filming. Used your script to start talking to the camera, remember to be happy mood while doing this tutorial. Make your viewers feel good while watching you and don’t forget to tell them what product you are using. Also leave some comment to where they can buy the product you are using on your video.

Step5Edit and Upload
This is the last step for making a makeup video. Edit your video properly and make your video creative to attract more viewers. Cut the unwanted clips especially the part where you’re just talking. Because sometime viewers get bored if they only see you talking. Create a nice animation or transition to make your video stands out.

Then upload your finish video to your Youtube channel, make sure to public and promote your video so that more viewers will see how great you are in making this kind of videos. Remember to share your video to all your social media account to have more viewers and subscribers, don’t be shy to tell also your family and friends that you made a video so they can see the finished product of your hard work video tutorial and ask them to leave comment and suggestion if you have anything else to change or fix in making video, because for us content creator people’s feedback is very important so we can do better next time.
The Bottom Line
Now that you already knew the gear that you need to start setting up your studio for your makeup video and you also knew the step-by-step process, you are now ready to film a makeup video. But remember this you can’t just put makeup on your face style your hair and end the video. As a beauty vlogger, you’re an entertainer, so open dialogue is essential when filming. Ask your audience what they want to see, more importantly always remember to ask for feedback because for us content creator viewers feedback is very important so we can do better next time.If you’ve just started this inspiring journey of becoming a beauty Youtuber then hopefully these tips on how to create a makeup video will helped.
Free Download For Win 7 or later(64-bit)
Free Download For macOS 10.14 or later
Free Download For macOS 10.14 or later
Step1Ready or set up your studio
A studio can be a corner of a room or if you have an extra space, you can dedicate an entire room to be your filming studio. Then get your camera or smart phone set up on a stable table with your cellphone stand to make it sturdy and make sure you have a suitable lighting. Dark video is not useful to anyone specially for something as detailed as applying a makeup.

Step2Create an outline
It may be helpful to create an outline or a script of your video beforehand so that you remember to do all the things your intent to do in your tutorial. This can also help you stay on track during filming so that you are remembering to demonstrate every part of your tutorial. Making a makeup tutorial video need also a step-by-step process so that you don’t forget anything that you will put or show in the video, you need to make a note or an outline for you to remember all because it so hustles to go back and record what you missed.
Step3Prepare Your Makeup
Before recording, prepare your makeup and make sure you use clean brushes. Set up the makeup you intent to use on the table or on you vanity near your filming setup. Lay out all you makeup and products that you want to use in this video. Have your makeup in front of you so that they are easily accessible during filming.

Make sure to have this thing in front of you before filming
- Makeup Brushes
- Skin and Eye Primer
- Moisturizer
- Foundation and Concealer
- Loose or Setting Powder
- Eyebrows Pencil or powder
- Contouring Palette
- Eyeshadow Palette
- Highlight powder
- Lipstick
- Setting Spray
Step4Concentrate and Film
Usually before filming I pray for guidance and knowledge. This is essential to me I do it before filming so that I can be guided and finish what I’m doing properly and less struggle.
If you are done the you can now start filming. Used your script to start talking to the camera, remember to be happy mood while doing this tutorial. Make your viewers feel good while watching you and don’t forget to tell them what product you are using. Also leave some comment to where they can buy the product you are using on your video.

Step5Edit and Upload
This is the last step for making a makeup video. Edit your video properly and make your video creative to attract more viewers. Cut the unwanted clips especially the part where you’re just talking. Because sometime viewers get bored if they only see you talking. Create a nice animation or transition to make your video stands out.

Then upload your finish video to your Youtube channel, make sure to public and promote your video so that more viewers will see how great you are in making this kind of videos. Remember to share your video to all your social media account to have more viewers and subscribers, don’t be shy to tell also your family and friends that you made a video so they can see the finished product of your hard work video tutorial and ask them to leave comment and suggestion if you have anything else to change or fix in making video, because for us content creator people’s feedback is very important so we can do better next time.
The Bottom Line
Now that you already knew the gear that you need to start setting up your studio for your makeup video and you also knew the step-by-step process, you are now ready to film a makeup video. But remember this you can’t just put makeup on your face style your hair and end the video. As a beauty vlogger, you’re an entertainer, so open dialogue is essential when filming. Ask your audience what they want to see, more importantly always remember to ask for feedback because for us content creator viewers feedback is very important so we can do better next time.If you’ve just started this inspiring journey of becoming a beauty Youtuber then hopefully these tips on how to create a makeup video will helped.
Free Download For Win 7 or later(64-bit)
Free Download For macOS 10.14 or later
Free Download For macOS 10.14 or later
Step1Ready or set up your studio
A studio can be a corner of a room or if you have an extra space, you can dedicate an entire room to be your filming studio. Then get your camera or smart phone set up on a stable table with your cellphone stand to make it sturdy and make sure you have a suitable lighting. Dark video is not useful to anyone specially for something as detailed as applying a makeup.

Step2Create an outline
It may be helpful to create an outline or a script of your video beforehand so that you remember to do all the things your intent to do in your tutorial. This can also help you stay on track during filming so that you are remembering to demonstrate every part of your tutorial. Making a makeup tutorial video need also a step-by-step process so that you don’t forget anything that you will put or show in the video, you need to make a note or an outline for you to remember all because it so hustles to go back and record what you missed.
Step3Prepare Your Makeup
Before recording, prepare your makeup and make sure you use clean brushes. Set up the makeup you intent to use on the table or on you vanity near your filming setup. Lay out all you makeup and products that you want to use in this video. Have your makeup in front of you so that they are easily accessible during filming.

Make sure to have this thing in front of you before filming
- Makeup Brushes
- Skin and Eye Primer
- Moisturizer
- Foundation and Concealer
- Loose or Setting Powder
- Eyebrows Pencil or powder
- Contouring Palette
- Eyeshadow Palette
- Highlight powder
- Lipstick
- Setting Spray
Step4Concentrate and Film
Usually before filming I pray for guidance and knowledge. This is essential to me I do it before filming so that I can be guided and finish what I’m doing properly and less struggle.
If you are done the you can now start filming. Used your script to start talking to the camera, remember to be happy mood while doing this tutorial. Make your viewers feel good while watching you and don’t forget to tell them what product you are using. Also leave some comment to where they can buy the product you are using on your video.

Step5Edit and Upload
This is the last step for making a makeup video. Edit your video properly and make your video creative to attract more viewers. Cut the unwanted clips especially the part where you’re just talking. Because sometime viewers get bored if they only see you talking. Create a nice animation or transition to make your video stands out.

Then upload your finish video to your Youtube channel, make sure to public and promote your video so that more viewers will see how great you are in making this kind of videos. Remember to share your video to all your social media account to have more viewers and subscribers, don’t be shy to tell also your family and friends that you made a video so they can see the finished product of your hard work video tutorial and ask them to leave comment and suggestion if you have anything else to change or fix in making video, because for us content creator people’s feedback is very important so we can do better next time.
The Bottom Line
Now that you already knew the gear that you need to start setting up your studio for your makeup video and you also knew the step-by-step process, you are now ready to film a makeup video. But remember this you can’t just put makeup on your face style your hair and end the video. As a beauty vlogger, you’re an entertainer, so open dialogue is essential when filming. Ask your audience what they want to see, more importantly always remember to ask for feedback because for us content creator viewers feedback is very important so we can do better next time.If you’ve just started this inspiring journey of becoming a beauty Youtuber then hopefully these tips on how to create a makeup video will helped.
Free Download For Win 7 or later(64-bit)
Free Download For macOS 10.14 or later
Also read:
- New 2024 Approved 4 Solutions to Crop a Video on Android Easily
- New In 2024, Discover the Top Slow Motion Camera App to Use
- New The Complete Guide to Zoho Slides with Ease
- Updated 2024 Approved How To Make a Timelapse in After Effects
- New Top 5 Best Video to PPT Converters for 2024
- Updated In 2024, Whatre the Best Alternatives to Pexels?
- New In 2024, Tips to Make Cinematic Color Grading
- 2024 Approved Wondering How to Rotate a Video in Windows at Any Desired Angle and Save It Permanently? Find Out All the Different Ways to Rotate Videos Temporarily as Well as Permanently
- New Are You Looking for the Best Premiere Pro Slideshow Template Online for Free? If Yes, You Can Find a Few Exciting Slideshow Templates Here. They Are Worth Using
- New Finding The Best Filmic Pro LUTs For Video Editing for 2024
- New In 2024, Best Tips for Better Event Videography
- Best Voice Changers for WhatsApp Free Included
- You Are at the Right Post if You Are Surfing for a GIF to MP4 Conversion Tool. This Article Will Provide You with the Top Best Converters that Can Help You Convert GIF to MP4 Videos Quickly and Easily
- What Is the Selective Color Effect, and How Can You Add This Effect to Your Videos Using Wondershare Filmora? A Complete Guide for Beginners for 2024
- New In 2024, Cropping Video in VLC Step by Step
- New Final Cut Pro - How to Download and Install It, In 2024
- New In 2024, How to Stabilize Videos for Free with Google Photos App
- Updated 2024 Approved The Power of Music in Videos
- A Complete Guide to Use Distortion Effect in Premiere Pro
- How to Edit Facebook Video Ads for E-Commerce Business for 2024
- Wondering if You Can Make DIY Green Screen Video for Streaming? Learn the Easy Steps to Setup DIY Green Screen, Shoot the Video and Edit It Out to Add Green Screen Effects for 2024
- New In 2024, Detailed Guide to Resize Your Video in VLC
- In 2024, How to Use LUTs in Lumafusion & Free Resource
- Updated 2024 Approved Guide To Creating The Perfect VHS Effect Look in Premiere Pro
- In 2024, Sync Audio With Video With Filmora
- In 2024, Tutorial | How to Make a Smooth Speed Ramping in Premiere Pro?
- New Add Green Screen Video on TikTok
- Do You Want to Excel at Using Adobe Premiere Pro Software for Splitting Videos and Audio? Learn About Splitting a Video and Audio Using Different Tools and Add a New Skill to Your Skillset with a Step-by-Step Guide in This Article
- Updated Attaining Slow Motion Video Trend Finding The Best CapCut Templates for 2024
- New Best 9 Amv Makers for Computer for 2024
- New Complete Guide to Make a Super Easy Rotating Video Effect
- Updated Step by Step to Cut Video in Adobe Premiere Pro for 2024
- In 2024, This Article Discusses What Is Vegas Pro, How to Download, Install and Use It, and Its Key Features. It Further Discusses Its Alternative for Editing Your Videos and More. Check Out Now
- 2024 Approved How to Overlay Video in Premiere Pro
- In 2024, Create Eye-Catching Slow-Motion Videos to Set Your Own Trend. For This Purpose, Read This Article to Find and Learn to Use CapCuts New Slow-Motion Templates
- How to Make a Smooth Speed Ramping in Premiere Pro, In 2024
- Updated Easily Combine Videos and Audios with 5 Simple Online Tools for 2024
- Updated Best Free Video Editing Software to Boost Your Content Creation
- New Best Ai Generated Memes for 2024
- Updated 2024 Approved Best Free LUTs To Use in Shotcut
- Updated In 2024, Keyframes Interval Everything You Need To Know
- In 2024, Adobe Photoshop Is the Best Photo Editor to Add Green Screen Effect to Your Photo While Wondershare Filmora Is the Best Video Editor to Add Green Screen Effect to Your Video
- In 2024, Making Slow Motion Videos in Final Cut Pro The Best Methods
- 2024 Approved Adobe Premiere Pro Rec 709 LUTs Finding The Best Options
- Updated In 2024, 10 Matching Color Combination That Works Together
- New 10 Amazing Anime Character Designs to Inspire You
- Updated How to Film Better in Public - 2024 Guide
- In 2024, How to Track WhatsApp Messages on Samsung Galaxy F04 Without Them Knowing? | Dr.fone
- Catch or Beat Sleeping Snorlax on Pokemon Go For Nokia G42 5G | Dr.fone
- In 2024, How To Remove iCloud On iPhone XS Max Smoothly
- How to Make the Most of Your iPhone 6 Plus Lock Screen with Notifications?
- How To Unbrick a Dead Vivo T2 5G | Dr.fone
- How Can I Catch the Regional Pokémon without Traveling On Motorola Edge 2023 | Dr.fone
- How To Bypass FRP on Samsung Galaxy S24 Ultra
- In 2024, A Quick Guide to Samsung Galaxy A15 4G FRP Bypass Instantly
- 15 Best Strongest Pokémon To Use in Pokémon GO PvP Leagues For Oppo Reno 11 5G | Dr.fone
- 2024 Approved Ways You Can Master to Find 10 Best Free Animated Text Generator
- In 2024, Reasons why Pokémon GPS does not Work On Realme Narzo N53? | Dr.fone
- In 2024, 7 Ways to Unlock a Locked Itel S23 Phone
- In 2024, How to Change/Add Location Filters on Snapchat For your Realme 11 Pro | Dr.fone
- In 2024, How I Transferred Messages from Tecno Spark 10 5G to iPhone 12/XS (Max) in Seconds | Dr.fone
- In 2024, A Quick Guide to ZTE FRP Bypass Instantly
- How to Upgrade iPhone 11 without iTunes? | Dr.fone
- Vivo Y27 4G Camera Not Working Unexpected Error? Fix It Now | Dr.fone
- Vivo Y28 5G Music Recovery - Recover Deleted Music from Vivo Y28 5G
- The Best 8 VPN Hardware Devices Reviewed On Oppo A59 5G | Dr.fone
- In 2024, Android Unlock Code Sim Unlock Your Oppo A56s 5G Phone and Remove Locked Screen
- In 2024, How To Unlock A Found iPhone 15 Pro? | Dr.fone
- How to Change Location on TikTok to See More Content On your Realme C53 | Dr.fone
- Stuck at Android System Recovery Of Vivo X100 ? Fix It Easily | Dr.fone
- In 2024, How can I get more stardust in pokemon go On Oppo Find N3 Flip? | Dr.fone
- How to Remove Activation Lock On the iPhone 13 Pro Max Without Previous Owner?
- Can Life360 Track You When Your Tecno Pova 5 Pro is off? | Dr.fone
- How to Remove a Previously Synced Google Account from Your Samsung Galaxy A05s
- In 2024, Resolve Your iPhone 6 Keeps Asking for Outlook Password | Dr.fone
- In 2024, AddROM Bypass An Android Tool to Unlock FRP Lock Screen For your Nokia C12 Pro
- Poco X6 Pro Camera Not Working Unexpected Error? Fix It Now | Dr.fone
- How To Restore Missing Contacts Files from Xiaomi 14.
- Refurbished Apple iPhone 7 Everything You Need to Know | Dr.fone
- Title: Adjust Background to Black for Your Product Review Video
- Author: Chloe
- Created at : 2024-05-20 03:37:19
- Updated at : 2024-05-21 03:37:19
- Link: https://ai-editing-video.techidaily.com/adjust-background-to-black-for-your-product-review-video/
- License: This work is licensed under CC BY-NC-SA 4.0.

