
:max_bytes(150000):strip_icc():format(webp)/removerokuchannel-c354faa0f712495384a4d5888017e30c.png)
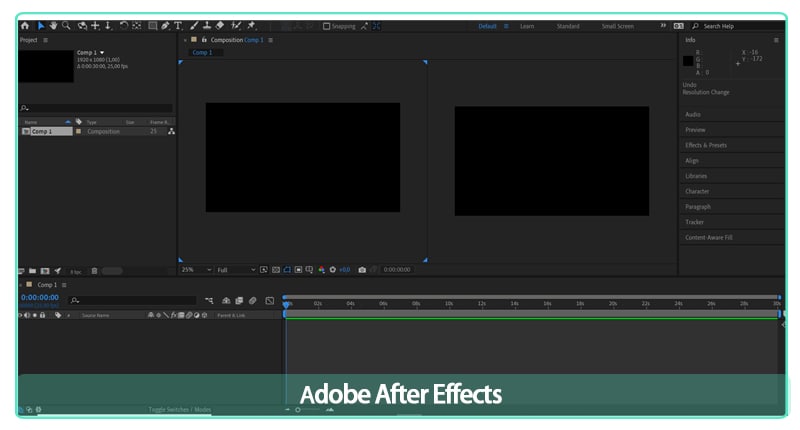
Adobe After Effects Review for 2024
Adobe After Effects Review
Make cinematic films, movies, intros, and transitions. Delete people from clips. Start fires or create a foggy weather. With Adobe After Effects, the industry-standard motion graphics and visual effects software, you are able to take any idea and make it come to life. Animate titles, credits, and lower thirds. Begin editing from scratch or with presets available. Combine photos and video footage to create anything you can think of.
Choose amazing effects from hundreds of options, remove unwanted parts from the frame, people or objects, and make VR videos to push your audience into the action. This software lets professionals configure keyframes, allow them to create compositing operations. Features of Adobe After Effects include a content library, digital asset management, video rendering, data import/export, and much more. In this article we will give you a brief overview of what After Effects is, what it’s used for and by who and the overall experience!
With that said, let’s get started!
1. Speed and Stability
When talking about speed and stability, After Effects has the latest release packed with improvements. All the developers have focused themselves on speed and also performance. The team at Adobe have worked very hard to make this application more responsive and when we go along in this article, that can be seen in many ways
The main improvement which is immediately clear to all users, is the renewed preview playback optimization. What we noticed is that After Effects is creating the ram preview for your projects a lot faster. However, while working with the software for this article, we did find the user interface to be more responsive, the playback is way smoother, so is it a lot more stable overall.
While using shape layers, there was a significant improvement. A few expressions are a lot faster. This alone is worth upgrading to the latest version of After Effects.

2. User Interface
The After Effects interface is constructed up of four main parts. The Timeline panel, the Project panel, the Composition panel and the Effects panel.
The Timeline Panel
In the Timeline panel, you edit all the footage and clips to create your rough cut. You can find the Timeline panel on the bottom of the workspace.
The Project Panel
It’s pretty straightforward that in the Project panel you import your footage and create your project. This is located on the top left of the standard After Effects workspace.
The Composition Panel
The Composition panel is where you will see the final product. This is located in the middle of your workspace.
The Effects Panel
In order to make creative changes to your video, use the preview, audio, effects, and Preset Panels. These panels are located on the upper right area of your workspace, each one also has its dropdown.
3. Learning Curve
The learning curve for After Effects depends on your background, the best way to find out if you like it is starting a free trial. Go through some tutorials online or paid courses. You’ll also want to spend time with the User Guide. The Search Help field in the top right corner provides you an easier search for answers to most questions that you have. Speaking of YouTube and online learning, most of the video tutorials you will find have been created by people that are experienced in After Effects and know their way around it.
4. VFX
There’s a time-period when video editors require strengthening their skills, calling it imperative software for improving editing skills is nowhere near an exaggeration. it really helps prospective professionals improve their learning experience through visual effects, camera tracking, text animation, motion tracking, color grading, etc. All of these methodologies do help in improving the VFX learning process in the long run.
Video editing happens to be a crucial part of film production. Making videos in a fantastic process can indulge in building professional videos via motion graphics animation. This is where Adobe After Effects become an excellent learning tool.
5. Motion Graphics
Motion graphics can sound quite scary. It’s a new term for a specific genre of animation. Motion graphics is the intersection between animation and graphic design. These are purpose-driven visual aspects with the goal of showing information to the viewer through the use of animated graphics or text. Sometimes they include voice-overs narrating what the text or graphics are showing. Where it gets a little complex is that the more popular the term motion graphics becomes, the more people are misaligning animations to it. They need to represent information and illustrate the idea to the viewer clearly, so they do that using animation and motion graphics.
6. Titles and Outros
Adobe released a new combination of features for you. For Adobe Stock: Graphics templates. Those pre-made templates give you a super smooth way to discover new motion graphics within Premiere Pro, without needing to spend time creating titles, overlays, or animations from scratch. The world has digitalized, and videos often need visual aspects such as titles, lower thirds, to present information. The templates not only assist video editors increase the quality of the content by showing certain information, but they also give a strong visual touch to keep the viewer engaged throughout the video. The audience nowadays is a lot more sophisticated, meaning that motion graphics are a necessity in a driven media world.
Motion Graphics templates are valuable for video editors of all levels. For the beginning content creators, the templates offer great quality, ready-made footage to help their creative goal. They can explore and work on their skills. Motion graphics that are pre-made are an excellent way to express the vision and express inspiration to new opportunities.
So now that you are aware of what After Effects templates are, we can move on to the actual workflow, why it is important, and how to use it as efficient as possible.
7. Workflow
Whether you are using Adobe After Effects to create motion graphics, or composite realistic visuals, you usually follow the same workflow, you may repeat the process of adjusting layer properties, editing, and compositing until everything looks good. You can change any property of any element, such as position, opacity and size. Make use of motion tracking to stabilize footage so that it follows the motion from another clip, and so much more!
8. Rendering Speed
When it comes to exporting your project in After Effects, you don’t need to buy an expensive workstation. You can speed up your rendering process from your own laptop without investing too much and by using the following tips we have for you below!
Tip #1: Enable Multiprocessing
What exactly is multiprocessing? That is when After Effects uses multiple cores from your CPU to export multiple frames at once. If your processor has one or more cores, you can enable this feature to reduce your rendering time. We want to mention that you need to check whether or not this option is turned on. Once enabled, you’ll see a great decrease in export time.
To enable Multiprocessing, navigate to Preferences > Memory & Multiprocessing. Then you click the check box next to ‘Render Multiple Frames Simultaneously’ and remember also to adjust the settings that you need.
Tip #2: Optimize Your RAM Usage
The RAM memory inside your workstation can be used to write and read data at a lot higher speeds than regular hard drives and portable drives. Configuring your RAM in a system is one of the easiest upgrades for better performance. Giving you affordable solutions for both desktop and laptop systems, the RAM memory upgrade does not require a lot of knowledge. The more RAM you allow applications to use, the higher the performance you will get out of it.
It also shows a noticeable increase in rendering speed. When the export time in your work is longer than needed, look at your RAM memory and see if you can make the necessary changes or upgrades.
Tip #3: Use the Media Encoder
Let’s talk about the Media Encoder. It’s the software that comes up with Adobe Creative Cloud products such as After Effects and Premiere Pro to simplify the export process. You can easily render your project from After Effects to Adobe Media Encoder and begin the project render process from that point on. The Media Encoder will increase your rendering performance and will significantly decrease rendering time.
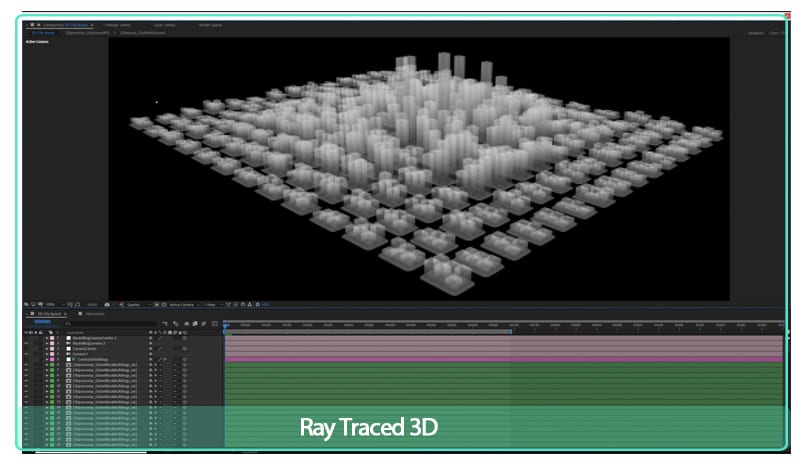
Tip #4: Disable Ray-Traced 3D
The included After Effects Ray-Traced 3D feature enables you to produce 3D models within After Effects without any struggle. Calculating all the motions and visual graphics is such a heavy process for your workstation. When you disable raytracing, you will get a faster export time. By looking that ‘Classic 3D’ is checked instead of ‘Ray-Traced 3D’ from your composition preferences, you can speed your rendering speed up to 50%. Isn’t that incredible?
Tip #5: Activate GPU Exporting with Cuda Acceleration
Exporting your videos with GPU rather than CPU will increase the efficiency of your render process. The export length will decrease a whole lot when you activate Mercury GPU Acceleration, also known as ‘CUDA’ from the ‘Project Settings’.
After Effects doesn’t really require CUDA features from a special kind of Nvidia GPU. Only the GPU accelerated 3D renderer, that is based on the raytracing algorithm, requires that. The other GPU features are running on any GPU that meets the basic minimums, including Intel and AMD GPUs.
9. System Requirements for Windows
These are the minimum specifications needed to use After Effects on PC:
OS: Windows 10 (64-bit) versions 1909 and later, or Windows 11
CPU: Intel or AMD Quad-Core Processor (Intel i5 and i7 will do the job)
RAM: 16 GB
Monitor resolution: 1280 x 1080
An internet connection
Free storage: 15 GB
GPU: Minimum 2 GB of VRAM
10. System Requirements for macOS
OS: macOS 10.13 or later
RAM: 16 GB
CPU: Intel and Apple Silicon (Rosetta2 Supported) Quad-Core Processor
GPU: 2GB of VRAM
Monitor resolution: 1440×900
Free storage: 15 GB
An internet connection
11. Keyboard Shortcuts
You can work visually when you configure your keyboard shortcuts with the visual keyboard shortcut editor within After Effects. You can use the keyboard user interface to show the keys that have been assigned to shortcuts, the available keys for assignment, and edit assigned shortcuts to make your workflow even easier.
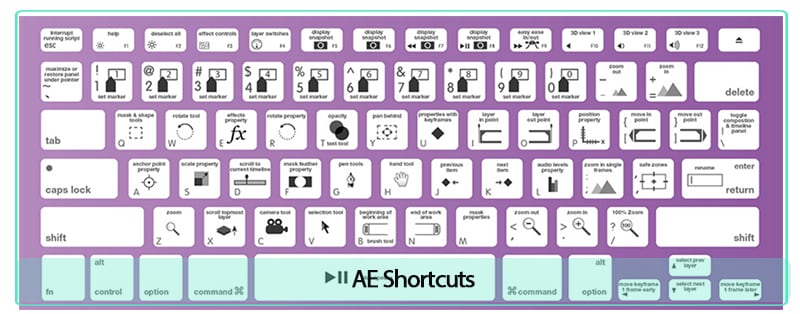
The keyboard layout:
This is a representation of your physical keyboard where you can see which keys have been assigned a shortcut, and which are available.
Command list:
The list displays all the commands that can be assigned shortcuts.
Key modifier list:
This list shows you all the modifier combinations and assigned shortcuts associated with the key you select on your physical keyboard.
After Effects does not allow you to reassign the following keys:
- A
- AA
- E
- EE
- F
- FF
- L
- LL
- M
- MM
- P
- PP
- R
- RR
- S
- SS
- T
- TT
- U
- UU
12. Should You Buy It?
Well first, you cannot buy After Effects, Premiere Pro or other software from Adobe. You have to rent them by paying monthly. After Effects is primarily a compositing and graphics software. Premiere is primarily a video editing program. In the case of After Effects and Premiere Pro, it’s not really an either/or. They’re both software with different purposes. After Effects is a lot more powerful and essentially showcases most of Premiere’s functionality, but according to our experience, the Premiere Pro interface and workflow is way more superior for video editing.
Premiere Pro is essentially built around its timeline, the region where you cut your video clips and drag and place them into your appropriate sequence. Hollywood filmmakers and professional YouTube content creators are using Premiere Pro to edit high-performing content and award-winning films. The software is very intuitive and easy for beginners to start with.
Are going to work with After Effects to create an income? Or are just going to use it for a hobby? It’s crucial to mention that question because Adobe After Effects is not something that is cheaply available. You will be investing much money on the program, and if you are working to use the software, paying a good amount, and earning nothing in return, then you might want to shift to another alternative which would cost you less. For instance, let’s assume you are using the application to earn an income, and have a few low-paying clients. In such a situation, you will have to rethink your options of software and analyze whether what you are paying in comparison to what you are getting is enough for you or not. We all are different individuals and have different preferences. Once we can see what is more important to us, or what is our need at this moment, then we will be able to judge the worth of purchasing Adobe After Effects better.
Are you going to use After Effects to earn an income? Or are just using it as a hobby? It is very important to address this question because Adobe After Effects is not something cheaply accessible. You will be investing a lot of money into this software, if you are using the software while paying a good amount and earning nothing in return yet, then you could shift to a different alternative which will cost you a lot less. Let’s say you are using After Effects to earn an income and have some low-paying work. In that case, you will have to reconsider your options of video editing software and look at whether what you are paying in comparison to what you are getting is possible for you. When we can see what is more important to us, we will be able to see the worth of buying After Effects.
Did you previously use After Effects or are you new to the program? The return that you will get using Adobe After Effects, depends on how good you know how to work with the options, functions and features in the software.
The Bottom Line
So summing it all together, Adobe After Effects takes care of all your assets and creates a final product, considering that After Effects is usually an asset-generation tool. Most video editors complete their projects in After Effects non-stop. It’s excellent for making visual videos come to life.
AE version 22.3 is very impressive. Giving you a wealth of new features created to make VFX editing a lot faster and easier. Offering new features on a regular basis, improving their subscription model making it more attractive. Especially if you’re a professional editor and designer.
Once you get comfortable with Adobe After Effects, you learn how to dynamically combine After Effects compositions to your Premiere projects. You are able to access both assets at the same time if needed!
Free Download For Win 7 or later(64-bit)
Free Download For macOS 10.14 or later
Are You Searching for the Best Cinematic LUTs for Premiere Pro? You Are in the Right Place because This Article Is Dedicated to LUTs
LUTs stand for Look-Up Tables and are compatible with a wide array of editing software. This element in video editing can be used during production or before and after production. Using the LUTs, you can color grade your media content to make it more visually appealing. The LUTs can create consistency in your videos and photos and also leads to accurate results.
This article is designed to provide all the information about cinematic LUTs for Premiere Pro. You will not only find the best LUTs present for Premiere Pro, but we will also discuss the compatibility of LUTs with other editing software. Above all, the bonus tip will also provide a great alternative to Premiere Pro for cinematic LUTs.
Part 1: Which File Formats Are LUTs Available In?
You must be wondering if there are any specific file formats for cinematic LUTs Premiere Pro. Yes, some formats define the availability of LUTs. Some of them are:
- 3DL: 3DL is the 3D lattice of RGB output colors. You can find this in DaVinci Resolve, Adobe After Effects, and Photoshop.
- CUBE: It is one of the most popular file formats for video editing. If you want to work with CUBE, you can access it on Final Cut Pro, Adobe Premiere Pro, and other editing software.
- DAT: If you are an animation maker or work with 3D modeling, this file format is for you. In case you want to use it, go to Autodesk Maya.
- CSP: This stands for Clip Studio Paint. As the name suggests, you can use it for making high-class digital art.
- ICC: The International Color Consortium is a file format specifically used for color calibrations along with color management.
- MGA: Are you irritated by low-quality graphics? No worries because MGA can help you in improving the graphics in versatile gaming software.
- Look: With this file format; you can work with Sony Camera’s postproduction work. It leads to high-quality results, so you can use it without issues.
Empower your videos with a new mood using different LUTs. Filmora now offers 100+ top-quality 3D LUTs cover a broad range of scenarios. Transform your videos with Filmora’s powerful 3D LUTs.
Apply LUT on Videos Apply LUT on Videos Learn More


Part 2: Are LUTs Compatible With All Media Editing Software?
Predominantly, LUTs are compatible with a considerable number of media editing software. Yet, the specificity of the compatibility is somehow dependent on the file formats for the LUTs you want to use. Moreover, some software does not have the ability to import or apply the LUTs to a satisfactory quality. Many video editing software supports 3DL and CUBE as they are the most commonly used software.
In addition, popular platforms such as Final Cut Pro, Adobe Acrobat, DaVinci Resolve, and many other software can provide you with LUTs. However, you need to make sure that you are using their latest version because versions of software can affect the compatibility of LUTs. In case you want to use the less commonly used LUTs formats, you need to find a reliable source to import or apply it.
Part 3: What Are The Best Cinematic LUTs For Premiere Pro?
Now that you know considerable information about LUTs, you must be wondering where to find them. In this section, you will discover the cinematic LUTs for Premiere Pro, one of the most known platforms for providing LUTs. Thus, look below to find the LUTs of Premiere Pro:
1. Fast Film LUTs
With this cinematic LUTs Premiere Pro, you can add aesthetic emulation to your film project. It can even add a filmy touch to simple photographs. This can also save the low light issues in the footage to show clear scenes to your audience. Above all, it also reduces the noise and helps improve your film’s outlook.

2. Emulation LUTs
Using this LUT preset, you can optimize your film’s dynamic range and emulation metrics. It can escalate every little detail of your footage and help engage more viewers. In addition to this, you can apply these LUTs to multiple shots to add consistency to your video. These Premiere Pro cinematic LUTs can also

3. Pro Color Grading LUTs
A video or photo without colors can never attract the target audience. Yet, you can cater to these issues using the intuitive LUT named Pro Color Grading LUTs. It can not only fix the color grading problems of your media but can also add aesthetics to it. Moreover, you can also customize it as per your need.

4. Filmy Tone LUTs
If you wish to evoke a sense of nostalgia in your viewers, there is no better way than the Filmy Tone LUTs. It enhances the visibility of videos and photos and aims to show different periods. This can be the perfect choice for those who want to create films and photos dedicated to the past.

5. City Skyline LUTs
For creating and adding the city-lighted environment to media, you can take assistance from this LUT. It is widely used in travel and commercial videos. Moreover, you can also emphasize the features of the cityscape by using it. This also helps to add vibrant colors and styling, just as in city shots.

6. LUTs Summer Film
Creating summer videos with precise summer lights can be a tricky procedure. However, the LUTs Summer Film can help you with this as it can add summer vibes to any videos and photos. You can even use it to give summer looks to the videos shot in the winter season.

7. Exhale LUTs
To add the soft highlight along with a moody environment, you can use the Exhale LUTs. These cinematic filters Premiere Pro are widely used in music and fashion videos. You can also use it in art videos to create a sense of immersion and connection for the viewers.

8. DELUTS
The Digital Film Emulation Look-Up Tables are useful for creating a classic filmy look for simple videos and photos. It can enhance the texture and depth of everything in the video, making it more studio friendly. You can use this LUT for weddings or corporate videos.

9. Free Reign Sample LUTs
With the help of this LUT, you can experience full control over the color metrics of videos and photos. Even if the video’s color gets compromised during shooting, you can fix them with this. This type of LUTs can be used for experiments, independent or travel videos.

10. Vintage LUTs for Premiere Pro
As the name suggests, you can use these LUTs to add a more vintage look to the photos and videos. This can improve the warmth and clarify the theme of the video. You can make your videos and photos stand out in a crowd with the help of this type of LUTs.

11. Airy Bright LUTs
Many users love to make their videos airier and fuller in brightness. This LUT is perfect for users of these types of liking. You can access these LUTs to add soothing brightness and airer effects in videos and photos. It is widely used for fixing the photos of bad videos captured at night.

12. Canon Cinestyle to Rec.709 LUT
This LUT can help the videographers to add a more cinematic look to the videos captured by Cannon DSLR. You can also create a color space of Rec.709 in your videos with this LUT. No matter if you want to work on wedding shots or short films, this LUT can help you with all.

13. Urban Fashion Premiere Pro LUTs
By applying this LUT, you can convert simple fashion videos into professional ones. It can create VOUGE-standard videos for you; thus, you can also use this for startup brands. Moreover, if you are an Instagram or TikTok model, you should get familiar with it because it can make any footage premiere level in a few taps.

14. Osiris Cinematic LUTs
For making travel or advertisement videos more high quality, you can use this Premiere Pro cinematic presets. It can make all types of videos more visually appealing and can add cinematic looks to it. Moreover, this LUT allows you to upscale all the visuals and characters in the video.

15. Finishing LUTs
To add eye-catching finishing effects to the videos, you can use the Finishing LUTs. This can enhance the end-of-color grading procedure for you. It can also add a more contrast and color-friendly look to the ends. You can use it for TV series, films, music, and other videos.

Bonus Part: Wondershare Filmora – A Great Alternative To Discover Cinematic LUTs
Undoubtedly, you can use the cinematic LUTs for Premiere Pro, yet sometimes it can be a tricky platform. Thus, you need to know the best alternative to Premiere Pro so you can apply LUTs to your videos in an optimized manner. The best tool that can help you with this is Wondershare Filmora . You can experience professional-level video editing with this.
Add LUTs on Video For Win 7 or later(64-bit)
Add LUTs on Video For macOS 10.14 or later
Moreover, you can apply LUTs to the videos and can also adjust their intensity as per your need. Above all, it can help you to apply LUTs to several types of videos, such as landscapers or short videos. It also supports the LUTs hover, which lets you preview the LUTs effects .

Prominent Features of Wondershare Filmora
- With its Color Wheel, you can adjust every color metric of video. It can include mid-tones, shadows, hue, and more.
- Along with color customization, you can also sharpen the blur videos to improve the quality of your video.
- You can also control the speed ramping of your video with Filmora. It can also do motion tracking for you.
- By using the batch edit feature, you can edit multiple videos at once without compromising the quality.
Conclusion
Considering everything, you can use the cinematic LUTs for Premiere Pro to upgrade the functionality of your video. The LUTs are available in several file formats, which are mentioned above. Moreover, several editing software can help you to import and apply LUTs on photos and videos. One of the popular ones is Premiere Pro.
Other than this, the best Premiere Pro cinematic LUTs are also discussed above for your ease. Yet, if you find the Premiere Pro difficult, you can use its best alternative named Wondershare Filmora. To find out more about Filmora, go to the previous part.
Add LUTs on Video For Win 7 or later(64-bit)
Add LUTs on Video For macOS 10.14 or later
Apply LUT on Videos Apply LUT on Videos Learn More
Part 2: Are LUTs Compatible With All Media Editing Software?
Predominantly, LUTs are compatible with a considerable number of media editing software. Yet, the specificity of the compatibility is somehow dependent on the file formats for the LUTs you want to use. Moreover, some software does not have the ability to import or apply the LUTs to a satisfactory quality. Many video editing software supports 3DL and CUBE as they are the most commonly used software.
In addition, popular platforms such as Final Cut Pro, Adobe Acrobat, DaVinci Resolve, and many other software can provide you with LUTs. However, you need to make sure that you are using their latest version because versions of software can affect the compatibility of LUTs. In case you want to use the less commonly used LUTs formats, you need to find a reliable source to import or apply it.
Part 3: What Are The Best Cinematic LUTs For Premiere Pro?
Now that you know considerable information about LUTs, you must be wondering where to find them. In this section, you will discover the cinematic LUTs for Premiere Pro, one of the most known platforms for providing LUTs. Thus, look below to find the LUTs of Premiere Pro:
1. Fast Film LUTs
With this cinematic LUTs Premiere Pro, you can add aesthetic emulation to your film project. It can even add a filmy touch to simple photographs. This can also save the low light issues in the footage to show clear scenes to your audience. Above all, it also reduces the noise and helps improve your film’s outlook.
2. Emulation LUTs
Using this LUT preset, you can optimize your film’s dynamic range and emulation metrics. It can escalate every little detail of your footage and help engage more viewers. In addition to this, you can apply these LUTs to multiple shots to add consistency to your video. These Premiere Pro cinematic LUTs can also
3. Pro Color Grading LUTs
A video or photo without colors can never attract the target audience. Yet, you can cater to these issues using the intuitive LUT named Pro Color Grading LUTs. It can not only fix the color grading problems of your media but can also add aesthetics to it. Moreover, you can also customize it as per your need.
4. Filmy Tone LUTs
If you wish to evoke a sense of nostalgia in your viewers, there is no better way than the Filmy Tone LUTs. It enhances the visibility of videos and photos and aims to show different periods. This can be the perfect choice for those who want to create films and photos dedicated to the past.
5. City Skyline LUTs
For creating and adding the city-lighted environment to media, you can take assistance from this LUT. It is widely used in travel and commercial videos. Moreover, you can also emphasize the features of the cityscape by using it. This also helps to add vibrant colors and styling, just as in city shots.
6. LUTs Summer Film
Creating summer videos with precise summer lights can be a tricky procedure. However, the LUTs Summer Film can help you with this as it can add summer vibes to any videos and photos. You can even use it to give summer looks to the videos shot in the winter season.
7. Exhale LUTs
To add the soft highlight along with a moody environment, you can use the Exhale LUTs. These cinematic filters Premiere Pro are widely used in music and fashion videos. You can also use it in art videos to create a sense of immersion and connection for the viewers.
8. DELUTS
The Digital Film Emulation Look-Up Tables are useful for creating a classic filmy look for simple videos and photos. It can enhance the texture and depth of everything in the video, making it more studio friendly. You can use this LUT for weddings or corporate videos.
9. Free Reign Sample LUTs
With the help of this LUT, you can experience full control over the color metrics of videos and photos. Even if the video’s color gets compromised during shooting, you can fix them with this. This type of LUTs can be used for experiments, independent or travel videos.
10. Vintage LUTs for Premiere Pro
As the name suggests, you can use these LUTs to add a more vintage look to the photos and videos. This can improve the warmth and clarify the theme of the video. You can make your videos and photos stand out in a crowd with the help of this type of LUTs.
11. Airy Bright LUTs
Many users love to make their videos airier and fuller in brightness. This LUT is perfect for users of these types of liking. You can access these LUTs to add soothing brightness and airer effects in videos and photos. It is widely used for fixing the photos of bad videos captured at night.
12. Canon Cinestyle to Rec.709 LUT
This LUT can help the videographers to add a more cinematic look to the videos captured by Cannon DSLR. You can also create a color space of Rec.709 in your videos with this LUT. No matter if you want to work on wedding shots or short films, this LUT can help you with all.
13. Urban Fashion Premiere Pro LUTs
By applying this LUT, you can convert simple fashion videos into professional ones. It can create VOUGE-standard videos for you; thus, you can also use this for startup brands. Moreover, if you are an Instagram or TikTok model, you should get familiar with it because it can make any footage premiere level in a few taps.
14. Osiris Cinematic LUTs
For making travel or advertisement videos more high quality, you can use this Premiere Pro cinematic presets. It can make all types of videos more visually appealing and can add cinematic looks to it. Moreover, this LUT allows you to upscale all the visuals and characters in the video.
15. Finishing LUTs
To add eye-catching finishing effects to the videos, you can use the Finishing LUTs. This can enhance the end-of-color grading procedure for you. It can also add a more contrast and color-friendly look to the ends. You can use it for TV series, films, music, and other videos.
Bonus Part: Wondershare Filmora – A Great Alternative To Discover Cinematic LUTs
Undoubtedly, you can use the cinematic LUTs for Premiere Pro, yet sometimes it can be a tricky platform. Thus, you need to know the best alternative to Premiere Pro so you can apply LUTs to your videos in an optimized manner. The best tool that can help you with this is Wondershare Filmora . You can experience professional-level video editing with this.
Add LUTs on Video For Win 7 or later(64-bit)
Add LUTs on Video For macOS 10.14 or later
Moreover, you can apply LUTs to the videos and can also adjust their intensity as per your need. Above all, it can help you to apply LUTs to several types of videos, such as landscapers or short videos. It also supports the LUTs hover, which lets you preview the LUTs effects .
Prominent Features of Wondershare Filmora
- With its Color Wheel, you can adjust every color metric of video. It can include mid-tones, shadows, hue, and more.
- Along with color customization, you can also sharpen the blur videos to improve the quality of your video.
- You can also control the speed ramping of your video with Filmora. It can also do motion tracking for you.
- By using the batch edit feature, you can edit multiple videos at once without compromising the quality.
Conclusion
Considering everything, you can use the cinematic LUTs for Premiere Pro to upgrade the functionality of your video. The LUTs are available in several file formats, which are mentioned above. Moreover, several editing software can help you to import and apply LUTs on photos and videos. One of the popular ones is Premiere Pro.
Other than this, the best Premiere Pro cinematic LUTs are also discussed above for your ease. Yet, if you find the Premiere Pro difficult, you can use its best alternative named Wondershare Filmora. To find out more about Filmora, go to the previous part.
Add LUTs on Video For Win 7 or later(64-bit)
Add LUTs on Video For macOS 10.14 or later
Right Tools for Converting 60FPS Frame Rate in Videos
One of the primary things that differentiate a good video from a low-quality one is its frame rate or burst rate. This refers to the frequency of a series of images or frames consecutively appearing during display. A low frame rate per second or FPS causes issues in most display screens, so you will need a 60 FPS video converter to update it.
You need to convert or make video 60FPS online through tools and software to improve the sharpness of frame speed and make it suitable for streaming sites like YouTube that play 60FPS only or create UHD/4K videos. Plus, most high-definition screens for gaming, computers, tablets, and smartphones require high FPS.
This article will teach you the best solutions to make the conversion possible. Choose your option after a full evaluation.

Part I. What does 60 FPS mean?
Before discussing the best tools available for frame rate conversion, you should know what frame rate is. Also known as update rate, this signifies the frequency of the display of consecutive series of frames or images. The speed of how they appear determines the fluid play of the video with no interruption or lag.
In the context of video and film cameras, motion capture systems, and computer graphics, you should try to convert video to 60FPS. There are multiple types available, like the low 24FPS or 30FPS or the higher 60FPS or 120FPS. 60FPS is the most accepted option for diverse operating systems, screens, and graphics.
Differences between 24FPS, 30FPS, and 60FPS
Here are the differences you will note between the three common frame rates per second in videos. For a simple overview, these differences are expressed in tabular form.
| 24FPS | 30FPS | 60FPS | |
|---|---|---|---|
| Description | This universally acceptable frame rate choice is used for transferring video signals to film. | 30FPS is a slightly higher frame rate choice for animations and show videos that are suitable for television viewing and online platforms. | Videos at 60FPS have better fluency and smoother definition, with sharp videos that work during gaming, high-definition streaming, and UHD/4K video editing. |
| Types of videos | Older videos and films. | Online videos, TV shows, and news. | HD-quality movies, online videos, and games. |
| Users | Movie suppliers | Entertainment and Media professionals. | Movie producers, video editors, gaming software developers, etc. |
Why Should You Convert Videos into 60FPS?
In the context of video FPS, the three variations- 30FPS, 60FPS, and 24FPS are the most common. However, there are specific reasons why 60FPS is the best option you should use, and take the time to convert your files with this frame rate.
- Playing 24FPS or 30FPS videos on LCD screens have more prominent motion blur, the sharpness of transition is low and rough, etc.
- Well-known streaming sites like YouTube set their standard for videos at 60FPS. If you use a file with a higher FPS, it will compress to 60FPS automatically. Anything lower than that is unacceptable since it creates a laggy video transition.
- Creating high-quality movies in UHD or 4K resolution requires a high FPS like 60FPS. Movies shot with 24FPS do not assure the best display in the native frame rate and need pulldown conversion. This causes judder, which affects video quality. Converting the video to 60fps ai online is a better choice.
- Modern devices like computers, smartphones, and tablets have a high refresh rate. So, these, including some gaming monitors and television varieties, accept videos with 60FPS best.
- In animation, most creators run 3-4 images per drawing, which means 6 or 8 drawings per second. For the best transition between shorts and images, converting the animation videos to 60FPS is useful.
If you want to know more about these FPS options and which one to select for long-term usage, read through the comprehensive review .
Part II. How to convert A Video to 60fps?
If you plan to use a 60fps video converter, luckily, multiple capable choices are available in the market. Here, we present the top options you can use with an accurate conversion that occurs quickly and with limited errors.
1. Best Software Converters
The following are the best software-based platforms that you can try out.
One notable ai 60fps converter that users find extremely useful all around for optimized video editing is Wondershare UniConverter. The tool comes with varying AI-powered tools you can try to change.
With this software, you can easily make changes to the file during the conversion, like upgrading the FPS and bitrate of various video codecs, adjusting the contrast, contrast, etc., for output. Plus, it is possible to change the speed of the videos you are editing through the Editing timeline, between 0.25X - 3X speed options.

- User Base: Professional video editors, social media vloggers, businesses, students, beginner-level users, etc.
Watch this video to get a visual representation of how the tool works for FPS conversion and other editing functions.
How to use Wondershare UniConverter for converting FPS?
Step1 Download and launch the Wondershare UniConverter software on your device after completing all installation steps.
Step2 Click or drag and drop the video file of which you will change the frame rate.

Step3 To make changes to the video, click the Edit button and do them- like speed change, cutting sections, etc.
Step4 Then press the Settings button. Choose the Video option and then select the format like MP4.
Step5 Tap the setting icon beside the format choice and set the frame rate option as 60FPS. Then, press the Create button.

Step6 To convert the file further, click the Convert button and choose the destination file format. Press Convert.

Features:
- Convert between different file formats.
- Edit or split the files.
- Change the speed of the video between various speed modes.
- Download files at high resolution as per customization.
Pros
- Easy to use for non-technical users.
- The free software includes most of the conversion functions.
- Zero quality loss or lagging FPS playthrough in the converted file.
Cons
- GPU acceleration and High-Speed Conversion are available for Pro users only.
- You can resize the file for social media platforms like YouTube once using the Free Trial version.
Another FPS video maker and converter tool that you must try is Format Factory. This professional-quality video and audio converter tool are useful for various levels of video editing, including specifications like the frame rate per second.
You can clip and join your video section and do audio mixing steps. Easily adjust your video frame speed to ensure top-grade video playback with limited to no resolution loss. You can easily set the frame rate to 60FPS after downloading YouTube videos and making adjustments.

Pros
- Compress file size with settings changes for frame rate.
- Supports different video formats.
- Compatible with HEIC and WEBP formats for conversion.
Cons
- Only suitable for Windows users.
- Slightly complex to try for beginner-level users.
One of the best 60fps video editor options available in the market is MiniTool Video Converter. This Windows-based native software can make multiple advanced changes to your video file during conversion. Not to mention, it supports quick batch processing, with zero drop in quality after the process.
You can easily change the frame rate speed to 60FPS or other speed options during the exporting process. Adding effects will maintain a strong frame rate frequency that you can also preview.

Pros
- Supports a variety of video formats for conversion.
- Batch conversion is supported here.
- No loss of quality when you change the frame rate or bitrate.
Cons
- The process will lag if there is not at least 1 GB of free storage space in your device.
- Only works on Windows devices.
2. Best Online Converters
If you want to use a 60fps video converter online, there are tools available for that as well. These converters come with limited advanced mechanisms or features. However, in terms of changing the FPS of videos, web-based tools are easier to operate and do straightforward tasks.
Plus, you will not need to register or download third-party software here- the tools are accessible through any browser or device.
1) AI Video Frame Rate Converter
One of the best tools for online video frame rate conversion is the AI Video Frame Rate Converter. With this online tool, you can easily insert your file into the tool you access on any browser of your choice.
Then, choose the conversion FPS like 60FPS for your video and get high-resolution video quality in the final file. The software does not keep the file on the server, which assures good privacy protection for users with their files and data.

Pros
- No need to install the software.
- Easily choose the FPS option to convert the file.
- The quick conversion process.
Cons
- The free version only allows 5 credits for users to try.
- No tools to enhance video quality with the free tool.
2) Video2Edit
Another top 60fps converter online that users should give a chance is Video2Edit. This tool is accessible through any web browser and allows one to change various aspects of the video they are converting, including the frame rate.
You can choose 60FPS as the target frame rate choice for the video that you add to your device’s tool. It also supports 120FPS and other options lower than 60FPS- the final converter file is still a high definition.

Pros
- Choose the frame rate per second for your video.
- Make settings changes for your video audio additionally.
- The tool is easily accessible and free to use.
Cons
- You have to take more steps for customization instead of directly getting the FPS changing option.
- Cannot convert multiple files simultaneously.
3) Aconvert
Users can try out this online video to 60fps converter to change elements of videos quickly during conversion. You can insert your file from a cloud account, device, or URL and choose the video format to convert.
Plus, it is much easier to directly set the frame rate you want to change in the video. This tool supports up to 60FPS for the change, and you can choose a custom FPS if necessary.

Pros
- Can convert video codec settings like bitrate, etc., for different file formats.
- Easily add a file from the device, URL, or cloud.
- Quick processing speed for the conversion.
Cons
- No batch conversion for multiple files.
- Big files can get slow to convert.
Bonus Tip. Use Wondershare Filmora to Create High-Quality Videos with 60FPS Support
If you plan to make further edits to your video clips and directly create a project with 60FPS support, using a capable 60fps maker software is necessary. Wondershare Filmora is suitable software for video editing professionals and regular users to try to make videos easily.
Free Download For Win 7 or later(64-bit)
Free Download For macOS 10.14 or later
You can use the different features available for quick and customized video projects. Here, you can try the Instant Mode feature for instantaneous video edits or directly try out the editor timeline with diverse features like Edit icon or Speed Ramping to make changes. As for adjusting the frame rate, you can make those changes during export.
Watch this video to know how to use Filmora for further video editing.
How to Change Frame Rate to 60FPS in Filmora?
Step1 After you have completed all of the edits, click on the Export button in the editor timeline of Filmora.
Step2 Choose the output format you will download the video file, e.g., MP4, from the Local tab.

Step3 Click on the Settings button. Adjust the specification of the video, like frame rate, and change to 60FPS. Make other changes if needed, and press OK.

Step4 Click on Export to download the file or directly upload it via Vimeo or YouTube through those tabs.
Conclusion
Indeed, adjusting the frame rate of your video will help you create high-quality videos with a fluid and lag-less transition. You should convert your file to 60FPS if it is a lower version at the time to improve sharpness and make it compatible with most screen types, 4K movie playing, and streaming.
Use the available online and native software options to make these changes quickly and efficiently. Additionally, if you want to create a file directly at 60FPS, you can do so using Filmora.
Give these tools a try first to get a better experience with the features and process.
Why Should You Convert Videos into 60FPS?
In the context of video FPS, the three variations- 30FPS, 60FPS, and 24FPS are the most common. However, there are specific reasons why 60FPS is the best option you should use, and take the time to convert your files with this frame rate.
- Playing 24FPS or 30FPS videos on LCD screens have more prominent motion blur, the sharpness of transition is low and rough, etc.
- Well-known streaming sites like YouTube set their standard for videos at 60FPS. If you use a file with a higher FPS, it will compress to 60FPS automatically. Anything lower than that is unacceptable since it creates a laggy video transition.
- Creating high-quality movies in UHD or 4K resolution requires a high FPS like 60FPS. Movies shot with 24FPS do not assure the best display in the native frame rate and need pulldown conversion. This causes judder, which affects video quality. Converting the video to 60fps ai online is a better choice.
- Modern devices like computers, smartphones, and tablets have a high refresh rate. So, these, including some gaming monitors and television varieties, accept videos with 60FPS best.
- In animation, most creators run 3-4 images per drawing, which means 6 or 8 drawings per second. For the best transition between shorts and images, converting the animation videos to 60FPS is useful.
If you want to know more about these FPS options and which one to select for long-term usage, read through the comprehensive review .
Part II. How to convert A Video to 60fps?
If you plan to use a 60fps video converter, luckily, multiple capable choices are available in the market. Here, we present the top options you can use with an accurate conversion that occurs quickly and with limited errors.
1. Best Software Converters
The following are the best software-based platforms that you can try out.
One notable ai 60fps converter that users find extremely useful all around for optimized video editing is Wondershare UniConverter. The tool comes with varying AI-powered tools you can try to change.
With this software, you can easily make changes to the file during the conversion, like upgrading the FPS and bitrate of various video codecs, adjusting the contrast, contrast, etc., for output. Plus, it is possible to change the speed of the videos you are editing through the Editing timeline, between 0.25X - 3X speed options.
- User Base: Professional video editors, social media vloggers, businesses, students, beginner-level users, etc.
Watch this video to get a visual representation of how the tool works for FPS conversion and other editing functions.
How to use Wondershare UniConverter for converting FPS?
Step1 Download and launch the Wondershare UniConverter software on your device after completing all installation steps.
Step2 Click or drag and drop the video file of which you will change the frame rate.
Step3 To make changes to the video, click the Edit button and do them- like speed change, cutting sections, etc.
Step4 Then press the Settings button. Choose the Video option and then select the format like MP4.
Step5 Tap the setting icon beside the format choice and set the frame rate option as 60FPS. Then, press the Create button.
Step6 To convert the file further, click the Convert button and choose the destination file format. Press Convert.
Features:
- Convert between different file formats.
- Edit or split the files.
- Change the speed of the video between various speed modes.
- Download files at high resolution as per customization.
Pros
- Easy to use for non-technical users.
- The free software includes most of the conversion functions.
- Zero quality loss or lagging FPS playthrough in the converted file.
Cons
- GPU acceleration and High-Speed Conversion are available for Pro users only.
- You can resize the file for social media platforms like YouTube once using the Free Trial version.
Another FPS video maker and converter tool that you must try is Format Factory. This professional-quality video and audio converter tool are useful for various levels of video editing, including specifications like the frame rate per second.
You can clip and join your video section and do audio mixing steps. Easily adjust your video frame speed to ensure top-grade video playback with limited to no resolution loss. You can easily set the frame rate to 60FPS after downloading YouTube videos and making adjustments.
Pros
- Compress file size with settings changes for frame rate.
- Supports different video formats.
- Compatible with HEIC and WEBP formats for conversion.
Cons
- Only suitable for Windows users.
- Slightly complex to try for beginner-level users.
One of the best 60fps video editor options available in the market is MiniTool Video Converter. This Windows-based native software can make multiple advanced changes to your video file during conversion. Not to mention, it supports quick batch processing, with zero drop in quality after the process.
You can easily change the frame rate speed to 60FPS or other speed options during the exporting process. Adding effects will maintain a strong frame rate frequency that you can also preview.
Pros
- Supports a variety of video formats for conversion.
- Batch conversion is supported here.
- No loss of quality when you change the frame rate or bitrate.
Cons
- The process will lag if there is not at least 1 GB of free storage space in your device.
- Only works on Windows devices.
2. Best Online Converters
If you want to use a 60fps video converter online, there are tools available for that as well. These converters come with limited advanced mechanisms or features. However, in terms of changing the FPS of videos, web-based tools are easier to operate and do straightforward tasks.
Plus, you will not need to register or download third-party software here- the tools are accessible through any browser or device.
1) AI Video Frame Rate Converter
One of the best tools for online video frame rate conversion is the AI Video Frame Rate Converter. With this online tool, you can easily insert your file into the tool you access on any browser of your choice.
Then, choose the conversion FPS like 60FPS for your video and get high-resolution video quality in the final file. The software does not keep the file on the server, which assures good privacy protection for users with their files and data.
Pros
- No need to install the software.
- Easily choose the FPS option to convert the file.
- The quick conversion process.
Cons
- The free version only allows 5 credits for users to try.
- No tools to enhance video quality with the free tool.
2) Video2Edit
Another top 60fps converter online that users should give a chance is Video2Edit. This tool is accessible through any web browser and allows one to change various aspects of the video they are converting, including the frame rate.
You can choose 60FPS as the target frame rate choice for the video that you add to your device’s tool. It also supports 120FPS and other options lower than 60FPS- the final converter file is still a high definition.
Pros
- Choose the frame rate per second for your video.
- Make settings changes for your video audio additionally.
- The tool is easily accessible and free to use.
Cons
- You have to take more steps for customization instead of directly getting the FPS changing option.
- Cannot convert multiple files simultaneously.
3) Aconvert
Users can try out this online video to 60fps converter to change elements of videos quickly during conversion. You can insert your file from a cloud account, device, or URL and choose the video format to convert.
Plus, it is much easier to directly set the frame rate you want to change in the video. This tool supports up to 60FPS for the change, and you can choose a custom FPS if necessary.
Pros
- Can convert video codec settings like bitrate, etc., for different file formats.
- Easily add a file from the device, URL, or cloud.
- Quick processing speed for the conversion.
Cons
- No batch conversion for multiple files.
- Big files can get slow to convert.
Bonus Tip. Use Wondershare Filmora to Create High-Quality Videos with 60FPS Support
If you plan to make further edits to your video clips and directly create a project with 60FPS support, using a capable 60fps maker software is necessary. Wondershare Filmora is suitable software for video editing professionals and regular users to try to make videos easily.
Free Download For Win 7 or later(64-bit)
Free Download For macOS 10.14 or later
You can use the different features available for quick and customized video projects. Here, you can try the Instant Mode feature for instantaneous video edits or directly try out the editor timeline with diverse features like Edit icon or Speed Ramping to make changes. As for adjusting the frame rate, you can make those changes during export.
Watch this video to know how to use Filmora for further video editing.
How to Change Frame Rate to 60FPS in Filmora?
Step1 After you have completed all of the edits, click on the Export button in the editor timeline of Filmora.
Step2 Choose the output format you will download the video file, e.g., MP4, from the Local tab.
Step3 Click on the Settings button. Adjust the specification of the video, like frame rate, and change to 60FPS. Make other changes if needed, and press OK.
Step4 Click on Export to download the file or directly upload it via Vimeo or YouTube through those tabs.
Conclusion
Indeed, adjusting the frame rate of your video will help you create high-quality videos with a fluid and lag-less transition. You should convert your file to 60FPS if it is a lower version at the time to improve sharpness and make it compatible with most screen types, 4K movie playing, and streaming.
Use the available online and native software options to make these changes quickly and efficiently. Additionally, if you want to create a file directly at 60FPS, you can do so using Filmora.
Give these tools a try first to get a better experience with the features and process.
Turn Your Blog Content Into Audio Podcasts to Reach a Wider Audience and Increase Reader Participation
Being a content creator, either writing or generating videos, requires podcast text-to-speech knowledge. The impact of content depends on how many people see it. It means finding new ways to get it into real and virtual places where customers and users might be.
Depending on the context, podcasting can be a perfect alternative for sharing content.
This article will address your questions about the easiest way to turn a blog into a podcast. Let’s begin with the reasons why you should do a podcast.
Part 1. Why You Should Podcast
Podcasts are one of the simplest and most cost-effective ways. It helps to advertise yourself and your products to a highly targeted audience. Podcasts are also excellent for engaging with potential clients interested in your content. In your field, you can achieve fame and expertise.

Repurposing of Content
Podcasters can maximize their potential for successful episodes and repurposing their podcast into multiple content pieces.
This podcasting strategy can help you reach more people by putting your podcasts on more channels and engaging more people who might be interested.
More Fulfilling than Articles
Unlike music, news, TV, and social media, podcast listeners don’t have to watch the screen like they do with YouTube videos or TV shows. This means they can listen while walking or driving home from work.
Podcasts are the best way to get people to pay attention and make fundamental societal changes. They can keep people interested for a long time, so you can go into detail and get personal without turning off your audience.
Minimal Start-Up Costs
To start a podcast, you can spend a little money. Even some of the most famous podcasts use a microphone, a computer, and software for recording. But it’s common to spend more money on advertising and better hosting.
Starting a podcast doesn’t cost much, as you can get everything you need for about $145.
Expansion of Search Potential
In the past few years, many big brands and small to medium-sized businesses have started using podcasts as a marketing strategy. This is because podcasts are becoming more and more popular and can help raise your company’s profile.
Podcasting is another way to disseminate your study to a broader audience, whether that audience consists of policymakers or interested citizens.
Potential to Monetize
Using an affiliate program podcast, you can earn money. Businesses can increase their income by offering paid advertising sponsorships to monetize podcasts. Suppose you accept an affiliate offer to sell ads. In that case, you become the company’s voice and put recorded ads in your podcast episodes.
The most common way to make money from a podcast is through sponsorship. It’s also the easiest way to make money because you don’t have to make or sell anything. You just have to make a deal with a sponsor.
Part 2. Why Are Writers Hesitant to Start a Podcast?
Even after knowing all these benefits, writers are still hesitant to start a podcast. One of the main reasons a writer may be reluctant to launch a podcast is the cost of the necessary equipment. You will need at least $80 to $500 for this unpromissing business.
However, let me tell you a secret that many podcastors didn’t buy any audio equipment for the launch of their podcast channel on Spotify.
Moreover, many writers don’t want to show their voice through recordings. This is because they couldn’t just make a recording and hand it off to a sound specialist. Besides, finding their voice through the stories they write is the routine.
But we all need to get the truth that many podcastors don’t record a single word of the podcast with their own voice. Due to a solution: text-to-speech, technology like this has been around for a while and continues to improve.
The two important issues have been solved, so what are you waiting for? Platform building has always relied heavily on content marketing. With blog posts and social media, additional support was provided, and now podcasts are becoming more commonplace.
Part 3. How to Turn a Text Into a Podcast?
Text To Speech
To turn your text into audible content, Text-to-speech (TTS) is an assistive technology. With a single click, TTS reads your written text aloud. Many people also use it for writing and editing to maintain audience concentration.
Text-to-speech technology is compatible with all digital devices, including computers, tablets, and smartphones. Increasing numbers of websites and products now have developed this function. For example, you can find it within the trusted video editing software like Filmora. With Filmora’s Text to Speech (TTS) feature , you may add extra aspects to your video by turning your text files into voiceovers.
Free Download For Win 7 or later(64-bit)
Free Download For macOS 10.14 or later
Why we regard text to speech as a good
For writers, imagination is the only tool to construct their stories. To bring our stories to life, all we need is a laptop. The same holds for text-to-speech technologies, which can significantly assist writing and editing by allowing the author to hear their words without using their voice.
- Text-to-speech applications can assist you in repurposing your material.
Your written work can be converted into spoken language or a podcast. A podcast can be converted into a YouTube video with a few alterations. All of these factors can help you reach new audiences.
Repurposing material permits your audience to consume it in a variety of ways. The audience can read, listen to, or view your content.
- Text-to-speech systems enable authors to create information that is accessible.
As per World Health Organization, there are almost 285 million visually impaired persons and 39 million blind people. We writers can create a more inclusive world by constantly keeping accessibility in mind.
The limitations of text to speech
Text-to-speech software is becoming increasingly lifelike thanks to technological advancements. However, it cannot still express genuine human emotions. However, this should allow you to utilize these tools. The positives significantly exceed the disadvantages, and technology is continually improving.
Easiest Fix: Turn Texts Into Podcasts With TTS in Filmora
So how can you use text-to-speech? Andhow you can turn your texts into audio podcasts in a daily routine? Filmora, a all-in-one video editor, gets you the solution.
Step1 Download and install Filmora on your PC or Mac.

Step2 Open Filmora and select the video on which you wish to add audio.

Step3 After adding your selected video, select the option “Titles” to add text to your video.

Step4 Select your favorite position for text in the video, like “lower third,” which is used the most in video titles.

Step5 Add text to the timeline and click “Ok.” You can move the red timeline marker if you want your text in a certain spot.

Click the “+” button marked in the picture below to add text.

You can also edit the text by changing its style, color, and font or by animating it.

Step6 Press the “Text-to-Speech” button in the lower right side and choose your preferred voice. For example, Lilly’s voice resembles Siri.

You can also choose another language other than English.

Click “Ok” once you’ve selected everything according to your requirements.
Step7 Once the transcription is completed, go ahead and test the video and audio to see if it’s synching.

And that’s done. This is how easy it is to turn your texts into speech using Filmora.
Part 4. Hot FAQs on Podcast Text to Speech
How do I convert podcasts to text?
With the help of the smartphone app Google Recorder you can easily convert podcasts to texts for free.
- Open the app on your phone, start recording to it, and start recording your podcast simultaneously.
- The words will be automatically recorded and entered into the application as you talk into your phone’s microphone.
- After you click stop on the app, you can store and share the files once you finish your recording.
You have an option of sharing the text, the audio, or both. Alternatively, you can save them to your Google Drive if you don’t want to share them.
How to turn my podcast into a sound?
To convert your video podcasts into audio through Filmora. Follow these steps:
- Drag the imported video from the media library into the video timeline.
- To extract the audio from the video, right-click the video clip and select “Audio Detach.”
- After a while, audio and video will be seen on separate tracks.
Can I save the sound after converting text to speech?
Once the text has been converted to speech, you can save the sound. Select your preferred format after clicking the “export” option in Filmora.
Conclusion
Many of us wish to launch a podcast and blog. A productive podcast’s essence is turning writing into audio using various podcasting techniques. AI-powered text-to-speech softwares can quickly convert articles into podcasts. Or, you can invite significant people to your podcast to personalize it. Podcasting can give outdated content a new life.
Free Download For macOS 10.14 or later
Why we regard text to speech as a good
For writers, imagination is the only tool to construct their stories. To bring our stories to life, all we need is a laptop. The same holds for text-to-speech technologies, which can significantly assist writing and editing by allowing the author to hear their words without using their voice.
- Text-to-speech applications can assist you in repurposing your material.
Your written work can be converted into spoken language or a podcast. A podcast can be converted into a YouTube video with a few alterations. All of these factors can help you reach new audiences.
Repurposing material permits your audience to consume it in a variety of ways. The audience can read, listen to, or view your content.
- Text-to-speech systems enable authors to create information that is accessible.
As per World Health Organization, there are almost 285 million visually impaired persons and 39 million blind people. We writers can create a more inclusive world by constantly keeping accessibility in mind.
The limitations of text to speech
Text-to-speech software is becoming increasingly lifelike thanks to technological advancements. However, it cannot still express genuine human emotions. However, this should allow you to utilize these tools. The positives significantly exceed the disadvantages, and technology is continually improving.
Easiest Fix: Turn Texts Into Podcasts With TTS in Filmora
So how can you use text-to-speech? Andhow you can turn your texts into audio podcasts in a daily routine? Filmora, a all-in-one video editor, gets you the solution.
Step1 Download and install Filmora on your PC or Mac.
Step2 Open Filmora and select the video on which you wish to add audio.
Step3 After adding your selected video, select the option “Titles” to add text to your video.
Step4 Select your favorite position for text in the video, like “lower third,” which is used the most in video titles.
Step5 Add text to the timeline and click “Ok.” You can move the red timeline marker if you want your text in a certain spot.
Click the “+” button marked in the picture below to add text.
You can also edit the text by changing its style, color, and font or by animating it.
Step6 Press the “Text-to-Speech” button in the lower right side and choose your preferred voice. For example, Lilly’s voice resembles Siri.
You can also choose another language other than English.
Click “Ok” once you’ve selected everything according to your requirements.
Step7 Once the transcription is completed, go ahead and test the video and audio to see if it’s synching.
And that’s done. This is how easy it is to turn your texts into speech using Filmora.
Part 4. Hot FAQs on Podcast Text to Speech
How do I convert podcasts to text?
With the help of the smartphone app Google Recorder you can easily convert podcasts to texts for free.
- Open the app on your phone, start recording to it, and start recording your podcast simultaneously.
- The words will be automatically recorded and entered into the application as you talk into your phone’s microphone.
- After you click stop on the app, you can store and share the files once you finish your recording.
You have an option of sharing the text, the audio, or both. Alternatively, you can save them to your Google Drive if you don’t want to share them.
How to turn my podcast into a sound?
To convert your video podcasts into audio through Filmora. Follow these steps:
- Drag the imported video from the media library into the video timeline.
- To extract the audio from the video, right-click the video clip and select “Audio Detach.”
- After a while, audio and video will be seen on separate tracks.
Can I save the sound after converting text to speech?
Once the text has been converted to speech, you can save the sound. Select your preferred format after clicking the “export” option in Filmora.
Conclusion
Many of us wish to launch a podcast and blog. A productive podcast’s essence is turning writing into audio using various podcasting techniques. AI-powered text-to-speech softwares can quickly convert articles into podcasts. Or, you can invite significant people to your podcast to personalize it. Podcasting can give outdated content a new life.
Also read:
- 2024 Approved How to Color Correct in OBS
- 2024 Approved Want to Speed up Your Video to Shorten Its Duration and Make It More Entertaining? Here Is How to Speed up Videos in Final Cut Pro. Get a Better Alternative to FCP to Speed up Videos
- Updated 2024 Approved How to Add Motion Titles
- New 10 Best Music Video Templates to Make Your Video Popular for 2024
- 2024 Approved Easy Guide to Apply Slow Zoom Effects to Videos
- In 2024, Do You Want to Make TikTok Videos More Elemental by Using Countdown but Dont Know How to Do This? Here We Will Thoroughly Guide You About This
- How To Create The Best AI Thumbnail Using The Right Tools?
- How to Turn On/Off Motion Blur in Dying Light 2 for 2024
- New In 2024, How to Perfect Quick and Efficient Video Editing | Keyboard Shortcuts in Filmora
- New In 2024, How to Start a Vlog
- Updated In 2024, Ideas to Make A Perfect Café Vlog
- New Progressive Solutions to Add VHS Effects to Video with Ease
- New 2024 Approved 10 Best Camera for YouTube Beginners
- Updated How to Make a Slow Motion Video in Wondershare Filmora for 2024
- In 2024, Mastering Video Speed Control Slow Down, Speed Up, and Edit with Ease
- A Comprehensive Guide on VHS Technology and Its Influence on Video Editing for 2024
- 2024 Approved If You Do Not Know How to Blur Faces in a Video on iPhone, You Are in the Right Place. We Have Provided You with All the Details You Need to Learn How to Blur Part of Your Video on Your iOS Device
- Discover 8 Top-Rated Video and Photo Merger Tools for Desktop, Mobile, and Online Use. Elevate Your Media Game and Create Stunning Visuals with Ease
- Updated Free LUTs for OBS How to Use Them, In 2024
- How to Use LUTs in VN Editor – Complete Guide and Best LUTs Download
- 6 Websites to Free Download Motivational Video Footage for 2024
- 2024 Approved How to Put a Background on A Green Screen
- Updated How to Add Text to Video
- Updated 2024 Approved 4 Ways to Merge MP4 and MP3
- New Are You Looking to Make Subscribe Channel Graphics? Here Is a Complete Guide on How to Make One on Your Own
- In 2024, How To Stream Anything From Honor Magic 6 Pro to Apple TV | Dr.fone
- In 2024, How to Mirror Apple iPhone 11 Pro Max to Other iPhone? | Dr.fone
- In 2024, How to Unlock Vivo S17t Pattern Lock if Forgotten? 6 Ways
- In 2024, How to Come up With the Best Pokemon Team On Vivo Y78+ (T1) Edition? | Dr.fone
- How to recover deleted photos from Android Gallery without backup on Honor 90 GT
- How to Remove an AirTag from Your Apple ID Account On iPhone 15?
- In 2024, How Can I Create My Pokemon Overworld Maps On Apple iPhone SE (2020)? | Dr.fone
- How to Factory Reset Infinix Smart 8 HD without Losing Data | Dr.fone
- Updated 2024 Approved How to Create a YouTube Intro Animation Like a Pro
- In 2024, Ways to trade pokemon go from far away On Apple iPhone 15 Plus? | Dr.fone
- How to Unlock Vivo S18e Phone without PIN
- How to Unlock Xiaomi Redmi 13C Phone without PIN
- In 2024, Fuel Creativity with 10 Awesome Collection of 2D Animation Examples
- In 2024, 5 Ways To Teach You To Transfer Files from Xiaomi Redmi A2 to Other Android Devices Easily | Dr.fone
- How to Rescue Lost Messages from Honor 80 Pro Straight Screen Edition
- How to Fix iPhone 6s Stuck at attempting data recovery Loop | Stellar
- Remove Google FRP Lock on Honor 100
- Title: Adobe After Effects Review for 2024
- Author: Chloe
- Created at : 2024-05-20 03:37:50
- Updated at : 2024-05-21 03:37:50
- Link: https://ai-editing-video.techidaily.com/adobe-after-effects-review-for-2024/
- License: This work is licensed under CC BY-NC-SA 4.0.
