
:max_bytes(150000):strip_icc():format(webp)/frenchopen-4d320297828b413f84f9940d5bd258f9.jpg)
And when It Comes to Voice Changers for Discord, None Is as Easy to Operate as the Voicemod. Here Is a Detailed Guide About How to Use Voicemod on Discord on Mobile and Desktop Devices
And when It Comes to Voice Changers for Discord, None Is as Easy to Operate as the Voicemod. Here Is a Detailed Guide About How to Use Voicemod on Discord on Mobile and Desktop Devices
Powerful Video Editor - Wondershare Filmora
Provide abundant video effects - A creative video editor
Powerful color correction and grading
Detailed tutorials are provided by the official channel
Introduction
In today’s world, these voice-changing tools are in use by a lot of online gamers for them to remain anonymous on popular game streaming platforms like Twitch. However, we are more focused on Discord in this article. With everything that’s happening in the world today, voice changers can be used for good or can be misused, depending on who is using them. However, we promote such tools for the immerse benefits they offer users as we do not condone the suggestive use of such devices.
Therefore, in a bid to rave about this phenomenal voice-changing tool, we will talk about the best voice changer for Discord which is Voicemod.
Voicemod is an excellent tool with an impressive list of voice filters at its disposal. With this tool, users can choose from a wide range of voice effects that can have both fun and practical uses. Also, if you are looking to use the tool like a robot, Voicemod can help you do that. The tool is spectacularly easy to use, free across all Windows platforms, and operates in real-time. Additionally, the software can work on Skype, Twitch, and other online chat or streaming platforms.
In this article
01 How to Use Voicemod Voice Changer for Discord on Desktop (Win+Mac)?
02 How to Use Voicemod Voice Changer for Discord on Mobile (Android+iPhone)?

Part 1: How to Use Voicemod Voice Changer for Discord on Desktop (Win+Mac)?
Voicemod Discord works for Windows and Mac operating systems smoothly. Its new Mac OS version is on its way, and you can choose to get notified once it launches.
With a voice changer for Discord, you can add sound effects and change your voice in your communication. You can download this free application on your Windows 10/11 (64-bit) desktop. Its 90 different voices and effects integrate perfectly with Discord to give you strict and most efficient performance.
Now that you know about Voicemod, explore how to use Voicemod on Discord for Desktop.
Step 1: Install Voicemod
Before jumping straight to how we can use Discord for Desktop, we must first know how to install it on our Windows and Mac PC. Here is how to install Voicemod:
- First of all, visit the Voicemod website to start the download process.
- Next, you will see the “Get Voicemod Free” screen. Click it!
- After clicking, you will need to sign in to your account from Discord, Twitch, to Google. Make sure you use your Discord login details to sign in.
- After signing in, the “.exe” file will download to your Windows and Mac download folder. Open it.
- Then an install wizard opens. Navigate through it to install the program on your Windows and Mac computer.
- After complete installation, the installation wizard will ask you to restart your Windows’ or Mac computer.
- However, you can skip the restart process, but it’s best to restart it for smooth operations. Once your Mac or Windows computer restarts, you will see the Voicemod application icon on your desktop screen.
Step 2. Go to Settings>Voice and Video
To configure Voicemod with Discord, open your discord account and go to the settings option located in the screen’s bottom-left corner. Then tap on the “Voice and Video” option right under the app settings.
Step 3. In the “Input Device” section, Choose “Microphone Voicemod Virtual Audio.”
To make Voicemod usable, you are required to change the Voice settings. So, navigate within the “Input Device” option and select the option that says “Microphone Voicemod Virtual Audio.” Once the audio setting changes, it makes it easy for you to change the voice within the program. Also, other users can hear your audio alteration.
Step 4. Choose Your Favorite Voice
In the “basic version,” you have the authorization to change seven free voice choices each day. In addition, with the “pro-version,” you have access to more than 80 different voice options.
Therefore, if you are looking for a simple and easy Windows and Mac application, do not look further than Voicemod!

Part 2: How to Use Voicemod Voice Changer for Discord on Mobile (Android+iPhone)?
“Voicemod clips” is the version that is available for both Apple and Android devices. The application help users to make very high-quality content using its wide selection of one-of-a-kind effects that will change your voice so that you won’t even recognize yourself. Additionally, you can add filters connected to your cell phone’s camera to create hilarious, exciting videos. Also, you get the option to select from 10 different voices, and you can also make infinite videos and audio from the humorous to the terrifying.
Some of the Voicemod for Discord voices that are available on mobile devices include;
- Male-to-female
- Different robot effects
- Celebrities
- Scary voices, etc.
Also, the changes are on how you would like to modify your voice. It can also be cross-share to popular social networking platforms such as Facebook, Twitter, Instagram, TikTok, and Snapchat using your smartphone.
Here are step-by-step instructions:
Step 1: Download Voicemod for Mobile
Ensure you have downloaded the Voicemod application on your Android and iPhone and appropriately configured it. To configure, follow the step below;
- Open it to set your profile using Discord. Additionally, you can view all the different filters for videos and available voices.
- Also, you can decide the type of content you want to create, whether it is a video clip or audio.

Step 2: Access Sound Effects
Open Discord and tap the “cogwheel icon” near your name and avatar. You will see a “settings” page located within it. Tap the “Voice & Video” option. Then under the “Input Device” option, select Voicemod and the headset under the “Output Device” option and tap escape. Then you will have access to numerous exciting sounds.

Finally, add your favorite effect, save and start using your new enhanced voice from Voicemod Discord.
Part 3: People Also Want to Know
This section will look at some basic questions about Voicemod Discord that appeared in Q&A forums.
Is Voicemod safe for Discord?
Yes, Voicemod is safe, but you must download it from its official website or the Google Playstore and Apple’s App Store, as there are many cracked versions of Voicemod online.
Is there a voice changer for Discord?
Yes, a voice changer for Discord and Voicemod is known to be the best. It is an advanced and easy-to-use voice changer that allows you to sound like a man, woman, robot, or anything else you can ever imagine.
Key Takeaways from This Episode
Thus, as you saw, in this report, we have summarised a few essential points that you should know regarding Voicemod Discord. You learned:
- The best voice changer for Discordis Voicemod
- How to use Voicemod for Windows and Mac computers
- How to use Voicemod for mobile (iPhone and Android)
- Finally, a few FAQs for users to better understand the discord voice changer (Voicemod).
So, use the new knowledge about how to use Voicemod on Discord you acquired above and spin some voice changes.
Introduction
In today’s world, these voice-changing tools are in use by a lot of online gamers for them to remain anonymous on popular game streaming platforms like Twitch. However, we are more focused on Discord in this article. With everything that’s happening in the world today, voice changers can be used for good or can be misused, depending on who is using them. However, we promote such tools for the immerse benefits they offer users as we do not condone the suggestive use of such devices.
Therefore, in a bid to rave about this phenomenal voice-changing tool, we will talk about the best voice changer for Discord which is Voicemod.
Voicemod is an excellent tool with an impressive list of voice filters at its disposal. With this tool, users can choose from a wide range of voice effects that can have both fun and practical uses. Also, if you are looking to use the tool like a robot, Voicemod can help you do that. The tool is spectacularly easy to use, free across all Windows platforms, and operates in real-time. Additionally, the software can work on Skype, Twitch, and other online chat or streaming platforms.
In this article
01 How to Use Voicemod Voice Changer for Discord on Desktop (Win+Mac)?
02 How to Use Voicemod Voice Changer for Discord on Mobile (Android+iPhone)?

Part 1: How to Use Voicemod Voice Changer for Discord on Desktop (Win+Mac)?
Voicemod Discord works for Windows and Mac operating systems smoothly. Its new Mac OS version is on its way, and you can choose to get notified once it launches.
With a voice changer for Discord, you can add sound effects and change your voice in your communication. You can download this free application on your Windows 10/11 (64-bit) desktop. Its 90 different voices and effects integrate perfectly with Discord to give you strict and most efficient performance.
Now that you know about Voicemod, explore how to use Voicemod on Discord for Desktop.
Step 1: Install Voicemod
Before jumping straight to how we can use Discord for Desktop, we must first know how to install it on our Windows and Mac PC. Here is how to install Voicemod:
- First of all, visit the Voicemod website to start the download process.
- Next, you will see the “Get Voicemod Free” screen. Click it!
- After clicking, you will need to sign in to your account from Discord, Twitch, to Google. Make sure you use your Discord login details to sign in.
- After signing in, the “.exe” file will download to your Windows and Mac download folder. Open it.
- Then an install wizard opens. Navigate through it to install the program on your Windows and Mac computer.
- After complete installation, the installation wizard will ask you to restart your Windows’ or Mac computer.
- However, you can skip the restart process, but it’s best to restart it for smooth operations. Once your Mac or Windows computer restarts, you will see the Voicemod application icon on your desktop screen.
Step 2. Go to Settings>Voice and Video
To configure Voicemod with Discord, open your discord account and go to the settings option located in the screen’s bottom-left corner. Then tap on the “Voice and Video” option right under the app settings.
Step 3. In the “Input Device” section, Choose “Microphone Voicemod Virtual Audio.”
To make Voicemod usable, you are required to change the Voice settings. So, navigate within the “Input Device” option and select the option that says “Microphone Voicemod Virtual Audio.” Once the audio setting changes, it makes it easy for you to change the voice within the program. Also, other users can hear your audio alteration.
Step 4. Choose Your Favorite Voice
In the “basic version,” you have the authorization to change seven free voice choices each day. In addition, with the “pro-version,” you have access to more than 80 different voice options.
Therefore, if you are looking for a simple and easy Windows and Mac application, do not look further than Voicemod!
Part 2: How to Use Voicemod Voice Changer for Discord on Mobile (Android+iPhone)?
“Voicemod clips” is the version that is available for both Apple and Android devices. The application help users to make very high-quality content using its wide selection of one-of-a-kind effects that will change your voice so that you won’t even recognize yourself. Additionally, you can add filters connected to your cell phone’s camera to create hilarious, exciting videos. Also, you get the option to select from 10 different voices, and you can also make infinite videos and audio from the humorous to the terrifying.
Some of the Voicemod for Discord voices that are available on mobile devices include;
- Male-to-female
- Different robot effects
- Celebrities
- Scary voices, etc.
Also, the changes are on how you would like to modify your voice. It can also be cross-share to popular social networking platforms such as Facebook, Twitter, Instagram, TikTok, and Snapchat using your smartphone.
Here are step-by-step instructions:
Step 1: Download Voicemod for Mobile
Ensure you have downloaded the Voicemod application on your Android and iPhone and appropriately configured it. To configure, follow the step below;
- Open it to set your profile using Discord. Additionally, you can view all the different filters for videos and available voices.
- Also, you can decide the type of content you want to create, whether it is a video clip or audio.

Step 2: Access Sound Effects
Open Discord and tap the “cogwheel icon” near your name and avatar. You will see a “settings” page located within it. Tap the “Voice & Video” option. Then under the “Input Device” option, select Voicemod and the headset under the “Output Device” option and tap escape. Then you will have access to numerous exciting sounds.

Finally, add your favorite effect, save and start using your new enhanced voice from Voicemod Discord.
Part 3: People Also Want to Know
This section will look at some basic questions about Voicemod Discord that appeared in Q&A forums.
Is Voicemod safe for Discord?
Yes, Voicemod is safe, but you must download it from its official website or the Google Playstore and Apple’s App Store, as there are many cracked versions of Voicemod online.
Is there a voice changer for Discord?
Yes, a voice changer for Discord and Voicemod is known to be the best. It is an advanced and easy-to-use voice changer that allows you to sound like a man, woman, robot, or anything else you can ever imagine.
Key Takeaways from This Episode
Thus, as you saw, in this report, we have summarised a few essential points that you should know regarding Voicemod Discord. You learned:
- The best voice changer for Discordis Voicemod
- How to use Voicemod for Windows and Mac computers
- How to use Voicemod for mobile (iPhone and Android)
- Finally, a few FAQs for users to better understand the discord voice changer (Voicemod).
So, use the new knowledge about how to use Voicemod on Discord you acquired above and spin some voice changes.
How To Fade Audio With Movavi Editor
Movavi Video Editor Plus is the best option if you want to use its user-friendly Movavi fade audio feature set with plenty of functionality. There are versions of the app on Mac and Windows. For all intents and purposes, Movavi fade out music functionality is an excellent piece of this video editing software. The Movavi Video Editor Plus package comes with standard advanced features and functionality. You may also store your work and share your Movavi fade out audio exports across devices that have the software installed.
Looking for how to fade out music in Movavi? We’ve got you solutions to it. The ability to quickly and simply check that the beginning and conclusion of any audio is one of the best Movavi fade audio features. Prior to the audio, there must be a distinct period of quiet. Finding the program, like Movavi Audio fade out, that best suits your requirements is essential whether you want to fade-in, fad-out, trim, crop, clip, or combine audio files or segments of a music. Find out the details in the upcoming sections.
Part 1. How to Fade Audio with Movavi Editor
When the song’s ending is not featured in the video, fade-out is used to provide an added level of professionalism. Even if you’ve never altered a video before, using Movavi Video Editor Plus is simple. A step-by-step tutorial that walks you through all the tools you’ll need is shown to you when the software initially launches. Additionally, you may always search the Movavi official website for advice.
Steps to use Movavi Fade Audio:
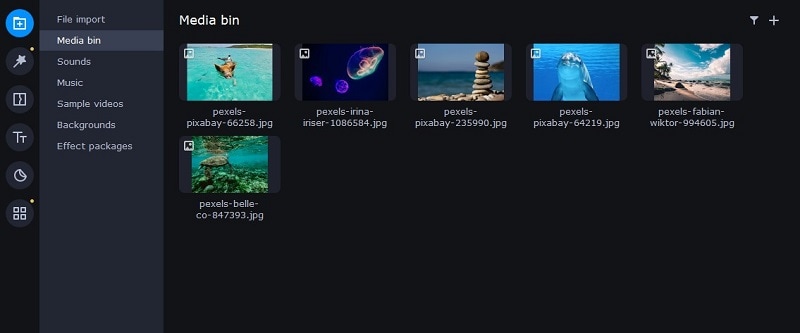
Step1The first step is to import the audio and video files you want to utilize. Drag and drop the files into the software or choose “Add Files” from the Media Bin area to do this. Drag and drop the clip into the timeline after that.
Step2Select the disconnect audio option from the edit menu. Additionally, you can see that the audio and video will no longer be connected by a little connection. Your titles’ location, color, and font may all be changed.
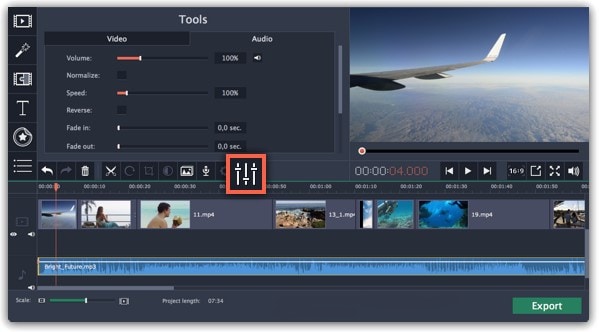
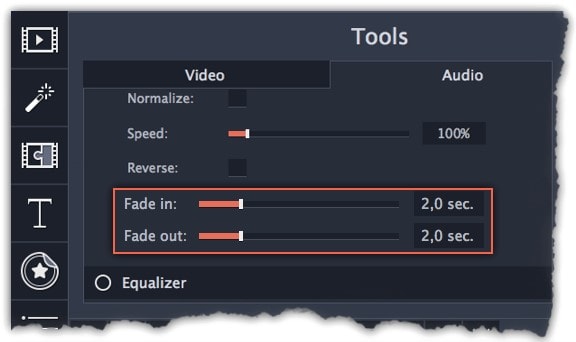
Step3Use the sliders on the Audio tab to set the fade duration by referring to the Audio Properties. Additional options may be used to increase the audio’s loudness, eliminate ambient noise, or even create an echo effect.
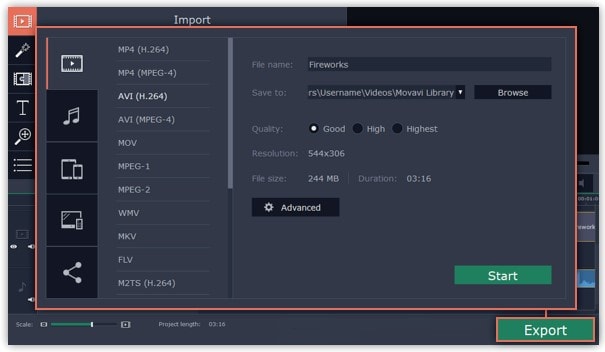
Step4Click on the export option to save this audio as an MP3. Select Audio Export. The MP3 choice is used by default. Select the Save Audio File tab after clicking the Export button. Choose the preferred format and press Start.
Part 2. Movavi Alternative to Fade Audio
Look no further than Filmora by Wondershare if you’re seeking for an effective and user-friendly Movavi audio fade out substitute. This program has all the tools you need to edit, apply special effects, and make titles for videos of a professional caliber. In contrast to Movavi, Filmora gives you the ability to create fade out music without requiring you to install a separate extension. In order to help you understand how to use this function using the Filmora video editing interface, we have enlisted the step-by-step guide for you as well.
Although there are several video editors on the market, Filmora has successfully carved out a position for itself with a variety of intriguing features. The application is appropriate for both new and more experienced users and was designed with novice users in mind. Its user interface (UI), which is rather simple when compared to professional applications. Among all the free video editing programs for beginners, Filmora also offers a far larger selection of effects, customizability, and correction tools, and its screen-splitting capability is much handier than Movavi fade audio feature.
Steps to Fade Out Audio in Filmora:
Step1Install Wondershare Filmora
The straightforward platform to start editing your audio and music files is Filmora, which is available for free. You must first download and install this application on your windows computer in order to utilize it without difficulty. Download the most current edition of this application first. It’s now time to install it on your computer when you’ve completed that. Simply install this program on your computer by following the standard setup instructions if you want to do it fast.
Step2Open Filmora Editor and Import Audio Files
In the step that follows, we’ll show you how to use this platform to fade in and out audio. Filmora may be immediately launched from your desktop or the search bar, then opened as seen below to begin going. By choosing the Video Editor option from the software’s home screen, you may now investigate the basic principles of editing. This will bring up the main interface for Filmora. To import your music and video files, just choose the Import button from the software’s main screen, as seen below:

Step3Load Built-in Audio Editor
You must drag the media files into the program’s timeline after importing them into Filmora. You may modify your media files using every tool in the timeline. To utilize the audio editor in Filmora, just right-click on the specific audio file and choose “Edit Audio” from the list, as seen below.

Step4Use Audio Fade-in/Fade-out
The initial step is to learn how to use Filmora to start fading in and, afterwards, fading out your audio recordings. The best aspect of Filmora is how simple it is to employ these techniques from the timeline. To achieve this, focus on the audio file that you want to change in the timeline; after you’ve picked it, the two icons will show up above the audio file. Drag the first one to the desired duration for the audio fade-in option, as demonstrated:

Step5Edit and Share Video/Sound
In addition to an audio editor, Filmora has a built-in toolset for video editing. You may utilize basic to sophisticated editing techniques inside the program. To choose the basic editor, just click on the video file within the timeline as seen below. There is support for all widely used video and audio formats, including MP3. Click “Export” and choose “File Format” to do this.
By pressing the Format button, choose the required configuration from the list. On a computer, the particular document will be saved to the designated directory.
The Bottom Line
Have you learned how to fade out music in Movavi? If so, then you would also find out that the Movavi fade audio alternative, Filmora , provides a selection of audio editing options in addition to video editing features. The Movavi editor is capable of spicing up your videos and audios, however; Filmora’s workflow is a little more established and well-defined than Movavi’s, which is what propels it to the top of the audio editing field. As a result, Filmora would be the better option if you intend to work as a video editor for a long time.
Free Download For Win 7 or later(64-bit)
Free Download For macOS 10.14 or later
VSDC Free Video Editor Review
If you are a Window user and you are looking for a free video editor without a watermark, VSDC free video editor is definitely a great application. There are only a handful of free video editors available where the output video will not have a watermark, and there is no limitation on the video length. VSDC video editor belongs to the non-liner video editor group where you can combine video clips, photos, objects, and blend and overlap them as per your requirements.
For a beginner, VSDC free video editor is undoubtedly one of the best video editors. It supports different types of video and audio formats as well as codes. The system requirements are very basic, and hence, it is perfect for low-end computers? But can you rely on VSDC editor when you need slightly advanced video editing? Check out our VSDC editor review and find a better alternative.
Part 1. How to Download and Install VSDC?
VSDC editor download is only available for Windows users. It is tailor-made for those who have a low-end computer with older Windows version OS. The software is compatible with Windows 2000 to Windows 11. The minimum RAM requirement is 128MB and free disk space of 200 MB. Here are the steps to download and install VSDC editor.
Step 1: Open your web browser and visit ‘www.videosoftdev.com/free-video-editor/download” .
Step 2: Click on Download Video Editor button based on 32-bit or 64-bit version of your computer. If you have Windows XP, you have to download VDSC video editor version 6.4 instead of the latest version for compatibility.
Step 3: Give some time for the installer file to get downloaded. It is merely 100 MB and it should not take long. After downloading the installer, launch it and follow the on-screen instruction to complete the installation.
Step 4: After proper installation, launch VSDC video editor. You will get the options to create a new project and capture screen, start editing an existing video and export the finished project in a proper video format.
Part 2. Key Features of VSDC
There are two versions of VSDC video editor available – Free video editor and Pro video editor. The free version has limited features while Pro version has advanced features. Here are going to discuss the key features of VSDC Free Video Editor.
Low System Requirements – One of the reasons for the wide popularity of VSDC video editor is that it does not demand high system configurations like most other video editors. If you have a low-end computer with an outdated Windows operating system, you can use VSDC video editor without any issue.
Basic Editing – Among the basic editing tools, you can cut, trim, split and join video clips. There are options for rotating and resizing videos. You can also go for color correction and put overlays on videos as applicable. Besides, you can edit 36-degree videos with zoom and chart tools.
Effects – VSDC has a wide collection of video, audio and text effects. You can also add objects to your video and apply different ready-made filters. There are also transitions to apply in between video clips and slides. You can also use green screen effect to change your background. The special split-screen effect and picture-in-picture effects are quite eye-catching.
Capture Video – VSDC video editor is equally competent in capturing videos from your webcam as well as recording your screen video. In fact, there is a dedicated option available for creating slideshow videos from photos. You can even record your voiceover if you want to.
File Formats - VSDC supports all the popular file formats for importing and exporting video and audio files. There are different export profiles available so that you can save your edited video for different devices conveniently.
Apart from these, if you opt for the Pro version, you get motion tracking, video masking, video stabilization, and much more such advanced video editing tools.
Part 3. How to Edit Videos with VSDC
If you have the recorded video and you want to edit it with VSDC video editor, the steps are quite simple. You can even record your webcam and screen video with audio if you want to start from scratch. Coming to the editing part, you can split large video files, merge video clips, add transitions in between, add objects in the video as well as crop and rotate videos. There are different effects you can apply to uplift video content. Here are the steps to edit videos with VSDC editor.
Step 1: Open VSDC Video Editor and click on Blank Project option. Name the project and change parameters, and click on Finish.

Step 2: Click on Add Object option at the top and select Video. Import the video clips saved on your hard drive. Similarly, you can go to Add Objects> Audio to import audio files.

Step 3: All the imported media files will appear on the timeline. If you have multiple video clips, you can shift the position of clips on the timeline so that one video clip ends and the other begins.
Step 4: If you want to add transitions in between the video clips, go to Video Effects> Transitions> select the effect you want to apply. Check the on-screen parameters such as duration and click on Ok button.

Step 5: If you want to add objects, go to Add Object and select shapes, texts, animations, charts, and much more. You can also add Audio Effects as well as Text Effects from the top bar.
Step 6: Once you are happy with the preview of the edited video, go to Export Project and check all the parameters. Click on Export Project option.

Part 4. Best VSDC Alternative Video Editor
Since VSDC video editor is available completely free, there is no hard in downloading the application and trying it out. But soon, you will understand that the video editor is limited as far as tools and features are concerned. If you want to get more than just basic tools, you will have to upgrade to its Pro version. However, there are better premium video editors available. We recommend Wondershare Filmora as a better alternative to VSDC video editor.
Filmora is extremely popular in the professional video editing world as it has an intuitive interface and does not demand high-end computers. There are tons of transitions, effects, filters, and objects available to add to your edit. You can perform all standard and advanced video editing to take your video to the next level. Here are all the steps to edit videos on Filmora.
For Win 7 or later (64-bit)
For macOS 10.12 or later
Step 1: Download and install Filmora and it is available for Windows and Mac. Launch Filmora and click on New Project. Import all your media files into Project Media folder by drag and drop action.

Step 2: Arrange the video clips and audio clips on the timeline by drag and drop action. You should be placing the video and audio files on different tracks. This is where you can do all the basic editing such as trimming, cutting, splitting, and merging.

Step 3: To add transitions in between the video clips, go to Transitions from the top bar and drag and drop any transition in between the clips. Check out Titles, Effects, and Elements from the top bar and insert them on the timeline as you think appropriate.

Step 4: Play the video to see if everything is perfect and click on Export button to save your video to your hard drive.

Part 5. FAQs about VSDC
1. Is VSDC video editor really free?
Yes, VSDC video editor is completely free to use. However, there is a pro version available where more features are present. But the free version does not put watermark on the output video and has all the standard tools for video editing without any limitation.
2. Is VSDC better than Adobe Premiere Pro?
No, VSDC is not better than Adobe Premiere Pro. VSDC is a free video tor while Adobe Premiere Pro is a premium one. Naturally, Adobe Premiere Pro has more features and functionalities. However, VSDC is better for beginners and those who have low-end computers if you compare it with Adobe Premiere Pro.
3. Is VSDC safe?
Yes VSDC video editor is safe and stable to use. However, there was an incident in 2019 where VSDC video editor’s official website was hacked, but the software itself is safe to use on Windows computers.
For macOS 10.12 or later
Step 1: Download and install Filmora and it is available for Windows and Mac. Launch Filmora and click on New Project. Import all your media files into Project Media folder by drag and drop action.
Step 2: Arrange the video clips and audio clips on the timeline by drag and drop action. You should be placing the video and audio files on different tracks. This is where you can do all the basic editing such as trimming, cutting, splitting, and merging.
Step 3: To add transitions in between the video clips, go to Transitions from the top bar and drag and drop any transition in between the clips. Check out Titles, Effects, and Elements from the top bar and insert them on the timeline as you think appropriate.
Step 4: Play the video to see if everything is perfect and click on Export button to save your video to your hard drive.
Part 5. FAQs about VSDC
1. Is VSDC video editor really free?
Yes, VSDC video editor is completely free to use. However, there is a pro version available where more features are present. But the free version does not put watermark on the output video and has all the standard tools for video editing without any limitation.
2. Is VSDC better than Adobe Premiere Pro?
No, VSDC is not better than Adobe Premiere Pro. VSDC is a free video tor while Adobe Premiere Pro is a premium one. Naturally, Adobe Premiere Pro has more features and functionalities. However, VSDC is better for beginners and those who have low-end computers if you compare it with Adobe Premiere Pro.
3. Is VSDC safe?
Yes VSDC video editor is safe and stable to use. However, there was an incident in 2019 where VSDC video editor’s official website was hacked, but the software itself is safe to use on Windows computers.
This Article Talks in Detail About Why People Look for a Free Title Maker, and 8 Options that Will Benefit Their Work. It Includes Tools Like SEMrush Title Generator, Hubspot Title Generator, and More. Check Out
Do you know what’s more important in a blog post? Yes, you guessed it right, headline. It helps your blog grab attention and encourages people to click through. Additionally, the title is a key factor in how search engines categorize and rank posts. A great blog free title maker might be a handy tool for those who want to boost their site’s traffic.
A headline generator may assist you in creating a compelling and efficient title that will make your blog distinguish itself from others by letting you enter a few essential details. Additionally, exploring ideas might be a terrific approach if you’re feeling stuck. A title generator is unquestionably something you should consider including in the toolkit if you’re signed in marketing and blogging.
8 Best Free Title Maker You Must Try and Put to Use
1. SEMrush Title Generator

While writing and publishing something the first thing that grabs a user’s attention is the title of the post. It must be catchy and good enough for them to read the whole thing. What SEMrush ideas generator does is that it suggests you some catchy and interesting title ideas when you type in and search the same keyword.
You can opt to choose the best among the suggested ones and grab people’s attention and make them read your blog/article. Since it’s a free title generator you need not worry about spending money for title ideas and search for as many topics as you need. You may also look for topic ideas by clicking the “get more content ideas” button that is there on the right side at the bottom.
2. Contentrow Title Generator

Another excellent title intro maker online free is Content Row. It provides specific outcomes when a specific keyword is used. You only have to register with the email ID if you want to discover your keyword’s currently trending titles. You can use this free tool to analyze your headline score as well. Once you’ve chosen the blog title or headline, you can assess the topic’s strength. Additionally, it provides some ideas on which you might base your new headline.
Also, this tool displays hot subjects currently being widely or passionately debated online. A case converter or word counter is also an option. Contentrow Title Generator helps you to generate clickable and catchy blog titles to drive traffic to the articles. Discover unique video ideas that will inspire you and interest your audience. Use the clickbait or linkbait ideas for the content with their title generator to capitalize on readers’ curiosity.
3. Hubspot Title Generator

The HubSpot Title Generator has a lot going for it, not the least because it is free to use. This indicates that using the tool is not dependent upon having a HubSpot account. Here are a few additional reasons you should use it, besides being free. HubSpot Title Generator is one of the most accessible content marketing strategies. Type up to five distinct nouns into the area provided and click “Give Me Blog Ideas.”
Afterward, you can navigate through a week’s generated blog post ideas. All it takes is that. It will only take a few seconds to generate title ideas, and once you have entered the nouns into the generator field, you will be given new ideas to create new posts instantly. Users can get a unique title every week based on the nouns they put. Hubspot doesn’t share copied blog titles, producing unique and plagiarism-free titles.
4. Tweak Your Biz

Tweak your Biz Title Maker. Create catchy headlines for your blog posts and articles. A great title can boost visitor traffic, Facebook Likes, and tweets by 50% or more. An online web-only creative title generator called Tweak Your Biz title generator online free is available to experienced and inexperienced bloggers and social media influencers. It is the free headline maker that provides the two-way service, and it serves as the best headline analyzer and generator.
The target word can be searched as a verb or a noun before the output in the Tweak Your Biz headline maker. Input your subject or topic in the box provided on this innovative title generator and press the “Submit” button. It provides headlines for various topics that are grouped under several categories and gives a variety of headlines to fit the tone of your site. Use this free headline generator to create attention-grabbing headlines for your blog or social media sites. It does not require the installation of any programs, just a web browser, to function.
5. The Hoth

A well-known free online title generator and marketing provider called The HOTH offers a variety of solutions for business owners and marketers. They provide a free blog subject headline generator so you can rapidly develop headlines for your posts to help you obtain the maximum traffic to your article. The HOTH’s headline generator is a fantastic choice if you want more control over the suggestions. It still requires little time to operate and is simple, but it requires more input than many other tools.
You must add a keyword, your audience’s intended goal, a frequent key point, the name of your industry, your target audience, and other information into this tool to generate titles. After that, the program generates ten titles simultaneously, each with options specific to the abovementioned factors. The title generator on the HOTH is still a quick and straightforward approach to developing a list of intriguing title concepts. You can specify your preferred term, target market, and other details to make the headline more suited to your needs.
6. Wix Title Generator

Well, this tool called Wix title generator is no different than others as it comes with a plethora of options. All you got to do is open the website using the above link and enter around 2 main keywords to look for a relevant and catchy title for your blog/article. Put the required keywords and then opt for clicking the button that says, “Get your Title.”
You will be given around 7-8 options for the title of the blog and you can choose whatever feels best for the same. You may also load more options by clicking the button that is there at the bottom of the PC’s screen. Once chosen, you can copy the title and use it however you like being it a free tool to be used as many times as you wish.
7. Small Biz Trends

Well, the Small Biz Trends title generator is a bit different when it comes to generating title ideas for your blog than other tools mentioned here. It’s because when you open the website and type in your topic and click the submit button, you will be given a ton of blog title options. Not just that, the options here will be presented to you category-wise. Isn’t this convenient?
Yes, it is, if you feel the other tools are giving you lesser options or ideas. You can just copy whatever title appeals to you the most and use it however you need to. Also, you may use the option given above the submit button “i.e. Small business trends Thesaurus,” of you wish to opt for generating more ideas.
8. fatjoe

With the help of the well-liked headline generator from FatJoe, users may quickly come up with over 100 ideas for blog posts. Have trouble coming to a title for your most recent blog post? There are always options available here. You can enter the focus keyword or selected subject to get the best clickable and SEO-friendly titles.
In addition to providing one of the best headline creation tools for free, Fat Joe is a link-building business. One can create more than 100 titles and even the best headline ideas. You can even create new topics for generating other topics.
Conclusion
Online free title creator can create catchy headlines that increase social media engagement, drive website traffic, and accomplish various other goals. Several automated solutions will handle your labor-intensive tasks, so you don’t have to rely only on your creativity to develop article titles. With the correct tools, you can improve your SEO content and grow your business without going over budget by bringing in more customers and increasing conversions.
Free Download For Win 7 or later(64-bit)
Free Download For macOS 10.14 or later
Free Download For macOS 10.14 or later
Also read:
- Updated The Best 10 AI Video Analytics Companies at a Glance for 2024
- In 2024, How to Convert Videos to Slow Motion? Complete Guide
- 2024 Approved Splitting Video Into Frames with the FFmpeg Step by Step
- 2024 Approved How to Brighten a Video in Windows 10 | Step-By-Step Guide
- Hitfilm Express - A Guide to Download, Install, Key Features
- So, without Further Dilly-Dallying, Lets Learn How to Create a Retro 1950-Style Video with This Simple Filmora Tutorial
- New Convert Slow Motion Videos to Regular Videos in Your iOS Device |A How
- Updated Learning The Details Of How To Replace Sky in Lightroom for 2024
- New Best Way To Color Grading & Color Correction in Filmora for 2024
- Updated In 2024, Learn Topaz Video Enhance AI Review and Achieve Powerful Video Conversion
- Updated The Glitch Effect Shows Errors and Flaws in the Image or a Video. The Write-Up Presents the Complete Procedure of Adding Premiere Pros Glitch Effect and Introduces Eight Free Glitch Effects
- In 2024, How to Rotate AVI in Vertical/Portrait Orientation Windows, Mac,Andro
- Updated Looking for the Best Alternatives of iPad Compatible Slideshow Applications to Design High End Graphic Presentations? Rest Assured, You Have Landed at the Correct Spot
- Confused About Which GoPro Should You Use? This Article Introduces and Provides a Detailed Overview of the Best GoPro for YouTubers You Can Find in the Market for Vlogging
- New How to Make a Slow Motion Video Complete Guide
- 2024 Approved Add Green Screen Effects in Final Cut Pro
- Easy Way to Create a DIY Green Screen Video Effect for 2024
- 2024 Approved What Is Animated GIF
- In 2024, How to Create Video Contents That Convert Sales
- In This Article, We Will Show You How to Rotate Videos Using Obs
- New In 2024, Fixes | What If YouTube Zoom to Fill Not Working?
- Updated 2024 Approved Blender - A Video Editor for All Professor
- 2024 Approved Some Effective Slow Motion Video Editors You Can Try
- Updated End Screen Makers
- New In 2024, 10 Top Innovative AR Video Effects to Check Out
- In 2024, The Most Efficient Ways to Manage Your Timeline
- 2024 Approved How to Slow Down Time-Lapse Videos on iPhone
- Learn About Splice Video Online and Its Advantages. Also, Check Out the Best Online Apps for Splice Editing
- Updated In 2024, How To Make A Political Video
- Updated Elevate Your Designs with Feather Shapes in After Effects
- New Best Online MPEG to GIF Converters for 2024
- In 2024, How to Create a Vacation Slideshow in 5 Minutes
- New 2024 Approved Deleting White Background in Photoshop Is Hard?
- New REVIEW Whats Top 10 Software to Make AI Upscaling Video
- Updated Color Match Game Top Tips for You for 2024
- In 2024, How to Cast Realme Note 50 Screen to PC Using WiFi | Dr.fone
- In 2024, About Infinix Hot 40i FRP Bypass
- In 2024, How To Unlock a Vivo G2 Easily?
- Complete guide for recovering call logs on Nokia 150 (2023)
- Updated 2024 Approved Must-Read Top 10 AI Realistic Avatar Generators
- How To Unlock a Samsung Galaxy S24+ Easily?
- In 2024, How to Mirror Your Tecno Pova 6 Pro 5G Screen to PC with Chromecast | Dr.fone
- In 2024, The Ultimate Guide to Realme GT 5 Pattern Lock Screen Everything You Need to Know
- 11 Ways to Fix it When My Infinix Note 30 VIP Wont Charge | Dr.fone
- How to Easily Hard reset my Infinix Hot 30i | Dr.fone
- Updated 7 Best Real Time Video Translation Apps for 2024
- How to Fake Snapchat Location without Jailbreak On Vivo Y02T | Dr.fone
- In 2024, How To Change Your Apple ID on Apple iPhone SE (2020) With or Without Password
- A Step-by-Step Guide to Finding Your Apple ID From Your Apple iPhone 11 Pro
- In 2024, Is Your Apple iPhone 7 Plus in Security Lockout? Proper Ways To Unlock | Dr.fone
- 11 Best Location Changers for Samsung Galaxy A54 5G | Dr.fone
- Best Sony Xperia 1 V Pattern Lock Removal Tools Remove Android Pattern Lock Without Losing Data
- Three Solutions to Hard Reset Poco C51? | Dr.fone
- 10 Best Meme Makers Online (Free to Use) for 2024
- Pokemon Go No GPS Signal? Heres Every Possible Solution On Nokia C22 | Dr.fone
- Where Is the Best Place to Catch Dratini On Oppo F25 Pro 5G | Dr.fone
- In 2024, How I Transferred Messages from Vivo X100 Pro to iPhone 12/XS (Max) in Seconds | Dr.fone
- In 2024, 5 Easy Ways to Copy Contacts from Honor Magic 6 Pro to iPhone 14 and 15 | Dr.fone
- 4 Methods to Turn off Life 360 On Vivo Y200e 5G without Anyone Knowing | Dr.fone
- Title: And when It Comes to Voice Changers for Discord, None Is as Easy to Operate as the Voicemod. Here Is a Detailed Guide About How to Use Voicemod on Discord on Mobile and Desktop Devices
- Author: Chloe
- Created at : 2024-05-20 03:37:31
- Updated at : 2024-05-21 03:37:31
- Link: https://ai-editing-video.techidaily.com/and-when-it-comes-to-voice-changers-for-discord-none-is-as-easy-to-operate-as-the-voicemod-here-is-a-detailed-guide-about-how-to-use-voicemod-on-discord-on-/
- License: This work is licensed under CC BY-NC-SA 4.0.
