:max_bytes(150000):strip_icc():format(webp)/5-best-texting-apps-for-android-tablets-in-2023-a5a6329d6b744167acf0a02f6a413ff2.jpg)
Best 15 Subtitle Apps for 2024

Best 15 Subtitle Apps
Every content creator wants professional subtitle generator apps to create subtitles flawlessly. There are tons of subtitle editors that you can find in the market, but not every tool produces quality results. It can be confusing and difficult to choose the best subtitle editor app among tons of options. By reading this article, you will come to know about professional subtitle apps for PC and all platforms.
- Jubler Subtitle Editor - The Best Free Subtitle Editor for Windows
- Wondershare Filmora - All-in-One Subtitle Solution
- Movavi Video Editor - Best for Adding Subtitles Manually
- VideoProc - Best Video Converter for macOS Devices
- Wondershare UniConverter - Complete Video Toolbox for Mac Users
- Adobe Premiere Pro - Video Editor for Professionals
- CapCut - Best App for TikTok Users
- MixCaptions - Specially Built for Adding Captions
- VLLO - Advanced Video and Subtitle Editor for Android Users
- iMovie - Free Video Editor for iOS Users
- Add Subtitles - Auto Captions - Enhanced Subtitle Creator for Apple Users
- InShot - Video Editor - Complete Subtitle and Video Editor
- Veed.io - Online Auto Subtitle Generator
- Happy Scribe - Subtitle Generator with Enhanced Features
- FlexClip - Manual Online Subtitle Editor
Part 1: Best 3 Subtitle Apps on Windows
Do you want to know about some reliable video subtitle apps for Windows? This section will shed light on the top 3 subtitle apps on Windows, along with their advantages and drawbacks.
| Name | Price | Support System | Supported Subtitle Files | Auto Caption | Video Editing |
|---|---|---|---|---|---|
| Jubler Subtitle Editor | Free | Linux, Windows, and Mac | ASS, SRT, SUB, Text, etc. | No | No |
| Wondershare Filmora | Month Plan: $19.99Annual Plan: $49.99Perpetual Plan: $79.99 | Windows, Mac, and iOS | SRT and Text | Yes | Yes |
| Movavi Video Editor | $69.95 | Windows and Mac | Text | No | Yes |
1. Jubler Subtitle Editor - The Best Free Subtitle Editor for Windows
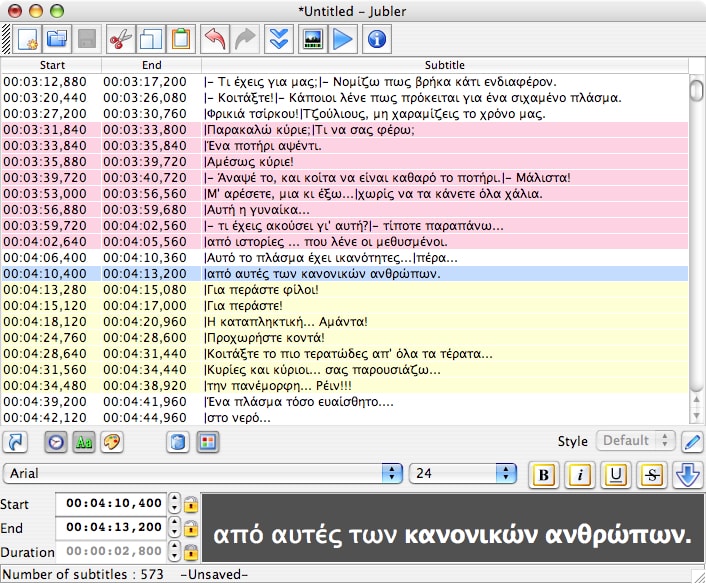
Jubler is a classic example of a subtitle editor through which you can efficiently create and edit subtitles for your videos. You can also use this tool to convert, modify, transform, or correct the existing subtitles on a video file. The supported file formats are SubViewer, SubRip, SubStation, etc. Hence, it’s a compatible subtitle app for Windows users comprising all the necessary features for subtitle creation and editing.
Key Features
- This tool allows you to mark your subtitles with different colors while editing or playing the video file in real-time.
- This app can graphically display your subtitles and allows you to resize or move them.
- It provides the Undo and the Redo options to edit your subtitles without any complications.
Pros
- This tool offers a feature for spell-checking along with dictionary selection to prevent the chances of mistakes.
- You can check the current frame and waveform preview to graphically preview the subtitles using the FFMPEG library.
Cons
- You have to install a video player with this tool to preview your video to check the results.
2. Wondershare Filmora - All-in-One Subtitle Solution
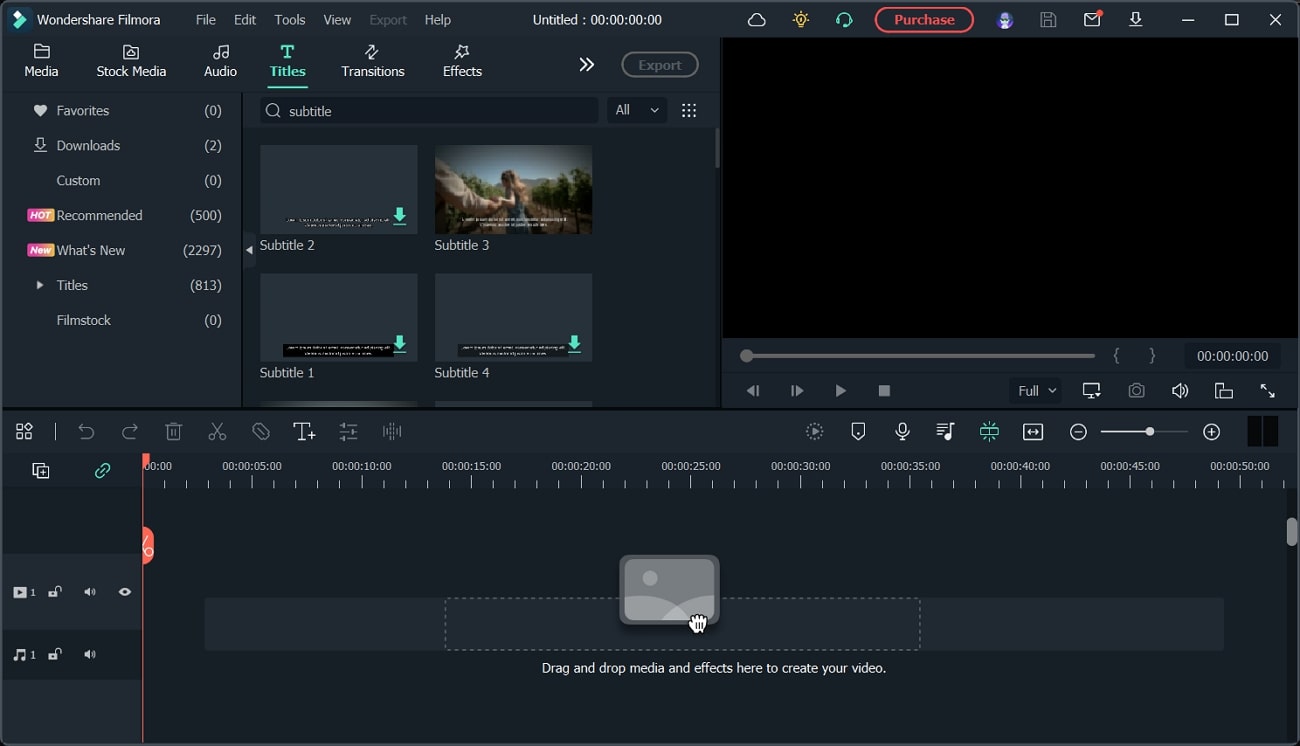
Have you ever experienced using Wondershare Filmora? Filmora is a famous tool through which people can enhance and edit their video files using advanced features. You can utilize this platform with a famous video editor to create subtitles from scratch efficiently. It contains a Speech-to-Text option that can help you to generate subtitles without requiring your efforts. With a single click, this feature can automatically create subtitles by transcribing your voice with high accuracy.
Key Features
- Filmora offers more than 80 animation presets and styles that you can instantly apply to your created subtitles.
- The speech-to-text feature shows compatibility with up to 16 different languages. Thus, you can auto-create subtitles in popular languages.
- This tool contains stock footage in its library that you can easily add to your videos.
Pros
- This platform offers an AI Portrait feature that can remove the background from your videos. Moreover, it contains more than 70 AI portrait effects and stickers for further enhancement.
- This tool can act as a high-quality screen recorder to capture gameplays, online meetings, tutorials, and other screen activities.
Cons
- Filmora adds a watermark to your video in the free trial.
3. Movavi Video Editor - Best for Adding Subtitles Manually
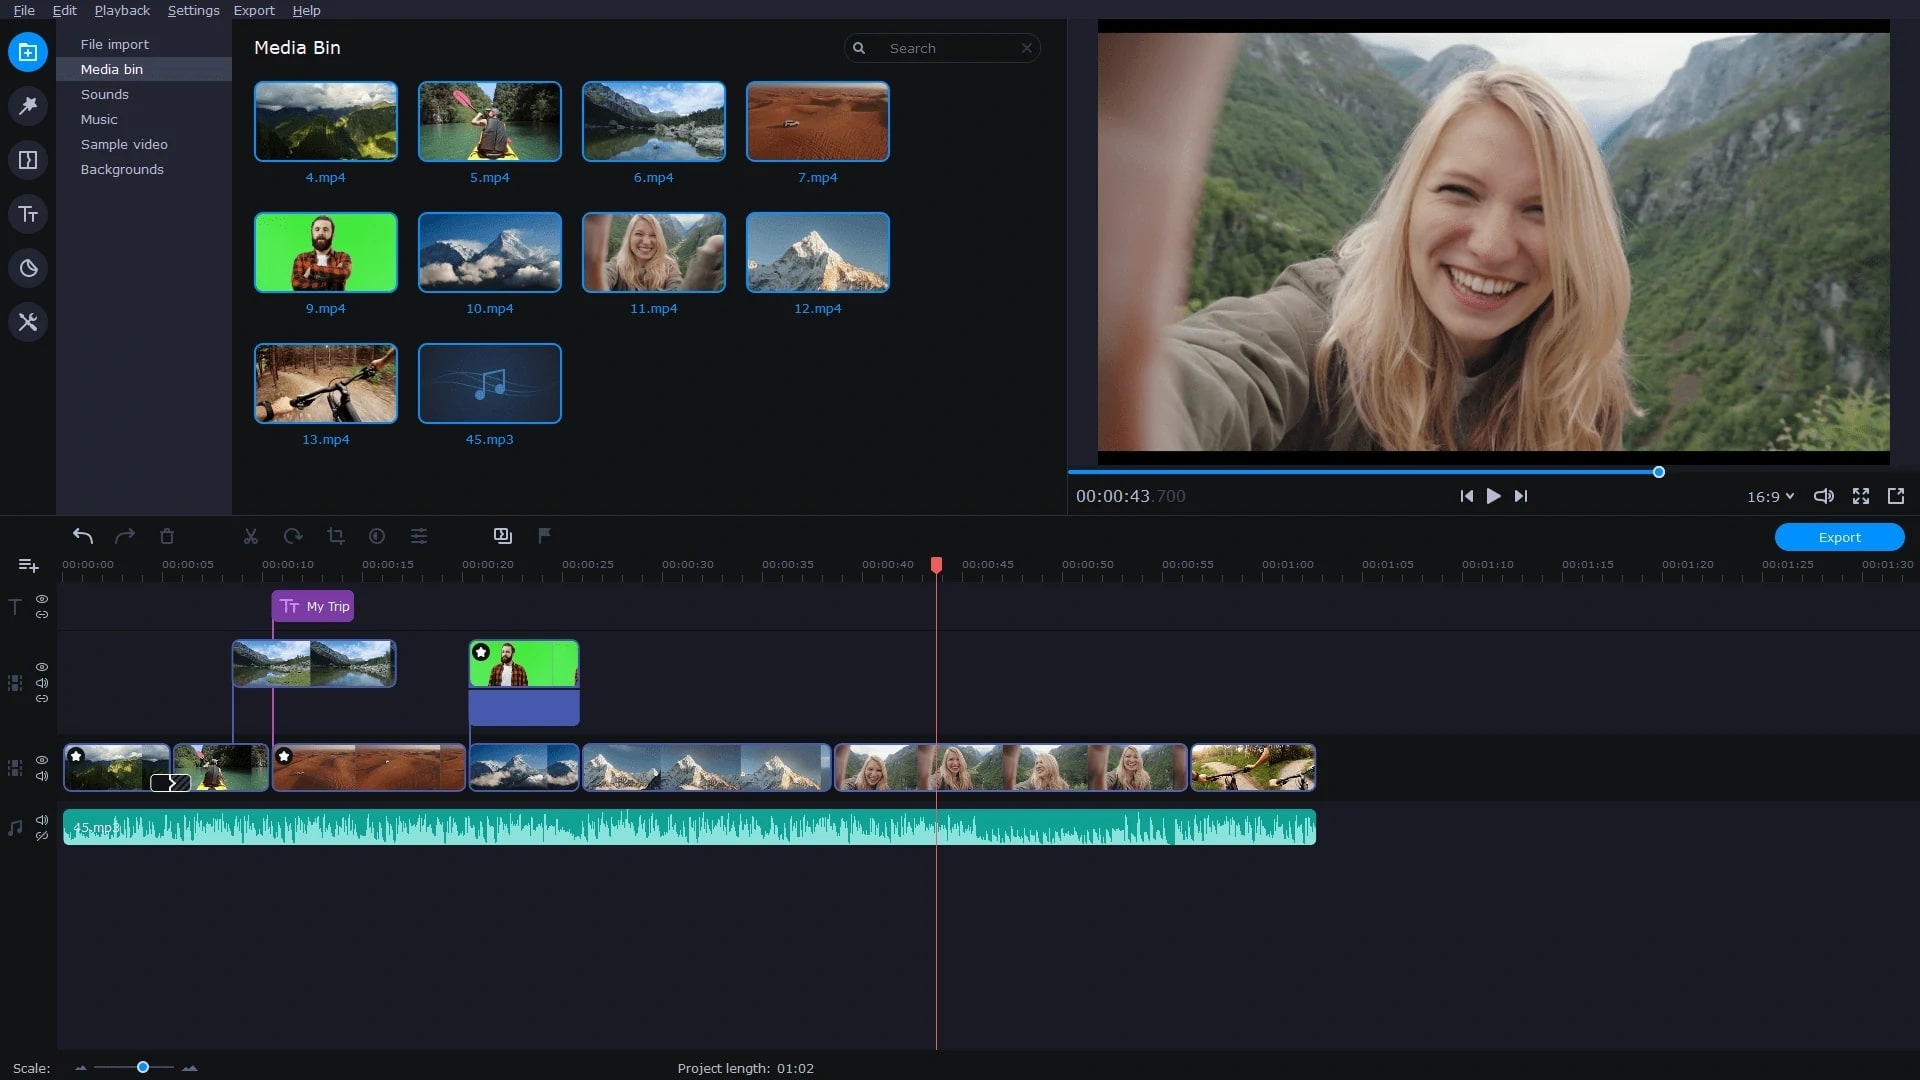
Movavi is a popular tool that many professionals use to create and edit their videos in high quality. It contains various transition effects that you can apply to make your video look smooth and attractive. By using this tool, you can also create Softsubs and Hardsubs according to your desire. Afterward, you can select the font, color, and size of your added subtitles using this platform.
Key Features
- It contains a synchronization box that enables you to delay or advance the subtitles according to the specific time. This will make your subtitles synchronized effectively.
- You can also change the position of your subtitles with accuracy and precision using this tool.
- To make your video look customized, you can add a watermark to your video files according to your desire.
Pros
- If your video contains unnecessary noise, Movavi offers an AI Noise removal feature that allows you to eradicate the noise.
- If you have captured a shaky video, you can use its stabilization option to get rid of flaws.
Cons
- The video rendering process in this tool is slow and sluggish.
Part 2: 3 Subtitle Apps for Mac Worth Trying
Are you looking for special subtitle apps for your MacBook? In this section, we will shed light on the top 3 subtitle generator apps that can be ideal for MacBook users.
| Name | Price | Support System | Supported Subtitle Files | Auto Caption | Video Editing |
|---|---|---|---|---|---|
| VideoProc Converter | Lifetime License: $39.95 | Windows and Mac | ASS, SSA, SRT, Text | No | No |
| Wondershare UniConverter | Quarterly Plan: $29.99Annual Plan: $39.99Perpetual Plan: $55.99 | Windows and Mac | SRT. ASS, SSA, Text | Yes | Yes |
| Adobe Premier Pro | $20.99/Month | Windows and Mac | SCC, MCC, XML, STL, SRTDFXMP, Text | Yes | Yes |
1. VideoProc - Best Video Converter for macOS Devices
This app has a simple interface that enables you to manage subtitle files easily. Through this compatible tool, you can embed your subtitles into your videos without any hassle. It’s a lightweight tool as it won’t take up excessive storage space on your MacBook. Moreover, you can also use this tool to tackle video issues like noise, poor color, camera shake, etc.

Key Features
- This software can convert 4K and HD videos while maintaining their original quality.
- It offers batch conversion so that you can convert multiple video files at the same time easily.
- You can batch-download the video files in various formats and preferred resolutions. It also supports more than 1000 websites for media download.
Pros
- It offers two recording modes: Chroma key and Picture-in-picture. By utilizing these modes, you can capture live stream sessions and gameplays in high resolution.
- Using this tool instantly, you can rotate and flip your videos clockwise or counter-clockwise.
Cons
- The free trial of this tool is limited to 5 minutes video only.
2. Wondershare UniConverter - Complete Video Toolbox for Mac Users
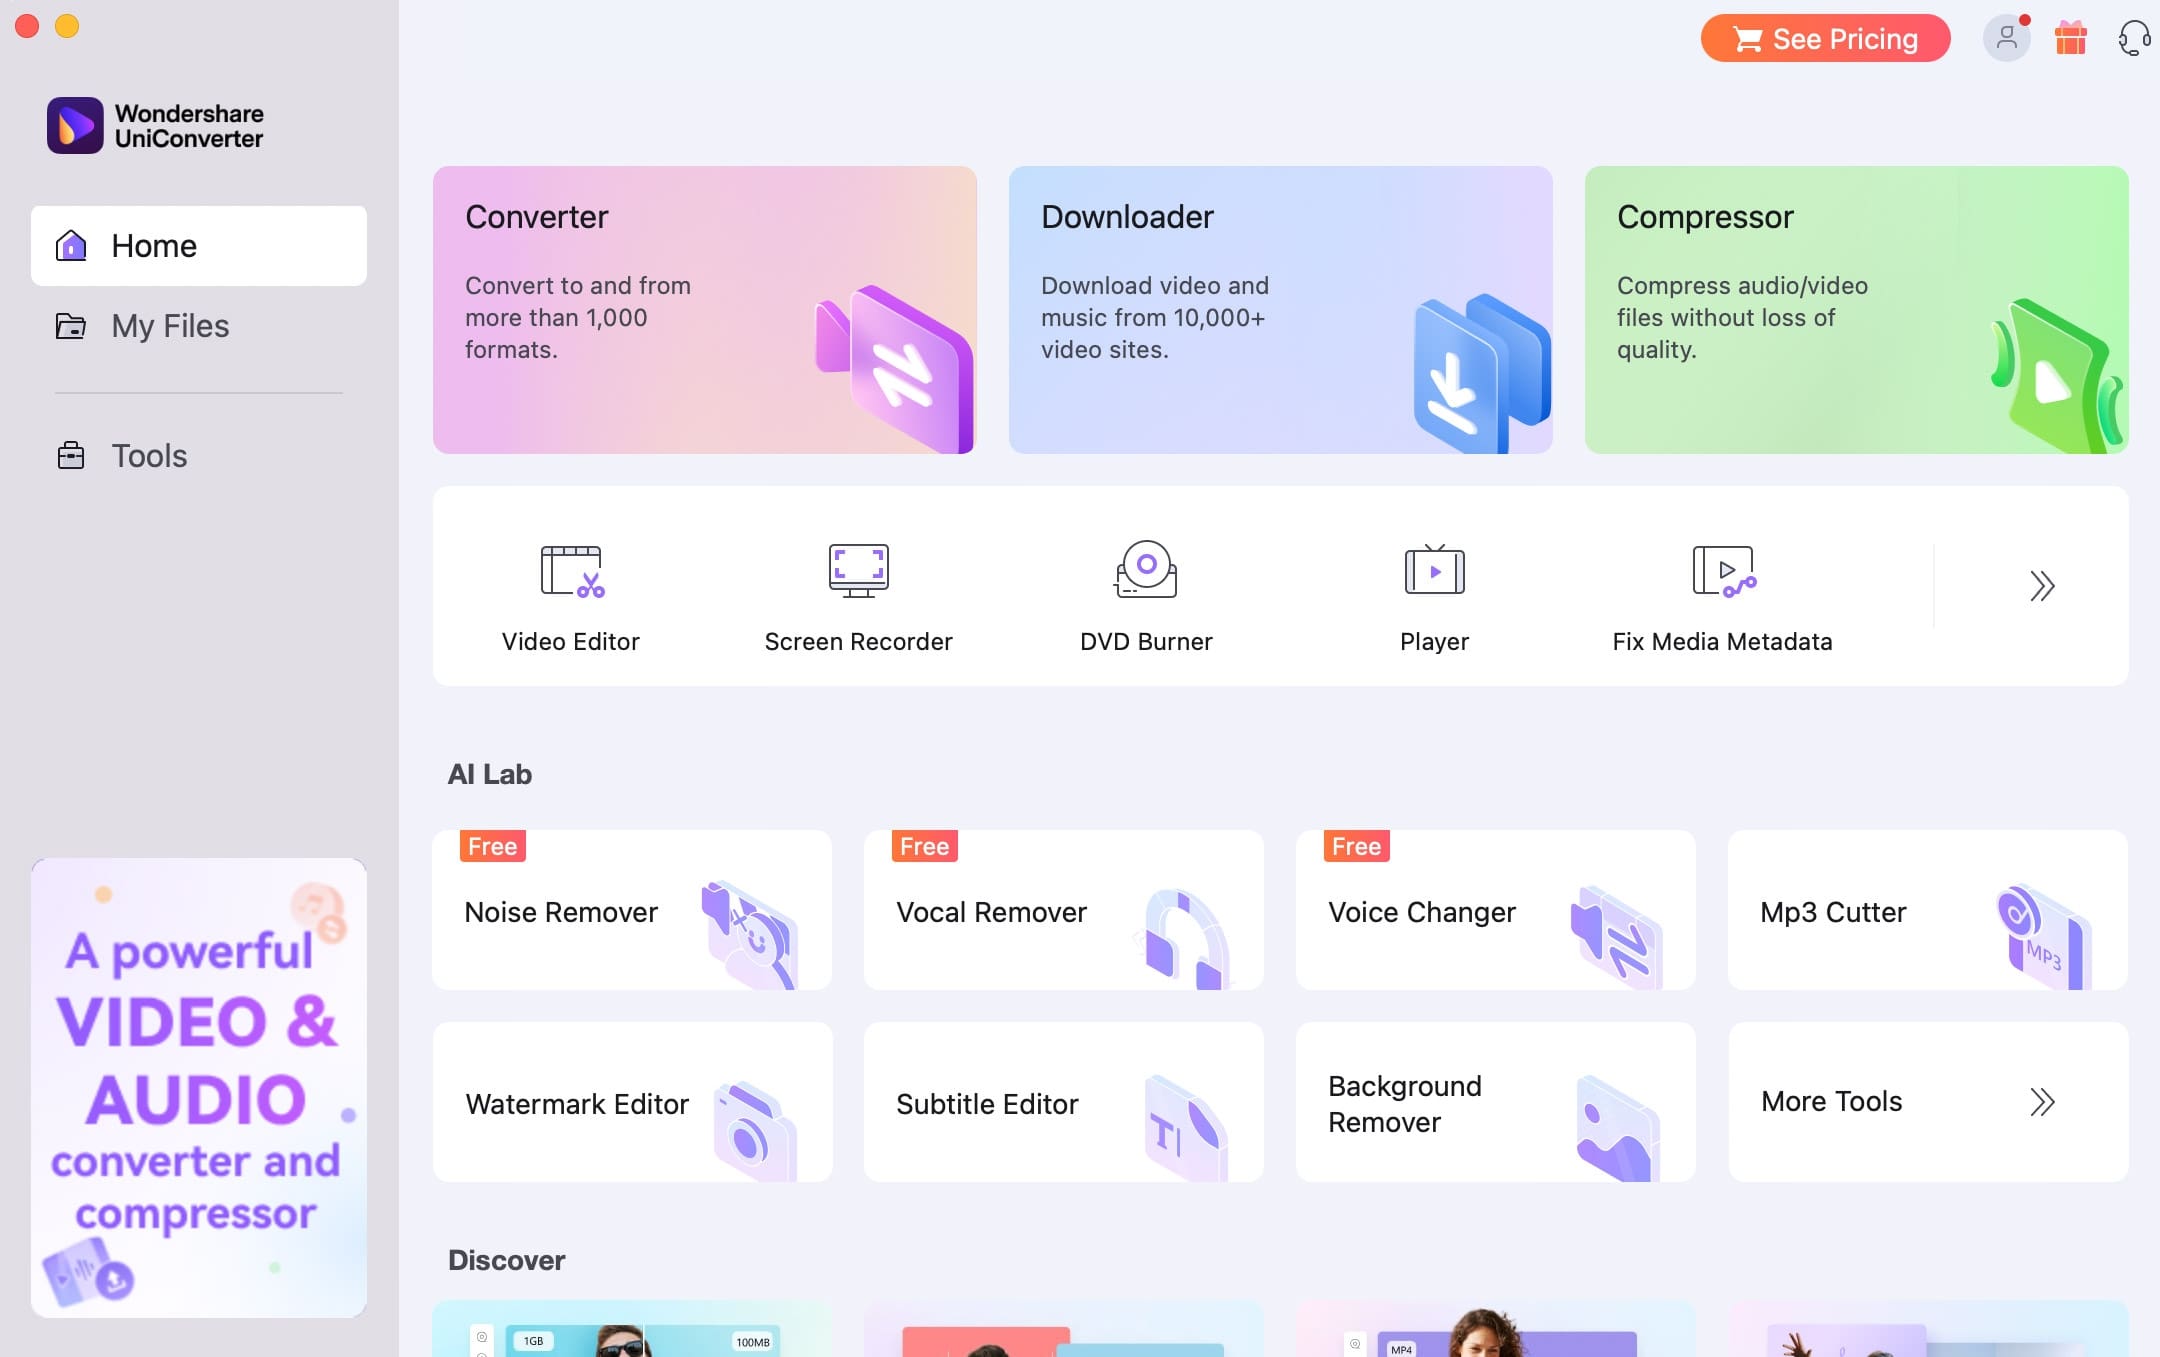
UniConverter is one of the well-trusted platforms through which you can modify your videos by using advanced key features. It contains tons of options, such as a watermark editor, screen recorder, compressor, converter, etc. Furthermore, it provides a subtitle editor through which you can add subtitles to your videos in multiple ways. Thus, using this tool, you can add subtitles to your videos at a fast-processing speed.
Key Features
- This tool supports more than 1000 video file formats batch conversion. Thus, you can convert your multiple video files to other formats.
- You can use this tool as a downloader to download online videos of high quality.
- It contains an Auto Crop feature through which you can resize your videos according to social media channels.
Pros
- By using its AI Portrait feature, you can automatically separate the portrait and background from your video.
- To eradicate the unwanted parts from your video, you can use the trim feature of UniConverter effectively.
Cons
- It lacks advanced video editing features that are necessary for professional editing.
3. Adobe Premiere Pro - Video Editor for Professionals
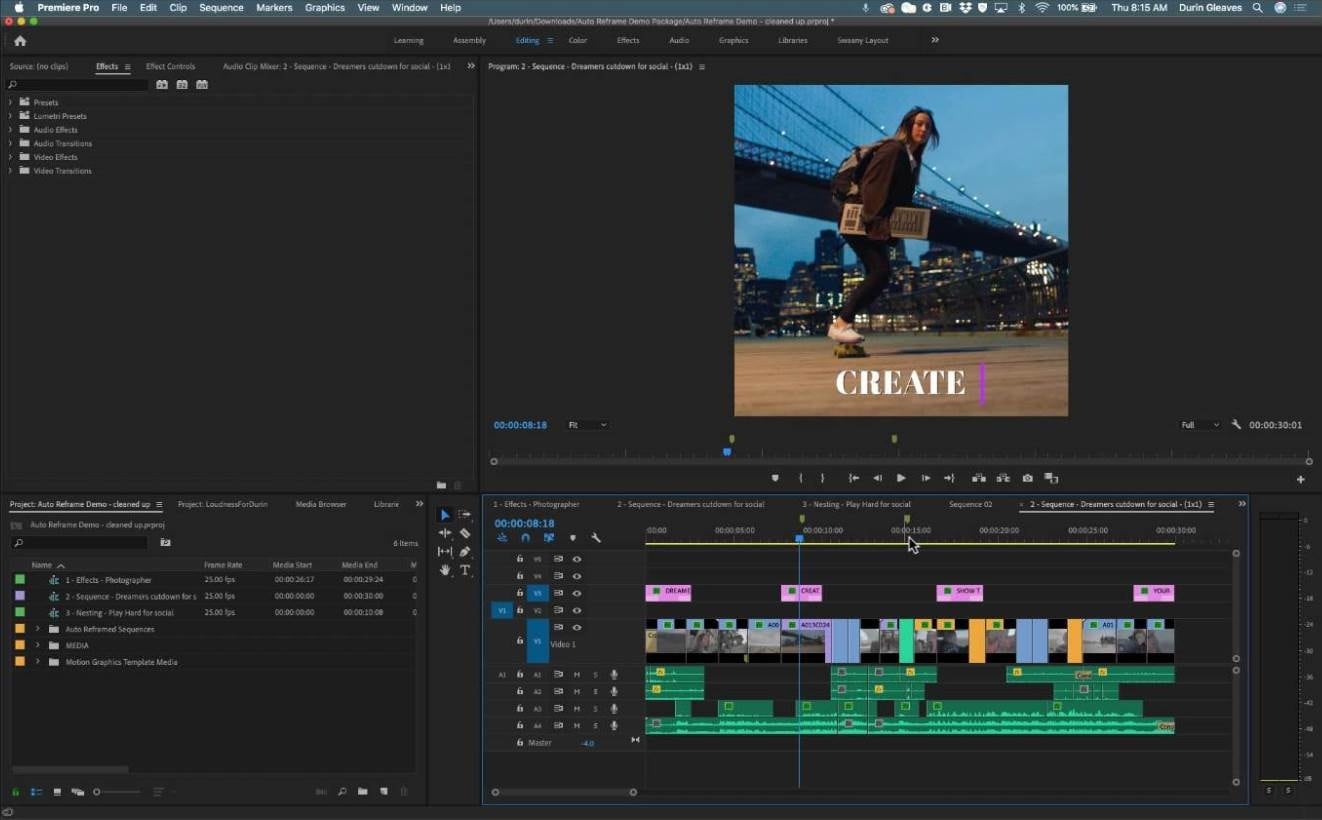
Have you ever used Adobe Premiere Pro for video editing? Adobe Premiere Pro is undoubtedly the most famous software for MacBook users through which you can execute professional editing. It functions as a complete video toolbox and ensures great output results. Besides being a professional video editing software, you can also use this tool as a subtitle generator app. You can use its Speech-to-Text feature to produce subtitles automatically and with precision.
Key Features
- To increase the visual appeal of your video, you can use this tool for color grading and correction.
- You can create captivating intros and outros for your videos by using graphic templates and other elements.
- You can add different audio effects to transform the sound in your video professionally.
Pros
- Using this tool, you can convert your video to GIF within seconds.
- You can enhance or decrease the speed of your video accordingly from this professional tool.
Cons
- The interface of Adobe Premiere Pro can be intimidating for beginners.
Part 3: The Best 3 Subtitle Apps for Android
Being an Android user, you may feel to use auto caption apps to create subtitles for your videos without any hassle. By reading this section, you can come across some of the best subtitle generator apps for your Android devices.
1. CapCut - Best App for TikTok Users
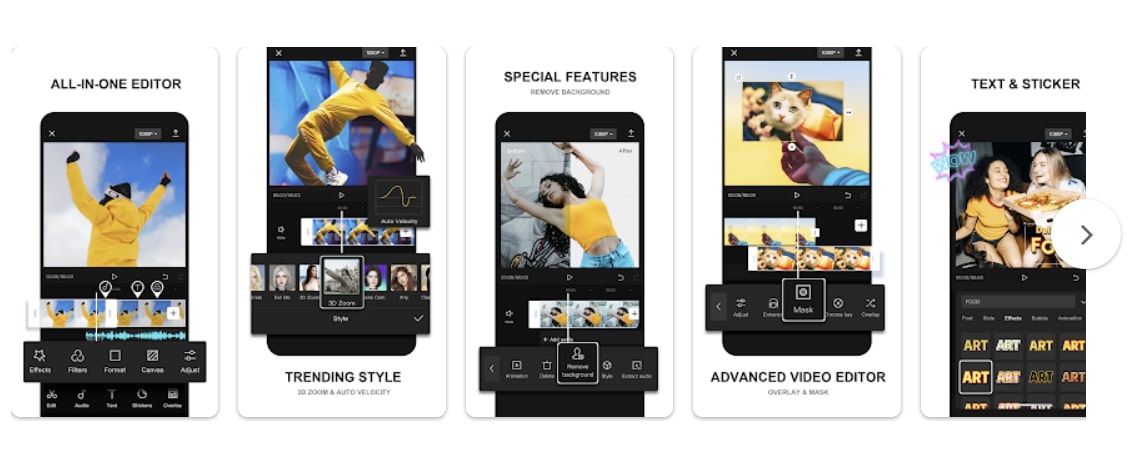
CapCut is an easy-to-use Android and iOS app to add subtitles to videos professionally. It comprises different functions that can assist you in making your video look appealing and engaging. You can make adjustments such as changing the brightness, saturation, exposure, contrast, etc. To add subtitles, you can create auto captions through CapCut without manually adding them. Thus, it’s a complete tool for creating subtitles and editing videos effortlessly.
Price
- $0.99 - $74.99 Per Item
Key Features
- CapCut contains various trending text templates that you can apply while creating subtitles. It contains multiple text templates such as Titles, Outro, Spark, Chapter, Message, Tag, etc.
- You can extract audio from a video file using this app in its original quality with a single click.
- To enhance your visual appearance in a video, CapCut provides different filters such as Metal, Green Milk, Taro, Red Tea, and many more.
Pros
- You can retouch the facial features of your face by using different options such as White Teeth, Dark Circles, Smile Lines, etc.
- For more enhancements, you can modify the opacity of your video using this app.
Cons
- It does not offer impressive color grading options.
2. MixCaptions - Specially Built for Adding Captions
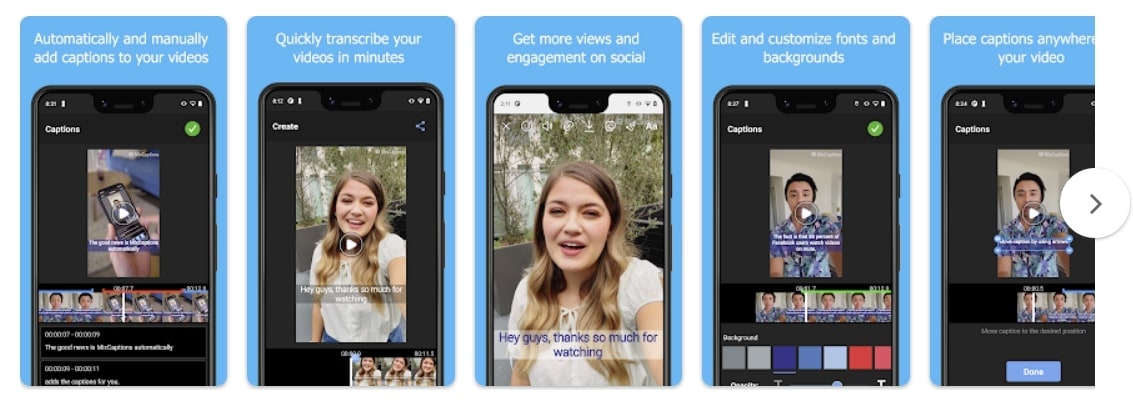
MixCaptions can be used as a video editor and subtitle editor app effectively. Apart from creating subtitles manually, you can utilize your SRT files to create subtitles. You can also use this app to create SRT files instantly. Moreover, you can also decide where to display your subtitles on your video. You can display your subtitles at the top, bottom, or middle using this tool.
Price
- $0.49 - $24.99 Per Item
Key Features
- Using MixCaptions, you can transcribe your voice in up to 23 languages, such as Turkish, English, French, German, Spanish, Chinese, etc.
- This tool supports common video aspect ratios that can be suitable for IGTV, TikTok, Twitter, Facebook, and Instagram posts.
- Once you have transcribed your voice to create subtitles, you can edit them by selecting the desired font, color, text style, etc.
Pros
- This tool does not add a watermark to your video files after you have bought its subscription plan.
- Using this tool, you can manually add subtitles to your videos according to the time frame.
Cons
- In a free trial, you can only transcribe the video for up to 3 minutes.
3. VLLO - Advanced Video and Subtitle Editor for Android Users
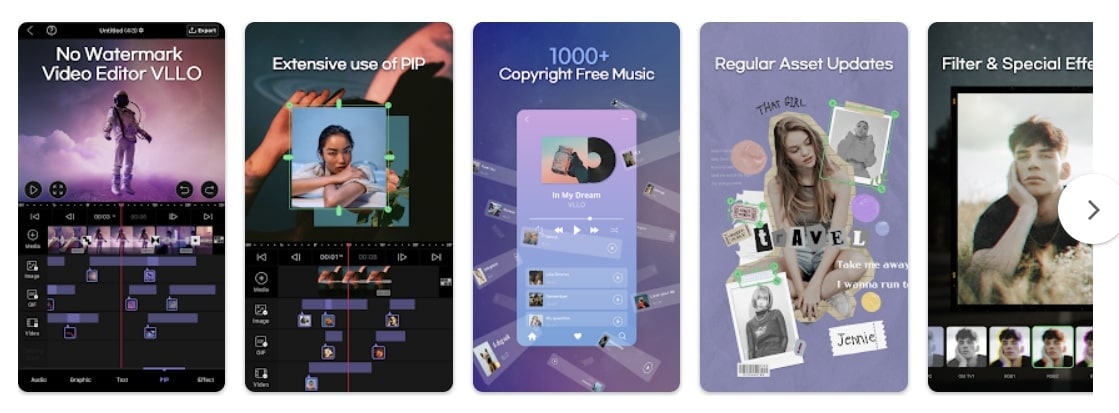
Have you ever used VLLO before? This video subtitle app offers an intuitive user interface through which you can perform different operations on your video files. You can trim, split, reverse, rotate, and crop your video quickly using this app. Moreover, you can add subtitles to your videos through this tool easily. The offered subtitle text styles are present in vector format so that you won’t lose the quality of your video.
Price
- $0.99 - $25.99 Per Item
Key Features
- VLLO provides more than 200 royalty-free background music tracks that can easily be added to your video files.
- You can also add a voice-over to your videos in high audio quality while editing in real-time.
- On this platform, you can craft your own customized text style by utilizing animation effects, shadows, and outline properties.
Pros
- To check the editing of your video, this tool provides a full-screen preview window. It also offers a grid so that you can analyze the ratio of your video easily.
- You can save all the edited videos in this app under the “My Project” folder.
Cons
- Many stickers, filters, text styles, and effects are only available for premium users.
Part 4: 3 Apps to Add Captions to Videos on iPhone
Are you ready to know about the best subtitle creators for iOS devices? Here are some of the top subtitle generators which you can use to add captions to videos on your iPhone.
1. iMovie - Free Video Editor for iOS Users
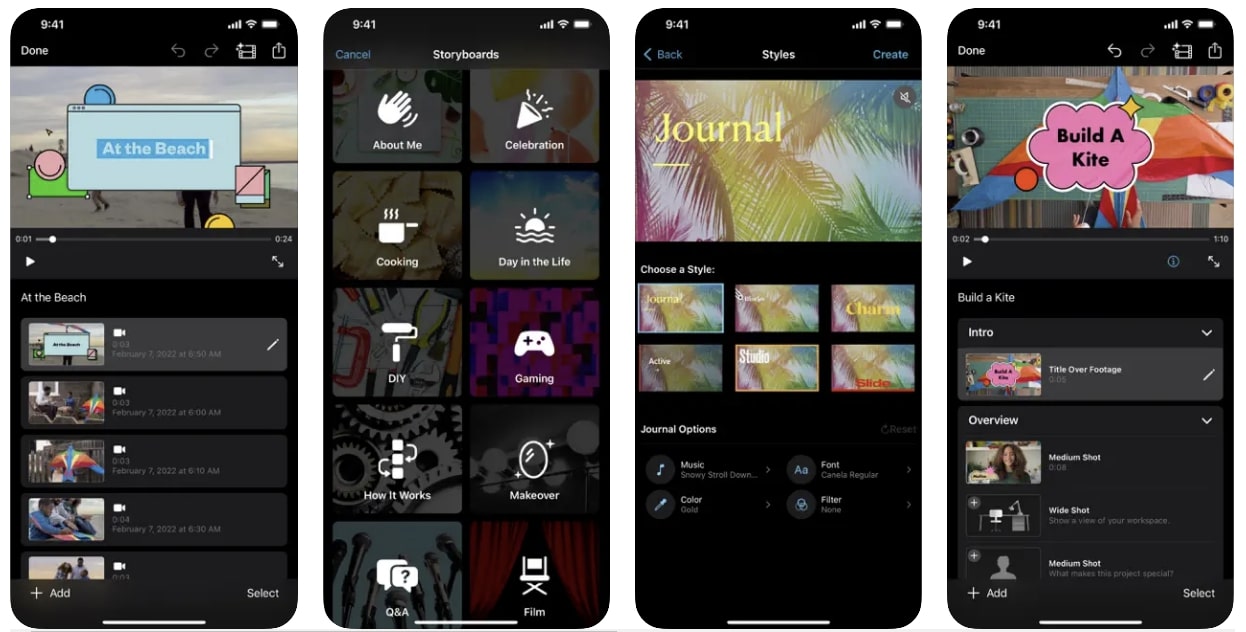
iMovie is an excellent app for iOS users through which they can try their creative editing skills easily. You can apply different styles and transitions to change the dimensions of your video clips completely. Moreover, you can also add text and subtitles to your videos using this tool. It offers various font styles and options that you can apply to create customized subtitles.
Price
- Free
Download: iOS
Key Features
- It offers 20 storyboards related to different categories that you can use to begin creating your videos effectively.
- In its timeline, you can easily rearrange and remove video clips.
- This tool offers up to 14 trailer templates through which you can produce your movie trailers.
Pros
- iMovie contains 8 distinct themes with added transitions, music tracks, and titles. You can apply these themes to create impressive videos effortlessly.
- You can share your projects created in iMovie between your iPhone and iPad using iCloud Drive.
Cons
- This tool does not include Multicam and motion tracking options.
2. Add Subtitles - Auto Captions - Enhanced Subtitle Creator for Apple Users
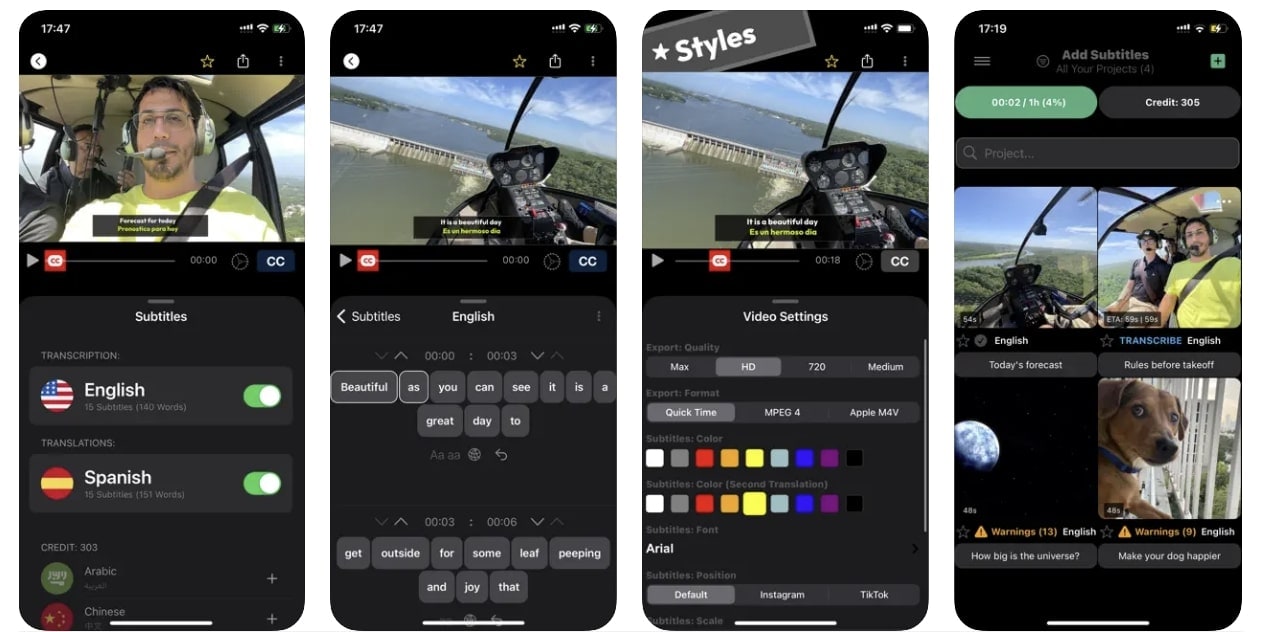
This video subtitle app is commonly used to add auto-captions on videos without any restrictions. The speech recognition feature in this tool works 3 times faster along with high precision. It does not restrict a user to a particular video length. Moreover, you would also receive text alternatives so that you can edit auto-generated subtitles.
Price
- Beginner: $3.99
- Expert: $9.99
- Business: $29.99
- Personal Use: $8.49
- Small Translations Pack: $2.99
- Big Translations Pack: $5.99
Download: iOS
Key Features
- The translation feature of this tool supports more than 100 languages. Moreover, you can translate up to 2 languages in one video file.
- It provides various export options such as M4V, MPEG4, 4K, HD, and QuickTime.
- You can create projects on this tool through your camera, photo library, and iCloud.
Pros
- You can filter videos to search for your project without any hassle.
- Using this tool, you can change the file name and thumbnail with a single tap.
Cons
- On this platform, you cannot edit or modify your video files.
3. InShot - Video Editor - Complete Subtitle and Video Editor
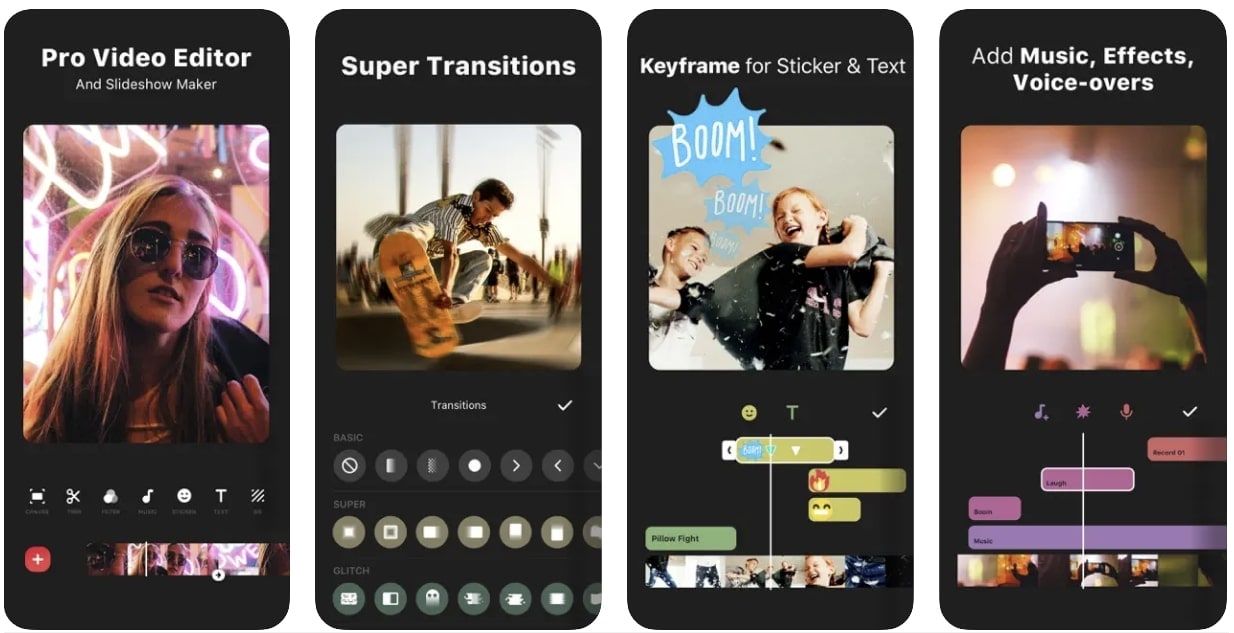
Have you ever used InShot before? InShot is a famous app that enables you to trim, cut, and merge video files instantly. Along with basic editing, you can also add music tracks, voice-overs, and effects. You can also add subtitles to your videos efficiently without any restrictions. Moreover, you can sync the added text to your videos on the timeline proficiently with a few clicks.
Price
- InShot Pro (1 Month): $3.99
- InShot Pro (1 Year): $14.99
- Remove Ads: $3.99
- InShot Pro (Permanently): $34.99
- Transition Pack - Power: $3.99
- Video Effect - FORM Pack: $1.99
- Filter Pack - CINEMA: $1.99
- Transition Pack - Glitch: $3.99
- Filter Pack - SKIN: $1.99
- Filter Pack - CREATE: $1.99
Key Features
- You can make blur borders on your video using this tool to upload them on social media platforms.
- This video subtitle app supports high video output resolution and allows you to save a video in 4K and 60FPS.
- This tool provides a wide variety of cinematic filters which you can add to make your videos more compelling.
Pros
- You can add music tracks to your video files to make your content more engaging.
- On this tool, you can add video and photo layers to display your creativity in a unique manner.
Cons
- This tool does not offer advanced features to create subtitles for video files automatically.
Part 5: 3 Online Tools to Add Subtitles to Videos
Many people don’t prefer to download apps or software on their devices. For such users, there are various online subtitle generator apps that can be accessed from any web browser. For your convenience, this part of the article will discuss the top 3 online auto caption apps.
1. Veed.io - Online Auto Subtitle Generator
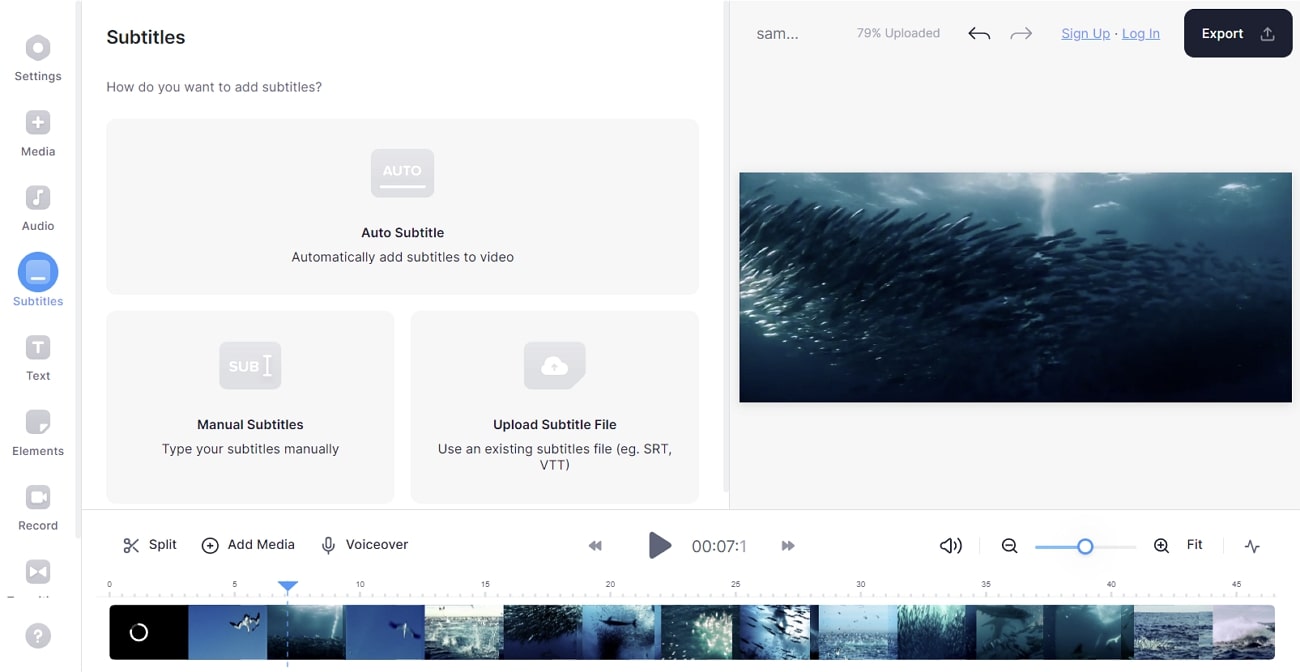
When it comes to online subtitle generator apps, Veed.io is one of the most suitable choices. Through this app, you can add subtitles in three ways. To add subtitles briefly, you can use the manual option on this tool. Or, if you already have a subtitle file, you can upload it directly to this tool easily. To increase your work efficiency and productivity, you can use the auto transcription services to produce subtitles with 95% accuracy.
Pricing
- Basic: $12/Month
- Pro: $24/Month
Key Features
- To decrease the file size of your videos, this tool contains a video compressor to compress videos while preserving the original video quality.
- If you want to make your videos interesting and funny, Veed.io allows you to add emojis and stickers to video files instantly.
- It has a Subtitle Translator through which you can translate your subtitles into different languages.
Pros
- This tool can act as a video player that allows you to play videos of various file formats.
- io can function as a multi-streaming platform through which you can broadcast your live streams to multiple platforms like Twitter, YouTube, Facebook, etc.
Cons
- The video export length of the Veed.io free package is extremely low, which is 10 minutes.
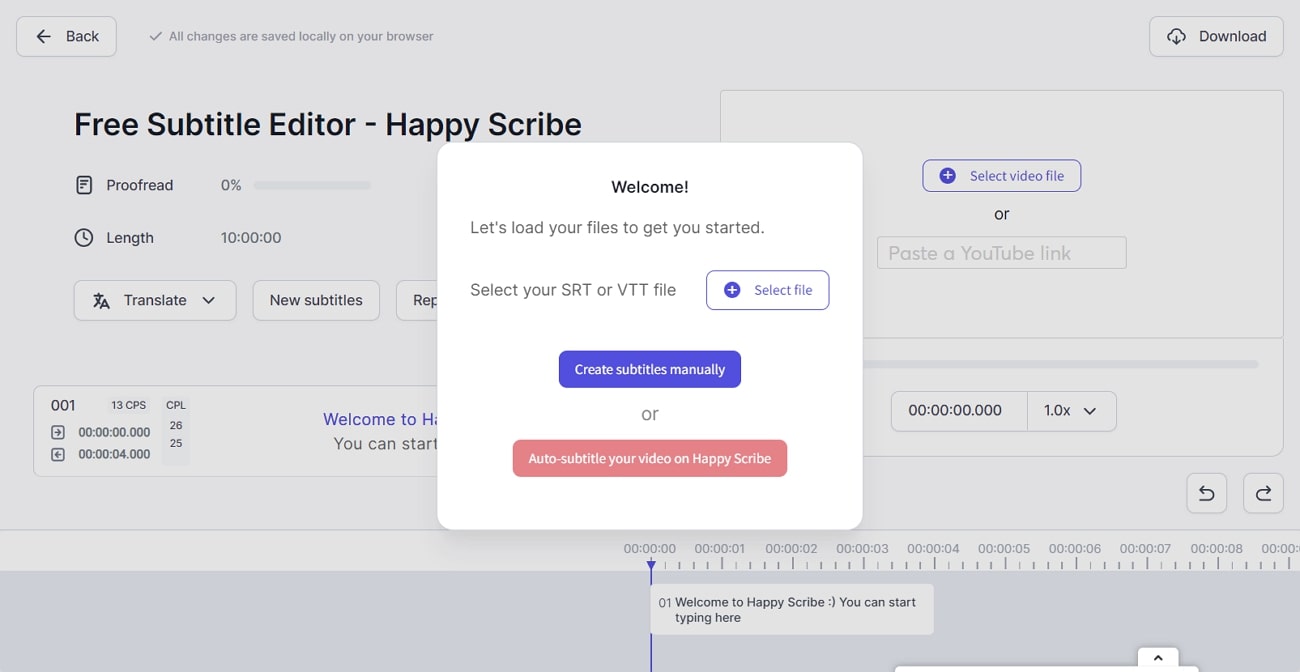
2. Happy Scribe - Subtitle Generator with Enhanced Features
Happy Scribe is a famous online platform for adding subtitles to video apps impressively. It contains multiple export formats such as SRT, Word, PDF, Text, AVID, STL, VVT, etc. Without any limitations, such as creating a user account or uploading a particular file size, you can create subtitles for your videos. Furthermore, this app preserves the confidentiality and security of your files to keep personal data safe while editing it online.
Pricing
- Automatic: €0.20/minute
- Hand-made: €2.00/Minute
- Human Translation: €20.85/Minute
Key Features
- This app supports real-time collaboration so that you can modify and enhance your video files along with your friends and team members.
- In its transcription services, you can select either automatic transcription software or human-made transcription for more accurate results.
- You can customize your added subtitles with the help of CPL and CPS management.
Pros
- You can preview your subtitles in real-time and analyze their position with a soundwave.
- You can also share your subtitles by enabling the options like view-only and edit mode.
Cons
- Happy Scribe does not offer video editing features like other subtitle creators.
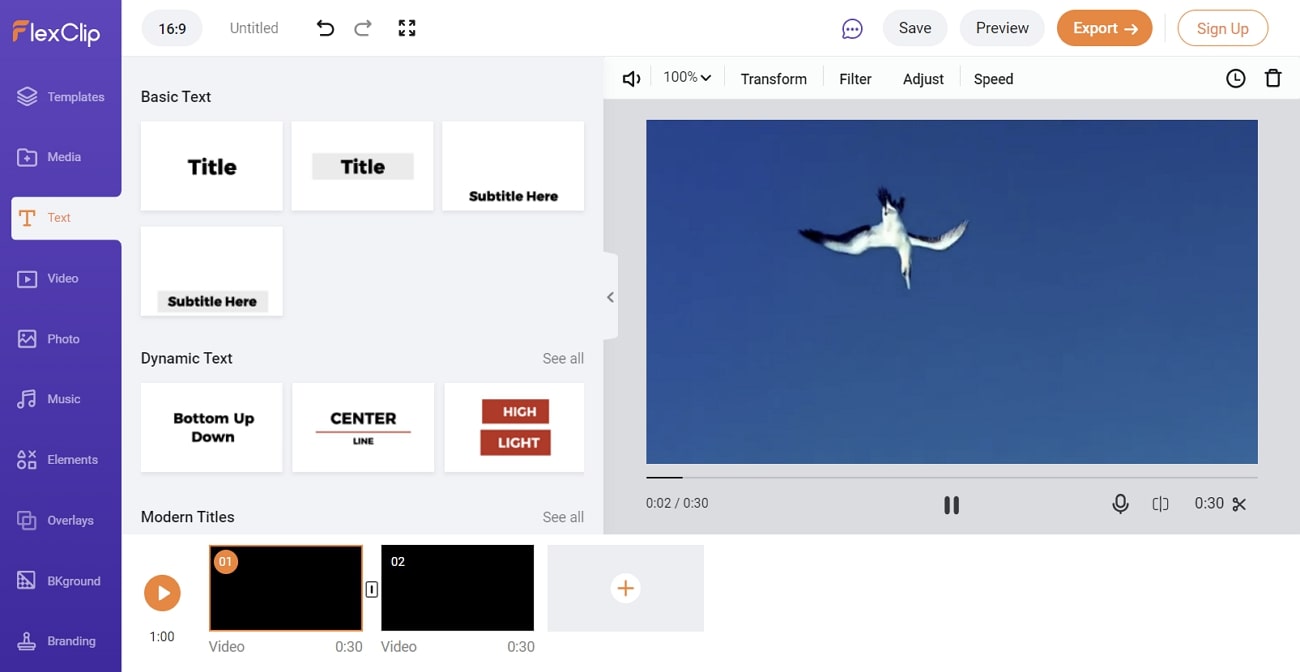
3. FlexClip - Manual Online Subtitle Editor
FlexClip is a classic and basic subtitle generator app through which you can produce subtitles in three simple steps. It supports popular video file formats such as MOV, MP4, M4V, etc. Without downloading any software or extension, you can quickly insert subtitles to your videos easily. This tool also provides more than 100 built-in text fonts for your ease. Hence, this online tool provides flexible subtitle editing in its clean and delightful user interface.
Pricing
- Basic: $9.99/Month
- Plus: $19.99/Month
- Business: $29.99/Month
Key Features
- To make your video look more appealing, you can enhance the video brightness through this online tool.
- You can also add text boxes to your videos to demonstrate or explain the content in an organized manner.
- To endorse your product or brand, you can easily add customized logos to your videos.
Pros
- You can use its merger feature to combine several video clips smoothly and effortlessly.
- This online tool does not charge any subscription fees from the users. Thus, you can create subtitles for your videos using this online platform free of cost.
Cons
- Using this tool, you cannot export videos in 4K and 8K.
Part 6: Three Top Picks
Do you want to know the top three picks of subtitle editors? Read this section to learn the best choices for video subtitle apps:
1. Best Easy-to-Use Subtitle Editor: Veed.io
Veed.io is an online tool that has the best clean and delightful user interface. As a beginner, you can easily navigate its interface and create subtitles without interruption or ads.
2. Most Advanced Subtitle Creator: Filmora
If you are looking for an advanced subtitle creator, Wondershare Filmora is the best choice. Its Speech-To-Text feature uses advanced algorithms through which you can auto-create subtitles for your videos.
Free Download For Win 7 or later(64-bit)
Free Download For macOS 10.14 or later
3. Most Cost-Effective Subtitle Generator: UniConverter
UniConverter is one of the most reliable and cost-effective software for subtitle editing. It provides multiple subscription plans within affordable ranges to assist students, beginners, and other individuals.
People May Also Ask
1. How can I merge subtitles and video permanently?
You can use Wondershare Filmora to edit your video files flawlessly. Once you are done editing your video, you can add subtitles to it by using your preferred option. Afterward, the tool will automatically merge subtitles and video once you have exported the video file.
2. How do I add subtitles to an already recorded or downloaded video?
Upload your video file to the interface of Filmora and head to its “Title” option. From there, select the option of “Subtitle” and choose your preferred subtitle style to add your subtitles. Using this tool, you can also choose its font style, color, size, and opacity.
Last Words
This article has shed light on the top 15 subtitle generator apps along with their descriptions, advantages, features, and drawbacks. For your help, we have provided a detailed list of subtitle apps for all platforms. However, if you want to choose the best video subtitle app, you can try Wondershare Filmora. This tool offers a Speech-to-Text feature that enables you to produce subtitles automatically and with high accuracy.
- VideoProc - Best Video Converter for macOS Devices
- Wondershare UniConverter - Complete Video Toolbox for Mac Users
- Adobe Premiere Pro - Video Editor for Professionals
- The Best 3 Subtitle Apps for Android
- CapCut - Best App for TikTok Users
- MixCaptions - Specially Built for Adding Captions
- VLLO - Advanced Video and Subtitle Editor for Android Users
- iMovie - Free Video Editor for iOS Users
- Add Subtitles - Auto Captions - Enhanced Subtitle Creator for Apple Users
- InShot - Video Editor - Complete Subtitle and Video Editor
- Veed.io - Online Auto Subtitle Generator
- Happy Scribe - Subtitle Generator with Enhanced Features
- FlexClip - Manual Online Subtitle Editor
Part 1: Best 3 Subtitle Apps on Windows
Do you want to know about some reliable video subtitle apps for Windows? This section will shed light on the top 3 subtitle apps on Windows, along with their advantages and drawbacks.
| Name | Price | Support System | Supported Subtitle Files | Auto Caption | Video Editing |
|---|---|---|---|---|---|
| Jubler Subtitle Editor | Free | Linux, Windows, and Mac | ASS, SRT, SUB, Text, etc. | No | No |
| Wondershare Filmora | Month Plan: $19.99Annual Plan: $49.99Perpetual Plan: $79.99 | Windows, Mac, and iOS | SRT and Text | Yes | Yes |
| Movavi Video Editor | $69.95 | Windows and Mac | Text | No | Yes |
1. Jubler Subtitle Editor - The Best Free Subtitle Editor for Windows
Jubler is a classic example of a subtitle editor through which you can efficiently create and edit subtitles for your videos. You can also use this tool to convert, modify, transform, or correct the existing subtitles on a video file. The supported file formats are SubViewer, SubRip, SubStation, etc. Hence, it’s a compatible subtitle app for Windows users comprising all the necessary features for subtitle creation and editing.

Key Features
- This tool allows you to mark your subtitles with different colors while editing or playing the video file in real-time.
- This app can graphically display your subtitles and allows you to resize or move them.
- It provides the Undo and the Redo options to edit your subtitles without any complications.
Pros
- This tool offers a feature for spell-checking along with dictionary selection to prevent the chances of mistakes.
- You can check the current frame and waveform preview to graphically preview the subtitles using the FFMPEG library.
Cons
- You have to install a video player with this tool to preview your video to check the results.
2. Wondershare Filmora - All-in-One Subtitle Solution
Have you ever experienced using Wondershare Filmora? Filmora is a famous tool through which people can enhance and edit their video files using advanced features. You can utilize this platform with a famous video editor to create subtitles from scratch efficiently. It contains a Speech-to-Text option that can help you to generate subtitles without requiring your efforts. With a single click, this feature can automatically create subtitles by transcribing your voice with high accuracy.

Key Features
- Filmora offers more than 80 animation presets and styles that you can instantly apply to your created subtitles.
- The speech-to-text feature shows compatibility with up to 16 different languages. Thus, you can auto-create subtitles in popular languages.
- This tool contains stock footage in its library that you can easily add to your videos.
Pros
- This platform offers an AI Portrait feature that can remove the background from your videos. Moreover, it contains more than 70 AI portrait effects and stickers for further enhancement.
- This tool can act as a high-quality screen recorder to capture gameplays, online meetings, tutorials, and other screen activities.
Cons
- Filmora adds a watermark to your video in the free trial.
3. Movavi Video Editor - Best for Adding Subtitles Manually
Movavi is a popular tool that many professionals use to create and edit their videos in high quality. It contains various transition effects that you can apply to make your video look smooth and attractive. By using this tool, you can also create Softsubs and Hardsubs according to your desire. Afterward, you can select the font, color, and size of your added subtitles using this platform.

Key Features
- It contains a synchronization box that enables you to delay or advance the subtitles according to the specific time. This will make your subtitles synchronized effectively.
- You can also change the position of your subtitles with accuracy and precision using this tool.
- To make your video look customized, you can add a watermark to your video files according to your desire.
Pros
- If your video contains unnecessary noise, Movavi offers an AI Noise removal feature that allows you to eradicate the noise.
- If you have captured a shaky video, you can use its stabilization option to get rid of flaws.
Cons
- The video rendering process in this tool is slow and sluggish.
Part 2: 3 Subtitle Apps for Mac Worth Trying
Are you looking for special subtitle apps for your MacBook? In this section, we will shed light on the top 3 subtitle generator apps that can be ideal for MacBook users.
| Name | Price | Support System | Supported Subtitle Files | Auto Caption | Video Editing |
|---|---|---|---|---|---|
| VideoProc Converter | Lifetime License: $39.95 | Windows and Mac | ASS, SSA, SRT, Text | No | No |
| Wondershare UniConverter | Quarterly Plan: $29.99Annual Plan: $39.99Perpetual Plan: $55.99 | Windows and Mac | SRT. ASS, SSA, Text | Yes | Yes |
| Adobe Premier Pro | $20.99/Month | Windows and Mac | SCC, MCC, XML, STL, SRTDFXMP, Text | Yes | Yes |
1. VideoProc - Best Video Converter for macOS Devices
This app has a simple interface that enables you to manage subtitle files easily. Through this compatible tool, you can embed your subtitles into your videos without any hassle. It’s a lightweight tool as it won’t take up excessive storage space on your MacBook. Moreover, you can also use this tool to tackle video issues like noise, poor color, camera shake, etc.

Key Features
- This software can convert 4K and HD videos while maintaining their original quality.
- It offers batch conversion so that you can convert multiple video files at the same time easily.
- You can batch-download the video files in various formats and preferred resolutions. It also supports more than 1000 websites for media download.
Pros
- It offers two recording modes: Chroma key and Picture-in-picture. By utilizing these modes, you can capture live stream sessions and gameplays in high resolution.
- Using this tool instantly, you can rotate and flip your videos clockwise or counter-clockwise.
Cons
- The free trial of this tool is limited to 5 minutes video only.
2. Wondershare UniConverter - Complete Video Toolbox for Mac Users
UniConverter is one of the well-trusted platforms through which you can modify your videos by using advanced key features. It contains tons of options, such as a watermark editor, screen recorder, compressor, converter, etc. Furthermore, it provides a subtitle editor through which you can add subtitles to your videos in multiple ways. Thus, using this tool, you can add subtitles to your videos at a fast-processing speed.

Key Features
- This tool supports more than 1000 video file formats batch conversion. Thus, you can convert your multiple video files to other formats.
- You can use this tool as a downloader to download online videos of high quality.
- It contains an Auto Crop feature through which you can resize your videos according to social media channels.
Pros
- By using its AI Portrait feature, you can automatically separate the portrait and background from your video.
- To eradicate the unwanted parts from your video, you can use the trim feature of UniConverter effectively.
Cons
- It lacks advanced video editing features that are necessary for professional editing.
3. Adobe Premiere Pro - Video Editor for Professionals
Have you ever used Adobe Premiere Pro for video editing? Adobe Premiere Pro is undoubtedly the most famous software for MacBook users through which you can execute professional editing. It functions as a complete video toolbox and ensures great output results. Besides being a professional video editing software, you can also use this tool as a subtitle generator app. You can use its Speech-to-Text feature to produce subtitles automatically and with precision.

Key Features
- To increase the visual appeal of your video, you can use this tool for color grading and correction.
- You can create captivating intros and outros for your videos by using graphic templates and other elements.
- You can add different audio effects to transform the sound in your video professionally.
Pros
- Using this tool, you can convert your video to GIF within seconds.
- You can enhance or decrease the speed of your video accordingly from this professional tool.
Cons
- The interface of Adobe Premiere Pro can be intimidating for beginners.
Part 3: The Best 3 Subtitle Apps for Android
Being an Android user, you may feel to use auto caption apps to create subtitles for your videos without any hassle. By reading this section, you can come across some of the best subtitle generator apps for your Android devices.
1. CapCut - Best App for TikTok Users
CapCut is an easy-to-use Android and iOS app to add subtitles to videos professionally. It comprises different functions that can assist you in making your video look appealing and engaging. You can make adjustments such as changing the brightness, saturation, exposure, contrast, etc. To add subtitles, you can create auto captions through CapCut without manually adding them. Thus, it’s a complete tool for creating subtitles and editing videos effortlessly.

Price
- $0.99 - $74.99 Per Item
Key Features
- CapCut contains various trending text templates that you can apply while creating subtitles. It contains multiple text templates such as Titles, Outro, Spark, Chapter, Message, Tag, etc.
- You can extract audio from a video file using this app in its original quality with a single click.
- To enhance your visual appearance in a video, CapCut provides different filters such as Metal, Green Milk, Taro, Red Tea, and many more.
Pros
- You can retouch the facial features of your face by using different options such as White Teeth, Dark Circles, Smile Lines, etc.
- For more enhancements, you can modify the opacity of your video using this app.
Cons
- It does not offer impressive color grading options.
2. MixCaptions - Specially Built for Adding Captions
MixCaptions can be used as a video editor and subtitle editor app effectively. Apart from creating subtitles manually, you can utilize your SRT files to create subtitles. You can also use this app to create SRT files instantly. Moreover, you can also decide where to display your subtitles on your video. You can display your subtitles at the top, bottom, or middle using this tool.

Price
- $0.49 - $24.99 Per Item
Key Features
- Using MixCaptions, you can transcribe your voice in up to 23 languages, such as Turkish, English, French, German, Spanish, Chinese, etc.
- This tool supports common video aspect ratios that can be suitable for IGTV, TikTok, Twitter, Facebook, and Instagram posts.
- Once you have transcribed your voice to create subtitles, you can edit them by selecting the desired font, color, text style, etc.
Pros
- This tool does not add a watermark to your video files after you have bought its subscription plan.
- Using this tool, you can manually add subtitles to your videos according to the time frame.
Cons
- In a free trial, you can only transcribe the video for up to 3 minutes.
3. VLLO - Advanced Video and Subtitle Editor for Android Users
Have you ever used VLLO before? This video subtitle app offers an intuitive user interface through which you can perform different operations on your video files. You can trim, split, reverse, rotate, and crop your video quickly using this app. Moreover, you can add subtitles to your videos through this tool easily. The offered subtitle text styles are present in vector format so that you won’t lose the quality of your video.

Price
- $0.99 - $25.99 Per Item
Key Features
- VLLO provides more than 200 royalty-free background music tracks that can easily be added to your video files.
- You can also add a voice-over to your videos in high audio quality while editing in real-time.
- On this platform, you can craft your own customized text style by utilizing animation effects, shadows, and outline properties.
Pros
- To check the editing of your video, this tool provides a full-screen preview window. It also offers a grid so that you can analyze the ratio of your video easily.
- You can save all the edited videos in this app under the “My Project” folder.
Cons
- Many stickers, filters, text styles, and effects are only available for premium users.
Part 4: 3 Apps to Add Captions to Videos on iPhone
Are you ready to know about the best subtitle creators for iOS devices? Here are some of the top subtitle generators which you can use to add captions to videos on your iPhone.
1. iMovie - Free Video Editor for iOS Users
iMovie is an excellent app for iOS users through which they can try their creative editing skills easily. You can apply different styles and transitions to change the dimensions of your video clips completely. Moreover, you can also add text and subtitles to your videos using this tool. It offers various font styles and options that you can apply to create customized subtitles.

Price
- Free
Download: iOS
Key Features
- It offers 20 storyboards related to different categories that you can use to begin creating your videos effectively.
- In its timeline, you can easily rearrange and remove video clips.
- This tool offers up to 14 trailer templates through which you can produce your movie trailers.
Pros
- iMovie contains 8 distinct themes with added transitions, music tracks, and titles. You can apply these themes to create impressive videos effortlessly.
- You can share your projects created in iMovie between your iPhone and iPad using iCloud Drive.
Cons
- This tool does not include Multicam and motion tracking options.
2. Add Subtitles - Auto Captions - Enhanced Subtitle Creator for Apple Users
This video subtitle app is commonly used to add auto-captions on videos without any restrictions. The speech recognition feature in this tool works 3 times faster along with high precision. It does not restrict a user to a particular video length. Moreover, you would also receive text alternatives so that you can edit auto-generated subtitles.

Price
- Beginner: $3.99
- Expert: $9.99
- Business: $29.99
- Personal Use: $8.49
- Small Translations Pack: $2.99
- Big Translations Pack: $5.99
Download: iOS
Key Features
- The translation feature of this tool supports more than 100 languages. Moreover, you can translate up to 2 languages in one video file.
- It provides various export options such as M4V, MPEG4, 4K, HD, and QuickTime.
- You can create projects on this tool through your camera, photo library, and iCloud.
Pros
- You can filter videos to search for your project without any hassle.
- Using this tool, you can change the file name and thumbnail with a single tap.
Cons
- On this platform, you cannot edit or modify your video files.
3. InShot - Video Editor - Complete Subtitle and Video Editor
Have you ever used InShot before? InShot is a famous app that enables you to trim, cut, and merge video files instantly. Along with basic editing, you can also add music tracks, voice-overs, and effects. You can also add subtitles to your videos efficiently without any restrictions. Moreover, you can sync the added text to your videos on the timeline proficiently with a few clicks.

Price
- InShot Pro (1 Month): $3.99
- InShot Pro (1 Year): $14.99
- Remove Ads: $3.99
- InShot Pro (Permanently): $34.99
- Transition Pack - Power: $3.99
- Video Effect - FORM Pack: $1.99
- Filter Pack - CINEMA: $1.99
- Transition Pack - Glitch: $3.99
- Filter Pack - SKIN: $1.99
- Filter Pack - CREATE: $1.99
Key Features
- You can make blur borders on your video using this tool to upload them on social media platforms.
- This video subtitle app supports high video output resolution and allows you to save a video in 4K and 60FPS.
- This tool provides a wide variety of cinematic filters which you can add to make your videos more compelling.
Pros
- You can add music tracks to your video files to make your content more engaging.
- On this tool, you can add video and photo layers to display your creativity in a unique manner.
Cons
- This tool does not offer advanced features to create subtitles for video files automatically.
Part 5: 3 Online Tools to Add Subtitles to Videos
Many people don’t prefer to download apps or software on their devices. For such users, there are various online subtitle generator apps that can be accessed from any web browser. For your convenience, this part of the article will discuss the top 3 online auto caption apps.
1. Veed.io - Online Auto Subtitle Generator
When it comes to online subtitle generator apps, Veed.io is one of the most suitable choices. Through this app, you can add subtitles in three ways. To add subtitles briefly, you can use the manual option on this tool. Or, if you already have a subtitle file, you can upload it directly to this tool easily. To increase your work efficiency and productivity, you can use the auto transcription services to produce subtitles with 95% accuracy.

Pricing
- Basic: $12/Month
- Pro: $24/Month
Key Features
- To decrease the file size of your videos, this tool contains a video compressor to compress videos while preserving the original video quality.
- If you want to make your videos interesting and funny, Veed.io allows you to add emojis and stickers to video files instantly.
- It has a Subtitle Translator through which you can translate your subtitles into different languages.
Pros
- This tool can act as a video player that allows you to play videos of various file formats.
- io can function as a multi-streaming platform through which you can broadcast your live streams to multiple platforms like Twitter, YouTube, Facebook, etc.
Cons
- The video export length of the Veed.io free package is extremely low, which is 10 minutes.
2. Happy Scribe - Subtitle Generator with Enhanced Features
Happy Scribe is a famous online platform for adding subtitles to video apps impressively. It contains multiple export formats such as SRT, Word, PDF, Text, AVID, STL, VVT, etc. Without any limitations, such as creating a user account or uploading a particular file size, you can create subtitles for your videos. Furthermore, this app preserves the confidentiality and security of your files to keep personal data safe while editing it online.

Pricing
- Automatic: €0.20/minute
- Hand-made: €2.00/Minute
- Human Translation: €20.85/Minute
Key Features
- This app supports real-time collaboration so that you can modify and enhance your video files along with your friends and team members.
- In its transcription services, you can select either automatic transcription software or human-made transcription for more accurate results.
- You can customize your added subtitles with the help of CPL and CPS management.
Pros
- You can preview your subtitles in real-time and analyze their position with a soundwave.
- You can also share your subtitles by enabling the options like view-only and edit mode.
Cons
- Happy Scribe does not offer video editing features like other subtitle creators.
3. FlexClip - Manual Online Subtitle Editor
FlexClip is a classic and basic subtitle generator app through which you can produce subtitles in three simple steps. It supports popular video file formats such as MOV, MP4, M4V, etc. Without downloading any software or extension, you can quickly insert subtitles to your videos easily. This tool also provides more than 100 built-in text fonts for your ease. Hence, this online tool provides flexible subtitle editing in its clean and delightful user interface.

Pricing
- Basic: $9.99/Month
- Plus: $19.99/Month
- Business: $29.99/Month
Key Features
- To make your video look more appealing, you can enhance the video brightness through this online tool.
- You can also add text boxes to your videos to demonstrate or explain the content in an organized manner.
- To endorse your product or brand, you can easily add customized logos to your videos.
Pros
- You can use its merger feature to combine several video clips smoothly and effortlessly.
- This online tool does not charge any subscription fees from the users. Thus, you can create subtitles for your videos using this online platform free of cost.
Cons
- Using this tool, you cannot export videos in 4K and 8K.
Part 6: Three Top Picks
Do you want to know the top three picks of subtitle editors? Read this section to learn the best choices for video subtitle apps:
1. Best Easy-to-Use Subtitle Editor: Veed.io
Veed.io is an online tool that has the best clean and delightful user interface. As a beginner, you can easily navigate its interface and create subtitles without interruption or ads.
2. Most Advanced Subtitle Creator: Filmora
If you are looking for an advanced subtitle creator, Wondershare Filmora is the best choice. Its Speech-To-Text feature uses advanced algorithms through which you can auto-create subtitles for your videos.
Free Download For Win 7 or later(64-bit)
Free Download For macOS 10.14 or later
3. Most Cost-Effective Subtitle Generator: UniConverter
UniConverter is one of the most reliable and cost-effective software for subtitle editing. It provides multiple subscription plans within affordable ranges to assist students, beginners, and other individuals.
People May Also Ask
1. How can I merge subtitles and video permanently?
You can use Wondershare Filmora to edit your video files flawlessly. Once you are done editing your video, you can add subtitles to it by using your preferred option. Afterward, the tool will automatically merge subtitles and video once you have exported the video file.
2. How do I add subtitles to an already recorded or downloaded video?
Upload your video file to the interface of Filmora and head to its “Title” option. From there, select the option of “Subtitle” and choose your preferred subtitle style to add your subtitles. Using this tool, you can also choose its font style, color, size, and opacity.
Last Words
This article has shed light on the top 15 subtitle generator apps along with their descriptions, advantages, features, and drawbacks. For your help, we have provided a detailed list of subtitle apps for all platforms. However, if you want to choose the best video subtitle app, you can try Wondershare Filmora. This tool offers a Speech-to-Text feature that enables you to produce subtitles automatically and with high accuracy.
How to Denoise in After Effects – Audio and Video Noise Removal
I was filming with my mobile phone, and the light was low, and it happened so that I had to shake the phone a little because I was in movement. I return home, thinking that the shots were not so bad, look at the new footage on the bigger screen than my phone would have provided, and – no! I am totally wrong! This footage has some kind of little dots all over it, the whole shot looks sort of pixelated. I understand that the circumstances were not so good for shooting, but how come the video is actually this bad? How to get rid of this annoying dot-like overlay, that hinders me from seeing some details and makes my eyes exhausted? Is there a way to make this better at all?
Yeah, this is something called noise, and something called grain can also be in play. And is there a way to solve the problem? –Yes! Technology is getting so good from day to day that editing programs offer the ways to not be bothered because of this problem.
But noise is a word that not necessarily evoke the image of the visual side, rather, for the broader society, it is connected to the audio. A room, filled with some people hanging out and chatting, air conditioner that creates some sound, an opened window from where the chirping of the birds are coming… Anyway, I am still trying to concentrate, to make my voice recording, and then edit the video. Even in this case, I think everything is going pretty well, and the scenario is so alike: I record the whole text I have to follow, then try to listen to it in the speakers or in the headphones, and – SOS again! These noises I mentioned, are filling up my recording, where only my words should be played. Now, I don’t like to cut the parts of my whole recording one by one, and relentlessly, like a butcher, because I am just trying to create a good listener, or viewer experience, and slicing my piece will only make things work. There should be another way!
And yes, there also is. I can solve this problem using some editing software as well. It might even take me only a while and I will have a great voice recording to include in my content. So, my choice, in this case, would be Adobe After Effects – you will say, wow, why so serious? (because this is a very powerful and sophisticated program!) but the answer is – because we can, and because it gives us many opportunity.
So, as you may have noticed already, in this article we will be touching upon audio and video denoising in Adobe After Effects! Let’s get started and solve those little problems we have in our everyday life and work!
How to denoise a video in Adobe After Effects
So, denoising in image and video production is used as a technique to take footage from grainy to crystal-clear, and this is exactly our target. But when can we say that the video noise reduction went well? This method achieves its goal If it suppresses noise effectively in uniform regions; preserves edges and other characteristics, such as fine details and textures; and provides a visually natural experience.
Primarily, Adobe After Effects is a digital visual effects, motion graphics, and compositing application. If you are skilled, you are almost invincible in this software, meaning that you can do almost everything that sparks your imagination. So, if that is the sophistication of the program, why can it not be so that it can help us get rid of the unwanted noise and grain on the scene? There is no answer, because of course, it can.
Even though sometimes this kind of software requires you to download and install and then finally use some external resources, such as plugins, there is a way to do what we are going to, without any help from outside of the program.
First of all, I suppose you have some video you want to edit and make better. Bringing that clip into the program would be the first step of our little adventure. And see the menu where it says Effect? – you need to click on it. Then it gets pretty, meaning very… meaning extremely straightforward – you will find it written – Noise and Grain. Of course, you will need to choose it, and then see the Remove Grain option, to which you are going to stick.

Then, you will need to move your attention to the left side of the screen, where Effects Control will open. By default, you are able to see viewing mode, where Preview can be changed to Final Output, which is exactly what you are going to do.

This will be the video with Preview checked:

And this is the look of the same frame from the video whenever Final Output is turned on:

Yes, it’s true – we have done it already! This is actually this fast and easy in Adobe After Effects – no more noise, no more grain! Anyway, if you want to see the whole process on the video, you can check it here !
How to denoise an audio in Adobe After Effects
When it comes to audio noise, as we have mentioned already, it is possible to master the recording in After Effects in terms of the voice as well, but in reality, After Effects requires another Adobe program called Audition. Let us say that you have a video with audio attached, and you are working in AE, but in order to remove the background noise, you will need to open Audition. Here’s how it’s done:
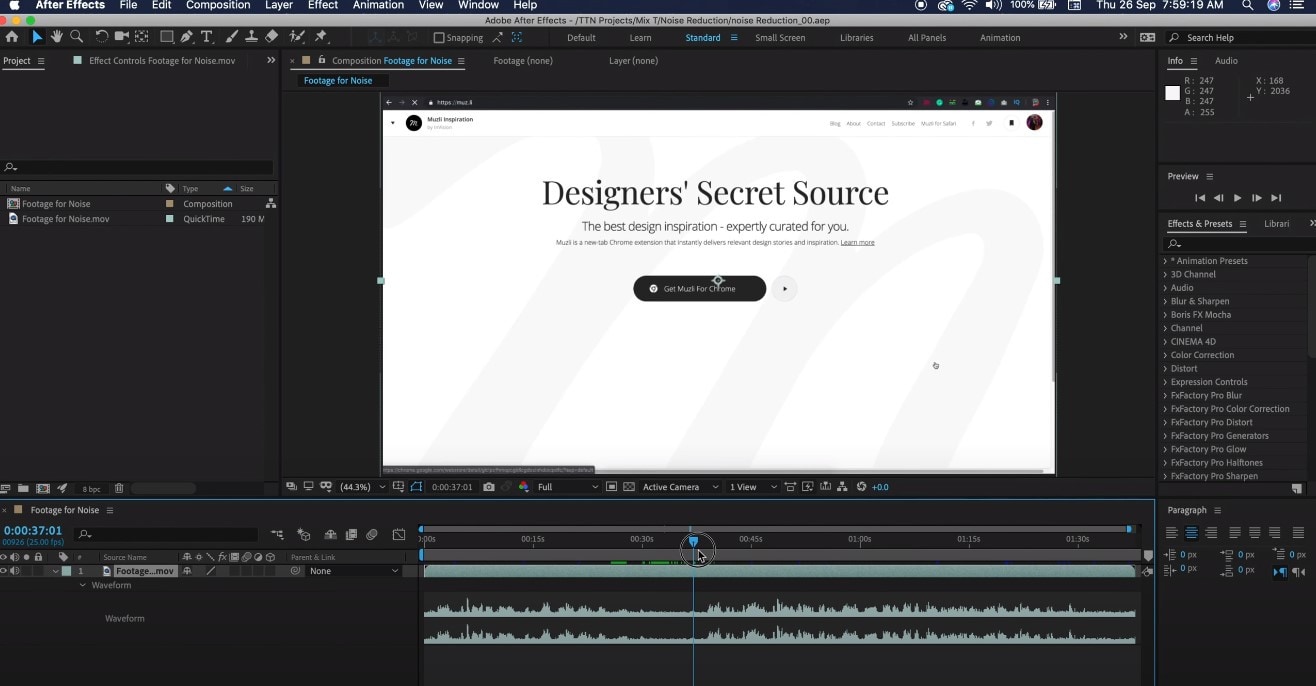
First, in the sequence, you will need to click twice on the video clip, which will open audio graphics below.
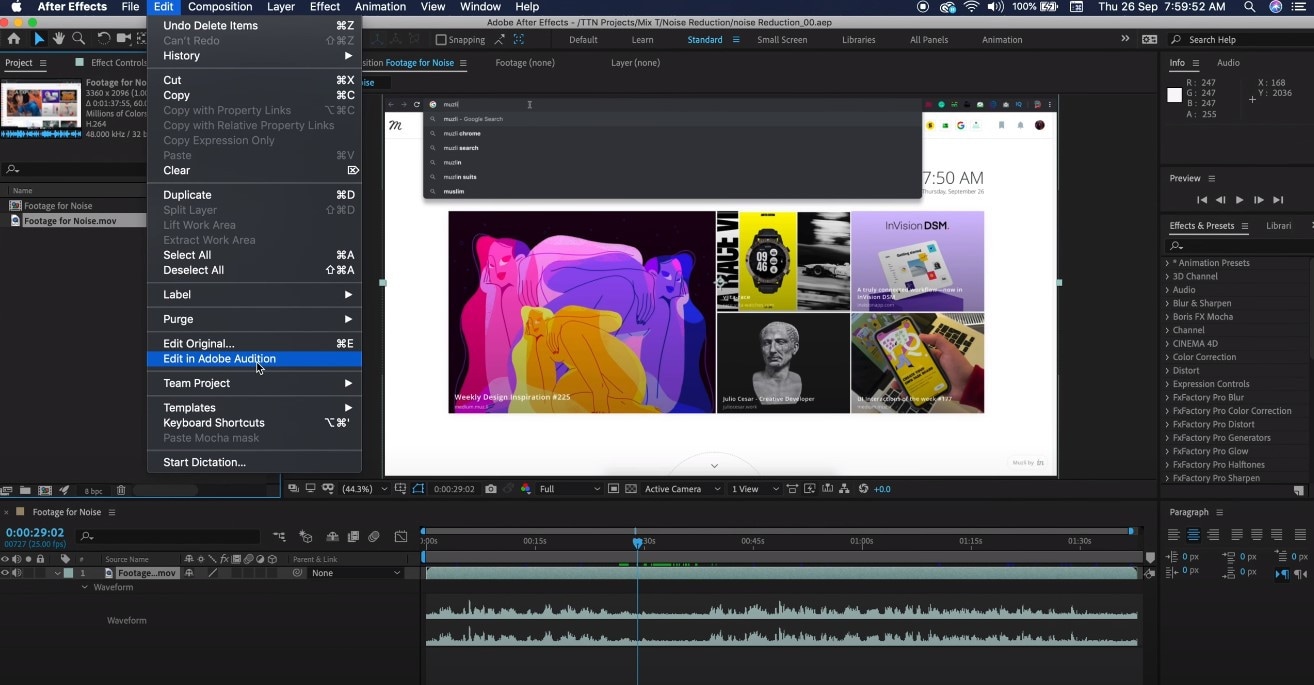
Then, go to Edit in the Navbar, and choose Edit in Adobe Audition.
This program will open and show you more detailed graphic image of the voice recording. Now, you will find the space of time in your recording when you have a somewhat damaged audio and you will select the beginning and the end of it with the mouse. Keep in mind that in case you need to take a look at the video when your audio is played, you can see a little window showing the scene on the left and bottom of your screen.
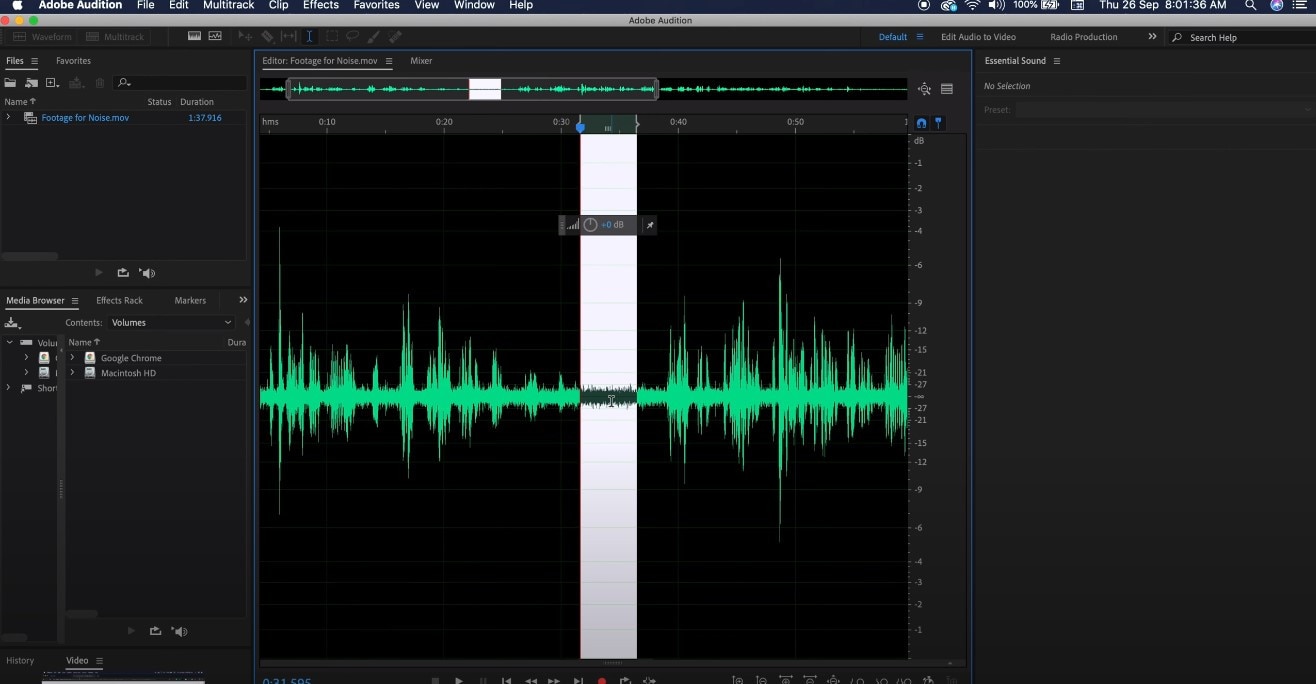
Once you have the selection and are determined with it, you right click on the selection and find Capture Noise Print. Then, you will click on the selection again and find Select all, which will cover the whole audio. That’s when you go to the Navbar again and find Effects -> Noise Reduction / Restoration -> Noise Reduction (process). This will open the graphics again, where you can reduce the noise – you will see the percentage scale where you can modify the noise.
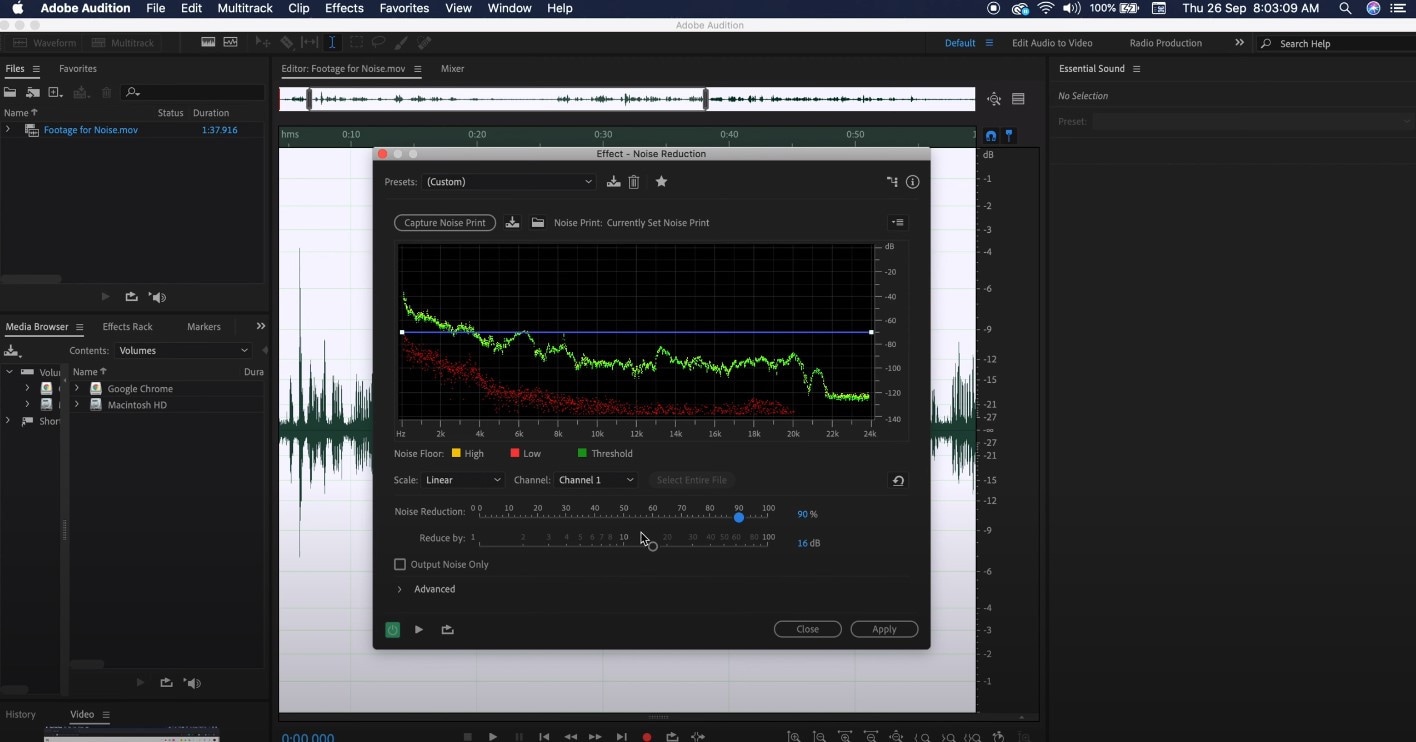
After changing it a little, you will click on the Apply and be able to visually see how the flow has changed and lowered.
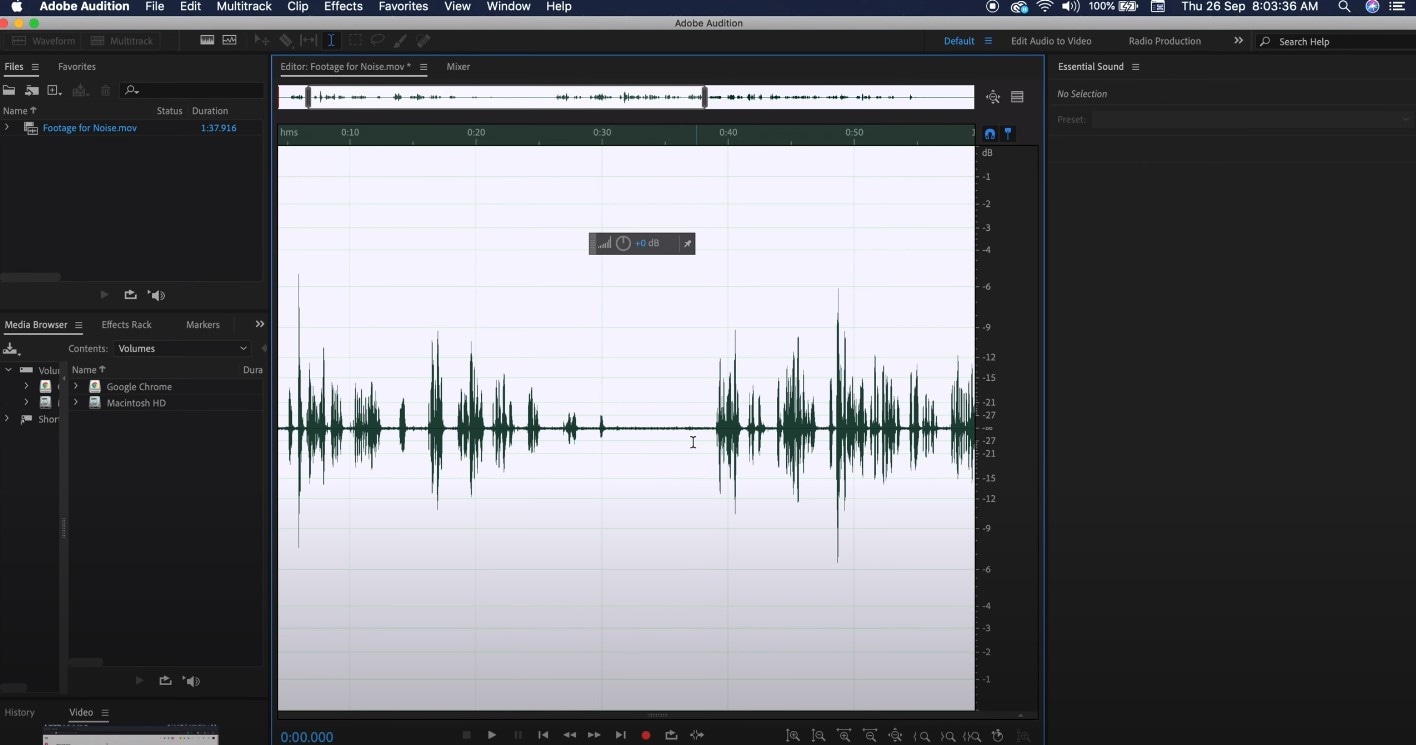
So, when you deselect the selection and play the recording, you will notice that from now on the words are hearable, but some background noise is not there anymore! In order to export, please go to the File and Export, choose your preferred settings and you are ready to go!
Bonus tip: how to remove audio noise in video with Wondershare Filmora
When it comes to audio noise removal, it’s also good to have some alternatives, and you might not even have Adobe After Effects installed on your computer, because there exist a lot of programs easier to use. One of them is Wondershare Filmora, which can play a major role in background noise removal, in a simple way. For this to play out, you will need to pursue the following steps:
To bring your video clip in the program, drag and drop it into the timeline. Right-clicking on the video and hitting Detach Audio will enable you to separate audio and video from each other and work on them individually.

Click twice on the audio track, which will make sure you can see the editing panel and find Remove background noise option there – it can remove the noise right away.

And, that’s it – hard to believe it’s so simple!
So, in this article, you followed us through the steps of how to denoise in Adobe After Effects – first, we touched upon video noise reduction, and then, background noise removal, for which we had to open the audio in Adobe Audition from After Effects. Last but not least, we took a look at how another magnificent software, Wondershare Filmora can help us in doing the same task! Armed with different tools and knowledge, now you can go for it and make your videos and audios more appealing for everyone!
Then, you will need to move your attention to the left side of the screen, where Effects Control will open. By default, you are able to see viewing mode, where Preview can be changed to Final Output, which is exactly what you are going to do.

This will be the video with Preview checked:

And this is the look of the same frame from the video whenever Final Output is turned on:

Yes, it’s true – we have done it already! This is actually this fast and easy in Adobe After Effects – no more noise, no more grain! Anyway, if you want to see the whole process on the video, you can check it here !
How to denoise an audio in Adobe After Effects
When it comes to audio noise, as we have mentioned already, it is possible to master the recording in After Effects in terms of the voice as well, but in reality, After Effects requires another Adobe program called Audition. Let us say that you have a video with audio attached, and you are working in AE, but in order to remove the background noise, you will need to open Audition. Here’s how it’s done:
First, in the sequence, you will need to click twice on the video clip, which will open audio graphics below.

Then, go to Edit in the Navbar, and choose Edit in Adobe Audition.

This program will open and show you more detailed graphic image of the voice recording. Now, you will find the space of time in your recording when you have a somewhat damaged audio and you will select the beginning and the end of it with the mouse. Keep in mind that in case you need to take a look at the video when your audio is played, you can see a little window showing the scene on the left and bottom of your screen.

Once you have the selection and are determined with it, you right click on the selection and find Capture Noise Print. Then, you will click on the selection again and find Select all, which will cover the whole audio. That’s when you go to the Navbar again and find Effects -> Noise Reduction / Restoration -> Noise Reduction (process). This will open the graphics again, where you can reduce the noise – you will see the percentage scale where you can modify the noise.

After changing it a little, you will click on the Apply and be able to visually see how the flow has changed and lowered.

So, when you deselect the selection and play the recording, you will notice that from now on the words are hearable, but some background noise is not there anymore! In order to export, please go to the File and Export, choose your preferred settings and you are ready to go!
Bonus tip: how to remove audio noise in video with Wondershare Filmora
When it comes to audio noise removal, it’s also good to have some alternatives, and you might not even have Adobe After Effects installed on your computer, because there exist a lot of programs easier to use. One of them is Wondershare Filmora, which can play a major role in background noise removal, in a simple way. For this to play out, you will need to pursue the following steps:
To bring your video clip in the program, drag and drop it into the timeline. Right-clicking on the video and hitting Detach Audio will enable you to separate audio and video from each other and work on them individually.

Click twice on the audio track, which will make sure you can see the editing panel and find Remove background noise option there – it can remove the noise right away.

And, that’s it – hard to believe it’s so simple!
So, in this article, you followed us through the steps of how to denoise in Adobe After Effects – first, we touched upon video noise reduction, and then, background noise removal, for which we had to open the audio in Adobe Audition from After Effects. Last but not least, we took a look at how another magnificent software, Wondershare Filmora can help us in doing the same task! Armed with different tools and knowledge, now you can go for it and make your videos and audios more appealing for everyone!
Then, you will need to move your attention to the left side of the screen, where Effects Control will open. By default, you are able to see viewing mode, where Preview can be changed to Final Output, which is exactly what you are going to do.

This will be the video with Preview checked:

And this is the look of the same frame from the video whenever Final Output is turned on:

Yes, it’s true – we have done it already! This is actually this fast and easy in Adobe After Effects – no more noise, no more grain! Anyway, if you want to see the whole process on the video, you can check it here !
How to denoise an audio in Adobe After Effects
When it comes to audio noise, as we have mentioned already, it is possible to master the recording in After Effects in terms of the voice as well, but in reality, After Effects requires another Adobe program called Audition. Let us say that you have a video with audio attached, and you are working in AE, but in order to remove the background noise, you will need to open Audition. Here’s how it’s done:
First, in the sequence, you will need to click twice on the video clip, which will open audio graphics below.

Then, go to Edit in the Navbar, and choose Edit in Adobe Audition.

This program will open and show you more detailed graphic image of the voice recording. Now, you will find the space of time in your recording when you have a somewhat damaged audio and you will select the beginning and the end of it with the mouse. Keep in mind that in case you need to take a look at the video when your audio is played, you can see a little window showing the scene on the left and bottom of your screen.

Once you have the selection and are determined with it, you right click on the selection and find Capture Noise Print. Then, you will click on the selection again and find Select all, which will cover the whole audio. That’s when you go to the Navbar again and find Effects -> Noise Reduction / Restoration -> Noise Reduction (process). This will open the graphics again, where you can reduce the noise – you will see the percentage scale where you can modify the noise.

After changing it a little, you will click on the Apply and be able to visually see how the flow has changed and lowered.

So, when you deselect the selection and play the recording, you will notice that from now on the words are hearable, but some background noise is not there anymore! In order to export, please go to the File and Export, choose your preferred settings and you are ready to go!
Bonus tip: how to remove audio noise in video with Wondershare Filmora
When it comes to audio noise removal, it’s also good to have some alternatives, and you might not even have Adobe After Effects installed on your computer, because there exist a lot of programs easier to use. One of them is Wondershare Filmora, which can play a major role in background noise removal, in a simple way. For this to play out, you will need to pursue the following steps:
To bring your video clip in the program, drag and drop it into the timeline. Right-clicking on the video and hitting Detach Audio will enable you to separate audio and video from each other and work on them individually.

Click twice on the audio track, which will make sure you can see the editing panel and find Remove background noise option there – it can remove the noise right away.

And, that’s it – hard to believe it’s so simple!
So, in this article, you followed us through the steps of how to denoise in Adobe After Effects – first, we touched upon video noise reduction, and then, background noise removal, for which we had to open the audio in Adobe Audition from After Effects. Last but not least, we took a look at how another magnificent software, Wondershare Filmora can help us in doing the same task! Armed with different tools and knowledge, now you can go for it and make your videos and audios more appealing for everyone!
Then, you will need to move your attention to the left side of the screen, where Effects Control will open. By default, you are able to see viewing mode, where Preview can be changed to Final Output, which is exactly what you are going to do.

This will be the video with Preview checked:

And this is the look of the same frame from the video whenever Final Output is turned on:

Yes, it’s true – we have done it already! This is actually this fast and easy in Adobe After Effects – no more noise, no more grain! Anyway, if you want to see the whole process on the video, you can check it here !
How to denoise an audio in Adobe After Effects
When it comes to audio noise, as we have mentioned already, it is possible to master the recording in After Effects in terms of the voice as well, but in reality, After Effects requires another Adobe program called Audition. Let us say that you have a video with audio attached, and you are working in AE, but in order to remove the background noise, you will need to open Audition. Here’s how it’s done:
First, in the sequence, you will need to click twice on the video clip, which will open audio graphics below.

Then, go to Edit in the Navbar, and choose Edit in Adobe Audition.

This program will open and show you more detailed graphic image of the voice recording. Now, you will find the space of time in your recording when you have a somewhat damaged audio and you will select the beginning and the end of it with the mouse. Keep in mind that in case you need to take a look at the video when your audio is played, you can see a little window showing the scene on the left and bottom of your screen.

Once you have the selection and are determined with it, you right click on the selection and find Capture Noise Print. Then, you will click on the selection again and find Select all, which will cover the whole audio. That’s when you go to the Navbar again and find Effects -> Noise Reduction / Restoration -> Noise Reduction (process). This will open the graphics again, where you can reduce the noise – you will see the percentage scale where you can modify the noise.

After changing it a little, you will click on the Apply and be able to visually see how the flow has changed and lowered.

So, when you deselect the selection and play the recording, you will notice that from now on the words are hearable, but some background noise is not there anymore! In order to export, please go to the File and Export, choose your preferred settings and you are ready to go!
Bonus tip: how to remove audio noise in video with Wondershare Filmora
When it comes to audio noise removal, it’s also good to have some alternatives, and you might not even have Adobe After Effects installed on your computer, because there exist a lot of programs easier to use. One of them is Wondershare Filmora, which can play a major role in background noise removal, in a simple way. For this to play out, you will need to pursue the following steps:
To bring your video clip in the program, drag and drop it into the timeline. Right-clicking on the video and hitting Detach Audio will enable you to separate audio and video from each other and work on them individually.

Click twice on the audio track, which will make sure you can see the editing panel and find Remove background noise option there – it can remove the noise right away.

And, that’s it – hard to believe it’s so simple!
So, in this article, you followed us through the steps of how to denoise in Adobe After Effects – first, we touched upon video noise reduction, and then, background noise removal, for which we had to open the audio in Adobe Audition from After Effects. Last but not least, we took a look at how another magnificent software, Wondershare Filmora can help us in doing the same task! Armed with different tools and knowledge, now you can go for it and make your videos and audios more appealing for everyone!
Wondershare Filmora Has Introduced a New Feature - AI Portrait Effect that You Can Use to Remove Background From Various Videos and Images. Explore the Uses, Benefits, and Real-Life Scenarios of This Feature in a Comprehensive Guide
Quick Answer: Why Did Filmora AI Portrait Attract People?
An easy yet powerful editor
Numerous effects to choose from
Detailed tutorials provided by the official channel
In the recent few years, video editing has become one of the most-sought after professions, all thanks to the popularity of various video sharing platforms like YouTube. Today, creators don’t need big budgets to share their stories with the world. They can simply grab the camera, shoot the video, and use editing software to compile their brainchild into a dedicated movie. And, once the movie is ready, these creators can simply upload it to YouTube and gain the desired viewership. However, it’s worth noting that YouTube isn’t the only element that has helped content creators excel in their careers and follow their passion.
Editing software like Wondershare Filmora also play an equal role in the success of a creator in today’s digital world. These editing tools are equipped with a plethora of features that allow creators to unleash their creativity and compile high-quality videos for their viewers. What’s more interesting is that these tools keep receiving new updates that further streamlines the entire video editing process to help creators edit videos more conveniently.
Today, we are here to talk about one such feature - known as Filmora AI portrait - that recently got introduced to Wondershare Filmora and became an all-time favorite of many creators. We’ll be going in detail about Filmora AI portrait and how you can use it in your videos to uplift the production quality of your videos. We’ll also share some of the alternatives of this cool feature so that you can bring variety to your videos and keep the viewers engaged throughout the video.
In this article
01 [Why Did AI Portrait Become More and More Popular](#Part 1)
02 [What Scenes Apply to AI Portrait?](#Part 2)
03 [What Scenes Do Not Apply to AI Portrait?](#Part 3)
04 [Why Filmora AI Portrait Deserves to Try?](#Part 4)
05 [A Comparison to Other AI Portrait Software](#Part 5)
Part 1 Why Did AI Portrait Become More and More Popular

Let’s start with the basics first! What is Filmora AI portrait and why it has gained an immense popularity in the editing community. It’s basically an add-on effect in Wondershare Filmora X that was introduced with the latest Filmora X version 10.5.
By integrating this add-on into their video, editors can remove/change the background without losing any details of the main subject. So, let’s say if you don’t have green screen footage and still want to remove the background without affecting the foreground (a single subject), Filmora AI portrait will help you get the job done without any hassle.
Being an AI-powered feature, Filmora AI portrait automatically detects the shape and structure of the main subject and separates it from the background. This way even if you don’t have used a green screen or don’t know how to apply the Chroma key in your videos, you’ll be able to remove the background from the RAW footage and replace it with a custom background. This will allow you to make your videos more appealing and add a funny element for better engagement. For example, you can add a moving background to uplift the entire storyline to your videos.
Filmora AI portrait is a great feature for different types of creators such as gaming streamers, YouTube content creators, and daily vloggers. Regardless of your editing style, by integrating the Filmora AI portrait add-on, you’ll have the liberty to remove unwanted backgrounds from various shots and keep the production quality high.
In addition to removing the background, Filmora AI portrait is also a great tool to design thumbnails for your videos. Also, you can use this feature to apply borders, glitch effects, pixelated, noise, or segmentation video effects to your videos. All these elements will allow you to eliminate dull and low quality things from your videos and make the main characters pop-out in every frame.
Here are a few situations where one can implement the Filmora AI portrait and make the most out of its functions.
● If you livestream videos on YouTube, but don’t have a green screen yet, you can use the AI portrait feature in Filmora to remove the background and make your streaming setup look more elegant and professional.
● With the Filmora AI portrait feature, you can also design high-quality and captivating thumbnails for your videos and draw the maximum attention within YouTube’s rabbithole. Any new viewer is more likely to click on your videos when the thumbnail is engaging.
● You can also use Filmora AI portrait effect to remove background from interviews. Usually, when someone shoots an interview, they usually place a green screen behind the person. But, in case you don’t have green screen footage, you can easily make your interviews look more professional with the Filmora AI portrait effect.
● Finally, you can also use the Filmora AI portrait feature in regular YouTube vlogs. This would be applicable when there are unnecessary elements in the background of a clip that are ruining the entire frame. In this case by simply erasing the background and replacing it with a custom one, you’ll be able to keep the production quality high and keep the viewers engaged throughout the vlog.
Part 2 What Scenes Apply to AI Portrait?

While the AI portrait effect can work for all frames, there are a few situations when it delivers the best results. The designers at Wondershare Filmora claim that AI Portrait works like a charm when the frame has a single subject talking directly to the camera.
When there’s a single individual or subject in front of the camera, it’s relatively easier for the AI-algorithm to detect the edges and separate the background with high precision. Moreover, when the main subject is static, you are most likely to witness the best output in terms of background removal. Why? The reason being when there’s a single static subject, an AI-powered algorithm can precisely mark its edges and achieve relatively better results.
Let’s understand this with the help of a few examples.
One-Person Interview
Going back to the interview example - let’s say you are interviewing a person who’s sitting in a chair and talking directly to the camera in front of him. Now, since there isn’t too much movement on his side, the AI-algorithm will be able to detect his edges and remove the background accordingly. In fact, in such ideal cases, the tool will even be able to detect the hair of the subject with high precision.
Shot of a Monologue
Monologues are no longer limited to high-budget Hollywood movies only. They have become a regular part of conventional videos such as daily YouTube vlogs. Monologues boast better authenticity as the entire clip is shot in one go.
Since there are no random cuts, the presenter can easily convey his views to the viewers. But, for a monologue to work, it’s extremely crucial that it has a high-quality background otherwise it’ll fail to grab the viewer’s attention. In case you are also stuck with a monologue that has a bad background, you can use Filmora AI portrait to remove it and make the primary character of the video pop-up more effectively.
YouTube Vlogs
Again, YouTube vlogs are another great example where editors could really benefit from Filmora’s AI portrait effect. For daily vloggers, getting the perfect shot is always a challenge. And, more often than you think, they end up taking shots that have bad backgrounds. But, thanks to Filmora’s AI portrait effect, one could easily remove background from such shots and use them to convey the storyline more effectively. This won’t waste your efforts and you’ll be able to use the shot that would have otherwise gone to Trash.
So, these are a few situations where the AI portrait effect in Filmora can do wonders for your video editing process.
Part 3 What Scenes Do Not Apply to AI Portrait?

Now, as we mentioned in the previous part, the Filmora AI portrait effect works better in scenarios where there’s only a single subject in the frame. This means the effect isn’t applicable in all the situations.
If there is a lot of movement in the frame, the AI-algorithm may fail to detect the edges of the subject(s) and not deliver the expected results. For example if you are working on a vlog where you are moving the camera really fast, the AI effect will struggle to separate the background from the foreground and fail to achieve the desired precision while removing background.
Some of the other situations where you won’t be able to make the most out of the AI portrait effect include:
Shots With Multiple Moving Subjects
If you have a shot of a crowded place where too many people are moving in the frame, it’ll be challenging to detect the background properly. The movement of multiple subjects will interfere with the overall functionality of the algorithm, restricting users from achieving a background-free shot. In such a situation, you’ll either have to use the shot without removing the background or dump into the Trash folder.
Videos With Special Effects and Filters
Here’s the deal; special effects and filters have become an inevitable part of today’s social media-influenced world. People apply filters and visual effects to make their videos more appealing and grab more likes and comments on Instagram, Facebook, and Snapchat.
But, these filters are often a nightmare for video editors as it’s pretty challenging to process them in any video editing software. If you have a clip with filters or video effects, you’ll struggle to implement the Filmora AI portrait effect properly. In fact, the effect will not work as expected and you’ll be stuck with a shot that would be pretty useless for the entire storyline. So, do not apply unnecessary filters to your videos if you are planning to apply the AI portrait effect in the long run.
Videos With Backlights
The lighting setup of any video has a huge influence on how it will look at the end. Just like a human being, even the AI algorithm struggles to detect the background in a video that has poor lighting conditions or bad backlight. In such videos, it’s challenging for the algorithm to detect the main subject and then identify its edges.
To avoid such scenarios, it would be better to plan your shots in advance and shoot them when there are proper lighting conditions. In case you are going to shoot indoors, you can use a dedicated lighting setup. If anything, this will make it much easier to apply the Filmora AI portrait effect and achieve the best results in terms of background removal.
Paintings
Paintings aren’t like traditional videos. The color scheme is entirely different and it’s much challenging to identify the background and the foreground. So, if there are any images of paintings that you want to use as a thumbnail, it might get a bit challenging to remove the background. In such a scenario, it would be much better to either choose a different image for the thumbnail and use the painting without removing its background.
So, these are a few scenarios where using the Filmora AI portrait won’t be an effective solution for you. We would recommend to plan your shots in advance so that you don’t end up with random shots where it’s challenging to apply the AI portrait effect.
Part 4 Why Filmora AI Portrait Deserves to Try?
If you’ve come this far, you are most likely to be serious about video editing. So, now that we have clarified all the situations where using ****Wondershare Filmora Video Editor AI portrait** will be effective, let’s understand how you can use it in your videos.
01Are the Subscription Periods for Wondershare Filmora and the AI Portrait Add-on the Same?
So, first things first, will you get direct access to the AI portrait add-on along with your Filmora license? The answer is No! THe AI portrait add-on is available as a separate item and you’ll have to pay additional charges to use it on your videos. The default Filmora license will not give you access to the AI portrait mode whatsoever. In terms of pricing, the Filmora AI portrait is available at a pocket-friendly price.
For Win 7 or later (64-bit)
For macOS 10.12 or later
You can get this add-on by paying a minimal fee of $5.99 per month. One of the best things about choosing this add-on is that you can discontinue it whenever you want. So, let’s say you no longer need to remove backgrounds from your videos - in this situation, you can directly discontinue your subscription without affecting your regular Filmora subscription.
02How to Add AI Portrait Effects?
Now, coming to the real reason why you’ve come this far - the process to use the AI portrait effect in Filmora. To be honest, it’s a relatively easier process to add the AI portrait effect in Filmora. Even if you are not a Filmora user, you’ll be able to get the job done without any hassle. Let me quickly walk you through the step-by-step procedure of adding the AI portrait effect in Wondershare Filmora.
Step 1 - If you are not an existing user of Filmora, start by purchasing its license and install the software on your system to get started. On the other hand, if you’ve been using Filmora for a while, directly move to the next step to proceed further.
Step 2 - Now, launch the software and create a new project. You’ll be prompted to Filmora’s editing panel. At this point, you’ll have to drag the video clip (that you want to edit) to the timeline.
Step 3 - Once the video is successfully imported, switch to the “Effects” tab and search for “AI Portrait”. You’ll see a “premium” icon next to its name. Double-click on the effect and follow the on-screen instructions to complete the payment procedure.

Step 4 - After you have bought the effect, just drag it to the timeline and place it above your video.

Step 5 - Based on how long you want to keep this effect, you can elongate or shorten its duration by simply stretching its duration.

That’s it; the AI portrait effect will automatically detect and remove the background without requiring you to even lift a finger. After the background is removed, you can tap the “Export” button and choose the desired output format to save the file on your system.
03How to Adjust AI Portrait Effects?
Apart from its core ability to remove the background from a video/image, the another advantage of choosing Filmora AI portrait add-on is its fully customization support. Based on your requirements, you can adjust different parameters such as percentage, edge thickness, edge feather, etc. to achieve the desired results in the output.
Let’s have a closer look at all these parameters to understand their overall functionality more precisely.
● Percentage: By adjusting the percentage, you can decide how effective you want the AI portrait effect to appear in your videos. If you drag the slider all the way to the end, the background will be removed completely and you might not even recognize the main subject properly. On the other hand, if you keep it at a lower percentage, there will be a little bit of transparency in the background.
● Alpha: The alpha slider will decide the transparency of the portrait effect itself. You can drag this slider left or right until you have the perfect frame in front of you.
● Edge Thickness: As the name implies, edge thickness decides how thick the edges of the subject would appear in the video. A smaller percentage would mean thinner edges whereas a higher percentage would mean larger edges.
● Edge Feather: With Edge feather, you can define the blurriness of the edges themselves. The higher the value of the edge feather, the blurier the edges would appear in your videos.
Now, to access all these features, all you have to do is double-tap on the AI portrait effect within FIlmora’s timeline. This will automatically prompt you to the editing panel for this particular effect where you’ll be able to manipulate all these parameters and achieve the desired portrait results accordingly.

In case you are not happy with your customization, you can also tap the “Restore” button next to each parameter to restore the default value. Once you are happy with the results, just tap the “Ok” button to implement your changes.
04Why Did Filmora AI Portrait Attract People?
Apart from attracting editors, what makes Filmora AI portrait one of the best video effects that you can apply to your videos to engage viewers. Well, the answer is pretty simple; AI portrait effect makes the background of a video transparent.
It means the editors have the liberty to replace the dull boring background with a custom one and keep the engagement level high. This becomes really useful when you are trying to compile a long documentary and have a few shots with bad backgrounds. Since using such shots directly might affect the production quality of your videos, it would be better to first replace the background using the AI portrait effect.
So, regardless of your editing setup, production goals, or the type of video you want to compile at the end, you can use the AI portrait effect in Wondershare Filmora in different situations and protect the end results from becoming a failure. This will help you maximize the reach of your videos and attract more viewers more effectively. So, install Filmora today and sign up for its AI portrait effect to uplift the overall video quality of your projects.
Part 5 A Comparison to Other AI Portrait Software
Now, before saying goodbye, we also believe that it would be unfair if we only talk about a single tool and a single effect in this guide. Of course, Filmora’s AI portrait effect works like a charm in different situations, there are other tools in the market that you can try to achieve similar results. As a video editor, it’s always great to keep trying new things as it will add variation to your portfolio and make it much easier to attract new clients.
So, here’s a list of top 5 video editing software that you can use to get similar functionality like the AI portrait effect in Wondershare Filmora.
01Adobe Premiere Pro
Adobe Premiere Pro is undoubtedly one of the most popular video editing software with a strong fan base. Many industry leaders including Sam Kolder and Rory Kramer use Premier Pro to compile high-quality Hollywood-style videos for musicians as well as other clients.
Premiere Pro is more of an advanced video editing tool, which means even though it can help you remove background from portraits, you’ll have to do all the work manually. There’s no predefined add-on or effect that you can apply to the video to erase the background. Instead, you’ll have to manually mark the edges of the subject, erase the background and then, replace it with a different one to achieve the desired results.
In general, Premiere Pro is a great option for skilled editors who want to take things in their own hands to achieve the best results. If you are a beginner, you would be better off with a more user-friendly tool such as Wondershare Filmora.
Key Features:
● Extreme precision while erasing the background
● Achieve the desired results without compromising the quality of the main subject in the portrait
● An industry-preferred software
Pros:
● Existing Premiere Pro users will find it much easier to replicate the AI portrait effect
● Complete flexibility over your project
Cons:
● It can take several hours to precisely remove the background
● The entire process will be manual
02Final Cut Pro
Like Premiere Pro, Final Cut Pro is another famous video editing software that can help you replicate the results of the Filmora AI portrait effect and remove the background from different videos, images, and motion graphics. Keep in mind that Final Cut Pro is only available for macOS, which means if you own a Windows system, you won’t be able to use the software whatsoever.
Again, the only downside of using Final Cut Pro is the amount of manual effort you’ll have to put in to achieve the expected results. Being a full-scale video editing tool, there aren’t too many add-ons or predefined video effects.
Instead, you’ll have to rely on conventional methods such as keyframing to remove the background frame by frame and make your videos look professional. On the major side, Final Cut Pro will work in all situations. Even if you have a clip with too many moving objects, you’ll be able to mark the edges frame-by-frame and remove the background without losing any details from the foreground.
Key Features:
● Timeline-based interface for rapid video editing
● Exclusive macOS compatibility ensures high performance
● Ideal for experienced editors and designers
Pros:
● Final Cut Pro has an easy-to-use interface
● It’s easier to process each frame individually
Cons:
● Unlike Wondershare Filmora, there aren’t any ready-to-use add-ons
● While working on complex shots, it can take several hours to remove the background
03Unscreen Online
Unscreen is an online video background remover that’s specifically designed to remove background from videos with a single click. Being an online application, Unscreen is an ideal choice for short videos (up to 20 seconds) because longer-duration videos will likely take forever to upload. If you want to edit a video for Instagram Reels or YouTube shorts, Unscreen Online would be worth the consideration.
It’ll allow you to remove the background with one click and you won’t even need high-performance software to get the job done. The only drawback of Unscreen online is its lack of video format compatibility. Since it’s an online application, not all video formats are compatible with Unscreen Online.
Moreover, you can only use the tool to process shorter videos. In general, this is an ideal choice for an average Joe who doesn’t want to go through the hassle of installing and using a dedicated video editing software. So, if you are a professional, it would be far beneficial to stick to other premium tools like Filmora, Premiere Pro, and Final Cut Pro.
Key Features:
● You can access Unscreen Online on any device you want
● The edge detection is quite precise for videos with a single subject
● As compared to other premium options, Unscreen Online is relatively cheaper
Pros:
● Cross-platform compatibility
● Perfect for Instagram content creators
● Affordable pricing
Cons:
● Doesn’t achieve the expected results for more complex videos having too many subjects
● Can’t process videos having longer durations
04MOVAVI Video Editor
MOVAVI is another desktop-based video editing software that offers all the basic functionality one looks for in a video editing tool. The software is compatible with Windows and is an ideal choice for beginners who are just getting started on their video editing journey. You’ll find all the basic features along with a few advanced functions such as background removal. Like Filmora, MOVAVI also has a built-in add-on to remove the background from your clips. However, you might not be able to achieve the same precision, especially when we are talking about more complex frames.
Key Features:
● An ideal choice for beginners
● Compatible with Windows
● Can remove background from videos with a single subject
Pros:
● The user interface is pretty straightforward
● It’s easier to edit the videos, thanks to a timeline-based interface
Cons:
● For a beginner editing tool, the price is on the higher side
● You won’t be able to remove background from complex shots with multiple subjects in the foreground
05Kinemaster
Kinemaster is a video editing tool that’s only available on mobile devices, Android to be more specific. It boasts a plethora of features that make it one of the most sought-after editing tools among mobile users. Apart from the basic editing features, Kinemaster also has Chroma key and green screen functionality that allow users to remove background from the videos. Though it’s not as same as a professional-level video editing tool like Filmora Pro, you can still use Kinemaster to erase the background from your green screen footage to achieve the desired portrait look.
Features:
● Kinemaster is beginner-friendly
● Compatible with all Android devices
Pros:
● Green screen compatibility
● Offers advanced features such as chroma key
● Idea choice for novice video editors
Cons:
● It’s quite challenging to edit longer videos on a phone, making Kinemaster less reliable for large documentary-type videos
● Ending Thoughts →
● Wondershare Filmora has introduced a new AI Portrait feature that allows users to remove background from different video clips to shift the entire focus on the main subject.
● Filmora AI Portrait is applicable in different situations and can help editors maximize the production quality of their videos
● Apart from Filmora AI Portrait, there are several video editing tools that editors can give a try to replicate the AI portrait effect. Though, the results of such tools may differ as well.
In the recent few years, video editing has become one of the most-sought after professions, all thanks to the popularity of various video sharing platforms like YouTube. Today, creators don’t need big budgets to share their stories with the world. They can simply grab the camera, shoot the video, and use editing software to compile their brainchild into a dedicated movie. And, once the movie is ready, these creators can simply upload it to YouTube and gain the desired viewership. However, it’s worth noting that YouTube isn’t the only element that has helped content creators excel in their careers and follow their passion.
Editing software like Wondershare Filmora also play an equal role in the success of a creator in today’s digital world. These editing tools are equipped with a plethora of features that allow creators to unleash their creativity and compile high-quality videos for their viewers. What’s more interesting is that these tools keep receiving new updates that further streamlines the entire video editing process to help creators edit videos more conveniently.
Today, we are here to talk about one such feature - known as Filmora AI portrait - that recently got introduced to Wondershare Filmora and became an all-time favorite of many creators. We’ll be going in detail about Filmora AI portrait and how you can use it in your videos to uplift the production quality of your videos. We’ll also share some of the alternatives of this cool feature so that you can bring variety to your videos and keep the viewers engaged throughout the video.
In this article
01 [Why Did AI Portrait Become More and More Popular](#Part 1)
02 [What Scenes Apply to AI Portrait?](#Part 2)
03 [What Scenes Do Not Apply to AI Portrait?](#Part 3)
04 [Why Filmora AI Portrait Deserves to Try?](#Part 4)
05 [A Comparison to Other AI Portrait Software](#Part 5)
Part 1 Why Did AI Portrait Become More and More Popular

Let’s start with the basics first! What is Filmora AI portrait and why it has gained an immense popularity in the editing community. It’s basically an add-on effect in Wondershare Filmora X that was introduced with the latest Filmora X version 10.5.
By integrating this add-on into their video, editors can remove/change the background without losing any details of the main subject. So, let’s say if you don’t have green screen footage and still want to remove the background without affecting the foreground (a single subject), Filmora AI portrait will help you get the job done without any hassle.
Being an AI-powered feature, Filmora AI portrait automatically detects the shape and structure of the main subject and separates it from the background. This way even if you don’t have used a green screen or don’t know how to apply the Chroma key in your videos, you’ll be able to remove the background from the RAW footage and replace it with a custom background. This will allow you to make your videos more appealing and add a funny element for better engagement. For example, you can add a moving background to uplift the entire storyline to your videos.
Filmora AI portrait is a great feature for different types of creators such as gaming streamers, YouTube content creators, and daily vloggers. Regardless of your editing style, by integrating the Filmora AI portrait add-on, you’ll have the liberty to remove unwanted backgrounds from various shots and keep the production quality high.
In addition to removing the background, Filmora AI portrait is also a great tool to design thumbnails for your videos. Also, you can use this feature to apply borders, glitch effects, pixelated, noise, or segmentation video effects to your videos. All these elements will allow you to eliminate dull and low quality things from your videos and make the main characters pop-out in every frame.
Here are a few situations where one can implement the Filmora AI portrait and make the most out of its functions.
● If you livestream videos on YouTube, but don’t have a green screen yet, you can use the AI portrait feature in Filmora to remove the background and make your streaming setup look more elegant and professional.
● With the Filmora AI portrait feature, you can also design high-quality and captivating thumbnails for your videos and draw the maximum attention within YouTube’s rabbithole. Any new viewer is more likely to click on your videos when the thumbnail is engaging.
● You can also use Filmora AI portrait effect to remove background from interviews. Usually, when someone shoots an interview, they usually place a green screen behind the person. But, in case you don’t have green screen footage, you can easily make your interviews look more professional with the Filmora AI portrait effect.
● Finally, you can also use the Filmora AI portrait feature in regular YouTube vlogs. This would be applicable when there are unnecessary elements in the background of a clip that are ruining the entire frame. In this case by simply erasing the background and replacing it with a custom one, you’ll be able to keep the production quality high and keep the viewers engaged throughout the vlog.
Part 2 What Scenes Apply to AI Portrait?

While the AI portrait effect can work for all frames, there are a few situations when it delivers the best results. The designers at Wondershare Filmora claim that AI Portrait works like a charm when the frame has a single subject talking directly to the camera.
When there’s a single individual or subject in front of the camera, it’s relatively easier for the AI-algorithm to detect the edges and separate the background with high precision. Moreover, when the main subject is static, you are most likely to witness the best output in terms of background removal. Why? The reason being when there’s a single static subject, an AI-powered algorithm can precisely mark its edges and achieve relatively better results.
Let’s understand this with the help of a few examples.
One-Person Interview
Going back to the interview example - let’s say you are interviewing a person who’s sitting in a chair and talking directly to the camera in front of him. Now, since there isn’t too much movement on his side, the AI-algorithm will be able to detect his edges and remove the background accordingly. In fact, in such ideal cases, the tool will even be able to detect the hair of the subject with high precision.
Shot of a Monologue
Monologues are no longer limited to high-budget Hollywood movies only. They have become a regular part of conventional videos such as daily YouTube vlogs. Monologues boast better authenticity as the entire clip is shot in one go.
Since there are no random cuts, the presenter can easily convey his views to the viewers. But, for a monologue to work, it’s extremely crucial that it has a high-quality background otherwise it’ll fail to grab the viewer’s attention. In case you are also stuck with a monologue that has a bad background, you can use Filmora AI portrait to remove it and make the primary character of the video pop-up more effectively.
YouTube Vlogs
Again, YouTube vlogs are another great example where editors could really benefit from Filmora’s AI portrait effect. For daily vloggers, getting the perfect shot is always a challenge. And, more often than you think, they end up taking shots that have bad backgrounds. But, thanks to Filmora’s AI portrait effect, one could easily remove background from such shots and use them to convey the storyline more effectively. This won’t waste your efforts and you’ll be able to use the shot that would have otherwise gone to Trash.
So, these are a few situations where the AI portrait effect in Filmora can do wonders for your video editing process.
Part 3 What Scenes Do Not Apply to AI Portrait?

Now, as we mentioned in the previous part, the Filmora AI portrait effect works better in scenarios where there’s only a single subject in the frame. This means the effect isn’t applicable in all the situations.
If there is a lot of movement in the frame, the AI-algorithm may fail to detect the edges of the subject(s) and not deliver the expected results. For example if you are working on a vlog where you are moving the camera really fast, the AI effect will struggle to separate the background from the foreground and fail to achieve the desired precision while removing background.
Some of the other situations where you won’t be able to make the most out of the AI portrait effect include:
Shots With Multiple Moving Subjects
If you have a shot of a crowded place where too many people are moving in the frame, it’ll be challenging to detect the background properly. The movement of multiple subjects will interfere with the overall functionality of the algorithm, restricting users from achieving a background-free shot. In such a situation, you’ll either have to use the shot without removing the background or dump into the Trash folder.
Videos With Special Effects and Filters
Here’s the deal; special effects and filters have become an inevitable part of today’s social media-influenced world. People apply filters and visual effects to make their videos more appealing and grab more likes and comments on Instagram, Facebook, and Snapchat.
But, these filters are often a nightmare for video editors as it’s pretty challenging to process them in any video editing software. If you have a clip with filters or video effects, you’ll struggle to implement the Filmora AI portrait effect properly. In fact, the effect will not work as expected and you’ll be stuck with a shot that would be pretty useless for the entire storyline. So, do not apply unnecessary filters to your videos if you are planning to apply the AI portrait effect in the long run.
Videos With Backlights
The lighting setup of any video has a huge influence on how it will look at the end. Just like a human being, even the AI algorithm struggles to detect the background in a video that has poor lighting conditions or bad backlight. In such videos, it’s challenging for the algorithm to detect the main subject and then identify its edges.
To avoid such scenarios, it would be better to plan your shots in advance and shoot them when there are proper lighting conditions. In case you are going to shoot indoors, you can use a dedicated lighting setup. If anything, this will make it much easier to apply the Filmora AI portrait effect and achieve the best results in terms of background removal.
Paintings
Paintings aren’t like traditional videos. The color scheme is entirely different and it’s much challenging to identify the background and the foreground. So, if there are any images of paintings that you want to use as a thumbnail, it might get a bit challenging to remove the background. In such a scenario, it would be much better to either choose a different image for the thumbnail and use the painting without removing its background.
So, these are a few scenarios where using the Filmora AI portrait won’t be an effective solution for you. We would recommend to plan your shots in advance so that you don’t end up with random shots where it’s challenging to apply the AI portrait effect.
Part 4 Why Filmora AI Portrait Deserves to Try?
If you’ve come this far, you are most likely to be serious about video editing. So, now that we have clarified all the situations where using ****Wondershare Filmora Video Editor AI portrait** will be effective, let’s understand how you can use it in your videos.
01Are the Subscription Periods for Wondershare Filmora and the AI Portrait Add-on the Same?
So, first things first, will you get direct access to the AI portrait add-on along with your Filmora license? The answer is No! THe AI portrait add-on is available as a separate item and you’ll have to pay additional charges to use it on your videos. The default Filmora license will not give you access to the AI portrait mode whatsoever. In terms of pricing, the Filmora AI portrait is available at a pocket-friendly price.
For Win 7 or later (64-bit)
For macOS 10.12 or later
You can get this add-on by paying a minimal fee of $5.99 per month. One of the best things about choosing this add-on is that you can discontinue it whenever you want. So, let’s say you no longer need to remove backgrounds from your videos - in this situation, you can directly discontinue your subscription without affecting your regular Filmora subscription.
02How to Add AI Portrait Effects?
Now, coming to the real reason why you’ve come this far - the process to use the AI portrait effect in Filmora. To be honest, it’s a relatively easier process to add the AI portrait effect in Filmora. Even if you are not a Filmora user, you’ll be able to get the job done without any hassle. Let me quickly walk you through the step-by-step procedure of adding the AI portrait effect in Wondershare Filmora.
Step 1 - If you are not an existing user of Filmora, start by purchasing its license and install the software on your system to get started. On the other hand, if you’ve been using Filmora for a while, directly move to the next step to proceed further.
Step 2 - Now, launch the software and create a new project. You’ll be prompted to Filmora’s editing panel. At this point, you’ll have to drag the video clip (that you want to edit) to the timeline.
Step 3 - Once the video is successfully imported, switch to the “Effects” tab and search for “AI Portrait”. You’ll see a “premium” icon next to its name. Double-click on the effect and follow the on-screen instructions to complete the payment procedure.

Step 4 - After you have bought the effect, just drag it to the timeline and place it above your video.

Step 5 - Based on how long you want to keep this effect, you can elongate or shorten its duration by simply stretching its duration.

That’s it; the AI portrait effect will automatically detect and remove the background without requiring you to even lift a finger. After the background is removed, you can tap the “Export” button and choose the desired output format to save the file on your system.
03How to Adjust AI Portrait Effects?
Apart from its core ability to remove the background from a video/image, the another advantage of choosing Filmora AI portrait add-on is its fully customization support. Based on your requirements, you can adjust different parameters such as percentage, edge thickness, edge feather, etc. to achieve the desired results in the output.
Let’s have a closer look at all these parameters to understand their overall functionality more precisely.
● Percentage: By adjusting the percentage, you can decide how effective you want the AI portrait effect to appear in your videos. If you drag the slider all the way to the end, the background will be removed completely and you might not even recognize the main subject properly. On the other hand, if you keep it at a lower percentage, there will be a little bit of transparency in the background.
● Alpha: The alpha slider will decide the transparency of the portrait effect itself. You can drag this slider left or right until you have the perfect frame in front of you.
● Edge Thickness: As the name implies, edge thickness decides how thick the edges of the subject would appear in the video. A smaller percentage would mean thinner edges whereas a higher percentage would mean larger edges.
● Edge Feather: With Edge feather, you can define the blurriness of the edges themselves. The higher the value of the edge feather, the blurier the edges would appear in your videos.
Now, to access all these features, all you have to do is double-tap on the AI portrait effect within FIlmora’s timeline. This will automatically prompt you to the editing panel for this particular effect where you’ll be able to manipulate all these parameters and achieve the desired portrait results accordingly.

In case you are not happy with your customization, you can also tap the “Restore” button next to each parameter to restore the default value. Once you are happy with the results, just tap the “Ok” button to implement your changes.
04Why Did Filmora AI Portrait Attract People?
Apart from attracting editors, what makes Filmora AI portrait one of the best video effects that you can apply to your videos to engage viewers. Well, the answer is pretty simple; AI portrait effect makes the background of a video transparent.
It means the editors have the liberty to replace the dull boring background with a custom one and keep the engagement level high. This becomes really useful when you are trying to compile a long documentary and have a few shots with bad backgrounds. Since using such shots directly might affect the production quality of your videos, it would be better to first replace the background using the AI portrait effect.
So, regardless of your editing setup, production goals, or the type of video you want to compile at the end, you can use the AI portrait effect in Wondershare Filmora in different situations and protect the end results from becoming a failure. This will help you maximize the reach of your videos and attract more viewers more effectively. So, install Filmora today and sign up for its AI portrait effect to uplift the overall video quality of your projects.
Part 5 A Comparison to Other AI Portrait Software
Now, before saying goodbye, we also believe that it would be unfair if we only talk about a single tool and a single effect in this guide. Of course, Filmora’s AI portrait effect works like a charm in different situations, there are other tools in the market that you can try to achieve similar results. As a video editor, it’s always great to keep trying new things as it will add variation to your portfolio and make it much easier to attract new clients.
So, here’s a list of top 5 video editing software that you can use to get similar functionality like the AI portrait effect in Wondershare Filmora.
01Adobe Premiere Pro
Adobe Premiere Pro is undoubtedly one of the most popular video editing software with a strong fan base. Many industry leaders including Sam Kolder and Rory Kramer use Premier Pro to compile high-quality Hollywood-style videos for musicians as well as other clients.
Premiere Pro is more of an advanced video editing tool, which means even though it can help you remove background from portraits, you’ll have to do all the work manually. There’s no predefined add-on or effect that you can apply to the video to erase the background. Instead, you’ll have to manually mark the edges of the subject, erase the background and then, replace it with a different one to achieve the desired results.
In general, Premiere Pro is a great option for skilled editors who want to take things in their own hands to achieve the best results. If you are a beginner, you would be better off with a more user-friendly tool such as Wondershare Filmora.
Key Features:
● Extreme precision while erasing the background
● Achieve the desired results without compromising the quality of the main subject in the portrait
● An industry-preferred software
Pros:
● Existing Premiere Pro users will find it much easier to replicate the AI portrait effect
● Complete flexibility over your project
Cons:
● It can take several hours to precisely remove the background
● The entire process will be manual
02Final Cut Pro
Like Premiere Pro, Final Cut Pro is another famous video editing software that can help you replicate the results of the Filmora AI portrait effect and remove the background from different videos, images, and motion graphics. Keep in mind that Final Cut Pro is only available for macOS, which means if you own a Windows system, you won’t be able to use the software whatsoever.
Again, the only downside of using Final Cut Pro is the amount of manual effort you’ll have to put in to achieve the expected results. Being a full-scale video editing tool, there aren’t too many add-ons or predefined video effects.
Instead, you’ll have to rely on conventional methods such as keyframing to remove the background frame by frame and make your videos look professional. On the major side, Final Cut Pro will work in all situations. Even if you have a clip with too many moving objects, you’ll be able to mark the edges frame-by-frame and remove the background without losing any details from the foreground.
Key Features:
● Timeline-based interface for rapid video editing
● Exclusive macOS compatibility ensures high performance
● Ideal for experienced editors and designers
Pros:
● Final Cut Pro has an easy-to-use interface
● It’s easier to process each frame individually
Cons:
● Unlike Wondershare Filmora, there aren’t any ready-to-use add-ons
● While working on complex shots, it can take several hours to remove the background
03Unscreen Online
Unscreen is an online video background remover that’s specifically designed to remove background from videos with a single click. Being an online application, Unscreen is an ideal choice for short videos (up to 20 seconds) because longer-duration videos will likely take forever to upload. If you want to edit a video for Instagram Reels or YouTube shorts, Unscreen Online would be worth the consideration.
It’ll allow you to remove the background with one click and you won’t even need high-performance software to get the job done. The only drawback of Unscreen online is its lack of video format compatibility. Since it’s an online application, not all video formats are compatible with Unscreen Online.
Moreover, you can only use the tool to process shorter videos. In general, this is an ideal choice for an average Joe who doesn’t want to go through the hassle of installing and using a dedicated video editing software. So, if you are a professional, it would be far beneficial to stick to other premium tools like Filmora, Premiere Pro, and Final Cut Pro.
Key Features:
● You can access Unscreen Online on any device you want
● The edge detection is quite precise for videos with a single subject
● As compared to other premium options, Unscreen Online is relatively cheaper
Pros:
● Cross-platform compatibility
● Perfect for Instagram content creators
● Affordable pricing
Cons:
● Doesn’t achieve the expected results for more complex videos having too many subjects
● Can’t process videos having longer durations
04MOVAVI Video Editor
MOVAVI is another desktop-based video editing software that offers all the basic functionality one looks for in a video editing tool. The software is compatible with Windows and is an ideal choice for beginners who are just getting started on their video editing journey. You’ll find all the basic features along with a few advanced functions such as background removal. Like Filmora, MOVAVI also has a built-in add-on to remove the background from your clips. However, you might not be able to achieve the same precision, especially when we are talking about more complex frames.
Key Features:
● An ideal choice for beginners
● Compatible with Windows
● Can remove background from videos with a single subject
Pros:
● The user interface is pretty straightforward
● It’s easier to edit the videos, thanks to a timeline-based interface
Cons:
● For a beginner editing tool, the price is on the higher side
● You won’t be able to remove background from complex shots with multiple subjects in the foreground
05Kinemaster
Kinemaster is a video editing tool that’s only available on mobile devices, Android to be more specific. It boasts a plethora of features that make it one of the most sought-after editing tools among mobile users. Apart from the basic editing features, Kinemaster also has Chroma key and green screen functionality that allow users to remove background from the videos. Though it’s not as same as a professional-level video editing tool like Filmora Pro, you can still use Kinemaster to erase the background from your green screen footage to achieve the desired portrait look.
Features:
● Kinemaster is beginner-friendly
● Compatible with all Android devices
Pros:
● Green screen compatibility
● Offers advanced features such as chroma key
● Idea choice for novice video editors
Cons:
● It’s quite challenging to edit longer videos on a phone, making Kinemaster less reliable for large documentary-type videos
● Ending Thoughts →
● Wondershare Filmora has introduced a new AI Portrait feature that allows users to remove background from different video clips to shift the entire focus on the main subject.
● Filmora AI Portrait is applicable in different situations and can help editors maximize the production quality of their videos
● Apart from Filmora AI Portrait, there are several video editing tools that editors can give a try to replicate the AI portrait effect. Though, the results of such tools may differ as well.
In the recent few years, video editing has become one of the most-sought after professions, all thanks to the popularity of various video sharing platforms like YouTube. Today, creators don’t need big budgets to share their stories with the world. They can simply grab the camera, shoot the video, and use editing software to compile their brainchild into a dedicated movie. And, once the movie is ready, these creators can simply upload it to YouTube and gain the desired viewership. However, it’s worth noting that YouTube isn’t the only element that has helped content creators excel in their careers and follow their passion.
Editing software like Wondershare Filmora also play an equal role in the success of a creator in today’s digital world. These editing tools are equipped with a plethora of features that allow creators to unleash their creativity and compile high-quality videos for their viewers. What’s more interesting is that these tools keep receiving new updates that further streamlines the entire video editing process to help creators edit videos more conveniently.
Today, we are here to talk about one such feature - known as Filmora AI portrait - that recently got introduced to Wondershare Filmora and became an all-time favorite of many creators. We’ll be going in detail about Filmora AI portrait and how you can use it in your videos to uplift the production quality of your videos. We’ll also share some of the alternatives of this cool feature so that you can bring variety to your videos and keep the viewers engaged throughout the video.
In this article
01 [Why Did AI Portrait Become More and More Popular](#Part 1)
02 [What Scenes Apply to AI Portrait?](#Part 2)
03 [What Scenes Do Not Apply to AI Portrait?](#Part 3)
04 [Why Filmora AI Portrait Deserves to Try?](#Part 4)
05 [A Comparison to Other AI Portrait Software](#Part 5)
Part 1 Why Did AI Portrait Become More and More Popular

Let’s start with the basics first! What is Filmora AI portrait and why it has gained an immense popularity in the editing community. It’s basically an add-on effect in Wondershare Filmora X that was introduced with the latest Filmora X version 10.5.
By integrating this add-on into their video, editors can remove/change the background without losing any details of the main subject. So, let’s say if you don’t have green screen footage and still want to remove the background without affecting the foreground (a single subject), Filmora AI portrait will help you get the job done without any hassle.
Being an AI-powered feature, Filmora AI portrait automatically detects the shape and structure of the main subject and separates it from the background. This way even if you don’t have used a green screen or don’t know how to apply the Chroma key in your videos, you’ll be able to remove the background from the RAW footage and replace it with a custom background. This will allow you to make your videos more appealing and add a funny element for better engagement. For example, you can add a moving background to uplift the entire storyline to your videos.
Filmora AI portrait is a great feature for different types of creators such as gaming streamers, YouTube content creators, and daily vloggers. Regardless of your editing style, by integrating the Filmora AI portrait add-on, you’ll have the liberty to remove unwanted backgrounds from various shots and keep the production quality high.
In addition to removing the background, Filmora AI portrait is also a great tool to design thumbnails for your videos. Also, you can use this feature to apply borders, glitch effects, pixelated, noise, or segmentation video effects to your videos. All these elements will allow you to eliminate dull and low quality things from your videos and make the main characters pop-out in every frame.
Here are a few situations where one can implement the Filmora AI portrait and make the most out of its functions.
● If you livestream videos on YouTube, but don’t have a green screen yet, you can use the AI portrait feature in Filmora to remove the background and make your streaming setup look more elegant and professional.
● With the Filmora AI portrait feature, you can also design high-quality and captivating thumbnails for your videos and draw the maximum attention within YouTube’s rabbithole. Any new viewer is more likely to click on your videos when the thumbnail is engaging.
● You can also use Filmora AI portrait effect to remove background from interviews. Usually, when someone shoots an interview, they usually place a green screen behind the person. But, in case you don’t have green screen footage, you can easily make your interviews look more professional with the Filmora AI portrait effect.
● Finally, you can also use the Filmora AI portrait feature in regular YouTube vlogs. This would be applicable when there are unnecessary elements in the background of a clip that are ruining the entire frame. In this case by simply erasing the background and replacing it with a custom one, you’ll be able to keep the production quality high and keep the viewers engaged throughout the vlog.
Part 2 What Scenes Apply to AI Portrait?

While the AI portrait effect can work for all frames, there are a few situations when it delivers the best results. The designers at Wondershare Filmora claim that AI Portrait works like a charm when the frame has a single subject talking directly to the camera.
When there’s a single individual or subject in front of the camera, it’s relatively easier for the AI-algorithm to detect the edges and separate the background with high precision. Moreover, when the main subject is static, you are most likely to witness the best output in terms of background removal. Why? The reason being when there’s a single static subject, an AI-powered algorithm can precisely mark its edges and achieve relatively better results.
Let’s understand this with the help of a few examples.
One-Person Interview
Going back to the interview example - let’s say you are interviewing a person who’s sitting in a chair and talking directly to the camera in front of him. Now, since there isn’t too much movement on his side, the AI-algorithm will be able to detect his edges and remove the background accordingly. In fact, in such ideal cases, the tool will even be able to detect the hair of the subject with high precision.
Shot of a Monologue
Monologues are no longer limited to high-budget Hollywood movies only. They have become a regular part of conventional videos such as daily YouTube vlogs. Monologues boast better authenticity as the entire clip is shot in one go.
Since there are no random cuts, the presenter can easily convey his views to the viewers. But, for a monologue to work, it’s extremely crucial that it has a high-quality background otherwise it’ll fail to grab the viewer’s attention. In case you are also stuck with a monologue that has a bad background, you can use Filmora AI portrait to remove it and make the primary character of the video pop-up more effectively.
YouTube Vlogs
Again, YouTube vlogs are another great example where editors could really benefit from Filmora’s AI portrait effect. For daily vloggers, getting the perfect shot is always a challenge. And, more often than you think, they end up taking shots that have bad backgrounds. But, thanks to Filmora’s AI portrait effect, one could easily remove background from such shots and use them to convey the storyline more effectively. This won’t waste your efforts and you’ll be able to use the shot that would have otherwise gone to Trash.
So, these are a few situations where the AI portrait effect in Filmora can do wonders for your video editing process.
Part 3 What Scenes Do Not Apply to AI Portrait?

Now, as we mentioned in the previous part, the Filmora AI portrait effect works better in scenarios where there’s only a single subject in the frame. This means the effect isn’t applicable in all the situations.
If there is a lot of movement in the frame, the AI-algorithm may fail to detect the edges of the subject(s) and not deliver the expected results. For example if you are working on a vlog where you are moving the camera really fast, the AI effect will struggle to separate the background from the foreground and fail to achieve the desired precision while removing background.
Some of the other situations where you won’t be able to make the most out of the AI portrait effect include:
Shots With Multiple Moving Subjects
If you have a shot of a crowded place where too many people are moving in the frame, it’ll be challenging to detect the background properly. The movement of multiple subjects will interfere with the overall functionality of the algorithm, restricting users from achieving a background-free shot. In such a situation, you’ll either have to use the shot without removing the background or dump into the Trash folder.
Videos With Special Effects and Filters
Here’s the deal; special effects and filters have become an inevitable part of today’s social media-influenced world. People apply filters and visual effects to make their videos more appealing and grab more likes and comments on Instagram, Facebook, and Snapchat.
But, these filters are often a nightmare for video editors as it’s pretty challenging to process them in any video editing software. If you have a clip with filters or video effects, you’ll struggle to implement the Filmora AI portrait effect properly. In fact, the effect will not work as expected and you’ll be stuck with a shot that would be pretty useless for the entire storyline. So, do not apply unnecessary filters to your videos if you are planning to apply the AI portrait effect in the long run.
Videos With Backlights
The lighting setup of any video has a huge influence on how it will look at the end. Just like a human being, even the AI algorithm struggles to detect the background in a video that has poor lighting conditions or bad backlight. In such videos, it’s challenging for the algorithm to detect the main subject and then identify its edges.
To avoid such scenarios, it would be better to plan your shots in advance and shoot them when there are proper lighting conditions. In case you are going to shoot indoors, you can use a dedicated lighting setup. If anything, this will make it much easier to apply the Filmora AI portrait effect and achieve the best results in terms of background removal.
Paintings
Paintings aren’t like traditional videos. The color scheme is entirely different and it’s much challenging to identify the background and the foreground. So, if there are any images of paintings that you want to use as a thumbnail, it might get a bit challenging to remove the background. In such a scenario, it would be much better to either choose a different image for the thumbnail and use the painting without removing its background.
So, these are a few scenarios where using the Filmora AI portrait won’t be an effective solution for you. We would recommend to plan your shots in advance so that you don’t end up with random shots where it’s challenging to apply the AI portrait effect.
Part 4 Why Filmora AI Portrait Deserves to Try?
If you’ve come this far, you are most likely to be serious about video editing. So, now that we have clarified all the situations where using ****Wondershare Filmora Video Editor AI portrait** will be effective, let’s understand how you can use it in your videos.
01Are the Subscription Periods for Wondershare Filmora and the AI Portrait Add-on the Same?
So, first things first, will you get direct access to the AI portrait add-on along with your Filmora license? The answer is No! THe AI portrait add-on is available as a separate item and you’ll have to pay additional charges to use it on your videos. The default Filmora license will not give you access to the AI portrait mode whatsoever. In terms of pricing, the Filmora AI portrait is available at a pocket-friendly price.
For Win 7 or later (64-bit)
For macOS 10.12 or later
You can get this add-on by paying a minimal fee of $5.99 per month. One of the best things about choosing this add-on is that you can discontinue it whenever you want. So, let’s say you no longer need to remove backgrounds from your videos - in this situation, you can directly discontinue your subscription without affecting your regular Filmora subscription.
02How to Add AI Portrait Effects?
Now, coming to the real reason why you’ve come this far - the process to use the AI portrait effect in Filmora. To be honest, it’s a relatively easier process to add the AI portrait effect in Filmora. Even if you are not a Filmora user, you’ll be able to get the job done without any hassle. Let me quickly walk you through the step-by-step procedure of adding the AI portrait effect in Wondershare Filmora.
Step 1 - If you are not an existing user of Filmora, start by purchasing its license and install the software on your system to get started. On the other hand, if you’ve been using Filmora for a while, directly move to the next step to proceed further.
Step 2 - Now, launch the software and create a new project. You’ll be prompted to Filmora’s editing panel. At this point, you’ll have to drag the video clip (that you want to edit) to the timeline.
Step 3 - Once the video is successfully imported, switch to the “Effects” tab and search for “AI Portrait”. You’ll see a “premium” icon next to its name. Double-click on the effect and follow the on-screen instructions to complete the payment procedure.

Step 4 - After you have bought the effect, just drag it to the timeline and place it above your video.

Step 5 - Based on how long you want to keep this effect, you can elongate or shorten its duration by simply stretching its duration.

That’s it; the AI portrait effect will automatically detect and remove the background without requiring you to even lift a finger. After the background is removed, you can tap the “Export” button and choose the desired output format to save the file on your system.
03How to Adjust AI Portrait Effects?
Apart from its core ability to remove the background from a video/image, the another advantage of choosing Filmora AI portrait add-on is its fully customization support. Based on your requirements, you can adjust different parameters such as percentage, edge thickness, edge feather, etc. to achieve the desired results in the output.
Let’s have a closer look at all these parameters to understand their overall functionality more precisely.
● Percentage: By adjusting the percentage, you can decide how effective you want the AI portrait effect to appear in your videos. If you drag the slider all the way to the end, the background will be removed completely and you might not even recognize the main subject properly. On the other hand, if you keep it at a lower percentage, there will be a little bit of transparency in the background.
● Alpha: The alpha slider will decide the transparency of the portrait effect itself. You can drag this slider left or right until you have the perfect frame in front of you.
● Edge Thickness: As the name implies, edge thickness decides how thick the edges of the subject would appear in the video. A smaller percentage would mean thinner edges whereas a higher percentage would mean larger edges.
● Edge Feather: With Edge feather, you can define the blurriness of the edges themselves. The higher the value of the edge feather, the blurier the edges would appear in your videos.
Now, to access all these features, all you have to do is double-tap on the AI portrait effect within FIlmora’s timeline. This will automatically prompt you to the editing panel for this particular effect where you’ll be able to manipulate all these parameters and achieve the desired portrait results accordingly.

In case you are not happy with your customization, you can also tap the “Restore” button next to each parameter to restore the default value. Once you are happy with the results, just tap the “Ok” button to implement your changes.
04Why Did Filmora AI Portrait Attract People?
Apart from attracting editors, what makes Filmora AI portrait one of the best video effects that you can apply to your videos to engage viewers. Well, the answer is pretty simple; AI portrait effect makes the background of a video transparent.
It means the editors have the liberty to replace the dull boring background with a custom one and keep the engagement level high. This becomes really useful when you are trying to compile a long documentary and have a few shots with bad backgrounds. Since using such shots directly might affect the production quality of your videos, it would be better to first replace the background using the AI portrait effect.
So, regardless of your editing setup, production goals, or the type of video you want to compile at the end, you can use the AI portrait effect in Wondershare Filmora in different situations and protect the end results from becoming a failure. This will help you maximize the reach of your videos and attract more viewers more effectively. So, install Filmora today and sign up for its AI portrait effect to uplift the overall video quality of your projects.
Part 5 A Comparison to Other AI Portrait Software
Now, before saying goodbye, we also believe that it would be unfair if we only talk about a single tool and a single effect in this guide. Of course, Filmora’s AI portrait effect works like a charm in different situations, there are other tools in the market that you can try to achieve similar results. As a video editor, it’s always great to keep trying new things as it will add variation to your portfolio and make it much easier to attract new clients.
So, here’s a list of top 5 video editing software that you can use to get similar functionality like the AI portrait effect in Wondershare Filmora.
01Adobe Premiere Pro
Adobe Premiere Pro is undoubtedly one of the most popular video editing software with a strong fan base. Many industry leaders including Sam Kolder and Rory Kramer use Premier Pro to compile high-quality Hollywood-style videos for musicians as well as other clients.
Premiere Pro is more of an advanced video editing tool, which means even though it can help you remove background from portraits, you’ll have to do all the work manually. There’s no predefined add-on or effect that you can apply to the video to erase the background. Instead, you’ll have to manually mark the edges of the subject, erase the background and then, replace it with a different one to achieve the desired results.
In general, Premiere Pro is a great option for skilled editors who want to take things in their own hands to achieve the best results. If you are a beginner, you would be better off with a more user-friendly tool such as Wondershare Filmora.
Key Features:
● Extreme precision while erasing the background
● Achieve the desired results without compromising the quality of the main subject in the portrait
● An industry-preferred software
Pros:
● Existing Premiere Pro users will find it much easier to replicate the AI portrait effect
● Complete flexibility over your project
Cons:
● It can take several hours to precisely remove the background
● The entire process will be manual
02Final Cut Pro
Like Premiere Pro, Final Cut Pro is another famous video editing software that can help you replicate the results of the Filmora AI portrait effect and remove the background from different videos, images, and motion graphics. Keep in mind that Final Cut Pro is only available for macOS, which means if you own a Windows system, you won’t be able to use the software whatsoever.
Again, the only downside of using Final Cut Pro is the amount of manual effort you’ll have to put in to achieve the expected results. Being a full-scale video editing tool, there aren’t too many add-ons or predefined video effects.
Instead, you’ll have to rely on conventional methods such as keyframing to remove the background frame by frame and make your videos look professional. On the major side, Final Cut Pro will work in all situations. Even if you have a clip with too many moving objects, you’ll be able to mark the edges frame-by-frame and remove the background without losing any details from the foreground.
Key Features:
● Timeline-based interface for rapid video editing
● Exclusive macOS compatibility ensures high performance
● Ideal for experienced editors and designers
Pros:
● Final Cut Pro has an easy-to-use interface
● It’s easier to process each frame individually
Cons:
● Unlike Wondershare Filmora, there aren’t any ready-to-use add-ons
● While working on complex shots, it can take several hours to remove the background
03Unscreen Online
Unscreen is an online video background remover that’s specifically designed to remove background from videos with a single click. Being an online application, Unscreen is an ideal choice for short videos (up to 20 seconds) because longer-duration videos will likely take forever to upload. If you want to edit a video for Instagram Reels or YouTube shorts, Unscreen Online would be worth the consideration.
It’ll allow you to remove the background with one click and you won’t even need high-performance software to get the job done. The only drawback of Unscreen online is its lack of video format compatibility. Since it’s an online application, not all video formats are compatible with Unscreen Online.
Moreover, you can only use the tool to process shorter videos. In general, this is an ideal choice for an average Joe who doesn’t want to go through the hassle of installing and using a dedicated video editing software. So, if you are a professional, it would be far beneficial to stick to other premium tools like Filmora, Premiere Pro, and Final Cut Pro.
Key Features:
● You can access Unscreen Online on any device you want
● The edge detection is quite precise for videos with a single subject
● As compared to other premium options, Unscreen Online is relatively cheaper
Pros:
● Cross-platform compatibility
● Perfect for Instagram content creators
● Affordable pricing
Cons:
● Doesn’t achieve the expected results for more complex videos having too many subjects
● Can’t process videos having longer durations
04MOVAVI Video Editor
MOVAVI is another desktop-based video editing software that offers all the basic functionality one looks for in a video editing tool. The software is compatible with Windows and is an ideal choice for beginners who are just getting started on their video editing journey. You’ll find all the basic features along with a few advanced functions such as background removal. Like Filmora, MOVAVI also has a built-in add-on to remove the background from your clips. However, you might not be able to achieve the same precision, especially when we are talking about more complex frames.
Key Features:
● An ideal choice for beginners
● Compatible with Windows
● Can remove background from videos with a single subject
Pros:
● The user interface is pretty straightforward
● It’s easier to edit the videos, thanks to a timeline-based interface
Cons:
● For a beginner editing tool, the price is on the higher side
● You won’t be able to remove background from complex shots with multiple subjects in the foreground
05Kinemaster
Kinemaster is a video editing tool that’s only available on mobile devices, Android to be more specific. It boasts a plethora of features that make it one of the most sought-after editing tools among mobile users. Apart from the basic editing features, Kinemaster also has Chroma key and green screen functionality that allow users to remove background from the videos. Though it’s not as same as a professional-level video editing tool like Filmora Pro, you can still use Kinemaster to erase the background from your green screen footage to achieve the desired portrait look.
Features:
● Kinemaster is beginner-friendly
● Compatible with all Android devices
Pros:
● Green screen compatibility
● Offers advanced features such as chroma key
● Idea choice for novice video editors
Cons:
● It’s quite challenging to edit longer videos on a phone, making Kinemaster less reliable for large documentary-type videos
● Ending Thoughts →
● Wondershare Filmora has introduced a new AI Portrait feature that allows users to remove background from different video clips to shift the entire focus on the main subject.
● Filmora AI Portrait is applicable in different situations and can help editors maximize the production quality of their videos
● Apart from Filmora AI Portrait, there are several video editing tools that editors can give a try to replicate the AI portrait effect. Though, the results of such tools may differ as well.
In the recent few years, video editing has become one of the most-sought after professions, all thanks to the popularity of various video sharing platforms like YouTube. Today, creators don’t need big budgets to share their stories with the world. They can simply grab the camera, shoot the video, and use editing software to compile their brainchild into a dedicated movie. And, once the movie is ready, these creators can simply upload it to YouTube and gain the desired viewership. However, it’s worth noting that YouTube isn’t the only element that has helped content creators excel in their careers and follow their passion.
Editing software like Wondershare Filmora also play an equal role in the success of a creator in today’s digital world. These editing tools are equipped with a plethora of features that allow creators to unleash their creativity and compile high-quality videos for their viewers. What’s more interesting is that these tools keep receiving new updates that further streamlines the entire video editing process to help creators edit videos more conveniently.
Today, we are here to talk about one such feature - known as Filmora AI portrait - that recently got introduced to Wondershare Filmora and became an all-time favorite of many creators. We’ll be going in detail about Filmora AI portrait and how you can use it in your videos to uplift the production quality of your videos. We’ll also share some of the alternatives of this cool feature so that you can bring variety to your videos and keep the viewers engaged throughout the video.
In this article
01 [Why Did AI Portrait Become More and More Popular](#Part 1)
02 [What Scenes Apply to AI Portrait?](#Part 2)
03 [What Scenes Do Not Apply to AI Portrait?](#Part 3)
04 [Why Filmora AI Portrait Deserves to Try?](#Part 4)
05 [A Comparison to Other AI Portrait Software](#Part 5)
Part 1 Why Did AI Portrait Become More and More Popular

Let’s start with the basics first! What is Filmora AI portrait and why it has gained an immense popularity in the editing community. It’s basically an add-on effect in Wondershare Filmora X that was introduced with the latest Filmora X version 10.5.
By integrating this add-on into their video, editors can remove/change the background without losing any details of the main subject. So, let’s say if you don’t have green screen footage and still want to remove the background without affecting the foreground (a single subject), Filmora AI portrait will help you get the job done without any hassle.
Being an AI-powered feature, Filmora AI portrait automatically detects the shape and structure of the main subject and separates it from the background. This way even if you don’t have used a green screen or don’t know how to apply the Chroma key in your videos, you’ll be able to remove the background from the RAW footage and replace it with a custom background. This will allow you to make your videos more appealing and add a funny element for better engagement. For example, you can add a moving background to uplift the entire storyline to your videos.
Filmora AI portrait is a great feature for different types of creators such as gaming streamers, YouTube content creators, and daily vloggers. Regardless of your editing style, by integrating the Filmora AI portrait add-on, you’ll have the liberty to remove unwanted backgrounds from various shots and keep the production quality high.
In addition to removing the background, Filmora AI portrait is also a great tool to design thumbnails for your videos. Also, you can use this feature to apply borders, glitch effects, pixelated, noise, or segmentation video effects to your videos. All these elements will allow you to eliminate dull and low quality things from your videos and make the main characters pop-out in every frame.
Here are a few situations where one can implement the Filmora AI portrait and make the most out of its functions.
● If you livestream videos on YouTube, but don’t have a green screen yet, you can use the AI portrait feature in Filmora to remove the background and make your streaming setup look more elegant and professional.
● With the Filmora AI portrait feature, you can also design high-quality and captivating thumbnails for your videos and draw the maximum attention within YouTube’s rabbithole. Any new viewer is more likely to click on your videos when the thumbnail is engaging.
● You can also use Filmora AI portrait effect to remove background from interviews. Usually, when someone shoots an interview, they usually place a green screen behind the person. But, in case you don’t have green screen footage, you can easily make your interviews look more professional with the Filmora AI portrait effect.
● Finally, you can also use the Filmora AI portrait feature in regular YouTube vlogs. This would be applicable when there are unnecessary elements in the background of a clip that are ruining the entire frame. In this case by simply erasing the background and replacing it with a custom one, you’ll be able to keep the production quality high and keep the viewers engaged throughout the vlog.
Part 2 What Scenes Apply to AI Portrait?

While the AI portrait effect can work for all frames, there are a few situations when it delivers the best results. The designers at Wondershare Filmora claim that AI Portrait works like a charm when the frame has a single subject talking directly to the camera.
When there’s a single individual or subject in front of the camera, it’s relatively easier for the AI-algorithm to detect the edges and separate the background with high precision. Moreover, when the main subject is static, you are most likely to witness the best output in terms of background removal. Why? The reason being when there’s a single static subject, an AI-powered algorithm can precisely mark its edges and achieve relatively better results.
Let’s understand this with the help of a few examples.
One-Person Interview
Going back to the interview example - let’s say you are interviewing a person who’s sitting in a chair and talking directly to the camera in front of him. Now, since there isn’t too much movement on his side, the AI-algorithm will be able to detect his edges and remove the background accordingly. In fact, in such ideal cases, the tool will even be able to detect the hair of the subject with high precision.
Shot of a Monologue
Monologues are no longer limited to high-budget Hollywood movies only. They have become a regular part of conventional videos such as daily YouTube vlogs. Monologues boast better authenticity as the entire clip is shot in one go.
Since there are no random cuts, the presenter can easily convey his views to the viewers. But, for a monologue to work, it’s extremely crucial that it has a high-quality background otherwise it’ll fail to grab the viewer’s attention. In case you are also stuck with a monologue that has a bad background, you can use Filmora AI portrait to remove it and make the primary character of the video pop-up more effectively.
YouTube Vlogs
Again, YouTube vlogs are another great example where editors could really benefit from Filmora’s AI portrait effect. For daily vloggers, getting the perfect shot is always a challenge. And, more often than you think, they end up taking shots that have bad backgrounds. But, thanks to Filmora’s AI portrait effect, one could easily remove background from such shots and use them to convey the storyline more effectively. This won’t waste your efforts and you’ll be able to use the shot that would have otherwise gone to Trash.
So, these are a few situations where the AI portrait effect in Filmora can do wonders for your video editing process.
Part 3 What Scenes Do Not Apply to AI Portrait?

Now, as we mentioned in the previous part, the Filmora AI portrait effect works better in scenarios where there’s only a single subject in the frame. This means the effect isn’t applicable in all the situations.
If there is a lot of movement in the frame, the AI-algorithm may fail to detect the edges of the subject(s) and not deliver the expected results. For example if you are working on a vlog where you are moving the camera really fast, the AI effect will struggle to separate the background from the foreground and fail to achieve the desired precision while removing background.
Some of the other situations where you won’t be able to make the most out of the AI portrait effect include:
Shots With Multiple Moving Subjects
If you have a shot of a crowded place where too many people are moving in the frame, it’ll be challenging to detect the background properly. The movement of multiple subjects will interfere with the overall functionality of the algorithm, restricting users from achieving a background-free shot. In such a situation, you’ll either have to use the shot without removing the background or dump into the Trash folder.
Videos With Special Effects and Filters
Here’s the deal; special effects and filters have become an inevitable part of today’s social media-influenced world. People apply filters and visual effects to make their videos more appealing and grab more likes and comments on Instagram, Facebook, and Snapchat.
But, these filters are often a nightmare for video editors as it’s pretty challenging to process them in any video editing software. If you have a clip with filters or video effects, you’ll struggle to implement the Filmora AI portrait effect properly. In fact, the effect will not work as expected and you’ll be stuck with a shot that would be pretty useless for the entire storyline. So, do not apply unnecessary filters to your videos if you are planning to apply the AI portrait effect in the long run.
Videos With Backlights
The lighting setup of any video has a huge influence on how it will look at the end. Just like a human being, even the AI algorithm struggles to detect the background in a video that has poor lighting conditions or bad backlight. In such videos, it’s challenging for the algorithm to detect the main subject and then identify its edges.
To avoid such scenarios, it would be better to plan your shots in advance and shoot them when there are proper lighting conditions. In case you are going to shoot indoors, you can use a dedicated lighting setup. If anything, this will make it much easier to apply the Filmora AI portrait effect and achieve the best results in terms of background removal.
Paintings
Paintings aren’t like traditional videos. The color scheme is entirely different and it’s much challenging to identify the background and the foreground. So, if there are any images of paintings that you want to use as a thumbnail, it might get a bit challenging to remove the background. In such a scenario, it would be much better to either choose a different image for the thumbnail and use the painting without removing its background.
So, these are a few scenarios where using the Filmora AI portrait won’t be an effective solution for you. We would recommend to plan your shots in advance so that you don’t end up with random shots where it’s challenging to apply the AI portrait effect.
Part 4 Why Filmora AI Portrait Deserves to Try?
If you’ve come this far, you are most likely to be serious about video editing. So, now that we have clarified all the situations where using ****Wondershare Filmora Video Editor AI portrait** will be effective, let’s understand how you can use it in your videos.
01Are the Subscription Periods for Wondershare Filmora and the AI Portrait Add-on the Same?
So, first things first, will you get direct access to the AI portrait add-on along with your Filmora license? The answer is No! THe AI portrait add-on is available as a separate item and you’ll have to pay additional charges to use it on your videos. The default Filmora license will not give you access to the AI portrait mode whatsoever. In terms of pricing, the Filmora AI portrait is available at a pocket-friendly price.
For Win 7 or later (64-bit)
For macOS 10.12 or later
You can get this add-on by paying a minimal fee of $5.99 per month. One of the best things about choosing this add-on is that you can discontinue it whenever you want. So, let’s say you no longer need to remove backgrounds from your videos - in this situation, you can directly discontinue your subscription without affecting your regular Filmora subscription.
02How to Add AI Portrait Effects?
Now, coming to the real reason why you’ve come this far - the process to use the AI portrait effect in Filmora. To be honest, it’s a relatively easier process to add the AI portrait effect in Filmora. Even if you are not a Filmora user, you’ll be able to get the job done without any hassle. Let me quickly walk you through the step-by-step procedure of adding the AI portrait effect in Wondershare Filmora.
Step 1 - If you are not an existing user of Filmora, start by purchasing its license and install the software on your system to get started. On the other hand, if you’ve been using Filmora for a while, directly move to the next step to proceed further.
Step 2 - Now, launch the software and create a new project. You’ll be prompted to Filmora’s editing panel. At this point, you’ll have to drag the video clip (that you want to edit) to the timeline.
Step 3 - Once the video is successfully imported, switch to the “Effects” tab and search for “AI Portrait”. You’ll see a “premium” icon next to its name. Double-click on the effect and follow the on-screen instructions to complete the payment procedure.

Step 4 - After you have bought the effect, just drag it to the timeline and place it above your video.

Step 5 - Based on how long you want to keep this effect, you can elongate or shorten its duration by simply stretching its duration.

That’s it; the AI portrait effect will automatically detect and remove the background without requiring you to even lift a finger. After the background is removed, you can tap the “Export” button and choose the desired output format to save the file on your system.
03How to Adjust AI Portrait Effects?
Apart from its core ability to remove the background from a video/image, the another advantage of choosing Filmora AI portrait add-on is its fully customization support. Based on your requirements, you can adjust different parameters such as percentage, edge thickness, edge feather, etc. to achieve the desired results in the output.
Let’s have a closer look at all these parameters to understand their overall functionality more precisely.
● Percentage: By adjusting the percentage, you can decide how effective you want the AI portrait effect to appear in your videos. If you drag the slider all the way to the end, the background will be removed completely and you might not even recognize the main subject properly. On the other hand, if you keep it at a lower percentage, there will be a little bit of transparency in the background.
● Alpha: The alpha slider will decide the transparency of the portrait effect itself. You can drag this slider left or right until you have the perfect frame in front of you.
● Edge Thickness: As the name implies, edge thickness decides how thick the edges of the subject would appear in the video. A smaller percentage would mean thinner edges whereas a higher percentage would mean larger edges.
● Edge Feather: With Edge feather, you can define the blurriness of the edges themselves. The higher the value of the edge feather, the blurier the edges would appear in your videos.
Now, to access all these features, all you have to do is double-tap on the AI portrait effect within FIlmora’s timeline. This will automatically prompt you to the editing panel for this particular effect where you’ll be able to manipulate all these parameters and achieve the desired portrait results accordingly.

In case you are not happy with your customization, you can also tap the “Restore” button next to each parameter to restore the default value. Once you are happy with the results, just tap the “Ok” button to implement your changes.
04Why Did Filmora AI Portrait Attract People?
Apart from attracting editors, what makes Filmora AI portrait one of the best video effects that you can apply to your videos to engage viewers. Well, the answer is pretty simple; AI portrait effect makes the background of a video transparent.
It means the editors have the liberty to replace the dull boring background with a custom one and keep the engagement level high. This becomes really useful when you are trying to compile a long documentary and have a few shots with bad backgrounds. Since using such shots directly might affect the production quality of your videos, it would be better to first replace the background using the AI portrait effect.
So, regardless of your editing setup, production goals, or the type of video you want to compile at the end, you can use the AI portrait effect in Wondershare Filmora in different situations and protect the end results from becoming a failure. This will help you maximize the reach of your videos and attract more viewers more effectively. So, install Filmora today and sign up for its AI portrait effect to uplift the overall video quality of your projects.
Part 5 A Comparison to Other AI Portrait Software
Now, before saying goodbye, we also believe that it would be unfair if we only talk about a single tool and a single effect in this guide. Of course, Filmora’s AI portrait effect works like a charm in different situations, there are other tools in the market that you can try to achieve similar results. As a video editor, it’s always great to keep trying new things as it will add variation to your portfolio and make it much easier to attract new clients.
So, here’s a list of top 5 video editing software that you can use to get similar functionality like the AI portrait effect in Wondershare Filmora.
01Adobe Premiere Pro
Adobe Premiere Pro is undoubtedly one of the most popular video editing software with a strong fan base. Many industry leaders including Sam Kolder and Rory Kramer use Premier Pro to compile high-quality Hollywood-style videos for musicians as well as other clients.
Premiere Pro is more of an advanced video editing tool, which means even though it can help you remove background from portraits, you’ll have to do all the work manually. There’s no predefined add-on or effect that you can apply to the video to erase the background. Instead, you’ll have to manually mark the edges of the subject, erase the background and then, replace it with a different one to achieve the desired results.
In general, Premiere Pro is a great option for skilled editors who want to take things in their own hands to achieve the best results. If you are a beginner, you would be better off with a more user-friendly tool such as Wondershare Filmora.
Key Features:
● Extreme precision while erasing the background
● Achieve the desired results without compromising the quality of the main subject in the portrait
● An industry-preferred software
Pros:
● Existing Premiere Pro users will find it much easier to replicate the AI portrait effect
● Complete flexibility over your project
Cons:
● It can take several hours to precisely remove the background
● The entire process will be manual
02Final Cut Pro
Like Premiere Pro, Final Cut Pro is another famous video editing software that can help you replicate the results of the Filmora AI portrait effect and remove the background from different videos, images, and motion graphics. Keep in mind that Final Cut Pro is only available for macOS, which means if you own a Windows system, you won’t be able to use the software whatsoever.
Again, the only downside of using Final Cut Pro is the amount of manual effort you’ll have to put in to achieve the expected results. Being a full-scale video editing tool, there aren’t too many add-ons or predefined video effects.
Instead, you’ll have to rely on conventional methods such as keyframing to remove the background frame by frame and make your videos look professional. On the major side, Final Cut Pro will work in all situations. Even if you have a clip with too many moving objects, you’ll be able to mark the edges frame-by-frame and remove the background without losing any details from the foreground.
Key Features:
● Timeline-based interface for rapid video editing
● Exclusive macOS compatibility ensures high performance
● Ideal for experienced editors and designers
Pros:
● Final Cut Pro has an easy-to-use interface
● It’s easier to process each frame individually
Cons:
● Unlike Wondershare Filmora, there aren’t any ready-to-use add-ons
● While working on complex shots, it can take several hours to remove the background
03Unscreen Online
Unscreen is an online video background remover that’s specifically designed to remove background from videos with a single click. Being an online application, Unscreen is an ideal choice for short videos (up to 20 seconds) because longer-duration videos will likely take forever to upload. If you want to edit a video for Instagram Reels or YouTube shorts, Unscreen Online would be worth the consideration.
It’ll allow you to remove the background with one click and you won’t even need high-performance software to get the job done. The only drawback of Unscreen online is its lack of video format compatibility. Since it’s an online application, not all video formats are compatible with Unscreen Online.
Moreover, you can only use the tool to process shorter videos. In general, this is an ideal choice for an average Joe who doesn’t want to go through the hassle of installing and using a dedicated video editing software. So, if you are a professional, it would be far beneficial to stick to other premium tools like Filmora, Premiere Pro, and Final Cut Pro.
Key Features:
● You can access Unscreen Online on any device you want
● The edge detection is quite precise for videos with a single subject
● As compared to other premium options, Unscreen Online is relatively cheaper
Pros:
● Cross-platform compatibility
● Perfect for Instagram content creators
● Affordable pricing
Cons:
● Doesn’t achieve the expected results for more complex videos having too many subjects
● Can’t process videos having longer durations
04MOVAVI Video Editor
MOVAVI is another desktop-based video editing software that offers all the basic functionality one looks for in a video editing tool. The software is compatible with Windows and is an ideal choice for beginners who are just getting started on their video editing journey. You’ll find all the basic features along with a few advanced functions such as background removal. Like Filmora, MOVAVI also has a built-in add-on to remove the background from your clips. However, you might not be able to achieve the same precision, especially when we are talking about more complex frames.
Key Features:
● An ideal choice for beginners
● Compatible with Windows
● Can remove background from videos with a single subject
Pros:
● The user interface is pretty straightforward
● It’s easier to edit the videos, thanks to a timeline-based interface
Cons:
● For a beginner editing tool, the price is on the higher side
● You won’t be able to remove background from complex shots with multiple subjects in the foreground
05Kinemaster
Kinemaster is a video editing tool that’s only available on mobile devices, Android to be more specific. It boasts a plethora of features that make it one of the most sought-after editing tools among mobile users. Apart from the basic editing features, Kinemaster also has Chroma key and green screen functionality that allow users to remove background from the videos. Though it’s not as same as a professional-level video editing tool like Filmora Pro, you can still use Kinemaster to erase the background from your green screen footage to achieve the desired portrait look.
Features:
● Kinemaster is beginner-friendly
● Compatible with all Android devices
Pros:
● Green screen compatibility
● Offers advanced features such as chroma key
● Idea choice for novice video editors
Cons:
● It’s quite challenging to edit longer videos on a phone, making Kinemaster less reliable for large documentary-type videos
● Ending Thoughts →
● Wondershare Filmora has introduced a new AI Portrait feature that allows users to remove background from different video clips to shift the entire focus on the main subject.
● Filmora AI Portrait is applicable in different situations and can help editors maximize the production quality of their videos
● Apart from Filmora AI Portrait, there are several video editing tools that editors can give a try to replicate the AI portrait effect. Though, the results of such tools may differ as well.
How to Make Discord GIF PFP
How to Make Discord GIF PFP? [Solved]
An easy yet powerful editor
Numerous effects to choose from
Detailed tutorials provided by the official channel
Recently, Discord has become quite popular among different communities, especially gamers. After all, it is a safe platform that delivers a convenient area to communicate with friends and family. Are you familiar with the forum? If yes, you understand some of its advantages and why many people settle for it. If not, here you will get complete information about discord gif PFP. Discord allows communication via text, video, audio, and files. It features a private chat section where you chat with your friends. Besides, it includes a free and paid version, depending on which suits you.
Despite its popularity, issues are still rising, especially on Discord GIF PFP. Besides, the idea of having a GIF as a PFP is unique and is rare among different platforms. Fortunately, this article has essential details about Discord animated PFP. Read through the content below to understand how to get an animated Discord PFP.
In this article
01 [How to Make Discord PFP a GIF? The Complete Guide](#Part 1)
02 [How to Fix GIF PFP not Working on Discord?](#Part 2)
03 [Discord GIF PFP: How to set GIF Profile Pic](#Part 3)
Part 1 How to Make Discord PFP a GIF? The Complete Guide
Let’s kick off with details on making a Discord PFP a GIF. The first thing you need to keep in mind is the requirements of a Discord PFP GIF. In other words, what are the things that Discord considers before agreeing to set up your profile? Note that the platform only allows file sizes of up-to 8Mbs. Anything above that is irrelevant. Its maximum resolution is 128 by 128 pixels. Consider these essential points to ensure that your PFP is accepted.
How do you save a GIF for Discord?
There are several ways to access Discord animated PFP. One is a Discord nitro, and the other is making one yourself. If you are a Nitro subscriber, the platform will prompt you with amazing Discord nitro PFP. However, regular users need to make the animated PFP for Discord. This section covers these individuals as we give simple steps to save a suitable GIF.
Step 1: Visit a GIF website with different options available such as Tenor and GIPHY, depending on your preference and taste
Step 2: Search for the ultimate GIF you need
Step 3: Click the animated GIF for Discord and open it on a new tab
Step 4: Right-click on the GIF and choose Save Image to name it and save it on your PC
How do you make a Discord GIF PFP?
Step 1: Visit powerful GIF websites such as the EZgif website
Step 2: Go to the editing option, Resize and upload your GIF by selecting the Upload icon
Step 3: For sizing, enter 128 as height and weight. Ensure that your Discord GIF PFP is 8Mbs and if it isn’t, go for the Gifsicle resize method.

Step 4: Select the resize option and save the necessary changes so that you can download your GIF on your PC.
After strictly following the steps above, you can easily make a Discord GIF PFP and upload it into your account. As a result, you will have an animated GIF PFP even without the Nitro subscription. Note that the Nitro option is bigger and better. After all, it has fewer requirement needs since the platform offers you the available choices. Try out Discord animated PFP today and experience powerful and eye-catching profiles.
Part 2 How to Fix GIF PFP not Working on Discord?
Discord is no secret a robust platform that makes communication among different communities more convenient for all. Are you new on Discord, or are you among the millions of users under the platform? Whatever your case is, you need the answers on dealing with an unresponsive Discord account. For instance, you can’t upload your Discord GIF PFP? GIF PFP is unresponsive in Discord? This section offers you some of the simplest ways to solve these problems.
01Ensure that you subscribe to Discord Nitro
Discord is the most sought-after platform for effective communication between different communities. It includes a free and paid option depending on your taste and preference. Of course, Discord Nitro is the paid version with many advantages that makes your experience bigger and better. Discord Nitro is the ultimate version when you wish to include GIF as your PFP since there are almost no restrictions. The platform prompts you with a conversation that assists you in setting up your PFP. Is it possible to get Discord animated GIF without Nitro? Yes. All you need is to get the GIF from other free websites. However, issues may arise, especially when meeting the requirements.
02Ensure you have a stable Internet connection
Like most networking applications, you need an internet connection to connect with your friends and family. Are you struggling with making the necessary changes for your animated Discord PFP? If yes, then ensure that you check your internet. After all, it is impossible to make the required changes without a stable network.
03Check the Discord PFP format and ensure it is GIF and not other formats such as WebM
From the information above, you can tell that Discord is quite a restrictive software when you wish to add a Discord GIF PFP without the Nitro subscription. Therefore, it is crucial to ensure that you get the correct format. Otherwise, your GIF upload will be unsuccessful. The only Discord format allowed is the GIF; hence ensure that yours meets this requirement.
04Suppose you are an IOS user, try to re-upload the GIF from your computer
Different operating systems tend to work differently. Are you an iOS user and having difficulty uploading your Discord GIF PFP from your mobile? If yes, try to re-upload it from your computer. It is a simple hack that can assist with an unresponsive Discord account.
05Reinstall or Update your Discord Application
Sometimes applications have issues because of pending updates. If you are trying to fix GIF PFP for an unresponsive Discord software, try reinstalling it or updating it. In most cases, upon making these updates, your app will automatically respond to the necessary changes.
Is your Discord having issues? Do you have a problem uploading animated GIFs for Discord? If yes, then follow the simple hacks above.
Part 3 Discord GIF PFP: How to set GIF Profile Pic?
Discord GIF PFP is a critical topic we often encounter in different online communities. After all, using GIFs as PFP is unique and makes your account gain the necessary attention. Why not when your PFP often reflects on your community. However, many questions often arise regarding animated PFP for Discord since few people are familiar with how to go about getting moving PFP discord. Luckily, several resourceful sources offer you the information you need. And this piece is one of them. This section explains the most straightforward steps to help you set a GIF Profile pic in Discord. Check it out!
You need to know that getting discord nitro is the most convenient way to get and set a GIF profile pic. Is it possible without the Nitro subscription? Yes. However, it has multiple limitations compared to Discord nitro.
Step 1: Discord Nitro
Get Discord Nitro. As mentioned above, Discord has a free and paid version. However, it is no secret that the latter version is more convenient. Discord Nitro requires you to pay a monthly fee of $4.99
Step 2: Discord GIF Picker
Use Discord GIF Picker to search for your ultimate GIF. You can access this feature from your app’s chat box right side. In this case, you need the desktop version.

Note: If you don’t get what you are looking for, consult external websites such as Tenor, Wondershare Filmora Video Editor and save the GIF of your choice. Of course, there are many free websites available hence you can settle for any of them.

Wondershare Filmora - Best Video Editor for Mac/Windows
5,481,435 people have downloaded it.
Build unique custom animations without breaking a sweat.
Focus on creating epic stories and leave the details to Filmora’s auto features.
Start a creative adventure with drag & drop effects and endless possibilities.
Filmora simplifies advanced features to save you time and effort.
Filmora cuts out repetition so you can move on to your next creative breakthrough.
Step 3: Settings
Change your PFP. For a successful process, you need to go to settings and User-Profile. Click on the available PFP and edit by selecting Change Avatar.
Step 4: Select GIF
Select your GIF from your PC and resize it to meet Discord’s requirements. Automatically, you will go to the editing page and apply the necessary changes. Select save changes and successfully change your PFP.
Step 5: Check Changes
View your Discord animated PFP to confirm the changes

Editing the animated GIF PFP is necessary, and you can use powerful editing software such as Filmora for the job. Filmora is a top editing platform that supports both video and GIF. Besides, it includes multiple features that assist in efficient editing. These features include noise removal, video stabilization, scene detection, 4k resolution support, image filters, etc. All these features blend to deliver a high-quality discord animated PFP.
● Ending Thoughts →
● Discord Nitro opens new possibilities for Discord users.
● Filmora is among the top editors you can use to get a great Discord moving PFP.
● It is possible to add GIF as PFP without Nitro. But the process is long and never delivers equally impressive results like those of Nitro.
● How to get animated Discord PFP is among the most popular topics about Discord. After all, almost everyone wants to have an exciting moving PFP Discord. Is it a straightforward process? Consider the details as above and learn more about Discord GIF PFP.
Recently, Discord has become quite popular among different communities, especially gamers. After all, it is a safe platform that delivers a convenient area to communicate with friends and family. Are you familiar with the forum? If yes, you understand some of its advantages and why many people settle for it. If not, here you will get complete information about discord gif PFP. Discord allows communication via text, video, audio, and files. It features a private chat section where you chat with your friends. Besides, it includes a free and paid version, depending on which suits you.
Despite its popularity, issues are still rising, especially on Discord GIF PFP. Besides, the idea of having a GIF as a PFP is unique and is rare among different platforms. Fortunately, this article has essential details about Discord animated PFP. Read through the content below to understand how to get an animated Discord PFP.
In this article
01 [How to Make Discord PFP a GIF? The Complete Guide](#Part 1)
02 [How to Fix GIF PFP not Working on Discord?](#Part 2)
03 [Discord GIF PFP: How to set GIF Profile Pic](#Part 3)
Part 1 How to Make Discord PFP a GIF? The Complete Guide
Let’s kick off with details on making a Discord PFP a GIF. The first thing you need to keep in mind is the requirements of a Discord PFP GIF. In other words, what are the things that Discord considers before agreeing to set up your profile? Note that the platform only allows file sizes of up-to 8Mbs. Anything above that is irrelevant. Its maximum resolution is 128 by 128 pixels. Consider these essential points to ensure that your PFP is accepted.
How do you save a GIF for Discord?
There are several ways to access Discord animated PFP. One is a Discord nitro, and the other is making one yourself. If you are a Nitro subscriber, the platform will prompt you with amazing Discord nitro PFP. However, regular users need to make the animated PFP for Discord. This section covers these individuals as we give simple steps to save a suitable GIF.
Step 1: Visit a GIF website with different options available such as Tenor and GIPHY, depending on your preference and taste
Step 2: Search for the ultimate GIF you need
Step 3: Click the animated GIF for Discord and open it on a new tab
Step 4: Right-click on the GIF and choose Save Image to name it and save it on your PC
How do you make a Discord GIF PFP?
Step 1: Visit powerful GIF websites such as the EZgif website
Step 2: Go to the editing option, Resize and upload your GIF by selecting the Upload icon
Step 3: For sizing, enter 128 as height and weight. Ensure that your Discord GIF PFP is 8Mbs and if it isn’t, go for the Gifsicle resize method.

Step 4: Select the resize option and save the necessary changes so that you can download your GIF on your PC.
After strictly following the steps above, you can easily make a Discord GIF PFP and upload it into your account. As a result, you will have an animated GIF PFP even without the Nitro subscription. Note that the Nitro option is bigger and better. After all, it has fewer requirement needs since the platform offers you the available choices. Try out Discord animated PFP today and experience powerful and eye-catching profiles.
Part 2 How to Fix GIF PFP not Working on Discord?
Discord is no secret a robust platform that makes communication among different communities more convenient for all. Are you new on Discord, or are you among the millions of users under the platform? Whatever your case is, you need the answers on dealing with an unresponsive Discord account. For instance, you can’t upload your Discord GIF PFP? GIF PFP is unresponsive in Discord? This section offers you some of the simplest ways to solve these problems.
01Ensure that you subscribe to Discord Nitro
Discord is the most sought-after platform for effective communication between different communities. It includes a free and paid option depending on your taste and preference. Of course, Discord Nitro is the paid version with many advantages that makes your experience bigger and better. Discord Nitro is the ultimate version when you wish to include GIF as your PFP since there are almost no restrictions. The platform prompts you with a conversation that assists you in setting up your PFP. Is it possible to get Discord animated GIF without Nitro? Yes. All you need is to get the GIF from other free websites. However, issues may arise, especially when meeting the requirements.
02Ensure you have a stable Internet connection
Like most networking applications, you need an internet connection to connect with your friends and family. Are you struggling with making the necessary changes for your animated Discord PFP? If yes, then ensure that you check your internet. After all, it is impossible to make the required changes without a stable network.
03Check the Discord PFP format and ensure it is GIF and not other formats such as WebM
From the information above, you can tell that Discord is quite a restrictive software when you wish to add a Discord GIF PFP without the Nitro subscription. Therefore, it is crucial to ensure that you get the correct format. Otherwise, your GIF upload will be unsuccessful. The only Discord format allowed is the GIF; hence ensure that yours meets this requirement.
04Suppose you are an IOS user, try to re-upload the GIF from your computer
Different operating systems tend to work differently. Are you an iOS user and having difficulty uploading your Discord GIF PFP from your mobile? If yes, try to re-upload it from your computer. It is a simple hack that can assist with an unresponsive Discord account.
05Reinstall or Update your Discord Application
Sometimes applications have issues because of pending updates. If you are trying to fix GIF PFP for an unresponsive Discord software, try reinstalling it or updating it. In most cases, upon making these updates, your app will automatically respond to the necessary changes.
Is your Discord having issues? Do you have a problem uploading animated GIFs for Discord? If yes, then follow the simple hacks above.
Part 3 Discord GIF PFP: How to set GIF Profile Pic?
Discord GIF PFP is a critical topic we often encounter in different online communities. After all, using GIFs as PFP is unique and makes your account gain the necessary attention. Why not when your PFP often reflects on your community. However, many questions often arise regarding animated PFP for Discord since few people are familiar with how to go about getting moving PFP discord. Luckily, several resourceful sources offer you the information you need. And this piece is one of them. This section explains the most straightforward steps to help you set a GIF Profile pic in Discord. Check it out!
You need to know that getting discord nitro is the most convenient way to get and set a GIF profile pic. Is it possible without the Nitro subscription? Yes. However, it has multiple limitations compared to Discord nitro.
Step 1: Discord Nitro
Get Discord Nitro. As mentioned above, Discord has a free and paid version. However, it is no secret that the latter version is more convenient. Discord Nitro requires you to pay a monthly fee of $4.99
Step 2: Discord GIF Picker
Use Discord GIF Picker to search for your ultimate GIF. You can access this feature from your app’s chat box right side. In this case, you need the desktop version.

Note: If you don’t get what you are looking for, consult external websites such as Tenor, Wondershare Filmora Video Editor and save the GIF of your choice. Of course, there are many free websites available hence you can settle for any of them.

Wondershare Filmora - Best Video Editor for Mac/Windows
5,481,435 people have downloaded it.
Build unique custom animations without breaking a sweat.
Focus on creating epic stories and leave the details to Filmora’s auto features.
Start a creative adventure with drag & drop effects and endless possibilities.
Filmora simplifies advanced features to save you time and effort.
Filmora cuts out repetition so you can move on to your next creative breakthrough.
Step 3: Settings
Change your PFP. For a successful process, you need to go to settings and User-Profile. Click on the available PFP and edit by selecting Change Avatar.

Step 4: Select GIF
Select your GIF from your PC and resize it to meet Discord’s requirements. Automatically, you will go to the editing page and apply the necessary changes. Select save changes and successfully change your PFP.
Step 5: Check Changes
View your Discord animated PFP to confirm the changes

Editing the animated GIF PFP is necessary, and you can use powerful editing software such as Filmora for the job. Filmora is a top editing platform that supports both video and GIF. Besides, it includes multiple features that assist in efficient editing. These features include noise removal, video stabilization, scene detection, 4k resolution support, image filters, etc. All these features blend to deliver a high-quality discord animated PFP.
● Ending Thoughts →
● Discord Nitro opens new possibilities for Discord users.
● Filmora is among the top editors you can use to get a great Discord moving PFP.
● It is possible to add GIF as PFP without Nitro. But the process is long and never delivers equally impressive results like those of Nitro.
● How to get animated Discord PFP is among the most popular topics about Discord. After all, almost everyone wants to have an exciting moving PFP Discord. Is it a straightforward process? Consider the details as above and learn more about Discord GIF PFP.
Recently, Discord has become quite popular among different communities, especially gamers. After all, it is a safe platform that delivers a convenient area to communicate with friends and family. Are you familiar with the forum? If yes, you understand some of its advantages and why many people settle for it. If not, here you will get complete information about discord gif PFP. Discord allows communication via text, video, audio, and files. It features a private chat section where you chat with your friends. Besides, it includes a free and paid version, depending on which suits you.
Despite its popularity, issues are still rising, especially on Discord GIF PFP. Besides, the idea of having a GIF as a PFP is unique and is rare among different platforms. Fortunately, this article has essential details about Discord animated PFP. Read through the content below to understand how to get an animated Discord PFP.
In this article
01 [How to Make Discord PFP a GIF? The Complete Guide](#Part 1)
02 [How to Fix GIF PFP not Working on Discord?](#Part 2)
03 [Discord GIF PFP: How to set GIF Profile Pic](#Part 3)
Part 1 How to Make Discord PFP a GIF? The Complete Guide
Let’s kick off with details on making a Discord PFP a GIF. The first thing you need to keep in mind is the requirements of a Discord PFP GIF. In other words, what are the things that Discord considers before agreeing to set up your profile? Note that the platform only allows file sizes of up-to 8Mbs. Anything above that is irrelevant. Its maximum resolution is 128 by 128 pixels. Consider these essential points to ensure that your PFP is accepted.
How do you save a GIF for Discord?
There are several ways to access Discord animated PFP. One is a Discord nitro, and the other is making one yourself. If you are a Nitro subscriber, the platform will prompt you with amazing Discord nitro PFP. However, regular users need to make the animated PFP for Discord. This section covers these individuals as we give simple steps to save a suitable GIF.
Step 1: Visit a GIF website with different options available such as Tenor and GIPHY, depending on your preference and taste
Step 2: Search for the ultimate GIF you need
Step 3: Click the animated GIF for Discord and open it on a new tab
Step 4: Right-click on the GIF and choose Save Image to name it and save it on your PC
How do you make a Discord GIF PFP?
Step 1: Visit powerful GIF websites such as the EZgif website
Step 2: Go to the editing option, Resize and upload your GIF by selecting the Upload icon
Step 3: For sizing, enter 128 as height and weight. Ensure that your Discord GIF PFP is 8Mbs and if it isn’t, go for the Gifsicle resize method.

Step 4: Select the resize option and save the necessary changes so that you can download your GIF on your PC.
After strictly following the steps above, you can easily make a Discord GIF PFP and upload it into your account. As a result, you will have an animated GIF PFP even without the Nitro subscription. Note that the Nitro option is bigger and better. After all, it has fewer requirement needs since the platform offers you the available choices. Try out Discord animated PFP today and experience powerful and eye-catching profiles.
Part 2 How to Fix GIF PFP not Working on Discord?
Discord is no secret a robust platform that makes communication among different communities more convenient for all. Are you new on Discord, or are you among the millions of users under the platform? Whatever your case is, you need the answers on dealing with an unresponsive Discord account. For instance, you can’t upload your Discord GIF PFP? GIF PFP is unresponsive in Discord? This section offers you some of the simplest ways to solve these problems.
01Ensure that you subscribe to Discord Nitro
Discord is the most sought-after platform for effective communication between different communities. It includes a free and paid option depending on your taste and preference. Of course, Discord Nitro is the paid version with many advantages that makes your experience bigger and better. Discord Nitro is the ultimate version when you wish to include GIF as your PFP since there are almost no restrictions. The platform prompts you with a conversation that assists you in setting up your PFP. Is it possible to get Discord animated GIF without Nitro? Yes. All you need is to get the GIF from other free websites. However, issues may arise, especially when meeting the requirements.
02Ensure you have a stable Internet connection
Like most networking applications, you need an internet connection to connect with your friends and family. Are you struggling with making the necessary changes for your animated Discord PFP? If yes, then ensure that you check your internet. After all, it is impossible to make the required changes without a stable network.
03Check the Discord PFP format and ensure it is GIF and not other formats such as WebM
From the information above, you can tell that Discord is quite a restrictive software when you wish to add a Discord GIF PFP without the Nitro subscription. Therefore, it is crucial to ensure that you get the correct format. Otherwise, your GIF upload will be unsuccessful. The only Discord format allowed is the GIF; hence ensure that yours meets this requirement.
04Suppose you are an IOS user, try to re-upload the GIF from your computer
Different operating systems tend to work differently. Are you an iOS user and having difficulty uploading your Discord GIF PFP from your mobile? If yes, try to re-upload it from your computer. It is a simple hack that can assist with an unresponsive Discord account.
05Reinstall or Update your Discord Application
Sometimes applications have issues because of pending updates. If you are trying to fix GIF PFP for an unresponsive Discord software, try reinstalling it or updating it. In most cases, upon making these updates, your app will automatically respond to the necessary changes.
Is your Discord having issues? Do you have a problem uploading animated GIFs for Discord? If yes, then follow the simple hacks above.
Part 3 Discord GIF PFP: How to set GIF Profile Pic?
Discord GIF PFP is a critical topic we often encounter in different online communities. After all, using GIFs as PFP is unique and makes your account gain the necessary attention. Why not when your PFP often reflects on your community. However, many questions often arise regarding animated PFP for Discord since few people are familiar with how to go about getting moving PFP discord. Luckily, several resourceful sources offer you the information you need. And this piece is one of them. This section explains the most straightforward steps to help you set a GIF Profile pic in Discord. Check it out!
You need to know that getting discord nitro is the most convenient way to get and set a GIF profile pic. Is it possible without the Nitro subscription? Yes. However, it has multiple limitations compared to Discord nitro.
Step 1: Discord Nitro
Get Discord Nitro. As mentioned above, Discord has a free and paid version. However, it is no secret that the latter version is more convenient. Discord Nitro requires you to pay a monthly fee of $4.99
Step 2: Discord GIF Picker
Use Discord GIF Picker to search for your ultimate GIF. You can access this feature from your app’s chat box right side. In this case, you need the desktop version.

Note: If you don’t get what you are looking for, consult external websites such as Tenor, Wondershare Filmora Video Editor and save the GIF of your choice. Of course, there are many free websites available hence you can settle for any of them.

Wondershare Filmora - Best Video Editor for Mac/Windows
5,481,435 people have downloaded it.
Build unique custom animations without breaking a sweat.
Focus on creating epic stories and leave the details to Filmora’s auto features.
Start a creative adventure with drag & drop effects and endless possibilities.
Filmora simplifies advanced features to save you time and effort.
Filmora cuts out repetition so you can move on to your next creative breakthrough.
Step 3: Settings
Change your PFP. For a successful process, you need to go to settings and User-Profile. Click on the available PFP and edit by selecting Change Avatar.

Step 4: Select GIF
Select your GIF from your PC and resize it to meet Discord’s requirements. Automatically, you will go to the editing page and apply the necessary changes. Select save changes and successfully change your PFP.
Step 5: Check Changes
View your Discord animated PFP to confirm the changes

Editing the animated GIF PFP is necessary, and you can use powerful editing software such as Filmora for the job. Filmora is a top editing platform that supports both video and GIF. Besides, it includes multiple features that assist in efficient editing. These features include noise removal, video stabilization, scene detection, 4k resolution support, image filters, etc. All these features blend to deliver a high-quality discord animated PFP.
● Ending Thoughts →
● Discord Nitro opens new possibilities for Discord users.
● Filmora is among the top editors you can use to get a great Discord moving PFP.
● It is possible to add GIF as PFP without Nitro. But the process is long and never delivers equally impressive results like those of Nitro.
● How to get animated Discord PFP is among the most popular topics about Discord. After all, almost everyone wants to have an exciting moving PFP Discord. Is it a straightforward process? Consider the details as above and learn more about Discord GIF PFP.
Recently, Discord has become quite popular among different communities, especially gamers. After all, it is a safe platform that delivers a convenient area to communicate with friends and family. Are you familiar with the forum? If yes, you understand some of its advantages and why many people settle for it. If not, here you will get complete information about discord gif PFP. Discord allows communication via text, video, audio, and files. It features a private chat section where you chat with your friends. Besides, it includes a free and paid version, depending on which suits you.
Despite its popularity, issues are still rising, especially on Discord GIF PFP. Besides, the idea of having a GIF as a PFP is unique and is rare among different platforms. Fortunately, this article has essential details about Discord animated PFP. Read through the content below to understand how to get an animated Discord PFP.
In this article
01 [How to Make Discord PFP a GIF? The Complete Guide](#Part 1)
02 [How to Fix GIF PFP not Working on Discord?](#Part 2)
03 [Discord GIF PFP: How to set GIF Profile Pic](#Part 3)
Part 1 How to Make Discord PFP a GIF? The Complete Guide
Let’s kick off with details on making a Discord PFP a GIF. The first thing you need to keep in mind is the requirements of a Discord PFP GIF. In other words, what are the things that Discord considers before agreeing to set up your profile? Note that the platform only allows file sizes of up-to 8Mbs. Anything above that is irrelevant. Its maximum resolution is 128 by 128 pixels. Consider these essential points to ensure that your PFP is accepted.
How do you save a GIF for Discord?
There are several ways to access Discord animated PFP. One is a Discord nitro, and the other is making one yourself. If you are a Nitro subscriber, the platform will prompt you with amazing Discord nitro PFP. However, regular users need to make the animated PFP for Discord. This section covers these individuals as we give simple steps to save a suitable GIF.
Step 1: Visit a GIF website with different options available such as Tenor and GIPHY, depending on your preference and taste
Step 2: Search for the ultimate GIF you need
Step 3: Click the animated GIF for Discord and open it on a new tab
Step 4: Right-click on the GIF and choose Save Image to name it and save it on your PC
How do you make a Discord GIF PFP?
Step 1: Visit powerful GIF websites such as the EZgif website
Step 2: Go to the editing option, Resize and upload your GIF by selecting the Upload icon
Step 3: For sizing, enter 128 as height and weight. Ensure that your Discord GIF PFP is 8Mbs and if it isn’t, go for the Gifsicle resize method.

Step 4: Select the resize option and save the necessary changes so that you can download your GIF on your PC.
After strictly following the steps above, you can easily make a Discord GIF PFP and upload it into your account. As a result, you will have an animated GIF PFP even without the Nitro subscription. Note that the Nitro option is bigger and better. After all, it has fewer requirement needs since the platform offers you the available choices. Try out Discord animated PFP today and experience powerful and eye-catching profiles.
Part 2 How to Fix GIF PFP not Working on Discord?
Discord is no secret a robust platform that makes communication among different communities more convenient for all. Are you new on Discord, or are you among the millions of users under the platform? Whatever your case is, you need the answers on dealing with an unresponsive Discord account. For instance, you can’t upload your Discord GIF PFP? GIF PFP is unresponsive in Discord? This section offers you some of the simplest ways to solve these problems.
01Ensure that you subscribe to Discord Nitro
Discord is the most sought-after platform for effective communication between different communities. It includes a free and paid option depending on your taste and preference. Of course, Discord Nitro is the paid version with many advantages that makes your experience bigger and better. Discord Nitro is the ultimate version when you wish to include GIF as your PFP since there are almost no restrictions. The platform prompts you with a conversation that assists you in setting up your PFP. Is it possible to get Discord animated GIF without Nitro? Yes. All you need is to get the GIF from other free websites. However, issues may arise, especially when meeting the requirements.
02Ensure you have a stable Internet connection
Like most networking applications, you need an internet connection to connect with your friends and family. Are you struggling with making the necessary changes for your animated Discord PFP? If yes, then ensure that you check your internet. After all, it is impossible to make the required changes without a stable network.
03Check the Discord PFP format and ensure it is GIF and not other formats such as WebM
From the information above, you can tell that Discord is quite a restrictive software when you wish to add a Discord GIF PFP without the Nitro subscription. Therefore, it is crucial to ensure that you get the correct format. Otherwise, your GIF upload will be unsuccessful. The only Discord format allowed is the GIF; hence ensure that yours meets this requirement.
04Suppose you are an IOS user, try to re-upload the GIF from your computer
Different operating systems tend to work differently. Are you an iOS user and having difficulty uploading your Discord GIF PFP from your mobile? If yes, try to re-upload it from your computer. It is a simple hack that can assist with an unresponsive Discord account.
05Reinstall or Update your Discord Application
Sometimes applications have issues because of pending updates. If you are trying to fix GIF PFP for an unresponsive Discord software, try reinstalling it or updating it. In most cases, upon making these updates, your app will automatically respond to the necessary changes.
Is your Discord having issues? Do you have a problem uploading animated GIFs for Discord? If yes, then follow the simple hacks above.
Part 3 Discord GIF PFP: How to set GIF Profile Pic?
Discord GIF PFP is a critical topic we often encounter in different online communities. After all, using GIFs as PFP is unique and makes your account gain the necessary attention. Why not when your PFP often reflects on your community. However, many questions often arise regarding animated PFP for Discord since few people are familiar with how to go about getting moving PFP discord. Luckily, several resourceful sources offer you the information you need. And this piece is one of them. This section explains the most straightforward steps to help you set a GIF Profile pic in Discord. Check it out!
You need to know that getting discord nitro is the most convenient way to get and set a GIF profile pic. Is it possible without the Nitro subscription? Yes. However, it has multiple limitations compared to Discord nitro.
Step 1: Discord Nitro
Get Discord Nitro. As mentioned above, Discord has a free and paid version. However, it is no secret that the latter version is more convenient. Discord Nitro requires you to pay a monthly fee of $4.99
Step 2: Discord GIF Picker
Use Discord GIF Picker to search for your ultimate GIF. You can access this feature from your app’s chat box right side. In this case, you need the desktop version.

Note: If you don’t get what you are looking for, consult external websites such as Tenor, Wondershare Filmora Video Editor and save the GIF of your choice. Of course, there are many free websites available hence you can settle for any of them.

Wondershare Filmora - Best Video Editor for Mac/Windows
5,481,435 people have downloaded it.
Build unique custom animations without breaking a sweat.
Focus on creating epic stories and leave the details to Filmora’s auto features.
Start a creative adventure with drag & drop effects and endless possibilities.
Filmora simplifies advanced features to save you time and effort.
Filmora cuts out repetition so you can move on to your next creative breakthrough.
Step 3: Settings
Change your PFP. For a successful process, you need to go to settings and User-Profile. Click on the available PFP and edit by selecting Change Avatar.

Step 4: Select GIF
Select your GIF from your PC and resize it to meet Discord’s requirements. Automatically, you will go to the editing page and apply the necessary changes. Select save changes and successfully change your PFP.
Step 5: Check Changes
View your Discord animated PFP to confirm the changes

Editing the animated GIF PFP is necessary, and you can use powerful editing software such as Filmora for the job. Filmora is a top editing platform that supports both video and GIF. Besides, it includes multiple features that assist in efficient editing. These features include noise removal, video stabilization, scene detection, 4k resolution support, image filters, etc. All these features blend to deliver a high-quality discord animated PFP.
● Ending Thoughts →
● Discord Nitro opens new possibilities for Discord users.
● Filmora is among the top editors you can use to get a great Discord moving PFP.
● It is possible to add GIF as PFP without Nitro. But the process is long and never delivers equally impressive results like those of Nitro.
● How to get animated Discord PFP is among the most popular topics about Discord. After all, almost everyone wants to have an exciting moving PFP Discord. Is it a straightforward process? Consider the details as above and learn more about Discord GIF PFP.
Also read:
- Updated In 2024, Top Free LUTs To Use in Shotcut An Overview
- How Can You Make a Slideshow Look Aesthetic? Follow the Given Discussion to Learn About Creating an Aesthetic Slideshow All by Yourself
- New This Article Presents the Guide to Using Magic Effects for Creating Competent Films with Step-by-Step Instructions and Filmoras Grow and Win Program Contest
- Updated 2024 Approved Top 10 Transparent Image Online Tools That Give You an Advantage
- 2024 Approved Looking for the Ways by Which Subtitles Can Be Extracted From Your MKV Files without Affecting the File Quality? Look No Further as We Are Here to Help You Know the Best Tools that Can Easily Extract SRT From MKV
- Knowing All Ways To Slow Down Video With Adobe Premiere Pro for 2024
- Updated 2024 Approved How to Make Boring Videos Look Cool By B Rolls
- Are You an Apple User Interested in Adding a Slow-Mo to Their Videos? This Article Features an Exceptional Procedure for Creating Slow-Mo in iMovie for 2024
- Updated Best 10 Mind-Blowing Video Collage Maker for PC for 2024
- 2024 Approved Do You Want to Make Your Photos and Videos Look Different From Others? There Are Many Lightroom LUTs Free, and They Make Your Media Content Stand Out From Others
- In 2024, Best 12 AI Video Generators to Pick
- How to Speed Up Video with Canva Online Tool?
- In 2024, Do You Want to Know About the Photo Video Maker with Song? Are You Ready to Discover It in Detail? This Article Will Give You Valuable Insights on This Topic
- Updated | Best WMV to GIF Converters
- New Some Facts That Few People Know on How to Make Transparent Background in Canva for 2024
- Types of Cartoon Styles You May Use for The Next Marketing Project
- Android Unlock Code Sim Unlock Your Poco F5 5G Phone and Remove Locked Screen
- Complete Guide For iPhone 15 Plus Lock Screen | Dr.fone
- Top 11 Free Apps to Check IMEI on Oppo Find X7 Ultra Phones
- Easy steps to recover deleted data from Huawei Nova Y91
- How to Repair Corrupt Excel 2013 Workbook?
- In 2024, How to Remove iPhone 8 Plus Activation Lock
- Apple iPhone 6s Plus Backup Password Never Set But Still Asking? Heres the Fix
- How To Open Your Apple iPhone 12 Pro Without a Home Button
- How to Fix Android.Process.Media Has Stopped on Samsung Galaxy A15 5G | Dr.fone
- Title: Best 15 Subtitle Apps for 2024
- Author: Chloe
- Created at : 2024-05-20 03:37:56
- Updated at : 2024-05-21 03:37:56
- Link: https://ai-editing-video.techidaily.com/best-15-subtitle-apps-for-2024/
- License: This work is licensed under CC BY-NC-SA 4.0.

